


Intell-Lab™Precision Toploading Balances
PH Series
A Higher Level of Precision…
A Higher Level of Performance
User Operation Manual
June, 2009

CONTENTS
B
................................
11
................................
V
M
A
................................
................................
................................
1 INSTALLATION INSTRUCTION ...............................................................................4
2 STORAGE .................................................................................................................5
3 KEYPAD AND DISPLAY ...........................................................................................6
4 INPUT AND OUTPUT CONNECTORS .....................................................................7
4.1 REAR AND BOTTOM PART OF BALANCE, K MODEL ................................................................. 7
5 WEIGHING ................................................................................................................8
5.1 STANDBY ............................................................................................................................................... 8
5.2 SIMPLE WEIGHING .............................................................................................................................. 8
6 CALIBRATION ..........................................................................................................9
6.1 EXTERNAL CALIBRATION BALANCES ...........................................................................................9
6.1.1 External calibration ........................................................................................9
ALANCES WITH INTERNAL CALIBRATION ................................................................
6.2.1 Internal calibration ................................................................
6.2.2 Auto calibration (A UT-CAL) ................................................................
6.2.3 Internal calibration (I-CAL)................................................................
6.2.4 External calibration (E-CAL) ................................................................
6.2.5 Technical calibration (TEC-CAL) ................................
11
11
12
12
12
7 TARE FUNCTION ....................................................................................................14
7.1.1 Manual tare function (Not available for V-range models) ..............................15
7.1.2 Optional alphanumeric external keyboard (code T201).................................16
8 WEIGHT UNITS........................................................................................................18
9 PC COMMUNICATION SETTING ...........................................................................20
10 PRINTER SERIAL COMMUNICATION SELECTION ...........................................21
11 TRANSMISSION SPEED SELECTION .................................................................22
12 AUTO ZERO FUNCTION .......................................................................................23
13 FILTERS SELECTION ...........................................................................................24
14 STABILITY FUNCTION .........................................................................................26
15 BACKLIGHT SETUP .............................................................................................27
16 AUTO POWER-OFF FUNCTION ...........................................................................28
17 PIECE COUNTING FUNCTION .............................................................................29
ANUAL INSERTION OF THE UNIT AVERAGE WEIGHT ................................
18 V-RANGE FUNCTION ...........................................................................................33
19 DENSITY DETERMINATION OF A SOLID OR A LIQUID.....................................34
19.1 DENSITY DETERMINATION OFA SOLID ......................................................34
19.2 DENSITY DETERMINATION OFA LIQUID......................................................36
20 MAXIMUM LOAD DETERMINATION FUNCTION.................................................38

3
21 PERCENTAGE WEIGHING FUNCTION ............................................................... 39
22.3
IGHERTHRESHOLDSET ONLY
................................
43
21.1 MODEWITH WEIGHT REFERENCE ...........................................................................................39
21.2 MODEWITH MANUAL INSERTION OF THE REFERENCEWEIGHT..........................................40
22 THRESHOLD FUNCTION HI-LO-GO ...................................................................42
22.2 LOWER THRESHOLD SET ONLY ................................................................
43
23 RS232 INTERFACE FEATURES ..........................................................................44
24 CONNECTORS POSITIONS (REAR) ....................................................................49
25 WORKING WITH THE BATTERY..........................................................................50
26 ERROR CODES.....................................................................................................51
27 MAINTENANCE AND CARE .................................................................................51
28 QUICK GUIDE TO BALANCE PARAMETERS SETUP .......................................52
29 QUICK GUIDE TO THE USE OF THE BALANCE PROGRAMS ..........................53
1 Installation instruction
WARNING:
Please follow carefully these steps for installing and use the new balance
with these guidelines will affect the weighing results.
� Remove the balance and accessories from the cartoon and check for any visible
damage of the instrument.
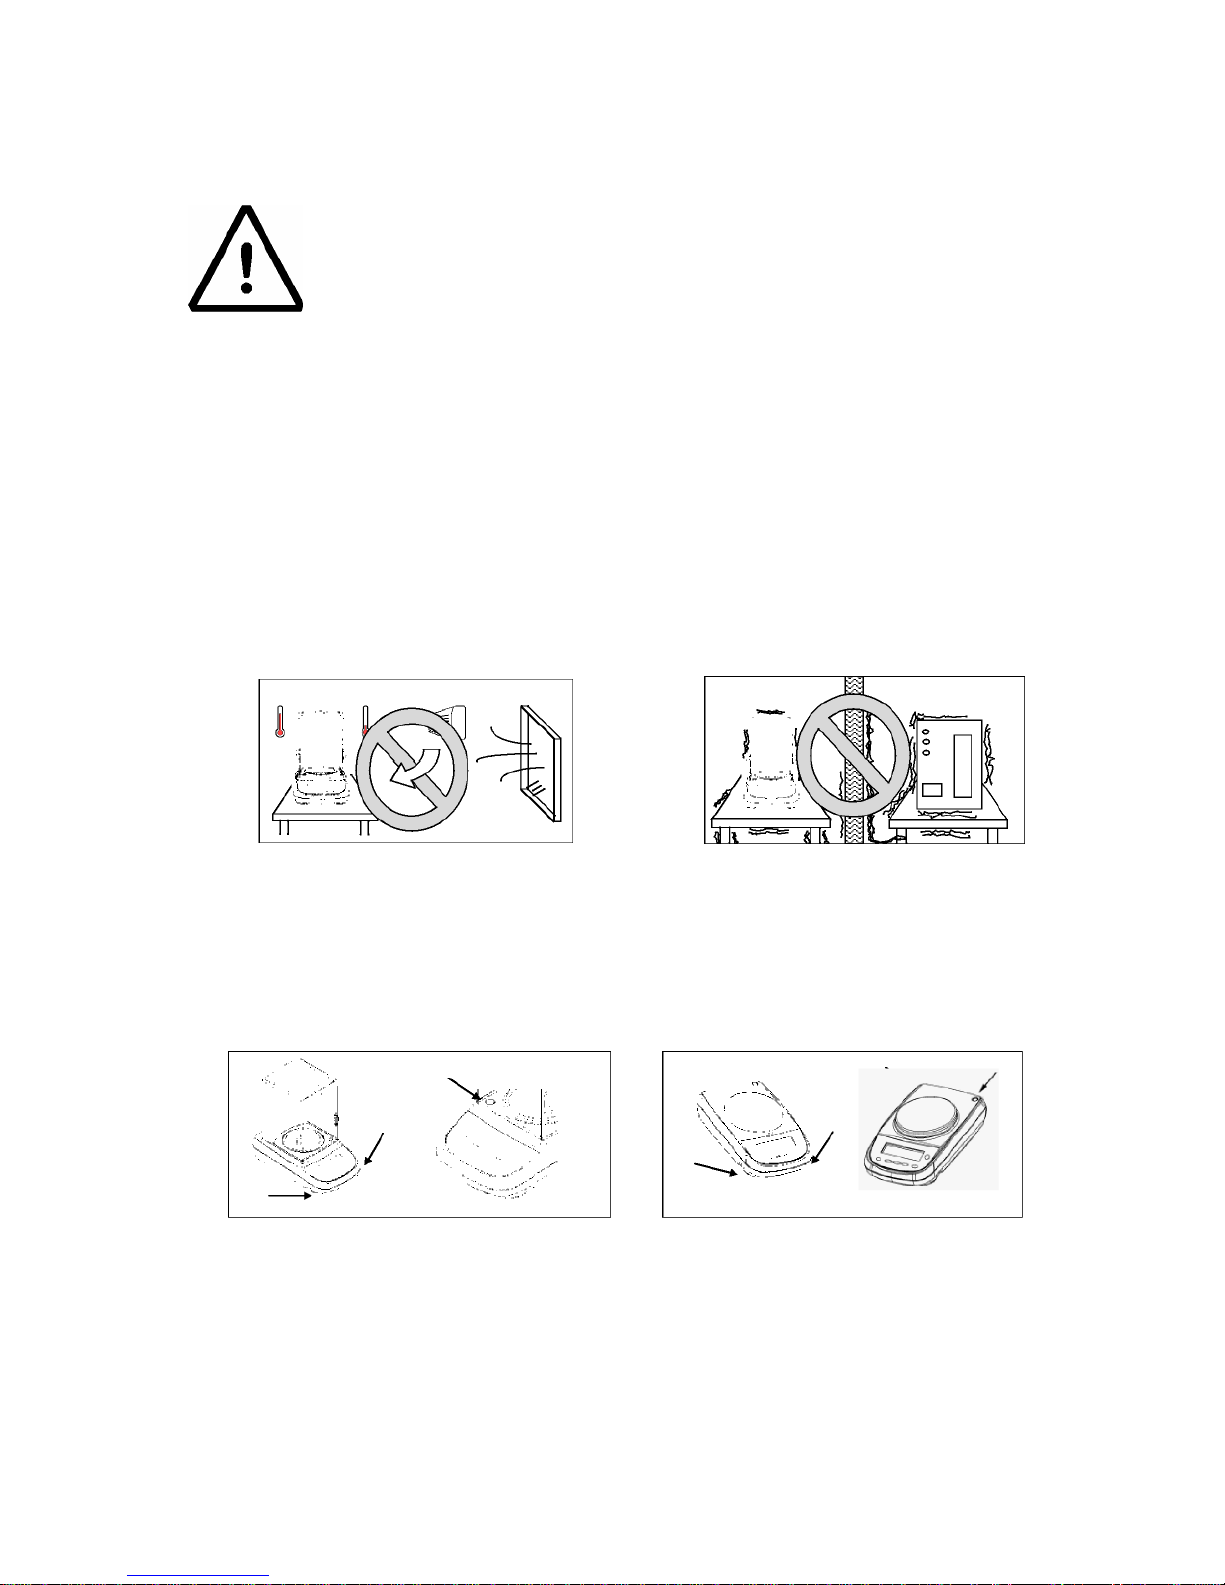
� Do not install the balance in a place with air flows, heavy thermal changes and
vibrations.
� Do not use the balance in explosion risk environment.
� The humidity rate of the balance environment must be between 45% and 75%
� Place the weighing pan and the support pan on the balance (see pag. 5).
� Level the balance using the level bubble and levelling feet located underneath the
case
� Connect power supply to connector 2 located on the rear panel of the unit (see
pag. 7).
� Insert power unit into AC outlet, which should be easily accessible; after few
seconds the balance will automatically switch on.
� Wait 30 minutes from switch on and then calibrate the balance using the
appropriate mass, following the instructions (pag.9-10)

� Calibrate the balance every time it’s moved to another place
� Check balance calibration periodically.
� We recommend not dropping heavy objects on balance pan, in order to avoid
damage.
� Service must be supplied by specialized staff and the spare parts used must be
original. Therefore, it is necessary to apply to the reseller who sold the equipment.
2 Storage
.
� Storage temperature: +5 °C…+40°C
� Storage humidity 45% - 75%.
� Keep package in the case the balance needs to be sent back to the factory for
service. Disconnect the cables, platter and the accessories for avoiding damage
during transportation.
� Do not place the balance in extreme temperature and humidity condition and avoid
shock loads to the balance.
June, 2009

3 Keypad and display
Lab™
Standby (OFF) or power on
(ON).
TARE or zero button.
Selection CONFIRM or SEND
data to printer.
June, 2009
*
O
%
Stability indicator
Zero indicator
Percentage weighing
Piece counting
Battery charge indicator
Insert data mode

Balance setup MENU button.
H
L
Balance CALIBRATION button.
DS
ozt, lb, GN, dwt, Kg, mg
3
7

4 Input and output connectors
Hook for weighing under
4.1 Rear and bottom part of balance, K model
3
1. Weighing pan
2. CONNECTOR 1
9 pin RS232 Interface Output
for PC/keyboard or printer
3. levelling feet
4. CONNECTOR 2
power supply connector
5.Level
Bubble
0. Closing screws
2.
balance pan. First remove
hook cap.

5 Weighing
After having connected the balance to AC outlet, it will perform an internal circuits test,
after that the balance will set itself in stand-by mode.
5.1 Stand By
From “STAND BY” mode:
� Press ON/OFF button to bring balance to work conditions.
� Press again ON/OFF button to return to “STAND BY” condition.
5.2 Simple weighing
Load the sample to weigh on the pan and read the value on display as soon as the
stability symbol ж (star) appears
3
9

6 Calibration
Electronic balances take mass measurements making use of gravity (g). Different
latitude and in geographic areas and altitude will vary gravity acceleration value (g).
Therefore, for accurate measurements, the balance must be adjusted to the local
environment. This adjustment is accomplished by the calibration function.
6.1 External calibration balances
6.1.1 External calibration
Calibration is accomplished by pressing CAL button.
1. Press CAL button when pan is empty, dashes are displayed on the display.
2. When calibration weight value starts to flash, load the weight on the pan.
The display will stop
flashing, indicating
calibration weight
value.
Once the calibration
is effected will be
shown the value of
the calibrated weight
and the current unit
of measure.
3. Unload calibration weight from the pan. The
balance is ready for weighingoperations.
NOTE: if there is interference during calibration process, an error message will be displayed.
Moreover, it is
possible to
calibrate the
balance with a
calibration weight
higher than the
one set by default:
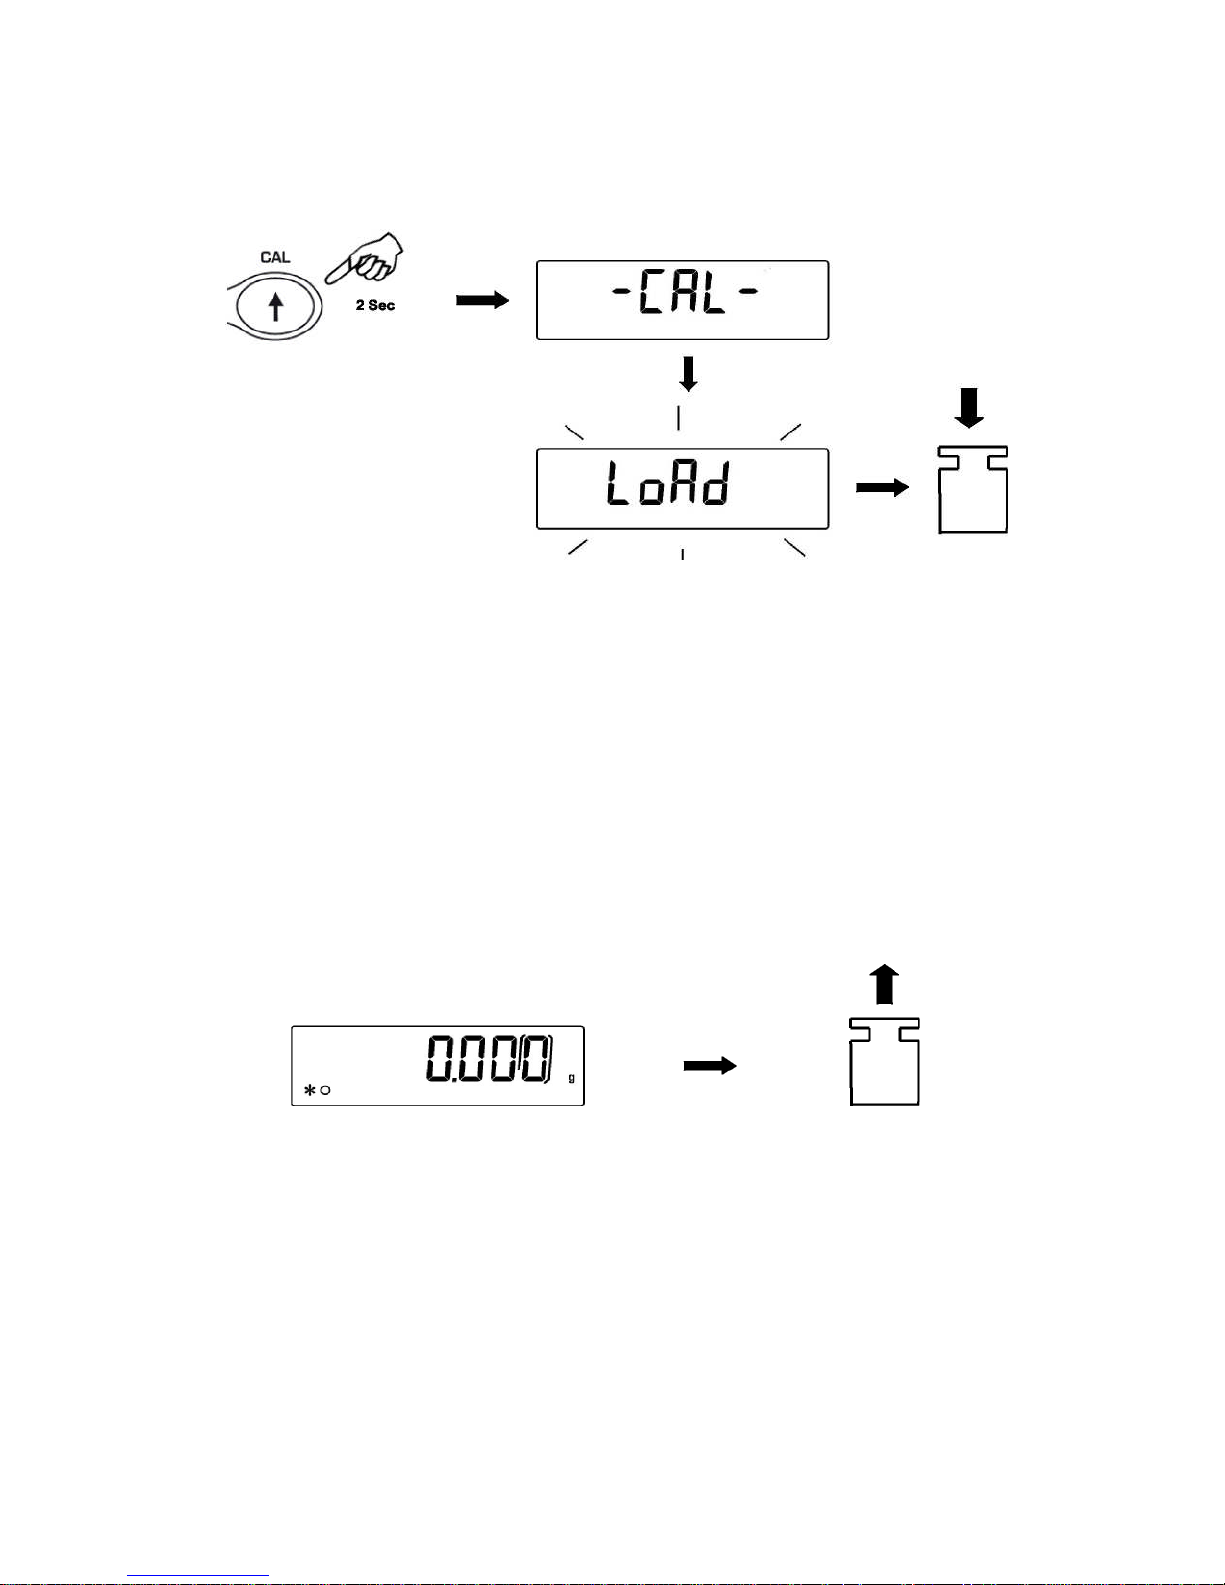
1. Press and keep CAL button pressed with empty pan until the acoustic alarm stops,
then release the button. On display it will be visualized the string "-CAL-", followed by
flashing string "LOAD".
2. L
o
a
d
o
n
t
h
e
p
a
n
a
w
ei
g
ht equal higher or lower than default calibration weight; the balance will recognize it
as valid weight if equal or higher than calibration weight as long as it is a whole
number in comparison with the most meaningful digit of calibration weight.
e.g.: if calibration weight is 200g, it will be possible to calibrate the balance with
values from 100g 200g, 300g, 400g up to the highest limit of balance weighing
range.
The message“LOAD” on display will stopflashing. Oncecalibrationhas been
effected, the value of calibrated weight will be displayed.
3. Unload calibration weight. The balance is ready for weighing operations.
NOTE: if there is
interference during
calibration process,
an error message
will be
displayed.

6.2 Balances with internal calibration
6.2.1 Internal calibration
In these balance models there are 4 calibration modes:
From display zero condition, press and keep pressed the MENU button until the acoustic
alarm is over, then release the button. The message “unitS” will be visualized on display,
press then MENU button until you visualize “Calib” on display. Press PRINT to confirm.
1. Select the calibration mode you wish by pressing MENU button in sequence:
~ AUT-CAL: auto calibration
~ I-CAL: internal calibration
~ E-CAL: external calibration
~ TEC-CAL: technical calibration
2. Press PRINT button to confirm “AUT-CAL”, “I-CAL”, “E-CAL”.
To confirm “TEC-CAL” keep pressed the PRINT button until the acoustic alarm is
over.
3. After selection, the balance returns to calibration menu. Press and keep pressed
MENU button until the acoustic alarm is over, then release the button. Balance is
again ready for weighing operations.
6.2.2 Autocal ibration (AUT-CAL)
The balance auto calibrates through the internal reference calibration mass, after the
microprocessor has checked that no other weighing operations are being effected. In this
mode it is furtherly possible to effect calibration through reference internal mass by
pressing CAL button at any time, being sure first that there’s no weight load on the pan.
1. Press CAL button with no weight on the pan.
The message“CAL” will be displayed andbalance calibration willbe effected
automatically.
2. At the end of calibration, balance returns to normal weighing conditions.

If calibration is notfinished due to vibrations or airflows, then the message “CAL
bUt” is displayed. Press again CAL button. If the problem repeats then select
external calibration and contact the product supplier.
6.2.3 Internal calibration (I-CAL)
The balance calibrates itself with internal reference mass ONLY on user command by
pressing CAL button.
Before effectinginternal calibration, be sure that there’s no weight loadedon the
balance pan.
6.2.4 External calibration (E-CAL)
The balance iscalibrated throughanexternal reference mass (NOTprovided with
models with internal calibration).
(Follow procedures described at paragraph 6.1.1)
6.2.5 Technical calibration (TEC-CAL)
This function allows storing the value of internal reference mass whenever checking or
assistance actions require it.
1. After having selected the TEC-CAL calibration mode, press CAL button at empty
pan. It will be displayed “CAL”.
2. When the value of calibration weight start flashing on display, load the weight on to
the balance pan.
pan.
4. When string “0.000” is displayed continuously, then press and keep pressed the
PRINT button. This starts the internal weight value automatic acquisition and store.
During the acquisition cycle, the display will show “TEC-MEM”.
3. Wait the
acoustic alarm
and that the
displayed
calibrated
weight value
stops flashing,
then unload
the weight
from balance

5. After having stored the value of internal calibration weight, balance returns to
normal weighing conditions.
6. Return to calibration menu as described at paragraph 6.2 and set the desired
calibration mode: internal, automatic or external.
ATTENTION : this procedure must be effected only using E2 or Class 1 reference
masses.

7 Tare function
1. Load the container on the pan. The display will show the weight.
2. Press O/T button. “O-t” string will be displayed
3. After reaching stability, the value “0.000” will be displayed. If the stability is not
reached (due to air flows or vibrations or other disturbs) the dashes will remain
displayed.
4. Load the objects to weigh in the container. Read net weight value on display.

7.1.1 Manual tare function (Not available for V-range models) This
function allows inserting manually the tare values.
1. Press and keep pressed the O/T key whit no objects on the weighing pan until the
beep alarm stops, and then release the key.
2. Will be shown on the display the following string:
3. Insert now the desired tare value using the keys CAL and MENU for increase or
decrease the value, and press the O/T key for skip to the following digit. During the
value insert mode, if keep pressed the O/T key is possible to delete the inserted
value.
4. Press PRINT key to confirm the value inserted.

7.1.2 Optional alphanumeric external keyboard (code T201)
If you have the optional external alphanumeric keyboard, then it is possible to perform
tare also by pressing the TARE/DELETE button of this keyboard, in the same way as
previously described.
It’s also possible to manually insert a known tare value by the keypad.
1. Press TARE MAN button on the alphanumeric keyboard. An arrow will appear on
the balance display along with the previous value of manual tare, if one has been
inserted before.

2. Press CLEAR to set at zero the previous value (if any) then insert the new value
using the alphanumeric buttons placed on the bottom part of alphanumeric
keyboard.
3. Press INSER to confirm.
4. Press ESCAPE button to escape from tare condition.
To set to zero the value of the manual tare inserted by means of alphanumeric
keyboard, effect a normal operation of tare by pressing O/T button of the balance or
with TARE/DELETE button placed on the optional alphanumeric keyboard.

8 Weight units
It is possible to select the weight unit that balance will use to display weight.
1. From display zero condition press and keep pressed the MENU button until the
acoustic alarm is over, and then release the button. The message “unitS” will be
displayed then press PRINT to confirm.
2. It will be displayed “GRAM” unit. Pressing now the MENU or CAL button, it will
be possible to scroll forward or backward the weight units menu.
3. Press PRINT button to confirm or MENU button to shift to the other weight unit.
SYMBOL UNIT
GRAM GRAM 1.
CARAT CARAT 5.
OUNCE ONCE 0.035273962
POUND POUND 0.0022046226
PENN. PENNYWEIGHTS 0.643014931
ONCETR. ONCE TROY 0.032150747
GRANO GRAIN 15.43235835
TAEL HON
* TAEL SGP SYNGAPORE
* TAEL ROC R.O.C. TAEL 0.02666666
* MOMME MOMME 0.2667
*M 10 x10 10.
*M 100 x 100 100.
HONG KONG
TAEL
TAEL
CONVERSION
FACTOR 1g =
0.02671725
0.02646063

4. After having selected the desired weight unit, press the MENU button to go to
next parameter or CAL button to return to previous.
5. To escape from parameters setup menu, press the MENU button until the
acoustic alarm is over, then release the button. The balance returns to normal
weighing conditions.
* The unit of measure with the star (*) are not available in the balances with the software
for paper grammage. In these models is possible to set from the menu of the units of
measure the multiply factor of the weight “M 10” or “M 100”. For visualizing the m²
weight, select the M 100 multiply factor (as described at pag. 17) and load on the pan a
10x10 cm piece of paper.
10x10cm paper sa mp le

9 PC communication setting
Connect the balance to PC with proper cable (pag. 35)
1. From zero display condition press and keep pressed the MENU button until the
acoustic alarm is over, and then release the button. It will be displayed the string
“unitS”, then press theMENU button until it is displayed “PC-PRTR” messagethen
confirm by pressing PRINT button.
2. Press the
MENU
button
until the
“PC
cont” is
displayed to choose continuous print or “PC CMd” to choose print to PC at user
command, and then press the PRINT button to confirm the choice.
6. After having selected the desired transmission mode, press the MENU button to
go to next parameter or the CAL button to go to previous.
7. To escape from parameters setup menu, press the MENU button until the
acoustic alarm is over, then release the button. The balance returns to normal
weighing conditions.
8. The balance returns to normal weighing conditions sending the data
continuously or at user command.
NOTE: select speed transmission (pag. 21)

10 Printer serial communication selection
Connect the balance to the printer using the proper cable (pag. 35)
1. From zero condition on display, press and keep pressed the MENU button until the
acoustic alarm is over, and then release the button. The message “unitS” will be
displayed, then press MENU until you read the message “PC-PRTR”on display and
confirm pressing PRINT button
2. T
o
s
e
l
e
ct the data print mode, press MENU until the message “PRINT” is
displayed.
3. Press PRINT to confirm.
4. After having selected the data print mode, press MENU button to go to next
parameter or CAL button to go to previous one.
5. To escape from parameters setup menu, press MENU button until the acoustic
alarm is over, then release the button. The balance returns to normal weighing
conditions, ready to transmit data each time the PRINT button is pressed. .
NOTE: select speed transmission (pag. 21)

11 Transmission speed selection
1. From zero condition on display, press and keep pressed the MENU button until the
acoustic alarm is over, and then release the button. The message “unitS” is
displayed, thenpress MENUbutton until the message “BAUD RT” is displayedand
confirm by pressing thePRINT button.
.
2. Select serial data transmission speed (1200-2400-4800-9600 baud). Pressing
MENU or CAL buttons it will be possible to scroll forward or backward trough the
different transmission speeds, and then confirm your choice by pressing PRINT
button.
3. After having selected the transmission speed you wish, press the MENU button to go
to next parameter or CAL button to go to previous one.
4. To escape from parameters setup menu, press the MENU button until the acoustic
alarm is over, then release the button.
5. The balance will return to standard weighing conditions.

12 Auto zero function
Au0 OFF
Auto zero is an automatic correction of a possible zero drift.
Au0 1
~
~ Au0 2 = medium autozero
Au0 3
~
~ Au0 3E = heavy auto zero over allrange
1. From zero condition on display, press and keep pressed the MENU button until the
acoustic alarm is over, and then release the button. The message “unitS” is
displayed, then press MENU button until the message “AUTO 0” is displayed, then
press PRINT to confirm.
2. Pressing MENU or CAL button it will be possible to scroll forward or backward
through the different auto zero levels, select the one you wish and confirm it by
pressing the PRINT button.
= soft autozero
= heavy auto zero

3. After having selected the auto zero level you wish, press the MENU button to go to
next parameter or CAL button to go to previous one.
4. To escape from parameters setup menu, press the MENU button until the acoustic
alarm is over, then release the button.
5. The balance will return to standard weighing conditions.
13 Filters selection
It is possible to adapt the balance to the different environment conditions thanks to the
selection of three filters:
� FILTER 1: Ideal conditions and filling applications
� FILTER 2: stable conditions
� FILTER 3: unstable conditions
1. From zero condition on display, press and keep pressed the MENU button until the
acoustic alarm is over, and then release the button. The message “unitS” is
displayed, then press MENU button until the message “FILTER” is displayed then
confirm it by pressing the PRINT button.
2. Pressing MENU or CAL button it will be possible to scroll forward or backward the
different filtering levels, select the one you wish and then confirm it by pressing the
PRINT button

3. After having selected the filtering level you wish, press the MENU button to go to
next parameter or CAL to go to previous one.
4. To escape from parameters setup menu, press the MENU button until the acoustic
alarm is over, then release the button.
5. The balance will return to standard weighing conditions.
NOTE: It is suggested to use FILTER 1 when proportioning ingredients or filling liquids.

14 Stability function
The stability symbol is displayed when the weight is stable inside a defined range
� STAB 1 = for stable environments
� STAB 2 = for not so stable environments
� STAB 3 = for unstable environments
1. From zero condition on display, press and keep pressed the MENU button until the
acoustic alarm is over, and then release the button. The message “unitS” is
displayed, then press MENU button until the message “StAbiL” is displayed, and
then confirm this by pressing the PRINT button.
2. Pressing MENU or CAL button it will be possible to scroll forward or backward the
different stability levels, select the one you wish and then confirm it by pressing the
PRINT button.
3. After having selected the stability level you wish, press the MENU button to go to
next parameter or the CAL button to go to previous one.
4. To escape from parameters setup menu, press the MENU button until the acoustic
alarm is over, then release the button.
5. The balance returns to normal weighing conditions.

15 Backlight setup
The balance displayis equipped withbacklight to make theindicationmore visible also
during low light conditions.
There are 3 working modes:
� ON = light always switched ON
� OFF = backlight always switched OFF
� AUTO = backlight automatically switched on during weighing operations
1. From zero condition on display, press and keep pressed the MENU button until the
acoustic alarm is over, then release the button. The message “unitS” is displayed,
then press MENU button until the message “bLt”, then press the PRINT button to
confirm this.
2. Pressing MENU or CAL button it will be possible to scroll forward or backward the
different working modes, select the one you wish and then confirm it by pressing the
PRI
NT
butt
on
3. After
havi
ng
sele
cted
the
back
light
work
ing
mod
e
you wish, press the MENU button to go to next parameter or the CAL button to go to
previous one.
4. To escape from parameters setup menu, press the MENU button until the acoustic
alarm is over, then release the button.
5. The balance returns to normal weighing conditions.

16 Auto Power-off function
off disabled
This function allows activating the automatic power-off of the balance after a defined
balance idle-time. There are 4 auto power-off modes:
~ 2 Min = Auto power-off after 2 minutes of idle time
~ 5 Min = Auto power-off after 5 minutes of idle time
15 Min
~
1. From zero condition on display, press and keep pressed the MENU button until the
acoustic alarm is over, then release the button. The message “unitS” is displayed,
then press MENU button until the message “tiME oFF” then confirm by pressing the
PRINT button.
2. Pressing MENU or CAL button it will be possible to scroll forward or backward the
different auto power-off modes, select the one you wish and then confirm it by
pressing the PRINT button
= Auto power-off after 15 minutes of idle time
3. After having selected the auto power-off mode you wish, press the MENU button to
go to next parameter or the CAL button to go to previous one.
4. To escape from parameters setup menu, press the MENU button until the acoustic
alarm is over, then release the button.
5. The balance returns to normal weighing conditions.

17 Piece counting function
1. From zero condition on display, press MENU button until the message “Count“is
displayed then press the PRINT button to confirm
2. Select the number of pieces to put on the pan as sample by pressing MENU
repeatedly to increase and CAL to decrease the number. Choice of the number of
pieces (10, 25, 50, 100) depends from the weight of single pieces.
If
available, load the empty container first then press PRINT to confirm.
Load on the pan the number of pieces displayed on the balance display
Press again the PRINT button and wait the weight to stabilize.
If the number of samples is enough (for example 10 as in figure), then this number
will be displayed and it will be possible to go on by loading the pieces to count on the
balance pan.
If the weight of the pieces to count is too low in comparison with balance resolution,
then an error message will be displayed. In this case it is necessary to use a balance
with higher resolution.
If the weight of samples is acceptable but not enough, then the message “Add” will
be displayed.

Add a quantity of pieces so that to almost double the number read on display, then
press the PRINT button
If the number of pieces is still not enough then the message “Add SMP” is
displayed. Add again a quantity of pieces so that to almost double the number you
read on display
As soon as it is reached a sufficient number of pieces, this number is displayed and it
will be possible to go on with count by loading the pieces count on the balance pan.
3. To escape from piece counting mode press the ON/OFF button and the balance
returns to normal weighing conditions.
17.1 Visualization of total and unit weight of pieces
1. Press MENU button to pass from pieces number visualization to total weight
visualization.
2. In order to display the weight of single piece from the total number of pieces press
and
keep
presse
d the
MENU
button
until
the
acoust
ic alarm is over.
3. Press again the MENU button to display the number of pieces.

17.2 Manual insertion of the unit average weight
It is possible to inserttheunit average weight of the sample, if known. In this waycan be
avoided the sampling of the units.
1. From zero condition on display, press the MENU button until the message
“Count”, then press the PRINT button to confirm.
Select MANUALby pressing repeatedly the MENU button.
2. Press the PRINT button to confirm.
3. Insert the unit weight of a sample in grams using CAL and MENU buttons for
increase and decreases the value and use the O/T button to skip to the others
digits. For inserting the decimal point keep pressed the CAL button. Keeping
pressed the O/T button is possible to delete the inserted value.
4. Press the PRINT button to confirm.
If the inserted weight is 100 times lower than balance resolution, it will be displayed an
error message.
To escape without inserting the weight press ON/OFF.
5. If the weight is enough then “0” is displayed; it is now possible to go on to count
loading the pieces on the pan.
6. Press MENU button to display the total number of pieces, then press again to
display the number of pieces.
7. To escape from piece counting function, press ON/OFF button.

It is possible to use the optional alphanumeric keyboard to insert the weight of the unit
sample as following:
1. From zero condition on display, press the MENU button until the message
“Count”, then press thePRINT button to confirm.
Select MANUAL by pressing repeatedly the MENU button.
2. Press the PRINT button to confirm.
3. Insert the unit weight of a sample in grams using the numerical buttons from 0 to 9
and the decimal point.
In case of mistake, press the CLEAR button to start insertion again.
4. Press the INSER button to confirm.
5. If the inserted weight is 100 times lower than balance resolution, it will be displayed
an error message.
To escape without inserting the weight press ESCAPE (on alphanumeric keyboard) or
ON/OFF.
6. If the weight is enough then “0” is displayed ; it is now possible to go on to count
loading the pieces on the pan.
7. Press MENU button to display the total number of pieces, then press again the
button to display again the number of pieces.
8. To escape from piece counting function, press ON/OFF button.
17.3 Automatic update of unit weight
After having effected the sampling, it is possible to update the average piece weight as
follows:
1. Instead of loading all the pieces to count, load a number of pieces equal to the
double of the ones loaded on the pan and wait for the acoustic alarm.
2. It is now possible to repeat this procedure up to a maximum of 255 pieces or to
proceed to the normal counting of the pieces.
This procedure allows a more accurate evaluation of the average unit weight and a
better precision in the pieces count.
NOTE: automatic update is not active if the sampling has been effected by insertion of the
average unit weight

18 V-Range function
* This (optional) function is available ONLY for double range models *
1. V-RANGE function is to be considered when it is necessary to effect proportioning of
small quantities with accuracy. To activate V-RANGE function, after having put on
the pan the container if any, press keep pressed the TARE button until the acoustic
alarm is over.
In this way a tare operation is automatically performed, at the end of which it is
possible to operate with the highest resolution range.
2. The range
change is
pointed out by
the switch-on of a
small arrow on the
display.
3. The
range
of highest
sensivity is kept active as far as the net weight exceeds in positive the maximum
value set for the lower sensitivity range.
However it is possible to disablethis functionpressing andkeeping pressedthe
TARE button until the acoustic alarm is over. In both the cases total weight is
displayed.
4. In V-Range function the manual tare insertion by (optional) alphanumeric keyboard is
not available.

19 Density determination of a solid or a liquid
* The balance must be equipped with the proper optional software (not available for all models) *
The software for density determination allows to calculate the density of a solid or a
liquid through the under balance hook or through the optional hydrostatic kit ( part #
T027)
19.1 DENSITY DETERMINATION OF A SOLID
1. From zero condition on display, press the MENU button until the message “dEnS” is
displayed, then press the PRINT button to confirm.
2. Select
the
functio
n “d
SoLid
”
throug
h the MENU button and then confirm with PRINT button.
3. The
densit
y of
the
liquid
to use
will be
displayed, the default value is equal to 1.0000 (distilled water at 20°C).
4. It is
possible to set a different value using the CAL e MENU buttons for increase and
decrease the value and using the O/T button for skip to the others digits. Keeping
presses the O/T button is possible to delete the inserted value.
5. It is also possible to set a different value if the balance is equipped with the optional
alphanumeric keyboard.
6. Once the wished value is set, press PRINT button.
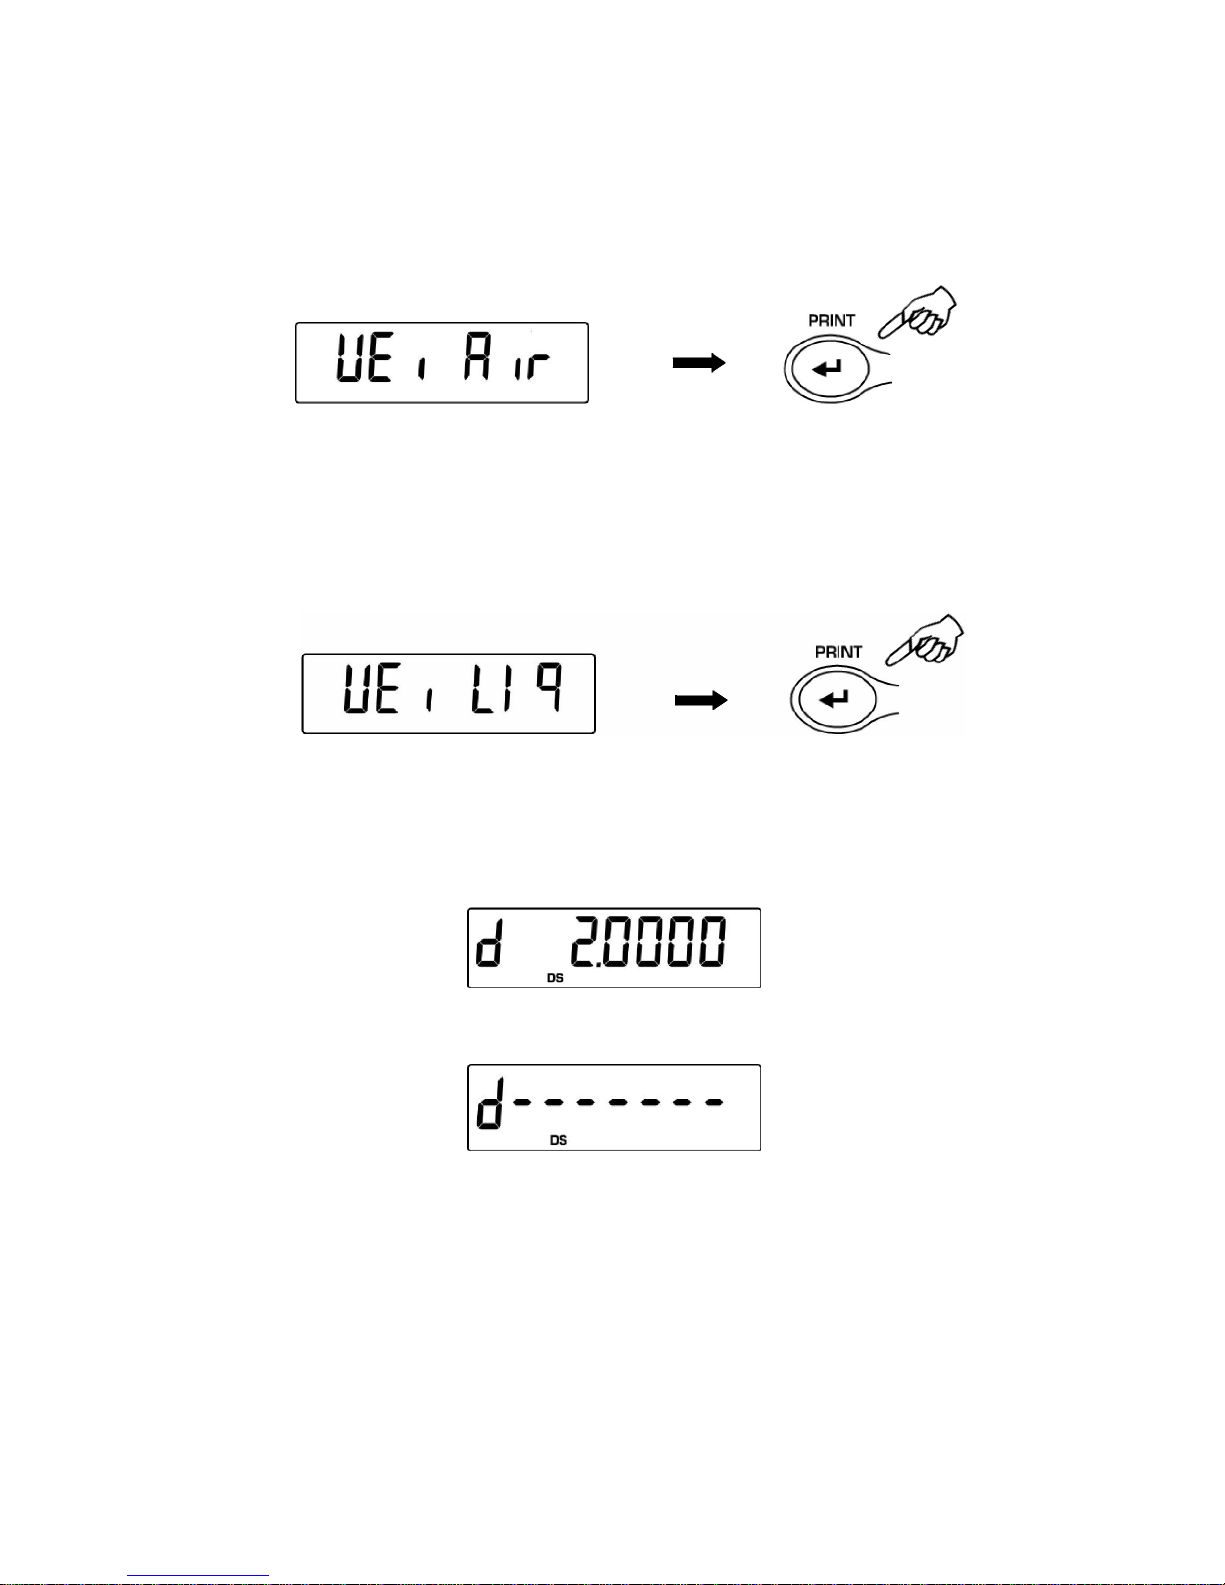
7. Now it will be asked to weigh the solid in air, confirm this with PRINT button.
8. If
necessary, effect a tare operation and load the solid. Press the PRINT button to
acquire the value. During value acquisition the message WEI AIR will be flashing.
9. Now it is asked to weigh the solid inside the liquid. Effect the tare of the small
basket inside liquid, immerse the solidand pressPRINT. During the acquisition of
the
value
the
messageWEI LIq will be flashing.
10. The result of density of the solid is then displayed. Pressing the PRINT button it is
possible to print the value of density, if the balance is equipped with a printer.
11. If any error occurs, this message will be displayed:
12. Press now the ON/OFF button to escape from density function or the MENU button
to perform another measurement.

19.2 DENSITY DETERMINATION OF A LIQUID
1. From zero condition on display, press the MENU button until the message “dEnS” is
displayed, then press the PRINT button to confirm.
2. Using the MENU button, select the function “d Liquid” and confirm this with PRINT
3. It will be
displaye
d the value of the density of the glass float of known volume to use, the default
value is
equal to
3.0000.
4. It is
possible
to set a
different
value
using the CAL e MENU buttons for increase and decrease the value and using
the O/T button for skip to the others digits. Keeping pressed the O/T button is
possible to delete the inserted value.
5. It is possible toset a different value if you have the optional alphanumeric keyboard
6. Once the wished value is set, press the PRINT button.

7. It is now asked to weigh the glass float in air, confirm this with PRINT
8. Now
perform a tare if necessary and put the glass float to the weighing hook. Press then
the PRINT button to acquire the value. During the acquisition of the value the
messageWEI AIR will be flashing.
9. It is now asked to weigh the glass float immersed into the liquid. Perform a tare if
necessary and immerse the glass float into the liquid. Press the PRINT button.
During
the
acquisition of the value the message WEI LIq will be flashing.
10. The result of the density of the liquid is now displayed. Pressing the PRINT button it is
possible to print the value of density, if the balance is equipped with a printer.
11. In case of error the following message is displayed
12. Press the ON/OFF button to escape from density function, or the MENU button to
perform another measurement.

20 Maximum load determination function
*The balance must be equipped with the specific optional software (not available for all models)*
The function M LOAD allows to measure the maximum load for a solid.
1. To activate the function M LOAD from zero display condition, press repeatedly the
MENU button until the message “M Load” is displayed, then press the PRINT button
to confirm. When this function is activated, a tare is automatically performed.
2. Activation of this function is indicated by the visualization of the letter M on the last
digit on the display.
3. It is now possible to determine the weight of the maximum load.
4. Then press
the TARE button to
effect another
measurement.
5. When the function M LOAD is active, the calibration is disabled.
6. Press the button ON/OFF to escape from M LOAD function.

21 Percentage weighing function
This function allows to read the weighing value as a percentage of a reference weight.
The reference weight is took as 100% percentage value (factory setting). There are two
modes for acquiring the reference weight: one is automatic (with the reference weight)
and one manual (by inserting manually the value of the reference weight).
21.1 Mode with weight reference
1. From zero condition of the display press the MENU button until will be displayed
the “Perc”message, then press the PRINT button to confirm.
2. Press the MENU button to select the “Perc A” function and press PRINT button to
confirm.
3. Tare function will be performed and will be shown on the display the string “Load”.
Then load on the weighing pan the reference and press the PRINT button, the string
“Load” will start to flash and once the weight is acquired will be visualized the value
with the % indication.
4. Remove now the reference weight and load the sample. Is possible to read the
weight in percentage now.

5. Press the MENU button to visualize the weight in gram and vice-versa.
6. Press the ON/OFF button to escape from the percentage weight function.
NOTE: If the reference weight is lower than 10 digits after the acquiring sequence of the weight,
the string ERROR 07 will be displayed.
21.2 Mode with manual insertion of the reference weight.
1. From zero condition of the display press the MENU button until will be displayed
the “Perc” message, then press the PRINT button to confirm.
2. Press the MENU button to select the “Perc A” function and press PRINT button to
confirm.
3. It is possible to set a different value using the CAL e MENU buttons for increase
and decrease the value and using the O/T button for skip to the others digits.
Keeping pressed the O/T button is possible to delete the inserted value. The
inserted value will be stored in the memory until the balance is switched off.

4. Press PRINT button when the desired value of the reference weight is inserted
5. Load now the sample and read the percentage value.
7. Press the MENU button to visualize the weight in gram and vice-versa.
6. Press the ON/OFF button to escape from the percentage weight function.
7. It is also possible to set the value if the balance is equipped with the optional
alphanumeric keyboard. Press PRINT button to confirm the inserted value.
NOTE: If the reference weight inserted is lower than 10 digit displayed, will be shown the
ERROR 07.

22 Threshold function HI-LO-GO
Threshold function allow to determinate if the weight loaded on the pan is above or
below the two threshold fixed by the user.
1. From zero condition of the display press the MENU button until will be displayed
the string “H o L”, then press the PRINT button to confirm.
2. Insert the
lower
threshold value using the CAL e MENU buttons for increase and decrease the value
and using the O/T button for skip to the others digits. Keeping pressed the O/T
button is possible to delete the inserted value. The inserted value will be stored in
the memory until the balance is switched off.
.
3. Insert the higher threshold value as same as the lower value steps.
4. The string “bEEP OFF” will be displayed and select by the MENU button if the
acoustic alarm should be set or not if the weight is within the two threshold values set
before. Press PRINT button to confirm.

5. If the value of the thresholds is correctly inserted, the balance will be back to the
weighing mode with the indication of the threshold state (H = higher threshold, L =
lower threshold, OK= weight within the two set thresholds).
NOTE: If the values are not inserted correctly will be displayed the string ERROR 07.
There are 3 modes of the threshold function:
22.1 Both thresholds set
This mode allow to set the lower and the higher threshold values and to identify the
acceptable range for the weight value shown by the switching on of the symbol “OK” and
by the acoustic alarm is activated. When the value of the weight is under the lower
threshold value set will be displayed the symbol “ L” while if the weight is over the higher
threshold value set will be displayed the symbol “ H ”.
22.2 Lower threshold set only
Setting only the lower threshold and setting to zero the higher threshold, will be
displayed the symbol “OK” and eventually the acoustic alarm if activated whenever
the loaded weight is higher than the lower threshold value set. When the value of the
weight is under the lower threshold set the symbol “ L” will be displayed.
22.3 Higher threshold set only
Setting only the higher threshold and setting to zero the lower threshold, will be
displayed the symbol “OK” and eventually the acoustic alarm if activated whenever
the loaded weight is lower than the higher threshold value set. When the value of the
weight is above the higher threshold set the symbol “ H” will be displayed.

23 RS232 interface features
1. General features
The balance transmits the value visualized on the display following serial RS232C
standard, allowing to print the value of weight to a PC monitor or to a serial printer. In
the case of connection to a PC, it will be possible to select the transmission in
continuous mode or transmission at user command through pressing of the PRINT
button (as described at pag.17). The balance is also capable of receiving commands,
always through the standard RS232C, that allow performing all the functions
available through the keyboard of PC itself. The speed of transmission and reception
can be selected, as described previously (pag.19), to 1200, 2400, 4800, e 9600 baud.
The character format is of 8 bit preceded by one bit of start and followed by a bit of
stop. Parity is not considered.
2. Selection of interface for PC
Selecting the transmission to PC (personal computer IBM compatible), it is
achieved a continuous transmission output, at the same rate of weight update on
display of the balance. It is possible to perform all the functions of the balances
directly from the computer keyboard, transmitting to the balance the ASCII codes
as in the table below. The connector to use for connection to PC is the number 1
(fig.1 pag.49).
CODE
1st FUNCTION
(SINGLE PRESS)
“T” = H54 TARE
“C” = H43 CALIBRATION
“E” = H45 ENTER
“M” = H4D MENU
“O” = H4F ON/OFF
CODICE
2nd FUNCTION
(PROLONGED
PRESS)
“t” = H74
“c” = H63 CALIBRATION
“e” = H65 ENTER
“m” = H6D MENU
“o” = H6F ON/OFF
TARE

3. Selecting the transmission to PC at user command, it is achieved a transmission
output only when the PRINT button is pressed, also in this case it is possible to
perform all the functions of the balance directly from the keyboard of the computer,
sending to the balance the ASCII codes in the table above. The connector to use for
connection to PC is the number 1 (fig.1 pag. 49).
4. Connection of the balance to PC
To receive/transmit data, connect the connector 1 (fig.1 pag. 49) of the balance to the
serial port of the PC as shown below:
Balance
side
Connector 1
2
3
5
6
4
Balance
side
Connector 1
2
3
5
6
4
5. Transmission format
String transmitted is composed by the following 14 characters:
� First character: weight sign (blank or-)
� second/ninth character: weight or other data
� tenth/twelfth character: weight unit symbol
� thirteenth character: stability indicator
� fourteenth character: carriage return
� fifteenth character: line feed
Eventuale non-sign ificative zero are spaces.
7 6
20
2
3
5
6
4
3 2
PC
side
25 pins
Connector
PC
side
9 pins
Connector
6. In the following tables the various transmission formats are shown:
Weighing mode (valid both for continuous transmission and transmission at user
command
1°
Sign Weight Weight unit Stability
)
3° 4° 5° 6° 7° 8° 9° 10° 11° 12° 13° 14° 15°
CR LF

Density mode (only in transmission at user command mode)
1° 2° 3° 4° 5° 6° 7° 8° 9° 10° 11° 12° 13° 14° 15° 16° 17°
d = Density value Space Weight unit CR LF
Piece counting mode (only in transmission at user command mode)
Number ofpieces
1°. 2° 3° 4° 5° 6° 7° 8° 9°
Pcs : spaces Number of pieces
10°11°12°13°14°15°16
°
Total weight of pieces
1°. 2° 3° 4° 5° 6° 7° 8° 9°
Weight :
space
10°11°12°13°14°15°16°17°18°19°20
Value of weight
Average unit weight of pieces:
1°. 2° 3° 4° 5° 6° 7° 8° 9°
PMU : spaces Value of weight
PMU stands for average unit weight
10°11°12°13°14°15°16°17°18
Percentage weight mode (only in transmission at user command mode)
space
spaces
°
g
space
S
°
g
Percentage
1°. 2° 3° 4° 5° 6° 7° 8° 9° 10° 11° 12° 13° 14° 15° 16° 17° 18°
Perc . space Percentage space %
Weight
1°. 2° 3° 4° 5° 6° 7° 8° 9° 10° 11° 12° 13° 14° 15° 16° 17° 18°
Weight space Weight value space g

7. Selection of interface to printer
2
Selecting the PRINTER mode,the serial output ofthe balance is set to work with serial
printers.
In this case the printing is effected only when the PRINT button is pressed and with
stable weight. If the stability is not reached within ten seconds, the message
ERROR05 is displayed preceded by a short acoustic signal and the value of the weight is
not sent to the printer.
The connector to be used for the connection is the number 1 (fig.1 pag.46)
8. Connection of the balance with the serial printer
Connect a serial printer to connector 1 to the balance as shown in the following
scheme:
Balance
Input data
side
Printer side
Connector 1
Busy signal
5
GND
9. If the optional TLP50 printer is used, it will be possible to print both in continuous-
mode and in labels-mode with the following formats:
Weighing mode and maximum load mode Piececounting mode
12-02-2008 12:00 12-02-2008 12:00
Weight: 22.000 g
Pcs 100
Weight: 300.000 g
PMU: 3.000 g
Density determination mode Percentage weight mode
12-02-2008 12:00
d= 2.80066 g/cm3d
12-02-2009 12:00
Perc.
Weight: 300.000 g

10. Connection of the balance to the optional alphanumeric keyboard
To connect the optional alphanumeric keyboard it must be used the connector 1 the
same used for connection to a PC. In this case the connection to PC or to printer must
be effected through the connector placed on the optional alphanumeric keyboard.

24 Connectors positions (rear)
rd
Connector 1
9 pins female:
Keyboard/PC/
Printer
9
8
7
6
Connector 2:
Power supply
connector
Fig. 1 Rear of the balance
CONNECTOR 1 CONNECTION FOR
KEYPAD, PC AND PRINTER
5
4
~ pin2 =Txsignal
~ pin3 =Rxsignal
~ pin 4 = busy signal
3
~ pin5 =Gnd
~ pin 4-6= connected to each other for
1
connection to PC
Fig. 2 Fig. 3

25 Working with the battery
Balance can work, at wish, using only the battery power.
The battery on board is located inside the balance and gives 10 hours of stand alone
operation
1. With the external power supply disconnected, it is possible to switch on or
switch off the balance through the ON/OFF button and work without being
connected to an AC power outlet.
2. When the balance is working using the battery, the symbol of battery with
charge level is displayed on up-right corner of the balance’s display. The three
lines all switched on means a maximum level of battery charge, instead when all
three lines are switched off and only the battery symbol is displayed means that
it is necessary to connect the balance to AC power outlet to re-charge the
battery.Failure to do so will damage the battery. This is NOT covered by
warranty.
1. To re-charge the battery, connect the external power supply (supplied) to the
balance. (See Pag.5)
2. When the external power supply is connected, the balance automatically switches
itself on and, after performing the initial test on display, it enters the stand-by mode
showed by a single point in the display. In standby mode also the battery recharge
symbol will remain switched on.
3. The charge level will graduallystep rise until it reaches the maximum level.
However let the battery recharge at least for 8-10 hours before disconnecting the
external power supply from the balance.
NOTE: Battery duration depends also from working mode of the display backlight. To get longer
battery duration, switch off the backlight or set it in AUTO mode.

26 Error Codes
� ERR01: the weight does not reach stability after a tare operation ~ Protect the
balance from air flows or from vibrations of the working table.
� ERR02: impossible to start the calibration operation due to balance instability ~
Protect the balance from air flows or from vibrations of the working table.
� ERR03: calibration weight not correct or balance unstable ~ Calibrate with correct
weight or protect the balance from environment disturbs.
� ERR04: weight of samples for the piece counting function not adequate or unstable ~
Select a bigger number of samples or protect the balance from vibrations.
� ERR05: impossible to print due to instability ~ Protect the balance from
environment disturbs.
� ERR07: error in inserting the data.
� “UNLOAD”:weight loaded on the pan or pan not positioned properly ~ Remove
the weight from the pan or position properly the pan and underpan.
� “CAL But”: the balance requires to be re-calibrated ~ Unload weights, if any, on the
pan, and press the CAL button.
� : Overange condition ~ Unload the weights loaded on the
pan.
� : Underange condition ~Place properly pan and underpan.
27 Maintenance and care
Regular maintenance of yours balance guarantee accurate measurements.
� Cleaning
Before cleaning the balance unplug the power supply of the balance from the
voltage supply of your room. Do not use aggressivecleaning product (as solvents or
similar), use a humid towel with soft detergent, Avoid liquids to go inside the
instruments during the cleaning. Wipe the balance with a soft towel. Parts of
samples or powder can be removed using a brush or vacuum cleaner.
� Safety checks
Safety of the instrument is no more guaranteed when:
balance power supply is clearly damaged
balance power supply is not working anymore
balance power supply is stored for long time in hard environment conditions. In
these instances refer to the assistance centre where specialized technician will
make reparations to bring back the instrument in the safety conditions eventually.

53
28 Quick guide to balance parameters setup
� To enter the balance parameters setup menu, press and keep pressed the MENU button until the acoustic alarm is over.
� Use then the MENU button to go to next parameter, use the CAL button to go to previous and the PRINT button to confirm the
choice.
� To escape from menu, press and keep pressed the MENU button until the acoustic alarm is over.
Units
Pc-Print
Baud rt
Auto 0
Filter
Stabil
Blt
Time Off
Calib
End
br 1200
br2400
br4800
br9600
Stab 1
Stab 2
Stab 3
Disab
2 Min 5
Min 15
Min
Print Pc
Cont Pc
Cmd
Gram
Carat
Once
Pound
Penn
Ouncetr
Grain
Tael Hon
Tael Sgp
Tael roc
Momme
On
Off
Auto
Auo off
Auo 1
Auo 2
Auo 3
Auo 3E
Filt 1
Filt2
Filt3
E Cal
Tec Cal
Aut Cal
I Cal

54
29 Quick guide to the use of the balance programs
To enter the balance programs menu, press the MENU button.
Use then the MENU button to go to next parameter, use the CAL button to go to previous and the PRINT button to confirm the
choice.
To escape from menu, press and keep pressed the MENU button until the acoustic alarm is over.
Smlp 10
Smlp 25
Smlp 50
Smpl 100
Manual
D solid
D liquid
L threshold
Perc A
Perc M
Tare
dl 1.0000
ds 3.0000
H threshold
t/0
Ins. weight
M 0.000
Escape
Liquid den
sity
Count
Dens
HoL
Perc
M Load
End
Weight
Load
%weight
Escape
New value
(Uei air)
Pcs
Weigh in liquid
(Uei Lqd)
Weigh in liquid
(Uei Lqd)
Solid
dens ity
Auto tare Load
D solid
Escape
D liquid
Escape

WARRANTY CONDITIONS
1. Duration of warranty is of one (1) year from the date of purchase
proved by invoice concerning the product or by delivery note.
2. Warranty covers all parts resulting defective at the origin. It does not cover
mechanical or electronic parts damaged by wrong installation, tampering or
incorrect use.
3. Warranty does not cover damages caused by impacts, balance drops or
drop of objects on weighing pan.
4. Shipment to and from service centre is at customer charge
June, 2009

Intelligent Weighing Technology serves the industrial and laboratory markets in North America with
competitive pricing and value for money on a complete range of industrial and laboratory scales and
balances, force measurement and load monitoring technology from 0.01 mg to 275 tons.
We are the exclusive source for Intel l-Lab™, Intell-Industrial™, Intell-Check™, IntellCount™, Intell-Weigh™, Intel l-Base™, Intel l-Scan™and Intell-Print™laboratory, industrial,
counting, analytical, precision and toploading balances, printers, peripherals and
weighing equipment.
We are the exclusive source for UWE weighing equipment in the US and the Caribbean.
We are the exclusive source for Intell-Lift™Straightpoint (UK), Ltd. products in North
America, Mexico and the Caribbean.
We have a combined 50 years of experience in the weighing and measurement industry, both in the
USA and worldwide. With contacts in over 50 countries, we provide you with the weighing and
measurement equipment you need.
QUALITY- Products solidly built from the ground up with superior engineering and components for
exacting results.
VALUE - Equipment priced for real-world business applications, with superior service and
support.
EXPERIENCE - Expert advice to help you choose just the right product for your application.
Quality + Value + Experience…it adds up to the Intelligent Investment.
Intelligent Weighing Technology,
Inc. www.intelligentwt.com
© IntelligentWeighingTechnology, Inc.All rightsreservedworldwide.
The information contained herein is the property of Intelligent Weighing Technology, Inc. and is supplied without liability for errors or omissions. No part may be reproduced or used
escept as authorized by contract or other written permission. The copyright and the foregoing restrictionon reproduction and use extend to all media in which the information may be
embodies.
 Loading...