

Page 1

Intellicorder
User Manual
Product Model: SH1006
Utility Model Patent No.: ZL201120121587.3
Design Patent No.: ZL201130075639.3
Standard No.: EN 55022 EN 55024
GB 17626.2-2006 Q/GZ 4-2011
Page 2

2
Dear Users,
Ple ase read the user m anual carefully befo re using this product a nd Kindly safe keep this
ma nual fo r future referen ce .
Safety Use Note:
Warning: P lea se insta ll the digita l door vie wer in the recommended p laces to e nsure safety.
To g uard against the explosion, please use the o riginal battery. Please ask for mainte nance from
qualified service profe ssionals.
Equipment Ma intena nce
• Do not shake and tap equip men t vio lently.
• If dust or wate r droplets sp lashing on the device, carefully wipe with a dry cloth .
• Do not use any ba tte ry charger ex cept the supplied one.
• Please charge with our specia lly equipped ba ttery cha rger.
Page 3

3
Chapter I: Product information
1.1 Package contents
1.2 Product a ppearance
1.3 Ma in fea tures, functions
1.4 Ma in spe cifica tions
Chapter II: Install diagram
2.1 Structure chart
2.2 Installa tion pro ce ss
2.3 Batte ry insta llatio n and remo ve method
2.3.1 Batte ry installation me thod
2.3.2 Batte ry remove me thod
2.4 SD memory card insertion and remove
2.4.1 SD memo ry card inse rtion
2.4.2 SD memo ry ca rd re move
2.5 C lock battery repla ceme n t
2.5.1 Clock batte ry remove
Catalog
Page 4

4
2.5.2 Clock batte ry installation
2.6 C harge
Chapter III: Intellicorder use instruction
3.1 Live mode
3.1.1 Syste m setting
3.1.2 Time se tting
3.1.3 Parame te rs setting
3.1.4 Playback setting
3.2 Re cord mode
Chapter IV: FAQ
Chapter V: Fault、solution and Precautions
Note:
Ple ase read the user manual carefully before using this product a nd Kindly safe keep this manual
fo r future reference .
Page 5

5
1.1 Package contents
(1) Intellicorder indoor host 1pc
(2) Intellico rder outdoor host 1pc
(3) Indoo r host mounting plate 1pc
(4) Power a daptor 1pc
(5) Lithium batte ry 1pc
(6) Clock batte ry 1pc (Loaded. Not insta llatio n for will loss of po wer, fitted whe n using)
(7) Fixed nut 1pc
(8) Screw 2pcs
(9) Phillips scre wdrive r 1 pc
(10) Use r manual 1pc
In the event the pa ck ing accessories a re incomple te to ensure your interests, kind ly contact the
deale r or the company immedia tely.
Chapter I Product introduction
Page 6

6
1.2 Product Appearance
1.3 Product features and functions
Page 7

7
The intellicorde r SH1006 is a ne w genera tion of visual digital reco rding door viewer, it
incorpo rate d the m ost a dvanced te chnical digital chipse t. W ith a unique a sse mb ly me thod,
use r can enjoy eas y and convenient installation witho ut the need of any wiring and any need
to alter or modify their current tra ditiona l peep -hole on the ir door construction. This is indeed
a simple, practical and ye t highly te chnolog ica lly ad vanced home security product.
Main features and functions
(1) 2.8” LCD d isplay screen
(2) Attractive & Fashio nable appea ra nce
(3) Easy to opera te and install, no wiring
(4) Indoo r host monitoring outs ide
(5) Infrared detection video / pho to
(6) O wn 256M built-in memory, easy to use
(7) Suppo rt SD ca rd extens ion, up to 32G
(8) Re cord the da te , time , the video le ngth, facilitate to provide valuable data whe n inquiry
(9) No radiation, lo w po wer co nsumption
(10) 3X digita l zoom
(11) 0.3 mega pixel high resolutio n
(12) Automatic po we r sa ving mode
1.4 Product specifications
Page 8

8
Item Spec. Rem a rk s
Indoor unit size 13 8mm *103mm *25mm
Outdoor unit s ize 18m m*Dia .50m m
Ma chine Pa rt
Adapter plate 10 0mm *78mm*9.5mm
Am b ient light
adaptation
Working environment
Illum ina tion of the outdoor unit
20 lux~3500 lux
Resolution
The resolution of images on the indoor
monito r should not be less
tha n 200
(Ce n tra l le vel, under
80 0 lux condition)
MIC part
Capacitive Electret
Microphone
Diameter 6MM Heigh t: 2.7MM
Sensitivity: 40 + /-3d B
Came ra Pixe l Width:640, Height:480 30 0K Pixel
Came ra Angle
Dia go nal:115+/-5 degrees
Ho rizontal:102+/-3 degrees
Vertical: 85+/-3 degrees
Came ra Part
Dig ital Zoom 3X digital zoom
Page 9

9
Lo udspeake r Part
Lo udspeake r
Diameter:20MM Powe r:1W
Impedance :8 OHM
Dis play Type 24 0(R+G+B)*320 Dots
LC D Type 2.8 inch TFT LCD
Vie wing Direction 6 O ”colock
Dis play Screen
Backlight 4 LED white color
water-proof
dust-proof
requ irem ents
Indoor Unit: IP30;
Outdoor Unit: IP3 3
Door Thick ness
suited
Door thickness is: 35mm-55mm ,
55m m-85mm and 85mm -105mm.
Insta llatio n Pa rt
Door pe ep hole size Dia .15mm
Own memory 256M
Memory
Memory Extension
Max im um suppo rt 32G
SD ca rd an d
back wa rd co mpa tible
Page 10

10
Batte ry Charger
(MODEL:VA8B-050
10 0)
Input: 110 V to 240 V 50/60 Hz, 0.3 A
Output: Dc 5.0 V 1.0A
5.0V
Batte ry Pa ck
(lithium-ion)
(MODEL:DS-L600)
Voltage /capa city: 3 .7 V, 1800 mAh
Power Pa rt
Clock batte ry Dia.20.0 th ick:3.2 3.0V CR2032
Infrared mo bile
monito ring
Dis tance Nea r: <1.5M ; Fa r: <2.5M
Am b ient
tem perature
-10 ℃~+55 ℃;
Relative Humidity 10 %~95 %;
Working
Cond ition
Atm os pheric
pressure
86 kPa~106 kPa
Include SD ca rd o r
no t
Optional a ccording to custome r’s
request
Include ba ttery Include 1pc 1800mAh lithium battery
Others
La nguage Kinds of la nguage to set
Page 11

11
Settings functio n time and date settings function
Slee p automatically Can a u tomatically go to sleep
File sa ve forma t JP EG,MP4
Page 12
12
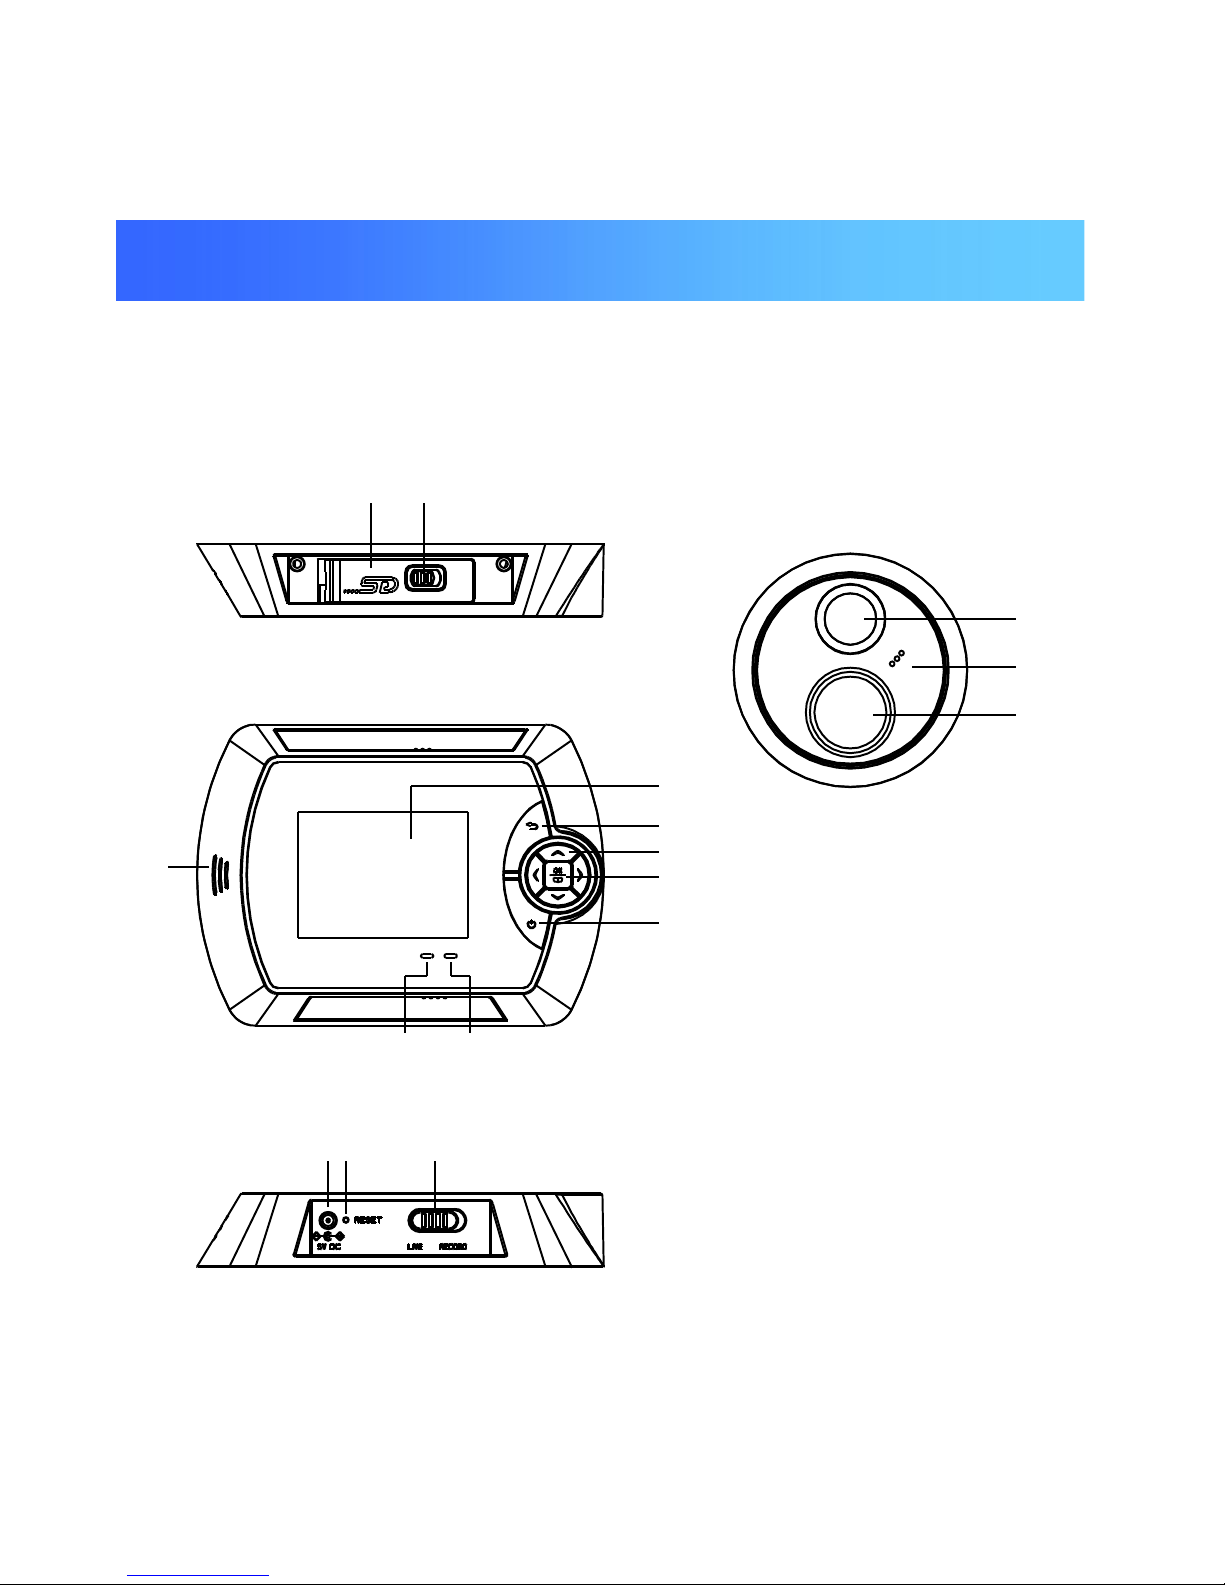
2.1 Intellicorder structure chart
21
host underside
131211
10
98
7
6
5
4
3
host underside
host front
16
15
14
Chapter II Install diagram
Page 13

13
Explain the various parts of the structure or button:
(1) Ba tte ry Co ve r (SD m emory card and lith ium battery inside )
(2) Lock bracket for batte ry cover
(3) Colo r LCD screen
(4) Return:
(5) Curs o r: △▽
(6) O K: co nfirm se tting
(7) Power: po we r on or powe r off
(8) C harge indicator (re d): whe n there the ex te rnal po we r adap tor is conne cted, light on
(9) New record ind ica to r (green): recording whe n in recording mode ,light on
(10) Speaker: Play the reco rded audio sound under record mode
(11) Charg ing interface
(12) RESET – use a pointer or alike to p re ss this bu tton to reset the unit
(13) Mode switch key: switch btw (R ECOR D) and (LIVE) mode
(14) Lens
(15) Microphone
(16) Infrare d motion-a ctivated Sensor – dete cts motio n up to 2-2.5m
Page 14
14
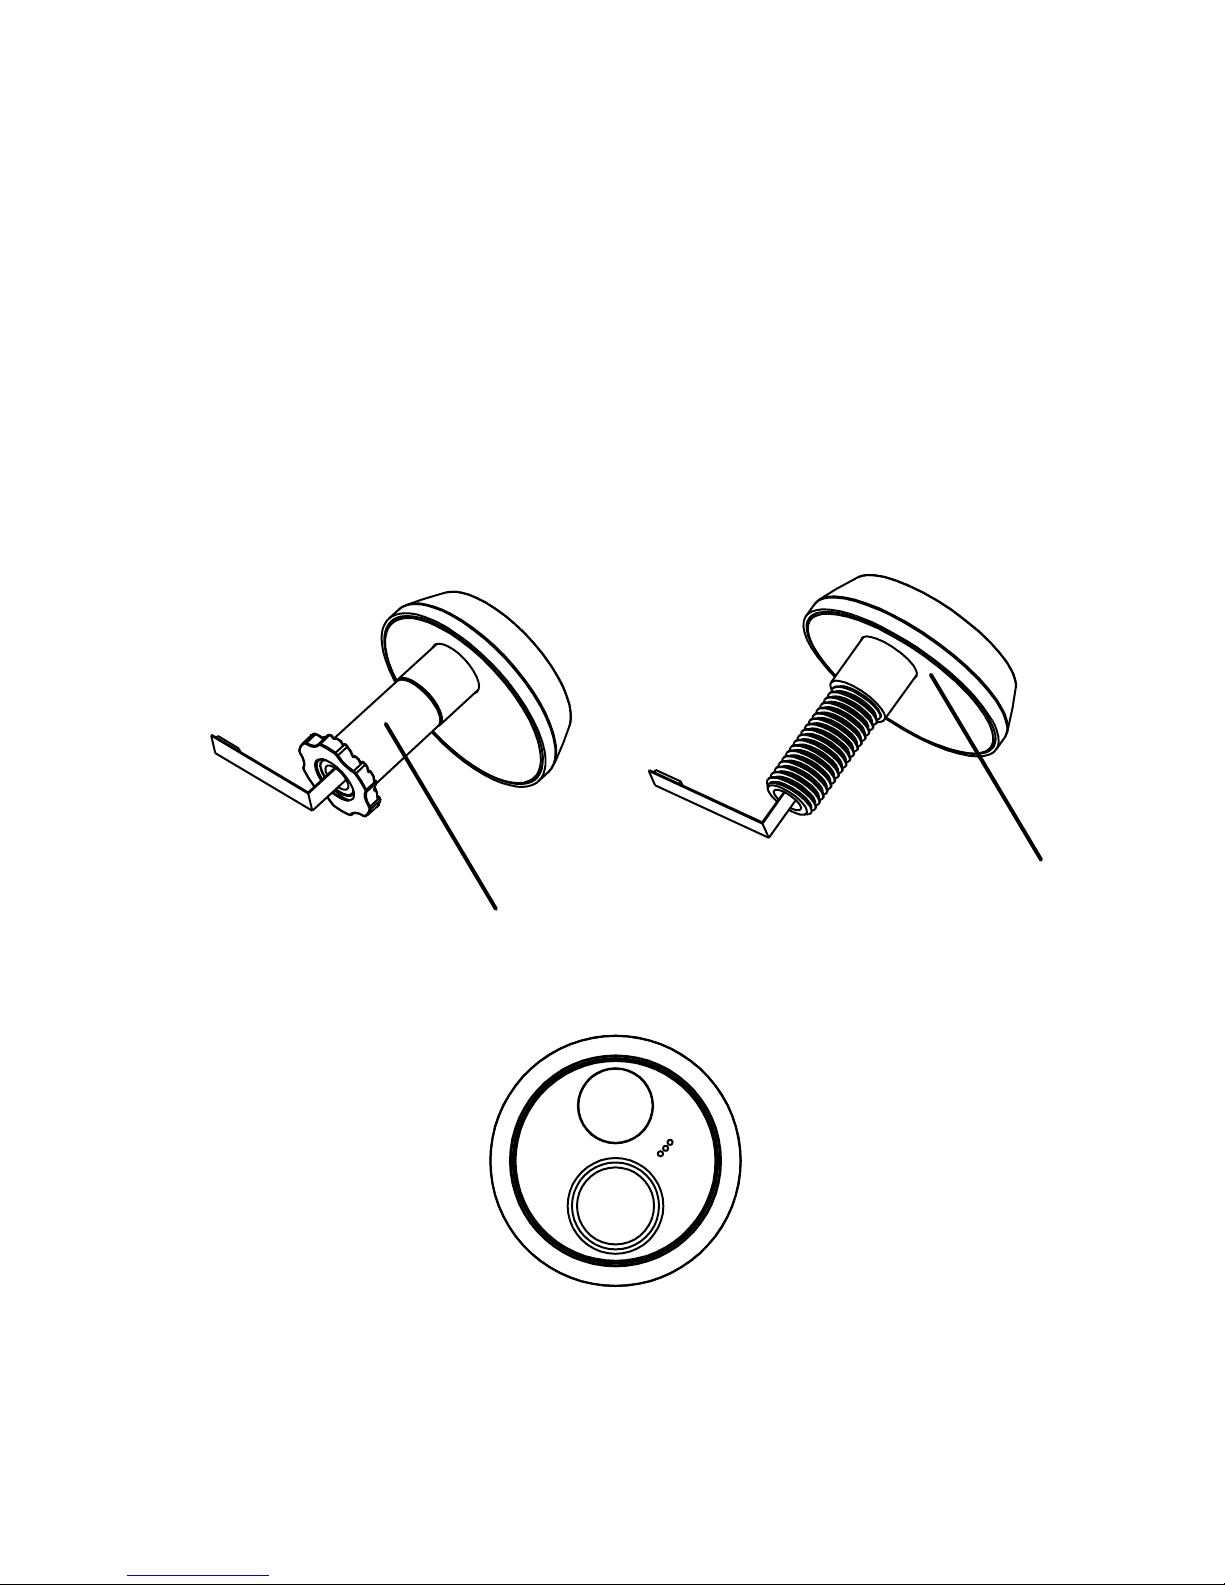
2.2 Install proce ss
(1) Unscrew the sleeve out comple tely first from the outdoor p a rt, Remo ve the ba cking of
double-sided adhesive (p ic.2.1);
(2) Pass the Outdoo r slave thro ugh the pee phole, and s tick it to the outs ide of the door like
shown in pic.2.2;
slee ve
Double-s ided adhesive
pic.2.2
pic.2.1
Page 15

15
(3) Remo ving the double-side d adhesive on the mo unting bracke t (pic.2.3);
Double-s ided adhesive
pic.2.3
Page 16

16
(4) Fo llow pic.2.4, to stick the mounting brack e t on the door, then insta ll the Screw fo r
fixing, and buck le the male conne cto r of the FP C with the fema le Co nnector on the
mounting bracket;
Dire ctor buck le
Door
Fixe d nut
FPC
pic.2.4
Page 17

17
(5) Remo ve the insula te shee t on the clock battery (pic.2.5);
Insula te shee t
Square groove
pic.2.5
Page 18

18
(6) Fo llow pic.2.6 install the indoo r host to the mounting b ra cket;
pic.2.6
Page 19

19
(7) Lock the screws with th e Philips s crewdriver (pic.2.7);
(8) Install finished.
Scre w
pic.2.7
Page 20

20
2.3 Battery install and remove
2.3.1 Battery installation method
2.3.1.1 Push the ba tte ry cover lock to the left, it will o pe n automa tically (pic.3 .1);
2.3.1.2 Insta ll the ba tte ry like in P ic.3.2: p ush the ba tte ry Buckle o utwa rd, then insta ll the
batte ry in;
2.3.1.3 Re place the batte ry cover, push the ba tte ry cover lock to the right, the n b uckle up.
pic.3.1
Batte ry cover lock pannel
Batte ry co ver
Page 21

21
2.3.2 Battery remove method
Opposite to the batte ry install ste ps.
Batte ry buckle
Batte ry
pic.3.2
Page 22

22
2.4 SD memory card insertion and remove
2.4.1 SD memory card insertion
2.4.1.1 Follow step 2.3.1.1 to open the ba ttery cove r;
2.4.1.2 Insert the SD memory ca rd to the SD slo t like pic.4.1;
2.4.1.3 Re place the battery co ver, push th e battery co ver lock to the rig ht, then buckle up.
SD slo t
SD card
pic.4.1
Page 23

23
2.4.2 SD memory card remove
2.4.2.1 Follow step 3.1.1 to open the b a ttery cover;
2.4.2.2 Press and re lease SD card (pic.4.2);
2.4.2.3 Re place the battery co ver, push th e battery co ver lock to the rig ht, then buckle up.
SD card
Release SD ca rd
pic.4.2
Page 24

24
2.5 Clock battery replace ment
2.5.1 Clock battery remove
2.5.1.1 Remove the two screws on the indoo r host, then take down the indoor host;
2.5.1.2 Remove the co ver o n the back of the clock battery b y rotating tabs into un locked
positio n. (p ic.5.1 );
2.5.1.3 Ta ke out the clock battery b y using a sharp obje ct (pic.5.1 ).
Clock batte ry cover
pic.5.1
Pick out hole
Page 25

25
2.5.2 Clock battery installation
2.5.2.1 Insert the clock batte ry under the splinter like pic.5.3, then press the top in to the
batte ry co nta ine r;
2.5.2.2 Install the clock batte ry cove r b y rota ting it clo ckwis e ;
2.5.2.3 Install the indoor host.
Batte ry blo ck splinter
pic.5.2
Page 26

26
2.6 Charge
When the battery has low capacity, the capacity icon will indicate
empty, please charge the battery.
2.6.1 Connect the power adaptor to the power supply;
2.6.2 Inse rt the DC plug to charging pot of the host, the indicate
Light turn on (red);
2.6.3 On the LCD scre en, you can see the batte ry icon is rolling, this is the
charging indicate;
2.6.4 The battery icon stops rolling and shows full power when fully
charged.
Page 27

27
Press power o n key to turn on the device ( )(5 seconds ).
Mode sele ction: Live mode (LIVE) / Record mode (RECORD), through the mode s witch in the
lowe r s ide fo r selection.
Note s : Under live m ode (LIVE), shut down auto matically when non-operatio n for 40 seconds.
Under re cord mode (RECOR D), automa tically s to re data and standby after
auto-re co rding 15 se co nds, and start again if have trigger.
Chapter III Operation
Page 28
28
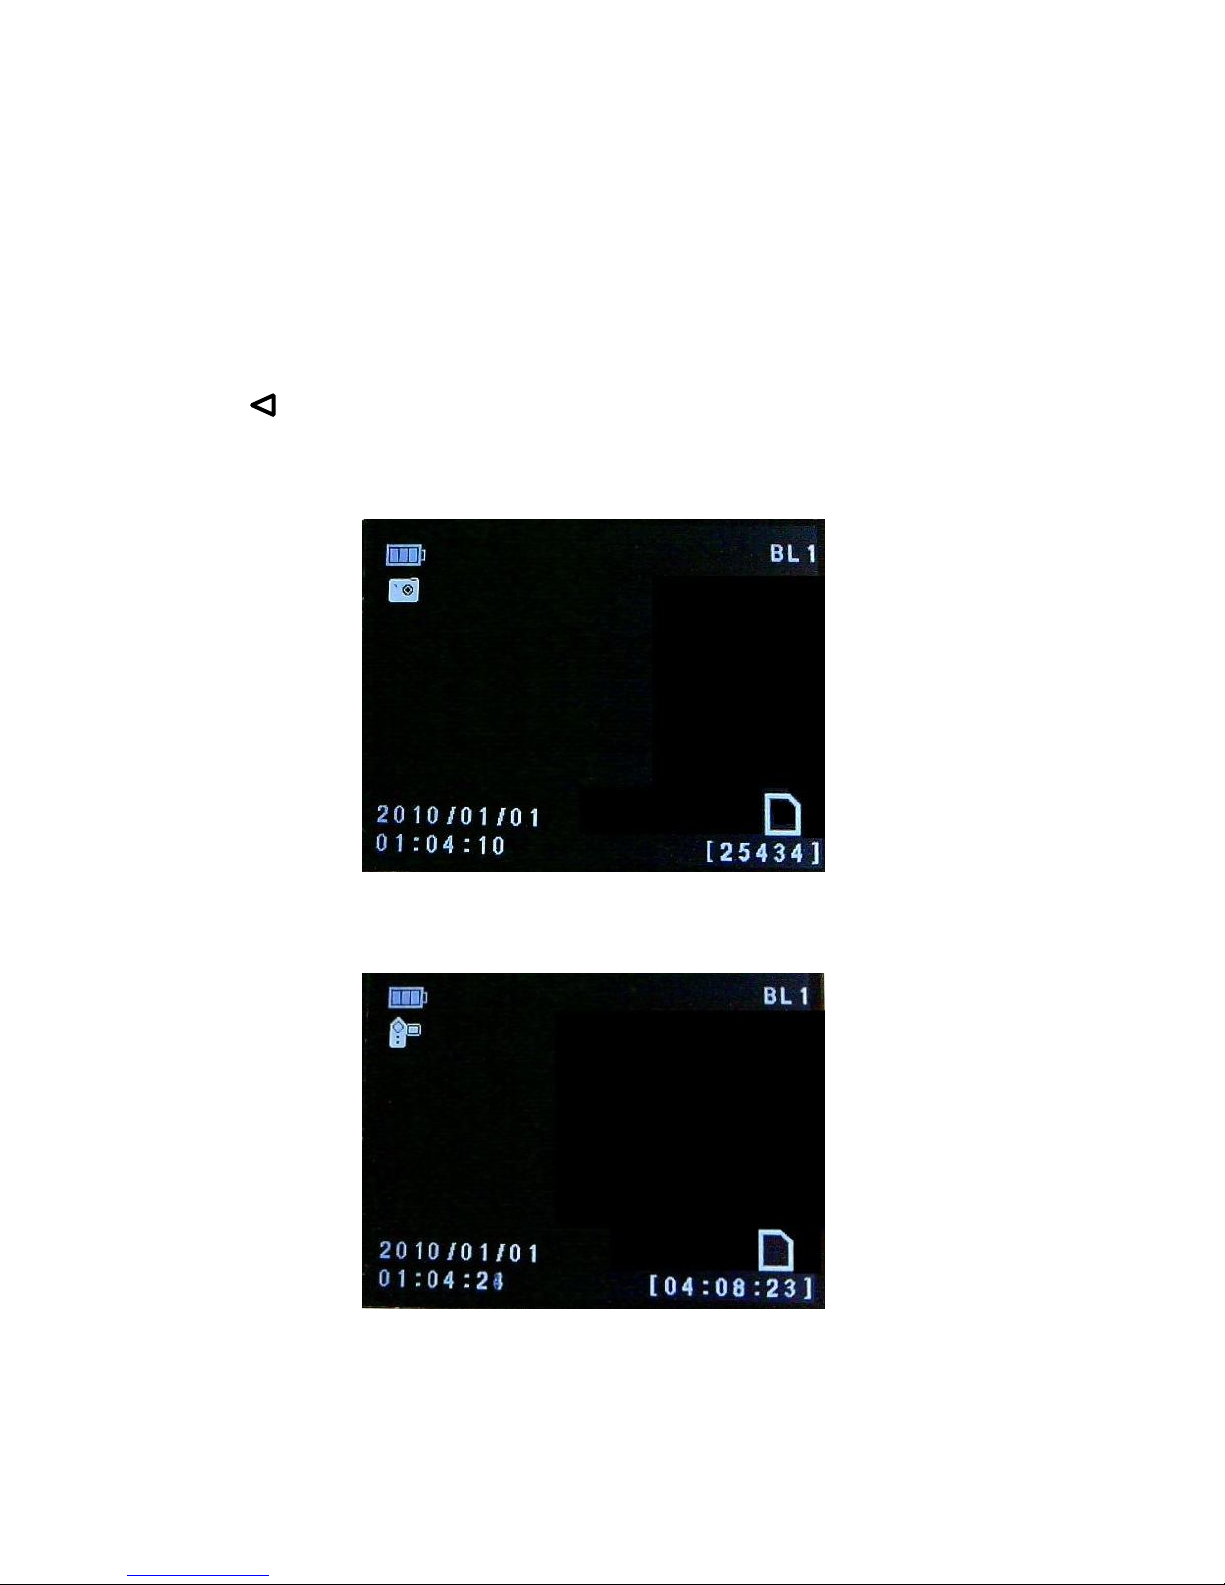
3.1 Live mode (LIVE)
Press △▽ to zoom in/out ima ge with 3X;
Press to switch b tw came ra mode and recording mode ;
■ Came ra mode: Press O K to take photos
■Recording mode: Press OK to start/s top
Shortly pre ss OK to enter m a in me nu.
Page 29

29
Press △▽ to se lect setting, Press OK to e nte r setting ,press o nce to return
to previo us men u,s hortly p ress to re turn to monito ring in terface .
System setting
Time se tting
Parame ter setting
Playback setting
Page 30

30
3.1.1 System setting
Press △▽ to s witch se tting option, and press OK enter to the se tting ca talog.
3.1.1.1 Language se tting
Press to sele ct language, then press O K to confirm .
Page 31

31
3.1.1.2 Infra re d setting
Press to sele ct close/far, then press O K to confirm .
Page 32

32
Nea r: infrare d distance is around 0-1.5M
Fa r: infra red dis tance is around 0-2.5M
Page 33

33
3.1.1.3 Format
Press to se lect YES/NO, then press OK to confirm your se le ction.
Note: Fo rmat will delete what saved in the SD memory card, please use with
caution.
3.1.1.4 Default se tting
Press to sele ct YES/NO, then press OK to confirm whether to re s tore fa ctory settings.
Page 34

34
3.1.1.5 Version No.
Show software Vers ion No.
3.1.1.6 NAND Remo ve to SD Ca rd
Press △ ▽ to se lect Yes or No, then press OK key to confirm if remo ving the built-in
mem o ry to SD card.
Page 35

35
3.1.2 Time setting
Press OK to sele ct or switch s e tting position, then press△▽to adjust time.
Page 36

36
3.1.3 Parameter setting
Press to s witch se tting option, then press OK enter to the setting cata log.
Note : Settings updates take e ffe ct when you reboot the intellico rder.
3.1.3.1 Back light
Press to select ba ck light o r NO (if need to ope n screen under re cord mode ), then
press OK to confirm your se lection (defau lt: NO).
Page 37

37
3.1.3.2 Timestam p
Press to sele ct YES/NO (if show time when came ra/reco rd), then p ress O K to
confirm your sele ction (default: Y ES).
Page 38

38
3.1.3.3 Record se tting
Press to sele ct cam e ra /reco rd mode, then press OK to confirm your se lection
(de fault: reco rd mode ).
3.1.4 Playback se tting
Press OK to enter the sub-co nte nt, then press △▽to mak e your desired selection and
press O K to enter root-conte nt, lastly press △▽to select play back menu and press O K to
play back.
Page 39

39
Pla ying back pho tos, press to revie w your pho tos;
Pla ying back recording, press OK to sele ct play/pause;
Press / to se lect backward/forward;
Volume + / Vo lume -, Press △/▽;
When the storage space is full, the below rem inder will come to the inte rfa ce.
De lete the dire ctory or file: Select the file or dire ctory you need to de lete, press
Page 40

40
button fo r long time , then choose yes , then press OK button to confirm the de letion.
De leting contents or files, sele ct the one you want to de lete , s hortly press , then press
to se lect YES/NO, and pre ss OK to dele te.
3.2 Record mode (RECORD)
When mo tion is detected, the re co rd indica ting light turns gree n , the re cording time is 15
seconds. Note: When switch to “RE CORD” MODE, the infrared mot ion detector
will work, the live display screen turn of f.
SH1 006 is equipped with inte rnal memory for immedia te re co rding, afte r re co rded 15
seco nds, the reco rding will be finishe d an d stored autom a tica lly, and the g re en lig ht will
turn ou t. Note: If the record ing is stopped without 15 seconds, the recorded
video cou ldn’t be read when p layback. The interval time needed to reactivate t he
motion senso r is about 15 seconds.
Page 41

41
When recording, press powe r ke y to tu rn on/off the LCD display.
Infrared Cautio n:
1. Susceptible to ra d io frequency ra d iatio n interfere n ce, to be a way from sou rces of
interference .
2. Away from the air-conditioning, re frigerato r, stove and other pla ce s sensitive to
tem perature change s.
3. Motion se nsor may not be activate d in the following situations:
When the actio n is ve ry slow or ve ry fast;
When the moving object is ve ry small;
When the actio n only in a corne r of the vie wing a rea.
Page 42

42
1. Q: Ho w long will the ima ge turn out after the SH1006 is po wered on?
A: Around 5 se conds, be cause the system needs time to initial.
2. Q : When the SH1006 is working, how long will it enter into standby mode ?
A: afte r no operatio n for 40 se conds, it will en ter to sta ndby mo de and save powe r.
3. Q : How lo ng will the full-charged batte ry las t for?
A: It ca n last for a round one to two mo nths (es timate 5 times/da y, 40 seconds/time).
4. Q : Why the image is fuzzy?
A: Ma y displa y or came ra protective film does no t tea r up, please tear a wa y the protective
film.
5. Q : What thickness of the door will th e SH1006 fit?
A:The ranges are 35mm ~ 55mm ,55~85mm ,85~105mm .
6. Q : Why does the image looks fuzzy not cle a r?
A: Outdoor unit is not properly insta lled, the came ra shou ld be in the above, infrared
dete ction head in belo w, a nd then fine-tuning the outd oor unit in order to image displa y
prope rly.
7. Q : How m an y pictures and how long of video ca n the me mo ry store?
Chapter IV F AQ
Page 43

43
A:It own 2 56M memory, ex cept for system me mo ry, ab out 240M le ft ava ilab le, so can store
picture s abo ut 1113pcs, and 11 m inutes of video.
Ple ase consult below cha rt for de tails:
Capacity(GB)
Num be r of pictures (pcs) Video time (m inute s )
1 66 25 65
2 13 250 13 0
4 26 500 26 0
8 53 000 52 0
16 10 600 0 1040
32 21 200 0 2080
Note : Capa city for pictures=capa city/size of ea ch picture, 1GB=1000MB=1000 *1000KB.
Video time =ca pacity/video size of each minute (15s is 3.2MB, 60s is 3.2*4=12.8MB).
Page 44

44
1. Please do not use sharp obje cts to graze the LCD of indoo r hos t to preve nt scratch on the
LC D.
2. Whe n magn ifying the imag e, the noise will become higher, this is no rm al.
3. Please follo w above install process.
4. Afte r the machine is installed, to avoid damage of the connecting line , p lease do not ro tate
both of the indoor and outdoor hosts. If the co nnecting line b rea k caused b y above re ason,
then the p roduct will no t be in the warranty.
5. Turn off the displa y each time you finished a conve rsation, this can help to save power of the
batte ry.
6. Discard yo ur b a ttery properly to avoid pollution the environm ent.
7. To prevent m is co nduct, please use the product:
Keep out of dire ct sunlight
Keep out of be heated , such as hea ters, heat sinks a n d heat lam p.
Keep out of strong dry, such as ce ntral hea ting vents.
Chapter V F ault、solution and Precautions
 Loading...