

Page 1
Quick Reference Guide
© 2013 Intellibot Robotics, LLC All Rights Reserved v3 Page 1
Quick Reference Guide
DuoBot Floor Scrubber
Intellibot Robotics, LLC
5410 SW Macadam Ave
Suite 100
Portland, Oregon 97239
Page 2

Quick Reference Guide
© 2013 Intellibot Robotics, LLC All Rights Reserved v3 Page 2
TABLE OF CONTENTS Page
Introduction 3
Customer Assistance 3
Machine Images 4
Operator Control Panel Overview 5
Start Up Steps 6
Clearing Obstacles 9
Manual Clean 10
Hands-Free Spot Clean 10
Hands-Free Area Clean 12
Cleaning Patterns 13
Map Clean (optional) 15
Completing Daily Cleaning Routine 16
Parking and Charging 17
Exchanging Battery Packs 17
Page 3

Quick Reference Guide
© 2013 Intellibot Robotics, LLC All Rights Reserved v3 Page 3
Introduction
This quick reference guide contains information on the daily operation and care of the DuoBot. Read
it carefully and become familiar with its contents.
It is important to follow all instructions and any warnings contained within this guide. Ignoring them
could result in personal injury or damage to the DuoBot that may not be covered by the limited
warranty.
Customer Assistance 1-888-837-0002
Customer service is available 24 hours per day, 7 days per week.
User Code:
A user code is required to operate the machine. This machine is pre-programed with a user code
12345. This should be replaced during initial setup with your own unique personal code.
USER CODE: _________________________________
Page 4
Quick Reference Guide
© 2013 Intellibot Robotics, LLC All Rights Reserved v3 Page 4
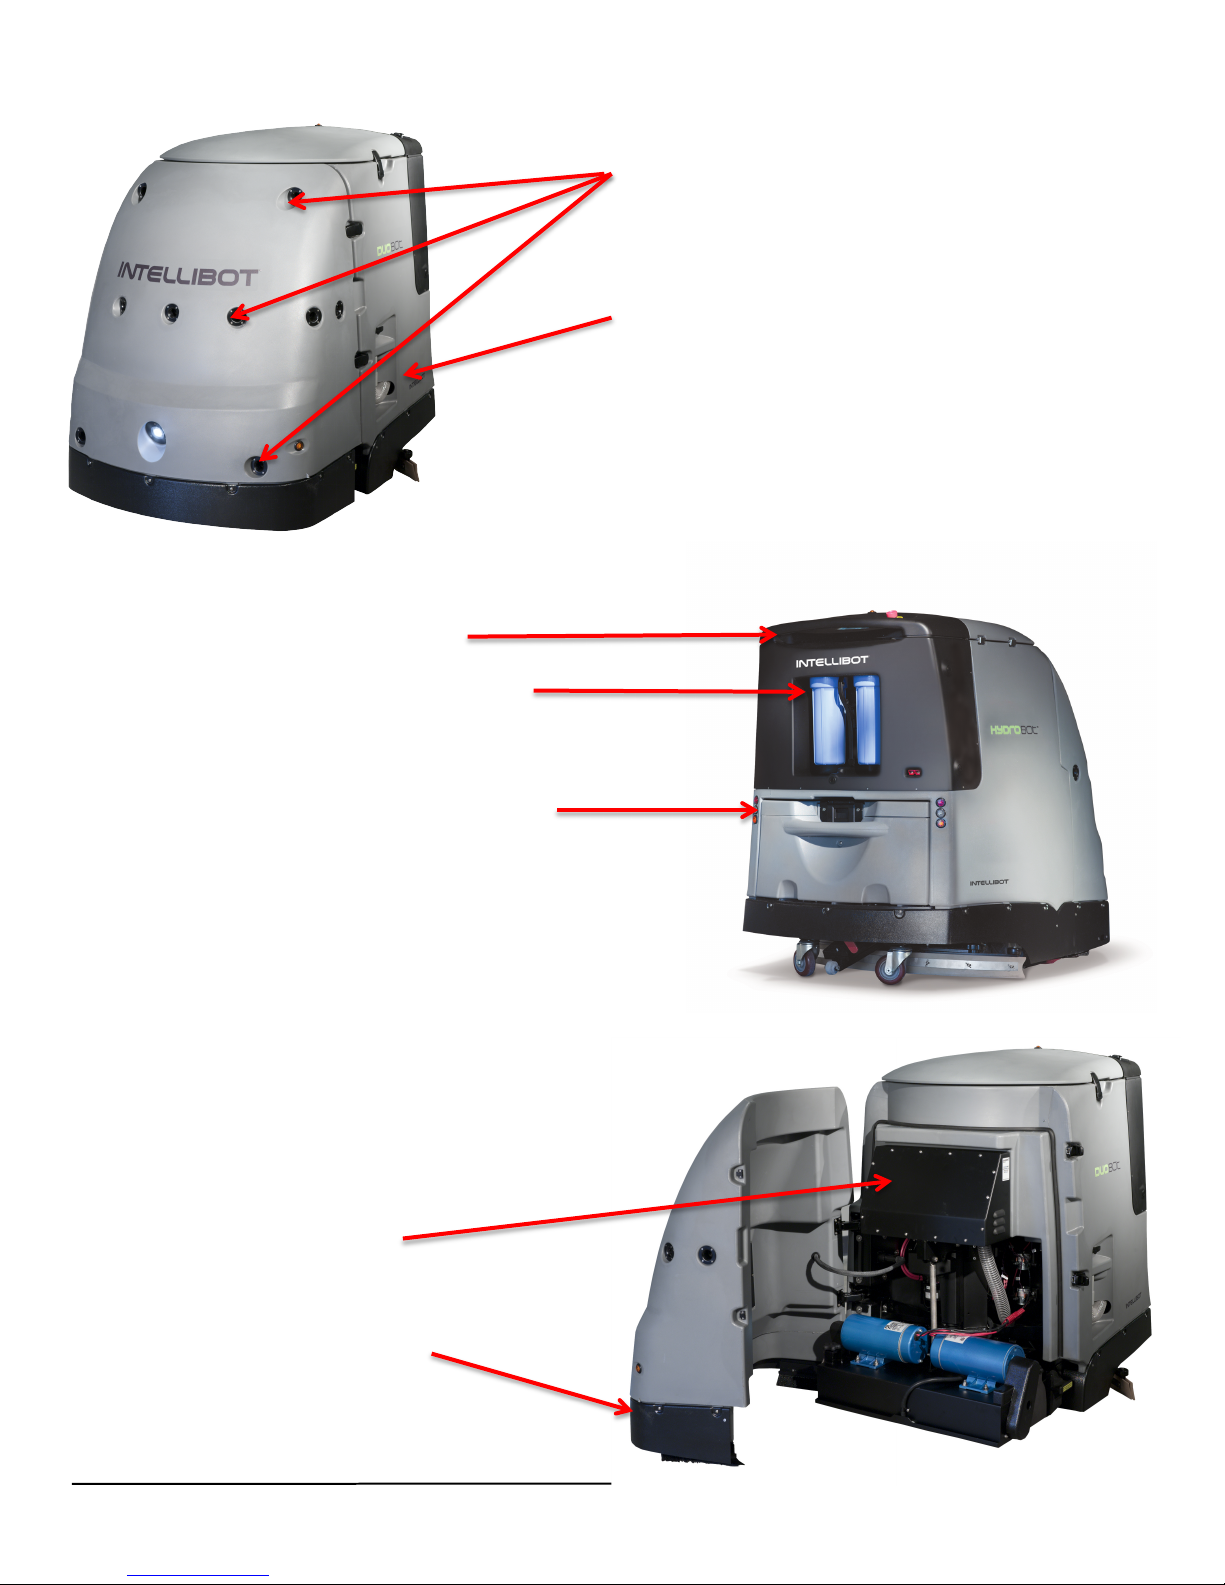
Battery pack door
Filter and canisters
Handle bar
Drain hose and drain valve
Sonars
Safety touch shield
Electronics box
Page 5
Quick Reference Guide
© 2013 Intellibot Robotics, LLC All Rights Reserved v3 Page 5
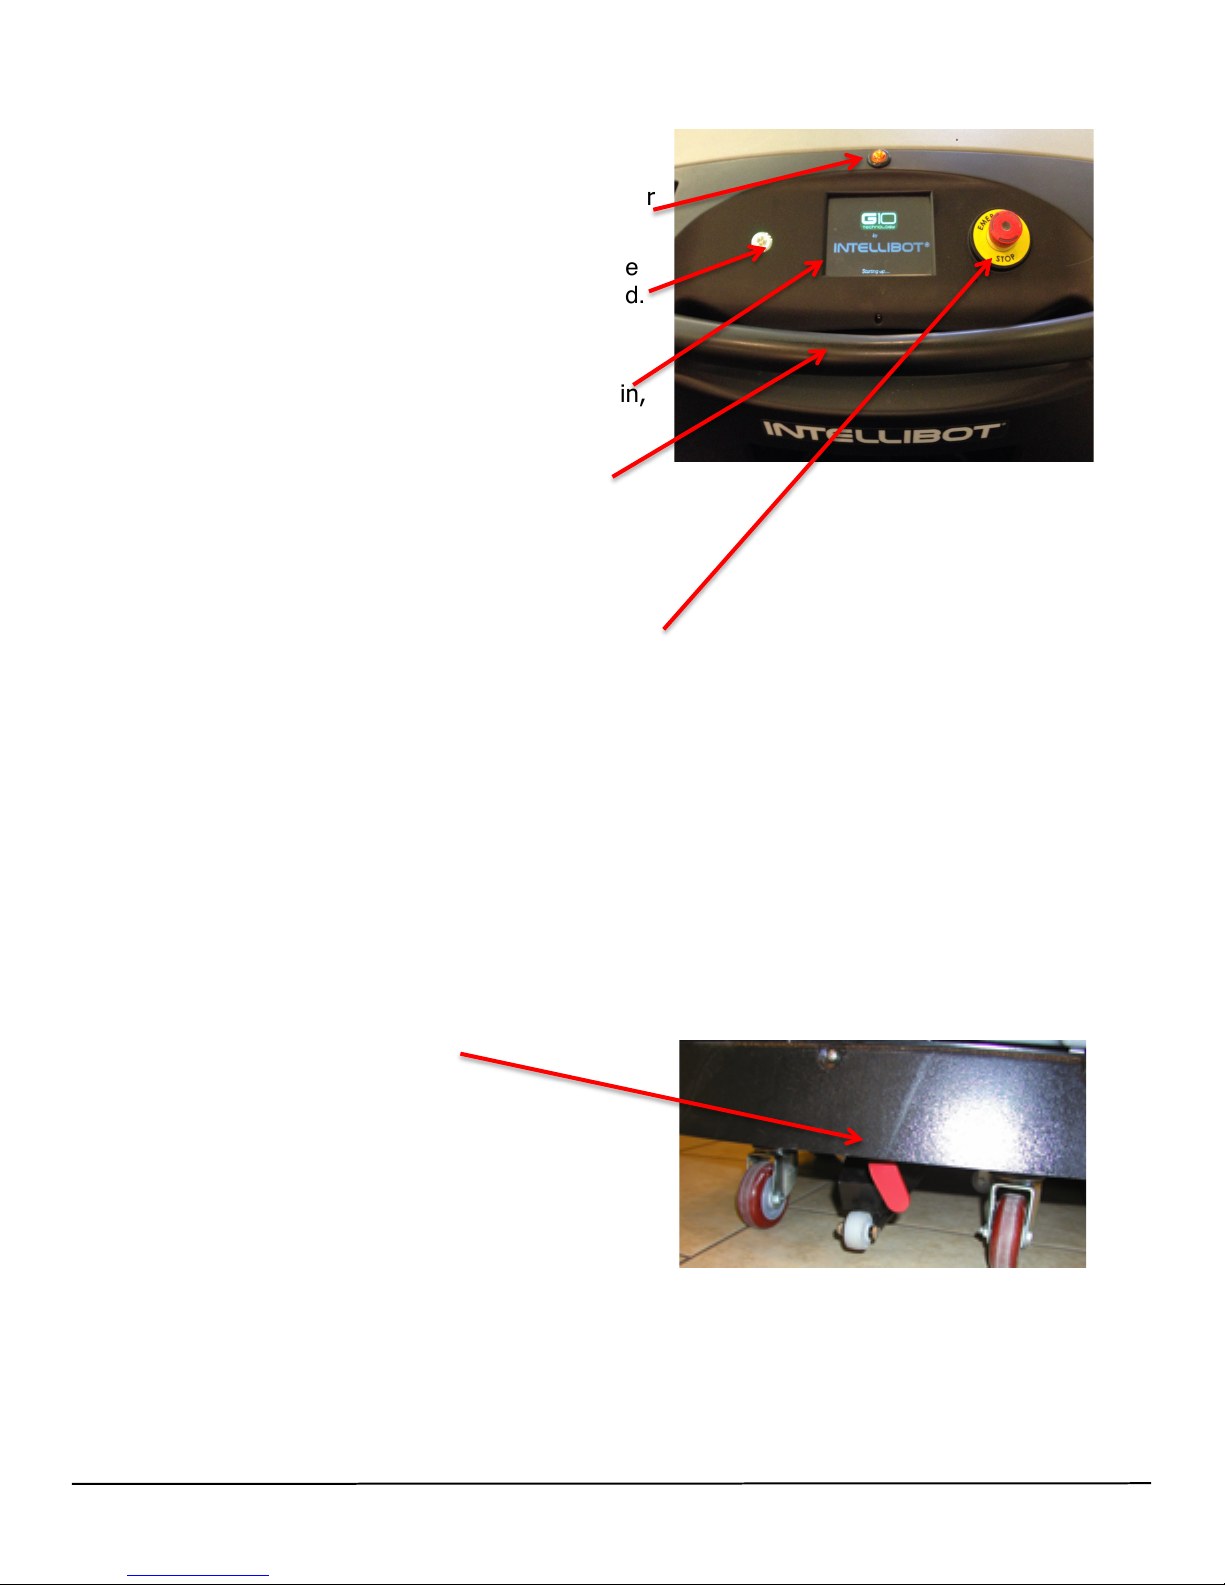
Operator Control Panel Overview
Amber warning light: Provides a visual indicator
that the machine is operating.
On/Off button: Press this button to power on the
machine. A green ring will light up when pressed.
You can use the same button to power down the
machine.
Touch Screen display: Use the screen to log in,
input commands and monitor the status of the
machine.
Handle bar: To move the machine you must gently
squeeze the pressure strip on the underside of the
handle.
Emergency stop switch: Depressing the stop
switch will immediately “pause” the machine. Pull
the button out to resume cleaning. Note: When
running in Hands-Free mode, there will be a pause
button on the touchscreen. This is the preferred
method to pause the machine. The emergency
stop button is best reserved for emergencies.
Parking Brake: To the left is locked, to the right
is released.
Page 6
Quick Reference Guide
© 2013 Intellibot Robotics, LLC All Rights Reserved v3 Page 6
Start Up Steps
1. Disconnect the Battery Charger (it will not start if
connected).
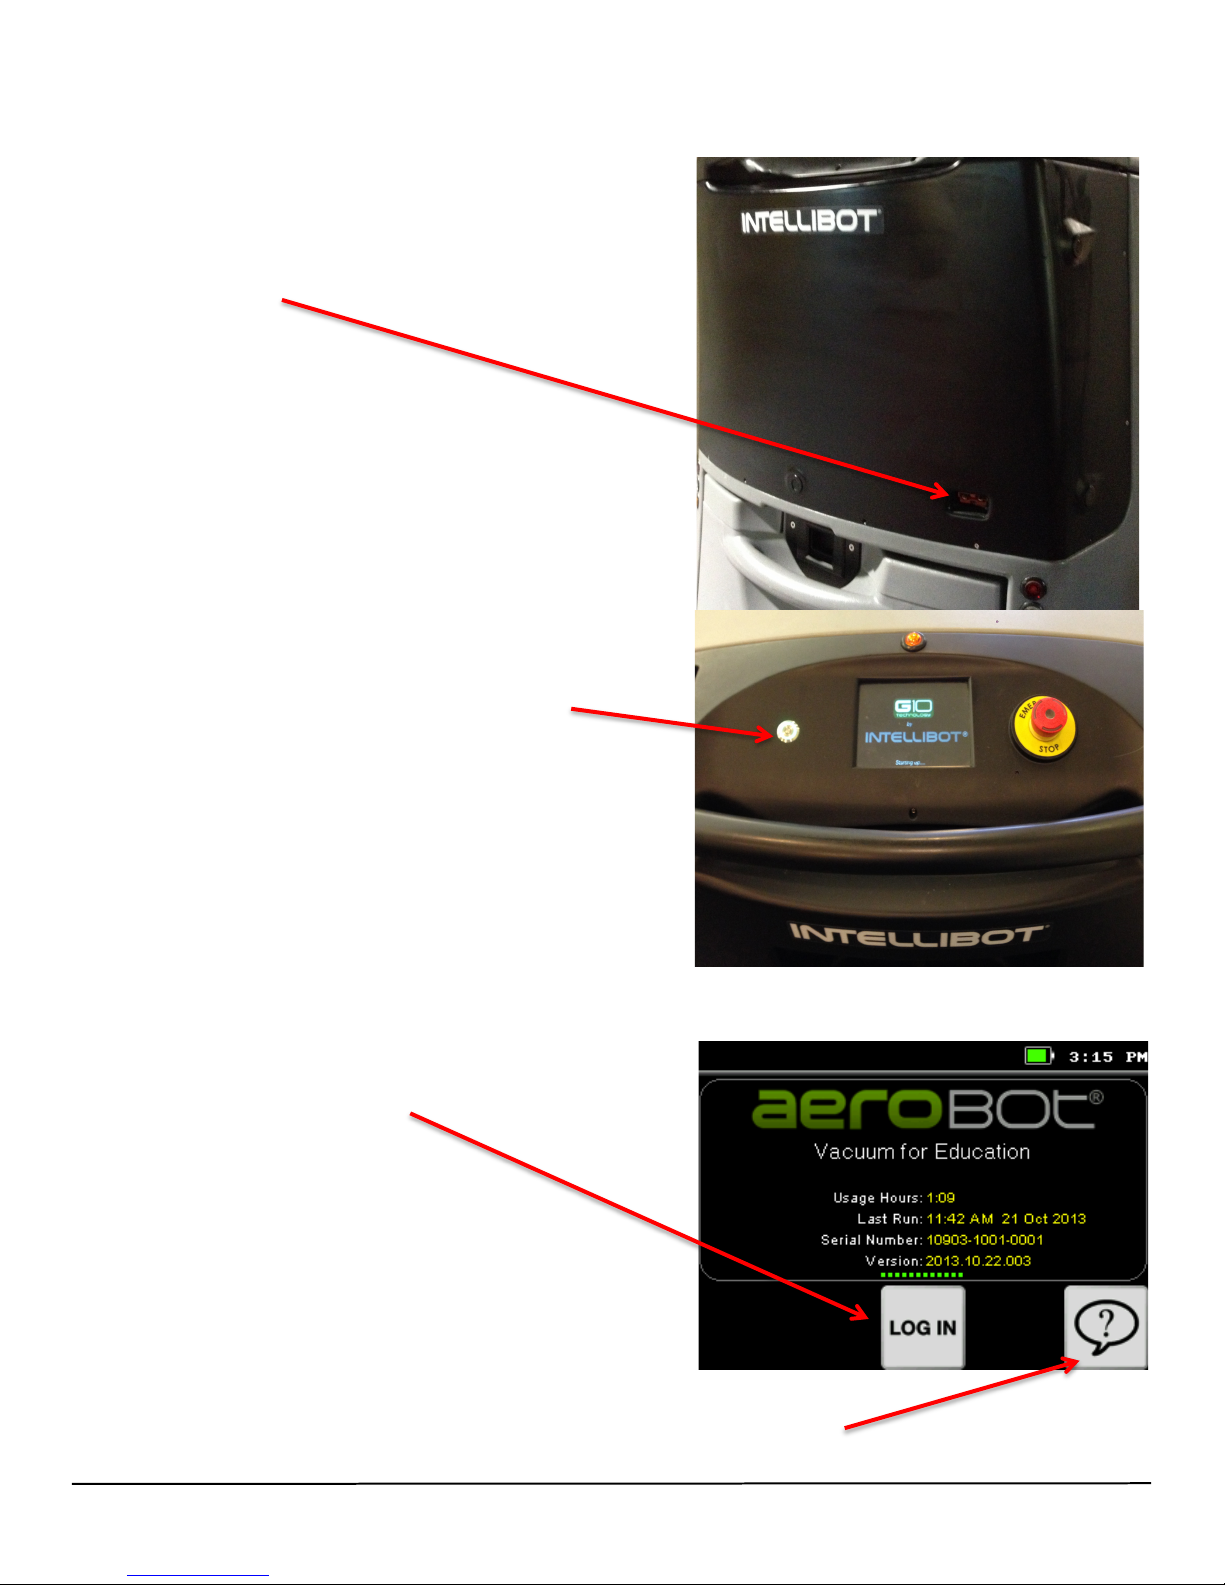
2. Press the “ON” button. Note: It takes almost two (2)
minutes for the machine to fully power up.
3. Touch the “Log In” button.
4. Help Button: For help at any time, touch this button to show Hint Bubbles, which explains what
each one does.
Page 7

Quick Reference Guide
© 2013 Intellibot Robotics, LLC All Rights Reserved v3 Page 7
5. Enter your operator code and Touch “OK”. (If your
operator code is unknown, contact your
administrator.)
Once you enter your operator code, a series of screens
will appear that will prompt you through the
preparation steps prior to cleaning.
Install filters.
Page 8

Quick Reference Guide
© 2013 Intellibot Robotics, LLC All Rights Reserved v3 Page 8
Attach canister filters.
Check tank.
Fill tank with water to prescribed line.
Add no more than 3-6 oz. of non-foaming cleaner
(e.g. neutral cleaner).
Check squeegee blades.
Page 9

Quick Reference Guide
© 2013 Intellibot Robotics, LLC All Rights Reserved v3 Page 9
Check pads.
Release parking brake.
Clear Obstacles Before Cleaning:
Make sure the area to be cleaned is as clutter-free as possible by removing all items from the area
such as garbage bags, trashcans and cleaning carts.
Cleaning Options
There are two operating modes for the DuoBot: Manual and Hands Free. Manual allows you to
control all cleaning functions including speed and water flow.
Hands Free allows you to let go while the machine cleans the area automatically.
Page 10

Quick Reference Guide
© 2013 Intellibot Robotics, LLC All Rights Reserved v3 Page 10
Manual Clean
To operate the machine in manual cleaning mode,
perform the following actions:
1. Touch the Manual Clean button on the home
screen.
2. Turn on the vacuum and squeegee by touching
the fan button.
3. Turn on the cleaning head by touching the scrub
brush button.
4. Touch the forward arrow icon until the speed bar
indicator is at the desired speed.
5. Squeeze the handle bar and maneuver the machine over the surface to be cleaned. To stop the
machine, release the handle bar.
Hands-Free Spot Clean
Spot Clean is used to clean a hallway or aisle for a specific distance (minimum of 20 feet). The
hallway/aisle must be between 5.5 feet and 60 feet wide. There must be two walls, one on the left and
one on the right, at the start of Spot Clean for it to accurately measure the width of the area to clean.
Page 11

Quick Reference Guide
© 2013 Intellibot Robotics, LLC All Rights Reserved v3 Page 11
Position the machine in the middle of the hallway/aisle and perform the following actions:
1. Touch the Spot Clean button on the Home
screen.
2. Select the distance to clean with the “+” and “-“
buttons to set the cleaning length from 20 to 200
feet.
3. 3. Touch “GO” and the machine will start
cleaning.
Page 12

Quick Reference Guide
© 2013 Intellibot Robotics, LLC All Rights Reserved v3 Page 12
Hands-Free Area Clean
Use this mode to automatically clean hallways, conference rooms and aisles, 5.5 feet to 60 feet wide.
Area Clean can clean an area with only one sidewall as a reference but works best when both a left
and right wall are present. An end wall or some other obstacle is needed to designate the end of the
cleaning area for the machine. There are nine separate cleaning patters to choose from.
Position the machine in the middle of the hallway/aisle.
1. Touch the Area Clean button on the Home screen.
The nine cleaning patterns available on the machine are show graphically on the touchscreen. Below
are the elements of a cleaning pattern.
Below is the same pattern with “Return to Start” enabled. Notice the red octagon moved to the starting
location. The gray circle shows where the cleaning finished.
Side T Right
Areas to clean
Green triangle is
the machine's
starting location
Red octagon is the
machine's ending
location
Pattern name
Page 13

Quick Reference Guide
© 2013 Intellibot Robotics, LLC All Rights Reserved v3 Page 13
Cleaning Patterns:
Single Area Single Area Return
L Left L Left Return
L Right L Right Return
T Left T Left Return
T Right T Right Return
Side T Right Side T Right Return
Side T Left Side T Left Return
Cross Left Cross Left Return
Cross Right Cross Right Return
Page 14

Quick Reference Guide
© 2013 Intellibot Robotics, LLC All Rights Reserved v3 Page 14
2. Use Left and Right arrows to choose a Hands-Free pattern.
Once you select a cleaning pattern, touch “Go.”
On the first pass (learning pass) of the first Area, the machine looks for openings that match the
Cleaning Pattern selected. Note: If the hallway does not match the pattern you selected, the machine
will only clean the first leg.
The machine will automatically stop at the end of the cleaning pattern. Optionally, by touching Return
to Start the machine will return to the starting location of the first Area when it is finished cleaning.
3. To pause the machine, touch the “ll” Pause
button.
1.
4. To resume cleaning, touch the blinking “GO.”
5. To stop cleaning, touch the “Stop.” The machine
will ask you to confirm that you want to stop
cleaning. If not, the machine will be paused and
can be resumed.
Page 15

Quick Reference Guide
© 2013 Intellibot Robotics, LLC All Rights Reserved v3 Page 15
Map clean (optional)
Map clean is created with an optional software package. Maps are created and stored on the
machine. Each map has a unique starting location. The machine must be within 2 feet of that
starting location and oriented in the proper direction for the route to run successfully.
1. Position the machine at starting point that is
associated with a specific map.
2. Choose “MAP” from the menu.
3. Select appropriate map from list.
4. Touch “Go.”
Page 16

Quick Reference Guide
© 2013 Intellibot Robotics, LLC All Rights Reserved v3 Page 16
Completing Daily Cleaning Routine
The tank should be drained, rinsed and cleaned at the end of every shift. Filters should be removed,
rinsed, and allowed to air dry. Pleated filters need to be brushed and rinsed after drying and before
re-installing in canisters. This will ensure the robot remains clean and free from bacteria.
Maneuver the robot to a location where fluids can be drained.
1. Open tank lid.
2. Locate the drain hose and position the end to where fluids can be
dumped.
3. Pull the drain valve. The dirty water should now dispense into the
drain area.
4. Rinse tank.
Using the canister wrench, remove the blue canister(s) by turning
counterclockwise. Remove filter(s). If using cotton wound filters, rinse
and allow to dry before next use. If using pleated filters, allow to dry
completely; brush filters with brush and rinse before using. Inspect
filter(s) and replace as necessary.
Important: Insure O-rings remain on the interior lip of blue
canisters.
1. Remove wire basket and clean.
2. Rinse out tank.
Page 17

Quick Reference Guide
© 2013 Intellibot Robotics, LLC All Rights Reserved v3 Page 17
Parking and Charging
1. Maneuver the machine to the charging station.
2. Power down by pressing the on/off button on the control
panel.
3. The machine must be placed on a continuous charge for
18 hours for a full charge. Only 24-volt chargers with a
gel cell setting can be used. These chargers ensure that
the batteries do not overheat. Using any other charger
will damage the machine’s batteries.
Exchanging Battery Packs
1. Set the parking brake.
WARNING: THE BATTERY PACK CONTAINS 4 BATTERIES, ALL
OF WHICH HAVE AN ACTIVE CHARGE THAT CAN CAUSE
PERSONAL INJURY. USE CAUTION WHEN HANDLING.
2. Position battery exchange cart to receive battery pack. Latch the
guide ramp into slots located above rear bumper. Lock the casters on
the Battery Exchange Cart.
WARNING: A BATTERY PACK WEIGHS 260 LBS. BE SURE
THAT THE EXCHANGE CART CASTERS ARE IN A LOCKED
POSITION TO PREVENT PERSONAL INJURY.
3. Press latch to release battery pack.
4. Using the handle, pull the battery pack onto the cart.
5. Release locking latch and casters.
6. Spin battery Cart 180 degrees, aligning new battery pack.
7. Engage latching gate and lock casters.
8. Push battery pack into place until handle latch locks.
Important!
The DuoBot should be inspected and serviced by a factory-trained and certified Intellibot service
technician every 250 hours. Call Intellibot Customer Assistance (1-888-837-0002) to schedule service.
 Loading...