

Page 1

Product version 1.21 – Manual version 01
Huddle Hub One / Huddle Hub One+
Installation Guide
Page 2

HUDDLE ROOM TECHNOLOGY SRL (“HRT”) PROVIDES THIS MANUAL “AS IS” WITHOUT WARRANTY OF ANY
KIND, EITHER EXPRESS OR IMPLIED, INCLUDING BUT NOT LIMITED TO THE IMPLIED WARRANTIES OR
CONDITIONS OF MERCHANTABILITY OR FITNESS FOR A PARTICULAR PURPOSE. IN NO EVENT SHALL HRT,
ITS DIRECTORS, OFFICIERS, EMPLOYEES OR AGENTS BE LIABLE FOR ANY INDIRECT SPECIAL, INCIDENTAL,
OR CONSEQUENTIAL DAMAGES (INCLUDING DAMAGES FOR LOSS OF PROFITS, LOSS OF BUSINESS, LOSS OF
USE OR DATA, INTERRUPTION OF BUSNESS AND THE LIKE), EVEN IF HRT HAS BEEN ADVISED OF THE
POSSIBILITYOF SUCH DAMAGES ARISING FROM ANY DEFECT OR ERROR IN THIS MANUAL OR PRODUCT.
SPECIFICATIONS AND INFORMATION CONTAINED IN THIS MANUAL ARE FURNISHED FOR INFORMATIONAL
USE ONLY AND ARE SUBJECT TO CHANGEAT ANY TIME WITHOUT NOTICE, AND SHOULD NOT BE
CONSTRUED AS A COMMITMENT BY HRT. HRT ASSUMES NO RESPONSIBILITY OR LIBILITY FOR ANY ERRORS
OR INACCURACIES THAT MAY APPEAR N THIS MANUAL, INCLUDING THE PRODUCT AND THE SOFTWARE
DESCRIBED IN IT.
Specifications are subject to change without notice.
HRT and Huddle Hub trademarks and logos are trademarks of HRT Srl. Any non-HRT products and corporate
names may or may not be registered trademarks or copyrights of their respective companies and are used for
reference purposes only without intent to infringe.
Huddle Room Technology Srl
Via Pio La Torre n.13 – Campogalliano (MO)
Italy
www.hrt.website
info@hrt.email
Copyright © 2017 HRT Srl. All right reserved.
Page 3

Page 1
Table of Contents
1 Introduction ............................................................................................................................................. 2
2 Product description ................................................................................................................................ 3
2.1 Unpack HHO / HHO+ ................................................................................................................................. 3
2.2 Front panel .................................................................................................................................................. 5
2.3 Rear panel.................................................................................................................................................... 6
3 Deployment ............................................................................................................................................. 8
Page 4

Page 2
1 Introduction
Huddle Hub™ product family is the answer to the needs of modern teamwork, which is increasingly based
on content presentation and video conference. Thanks to Huddle Hub, these activities can be performed
everywhere in your organization without the need of dedicated huddle rooms, large displays, webcams or
other devices.
In fact, Huddle Hub gives you access to a new and unprecedented collaboration mode. By using Huddle
Hub, you can make your presentations and share your documents from the screen of your PC (desktop
or laptop) directly to the screen of other devices (desktop PCs and laptops, tablets or smartphones), with
no need for a specifically equipped place. Additionally, the camera streams of your devices can be
collectively combined into a Multicam single feed to be used during videoconferences.
The result is that every place in your company / organization can be used as a Virtual Huddle Room.
The Huddle Hub solution is made of two components:
• The Huddle Hub unit, currently available in two versions: Huddle Hub One (HHO) and Huddle Hub
One+ (HHO+);
• The Huddle Hub App (HHApp), a companion software available for Windows, MacOS, iOS and
Android devices.
Given that HHO+ includes all the functionalities of HHO, when this guide refers to HHO it means HHO or
HHO+. HHO+ specific features will be highlighted with the HHO+ only marker.
This guide will help you to get install your HHO or HHO+ unit. Please refer to the Configuration Guide to
understand how to configure HHO to better suit your needs, and to the User Guide to understand how to
use the companion software.
Page 5
Page 3
2 Product description
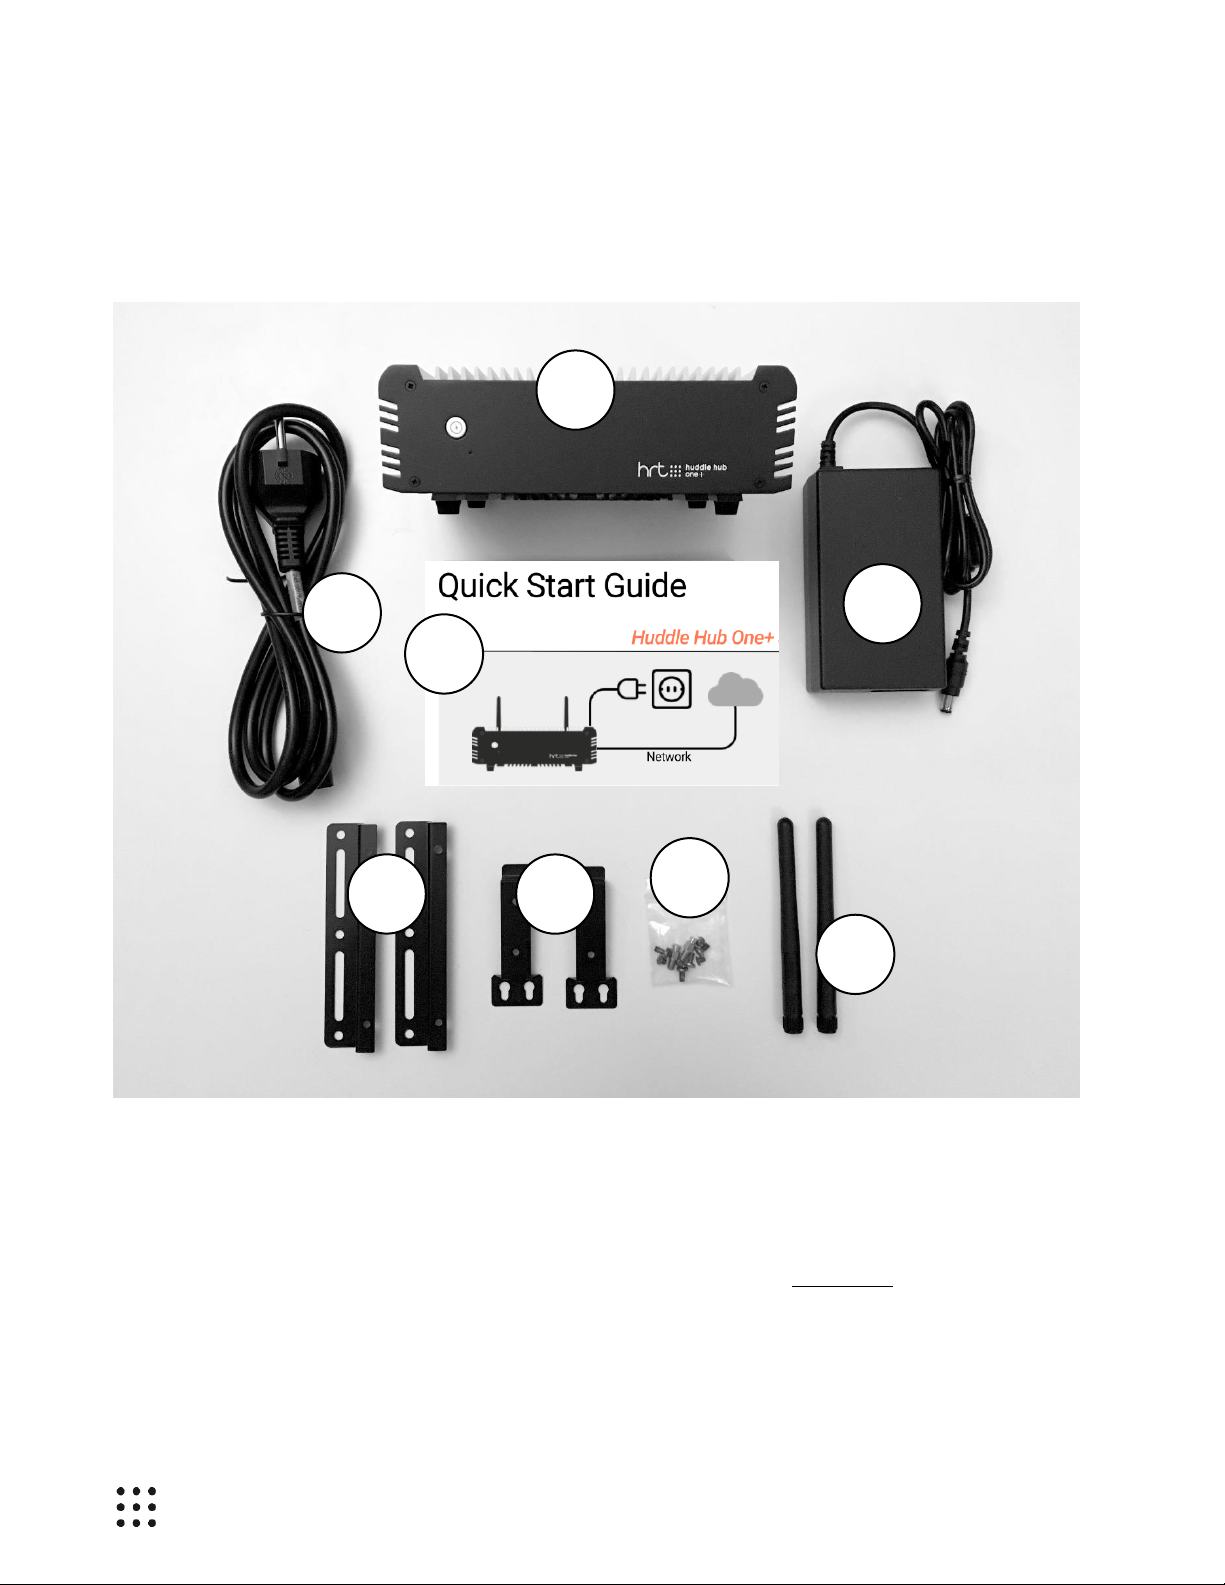
2.1 Unpacking HHO / HHO+
Huddle Hub One / Huddle Hub One+ unit
When installing HHO, please follow these important guidelines:
1 Huddle Hub One / Huddle Hub One+ unit
2 Power cord (localized)
3 AC-DC Adapter
4 Quick start guide
5 L-shape mounting kit
6 VESA mounting kit
7 Screws kit
8 Wi-Fi antennas (HHO+ only)
1
2
3
5 6 7 8 4
Page 6

Page 4
• The product should not be located in a place where it will be exposed to moisture or excessive
heat.
• Place HHO in a well-ventilated place, far from any heater or heating vent.
• Avoid direct irradiation of any strong light (such as sunlight) and keep at least 2 inches (5 cm) of
clear space around your device.
• Place HHO horizontally for optimal heat dissipation. HHO can be installed vertically with front
panel up. Vertical installations with front panel facing left or right don’t allow correct heat
dissipation and must not be used.
• Do not place this equipment on an unstable cart, stand, or table. The product may fall, causing
serious damage to it.
• Place HHO in a location where it can be connected to multiple devices as well as to a power
source.
• Make sure the cables and power cord are safely placed out of the way, so they do not create a
tripping hazard.
• Keep the product away from devices with strong electromagnetic reference, such as cordless
phones and microwaves. To access your HHO through its Ethernet interface, the unit must be
connected to the company LAN using an Ethernet cable.
Power Cord and AC-DC Adapter
The power cord is country specific.
The supplied AC-DC adapter input voltage range is 90 – 264 VAC and the output is 12V – 5A - 60W.
Warning: You are required to use the supplied AC-DC adapter only.
Quick start guide
The quick installation guide describes the installation procedure from unpacking the unit to hardware
connections and power on.
L-shape and VESA mounting kit, screws kit
The L-shape mounting kit can be used to secure the unit on walls, tables, rack cabinets, etc.
The VESA mounting kit allows to install HHO+ on TV screens or any other device which follows the VESA
mounting standard.
The screws kit contains screws for both the mounting kits.
Wi-Fi antennas
The two supplied antennas work for both 2.4 and 5GHz Wi-Fi bands. The gain is 2.0db and the impedance
is 50ohm.
Warning: You are required to use the supplied antennas only.
Page 7

Page 5
2.2 Front panel
HHO powers on automatically when connected to the wall socket. The LED power indicator on the front
panels turns from red to green.
To switch HHO off, keep the power button pressed for more than 5 seconds: the LED on the front panel
will turn from green to red.
To switch HHO on again, simply press the power button.
Warning: at the very first power-on, HHO starts the automatic firmware installation procedure. This
operation takes few minutes. After the first installation, and at every power-on or reboot, HHO
connects to the HRT software repository to check for firmware updates and automatically installs
its own latest release. For this reason, HHO may appear unresponsive for few minutes after poweron or reboot. The effective time required for the update depends on the speed of the Internet
connection. Please see the Configuration Manual if you want to disable the auto-update feature.
LED power indicator
Power button
Page 8

Page 6
2.3 Rear panel
Power supply
Plug the power cord to the AC-DC power supply and connect the power supply to the DCIN connector.
Connect the power supply to the wall socket.
Verify that the green LED on the front panel is on and solid to confirm that the hardware is connected
correctly.
Antenna (HHO+ only)
Antenna (HHO+ only)
Power supply
TV port (HHO+ only)
USB webcam port (HHO+)
Restore button
Network port
Page 9

Page 7
Network port
The network connector is a standard RJ45 and the network interface is a Gigabit Ethernet standard.
Connect HHO to the company LAN using an Ethernet cable (not supplied).
Warning: Use shielded cat 6 SSTP Ethernet cable to connect HHO to the company LAN.
Tip: HHO must be able to connect to Internet in order to download the latest release of its
software. Internet connection is also necessary if you want to connect your devices to HHO+ using
its embedded access point and want to use the multicam feed to video conference.
Restore button
This button has two functions:
• Restore: to force the system to restore the factory default configuration, press it for more than 5
seconds, while the unit is turned on. After the restore procedure the unit will restart.
• Recovery: this procedure reinstalls the original factory firmware and restores the factory default
configuration. To start recovery, turn the unit on and, within 2 seconds, press the restore button
for 15 seconds. After the recovery operation, HHO connects to the HRT software repository to
check for firmware updates and automatically installs its latest release.
USB webcam port (HHO+ only)
The USB webcam port can be connected to any standard UVC webcam (USB Video Device Class). The
USB port is a standard USB 3.0 Type-A.
TV port (HHO+ only)
The TV port output can be connected to a TV screen using a standard HDMI cable (not supplied).
Antennas (HHO+ only)
Gently hand-tight the supplied Wi-Fi antennas on the two ANT connectors. Antennas should stand
vertically, thus if you place your HHO unit on a surface, gently bend them at their hinge as shown in the
picture below:
Page 10

Page 8
3 Deployment
3.1 Usage scenarios
As explained in the Introduction, the Huddle Hub product family gives you access to a new and
unprecedented collaboration mode, called the Virtual Huddle Room. This means that you can make your
presentations and share your documents from the screen of your computer (desktop or laptop) directly
to the screen of other devices (computers, tablets or smartphones), with no need for a specifically
equipped place. Same applies to the Multicam feed feature, where the camera streams of your devices
can be combined into a single one to be used during videoconferences.
The Virtual Huddle Room concept is supported by the entire Huddle Hub family. Additionally, Huddle Hub
One+ can be used also in traditional huddle rooms, equipped with webcam and TV.
3.1.1 Virtual Huddle Room
A virtual huddle room is any place in your company where you want to benefit of HHO collaboration
facilities. In this configuration, you do not need to be close to the HHO unit, but you must be able to reach
it through your company LAN. This means that you have to respect two conditions:
1. The HHO unit must be connected to the LAN.
2. The devices you want to use with HHO must be connected to the same LAN (through an access
point).
Provided that these two conditions have been met, HHO can be placed anywhere in the company, typically
in a data center, server room or any other place under IT Manager’s control.
3.1.2 Traditional Huddle Room (HHO+ only)
HHO+ has all the features of HHO. Additionally, it can be plugged to a display and/or to an external USB
webcam.
These features make it suitable to be used in traditional A/V equipped huddle rooms, so as to send
Presenter’s screen to a TV and to include the stream of the webcam in the multicam feed.
When installed in a huddle room, you have different options to reach it with your devices:
• Connect HHO+ and its client devices to the company LAN.
• Connect HHO+ to company LAN and devices to its embedded access point.
• Mix the previous configurations, having part of the devices connect directly to HHO+ and part
through the company LAN.
Please see next section to explore the possible network topologies in detail.
Page 11

Page 9
3.2 Network topology
There are some possible network topologies allowed by HHO and especially by HHO+, described in the
following chapters.
3.2.1 Company LAN
In this configuration, HHO ③ is connected to the company LAN. The Wi-Fi devices ⑤ reach HHO through
a company access point ④.
To be used by the devices, HHO doesn’t need any Internet access. However, Internet access is necessary
to allow HHO to download its updates.
①
②
③
④ ⑤ ⑤
⑤
Wireless company LAN
Internet connection
① Internet
② Company router
③ Huddle Hub One / One+
④ Company access point
⑤ Wi-Fi devices
Wired company LAN
Page 12

Page 10
3.3 Company LAN – Clustered
This configuration is similar to the previous one, but describes the case where you have multiple HHO
units in the same LAN.
As explained in the Configuration Guide, each HHO must have a unique name.
① ② ③
④
⑤
⑤
⑤
Wireless company LAN
Internet connection
① Internet
② Company router
③ Huddle Hub One / One+
④ Company access point
⑤ Wi-Fi devices
Wired company LAN
Page 13

Page 11
3.3.1 Dedicated network (HHO+ only)
HHO+ features an on-board access point, which the Wi-Fi devices can connect to.
In this configuration HHO+ ③ is wired to the company LAN, and the devices ④ connect directly to HHO+.
To provide Internet access to the devices, HHO+ must have Internet access itself. Otherwise, presentation
will still be possible, but the devices will not be able to make a videoconference because they won’t be
able to reach the far end.
Internet access is necessary also to allow HHO to download its updates.
①
②
③
④
④
④
HHO+ wireless network
Internet connection
① Internet
② Company router
③ Huddle Hub One+
④ Wi-Fi devices
Wired company LAN
Page 14

Page 12
3.3.2 Mixed configuration (HHO+ only)
In a mixed configuration, part of the devices ⑤ reach HHO+③ via a direct connection, and another part
via the company LAN through an access point ④.
① ② ③
⑤
⑤
⑤
④
HHO+ wireless network
Internet connection
① Internet
② Company router
③ Huddle Hub One+
④ Company access point
⑤ Wi-Fi devices
Wired company LAN
Wireless company LAN
Page 15

Page 13
3.3.3 Station mode (HHO+ only)
Station mode is useful when you have no way to connect HHO+ to the company LAN with an Ethernet
cable. In this configuration, HHO+③ is connected to the company LAN via its Wi-Fi module, through an
access point ④, as the devices ⑤ do.
①
②
③
⑤ ⑤ ⑤
④
Internet connection
① Internet
② Company router
③ Huddle Hub One+
④ Company access point
⑤ Wi-Fi devices
Wired company LAN
Wireless company LAN
 Loading...