

Page 1

INT-PS82-H2 Owners Manual
Rev 190224
11675 Ridgeline Drive
Colorado Springs, CO
80921
Phone: 719-260-0061
Toll-Free: 800-530-8998
Fax: 719-260-0075
Page 2

INT-PS82-H2 Owners Manual
» Please completely read and verify you understand all instrucons in this manual before operang this equipment.
» Keep these instrucons in a safe, accessible place for future reference.
» Heed all warnings.
» Follow all instrucons.
» Do not use this apparatus near water.
» Clean only with a dry cloth.
» Do not install near any heat sources such as radiators, heat registers, stoves, or other apparatus (including ampliers)
that produce heat.
» Use only accessories specied or recommended by Intelix.
» Explanaon of graphical symbols:
◊ Lightning bolt/ash symbol: the lightning bolt/ash and arrowhead within an equilateral triangle
symbol is intended to alert the user to the presence of uninsulated “dangerous voltage” within the
product enclosure which may be of sucient magnitude to constute a risk of shock to a person or
persons.
Important Safety Instrucons
◊ Exclamaon point symbol: the exclamaon point within an equilateral triangle symbol is intended
to alert the user to the presence of important operang and maintenance (servicing) instrucons
in the literature accompanying the product.
» WARNING: TO REDUCE THE RISK OF FIRE OR ELECTRIC SHOCK, DO NOT EXPOSE THIS APPARATUS TO RAIN OR
MOISTURE AND OBJECTS FILLED WITH LIQUIDS, SUCH AS VASES, SHOULD NOT BE PLACED ON THIS APPARATUS.
» Use the mains plug to disconnect the apparatus from the mains.
» THE MAINS PLUG OF THE POWER CORD MUST REMAIN READILY ACCESSIBLE.
» Do not defeat the safety purpose polarized or grounding-type plug. A polarized plug has two blades with one wider
than the other. A grounding-type plug has two blades and a third grounding prong. The wide blade or the third prong
is provided for your safety. If the provided plug does not t into your outlet, consult an electrician for replacement of
your obsolete outlet. Cauon! To reduce the risk of electrical shock, grounding of the center pin of this plug must be
maintained.
» Protect the power cord from being walked on or pinched parcularly at the plugs, convenience receptacles, and the
point where they exit from the apparatus.
» Do not block the air venlaon openings. Only mount the equipment per Intelix’s instrucons.
» Use only with the cart, stand, table, or rack specied by Intelix or sold with the equipment. When/if a
cart is used, use cauon when moving the cart/equipment combinaon to avoid injury from p-over.
» Unplug this apparatus during lightning storms or when unused for long periods of me.
» Cauon! Shock Hazard. Do not open the unit.
» Refer to qualied service personnel. Servicing is required when the apparatus has been damaged in any way, such as
power supply cord or plug is damaged, liquid has been spilled or objects have fallen into the apparatus, the apparatus
has been exposed to rain or moisture, does not operate normally, or has been dropped.
2
Page 3

INT-PS82-H2 Installaon Guide
Table of Contents
Product Overview ��������������������������������������������������������������������������������������������������������������������������������������� 5
Product Contents ���������������������������������������������������������������������������������������������������������������������������������������� 5
Front and Rear Panels ��������������������������������������������������������������������������������������������������������������������������������� 6
Front Panel - Switcher �����������������������������������������������������������������������������������������������������������������������������������6
Rear Panel - Switcher ������������������������������������������������������������������������������������������������������������������������������������7
Front Panel - HDBaseT Receiver �������������������������������������������������������������������������������������������������������������������� 8
Rear Panel - HDBaseT Receiver ��������������������������������������������������������������������������������������������������������������������� 9
Installaon Instrucons ���������������������������������������������������������������������������������������������������������������������������� 10
Mount the Matrix ���������������������������������������������������������������������������������������������������������������������������������������10
Rack Mounng Instrucons..................................................................................................................10
Connect Sources ������������������������������������������������������������������������������������������������������������������������������������������ 10
Video Inputs .........................................................................................................................................10
HDBaseT Input ......................................................................................................................................10
Connect Displays ����������������������������������������������������������������������������������������������������������������������������������������� 11
HDMI Outputs ......................................................................................................................................11
HDBaseT Output ...................................................................................................................................11
Connect Audio (Oponal) ���������������������������������������������������������������������������������������������������������������������������� 11
Connecng Control �������������������������������������������������������������������������������������������������������������������������������������12
RS232 Port Wiring ................................................................................................................................12
Relay Port Wiring .................................................................................................................................. 12
IR Receiver Connecon IR Remote Control ..........................................................................................12
Connect Ethernet (Web Browser) Control (Oponal) ����������������������������������������������������������������������������������13
Router Connecon ...............................................................................................................................13
Crossover Cable Connecon ................................................................................................................. 13
Web Browser Control ...........................................................................................................................13
Applying Power �������������������������������������������������������������������������������������������������������������������������������������������14
HDBaseT Cabling Requirements ���������������������������������������������������������������������������������������������������������������� 14
A/V Diagram �������������������������������������������������������������������������������������������������������������������������������������������� 15
IR Remote Control ������������������������������������������������������������������������������������������������������������������������������������ 16
On Screen Display (OSD) Menu ����������������������������������������������������������������������������������������������������������������� 17
Accessing OSD Menu ����������������������������������������������������������������������������������������������������������������������������������� 17
Menu Opons ���������������������������������������������������������������������������������������������������������������������������������������������17
3
Page 4

INT-PS82-H2 Owners Manual
Web GUI Control / System Sengs ����������������������������������������������������������������������������������������������������������� 18
Switcher Control ������������������������������������������������������������������������������������������������������������������������������������������18
Connecng to Web GUI Control ...........................................................................................................18
VIDEO SWITCHING ................................................................................................................................ 19
RESOLUTION .........................................................................................................................................20
AUDIO ...................................................................................................................................................21
POC CONFIGURATION ...........................................................................................................................22
EDID MANAGEMENT ............................................................................................................................23
RELAY CONFIGURATION ........................................................................................................................ 24
CEC - SOURCE CONTROL .......................................................................................................................25
CEC - DISPLAY CONTROL ....................................................................................................................... 26
CEC - USER DEFINED ............................................................................................................................. 27
RS232 Control - PORT MODE ................................................................................................................28
RS232 CONTROL - COMMAND .............................................................................................................29
TAGS .....................................................................................................................................................30
NETWORK .............................................................................................................................................31
SECURITY ..............................................................................................................................................32
RS232 and TCP/IP Control ������������������������������������������������������������������������������������������������������������������������� 33
A/V Roung ������������������������������������������������������������������������������������������������������������������������������������������������� 33
Preset Sengs ��������������������������������������������������������������������������������������������������������������������������������������������34
Audio Control ����������������������������������������������������������������������������������������������������������������������������������������������34
Relay Control ����������������������������������������������������������������������������������������������������������������������������������������������� 38
RS232 Pass Through Commands �����������������������������������������������������������������������������������������������������������������39
System Commands ��������������������������������������������������������������������������������������������������������������������������������������41
Technical Specicaons - Switcher ������������������������������������������������������������������������������������������������������������ 42
Technical Specicaons - HDBaseT Receiver���������������������������������������������������������������������������������������������� 44
4
Page 5

INT-PS82-H2 Installaon Guide
Product Overview
The INT-PS82-H2 is an 8x2 mul-format seamless presentaon matrix switcher featuring four
HDMI, one HDBaseT, one USB-C , one DisplayPort and one VGA input as well as an HDBaseT and
two HDMI outputs, one of which is a mirrored from the HDBaseT output. The switcher supports
automac switching based on video sensing, and each output can be congured separately for auto
or manual switching. The INT-PS82-H2 provides true 4K up/down scaling up to 4K@60Hz / 4:4:4 /
8 bit deep color and both outputs can be scaled to dierent resoluons independently. The INTPS82-H2 provides external audio inputs that can be embedded in HDBaseT, HDMI and VGA video
inputs respecvely. Moreover, it provides an global, auxiliary MIX audio input that can be assigned
to any output. The switcher can de-embed digital and/or analog audio from both outputs for audio
reinforcement purposes.
The INT-PS82-H2 ships with an 18G HDMI 2.0 HDBaseT receiver capable of extending 4K signals up to
40m / 132’ or 1080p up to 70m / 232’. The INT-PS82-H2 can also tunnel RS232 and bi-direconal IR signals to and from the HDBAseT receiver. The extension system enables high data rates by ulizing visual
lossless compression at a 2:1 data compression rate when the signal surpasses 10Gbps, anything under
10Gbps will never be compressed. Supports stac HDR (HDR10) only when data rate exceeds 18Gbps,
supports dynamic HDR (HDR10+ / Dolby Vision) when data rate is 10Gbps or less.
The switchers funcons can be controlled by built in web server / GUI, IR remote, RS232, IP or by
front panel buon operaon. Two relay switches are built in for projector screen or shades control.
Product Contents
• INT-PS82-H2 8x2 HDMI 2.0 Switcher
• 70m HDBaseT 2.0 Receiver
• Quick Install Guide
• (3) 3-pin Phoenix connectors
• (7) 5-pin Phoenix connectors
• (1) 3.5mm Audio Cable (for IR cascading)
• IR Remote
• (1) IR Emier
• (1) IR Receivers
• (1) DC24V 6A power supply with US power plug
• (2) Rack mount ears with 6 mounng screws
• (4) Plasc Cushions
5
Page 6

INT-PS82-H2 Owners Manual
Front Panel - Switcher
1 2 3 4 5
Front and Rear Panels
1. POWER LED - Illuminates solid RED when switcher is in standby mode or illuminates GREEN when
device is powered ON.
2. SOURCE
• 1- HDBT - HDBaseT input selecon / Le key for On Screen Display (OSD)
• 2- HDMI - HDMI input selecon / Right key for On Screen Display (OSD)
• 3- HDMI - HDMI input selecon / Up key for On Screen Display (OSD)
• 4- HDMI - HDMI input selecon / Down key for On Screen Display (OSD)
• 5- HDMI - HDMI input selecon
• 6- VGA - VGA input selecon
• 7- DP - DisplayPort input selecon
• 8- USB C - USB-C input selecon / Enter key for On Screen Display (OSD)
• AUTO - Auto switch selector. Press this to enter / exit auto switch mode. Press and hold for 2
seconds to enable On Screen Display (OSD) menu
3. OUTPUTS
• 1- HDMI - HDMI output selector
• 2- HDBT - HDBaseT output selector
Note: To make a video route, select the desired SOURCE buon, then select the desired OUTPUT
buon. The video will switch in 2 to 3 seconds. For faster switch response, select the desired SOURCE
buon, then select the desired OUTPUT buon and then press the selected SOURCE buon again.
4. RESOLUTION - Two output video resoluon selectors. Press 1.HDMI or 2.HDBT buon repeatedly
to cycle through the available video resoluons. The output will reset once an opon is selected
5. VOLUME - Variable audio control
• Press the volume knob to toggle among MIX, HDMI OUT and HDBT OUT audio control.
• Rotate the knob to increase decrease volume of the selected audio
• Press and hold the knob at least 3 seconds to mute selected audio, rotate the knob to unmute
6
Page 7

Rear Panel - Switcher
INT-PS82-H2 Installaon Guide
3 4
1 2
1. INPUT
• 1- HDBT - RJ45 / HDBaseT Input, external 5 pin phoenix for balanced audio input
• 2- HDMI - HDMI input, external 5 pin phoenix for balanced audio input
• 3- HDMI - HDMI input, external 5 pin phoenix for balanced audio input
• 4- HDMI - HDMI input
• 5- HDMI - HDMI input
• 6- VGA - VGA with 3.5mm audio input
• 7- DP - DisplayPort input
• 8- USB C - USB-C input (supports ALT-DP video mode)
• IR - 3.5mm IR input to connect IR receiver for IR pass through
• MIX - 5 pin phoenix for global balanced audio input
2. OUTPUTS
• 1- HDMI - HDMI output
• 2- HDMI - HDMI output (mirrors HDBT output)
• 2- HDBT - HDBaseT output
• IR IN - 3.5mm IR input to connect IR receiver for IR pass through
• IR OUT - 3.5mm IR input to connect IR emier for IR pass through
3. AUDIO OUTPUT
5
• 1 - 5 pin phoenix for balanced analog audio input and one digital SPDIF audio output for
1-HDMI output audio de-embedding
• 2 - 5 pin phoenix for balanced analog audio input and one digital SPDIF audio output for
2-HDBT output audio de-embedding
4. CONTROL
• RS232 - 3 pin phoenix connector for RS232 control
• RELAY 1-2 - (2) 3 pin phoenix connectors for relay control
• IR EYE - 3.5mm IR input to connect IR receiver for local switcher control
• TCP/IP - RJ45 to control device via network / web GUI
• FIRMWARE - Type A USB port for rmware upgrade
5. DC24V- Locking power supply port
7
Page 8

INT-PS82-H2 Owners Manual
Front Panel - HDBaseT Receiver
1 2
1. MODE SWITCH
• CTRL - When placed in control mode, HDBaseT receiver will receiver RS232 pass through
commands from the switcher
• UPDATE B - Update mode for system program
• UPDATE A - Update mode for Valens program
2. POWER LED - Illuminates solid RED when power is applied
8
Page 9

Rear Panel - HDBaseT Receiver
1 2 3 4 5
INT-PS82-H2 Installaon Guide
1. DC12V- Locking power supply port
2. HDBT IN - RJ45 HDBaseT connecon. Connect Cat6 cable to HDBT output transmier of the INT-
PS82-H2
3. IR IN / IR OUT
• 3.5mm IR input port for connecon to IR receiver or IR system
• 3.5mm IR output port for connecon to IR emier
4. RS232 - 3 pin Phoenix connector port for connecng / passing RS232 control from INT-PS82-h2
5. HDMI OUT - HDMI output port for connecon to video display
9
Page 10

INT-PS82-H2 Owners Manual
Installaon Instrucons
Mount the Matrix
At least 2 inches of free air space is required on both sides of the INT-PS82-H2 for proper side venlaon. Avoid
mounng the INT-PS82-H2 near a power amplier or any other source of signicant heat.
Rack Mounng Instrucons
Aach the supplied rack ears to the sides of the INT-PS82-H2 matrix. The matrix requires one rack unit (1 RU) of
space. It is recommended that you leave an empty rack space above and below the INT-PS82-H2 for addional
cooling.
Connect Sources
Video Inputs
Connect source devices to the HDBaseT, HDMI, Display Port, USB-C or VGA inputs. When using HDMI cables for
source inputs, use a High Speed HDMI cable that is less than or equal to 1.5 meters in length for 4k60 signals and
5 meters for 1080p signals. The HDBaseT input is compable with all Intelix HDBaseT transmiers.
When connecng a source device to the USB-C input using a USB-C cable, be sure the USB-C cable is capable
of supporng video and is no longer than 2 meters (6.6’) in total length. The INT-PS82-H2 USB-C input supports
ALT-DP mode for video, to ensure a laptop is compable with the INT-PS82-H2 check the laptops capability of
supporng this mode.
Note that not all laptops with USB-C port opons will support video or more specically AT-DP video mode.
HDBaseT Input
Connect a solid core CAT6 F/UTP rated category cable to the INT-PS82-H2 HDBaseT input and a
compable Intelix HDBaseT transmier. The INT-PS82-H2 is compable will all Intelix branded HDBaseT
transmiers. Use TIA/EIA-568B wiring for Category 6 connecon between the transmier and the
INT-PS82-H2 receiver input.
Connect a source device to the HDMI input of an Intelix compable HDBaseT transmier using a High
Speed HDMI cable that is less than or equal to 1.5 meters in length for 4k60 signals and 5 meters for
1080p signals.
Note: The HDBaseT receiver input supports up to 40m/132’ for 4K@60Hz / 4:2:0 / 8 bit color signals
(up to 10Gbps) and 70m/232’ for 1080p signals using CAT6 F/UTP cable.
10
Page 11

INT-PS82-H2 Installaon Guide
Connect Displays
HDMI Outputs
Connect display devices to the HDMI 1 and 2 output using a High Speed HDMI cable that is less than or
equal to 1.5 meters in length for 4k60 signals and 5 meters for 1080p signals.
HDBaseT Output
Connect a solid core CAT6 F/UTP rated category cable to the INT-PS82-H2 HDBaseT output and
the supplied HDBaseT receiver. Use TIA/EIA-568B wiring for Category 6 connecon between the
INT-PS82-H2 and the receiver
Connect a display device to the HDMI output of the HDBaseT receiver using a High Speed HDMI cable
that is less than or equal to 1.5 meters in length for 4k60 signals and 5 meters for 1080p signals.
Note: The HDBaseT transmier supports up to 40m/132’ for 4K@60Hz / 4:4:4 / 8 bit color signals (up
to 18Gbps) and 70m/232’ for 1080p signals using CAT.6 F/UTP cable
Connect Audio (Oponal)
The INT-PS82-H2 supports stereo balanced analog audio inputs and outputs as well as digital audio outputs via
Toslink.
Connect an audio amplier to the audio output of the DL-AS61U-H2, the switcher features a le and right
balanced audio output and a digital TOSLINK output.
11
Page 12

INT-PS82-H2 Installaon Guide
Connecng Control
RS232 Port Wiring
Connect a control system to the INT-PS82-H2 via RS232 for switcher control.
INT-PS82-H2 RS232 Port
RS232 Wiring
Connect the system controller RX signal
to TX on the INT-PS82-H2 , then connect
the controllers TX signal to RX on the
INT-PS82-H2.
RS232 Sengs:
• 9600 baud
• 8 Data Bits
• 1 Stop Bit
• Parity = none
Conncected RS232 Device pins
TX G RX
RX G TX
Relay Port Wiring
For the normally open contacts (NO), connect a circuit between the NO and COM terminals of the
3-pin phoenix connector
For the normally closed contacts (NC), connect a circuit between the NC and COM terminals of the
3-pin phoenix connector
RELAY 1 / 2
I/O STATE RELAY STATE
NO NC
ON CLOSED OPEN
OFF OPEN CLOSED
IR Receiver Connecon IR Remote Control
If IR extension is required, connect the suppled IR receiver to the IR EXT port, ensuring the IR receiver
eye is placed in line of sight when using the suppled remot
12
Page 13

Connect Ethernet (Web Browser) Control (Oponal)
The INT-PS82-H2 can be controlled via Ethernet through a web browser interface.
The TCP/IP port requires a standard straight-through Category 5
or greater cable with the TIA/EIA-568B crimp paern for opmal
1 8
TIA/EIA-568B
Pin 1
Pin 2
Pin 3
Pin 4
Pin 5
Pin 6
Pin 7
Pin 8
Orange/White
Orange
Green/White
Blue
Blue/White
Green
Brown/White
Brown
operaon.
The default sengs for the TCP/IP port are:
IP address: 192.168.0.178
Connect the Ethernet cable between to the switcher and a
router with a straight-through cable or between the matrix and
a computer with a crossover cable.
INT-PS82-H2 Installaon Guide
Router Connecon
1. Congure the router to use the same IP range as the matrix, such as 192.168.0.1.
2. Connect the computer to the router.
3. Connect the INT-PS82-H2 to the router
Crossover Cable Connecon
1. Congure the computer to use the same network prex as the IP address assigned to the matrix. For
example, the IP address of the matrix is 192.168.0.178. Set the computer to use a stac IP address within
the same network range, such as 192.168.0.42.
2. Connect the network crossover cable to the computer and to the TCP/IP port on the INT-PS82-H2
Crossover Cable Pinout
1 8
Pin 1
Pin 2
Pin 3
Pin 4
Pin 5
Pin 6
Pin 7
Pin 8
TIA/EIA-568A
Green/White
Green
Orange/White
Blue
Blue/White
Orange
Brown/White
Brown
1 8
Pin 1
Pin 2
Pin 3
Pin 4
Pin 5
Pin 6
Pin 7
Pin 8
TIA/EIA-568B
Orange/White
Orange
Green/White
Blue
Blue/White
Green
Brown/White
Brown
Web Browser Control
The INT-PS82-H2 includes a web portal to allow control of the matrix via a standard web browser. The IP address
is the same address that is used for TCP/IP control.
13
Page 14

INT-PS82-H2 Installaon Guide
Applying Power
Connect the included power supply to the INT-PS82-H2 power port, connect the IEC power cord connected to
power supply to a power source.
HDBaseT Cabling Requirements
HDBaseT Cabling
To ensure proper performance of the INT-PS82-H2, it is recommended that you use solid
core, shielded Category 6 F/UTP cabling at a minimum. Category 5e F/UTP may perform
well but may not support power over HDBaseT reliably over longer distances.
When using shielded category cabling ALWAY S ...
....use shielded connectors
....properly ground the category cable
For opmized HDBaseT performance use the following Liberty Wire and Cable branded
cabling;
Category 6 plenum; 24-4P-P-L6SH
Category 6A plenum; 24-4P-P-L6ASH
Category 6 NON-plenum; 24-4P-L6SH
Category 6A NON -plenum; 24-4P-L6ASH
Twisted Pair Wiring
Use TIA/EIA-568B wiring for Category 6
connecon between send and receive
units.
14
Page 15

HDMI
VGA/A
DP
CAT
AUDIO
RS232
IR
USB
RELAY
Audio
Mixer
A/V Diagram
Control System
Audio
Amp
INT-PS82-H2 Installaon Guide
Web GUI
Control
IR Remote
Intelix
Transmi�er
(not included)
Laptop
(HDMI)
up to 70m / 232’
HDMI
Source
Legacy
PC
Laptop
(DP)
Display
up to 70m / 232’
INT-PS82-H2
Receiver
Projector
Laptop
(USB-C)
Projector Screen
15
Page 16

INT-PS82-H2 Installaon Guide
IR Remote Control
1. Video Source Selecon
2. Output Selecon
3. Auto Switch Mode
• Press AUTO to enable automac switching mode, and
then select output channel
4. Video Blackout
• Press BLACK, and then select output channel to make it
output black screen
5. On Screen Display (OSD) Menu
6. Navigaon buons: OK, UP, DWON, LEFT and RIGHT for
OSD menu.
7. Return to the previous OSD menu.
8. MIX input audio control: Mute, Volume Down and Volume
Up.
9. HDMI output audio control: Mute, Volume Down and
Volume Up.
10. HDBT output audio control: Mute, Volume Down and
Volume Up.
16
Page 17

INT-PS82-H2 Installaon Guide
On Screen Display (OSD) Menu
Accessing OSD Menu
The OSD menu will allow you to set audio, video and other system sengs by either using the front
panel buons on the switcher or by the supplied IR remote. There are two ways to access the OSD
controls on the INT-PS82-H2.
1) Press and hold the MENU/2S (AUTO) buon on the front panel of the INT-PS82-H2 for 2 seconds
2) Press the MENU buon on the IR remote
To control direcon and selecon of menu opons, use either the front panel buons or IR remote to conrm
selecons.
Menu Opons
There are 5 menu opons in the OSD menu;
PICTURE: Picture mode, color temperature and aspect rao sengs for outputs
SOUND: Volume and mute sengs control for the outputs
OPTION: Output resoluon sengs, allows HDCP to be turned either ON or OFF for output support
SYSTEM: Allows for factory reset to be iniated
INFO: Displays current output resoluon, sofware (SW) version and current IP address sengs.
Navigate to a desired menu / submenu opon to change or adjust sengs using the front panel buons
or using the IR remote. Press ENTER on the front panel buons or the OK buon on the IR remote for
sengs to take place.
NOTE: When turning OFF HDCP support in the OPTION menu, encrypted HDCP content will not pass.
17
Page 18

INT-PS82-H2 Installaon Guide
Web GUI Control / System Sengs
Switcher Control
Connecng to Web GUI Control
Network a PC computer and the INT-PS82-H2 then open a web browser and type in IP address of the
INT-PS82-H2. The default IP address is 192.168.0.178. Be sure the computer you are using to connect
to the INT-PS82-H2 is in the same IP range to access the web GUI / server.
The login screen will appear. The default user name and password is admin
18
Page 19

INT-PS82-H2 Installaon Guide
VIDEO SWITCHING
The Video menu allows you to route A/V signals to the HDMI and HDBaseT output of the switcher, enable
/ disable auto switching mode for each output and save and recall video switching presets. By default the
INT-PS82-H2 is set to auto switching mode.
To switch the video route for either HDMI and HDBT outputs, check the 1-8 buons corresponding to the
desired input, only one input can be selected at one me for each output.
To enable / disable auto switching mode, check the AUTO buon.
To save or recall video presets, click the desired preset buon and click SAVE or RECALL.
19
Page 20

INT-PS82-H2 Installaon Guide
RESOLUTION
The Resoluon menu allows you to set the scaled output of each output channel.
To adjust the scaled output of each output, select the desired resoluon under HDMI OUTPUT or HDBT OUTPUT
then click CONFIRM. When using the AUTO selecon, the scaled output will match the connected displays nave
resoluon.
20
Page 21

AUDIO
The AUDIO menu allows you adjust input and output audio opons.
INT-PS82-H2 Installaon Guide
1. HDBT Embedded - Enabling this opon embeds the 5 pin stereo balanced audio input as the embedded
audio input for the HDBT input
2. HDMI Embedded - Enabling this opon embeds the 5 pin stereo balanced audio input as the embedded
audio input for the HDMI input (input #2)
3. HDMI Embedded - Enabling this opon embeds the 5 pin stereo balanced audio input as the embedded
audio input for the HDMI input (input #3)
MIX: Global MIX input volume / mute control
HDMI Output: Select MIX input audio to route to HDMI output audio, and then control the global output
audio by volume bar / buons.
HDBT Output: Select MIX input audio to route to HDMI output audio, and then control the global output
audio by volume bar / buons.
21
Page 22

INT-PS82-H2 Installaon Guide
POC CONFIGURATION
The POC CONFIGURATION menu allows you to control the HDBaseT output and input PoC power opons.
Navigate to the CONFIGURATION menu, then click PoC. To turn the PoC power opon ON or OFF for either HDBT
input or output, check the ON or OFF buon and then click CONFIRM.
22
Page 23

INT-PS82-H2 Installaon Guide
EDID MANAGEMENT
EDID can be set for each input using the CONFIGURATION menu.
Navigate to the CONFIGURATION menu, then click EDID. To adjust an inputs EDID opon, click on the desired
input channel then click on the desired resoluon, then click CONFIRM.
When uploading a USER DEFINED EDID opon, click the open eld to locate the .bin EDID le on your local
computer, then click APPLY.
23
Page 24

INT-PS82-H2 Installaon Guide
RELAY CONFIGURATION
Latching or momentary relay modes can be programmed using the CONFIGURATION > RELAY menu.
To adjust RELAY 1 or RELAY 2, navigate to the CONFIGURATION menu, them click on the RELAY opon. Choose
either MOMENTARY or LATCHING more for each relay. When choosing the MOMENTARY opon, dene how
long the relay will stay open/closed.
24
Page 25

INT-PS82-H2 Installaon Guide
CEC - SOURCE CONTROL
The CEC menu allows you to control a CEC compable source via HDMI or HDBaseT.
Navigate to the CEC menu, then choose the SOURCE submenu. Choose a source, then choose a funcon to
control the selected source.
NOTE: The CEC compable source must be CEC enabled in the sources systems sengs. Not all funcons may
be supported by source manufacturer.
25
Page 26

INT-PS82-H2 Installaon Guide
CEC - DISPLAY CONTROL
The CEC menu allows you to control a CEC compable display via HDMI or HDBaseT.
Navigate to the CEC menu, then choose the DISPLAY submenu. Choose a display opon (HDBT or HDMI), then
choose a funcon to control the selected display.
NOTE: The CEC compable display must be CEC enabled in the displays systems sengs. Not all funcons may
be supported by display manufacturer.
26
Page 27

INT-PS82-H2 Installaon Guide
CEC - USER DEFINED
The CEC menu allows you to control a CEC compable source or display via HDMI or HDBaseT using known CEC
commands.
Navigate to the CEC menu, then choose the USER DEFINED submenu. Choose a source or display opon, then
user the TRIGGER 1 and TRIGGER 2 elds to enter the known CEC commands, click the SEND buon to iniate
the commands.
NOTE: The CEC compable source or display must be CEC enabled in the source or displays systems seng. Not
all funcons may be supported by source and display manufacturer. To nd the CEC commands for a source or
display contact the source or display manufacturer.
27
Page 28

INT-PS82-H2 Installaon Guide
RS232 Control - PORT MODE
The RS232 > Port Mode menu allows you to establish how RS232 control is congured.
Navigate to the RS232 menu, then choose the PORT MODE submenu.
HDBT Transmier Pass Through: Establishes RS232 pass-through communicaon between the INT-PS82-H2
and the HDBaseT transmier. In this mode the RS232 port of the INT-PS82-H2 will be used to transfer commands
to control third-party devices connected to the HDBaseT transmiers RS232 port.
HDBT Receiver Pass Through: Establishes RS232 pass-through communicaon between the INT-PS82-H2 and
the HDBaseT receiver. In this mode the RS232 port of the INT-PS82-H2 will be used to transfer commands to
control third-party devices connected to the HDBaseT receivers RS232 port.
Local Control: In this mode the RS232 port of the switcher will be used to connect a control device (3rd party
control system) to control the INT-PS82-H2.
28
Page 29

INT-PS82-H2 Installaon Guide
RS232 CONTROL - COMMAND
The RS232 > Command menu allows you to issue RS232 commands to 3rd party devices
Navigate to the RS232 menu, then choose the COMMAND submenu.
Select Local, HDBT In or HDBT Out control mode.
Local: Sends RS232 commands to control a local 3rd party device connected to the RS232 port of the
INT-PS82-H2.
HDBT In: Sends RS232 commands to control the 3rd party device connected to the RS232 port of the
INT-PS82-H2.of the HDBaseT transmier.
HDBT Out: Sends RS232 commands to control the 3rd party device connected to the RS232 port of the
INT-PS82-H2.of the HDBaseT receiver.
Select HEX or ASCII format�
Select Baud Rate: Supports 2400, 4800, 9600, 19200, 38400, 57600 or 115200.
Select Command Ending: NULL, CR, LF or CR+LF can be chosen.
Command: Type command in this eld to control the third-party device.
Trigger On: Type Power On command in this eld to turn ON the third-party device.
Trigger O: Type Power O command in this eld to turn OFF the third-party device.
29
Page 30

INT-PS82-H2 Installaon Guide
TAG S
The Tags menu allows you to set user dened names for inputs and presets that will be displayed on the VIDEO
tab for easy system control
Navigate to the Tags menu, enter in the desired names for the INPUTS and PRESET secons, then click CONFIRM.
30
Page 31

INT-PS82-H2 Installaon Guide
NETWORK
The Network menu allows you to set the network sengs for the device.
Navigate to the Network menu, select either DHCP or STATIC IP as the desired IP mode. If choosing DHCP, make
sure the INT-PS82-H2 is connected to a router / network switch with DHCP server support. When choosing the
STATIC IP opon, manually enter in the desired IP ADDRESS, SUBNET MASK and GATEWAY informaon, then click
CONFIRM for changes to take place. Depending on the newly given IP address range you may need to adjust
your computers IP address sengs to log back into the web GUI server for the INT-PS82-H2
31
Page 32

INT-PS82-H2 Installaon Guide
SECURITY
The Security menu allows you to set the admin password to a user dened password as well as lock or unlock
the front panel buons of the INT-PS82-H2
Navigate to the Security menu, enter in a user dened password in the password eld, then click CONFIRM. To
lock or unlock the front panel buons simple check the ON or OFF opon.
32
Page 33

INT-PS82-H2 Installaon Guide
RS232 and TCP/IP Control
RS232 Sengs: 9600 baud, 8 Data bits, 1 Stop bit, Parity = None
TCP/IP Sengs: User dened IP address (default IP address:192.168.0.178), port 4001
There are no spaces between any of the characters in the command string. The commands are case sensive.
Note: In order to use the switching commands below, the switcher must be in manual switching mode only.
System will not respond to switching commands in auto switching mode.
A/V Roung
Descripon Command Examples
Switch input (1-8) to ALL outputs
{I}All.
Command:
8All.
Switch input (1-8) to output (1-2)
Note: output 1 = HDMI, 2 = HDBT
Turn OFF all outputs
Turn ON all outputs
Turn OFF output (1-2)
Turn ON output (1-2)
{I} = 1-8
{I}B{O}.
{I} = 1-8
{O} = 1-2
All$.
All@.
{O}$.
{O} = 1-2
{O}@.
Response:
08 to All.
Command:
2B1.
Response:
AV:02->01
Command:
All$.
Response:
All Closed.
Command:
All@.
Response:
All Open.
Command:
1$.
Response:
1 Closed.
Command:
1@.
Query roung status of outputs (1-2)
Query connecon status of all inputs
Y = source connected
N = no source connected
{O} = 1-2
Status.
%9971.
Response:
1 Open.
Command:
Status.
Response:
AV: 7->1 8->2
Response:
IN 01 02 03 04
CONNECT Y Y N N
IN 05 06 07 08
CONNECT Y Y N N
33
Page 34

INT-PS82-H2 Installaon Guide
Preset Sengs
Descripon Command Examples
Save current AV roung status to
presets 0-9
Save{P}.
{P} = 0-9
Command:
Save1.
Response:
Save to F1
Recall AV roung presets (0-9)
Clear AV roung presets (0-9)
Recall{P}.
{P} = 0-9
Clear{P}.
{P} = 0-9
Command:
Recall1.
Response:
Recall From F1
AV:07->01
AV:08->02
Out 1 2
In 7 8
Command:
Clear1.
Response:
Clear F1
Audio Control
Descripon Command Examples
Select external balanced audio
input for inputs 1-3
Embedded:{I}.
{I} = 1-3
Command:
Embedded:1.
Response:
HDBT1 Embedded
Select internal source audio
input for inputs 1-3
Output audio is mixed with the
global MIX audio input
Output audio is unmixed with
the global MIX audio input
34
UnEmbedded:{I}.
{I} = 1-3
MIXOUT:{O}.
{I} = 1-2
UnMIXOUT:{O}.
{I} = 1-2
Command:
UnEmbedded:1.
Response:
HDBT1 UnEmbedded
Command:
MIXOUT:1.
Response:
HDMI1 OUT MIX
Command:
UnMIXOUT:1.
Response:
HDMI1 OUT UnMIX
Page 35

Audio Control - Connued
Descripon Command Examples
Set HDMI 1 output volume at a
specic value
SetHDMIVol:{vl}.
{vl} = 00-60
Command:
SetHDMIVol:30.
Response:
Volume of HDMI: 30
INT-PS82-H2 Installaon Guide
Increase HDMI 1 output volume by
1 value
Decrease HDMI 1 output volume
by 1 value
Mute HDMI 1 output audio
Unmute HDMI 1 output audio
HDMIVolume+.
HDMIVolume-.
HDMIMute.
HDMIUnmute.
Command:
HDMIVolume+.
Response:
Volume of HDMI: 31
Command:
HDMIVolume+.
Response:
Volume of HDMI: 29
Command:
HDMIMute.
Response:
HDMI Mute
Command:
HDMIUnmute.
Response:
HDMI Unmute
35
Page 36

INT-PS82-H2 Installaon Guide
Audio Control - Connued
Descripon Command Examples
Set HDBT 2 / HDMI 2 output
volume at a specic value
SetHDBTVol:{vl}.
{vl} = 00-60
Command:
SetHDBTVol:30.
Response:
Volume of HDBT: 30
Increase HDBT 2 / HDMI 2output
volume by 1 value
Decrease HDBT 2 / HDMI 2 output
volume by 1 value
Mute HDBT 2 / HDMI 2 output
audio
Unmute HDBT 2 / HDMI 2 output
audio
HDBTVolume+.
HDBTVolume-.
HDBTMute.
HDBTUnmute.
Command:
HDBTVolume+.
Response:
Volume of HDBT: 31
Command:
HDBTVolume+.
Response:
Volume of HDBT: 29
Command:
HDBTMute.
Response:
HDBT Mute
Command:
HDMIUnmute.
Response:
HDBT Unmute
36
Page 37

Audio Control - Connued
Descripon Command Examples
Set global MIX input volume at a
specic value
SetMIXVol:{vl}.
{vl} = 00-60
Command:
SetMIXVol:30.
Response:
Volume of MIX: 30
INT-PS82-H2 Installaon Guide
Increase global MIX input volume
by 1 value
Decrease global MIX input volume
by 1 value
Mute global MIX input volume
audio
Unmute global MIX input volume
audio
Query current audio mute status
MIXVolume+.
MIXVolume-.
MIXMute.
MIXUnmute.
%9941.
Command:
MIXVolume+.
Response:
Volume of MIX: 31
Command:
MIXVolume+.
Response:
Volume of MIX: 29
Command:
MIXMute.
Response:
MIX Mute
Command:
MIXUnmute.
Response:
MIX Unmute
Command:
%9941.
Query current audio volume values
Query current audio input status
for inputs 1-3
%9942.
%9943.
Response:
HDBT Unmute.
HDMI Mute.
MIX Mute.
Command:
%9942.
Response:
Volume of HDBT: 10.
Volume of HDMI: 15.
Volume of MIX: 25.
Command:
%9943.
Response:
HDBT1 UnEmbedded.
HDMI2 UnEmbedded.
HDMI3 UnEmbedded.
37
Page 38

INT-PS82-H2 Installaon Guide
Relay Control
Descripon Command Examples
Turn Relay 1 or 2 ON
RelayON{R}.
Command:
RelayON1.
Turn Relay 1 or 2 OFF
Turn Relay 1 or 2 ON
momentarily
{R} = 1-2
RelayOFF{R}.
{R} = 1-2
RelayAutomationCtl:{R},{T}0.
{R} = 1-2
{T} = 0-20
Response:
Relay 1 ON
Command:
RelayOFF1.
Response:
Relay 1 OFF
Command:
RelayAutomationCtl:1,30.
Response:
Relay 1 TURN ON, DELAY
3.0 SECONDS TURN OFF
38
Page 39

INT-PS82-H2 Installaon Guide
RS232 Pass Through Commands
Descripon Command Examples
Pass through command - ASCII
/+{R}/{B}:{XX}.
{R}(RS232 PORT) = 1-3
1 = INT-PS82-H2 RS232 port
2 = HDBASET Receiver RS232 port
3 = HDBASET Transmitter RS232
port
{B}(BAUD RATE) = 1-7
1 = 2400
2 = 4800
3 = 9600
4 = 19200
5 = 38400
6 = 57600
7 = 115200
Command:
/+2/3:POWERON
Response:
NO RESPONSE
Sends the ASCII
formatted command
POWERON through the
RS232 of the HDBT
receiver at 9600bps
baud rate
{XX} = ASCII COMMAND
39
Page 40

INT-PS82-H2 Installaon Guide
RS232 Pass Through Commands - Connued
Descripon Command Examples
Pass through command - HEX
/#{R}/{B}:{XX XX XX}.
{R}(RS232 PORT) = 1-3
1 = INT-PS82-H2 RS232 port
2 = HDBASET Receiver RS232 port
3 = HDBASET Transmitter RS232
port
{B}(BAUD RATE) = 1-7
1 = 2400
2 = 4800
3 = 9600
4 = 19200
5 = 38400
6 = 57600
7 = 115200
Command:
/#2/3:A1 A2 A3
Response:
NO RESPONSE
Sends the HEX
formatted command
A1 A2 A3 through the
RS232 of the HDBT
receiver at 9600bps
baud rate
{XX XX XX} = HEX COMMAND
40
Page 41

System Commands
Descripon Command Examples
Turns switcher ON
PWON. Command:
PWON.
Response:
PWON
INT-PS82-H2 Installaon Guide
Turns switcher OFF
Iniates standby mode,
iniate any command to wake
up
Query power status
Front panel buon LOCK
Front panel buon UNLOCK
PWOFF. Command:
PWOFF.
Response:
PWOFF.
STANDBY. Command:
STANDBY.
Response:
STANDBY
%9962. Command:
%9962.
Response:
PWON / PWOFF / STANDBY
/%Lock; Command:
/%Lock;
Response:
System Locked!
/%Unlock; Command:
/%Unlock;
Query lock status
Query rmware version
Restores the matrix to factory
defaults
Response:
System Unlocked!
%9961. Command:
%9961.
Response:
System Unlock / Lock
/^Version; Command:
/^Version;
Response:
V1.0.4
%0911. Command:
%0911.
Response:
FACTORY DEFAULT!
41
Page 42

INT-PS82-H2 Installaon Guide
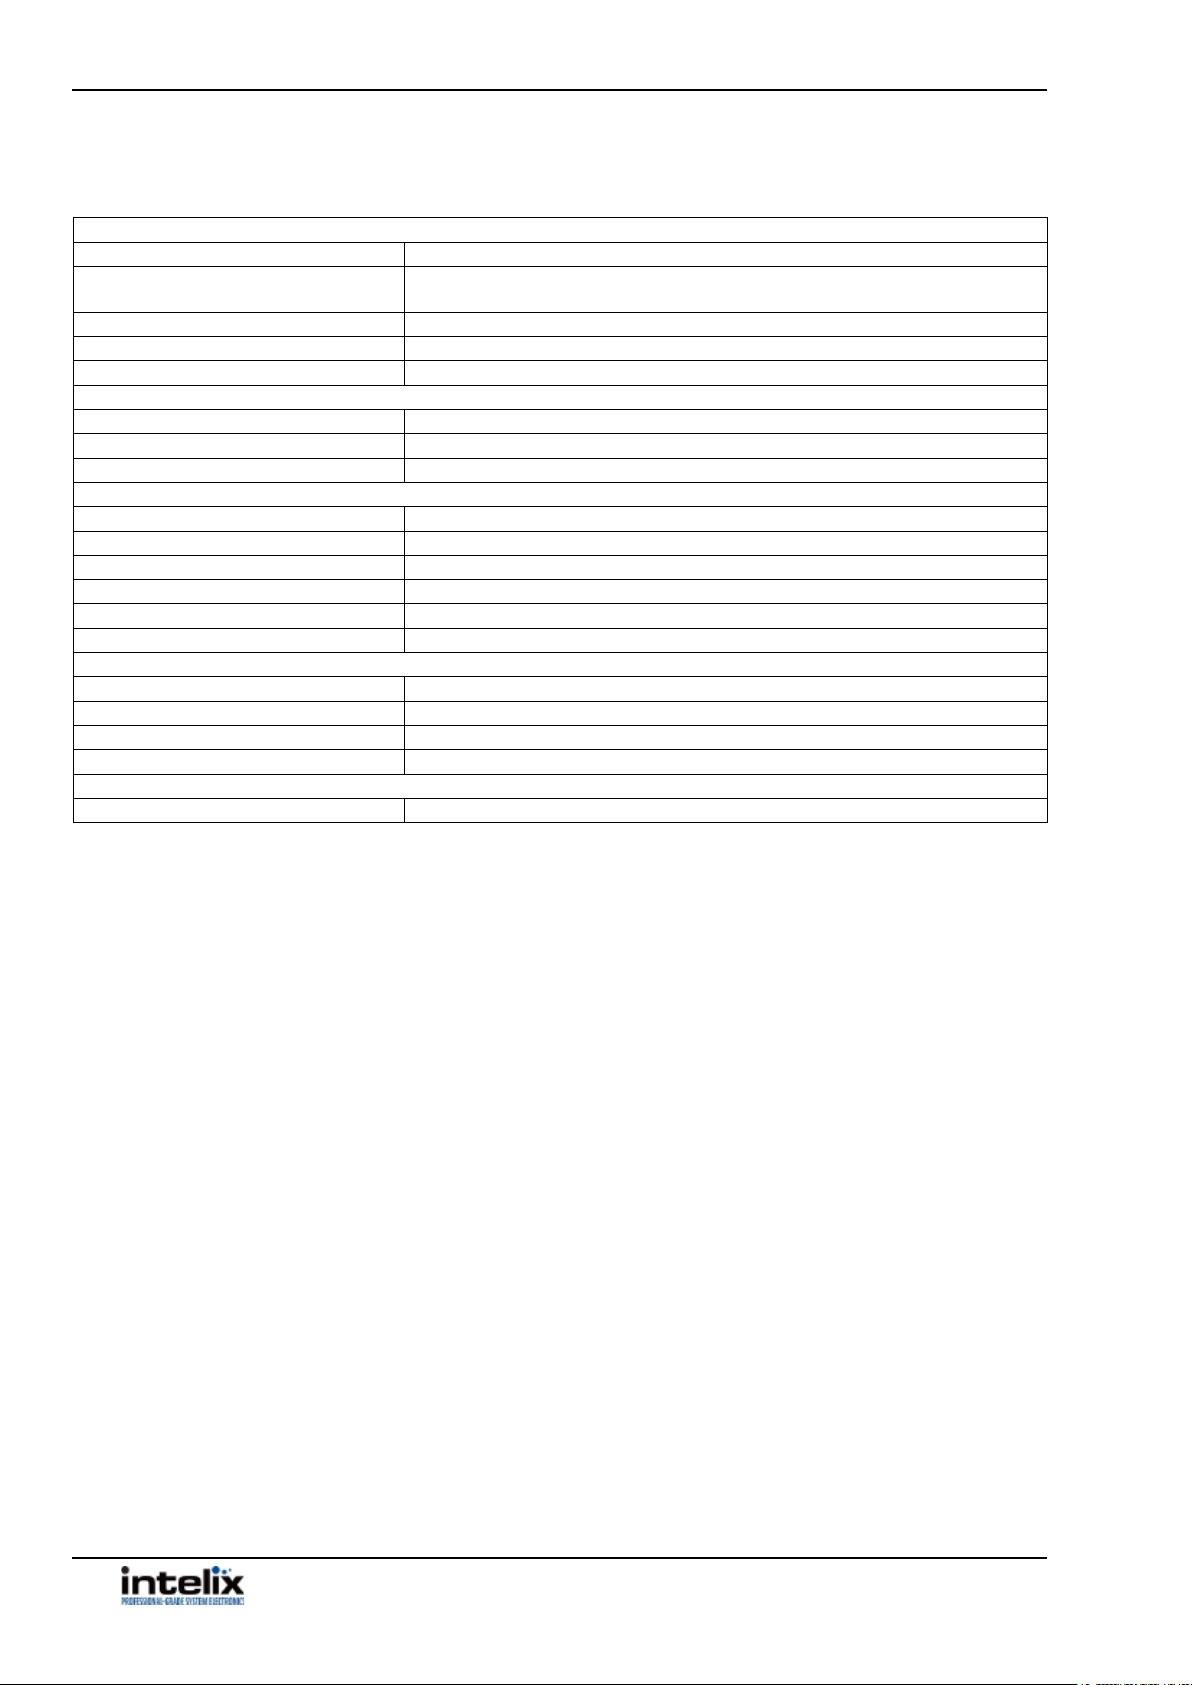
Technical Specicaons - Switcher
Video
Video Inputs (1) HDBaseT, (4) HDMI, (1) DisplayPort, (1) VGA, (1) USB-C
Video Input Connectors (1) RJ45 (HDBaseT), (4) HDMI Type A Female, (1) USB-C , (1) DisplayPort, (1) 15-pin VGA
Input video Signal HDMI for HDMI input, ALT-DP Mode for USB-C 3.0, DP Version 1.2 for
DisplayPort input
HDBaseT Input Resoluon Support Up to 4Kx2K@60Hz 4:2:0 / 8 bit deep color (10.2Gbps)
HDMI Input Resoluon Support Up to 4Kx2K@60Hz 4:4:4 / 8 bit deep color
USB C Input Resoluon Support Up to 4Kx2K@30Hz 4:4:4 / 8 bit deep color
DisplayPort Input Resoluon Support Up to 4Kx2K@60Hz 4:4:4 / 8 bit deep color
VGA Input Resoluon Support Up to 1920x1200 (50/60Hz)
Video Output (2) HDMI, (1) HDBaseT
Video Output Connector (2) Type-A Female HDMI, (1) RJ45
Output Resoluon Support Up to 3840 x 2160 @60Hz / 4:4:4 / 8 bit deep color
Standards HDMI 2.0, HDCP 2.2 and CEC
Bandwidth HDBaseT Input (Receiver): 10.2Gbps
All other inputs / outputs: 18Gbps
24V DC Power One (1) Locking Barrel (5.5 mm OD, 2.1 mm ID)
Audio Input
Audio Input (1) External balanced audio (L+R) for 1-HDBT input port
(1) External balanced audio (L+R) for 2-HDMI input port
(1) External balanced audio (L+R) for 3-HDMI input port
(1) Stereo auxiliary audio for 6-VGA input port
(1) Balanced MIX audio
Audio Input Connector (4) 5-pin terminal blocks (1) 3.5mm jack
Frequency Response 20Hz – 20KHz, ±3dB
Max Input Level 2.0Vrms ± 0.5dB. 2V = 16dB headroom above - 10dBV (316mV) nominal consumer line
level signal.
Input Impedance >10KΩ
Audio Output
Audio Output (1) Balanced audio (L+R) for 1-HDMI output audio de-embedding
(1) Digital SPDIF audio (L+R) for 1-HDMI output audio de-embedding
(1) Balanced audio (L+R) for 2-HDBT output audio de-embedding
(1) Digital SPDIF audio (L+R) for 2-HDBT output audio de-embedding
Audio Output Connector (2) 5-pin terminal blocks (2) Toslink connectors
Frequency Response 20Hz – 20KHz, ±3dB
Max Input Level 2.0Vrms ± 0.5dB. 2V = 16dB headroom above -10dBV (316mV) nominal consumer line
level signal
Output Impedance 70Ω
42
Page 43

INT-PS82-H2 Installaon Guide
Technical Specicaons - Switcher
Control
Control Ports (1) RS232, (2) Relay 1-2, (1) IR Eye, (2) IR IN, (1) IR OUT, (1) TCP/IP, (1) Firmware
Control Connectors (3) 3-pin terminal blocks, (4) 3.5mm jacks, (1) RJ45, (1) Type-A USB
IR Carrier Frequency Range 33-55kHz at 5 volts
HDBaseT Signal Characteriscs
Maximum Distance HDBaseT Input (Receiver): 70 m (up to 1080p) , 40 m (up to 4K@60Hz / 4:2:0 / 8 bit
deep color)
HDBaseT Output (Transmier): 70 m (up to 1080p) , 40 m (up to 4K@60Hz / 4:4:4 / 8
bit deep color)
Cable Requirements Solid core shielded Category 6 F/UTP cable or greater with TIA/EIA-568B crimp paern
Bandwidth HDBaseT Input (Receiver): 10.2Gbps
HDBaseT Output (Transmier): 18Gbps
Chassis and Environmental
Dimensions (WxHxD) 436 mm x 44 mm x 356.5 mm (17 in x 1.7 in x 14 in) – 1RU
Shipping Weight 2.87kg (6.3 lbs.)
Operang Temperature 0° to +55° C (+32° to +131° F)
Operang Humidity 10% to 90%, Non-condensing
Storage Temperature -20° to +70° C (+14° to +158° F)
Storage Humidity 10% to 90%, Non-condensing
Power, ESD, and Regulatory
Power Supply Input 100V-240VAC / 50-60 Hz
Power Supply Output 24VDC / 6A
Power Consumpon 85 was (max)
ESD Protecon 15kV
Product Regulatory FCC, CE, RoHS
Power Supply Regulatory CE, RoHS
Other
Standard Warranty 5 years
Included Accessories Quick Install Guide, (3) 3-pin Phoenix connectors, (7) 5-pin Phoenix connectors, (1)
3.5mm Audio Cable (for IR cascading), IR Remote, (1) IR Emier, (1) IR Receivers, (1)
DC24V 6A power supply with US power plug, (2) Rack mount ears with 6 mounng
screws, (4) Plasc Cushions
Compable Transmiers INT-HD70-TXWP, INT-HD70-TX, AS-1H1V, AS-1H1V-WP-W., AS-2H, AS-2H-WP-W, INT-
HD52
Distances and picture quality may be aected by cable grade, cable quality, source and desnaon equipment, RF and electrical interference, and cable
patches.
43
Page 44
INT-PS82-H2 Installaon Guide
Technical Specicaons - HDBaseT Receiver
Supported Audio and Video
Video Compliance HDMI 2.0a, HDCP 2.2, CEC
Output Resoluon Support SMPTE: Up to 4096x2160@60Hz (4:4:4 chroma sub-sampling / 8 bit deep color)
VESA: Up to 1920x1200
Embedded Audio 2 Channel Stereo
IR Carrier Frequency Range 33-55kHz at 5 volts
RS232 Baud Rate up to 115200
HDBaseT Signal Characteriscs
Maximum Distance 70 m (up to 1080p) , 40 m (up to 4K@60Hz / 4:2:0 / 8 bit deep color)
Cable Requirements Solid core shielded Category 6 F/UTP cable or greater with TIA/EIA-568B crimp paern
Bandwidth 18Gbps
Chassis and Environmental
Dimensions (WxHxD) 115 mm x 16 mm x 84 mm (4.5 in x .6 in x 3.3 in)
Shipping Weight 153g (.3 lbs.)
Operang Temperature 0° to +40° C (+32° to +104° F)
Operang Humidity 10% to 90%, Non-condensing
Storage Temperature -10° to +50° C (+14° to +122° F)
Storage Humidity 10% to 90%, Non-condensing
Power, ESD, and Regulatory
Power Consumpon 14 was (max)
ESD Protecon 15kV
Product Regulatory FCC, CE, RoHS
Power Supply Regulatory CE, RoHS
Other
Standard Warranty 5 years
Distances and picture quality may be aected by cable grade, cable quality, source and desnaon equipment, RF and electrical interference, and cable
patches.
44
Page 45

Thank you for your purchase.
For Technical Support please call our toll
free number at 800-530-8998 or email us at
supportlibav@libav.com
www.libav.com
Digitalinx is a brand of:
 Loading...