

Page 1

DL-S41-H2 Owners Manual
Rev 180718
11675 Ridgeline Drive
Colorado Springs, CO
80918
Phone: 719-260-0061
Toll-Free: 800-530-8998
Fax: 719-260-0075
Page 2
DL-S41-H2 Owners Manual
» Please completely read and verify you understand all instrucons in this manual before operang this equipment.
» Keep these instrucons in a safe, accessible place for future reference.
» Heed all warnings.
» Follow all instrucons.
» Do not use this apparatus near water.
» Clean only with a dry cloth.
» Do not install near any heat sources such as radiators, heat registers, stoves, or other apparatus (including ampliers)
that produce heat.
» Use only accessories specied or recommended by Intelix.
» Explanaon of graphical symbols:
◊ Lightning bolt/ash symbol: the lightning bolt/ash and arrowhead within an equilateral triangle
symbol is intended to alert the user to the presence of uninsulated “dangerous voltage” within the
product enclosure which may be of sucient magnitude to constute a risk of shock to a person or
persons.
Important Safety Instrucons
◊ Exclamaon point symbol: the exclamaon point within an equilateral triangle symbol is intended
to alert the user to the presence of important operang and maintenance (servicing) instrucons
in the literature accompanying the product.
» WARNING: TO REDUCE THE RISK OF FIRE OR ELECTRIC SHOCK, DO NOT EXPOSE THIS APPARATUS TO RAIN OR
MOISTURE AND OBJECTS FILLED WITH LIQUIDS, SUCH AS VASES, SHOULD NOT BE PLACED ON THIS APPARATUS.
» Use the mains plug to disconnect the apparatus from the mains.
» THE MAINS PLUG OF THE POWER CORD MUST REMAIN READILY ACCESSIBLE.
» Do not defeat the safety purpose polarized or grounding-type plug. A polarized plug has two blades with one wider
than the other. A grounding-type plug has two blades and a third grounding prong. The wide blade or the third prong
is provided for your safety. If the provided plug does not t into your outlet, consult an electrician for replacement of
your obsolete outlet. Cauon! To reduce the risk of electrical shock, grounding of the center pin of this plug must be
maintained.
» Protect the power cord from being walked on or pinched parcularly at the plugs, convenience receptacles, and the
point where they exit from the apparatus.
» Do not block the air venlaon openings. Only mount the equipment per Intelix’s instrucons.
» Use only with the cart, stand, table, or rack specied by Intelix or sold with the equipment. When/if a
cart is used, use cauon when moving the cart/equipment combinaon to avoid injury from p-over.
» Unplug this apparatus during lightning storms or when unused for long periods of me.
» Cauon! Shock Hazard. Do not open the unit.
» Refer to qualied service personnel. Servicing is required when the apparatus has been damaged in any way, such as
power supply cord or plug is damaged, liquid has been spilled or objects have fallen into the apparatus, the apparatus
has been exposed to rain or moisture, does not operate normally, or has been dropped.
2
Page 3

DL-S41-H2 Owners Manual
Table of Contents
Product Overview ����������������������������������������������������������������������������������������������������������������������������������������������������� 4
Package Contents ����������������������������������������������������������������������������������������������������������������������������������������������������� 4
Front and Rear Panel View ��������������������������������������������������������������������������������������������������������������������������������������� 5
Front View ��������������������������������������������������������������������������������������������������������������������������������������������������������� 5
Rear View����������������������������������������������������������������������������������������������������������������������������������������������������������� 6
Installaon Instrucons �������������������������������������������������������������������������������������������������������������������������������������������7
Quick Start ��������������������������������������������������������������������������������������������������������������������������������������������������������� 7
Mount the Switcher ������������������������������������������������������������������������������������������������������������������������������������������ 7
Connecng a Display ����������������������������������������������������������������������������������������������������������������������������������������� 7
HDMI Output ���������������������������������������������������������������������������������������������������������������������������������������������� 7
Connect Audio Output ��������������������������������������������������������������������������������������������������������������������������������������� 7
Connecng Control �������������������������������������������������������������������������������������������������������������������������������������������� 8
RS232 Control Wiring ��������������������������������������������������������������������������������������������������������������������������������� 8
IR Remote Control (Oponal) ���������������������������������������������������������������������������������������������������������������������8
Apply Power ������������������������������������������������������������������������������������������������������������������������������������������������������� 8
EDID Management �������������������������������������������������������������������������������������������������������������������������������������������������� 9
ARC Mode���������������������������������������������������������������������������������������������������������������������������������������������������������������10
Applicaon Diagram ���������������������������������������������������������������������������������������������������������������������������������������������� 11
RS232 Control Commands �������������������������������������������������������������������������������������������������������������������������������������12
A/V Switching Commands ������������������������������������������������������������������������������������������������������������������������������� 12
CEC Source Device Control ������������������������������������������������������������������������������������������������������������������������������13
CEC Display Control �����������������������������������������������������������������������������������������������������������������������������������������15
Audio Mode Sengs ���������������������������������������������������������������������������������������������������������������������������������������16
System Commands ������������������������������������������������������������������������������������������������������������������������������������������16
Technical Specicaons �����������������������������������������������������������������������������������������������������������������������������������������17
3
Page 4

DL-S41-H2 Owners Manual
Product Overview
The DL-S41-H2 is a slimline HDMI 2.0b auto switcher with four HDMI video inputs and
one HDMI output. This switcher supports HDMI video resoluons up to 4Kx2K@60Hz
4:4:4, HDR, and mulchannel audio. In addion to passing EDID informaon from the
display, there are mulple built-in EDID sengs to simplify an installaon. The switcher
will de-embed digital stereo audio to provide an analog audio source for an exisng
audio system. The switcher also supports audio return channel (ARC) for transming
audio back to HDMI input and audio output ports from display device.
When in auto-switch mode, the switcher will switch to an HDMI input as soon as a new
source is connected. When the acve source is removed, the switcher will select the rst
source on the lowest numbered input. The switcher may also be controlled via RS232, IR
with the included remote, or from the source buon on the front of the switcher.
Package Contents
• DL-S41-H2 HDMI 2.0b Auto Switcher
• Quick Install Guide
• (1) IR Remote
• (1) IR Receiver
• (1) RS232 3.5mm to DB9 adapter cable
• (1) DC5V 1A power supply with US, UK, EU and AU power adapter plugs
• (2) Mounng ears with mounng screws
• (4) Plasc cushions
4
Page 5

Front View
DL-S41-H2 Owners Manual
Front and Rear Panel View
1 324 5
1. AUTO/SOURCE - Auto / manual mode switching selecon
• Press and hold 3 seconds to switch between switching modes
2. POWER LED - Illuminates RED when power is applied
3. AUDIO MODE LED - Audio mode indicator
• When LED is green, unit is in de-embed mode
• When LED is yellow, unit is in ARC mode
4. SOURCE MODE LED - Switch mode indicator
• When LED is green, unit is in manual switch mode
• When LED is yellow, unit is in auto switch mode
5. HDMI INPUT LEDS - Illuminates GREEN when there is an HDMI input on the corresponding
channel
6. FIRMWARE - USB port for rmware updates
6
5
Page 6

DL-S41-H2 Owners Manual
Rear View
1
2
3
4 5
1. HDMI IN 1-3 - HDMI inputs 1 - 3 for HDMI sources
2. (ARC) HDMI IN 4 - ARC compable HDMI input
3. HDMI OUTPUT - HDMI output to connect to display technology
4. AUDIO OUTPUT - 3.5mm audio output jack
5. RS232 - 3.5mm serial control output
6. IR IN - 3.5mm IR input port for IR receiver (included)
7. EDID - 4 pin dip switch for EDID sengs
8. DC 5V - DC barrel port for 5V power adapter (included)
6
7 8
6
Page 7

DL-S41-H2 Owners Manual
Installaon Instrucons
Quick Start
1. Mount the switcher
2. Connect display
3. Connect audio output (oponal)
4. Connect control (oponal)
5. Apply power
Mount the Switcher
At least 2 inches of free air space is required on both sides of the DL-S41-H2 for proper side venlaon. Avoid
mounng the DL-S41-H2 near a power amplier or any other source of signicant heat.
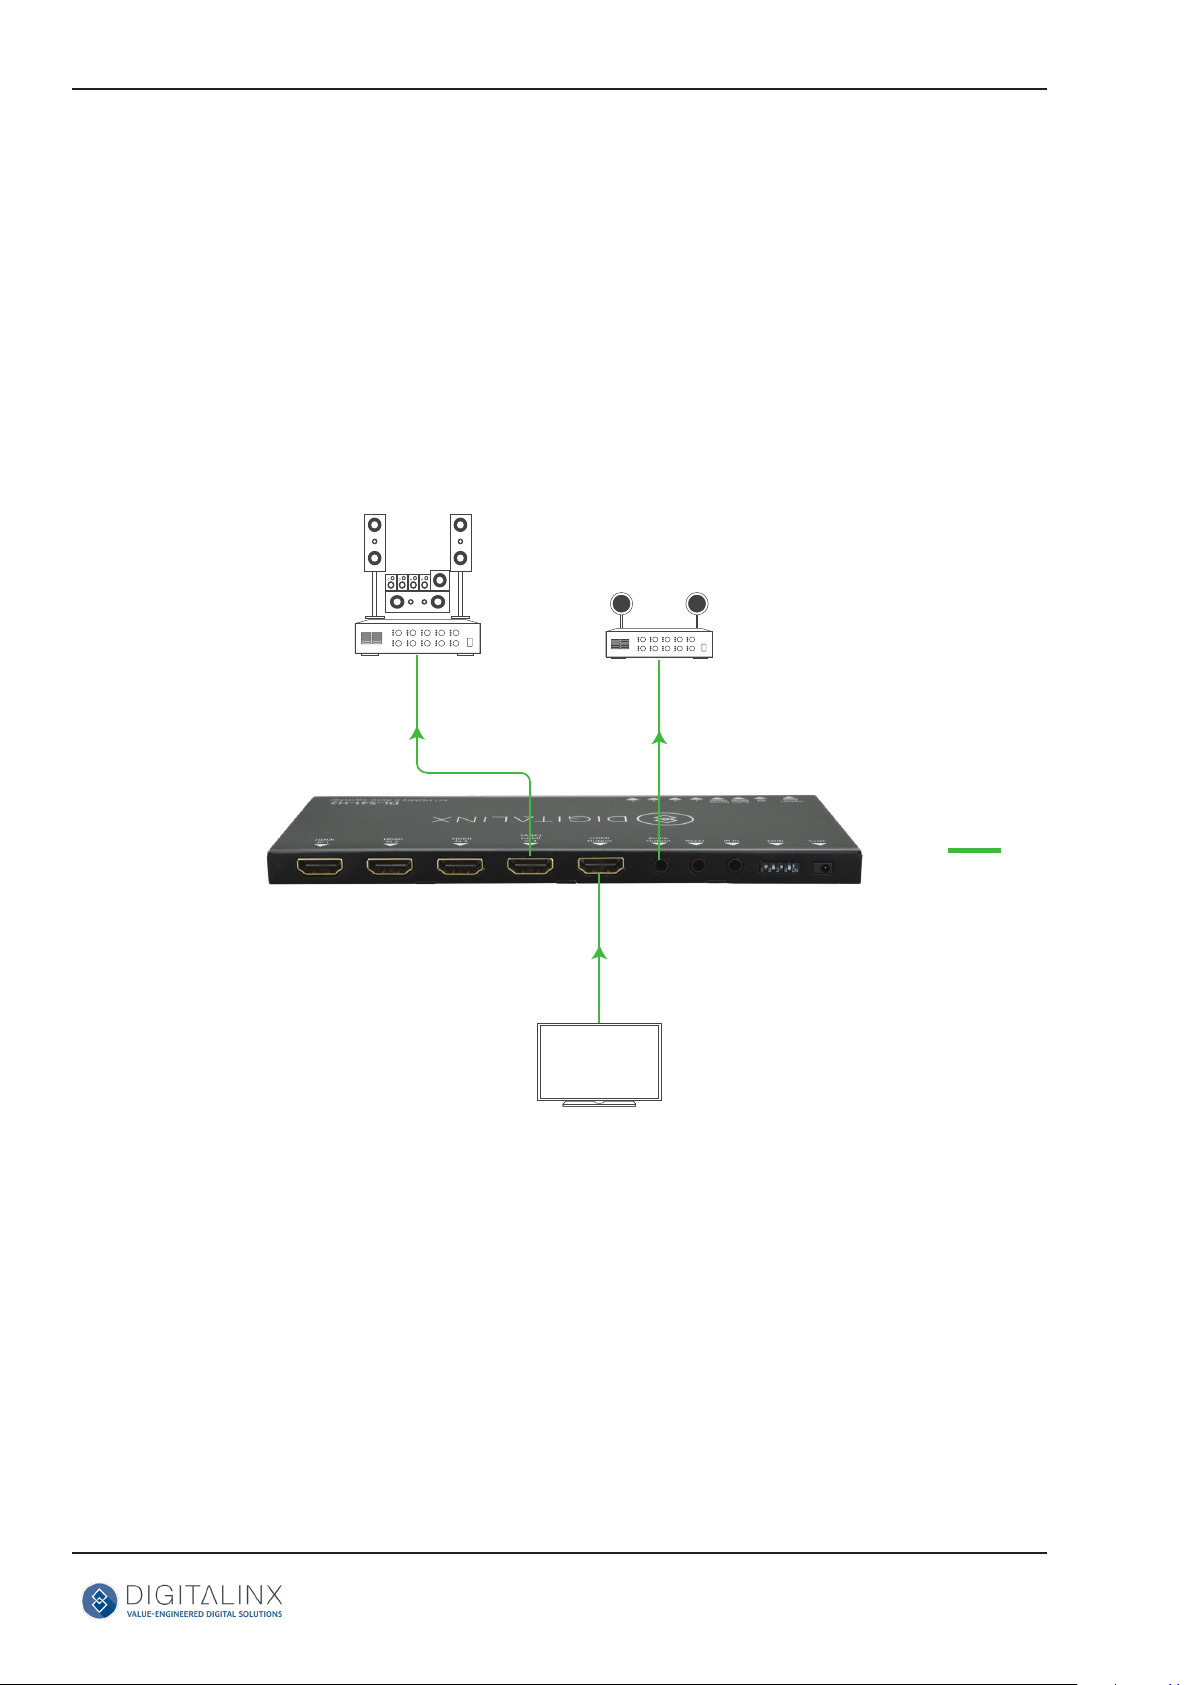
Connecng a Display
HDMI Output
Connect the display device to the HDMI output on the DL-S41-H2 using an HDMI cable that is less than or equal
to 5 meters in length.
Connect Audio Output
Connect a compable 3.5mm audio cable to the 3.5mm audio output port of the DL-S41-H2. The DL-S41-H2
supports a stereo unbalanced output.
Below is an audio cable pin-out that is compable with the DL-S41-H2 audio output
LEFT
RIGHT
GROUND
7
Page 8

DL-S41-H2 Owners Manual
Connecng Control
RS232 Control Wiring
Using the supplied RS232 3.5mm - DB9 serial breakout cable, connect the controller device to the 3.5mm port
on DL-S41-H2 switcher labeled as RS232. Below is a pin out for the supplied breakout cable.
DL-S41-H2
Tx
Rx
Controller or
Device
RXD
TXD
GND
IR Remote Control (Oponal)
Connect the IR receiver to the IR input port of the DL-S41-H2, the IR remote is used for input switching and
it also can be used to control source and display devices based on CEC control. To use this feature with a
compable CEC source and display, turn on the CEC opon in the source and displays menu opons.
Note: CEC performance may dier for various sources and displays and not all remote funcons may be
supported by third party source and display manufacturers.
Apply Power
Plug the power supply into the power input port on the rear of the DL-S41-H2 receiver.
8
Page 9

DL-S41-H2 Owners Manual
EDID Management
The rear panel features a 4-pin DIP switch for seng predened EDID input sengs. The ten types of
embedded EDID and their corresponding switch sengs are shown below.
When in the down posion, the switch represents
“ON”, when the switch posion in the up posion it
represents “OFF”.
EDID Seng DIP 1 DIP 2 DIP 3 DIP 4
EDID Pass Through
1920x1080p@60Hz / 4:4:4 / 8 bit
2 Channel Audio
1920x1080p@60Hz / 4:4:4 / 8 bit
Mul Channel Audio
1920x1080p@60Hz / 4:4:4 / 12 bit
2 Channel Audio
1920x1080p@60Hz / 4:4:4 / 8 bit
Mul Channel Audio
3840x2160p@60Hz / 4:2:0 / 8 bit
2 Channel Audio
3840x2160p@60Hz / 4:2:0 / 8 bit
Mul Channel Audio
3840x2160p@60Hz / 4:4:4 / 10 bit HDR
2 Channel Audio
3840x2160p@60Hz / 4:4:4 / 10 bit HDR
Mul Channel Audio
128 0 x 8 0 0 @60 H z
2 Channel Audio
UP UP UP UP
UP UP UP DOWN
UP UP DOWN UP
UP UP DOWN DOWN
UP DOWN UP UP
UP DOWN UP DOWN
UP DOWN DOWN UP
UP DOWN DOWN DOWN
DOWN UP UP UP
DOWN UP UP DOWN
1 9 20x120 0 @ 6 0 H z
2 Channel Audio
DOWN UP DOWN UP
9
Page 10
DL-S41-H2 Owners Manual
ARC Mode
Audio Return Channel (ARC) allows audio from a display to pass “upstream” through an HDMI cable
to an audio processing device, such as an A/V amplier. When ARC mode is acve on the switcher, the
ARC stream will pass to the acve HDMI source device if it can process the signal.
To adjust the audio mode of the DL-S41-H2, see pg 16- RS232 Control Commands: Audio Mode Sengs
When the display and A/V amplier support ARC, follow the audio connecon diagram below
SURROUND AUDIO SYSTEM
STEREO AUDIO SYSTEM
NOTE: Only HDMI 4 supports ARC upstream
ARC AUDIO
SMART TV
10
Page 11

BLURAY
DL-S41-H2 Owners Manual
Applicaon Diagram
WIRELESS
BYOD
LAPTOP
MEDIA
PLAYER
RS232 CONTROL
AUDIO AMP
HDMI
AUDIO
RS232
IR
IR RECEIVER
IR REMOTE
(supplied)
DISPLAY
11
Page 12

DL-S41-H2 Owners Manual
RS232 Control Commands
RS232 Sengs: 9600 baud, 8 Data bits, 1 Stop bit, Parity = None
The commands are case sensive. All commands below are in ASCII and all strings and responses end
in a carriage return (hex 0D) and a line feed (hex 0A).
<CR> = Carriage return (Hex 0D)
<LF> = Line Feed (Hex 0A)
A/V Switching Commands
Note: Switching A/V inputs via RS232 requires the switching mode to be set to MANUAL switching mode
Descripon Command Example
Switches input to HDMI 1
>>HDMI1 Command: >>HDMI1<CR><LF>
Switches input to HDMI 2
Switches input to HDMI 3
Switches input to HDMI 4
Enables auto switching mode
Enables manual switching mode
Return: <<HDMI1<CR><LF>
>>HDMI2 Command: >>HDMI2<CR><LF>
Return: <<HDMI2<CR><LF>
>>HDMI3 Command: >>HDMI3<CR><LF>
Return: <<HDMI3<CR><LF>
>>HDMI4 Command: >>HDMI4<CR><LF>
Return: <<HDMI4<CR><LF>
>>AUTO Command: >>AUTO<CR><LF>
Return: <<AUTO Switch<CR><LF>
>>MANUAL Command: >>MANUAL<CR><LF>
Return: <<MANUAL Switch<CR><LF>
12
Page 13

DL-S41-H2 Owners Manual
CEC Source Device Control
To use these commands sets with a compable CEC source, turn on the CEC opon in the sources menu
opon.
Note: CEC performance may dier for various sources and not all command funcons may be supported by
third party source manufacturers.
Descripon Command Example
Turns the selected input source
device ON via CEC
>>SRCOn Command: >>SRCOn<CR><LF>
Return: <<SRCOn<CR><LF>
Turns the selected input source
device OFF via CEC
Play
Pause
Stop
Fast forward x 1
Rewind x 1
Next Secon
>>SRCOff Command: >>SRCOff<CR><LF>
Return: <<SRCOff<CR><LF>
>>SRCPlay Command: >>SRCPlay<CR><LF>
Return: <<SRCPlay<CR><LF>
>>SRCPause Command: >>SRCPause<CR><LF>
Return: <<SRCPause<CR><LF>
>>SRCStop Command: >>SRCStop<CR><LF>
Return: <<SRCStop<CR><LF>
>>SRCForward Command: >>SRCForward<CR><LF>
Return: <<SRCForward<CR><LF>
>>SRCBackward Command: >>SRCBackward<CR><LF>
Return: <<SRCBackward<CR><LF>
>>SRCSkipForward Command:
>>SRCSkipForward<CR><LF>
Previous Secon
Return:
<<SRCSkipForward<CR><LF>
>>SRCSkipBackward Command:
>>SRCSkipBackward<CR><LF>
Return:
<<SRCSkipBackward<CR><LF>
13
Page 14

DL-S41-H2 Owners Manual
CEC Source Device Control (connued)
Descripon Command Example
Open Menu Sengs
>>SRCMenu Command: >>SRCMenu<CR><LF>
Return: <<SRCMenu<CR><LF>
Go Back
Conrm (OK)
Exit
Up direcon
Down direcon
Le direcon
Right direcon
>>SRCBack Command: >>SRCBack<CR><LF>
Return: <<SRCBack<CR><LF>
>>SRCOk Command: >>SRCOk<CR><LF>
Return: <<SRCOk<CR><LF>
>>SRCExit Command: >>SRCExit<CR><LF>
Return: <<SRCExit<CR><LF>
>>SRCUp Command: >>SRCUp<CR><LF>
Return: <<SRCUp<CR><LF>
>>SRCDown Command: >>SRCDown<CR><LF>
Return: <<SRCDown<CR><LF>
>>SRCLeft Command: >>SRCLeft<CR><LF>
Return: <<SRCLeft<CR><LF>
>>SRCRight Command: >>SRCRight<CR><LF>
Enter
Return: <<SRCRight<CR><LF>
>>SRCEnter Command: >>SRCEnter<CR><LF>
Return: <<SRCEnter<CR><LF>
14
Page 15

DL-S41-H2 Owners Manual
CEC Display Control
To use these commands sets with a compable CEC display, turn on the CEC opon in the displays menu
opon.
Note: CEC performance may dier for various displays and not all command funcons may be supported by
third party source manufacturers.
Descripon Command Example
Turn display ON via CEC
>>TVOn Command: >>TVOn<CR><LF>
Return: <<TVOn<CR><LF>
Turn display OFF via CEC
Volume UP
Volume DOWN
Mute / Unmute (toggle)
>>TVOff Command: >>TVOff<CR><LF>
Return: <<TVOff<CR><LF>
>>TVVOL+ Command: >>TVVOL+<CR><LF>
Return: <<TVVOL+<CR><LF>
>>TVVOL- Command: >>TVVOL-<CR><LF>
Return: <<TVVOL-<CR><LF>
>>TVMUTE Command: >>TVMUTE<CR><LF>
Return: <<TV MUTE&UNMUTE<CR><LF>
15
Page 16

DL-S41-H2 Owners Manual
Audio Mode Sengs
Descripon Command Example
Enable ARC mode
>>AUDExternal Command: >>AUDExternal<CR><LF>
Return: <<AUDExternal<CR><LF>
Enable embedded HDMI audio
input
>>AUDInternal Command: >>AUDInternal<CR><LF>
Return: <<AUDInternal<CR><LF>
System Commands
Descripon Command Example
Factory Reset
Query current system sengs
>>RESET Command: >>RESET<CR><LF>
Return:
<<SYSRESET<CR><LF>
DL-S41-H2
VER 1.0.0
<<AUTO Switch
<<AUDInternal
>>SYSInfo Command: >>SYSInfo<CR><LF>
Return:
<<AUDExternal
<< DL-S41-H2
<< V1.0.0
<< -------<<HDMI1
<<Auto Switch
<<AUDExternal
<<EDID0
16
Page 17

Technical Specicaons
VIDEO
Video Inputs (4) HDMI
Video Input Connector (4) HDMI type A
Input Video Signal HDMI
Video Output (1) HDMI
Video Output Connector (1) HDMI type A
Output Video Signal HDMI
Input Resoluons Support-edUp to 3840 x 2160 @ 60Hz, 4:4:4, 8bit color depth
Standards Compliant with HDMI 2.0b & HDCP2.2
AUDIO
Supported output formats PCM 2.0
Audio Output Stereo analog
Audio Output Connector (1) 3.5mm TRS audio jack
Audio Output Impedance 70 Ohms
Frequency Response 20Hz~20K Hz
CONTROL
Control Port / Connector (1) IR / 3.5mm connector
(1) RS232 / 3.5mm connector
OTHER
System Bandwidth 18Gbps
Operang Temperature -10C ~ +55C
Storage Temperature -25C ~ +70C
Humidity 10% ~ 90%
Power Supply Input:100V~240V AC; Output: 5V DC 1A
Power Consumpon 5 was
Dimension (W*H*D) 194mm * 12mm * 81mm / 7.6” * .47” * 3.2”
Weight 180g / .4 lbs
Warranty 2 years
Cercaon CE, FCC, RoHS
DL-S41-H2 Owners Manual
17
Page 18

Thank you for your purchase.
For Technical Support please call our toll free number at
800-530-8998 or email us at supportlibav@libav.com
www.libav.com
Intelix is a brand of:
11675 Ridgeline Drive
Colorado Springs, Colorado
80921 USA
Phone: 719-260-0061
Fax: 719-260-0075
Toll-Free: 800-530-8998
 Loading...