

Page 1

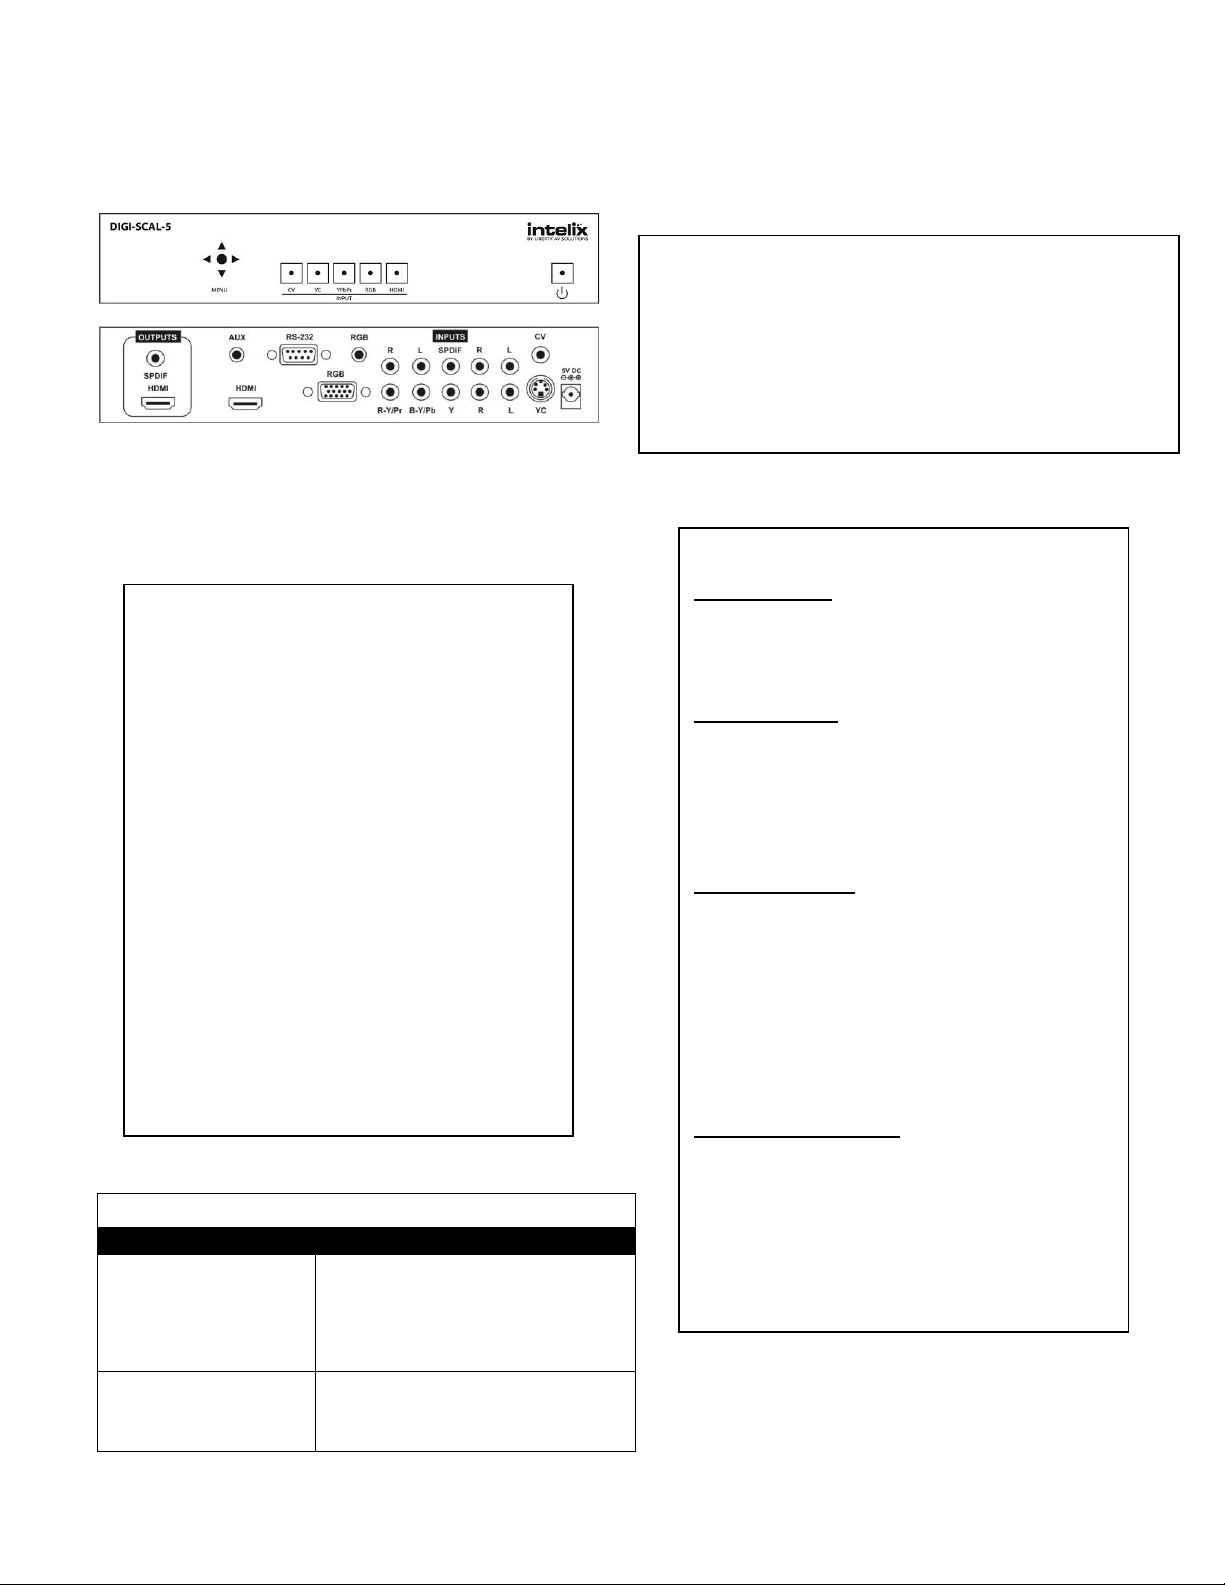
DIGI-SCAL-5 Installation Guide
Intelix
www.intelix.com
Page 2
Troubleshooting
Symptom
Possible Solutions
No signal
Verify the source and destination devices are
functioning properly by connecting the source
directly to the destination device.
Verify HDMI cables and source and destination
HDMI ports are operational.
Poor/intermittent signal
Verify the video and audio cables are in good
condition.
Use shorter, high quality cables.
Installation Instructions
1. Power off the source and destination
audio/video devices.
2. Connect the input sources to the DIGI-SCAL-5
using high quality cables.
3. Connect the output destinations to the DIGI-
SCAL-5 using high-quality HDMI, stereo audio,
and/or digital audio cables.
4. If the DIGI-SCAL-5 will be controlled by a
third-party control system, connect a DE9
cable to the RS232 port.
5. Connect the included power supply to the
5VDC port. Connect the power supply to AC
power outlet.
6. Power on the DIGI-SCAL-5.
7. Power on attached audio/video devices.
Important notice:
Do not attempt to disassemble or alter the scaler housing. There
are no user-serviceable parts inside the unit. Doing so will void
your warranty.
To minimize the possibility of equipment damage from
electrostatic discharge (ESD), all source and destination
equipment must be powered off during installation.
Allow proper ventilation to reduce the risk of thermal failure.
Operating Instructions
Source Selection
The five inputs each have their own push button on
the front panel. Press the desired button to select
the corresponding input.
Menu Navigation
Press the top of the joystick to bring up the on
screen display. Use the joystick to navigate to the
desired function. Once adjustments have been
made to the settings, press the top of the joystick
again to save the configuration.
Resolution Settings
The output submenu allows you to set the
resolution you want the DIGI-SCAL-5 to send to
your display. Do not select a resolution that your
display is not capable of processing, as this may
cause the DIGI-SCAL-5 and/or your display to
malfunction. Please see page 2 for information
about how the DIGI-SCAL-5 processes video and
audio signals.
Remote Control & RS232
The DIGI-SCAL-5 offers two methods of controlling
the scaler in addition to front panel operation. The
included remote control features all of the front
panel functionality, plus several output resolution
hot keys. The DIGI-SCAL-5 also features RS232
control. Please see pages 3 & 4 for RS232
commands.
The Intelix DIGI-SCAL-5 allows the integration of multiple
analog and digital devices into a high-definition
environment. With switching, scaling, and format
conversion capabilities, the DIGI-SCAL-5 combines the
processing of three devices into one.
www.intelix.com 2
Page 3
Resolution
Refresh Rate (Hz)
Scan
Format
Connector
480i
720x480
60
Interlaced
YUV NTSC
HDMI
576i
720x576
50
Interlaced
YUV PAL
HDMI
480p
720x480
60
Progressive
RGBHV
HDMI
576p
720x576
50
Progressive
RGBHV
HDMI
720p
1280x720
50,60
Progressive
RGBHV
HDMI
1080i
1920x1080
50,60
Interlaced
RGBHV
HDMI
1080p
1920x1080
50,60
Progressive
RGBHV
HDMI
VGA
640x480
60
Progressive
RGBHV
HDMI
SVGA
800x600
60
Progressive
RGBHV
HDMI
XGA
1024x768
60
Progressive
RGBHV
HDMI
SXGA
1280x1024
60
Progressive
RGBHV
HDMI
SXGA+
1400x1050
60
Progressive
RGBHV
HDMI
UXGA
1600x1200
60
Progressive
RGBHV
HDMI
WXGA
1280x800
60
Progressive
RGBHV
HDMI
WXGA+
1440x900
60
Progressive
RGBHV
HDMI
WSXGA
1680x1050
60
Progressive
RGBHV
HDMI
WUXGA
1920x1200
60
Progressive
RGBHV
HDMI
Resolution
Refresh Rate (Hz)
Scan
Format
Connector
CV
SDTV
60 NTSC, 50 PAL
Interlaced
NTSC/PAL
RCA
YC
SDTV
60 NTSC, 50 PAL
Interlaced
NTSC/PAL
4-Pin Mini-Din
480i
720x480
60
Interlaced
YUV NTSC
RCA, HDMI
576i
720x576
50
Interlaced
YUV PAL
RCA, HDMI
480p
720x480
60
Progressive
YPbPr/RGBHV
HD15,HDMI,RCA
576p
720x576
50
Progressive
YPbPr/RGBHV
HD15,HDMI,RCA
720p
1280x720
50,60
Progressive
YPbPr/RGBHV
HD15,HDMI,RCA
1080i
1920x1080
50,60
Interlaced
YPbPr/RGBHV
HDMI, RCA
1080p
1920x1080
50,60
Progressive
YPbPr/RGBHV
HD15,HDMI,RCA
VGA
640x480
60,72,75,85
Progressive
RGBHV
HD15,HDMI
SVGA
800x600
56,60,72,75,85
Progressive
RGBHV
HD15,HDMI
XGA
1024x768
60,70,75,85
Progressive
RGBHV
HD15,HDMI
SXGA
1280x1024
60,75,85
Progressive
RGBHV
HD15,HDMI
UXGA
1600x1200
60
Progressive
RGBHV
HD15,HDMI
WXGA
1280x800
60
Progressive
RGBHV
HD15,HDMI
WSXGA
1680x1050
60
Progressive
RGBHV
HD15,HDMI
WUXGA
1920x1200
60
Progressive
RGBHV
HD15,HDMI
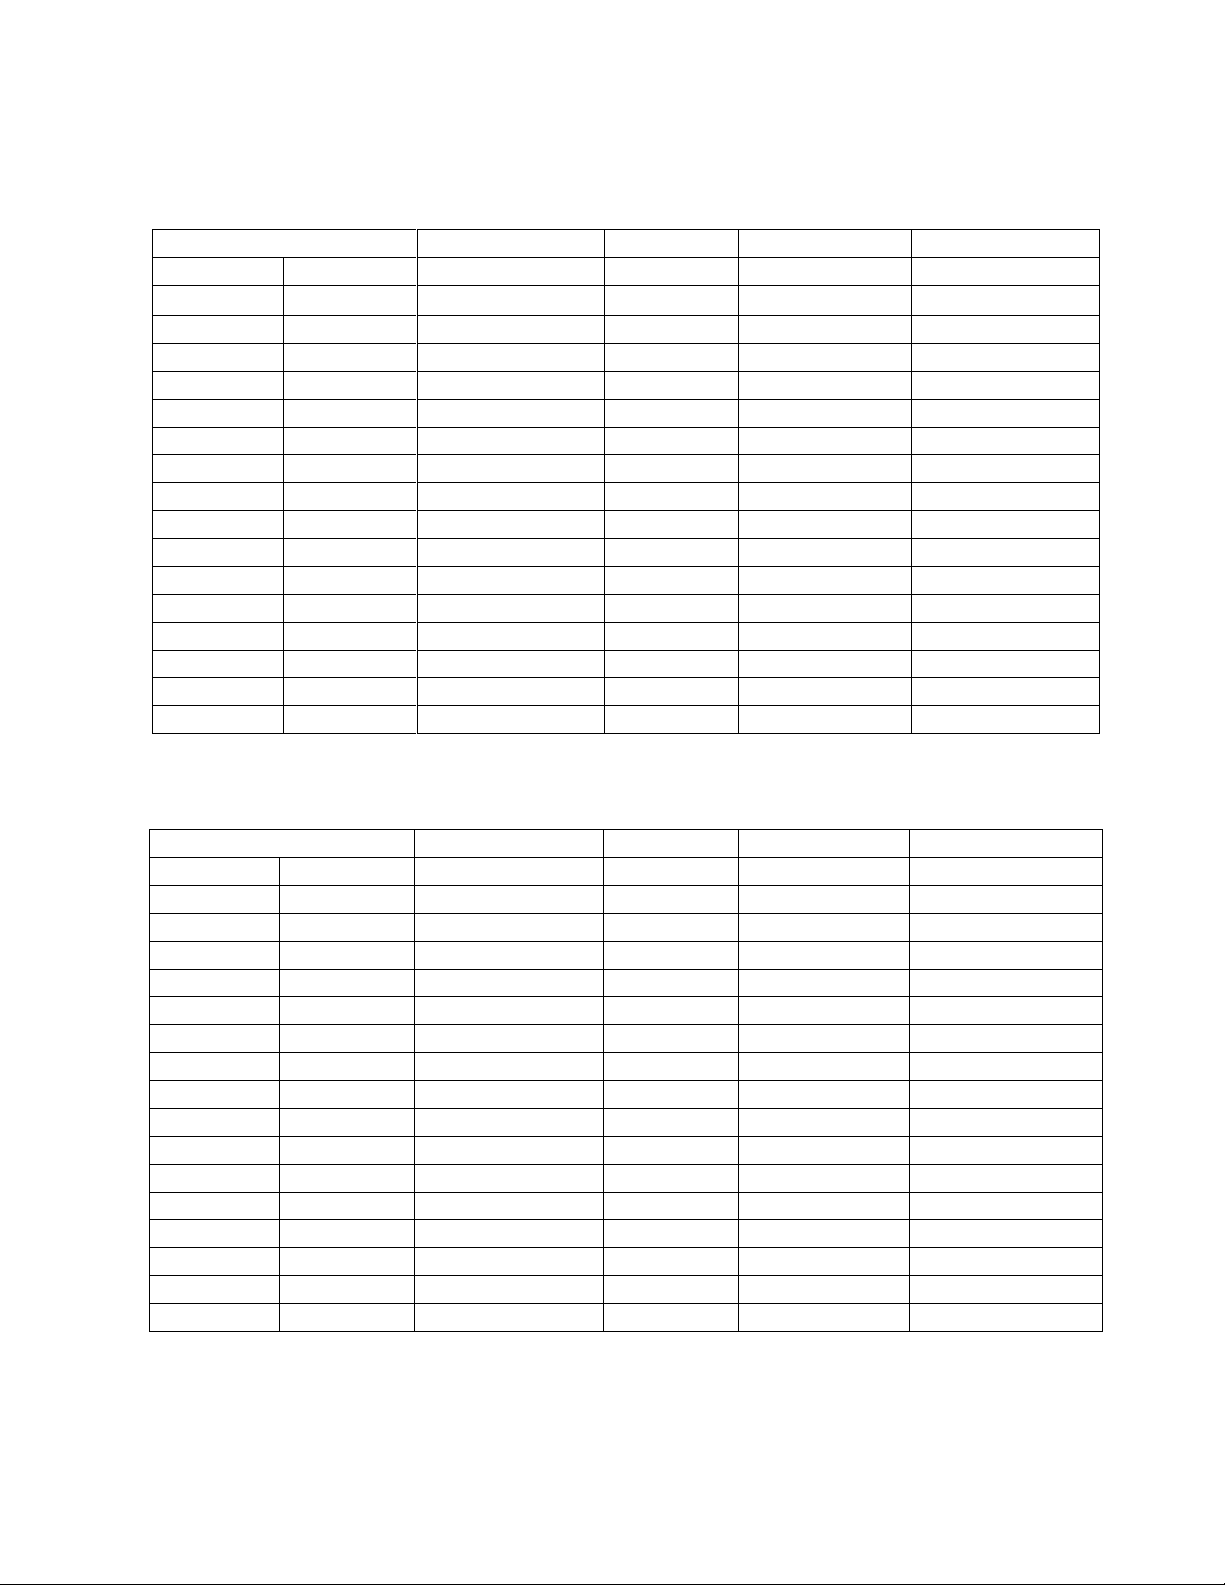
The DIGI-SCAL-5 accepts HDMI, DVI, analog PC, Component, Composite, and YC (S-Video) inputs. The resolutions and formats
processed for these inputs are as follows:
The DIGI-SCAL-5 supports various output resolutions, as shown below:
3 www.intelix.com
Page 4
Menu
Main Menu
Secondary Menu
Adjustment
Video
Picture Mode
User/Standard/Vivid/Movie
Contrast
0-100 Relative Contrast Adjustment
Brightness
0-100 Relative Brightness Adjustment
Hue
0-100 Relative Hue Adjustment
Saturation
0-100 Relative Color Level Adjustment
Sharpness
0-100 Relative Picture Sharpness Adjustment
Scale
Overscan/Underscan/Letterbox/Panscan/Full
Noise Reduction
Low / Middle/High/Off
Exit
Return to Main Menu
Color
Color Tone
User / Normal / Warm / Cool
Red
0-100 Relative Red Color Level
Green
0-100 Relative Green Color Level
Blue
0-100 Relative Blue Color Level
Exit
Return to Main Menu
Output 1
-
NATIVE / VGA / SVGA / XGA / SXGA / SXGA+
WXGA+ / WSXGA / UXGA / WUXGA
480i / 480p / 720p@60Hz / 1080i@60Hz / 1080p@60Hz
576i / 576p / 720p@50Hz / 1080i@50Hz / 1080p@50Hz
OSD Control 2
H Position
0-100 Relative L-R Position
V Position
0-100 Relative U-D Position
Timer
0-100 Relative OSD Show Time (Sec)
Transparency
0-100 Relative OSD Text Transparency
Exit
Return to Main Menu
Audio 3
Source
HDMI/L-R/Coaxial
Delay
OFF/40MS/110 MS/150 MS
Sound
On/ Mute
Exit
Return to Main Menu
Information 4
-
Source (Input Interface)
Input (Input Resolution)
Output (Output Resolution)
Version (Firmware Version)
Exit - Close the OSD Menu
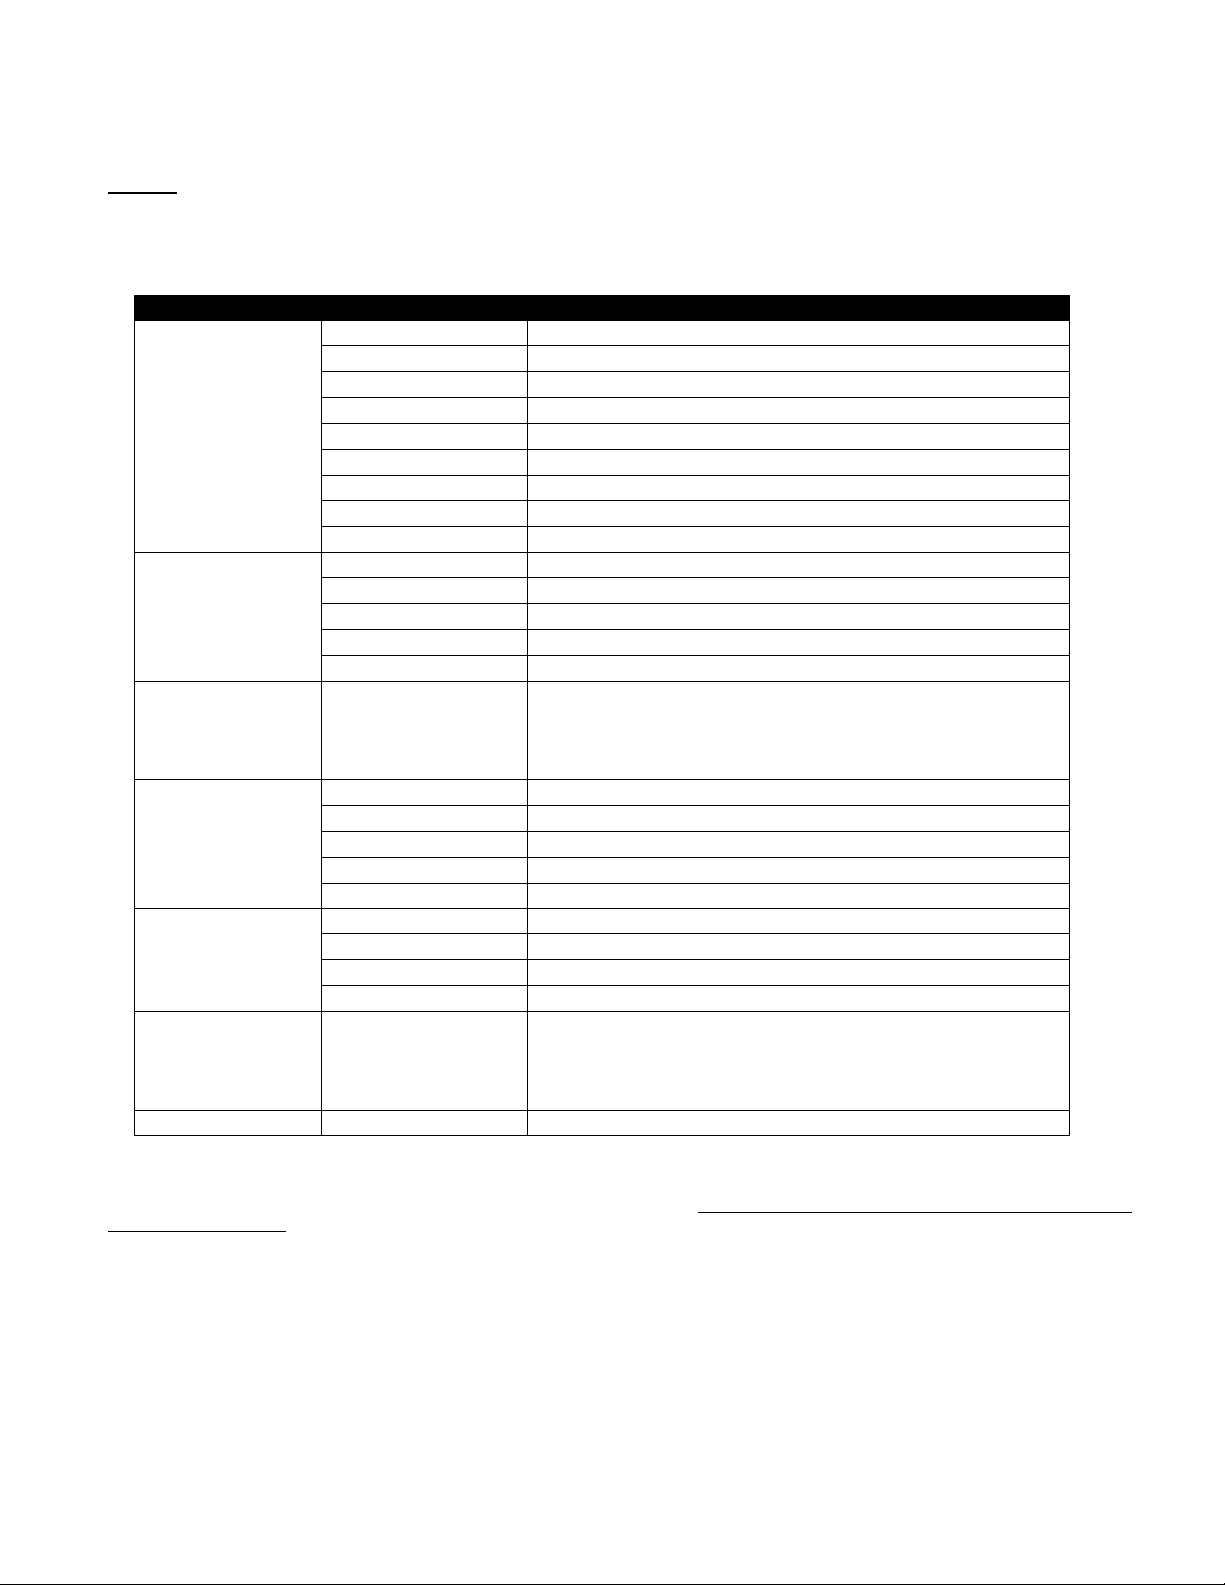
The DIGI-SCAL-5 menu provides several options for configuring audio, video, and on screen display characteristics. The menu
contains the following main categories: Video, Color, Output, OSD, Audio, Information, and Exit. With the exception of the
‘Exit’ function, a secondary menu will appear where specific adjustments and selections can be made. Please see the Menu
tree below for more information.
OSD Menu Notes:
Note 1: The Output sub-menu allows you to specify the resolution you want the DIGI-SCAL-5 to produce. Keep in mind that setting the resolution can cause an
apparent malfunction if you select a resolution that your display device cannot reproduce. Make certain your display device can reproduce the resolution you
select BEFORE you select it.
Note 2: The OSD sub-menu allows you to customize the way the On Screen Display appears when it has been accessed. This is a personal preference matter.
You can change the default if you wish or simply leave it at the factory setting.
Note 3: Since Video and Audio Lip Sync can be lost in Digital Television, the DIGI-SCAL-5 provides a secondary menu item called “Delay” under the Audio
selection of the main menu where audio delay can be introduced to restore lip sync. Use this function if you hear audio before the video portion of the
program appears to make the sound.
Note 4: The Info sub-menu contains technical information. If you have problems with the DIGI-SCAL-5 and require assistance, the technician may ask you to
read information from this menu as part of the troubleshooting process.
www.intelix.com 4
Page 5

Command Code
Response
Description
S POWER 0
> POWER OFF
POWER OFF
S POWER 1
> POWER ON
POWER ON
S SOURCE 0
> SOURCE CV
CV INPUT
S SOURCE 1
> SOURCE SV
SV INPUT
S SOURCE 2
> SOURCE COMP
COMP INPUT
S SOURCE 3
> SOURCE PC
PC INPUT
S SOURCE 4
> SOURCE HDMI
HDMI INPUT
S OUTPUT 0
> OUTPUT NATIVE
NATIVE RESOLUTION OUTPUT
S OUTPUT 1
> OUTPUT VGA
VGA RESOLUTION OUTPUT
S OUTPUT 2
> OUTPUT SVGA
SVGA RESOLUTION OUTPUT
S OUTPUT 3
> OUTPUT XGA
XGA RESOLUTION OUTPUT
S OUTPUT 4
> OUTPUT SXGA
SXGA RESOLUTION OUTPUT
S OUTPUT 5
> OUTPUT UXGA
UXGA RESOLUTION OUTPUT
S OUTPUT 6
> OUTPUT 480I
480I RESOLUTION OUTPUT
S OUTPUT 7
> OUTPUT 480P
480P RESOLUTION OUTPUT
S OUTPUT 8
> OUTPUT 720P
720P 60HZ RESOLUTION OUTPUT
S OUTPUT 9
> OUTPUT 1080I
1080I 60HZ RESOLUTION OUTPUT
S OUTPUT 10
> OUTPUT 1080P
1080P 60HZ RESOLUTION OUTPUT
Pins definition of modem cable
Scaler Unit
Control Unit
PIN
Definition
PIN
Definition
1
NC 1
NC 2 TxD
2
RxD
3
RxD
3
TxD
4
NC 4
NC 5 GND
5 GND
6
NC 6
NC 7 NC 7
NC
8
NC 8
NC 9 NC 9
NC
RS232 Transmission Format:
Baud Rate: 19200 bps
Data Bit: 8 bits
Parity: None
Stop Bit: 1 bit
ALL RS232 COMMANDS MUST
CONCLUDE WITH A CARRIAGE
RETURN AND LINE FEED.
RS232 Protocol
(A) Set Command
5 www.intelix.com
Page 6

www.intelix.com 6
S OUTPUT 11
> OUTPUT 576I
576I 60HZ RESOLUTION OUTPUT
S OUTPUT 12
> OUTPUT 576P
576P 60HZ RESOLUTION OUTPUT
S OUTPUT 13
> OUTPUT 720P
720P 50HZ RESOLUTION OUTPUT
S OUTPUT 14
> OUTPUT 1080I50
1080I 50HZ RESOLUTION OUTPUT
S OUTPUT 15
> OUTPUT 1080P50
1080P 50HZ RESOLUTION OUTPUT
S OUTPUT 16
> OUTPUT WXGA
WXGA RESOLUTION OUTPUT
S OUTPUT 17
> OUTPUT WSXGA
WSXGA RESOLUTION OUTPUT
S OUTPUT 18
> OUTPUT WUXGA
WUXGA RESOLUTION OUTPUT
S OUTPUT 19
> OUTPUT WXGA+
WXGA+ RESOLUTION OUTPUT
S SIZE 0
> SIZE FULL
SCALER FULL OUTPUT
S SIZE 1
> SIZE OVERSCAN
SCALER OVERSCAN OUTPUT
S SIZE 2
> SIZE UNDERSCAN
SCALER UNDERSCAN OUTPUT
S SIZE 3
> SIZE LETTERBOX
SCALER LETTERBOX OUTPUT
S SIZE 4
> SIZE PANSCAN
SCALER PANSCAN OUTPUT
S PICTUREMODE 0~3
> PICTUREMODE STANDARD~USER
0:STANDARD;1:MOVIE;2:VIVID;3:USER,PICTURE MODE OUTPUT
S CONTRAST 0~100
> CONTRAST 0~100
CONTRAST 0~100 ADJUST [Defaut:50]
S BRIGHTNESS 0~100
> BRIGHTNESS 0~100
BRIGHTNESS 0~100 ADJUST [Defaut:45]
S HUE 0~100
> HUE 0~100
HUE 0~100 ADJUST [Defaut:50]
S SATURATION 0~100
> SATURATION 0~100
SATURATION 0~100 ADJUST [Defaut:60]
S SHARPNESS 0~100
> SHARPNESS 0~100
SHARPNESS 0~100 ADJUST [Defaut:32]
S NR 0~3
> NR OFF~HIGH
0:OFF ; 1:LOW ; 2:MIDDLE ; 3:HIGH ,NR CONTROL
S PCHPOSITION 0~100
> PCHPOSITION 0~100
H POSITION 0~100 ADJUST
S PCVPOSITION 0~100
> PCVPOSITION 0~100
V POSITION 0~100 ADJUST
S PCCLOCK 0~100
> PCCLOCK 0~100
PC MODE CLOCK 0~100 ADJUST
S PCPHASE 0~63
> PCPHASE 0~63
PC MODE PHASE 0~63 ADJUST
S COLORTEMP 0~3
> COLORTEMP NORMAL~USER
0:NORMAL; 1:WARM; 2:COOL; 3:USER , COLOR TEMP SETTING
S RED 0~100
> RED 0~100
COLOR TEMP "RED" ADJUST [Defaut:47]
S GREEN 0~100
> GREEN 0~100
COLOR TEMP "GREEN" ADJUST [Defaut:47]
S BLUE 0~100
> BLUE 0~100
COLOR TEMP "BLUE" ADJUST [Defaut:47]
S OSDHPOSITION 0~100
> OSDHPOSITION 0~100
OSD H POSITION 0~100 ADJUST [Defaut:50]
S OSDVPOSITION 0~100
> OSDVPOSITION 0~100
OSD V POSITION 0~100 ADJUST [Defaut:50]
S OSDTIMEOUT 0~100
> OSDTIMEOUT 0~100
OSD TIMEOUT 0~100 SETTING [Defaut:10]
S OSDBACKGROUND 0~8
> OSDBACKGROUND 0~8
OSD OSDBACKGROUND 0~8 ADJUST [Defaut:5]
S AUDIOMUTE 0~1
> AUDIOMUTE OFF~ON
0:OFF ; 1:ON , AUDIO MUTE CONTROL
S AUDIODELAY 0~3
> AUDIODELAY OFF~150MS
0:OFF ; 1:40MS ; 2:110MS ; 3:150MS , AUDIO DELAY SETTING
S RESET 1
> RESET ON
RESET ACTION
Page 7

Command Code
Response
Description
R POWER
> POWER ON
SHOW POWER STATUS
R SOURCE
> SOURCE CV~HDMI
SHOW SOURCE STATUS
R OUTPUT
> OUTPUT NATIVE~WUXGA
SHOW OUTPUT STATUS
R SIZE
> SIZE FULL~PANSCAN
SHOW SIZE STATUS
R PICTUREMODE
> PICTUREMODE STANDARD~USER
SHOW PICTURE MODE STATUS
R CONTRAST
> CONTRAST 0~100
SHOW CONTRAST STATUS
R BRIGHTNESS
> BRIGHTNESS 0~100
SHOW BRIGHTNESS STATUS
R HUE
> HUE 0~100
SHOW HUE STATUS
R SATURATION
> SATURATION 0~100
SHOW SATURATION STATUS
R SHARPNESS
> SHARPNESS 0~100
SHOW SHARPNESS STATUS
R NR
> NR OFF~HIGH
SHOW NR STATUS
R PCHPOSITION
> PCHPOSITION 0~100
SHOW PC H-POSITION STATUS
R PCVPOSITION
> PCVPOSITION 0~100
SHOW PC V-POSITION STATUS
R PCCLOCK
> PCCLOCK 0~100
SHOW PC CLOCK STATUS
R PCPHASE
> PCPHASE 0~63
SHOW PC PHASE STATUS
R COLORTEMP
> COLORTEMP NORMAL~USER
SHOW COLOR TEMP STATUS
R RED
> RED 0~100
SHOW COLOR TEMP RED STATUS
R GREEN
> GREEN 0~100
SHOW COLOR TEMP GREEN STATUS
R BLUE
> BLUE 0~100
SHOW COLOR TEMP BLUE STATUS
R OSDHPOSITION
> OSDHPOSITION 0~100
SHOW OSD H-POSITION STATUS
R OSDVPOSITION
> OSDVPOSITION 0~100
SHOW OSD V-POSITION STATUS
R OSDTIMEOUT
> OSDTIMEOUT 0~100
SHOW OSD TIMEOUT STATUS
R OSDBACKGROUND
> OSDBACKGROUND 0~8
SHOW OSD BACKGROUND STATUS
R AUDIOMUTE
> AUDIOMUTE OFF~ON
SHOW AUDIO MUTE STATUS
R AUDIODELAY
> AUDIODELAY OFF~150MS
SHOW AUDIO DELAY STATUS
S OSDNOTICE 0
> OSDNOTICE INFO
SHOW INFO POPUP FOR 5 SEC. AFTER SOURCE SWITCH
S OSDNOTICE 1
> OSDNOTICE OFF
DISABLE INFO POPUP
S OSDNOTICE 2
> OSDNOTICE ON
ALWAYS SHOW INFO POPUP AFTER SOURCE SWITCH
R OSDNOTICE
> OSDNOTICE (OFF, ON, or INFO)
SHOW INFO POPUP SETTING STATUS
(B) Status Commands
7 www.intelix.com
Page 8
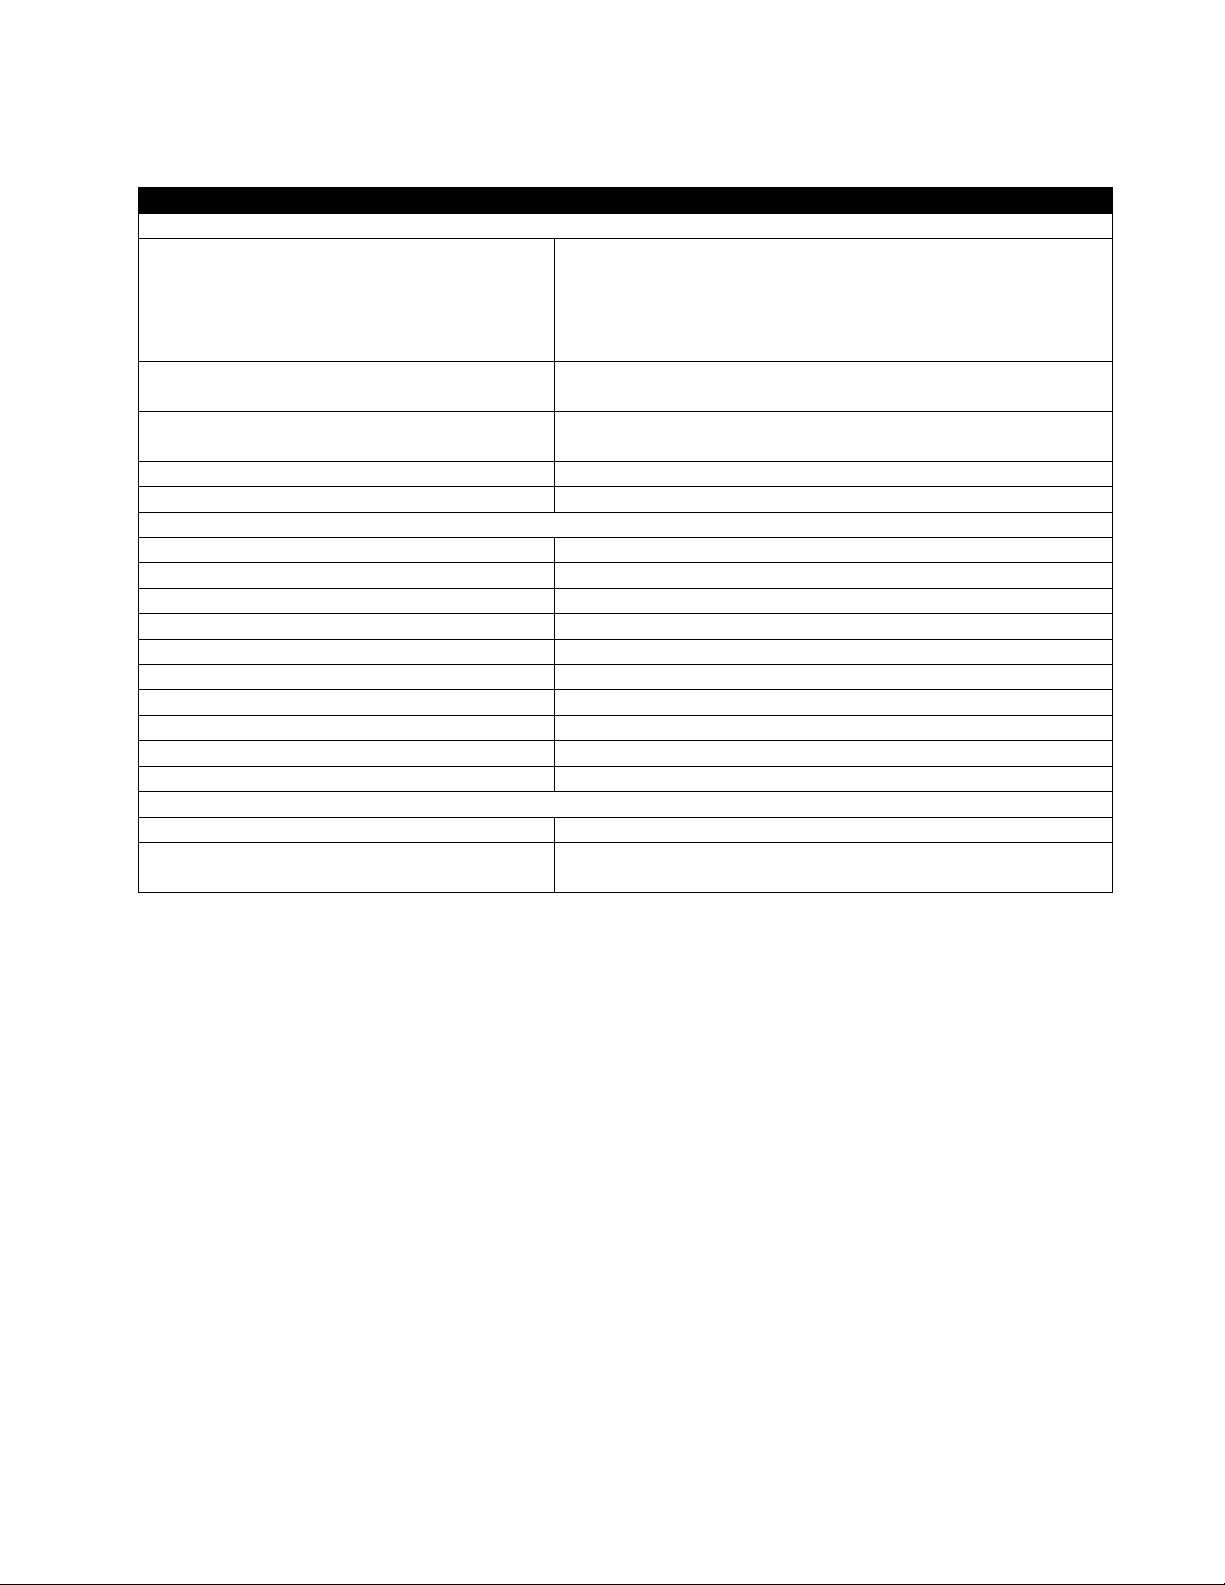
Technical Specifications
I/O Connections
Input Connectors
HDMI type A (DVI-D compatible)
RGB and analog stereo audio (HD15 & 3.5mm)
YPbPr, SPDIF, analog stereo audio (RCA)
S-Video and analog stereo audio (4-pin and RCA)
Composite Video and analog stereo audio (RCA)
Output Connectors
HDMI type A
SPDIF (RCA)
Supported Resolutions
480i, 480p, 576i, 576p, 720p, 1080i, 1080p
VGA, SVGA, XGA, SXGA, UXGA, WXGA, WSXGA, WUXGA
Control
Front Panel, Included IR Remote, RS232
Compliance
HDMI, HDCP
Chassis and Environmental
Dimensions (HxWxD)
1.7x8.5x6.45” (42x218x164mm)
Shipping Weight
4.45 lbs. (2.1 kg)
Operating Temperature
0° to +48° C (+32° to +120° F)
Operating Humidity
10% to 85%, Non-condensing
Storage Temperature
-10° to +70° C (+14° to +158° F)
Storage Humidity
10% to 85%, Non-condensing
Enclosure
Painted Steel
Maximum Power Consumption
9 watts
External Power Supply
5VDC @ 2A
Regulatory
CE, RoHS
Other
Warranty
2 years
What’s in the Box
DIGI-SCAL-5 (1 ea.), IR Remote (1 ea.), AC Power Adapter (1 ea.),
Operation Guide (1 ea.)
www.intelix.com 8
 Loading...