

Page 1

DIGI-SCAL-11X2
11x2 Switcher/Scaler/Format Converter
Page 2

Intelix DIGI-SCAL-11X2 Installation Manual
Table of Contents
Overview ............................................................................................. 4
Installation ......................................................................................... 5
Operation ........................................................................................... 7
Technical Specifications ................................................................... 13
Warranty ............................................................................................ 14
Contact Information………………………………………………… . 16
Copyright 2011 Intelix LLC .
Design with Intelligence
Rev.1103
2 www.intelix.com
Page 3

Intelix DIGI-SCAL-11X2 Installation Manual
Important Safety Instructions
Please completely read and verify you understand all instructions in this manual before operating this
equipment.
Keep these instructions in a safe, accessible place for future reference.
Heed all warnings.
Follow all instructions.
Do not use this apparatus near water.
Clean only with a dry cloth.
Do not install near any heat sources such as radiators, heat registers, stoves, or other apparatus (including
amplifiers) that produce heat.
Use only accessories specified or recommended by Intelix.
Explanation of graphical symbols:
o Lightning bolt/flash symbol: the lightning bolt/flash and arrowhead within an equilateral
triangle symbol is intended to alert the user to the presence of uninsulated “dangerous
voltage” within the product enclosure which may be of sufficient magnitude to constitute a
risk of shock to a person or persons.
o Exclamation point symbol: the exclamation point within an equilateral triangle symbol is
intended to alert the user to the presence of important operating and maintenance
(servicing) instructions tin the literature accompanying the product.
WARNING: TO REDUCE THE RISK OF FIRE OR ELECTRIC SHOCK, DO NOT EXPOSE THIS
APPARATUS TO RAIN OR MOISTURE AND OBJECTS FILLED WITH LIQUIDS, SUCH AS VASES,
SHOULD NOT BE PLACED ON THIS APPARATUS.
Use the mains plug to disconnect the apparatus from the mains.
THE MAINS PLUG OF THE POWER SUPPLY CORD MUST REMAIN READILY ACCESSIBLE.
Do not defeat the safety purpose polarized or grounding-type plug. A polarized plug has two blades with one
wider than the other. A grounding-type plug has two blades and a third grounding prong. The wide blade or the
third prong is provided for your safety. If the provided plug does not fit into your outlet, consult an electrician for
replacement of your obsolete outlet. Caution! To reduce the risk of electrical shock, grounding of the center
pin of this plug must be maintained.
Protect the power cord from being walked on or pinched particularly at the plugs, convenience receptacles, and
the point where they exit from the apparatus.
Do not block the air ventilation openings. Only mount the equipment per Intelix’s instructions.
Use only with the cart, stand, tripod, bracket, table, or rack specified by Intelix or sold with the
equipment. When/if a cart is used, use caution when moving the cart/equipment combination to
avoid injury from tip-over.
Unplug this apparatus during lightning storms or when unused for long periods of time.
Caution! Shock Hazard. Do not open the unit. Refer to qualified service personnel. Servicing is required when
the apparatus has been damaged in any way, such as power-supply cord or plug is damaged, liquid has been
spilled or objects have fallen into the apparatus, the apparatus has been exposed to rain or moisture, does not
operate normally, or has been dropped.
Refer all servicing to qualified service personnel. Servicing is required when the apparatus has been damaged in
any way, such as the power-supply cord or plug is damaged, liquid has been spilled or objects have fallen into the
apparatus, the apparatus has been exposed to rain or moisture, does not operate normally, or has been dropped.
www.intelix.com
3
Page 4

Intelix DIGI-SCAL-11X2 Installation Manual
Overview
How do you integrate multiple analog and digital devices into a single,
comprehensive high-definition environment? Magic? Miracle? Intelix.
The Intelix DIGI-SCAL-11X2 features the processing of three different
devices—switching, scaling, and format conversion—in a single, 1RU chassis.
It provides switching between eleven different audio-visual sources, it scales the
sources up to 720p or 1080p, and it converts the sig nals to HDMI for seamless
integration into your HD environment.
The DIGI-SCAL-11X2 makes your old skool equipment look good and your
new school technology state-of-the-art.
Design with Intelix and Design with Intelligence.
DIGI-SCAL-11X2 Package Contents
DIGI-SCAL-11X2 switcher/scaler/format converter
5 VDC power supply
19” rack-mounting ears
Remote control
Manual
4 www.intelix.com
Page 5
Intelix DIGI-SCAL-11X2 Installation Manual
Installation
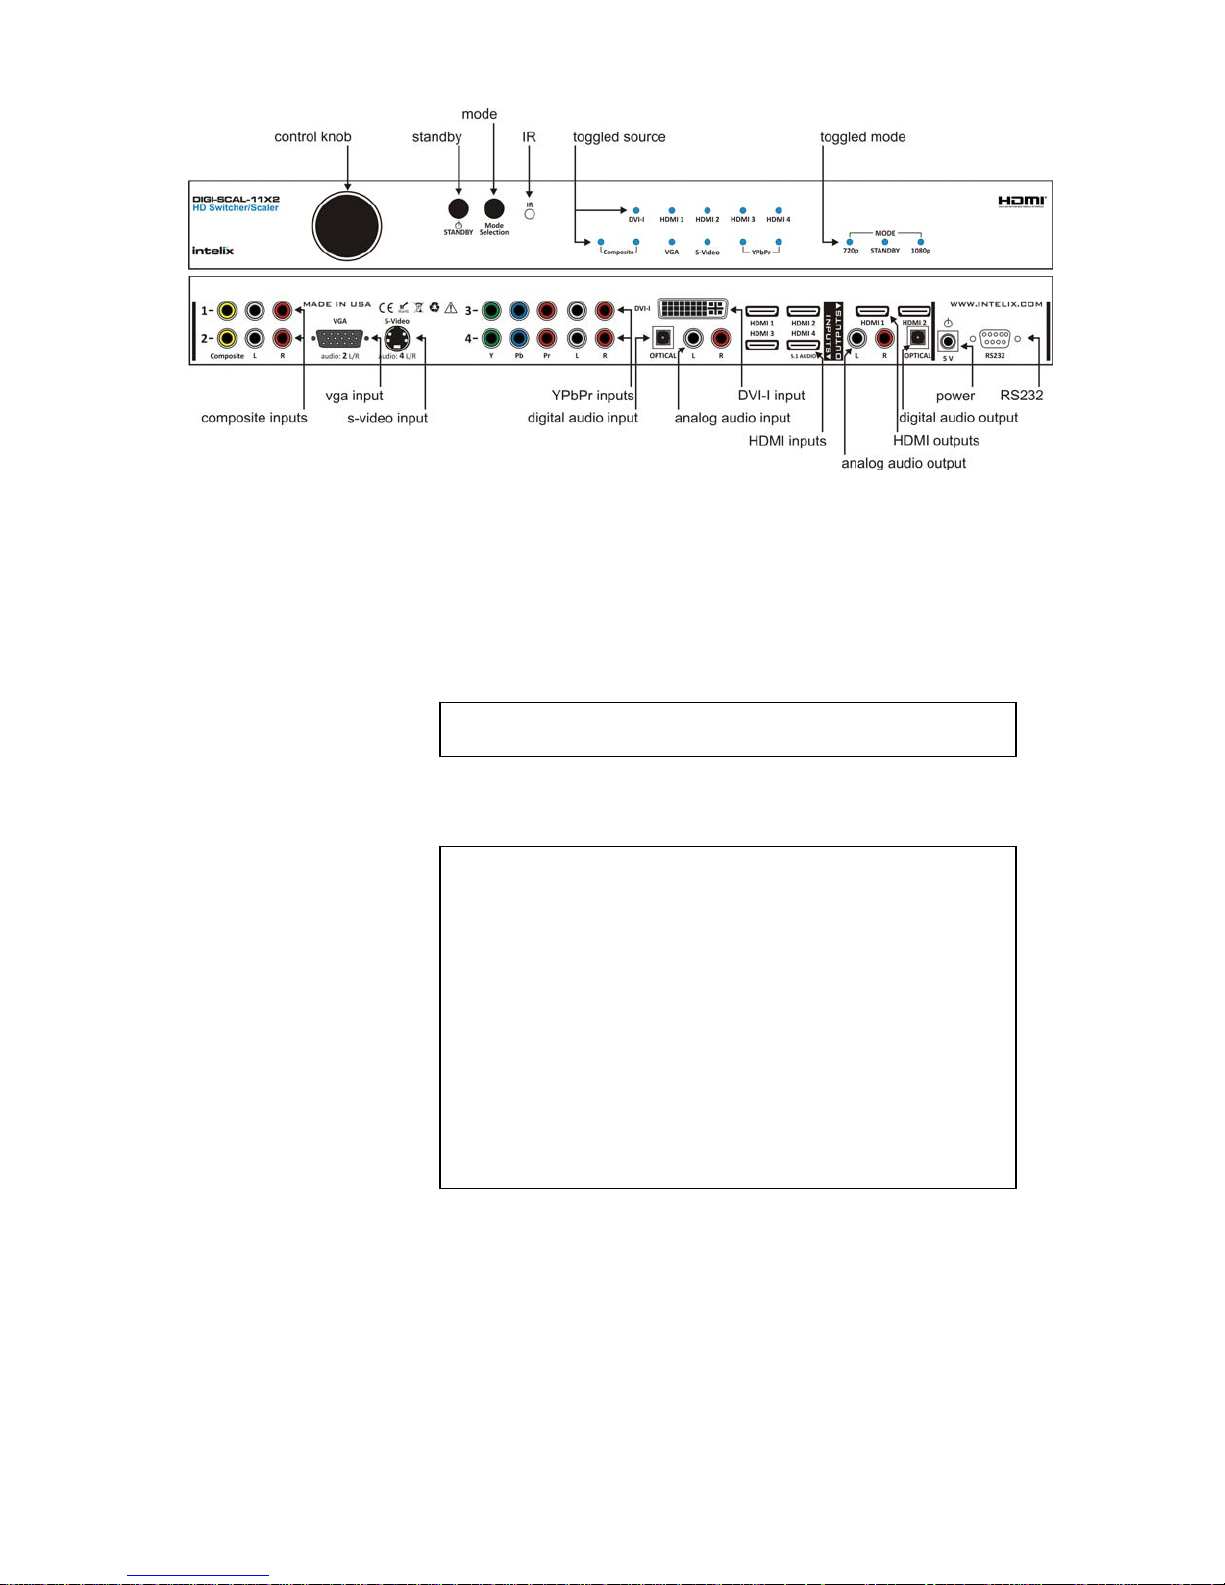
To install the Intelix DIGI-SCAL-11X2, please perform the following steps.
1. If mounting in a 19” audio/video rack, affix the 19” rack ears to the DIGI-
SCAL-11X2. The DIGI-SCAL-11X2 requires one rack unit of spacing.
2. Power-off the source and destination audio and video devices.
Note: All connecting audio-visual equipment must be powered off.
3. Connect the input sources to the DIGI-SCAL-11X2 using high-quality
cables.
Ventilation when Rack Mounting
4. Connect the output destinations to the DIGI-SCAL-11X2 using high-quality
HDMI, stereo audio, and/or digital audio cables.
5. If desired, connect a second HDMI destination to the DIGI-SCAL-11X2.
HDMI outputs 1 and 2 are paralleled.
6. Connect the included 5 VDC power supply to the DIGI-SCAL-11X2.
7. If controlling remotely, connect an RS232 or IR control cables.
At least 2 inches of free air space is required on both sides of
the DIGI-SCAL-11X2 for proper side ventilation.
Ensure there are no closeable doors on the rack that might seal
the DIGI-SCAL-11X2 from a steady supply of cool air.
Avoid mounting the DIGI-SCAL-11X2 near a power
amplifier or any other source of significant heat.
It is recommended that you leave an empty rack space above
and below the DIGI-SCAL-11X2 for additional cooling.
www.intelix.com
5
Page 6

Intelix DIGI-SCAL-11X2 Installation Manual
8. Power-on the DIGI-SCAL-11X2.
9. Power-on the source and destination audio and video devices.
6 www.intelix.com
Page 7
Intelix DIGI-SCAL-11X2 Installation Manual
Operation
To operate the Intelix DIGI-SCAL-11X2, please perform the following steps.
Note: The DIGI-SCAL-11X2 features on-board memory. Settings are
stored during power off and restored during power on. Additional
system saves occur automatically every five minutes.
Channel Pairing
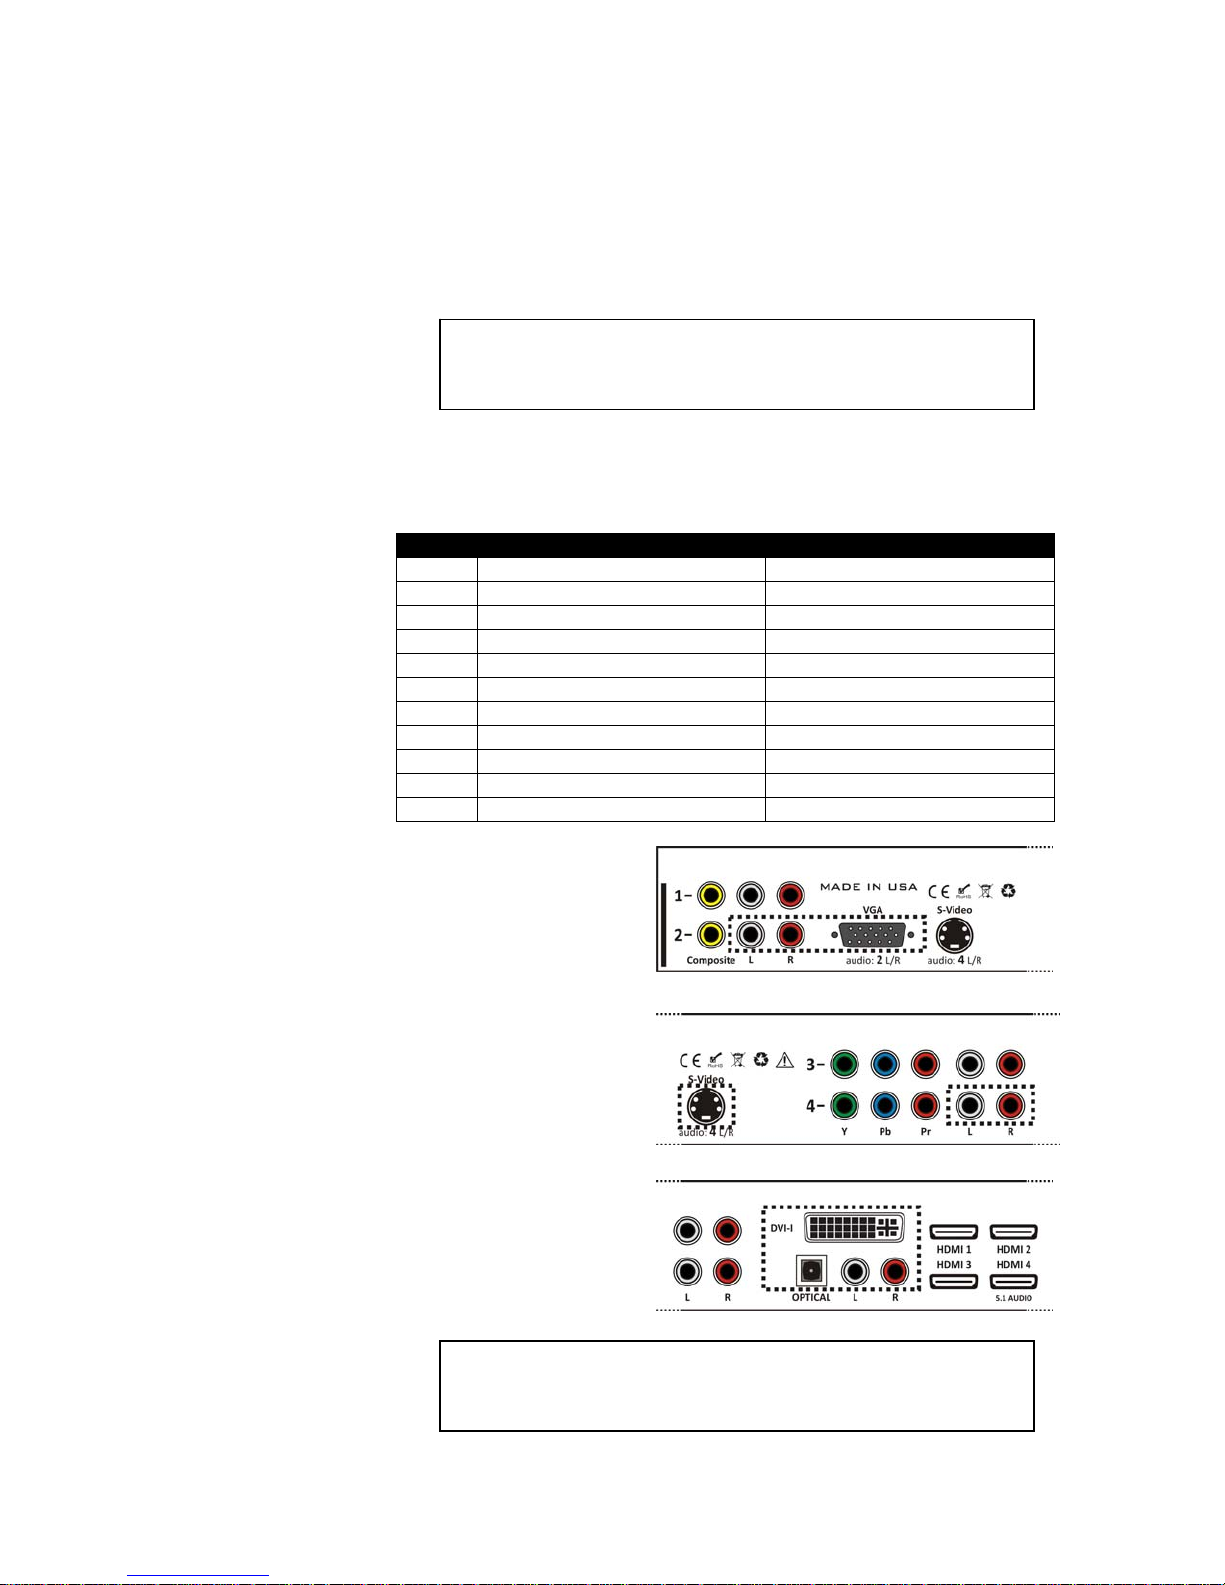
The DIGI-SCAL-11X2 features eleven different audio/video inputs. To best
utilize the switching functionality, audio and video pairing are as follows.
Input Video Format Audio Format
1 Composite Stereo audio
2 Composite Stereo audio
3 YPbPr Stereo audio
4 YPbPr Stereo audio
5 VGA Stereo audio
6 S-video Stereo audio
7 DVI-I Stereo audio & digital audio
8 HDMI Digital audio
9 HDMI Digital audio
10 HDMI Digital audio
11 HDMI Digital audio (Dolby 5.1)
When using VGA sources
with audio, stereo audio
channel two should be used.
When using S-video sources
with audio, stereo audio
channel four should be used.
When using DVI-I sources
with audio, both digital
(optical) and analog (stereo)
audio are available.
Note: The DIGI-SCAL-11X2 converts analog audio to digital audio;
however, it will not convert digital audio from the optical audio inp ut
or HDMI input 4 to stereo audio.
www.intelix.com
7
Page 8
Intelix DIGI-SCAL-11X2 Installation Manual
Front Panel Control
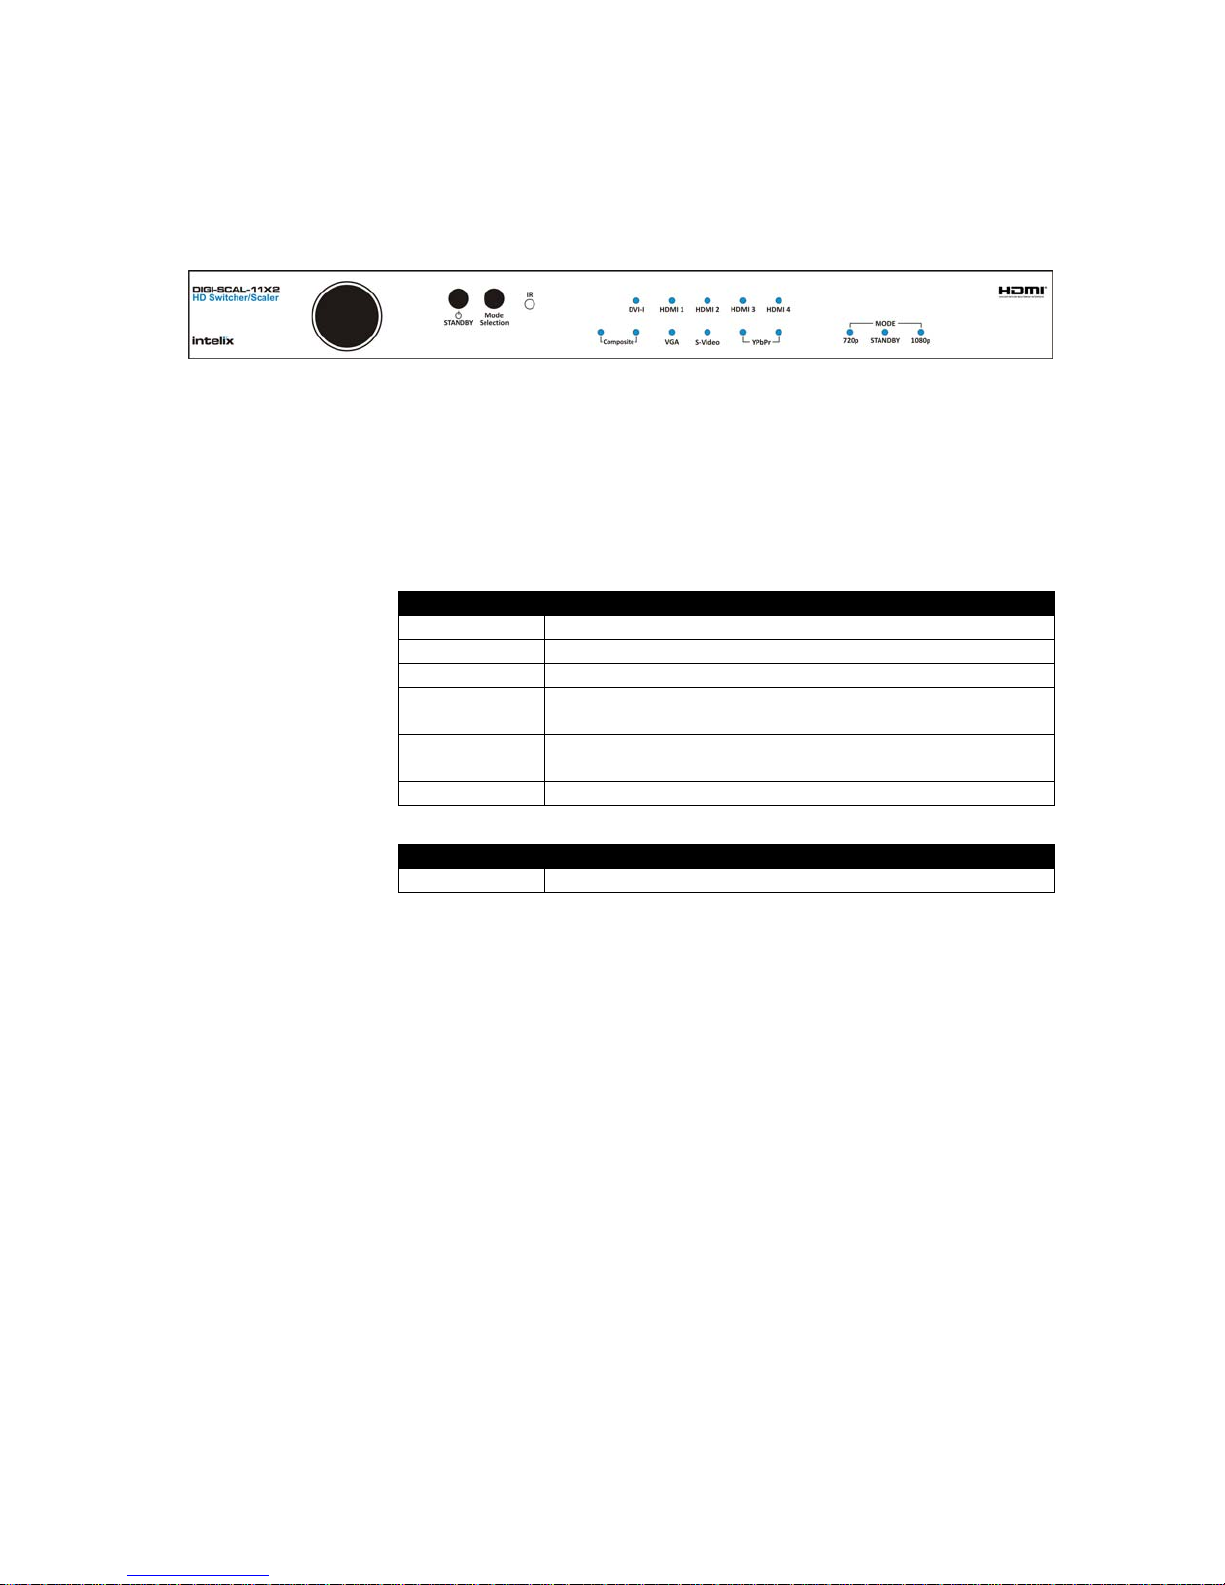
The DIGI-SCAL-11X2 features front panel control for source and mode
selection.
1. Power on the unit by selecting the Standby button.
2. Select the desired audio-visual input with the rotary control knob.
3. Select the desired mode (720p or 1080p) with the Mode Selection button.
Supported Signal Formats
Input Signal Format
Composite PAL, NTSC
S-video PAL, NTSC
YPbPr1 480i, 480p, 576i, 576p, 720p, 1080i, 1080p
VGA2 800x600, 1024x768, 1152x864, 1280x768, 1280x960,
DVI-I2 800x600, 1024x768, 1152x864, 1280x768, 1280x960,
HDMI1 480i, 480p, 576i, 576p, 720p, 1080i, 1080p
1280x1024, 1440x900, 1400x1050, 1600x1200, 1920x1200
1280x1024, 1440x900, 1400x1050, 1600x1200, 1920x1200
Output Signal Format
HDMI1 720p, 1080p
1
supported modes: 50 and 60 hz
2
supported modes: 60 hz
8 www.intelix.com
Page 9
Intelix DIGI-SCAL-11X2 Installation Manual
Included Remote Control
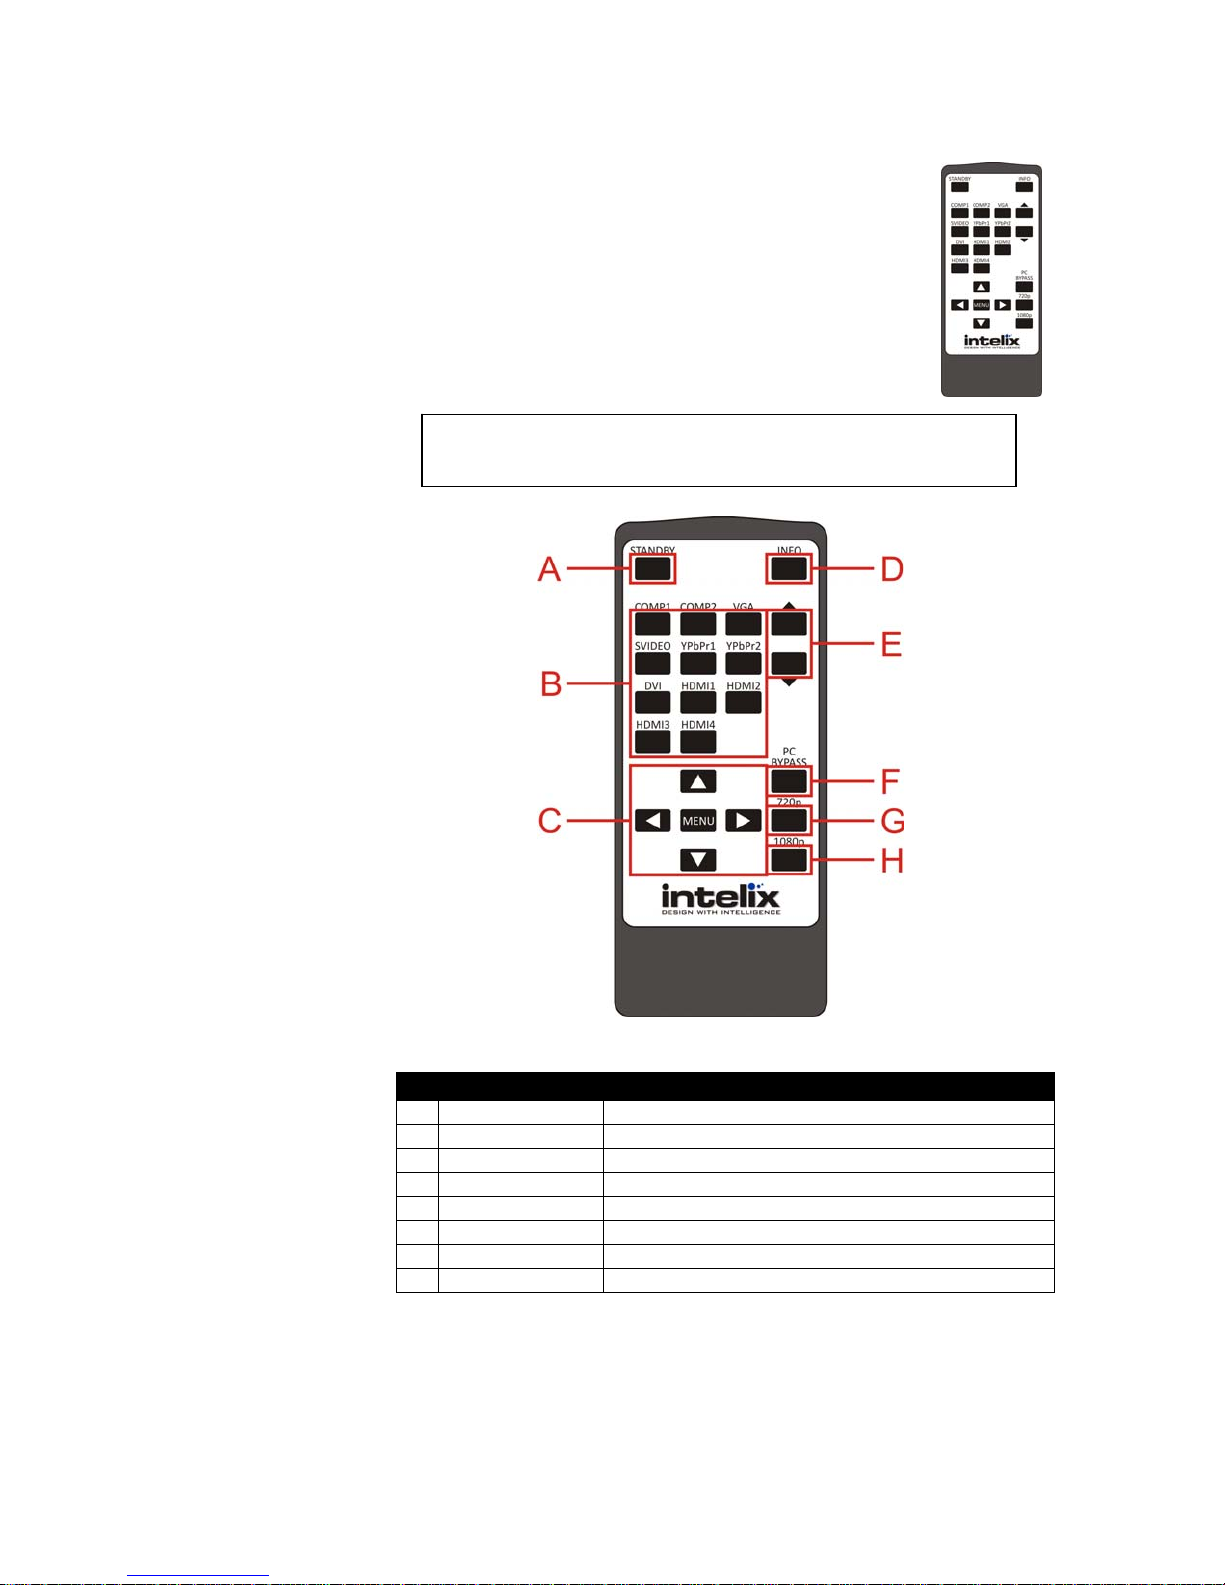
The DIGI-SCAL-11X2 includes a wireless remote control for
source selection, mode selection, and system configuration.
1. Verify the IR sensor on the front panel of the DIGI-SCAL-
11X2 is visible.
2. Aim the remote control at the sensor window. Push the
desired button. Boo yah.
Note: If your boo yah isn’t working, try moving closer to the unit. If
it still isn’t working, verify the battery is fully charged.
A Standby
B Source Selection
C Menu
D Info
E Source Scrolling
F PC Bypass
G 720p Mode
H 1080p Mode
www.intelix.com
Function Description
Toggles on and off standby mode (low power mode)
Directly selects an audio-visual input
Toggles the onscreen menu
Toggles the input and output messaging
Toggles the next or previous audio-vi sual i n put
Toggles on and off PC bypass mode
Toggles the output mode to 720p
Toggles the output mode to 1080p
9
Page 10
Intelix DIGI-SCAL-11X2 Installation Manual
PC Bypass Mode
PC Bypass Mode allows a computer’s native resolution to display on
the destination monitor. In essence, this mode disables format
conversion of the DVI and VGA inputs, even though the output is still
on the HDMI connectors.
When using PC Bypass Mode, the front panel indicators will disable.
In addition, the default output will be in 1080p.
PC Bypass Supported Resolutions
Input2 800x600, 1024x768, 1152x864, 1280x720, 1280x960,
1280x1024, 1440x900, 1600x1200, 1920x1080
Output2 800x600, 1024x768, 1152x864, 1280x720, 1280x960,
2
supported modes: 60 hz
1280x1024, 1440x900, 1600x1200, 1920x1080
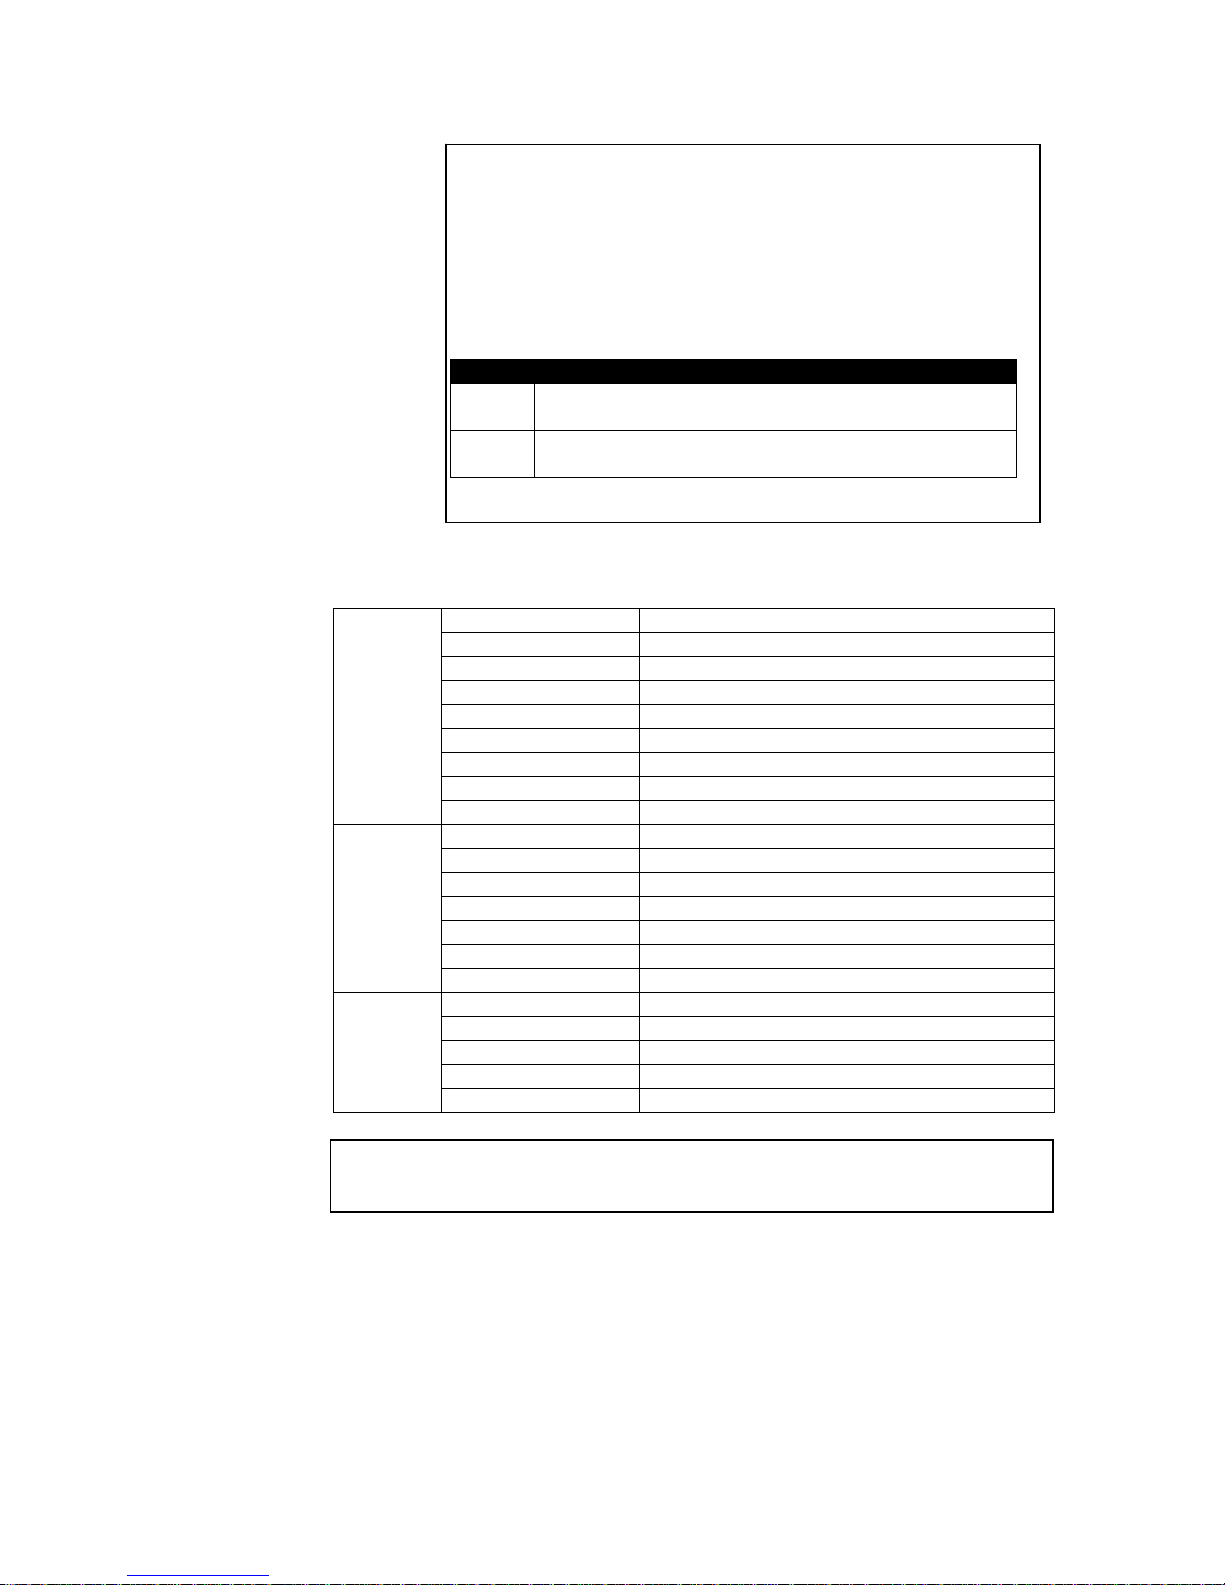
Onscreen Display Menu
Contrast
Brightness
Saturation
Sharpness
Picture
PC
Onscreen
Display
Hue
Picture Mode
Scale
Noise Rejection
Reset
Contrast
Brightness
Horizontal Position
Vertical Position
Horizontal Size
Vertical Size
Reset
Horizontal Position
Vertical Position
Duration
Halftone
Reset
Note: Changes in the onscreen display settings affect the currently selected input.
Each channel may be configured independently.
0 – 100 of contrast level
0 – 100 of brightness level
0 – 100 of saturation level
0 – 100 of sharpness level
0 – 100 of hue level
standard / dynamic / soft / personal
full / overscan / underscan / letterbox / panscan
high / mid / low / auto / off
reset settings to factory default
0 – 100 of contrast level
0 – 100 of brightness level
adjust horizontal positioning
adjust vertical positioning
adjust horizontal size
adjust vertical size
reset settings to factory default
adjust horizontal positioning of onscreen display
adjust vertical positioning of onscreen display
5 sec / 15 sec / 30 sec / 60 sec
0 – 8 of halftone level
reset settings to factory default
10 www.intelix.com
Page 11

Intelix DIGI-SCAL-11X2 Installation Manual
IR Remote Control
The DIGI-SCAL-11X2 supports remote control v ia IR through a front pan el IR
sensor.
1. If controlling the DIGI-SCAL-11X2 through the IR sensor on the front
panel, place an IR emitter directly over the front panel sensor.
IR Emitter Mounting Tips
Surrounding electrical equipment may be producing high
levels of IR noise. Plasma TVs and compact fluorescent lights
are known polluters. Shield the outside of the emitter and the
hardware’s IR window with electrical tape.
Verify the emitter is directly on the hardware’s IR window
and directly over the IR sensor. Operation may be intermittent
if the emitter is too far away from the sensor.
Clean the DIGI-SCAL-11X2 IR sensor window with an
alcohol-based cleaner before applying the emitter to guarantee
adhesion.
Should the emitter not adhere to the DIGI-SCAL-11X2 sensor
window, apply a small drop of glue to the adhesion pad on the
emitter and re-apply.
www.intelix.com
11
Page 12
Intelix DIGI-SCAL-11X2 Installation Manual
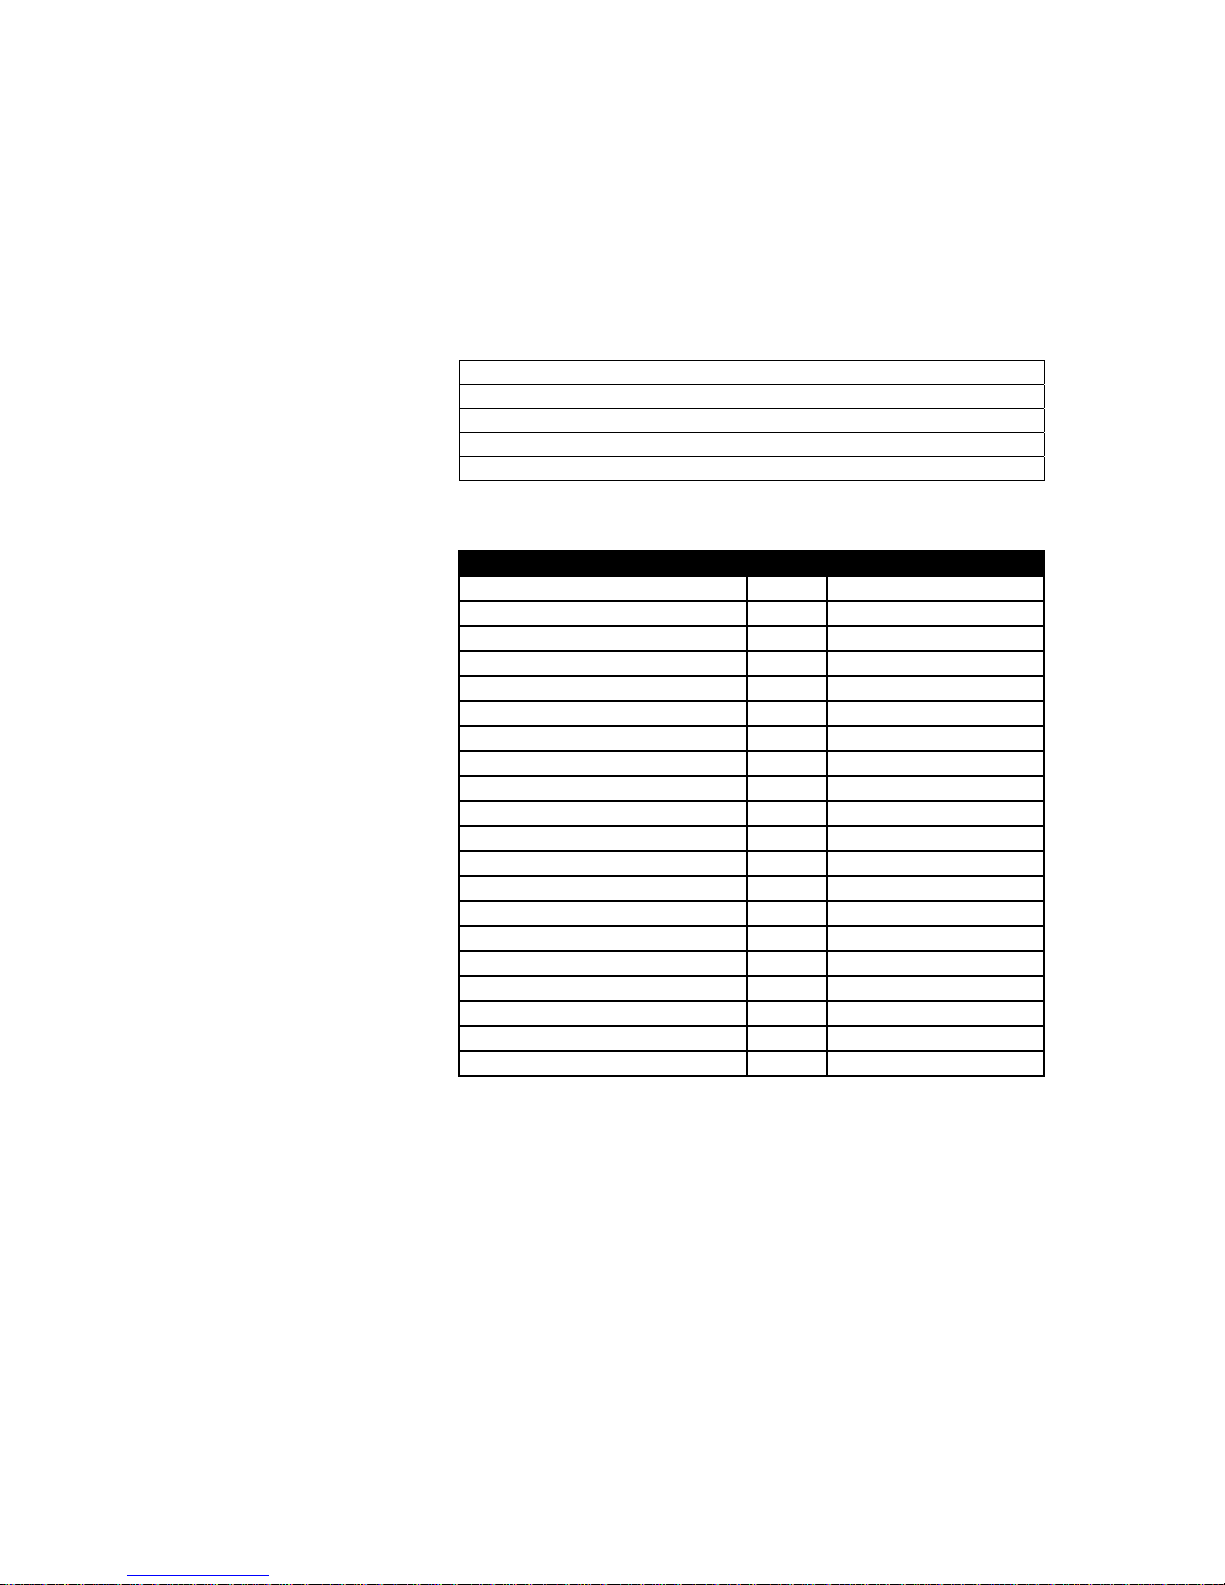
RS232 Remote Control
The DIGI-SCAL-11X2 supports remote control through a rear panel RS232
control port.
1. If controlling the DIGI-SCAL-11X2 through the RS232 control port on the
rear panel, connect a straight-through serial cable directly to the matrix.
9600 baud rate
8 data bits
1 stop bit
No parity bit
No handshake
RS232 Commands
Code Description Ascii Hex
Switch to AV 1
Switch to AV 2
Switch to VGA
Switch to S-Video
Switch to Component 1
Switch to Component 2
Switch to DVI
Switch to HDMI 1
Switch to HDMI 2
Switch to HDMI 3
Switch to HDMI 4
Menu
Menu Left
Menu Right
Menu Up
Menu Down
Info
PC Bypass
720P
1080P
Note that the “0x” in the Hex column denotes that the number is a
hexadecimal number. The programmer should only transmit the
number in the proper format for their control system.
|s1 0x7C 0x73 0x31
|s2 0x7C 0x73 0x32
|s3 0x7C 0x73 0x33
|s4 0x7C 0x73 0x34
|s5 0x7C 0x73 0x35
|s6 0x7C 0x73 0x36
|s7 0x7C 0x73 0x37
|s8 0x7C 0x73 0x38
|s9 0x7C 0x73 0x39
|sA 0x7C 0x73 0x41
|sB 0x7C 0x73 0x42
|mm 0x7C 0x6D 0x6D
|ml 0x7C 0x6D 0x6C
|mr 0x7C 0x6D 0x72
|mu 0x7C 0x6D 0x75
|md 0x7C 0x6D 0x64
|mi 0x7C 0x6D 0x69
|bp 0x7C 0x62 0x70
|o2 0x7C 0x6F 0x32
|o1 0x7C 0x6F 0x31
12 www.intelix.com
Page 13

Intelix DIGI-SCAL-11X2 Installation Manual
Technical Specifications
Vertical Frequency Range ..................................................................... 24 - 60 Hz
Signaling Rate ................................................................. 2.25 gigabits per second
Input DDC Signal .................................................................... 5.0 volts p-p (TTL)
Input Video Signal ..................................................................... 0.5 – 1.0 volts p-p
Video Amplifier Bandwidth .................................................................... 255 MHz
Input Connectors ............................................. Four (4) HDMI type A connectors
Two (2) composite video RCA connectors
(2) YPbPr video RCA connectors
One (1) HD15 VGA connector
One (1) 4-pin S-video connector
One (1) DVI-I video connector
Five (5) stereo audio RCA connectors
One (1) optical digital audio connector
Output Connectors ........................................... Two (2) HDMI type A connectors
Two (2) stereo audio RCA connectors
One (1) optical digital audio connector
Supported Video Resolutions ............ 480i, 480p, 576i, 576p, 720p, 1080i, 1080p
8, 10, 12 bits per channel
Diagnostic .......................................................... Front panel input to output LEDs
Front panel mode LED
Operating Temperature Range ................................................. -41 to 95 degrees F
-5 to 35 degrees C
Operating Humidity Range ............................................ 5 to 90% non-condensing
Included Accessories ............................................... One (1) 5 VDC power supply
Two (2) 19” rack mounting ears
One (1) remote control
Control ........................................................................ Front panel, RS232, and IR
Dimensions ............................................................................. 16.9” x 1.75” x 7.9”
1 RU
Enclosure ............................................................................................. Black metal
Max Power Consumption ......................................................................... 15 watts
Power .......................................................................................................... 5 VDC
Regulatory ............................................................................................. CE, RoHS
Shipping Weight ............................................................................................. 8 lbs
Intelix Part Number .................................................................. DI GI-SCAL-11X2
Warranty ..................................................................................................... 2 years
www.intelix.com
13
Page 14

Intelix DIGI-SCAL-11X2 Installation Manual
Warranty
Intelix warrants to the original purchaser of new and B-stock products that the
product will be free from defects in material and workmanship for a period of 2
years from the date of purchase from an authorized Intelix reseller, subject to the
terms and conditions set forth below.
All Intelix products are guaranteed against malfunction due to defects in
materials or workmanship for two years after date of purchase. If a malfunction
does occur during the specified period, the defective product will be repaired or
replaced at Intelix’s option without charge. As a condition to receiving the
benefits of this warranty, you must provide Intelix with documentation that
establishes you were the original purchaser of the Intelix produ cts. If yo u are not
the original purchaser, the Intelix equipment must be accompanied by dated
documentation of proof of purchase.
This warranty does not cover: 1) Malfunction resulting from use of the product
other than as specified in the user manual; 2) Installation specific wiring; 3)
Malfunction resulting from abuse or misuse of the product; 4) Exterior chassis
appearance; 5) Malfunction occurring after repairs have been made by anyone
other than Intelix or any of its authorized service representatives; 6) Acts of
nature; 7) Optional software upgrades or updates.
This warranty will be void if the product’s serial number or quality control
sticker has been removed or defaced, or if the product has been altered,
subjected to damage or abuse, repaired by any person not authorized by Intelix
to make repairs, or installed in any manner that does not comply with Intelix’s
recommendations.
This warranty is in lieu of all other warranties, express or implied. Intelix
disclaims all other warranties, express or implied, including, but not limited to,
implied warranties of merchantability and fitness for a particular purpose.
No agent or reseller of Intelix is authorized to modify this warran ty or to make
additional warranties on behalf of Intelix. Statements, representations or
warranties made by any party other than Intelix does not constitute warranties by
Intelix. Intelix shall not be responsible or liable for any statement, representation
or warranty made by any other person or party.
Return service is offered to the original purchaser of the equipment within 30
days from the original shipment from Intelix. All items must be in their original
factory condition, including all accessories and packaging. A restocking fee of
no less than 15% applies to all returns. A higher fee may be applied depending
on condition, model, and the age of the equipment. Intelix reserves the exclusive
right to determine the restocking fee. At Intelix’s option, refunded amounts will
be placed on the original purchaser’s account in the form of a credit.
Returns and service is only offered after a return authorization (RA) number has
been generated by an authorized Intelix factory representative. This RA number
must be clearly referenced on the outside of all packages shipped to Intelix.
Intelix Applications must be contacted prior to any return of goods; all return
shipments received by Intelix without an RA number will be refused. All
shipments must be received within 30 days from the RA number issue date.
14 www.intelix.com
Page 15

Intelix DIGI-SCAL-11X2 Installation Manual
At Intelix’s option, Intelix will advance replace failing Intelix goods on direct
reseller accounts within 90 days of shipment from Intelix. The advanced
replaced goods will be invoiced and payment will be due under standard terms if
the failing goods are not received within 14 days of the advanced replacement
shipment.
Intelix will match shipping method for units still under warranty. If a unit which
is out of warranty needs repair, the dealer must pay for shipping, replacement
parts, and a fixed $100/hr* labor fee. Normal Intelix credit terms apply to
billable repairs. If a unit is returned and found to work according to factory
specifications, a $100 service fee* is billed regardless of warranty status. All
repairs are made in a reasonably quoted amount of time; a rush shipment fee of
$50* may apply to repairs needing a quicker than usual turn-around time.
All goods outside of the standard warranty period which are repaired by Intelix
are covered by an additional 90 day warranty. This 90 day warranty only covers
the specific repaired components. All other standard warranty limitations apply.
*Or current applicable rate/fee.
Warranty, return, and shipping terms and conditions subject to chan ge and do
not apply outside of United States and Canada. Please contact the factory for
the most up-to-date information.
www.intelix.com
15
Page 16

Intelix DIGI-SCAL-11X2 Installation Manual
Thank you for your purchase.
We appreciate your business. Please contact us with your questions
and comments.
Intelix
2222 Pleasant View Road Suite 1
Middleton, WI 53562
Phone: 608-831-0880
Toll-Free: 866-4-MATMIX
Fax: 608-831-1833
www.intelix.com
[email protected]
Copyright 2011 Intelix LLC .
Design with Intelligence
16 www.intelix.com
 Loading...