


Intelix DIGI-HD-UHR2
Installation Manual
Introduction
The Intelix DIGI-HD-UHR2 transmits HDMI up to 300’ over a single twisted
pair cable. In environments with high electromagnetic interference (EMI), a
shielded twisted pair cable should be used.
Built-in HDshāk® technology provides dynamic HDMI, EDID/DDC and
HDCP mode selection, gauranteeing performance and image quality. Plus,
onboard HDMI amplification and buffering allows multiple extenders to be
daisy-chained for greater distances.
The DIGI-HD-UHR2 features electrostatic discharge (ESD) protection
circuitry which safegaurds the HDMI circuit against static electricity and other
destructive stray voltage.

Installation
g
Caution: Do not attempt to disassemble or alter the balun housing. There are no
user-serviceable parts inside the unit. Doing so will void your warranty.
To install the Intelix DIGI-HD-UHR2 baluns, perform the following steps:
1. Turn off power and disconnect the audio/video equipment by following the
manufacturer’s instructions.
Caution: To minimize the possibility of equipment damage from electrostatic
discharge (ESD), all source and destination equipment must be powered off durin
installation. This includes signal extenders, splitters, and switches.
2. Make certain that outlets and cross connects to which you will connect the DIGIHD-UHR2 are configured properly and labeled correctly to identify the point-topoint circuit.
Caution: Do not connect the balun to a telecommunication outlet wired to
unrelated equipment. Doing so may damage the unit or any connected equipment.
Ensure all connected twisted pair cabling is straight-through (point-to-point).
3. Verify the desired twisted pair cable is not being used for other LAN or telephony
equipment.
Note: For your convenience, it is recommended that you uniquely mark the ends
of the twisted pair cable before pulling them through a wall or conduit.
4. Verify that the source and destination equipment work when directly connected with
HDMI cables. Be sure to test both HDMI cables required for system installation.
5. Connect the DIGI-HD-UHR2 send balun to the HDMI output of the video source.
Do not connect the 5V power supply.
6. Connect the DIGI-HD-UHR2 send balun to the IR emitter.
7. Connect the DIGI-HD-UHR2 receive balun to the HDMI input of the receiving
device at the remote end. Do not connect the 5V power supply.
8. Connect the DIGI-HD-UHR2 receive balun to the IR receiver.
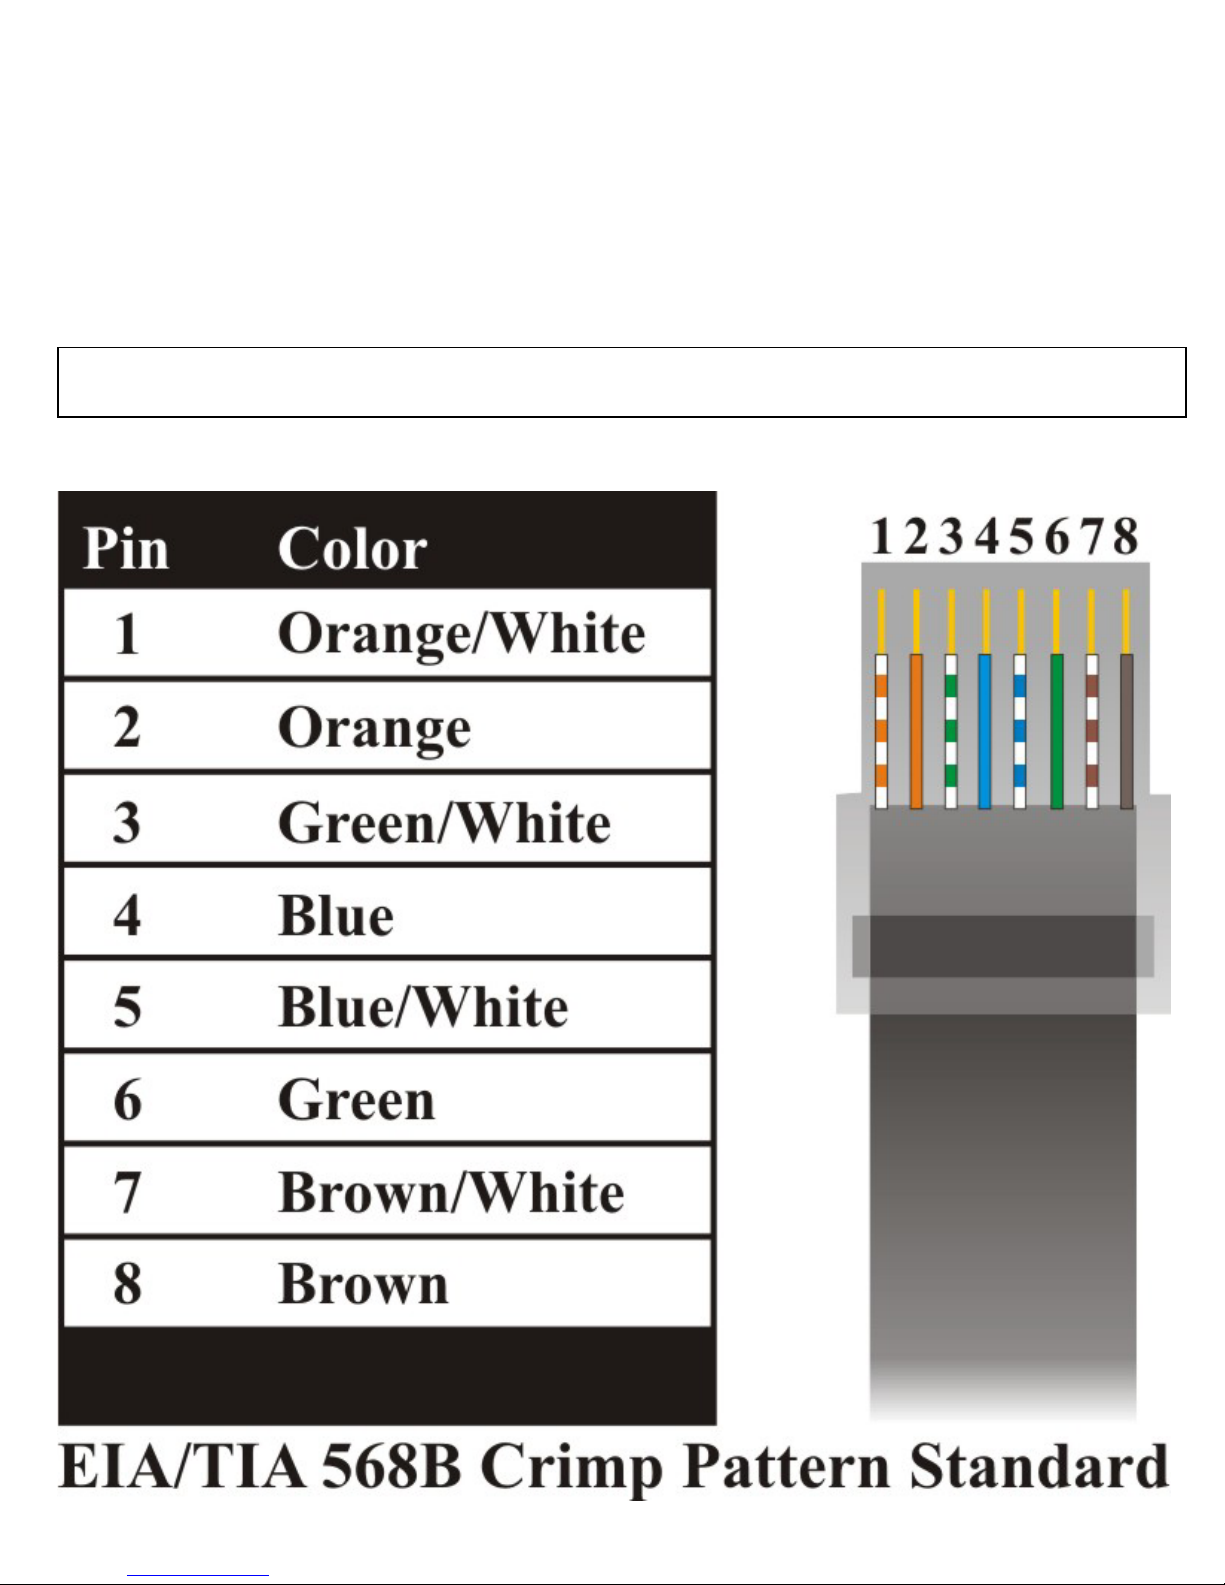
9. Complete the connection between the send and receive baluns using one run of
twisted pair cable. Ensure the cable conforms to EIA 568B crimp standards and
there are no split pairs or taps.
10. Connect the 5V power supply to the DIGI-HD-UHR2 receive balun.
11. Connect the 5V power supply to the DIGI-HD-UHR2 receive balun Power-on the
video equipment.
12. Verify picture quality.
If necessary, toggle the Hand Shake button to sync the source and destination
13.
devices.
If necessary, adjust the dip switches on the send and receive baluns to select modes
14.
of operation.
Note: Dip switches are located under the cap on the side of the unit.

DIGI-HD-UHR2-S Transmitter Dip Switch Positions
Position 1 Position 2 Mode
Off Off Read and store EDID data from displays
Off On Turn on Dolby TrueHD and DTS-HD
On Off Turn on stereo audio
On On No function
DIGI-HD-UHR2-R Receiver Switch Positions
Position 1 Position 2 Mode
Off Off Extended cable
Off On Force signal output
On Off Normal cable
On On No function

Troubleshooting
Symptom Probable Causes Possible Solutions
No signal
Status LED is off
Incorrect cable
termination
Verify that both ends of the twisted pair
cables use 568B crimp pattern.
No signal Insufficient power Verify the power supplies are connected to
both the send and receive baluns.
Verify the power LEDs on both the send
and receive units are brightly illuminated.
Unusual colors in
the video
HDMI
synchronization
issues
Power off the destination device and power
it back on to force renegotiation.
Unplug and re-plug the HDMI cable from
receive balun to force renegotiation.
No signal
Screen is
completely snowy
Speckling in the
Video signal exceeds
bandwidth of cabling
Use a shorter run of twisted pair cabling.
Drop the HDMI signal to the next lower
resolution; i.e., decrease resolution from
1080p to 1080i, etc.
video image
Occasional signal
dropouts
Video without
audio
Speckling in the
video image
Video without
audio
Unsupported video
resolution
Unsupported audio
codec
Replace the twisted pair cable with a
higher grade twisted pair cable; i.e.,
replace Cat 5e with Cat 6.
If the destination device is incapable of
displaying the video signal, alter the source
signal; i.e., decrease resolution from 1080p
to 1080i, etc.
Change source device to output PCM other
than Bitstream audio
Enable PCM down sampling if supported
by your source device

Technical Specifications
Video Amplifier Bandwidth
Supported Video Resolutions
Max Distance
(Cat 5e)
Max Distance
(Cat 6)
Input Video Signal
Input DDC Signal
Input Unit Connectors
Output Unit Connectors
Cabling
Power
Power Connector
Dimensions
Temperature
Shipping Weight
Warranty
Regulatory
Intelix Part Number
Ordering Information
1.65 Gbps
480i, 480p, 576i, 576p, 720p, 1080i, 1080p
1080p: 100’
1080i/720p: 200’
1080p: 150’
1080i/720p: 300’
1.2 volts p-p
5.0 volts p-p (TTL)
one (1) HDMI
one (1) shielded RJ45
one (1) HDMI
one (1) shielded RJ45
One run of Cat 5e or Cat 6
External 5 VDC
Powered on both ends
4.38” x 2.50” x 1.00”
Operating: 0° to 55°C
Storage: -20° to 85°C
Humidity: up to 95%
1 lb.
2 years
CE, RoHS
DIGI-HD-UHR2
DIGI-HD-UHR2 package includes one send unit, one
receive unit, and two power supplies
The Intelix DIGI-HD-UHR2 conforms to HDMI and HDCP specifications.
Intelix does not guarantee operation with devices that do not conform to these
specifications. The Intelix DIGI-HD-UHR2 passes HDCP signals and does not
manipulate them in any way.
Distances and picture quality may be affected by cable grade, cable quality, source
and destination equipment, RF and electrical interference, and cable patches. Intelix
specifications are based on straight-through cabling with standard-grade Cat 5e.

Thank you for your purchase.
www.intelix.com | intelix@intelix.com | 608-831-0880 phone | 608-831-1833 fax
 Loading...