


DIGI-HD-4X8
4 input by 8 output Matrix Switcher

Intelix DIGI-HD-4X8 Installation Manual
Table of Contents
Overview ............................................................................................. 4
Installation ......................................................................................... 5
Operation .......................................................................................... 10
Troubleshooting and Frequenty Asked Questions ........................... 23
Technical Specifications ................................................................... 25
Warranty ............................................................................................ 26
Contact Information………………………………………………… . 28
Copyright 2011 Intelix LLC.
Design with Intelligence
Rev. 1109
2 www.intelix.com

Intelix DIGI-HD-4X8 Installation Manual
3
Important Safety Instructions
Please completely read and verify you understand all instructions in this manual before operating this
equipment.
Keep these instructions in a safe, accessible place for future reference.
Heed all warnings.
Follow all instructions.
Do not use this apparatus near water.
Clean only with a dry cloth.
Do not install near any heat sources such as radiators, heat registers, stoves, or other apparatus (including
amplifiers) that produce heat.
Use only accessories specified or recommended by Intelix.
Explanation of graphical symbols:
o Lightning bolt/flash symbol: the lightning bolt/flash and arrowhead within an equilateral
triangle symbol is intended to alert the user to the presence of uninsulated ―dangerous
voltage‖ within the product enclosure which may be of sufficient magnitude to constitute a
risk of shock to a person or persons.
o Exclamation point symbol: the exclamation point within an equilateral triangle symbol is
intended to alert the user to the presence of important operating and maintenance
(servicing) instructions tin the literature accompanying the product.
WARNING: TO REDUCE THE RISK OF FIRE OR ELECTRIC SHOCK, DO NOT EXPOSE THIS
APPARATUS TO RAIN OR MOISTURE AND OBJECTS FILLED WITH LIQUIDS, SUCH AS VASES,
SHOULD NOT BE PLACED ON THIS APPARATUS.
Use the mains plug to disconnect the apparatus from the mains.
THE MAINS PLUG OF THE POWER SUPPLY CORD MUST REMAIN READILY ACCESSIBLE.
Do not defeat the safety purpose polarized or grounding-type plug. A polarized plug has two blades with one
wider than the other. A grounding-type plug has two blades and a third grounding prong. The wide blade or the
third prong is provided for your safety. If the provided plug does not fit into your outlet, consult an electrician for
replacement of your obsolete outlet. Caution! To reduce the risk of electrical shock, grounding of the center
pin of this plug must be maintained.
Protect the power cord from being walked on or pinched particularly at the plugs, convenience receptacles, and
the point where they exit from the apparatus.
Do not block the air ventilation openings. Only mount the equipment per Intelix’s instructions.
Use only with the cart, stand, tripod, bracket, table, or rack specified by Intelix or sold with the
equipment. When/if a cart is used, use caution when moving the cart/equipment combination to
avoid injury from tip-over.
Unplug this apparatus during lightning storms or when unused for long periods of time.
Caution! Shock Hazard. Do not open the unit. Refer to qualified service personnel. Servicing is required when
the apparatus has been damaged in any way, such as power-supply cord or plug is damaged, liquid has been
spilled or objects have fallen into the apparatus, the apparatus has been exposed to rain or moisture, does not
operate normally, or has been dropped.
Refer all servicing to qualified service personnel. Servicing is required when the apparatus has been damaged in
any way, such as the power-supply cord or plug is damaged, liquid has been spilled or objects have fallen into the
apparatus, the apparatus has been exposed to rain or moisture, does not operate normally, or has been dropped.
www.intelix.com

Intelix DIGI-HD-4X8 Installation Manual
DIGI-HD-4X8 Package Contents
DIGI-HD-4X8 matrix switcher
12 VDC 5A power supply
(2) 19‖ rack-mounting ears
(4) Shelf feet
Wireless remote control
Manual
(4) IR emitters
(1) IR receiver
(1) USB to Serial Adapter
Overview
Why settle for mediocrity? The Intelix DIGI-HD-4X8 combines a
professional-grade HDMI matrix with Intelix's industry-leading extenders.
A true matrix switcher, the DIGI-HD-4X8 features four HDMI inputs, eight
HDMI outputs and eight twisted pair extender outputs—and both HDMI and
twisted pair outputs are live simultaneously. When used in conjunction with a
compatible Intelix twisted pair receiver, the matrix extends output signals up to
300 feet over a single twisted pair cable. Trademarked HDshāk processing
provides remote EDID storing and enhanced bandwidth limiting, thereby
allowing the installer to optionally disable high-bandwidth HDMI elements—
such as deep color and HD multi-channel audio—to guarantee performance
when using low-grade cables.
The matrix supports 1080i and 1080p high-definition video and is HDCP
compliant. All operations are controlled via a diagnostic front panel interface or
remotely via RS232, IR, or Ethernet. The system also ships with a wireless
remote control and includes a 19‖ rack-mount kit.
In addition, the DIGI-HD-4X8 also features four pass-through IR channels
which distribute remote IR commands from in-room controllers over the twisted
pair cable and out of the matrix, thereby allowing complete control of remote
sources from the destination. The IR channels follow the matrix switching.
Design with Intelix and Design with Intelligence.
4 www.intelix.com

Intelix DIGI-HD-4X8 Installation Manual
5
Ventilation when Rack Mounting
At least 2 inches of free air space is required on both sides of
the DIGI-HD-4X8 for proper side ventilation.
Ensure there are no closeable doors on the rack that might seal
the DIGI-HD-4X8 from a steady supply of cool air.
Avoid mounting the DIGI-HD-4X8 near a power amplifier or
any other source of significant heat.
It is recommended that you leave an empty rack space above
and below the DIGI-HD-4X8 for additional cooling.
Note: All connecting audio-visual equipment must be powered off.
Installation
To install the Intelix DIGI-HD-4X8 matrix switcher, please perform the
following steps.
1. If mounting in a 19‖ audio/video rack, attach the 19‖ rack ears to the DIGI-
HD-4X8. The DIGI-HD-4X8 requires 2 rack units of spacing. If placing on
a shelf, attach the shelf feet to the DIGI-HD-4X8.
2. Power-off the source and destination audio and video devices.
www.intelix.com

Intelix DIGI-HD-4X8 Installation Manual
Signals
Twisted Pair Cables Required
DIGI-HD-UHR2-R
HDMI
1
DIGI-HD-IR2-R
HDMI and IR
2
1080p
1080i
720p
480i/p
Cat 6a (shielded)
150’
300’
300’
300’
Cat 6
110’
220’
220’
220’
Cat 5e
100’
200’
200’
200’
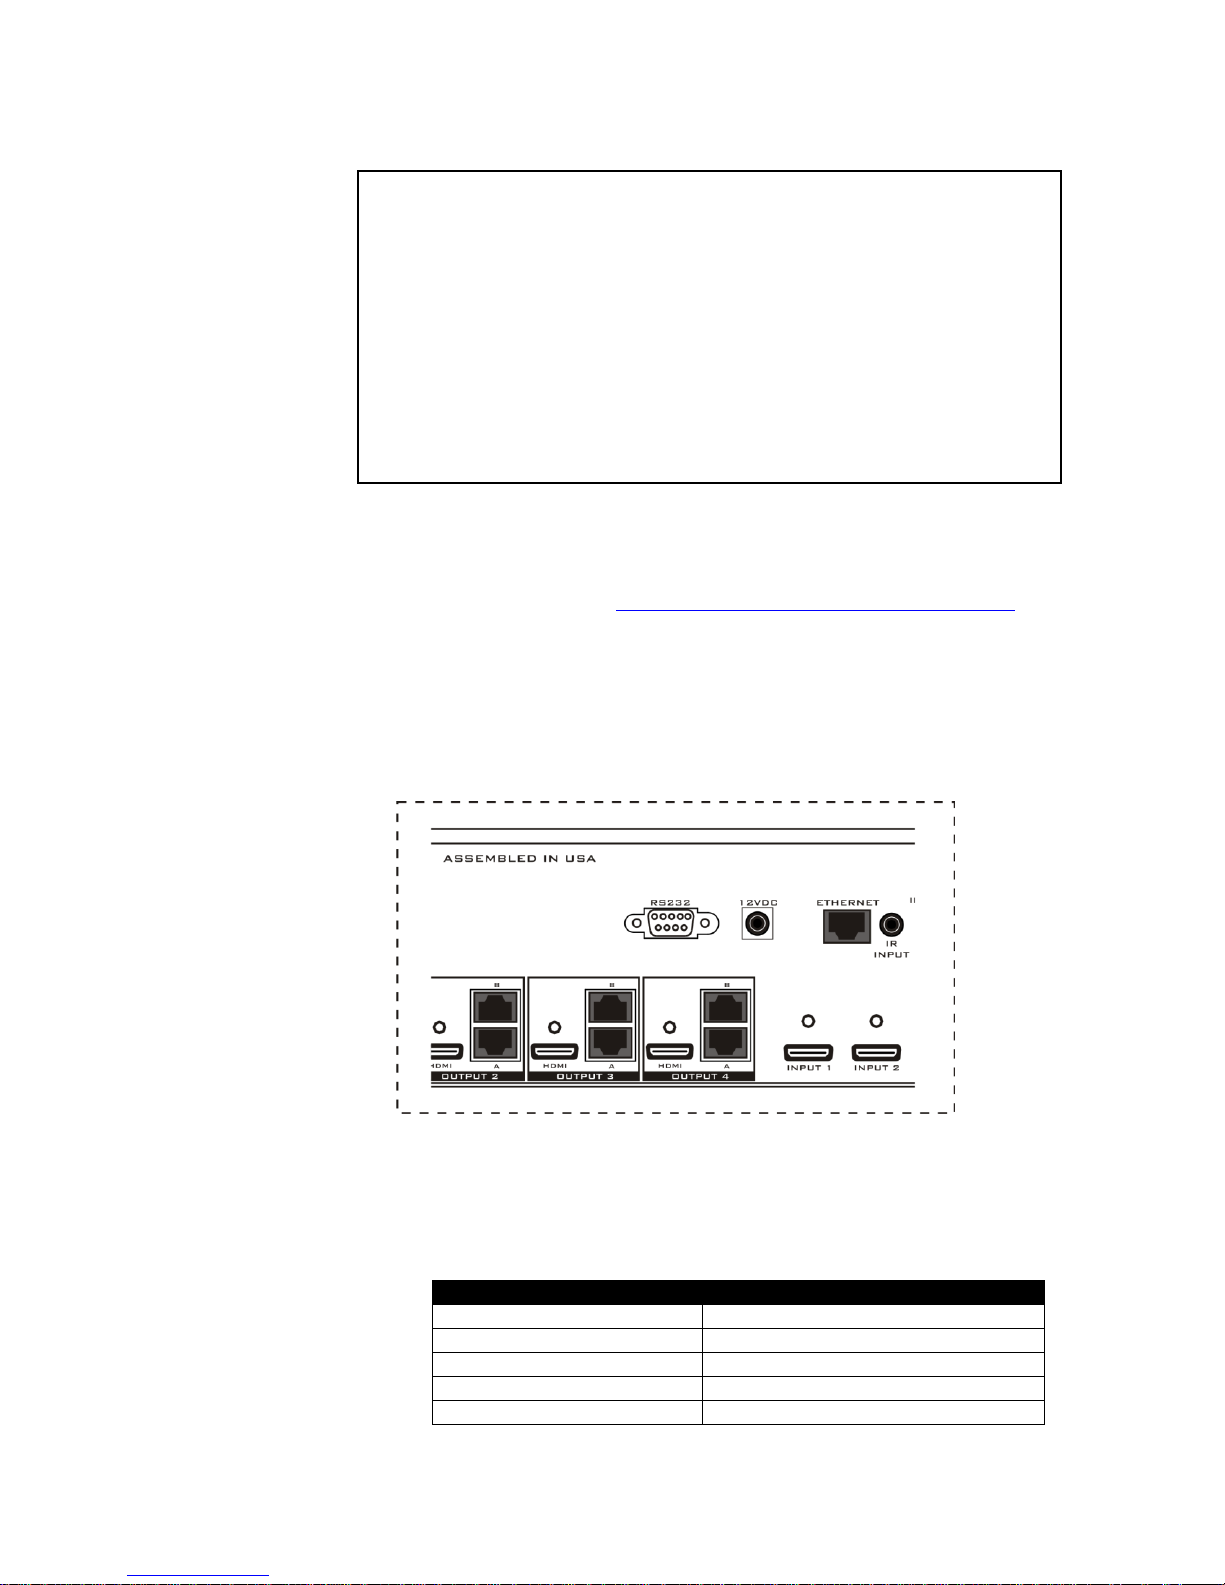
3. Connect the input sources to the DIGI-HD-4X8 using high-quality HDMI
cables.
4. Connect the output destinations to the DIGI-HD-4X8 using high-quality
HDMI cables.
5. For long distance destinations, connect one or two twisted pair cables per
run to the DIGI-HD-4X8 (twisted pair receivers sold separately).
6 www.intelix.com
Recommended Twisted Pair Receivers
Recommended Twisted Pair Distances

Intelix DIGI-HD-4X8 Installation Manual
7
Twisted Pair Settings
The DIGI-HD-4X8 is compatible with both single twisted pair extenders
(DIGI-HD-UHR2-R) and double twisted pair extenders (DIGI-HD-IR2-R).
The different modes of operation are changed through DIP switch settings
outlined on page 8.
Alternatively, the different modes of operation are toggled through RS232 or
IP commands. This includes the ability to set each output to single OR dual
mode, allowing for a mixture of single/dual extenders to be attached to the
UTP outputs. Please visit Intelix’s online technical library to download the
latest version of the software package:
http://www.intelix.com/tech_library/software.htm.
6. Connect the included 12 VDC power supply to the DIGI-HD-4X8.
7. If controlling remotely, connect RS232, Ethernet, or IR control cables.
8. Power-on the DIGI-HD-4X8.
9. Power-on the source and destination audio and video devices.
When connecting compatible UTP receivers, connect ―A‖ outputs to ―A‖ inputs and ―B‖ outputs to ―B‖
inputs, as shown below.
www.intelix.com

Intelix DIGI-HD-4X8 Installation Manual
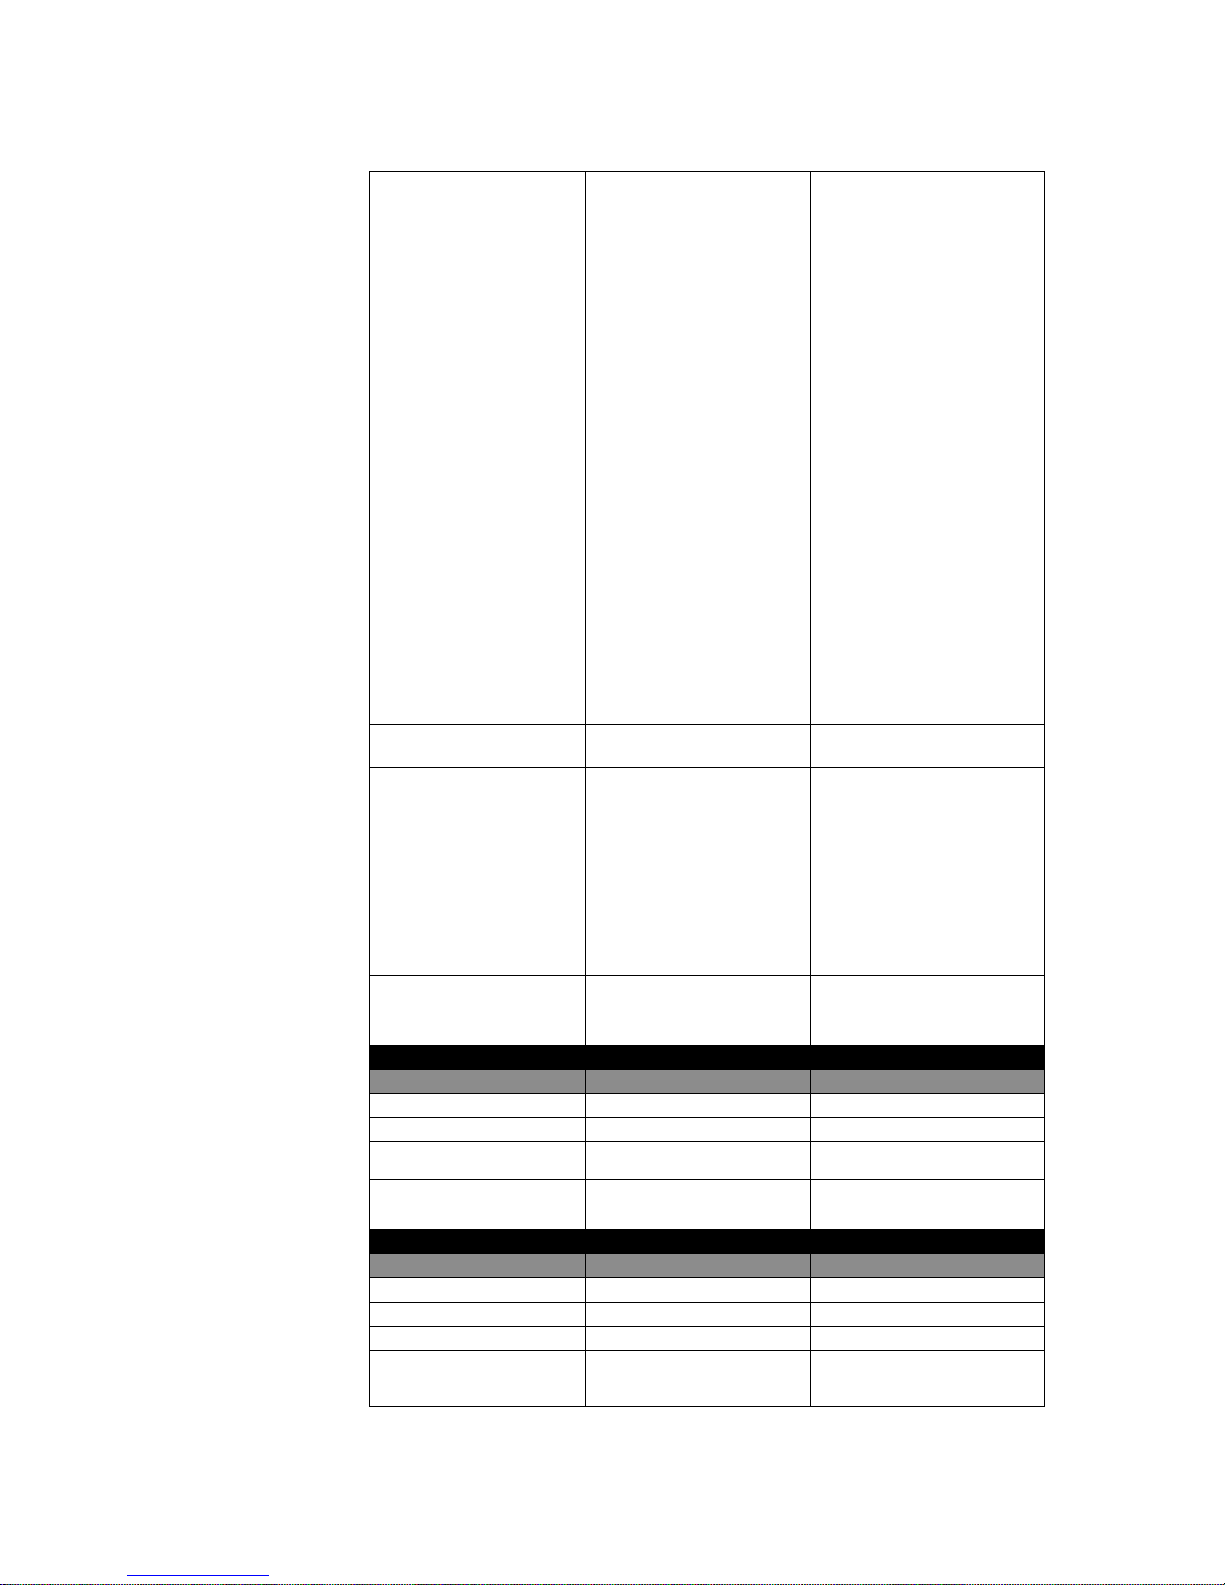
DIP 1
DIP 2
DIP 3
EDID Function
off
off
off
Dual Twisted Pair Mode – 1080p – stereo audio
The matrix is preset with EDID for 1080p video and PCM
stereo audio.
off
on
off
Dual Twisted Pair Mode – 1080p – 5.1 audio
The matrix is preset with EDID for 1080p video and Dolby
Digital 5.1, DTS 5.1, and PCM stereo audio.
on
off
off
Dual Twisted Pair Mode – EDID copy
The matrix uses custom EDID copied from outputs.
on
on
off
Dual Twisted Pair Mode – 1080i – stereo audio
The matrix is preset with EDID for 1080i video and PCM
stereo audio.
off
off
on
Single Twisted Pair Mode – 1080p – stereo audio
The matrix is preset with EDID for 1080p video and PCM
stereo audio.
off
on
on
Single Twisted Pair Mode – 1080p – 5.1 audio
The matrix is preset with EDID for 1080p video and Dolby
Digital 5.1, DTS 5.1, and PCM stereo audio
on
off
on
Single Twisted Pair Mode – EDID copy
The matrix uses custom EDID copied from outputs.
on
on
on
Single Twisted Pair Mode – 1080i – stereo audio
The matrix is preset with EDID for 1080i video and PCM
stereo audio.
Signal Mode Settings: HDshāk Inside
The DIGI-HD-4X8 features HDshāk processing, which is activated and toggled through the signal
mode DIP switches on the rear of the unit.
To change the signal mode:
1. Power off the DIGI-HD-4X8.
2. Unplug ALL input connectors. Failure to do so will prevent unit from loading desired
EDID.
3. Set the DIP switches to the desired setting.
4. Power on the DIGI-HD-4X8.
8 www.intelix.com

Intelix DIGI-HD-4X8 Installation Manual
9
Note: EDID copy cannot be performed over a single UTP extender – you
must use a dual UTP extender or an HDMI cable (preferred).
EDID Copy Operation
The DIGI-HD-4X8 allows custom EDID information to be copied from an output to be stored at each
input. One EDID table can be stored at each input. This table is stored until it is overwritten by
performing a new copy.
1. Determine the output you would like to copy from and the input you would like to copy it to.
2. Power off the matrix.
3. Disconnect ALL inputs.
4. Put the matrix into ―EDID Copy Mode‖ (see table on page 8)
5. Connect the device with the desired EDID to the chosen output with an HDMI cable. (example:
Output 3)
6. Power on the matrix.
7. Use the ―Output Select‖ button that corresponds to the output you wish to copy to select the input
you wish to copy to. (example: Output 3, Input 2)
8. Press and hold ―Output Select‖ button for 3-5 seconds until front panel LEDs flash twice. This
indicates that the copy was successful.
9. Repeat steps 7 & 8 to copy EDID to other inputs (example: Output 3, Input 3)
10. Power off the matrix.
11. Reconnect ALL inputs.
12. Power on the matrix.
www.intelix.com
Intelix DIGI-HD-4X8 Installation Manual
Note: The DIGI-HD-4X8 features on-board memory. Settings are
stored during power off and restored during power on.
Note: The DIGI-HD-4X8 front panel will automatically lock after one
minute of inactivity.
Operation
To operate the Intelix DIGI-HD-4X8 matrix switcher, please perform the
following steps.
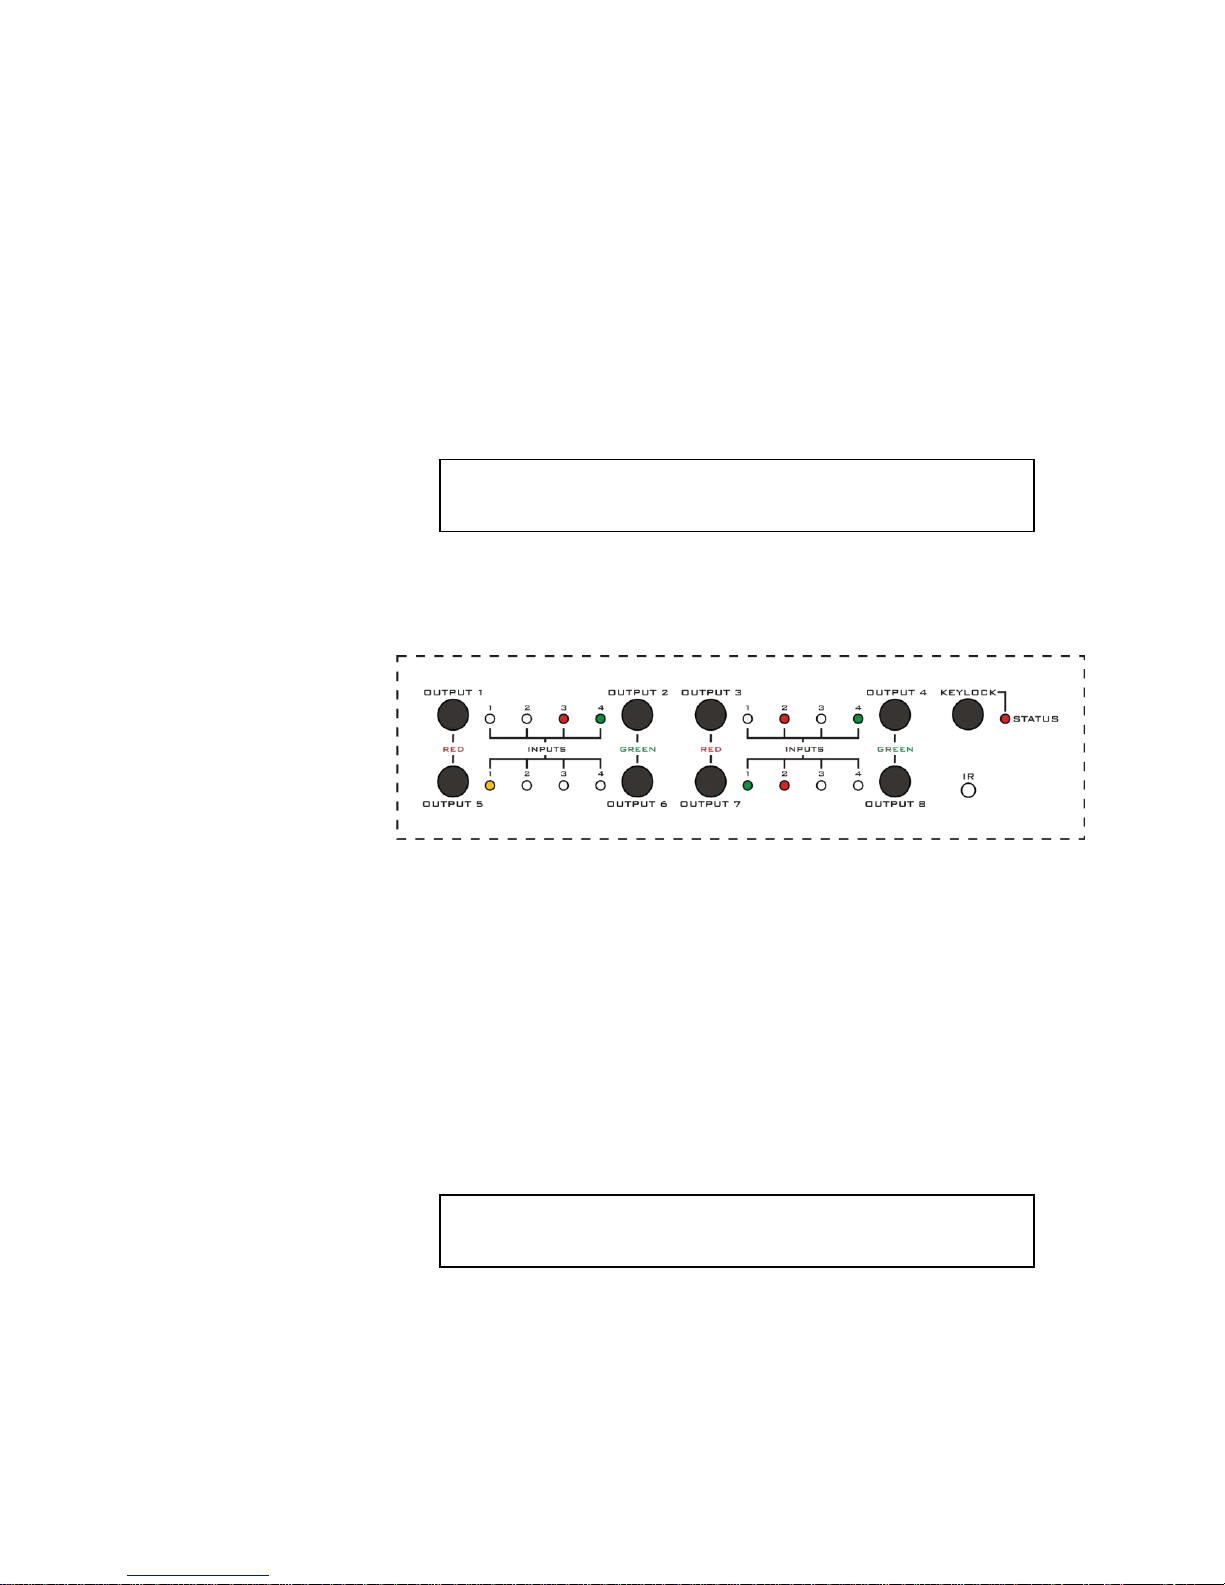
Front Panel Control
The DIGI-HD-4X8 features front panel control for switching inputs to the
various outputs. Each output is represented by a button. Pushing the button
toggles what input is being routed to the output.
1. Determine if the DIGI-HD-4X8 front panel is locked. If the panel is locked,
the keylock status indicator LED will be illuminated. If the panel is locked,
unlock it by selecting the keylock selector button.
2. Determine which output you wish to change.
3. On the determined output, push the ―Output Select‖ button. The input
indicator will cycle through the inputs. RED indicates the ODD outputs,
GREEN indicates the EVEN outputs, and AMBER indicates both outputs
are routed to the same input.
4. Optional: Once the desired input is selected, lock the front panel by
pressing the keylock button.
10 www.intelix.com

Intelix DIGI-HD-4X8 Installation Manual
11
Note: Operation of the rear panel IR input will disable the front
panel IR sensor. 3rd party IR systems are not compatible.
Included Remote Control
The DIGI-HD-4X8 includes a wireless remote
control for switching inputs to the various
outputs. Each output is represented by a bank
of buttons on the remote control.
1. Determine which output you wish to
change.
2. On the determined output, select the
desired input number.
IR Remote Control
The DIGI-HD-4X8 supports remote control
through a front panel IR sensor and a rear
panel 1/8‖ (3.5 mm) input jack.
1. If controlling the DIGI-HD-4X8 through the 1/8‖ (3.5 mm) input jack on
the rear panel, connect the IR receiver (eye) directly to the matrix.
2. If controlling the DIGI-HD-4X8 through the IR sensor on the front panel,
place an IR emitter directly over the front panel sensor.
www.intelix.com
Intelix DIGI-HD-4X8 Installation Manual
Settings
Bits per second
9600
Data bits
8
Parity
None
Stop bits
1
Flow control
Hardware
IR Emitter Mounting Tips
Surrounding electrical equipment may be producing high levels of IR noise.
Plasma TVs and compact fluorescent lights are known polluters. Shield the
outside of the emitter and the hardware’s IR window with electrical tape.
Verify the emitter is directly on the hardware’s IR window and directly over
the IR sensor. Operation may be intermittent if the emitter is too far away
from the sensor.
Clean the DIGI-HD-4X8 IR sensor window with an alcohol-based cleaner
before applying the emitter to guarantee adhesion.
IR Commands for 3rd Party Control Systems
Some 3rd party control systems will accept text data as well as utilizing
command learning. Go to http://www.intelix.com/tech_library/software.htm for
an electronic document of these commands.
RS232 Remote Control
The DIGI-HD-4X8 supports remote control through a rear panel RS232 control
port.
1. If controlling the DIGI-HD-4X8 through the RS232 control port on the rear
panel, connect a straight-through serial cable directly to the matrix.
DIGI-HD-4X8 RS232 Settings
12 www.intelix.com

Intelix DIGI-HD-4X8 Installation Manual
13
Misc. Commands
Function
Code
Return String
Get Device Type
br<sp>\r
ASCII String ―DIGI-HD4X8‖
Get Crosspoint Status
bc<sp>\r
ASCII string in the
format of: ―\r\n‖ +
―s1Ys2Ys3Ys4Ys5Ys6Y
s7Ys8Y‖ + ―\r\n‖ where
Y is the input source
being routed to each
output. The value of Y
maps as follows:
0 = input 1
1 = input 2
2 = input 3
3 = input 4
The outputs channels
map as follows:
s1 = output 1
s2 = output 2
s3 = output 3
s4 = output 4
s5 = output 5
s6 = output 6
s7 = output 7
s8 = output 8
Get UTP Mode
gup<sp>\r
ASCII string in the
format of:
u1Xu2Xu3Xu4Xu5Xu6
Xu7Xu8X‖ + ―\r\n‖
where X is the UTP
Mode. The value of X
maps as follows:
0 = dual UTP
1 = single UTP
The outputs channels
map as follows:
u1 = output 1
u2 = output 2
u3 = output 3
u4 = output 4
u5 = output 5
u6 = output 6
u7 = output 7
u8 = output 8
DIGI-HD-4X8 RS232 Codes
*\r = Carriage Return (hex=0D)
*\n= Line Feed (hex=0A)
* <sp> = Space (hex=20) is required as part of command
www.intelix.com
Intelix DIGI-HD-4X8 Installation Manual
Set UTP Mode
ASCII string in the
format of: uZX<sp>\r
where Zis the ouput
number and X is the
UTP Mode. The value
of X maps as follows:
0 = dual UTP
1 = single UTP
The outputs channels
map as follows:
u1 = output 1
u2 = output 2
u3 = output 3
u4 = output 4
u5 = output 5
u6 = output 6
u7 = output 7
u8 = output 8
For example to set
output 4 to single UTP
mode:
TX: u41<sp>\r
Response is the same as
the command; for
example:
TX: u21<sp>\r
RX: u21<sp>\r
Set IP to DHCP
dhc <sp>\r
DHCP\r\n
Set IP Address
sip<sp>xxx.xxx.xxx.xxx
\r
Where x = IP address
For example
sip<sp>192.168.001.213
\r
Response includes
machine language and
should not be parsed.
Response will look like:
RX: IP<sp>À¨_Õ
{pause for 10 seconds}
{Display crosspoint
status}
Reset Browser
Password to 10 zeroes
―0000000000‖
rpw<sp>\r
rpw<sp>\r\n
Output 1 Commands
Function
Code
Return
Select Input 1
cir<sp>09\r
s10
Select Input 2
cir<sp>1D\r
s11
Select Input 3
cir<sp>1F\r
s12
Select Input 4
cir<sp>0D\r
s13
Output 2 Commands
Function
Code
Return
Select Input 1
cir<sp>19\r
s20
Select Input 2
cir<sp>1B\r
s21
Select Input 3
cir<sp>11\r
s22
Select Input 4
cir<sp>15\r
s23
14 www.intelix.com

Intelix DIGI-HD-4X8 Installation Manual
15
Output 3 Commands
Function
Code
Return
Select Input 1
cir<sp>17\r
s30
Select Input 2
cir<sp>12\r
s31
Select Input 3
cir<sp>59\r
s32
Select Input 4
cir<sp>08\r
s33
Output 4 Commands
Function
Code
Return
Select Input 1
cir<sp>50\r
s40
Select Input 2
cir<sp>55\r
s41
Select Input 3
cir<sp>48\r
s42
Select Input 4
cir<sp>4A\r
s43
Output 5 Commands
Function
Code
Return
Select Input 1
cir<sp>5E\r
s50
Select Input 2
cir<sp>06\r
s51
Select Input 3
cir<sp>05\r
s52
Select Input 4
cir<sp>03\r
s53
Output 6 Commands
Function
Code
Return
Select Input 1
cir<sp>47\r
s60
Select Input 2
cir<sp>07\r
s61
Select Input 3
cir<sp>40\r
s62
Select Input 4
cir<sp>02\r
s63
Output 7 Commands
Function
Code
Return
Select Input 1
cir<sp>18\r
s70
Select Input 2
cir<sp>44\r
s71
Select Input 3
cir<sp>0F\r
s72
Select Input 4
cir<sp>51\r
s73
Output 8 Commands
Function
Code
Return
Select Input 1
cir<sp>0A\r
s80
Select Input 2
cir<sp>1E\r
s81
Select Input 3
cir<sp>0E\r
s82
Select Input 4
cir<sp>1A\r
s83
www.intelix.com

Intelix DIGI-HD-4X8 Installation Manual
Note: The DIGI-HD-4X8 will automatically be assigned an IP
address when connected to a DHCP-enabled network.
Connection Troubleshooting: If the matrix does not respond with
a green LED, please follow the steps below:
- Verify the LAN has DHCP support.
- Verify the LAN port is active.
- If you continue to have issues getting the matrix to connect
to the LAN, verify LAN connectivity using a PC. If you
can not get a PC to connect, contact a network
administrator for assistance
Ethernet Remote Control
The DIGI-HD-4X8 supports remote control through a rear panel Ethernet port.
The matrix accepts control messages when connected to a local area network
(LAN).
1. If controlling the DIGI-HD-4X8 through the Ethernet control port on the
rear panel, connect an Ethernet cable directly to the matrix.
2. Connect the opposite end of the Ethernet cable to a LAN port. Within 10
seconds of connecting the DIGI-HD-4X8 to the LAN, the yellow LED on
the matrix’s Ethernet port will stop blinking and the green LED will blink
intermittently.
Controlling the Matrix over a LAN
Intelix provides a diagnostic software utility, NetFinder, to determine the IP
address of the DIGI-HD-4X8. Please visit Intelix’s online technical library to
download the latest version of the software:
http://www.intelix.com/tech_library/software.htm.
1. Download and install NetFinder on your computer.
2. Launch the utility.
16 www.intelix.com

Intelix DIGI-HD-4X8 Installation Manual
17
3. Click the Search button if no IP address is present. This will search the
LAN for all Intelix DigiCat Series HDMI products.
4. Note the IP address of the matrix.
5. Open your web browser.
6. In the
address
field,
enter the
IP
address of
the
desired
matrix.
7. The
default
password
for the
DIGIHD-4X8 is ten zeros (0000000000).
8. A welcome screen will launch, followed by the Intelix Web Control
Application.
P
www.intelix.com

Intelix DIGI-HD-4X8 Installation Manual
Static IP
As a DHCP enabled device, the DIGI-HD-4X8 will automatically receive an IP
address. However, control systems require that devices have a fixed IP address
on the network. Using the Docklight utility, you can assign a static IP address to
the DIGI-HD-4X8. This must be done using a serial connection.
1. Download and install the Docklight application from
http://docklight.de/download/Docklight.zip
2. Download the ―DIGI-HD-4X8 – Simple.ptp‖ file from the Intelix Online
Technical Library. http://www.intelix.com/tech_library/software.htm
3. Connect your PC to the DIGI-HD-4x8 using a straight-thru serial cable, or
with the included USB to serial adapter (installation instructions on page
20).
4. Run Docklight and open the DIGI-HD-4X8 - Simple.ptp file.
5. Verify COM port settings 9600, none, 8, 1 in the upper right hand corner of
the Docklight screen
*COM channel setting should match what your PC is using. If you are using
a serial port, COM1 is standard. If you are using the included USB to serial
adapter, read the installation instructions to determine the used COM port.
To change the Docklight communications settings, select ToolsProject
SettingsCommunication.
6. Verify you are connected to the matrix by pressing the ―Get Device Type‖
button. If you are properly connected, you will see ―DIGI-HD-4X8‖ appear
in the Communication window.
18 www.intelix.com

Intelix DIGI-HD-4X8 Installation Manual
19
7. Click the Set IP button, a submenu will appear. Type in the desired IP
address using periods as seperators. Then click the ‖Send‖ button.
8. Wait about 15 seconds, the matrix will send the crosspoint status to confirm
the change.
9. Press the ―Get IP address‖ button to verify the new IP address.
www.intelix.com

Intelix DIGI-HD-4X8 Installation Manual
Using the included USB to serial adapter
The DIGI-HD-4x8 comes with an adapter to use if your computer does not have
a serial port. This is a useful for setup and diagnostic functions.
To Install:
1. Connect the USB connector to an unused port on your computer.
2. Allow hardware wizard to install.
3. Connect the serial connector to the DIGI-HD-4x8.
To determine the COM port this device is using:
1. (Windows) Click on the START menuRight-click ―My
Computer‖Select ―Properties‖
2. Select the ―Hardware‖ tab and click on the ―Device Manager‖ button.
3. Expand the ―Ports (COM&LPT) section. The COM port number will be
listed next to the device labeled ― USB Serial Port‖
Using 3rd-Party Software To Control the Matrix over a LAN
In addition to your web browser, you can also control the matrix using 3rd-party
software from companies such as Control4, Lutron, Savant, AMX, Crestron
Electronics, etc.
1. Follow the steps defined in the Static IP section above to assign a fixed IP
2. Verify that you are able to control your unit using your web brower as
3. The IP commands are the same as the RS232 commands (page 13). All
20 www.intelix.com
address to your unit.
described above.
commands will work except for:
Set IP address

Intelix DIGI-HD-4X8 Installation Manual
21
Note: By default, IR transmit output one corresponds to HDMI input
one, IR transmit output two corresponds to HDMI input two, IR
transmit output three corresponds to HDMI input three, and IR
transmit output four corresponds to HDMI input four. Therefore, the
IR output port will control the source connected to the HDMI input.
Set IP mode to DHCP
4. Communication settings:
The host address for Ethernet commands is the unit’s fixed
IP address
The port number is port 23.
IR Twisted Pair Pass-Through
When used with compatible Intelix receivers (DIGI-HD-IR2-R), the DIGI-HD4X8 supports four pass-through IR channels which distribute remote IR
commands from in-room controllers, up to 300 feet over twisted pair cable, and
out of the matrix.
1. Determine which devices you wish to control via the IR pass-through
outputs.
2. Connect an IR cable to the desired IR transmit output port.
3. Repeat for up to four devices.
www.intelix.com

Intelix DIGI-HD-4X8 Installation Manual
Note: If the IR codes for a pass-through signal conflict with the
internal IR codes of the matrix, the processing of remote matrix IR
commands may be disabled.
Simultaneously press and hold the Output 2 Source Select and
Keylock buttons for three seconds. A single flash of the front panel
source select LEDs indicates the remote IR commands are enabled. A
double flash of the front panel source select LEDs indicates the
remote IR commands are disabled.
4. All of the remote receive baluns transmit IR commands from the included
remote control, thereby allowing remote control of the matrix itself.
22 www.intelix.com

Intelix DIGI-HD-4X8 Installation Manual
23
Note: Not all Blu-ray® discs are mastered with Dolby Digital® or
DTS® audio. Please verify your movie is encoded with this format.
Note: The DIGI-HD-4X8 features on-board memory. Settings are
stored during power off and restored during power on.
Troubleshooting & Frequently Asked Questions
My destination is capable of Dolby Digital® and DTS® but it’s not
receiving a Multi-channel signal from the Blu-ray® player.
The DIGI-HD-4X8 may not be set in multichannel mode. Switch the matrix to
1080p, 5.1 Audio mode by following the steps on page 8.
My destination supports a resolution other than 1080p, but it’s
receiving a 1080p signal.
The DIGI-HD-4X8 supports device learning; i.e., the matrix can query
connected sources and destinations and learn and store their individual
resolutions.
1. Verify the desired destination is connected to the DIGI-HD-4X8 matrix via
an HDMI cable. Verify the signal DIP switches are configured for EDID
copy mode (see Installation section starting on page 5).
2. Route the signal from the desired source to the desired destination using the
front panel controls.
3. Disconnect all other sources.
4. Press and hold the Output Source Select button of the desired channel for
five seconds. The input 1 source select LEDs will illuminate and flash
during copy function.
5. After the LEDs cease flashing, release the Output Source Select button. The
DIGI-HD-4X8 has now learned and stored your devices’ settings.
How can I tell if my matrix is connected to the network?
The matrix is controllable via IP; however, the unit must be properly connected
to the network.
If you see a solid amber LED with a blinking green LED, the unit is
correctly connected to the network.
If you see a blinking amber LED and no green LED, the unit is not
communicating with the network.
My Ethernet port is not physically connecting to the network.
There are several external reasons why the matrix might not be connecting to the
network.
www.intelix.com

Intelix DIGI-HD-4X8 Installation Manual
Note: The Ping utility on a PC will verify that your matrix is
accessible on the network.
1. Try a different Ethernet cable to verify the cable is operational.
2. Try connecting a computer to the network port to verify the port is
active/operational.
What is the IP address of my matrix?
Run the NetFinder software from the Intelix website. Once connected, press the
―Search‖ button, and the IP address of your unit will be displayed in the title bar
of the application.
How do I assign a static IP address to my matrix?
As a DHCP enabled device, the DIGI-HD-4X8 will automatically receive an IP
address. However, control systems typically require devices to have a fixed IP
address. Setting a Static IP address must be accomplished though the matrix’s
serial port. See page 18 ―Static IP‖ section for information on how to assign a
Static IP.
What is the MAC address of my matrix?
1. Run the NetFinder software from the Intelix website.
2. Press ―Search‖ button.
3. Select ―Show MAC
Address‖
The MAC Address will be
displayed below the IP Address
24 www.intelix.com

Intelix DIGI-HD-4X8 Installation Manual
25
Technical Specifications
Vertical Frequency Range ..................................................................... 24 - 60 Hz
Output Video ......................................................................................... HDMI 1.3
Signaling Rate ................................................................. 2.25 gigabits per second
Input DDC Signal .................................................................... 5.0 volts p-p (TTL)
Input Video Signal ..................................................................... 0.5 – 1.0 volts p-p
Video Amplifier Bandwidth .................................................................... 255 MHz
Input Connectors.............................................. Four (4) HDMI type A connectors
Output Connectors ......... Eight (8) HDMI type A connectors with locking screws
Eight (8) dual twisted pair connectors
Supported Video Resolutions ............ 480i, 480p, 576i, 576p, 720p, 1080i, 1080p
8 bits per channel
Supported Audio ......... Dolby TrueHD 7.1, Dolby TrueHD 5.1, Dolby Digital 5.1
DTS-HD Master Audio 7.1, DTS-HD Master Audio 5.1,
DTS 5.1, PCM 2.0, PCM 5.1
Status Indicators ................................................ Front panel input to output LEDs
Front panel keylock LED
Operating Temperature Range ................................................. -41 to 95 degrees F
-5 to 35 degrees C
Operating Humidity Range ............................................ 5 to 90% non-condensing
Included Accessories ............................................. One (1) 12 VDC power supply
Two (2) 19‖ rack mounting ears
One (1) remote control
Four (4) shelf mount feet
(1) IR receiver
(4) IR emitters
Control ............................................ Front panel channel, RS232, IR and Ethernet
Dimensions ......................................................................... 17.25‖ x 8.375‖ x 3.5‖
2 RU
Enclosure ............................................................................................. Black metal
Max Power Consumption ......................................................................... 22 watts
Power ........................................................................................................ 12 VDC
Regulatory ............................................................................................. CE, RoHS
Compatible Intelix Twisted Pair Receivers ............................. DIGI-HD-UHR2-R
DIGI-HD-UHR2-WP-R, DIGI-HD-IR2-R, DIGI-HD-IR2-WP-R, DIGI-HD-
IR3-R, DIGI-HD-IR3-WP-R (*3series receivers will only support one-way IR –
Sink to destination)
Shipping Weight .......................................................................................... 7.1 lbs
Intelix Part Number ........................................................................ DIGI-HD-4X8
Warranty ..................................................................................................... 2 years
www.intelix.com

Intelix DIGI-HD-4X8 Installation Manual
Warranty
Intelix warrants to the original purchaser of new and B-stock products that the
product will be free from defects in material and workmanship for a period of 2
years from the date of purchase from an authorized Intelix reseller, subject to the
terms and conditions set forth below.
All Intelix products are guaranteed against malfunction due to defects in
materials or workmanship for two years after date of purchase. If a malfunction
does occur during the specified period, the defective product will be repaired or
replaced at Intelix’s option without charge. As a condition to receiving the
benefits of this warranty, you must provide Intelix with documentation that
establishes you were the original purchaser of the Intelix products. If you are not
the original purchaser, the Intelix equipment must be returned to the original
purchaser or another authorized Intelix reseller accompanied by dated
documentation of proof of purchase. Please contact Intelix for a list of
authorized resellers.
This warranty does not cover: 1) Malfunction resulting from use of the product
other than as specified in the user manual; 2) Installation specific wiring; 3)
Malfunction resulting from abuse or misuse of the product; 4) Exterior chassis
appearance; 5) Malfunction occurring after repairs have been made by anyone
other than Intelix or any of its authorized service representatives; 6) Acts of
nature; 7) Optional software upgrades or updates.
This warranty will be void if the product’s serial number or quality control
sticker has been removed or defaced, or if the product has been altered,
subjected to damage or abuse, repaired by any person not authorized by Intelix
to make repairs, or installed in any manner that does not comply with Intelix’s
recommendations.
This warranty is in lieu of all other warranties, express or implied. Intelix
disclaims all other warranties, express or implied, including, but not limited to,
implied warranties of merchantability and fitness for a particular purpose.
No agent or reseller of Intelix is authorized to modify this warranty or to make
additional warranties on behalf of Intelix. Statements, representations or
warranties made by any party other than Intelix does not constitute warranties by
Intelix. Intelix shall not be responsible or liable for any statement, representation
or warranty made by any other person or party.
Warranty service is only offered after a return authorization (RA) number has
been generated by an authorized Intelix factory representative. If you purchased
the Intelix goods directly from Intelix, please contact Intelix Applications for an
RA number. If you purchased the Intelix good from an authorized Intelix
reseller, please contact your authorized reseller for an RA number. This RA
number must be clearly referenced on the outside of all packages shipped to
Intelix. Intelix Applications must be contacted prior to any return of goods; all
return shipments received by Intelix without an RA number will be refused. All
shipments must be received within 30 days from the RA number issue date.
At Intelix’s option, Intelix will advance replace failing Intelix goods on
approved accounts within 90 days of shipment from Intelix. The advanced
replaced goods will be invoiced and payment will be due under standard terms if
26 www.intelix.com

Intelix DIGI-HD-4X8 Installation Manual
27
the failing goods are not received within 14 days of the advanced replacement
shipment.
Intelix will match shipping method for units still under warranty. If a unit which
is out of warranty needs repair, the dealer must pay for shipping, replacement
parts, and a fixed $100/hr* labor fee. Normal Intelix credit terms apply to
billable repairs. If a unit is returned and found to work according to factory
specifications, a $100 service fee* is billed regardless of warranty status. All
repairs are made in a reasonably quoted amount of time; a rush shipment fee of
$50* may apply to repairs needing a quicker than usual turn-around time.
All goods outside of the standard warranty period which are repaired by Intelix
are covered by an additional 90 day warranty. This 90 day warranty only covers
the specific repaired components. All other standard warranty limitations apply.
*Or current applicable rate/fee.
Warranty terms and conditions subject to change and do not apply outside of United States and
Canada.
Intelix Warranty is subject to change. Please contact the factory for the most up-to-date information.
www.intelix.com

Intelix DIGI-HD-4X8 Installation Manual
Thank you for your purchase.
We appreciate your business. Please contact us with your questions
and comments.
Intelix
8001 Terrace Ave., Suite #201
Middleton, WI 53562
Phone: 608-831-0880
Toll-Free: 866-4-MATMIX
Fax: 608-831-1833
www.intelix.com
intelix@intelix.com
28 www.intelix.com
Copyright 2011 Intelix LLC.
Design with Intelligence

Intelix DIGI-HD-4X8 Installation Manual
29
www.intelix.com
 Loading...