

Page 1

8001 Terrace Ave
Suite #201
Middleton, WI 53562
Phone: 608-831-0880
Toll-Free: 866-4-MATMIX
Fax: 608-831-1833
Maximum Recommended Distances
1080p
1080i
720p
576i/p
480i/p
Shielded
Cat 6a
150’
300’
300’
300’
300’
Cat 6
110’
220’
220’
220’
220’
Cat 5e
100’
200’
200’
200’
200’
Instructions
1. Turn off power and disconnect the audio/video
equipment by following the manufacturer’s
instructions.
2. Adjust DIP switches for desired mode.
3. Connect all twisted pair cables (ensure T568B
straight-thru wiring).
4. Connect HDMI cable between source and DIGI-
HD-1X8 input.
5. Connect power supplies.
6. Power on attached audio/video devices.
Compatible Devices
Compatible Receivers: DIGI-HD-UHR2-R, DIGI-HD-UHR2-WPR, DIGI-HD-IR2-R, DIGI-HD-IR3-WP-R, DIGI-HD-XR
Important notice:
Do not attempt to disassemble or alter the extender
housing. There are no user-serviceable parts inside the
unit. Doing so will void your warranty.
To minimize the possibility of equipment damage from
electrostatic discharge (ESD), all source and
destination equipment must be powered off during
installation.
Do not connect the extender to a telecommunication
outlet wired to unrelated equipment. Doing so may
damage the unit or any connected equipment. Ensure
all connected twisted pair cabling is straight-through
(point-to-point).
Allow proper ventilation to reduce the risk of thermal
failure.
Front Panel Indicators
When the unit is in a Dual UTP Mode, LEDs on the
front panel indicate connection with an attached
receiver. When the unit is in Single UTP Mode, LEDs
on the front panel will all be lit (except output 1) to
indicate that video is being sent out all outputs. In
either mode, the output 1 indicator will only be lit
when sending video to a compatible sink device.
DIGI-HD-1X8 Installation Manual
The Intelix DIGI-HD-1X8 seamlessly distributes on hdmi input to
seven twisted pair and one HDMI outputs using built-in twisted
pair extenders to provide HD video at distances up to 300 feet
when used with compatible Intelix twisted pair receivers, such as
the DIGI-HD-UHR2-R, DIGI-HD-IR2-R, and DIGI-HD-XR.
When distributing HDMI audio and video over twisted pair
cabling, the DIGI-HD-1X8 requires a single Cat 5e or Cat 6 cable.
When distributing HDMI audio and video and IR over twisted pair
cabling, the DIGI-HD-1X8 requires two Cat 5e or Cat 6 cables. IR is
transmitted from the display location, through the compatible
Intelix twisted pair receiver, over the twisted pair cable, and out
of the IR OUT port on the DIGI-HD-1X8 to the source equipment.
The DIGI-HD-1X8 has an HDMI output, allowing up to five DIGIHD-1X8s to be linked together for a total of 36 outputs.
The DIGI-HD-1X8 supports 3D, is HDCP compliant, and features
proprietary Intelix HDshāk processing, including bandwidth
limiting and custom EDID configuration and emulation.
Twisted Pair
Wiring - Use
T568B wiring
for Cat5e/6
connection
between send
and receive
units.
Page 2
8001 Terrace Ave
Suite #201
Middleton, WI 53562
Phone: 608-831-0880
Toll-Free: 866-4-MATMIX
Fax: 608-831-1833
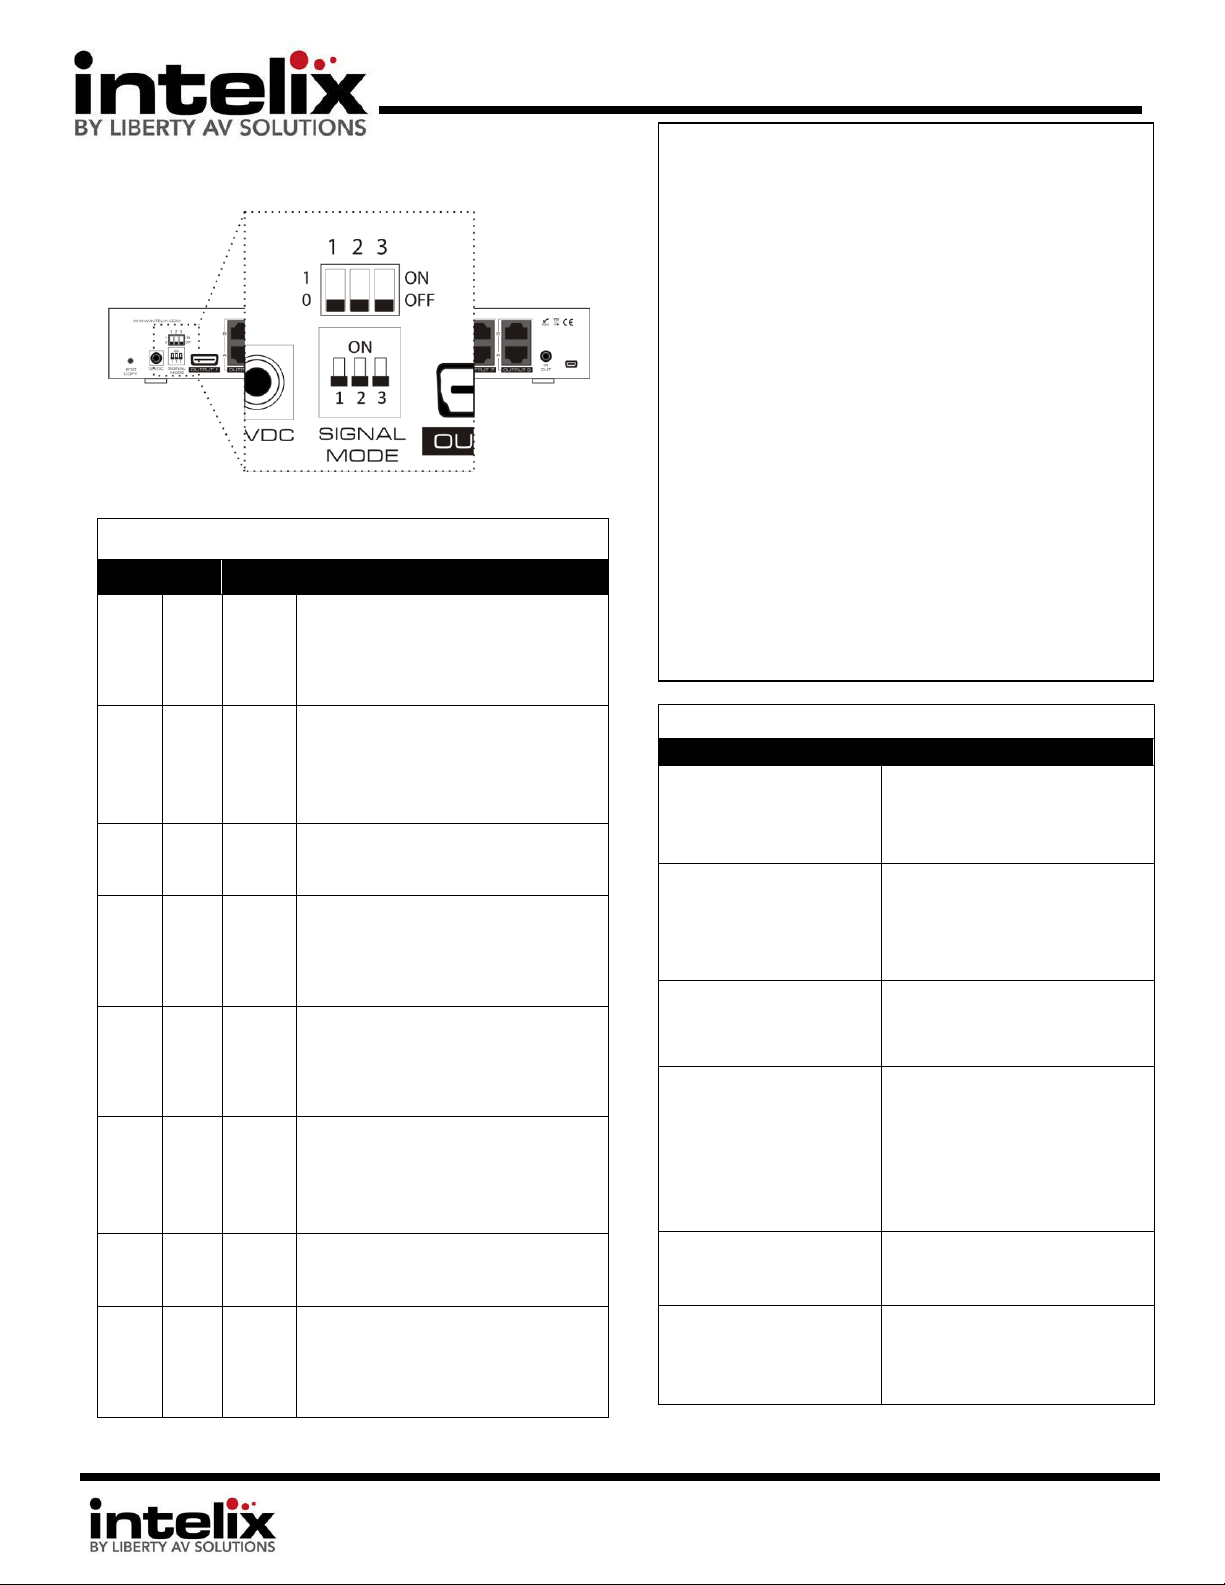
DIGI-HD-1X8 DIP Switch Positions
SW 1
SW 2
SW 3
Mode
off
off
off
Dual Twisted Pair Mode – 1080p –
stereo audio
The distribution amplifier is preset with
EDID for 1080p video and PCM stereo
audio.
off
on
off
Dual Twisted Pair Mode – 1080p – 5.1
audio
The distribution amplifier is preset with
EDID for 1080p video and Dolby Digital
5.1, DTS 5.1, and PCM stereo audio.
on
off
off
Dual Twisted Pair Mode – EDID copy
The distribution amplifier uses custom
EDID copied from outputs.
on
on
off
Dual Twisted Pair Mode – 1080i –
stereo audio
The distribution amplifier is preset with
EDID for 1080i video and PCM stereo
audio.
off
off
on
Single Twisted Pair Mode – 1080p –
stereo audio
The distribution amplifier is preset with
EDID for 1080p video and PCM stereo
audio.
off
on
on
Single Twisted Pair Mode – 1080p –
5.1 audio
The distribution amplifier is preset with
EDID for 1080p video and Dolby Digital
5.1, DTS 5.1, and PCM stereo audio
on
off
on
Single Twisted Pair Mode – EDID copy
The distribution amplifier uses custom
EDID copied from outputs.
on
on
on
Single Twisted Pair Mode – 1080i –
stereo audio
The distribution amplifier is preset with
EDID for 1080i video and PCM stereo
audio.
Troubleshooting
Symptom
Possible Solutions
No signal
Status LED is off
Verify that both ends of the twisted pair
cables use T568B crimp pattern.
Verify HDMI cables and source and
destination HDMI ports are operational.
No signal
Verify the power supplies are connected
to both the DA and receive baluns.
Verify the power LEDs on both the send
and receive units are brightly
illuminated.
Unusual colors in the video
Power off the destination device and
power it back on to force renegotiation.
Unplug and re-plug the HDMI cable from
receive balun to force renegotiation.
No signal
Screen is completely snowy
Speckling in the video image
Occasional signal dropouts
Use shorter runs of twisted pair cabling.
Drop the HDMI signal to the next lower
resolution; i.e., decrease resolution from
1080p to 1080i, etc.
Replace the twisted pair cable with a
higher grade twisted pair cable; i.e.,
replace Cat 5e with Cat 6.
Speckling in the video image
If the destination device is incapable of
displaying the video signal, alter the
source signal; i.e., decrease resolution
from 1080p to 1080i, etc.
Video without audio
Change source device to output PCM
rather than Bitstream audio
Enable PCM down sampling if supported
by your source device
Copying Display EDID
1. Disconnect the DIGI-HD-1X8 from the source device and
extenders.
2. Disconnect the receiver from the destination device that
you desire to copy from.
3. Set transmitter DIP switches to EDID Copy mode (On,
Off, Off for Dual UTP extenders, or On, Off, On for Single
UTP Extenders)
4. Connect the DIGI-HD-1X8 Input to the destination device
input via an HDMI cable.
5. Connect the 12VDC power supply to the DIGI-HD-1X8
and turn the device on with the power button.
6. Press the “EDID Copy” button on the DIGI-HD-1X8.
7. The Output LEDs will flash for 2-3 seconds then remain
solid. The EDID signals have been copied and stored.
8. Disconnect the DIGI-HD-1X8 from the destination.
9. Reconnect the DIGI-HD-1X8 and extenders following
normal installation procedures.
DIP Switch Settings
 Loading...