

Page 1

Intel NetportExpress
™
Print Server
Setup Guide
Page 2
About NetportExpress™ PRO and PRO/100
print servers
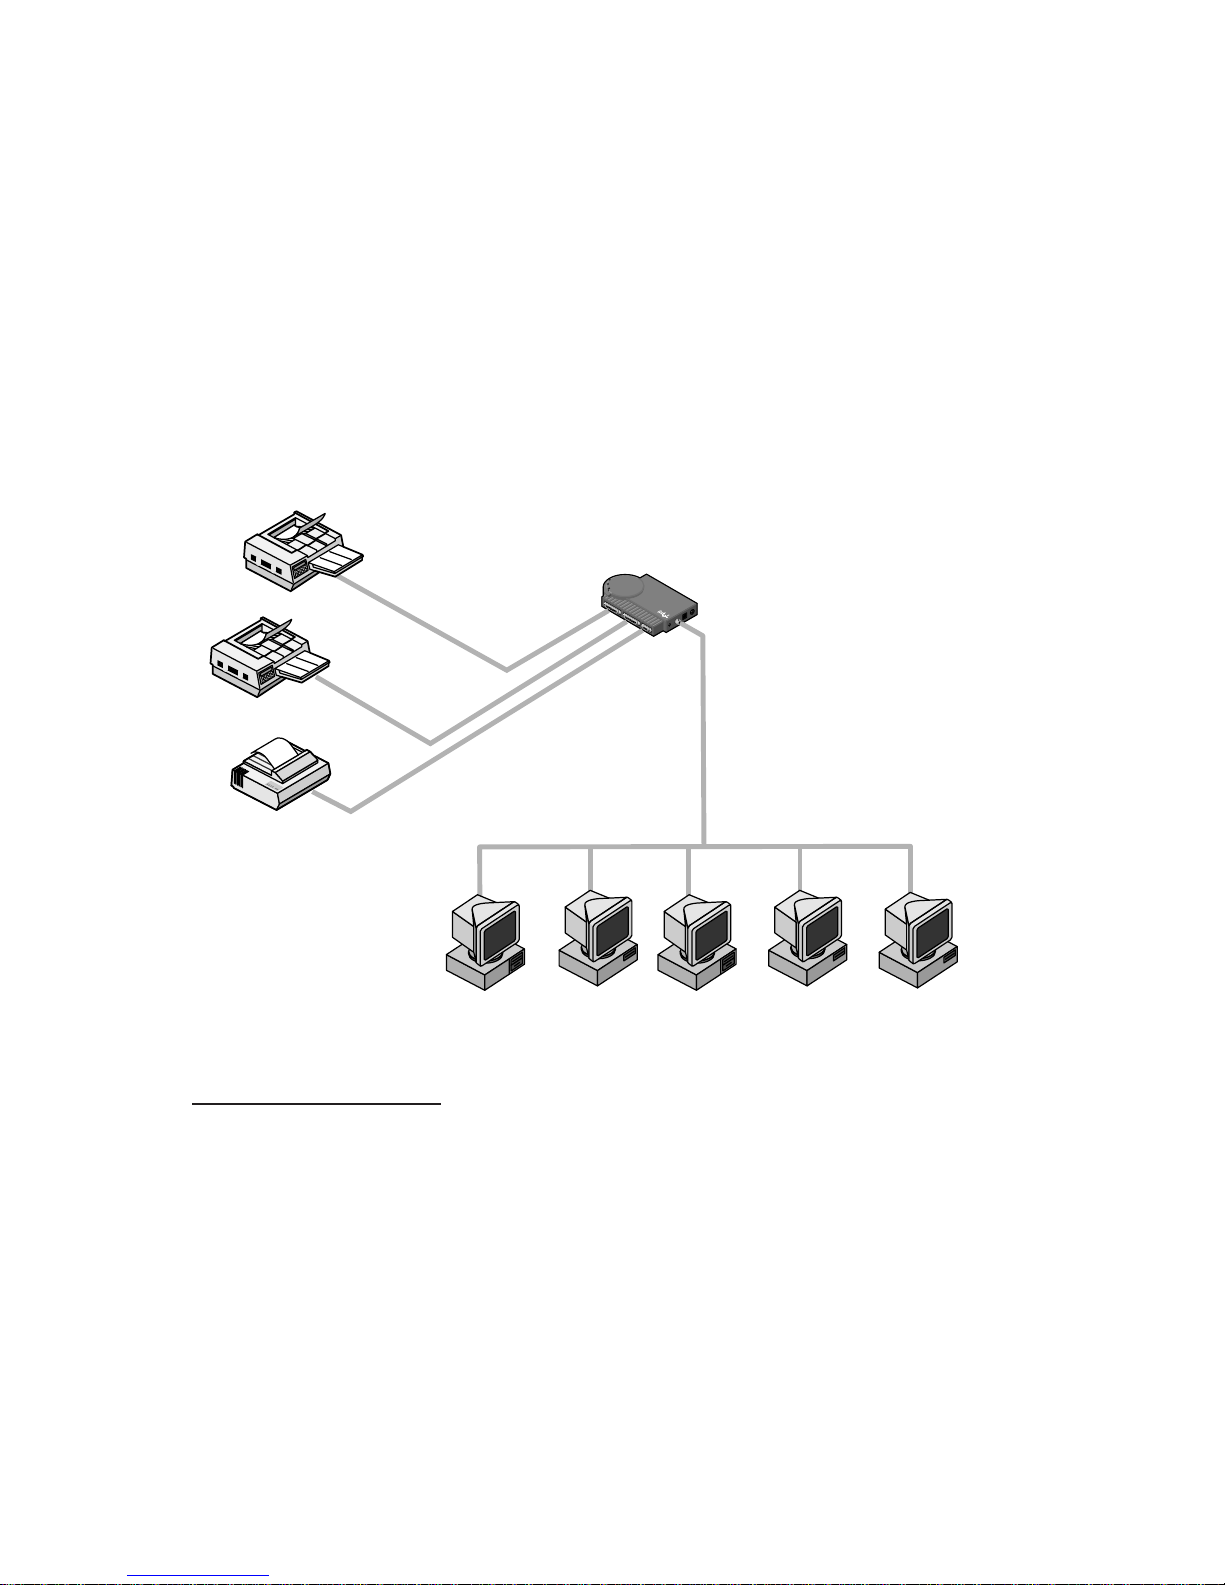
Intel NetportExpress™ PRO and PRO/100 print servers provide high
performance and centralized management for printers on
multiprotocol networks. With NetportExpress print servers, you can
locate printers anywhere on the LAN (Local Area Network).
The NetportExpress print servers support most makes and models of
printers on networks running IPX/SPX*, NetBEUI, TCP/IP, and
AppleTalk* Phase II protocols.
Copyright © 1997 Intel Corporation. All rights reserved.
First edition, August 1997 P/N 679939-001
Intel Corporation
5200 N.E. Elam Young Parkway
Hillsboro, Oregon 97124-6497
Intel Corporation assumes no responsibility for errors or omissions in this
guide. Nor does Intel make any commitment to update the information
contained herein.
*Other product and corporate names may be trademarks of other companies
and are used only for explanation and to the owners’ benefit, without intent to
infringe.
PARALLEL 1
PARALLEL 2
SERIAL
P
O
W
E
R
B
N
C
R
J-4
5
T
E
S
T
NetportExpress PRO
Activity
Transmit
Receive
PC-3782
NetportExpress
print server
Parallel
Parallel
Serial
Macintosh* Windows* UNIX* NetWare* OS/2*
Page 3

Contents
Hardware Installation ..............................................2
PRO/100, external and internal PRO print servers
Software Installation ...............................................6
Installing the CD-ROM and running setup
Novell NetWare* NDS Configuration ............................8
Print server mode, Remote printer mode
Novell NetWare Bindery Configuration ........................ 10
Print server mode, Remote printer mode
Microsoft Network Printing ...................................... 12
Windows* 95, Windows NT*, Windows for Workgroups, IP address
LAN Manager*/LAN Server Configuration .................... 16
Printing using netuse
AppleTalk* Configuration........................................ 18
Printer connectivity
UNIX* Configuration ............................................. 19
IP address, proprint, lpr/lpd printing, firmware updates using tftp
AIX* Configuration ............................................... 27
lpr/lpd printing
Managing the NetportExpress™ Print Server ................ 30
Changing configurations, firmware updates, advanced settings
Troubleshooting .................................................. 33
Hardware, software, printing solutions
Limited Warranty/Compliance Statements .................... 40
Product information
Customer Support ................................................ 42
Numbers to call for help, World Wide Web access
Index ............................................................... 43
Page 4
2
PARALLEL 1
PARALLEL 2
SERIAL
PARALLEL PORT
POWER
RJ45
Activity
Transmit
Receive
DIAG
NetportExpress PRO/100
TM
SW1
10/100
PC-3773
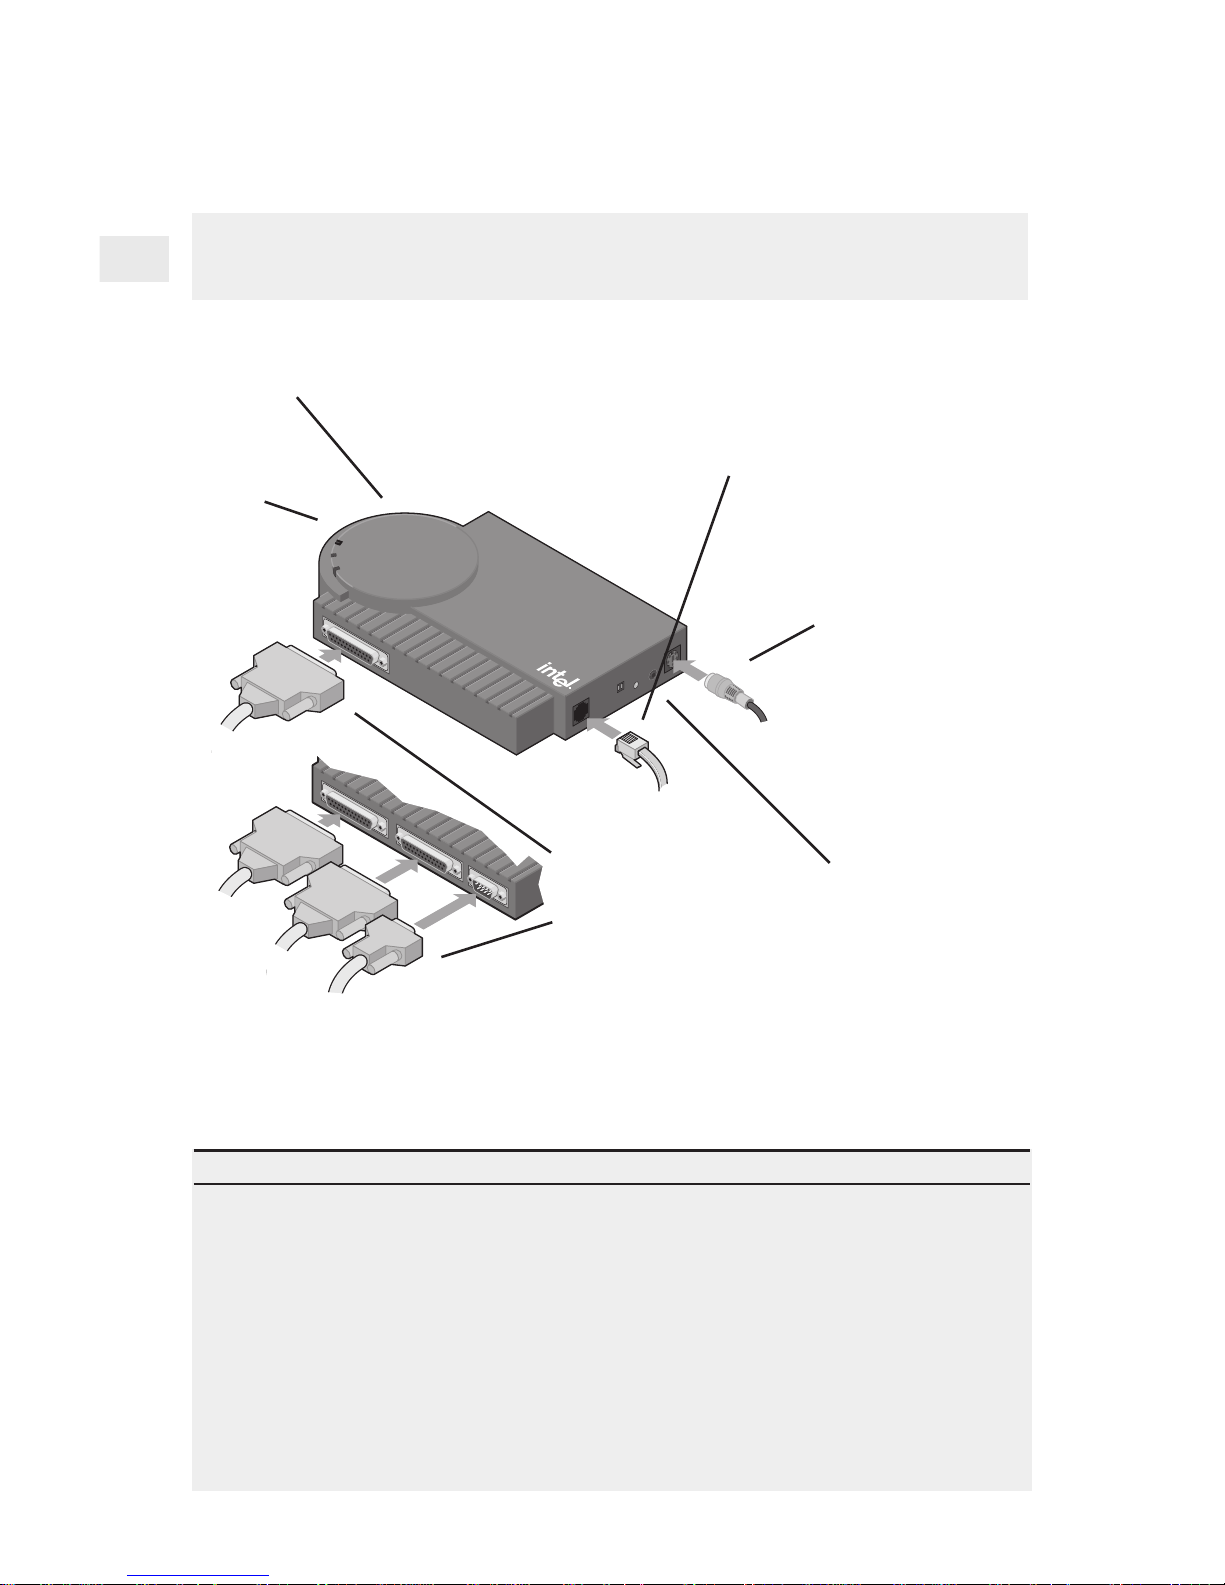
Hardware Installation
NetportExpress PRO/100 Single-port and
3-port print servers (Ethernet only)
1 Connect the network cable to the
RJ-45 connector. Use Category 5
cable to connect to a 100Mbps
network. Use Category 3 or 5 cable
to connect to a 10Mbps network.
4 Press the “diag” button
to send a test page from
the NetportExpress print
server to your printer. The
test page includes the
Device ID and other
configuration information.
2 Plug the power
cable into the print
server.
Tips for installing the PRO/100 print server
• When the activity light is solid green, the NetportExpress print server is ready. The
other two lights may blink, indicating communication with the network. If the Activity
light flashes red, see the troubleshooting section of this manual.
• The PRO/100 automatically senses the speed your Ethernet
network is running:
10Mbps or 100Mbps.
• The print server also senses the Novell NetWare frame type: 802.2, 802.3, Ethernet II,
or SNAP.
CAUTION When connecting the power cable, use the power supply that comes with
your PRO/100. Another power supply could cause your PRO/100 to malfunction.
Continue with Software Installation, page 6 . . .
Activity light
Device ID and Network
address (located on
bottom)
3 Connect the
printer cable(s)
to the printer(s)
and to the print
server port(s).
Page 5
3
PARALLEL 1
PARALLEL 2
SERIAL
POWER
BNC
RJ-45
Activity
Transmit
Receive
DIAG
NetportExpress PRO
TM
DB-9
POWER
RJ-45
DIAG
1 2
PC-3774
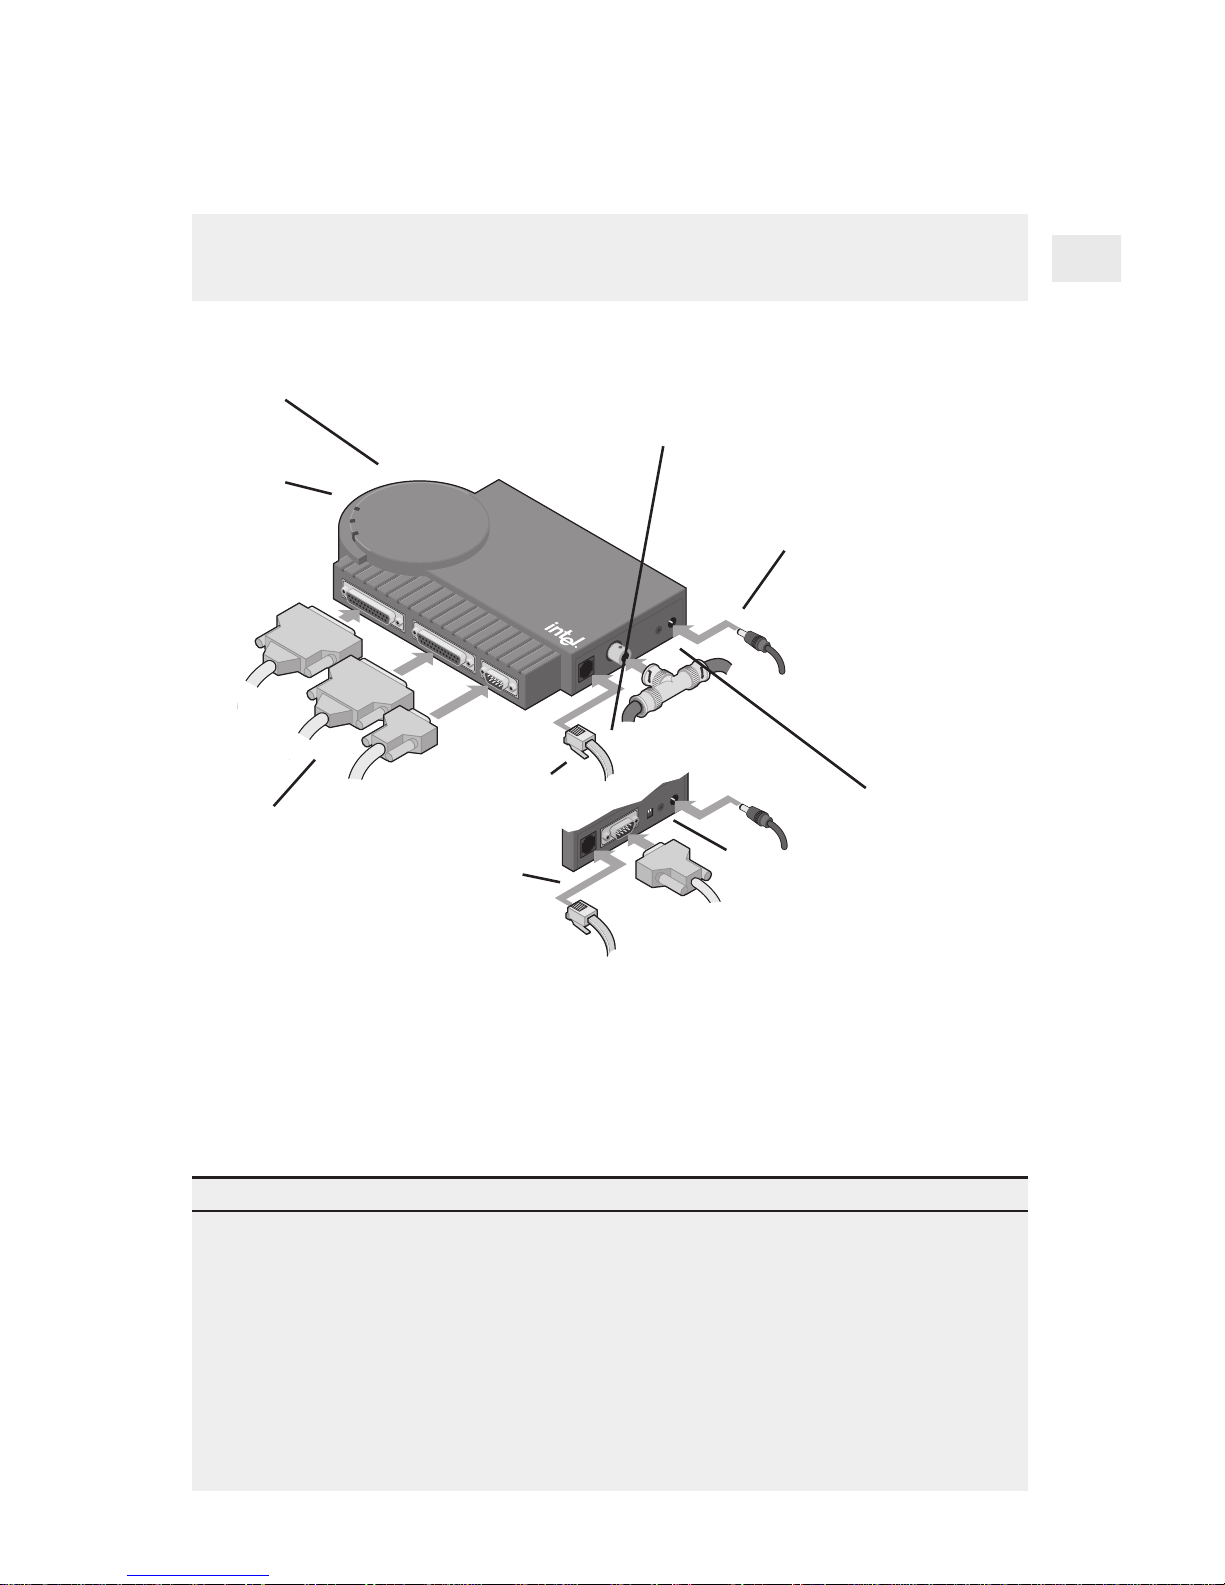
External NetportExpress PRO print servers
(Ethernet and Token Ring)
Tips for installing the External PRO print server
• When the activity light is solid gr een, the NetportExpress print server is r eady. The
other two lights may blink, indicating communication with the network. If the Activity
light flashes red, see the troubleshooting section of this manual.
• The PRO senses the Novell NetW are frame type: 802.2, 802.3, Ethernet II, or SNAP.
• The token ring version autosenses data rate speeds when both switches are in the
default UP position. (See page 34 for list of settings.)
CAUTION When connecting the power cable, use the power supply that comes with
your PRO. Another power supply could cause your PRO to malfunction.
Continue with Software Installation, page 6 . . .
1 Connect the network cable (Category 3 or 5).
The PRO Ethernet uses a BNC or an RJ-45
connector. The PRO token ring uses an RJ-45 or
DB-9 connector.
2 Plug the power
cable into the print
server.
3 Connect the
printer cable(s)
to the printer(s)
and to the print
server port(s).
4 Press the
“diag” button to
send a test page
from the
NetportExpress
print server to your
printer. The test
page includes the
Device ID and
other configuration
information.
Ethernet
connectors
Token Ring
connectors
Activity light
Switches
Device ID and Network
address (located on
bottom)
Page 6
4
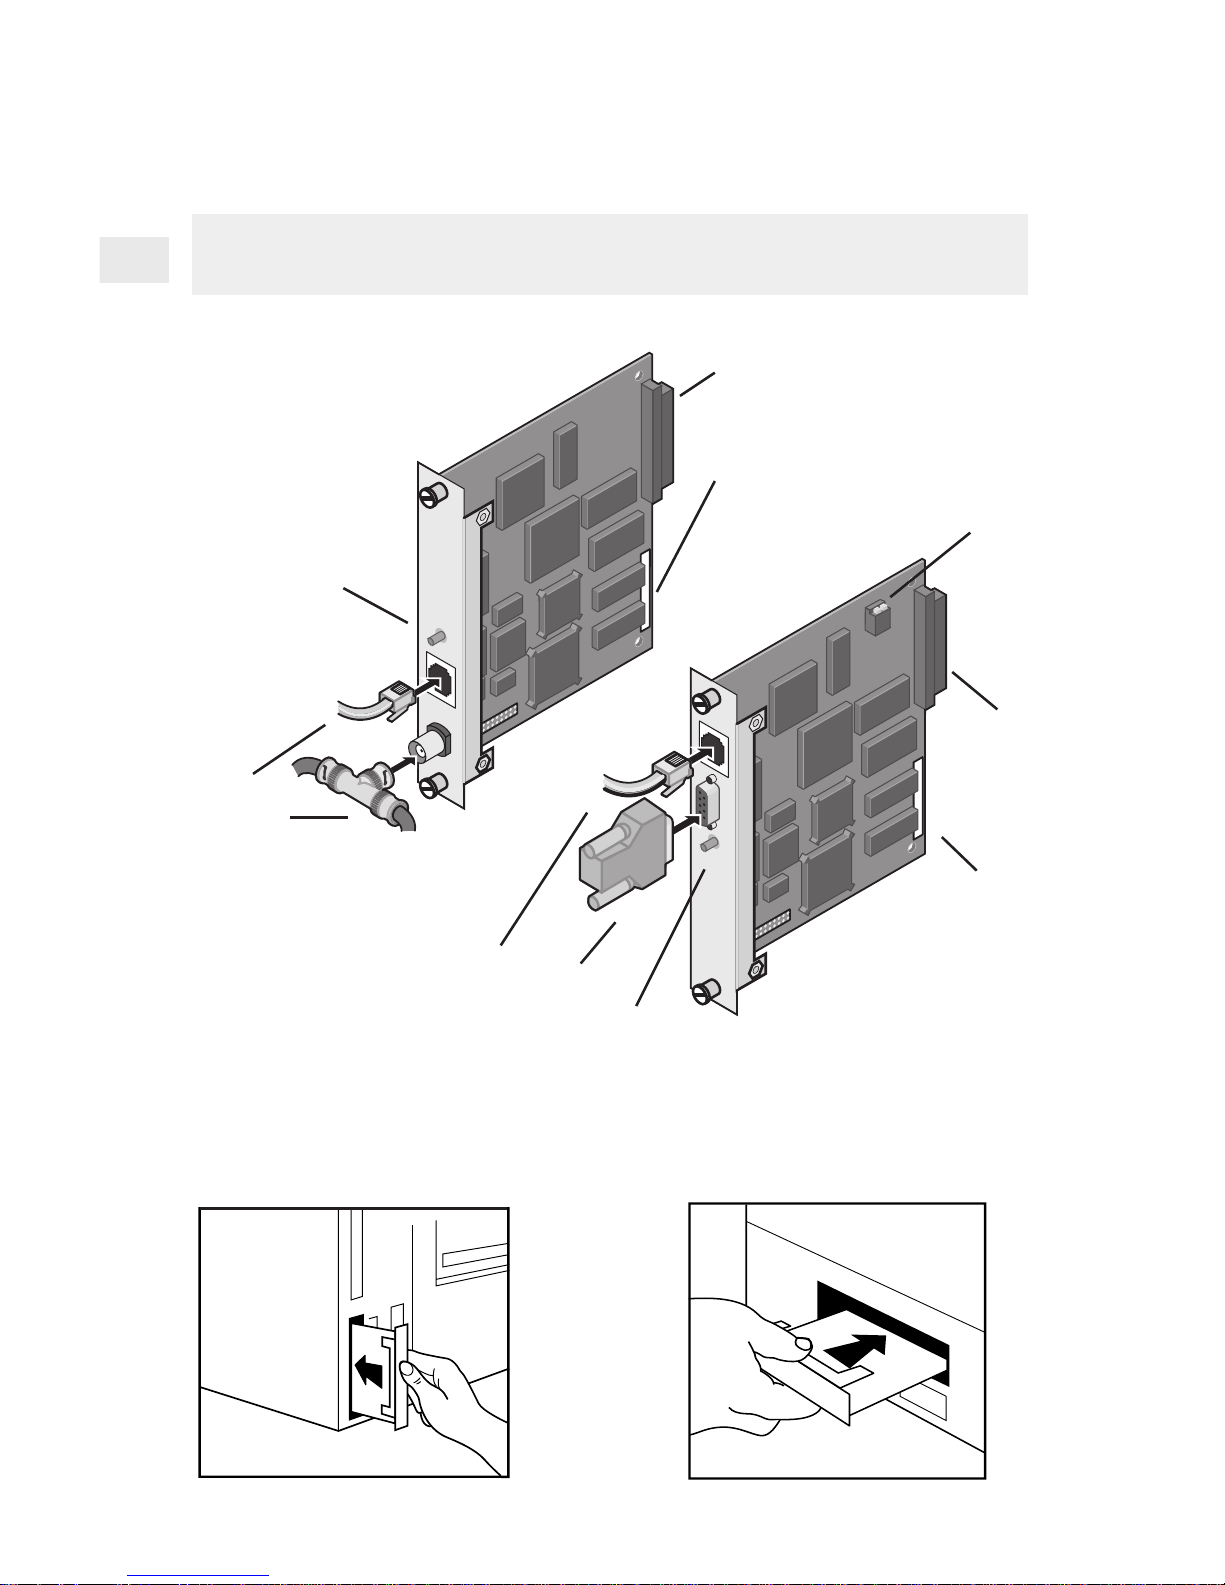
Hardware Installation
Internal NetportExpress PRO print server
(Ethernet and Token Ring)
PC-3124
Examples of inserting NetportExpress PRO print server cards in
printers. Your printer may look different from those shown. Make sure
the printer connector on the card is fully seated into the printer slot
connector.
PC-3126
Device ID
Switches
Printer
connector
RJ-45 and DB-9
network connectors
Diagnostics
button
Token Ring
Card
Device ID
Printer
connector
RJ-45
and BNC
network
connectors
Diagnostics
button
Ethernet Card
10Base-T
BNC
10Base-T
PC-3775
Page 7

5
To install the internal PRO print server card
in your printer
1 Power down the printer and disconnect the printer power cable.
2 If necessary, remove the cover plate from the printer MIO
(Modular Input/Output) slot.
3 Record the NetportExpress print server device ID so you can refer
to it later.
4 Check the back of the MIO slot to see where the connector is.
5 Insert the print server card, making sure you align the connector
on the card with the connector at the back of the MIO slot. When
correctly seated, the face plate on the card should rest flat against
the printer frame.
6 Secure the print server card by tightening the screws. Alternate
tightening them to keep the card stable in the slot.
7 Attach the network cable for your type of network.
8 Plug in the printer power cable and power on the printer.
9 Press the diagnostics button on the NetportExpress print server
card to print a test page. The test page includes the Device ID and
other configuration information.
Tips for installing the internal print server
• The PRO internal print server card connects to MIO printer slots.
• To get a complete list of all supported printers, see Intel’s automated customer
support services information at the back of this manual.
• The HP LaserJet* 4Si and 5Si printers have two MIO slots. Install the NetportExpress
PRO print server card into the lower slot. For instructions, install the Netport Manager
software on any networked Windows workstation and refer to online Help, or see
Intel’s online support documents.
• The token ring card autosenses data rate speeds when both switches are in the default
UP position. (See page 34 for list of settings.)
Continue with Software Installation, page 6. . .
Page 8

6
Software Installation
UNIX and AIX software installation
Turn to the NOS Configuration section in this manual for UNIX or
AIX systems.
Novell and Microsoft networks software installation
Installing Netport Manager softwa re on one Windows-based
workstation lets you manage all of your NetportExpress print servers.
You can run Netport Manager on Windows 3.1x, Windows fo r
Workgroups 3.11, Windows 95, and Windows NT 3.51 or 4.0 systems.
To install Netport Manager
1 Insert the CD-ROM in the selected Windows system.
• Windows 95 or Windows NT 4.0 systems. T he setup program
should automatically appear. If it does not, choose Start and
Run and browse to the CD-ROM drive.
• Windo ws 3.1x or Windows NT 3.51 . From Program Manager,
click the File menu and then click Run. Browse to the CDROM drive.
2 Run setup.exe from the root directory.
3 Install Netport Manager, then turn to the appropriate NOS section
to configure the NetportExpress print server for your system.
Note: If only the IP protocol is running on the system where you install
Netport Manager, the NetportExpress print server must have an
IP address to communicate with Netport Manager. To see if the
print server has an IP address, print a test page. To assign an IP
address, see page 15.
To configure the print server for your NOS, turn to . . .
Novell NetWare NDS Configuration.........................page 8
Novell NetWare Bindery Configuration ...................page 10
Microsoft Network Printing ...................................... page 12
LAN Manager/LAN Server Configuration ................page 16
AppleTalk Configuration .......................................... page 18
UNIX Configuration .................................................. page 19
AIX Configuration ..................................................... page 27
Note: You can configure each port on the NetportExpress print server
for multiple protocols.
Page 9
7
Making installation diskettes
You can make installation diskettes for the f ollowing:
• Netport Manager
• Port Monitor (for Microsoft Network printing)
Making installation disks lets you install these programs on any
system that has a 3-1/2 inch disk ette drive. To make the diskettes,
insert the CD-ROM into a CD-ROM drive. When the setup screen
appears, click Make Setup Disks.
Web Netport Manager
If you do not have a Windows-based workstation on your network for
running Netport Manager, you can set up your NetportExpress print
server using your Web browser. The print server contains a Web server
that lets you view and change settings on the print server from your
Web browser. T his method requires an IP address for the
NetportExpress print server.
• To find out if the print server has an IP address, print a test page by
pressing the “diag” button on the print server.
• To set an IP address, see “Setting an IP address” on pages 15 and 20.
• To access W eb Netport Manager, see “Using Web Netport Manag er”
on page 31.
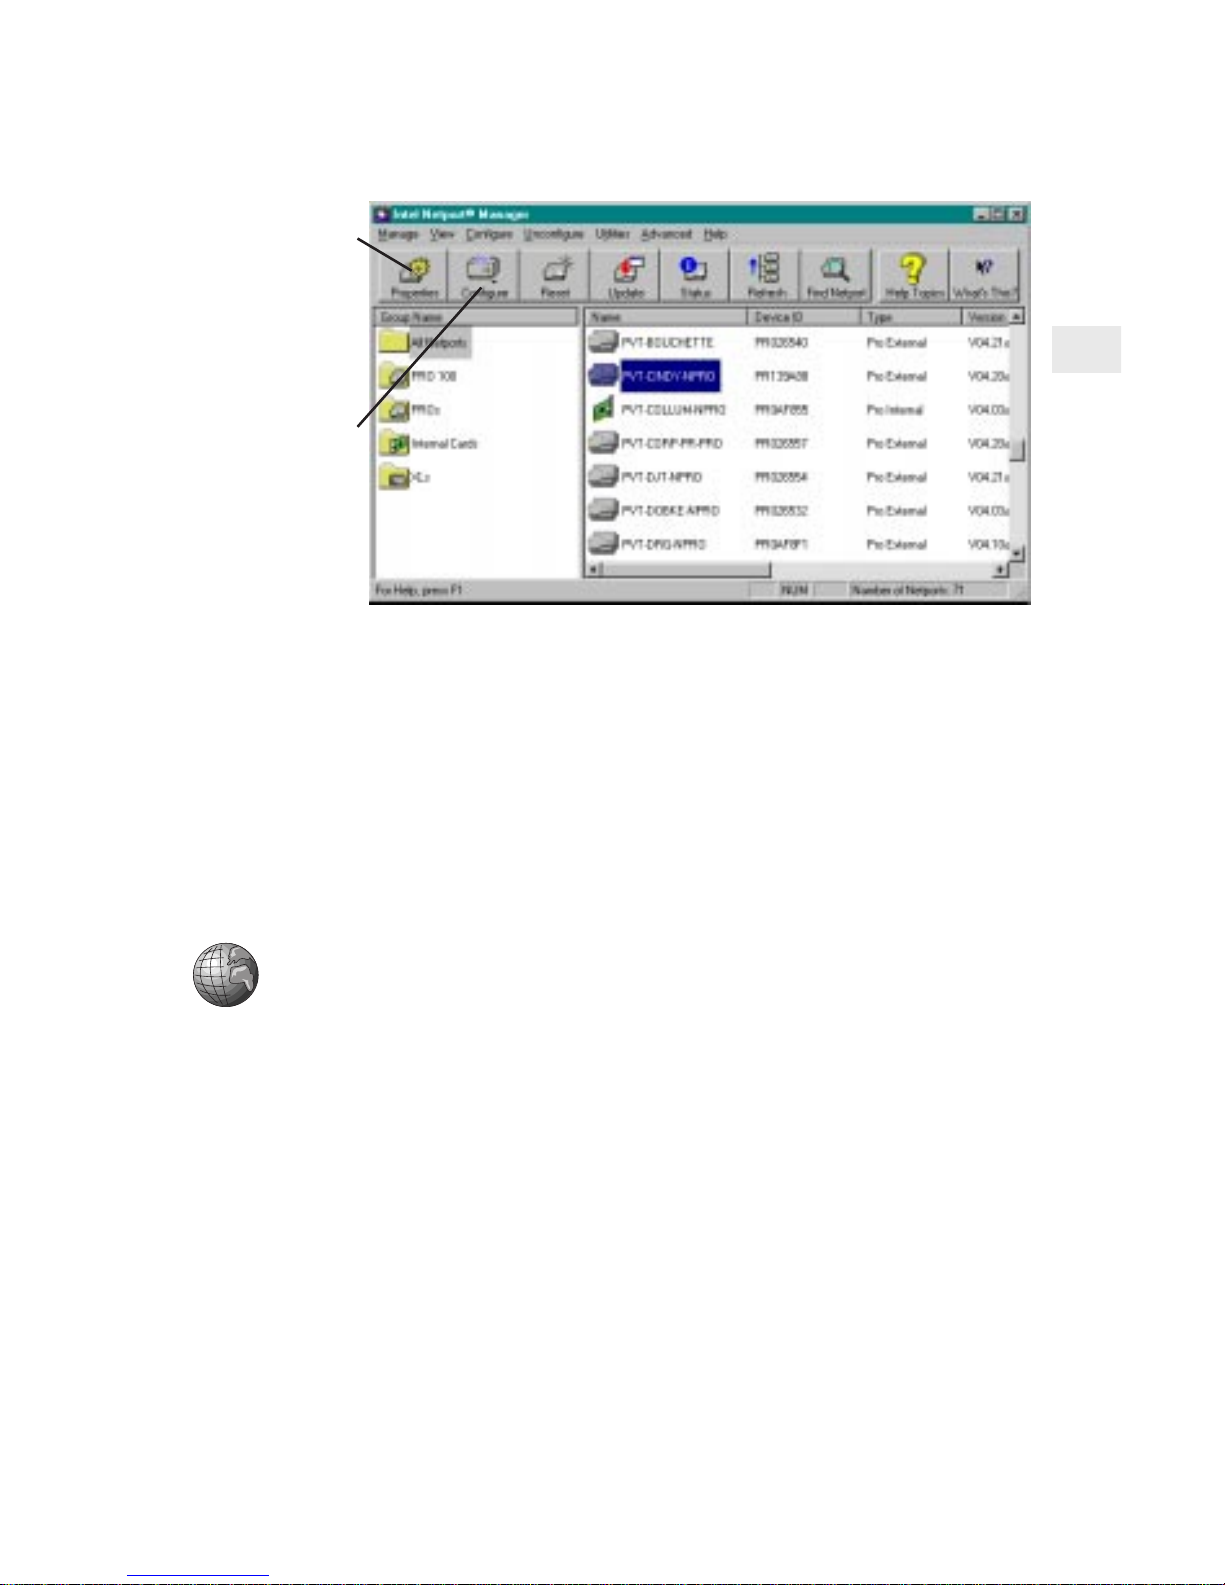
Click
Properties
button
to set the
Netport Name
and hardware
settings
Click
Configure
button to
configure the
NetportExpress
print server
Netport Manager Main Window
Page 10

8
Novell NetW are NDS Print Server Mode
Configuration
In this mode, the NetportExpress print server replaces the NetWare
print server program. The NetportExpress print server polls the NetWare
file server queue for print jobs, then sends each job directly to the
printer. This speeds up the printing process. Print server mode is
recommended because it provides the best printing performance. It
requires one NetWare user license for each print server (including
multi-port print servers).
To set up the print server for NDS print server mode
Note: Netport Manager will create any queues or print servers you
need for your NetWare setup. You don’t have to create these
objects in NWADMIN or PCONSOLE.
1 Log in as Admin at the workstation where you installed Netport
Manager.
2 Start Netport Manager.
3 Select the print server whose Device ID matches the number of
the NetportExpress print server you installed.
4 Click the Configure button.
5 Select Novell NDS Print Server.
6 Select a context for the print server. The context is the container
where the print server object will be created.
7 For each printer connected to the print server, click a Port tab and
assign an existing queue or add a new queue.
• To assign an existing queue, double-c lick the queue to add it
to the Assigned Queues list.
• To add a new queue, click New Queues and create the queue.
8 Click OK and exit Netport Manager.
To set up a workstation to print
At each workstation that will print to this printer, use the capture
command or the workstation’s pr int utility to redirect printing to the
NetWare queue you set up. For instructions see the NetportExpress
Help section on NetWa re printing.
Tip for NDS print server mode
For advanced setup parameters such as LIP (Large Internet Packets), see “Managing the
NetportExpress Print Server,” page 30.
Page 11

9
No vell NetWare NDS Remote Printer Mode
Configuration
In this mode, PSERVER.NLM polls the NetWare file server queue for
waiting print jobs, then sends the print job to the Netport print server,
which then sends the data to the printer. This mode does not require a
NetWare user license for each NetportExpress print server, but is not
recommended because it is much slower than print server mode.
To set up the print server for Novell NetWare NDS remote
printer mode
1 Log in as Admin at the workstation where you installed Netport
Manager.
2 If a print server does not already exist, create a print server using
NWADMIN or PCONSOLE.
3 Start Netport Manager.
4 Select the print server whose Device ID matches the number of
the NetportExpress print server you installed.
5 Click the Configure button.
6 Select Novell NDS Remote Printer.
7 Select a context for the print server. The context is the container
where the print server object was created.
8 Select the Novell NDS print server you created in NWADMIN or
PCONSOLE.
9 For each printer connected to the print server, click a Port tab and
assign an existing queue or add a new queue.
• To assign an existing queue, double-c lick the queue to add it
to the Assigned Queues list.
• To add a n ew queue, click New Queues and create the queue.
10 Click OK and close Netport Manager.
11 Unload and then reload PSERVER.NLM to enable the changes.
To set up a workstation to print
At each workstation that will print to this printer, use the capture
command or the workstation’s pr int utility to redirect printing to the
NetWare queue you set up. For instructions see the NetportExpress
Help section on NetWare printing.
Page 12

10
1
2
Novell NetWare Bindery Print Server Mode
Configuration
To set up the print server for bindery print server mode
Note: Netport Manager will create any queues or print servers you
need for your NetWare setup. You don’t have to create these
objects in NWADMIN or PCONSOLE.
1 Log in as Supervisor at the workstation where you installed
Netport Manager.
2 Start Netport Manager.
3 Select the print server whose Device ID matches the number of
the NetportExpress print server you installed.
4 Click the Configure button.
5 Select Novell Bindery Print Server.
6 Select the file server where the print server will be created.
7 For each printer connected to the print server, click a Port tab and
assign an existing queue or add a new queue.
• To assign an existing queue, double-c lick the queue to add it
to the Assigned Queues list.
• To add a new queue, click New Queues and create the queue.
8 Click OK and exit Netport Manager.
To set up a workstation to print
At each workstation that will print to this printer, use the capture
command or the workstation’s pr int utility to redirect printing to the
NetWare queue you set up. For instructions see the NetportExpress
Help section on NetWa re printing.
Tip for bindery print server mode
For advanced setup parameters such as LIP (Large Internet Packets), see “Managing the
Netpor tExpress Print Server,” page 30.
In this mode, the NetportExpress print server replaces the NetWare
print server program. The NetportExpress print server polls the NetWare
file server queue for print jobs, then sends each job directly to the
printer. This speeds up the printing process. Print server mode is
recommended because it provides the best printing performance. It
requires one NetWare user license for each print server (including
multi-port print servers).
Page 13

11
No vell NetWare Bindery Remote Printer
Mode Configuration
To set up the print server for bindery remote printer mode
1 Log in as Supervisor at the workstation where you installed
Netport Manager.
2 If a print server does not already exist, create a print server using
NWADMIN or PCONSOLE.
3 Start Netport Manager.
4 Select the print server whose Device ID matches the number of
the NetportExpress print server you installed.
5 Click the Configure button.
6 Select Novell Bindery Remote Printer.
7 Choose the file server where the Novell bindery print server is
located. (This is the file server where PSERVER is running.)
8 Select the PSERVER you want to use from the Novell bindery
print server list.
9 For each printer connected to the print server, click a Port tab and
assign an existing queue or add a new queue.
• To assign an existing queue, double-c lick the queue to add it
to the Assigned Queues list.
• To add a n ew queue, click New Queues and create the queue.
10 Click OK and close Netport Manager.
11 Unload and then reload PSERVER.NLM at the file server chosen
in step 7 to enable the changes.
To set up a workstation to print
At each workstation that will print to this printer, use the capture
command or the workstation’s pr int utility to redirect printing to the
NetWare queue you set up. For instructions see the NetportExpress
Help section on NetWare printing.
In this mode, PSERVER.NLM polls the NetWare file server queue for
waiting print jobs, then sends the print job to the NetportExpress print
server, which then sends the data to the printer. This mode does not
require a NetWare user license for each NetportExpress print server,
but is not recommended because it is much slower than print server
mode.
Page 14

12
Microsoft Network Printing
T o set up the print server for Microsoft network
printing
1 Start Netport Manager.
2 Select a NetportExpress print server in the Netport Manager
window.
3 Click the Configure button.
4 Click Microsoft Network Printing.
5 Specify a Name and Domain for the print server.
6 For each printer connected to the print server, click a Port tab and
specify a port name for the printer connected to that port.
Setting up Workstations to print
To print from Windows 95 and Windows NT systems, install the Intel
NetportExpress Po rt Monitor. The P o rt Monitor installs on the system
as a local port that you can share with other systems.
Printing Options
• Print sharing: Install
the NetportExpress
Port Monitor on one
Windows system and
share the port with
other Windows
systems. The system
with the Port Monitor
spools print jobs and
sends them to the
NetportExpress print
server.
• Direct printing: Install
the NetportExpress
Port Monitor on each
Windows system and
print directly to the
NetportExpress print
server.
PARALLEL 1
PARALLEL 2
SERIAL
POWER
BNC
RJ-45
TEST
NetportExpress PRO
Activity
Transmit
Receive
P
A
R
A
L
L
E
L
1
P
A
R
A
L
L
E
L
2
S
E
R
IA
L
P
O
W
E
R
B
N
C
R
J
-
4
5
T
E
S
T
NetportExpress PRO
Activity
Transmit
Receive
The NetportExpress print server can print jobs from networked workstations running Windows* 95, Windows NT*, or Windows for Workgroups*.
Using NetportExpress Port Monitor with a Windows 95 or Windows NT
workstation, you can also share printing with other systems, including
Windows for Workgroups and LAN Manager or LAN Server.
Page 15

13
To set up a Windows 95 workstation
1 Insert the NetportExpress Print Server CD into the CD-ROM
drive.
2 If Setup doesn’t run automatically, run setup.exe from the CD.
3 In Setup, click the NetportExpress Port Monitor button. When
setup is finished, you can set up printing on the workstation.
4 From My Computer, double-click the Printers folder.
5 Double-click Add Printer and follow the steps to set up a tempo-
rary local printer on LPT1. Do not print a test page.
6 After you finish the Add Printer Wizard, right-click the new
printer and click Properties.
7 Click Details and then click Add Port.
8 Click Other, select Intel NetportExpress Network Port, and then
click OK.
9 Click Browse to select the Domain, the Netport print server, and
Port where your printer is connected to the NetportExpress print
server.
10 To share the printer: in Properties, click the Sharing tab. Select
Shared As and specify a Share Name.
To set up a Windows NT 4.0 system
1 Insert the NetportExpress Print Server CD into the CD-ROM
drive.
2 If Setup doesn’t run automatically, run setup.exe from the CD.
3 In Setup, click the NetportExpress Port Monitor button. When
setup is finished, you are ready to set up printing on the system.
4 From My Computer, double-click the Printers folder.
5 Double-click Add Printer and select My Computer.
6 Follow the steps to set up a temporary local printer on LPT1. Do
not print a test page.
7 After you finish the Add Printer Wizard, right-click on the new
printer and click Properties.
8 Click Ports and then click Add Port.
9 Select Intel NetportExpress Network Port and click New Port.
10 Click Browse to select the Domain, Netport print server, and Port
where your printer is connected to the NetportExpress print
server.
11 To share the printer: in Properties, click the Sharing tab. Select
Shared and specify a Share Name.
Setting up a system to print directly or to share printing
Page 16

14
To set up a Windows NT 3.51 system
1 Insert the NetportExpress Print Server CD into the CD-ROM
drive.
2 Run setup.exe from the CD.
3 In Setup, click the NetportExpress Port Monitor button. When
setup is finished, you are ready to set up printing on the system.
4 Start Print Manager.
5 From the Printer menu, click Create Printer.
6 In the Create Printer window, type a printer name.
7 Select a driver for the printer.
8 In the Print to list, select Other.
9 Select Intel NetportExpress Network Port and click OK.
10 Click Browse to select the domain, NetportExpress print server,
and port where your printer is connected to the print server.
11 To share the printer: in Print Manager, select the printer. From
the Printer menu, select Properties. Click Share This Printer on the
Network and specify a Share Name.
Setting up systems to print to a shared printer
To set up a Windows 95 or Windows NT 4.0 workstation to
print to a shared printer
1 From My computer, open the Printers folder.
2 Open Add Printer to start the Add Printer Wizard.
3 Select Network Printer and specify the Share Name you set up
on the system where you installed the NetportExpress Port
Monitor.
To set up a Windows NT 3.51 workstation to print to a shared
printer
1 Start Print Manager and click the Printer menu.
2 Choose Connect to Printer.
3 Select the new printer in the Shared Printers list and specify the
Share Name you set up on the system where you installed the
NetportExpress Port Monitor.
Printing with Windows for Workgroups
Note: Windows for Workgroups cannot run the NetportExpress Port
Monitor. However, you can share printing with a Windows 95 or
Windows NT system that is running NetportExpress Port
Monitor. See pages 12-13.
Page 17

15
To set up a Windows for Workgroups workstation to print to
a shared printer
1 From Print Manager, click the Printer menu, and then click
Connect to Printer.
2 In the Connect to Printer window, select the Share Name for the
printer you set up on the Windows 95 or Windows NT system
where you installed the NetportExpress Port Monitor.
To set up a Windows for Workgroups workstation to print
directly to a printer
1 Start Print Manager on the Windows for Workgroups system.
2 Open Printers.
3 From the Printers menu, choose Connect to Printer.
4 Select the new printer in the Show Shared Printers list. The
NetportExpress print server will appear in the domain you
configured in Netport Manager.
Printing in Windows NT using LPR
You can print in Windows NT using lpr. This topic is covered in the
NetportExpress Help. The NetportExpress print server must have an
assigned IP address to print using lpr.
Setting an IP address in Windows NT using ARP (Ad dress
Resolution Protocol)
1 Make sure you are in the same network segment as the
NetportExpress print server.
2 From a Windows NT or Windows 95 workstation, go to the
command prompt.
3 Type: arp -s
ip_address network_address
where
ip_address
is the IP address you want to assign to the
NetportExpress print server.
network_address
is the 12-character network address printed
on the bottom of the NetportExpress print server. For Windows
NT, the address must be typed in this format: xx-xx-xx-xx-xx-xx.
Example: 00-A0-C9-12-34-56
4 Set the IP address on the print server by typing
ping
ip_address
where
ip_address
is the address you used in step 3.
Page 18

16
LAN Manager/LAN Server Configuration
To set up the NetportExpress print server
Note: Netport Manager runs only on a Windows-based workstation. If
you have only OS/2* workstations on your network, you can use
Web Netport Manager to configure your NetportExpress print
server. See “Using Web Netport Manager” on page 31.
1 Start Netport Manager.
2 Select the print server whose Device ID matches that of the
NetportExpress print server you installed.
3 Click the Configure button.
4 Select Microsoft Network Printing (for LAN Manager) or select
LAN Server.
5 Choose the Domain where you want the NetportExpress print
server to reside.
6 For each printer connected to the print server, click a Port tab and
specify a port name for the printer connected to that port.
To set up printing on an OS/2 workstation for Microsoft LAN
Manager
1 At the OS/2 command prompt on the LAN Manager server,
redirect printing to the NetportExpress print server by typing on
one line:
NET USE
LPT2
: \\
NETPORT\PORT
where
LPT2
is the Device ID.
NETPORT
is the name you’ve given the print server.
PORT
is the port name you used for the shared printer.
2 Click Print Manager on the same server, choose
Configure/Queue from the menu, and click Add.
3 Set the Name, Description, Queue and other entries you want,
then click Add.
4 Click OK.
5 Return to the OS/2 command prompt and type: NET ADMIN
In Microsoft LAN Manager and IBM LAN Server printing, the workstation sends a print job to a printing process, and the job is put in a print
queue and sent to the NetportExpress print server. The print server then
routes the job to the printer through one of its connected ports.
If you have a Windows 95 or Windows NT workstation on the network,
you can also print using Microsoft network printing. See pages 12-15.
Page 19

17
6 From the main menu, choose View/Share the Resource, then click
Add.
7 From the list box, choose Printer, then click Add.
8 Set the Queue name by using the name of the queue you set up in
the steps above.
9 Input the Share Name and other required settings, then click OK.
10 Click Finish. Set the required entry for the next screen, then click
OK/Finish.
11 From the main menu, click View/Exit and return to the command
prompt.
12 At the command prompt, confirm the settings by typing:
NET SHARE
Note: To stop redirection, use a command such as
NET USE LPT2: /DELETE
To set up printing on an OS/2 workstation for IBM LAN
Server
1 At the OS/2 command prompt on the LAN Server server, redirect
printing to the NetportExpress print server by typing on one line:
NET USE
LPT2
: \\
NETPORT\PORT
where
LPT2
is the Device ID.
NETPORT
is the name you’ve given the print server.
PORT
is the port name you used for the shared printer.
2 On the OS/2 desktop, open Templates.
3 Drag and drop the printer template to a folder on the desktop.
4 In the Create a Printer window, type the printer name you want.
5 Choose LPT1.
6 From the driver list, choose Corresponding Printer Drivers.
7 Click Create.
8 Click OK.
9 Indicate whether you want the system to install an equivalent
WIN-OS2 printer configuration, and share the printer you created.
Note: To stop redirection, use a command such as
NET USE LPT2: /DELETE
To share the printer you created
Click the top-left corner of the printer icon. When a drop-down menu
appears, choose Share Printer to share the printer on the network.
Page 20

18
AppleTalk Configuration
To configure the NetportExpress print server for AppleTalk
1 At the Windows workstation where you installed Netport Man-
ager, start that program.
2 Select the print server whose Device ID matches the number of
the NetportExpress print server you have installed.
3 Click the Configure button.
4 Select AppleTalk.
5 Select a zone name for the NetportExpress print server in the
AppleTalk Zone field.
6 Click on a Port tab.
7 Type a Chooser Name so the printer will appear in the Chooser on
Macintosh workstations.
8 Identify the Printer Type where the print server is connected. This
must match the printer driver name shown in the Chooser. The
default LaserWriter* will work for any PostScript* printer.
9 Select the Font Group that resides on the printer. Default is 35.
Note: If your printer supports bi-directional communication
capability, the default will be “automatically set by printer.”
10 Click OK to complete the set up.
To set up a workstation to print
1 At an Apple workstation, open Chooser.
2 Select the printer driver for the printer connected to the
NetportExpress print server. If you’re using a PostScript printer,
you can select either LaserWriter or the PostScript printer icon for
your printer.
3 If the Chooser window displays an AppleTalk Zone list, select the
zone you specified when setting up the print server.
4 Select the Chooser name for the NetportExpress print server you
want the Macintosh workstation to use.
5 Close the Chooser window.
The NetportExpress print server can service print jobs submitted by
Macintosh* workstations connected to an Ethernet or token ring network.
To print using LocalTalk*, connect the print server through a router to
an Ethernet segment.
Page 21

19
UNIX Configuration
4 Extract proinstall from the CD-R OM to your UNIX host
workstation. To do this, type on one line:
tar xvf /cdrom/npcdrom/unix/prounix.tar
/usr/intl/proinstall
5 Extract proprint and the operating system files. To do this, type
on one line:
tar xvf /cdrom/npcdrom/unix/prounix.tar
/usr/intl/
subdirectory
where
subdirectory
is one of the following:
solx86 (Solaris 2.x x86) solaris (solaris 2.x SPARC) sco
sun (SunOS 4.1.x) unixware hpux
The NetportExpress print server accommodates numerous UNIX
system configurations by providing alternate ways to print. The recommended print method uses
proprint
, which lets you view the status of
print jobs through log files. You can also print using lpr/lpd and ftp. (FTP
printing is documented in Web NetportExpress Help.)
Installing the
proinstall
software for UNIX gives you the files necessary
to use
proprint
. The software also includes the UNIX readme files.
To install the software (AIX users, turn to page 27)
Note: Install the software if you’re using
proprint
or want the readme
files.
1 Log in to a UNIX workstation as root.
2 Type: ls -l /cdrom/npcdrom to determine if the
mounting directory exists.
If necessary, create the directory by typing
mkdir -p /cdrom/npcdrom
3 Insert the CD-ROM into a UNIX workstation. If the CD-ROM
does not automatically mount, follow the directions below to
mount the CD for your system.
System Mount Instructions (type on one line)
HP-UX mount -t cdfs -o ro /dev/dsk/c1d1s0 /cdrom/npcdrom
SCO mount -f ISO9660 -o ro,lower /dev/cd0 /cdrom/npcdrom
Solaris 2.x mount -F hsfs -r /dev/dsk/c0t6d0s2 /cdrom/npcdrom
SunOS 4.1.3 mount -t hsfs -o ro /dev/sr0 /cdrom/npcdrom
UnixWare mount -F cdfs -r /dev/cdrom/c0b0t2l0 /cdrom/npcdrom
Page 22

20
Setting an IP Address in UNIX
The NetportExpress print server must have an assigned IP address to
print with UNIX. The print server by default tries to get an IP address
using RARP, BOOTP, and DHCP. The print server and workstation or
server running the commands must be connected to the same subnet
and not separated by routers.
To manually set an IP address for UNIX using ARP
1 Log in to a UNIX workstation as root.
2 Use a UNIX editor like vi to add the Netport IP address and host
name to the /etc/hosts file.
3 Register the print server on your workstation by typing on one
line:
arp -s
netportexpress network_address
temp
where
netportexpress
is the IP address or the host name of the
NetportExpress print server in the /etc/hosts file.
network_address
is the NetportExpress network address from
the test page or the bottom of the print server device. For UNIX
this address must be entered in two-digit segments separated by
colons. Example: 00:AA:00:1E:5D:B8
Note: To get an IP address that you can use for the
NetportExpress print server, see your network administrator.
4 Set the NetportExpress IP address by typing
ping
netportexpress
where
Netportexpress
is the IP address or the host name of
the NetportExpress print server in the /etc/hosts file.
To use telnet to set parameters such as subnet mask and
default gateway
1 From the UNIX workstation, use telnet to access the print server.
Type: telnet
ip_address
where
ip_address
is the IP address of the NetportExpress print
server.
2 Log in as root.
3 Type the NetportExpress print server password, or press Enter if
there is no password.
4 From the Main menu, choose TCP/IP Configuration.
5 Choose the option you want to change and press Enter.
6 Define the parameters you want to set and press Enter.
7 Exit telnet.
Page 23

21
The NetportExpress print server offers two methods for printing: using
proprint
or using lpr/lpd. The
proprint
program, which comes with your
NetportExpress print server, enables you to view the status of print jobs
through log files. As the following table shows, most systems can use
proprint
. Directions are provided for both
proprint
and lpd/lpr printing
setup.
Operating System Prints with
proprint
Prints with lpr/lpd
HP-UX X X
SCO X X
Solaris X X
SunOS X X
UnixWare X X
Other BSD systems X
Most System V,
Release 4 systems X
T o set up the workstation to print with
proprint
(HP-UX, SCO ,
Solaris, SunOS, UnixWare)
1 Make sure you have already installed the software and are logged
into the UNIX workstation as root.
2 At the UNIX workstation command line, type
cd /usr/intl
3 Type ./proinstall
4 Choose the UNIX platform you want.
5 From the proinstall main menu, choose option 2.
6 Follow the directions on the screen for entering the IP address of
the NetportExpress print server.
7 Choose the print mode. PostScript mode is used for PostScript,
most applications, and PCL (Printer Command Language)
printing. Choose text only if you’re printing UNIX text files.
8 Follow the instructions on the screen to enter a printer name.
9 Follow the instructions on the screen to complete the installation.
10 Print a test file to confirm your UNIX host configuration.
Setting up a UNIX workstation to print
Page 24

22
To set up the workstation to print with lpr/lpd on Solaris,
UnixWare , and other System V, Release 4-based systems
1 Log in to your UNIX workstation as root.
2 In the /etc/hosts file, add a unique host name and IP address for
each NetportExpress print server you want to configure.
3 Set up the print queue and remote printer. You can use the native
System Admininstration utility to add a remote printer of type
BSD, or you can add it from a command line by typing one of the
following sets of entries.
a Type: lpsystem -t bsd
host
where
host
is the host name from step 2.
b Type the printer entry.
• For printing PostScript or PCL files, type on one line:
lpadmin -p
printer
-s
host!port
-I
postscript,simple
• For printing standard UNIX text files, type on one line:
lpadmin -p
printer
-s
host!port
-I
simple
where:
printer
is the name of the printer queue.
host
is the name of the print server from step 2 above.
port
defines a remote printer attached to the
NetportExpress print server. It can be
LPT1_PASSTHRU or LPT1_TEXT (parallel port 1 or the
internal card)
LPT2_P ASSTHR U or LPT1_TEXT (for parallel port 2)
COM1_P ASSTHR U or COM1_TEXT (for the serial port )
Note: Use PASSTHRU for PCL, PostScript, or application
files and TEXT for standard UNIX text files.
c Type:
accept
printer
enable
printer
where:
printer
is the name of the printer queue.
Page 25

23
4 Test the configuration. At the command line, type:
ping
host
lp -d
printer file
where:
host
is the name of the NetportExpress print server from step 2
above.
printer
is the name of the printer queue.
file
is the name of a file.
To set up a workstation to print with lpr/lpd on HP-UX
1 Log in to your HP-UX workstation as root.
2 In the /etc/hosts file, add a unique host name and IP address for
each NetportExpress print server you want to configure.
3 Set up the print queue and remote printer.
4 Type: lpshut
5 Type on one line:
lpadmin -p
printer
-v/dev/null -orm
host
orp
port
-ob3
where
printer
is the print queue on the local system.
host
is the NetportExpress print server.
port
defines the remote printer attached to the NetportExpress
print server. It can be
LPT1_PASSTHRU or LPT1_TEXT (for parallel port 1 or the
internal card)
LPT2_P ASSTHR U or LPT2_TEXT (for parallel port 2)
COM1_P ASSTHR U or COM1_TEXT (for the serial port )
Note: Use PASSTHRU for PCL, PostScript, or application files
and TEXT for standard UNIX text files.
6 Type:
accept
printer
enable
printer
lpsched
where
printer
is the name of the printer queue on the local system.
Page 26

24
To set up the workstation to print with lpr/lpd on SunOS and
other BSD-based systems
1 Log in to your UNIX workstation as root.
2 Add the NetportExpress print server’s IP address and host name to
the /etc/hosts file on the BSD host.
3 Add the following entries for the printer to the bottom of the /etc/
printcap file.
printer_name|alternate_name|comment
:\
:lp=:\
:rm=
host
:\
:rp=
port
:\
:mx#0:\
:lf=
/usr/spool/lpd/errorlog
:\
:sd=
/usr/spool/lpd/printer_name
:
IMPORTANT: The last entry must end with a colon (:)
not with a backslash (\).
where:
printer_name|alternate_name
is a printer name and
alternate printer name. Example: lj3ps|LaserJet_IIIsi
comment
is an optional comment. Example:
printer_on_port_1
:lp is a required field.
host
defines a host name. Use either the NetportExpress print
server IP address or the print server name as entered in the /etc/
hosts file.
port
is a remote printer attached to the NetportExpress print
server. It can be one of the following:
LPT1_PASSTHRU or LPT1_TEXT (for parallel port 1 or the
internal card)
LPT2_P ASSTHR U or LPT2_TEXT (for parallel port 2)
COM1_P ASSTHR U or COM1_TEXT (for the serial port)
Note: Use PASSTHRU for PCL, PostScript, or application files
and TEXT for standard UNIX text files.
mx#0 provides unlimited buffer space.
/ usr/spool/lpd/
errorlog
defines the location of the
error log file.
/usr/spool/lpd/
printer_name
defines the directory for
spooled files.
Page 27

25
4 Go to the shell prompt and create a spool directory for the printer,
if the directory doesn’t already exist. To do this, type the following commands:
mkdir
spool_directory
chown daemon
spool_directory
chgrp daemon
spool_directory
chmod 775
spool_directory
where:
spool_directory
is specified in the /etc/printcap file by the
sd= option.
(Example: /usr/spool/lpd/lj3ps)
5 Enable queuing for the printer by typing the following command:
lpc enable
printer
where:
printer
is the local printer specified in the /etc/printcap file (for
example: lj3ps )
6 Enable printing by typing the following command:
lpc start
printer
where:
PRINTER is the local printer specified in the /etc/printcap file
(lj3ps in the printcap sample)
7 Test the configuration by typing:
ping
host
lpr -P
printer file
where:
host
is the name of the NetportExpress print server as it appears
in the /etc/hosts file.
printer
is the name of the printer queue.
file
is the name of a file.
Page 28

26
Upgrading firmware using TFTP
When you get a product upgrade, you can use TFTP (Trivial File
Transfer Protocol) to install it. You must have access to a UNIX host
running the TFTP daemon containing the update files.
To upgrade the firmware using TFTP
Follow steps 1-4 to initialize the TFTP daemon. If it’s already
running, skip to step 5.
1 Edit the /etc/inetd.conf file. From your workstation, type an entry
for your TFTP daemon. Example: (for Solaris users) type on one
line:
tftp dgram upd wait root /usr/sbin/in.tftpd
in.tftpd -s
/usr/local/tftpboot
where
/usr/local/tftpboot
is the TFTP home directory.
2 Save the inetd.conf file.
3 Use grep to get the inetd daemon process ID. You’ll need this to
reinitialize the inet daemon. Type
ps -ef | grep -v grep | grep inetd
output example:
root 104 1 80 Dec 13 ? 0:01 /usr/sbin/
inetd -s
where
104
is the inetd daemon process ID.
4 Reinitialize the inet daemon. Type
kill -HUP
process_ID
where
process_ID
is the process ID of the inetd daemon
obtained in step 3 above (104 in the example).
5 Copy nppro.upd (network update file) into the home directory of
your TFTP daemon.
6 Type telnet
netportexpress_ip_address
to
connect to the print server.
7 From telnet’s main menu, choose Utilities, then choose Network
Update.
8 Enter the tftp server IP address and the path and filename of the
network update file.
9 Choose yes to continue the network update. Network Update
closes the telnet connection.
10 When Network Update is complete, you’ll be able to type
telnet
netportexpress_ip_address
to communicate with the NetportExpress print server.
Page 29

27
AIX Configuration
To install the software
1 Log in to an AIX workstation with root privileges.
2 Mount the CD-ROM to /cdrom/npcdrom by typing
Mount -v cdrfs -o ro
/dev/cd0
/cdrom/npcdrom
where
/dev/cd0
is the device special file for the CD-ROM drive. This is
system-dependent; check your system documentation for the
exact file name.
3 Extract proflash and other operating system files by typing on
one line:
tar xvf /cdrom/npcdrom/unix/prounix.tar /usr/intl/
aix
4 Print a test page by pressing the “diag” button on the
NetportExpress print server.
To set the IP address
1 Log in to your AIX workstation as root.
2 Add an entry to the host table by typing
smit mkhostent
3 Go to the command line and type on one line:
arp -s ether
ip_address netport_address
temp
where
ip_address
is the IP address of the NetportExpress print server.
netport_address
is the print server network address from the
bottom of the print server device.
• To get an IP address to use for the NetportExpress print server
address, see your network administrator.
• To get the print server network address, see the bottom of the
print server device or the test page.
Intel’s NetportExpress print server can print with AIX using lpr/lpd. To
configure AIX for printing, use SMIT (System Management Interface
Tool) . For both versions (4.1 and 3.2.5) complete these sections:
• To install the software
• To set the IP address
Then see the printing section for your AIX version to complete setup.
Page 30

28
4 Type the NetportExpress IP address in the internet address field
and the NetportExpress host name in the Host Name field (Host
Name is any valid UNIX host name you choose).
5 Press F12 to exit smit.
6 Connect to the NetportExpress print server by typing:
telnet
NetportExpress_IP_address
7 Log in as root.
8 From the telnet main menu, choose the TCP/IP Configuration
option, such as subnet mask or Gateway address, that you want to
configure and press Enter.
9 Define the parameters for each option you want to configure
and press Enter.
10 Exit the telnet screen.
11 Test your network setup and connection by typing
ping
NetportExpress_host_name
To set up printing on AIX 4.1
1 Log in as root and type
smit mkrque
2 From the Attachment Type field, choose remote.
3 Type an entry for the option you want to configure for remote
printing.
• Name of queue to add. Type the name of the local print queue.
• HOSTNAME of remote server. Type the HOSTNAME of the
PRO/100 you added to the host tabl e.
• Name of QUEUE on remote server. Valid queue names ar e:
LPT1_PASSTHRU or LPT1_TEXT (for parallel port 1 or the
internal card)
LPT2_PASSTHR U or LPT2_TEXT (for parallel port 2)
COM1_P ASSTHR U or COM1_TEXT (for the serial port )
Note: Use PASSTHRU for PCL, PostScript, or application files
and TEXT for standard AIX text files.
• Type of print spooler on remote server. Click list, then click
BSD, the printing protocol of the NetportExpress print server.
4 Click OK, then click Done to save your configuration.
5 Click Cancel to exit smit.
6 Test AIX printing with the NetportExpress print server. From the
AIX workstation, type
Page 31

29
lpr -P
local_print_queue
/etc/hosts
where
local_print_queue
is the name you assigned in the
Name of queue to add field.
To set up printing on AIX 3.2.5
1 When logged in as root, type
smit mkrque
2 Type an entry for each option you want to configure to make a
remote printer queue.
• Name of queue to add. Type the name of the queue you want
to add.
• Activate the queue? Click list, then click yes or no.
• Destination Host for remote jobs. Type the name of the host
you added to the host table.
• Pathname of the Short Form Filter for queue status output.
Click list to choose the pathname of the Short Form Filter you
want to add.
• Pathname of the Long Form Filter for queue status output.
Click list to choose the pathname of the Long Form Filter you
want to add.
• Name of queue on remote printer. Valid queue names are:
LPT1_P ASSTHR U or LPT1_TEXT , LPT2_PASSTHRU or
LPT2_TEXT , COM1_PASSTHRU or COM1_TEXT
Note: Use PASSTHRU for PCL, PostScript, and application
files and TEXT for standard UNIX text files.
• Name of device to add. Type the name of the printer you want
to add.
• Backend Program pathname. Type
/usr/lpd/rembak
3 Click Do, then press F12 to exit smit.
4 Test AIX printing with the NetportExpress print server. From the
AIX workstation type
lpr -P
local_print_queue
/etc/hosts
where
local_print_queue
is the name you assigned in the Name of
queue to add field.
Page 32

30
Using Netport Manager
Managing the NetportExpress Print Server
The NetportExpress print server supports several network and printer
management tools. The Windows-based Netport Manager application
provides print server configuration, status, and management for all
supported network operating systems.
You also can access telnet and a web-based interface, Web Netport
Manager, which provides additional methods for managing the
NetportExpress print server. These two services require an IP address
for the NetportExpress print server.
To view status
Select a NetportExpress print server and click the status button.
To change parallel port speed
Select a NetportExpress print server. Click the Properties button, and
click a parallel port tab.
To change configuration
Right-click a NetportExpress print server and choose Configure print
services from the pop-upmenu.
To reset a NetportExpess print server to factory defaults
Right-click the NetportExpress print server and choose Factory
Defaults from the pop-up menu.
To update a print server using flash technology
Select the NetportExpress print servers you want to update. (Holding
down the shift key will let you select more than one print server. The
selected print servers must be in the same network segment.) Click the
Update button.
To change communications parameters (such as LIP for NetWare)
Select a NetportExpress print server and choose Communications from
the Options menu.
Page 33

31
To change a password
Select a NetportExpress print server and click the Properties button.
Click the password tab.
To set the IP address
Select a NetportExpress print server and click the Configure button.
Select TCP/IP. If the IP address does not display, you can assign an
address. If you need to request an IP address, see your Network
Administrator.
Using Web Netport Manager
You can also manage your print servers using your web browser to
connect to the Web server running on the NetportExpress print server.
To run Web Netport Manager you will need Netscape* or Microsoft
Internet Explorer*, versions 3.0 or later.
To access Web Netport Manager
1 Open your web browser.
2 Type the NetportExpress print server IP address in the Location
box and press Enter. The Web Netport Manager home page will
appear.
Note: To find out if the NetportExpress print server has an IP address,
print a test page by pressing the “diag” button on the print server. To
set an IP address, see “Setting an IP Address” on pages 15 and 20.
Page 34

32
Using telnet
Additional Management Support
The NetportExpress print server supports these network management
tools:
• Intel De vice V ie w for Web® 1.0 (www .intel.com/network)
• Intel LANDesk® Management Suite
• DMI* (Desktop Management Interface)
• SNMP (Simple Network Management Protocol)
See NetportExpress Help for more information about these tools.
To display the telnet main menu
1 From a workstation running TCP/IP, type
telnet
netport_ip_address
where
netport_ip_address
is the IP address of the
NetportExpress print server.
2 Log in as root, using the password you set on the NetportExpress
print server.
3 Choose the task you want to perform from the main menu.
Page 35

33
Troubleshooting the NetportExpress
Print Server
No lights on NetportExpress print server
r There is no power to unit. Check power sources.
r Cables are not securely seated in connectors. Check connections.
r You’re trying to run a PRO/100 on a 100Mbps network but the hub
doesn’t support 100Mbps. Chec k the hub.
r Network cable is not connected. Check the connection.
Blinking red activity light on print server
Number
of blinks Cause
The key to successfully troubleshooting printing problems is to have a
systematic approach and to know where to look for help. This section
lists the most likely causes for some common printing problems.
Along with this troubleshooting section, you can check these resources:
• Netport Manager Help
• Troubleshooting Help (Click the Troubleshooting icon in the Netport
Manager window.)
• Web help (located on the CD-ROM)
• Intel’s automated customer support pages and Intel’s online customer support (see page 43).
1- 4, 8 Unit failure. Contact your vendor or Intel’s
Customer Support
5 Serial port failure. Disconnect all devices
from the print server. Disconnect, then
reconnect the print server power cable.
6 Parallel port failure. Disconnect all devices
from the print server. Disconnect, then
reconnect the print server power cable.
7 Network interface failure. Replace the
network cable or attach the print server to a
different network location.
Hardware problems
Page 36

34
What does the light by the diag button mean?
r This light, which is green when lit, is located next to the diag button
on the PR O/100 de vice . It should be OFF f or 10 Mbps systems and ON
for 100 Mbps systems.
How should switches be set?
r For Token Ring PRO print servers only
Network speed Switch 1 Switch 2
Autosense speed Up Up
Set for 4 Mbps Down Down
Set for 16 Mbps Down Up
r For Ethernet PRO and PRO/100 print servers
Doesn’t apply. Switches are reserved for future use.
Printing problems
Can’t print (start here for most problems)
r Parallel port speed may be incorrect. Parallel port speed should match
the printer speed. See the following table.
P arallel Port
Speed T ype of printer using that speed
Low HP LaserJet 3* or lower, dot matrix, or inkjet
printers
Medium Default setting. HP LaserJet 4* or equivalent, most
other printers
High HP LaserJet 5si* (24 ppm) or faster printers
Software Use only if no other speed works.
To set port speed:
• In Netport Manage r, click the Properties button.
• Using telnet, access the Telnet main menu and choose
Port Configuration.
• From your web browser , enter the IP address of your
NetportExpress print server and choose Properties.
r Printer is off or is offline. Make sure the printer is operational. Print a
self-test page to make sure.
r NetportExpress print server may not be configured correctly. Check
Status in Netport Manager.
Page 37

35
r Print server is offline or is not functioning. Check that the lights on
the NetportExpress print server are on. Press the diag button on the
device to print a test page to check its configuration.
r Printer cable is too long or may be bad. Check that the printer cable is
six feet or less in length. If you suspect something is wrong with the
cable, replace it with a known good cable.
Can’t print in AppleTalk
r The network may be set up incorrectly. Check the control panel to
make sure the network is LocalTalk*, EtherTalk*, or TokenTalk*, as
appropriate.
If the network is running EtherTalk, make sure it is EtherTalk Phase 2.
To pr int using Phase 1, connect the Macintosh to the network with a
router, such as Apple Internet Router* or Liaison Internet Router*, that
routes Phase 1 to Phase 2.
r NetportExpress print server may not be configured for AppleTalk
printing. Check the print server configuration.
r The selected pr inter may not mat ch the Printer Type specified in
Netport Manage r. Check that the name is exactly the same, including
upper and lower case and spaces.
Can’t print in LAN Manager or LAN Server
r Queues may have been created on a system that isn’t running LAN
Manager or LAN Server. Check queue locations.
r Queues may have been mapped to the wrong port. Make sure the
queues are mapped to LPT1, LPT2, or LPT3 on the system running
LAN Manager or LAN Ser ver .
r Queues may be set up wrong. Make sure queues are set up so that one
logical LPT port is associated with one physical LPT port. Queues
must not all map to the logical device LPT1.
Can’t print in UNIX
r You may have typed the tar command used to extract the proinstall
files incorrectly. Check the manual.
r Your print setting may be incorrect. Most applications use the
PASSTHRU setting to print. This command is used f or PCL and
PostScript printer languages. Use TEXT only if you are printing a
UNIX text file.
Page 38

36
r The netwo rk may not be connected to the print server. Use ping from a
UNIX workstation to check IP connectivity to the Netport print
server’s TCP/IP task.
r If using proprint on an SCO, Solaris, UnixWare, or HP-UX host, the
complete path may need to be defined to proprint.
Make sure the lp_scrpt1 file specifies the correct and complete path to
the proprint utility. Also make sure the job number is specified. The
next-to-last line of lp_scrpt1 must read: (shell commands ...) |
usr/intl/hupx/proprint ‘basename $0’ job=1 exit $ ?
r If using proprint, program may not be working. Check it by pr inting a
job from the command line without using the spooling system.
r If using lpd without proprint and printing binary or PostScript files,
you may be using the wrong queue name. Make sure the queue name
is LPT1_P ASSTHR U for ASCII files.
Queues fill up but nothing prints
r Another print server may be servicing the queue. Select a different
queue or change the queue that the other print server is using.
r The printer may be off line or set for the wrong type of port (parallel or
serial). Check the printer and ports.
r The network may not be connected. Check the network connection.
Can you print a test page? If you can, check the network connection
between the workstation and the print server. Also check the
connection at the hub or switch.
r If the job appears to print but nothing comes out of the printer, the job
may be going to a different printer.
r The driver parameters may be incorrect. You may be trying to send a
PostScript job to a non-PostScript printer or sending a non-PostScript
job to a PostScript printer.
Print job doesn’t print correctly
r May be using wrong printer dr iver. Make sure the printer driver is the
right one for the printer.
r May need to tog gle the printer’s auto sensing of PostScript print jobs.
r A Postscript printer may be trying to print a non-PostScript job. Check
the job and the printer.
r If you are copying a graphics (binary) file to LPT1, you may have the
wrong parameter setting. Use the /b parameter:
Type: copy /b
filename
lpt1
Page 39

37
where
filename
is the name of the file you want to print.
r Novell NetWare only. The banner page parameter may be set wrong.
Include the NT (no tabs) parameter in the CAPTURE command.
Characters don’t print correctly
r AppleTalk only. If the printer doesn’t print the correct fonts, make sure
the font group specified in Netport Manager is the correct group for
the printer.
Note: This applies only if your printer does not have bi-directional
capability.
Serial printer prints incorrectly
r The serial port parameters may not match the parameters for your
printer. In Netport Manager, open the Device Properties menu and
check under serial port to find the baud rate, parity setting, stop bits,
etc. Make sure these settings match the settings for your printer. (You
can also check by typing your IP address in your web browser to
access the print server web pages.)
r The NetportExpress print server may have lost power or have been
unplugged. Check the printer to see if the form feed or activity light is
on. Reset the printer to clear the unprintable data. You may also need
to reset the NetportExpress print server.
r The cable may be defective. Connect the serial cable to a workstation
and try to print. If the files won’t print from the workstation, replace
the cable.
Printer adds space between lines
r Auto Linefeed may need to be turned off. In Netport Manager, select
the NetportExpress that has the problem and click Properties. At the
port settings, turn off Auto Linefeed. You can also use your web
browser or Telnet. See Managing your NetportExpress Print Server on
page 30.
Can’t print now, but could before
r If you change the Netport Name or Share Name of your
NetportExpress print server after you have configured it, the new name
won’t appear in the print servers list and the printer may not recognize
the print server. Remove the port configurations, then reassign print
servers and queues, as desired.
Page 40

38
Netport Manager problems
Netport Manager won’t launch
r The problem may be with the workstation. Try running Netport
Manager from a different workstation.
r The configuration may still be in process. If you have just configured
or reset the NetportExpress print server, wait a few seconds before
clicking the print server’s icon in the listing.
NetportExpress print server is missing or is listed incorrectly
r The NetportExpress print server may need to be reset. Unplug the
power cord, then plug it back in. Wait about 30 seconds, then click
the print server’s icon in the print servers list. If you still don’t see the
print server, cli ck the View menu and click Refresh.
r If the activity light blinks in a pattern, there may be a problem with
the device. Check the pattern listing at the beginning of the
Troubleshooting section. If you suspect a faulty device, try
connecting the print server to a different network drop to see if it
works there.
r If you have changed the Share Name or Netport Name after
configuring the the NetportExpress print server, the print server may
not appear in Netport Manager. Re-configure the print server with the
new name(s).
Get printed message instead of print job
r If you get a message instead of a print job, you may have bi-
directional communications enabled for a printer that does not
support this capability. In Netport Manager, g o to Properties, select
the port, and uncheck the bi-directional box.
Scrolling the print server list is slow
r You may have a large number of print servers on your network. You
can increase Netport Manager performance by grouping your print
servers into groups
Page 41

39
Other Problems
Can’t share queues in LAN Manager
r LAN Manager only . When you try to use the NET SHARE command
to share a queue that is not yet mapped to the correct printer, you’ll
see this DOS message:
The destination list provided does not match the
destination list of the printer queue.
Use NET ADMIN to check and cor rect the printer/queue ma ppings.
1 From the OS/2 full screen prompt, type:
NET ADMIN
2 Click the View menu, and then click Shared
Resources.
3 From the Shared Resources window, select
<Add Share>.
4 Choose the Printer option, and click OK.
5 From the Share a Printer Queue with the Network window,
highlight the desired queue. Click OK.
6 View the Shared Resource information to see the queue and
printer mappings. Click Done.
7 Assign permissions to the users and groups you want to have
access to the print queue. Highlight the desired user or group that
currently doesn’t have access, then select Yes for “permitted
access”. Choose Permit to add that user or group to the Assigned
Permissions list. Click OK.
8 Exit NET AD MIN.
Forgotten password
r Perform a serial update to remove the existing password.
If your model of NetportExpress print server does not have a serial
port, call Intel’ s customer support service.
Page 42

40
Limited Warranty
Intel warrants to the original owner that the product delivered in this package will be free from
defects in material and workmanship for three (3) year(s) following the latter of: (i) the date of
purchase only if you register by returning the registration card as indicated thereon with proof of
purchase; or (ii) the date of manufacture; or (iii) the registration date if by electronic means
provided such registration occurs within 30 days from purchase. This warranty does not cover
the product if it is damaged in the process of being installed. Intel recommends that you have the
company from whom you purchased this product install the product.
THE ABOVE WARRANTY IS IN LIEU OF ANY OTHER WARRANTY, WHETHER EXPRESS, IMPLIED
OR STATUTORY, INCLUDING, BUT NOT LIMITED TO, ANY WARRANTY OF MERCHANTABILITY,
FITNESS FOR A PARTICULAR PURPOSE, ANY WARRANTY OF INFRINGEMENT OF ANY OTHER
PARTY’S INTELLECTUAL PROPERTY RIGHTS, OR ANY WARRANTY ARISING OUT OF ANY
PROPOSAL, SPECIFICATION OR SAMPLE.
This warranty does not cover replacement of products damaged by abuse, accident, misuse,
neglect, alteration, repair, disaster, improper installation or improper testing. If the product is
found to be otherwise defective, Intel, at its option, will replace or repair the product at no charge
except as set forth below, provided that you deliver the product along with a return material
authorization (RMA) number (see below) either to the company from whom you purchased it or
to Intel. If you ship the product, you must assume the risk of damage or loss in transit. You must
use the original container (or the equivalent) and pay the shipping charge. Intel may replace or
repair the product with either a new or reconditioned product, and the returned product
becomes Intel’s property. Intel warrants the repaired or replaced product to be free from defects
in material and workmanship for a period of the greater of: (i) ninety (90) days from the return
shipping date; or (ii) the period of time remaining on the original three (3) year warranty.
This warranty gives you specific legal rights and you may have other rights which vary from state
to state. All parts or components contained in this product are covered by Intel’s limited warranty
for this product. The product may contain fully tested, recycled parts, warranted as if new.
Returning a Defective Product (RMA)
Before returning any product, contact an Intel Customer Support Group and obtain an RMA
number by calling: North America only: (916) 377-7000
Other locations: Return the product to the place of purchase.
If the Customer Support Group verifies that the product is defective, they will have the Return
Material Authorization Department issue you an RMA number to place on the outer package of
the product. Intel cannot accept any product without an RMA number on the package.
Limitation of Liability and Remedies
INTEL SHALL HAVE NO LIABILITY FOR ANY INDIRECT OR SPECULATIVE DAMAGES (INCLUDING
, WITHOUT LIMITING THE FOREGOING, CONSEQUENTIAL, INCIDENTAL AND SPECIAL DAMAGES) ARISING FROM THE USE OF OR INABILITY TO USE THIS PRODUCT, WHETHER ARISING
OUT OF CONTRACT, NEGLIGENCE, TORT, OR UNDER ANY WARRANTY, OR FOR INFRINGEMENT
OF ANY OTHER PARTY’S INTELLECTUAL PROPERTY RIGHTS, IRRESPECTIVE OF WHETHER
INTEL HAS ADVANCE NOTICE OF THE POSSIBILITY OF ANY SUCH DAMAGES, INCLUDING, BUT
NOT LIMITED TO LOSS OF USE, BUSINESS INTERRUPTIONS, AND LOSS OF PROFITS.
NOTWITHSTANDING THE FOREGOING, INTEL’S TOTAL LIABILITY FOR ALL CLAIMS UNDER THIS
AGREEMENT SHALL NOT EXCEED THE PRICE PAID FOR THE PRODUCT. THESE LIMITATIONS
ON POTENTIAL LIABILITIES WERE AN ESSENTIAL ELEMENT IN SETTING THE PRODUCT PRICE.
INTEL NEITHER ASSUMES NOR AUTHORIZES ANYONE TO ASSUME FOR IT ANY OTHER
LIABILITIES.
Some states do not allow the exclusion or limitation of incidental or consequential damages, so
the above limitations or exclusions may not apply to you
5/28/97(kc)
Page 43

41
FCC Compliance Statement
This product has been tested and found to comply with the limits for a Class A digital
device pursuant to Part 15 of the FCC rules. These limits are designed to provide
reasonable protection against harmful interference when the equipment is operated in a
commercial environment.
This product generates, uses, and can radiate radio frequency energy and, if not
installed and used in accordance with the instruction manual, may cause harmful
interference to radio communications. However, there is no guarantee that interference
will not occur in a particular installation. If this equipment does cause harmful
interference to radio or television reception, which can be determined by turning this
equipment off and on, the user is encouraged to try to correct the interference by one or
more of the following measures:
• Change the direction of the radio or TV antenna.
• To the extent possible, relocate the radio, TV, or other receiver away from the
product.
• Plug the product into a different electrical outlet so that the product and the receiver
are on different branch circuits.
If these suggestions don’t help, consult your dealer or an experienced radio/TV repair
technician for more suggestions.
NOTE This device complies with Part 15 of the FCC Rules. Operation is subject to the
following two conditions: (1) This device may not cause harmful interference, and
(2) this device must accept any interference received, including interference that
may cause undesired operation.
CAUTION If you make any modification to the equipment not expressly approved by
Intel, you could void your authority to operate the equipment.
CE Compliance Statement
This NetportExpress print server complies with the EU Directive, 89/336/EEC, using the
EMC standards EN55022 (Class A) and EN50082-1. This product also meets or exceeds
EN60950 safety requirements.
This product has been tested and verified to meet CISPR 22 Class A requirements.
Canada
Cet appareil numérique respecte les limites bruits radioélectriques applicables aux
appareils numériques de Classe A prescrites dans la norme sur le matériel brouilleur:
“Appareils Numériques”, NMB-003 édictée par le Ministre Canadian des Communications.
This digital apparatus does not exceed the Class A limits for radio noise emissions from
digital apparatus set out in the interference-causing equipment standard entitled: “Digital
Apparatus,” ICES-003 of the Canadian Department of Communications.
VCCI Class 1 (Japan)
Intel Corporation, Mailstop JF3-406, 5200 NE Elam Young Parkway
Hillsboro, Oregon 97124-6497 USA
Page 44

42
Intel Help World Wide Web & Intel Bulletin Board
Files Internet FTP Service (BBS)
View the online Access Intel’s World Wide Web Use Intel’s BBS. Dial
README files for home page or download in by modem at 8-N-1,
detailed information. information using and up to 14.4 Kbps.
anonymous FTP.
Troubleshooting
✓✓
✓✓
✓
✓✓
✓✓
✓
Software updates
✓✓
✓✓
✓
✓✓
✓✓
✓
Installation notes
✓✓
✓✓
✓
✓✓
✓✓
✓
Product information
✓✓
✓✓
✓
How to access:
WWW
US and Canada
General:
www.intel.com/network/print 1-503-264-7999
News:
news://cs.intel.com Europe
CS:
http://support.intel.com +44-1793-432955
FTP
Worldwide
Host:
download.intel.com +1-503-264-7999
/enduser_reseller
Directory:
/support
Intel Automated Customer Support
You can reach Intel’s automated support services 24 hours a day, every day at no charge. The services
contain the most up-to-date information about Intel products. You can access installation instructions,
troubleshooting information, and general product information.
Intel Customer Support T echnicians
Free support: You can speak with our technical support professionals free of charge.
Worldwide access: Intel has technical support centers worldwide. Many of the centers are staffed by
technicians who speak the local languages. For a list of all Intel support centers, the telephone numbers,
and the times they are open, download document 9089 from one of the automated services.
If you don’t have access to automated services, contact your local dealer or distributor.
Or call +1-916-377-7000 from 07:00 to 17:00 Monday through Friday, U.S. Pacific Time.
03/31/97
Page 45

43
Index
Symbols
10 Megabits per second (Mbps) network
speed 2
100 Megabits per second (Mbps) network
speed 2
A
Activity light 2, 33
Advanced configuration parameters 30
AIX 27
printing with AIX 3.2.5 29
printing with AIX 4.1 2 8
AppleTalk
troubleshooting printing prob-
lems 35, 37
AppleTalk Phase 1 35
AppleTalk printing problems 37
Autosensing data rate speeds 3
B
Bindery services
configuring remote printer mode 11
print server mode 10
BOOTP (Boot Protocol) 20
BSD-based systems
printing with lpr/lpd 2 4
C
Cables
Category 3 or 5 2, 3
parallel 2, 3
printing problems 35
Cabling
power cable 2
Category 3 or 5 cables 3
CD-ROM
NetportExpress print server soft-
ware 6
CE compliance 41
Chooser 18
Configuration
changing with Netport Manager 3 0
Configuration parameters, advanced 30
Configuring
for multiple protocols 6
Connectors
DB-9 3
internal print server cards 4
RJ-45 3
RJ-45 and BNC, for PRO internal
Ethernet cards 4
Context
for Novell NDS print server mode 8
Customer support 42
D
Data rate speeds
token ring 3
DB-9 connector 3, 4
Default gateway 20
Device ID 2, 3, 4
DHCP (Dynamic Host Configuration
Protocol) 20
DMI (Desktop Management Interface) 32
Domain 13, 14
F
Factory defaults
resetting to 30
FCC compliance 41
Firmware
upgrading using TFTP 26
Flash memory
upgrading using TFTP 26
Flash updates 30
Frame types
Novell NetWare 2, 3
FTP printing 19
G
Green light 34
H
Hardware installation 2
instructions for internal card 5
Help
customer support 42
HP-UX 19
printing with lpr/lpd 2 3
using proprint 21
HTML
accessing Web Netport Manager 31
I
Intel Device View for Web 32
Internal print server cards
hardware installation 4
inserting in printers 4
IP address
setting in UNIX 20
setting in Windows NT 1 5
setting with Netport Manager 3 1
L
LAN Manager/LAN Server
troubleshooting printing problems 35
LAN Manager/LAN Server printing 1 6
Page 46

44
LANDesk Management Suite 32
LaserJet printers
installing internal print server cards 5
LaserWriter printers 18
Lights
activity light 2
blinking red activity light 3 3
light by diag button 34
LIP (Large Internet Packet) 8, 10
LocalTalk 18
Log files
for proprint 21
LPR printing
for Windows NT 15
lpr/lpd
supported systems 21
lpr/lpd printing for UNIX 19, 21
M
MAC (Media Access Control)
address.
See
Network address
Macintosh printing 18
Memory
upgrading Flash memory using
TFTP 26
Microsoft network printing 12
MIO (modular input/output)
printer slots for internal print server
cards 5
Multiple protocols
configuring 6
N
NDS
configuring for print server mode 8
Netport Manager
installing the software 6
using to manage printing 30
Netport Manager main window 7
NetportExpress Port Monitor 12
NetportExpress print server
installing the software 6
Network address 2, 3, 20, 27
Network management
additional tools 3 2
Network speed
10/100 Mbps 2
Novell NetWare
Bindery services remote printer
mode 11
configuring for bindery services 10
configuring NDS remote printer
mode 9
frame types 2, 3
NW Admin and PCONSOLE 8, 10
user licenses 8
Novell NetWare NDS
configuring for print server mode 8
O
OS/2
printing with LAN Manager 1 6
printing with LAN Server 1 7
P
Parallel port speed
changing with Netport Manager 3 0
Parameters, advanced 30
PASSTHRU 22, 24
Password
changing 31
forgotten 39
PCONSOLE
not needed for Netport Manager
configuration 8 , 10
Phase 1, AppleTa lk 35
Phase 1 printing with LocalTa lk 1 8
Phase 2, EtherTalk 35
Port Monitor 12
Port speed 30
setting 34
Power supply
correct one to use 2, 3
Print server
returning 40
Print server mode
Novell NDS 8
Novell NetWare bindery services 10
Print servers
External PRO print server hardware
installation 3
Printer management tools 3 0
Printing
cable problem 35
can't print 34
common problems 34
sharing a printer in LAN Manager or
LAN Server 17
test page 2, 3
using CAPTURE command in Novell 8
using proprint 21
with LAN Manager or LAN Server 16
PRO print server, external
hardware installation 3
Problems with printing 34
Product, returning 40
proprint 19
log files 21
supported systems 21
Page 47

45
Protocols, configuring multiple 6
PSERVER.NLM
in Novell NDS remote printer mode 9
Q
Queues
assigning for Novell NDS print server
mode 8
R
RARP (Reverse Address Resolution
Protocol) 20
Remote printer mode 1 1
configuring for bindery services 11
Novell NDS 9
Resetting to factory defaults 30
Returning a defective product 40
RJ-45 4
RJ-45 connector 2, 3
for internal PRO print server card 4
S
SCO 19
using proprint 21
Serial printing problems 3 7
Setting an IP address
in Netport Manager 31
Setting an IP address in UNIX
using ARP 20
Setting an IP address in Windows NT
using ARP 15
SMIT (System Management Interface
Tool) 27
SNMP (Simple Network Management
Protocol 32
Software installation
installing Netport Manager 6
Solaris 19
printing with lpr/lpd 2 2
using proprint 21
Status
viewing with Netport Manager 3 0
Subnet mask 20
SunOS 19
printing with lpr/lpd 2 4
using proprint 21
Support, customer 42
Switches 5
settings 34
Switches, token ring
default position 3, 5
System V, Release 4
printing with lpr/lpd 2 2
T
Telnet 32
setting configuration parameters 20
Test page
printing 2, 3
TEXT 24
TFTP
upgrading flash memory with 2 6
Token ring
data rate speeds 3
defaul switch settings 5
Troubleshooting 33
U
UnixWare 19
printing with lpr/lpd 2 2
using proprint 21
User licenses (Novell) 8
W
Warranty, limited 40
Web management tools 32
Web Netport Manager 31
defined 7
Windows 95
installing the software 6
Windows 95 direct printing 1 3
Windows 95 shared printing 14
Windows for Workgroups
direct printing 15
installing the software 6
Windows for Workgroups printing 14
Windows NT
installing the software 6
Windows NT 3.51 direct printing 1 4
Windows NT 3.51 shared printing 1 4
Windows NT 4.0 direct printing 13
Z
Zones 18
Page 48

46
P/N 679939-001 *679939-001*
Hardware Installation
Software Installation
Novell NetWare NDS Configuration
Novell NetWare Bindery Configuration
Microsoft Network Printing
LAN Manager/LAN Server Configuration
AppleTalk Configuration
UNIX Configuration
AIX Configuration
Managing the NetportExpress Print Server
Troubleshooting
Limited Warranty/Compliance Statements
Customer Support
Index
 Loading...