

Page 1
Getting Started Guide
Intel
®
PC Cameras
with Intel® Create & Share™ Software
Page 2

Copyright© 2000 Intel Corporation. All rights reserved.
Intel Corporation, 5200 NE Elam Young Parkway, Hillsboro, OR, 97124-
6497, USA.
Intel Corporation assumes no responsibility for errors or omissions in this
manual. Nor does Intel make any commitment to update the information
contained herein.
The sample images included with the Intel® Create & Share™ Software
are provided courtesy of PhotoDisc, a Getty Images, Inc. company.
Copyright© 1999 Getty Images, Inc.
Music for the images is provided courtesy of Opus 1 Copyright© 1999
Opus 1. All rights reserved.
Portions of this product were created using LEADTOOLS© 1991-1996
LEAD Technologies. All rights reserved.
This software is based in part on the work of the Independent JPEG
Group.
Portions of this product were created using Mabry Internet Mail Control©
1996-1998 by Zane Thomas, Mabry Software, Inc. All rights reserved.
Portions of the product are provided by Reality Fusion© 2000. All rights
reserved.
*Other product and corporate names may be trademarks of other
companies and are used only for explanation and to the owners’ benefit,
without intent to infringe.
First Edition ii September 2000
Page 3

Note
Welcome
Congratulations! The combination of your Intel Pro
PC Camera and Intel Create & Share Software lets
you capture and organize videos, audio clips, and
images that can be incorporated into email postcards
and your own home pages. You can also use your
powerful new camera & software combo to:
• Quickly and easily record a video for an email.
• Talk to family and friends on an Internet video
phone call with Microsoft’s* Windows*
NetMeeting*.
• Play virtual reality games where you’re a part
of the on-screen action.
This manual
assumes that you
have successfully
installed your Intel
Create & Share
Software.
What you should have
Before starting the installation, check that your
package contains these items:
Video cable Audio cable
Intel Pro PC Camera Intel Create & Share
Software CD-ROM
Audio stereo-to-
mono adapter
GETTING STARTED GUIDE 3
Page 4

Where are the
online manuals?
You can find the
manuals at:
Start> Programs>
Intel Create &
Share Software>
Manual
Manuals
Your camera and software combination includes
several straight forward online references that make
using your camera and the Intel Create & Share
software fun and easy.
• This Getting Started Guide.
-or-
From the Intel
Create & Share
Help menu.
• Intel Create & Share Software User’s Manual.
• Intel Create & Share online help.
Getting Started Guide - Quick instructions on how to
use many of the numerous product features, and a
description of the camera and how to use it effectively.
User’s Manual - Details on using galleries, taking
snapshots, recording videos, creating and sending
email postcards, making Internet video phone calls,
creating your own home pages, building movies,
taking snapshots automatically, sending a video email,
and more.
Online Help - Detailed instructions and extensive
troubleshooting on the full Intel Create & Share
software suite.
4 GETTING STARTED GUIDE
Page 5

Note
To register later,
Starting Intel® Create & Share™ Software
From the Windows Start menu click Intel Create &
Share Software or double-click the desktop icon.
The first time you run the Intel Create & Share
Software:
• The Intel Registration Wizard is displayed to
help you register your program. If you choose
to register now, complete the requested
information. Remember to connect to the
Internet to register online.
• An opportunity to send a Tell Your Friends
message appears. This message provides the
recipient of your message with a link to install
Microsoft’s NetMeeting*. The message also
links your friends to Web sites to learn more
about Intel Pro PC cameras’ capabilities and
where to purchase them.
Be sure to
register to “Stay
in the Loop”.
Registered users
are periodically
informed of
updates,
upgrades, and
special offers.
If you want to send a Tell Your Friends message later:
• From the Help menu, choose Tell Your
Friends.
Visit the Web site
go to: Start>
Programs> Intel
Create & Share
Software>
Register Online.
To find out what’s new, get information on special
offers, and learn more about what you can do with your
camera, visit the web site at:
http://www.intel.com/PCcamera
GETTING STARTED GUIDE 5
Page 6
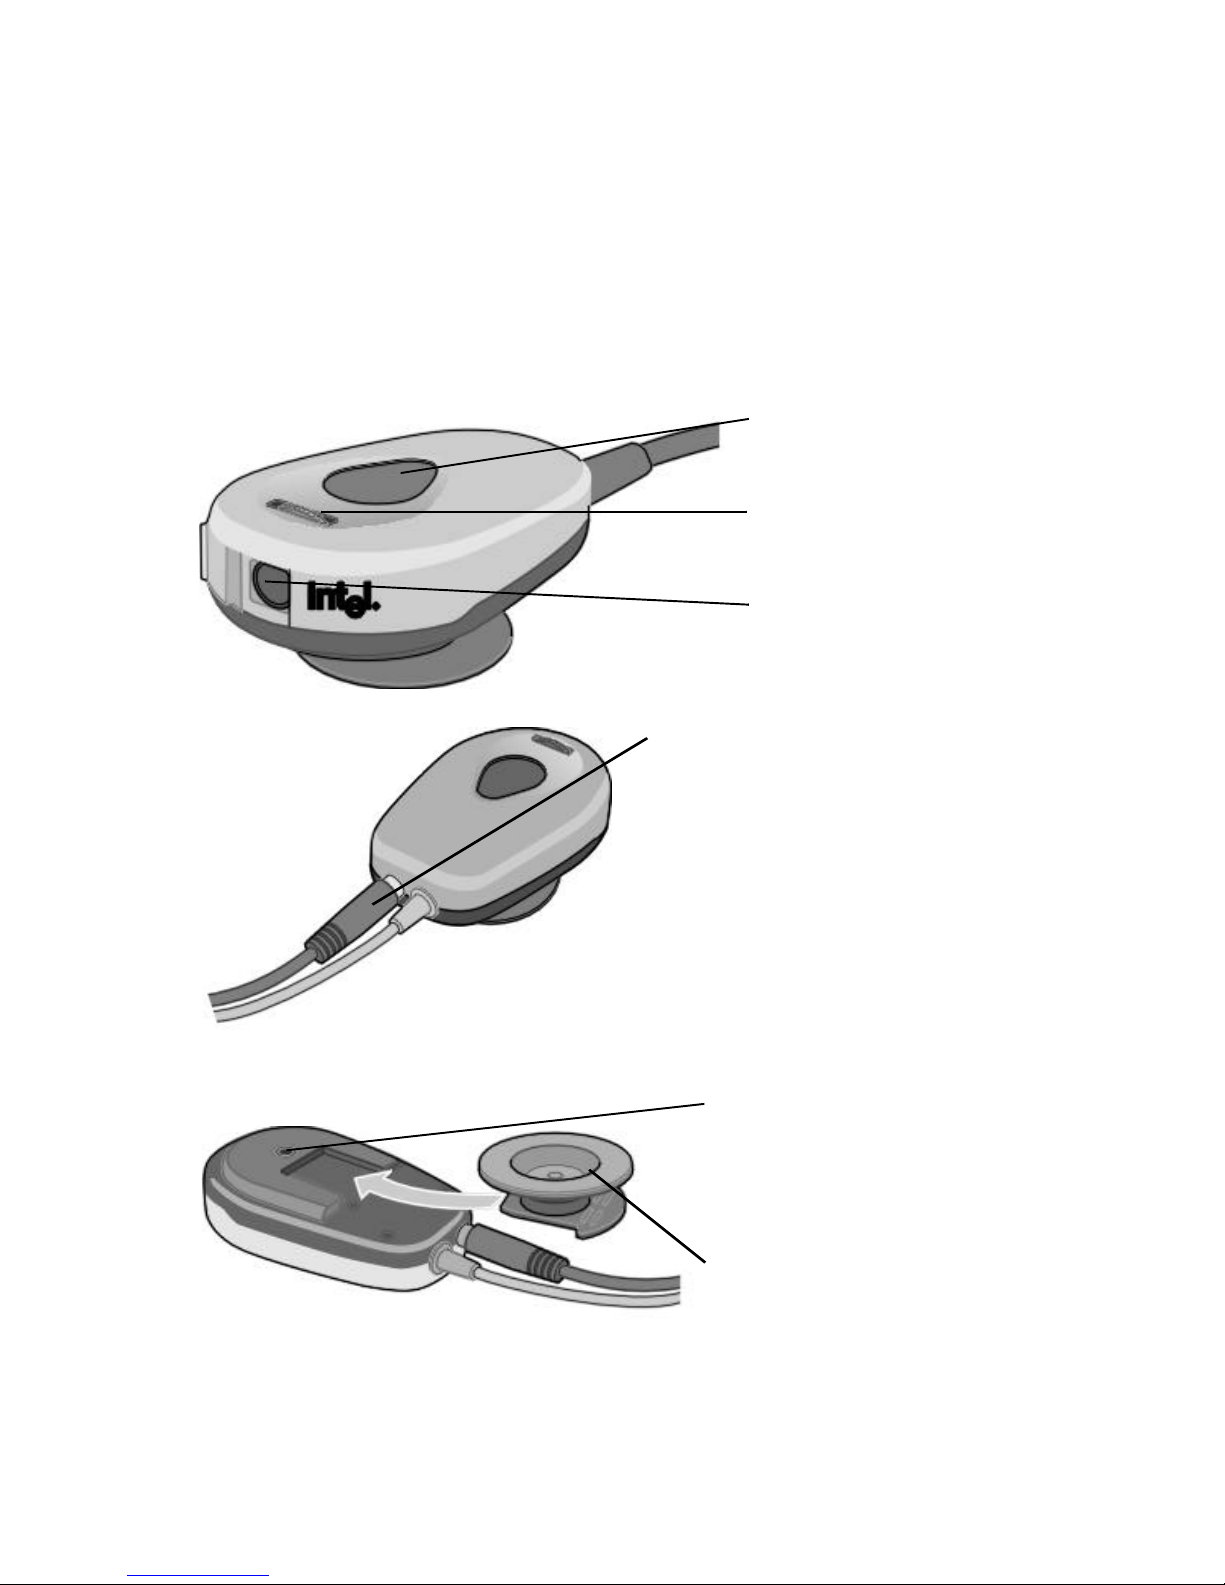
Setting up the Intel Pro PC Camera
Make sure the camera lens cover is open when you
take pictures or create videos. Use the snapshot
button to take snapshots, and the focus dial to focus
the video picture. To adjust the quality (such as hue,
saturation, or sharpness) of the video picture, follow
the instructions in online Help under camera settings.
Snapshot button. To take
a snapshot, press the
button.
Focus dial. To adjust the
focus of the video picture,
rotate the dial.
Privacy Shutter. To stop
video capture, slide shutter
closed.
Easy video-in connector. Connect
the supplied video cable here to an
external video device like a VCR,
camcorder, or DVD player. With this
cable you can transform previously
recorded video into digital video.
You can also record directly through
your device onto your computer’s
hard drive.
6 GETTING STARTED GUIDE
Tripod connector. Mount the
camera on a tripod to avoid
camera jitter, which can
contribute to larger file sizes.
Camera mount. Slide the
camera onto the mount and
connect mount to surface.
Page 7

Adjusting the Intel Snapshot image
1 On the Home screen, click Take Snapshot .
2 From the Snapshot System menu icon, choose
Adjust video.
3 Adjust the settings as needed.
4 Click OK.
Adjusting the Intel Scene Recorder
image
1 On the Home screen, click Record Video.
2 On the Scene Recorder window, click Settings.
3 Adjust the settings as needed.
4 Click OK.
Adjusting the NetMeeting* image
1 On the Home screen, click make a video phone
call.
2 On NetMeeting, click the Start Video button.
3 From the Tools menu, choose Options.
4 On the Video tab, under Video camera
properties, click Source.
5 Adjust the settings as necessary.
6 Click OK twice until you’re back to the
NetMeeting main window.
7 Evaluate the image quality.
8 Repeats steps 3 through 6 as necessary.
General Image Quality Tips
• Place the light source in front of you, not
behind you; avoid bright light which may cause
a glare.
• Wear solid-colored clothing; avoid patterns and
grays.
GETTING STARTED GUIDE 7
Page 8

This VCR
• When using the camera, ensure that the
shutter is in the open position
• Common mounting positions for the camera
include on top of the computer monitor or on a
speaker.
Using the Camera’s Video Input
The Intel Pro PC Camera has a connector to
connect other video devices like camcorders or VCRs
to your computer for use with the Intel Create &
Share Software.
Now you can take those video tapes of family
gatherings, business meetings, and special occasions
like vacations and turn selected scenes into digital
format for sharing in email, during video phone calls, or
on your home pages.
example uses the
supplied video
and audio cables.
Your external
device may
require different
cables and
adapters.
USB cable
Video cable
An example of creating a digital video clip
from video tape
1 Connect one end of the supplied video cable to
the Intel Pro PC Camera and the other end to
the external device (we are using a VCR).
2 To include the sound from the video as a part of
the recording, connect the supplied audio cable
from the VCR to the computer’s sound card.
Audio cable
8 GETTING STARTED GUIDE
Page 9

Note
3 From the Home Screen of the Intel Create &
Share Software, click Record Video.
4 Click A/V Input on the Intel Scene Recorder
window.
5 On the Video and Audio Input dialog, select
“External video plugged into camera”.
The Audio Source is automatically selected for
you.
6 Click Apply
7 Click OK.
8 Cue up the video tape in the VCR to the scene
you are interested in recording.
9 Click Record on Scene Recorder.
10 Press Play on the external player.
11 Once the scene is recorded, click Stop on the
Scene Recorder window.
12 Press Stop on your external player.
13 Click Play in the Scene Recorder window to play
back the digitized video.
14 Click Trim to trim the recorded video to the
length you are interested in.
15 Click Save to save the file.
When capturing
video from
previously
recorded video,
you can add
narration to the
video clip from a
microphone, or
use music from a
CD, rather than
the sound that is
part of the original
video. See the
online Help for
details.
What are the possibilities?
Here’s a short list of some of the things that you can
do.
• Take the video you recorded of your son’s
graduation and create a “Graduation’s
Highlights” video clip for sharing with family
and friends via your home page or on an email
postcard.
• With that video you made of the house hunting
trip for your new job, you could create a “Best
GETTING STARTED GUIDE 9
Page 10

of the Houses Seen” video showing the
features of the houses you are interested in.
The highlights could include your own
narration, added when the video was recorded
or when you were creating the movie.
• With a camcorder you can record the keynote
address to the sales staff and later use the
Intel Create & Share Software to edit and trim
some of this video for inclusion on the
company’s website.
• Using that already edited sales address, you
can create a small movie for your own
presentation to Marketing at a later point in
time.
What’s included?
Along with your Intel Pro PC Camera, your Intel
Create & Share Software helps you use your PC to
communicate in a variety of new ways.
To learn in depth about all of the applications
described here, see the Intel Create & Share Software
User’s Manual .
Here’s a brief description of what you can do with the
Intel Create & Share Software.
10 GETTING STARTED GUIDE
Page 11

Manage files in Galleries
The Gallery is the project and media file manager
within the Intel Create & Share Software. From the
gallery, you can save, organize, and open projects as
well as video, image, and sound files, collectively
called “media”.
• The active Gallery on the default Home screen
appears on the left side of the screen.
• To change the active gallery from the Home
screen, select from the Galleries drop-down.
• To expand the active Gallery to full screen
view, click Full Gallery on the Home screen.
• To change the active gallery from within the full
Gallery view, click the target Gallery on the
right side of the screen.
• To return to the default Home screen from the
full gallery view, click Minimize Gallery.
For more information on working with Galleries, see
the User’s Manual and the online Help.
Take snapshots
Quickly and easily take snapshots using your Intel
Pro PC camera. These snapshots can be assembled
into your own online galleries, sent to others using
email, incorporated into web pages, and more.
1 On the Home screen, click Take Snapshot .
2 Align the subject in the Snapshot Live View
window.
3 Click the Snapshot button.
GETTING STARTED GUIDE 11
Page 12

Note
Note
Note
To improve the
image quality,
see page6
The active gallery
is the gallery that
is open in the
Home screen
when you open
Snapshot.
The snapshot appears in the Snapshot window.
4 To preview a full size image, double click on the
image.
5 To close the preview image, click on the X in the
lower right hand corner of the preview image
window.
6 Click Save in the Snapshot window.
Your snapshot is saved to your active gallery
and is displayed as a thumbnail in that gallery.
7 To close Snapshot, click the X in the upper right
hand corner of the Snapshot window.
For more information on creating and using snapshots,
see the User’s Manual and the online Help.
Record videos
To improve the
image quality, see
page7
Record and trim video clips to spice up a web page,
add interest to a presentation, or share a video
moment of your children with their grandparents.
1 On the Home screen, click Record Video.
2 Align the subject in the Live View window.
3 Click Record.
4 When you’re done recording, click Stop.
5 To preview the video, click the Play button.
6 Click Save in the Scene Recorder window.
The gallery that you save to becomes the active
gallery on your Home screen.
The new video is displayed as a thumbnail in
that active gallery.
7 To close the application, click Done.
For more information on creating and using video files,
see the User’s Manual and the online Help.
12 GETTING STARTED GUIDE
Page 13

Note
Record audio
Record audio files of your baby’s first words, narrate a
business presentation, or send an audio message in
an email postcard.
1 On the Home Screen, click Record Audio .
2 Click Record to begin recording.
3 When you’re done recording, click Stop.
4 To save the file, click Save.
Your audio clip is saved to the active gallery and
is displayed as a speaker icon in that gallery.
5 To close the application, click Done.
For more information on creating and using audio files,
see the User’s Manual and the online Help.
Create and send email postcards
Add images and videos to one of the numerous
provided templates to create email postcards and send
them to family, friends, or business associates.
1 On the Home screen, click send an email
postcard.
2 Click Create a new postcard.
3 Select a category and template for your
postcard. Click Next.
4 Add images, videos, and audio clips to the
template cutouts. You can also add and modify
text to the front of your postcard. Click Next .
5 Add text, your email address, and the email
address of your recipient to the back of your
postcard. Click Next.
6 Choose the file type and method for sending
your postcard.
For more information on email postcards, see the
User’s Manual and the online Help.
To modify text,
double click on a
text box, make
your changes,
then click off of
the text box to
view your
changes.
GETTING STARTED GUIDE 13
Page 14

Note
Note
To improve the
image quality,
from Video email,
go to Settings >
Adjust Video...”
Send a video email
Tell the story in person by capturing and attaching a
streaming video file to any email.
1 On the Home screen, click send a video email.
2 Enter your email address, the recipient’s email
address, and the subject of the email.
3 Align your subject in the Record your video
window.
4 Click Record.
5 When you’re done recording, click Stop.
6 To preview the video, click Play.
7 To re-record the video, click Live View, then
click Record.
8 Click Send it!
For more information on video email, see the User’s
Manual and the online Help.
If you have
trouble making or
maintaining a
connection,
please contact
your Internet
Service Provider.
Place a video phone call
Now you can talk to and see others at the same time
using your Intel Pro PC Camera and NetMeeting*
software to make video phone calls over the Internet.
The person you call doesn’t have to use NetMeeting.
Many Internet phone programs work with NetMeeting.
NetMeeting connects directly to an Internet directory
server or another computer. To place a call, either
choose someone logged on to a server, or call another
computer directly by typing its name or address.
14 GETTING STARTED GUIDE
Page 15

Note
Note
Setting up the camera for calls
When you make Internet phone calls, you may want to
see the other person and be seen by them. When you
start NetMeeting, your video is not in the window.
Privacy Note: Due to the anonymous
nature of the Internet, you may want to
confirm who you’re connected to before
receiving or sending video.
To verify that you’re using the Intel Pro PC Camera
1 On the Home screen, click make a video phone
call.
2 In NetMeeting, select Tools > Options...
3 Select the Video tab.
4 Click the arrow in Video camera properties.
5 Select Intel Pro PC Camera from the list.
6 Click OK.
To add your video to the main NetMeeting window
1 On the Home screen, click Make a Video
Phone Call.
2 In NetMeeting, click the Start / Stop Video
button.
To not automatically receive video at the start of a call
1 From the Tools menu, choose Options.
2 On the Video tab, under Sending and
receiving video, uncheck Automatically
receive video at the start of each call.
3 Click OK.
To automatically send video at the start of a call
To improve the
image quality, see
page7.
The default is to
automatically
receive video and
not send video at
the start of a call.
1 From the Tools menu, choose Options.
2 On the Video tab, under Sending and
receiving video, check Automatically send
video at the start of each call.
3 Click OK.
GETTING STARTED GUIDE 15
Page 16

Note
Note
Note
The person you’re
calling may have
a different
Internet video
phone call
application. They
may need to
follow different
steps to place a
call.
To open a second window to display your camera view
1 Select the View menu.
2 Select My Video (New Window).
3 Click OK.
To place a call to another person
1 On the Home screen, click make a video phone
call.
2 In the Address bar, type one of the following:
• Email address
• Computer name (for LAN access)
• IP address
Address bar
The person you’re
calling must have
their video phone
running and be
connected to the
Internet.
The Address bar
and SpeedDial
don’t give you the
Place A Call
dialog box, which
displays the
Require
security for
this call check
box.
3 Click the Place Call button
Tips for placing NetMeeting calls
If NetMeeting can determine how to place the
•
call, it does so automatically. Otherwise, the
Place A Call dialog box opens.
If the Place A Call dialog box opens, in the
Using box, click the right connection type.
If you prefer to select security on a call-by-call
•
basis, place your calls through New Call rather
than the Address bar or a SpeedDial.
From the Call menu, select New Call.
• To display a list of who you’ve called recently,
click the arrow next to the Address bar.
• To create a SpeedDial list for people you call
16 GETTING STARTED GUIDE
Page 17

Note
frequently, from the Call menu select Create
SpeedDial.
To accept or reject a call
• When someone calls you, the Incoming Calls
dialog box appears. Click Accept or Ignore.
Notes
• If this is a secure call, a Details button also
appears. Click it to review the type of security
and certificate being used.
• To stay logged on to the directory server, and
be unavailable for calls, on the Call menu, click
Do Not Disturb.
• You also can set NetMeeting to accept calls
automatically. From the Call menu, choose
Automatically accept calls.
To use a directory server
1 On the NetMeeting Tools menu click Options.
2 On the General tab, under Directory Settings ,
in Directory, type or click the name of the
directory server you want to use.
Notes
• If you aren’t logged on to the directory server,
people can still reach you via your IP address.
• To log on to a server automatically, from the
NetMeeting Tools menu, choose Options.
Select the Log on to a directory server when
NetMeeting starts check box.
• If you don’t want your name and email address
to appear in the directory list when you’re
logged on to the directory, from the NetMeeting
Tools menu, choose Options.
The default server
is the Intel
directory.
Note
To avoid
unwanted video
phone calls
Select the Do not list my name in the
directory check box.
GETTING STARTED GUIDE 17
Page 18

Tip
To find someone in the Intel directory
1 Click the Find Someone in a Directory button.
2 In Select a directory, you’ll see that Intel
Directory is the default.
3 To use the Intel directory, follow the instructions
on the Web page to locate who you want to
contact.
To find someone in a non-Intel directory:
1 Click the Find Someone in a Directory button.
To make a test
call, open your
Internet browser
and type this URL
www.intel.com/
PCcamera/
portals/
testcall.htm
Click make a test
call
2 In the Find Someone dialog, choose a directory
from the Select a directory drop-down.
3 Locate the person in the displayed listing.
4 Click Close.
To log on or off a directory server
• On the NetMeeting Call menu, click Log Off
from <directory server name> or Log On to
<directory server name>.
Helpful hints for making
Internet phone calls
If you’re experiencing difficulties:
• Mute the video and ask the other person to do
the same. Your audio will remain connected.
Click the Start / Stop Video button.
18 GETTING STARTED GUIDE
Page 19

Full-duplex
To improve the sound quality:
• Speak slowly and clearly into the microphone.
• Wait until the other person stops speaking
before you reply.
• Eliminate background noise from your area.
• Consider using a headset instead of speakers.
This eliminates feedback, reduces background
noise, and allows you to use full-duplex audio.
Headsets with built-in microphones work as
well.
• Keep the microphone away from the speakers
to minimize feedback
• Ensure that the microphone’s volume is not too
loud.
when both parties
in a video phone
call can speak at
the same time.
To improve the video quality:
• Make your My video and Guest video
windows smaller and ask the other person to
do the same.
Click Tools > Video > Window Size, and
verify that the setting is 100%.
• Place light in front of you, not behind you.
Other tips
• Remember, the person you are calling may
have a different video phone application. Be
patient while making a call.
• Place the camera at eye level and the
microphone at least 6 inches from a computer
speaker.
• Disable call waiting on your telephone line.
(Consult your telephone directory for details.)
The Intel Create
& Share
Software User’s
Manual can be
found at:
Start>
Programs> Intel
Create & Share
Software>
Manual> User’s
Manual.
• Make sure your phone and modem are
properly connected to your computer.
GETTING STARTED GUIDE 19
Page 20

• You'll achieve a better connection quality if you
try to avoid connecting to the Internet at peak
times.
Peak times are generally during evenings,
holidays, and weekends
• The higher the speed of your connection to the
Internet, the higher the quality of your Internet
phone calls.
For further instructions and solutions to common
problems, consult the online Help. For customer
support, check the Intel customer support Web site at:
http://support.intel.com/support/createshare/
camerapack.
20 GETTING STARTED GUIDE
Page 21

Set up Auto Snapshot
Capture the action even when you’re not around to
click the button. Set up your Intel Pro PC Camera to
automatically take and send snapshots to your hard
drive, an email address, or directly to your web page.
For more information on taking automatic snapshots,
see the User’s Manual and the online Help.
Create a multimedia home page
Intel Home Page Builder quickly turns you into a Web
page designer. You can easily add text, graphics,
images, and video to any of the supplied templates.
For more information on building and publishing home
pages, see the User’s Manual and the online Help.
Build a Movie
Intel Movie Builder is your private production studio.
Add, trim, and blend images and videos taken
anywhere and everywhere to tell the story of your
vacation or business grand opening in ways that a
normal video just can’t.
For more information on building movies, see the
User’s Manual and the online Help.
Play a virtual reality camera game
Use the Intel Pro PC Camera to put yourself into a
virtual reality where you can pop falling bubbles, shoot
baskets, hold the world in your hands, and more.
For more information on PC camera games, see the
Camera Games online Help.
Note. PC Camera Games require a minimum of a
Pentium II processor, 266MHz withMMX.Technology or
higher.
GETTING STARTED GUIDE 21
Page 22

Note
For more
extensive trouble
shooting
information,
please refer to
Intel Pro PC
Camera with
Intel Create &
Share Software
Manuals or
Online Help.
Trouble Shooting
I don’t see an image in the Live View window in
Intel Scene Recorder or Snapshot .
Verify that:
• The camera’s shutter is open.
• The camera’s USB cable is plugged into the
computer or USB hub as applicable.
The snapshots or video that I take are too dark.
Verify that:
• There is adequate light in front of the subject
that you are focusing on.
The snapshots that I take appear washed out with
poor coloring.
Verify that:
• There is not a bright source of light shining into
your camera.
The snapshots that I take are fuzzy.
Verify that:
• The camera is focused with the focus dial.
22 GETTING STARTED GUIDE
 Loading...