

Page 1

486
TM
Page 2

3
Part Number: 351599-005
Copyright © 1996 Intel Corporation. All rights reserved.
Intel Corporation
5200 N.E. Elam Young Parkway, Hillsboro, OR 97124-6497
Intel Corporation assumes no responsibility for errors or omissions in this
guide. Nor does Intel make any commitment to update the information
herein.
*All other brand and product names are trademarks of their respective
owners.
First Edition July 1994
Second Edition April 1995
Third Edition September 1995
Fourth Edition January 1996
Fifth Edition July 1996
Page 3
4
This symbol indicates a CAUTION or
WARNING. These are operations or
situations that may be harmful or
dangerous to you or your equipment.
All cautions and warnings should be
read and observed.
Explanation of symbols used in this guide:
This symbol indicates a NOTE. Notes
are items of special interest that pertain
to the section or procedure you are
reading. Notes typically clarify or
augment the material in the text.
Introduction.................................................................................... 4
Before You Begin... ....................................................................... 4
Installation ...................................................................................... 5
Demonstration and Diagnostics Diskette .................................... 1 9
Troubleshooting ........................................................................... 20
Getting Help................................................................................. 2 8
Warranty ....................................................................................... 30
Appendix A .................................................................................. 3 2
Contents
Serial Number: P240076
Page 4
5
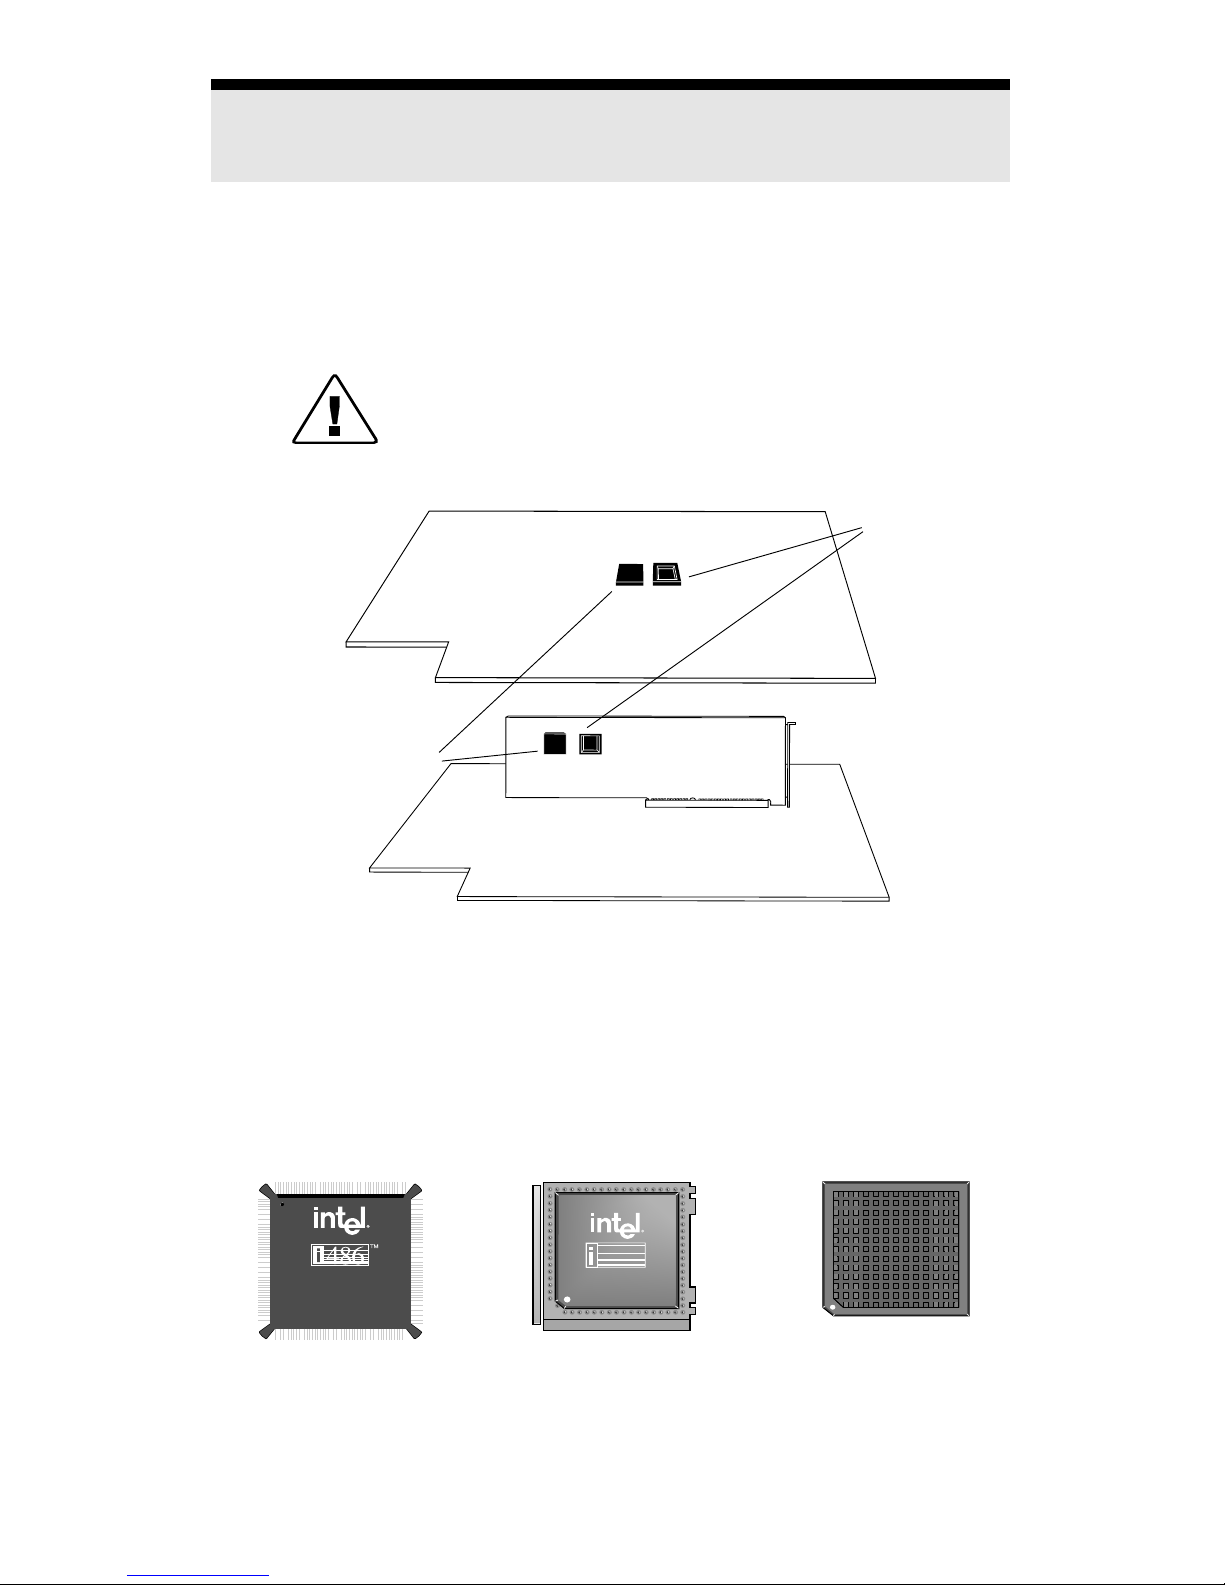
• the layout of any components or empty
sockets. Do the sockets have handles?
• the size of any components or empty
sockets. You must have a socket large
enough to fit the Pentium OverDrive
processor. In order to install the
Pentium OverDrive processor, you
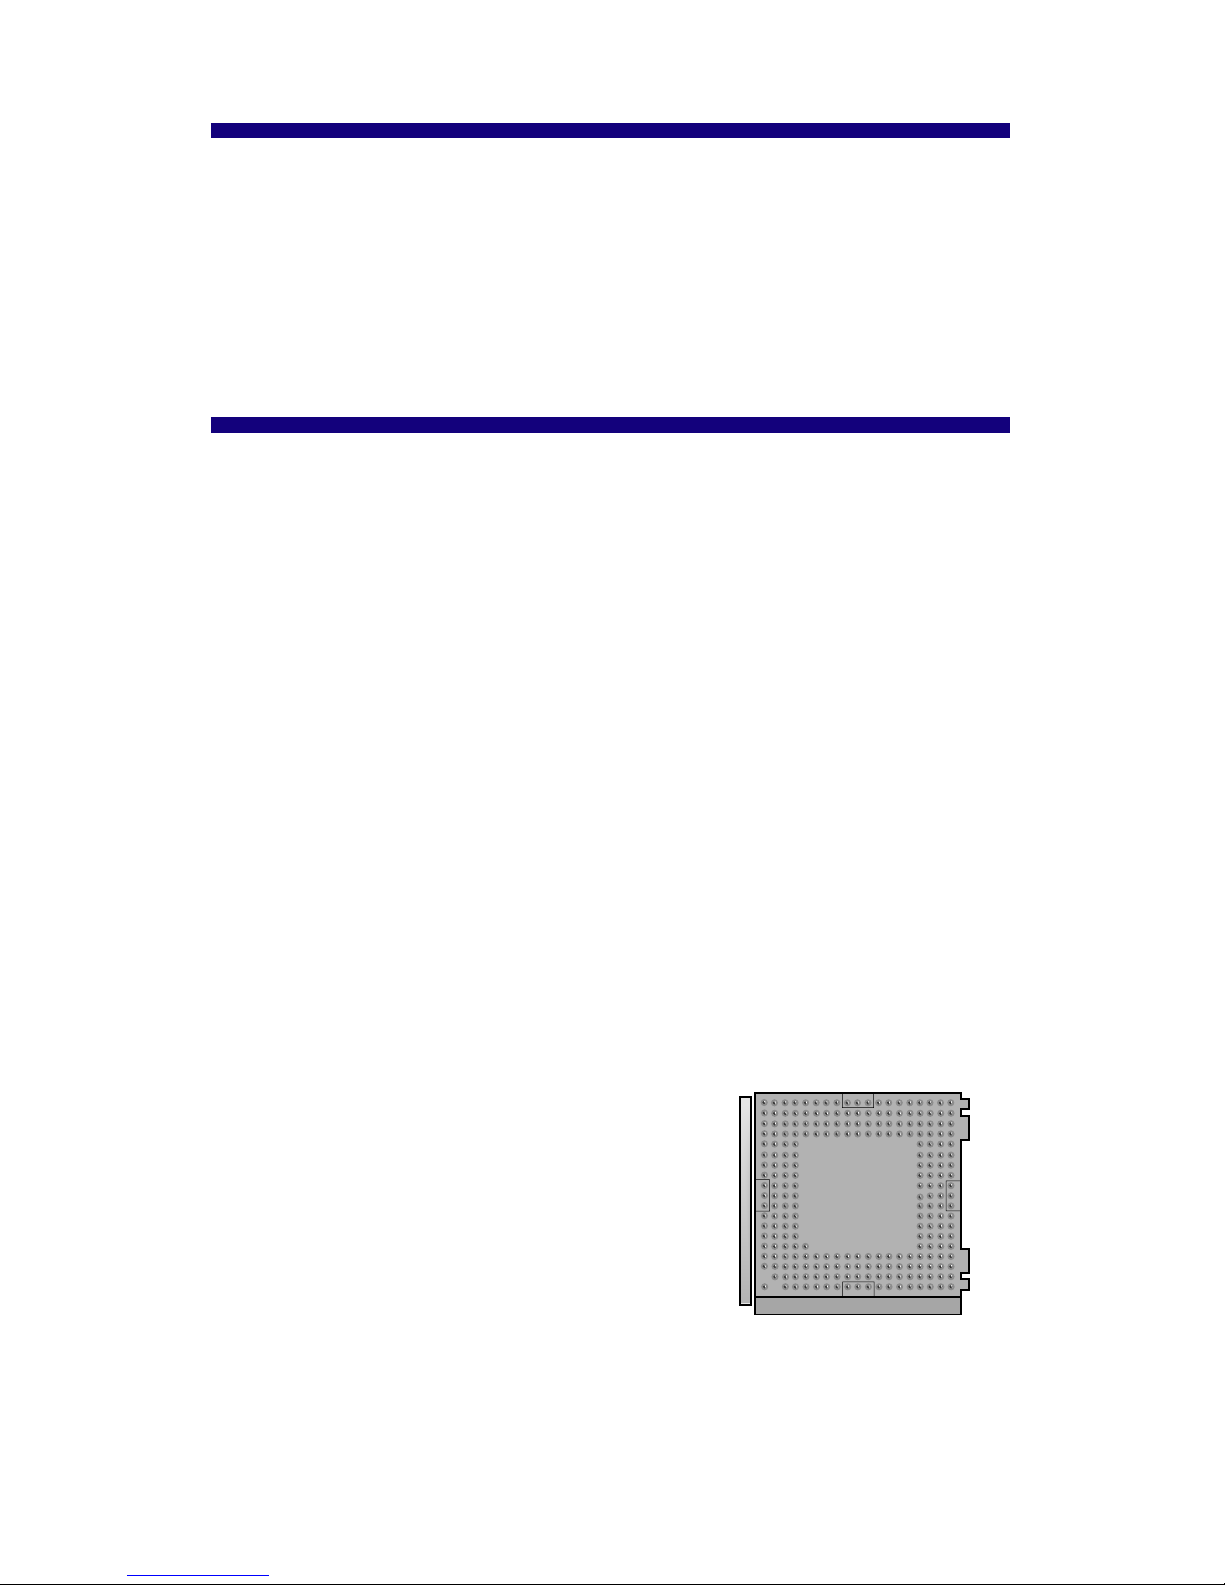
must have a 237 or 238 pin socket. See
page 10 for details.
Introduction
Congratulations on your purchase of a Pentium OverDrive processor!
The Pentium OverDrive processor for Intel486™ processor-based systems is
a single chip processor upgrade for systems based on Intel486 SX, Intel486
SX2™, Intel486 DX, and Intel486 DX2™ processors, and makes all software
run faster on existing systems.
Before You Begin...
This section provides instructions you should read before starting the Pentium
OverDrive processor installation.
On most computers, installing the Pentium OverDrive processor is simple if
you carefully follow the directions in your computer owner's manual and in
this manual. Before starting the installation process, we recommend you take
a few moments to:
• familiarize yourself with the appearance of your system's layout.
• read through the entire Installation section of this manual to fully
understand the process.
Your System's Layout
If you have not previously viewed your system's layout, at this point you may
wish to unplug your system, remove the cover and familiarize yourself with
the appearance of your system's components before continuing. Look for:
• the general appearance of your motherboard (the large board in
the bottom of your computer to which all other components are
attached). Are there cards or cables
near or attached to your motherboard?
Your system must
have a 237 or 238-pin
socket
Page 5
6
Step 1 - Install the diskette software and view
the animated demo.
Intel includes a Demonstration and Diagnostics Diskette with your Pentium
OverDrive processor. The diskette contains two portions:
•a demonstration to guide you through the Pentium OverDrive
processor installation procedure.
• diagnostics to test your Pentium OverDrive processor for
proper installation and operation.
To view the demo, your computer must be equipped with a VGA video board
and monitor, and you need to install the diskette software on your system.
Installing the software program to view the demo also
places the diagnostic utilities on your hard disk. Intel
provides you with a utility to remove the diskette
software from your hard disk once you have completed
your Pentium OverDrive processor installation and
diagnostics. For more information on this utility or on
the diagnostic software, see the section Demonstration
and Diagnostics Diskette.
Installing the Diskette Software
You can use DOS* or Windows* to install the software on the diskette. The
full set of utilities takes 1.1 MB on your hard disk if you install it using DOS
and 1.2 MB if you install it using Windows. If you install the software from
DOS, you are asked if you wish to approve modification of the AUTOEXEC.BAT
file. Intel recommends that you choose OK.
The installation program also asks you if you wish to only install the Fan
Monitor portion of the diagnostic software. If you want to install the fan test
software to your hard drive but do not desire the demonstration or post-install
diagnostics, choose this option.
Page 6

7
To install the software on your hard disk, insert the diskette in drive A and:
For DOS users type: a:\install
e
For OS/2* or Windows NT*
users type from a DOS prompt: a:\install
e
For Windows users: In the Program Manager, select: FILE
and then select: RUN
On the Command Line, type: a:setup
and click OK
For Windows 95 users: From the task bar, select Start
From the Start menu, select Run
and at the prompt type:
\SETUP
To begin the demonstration after installing the software:
For DOS users: Go to the odp_util directory and type:
overdriv
e
For Windows NT users : Go to the odp_util directory and
type from a full-screen DOS prompt:
overdriv
e
For Windows users: Double click the icon “OverDrive
Processor Demo/Diagnostics”
For OS/2 users: Ensure that the following line ap-
For more information, pears in your config.sys file:
refer to Troubleshooting VME=NO
section, p. 26. Ensure that the settings for your DOS
full-screen command prompt includes the following:
HW_TIMER set to ON
From a full-screen DOS prompt type:
overdriv
e
For Windows 95 users: Press e or click OK
When the Main Menu appears, select "Installation Demonstration." If installation sounds complicated after viewing the installation demo and after
reading through the installation sections of this manual, have a qualified
technician install the Pentium OverDrive processor for you.
Page 7
8
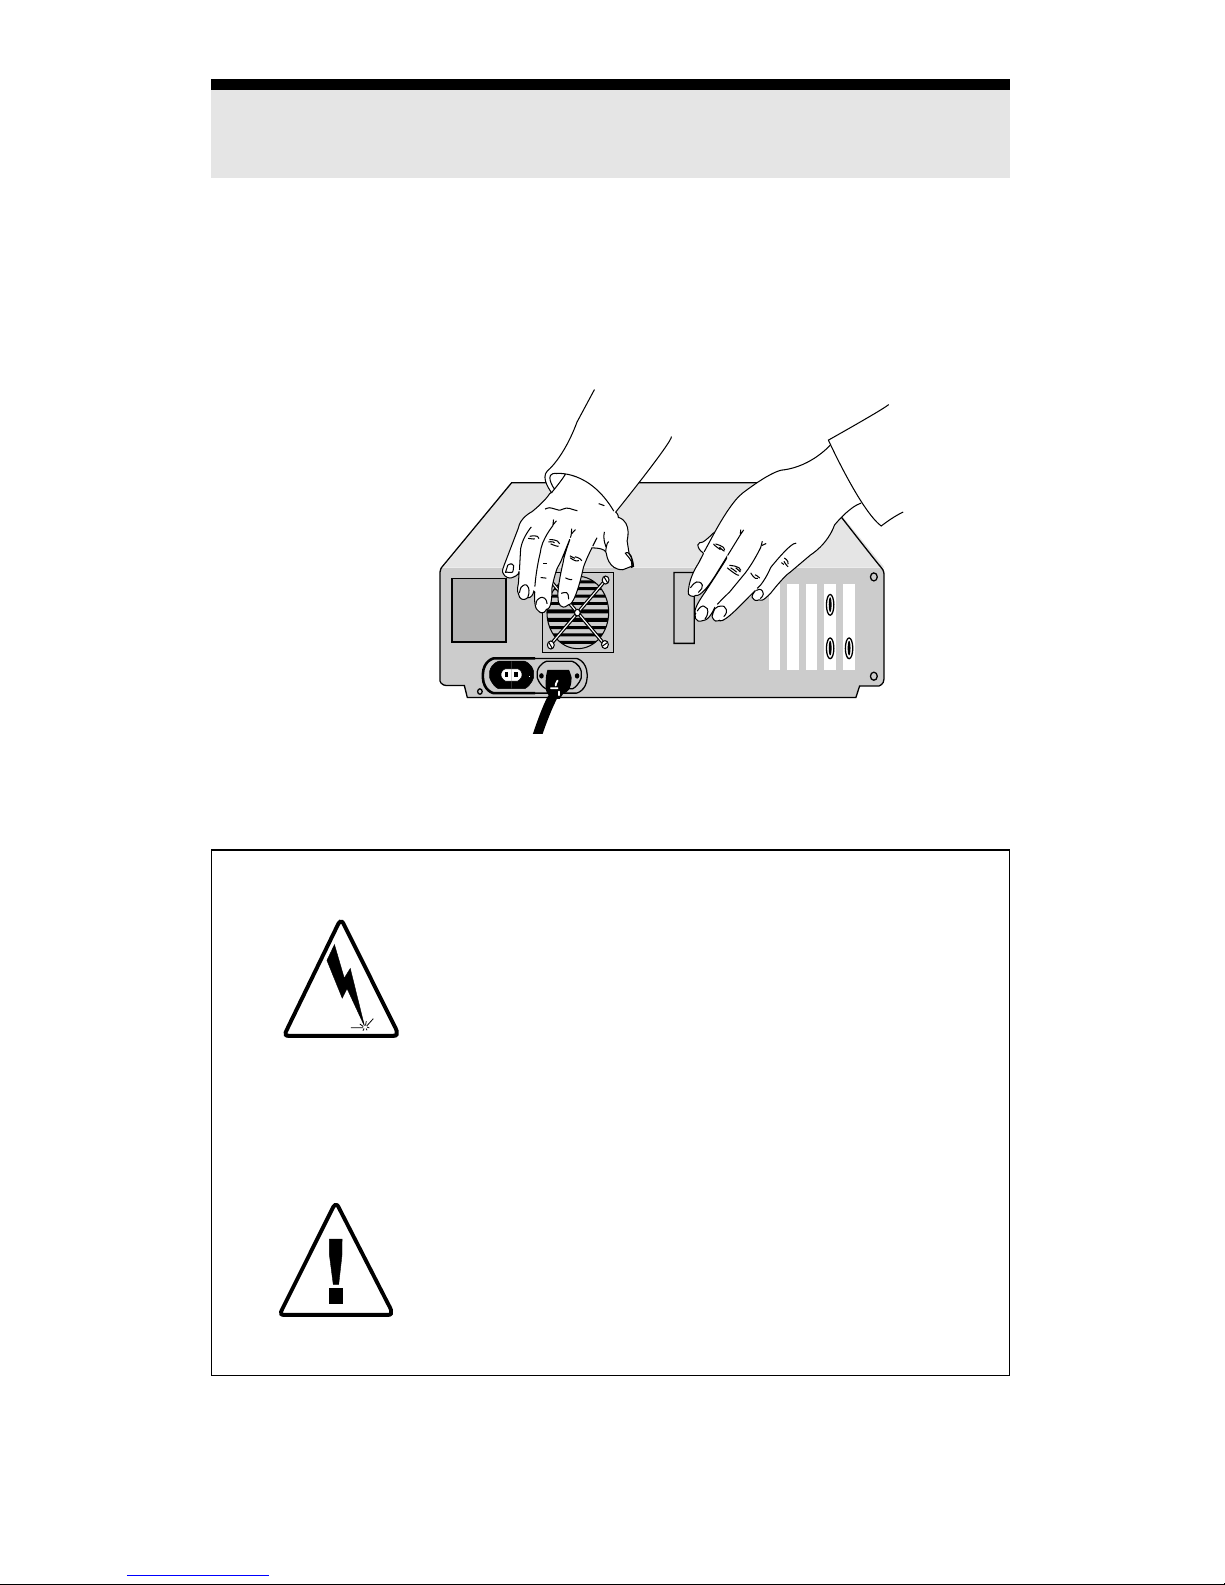
Step 2- Ground yourself, then unplug computer
and remove cover.
To prevent damage from static discharge to the Pentium OverDrive processor
and to your computer, touch the metal back or side panel of your computer’s
system unit to ground yourself. Then, turn off the computer and any attached
equipment (such as a printer), unplug the power cord, and remove the cover
from the computer.
Warning: Danger to Equipment! The Pentium
OverDrive processor can be damaged by static
discharge. Be sure to ground yourself before
handling the Pentium OverDrive processor by
touching the metal on your computer. Limiting
your movements during installation reduces
static electricity.
If installation sounds risky, have a qualified
technician install the Pentium OverDrive processor. If you make a mistake, you could
damage the Pentium OverDrive processor,
damage your computer, or injure yourself. If
you install it yourself, follow these instructions
exactly.
Page 8
9
Step 3 - Find the socket in which you will install
the Pentium OverDrive processor.
The socket in which you install your Pentium OverDrive processor may be
on your motherboard or removable processor card, and is near the Intel486
processor. If there is no specific Pentium OverDrive processor socket, you
must remove the original processor and install the Pentium OverDrive
processor in that socket.
If your system contains an Intel487™ SX math
coprocessor, you must remove that component and
install the Pentium OverDrive processor in that socket.
The processor can appear in various forms. Your computer may have a
surface-mounted processor or a socketed processor, and the processor may
have a heat sink attached. However, the dimensions of the original processor
are similar to those of the Pentium OverDrive processor. Your computer
owner's manual may contain location information for the processor. If you
cannot locate the processor, contact your dealer or your computer manufacturer for assistance.
Socketed
Processor
Motherboard
Motherboard
Intel486 SX or DX
Processor
OverDrive
processor
socket
Surface-mounted
Processor
Processor with heat
sink attached
PC-2597a
486
Removable
Processor card
Page 9
10
Once you locate the processor, look in the immediate area to determine
whether or not your system has an empty socket specifically dedicated for the
Pentium OverDrive processor.
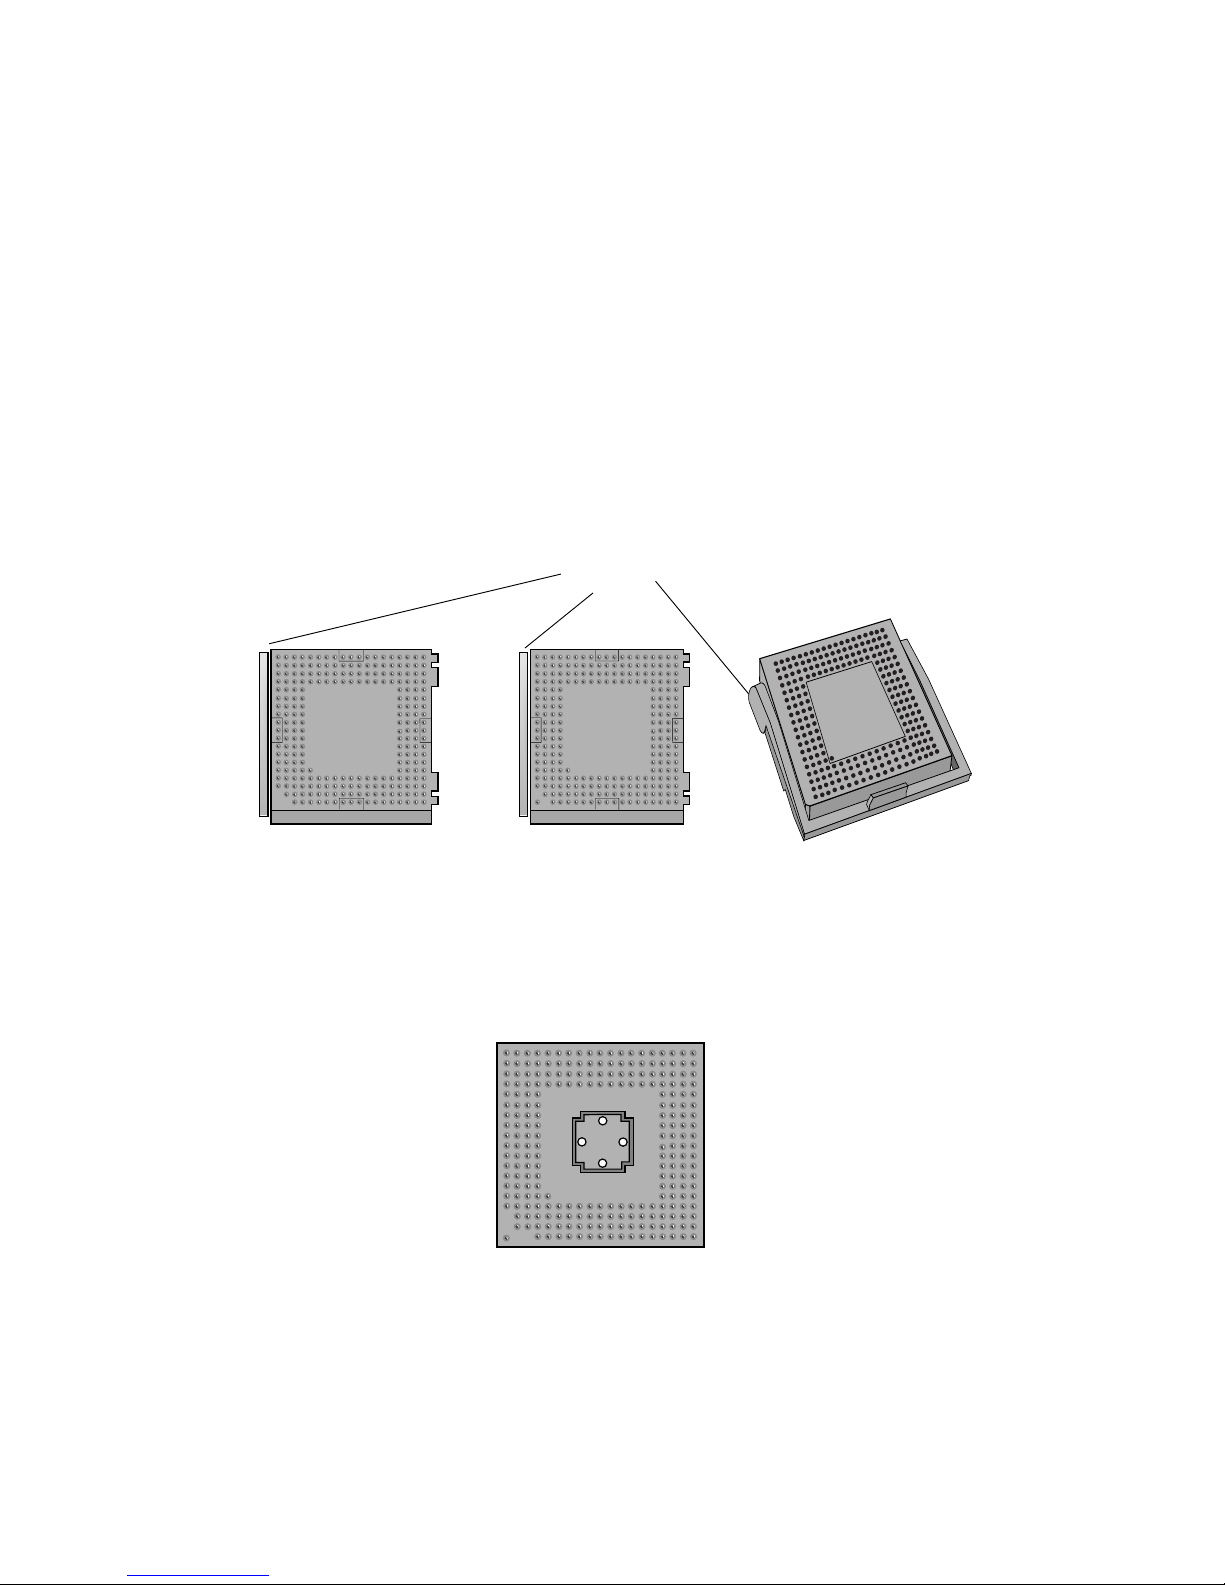
A Quick Word About Socket Types
There are several types of Pentium OverDrive processor sockets. You must
determine which socket type you have in order to successfully insert your
Pentium OverDrive processor.
Two common variations are the Zero Insertion Force (ZIF) socket and Low
Insertion Force (LIF) socket.
As the illustration shows, you can identify a ZIF socket type by the handle
which locks/unlocks to allow placement of the Pentium OverDrive processor.
LIF sockets do not have a handle, as shown.
handle
PC-1700
PC-1701
Typical Sockets With Handle (ZIF Sockets)
Note variations in pin hole layout
Typical Socket Without Handle (LIF Socket)
Page 10
11
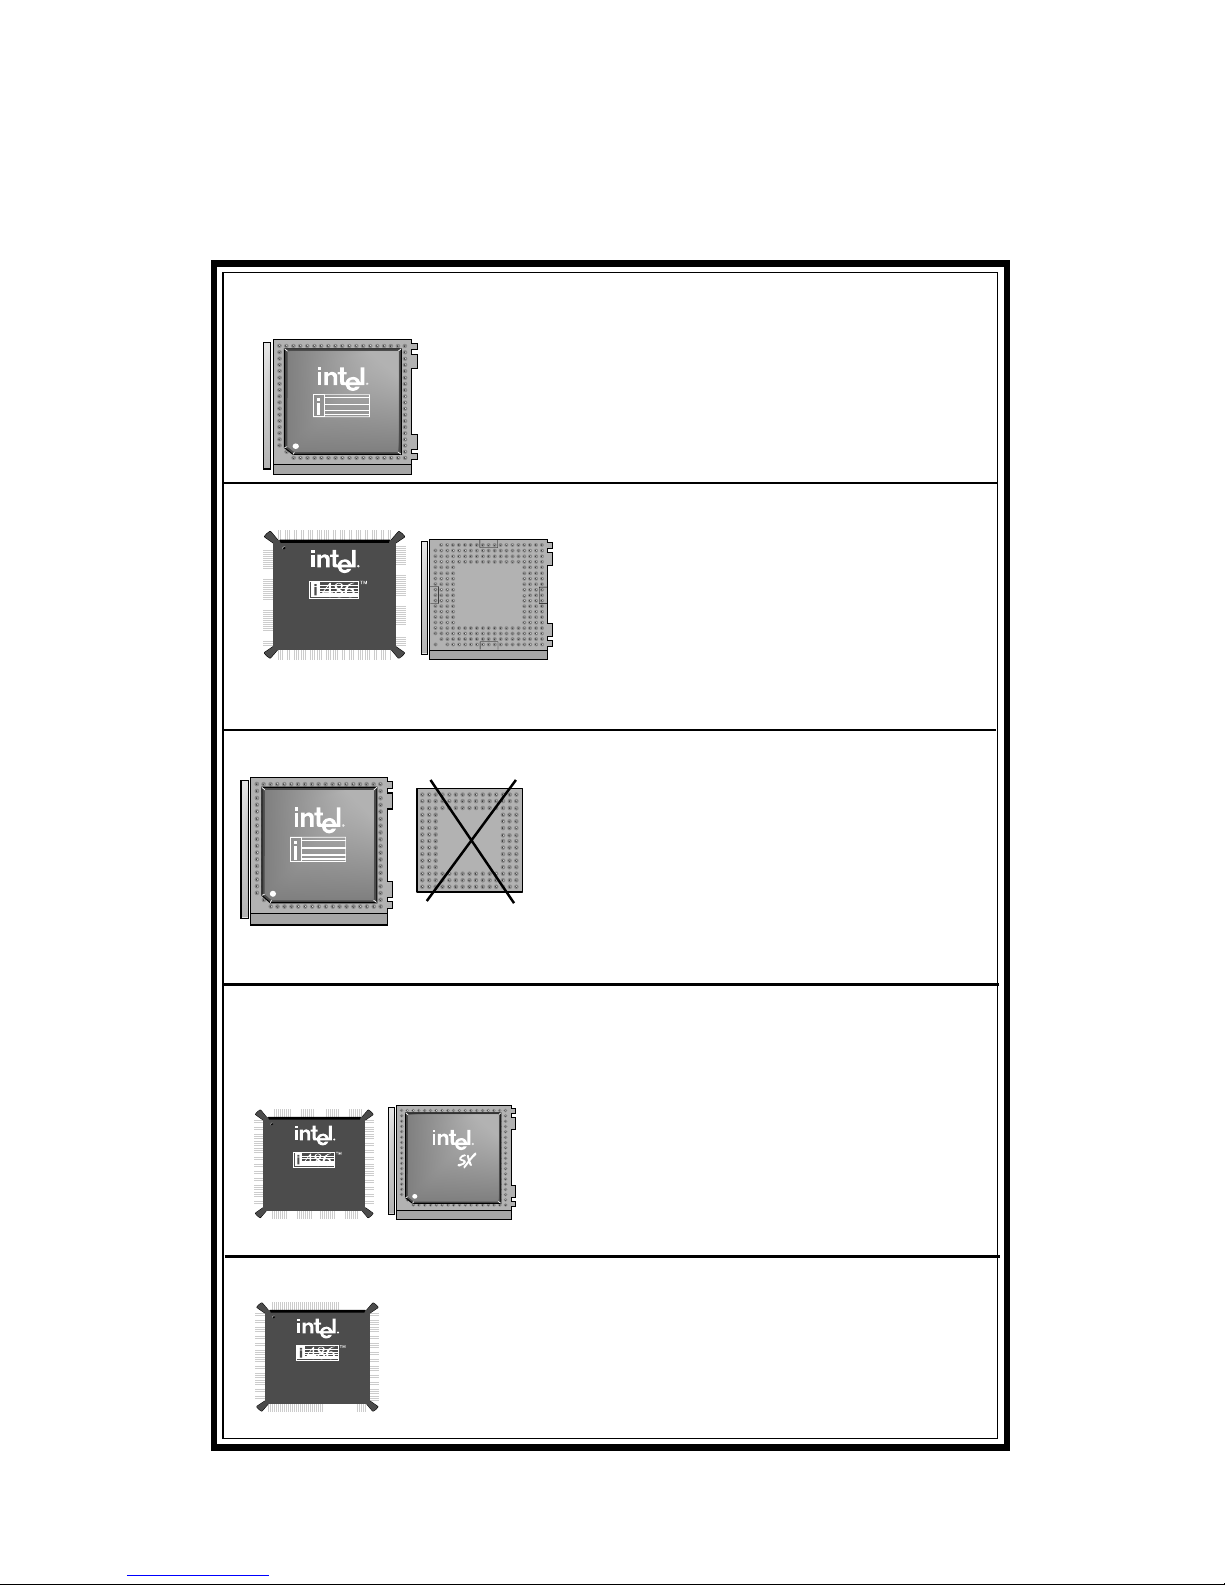
Match your computer's socket layout to one shown in the chart, then proceed
to the indicated step in this manual.
486
Remove the Intel486 processor and install the Pentium
OverDrive processor in the Intel486 processor socket. If
the Intel486 processor is not surrounded by an empty
row of pins, you cannot install the Pentium OverDrive
processor.
19 pinholes
per side
PC-1702
Empty Weitek socket beside Intel486 processor—go to Step 4.
Not an OverDrive processor socket! For
Weitek coprocessors only! Remove the
Intel486 processor and install the Pentium
OverDrive processor in the Intel486
processor socket. If the Intel486 processor
is not surrounded by an empty row of
pins, you cannot install the Pentium
OverDrive processor.
15 pinholes
per side
i487
TM
Remove the Intel487 SX math coprocessor
and install the Pentium OverDrive processor
in the Intel487 processor socket. If the math
coprocessor is not surrounded by an
empty row of pins, you cannot install the
Pentium OverDrive processor.
If your processor is soldered to the motherboard in a surface
mount, and you do not have a separate 237 or 238 pinhole
Pentium OverDrive socket, you cannot install the Pentium
OverDrive processor. Do not attempt to remove the
original processor!
No empty Pentium OverDrive processor socket—go to Step 4.
Empty socket beside Intel486 processor—go to Step 5.
Pentium OverDrive processor socket with Intel487 SX math
coprocessor installed—go to Step 4. (Intel486 SX processor
systems only)
Surface-mounted processor only—not compatible!
Possible System Layouts
If the empty socket does not contain 237
or 238 pinholes (19 pinholes per side),
you cannot install the Pentium OverDrive
processor.
486
Page 11

12
Step 4- For computers without an empty
Pentium OverDrive pr ocessor socket only.
Remove the existing processor from the
socket.
Removing the processor from a socket with a handle
If the processor is in a socket with a handle, open the socket by moving the
handle completely to a 90° upright position. Be sure the socket is completely
open.
Very little force is required to open the socket handle. Do not use excessive
force. Your computer’s motherboard should not bend while opening the
socket. Once the socket is open, remove the processor.
Be sure the socket handle is completely open.
486
PC-2637
Make a sketch to
help recall how the
original processor is
oriented.
Before removing the processor, make note of how its notched corner is
oriented in the socket (make a sketch, if necessary). You need to install the
Pentium OverDrive processor with exactly the same orientation.
Page 12

13
Removing the processor from a socket with no handle
Place the notch at a corner of the processor and insert between the processor
and socket. Rock the handle from side to side to lift the corner slightly. Once
a small gap appears between the chip and socket, move to the next corner.
Push inward on the processor removal tool’s handle to gently ease the
processor from its socket. Gradually loosen one side at a time. Loosen all
four sides evenly and remove the processor. Be sure to push the handle
towards the chip as shown.
2. Continue until all the
corners are loose and you
can insert the rake part of
the tool along the side of
the processor, between
processor and socket.
Be
sure to push the handle
toward the processor.
Do not push the handle
away from the processor.
1. Loosen each corner of the processor by carefully inserting the notched
handle of the removal tool between
the bottom side of the processor and
its socket as shown. Rock the handle
from side to side to loosen the
processor.
Fit the rake
tines between
processor
pins
Heatsink
Processor (gray layer )
Socket (white, black or blue)
Push handle
toward
processor
Now proceed to Step 5.
Find the chip removal tool in the Pentium
OverDrive processor package. The tool
resembles a tiny garden rake with a
notch in the end of the handle.
Removal tool
Page 13

14
PC-2682
Correctly orienting your Pentium OverDrive processor in the socket is crucial
to the success of your installation. Note that failure to correctly align your
Pentium OverDrive processor may result in damage to the chip or your
system. Before inserting the Pentium OverDrive processor into the socket,
take a moment to read through this step.
Regardless of your system layout and the socket type, there are clues to help
you correctly orient your Pentium OverDrive processor in the socket. If you
removed a processor in order to install the Pentium OverDrive processor, you
can refer to the sketch you made in Step 4 for the correct orientation.
Some sockets contain a key pin hole, an additional hole in one corner of the
inside pin hole row. The key pin hole corner serves as a landmark for you to
match the corresponding corner of the Pentium OverDrive processor which
contains a blunt edge and different pin arrangement as shown.
Step 5- Orient and insert the Pentium OverDrive
processor.
Aligning Pentium OverDrive
Processor in Socket with Key
Pin Hole
Line up processor corner
containing blunt edge and
distinctive pin arrangement to
key pin hole corner on socket
Key pin hole
Distinctive pin
arrangement
Page 14

15
PC-1702
PC-1701
Key Pin Hole
If your Pentium OverDrive processor socket does not have a key pin hole
corner, you must look for other alignment clues. Carefully inspect the socket
and the area around it. Some visual clues you may see include:
• a blunt edge on either an inside or outside corner of the socket
• a blunt edge in a silkscreened socket outline on the motherboard
• a socket corner which is a different shade or contains a mark not
found on any of the other socket corners
• a mark which is silkscreened on the motherboard by one socket
corner
• an extra pin hole on the outside pin hole row
• a corner with a pin hole arrangment different from the other
socket corners
• a socket corner labeled “A1” or “Pin 1” on the motherboard or
socket
You must match the corner of the Pentium OverDrive processor which
contains the blunt edge and distinctive pin arrangement with this corner of the
socket.
Pentium OverDrive
processor corner
with blunt edge and
distinctive pin
arrangement
corresponds to this
socket corner
Socket With
Key Pin Hole
Socket With No
Key Pin Hole
Seating Your Pentium OverDrive Processor
In a socket with a handle:
If your socket has a handle, make sure the handle is completely open by
moving it up to a 90° angle. Place the Pentium OverDrive processor into the
socket, making sure to match the processor corner with the blunt edge and
distinctive pin arrangement to the socket corner containing the key pin hole.
Key pin
hole
Page 15

16
If you removed a processor from the socket in a prior step, refer to the sketch
you made in Step 4 for proper orientation of the Pentium OverDrive processor.
No force is required for the pins to fit into the pin holes. Close the socket by
moving the handle down. Very little force is required to close the socket lever.
Do not use excessive force. Your computer’s system board should NOT bend
under the pressure.
PC-2643
Push handle to lock
In a socket with no handle:
Place the Pentium OverDrive processor into the socket, making sure to match
the corner with the blunt edge and distinctive pin arrangement to the socket
corner containing the key pin hole. If your socket does not have a key pin hole
corner, refer to the sketch you made in Step 4 to orient the Pentium OverDrive
processor correctly.
Seat the Pentium OverDrive processor in the socket by pressing firmly and
evenly on the key pin corner and the opposite corner at the same time. Be sure
to avoid pressing on the center of the fan and on the corners containing the
release clips and assembly connector.
DO NOT apply pressure to the center of the fan or corners
containing release clips and contact pins.
TM
Push here only
Push here only
Page 16

17
Your computer’s system board should not bend under
the insertion pressure. If it bends more than slightly, or
if you have difficulity in correctly seating the Pentium
OverDrive processor, see your dealer for assistance or
refer to the section Getting Help, page 28.
Ensure that the motherboard in your system has sufficient support to allow
you to apply the pressure necessary to seat your Pentium OverDrive processor. It is important that you do not bend the motherboard during the seating
process. If necessary, you can place reinforcement such as a pad of paper
underneath the socket area. Be sure to remove the reinforcement before
turning your computer back on.
As you press firmly, you should be able to feel the Pentium OverDrive
processor slide into place. When the Pentium OverDrive processor is fully
inserted, the pins are barely visible, and there is a slight gap between the
Pentium OverDrive processor and the socket. The gap should be even around
each side of the Pentium OverDrive processor, and about the same thickness
as the chip removal tool.
If you have difficulty in seating the Pentium OverDrive processor, you may
find it necessary to remove the processor fan in order to apply pressure to the
center of the chip. For information on removing and replacing the fan, refer
to the section Troubleshooting, page 27.
Proceed to Step 6.
Page 17

18
Step 7 - Start your computer and run the
computer's setup program.
Put the cover back on the system unit. Reconnect all the cables and cords, and
plug the power cord into the wall outlet.
Turn on your computer. If your computer requires it, run the computer’s setup
or configuration program. Refer to your computer owner’s manual.
If you have problems with your computer after installing the Pentium
OverDrive processor, turn to Troubleshooting.
Now you are ready to test the Pentium OverDrive processor.
Proceed to Step 8.
Step 6 - Set jumpers or switches, if required.
You may need to set switches, move or install jumpers or both on your
computer’s motherboard or removable card to let the computer know you’ve
added the Pentium OverDrive processor. See your computer owner’s manual
for more information. If your manual does not have a configuration section
for the Pentium OverDrive processor, contact your computer manufacturer's
technical support group.
In most cases, if you have correctly oriented the Pentium
OverDrive processor, starting your computer does not
damage the processor or your computer even if jumper
or switch changes are required—the system simply
does not function correctly.
Once you have configured your computer, proceed to Step 7.
Page 18

19
You can test your installation by either running a software program you use
frequently and experiencing the increased performance, or by using the
diagnostics on the diskette included in your Pentium OverDrive processor
package. If you installed the diskette software to view the animated demo
prior to this step, you do not need to reinstall the software at this time. To use
the diagnostics:
For DOS users Go to the odp_util directory and type:
overdriv
e
For Windows NT users Go to the odp_util directory and
type from a full-screen DOS
prompt:
overdriv
e
For Windows users: Double click the icon “OverDrive
Processor Demo/Diagnostics”
For OS/2, OS/2 WARP users: Ensure that the following line ap-
For more information, pears in your config.sys file:
refer to Troubleshooting VME=NO
section, p. 26.
Ensure that the settings for your DOS
full-screen command prompt includes the following:
HW_TIMER set to ON
From a full-screen DOS prompt type:
overdriv
e
For Windows 95 users: Press e or click OK
When the Main Menu appears, select “Intel OverDrive Processor Diagnostics.” If the diagnostic utilities program tells you the Pentium OverDrive
processor is not operating correctly or if you do not obtain any performance
increase, see the Troubleshooting section to determine possible problems. If
you cannot troubleshoot the problem, contact your dealer for assistance. If
you require further assistance, see the Getting Help section.
Step 8 - Test the Pentium OverDrive processor
installation.
Your Intel Pentium OverDrive processor installation is complete.
Page 19

20
Removing the Software Files From Your Hard Disk
Once you have installed and tested the Pentium OverDrive processor, you can
delete the demonstration and post-install diagnostic software from your hard
disk. To remove the software, follow these instructions:
For DOS users: Go to the ODP_UTIL directory and
type:
uninstal
e
For Windows users: In the Program Manager, select:
FILE
and then select:
RUN
On the Command Line type:
c:\odp_util\uninstal
and click OK
This removal program does not delete the Fan Monitor
software. Intel strongly recommends you keep the Fan
Monitor software resident on your system.
Demonstration and Diagnostics Diskette
Intel includes a Demonstration and Diagnostics diskette with your Pentium
OverDrive processor. The diskette contains two portions:
• a demonstration to guide you through the Pentium OverDrive
processor installation procedure. In order for you to view the
installation demonstration, your computer must be equipped
with a VGA video board and monitor.
• diagnostics to test your Pentium OverDrive processor for
proper installation and operation. For an overview of the
diagnostics, refer to the Troubleshooting section, page 20.
For information on how to install the diskette software, refer to page 6.
The installation program also asks you if you wish to
only install the Fan Monitor portion of the diagnostic
software. If you want to install the fan test software to
your hard drive but do not desire the demonstration or
post-install diagnostics, choose this option.
Page 20

21
Troubleshooting
This section contains the following information:
• describes and explains the diagnostic utilities included on the
diskette in your installation package
• contains a checklist to help you find solutions to problems you
may encounter while installing your Pentium OverDrive processor
• provides a process for removing the Pentium OverDrive
processor fan
Diagnostics Overview
The diagnostic software on the diskette allows you to test the Pentium
OverDrive processor for proper operation at the time of installation. In
addition, fan monitor software provides ongoing assurance that your Pentium
OverDrive processor fan is functioning normally.
Testing the Installation
This list describes the diagnostics that you use to test your installation:
Processor Instruction Tests various processor functions
to see if they are working properly.
Floating Point Conformance Tests processor’s floating point unit
by comparing the value of floating
point calculations with an established
standard.
Processor Information Compares processor speed and fea-
tures “before” and “after” Pentium
OverDrive processor installation.
Fan Status Checks to see that the fan on your
Pentium OverDrive processor is operating properly.
Page 21

22
Resident Diagnostics
The Fan Monitor software determines if your Pentium OverDrive processor
fan is operating correctly.
If you prefer to run the software from DOS, you can run the Fan Monitor
diagnostic executable file by typing the following command at the DOS
prompt in the directory in which the fan monitor software is located:
C\: fanmonit
e
The program then tests the fan’s operation. If the fan is functioning correctly,
the following messages appear on the screen:
Pentium OverDrive processor detected!!
The fan on your Pentium OverDrive processor is operating properly.
If you choose to run the Fan Monitor software from Windows, the software
runs continuously in the background. The software checks the fan every 60
seconds and does not affect system performance. Note that after installation,
no initial messages appear, but you can view any messages by double clicking
on the Fan Monitor icon.
The Fan Monitor icon automatically minimizes and appears in the lower
corner of your screen after startup. The Fan Monitor icon shows that the fan
is operating correctly. If a problem develops, the icon changes as shown and
a message box appears on your screen.
If you receive a warning or notice that the fan is not functioning correctly, first
check to ensure there are no obvious problems with the fan installation, for
example:
• a cable or other piece of hardware is blocking the airflow
• the fan is not making good connection or fully seated
• there is visible dirt or dust inhibiting airflow
Icon indicates fan is
functioning
Icon indicates fan
is not functioning
Page 22

23
Once you determine that the fan is not working correctly, call Intel Customer
Support for a possible return and/or replacement. For more information, see
the Getting Help section, page 28.
As you troubleshoot any problems with the Pentium OverDrive processor fan,
you may need to remove it in order to reseat the connection with the processor
or to return or replace it. For more information on removing the fan, refer to
page 27.
Troubleshooting Chec klist
Read through the symptoms below. If you find one that resembles the
problem you’re having, try the corresponding possible solutions.
The computer doesn’t power on when you turn on the switch, or the
operating system prompt doesn’t appear on the screen. Be sure:
• The power cord is plugged into the wall outlet.
• The cables and cords are attached correctly.
• Any boards or cards you removed are reinstalled properly.
• If you have installed the Pentium OverDrive processor in a socket with
no handle, is the chip fully inserted? Use the removal tool as a
measuring device to check the distance between the processor and the
socket. The removal tool should barely fit. Check all four sides to
ensure the processor is inserted evenly.
• The Pentium OverDrive processor and the socket are correctly aligned.
Your computer boots and runs normally. However, the Pentium OverDrive
processor fails the diagnostic test.
• Did you set the jumpers or system switches correctly, as described in
your computer owner's manual?
• Your computer may need an updated control program (BIOS). Contact
the technical support department at your computer vendor or dealer for
BIOS information.
Page 23

24
Your application programs don’t run any faster with the Pentium
OverDrive processor installed.
• Did you set the jumpers or system switches correctly, as described in
your computer owner’s manual?
• Does your computer require you to run its setup program? Check your
computer owner's manual or contact your dealer to verify.
• Is the fan for your Pentium OverDrive processor functioning? If you
installed the software using Windows, check the Fan Monitor icon to
ensure the fan is functioning correctly. If you chose a DOS installation
for this software, invoke the Fan Monitor utility to determine if the fan
is functioning. For more details on the Fan Monitor software, refer to
page 21.
• If your Pentium OverDrive processor passes all the diagnostic tests, but
you still don't see a speed improvement, contact Intel Customer
Support.
Your computer boots up and runs normally for a few minutes, then hangs
up or shuts down.
• Is the Pentium OverDrive processor socket handle fully locked?
• Recheck your installation — is the Pentium OverDrive processor fully
inserted? If you have installed the Pentium OverDrive processor in a
socket without handles, is the chip fully inserted? Use the removal tool
as a measuring device to check the distance between the processor and
the socket. The removal tool should barely fit. Check all four sides to
ensure the processor is inserted evenly.
• Did you set the jumpers or system switches correctly, as described in
your computer owner's manual?
• Your computer may not be providing enough airflow to adequately cool
the Pentium OverDrive processor. Call Intel Customer Support for
information about evaluating a possible thermal condition in your
computer.
Page 24

25
The Pentium OverDrive processor feels hot.
• It is normal for the Pentium OverDrive processor to generate heat while
operating.
Caution: Many chips in your computer, including the Pentium OverDrive processor, can
actually become hot enough to cause mild skin
burns if handled after operating for several
hours. Let the computer cool off before attempting to handle the Pentium OverDrive
processor.
Your Pentium OverDrive processor and computer have been functioning normally for some time, but you notice that suddenly your computer
and your application programs are running very slowly.
• Is the fan for your Pentium OverDrive processor functioning? If you
installed the software using Windows, check the fan monitor icon to
ensure the fan is functioning correctly. If you chose a DOS installation
for this software, invoke the fan monitor utility to determine if the fan
is functioning. For more details on the fan software, refer to page 21.
If the Pentium OverDrive processor fan stops functioning for any
reason, an added safety feature of the Pentium OverDrive processor
activates, stepping down the system speed to maintain thermal integrity. Your system continues to operate, but at a slower speed. Once the
Pentium OverDrive processor fan again begins to function, turn off
your system, then turn the power back on to return your system to full
levels and to reset the Fan Monitor.
You open your Pentium OverDrive processor package and some of the
pins are bent.
• Carefully straighten any bent pins with needlenose pliers or tweezers
before attempting to insert the Pentium OverDrive processor in the
socket.
Caution: Pins are thin and can be easily broken.
Page 25

26
Your computer owner's manual does not have a Pentium OverDrive
processor installation section and you installed the Pentium OverDrive
processor as described in this guide. Your computer still does not operate
faster or does not operate at all.
• If you experience problems after installing the Pentium OverDrive
processor according to the instructions in this guide, your computer
may have special configuration needs. For more informantion, refer to
your computer manufacturer or dealer.
You receive a message that your Pentium OverDrive processor fan is not
functioning correctly.
• Is there something blocking the airflow? Check to ensure that the fan
is fully seated. If there are no apparent reasons why the fan stopped, call
Intel Customer Support about a possible return and replacement.
Page 26

27
Your system uses OS/2 Warp or OS/2 2.1 and you are having trouble
loading or running the Diagnostics and Demonstration diskette.
• To successfully load the Diagnostics and Demonstration diskette,
complete the following steps:
1. Modify the C:\config.sys file:
a. Invoke the OS/2 system editor, as indicated in the OS/2
system manual.
b. Open the config.sys file for edit.
c. Insert the following line:
VME=NO
d. Save the file, close the system editor and reboot your
system.
2. Set the HW_TIMER to ON:
a. Select the full-screen DOS prompt icon
b. Click your right (second) mouse button
A pop-up menu appears.
c. For OS/2 WARP, select “Settings” from the
menu.
For OS/2 2.1, select “Open>Settings.”
A dialog box appears, with several tabbed windows.
d. Select the “Sessions” tab.
The “Sessions” edit view appears.
e. Select the button “DOS Settings” and press e.
A list of setting choices appears.
f. Set “HW_TIMER” by clicking the ON check box.
g. Select “Save.”
h. Close the Setting Window.
3. Run the demonstration or the diagnostics by going to the
ODP_UTIL directory and typing the following from a full-screen
DOS prompt:
overdriv
e
Page 27

28
Removing the Pentium OverDrive Processor Fan
Note that before handling the Pentium OverDrive processor you should be
careful to ground yourself by touching the metal on your computer. Limiting
your movements during installation reduces static electricity, which can
damage the part and your system.
To remove the Pentium OverDrive processor fan:
1. Release the corner of the fan assembly by gently squeezing together
the two retaining clips.
2. While keeping the clips squeezed together, slowly lift up the corner,
pivoting it against the opposite corner.
3. When the fan assembly is at an approximately 45° angle, gently
lift straight up from the processor.
4. Place the fan assembly on its back, being careful not to damage the
contact pins.
To replace the Pentium OverDrive processor fan:
1. Hold the fan at an approximately 45° angle, and align the fan
assembly over the base unit, starting with the corner opposite to the
retaining clip.
Take special care to align the contact pins on the fan assembly to the
three pads on the base unit.
2. Carefully lower the fan down onto the base.
3. Secure the fan assembly to the base unit by ensuring the retaining clips
have snapped into place.
PC-2623
PC-2624
Retaining Clips
Base unit contact pads
Contact pins
Lift 45
o
Page 28

29
Here are some easy ways to reach Intel Customer Support.
1.Call FaxBack, the Intel
automated fax delivery service.
If you have a touch-tone phone and a fax machine or a faxmodem board,
you can get a copy of anything in our customer support library — the same
product and technical information we use ourselves!
In the U.S. and Canada: 1-800-525-3019
In Europe: +44-1793-432509
From anywhere: 503-264-6835
This service is available 24 hours a day, every day. For a catalog of
documents related to the Intel OverDrive processor, order document
# 0103. You can then order any compatibility and configuration information necessary to finish your installation. The Intel OverDrive Processor
Upgrade Guide, available from your dealer, also contains FaxBack
numbers for information regarding your specific system.
2.Use the Internet.
Information is available on the Internet for downloading by Anonymous
FTP and for view or downloading on the World Wide Web:
Intel FTP Server hostname: ftp.intel.com
World Wide Web address (URL): http://www.intel.com
3.Use Your Modem.
You can use your modem to read these bulletin boards
(settings are 8, N, 1, up to 14.4 Kbps):
Intel BBS:
In Europe: +44-1793-432955
From anywhere: 503-264-7999
CompuServe*: GO INTEL
(Requires CompuServe subscription. Settings are: 7,E,1 up to 28.8 Kbps.)
Getting Help
Page 29

30
4.Talk to a Customer Support Technician.
In the U.S. and Canada: 1-800-321-4044 M-F 7 a.m.-5 p.m., PST
(Thursday 7 a.m.-3 p.m., PST)
In Europe - English +44-1793-404900 M-F 8 a.m.-12 p.m., GMT
In Europe - German +44-1793-404988 M-F 08:00-17:00, CET
(Tuesday 08:00-16:00, CET)
In Europe - French +44-1793-404777 M-F 08:00-17:00, CET
(Tuesday 08:00-16:00, CET)
In Japan 0120-868686 M-F 09:00-12:00 & 13:00-17:00
In Australia: +1-800-649-931 M-F 05:00-15:00 (Singapore Local
Time)
In Korea: +822-767-2595 M-F 05:00-15:00 (Singapore Local
Time)
In Taiwan: +886-2-718-9915 M-F 05:00-15:00 (Singapore Local
Time)
In Hong Kong: +886-2-718-9915 M-F 05:00-15:00 (Singapore Local
Time)
From anywhere: 503-264-7354
5. Send a letter. Mail your comments about this manual to:
Worldwide: Europe:
Intel Customer Support (EUCD) Branded Products Support
Mailstop JF3-333 Intel Corporation, U.K.
5200 NE Elam Young Parkway Pipers Way, Swindon
Hillsboro, Oregon 97124-6497 Wiltshire, England SN3 1RJ
Please take a few moments to fill out your OverDrive processor warranty
registration card. Returning this card allows us to send you important
OverDrive processor announcements and new product information.
Registration
Page 30

31
Three Y ear Limited Warranty
Intel warrants that the OverDrive processor, if properly used and installed, will be
free from defects in material and workmanship and will substantially conform to
Intel’s publicly available specifications for a period of three (3) years after the date
the OverDrive processor was purchased.
If the OverDrive processor which is the subject of this Limited Warranty fails during
the warranty period for reasons covered by this Limited Warranty, Intel, at its option,
will:
REPAIR the OverDrive processor by means of hardware and/or
software; OR
REPLACE the OverDrive processor with another OverDrive proces-
sor; OR, if Intel is unable to repair or replace the OverDrive processor,
REFUND the then-current value of the OverDrive processor.
THIS LIMITED WARRANTY, AND ANY IMPLIED WARRANTIES THAT MAY
EXIST UNDER STATE LAW, APPLY ONLY TO THE ORIGINAL PURCHASER
OF THE OVERDRIVE PROCESSOR AND LAST ONLY FOR AS LONG AS SUCH
PURCHASER CONTINUES TO OWN THE PROCESSOR.
Extent of Limited Warranty
Intel does not warrant that your OverDrive processor will be free from design defects
or errors known as “errata.” Current characterized errata for Pentium OverDrive
processors are available upon request.
This limited warranty does not cover any costs relating to removal or replacement of
any OverDrive processor that is soldered or otherwise permanently affixed to your
system’s motherboard.
This limited warranty does not cover damages due to external causes, including
accident, problems with electrical power, usage not in accordance with product
instructions, misuse, neglect, alteration, repair, improper installation, or improper
testing. If you do not wish to install the OverDrive processor yourself, you should
have the vendor from whom you purchased the product install it.
How to Obtain Warranty Service
To obtain warranty service, you must return the OverDrive processor to the vendor
from whom you purchased it, or, with proof of purchase, to Intel. Before returning
the OverDrive processor to Intel, you must contact Intel's Customer Support Group
at 503-264-7000 or toll free in the U.S., 1-800-321-4044.
If you obtain warranty service from Intel, upon Intel's verification that the OverDrive
processor is or may be defective, you will be issued a Return Material Authorization
(RMA). When you return the OverDrive processor to Intel, you must include the
RMA number on the outside of the package. Intel will not accept any returned
OverDrive processor that has no RMA number on the package.
Page 31

32
If you return the OverDrive processor to Intel, you must assume the risk of damage
or loss during shipping. You must use the original packaging or the equivalent, and
you must pay the postage.
Intel may require you to verify that you are the original end user purchaser of the
OverDrive processor. Intel may elect to replace or repair the OverDrive processor
with either a new or reconditioned product. The returned product shall become Intel’s
property on receipt by Intel.
The replacement processor is warranted under this written warranty and is subject to
the same limitations and exclusions for the remainder of the original warranty period
or one (1) year, whichever is longer.
WARRANTY LIMITATIONS AND EXCLUSIONS
THESE WARRANTIES REPLACE ALL OTHER WARRANTIES, EXPRESS
OR IMPLIED INCLUDING, BUT NOT LIMITED TO, THE IMPLIED WARRANTIES OF MERCHANTABILITY AND FITNESS FOR A PARTICULAR
PURPOSE. INTEL MAKES NO EXPRESS WARRANTIES BEYOND THOSE
STATED HERE. INTEL DISCLAIMS ALL OTHER WARRANTIES, EXPRESS OR IMPLIED INCLUDING, WITHOUT LIMITATION, IMPLIED
WARRANTIES OF MERCHANTABILITY AND FITNESS FOR A PARTICULAR PURPOSE. SOME JURISDICTIONS DO NOT ALLOW THE EXCLUSION OF IMPLIED WARRANTIES SO THIS LIMITATION MAY NOT
APPLY TO YOU.
ALL EXPRESS AND IMPLIED WARRANTIES ARE LIMITED IN DURATION TO THE LIMITED WARRANTY PERIOD. NO WARRANTIES APPLY
AFTER THAT PERIOD. SOME JURISDICTIONS DO NOT ALLOW LIMITATIONS ON HOW LONG AN IMPLIED WARRANTY LASTS, SO THIS
LIMITATION MAY NOT APPLY TO YOU.
LIMITATIONS OF LIABILITY
INTEL’S RESPONSIBILITY UNDER THIS, OR ANY OTHER WARRANTY,
IMPLIED OR EXPRESS, IS LIMITED TO REPAIR, REPLACEMENT OR
REFUND, AS SET FORTH ABOVE. THESE REMEDIES ARE THE SOLE
AND EXCLUSIVE REMEDIES FOR ANY BREACH OF WARRANTY. INTEL
IS NOT RESPONSIBLE FOR DIRECT, SPECIAL, INCIDENTAL, OR CONSEQUENTIAL DAMAGES RESULTING FROM ANY BREACH OF WARRANTY
OR UNDER ANY OTHER LEGAL THEORY INCLUDING, BUT NOT LIMITED TO, LOST PROFITS, DOWNTIME, GOODWILL, DAMAGE TO OR
REPLACEMENT OF EQUIPMENT AND PROPERTY, AND ANY COSTS OF
RECOVERING, REPROGRAMMING, OR REPRODUCING ANY PROGRAM
OR DATA STORED IN OR USED WITH A SYSTEM CONTAINING YOUR
OVERDRIVE PROCESSOR. SOME JURISDICTIONS DO NOT ALLOW THE
EXCLUSION OR LIMITATION OF INCIDENTAL OR CONSEQUENTIAL
DAMAGES, SO THE ABOVE LIMITATIONS OR EXCLUSIONS MAY NOT
APPLY TO YOU.
THIS LIMITED WARRANTY GIVES YOU SPECIFIC LEGAL RIGHTS, AND
YOU MAY ALSO HAVE OTHER RIGHTS THAT VARY FROM JURISDICTION
TO JURISDICTION.
Page 32

33
Appendix A—Pentium OverDrive
Processor Data Sheet
The Pentium OverDrive processor is a single chip upgrade for any 5
Volt Intel486 processor system with a Pentium OverDrive processor
socket.
The Pentium OverDrive processor employs a high speed 3.3 Volt
Pentium processor core and integral fan/heatsink cooling.
This list describes the features of the Pentium OverDrive processor:
Feature Description
Processor 3.3 Volt Pentium Processor core with:
Intel486 Interface
Superscalar Technology
Dual Instruction Pipelines
Dynamic Branch Prediction
Floating Point Unit High Speed Pentium Processor Floating
Point Unit
Bus/Core Speed 25-MHz Bus Speed/63-MHz Internal Speed
or
33-MHz Bus Speed/83-MHz Internal Speed
Internal Cache 16 KB Code Cache, 16 KB Write Back
Capable Data Cache**
Cooling Unit Integral Fan/Heatsink cooling solution with:
Detachable Fan Unit
Fan slow down detection and
thermal protection circuit
Voltage Regulation On-Package Voltage regulation for conver-
sion of the 5 Volt system supply to a 3.3
Volt supply for the processor
**Support of the internal write back data cache is system-dependent.
If the system does not support a write back interal cache, the cache
operates in a write-through manner, similar to a standard Intel486
processor.
 Loading...