

Page 1

II
Page 2

Information in this document is provided in connection with Intel
products. No license, express or implied, by estoppel or otherwise,
to any intellectual property rights is granted by this document.
Except as provided in Intel’s Three Year Limited Product Warranty
for this product, Intel assumes no liability whatsoever, and Intel
disclaims any express or implied warranty, relating to sale and/or
use of Intel products including liability or warranties relating to
fitness for a particular purpose, merchantability, or infringement of
any patent, copyright or other intellectual property right. Intel
products are not intended for use in medical, life saving, or life
sustaining applications. Intel may make changes to specifications
and product descriptions at any time, without notice.
The Pentium® II OverDrive® processor may contain design defects
or errors known as errata which may cause the product to deviate
from published specifications. Current characterized errata are
available on request.
Copyright © 1998 Intel Corporation. All rights reserved.
Intel Corporation
5200 N.E. Elam Young Parkway, Hillsboro, OR
97124-6497
Intel Corporation assumes no responsibility for errors
or omissions in this guide, nor does Intel make any
commitment to update the information herein.
*Other brands and names are the property of their
respective owners.
First Edition May 1998
Part number: 696766-001
2
Page 3
Contents
Check your Computer's Owner's Manual .....................................3
Single Processor Installation Instructions .................................... 4
Dual Processor Installation Instructions.....................................19
Troubleshooting and Additional Information.............................23
Getting Help ...............................................................................28
Three Year Limited W arranty .....................................................30
English
Explanation of symbols used in this guide:
This symbol indicates a NOTE. It identifies items of
special interest that pertain to the section or
procedure you are reading. Notes typically clarify or
expand the material in the text.
This symbol indicates a CAUTION or WARNING. It
identifies operations or situations that may be harmful
or dangerous to you or your equipment. For your
safety and to protect your equipment, read and
observe all cautions and warnings.
Check your computer's owner's manual
First check your computer's owner's manual to see if it has a section
on installing computer upgrade hardware such as the Pentium
OverDrive
procedure, using this manual for addtional information.
® processor. If it does, follow the owner's manual
3
® II
Page 4

Step 1 — Run Diagnostics Program
Prior to installing the Pentium® II OverDrive® processor, run the
diagnostic program on the included diskette to verify proper
operation of your PC. The diagnostic program will also update
Windows* 95 to improve multimedia performance when running
software written for Intel’s MMX™ technology.
To run the diagnostic program (requires Windows 95 or Windows
Step 1—Run Diagnostics Program
Step 3—U
NT* 3.51 or greater):
1. Insert the Pentium II OverDrive processor Diagnostic
diskette into drive A.
2. Choose File (for Windows NT 3.51) or Start (for
Windows 95 or Windows NT 4.0 or greater).
3. Choose Run .
4. Type a:\diag and click OK, wait for the menu to
appear on screen, then choose Run Diagnostics from
the menu.
Once the diagnostics are completed, continue the installation
process with Step 2. Be sure to run the diagnostics program again
after installing the Pentium II OverDrive processor to verify proper
operation of the new processor.
If you experience problems after installing the Pentium II
OverDrive processor, contact Intel customer support for more
information. (See "Getting Help" on page 28.)
Step 2 — Ground yourself
Warning: Danger to equipment! The Pentium II
OverDrive processor can be damaged by static
discharge. Before handling the Pentium II OverDrive
processor, be sure to ground yourself by touching the
metal on your computer. Limiting your movements
during installation reduces static electricity.
4
Page 5
To prevent damaging the Pentium II OverDrive processor and your
computer from a static discharge, ground yourself by touching the
metal back or side panel of your computer’s system unit.
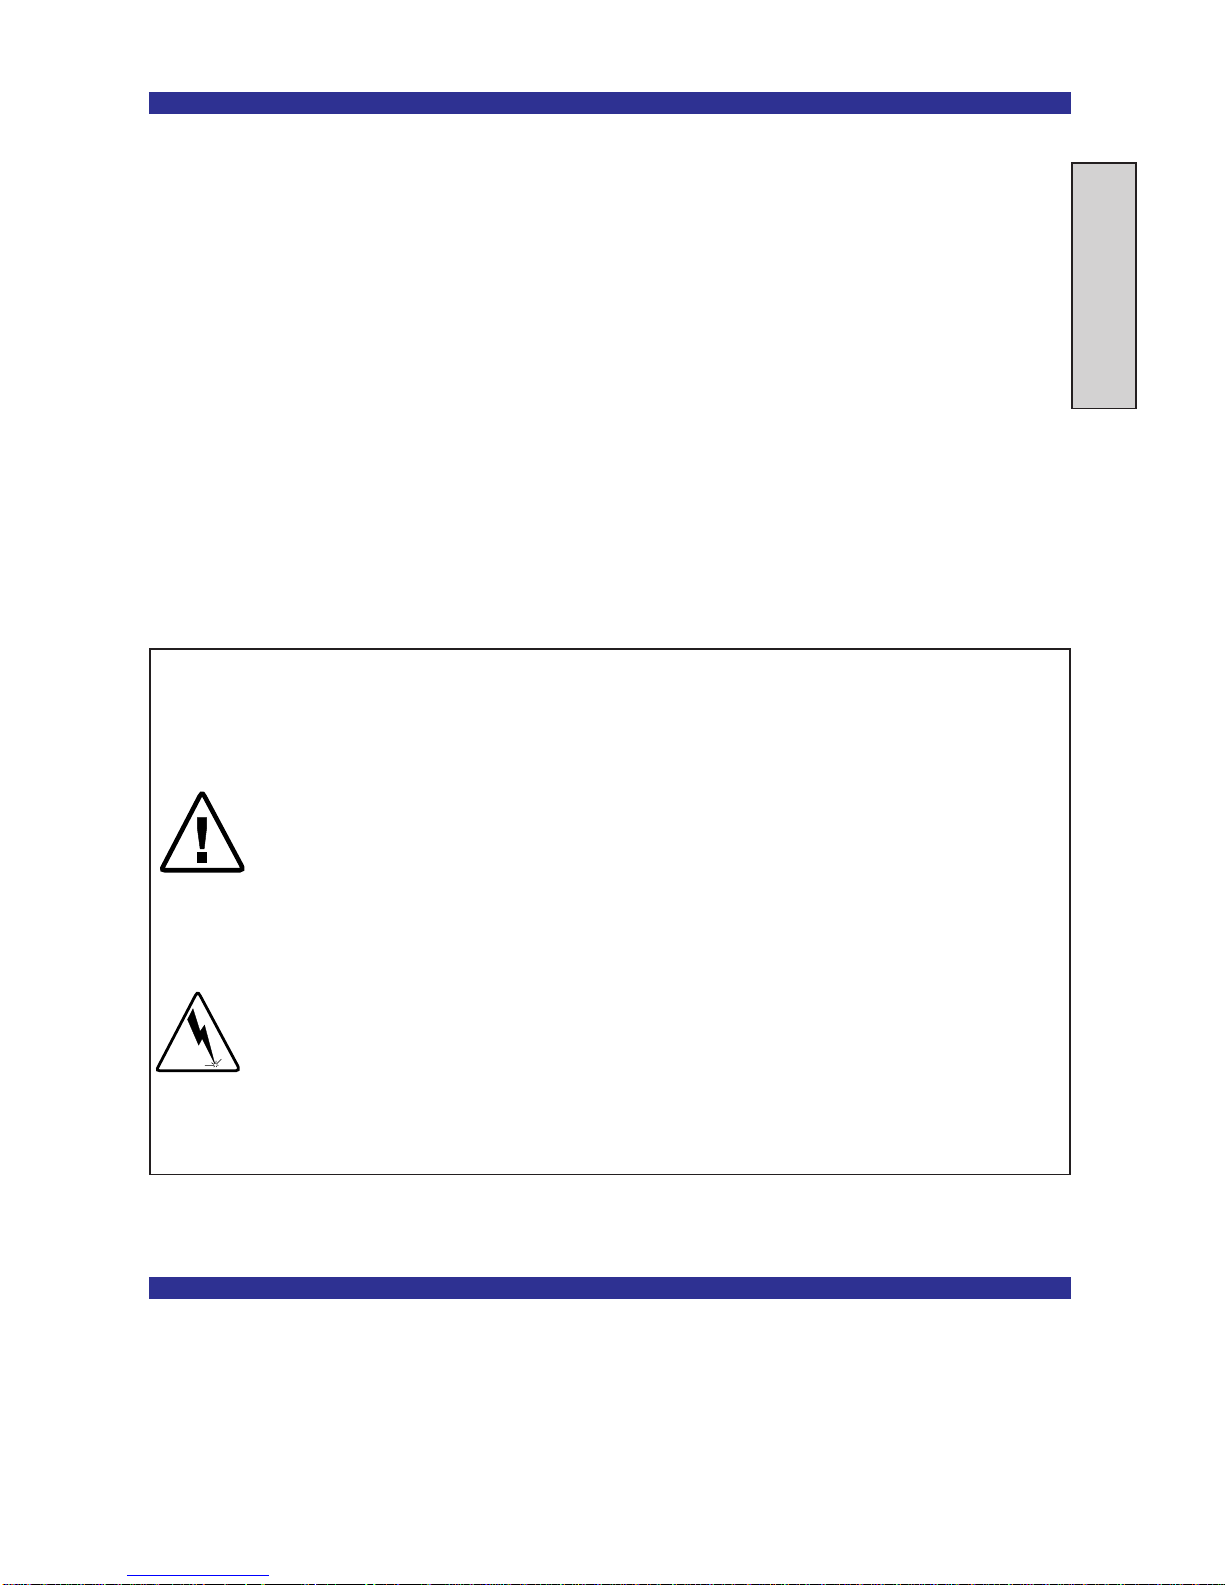
Step 3 — Unplug computer and remove cover
English
Turn off the computer and any attached equipment (such as a
monitor or printer), unplug the power cord, and remove the cover.
Warning: Don't burn yourself! Many components can
become hot enough to cause mild skin burns. Wait at
least 15 minutes after turning off the power before
handling any parts.
OFF
OFF
ON
5
Page 6
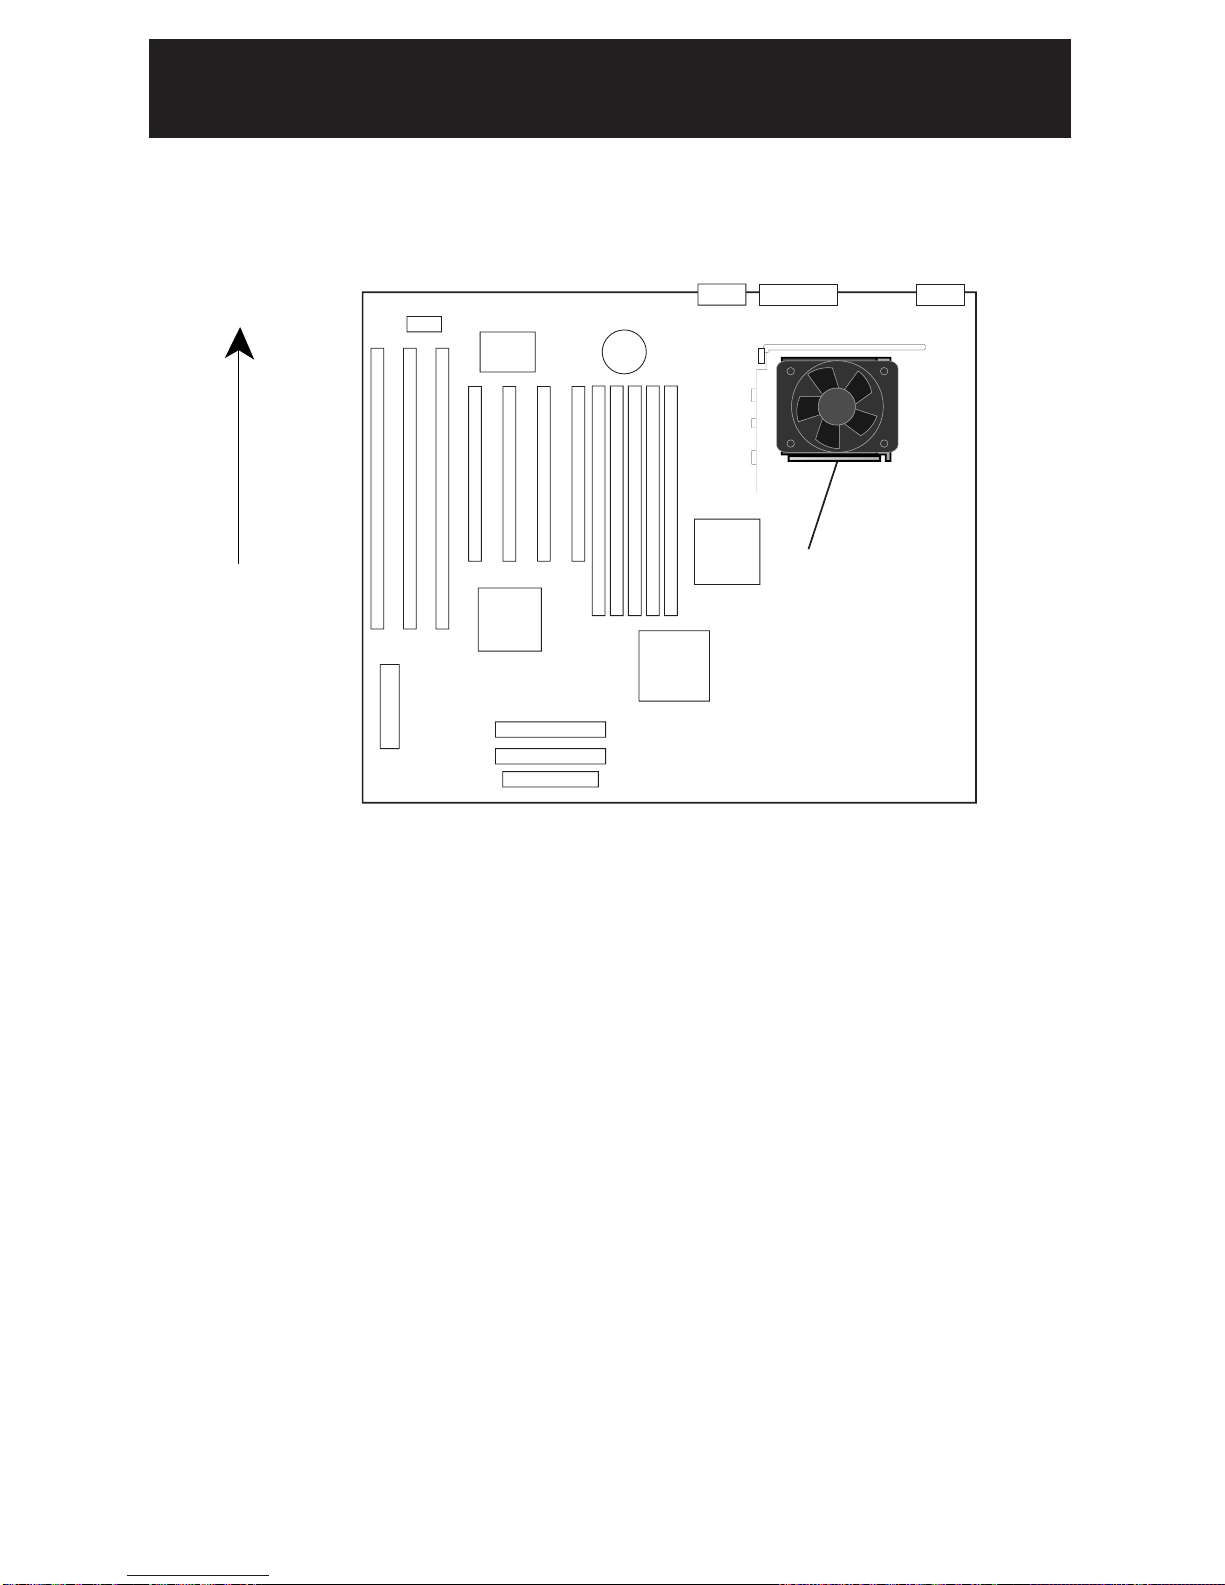
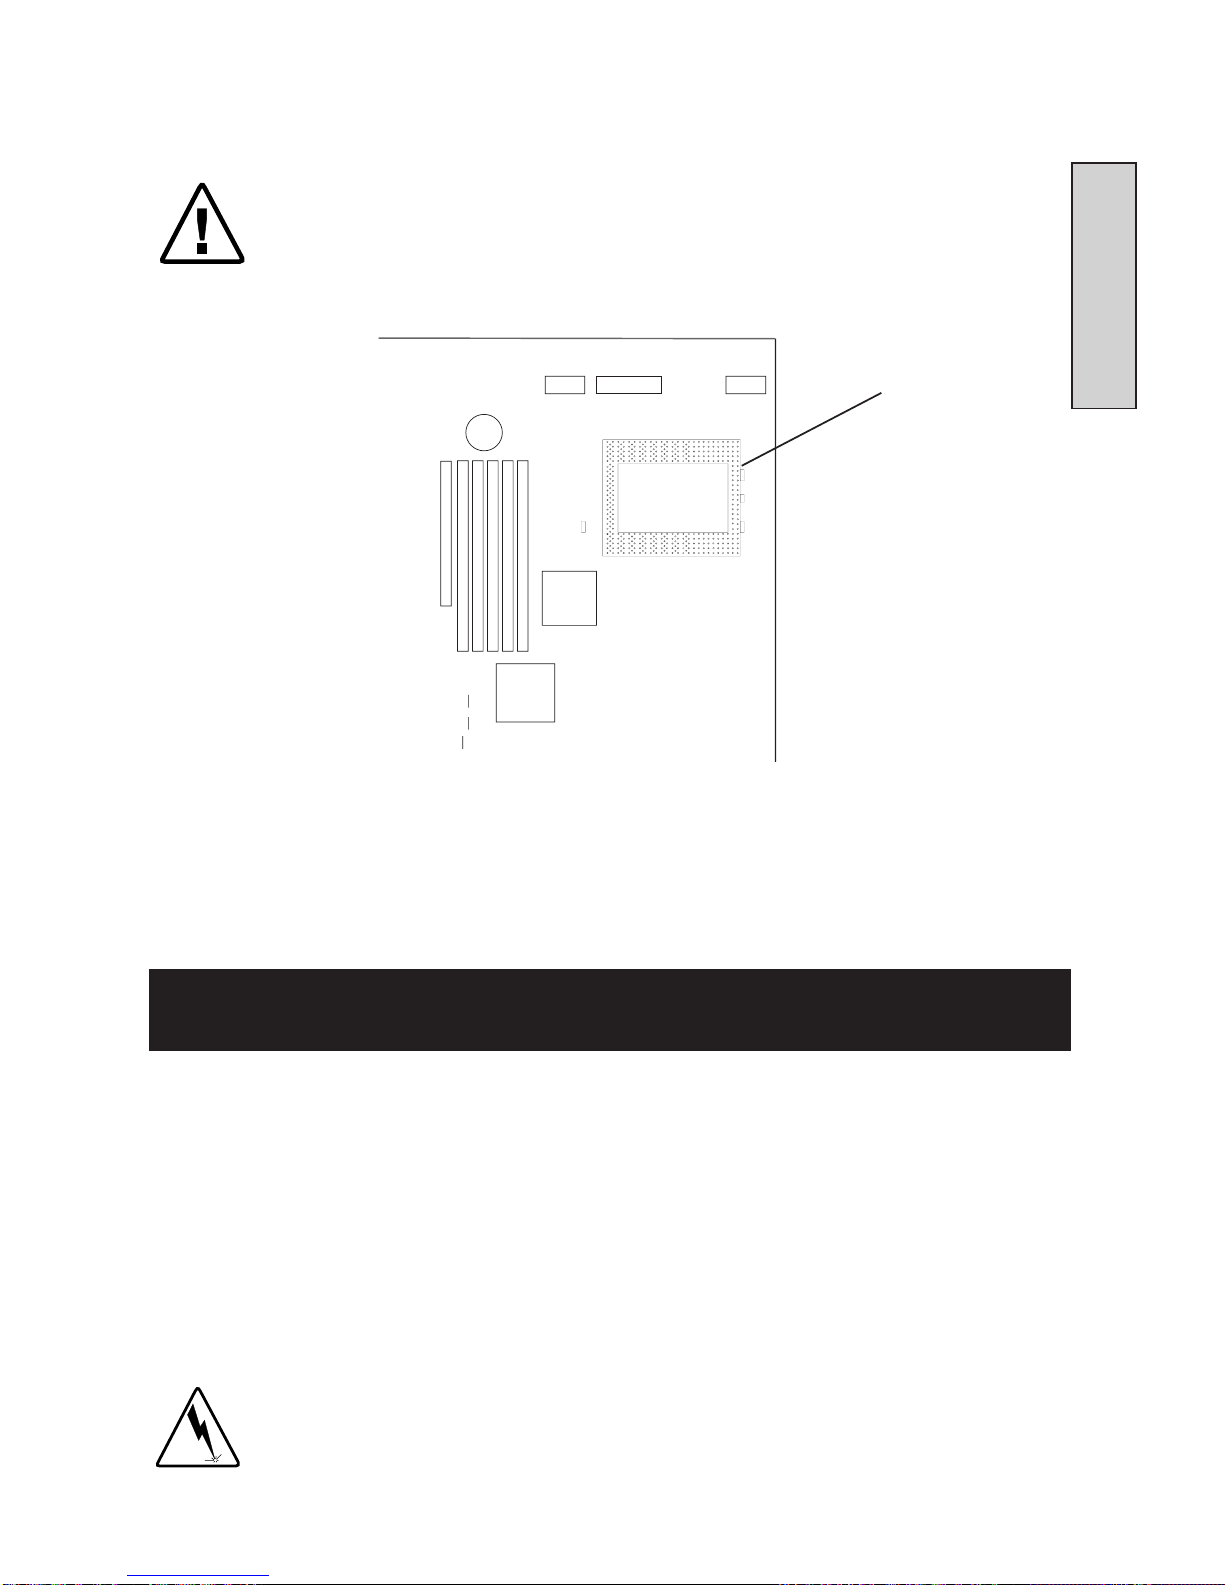
Step 4 — Find the computer's Pentium® Pro
processor
Find the Pentium Pro processor in your computer. The Pentium Pro
processor in most computers looks like one of the following:
PC-3846
Pentium Pro
Back of
System
processo
r
ATX Motherboard
In some systems, the Pentium Pro processor may be partially
obscured from sight by the system power supply, add-in cards, or
floppy/hard drive mounting brackets. It may be necessary to
remove add-in cards or drives to gain access to the processor socket.
Refer to your system documentation for information on removing
those items.
6
Page 7
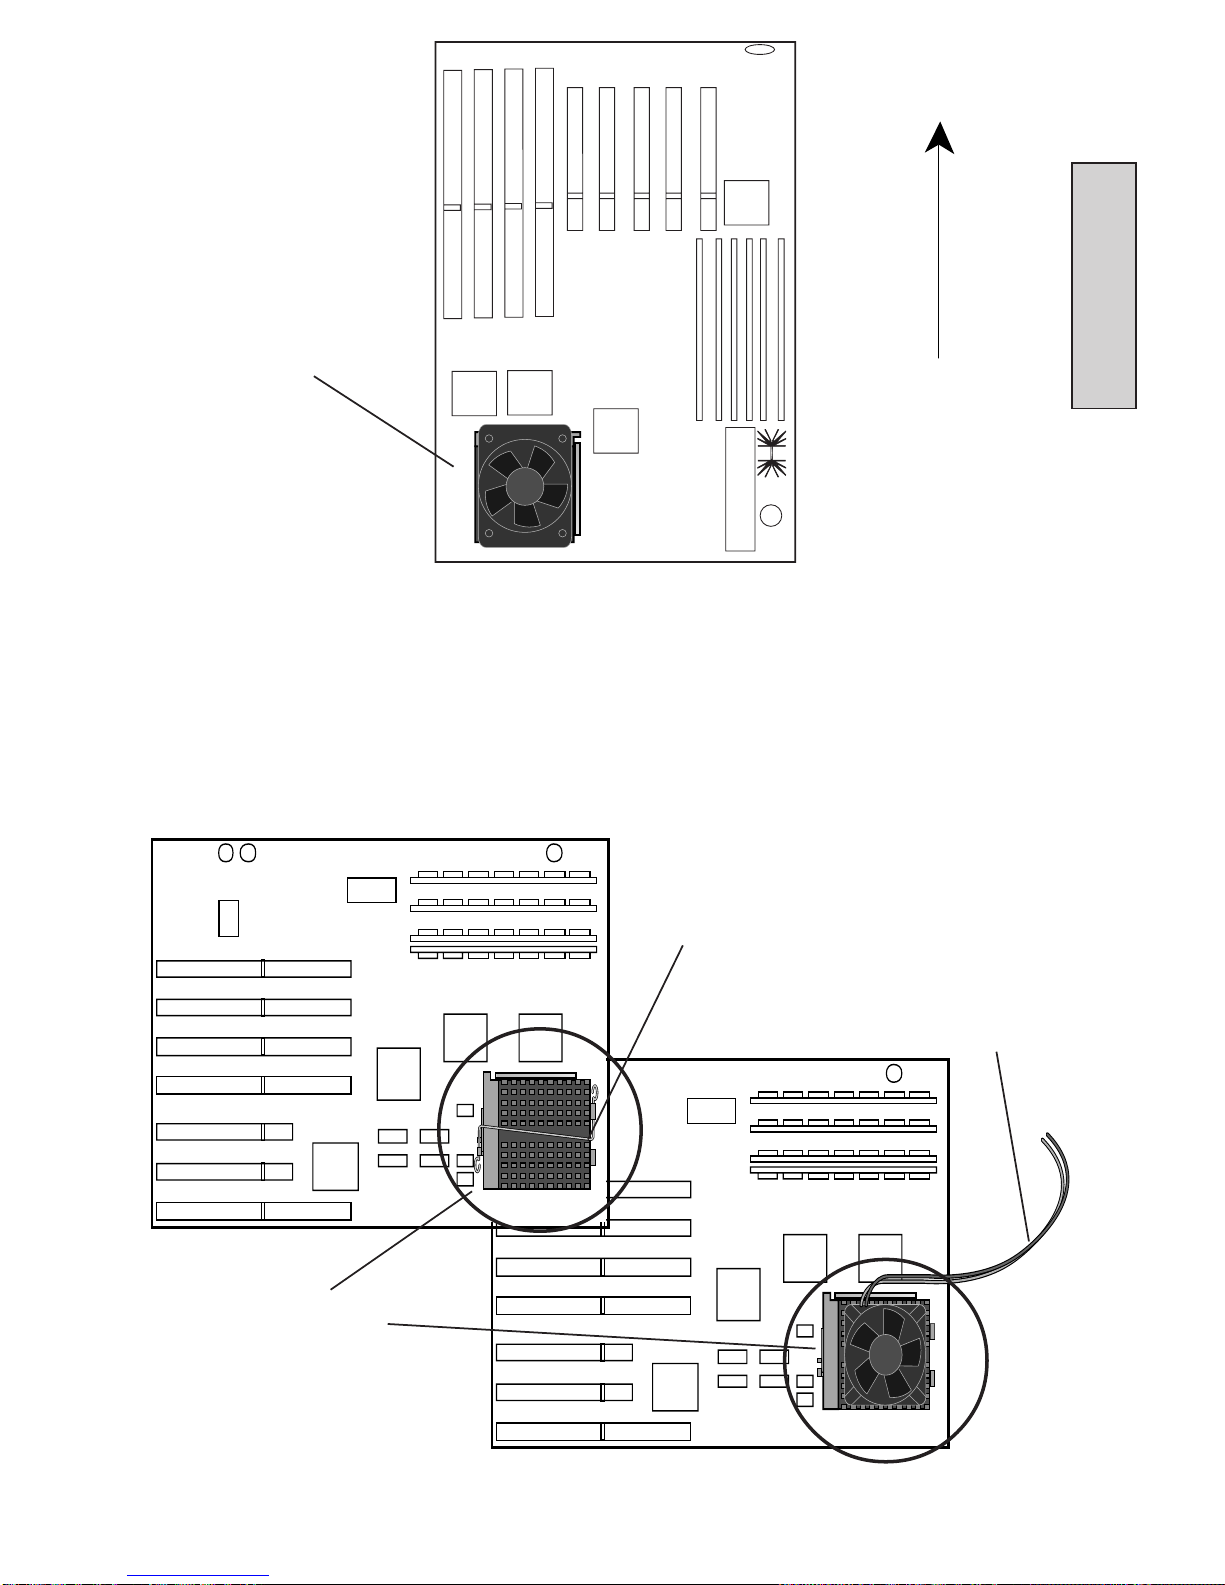
Pentium Pro
processor
Back of
system
PC-3844
Baby AT Motherboard
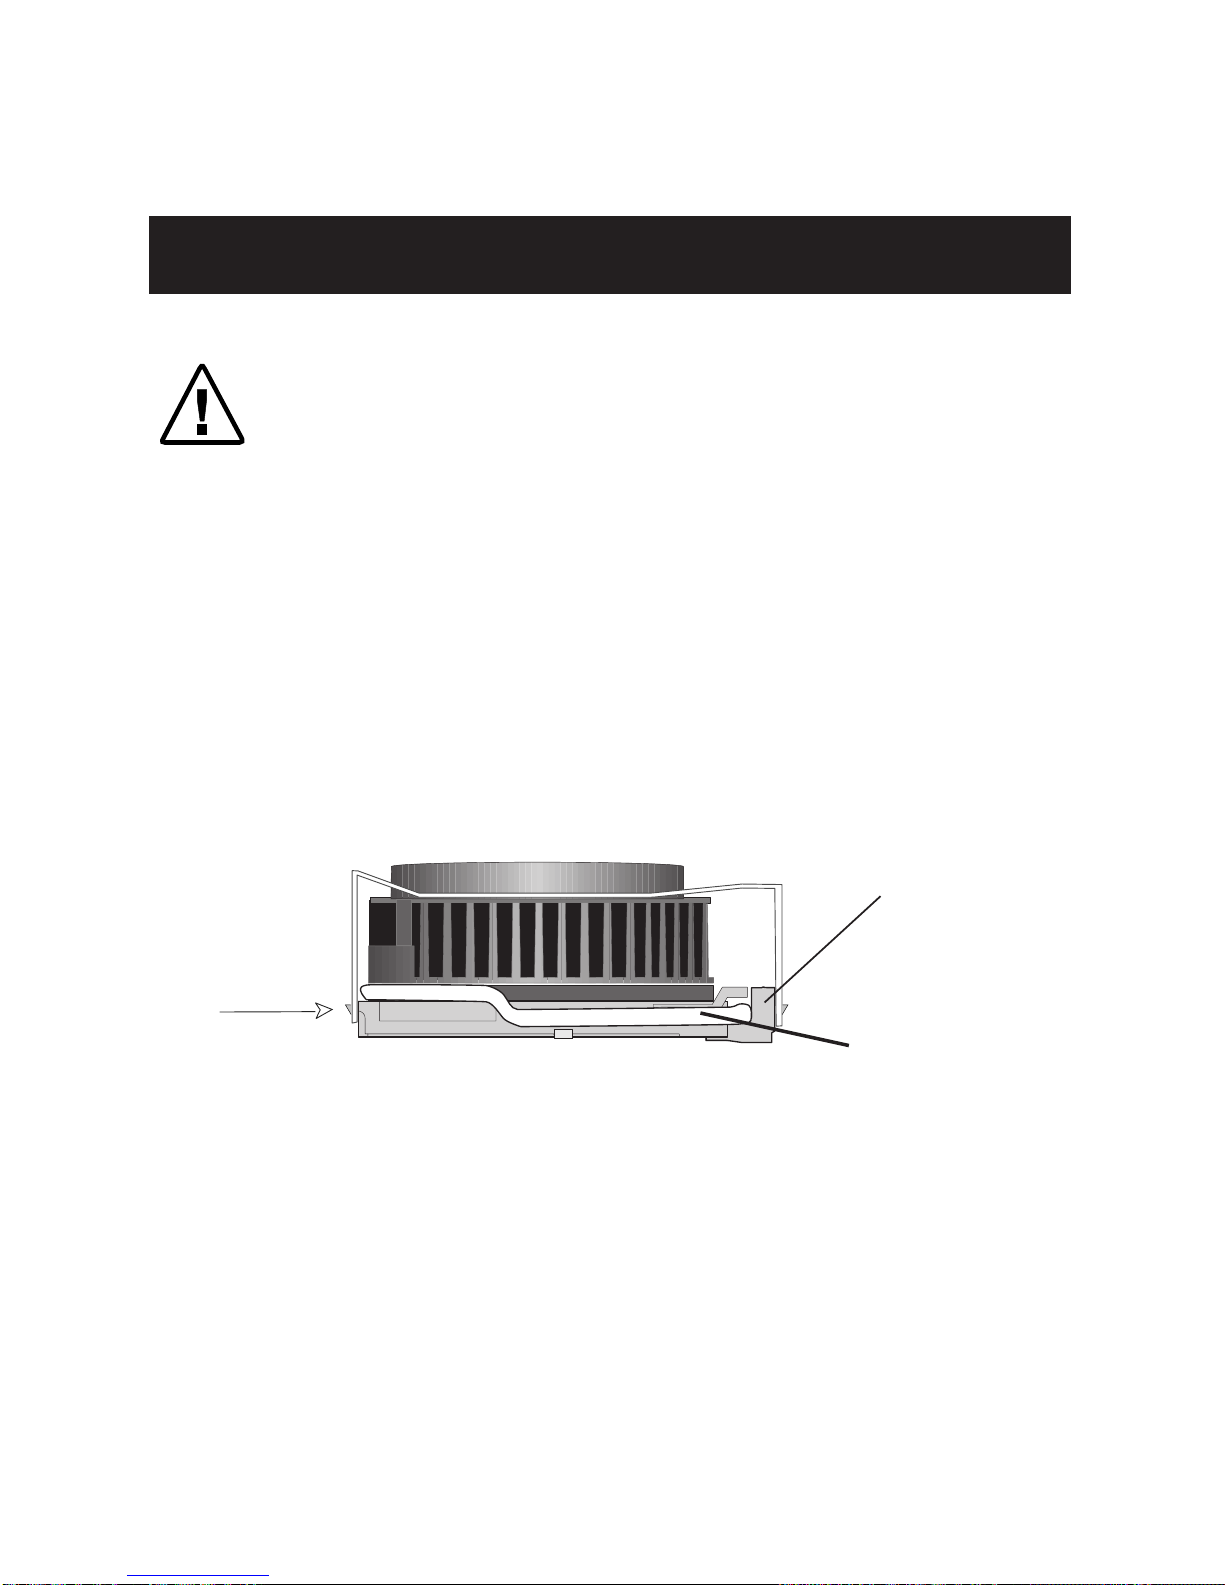
On top of your Pentium Pro processor there should be a passive
heatsink (which may be attached with a clip) or a fan heat sink with
an attached power cable.
Clip
English
Processor
socket
7
Fan power cable
PC-3786
Page 8
Step 4—Find the computer's
The Owner's Manual for your computer may show the location of
the processor. If you can't locate your computer's original processor,
Pentium processor.
contact your dealer or your computer manufacturer for assistance.
Step 5 — Determine the socket type
Some computers have an empty second socket next to the
processor. For more information on the installation
process for these computers, see the dual processor
section on page 19.
After locating the processor, examine the socket to determine the
socket type. There are two socket types:
1) A socket with a handle that locks or unlocks called a zero
insertion force (ZIF) socket.
Do not raise
socket handle
unless fan
heat sink
clip has been
undone first!
Typical ZIF socket
(with handle)
Socket
Handle
8
Page 9
2) A socket without a handle is called a low insertion force
(LIF) socket.
Warning: Damage to equipment! The Pentium II
OverDrive processor is incompatible with a LIF socket.
Attempting to install the Pentium II OverDrive processor
into a LIF socket will result in processor damage!
Typical LIF
socket
(no handle)
• If your computer has a power cable attached to the Pentium
Pro processor's fan heat sink proceed with Step 6. If the fan heat
sink is attached with a clip go to Step 7. Otherwise, go directly
to Step 8.
English
Step 6 — Unplug the fan power cable
The fan power cable may be attached to your computer's power
supply or to a connector on the motherboard. If other cables are
in the way, carefully fold them out of the way so they don't touch
computer components. Then carefully unplug the heatsink's
power cable from the computer's power supply or slide the
power cable off the motherboard connector.
Your new OverDrive processor does not need the older
processor's fan, cable, or clip; after removing these
parts, store them with your Pentium Pro processor.
9
Page 10
If your system uses a software program, such as Intel’s LANDesk®
Client Manager, to monitor the processor fan operation, the
Pentium II OverDrive processor may be compatible with that
feature. Refer to the Getting Help section on page 28 for more
information.
System power
supply cable
System Power Supply
Fan power cable
10
PC-3843N
Page 11

Step 7 — Remove fan heat sink clip assembly
If there is no clip on your processor, go to step 8. If the heat sink is
clipped to the socket, remove the clip by pressing down and
unfastening it from the tab on the socket, as shown in the following
illustrations. Be sure to hold your hand over the clip while
unfastening it to prevent it from flying loose.
Warning!: You must be very careful on removing the clip
from the processor. It may be under considerable tension
and may cause injury or system damage if not removed
carefully.
Heat sink clip surrounds fan and hooks to socket tabs.
English
Remove heat sink fan and fins as one piece. Be careful
not to break the socket tabs.
Heat sink clip
Fan
Push
down
and
unclip
Heat sink
fins
Socket
Typical fan heat sink clip
Press down on
Heat sink clips
to socket tab
Heat sink clips
tab to release
heat sink clip
Typical passive heat sink clip
11
to socket tab
PC-2822
Page 12

Some heat sinks clamp tightly over the socket tab and require a tool
such as a screwdriver to loosen the clip enough to slide over the tab.
See the illustration below.
Warning!: Damage to equipment! Some manufacturers
use thermal grease to attach the heat sink to the
processor. Thermal grease is a conductive material and
can damage your computer if it gets on socket pin holes,
processor pins, or other components. Avoid getting
thermal grease residue on your hands or the computer
when you remove the heat sink from the processor.
Carefully insert the tool between the heat sink and the socket, just
above the socket tab. Gently pry outward to allow the heat sink to
slip over the tab. You should then be able to completely release the
heat sink from all the other socket tabs.
Carefully use screwdriver to loosen
clip while pressing down
Processor
Fan
Socket
Step 8 — Open the socket handle and remove the
PC-3312
existing processor from the socket
Push the handle slightly sideways to slide it over the lever lock tab,
then move the handle to a 90-degree, upright position. Be sure the
socket is completely open. Don't use excessive force. Your
computer’s motherboard should not bend or flex while you are
opening the socket. See the illustration on the next page.
12
Page 13

Caution: The fan heat sink and processor may come out
as two separate pieces.
Before opening the ZIF socket lever, make sure to first
remove the fan heat sink clip assembly from the
processor.
Be sure the
English
Fan Heat Sink
Pentium Pro
Processor
socket is
completely
open.
90 deg.
PC-3885
Save the original processor in case you need it later. Store it in a
safe place, such as the box in which the Pentium II OverDrive
processor shipped.
Step 9 — Insert the Pentium II OverDrive
processor into the socket
Correctly orienting your Pentium II OverDrive processor in the
socket is crucial to the success of your installation. The Pentium II
OverDrive processor fits in the socket only one way.
Note: If your system’s processor socket is not easily
accessible, you may want to skip ahead to Step 13 and
connect the Pentium II OverDrive processor’s fan cable
before inserting the processor in the socket. After the fan
cable is connected, return to this step to complete
installation of the processor.
13
Page 14

Step 10 — Insert the Pentium II OverDrive
processor into the socket (continued)
Align the overhang area of the processor with the side of
the socket where the cam lever attaches.
Place the Pentium II OverDrive processor over the socket and align
the pins with the pin holes. Notice that the pin arrangement of the
socket matches the pin arrangement of the processor.
Processor
Ledge
Socket
Socket Handle
90 deg.
PC-3848
Once the pins and pin holes are properly aligned, gently
insert the processor into the socket. Don't use force to
insert the processor in the socket.
Don't apply pressure
to the center of the fan.
SANYO DENKI
DC 5V 0.14A
109X4405H6J05
PODP5V
Warning!: Damage to equipment: Never attempt to
remove the fan from the Pentium II OverDrive processor.
Serious damage to the processor could result and this
action will void the processor warranty.
14
Page 15

Step 11 — Close the socket handle
Close the socket handle to lock the Pentium II OverDrive processor
in place.
PC-3849
Once it is locked in place, the Pentium II OverDrive processor
English
should fit snugly in the socket
.
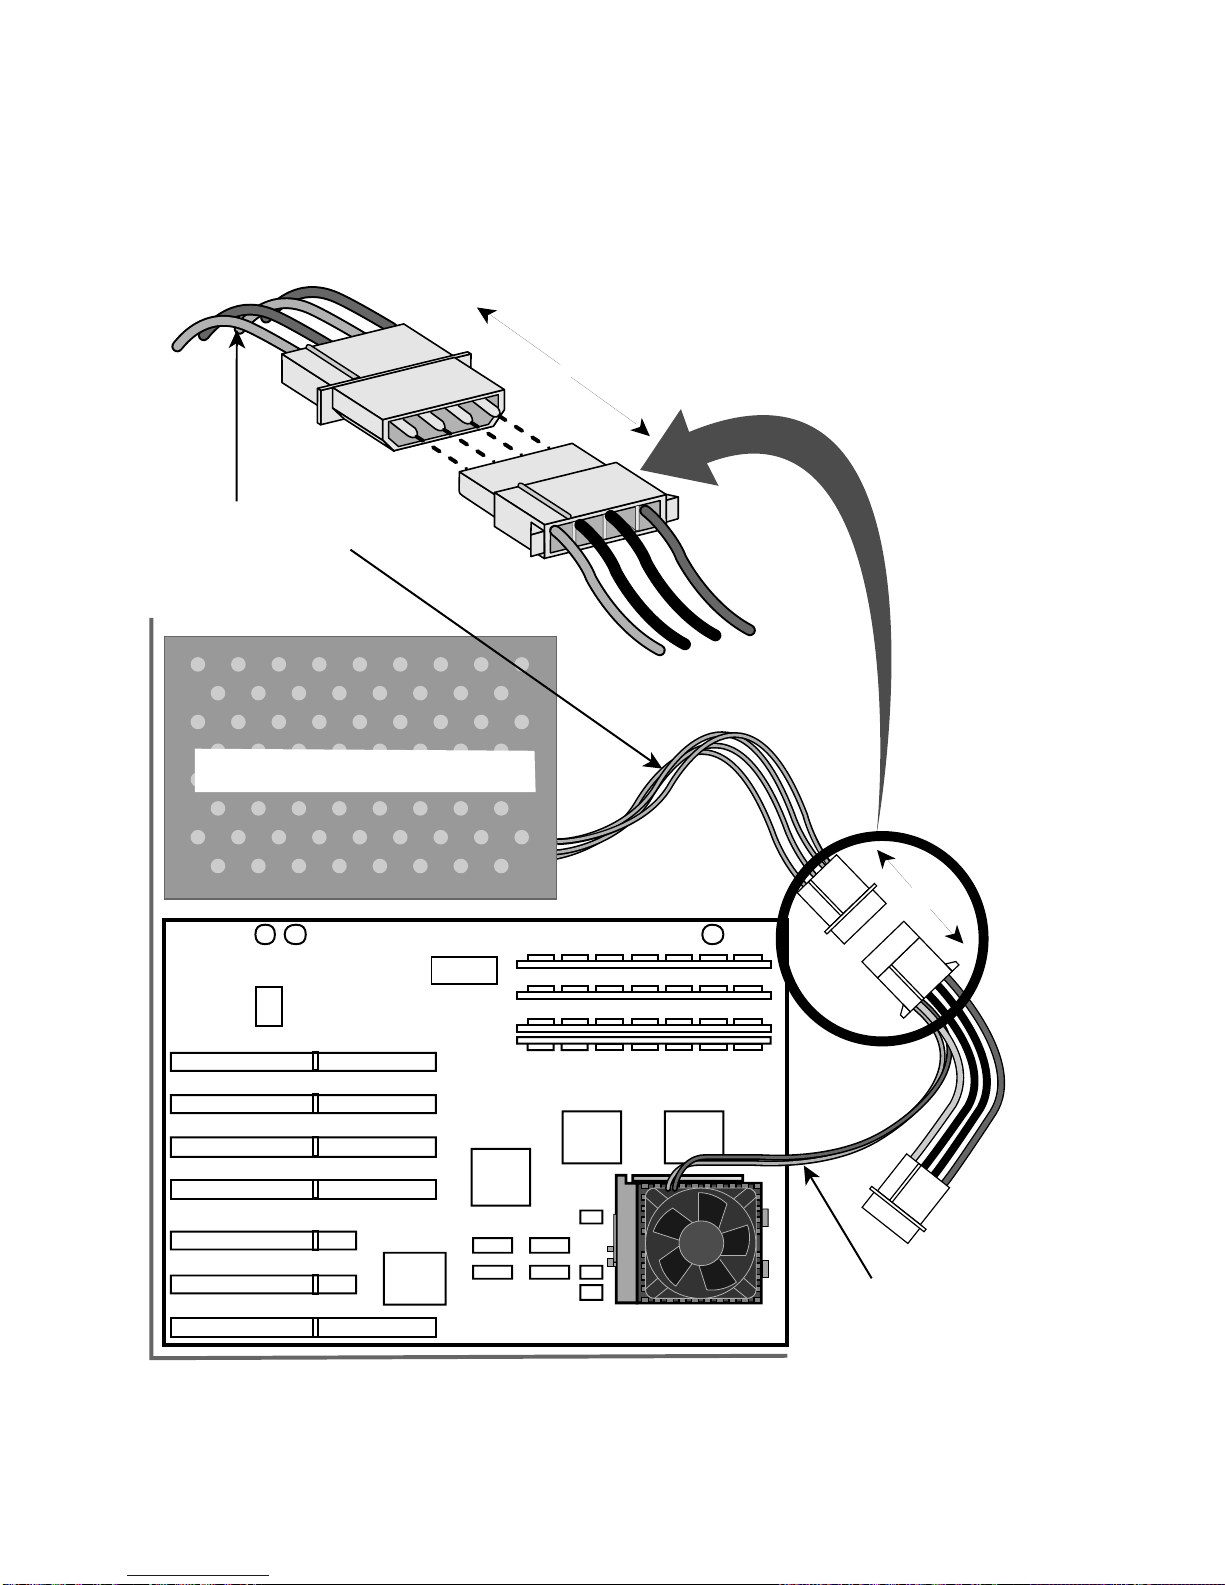
Step 12 — Connect the fan power cable
This is essentially the reverse of step 6. You should use the fan
power cable provided with the Pentium II OverDrive processor.
Carefully attach the small connector on the fan cable to the small
connector on the top of the Pentium II OverDrive processor fan.
The connector should snap into place. The cable’s small connector
is notched so it will only connect one way.
Then connect the large fan cable connector into one of the available
connectors from the system’s power supply. See the illustration on
the following page for details.
Note: If your system uses a software program, such as
Intel’s "LANDesk Client Manager", to monitor the
processor operation, refer to the "Troubleshooting" section
on page 23 for information on configuring the Pentium II
Step 11—Dual Processor installation instructions.
OverDrive processor to support the fan monitoring feature.
This feature can only be supported if fan power is supplied
by the motherboard.
15
Page 16

Step 13 — Connect the fan power cable
Step 10—Connect the fan power cable.
(continued)
System power
supply cable
System Power Supply
Fan power cable
provided with the
OverDrive processor
PC-3843N
16
Page 17

Step 14 — Replace the cover, plug in the
computer, and turn it on
If your computer requires setting jumpers or switches,
refer to your computer's owner's manual or the
"Troubleshooting" section.
Re-install any add-in cards or any internal cables that you may
have removed in Step 4. Put the cover back on the computer.
Reconnect all the cables and cords, and plug the power cord
into the wall outlet.
Turn on your computer. If your computer requires it, run
the computer’s setup or configuration program. Refer to
English
your computer's owner’s manual.
If you have problems with your computer after installing the
Pentium II OverDrive processor or don't see improved performance,
turn to the "Troubleshooting" section on page 23.
Step 15 — Test the installation of the Pentium II
OverDrive processor
Run the diagnostics again to see how much faster your computer
performs with your new Pentium II OverDrive processor. When
you ran the diagnostics in step 1, the program stored information
about your old processor. The disk also contains the diagnostics to
test your installation.
17
Page 18

Processor Instruction Test Tests various processor functions
to see whether they are working
properly.
Floating Point Tests the processor's floating-
Conformance Test point unit by comparing the value
the floating-point unit calculates
to the value established by the
IEEE standard.
MMX ™ Technology Tests the various MMX™
Instruction Test technology instructions to see
whether they are working
properly.
MMX Technology Video Test Demonstrates the MMX™
technology features of your
Pentium II OverDrive processor.
Step 10—Replace the cover, plug in the
In addition, you can test your installation by running software
computer, and turn it onStep 10—Replace the
programs you use frequently to experience the increased
performance.
cover, plug in the computer, and turn it on.
If you don't see increased performance, or if you have difficulty
getting the computer to run successfully, see the Troubleshooting
section to determine possible problems. If you still need help,
contact your dealer.
Installation of your Intel Pentium II OverDrive processor
.Step 11—Test the installation of the Pentium
is complete.
II OverDrive
18
Page 19

Dual Processor installation overview of the
Pentium II OverDrive processor
The Pentium II OverDrive processor is not designed to
support more than two processors in a system.
Some computers have two processor sockets that can be used for
dual processing as well as for single processing. The Pentium II
OverDrive supports dual processing. You must have two Pentium II
OverDrive processors to configure a system for dual processing.
PC-3845
Back of
System
English
Motherboard with two processor sockets
19
Page 20

Upgrading a single Pentium Pro processorbased system with two Pentium II OverDrive
processors
If you are installing two Pentium II OverDrive processors into a
dual processor-capable system equipped with only one Pentium Pro
processor, please consult your system manual and/or manufacturer
for information on configuring the motherboard to support dual
processors. Some motherboards may require jumper changes to
recognize the second processor.
Note: Mixing of processor types is not supported. You
cannot use the Pentium II OverDrive processor with the
Pentium Pro processor.
Note: Some dual processor motherboards may require a
Voltage Regulator Module (VRM) for the second
processor. Contact your system manufacturer for
information on obtaining a second VRM if one was not
included with your system/motherboard.
Note: Some operating systems may need to be
reconfigured or re-installed to recognize the second
processor. Some operating systems, such as Windows* 95
and Windows 98, do not support dual processors.
Follow Steps 1 through 13 on pages 4 to 17 to remove the
Pentium Pro processor and install the Pentium II OverDrive
processors. Install the second Pentium II OverDrive processor
the same way as the first. Install a second VRM and change
motherboard jumpers if necessary.
Note: Each Pentium II OverDrive processor will require
a fan power cable, included with each processor.
20
Page 21

Re-install any add-in cards and internal cables that you may have
removed in Step 4. Put the cover back on the computer. Reconnect
all the cables and cords, and plug the power cord into the wall
outlet. If required, run the computer’s setup or configuration
program to enable support for the second processor. Run the
Pentium II OverDrive processor Diagnostic Program to verify both
processors are functioning properly.
Note: The Pentium II OverDrive processor Diagnostic
Program will not recognize both processors until the
operating system has been configured to recognize both
processors.
Upgrading a dual Pentium Pro processor-based
English
system with two Pentium II OverDrive
processors
Note: Mixing of processor types is not supported. You
cannot use the Pentium II OverDrive processor with the
Pentium Pro processor.
Note: Each Pentium II OverDrive processor will require a
fan power cable, included with each processor.
Follow steps 1 through 13 on pages 4 to 17 to remove both
Pentium Pro processors and install both Pentium II OverDrive
processors.
Re-install any add-in cards and internal cables that you may have
removed in Step 4. Put the cover back on the computer. Reconnect
all the cables and cords, and plug the power cord into the wall
outlet. If required, run the computer’s setup or configuration
program. Then run the Pentium II OverDrive processor Diagnostic
Program to verify both processors are functioning properly.
21
Page 22

Upgrading a dual Pentium Pro processor-based
system with one Pentium II OverDrive processor
If your system is currently configured with two Pentium Pro
processors and you want to upgrade your system with only one
Pentium II OverDrive processor, consult your system manual for
information on configuring the system for single processor
operation. Some motherboards may require jumper changes.
Note: Mixing of processor types is not supported. You
cannot use the Pentium II OverDrive processor with the
Pentium Pro processor.
Follow Steps 1 through 8 in the Single Processor Installation
section to remove both Pentium Pro processors from the system.
Follow steps 9 through 13 to install the Pentium II OverDrive
processor into the primary processor socket, making any jumper
changes if necessary. Consult the system manual for the location of
the primary processor socket and required jumper changes.
Re-install any add-in cards and internal cables that you may have
removed in Step 4. Put the cover back on the computer. Reconnect
all the cables and cords, and plug the power cord into the wall
outlet. If required, run the computer’s setup or configuration
program. Then run the Pentium II OverDrive processor Diagnostic
Program to verify processor is functioning properly.
Installation of your Dual Intel Pentium II OverDrive
Processors is complete.
22
Page 23

Troubleshooting and Additional Information
Read through the symptoms below. If you find one that resembles
the problem you’re having, try the corresponding possible solutions. If your symptom is not listed or you would like additional
information, refer to the WWW at http://support.intel.com/
support/processors/overdrive
How do I know if my system will support the fan monitoring
feature?
If your not sure that your system supports the fan monitor feature,
refer to your system documentation. Management software such as
the LANDesk Client Manager is likely to support processor fan
monitoring. Refer to the WWW at http://support.intel.com/
support/processors/overdrive for more information on this feature.
The computer doesn’t power on when you turn on the switch, you
receive an error message, or the operating system prompt doesn’t
appear on the screen.
• Your computer may need an updated control program
(BIOS). Contact the technical support department at your
computer vendor or dealer for BIOS information.
English
• Be sure:
• The power cord is plugged into the wall outlet.
• The cables and cords are attached correctly.
• Any cards you removed are reinstalled properly.
• The Pentium II OverDrive processor is fully inserted and
the processor socket handle is fully locked.
• Did you set the jumpers or system switches correctly, as described in your computer owner's manual? For further information on jumpers and switches, see page 26 and 27.
• If you have access to another Pentium Pro processor-based
computer, remove your Pentium II OverDrive processor and
install it in the second computer.
23
Page 24

Your application programs don’t run any faster with the
Pentium II OverDrive processor installed.
• Did you set the jumpers or system switches correctly, as
described in your computer's owner’s manual? For further
information on jumpers and switches, see page 26.
• Does your computer require you to run its setup program?
Check your computer's owner's manual or contact your dealer
to verify.
If your computer appears to be functioning normally and you
have eliminated jumper settings and setup requirements as the
problem, but you don't see a speed improvement, see the "Getting
Help" section on page 28.
Some of the pins on the Pentium II OverDrive processor are bent.
• Carefully straighten any bent pins with needlenose pliers or
tweezers before inserting the Pentium II OverDrive processor to
the socket.
The Pentium II OverDrive processor feels hot.
• It is normal for the Pentium II OverDrive processor to generate
heat while operating.
Caution: After operating for several hours, many chips
in your computer, including the Pentium II OverDrive
processor, can become hot enough to cause mild skin
burns if handled. Let the computer cool off before
handling the Pentium II OverDrive processor.
Your computer powers on and runs normally for a few minutes
then hangs up or shuts down.
• Is the Pentium II OverDrive processor socket handle fully
locked?
• Is the Pentium II OverDrive processor fully inserted?
• Did you set the jumpers or system switches correctly, as
described in your computer's owner's manual?
24
Page 25

• Check to see if the Pentium II OverDrive processor’s fan is
functioning properly.
1. Make sure the computer is turned off before removing
the computer cover.
2. Check that nothing is blocking the airflow from the fan.
Are there cables, cards, or other components that prevent
good airflow to the vents in the chassis?
Note: There must be adequate clearance between the top
of the processor fan and the nearest object to ensure
proper airflow. After unplugging your computer, you
can measure the space above the fan. It should be at
least 0.4 inch, or about the thickness of your finger.
3. Make sure the fan power cable is properly connected per
page 16 and the cable connectors (both at the fan and
power source) are fully seated and tight.
Warning: When your computer is plugged in, the power
is on, and the cover is off, don't touch your computer or
the fan. Exercise extreme care, as injury may occur
from moving parts or death may occur from
English
electrocution. If uncertain, seek expert technical
assistance.
4. Turn your computer on with the cover off.
5. Observe the fan on the Pentium II OverDrive processor.
With the computer power on, the fan blades should be
turning. If the fan works, turn off and unplug your
computer, then replace the cover.
• If the fan is functioning and your system continues to lock-up
or power down, then your computer may not be providing
enough airflow to adequately cool the Pentium II OverDrive
processor. Call your computer manufacturer for information
about evaluating a possible thermal condition in your computer.
25
Page 26

Your Pentium II OverDrive processor fan is not working.
• Verify that the fan power cable included with the Pentium II
OverDrive processor is properly installed. If the fan still
isn’t working when the computer is powered on, contact Intel
Customer Support using the phone numbers located in the
back of this manual for additional information.
Your computer appears to work correctly and it passes the Intel
diagnostic program, but the BIOS or CMOS setup program does
not correctly display the name of the Pentium II OverDrive
processor.
• The BIOS in many older computers may not properly identify
the Pentium II OverDrive processor; however, those systems
might still operate correctly with the new processor. If the
processor passes the Intel diagnostic program and the system
seems to be operating correctly with satisfactory performance,
then the fact that the BIOS screen does not correctly display
the name, speed, or cache size of the Pentium II processor, will
probably not affect the system's or the processor's operation. In
this case, it is probably is not worth the effort to update the
BIOS
.
You need to set jumpers or switches to configure your computer
for the Pentium II OverDrive processor.
• In most computers, the jumper and switch settings for the
original Pentium Pro processor and the Pentium II OverDrive
processor are the same. In some cases, however, you may need
to specifically configure your system for a Pentium II OverDrive
processor. A good example would be to enable dual
processing. Your computer's owner's manual or your computer
manufacturer should have the correct settings for your computer.
26
Page 27

You need to set jumpers or switches to configure your computer
for the Pentium II OverDrive processor (Continued).
Jumpers are very small pins fastened to the motherboard. If you
look closely, you can see that each jumper is labelled with a number
or letter that typically is printed on the motherboard, as shown
below.
The pins are connected (ON) when a tiny plastic connector covers
two pins. The connector has a metal piece embedded in the plastic
that allows current to pass between the pins.
To turn the connection OFF, remove the jumper connector from the
pins. You can also place the connector over only one of the pins for
safekeeping as shown. To turn the connection ON, place the
English
connector over the two indicated pins. Note that while some
jumpers appear in pairs, others may appear in sets of four or more,
as shown.
1 2 3 4 5
J1
J1
JP1
JP1
27
PC-3847
Page 28

Intel Customer Support on the World Wide Web
Support information for Intel Brand products is available on the
Internet for downloading by anonymous FTP and for viewing or
downloading on the World Wide Web. Try Intel’s newsgroup forum
for answers to common questions or post your question to be
answered.
Intel web site http://www.intel.com
Customer support web site http://support.intel.com
Intel FTP hostname ftp.intel.com
Customer support files ftp.intel.com/pub/support
Intel Internet newsgroup news://cs.intel.com or
http://cs.intel.com
If you are unable to find the information you need on one of our
electronic services, you may need to call a customer support
technician. Please see the phone numbers on the next page.
28
Page 29

Japan
0298-47-0800
Hours: 0900-1700
Asia-Pacific/Korean Support
Asia-Pacific/English Support
Korea.......822-7672-595
Hours: 0900-1700
Asia-Pacific/Mandarin Support
PRC.........852-2-844-4456
Taiwan......2-718-9915
Hours: 0900-1700
Pakistan.........63-2-638-0860
Hours: 0900-1400
India...............63-2-638-0860
Hours: 0900-1500
Vietnam..........63--2-638-0860
Indonesia.......800-65-7249
Thailand.........63-2-638-0860
Hours: 0900-1600
Hong Kong.....852-2-844-4456
Phillipines.......1-800-651-0117
Singapore.......65-831-1311
Malaysia.........800-1390
Australia.........1-800-649-931
Hours: 0900-1700
New Zealand..0-800-44-4365
Hours: 1100-1700
English
www.intel.com
support.intel.com
(07:00-17:00
U.S. Pacific Time
1-916-377-7000
Monday-Friday)
29
1-800-321-4044
07:00-17:00 M-F
For English and European
customers not listed below
+44-1793-404-900
08:00-24:00 Monday-Friday
Francais.+44-1793-404-988
Deutsch..+44-1793-404-777
Italiano....+44-1793-404-141
All languages other than English
hours of operation are Monday,
Tuesday, & Friday 0900-1800
CET Tuesday, Wednesday,
0900-1700 CET.
Page 30

Three Year Limited Warranty
Intel warrants that the OverDrive® processor, if properly used and
installed, will be free from defects in material and workmanship and
will substantially conform to Intel's publicly available specifications
for a period of three (3) years after the date the OverDrive processor
was purchased.
If the OverDrive processor which is the subject of this Limited
Warranty fails during the warranty period for reasons covered by
this Limited Warranty, Intel, at its option, will:
REPAIR the OverDrive processor by means of hardware and/or
software; OR
REPLACE the OverDrive processor with another OverDrive
processor; OR, if Intel is unable to repair or replace the
OverDrive processor,
REFUND the then-current value of the OverDrive processor.
THIS LIMITED WARRANTY, AND ANY IMPLIED WARRANTIES
THAT MAY EXIST UNDER STATE LAW, APPLY ONLY TO THE
ORIGINAL PURCHASER OF THE OVERDRIVE PROCESSOR AND
LAST ONLY FOR AS LONG AS SUCH PURCHASER CONTINUES TO
OWN THE PROCESSOR.
Extent of Limited Warranty
Intel does not warrant that your OverDrive processor will be free
from design defects or errors known as "errata." Current
characterized errata for Pentium OverDrive processors are available
upon request.
This limited warranty does not cover any costs relating to removal
or replacement of any OverDrive processor that is soldered or
otherwise permanently affixed to your system's motherboard.
30
Page 31

This limited warranty does not cover damages due to external
causes, including accident, problems with electrical power, usage
not in accordance with product instructions, misuse, neglect,
alteration, repair, improper installation, or improper testing. If you
do not wish to install the OverDrive processor yourself, you should
have the vendor from whom you purchased the product install it.
How to Obtain Warranty Service
To obtain warranty service, you must return the OverDrive
processor to the vendor from whom you purchased it, or, with proof
of purchase, to Intel. Before returning the OverDrive processor to
Intel, you must contact Intel Customer Support at 1-916-377-7000
or toll free in the U.S., 1-800-321-4044.
English
If you obtain warranty service from Intel, upon Intel's verification
that the OverDrive processor is or may be defective, you will be
issued a Return Material Authorization (RMA). When you return
the OverDrive processor to Intel, you must include the RMA
number on the outside of the package. Intel will not accept any
returned OverDrive processor that has no RMA number on the
package.If you return the OverDrive processor to Intel, you must
assume the risk of damage or loss during shipping. You must use
the original packaging or the equivalent, and you must pay the
postage.
Intel may require you to verify that you are the original end user
purchaser of the OverDrive processor. Intel may elect to replace or
repair the OverDrive processor with either a new or reconditioned
product. The returned product shall become Intel's property on
receipt by Intel.
The replacement processor is warranted under this written warranty
and is subject to the same limitations and exclusions for the
remainder of the original warranty period or one (1) year, whichever
is longer.
31
Page 32

WARRANTY LIMITATIONS AND EXCLUSIONS
THESE WARRANTIES REPLACE ALL OTHER
WARRANTIES, EXPRESS OR IMPLIED INCLUDING, BUT
NOT LIMITED TO, THE IMPLIED WARRANTIES OF
MERCHANTABILITY AND FITNESS FOR A PARTICULAR
PURPOSE. INTEL MAKES NO EXPRESS WARRANTIES
BEYOND THOSE STATED HERE. INTEL DISCLAIMS ALL
OTHER WARRANTIES, EXPRESS OR IMPLIED
INCLUDING, WITHOUT LIMITATION, IMPLIED
WARRANTIES OF MERCHANTABILITY AND FITNESS FOR
A PARTICULAR PURPOSE. SOME JURISDICTIONS DO
NOT ALLOW THE EXCLUSION OF IMPLIED WARRANTIES
SO THIS LIMITATION MAY NOT APPLY TO YOU.
ALL EXPRESS AND IMPLIED WARRANTIES ARE LIMITED
IN DURATION TO THE LIMITED WARRANTY PERIOD. NO
WARRANTIES APPLY AFTER THAT PERIOD. SOME
JURISDICTIONS DO NOT ALLOW LIMITATIONS ON HOW
LONG AN IMPLIED WARRANTY LASTS, SO THIS
LIMITATION MAY NOT APPLY TO YOU.
LIMITATIONS OF LIABILITY
INTEL'S RESPONSIBILITY UNDER THIS, OR ANY OTHER
WARRANTY, IMPLIED OR EXPRESS, IS LIMITED TO
REPAIR, REPLACEMENT OR REFUND, AS SET FORTH
ABOVE. THESE REMEDIES ARE THE SOLE AND
EXCLUSIVE REMEDIES FOR ANY BREACH OF
WARRANTY. INTEL IS NOT RESPONSIBLE FOR DIRECT,
SPECIAL, INCIDENTAL, OR CONSEQUENTIAL DAMAGES
RESULTING FROM ANY BREACH OF WARRANTY OR
UNDER ANY OTHER LEGAL THEORY INCLUDING, BUT
NOT LIMITED TO, LOST PROFITS, DOWNTIME,
GOODWILL, DAMAGE TO OR REPLACEMENT OF
EQUIPMENT AND PROPERTY, AND ANY COSTS OF
RECOVERING, REPROGRAMMING, OR REPRODUCING
ANY PROGRAM OR DATA STORED IN OR USED WITH A
SYSTEM CONTAINING YOUR OVERDRIVE PROCESSOR.
SOME JURISDICTIONS DO NOT ALLOW THE EXCLUSION
OR LIMITATION OF INCIDENTAL OR CONSEQUENTIAL
DAMAGES, SO THE ABOVE LIMITATIONS OR
EXCLUSIONS MAY NOT APPLY TO YOU.
THIS LIMITED WARRANTY GIVES YOU SPECIFIC LEGAL RIGHTS,
AND YOU MAY ALSO HAVE OTHER RIGHTS THAT VARY FROM
JURISDICTION TO JURISDICTION.
32
 Loading...