

Page 1

EXHIBIT T – User Manual
FCC ID EJM-HRMP131
Page 2

Intel® Web Tablet Warranty and License Agreement
The following docum en t contains your Intel® Web Tablet warranty and
licensing agreement. It contains important information that you should
understand about the product. Take a few minutes at your convenience to
look over this information .
All Intel warranties and representations he r ein are null and void if the
packaging label has been broken or damaged. Please return product to
place of purchase for replacement.
Intel Web Tablet Limited Warranty
Limited Warranty
Intel warrants that the Web Tablet hardware product, if properly used and
installed, and the CD-ROM on which the accompanying software is
provided, will be free from defects in material and workma nship for a
period of one (1) year afte r th e date of purchase.
If the Web Tablet hardware product or the CD-ROM that are the subjects
of this Limit ed Warranty are de fect ive in mate rial or wo rkma nshi p dur ing
the warranty period, Intel, at its option, will:
REPAIR the Web Tablet hardware produc t or CD -ROM by means of
hardware and/or softwar e; O R
REPLACE the Web Tablet hardware product or CD-ROM
with a replacement Web Tablet hardware product or
CD-ROM; OR,
If Intel is un able to repair o r r eplace the Web
Tablet hardware product or CD-ROM,
REFUND the then-cur rent value of the Web
Tablet hardware product or CD-ROM.
THIS LIMITED WARRANTY, AND ANY IMPLIED WARRANTIES
THAT MAY EXIST UNDER STATE LAW, APPLY ONLY TO THE
ORIGINAL PURCHASER AND LAST ONLY FOR AS LONG AS
SUCH PURCHASER CONTINUES TO OWN THE WEB TABLET
HARDW A RE PRODUCT AND CD-ROM.
Extent of Limited Warranty
This warranty does NOT cover the performance or fun ct ion ality of any
computer soft ware in cluded in the packag e with the Web Table t hard ware
product; this warranty only covers defects in the CD-ROM media such as
a broken CD-ROM or a defect in the CD-ROM tha t w ould prevent the
CD-ROM from being read by your personal computer’s CD-ROM drive.
INTEL MAKES NO WAR RANTY THAT THE SOFT WARE
PROVIDED WITH THIS WEB TABLET HARDWARE PRODUCT
WILL FUNCTION WITHOUT INTERRUPTION OR OTHER WISE BE
FREE OF ANOMALIES, ERRORS OR “BUGS.” INTEL MAKES NO
WAR RANTY WITH REGARD TO ANY SOFTWARE PROVIDED
WITH THIS WEB TABLET HARDWARE PRODUCT UNLESS
SPECIFICALL Y SET FORTH OTHERWISE IN A LICENSE
AGREEMENT ACCOMPANYING SUCH SOFTWARE.
This limited warranty does not cove r any costs relating to removal or
replacement of any Web Tablet hardware product, CD-ROM, or software
installed on your comput er.
This limited warranty does not cove r da m age s due to external causes,
including accident, problems with electrical power, usage not in
accordance with product instructions, misuse, neglect, alteration, repair,
or improper installat io n.
How To Be Eligible For Warranty Coverage
In order to be eligible for warranty cov era ge , You MUST register the
Web Tablet hardw a re product with Intel within thirt y (30) days of
purchase. Registration can be completed by following the instr uc ti ons in
the program that is inc l uded on the Web Tabl et hardware product.
Page 3

How to Obtain Warranty Service
To obtain warranty service, you must return the Web Tablet hardware
product to Intel. Before ret urning the Web Table t hardw are product to
Intel, you must contact Tablet Customer Support at (877) 777-2 203 or
contact Intel by mail a t: Int el Corp oration, Cust omer Supp ort Depa rtment
M/S DC1-01, 5200 N.E. El am Young Parkway, Hillsboro, OR 971246497, USA (Include you r nam e , a ddre ss, tel ep hone number, and email
address if contacting Int el by ma i l al ong with a description of the
problem).
If you obtain warranty servic e from Intel, upon Intel’s veri fi cation that
the Web T ablet hardware product or CD-ROM may be defective, you will
be issued a Return Material Authorization (RMA). When yo u ret urn the
Web Tablet hardw a re product and CD-ROM to Intel, you m ust include
the RMA number on the outside of th e package. Int el will not acce p t any
returned Web Ta bl et hardware product or CD-R OM tha t has no RMA
number on the pa ckage.
If you return the Web Tablet hardware product and/or CD-ROM to Intel,
you must assume the risk of damage or loss during shi ppi ng. You must
use the original packaging or the equivalent, and you must pay the
postage.
Intel may elect to replace or repair the Web Tablet hardware product and/
or CD-ROM with either a new or reconditioned product. The returned
product shall become Intel’s property on receipt by Intel.
The replacement Web Tablet hardware product and/or CD-ROM is
warranted under this w ri tt en wa rra nt y and is subject to the same
limitations and excl u s io n s for th e re mainder of the original warranty
period or ninety (90) days, whichever is longer.
WARRANTY LIMITATIONS AND EXCLUSIO NS
THESE WARRANTIES REPLACE ALL OTHER WARRANTIES,
EXPRESS OR IMPLIED INCLUDING, BUT NOT LIMITED TO, THE
IMPLIED WARRANTIES OF MERCHANTABILITY AND FITNESS
FOR A PARTICULAR PURPOSE. INTEL MAKES NO EXPRESS
WARRANTIES BEYOND THOSE STATED HERE. INTEL
DISCLAIMS ALL OTHER WARRANTIES, EXPRESS OR IMPLIED
INCLUDING, WITHOUT LIMITATION, IMPLIED WARRANTIES
OF MERCHANTABILITY AND FITNESS FOR A PARTICULAR
PURPOSE. SOME STATES DO NOT ALLOW THE EXCLUSION OF
IMPLIED WARRANTIES SO THIS LIMITATION MAY NOT APPLY
TO YOU.
ALL EXPRESS AND IMPLIED WARRANTIES ARE LIMITED IN
DURATION TO THE LIMITED WARRANTY PERIOD. NO
WARRANTIES APPLY AFTER THAT PERIOD. SOME STATES DO
NOT ALLOW LIMITATIONS ON HOW LON G AN IMPLIED
WARRANTY LASTS, SO THIS LIMITATION MAY NOT APPLY TO
YOU.
LIMITATIONS OF LIABILITY
INTEL’S RESPONSIBILITY UNDER THIS, OR ANY OTHER
WARRA NTY, IMPLIED OR EXPRESS, IS LIMITED TO REPA IR,
REPLACEMENT OR REFUND, AS SET FORTH ABOVE. THESE
REMEDIES ARE THE SOLE AND EXCLUSIVE REMEDIES FOR
ANY BREACH OF WARRANTY. INTEL IS NOT RESPONSIBLE
FOR DIRECT, ACTUAL, SPECIAL, INDIRECT, INCIDENTAL,
PUNITIVE, EXEMPLARY, OR CONSEQUENTIAL DAMAGES
RESULTING FROM ANY BREACH OF WARRANTY OR UNDER
ANY OTHER LEGAL THEORY INCLUDING, BUT NOT LIMITED
TO, LOST PROFITS, DOWNTIME, GOODWILL, DAMAGE TO OR
REPLACEMENT OF EQUIPMENT AND PROPERTY, AND ANY
COSTS OF RECOVERING, REPROGRAMMING, OR
REPRODUCING ANY PROGRAM OR DAT A STORED IN OR USED
WITH A SYSTEM CONTAINING YOUR WEB T AB LET
HARDWARE PRODUCT, CD-ROM, OR ACCOMPANYING
SOFTWARE.
SOME STATES DO NOT ALLOW THE EXCLUSION OR
LIMITATION OF INCIDENTAL OR CONSEQUENTIAL DAMAGES,
SO THE ABOVE LIMITATIONS OR EXCLUSIONS MAY NOT
APPLY TO YOU.
THIS LIMITED WAR RANTY GIVES YOU SPECIFIC LEGAL
RIGHTS, AND YOU MAY ALSO HAVE OTHER RIGHTS THAT
VARY FROM STATE TO STATE.
Page 4

Intel AnyPoint™ Wireless USB
Adapter Limited Warranty
THE FOLLOWING WARRANTY SHALL APPLY EXCLUSIVELY
TO THE ANYPOINT WIRELESS USB ADAPTER PRODUCT
INCLUDED WITH THE INTEL WE B TABLET PACKAGE.
NOTWITHSTANDING ANYTHING HEREIN TO THE CONTRARY,
THE FOLLOWING WAR RANTY SHALL NOT APPLY TO THE
INTEL WEB TABLET OR ANY OTHER PRODUCT HEREIN
EXCEPT THE ANYPOINT WIRELESS USB ADAPTER PRODUCT.
CONVERSELY, THE PRIOR INTEL WEB TABLET WARRANTY
SHALL NOT APPLY TO THE ANYPOINT WIRELESS USB
ADAPTER PRODUCT.
Intel warrants to the original owner that the hardware product delivered
in this package will be free from defects in material and workmanship for
three (3) years following the latter of: (i) the date of purchase only if you
register by returning the registration card as indicated thereon with proof
of purchase; or (ii) the date of manufacture; or (iii) the registration date if
by electronic means pro vi ded such registration occurs within thir ty (30)
days from purchase.
INTEL RESER VES THE RIGHT TO FILL YOUR ORDER WITH A
PRODUCT CONTAINING NEW OR REMANUFACTURED
COMPONENTS. THE ABOVE WARRANTY IS IN LIEU OF ANY
OTHER WARRANTY, WHETHER EXPRESS, IMPLIED OR
STATUTORY, INCLUDING, BUT NOT LIMITED TO, ANY
WARRANTY OF NONINFRINGEMENT OF INTELLECTUAL
PROPERTY, MERCHANTABILITY, FITNESS FOR A PARTICULAR
PURPOSE, OR ANY WARRANTY ARISING OUT OF ANY
PROPOSAL, SPECIFICATION, SAMPLE OR OTHERWISE.
This warranty does not cover replacement of products damaged by abuse,
accident, misuse, neglect , alteration, repair, disaster, improper
installation or improper testing. If the product is found to be otherwise
defective, Intel, at its option, wil l rep la ce or re pair the product at no
charge except as set forth below, provided that you del i ver the product
along with a return material authoriza t ion (RMA) number either to the
company from whom you purc hased it or to Intel (North America onl y).
If you ship the product, you must assume the risk of dama ge or loss in
transit. You must use the original container (or the equi valent) and pay
the shipping charge. Inte l may replace or repair the product with either
new or remanufactured product or parts, and the returned product
becomes Intel’s property. Intel warrants the repaired or replaced product
to be free from defects in materi al and workmanship for a period of the
greater of: (i) ninety (90) days from the return shipping date; or (ii) the
period of time remain in g on the original three (3) year warra nt y.
This warranty gives you specifi c legal rights and you may have other
rights which vary from state to state. All parts or components contained
in this product are covere d by Int el’s limited warra nt y for th is pro du ct ;
the product may contain ful l y te sted, rec yc le d pa rts. For w ar ranty
information call the num ber below.
Returning a Defective Product (RMA)
Before returning any product, contact an Intel Customer Support Group
and obtain an RMA numbe r by calling:
North America only: (877) 777-2203
Other locations: Retur n the pro duct to the place of purchase. If the
Customer Support Group verifies that the product is defec ti ve , th ey will
have the Return Material A uth ori za ti on Department issue you an RMA
number to place on the ou ter package of the pro du ct. Intel cannot accept
any product withou t an R MA number on the package.
LIMITATION OF LIABILITY AND REMEDIES
INTEL SHALL HAVE NO LIABILITY FOR ANY INDIRECT OR
SPECULATIVE DAMAGES (INC LUD ING, WITHOUT LIMITING
THE FOREGOING, CONSEQUENTIAL, INCIDENTAL AND
SPECIAL DAMAGES) ARISING FROM THE USE OF OR
INABILITY TO USE THIS PRODUCT, W HETHER ARISING OUT
OF CONTRACT, NEGLIGENCE, TORT, OR UNDER ANY
WARRANTY, IRRESPECTIVE OF WHETHER INTEL HAS
ADVANCE NOTICE OF THE POSSIBILITY OF ANY SUCH
DAMAGES, INCLUDING, BUT NOT LIMITED TO LOSS OF USE,
INFRINGEMENT OF INTELLECTUAL PROPERTY, BUSINESS
INTERRUPTIONS, AND LOSS OF PROFITS, NOTWITHSTANDING
THE FOREGOING, INTEL’S TOTAL L IABILITY FOR ALL C LAIMS
UNDER THIS AGREEMENT SHALL NOT EXCEED THE PRICE
PAID FOR THE PRODUCT. THESE LIMITATIONS ON POTENTIAL
LIABILITIES WERE AN ESSENTIAL ELEMENT IN SETTING THE
Page 5

PRODUCT PRICE. INTEL NEITHER ASSUMES NOR
AUTHORIZES ANYONE TO ASSUME FOR IT ANY OTHER
LIABILITIES.
Some states do not allow the exclu s io n or li m it ation of incidental or
consequential damages, so the above limitations or exclusions may not
apply to you.
Critical Control Applic ati on s : Intel specifically disclaims liability
for use of the hardware product in critical control applications (including,
for example only, safety or health care control systems, nuclear energy
control systems, or air or ground traffic cont rol sy stems) by Licensee or
Sublicensees, an d such use is entirely at the user’s risk. Licensee agrees
to defend, indemnify, and hold Intel harmless from and against any and
all claims arising out of use of the hardware product in such applications
by Licensee or Sublicensees.
Software: Software provided with the adapter product is not covered
under the hardware warra nt y described above. See the applic a ble
software license agreeme n t wh ich shipped with the adapter produc t for
details on any software warranty.
Intel Software License Agreement
IMPORTANT - READ BEFORE COPYING, INSTALLING OR
USING.
Do not use or loa d this software or any associat ed materials (collectively
“Software”) until you have carefu lly read the following terms and
condition s . By loading o r using the Soft w are, you agree to the terms o f
this Agreement. If you do not wish to agr ee , do not i nstal l or use the
Software.
LICENSE.
personal, noncomme rci al use, and you may make one back-up copy of
the Software, subject to these conditions:
1
2 You may not reverse engineer, decompile, or disassemble the
You may copy the Software ont o a si ngle computer for your
You may not copy, modify, rent, sell, distribute or transfer any part
of the Software except as provided in this Agreement, and you
agree to prevent unauthorized copying of the S of tware.
Software.
3 You may not sublicense use of the Softwa re.
4 The Software may include portio ns offered on te rm s in a ddi tion t o
those set out here, as set out in a licen se accompanying those
portions.
OWNERSHIP OF SOFTWARE AND COPYRIGHTS. Title to all
copies of the Software remain s with Intel or its supp liers. In tel's suppli ers
shall be third-party beneficiaries of this license to the extent permitted by
applicable law. The Software is copyrighted and protected by the laws of
the United States and other countries, and international treaty provisions.
You may not remove any copyright notices from the Software. Intel may
make changes to the Software, or to items referenced therein, at any time
without notice, but is not obligated to support or update the Software.
Except as otherwise expressly provided, Intel grants no express or
implied right under Intel patents, copyrights, trademarks, or other
intellectual property rights. You may transfer the Software only if the
recipient agrees to be fully bound by these terms and you agree not to
retain any copies of the Software.
UPGRADES AND UPD ATES.
that the Software may be upgraded or updated remotely with or w ithout
your knowledge, and notwithstanding such remote upgrade or update this
software license will contin ue to be in full force and effect.
NO WARRANTIES, LIMITATION OF LIABILITY.
MAXIMUM EXTENT PERMITTED BY APPLICABLE LAW, INTEL
EXPRESSLY DISCLAIMS ANY WARRANTY FOR THE
SOFTWARE. THE SOFTWARE AND ANY RELATED
DOCUMENTATION ARE PROVIDED “AS IS,” “WITH ALL
FAULTS,” WITHOUT WARRANTY OF ANY KIND. INTEL
DISCLAIMS ANY AND ALL EXPRESS OR IMPLIED
WARRA NTIES OF MERCHANTABILITY, FITNESS FOR A
P ARTICULAR PURPOSE, OR NON-INFRINGEMENT. THE ENTIRE
RISK ARISING OUT OF USING THE SOFT WARE REMAINS WITH
YOU. INTEL'S ENTIRE LIABILITY AND YOUR EXCLUSIVE
REMEDY SHALL BE LIMITED TO THE COST OF THE SOFTWARE
OR A REPLACEMENT COPY OF THE SOFTWARE. TO THE
EXTENT PERMITTED BY APPLICABLE LAW, IN NO EVENT
SHALL INTEL OR ITS LICENSORS BE LIABLE FOR ANY
DAMAGES WHA TSOEVER (INCLUDING WITHOUT LIMITATION,
INDIRECT, CONSEQUENTIAL OR INCIDENTAL DAMAGES,
LOST PROFITS, BUSINESS INTERRUPTION OR LOST
You hereby acknowledge and co nsent
TO THE
Page 6

INFORMATION) ARISING OUT OF THE USE OR INABILITY
TOUSE THE SOFTWARE, EVEN IF INTEL HAS BEEN ADVISED
OF THE POSSIBILITY OF DAMAGES. SOME STATES DO NOT
ALLOW EXCLUSION OR LIMITATION OF IMPLIED
WARRANTIES, OR EXCLUSION OR LIMITATION OF
INCIDENTAL OR CONSEQUENTIAL DAMAGES, SO THE ABOVE
LIMITATIONS OR EXCLUSIONS MA Y NOT APPLY TO YOU. YOU
MAY ALSO HAVE OTHER RIGHTS WHICH VARY FROM STATE
TO STATE.
TERMINATION OF AGREEMENT.
Agreemen t at any time if y ou v iolate its ter ms. Upon term ination, you
will immediately destroy the Software or return all copies of the Software
to Intel.
Intel may terminate this
THIRD-PARTY SOFTWARE PROVIDER REQUIRED
NOTICES.
Portions Copyright (c) 1995-1999 The Apache Group. All rights
reserved. This product includes software developed by the Apache Group
for use in the Apache HTTP server project (http://www.apache.org).
The RealPlayer is included under license from RealNetworks, Inc.
Copyright © 1995 - 2000, Rea lNe tworks, Inc. All rights reserved.
RealNetworks, RealPlayer, RealAudio and RealVideo are registered
trademarks of RealNetworks, Inc.
APPLICABLE LAWS.
governed by the laws of California, excluding its principles of conflict of
laws and the United Nati ons Convention on Contract s fo r the Sal e of
Goods. You may not export the Software in violation of applicable export
laws and regulations. Intel is not obligated under any other agreements
unless they are in writing and signed by an authorized re presentative of
Intel.
EXPORT.
regulatio ns of the United States to assure that the software is not
exported, directly or indirectly, in violation of United States law.
GOVERNMENT RESTRICTED RIGHTS.
with “RESTRICTED RIGHTS.” Use, duplication, or disclosure by the
Government is subject to restrictions a s set fort h in FAR52.227-14 and
DFAR252.227-7013 et seq. or its succ es sor. Use of the Software by the
Government constitutes acknowledgment of Intel's propriet ary rights
therein. Contractor or Manufacturer is Intel Corporation, 5200 N.E. Elam
Young Parkway, Mailstop DC1-01, Hillsboro, Oregon 97 124-6497,
USA. Your specific rights may vary from country to country.
You shall comply fully with all relevant export laws and
Claims arising under this Agreement shall be
The Software is provide d
Page 7

Intel’s Privacy Policy
Intel respects your privac y choices. If you give us personal inform ation,
we will treat it according to our Online Privacy Policy. Intel encourages
you to read our privacy policy and th ose of all web sites you visit. You
can read our policy at www.intelwebtablet.com/legal/privacy.html.
Compliance Statements
FCC Part 15 Compliance Statement
This product has been te sted and found to comply with the limits for a
Class B digital device pursuant to Part 15 of the FCC rules. These limits
are designed to provide reas onable protection against harmful
interference when the equipment is operated in a residential environment.
This product generates, uses, and can radiate radio frequency energy and,
if not installed and used in acc ordance with the instruct ion ma nual, may
cause harmful interference to radio communications. However, there is
no guarantee that inte rferen ce will not occur in a part icular installa tion. I f
this equipment does caus e harmful interference to ra dio or television
reception, which can be determined by turning this equipment off and on,
the user is encoura ge d to try to cor rect the in ter fer ence b y one or more o f
the following measure s :
• Change the direction of the radio or TV antenna.
• To the extent possible, relocate the radio, TV, or other rec eiver
away from the product.
• Plug the product into a different electrical outlet so that the product
and the receiver are on different branch circuits.
If these sugges tions don’t he lp, consult your dealer or an expe rie nc ed
radio/TV repair technician for more suggestions.
Canada Compliance Statement (Industry Canada)
This digital apparatus does not ex ceed the Class B limits for radio noise
emissions from digital apparatus set out in the interference-causing
equipment standard entitled: “Digital Apparatus,” ICES-003 of th e
Canadian Department of Communications.
To prev en t ra dio interference to the licensed service, this device is
intended to be operated indoors and away fro m wi ndows to provide
maximum shielding. Equi pm en t (o r its tr an smit antenna) that is instal led
outdoors is subject to licensing.
Underwriters Laboratories Inc. Compliance Statement
This product is compliant with Safety requirements for Information
Technology Equipment and Certified by Underwriters Laboratories, Inc.
to be in compliance with UL 1950 3rd Ed./CSA 950-95.
This device compl ies with Part 15 of the FCC Rules. Operatio n is
note:
subject to the following two co ndit ions: (1) This device may not cause
harmful interference, and (2) this device must accept any interference
received, including interf e renc e that may cause undesired operation.
*A28674-002*
A28674-002
Page 8

CONTENTS
WELCOME TO THE TABLET
Use it Everywhere in Your Home..........................2
Enjoy a Customized Web Experience...................3
WHAT IS THE INTEL WEB TABLET?
How Does the Tablet Work? ................................4
Privacy, Security, and Parental Control.................6
The Tablet as Part of an AnyPoint™ Home
Network...............................................................7
IDENTIFYING PARTS OF THE TABLET
............................................................................8
OPERATING YOUR TABLET
Turning the Tablet On and Off............................10
Knowing Who Is Using the Tablet.......................10
Using the Button Bar and Loading Bar...............10
Checking the Wireless Signal Strength...............11
Checking the Battery Charge .............................11
Printing From the Tablet.....................................11
Turning the Screen Saver On and Off.................11
Typing With the Tablet .......................................11
TAKING CARE OF YOUR TABLET
Handling the Tablet ............................................12
Cleaning and Maintaining the Touch Screen.......12
Caring for the Tablet’s Battery............................12
Ordering Accessories and Replacement Parts....12
GOING PLACES ON THE WEB
Your Home Page ...............................................13
The Tablet Neighborhood...................................13
Searching the Web.............................................13
Going Places Outside the Neighborhood............13
Using Email With the Tablet................................13
THE TABLET AND YOUR INTERNET
CONNECTION
Always Connected vs. Dial-up Connection .........14
Hanging Up the Phone Line................................14
Keeping Home Page Content Fresh ...................15
Getting Software Updates From the Web...........15
GETTING HELP
Online Help and Quick Tour................................16
Contacting Customer Support............................16
Troubleshooting .................................................16
INSTALLATION INSTRUCTIONS
Installing the Tablet and the AnyPoint Network
Drivers For the First Time....................................20
Installing the Tablet Into an Existing AnyPoint
Wireless Home Network.....................................23
Installing the Tablet Into an Existing AnyPoint
Phoneline Network .............................................25
Installing Additional Tablets.................................28
Removing and Reinstalling the Tablet PC
Software.............................................................29
Troubleshooting Installation Problems ................31
PC AND KEYBOARD REQUIREMENTS
PC Requirements ...............................................33
Keyboard Requirements.....................................33
TABLET INFORMATION (French) 35
INDEX 43
| 1
Page 9

WELCOME TO THE TABLET
Congratulations on your purchase of the Intel® Web Tablet. We
believe this new device will revolutionize the way you use the
web at home. This product guide will help you learn about the
tablet, so read on and take a test drive.
Use it Everywhere in Your Home
The Intel W eb Tablet is easy for everyone to use. T ake the tablet
onto the veranda to surf the web while you sip iced tea on a
summer afternoon. Use the tablet in the TV room to browse
while you watch TV. Catch up on the latest news while you eat
breakfast at your kitchen table. Listen to a web radio station
while you relax in your room. The possibilities are endless, so
take the tablet with you, wherever you may wander aroun d your
home.
Top 10 Ways to Use The Intel Web Tabl et
1 Get the most up-to-date weather forecast and news
headlines from your tablet home page.
2 F ind a recipe, shop for groceries, and get tips on preparing a
special meal.
3 Get mor e information on your favorite s ho w or s por ts t eam
while you’re watching television.
4 Research travel destinations and make travel arrangements.
5 Bring the tablet to the garage to look up tips on completing
that do-it-yourself project.
6 Help your kids research and print out the results of a web
search for a school homework assignment.
7 Use the tablet to surf the web while someone else is surfing
on the PC.
8 Show a family member your favorite photos displayed in
the family center.
9 Keep in touch by reading and sending email from the
comfort of your bedroom.
10 Enjoy listening to music on the web.
2 | WELCOME TO THE TABLET
Page 10

Enjoy a Customized Web Experience
The home buttons at the top of th e tablet let you acces s p ersonal
home pages for up to five family members. We encourage you
to customize your home page to create a page th at’s just right for
you. Information available from your home page is updated
frequently with new stor ies and articles , so visit yo ur home page
often.
Find Out What ’s New on the Tablet
We will b e adding new content channel s and visu al hom e page
themes over time to help you further customize and freshen up
your home page. Touch the messages at the top of your home
page to find out about all that’s new on the tablet. You can
further enhance your Internet experience by visiting
www.shop-intel.com
to purchase a charging cradle or additional
tablets for your home, or to order a replacement battery or
stylus.
We want you to love your tablet. We hope it becomes an
important part of your morning ritual before you head off
to work and a way to relax and unwind in the evening.
The tablet provides a convenient, simple way for
everyone in your home to access the Internet.
For the tablet to meet your ever-changing needs, we have
designed it so that we can automatically add new features
as they become available. T o ensure we are pro viding you
with the tablet experience you want,
Send us an email at Webtablet_feedback@intel.com.
you!
we want to hear from
Your product ideas an d sugges tions will help us continue
to enrich the tablet experience. We will take these ideas
into consideration as we plan new tablet features.
WELCOME TO THE TABLET | 3
Page 11
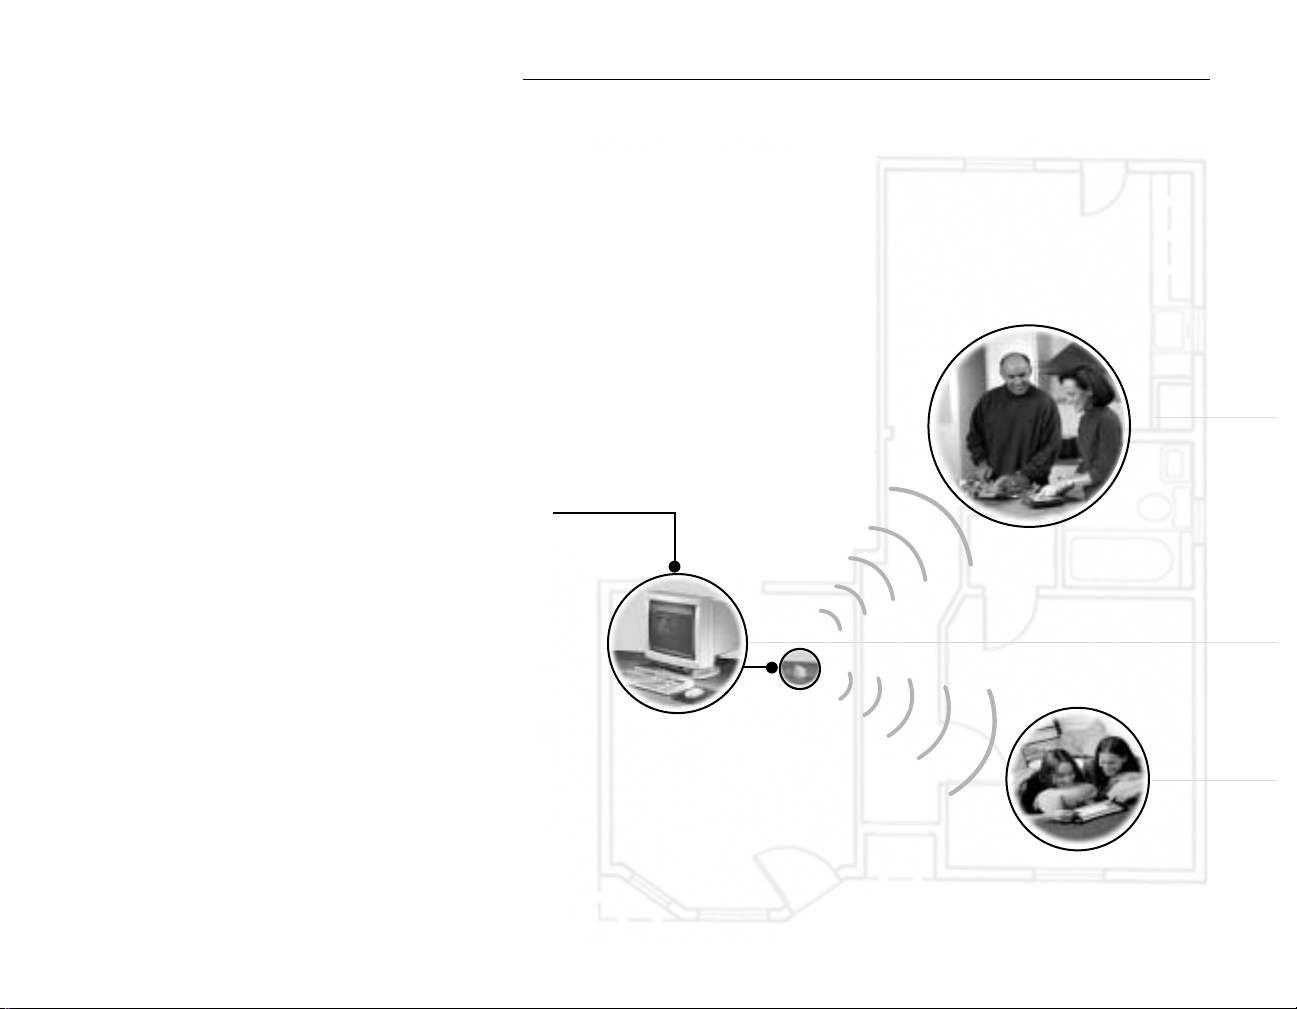
WHAT IS THE INTEL WEB T ABLET?
The Intel Web Tablet is a portable,
wireless home electronic device that lets
you create a customized home page,
browse the web, and access email from
anywhere in your home.
The tablet connects to the Internet
through a PC and Internet connection
you already use. Using Intel AnyPoint™
wireless home networking technology,
the tablet allows you the freedom to surf
the web from any room in your home!
How Does the Tablet Work?
You install tablet software and an
AnyPoint wireless USB adapter on an
existing PC in your home. Using
wireless home networking technology,
the tablet communicates with the PC
and shares the PC’s Internet connection.
This means the PC must be turned on for
your tablet to work.
Internet
For information about setting up the PC
to communicate with your tablet, see the
installation poster or the “Installation
Instructions” chapter of this guide.
4 | WHAT IS THE INTEL WEB TABLET?
Page 12

Someone turns on the
tablet and views their
home page for the latest
news. The PC
automatically connects
to the Internet and the
tablet shares that
connection.
Someone else turns on a
second tablet. The
wireless adapter picks up
the second tablet’s signal
and begins
communicating with it.
The two tablets and the
PC all share the same
Internet connection.
The person using the
tablet browses for
information about
interesting topics and
events. They then decide
to do some shopping on
the web.
The PC is turned on and
the AnyPoint wirel ess
adapter is connected to
it. The PC has an
existing Internet
connection.
Note: Someone in your
home can use the PC to
access the Internet or
run other software while
someone else uses the
tablet!
Tablet Software on the PC
As part of the tablet installation process, you install tablet
software on the PC and set up how the tablet will share the PC’s
Internet connection. Whenever the tablet software is running on
the PC, you’ll see a small tablet icon in the icon tray in the lower
right corner of the Windows* desktop.
Using Your Tablet With the PC
The tablet software on the PC allows the tablet and the PC to
access the Internet at the same time, using just one Internet
connection. That means you can use the tablet to check your
stock portfolio while someone else is browsing their favorite
web site on the PC!
After initial setup, use the Tablet Connection Wizard on the PC
if you need to make changes to the way your tablet connects to
the Internet. For example, run the wizard if you change your
Internet Service Provider (ISP) or the type of Internet service
you use. Use the wizard to change how often the PC connects to
the Internet to get fresh tablet content. You can access the Tablet
Connection Wizard from the Windows Start Menu on the PC or
by clicking the tablet tray icon at the bottom of the Windows
desktop.
Using Multiple Tablets in Yo u r H o m e
The tablet software on the PC supports up to five unique tablet
users at a time, allowing you to use more than one tablet
simultaneously in your home.
WHAT IS THE INTEL WEB TABLET? | 5
Page 13

Privacy, Security, and Parental Control
The Wireless Network Code
The Intel Web Tablet communicates with the PC using Intel
AnyPoint wi reless home networking t echnology. The network
code that you create during tablet installation helps to deter
anyone from “listening in” on the wireless connection while you
browse. Only devices that use the same network code and are
within a certain proximity to each other can communicate over
the same wireless connection. You can change your network
code at any time using the Tablet Connection Wizard on the PC
and the network code setting on the tablet.
The network code that you create when you install the tablet
software onto the PC allows multiple tablets to exist
independently in a given area. The network code is a 24-bit code
that provides 16 million possible codes. Similar to the security
code on a cordless phone, th e network cod e on the tablet great ly
minimizes the likelihood of interference from eavesdropping
and other nearby tablets.
Secure Transactions
Many web sites use a special type of secure communication that
prevents unauthorized access to the information that is sent to or
from those sites. The tablet supports these types of secure
Internet transactions.
Internet Connection Security
The security of the connection between the PC and your Internet
Service Provider (ISP) is governed by your ISP. Read the
information provided by your ISP to learn about their security
policies.
Proxy Settings for Security and Parental Control
If the PC has a firewall set up via a proxy server, or if the
Internet browser on the PC uses a proxy server to connect to the
Internet or to enable parental control software, you can set up
the tablet to use the same proxy settings as your browser. Use
the Tablet Connection Wizard to enter proxy settings for the
tablet.
For more information about tablet proxy setti ngs , click
Help on
the Proxy Settings dialog of the Tablet Connection Wi zard.
You’ll know you’re at a secure web site when a lock icon
appears in the lower right corner of the tablet screen.
6 | WHAT IS THE INTEL WEB TABLET?
Page 14

The Tablet as Part of an AnyPoint™ Home
Network
By purchasing the Intel Web Tablet, you’ve taken the first step
towards creating a PC home network. The AnyPoint wireless
USB adapter, in conjunction with AnyPoint Home Network
software, can be used to transform the PC into a home network
server.
To create your own wireless AnyPoint Home Network, you
must have one AnyPoint wireless adapter for each PC you want
on your home network. In addition, you must install the
AnyPoint Home Network software onto each PC.
Go to www.i ntel .co m/ anyp oi nt/
to learn more about creating an
AnyPoint h ome network.
Note: If you already have a wireless AnyPoint Home Network,
use its server PC as the tablet’s PC.
WHAT IS THE INTEL WEB TABLET? | 7
Page 15
Charging Cradle
Power Jack
PS/2 Keyboard Jack
15
1
6
15
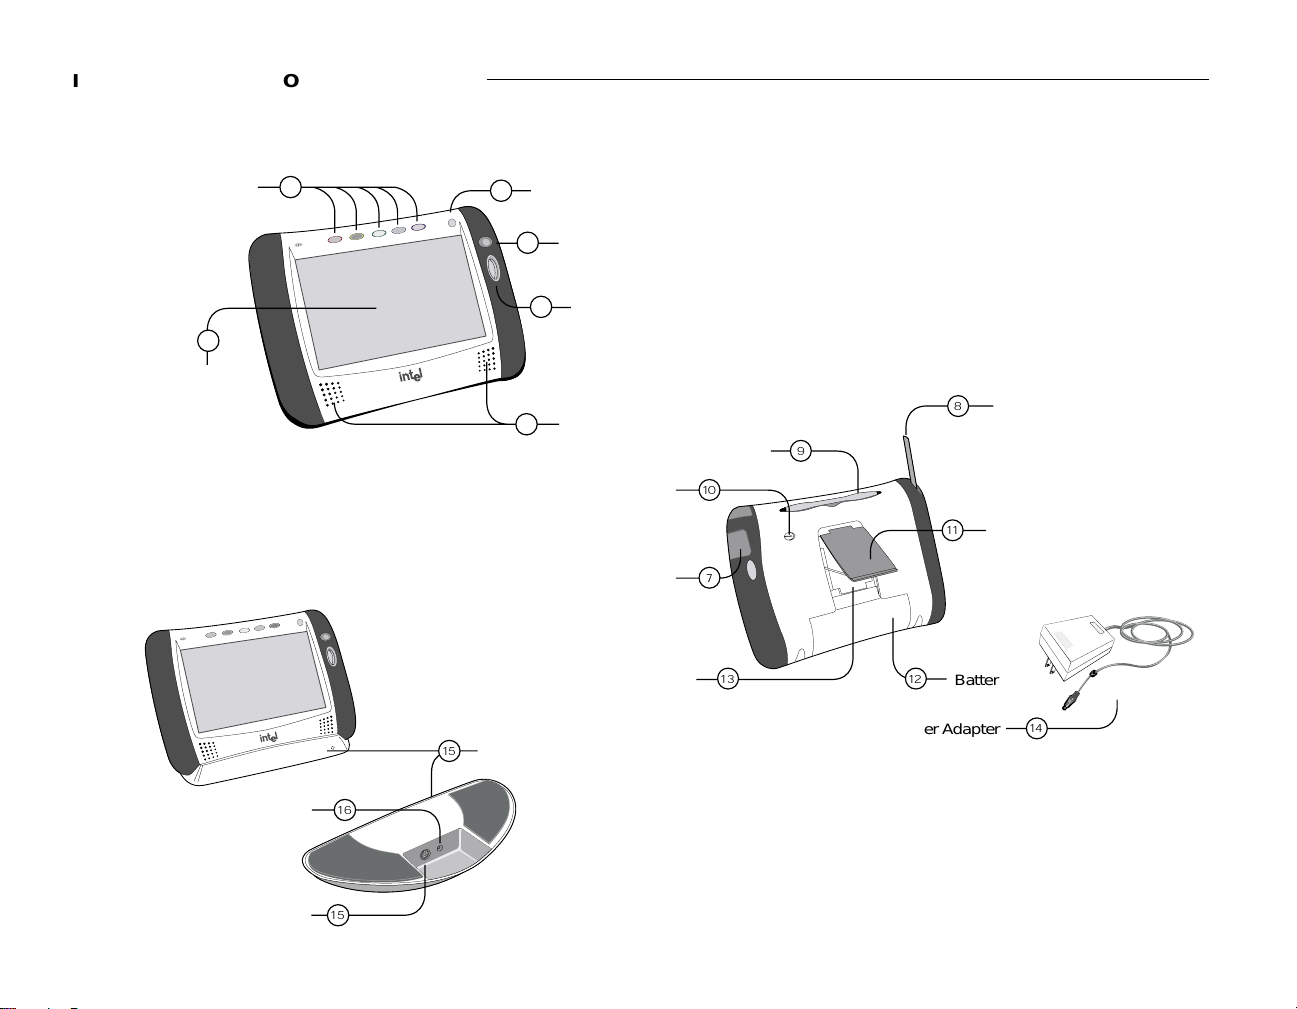
IDENTIFYING PARTS OF THE TABLET
Front View
Home Buttons
5
Touch Screen
1
2
3
Print Button
Back/Forward Button
4
Scroll Wheel
Back View
8
11
BatteryReset Button
Antenna
Flipstand
1
4
Speakers
5
Stylus Tether Anchor
Access Panel
1
0
7
Stylus
1
3
9
1
2
AC Power Adapter
8 | IDENTIFYING PARTS OF THE TABLET
Optional Charging Cradle
Page 16

The tablet has home buttons for up to five family members.
1
1
1
2
1
3
1
4
1
5
1
6
1
7
1
8
1
9
1
10
1
11
1
12
1
13
Use your personal home button to turn on the tablet and go
directly to your personal home page. If the tablet is already
on, your home button takes you to your home page.
Use the
Use the
print button to print the displayed page.
back/forward button to view web pages that you
visited recently.
Use the
scroll wheel to move the current web page up and
down for viewing.
Use the
touch screen to interact with web pages by
touching the screen with your finger or the stylus.
Use the tablet
Open the
speakers to listen to audio on the web.
access panel to use the AC power jack or
headphone jack.
Raising the
antenna may improve your tablet’s ability to
send and receive signals in your home.
Use the
Use the
stylus to interact with the touch screen.
stylus tether anchor if you want to attach the stylus
tether to the tablet.
Use the
flip stand to keep the tablet upright when using the
tablet on a table.
Use a screwdriver to remove the rechar geable
battery if you
need to replace it.
Use the stylus to press the
reset button if you need to reset
the tablet.
1
The
14
AC power adapter provides electrical power for
charging the tablet and for using a hardware keyboard. It
allows you to use the tablet while it is plugged into an
electrical outlet instead of using the tablet battery. To plug
the AC power adapter into the tablet, open the Access Panel
and plug the adapter into the AC power jack.
1
The
15
optional charging crad le acts as a stand and as a power
source for your tablet.
1
16
Use the
cradle power jack to plug the AC power adapter
into the charging cradle, so the tablet’s batteries can charge
while the tablet is resting in the cradle.
1
17
Use the
cradle keyboard j ack to plug in a standard PS/2
keyboard for use while the tablet is in the cradle.
IDENTIFYING PARTS OF THE TABLE T | 9
Page 17
OPERATING YOUR TABLET
Turning the Tablet On and Off
Turn the tablet on by pressing your home button. (If you do not
have an assigned home butto n, press an u nassigned home button
and begin setting it up.)
The tablet turns itself off after a period of inactivity. If you want
to turn the tablet off immediately , touch
of the screen and then touch
turn tablet OFF. You can also turn
controls on the bottom
the tablet off by pressing the purple home button and the print
button at the same time.
Knowing Who Is Using the Tablet
You can tell at a glance which family member is using the tablet
by checking for their home button color. Each member’s home
button color is highlig hted on their personal home page and
along the top edge of the button bar.
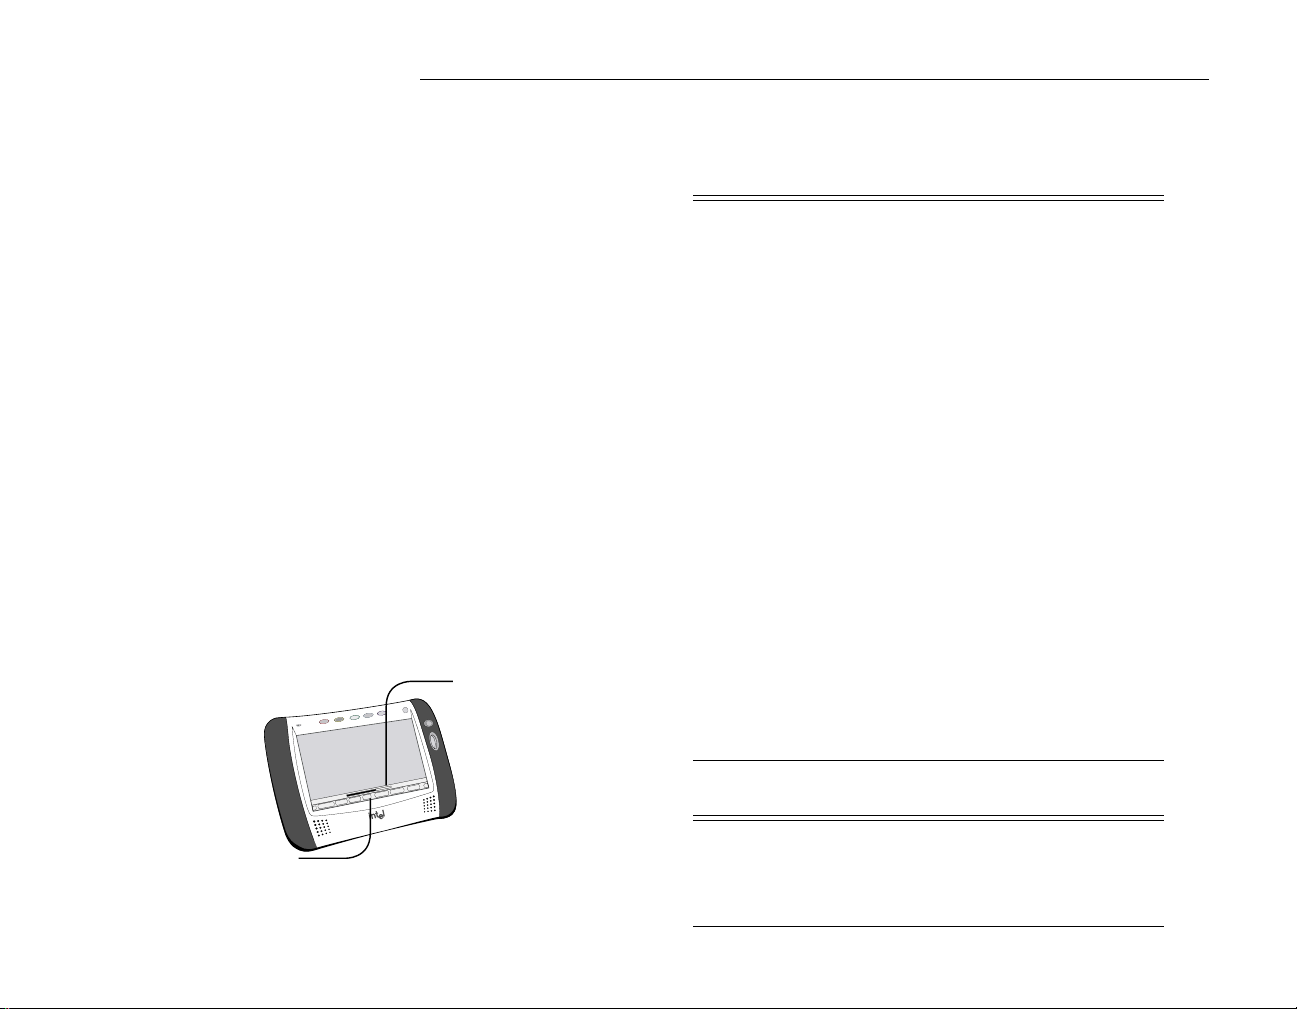
Using the Button Bar and Loading Bar
The button bar appears at the bottom of the tablet screen. Use
the button bar to access tablet functions and to go places on the
web. When a web page is loading, the
loading bar appears just
above the
button bar. It
Loading
Bar
shows the
progress of
the web page
as it loads.
Button Bar
Button Bar and Loading Bar Features
Touch… to…
web•search
Use the web panel to go to a specific
web address (URL ) or s earch for
information on the Internet. You can
also access your list of favorite web
sites or history of visited pages, and
check your current location on the web.
controls Use the control panel to control the
physical functions of the tablet (such as
screen brightness, speaker volume,
touch screen accuracy), check the
tablet’s signal strength and battery
charge, and turn the tablet off.
favorites
Use the favorites panel to add the
current web site to your list of favorite
web sites, or to go to your list of
favorites.
help
Get help on how to use the tablet and
access the Info Center.
stop
reload
horizontal scroll
arrows
look at the… to…
progress indicator
Stop the current web page from load ing.
Reload (refresh) the current web page.
Move a web page right or left on the
screen.
View the loading progress of the current
web page.
lock icon
See whether the current web site is a
secure site.
10 | OPERATING YOUR TABLET
Page 18

Checking the Wireless Signal Strength
The signal strength indicator on the control panel lets you know
the strength of the signal that the tablet is receiving from the
wireless adapter. If the signal strength becomes too weak (for
example, you may be too far away from the wireless adapter),
the tablet cannot communicate with the PC. As the signal gets
weaker, browsing performance may slow or stop entirely.
Moving closer to the wireless adapter and raising the antenna
may improve reception.
Checking the Battery Charge
The battery power indicator, also on the control panel, lets you
know how much power is availa ble in your tabl et’s rechargeable
battery. When the battery charge level becomes low, a warning
message appears indicating that you should recharge the battery.
To recharge the battery, open the tablet access panel and
connect the AC adapter to the AC Power jack. If you purchased
an optional charging cradle, connect the AC adapter to the
charging cradle and then set the tablet into the cradle. It takes
approximately six hours to fully recharge the battery.
You can continue to use the tablet while it is charging.
Printing From the Tablet
You can print a web page from your tablet by pressing the print
on your tablet. The tablet s ends t he p age th at is cur rent ly
button
on the screen to the PC’s default Windows printer.
Turning the Sc reen Sa ver O n and Off
If you turn the tablet off while it is connected to AC power, the
tablet displays screen saver information. To turn the screen
saver on and of f, to uch
panel, touch the
controls on the button bar . At t he control
screen saver on/off button.
Typing With the Tablet
The on-screen keyboard is available whenever you need it.
When you want to type information in a text box, touch the text
box with your finger or the stylus to bring up the on-screen
keyboard. If the keybo ard does n’t display when you touch a text
box, touch
keyboard
controls on the button bar, and th en touch th e show
button.
The on-screen keyboard is similar to a standard PC keyboard.
Letters and numbers are in the same location; however, web
shortcut keys and commonly used web symbols have been
added. Special characters and symbols are available when you
touch the
symbols key.
If you purchased a charging cradle, you can use a more
conventional method of typing by plugging a standard
PS/2 keyboard into the cradle keyboard jack. Place the tablet
into the charging cradle and begin typing. When the PS/2
keyboard is connected, the on-screen keyboard will not
automatically appear . The charg i ng crad le must be connected to
AC power when you use an attached keyboard.
Note: The tablet does not support special/shortcut keys on the
hardware keyboard, such as Internet shortcut keys and function
keys.
OPERATING YOUR TABLE T | 11
Page 19

TAKING CARE OF YOUR TABLET
Handling the Tablet
Do not drop the tablet. The tablet’s touch screen contains a
!
glass element that may break when dropped or su bjected to
a strong impact. Avoid placing the tablet where it may
accidentally fall to the floor (like on the edge of a counter ).
When you use the tablet’s flip stand, make sure that it is
fully extended and locked.
Keep the tablet away fro m water. The tablet is not
!
waterproof. Like any electrical device, keep the tablet
away from water and moisture to avoid possible injury to
yourself and permanent damage to the tablet.
Avoid exposing the tablet to temperature extremes and
!
direct sunlight for long periods of time.
Extreme
temperatures and long-term exposure to the sun can cause
the tablet’s touch screen to become dark and eventually
stop working.
Cleaning and Maintaining the Touch Screen
Avoid scratching your tablet’s touch screen. Use your finger,
the provided stylus, or othe r plastic-tipped p ens intended for use
with a touch-sensitive screen. Never use an actual pen or pencil
or other sharp object on the surface of the tablet.
Keep the touch screen clean. Use a soft cloth to clean the
screen. If necessary, dampen the cloth with a diluted windowcleaning solution to clean the touch screen. Never spray the
tablet directly with any liquid or foam cleaners.
Caring for the Tablet’s Battery
The tablet comes with a rechargeable lithium ion battery. When
fully charged, your tablet’s battery provides several hours of
constant use. When not in use, your tablet’s battery stays
charged for over six days. For tips on maximizing the length of
each charge, see the tablet’s online help.
When you're not using the tablet, keep it plug ged into AC power
so that the battery will be fully charged the next time you use it.
You cannot overcharge the tablet’s battery by leaving the tablet
plugged in.
It takes approximately six hours to completely charge a fully
depleted battery. You do not need to fully charge the batteries in
order for your tablet to work. You also do not need to fully
deplete the battery to gain the maximum effectiveness of the
tablet’s battery.
While the battery is designed for years of average use, it may
eventually need to be replaced. Do not dispose of the battery in
your trash. Please recycle the battery in accordance with your
local recycling guidelines.
Ordering Accessories and Replacement Parts
You can order additional tablets, charging cradles, and
replacement parts, such as an additional stylus or battery. Order
accessories or replacement parts online through the tablet’s
or by contacting us online at www.shop-intel.com.
Center
Info
12 | TAKING CARE OF YOUR TABLET
Page 20

GOING PLACES ON THE WEB
Your Home Page
The home buttons at the top of the tablet let you set up a
personal home page. There are five home butto ns, so you can set
up a different home page for up to five family members. Once
you’ve created your home page, just press your home button to
go there.
When you set up your home page, you select the topics you
want to see. Customize your home page with topics that match
your personal interests and preferences. The information you
see on your home page is updated periodically throughout the
day to keep it up-to-date and accurate.
You can change your home page settings at any time using the
my page setu p link on your home page. For more information
about setting up your home page, see the online User Guide,
available when you touch
Info Center on your home page.
The Tablet Neighborhood
Your personal home page is the entrance to a unique
neighborhood of web pages optimized for use with the tablet.
Neighborhood pages provide easy access to brand name content
and services on the web.
The topics you select for your home page provide quick access
to the neighborhood pages that interest you most. Ne ighborhood
channel links let you explore other information in the
neighborhood, on subjects such as news, sports, entertainment,
home life, money, and shopping.
Searching the We b
The search shortcut on your ho me page helps you f ind web site s
with information about a particular subject. When the search
shortcut is not displayed, use
web•search on the button bar to
search for information.
Going Places Outside the Neighborhood
The tablet puts the web right at your fingertips. Touch
web•search on the button bar to open the web panel. Using the
web panel, you can go to a specific web address or search for
information on the web.
Your favorites list lets you keep track of your favorite web sites
so you can easily return to them. Yo ur history list lets you get
back to web pages you’ve recently visited.
Using Email With the Tablet
The tablet provides a free web-based email account for each
home button. You can access your free email account from the
tablet and from any computer that has access to the Internet. If
you already have web-based email, y ou can set up your home
page for quick access to that account.
Note: To get a free email account, you must be at least 13 years
or older.
GOING PLACES ON THE WEB | 13
Page 21

THE TABLET AND YOUR INTERNET CONNECTION
Always Connected vs. Dial-up Connection
The tablet uses the PC to connect to the Internet. With today’s
technology, people have a number of options for accessing the
Internet. These include:
• Always connected (cable and most DSL)
• Dial-up connection (phone line and satellite)
Always Connected
With a persistent connection, tablet use does not interfere with
your family’s use of the phone line. The PC is always connected
to the Internet. Data transfer rates are considerably faster than
those of traditional analog phone line connections. This is the
ideal connection type for the tablet.
Note: Some DSL providers dial up to the Internet instead of
staying connected. In these situations, configure your tablet to
use a dial-up connection.
Dial-up Connection
With a dial-up connection, the PC must dial the number to your
ISP (Internet Service Provider) to access the Internet. If you
have a dedicated phone line for the PC, accessing an open phon e
line is not an issue. However, if the PC shares a phone line with
the rest of your household, you cannot use the tablet and the
phone at the same time.
Hanging Up the Phone Line
Important! Please read this if you access the Internet
!
using the same phone line as your telephone or fax
machine.
If the tablet initiates a dial-up Internet connection, you can
hang-up the phone line from the tablet. Otherwise, hang up the
phone line from the PC.
Hanging up the phone from the tablet
1 Touch the controls button on the button bar to open the
control panel.
2 Touch the
turn tablet OFF button.
3 At the PC, a warning message appears indicating that the
dial-up connection is about to be ended.
4 Wait a few seconds and the PC will automatically
disconnect, or click
Disconnect Now on the PC to hang up
the phone line.
Hanging up the phone from the PC
1 At the PC, check the icon tray in the lower-right
corner of the screen for your ISP’s connection icon.
2 Right-click the icon, and select
Note: This procedure works for most dial-up networking (DUN)
Disconnect.
software and America Online* (AOL). If this procedure does
not work on your PC, check your ISP documentation for
information about disconnecting a dial-up session.
14 | THE TABLET AND YOUR INTERNET CONNECTION
In case of an emergency, physically disconnect the phone
line from the PC by unplugging the phone line from the
!
wall or from the back of the PC.
Page 22

Keeping Home Page Content Fresh
The tablet uses your Int ernet connect ion period ically through out
the day to get fresh copies of your family’s home pages and
tablet neighborhood content. This ensures that the information
you see on your home page is current when you turn on the
tablet.
The tablet is initially set up to get fresh neighborhood content
three times each day. When you set up the PC during tablet
installation, you can specify when and how often you want the
tablet to get fresh content, up to four times each day. You can
update these settings at any time by running the Tablet
Connection Wizard on the PC.
Note: If the PC uses your phone line to connect to the Internet
and your dial-up connection is a toll call (metered or long
distance), you may want to change the frequency with which the
tablet refreshes its content.
Getting Software Updates From the Web
The tablet is designed to check for tablet software updates
automatically so that you always have the latest and greatest
features available to your tablet.
Software updates are usually performed overnight to reduce
possible inconvenience. The PC must be on in order for the
tablet to get the updates.
THE TABLET AND YOUR INTERNET CONNECTION | 15
Page 23

GETTING HELP
Online Help and Quick Tour
If you have questions regarding your tablet, use the tablet’s
online
Info Center. At the Info Center, you’ll find a variety of
information, including:
• Answers to our custom e rs’ most frequently asked
questions.
• A Quick Tour of the tablet.
• An online User Guide containing topics on how to use the
tablet and perform tablet tasks.
• Information about technical issues.
T o access the Info Center from the tablet, touch the link on your
home page. If you can’t get to the Info Center using the tablet,
use your PC Internet browser to go to:
www.intel.com/home/webtablet/support
To learn more about a specific tablet panel, touch the help
button on the panel. This context help provides information
about the features that are available on the panel and how they
work.
Contacting Customer Support
Our customer support team wants to hear from you. Touch the
Contact Us link at the bottom of your home page or at the Info
Center to send your ideas and suggestions or to submit a
problem report. You can call our customer support group toll
free at (877) 777-2203 or email us at
Webtablet_support@intel.com.
Troubleshooting
Low or bad wireless signal
Distance from the PC’s wireless adapter and interference from
household appliances (cordless phones, microwave ovens,
remote controls) are the most common reasons for low or bad
signals. To achieve a stronger signal, try the following:
• Move the tablet closer to the PC.
• Raise the tablet’s antenna.
• Change the location of the PC’s wireless adapter—move it
to a high point, like a shelf.
• Rotate the PC’s wireless adapter to different positions.
• Move the location of the appliance that is causing the
interference or turn the appliance off.
Low battery
A low battery warning message indicates that the charge in your
tablet’s battery is running low.
To recharge the battery, open the tablet access panel and
connect the AC adapter to the AC Power jack. If you purchased
an optional charging cradle, connect the AC adapter to the
charging cradle and then set the tablet into the cradle. It takes
approximately six hours to fully recharge the battery.
Leave the tablet plugged in for at least six hours to fully charge
the battery. You can continue to use the tablet while it is
recharging.
16 | GETTING HELP
Page 24

Adjusting the touch screen acc uracy
If you touch the screen at one spot, but the tablet responds as if
you touched somewhere nearby (for example, if you touch a
web-page link but the tablet acts as if you touched a nearby
link), you need to adjust the screen accuracy. To adjust your
touch screen, touch the
panel, and then touch the area labelled
screen accuracy
Note: If you cannot open the control panel from the button bar,
press the
forward button an d th e print button at the same time to
controls button to open the control
touch here to adjust
.
begin adjusting the touch screen accuracy.
Blank or partially-loaded w eb pages
If a web page does not display properly, touch the reload button
on the button bar.
Tablet can’t connect to the PC
If the tablet can’t connect to the PC, you may be too far away
from the PC’s wireless adapter, or there may be something
wrong at the PC. Make sure that the PC’s wir eless adapter is
securely plugged in and that the PC is turned on and logged in.
Addition al troubleshoot in g
For additional tablet troubleshooting information, go to the
tablet’s onl ine help by touching
Info Center on your home page.
If you can’t get to the Info Center, go to the PC, click the tablet
tray icon at the bottom of the Windows desktop, and then select
Help.
GETTING HELP | 17
Page 25

18 | GETTING HELP
Page 26

INSTALLATION INSTRUCTIONS
Follow the instructions on the installation poster to set up your
new Intel Web Ta b let. The po ster contains all th e in format ion
you need to set up the tablet and install the tablet software on
your PC.
The Intel Web Tablet uses Intel AnyPoint Wireless Home
Networking software to communicate with the web. Because
some homes may already have home networking installed on
their home PCs, tablet setup may differ from household to
household. If the instructions on the installation poster that came
with your tablet do not match your situation, find the installation
procedure in this chapter that does, and follow those steps to
install the web tablet.
Troubleshooting Installation Problems
If you experience any problems during setup, refer to the
Troub le s ho oting Installation Problems section that begins on
page 31 of this guide or contact custome r support toll free a t
(877) 777-2203 .
Installing the Tablet and the AnyPoint Network Dr ivers For the
First Time........................................................................... Page 20
Use this installation procedure if this is your first tablet and
you do not already have AnyPoint home networking
software installed on your PC.
Installing the Tablet Into an Existi ng AnyPoint Wirel es s Home
Network.............................................................................Page 23
Use this installation procedure if this is your first tablet and
you already have an AnyPoi nt Wireless Home Ne t work
installed.
Installing the Tablet Into an Exist ing AnyPoint Phoneline
Network.............................................................................Page 25
Use this installation procedure if this is your first tablet and
you already have an AnyPoint Phoneline Home Network
installed.
Installing Additional Tablets.............................................Page 28
Use this procedure if you already have an Intel Web Tablet
and you are adding an additional tablet.
Removing and Reinstalling the Tablet PC Software...... Page 29
Use these procedures if you already installed the tablet
software on the PC, and you need to remo ve and/or rein stall
the software.
Important: The PC on which you install the tablet software must
have a working Internet connection.
INSTALLATION IN STRUCTIONS | 19
Page 27

Installing the Tablet and the AnyPoint Network
Drivers For the First Time
Use the following steps i f this is your first tablet an d yo u do not
already have AnyPoint home networking installed on your PC.
Begin Charging the Tablet
1 Remove the plastic pull-tab from the battery case on the
rear of the tablet.
2 Plug the AC adapter into the wall. Open the tablet access
panel and plug the AC adapter into the tablet AC power
jack.
3 Leave the tablet connected to AC power so it can begin
charging while you complete the tablet setup. The entire
installation process takes approximately 45 minutes.
Note: If you use the flip stand on the back of the tablet to keep
the tablet upright, make sure the stand is fully extended.
Install the Wireless Adapter (On the PC)
1 Shut down the PC.
2 Plug the AnyPoint adapter cable into an open USB port.
3 Turn on the PC.
4 After the PC starts up,
into the CD-ROM drive
insert the Intel Web Tablet Setup CD
. The CD is located inside the back
cover of this Product Guide.
Install the Driv e rs ( O n t h e P C)
Important!
Do not click Cancel on ANY screen in the Add New
Hardware wizard.
1 When the Add New Hardware wizard starts, click
Next to
begin installing the drivers.
2 Select
3 If you are prompted for a drive, make sure the
Search for the best driver for your device and click
Next.
check box is checked. Click Next twice to install the
drive
CD-ROM
drivers.
4Click
5 If you are prompted to restart the PC, click
Install the Tablet Software (On the P C)
Finish. On Windows* 98 systems, you may need to
click
Finish twice.
No. Y ou may be
asked to restart the PC more than once – click
No each time.
After the drivers are installed, the Intel Web Tablet Setup screen
appears.
Note: If the Intel Web Tablet Setup screen does not appear, open
My Computer on your desk top. Double-click the CD-ROM
drive, and then double-click
setup.exe.
1Click Install to begin installing the tablet software.
2 Follow the on-screen instructions to install the software.
20 | INSTALLATION INSTRUCTIONS
Page 28

Create a Network Code (On the PC)
Write your network code here:
1 The Setup Wizard shows several screens and asks you to
create a network code. Write down the network code in the
space provided below. You will need this network code to
set up the tablet.
For more information about creating a network code, click Help
on the Setup Wizard screen.
2 If the PC has mor e than one Internet co nnection, ch oose the
connection that you want to use with the tablet.
3 If you are prompted for your Internet Service Provider
(ISP) password, enter and confirm your passwor d, and then
click
OK.
Restart Your Computer
When you complete the Setup Wizard, you will be asked to
restart your PC.
Note: If you are an America Online* (AOL*) customer
and you use AOL as your Internet Service Provider (ISP), you
must set your AOL preferences to save the passwords for your
AOL screen names. Do this before you continue with this
installation.
Return to the Tablet and Complete the Installation
1 Return to the tablet and leave it connected to AC power
while you set it up.
2Touch
Continue and follow the instructions on the tablet
screen.
3 When prompted for a network code, use the network code
that you created on the PC and wrote down in the previous
section.
The tablet will reset when its setup process completes. This
could take some time.
1Click
Restart Now to complete the PC setup.
2 When the PC restarts, you may receive a Windows logon
prompt.
If this is your first time logging on, type a user name but no
password and click
OK.
3 W hen restart completes, you’ll see a Congratulations screen
that displays the network code you created.
INSTALLATION IN STRUCTIONS | 21
Page 29

Set Up the Tablet Home Buttons
After the tablet resets, you are ready to set up the home buttons
for each member of your family. The first person setting up a
home button will be asked to fill out a tablet registration for the
family.
1 Press a home button.
2 Follow the directions on the screen to set up that home
button for you or a member of your family.
3 When the home page appears, you can begin using the
tablet right away or touch
my page setup to further
customize the page.
Each of your family members can repeat steps 1-3 to set up their
own home button.
Important! We recommend that you leave the tablet plugged in
for 6 hours to completely charge the batteries for the first time.
You can use the tablet while it is charging.
22 | INSTALLATION INSTRUCTIONS
Page 30

Installing the Tablet Into an Existing AnyPoint
Wireless Home Network
Use the following steps if this is your first tablet and you already
have an AnyPoint Wireless Home Network installed.
Begin Charging the Tablet
1 Remove the plastic pull-tab from the battery case on the
rear of the tablet.
2 Plug the AC adapter into the wall. Open the tablet access
panel and plug the AC adapter into the tablet AC power
jack.
3 Leave the tablet connected to AC power so it can begin
charging while you complete the tablet setup. The entire
installation process takes approximately 45 minutes.
Note: If you use the flip stand on the back of the tablet to keep
the tablet upright, make sure the stand is fully extended.
Install the Tablet Software On Your Home Network Server PC
Important:
Because the tablet will use your existing Intel
AnyPoint wi reless home networking software to co mmunicate
with the Internet, you need to install the tablet software on your
AnyPoint Home Network’s server PC.
Note: If you purchased an Intel Web Tablet that includes a
wireless USB adapter, do NOT install the new adapter on the
PC. The tablet will use your existing AnyPoint wireless adapter
to communicate with the PC.
1 At the PC,
CD-ROM drive
insert the Intel Web Tablet Setup CD into the
. The CD is located inside the back cover of
the Product Guide.
2 From the Windows desktop, open
My Computer and
double-click the CD-ROM drive.
3 Double-click
setup.exe. The Intel Web Tablet Setup screen
appears.
4 Click
Follow the on-screen instructions to install the software.
Install to begin installing the tablet software.
1 The Setup Wizard shows several screens and asks you to
create a network code. Write down the network code in the
space provided below. You will need this network code to
set up the tablet.
Write your network code here:
For more information about creating a netwo rk code , cli ck Help
on the Setup Wizard screen.
2 I f the PC has mo re than one Intern et conn ection, choose th e
connection that you want to use with the tablet.
3 If you are prompted for your Internet Service Provider
(ISP) password, ente r and confirm your password, and then
click
OK.
INSTALLATION IN STRUCTIONS | 23
Page 31

Restart Your Computer
When you complete the Setup Wizard, you will be asked to
restart your PC.
1Click
Restart Now to complete the PC setup.
2 When the PC restarts, you may receive a Windows logon
prompt.
If this is your first time loggin g on, type a user name but no
password and click
OK.
3 W hen restart completes, you’ll see a Congratulations screen
that displays the network code you created.
Note: If you are an America Online* (AOL*) customer
and you use AOL as your Internet Service Provider (ISP), you
must set your AOL preferences to save the passwords for your
AOL screen names. Do this before you continue with this
installation.
Return to the Tablet and Complete the Installation
1 Return to the tablet and leave it connected to AC power
while you set it up.
2Touch
Continue and follow the instructions on the tablet
screen.
3 When prompted for a network code, use the AnyPoint
network code that you wrote down in the previous section.
The tablet will reset when its setup process completes. This may
take some time.
Set Up the Tablet Home Buttons
After the tablet resets, you are ready to set up the home buttons
for each member of your family. The first person setting up a
home button will be asked to fill out a tablet registration for the
family.
1 Press a home button.
2 Follow the directions on the screen to set up that home
button for you or a member of your family.
3 When the home page appears, you can begin using the
tablet right away or touch
my page setup to further
customize the page.
Each of your family members can repeat steps 1-3 to set up their
own home button.
Important! We recommend that you leave the tablet plugged in
for 6 hours to completely charge the batteries for the first time.
You can use the tablet while it is charging.
24 | INSTALLATION INSTRUCTIONS
Page 32

Installing the Tablet Into an Existing AnyPoint
Phoneline Network
Use the following steps if this is your first tablet and you already
have an AnyPoint Phoneline Home Network installed.
Begin Charging the Tablet
1 Remove the plastic pull-tab from the battery case on the
rear of the tablet.
2 Plug the AC adapter into the wall. Open the tablet access
panel and plug the AC adapter into the tablet AC power
jack.
3 Leave the tablet connected to AC power so it can begin
charging while you complete the tablet setup. The entire
installation process takes approximately 45 minutes.
Note: If you use the flip stand on the back of the tablet to keep
the tablet upright, make sure the stand is fully extended.
Update the AnyPoint Phoneline Adapter Settings
Before installing the AnyPoint wireless USB adapter, you need
to change the AnyPoint Phoneline adapter settings.
Important! You must update the adapter settings on each
computer that is part of the AnyPoint phoneline network.
1 At each computer that is part of your home network, open
the Windows*
Control Panel and double-click the Network
icon. The Network dialog displays.
2 Click the
AnyPoint USB Phoneline Adapter
Configuration tab and locate the TCP/I P - > Int el(R )
in the list of installed
components.
3 Click the AnyPoint adapter to select it, and then click
Properties. The TCP/IP Properties dialog displays.
4 Click the
5 Select the
IP Address tab.
Specify an I P address radio button, and then
enter the following values:
IP Address: 192.168.168.1
Subnet Mask: 255.255.255.0
Each computer on your home network must have a
Note:
unique IP address. Use a unique number between 2 and
254 for the last number of the IP address on each of your
computers.
6 Click
7 If you are prompted to restart the computer, click
Install the Tablet Software On Your Home Network Server PC
Important:
OK twice to close the Network dialog.
Yes.
Because the tablet will connect to the Internet
through the PC, you must install the tablet software on your
AnyPoint Home Network’s server PC.
1 Shut down the PC.
2 Plug the AnyPoint adapter cable into an open USB port.
3 Turn on the PC.
4 Af ter the PC starts up,
into the CD-ROM drive. The CD is located inside the back
insert the Intel Web Tablet Setup CD
cover of this Product Guide.
INSTALLATION IN STRUCTIONS | 25
Page 33

Install the Drive rs (O n t he P C)
Important!
Do not click Cancel on ANY screen in the Add New
Hardware wizard.
1 When the Add New Hardware wizard starts, click
Next to
begin installing the drivers.
2 Select
3 If you are prompted for a drive, make sure the
Search for the best driver for your device and click
Next.
check box is checked. Click Next twice to install the
drive
CD-ROM
drivers.
4Click
5 If you are prompted to restart the PC, click
Install the Tablet Software (On the PC)
Finish. On Windows* 98 systems, you may need to
click
Finish twice.
No. You may be
asked to restart the PC more than once – click
No each time.
After the drivers are installed, the Intel Web Tablet Setup screen
appears.
Note: If the Intel Web Tablet Setup screen do es not appear, open
My Computer on your desk top. Double-click the CD-ROM
drive, and then double-click
setup.exe.
1Click Install to begin installing the tablet software.
2 Follow the on-screen instructions to install the software.
Create a Network Code (On the PC)
1 The Setup Wizard shows several screens and asks you to
create a network code. Write down the network code in the
space provided below. You will need this network code to
set up the tablet.
Write your network code here:
For more information about creating a network code, click Help
on the Setup Wizard screen.
2 If the PC has more than one Internet connection, choose the
connection that you want to use with the tablet.
3 If you are prompted for your Internet Service Provider
(ISP) password, enter and confir m your pas sword, and t hen
click
OK.
Restart Your Computer
When you complete the Setup Wizard, you will be asked to
restart your PC.
1Click
Restart Now to complete the PC setup.
2 When the PC restarts, you may receive a Windows logon
prompt.
If this is your first time logging on, type a user name but no
password and click
OK.
3 W hen restart completes, you ’ll see a Congratulations screen
that displays the network code you created.
26 | INSTALLATION INSTRUCTIONS
Page 34

Note:
If you are an America Online* (AOL*) customer
and you use AOL as your Internet Service Provider (ISP), you
must set your AOL preferences to save the passwords for your
AOL screen names. Do this before you continue with this
installation.
Return to the Tablet and Complete the Installation
1 Return to the tablet and leave it connected to AC power
while you set it up.
2Touch
Continue and follow the instructions on the tablet
screen.
3 When prompted for a network code, use the network code
that you created on the PC and wrote down in the previous
section.
The tablet will reset when its setup process completes. This
could take some time.
Set Up the Tablet Home Buttons
After the tablet resets, you are ready to set up the home buttons
for each member of your family. The first person setting up a
home button will be asked to fill out a tablet registration for the
family.
1 Press a home button.
2 Follow the directions on the screen to set up that home
button for you or a member of your family.
3 When the home page appears, you can begin using the
tablet right away or touch
my page setup to further
customize the page.
Each of your family members can repeat steps 1-3 to set up their
own home button.
Important! We recommend that you leave the tablet plugged in
for 6 hours to completely charge the batteries for the first time.
You can use the tablet while it is charging.
INSTALLATION IN STRUCTIONS | 27
Page 35

Installing Additional Tablets
Write your network code here:
Use the following steps if you already have an Intel Web Tablet
installed in your home and you are adding a new tablet.
Note: If you purchased an Intel Web Tablet that includes a
wireless adapter, do NOT install the new adapter on the PC. The
tablet will use your existing wireless adapter to communicate
with the PC.
Begin Charging the Tablet
1 Remove the plastic pull-tab from the battery case on the
rear of the tablet.
2 Plug the AC adapter into the wall. Open the tablet access
panel and plug the AC adapter into the tablet AC power
jack.
3 Leave the tablet connected to AC power so it can begin
charging while you complete the tablet setup. The entire
installation process takes approximately 45 minutes.
Get Your Network Code From the PC
1 At the PC, open the Windows Control Panel, then double-
click the
Wireless Control Panel icon. The Wireless Control
Panel dialog displays.
2 Write down the network code in the space provided below.
You will need this network code to set up the tablet.
Return to the Tablet and Co mplete the Installation
1 Return to the tablet and leave it connected to AC power
while you set it up.
2Touch
Continue and follow the instructions on the tablet
screen.
3 When prompted for a network code, use the AnyPoint
network code that you found on the PC and wrote down in
the previous section.
The tablet will reset when its setup process completes.
Important! We recommend that you leave the tablet plugged in
for 6 hours to completely charge the batteries for the first
time.You can use the tablet while it is charging.
Register Your New Table t
After the tablet resets, it is ready for use. The first time you
press a home button, you’ll be asked to register your new tablet.
Accessing Your Home Page From the New Tablet
The home buttons on the new tablet will match the home
buttons on your exi sting tablet(s). Use the same home button on
each tablet to access your personal home page. For example, if
your home button is the green one, use the green button on any
of your tablets to access your home page.
Only one tablet can use a particular home button at any given
time. If you press a home button and someone is already using
that button on anot her t abl et, you’ll receive a message notifying
you that another tablet is using that button.
3 Close the Wireles s Co ntrol Panel dialog.
28 | INSTALLATION INSTRUCTIONS
Page 36

Removing and Reinstalling the Tablet PC
Software
If the tablet software on the PC becomes damaged, you may
need to reinstall the tablet software. In some cases, you can
reinstall the software over the existing installation. In other
cases, you may need remove th e software first, an d then reinstall
a fresh copy.
Remove the tablet PC software
1 At the PC, open the Windows Start menu and select:
Programs > Intel Web Tablet > Uninstall Tablet Software
The Remove Tablet Software dialog displays.
2 Select the software you want to remove:
• Make sure the
Remove Intel Web T ablet software check
box is selected.
• If this PC is part of an AnyPoint home network, clear
Remove Intel AnyPoint Home Networking software
the
check box. Otherwise, leave this check box selected.
3Click
Remove. The PC will begin removing the tablet
software fr om the PC. If you are prompted to remove any
shared files, click
4 When the software removal completes, click
Yes.
Restart. After
the PC finishes restarting, use the following steps to
reinstall the tablet software.
Reinstall the tablet PC software
1 At the PC, insert the Intel Web Tablet Setup CD into the
CD-ROM drive. The CD is located inside the back cover of
the Product Guide.
2 From the Windows desktop, open
My Computer and
double-click the CD-ROM drive.
3 Double-click
setup.exe. The Intel Web Tablet Setup screen
appears.
4 Click
Install to begin installing the tablet software. Follow
the on-screen instructions to install the software.
The Setup Wi zard sh ows several screens , and dis plays you r
AnyPoint wireless home network code. This is the network
code that is currently set up on the tablet.
When you complete the Setup Wizard, you will be asked to
restart your PC.
5 Click
Restart Now to complete the PC setup.
When the PC restarts, you may receive a Windows logon
prompt. If this is your first time logging on, type a user
name but no password and click
OK.
6 When the restart completes, you’ll see a Congratulations
screen that displays your network code.
INSTALLATION IN STRUCTIONS | 29
Page 37

Restore Your Tablet Registration
Note:
These steps are required only if you removed the tablet PC
software and then reinstalled it.
1 Go to the tablet and press one of the home buttons. Two
introductory help pages display, followed by the Tablet
Registrat ion page.
2 On the tablet registration page, touch the
restore your registration information link (located in the
Touch here to
upper, right section of the page).
3 Follow the instructions on the Restore Registration page to
restore your tablet registration, then touch
Finish.
30 | INSTALLATION INSTRUCTIONS
Page 38

Troubleshooting Installation Problems
If you exit Se t u p b efore all steps are completed. . .
If you exit Setup before all of the installation steps are complete,
you can continue the installation later. To restart installation at a
later time:
1 Place the Intel Web Table Setup CD into your CD-ROM
drive.
2 At the Windows d e sk top, go to
My Computer and double-
click the CD-ROM Drive
3 Double-click
setup.exe.
Setup will begin at the point where you exited. Follow the
instructions on the screens to complete the setup.
If you receive Dial-up Networking errors...
If you receive the following error during setup:
“You have Dial-up Networking installed but it is not
configured to use any ISPs. Please configure Dial-up
Networking before running the connection wizard again.”
Do the following:
1 Follow the instructions from you Internet Service Provider
(ISP) to set up your PC Internet connection.
2 After the connection is set up and working, open the
Windows
Tablet > Tablet Connection Wizard
Start menu, and then select Programs > Intel W eb
. The Intel W eb Tablet
Connection Wizard dis plays .
3 Follow the directions on the Wizard screens to set up the
tablet to use your dial-up connection.
INSTALLATION IN STRUCTIONS | 31
Page 39

If setup detects more than one adapter on the PC...
If you receive an error message telling you that the PC has more
than one adapter, it m eans the PC h as a n etwork adapter with an
IP address that conflicts with the AnyPoint adapter.
Before continuing with setup, do the following to identify and
correct the conflict:
1 Write down the name of the network adapter(s) listed in the
error message.
1 Click the
2 Open the Windows
3 In the text box, type:
Exit Setup button.
Start menu and select Run.
winipcfg
and then click OK. The IP Configuration dialog displays
4 Open the selection list, and select each of the adapters that
you wrote down in step one. If any of these adapters have
an IP address beginning with 169.254, use the following
steps to change its IP address before continuing with tablet
setup.
5Click
6 Open the Windows
7 Click the
OK to close the IP Configuration dialog.
Control Panel and double-click the
Network icon. The Network dialog displays.
Configuration tab and locate the network adapter
you identified in step 4.
8 Click the adapter to s elect it, and then click
Properties. The
TCP/IP Properties dialog displays.
9 Click the
IP Address tab.
10 Select the
Specify an IP address radio button, and then
enter the following values:
IP Address: 192.168.168.1
Subnet Mask: 255.255.255.0
11 Click OK twice to close the Network dialog.
12 If you are prompted to restart the computer, click
Note: If the adapter you updated is part of a home network, the
Yes.
IP addresses of all computers on the network must b e updated to
begin with 192.168.168.
You are now ready to continue setting up the tablet PC software.
1 Insert the Intel Web Tablet Setup CD in to the CD-ROM
drive.
2 Open the Windows
Control Panel.
3 Double-click the CD-ROM drive, and then double-click
setup.exe.
4 The setup program will continue where it left off. Follow
the instructions on the installation poster to complete
setting up the tablet.
32 | INSTALLATION INSTRUCTIONS
Page 40

PC AND KEYBOARD REQUIREMENTS
PC Requirements
We recommend the following minimum PC configuration to
work with your tablet:
• PC with a 200 MHz Intel Pentium
®
processor performance
level or better
• 120 MB of available hard drive space
• 64 MB of RAM
• Sound card (to enable audio on the tablet)
• Windows* 98 or Windows Millennium Edition* operating
system
• An available USB port
• An established Internet connection, either dial-up or always
connected (broadband), with a minimum connection speed
of 56K
• Internet access through the provider of your choice
• Printer (to enable printing from the tablet)
Keyboard Requirements
If you purchased an optional charging cradle, you can use a
standard PS/2 keyboard with the tablet by attaching the
keyboard to the cradle. The keyboard that you attach must meet
the following requirements in order to work correctly with the
tablet:
• Connector type: PS/2
• Maximum current draw or consumption: 0.5 amps
Canada Compliance Statement (Industry
Canada)
This digital apparatus doe s not exc ee d th e Cl ass B limits for radio noise
emissions from digital apparatus set out in the interference-causing equipment
standard entitled: “Digital Apparatus,” ICES-003 of the Canadian Department of
Communications.
To pre vent radio interfer ence to th e licens ed servi ce, this dev ice is int ended to be
operated indoors and away from windows to provide maximum shielding.
Equipment (or its transmit an te nna ) that is installed outdoors is subject to
licensing.
PC AND KEYBOARD REQUIREMENTS | 33
Page 41

TABLET INFORMATION (French)
W elcome to the Intel® W eb T ablet. The tablet is designed to give
you and your entire household simple, portable, and personal
access to the Internet—from any room in your home. The tablet
provides quick access to the Internet and email. Each of the five
home buttons along the top of t he tablet can b e set up to provide
a separate, customized web experience for one of your family
members.
The tablet connects to the Internet through an existing Internet
connection on a PC in your home. That PC uses Intel
AnyPoint™ wireless home networking technology to
communicate with the tablet.
PC Requirements
We recommend the following minimum PC configuration:
• PC with a 200 MHz Intel Pentium
®
processor performance
level or better
• 120 MB of available hard drive space
• 64 MB of RAM
• Sound card (to enable audio on the tablet)
• Windows 98 or Win dows Millennium Edition* operating
system
• An available USB port
• An established Internet connection, either dial-up o r always
connected (broadband), with a minimum connection speed
of 56K
• Internet access through the provider of your choice
• Printer (to enable printing from the tablet)
CONTENTS
IDENTIFYING PA RTS OF THE TABLET 35
TAKING CARE OF YOUR TA B LET 37
THE TABLET AND YOUR INTERNET CONNECTION 38
INSTALLATION INSTRUCTIONS 40
34 | TABLET INFORMATION (French)
Page 42

IDENTIFYING PARTS OF THE TABLET
Front View
Home Buttons
5
Touch Screen
1
2
3
Print Button
Back/Forward Button
4
Scroll Wheel
Back View
8
Antenna
Speakers
5
Stylus Tether Anchor
15
Charging Cradle
Access Panel
1
0
7
Stylus
1
3
9
11
Flipstand
1
2
BatteryReset Button
1
AC Power Adapter
4
Power Jack
PS/2 Keyboard Jack
1
6
Optional Charging Crad le
1
5
IDENTIFYING PARTS OF THE TABLET | 35
Page 43

The tablet has home butt ons for up t o five family members.
1
1
1
2
1
3
1
4
1
5
1
6
1
7
1
8
1
9
1
10
1
11
1
12
1
13
Use your personal home button to turn on the tablet and go
directly to your personal home page. If the tablet is already
on, your home button takes you to your home page.
Use the
Use the
print button to print the displayed page.
back/forward button to view web pages that you
visited recently.
Use the
scroll wheel to move the current web page up and
down for viewing.
Use the
touch screen to interact with web pages by
touching the screen with your finger or the stylus.
Use the tablet
Open the
speakers to listen to audio on the web.
access panel to use the AC power jack or
headphone jack.
Raising the
antenna may improve your tablet’s ability to
send and receive signals in your home.
Use the
Use the
stylus to interact with the touch screen.
stylus tether anchor if you want t o attach the styl us
tether to the tablet.
Use the
flip stand to keep the tablet upright when using the
tablet on a table.
Use a screwdriver to remove the rechargeable
battery if y ou
need to replace it.
Use the stylus to press the
reset button if you need to reset
the tablet.
1
The
14
AC power adapter provides electrical power for
charging the tablet and for using a hardware keyboard. It
allows you to use the tablet while it is plugged into an
electrical outlet instead of using the tablet battery. To plug
the AC power adapter into the tablet, open the Access Panel
and plug the adapter into the AC power jack.
1
The
15
optional chargin g cradle acts as a stand and as a power
source for your tablet.
1
16
Use the
cradle power jack to plug the AC power adapter
into the charging cradle, so the tablet’s batteries can charge
while the tablet is resting in the cradle.
1
17
Use the
cradle keybo ard jack to plug in a standard PS/2
keyboard for use while the tablet is in the cradle.
36 | IDENTI F YING PARTS OF THE TABLET
Page 44

TAKING CARE OF YOUR TABLET
!
!!
Handling the Tablet
Do not drop the tablet. The tablet’s touch screen contains a
glass element that may break when dropped or subjected to
a strong impact. Avoid placing the tablet where it may
accidentally fall to the floor (like on the edge of a counter).
When you use the tablet’s flip stand, make sure that it is
fully extended and locked.
Keep the tablet away fro m water. The tablet is not
!
waterproof. Like any electrical device, keep the tablet
away from water and moisture to avoid possible injury to
yourself and permanent damage to the tablet.
Avoid exposing the tablet to temperature extremes and
direct sunlight for long periods of time.
Extreme
temperatures and long-term exposure to the sun can cause
the tablet’s touch screen to become dark and eventually
stop working.
Cleaning and Maintaining the Touch Screen
Avoid scratching your tablet’s touch screen. Use your finger,
the provided stylus, o r ot her pl astic-ti pped pens int ended for us e
with a touch-sensitive screen. Never use an actual pen or pencil
or other sharp object on the surface of the tablet.
Keep the touch screen clean. Use a soft cloth to clean the
screen. If necessary, dampen the cloth with a diluted windowcleaning solution to clean the touch screen. Never spray the
tablet directly with any liquid or foam cleaners.
Caring for the Tablet’s Battery
The tablet comes with a rechargeable lithium ion battery. When
fully charged, your tablet’s battery provides several hours of
constant use. When not in use, your tablet’s battery stays
charged for over six days. For tips on maximizing the length of
each charge, see the tablet’s online help .
When you're not using the tabl et, keep it plu gged into AC powe r
so that the battery will be fully charged the next time you use it.
You cannot overcharge the tablet’s battery by leaving the tablet
plugged in.
It takes approximately six hours to completely charge a fully
depleted battery. You do not need to fully ch arge the batteries in
order for your tablet to work. You also do not need to fully
deplete the battery to gain the maximum effectiveness of the
tablet’s battery.
While the battery is designed for years of average use, it may
eventually need to be replaced. Do not dispose of the battery in
your trash. Please recycle the battery in accordance with your
local recycling guidelines.
Ordering Accessories and Replacement Parts
You can order additional tablets, charging cradles, and
replacement parts, such as an additional stylus or battery. Order
accessories or replacement parts online through the tablet’s
or by contacting us online at www.shop-intel.com.
Center
Info
TAKING CARE OF YOUR TABLET | 37
Page 45

THE TABLET AND YOUR INTERNET CONNECTION
Always Connected vs. Dial-up Connection
The tablet uses the PC to connect to the Internet. With today’s
technology, people have a number of options for accessing the
Internet. These include:
• Always connected (cable and most DSL)
• Dial-up connection (phone line and satellite)
Always Connected
With a persistent connection, tablet use does not interfere with
your family’s use of the phone line. The PC is always connected
to the Internet. Data transfer rates are considerably faster than
those of traditional analog phone line connections. This is the
ideal connection type for the tablet.
Note: Some DSL providers dial up to the Internet instead of
staying connected. In these situations, configure your tablet to
use a dial-up connection.
Dial-up Connection
With a dial-up connection, the PC must dial the number to your
ISP (Internet Service Provider) to access the Internet. If you
have a dedicated phone line for the PC, accessing an open phon e
line is not an issue. However, if the PC shares a phone line with
the rest of your household, you cannot use the tablet and the
phone at the same time.
Hanging Up the Phone Line
Important! Please read this if you access the Internet using the
same phone line as your telephone or fa x m ac h in e .
If the tablet initiates a dial-up Internet connection, you can
hang-up the phone line from the tablet. Otherwise, hang up the
phone line from the PC.
Hanging up the phone from the tablet
1 Touch the controls button on the button bar to open the con-
trol panel.
2 Touch the
turn tablet OFF button.
3 At the PC, a warning message appears indicating that the
dial-up connection is about to be ended.
4 Wait a few seconds and the PC will automatically
disconnect, or click
Disconnect Now on the PC to hang up
the phone line.
Hanging up the phone from the PC
1 At the PC, check the icon tray in the lower-right
corner of the screen for your ISP’s connection icon.
2 Right-click the icon, and select
Note: This procedure works for most dial-up networking (DUN)
Disconnect.
software and America Online* (AOL). If this procedure does
not work on your PC, check your ISP documentation for
information about disconnecting a dial-up session.
38 | THE TABLET AND YOUR INTERNET CONNECTION
In case of an emergency, physically disconnect the phone line
from the PC by unplugging the pho ne line from the wall or from
the back of the PC.
Page 46

Keeping Home Page Content Fresh
The tablet uses your Int ernet connect ion period ically through out
the day to get fresh copies of your family’s home pages and
tablet neighborhood content. This ensures that the information
you see on your home page is current when you turn on the
tablet.
The tablet is initially set up to get fresh neighborhood content
three times each day. When you set up the PC during tablet
installation, you can specify when and how often you want the
tablet to get fresh content, up to four times each day. You can
update these settings at any time by running the Tablet
Connection Wizard on the PC.
Note: If the PC uses your phone line to connect to the Internet
and your dial-up connection is a toll call (metered or long
distance), you may want to change the frequency with which the
tablet refreshes its content.
Getting Software Updates From the Web
The tablet is designed to check for tablet software updates
automatically so that you always have the latest and greatest
features available to your tablet.
Software updates are usually performed overnight to reduce
possible inconvenience. The PC must be on in order for the
tablet to get the updates.
THE TABLET AND YOUR INTERNET CONNECTION | 39
Page 47

INSTALLATION INSTRUCTIONS
Follow the instructions on the installation poster to set up your
new Intel Web Ta b let. The po ster contains all th e in format ion
you need to set up the tablet and install the tablet software on
your PC.
The Intel Web Tablet uses Intel AnyPoint Wireless Home
Networking software to communicate with the web. Because
some homes may already have home networking installed on
their home PCs, tablet setup may differ from household to
household. If the instructions on the installation poster that
came with your tablet do not match your situation, find the
installation procedure in this chapter that does, and follow those
steps to install the web tablet.
Troubleshoo t ing Installa tion Problems
If you experience any problems during setup, refer to
the Troubleshooting Installation Problems section that
begins on page 53 of this guide or contact customer
support toll free at (877) 777-2203.
“Installing the Tablet and the AnyPoint Network Drivers For the
First Time” on page 41
Use this installation procedure if this is your first tablet and
you do not already have AnyPoint home networking
software installed on your PC.
“Installing the Tablet Into an Existing AnyPoint Wireless Home
Network” on page 44
Use this installation procedure if this is your first tablet and
you already have an AnyPoint Wireless Home Network
installed.
“Installing the Tablet Into an Existing AnyPoint Phoneline
Network” on page 46
Use this installation procedure if this is your first tablet and
you already have an AnyPoint Phoneline Home Network
installed.
“Installing Additional Tablets” on page 49
Use this procedure if you already have an Intel Web Tablet
and you are adding an additional tablet.
“Removing and Reinstalling the Tablet PC Softwar e” on page 50
Use these procedures if you already installed the tablet
software on the PC, an d you need to remove an d/or rein stall
the software.
40 | INSTALLATION INSTRUCTIONS
Important: The PC on which you install the tablet software must
have a working Internet connection.
Page 48

Installing the Tablet and the AnyPoint Network
Drivers For the First Time
Use the following steps if this is your first tablet and you do not
already have AnyPoint home networking installed on your PC.
Begin Charging the Tablet
1 Remove the plastic pull-tab from the battery case on the
rear of the tablet.
2 Plug the AC adapter into the wall. Open the tablet access
panel and plug the AC adapter into the tablet AC power
jack.
3 Leave the tablet connected to AC power so it can begin
charging while you complete the tablet setup. The entire
installation process takes approximately 45 minutes.
Note: If you use the flip stand on the back of the tablet to keep
the tablet upright, make sure the stand is fully extended.
Install the Wireless Adapter (On the PC)
1 Shut down the PC.
2 Plug the AnyPoint adapter cable into an open USB port.
3 Turn on the PC.
4 After th e PC star ts up,
into the CD-ROM drive
insert the Intel Web Tablet Setup CD
. The CD is located inside the back
cover of this Product Guide.
Install the Drivers (On the PC)
Important!
Do not cl ick Cancel on ANY screen in the Add New
Hardware wizard.
1 When the Add New Hardware wizard starts, click
Next to
begin installing the drivers.
2 Select
3 If you are prompted for a drive, make sure the
Search for the b est driver for your devic e and click
Next.
check box is checked. Click Next twice to install the
drive
CD-ROM
drivers.
4 Click
5 I f y ou are p romp ted to restart the PC, click
Install the Tablet Software (On the PC)
Finish. On Windows* 98 systems, you may need to
click
Finish twice.
No. You may be
asked to restart the PC more than once – click
No each time.
After the drivers are installed, the Intel W eb Tablet Setup screen
appears.
Note: If the Intel Web Tablet Setup screen does not appear, open
My Computer on your desk top. Double-click the CD-ROM
drive, and then double-click
setup.exe.
1 Click Install to begin installing the tablet software.
2 Follow the on-screen instructions to install the software.
INSTALLATION IN STRUCTIONS | 41
Page 49

Create a Network Code (On the PC)
Write your network code here:
1 The Setup Wizard shows several screens and asks you to
create a network code. Write down the network code in the
space provided below. You will need this network code to
set up the tablet.
For more information about creating a network code, click Help
on the Setup Wizard screen.
2 If the PC has more than one I nternet con nection, choose th e
connection that you want to use with the tablet.
3 If you are prompted for your Internet Service Provider
(ISP) password, enter and conf irm you r password, an d then
click
OK.
Restart Your Computer
When you complete the Setup Wizard, you will be asked to
restart your PC.
Note: If you are an America Online* (AOL*) customer
and you use AOL as your Internet Service Provider (ISP), you
must set your AOL preferences to save the passwords for your
AOL screen names. Do this before you continue with this
installation.
Return to the Tablet and Co mplete the Installation
1 Return to the tablet and leave it connected to AC power
while you set it up.
2Touch
Continue and follow the instructions on the tablet
screen.
3 When prompted for a network code, use the network code
that you created on the PC and wrote down in the previous
section.
The tablet will reset when its setup process completes. This
could take some time.
1Click
Restart Now to complete the PC setup.
2 When the PC restarts, you may receive a Windows logon
prompt.
If this is your first time loggin g on, type a user name but no
password and click
3 W hen restart completes, you’ll see a Congratulations screen
that displays the network code you created.
42 | INSTALLATION INSTRUCTIONS
OK.
Page 50

Set Up the Tablet Home Buttons
After the tablet resets, you are ready to set up the home buttons
for each member of your family. The first person setting up a
home button will be asked to fill out a tablet registration for the
family.
1 Press a home button.
2 Follow the directions on the screen to set up that home
button for you or a member of your family.
3 When the home page appears, you can begin using the
tablet right away or touch
my page setup to further
customize the page.
Each of your family members can repeat steps 1-3 to set up their
own home button.
Important! We recommend that you leave the tablet plugged in
for 6 hours to completely charge the batteries for the first time.
You can use the tablet while it is charging.
INSTALLATION IN STRUCTIONS | 43
Page 51

Installing the Tablet Into an Existing AnyPoint
Wireless Home Network
Use the following steps if this is your first tablet and you already
have an AnyPoint Wireless Home Network installed.
Begin Charging the Tablet
1 Remove the plastic pull-tab from the battery case on the
rear of the tablet.
2 Plug the AC adapter into the wall. Open the tablet access
panel and plug the AC adapter into the tablet AC power
jack.
3 Leave the tablet connected to AC power so it can begin
charging while you complete the tablet setup. The entire
installation process takes approximately 45 minutes.
2 From the Windows desktop, open
My Computer and
double-click the CD-ROM drive.
3 Double-click
setup.exe. The Intel Web Tablet Setup screen
appears.
4Click
Follow the on-screen instructions to install the software.
Install to begin installing the tablet software.
1 The Setup Wizard shows several screens and asks you to
create a network code. Write down the network code in the
space provided below. You will need this network code to
set up the tablet.
Write your network code here:
Note: If you use the flip stand on the back of the tablet to keep
the tablet upright, make sure the stand is fully extended.
Install the Tablet Software On Your Home Network Server PC
Important:
Because the tablet will use your existing Intel
AnyPoint wi reless home networking software to co mmunicate
with the Internet, you need to install the tablet software on your
AnyPoint Home Network’s server PC.
Note: If you purchased an Intel Web Tablet that includes a
wireless USB adapter, do NOT install the new adapter on the
PC. The tablet will use your existing AnyPoint wireless adapter
to communicate with the PC.
1 At the PC,
CD-ROM drive
insert the Intel Web Tablet Setup CD into the
the Product Guide.
44 | INSTALLATION INSTRUCTIONS
. The CD is located inside the back cover of
For more information about creating a network code, click Help
on the Setup Wizard screen.
2 If the PC has more than one Internet connection, choose the
connection that you want to use with the tablet.
3 If you are prompted for your Internet Service Provider
(ISP) password, enter and confir m your pas sword, and t hen
click
OK.
Page 52

Restart Your Computer
When you complete the Setup Wizard, you will be asked to
restart your PC.
1Click
Restart Now to complete the PC setup.
2 When the PC restarts, you may receive a Windows logon
prompt.
If this is your first time logging on, type a user name but no
password and click
OK.
3 W hen restart completes, you’ll see a Congratulations screen
that displays the network code you created.
Note: If you are an America Online* (AOL*) customer
and you use AOL as your Internet Service Provider (ISP), you
must set your AOL preferences to save the passwords for your
AOL screen names. Do this before you continue with this
installation.
Return to the Tablet and Complete the Installation
1 Return to the tablet and leave it connected to AC power
while you set it up.
2Touch
Continue and follow the instructions on the tablet
screen.
3 When prompted for a network code, use the AnyPoint
network code that you wrote down in the previous section.
The tablet will reset when its setup process completes. This may
take some time.
home button will be asked to fill out a tablet registration for the
family.
1 Press a home button.
2 Follow the directions on the screen to set up that home
button for you or a member of your family.
3 When the home page appears, you can begin using the
tablet right away or touch
my page setup to further
customize the page.
Each of your family members can repeat steps 1-3 to set up their
own home button.
Important! We recommend that you leave the tablet plugged in
for 6 hours to completely charge the batteries for the first time.
You can use the tablet while it is charging.
Set Up the Tablet Home Buttons
After the tablet resets, you are ready to set up the home buttons
for each member of your family. The first person setting up a
INSTALLATION IN STRUCTIONS | 45
Page 53

Installing the Tablet Into an Existing AnyPoint
Phoneline Network
Use the following steps if this is your first tablet and you already
have an AnyPoint Phoneline Home Network installed.
Begin Charging the Tablet
1 Remove the plastic pull-tab from the battery case on the
rear of the tablet.
2 Plug the AC adapter into the wall. Open the tablet access
panel and plug the AC adapter into the tablet AC power
jack.
3 Leave the tablet connected to AC power so it can begin
charging while you complete the tablet setup. The entire
installation process takes approximately 45 minutes.
Note: If you use the flip stand on the back of the tablet to keep
the tablet upright, make sure the stand is fully extended.
Update the AnyPoint Phoneline Adapter Settings
Before installing the AnyPoint wireless USB adapter, you need
to change the AnyPoint Phoneline adapter settings.
Important! You must update the adapter settings on each
computer that is part of the AnyPoint phoneline network.
1 At each computer that is part of your home network, open
the Window s*
icon. The Network dialog displays.
2 Click the
AnyPoint USB Phoneline Adapter
Configuration tab and locate the TCP/IP -> Intel(R)
components.
3 Click the AnyPoint adapter to select it, and then click
Properties. The TCP/IP Properties dialog displays.
46 | INSTALLATION INSTRUCTIONS
Control Panel and double-click the Network
in the list of installed
Page 54

Install the Drive rs (O n t he P C)
Important!
Do not click Cancel on ANY screen in the Add New
Hardware wizard.
1 When the Add New Hardware wizard starts, click
Next to
begin installing the drivers.
2 Select
3 If you are prompted for a drive, make sure the
Search for the best driver for your device and click
Next.
check box is checked. Click Next twice to install the
drive
CD-ROM
drivers.
4Click
5 If yo u ar e pr ompted to r estart the PC, click
Install the Tablet Software (On the PC)
Finish. On Windows* 98 systems, you may need to
click
Finish twice.
No. Y ou may be
asked to restart the PC more than once – click
No each time.
After the drivers are installed, the Intel Web T ablet Setup screen
appears.
Note: If the Intel Web Tablet Setup scr een does no t appear, open
My Computer on your desk top. Double-click the CD-ROM
drive, and then double-click
setup.exe.
1Click Install to begin installing the tablet software.
2 Follow the on-screen instructions to install the software.
Create a Network Code (On the PC)
1 The Setup Wizard shows several screens and asks you to
create a network code. Write down the network code in the
space provided below. You will need this network code to
set up the tablet.
Write your network code here:
For more information about creating a netwo rk code , cli ck Help
on the Setup Wizard screen.
2 I f the PC has mo re than one Intern et conn ection, choose th e
connection that you want to use with the tablet.
3 If you are prompted for your Internet Service Provider
(ISP) password, ente r and confirm your password, and then
click
OK.
Restart Your Computer
When you complete the Setup Wizard, you will be asked to
restart your PC.
1 Click
Restart Now to complete the PC setup.
2 When the PC restarts, you may receive a Windows logon
prompt.
If this is your f irst time logging on, type a us er n a me bu t no
password a nd click
OK.
3 When restart completes, you’ll see a Congratulations screen
that displays the network code you created.
INSTALLATION IN STRUCTIONS | 47
Page 55

Note: If you are an America Online* (AOL*) customer
and you use AOL as your Internet Service Provider (ISP), you
must set your AOL preferences to save the passwords for your
AOL screen names. Do this before you continue with this
installation.
Return to the Tablet and Complete the Installation
1 Return to the tablet and leave it connected to AC power
while you set it up.
2Touch
Continue and follow the instructions on the tablet
screen.
3 When prompted for a network code, use the network code
that you created on the PC and wrote down in the previous
section.
The tablet will reset when its setup process completes. This
could take some time.
Set Up the Tablet Home Buttons
After the tablet resets, you are ready to set up the home buttons
for each member of your family. The first person setting up a
home button will be asked to fill out a tablet registration for the
family.
1 Press a home button.
2 Follow the directions on the screen to set up that home
button for you or a member of your family.
3 When the home page appears, you can begin using the
tablet right away or touch
my page setup to further
customize the page.
Each of your family members can repeat steps 1-3 to set up their
own home button.
Important! We recommend that you leave the tablet plugged in
for 6 hours to completely charge the batteries for the first time.
You can use the tablet while it is charging.
48 | INSTALLATION INSTRUCTIONS
Page 56

Installing Additional Tablets
Write your network code here:
Use the following steps if you already have an Intel Web Tablet
installed in your home and you are adding a new tablet.
Note: If you purchased an Intel Web Tablet that includes a
wireless adapter, do NOT install the new adapter o n the PC. The
tablet will use your existing wireless adapter to communicate
with the PC.
Begin Charging the Tablet
1 Remove the plastic pull-tab from the battery case on the
rear of the tablet.
2 Plug the AC adapter into the wall. Open the tablet access
panel and plug the AC adapter into the tablet AC power
jack.
3 Leave the tablet connected to AC power so it can begin
charging while you complete the tablet setup. The entire
installation process takes approximately 45 minutes.
Get Your Network Code From the PC
1 At the PC, open the Windows Control Panel, then double-
click the
Wireless Control Panel icon. The Wireless Control
Panel dialog displays.
2 Write down the network code in the space provided below.
You will need this network code to set up the tablet.
Return to the Tablet and Complete the Installation
1 Return to the tablet and leave it connected to AC power
while you set it up.
2Touch
Continue and follow the instructions on the tablet
screen.
3 When prompted for a network code, use the AnyPoint
network code that you found on the PC and wrote down in
the previous section.
The tablet will reset when its setup process completes.
Important! We recommend that you leave the tablet plugged in
for 6 hours to completely charge the batteries for the first
time.You can use the tablet while it is charging.
Register Your New Tablet
After the tablet resets, it is ready for use. The first time you press
a home button, you’ll be asked to register your new tablet.
Accessing Your Home Page From the New Tablet
The home buttons on the new tablet will match the home buttons
on your existing tablet(s). Use the same home button on each
tablet to access your personal home page. For example, if your
home button is the green one, use the green button on any of
your tablets to access your home page.
Only one tablet can use a particular home button at any given
time. If you press a home button and someone is already using
that button on another ta blet , you ’ll receive a message n otifying
you that another tablet is using that button.
3 Close the Wireles s Co ntrol Panel dialog.
INSTALLATION IN STRUCTIONS | 49
Page 57

Removing and Reinstalling the Tablet PC
Software
If the tablet software on the PC becomes damaged, you may
need to reinstall the tablet software. In some cases, you can
reinstall the software over the existing installation. In other
cases, you may need remove the software first, and then reinst all
a fresh copy.
Remove the tablet PC software
1 At the PC, open the Windows Start menu and select:
Programs > Intel Web Tablet > Uninstall Tablet Software
The Remove Tablet Software dialog displays.
2 Select the software you want to remove:
• Make sure the
Remove Intel Web Tablet software
check box is selected.
• If this PC is part of an AnyPoint home network, clear
Remove Intel AnyPoint Home Networking software
the
check box. Otherwise, leave this check box selected.
3Click
Remove. The PC will begin removing the tablet
software fr om the PC. If you are prompted to remove any
shared files, click
4 When the software removal completes, click
Yes.
Restart. After
the PC finishes restarting, use the following steps to
reinstall the tablet software.
Reinstall the ta blet PC software
1 At the PC, insert the Intel Web Tablet Setup CD into the
CD-ROM drive. The CD is located inside the back cover of
the Product Guide.
2 From the Windows desktop, open
My Computer and
double-click the CD-ROM drive.
3 Double-click
setup.exe. The Intel Web Tablet Setup screen
appears.
4Click
Install to begin installing the tablet software. Follow
the on-screen instructions to install the software.
The Setup Wizard shows several s creens, an d display s your
AnyPoint wireless home net work code. This is the network
code that is currently set up on the tablet.
When you complete the Setup W izar d, you will be asked to
restart your PC.
5Click
Restart Now to complete the PC setup.
When the PC restarts, you may receive a Windows logon
prompt. If this is your first time logging on, type a user
name but no password and click
OK.
6 When the restart completes, you’ll see a Congratulations
screen that displays your network code.
50 | INSTALLATION INSTRUCTIONS
Page 58

Restore Your Tablet Registration
These steps are required only if yo u removed the tablet PC
Note:
software and then reinstalled it.
1 Go to the tablet and press one of the home buttons. Two
introductory help pages display, followed by the Tablet
Registrat ion page.
2 On the tablet registration page, touch the
restore your registration information link (located in the
Touch here to
upper, right section of the page).
3 Follow the instructions on the Restore Registration page to
restore your tablet registration, then touch
Finish.
INSTALLATION IN STRUCTIONS | 51
Page 59

Troubleshooting Installation Problems
If you exit Se t u p b efore all steps are completed. . .
If you exit Setup before all of the installation steps are complete,
you can continue the installation later. T o restart installation at a
later time:
1 Place the Intel Web Table Setup CD into your CD-ROM
drive.
2 At the Windows d e sk top, go to
My Computer and double-
click the CD-ROM Drive
3 Double-click
setup.exe.
Setup will begin at the point where you exited. Follow the
instructions on the screens to complete the setup.
If you receive Dial-up Networking errors...
If you receive the following error during setup:
“You have Dial-up Networking installed but it is not
configured to use any ISPs. Please configure Dial-up
Networking before running the connection wizard again.”
Do the following:
1 Follow the instructions from you Internet Service Provider
(ISP) to set up your PC Internet connection.
2 After the connection is set up and working, open the
Windows
Tablet > Tablet Connection Wizard
Start menu, and then select Prog ra ms > I nte l W e b
. The Intel Web Tablet
Connection Wizard displays.
3 Follow the directions on the Wizard screens to set up the
tablet to use your dial-up connection.
52 | INSTALLATION INSTRUCTIONS
Page 60

If setup detects more than one adapter on the PC...
If you receive an error message telling you that the PC has more
than one adapter, it mean s the PC has a networ k adap ter with an
IP address that conflicts with the AnyPoint adapter.
Before continuing with setup, do the following to identify and
correct the conflict:
1 Write down the name of the network adapter(s) listed in the
error message.
1 Click the
2 Open the Windows
3 In the text box, type:
Exit Setup button.
Start menu and select Run.
winipcfg
and then click OK. The IP Configuration dialog displays
4 Open the selection list, and select each of the adapters that
you wrote down in step one. If any of these adapters have
an IP address beginning with 169.254, use the following
steps to change its IP address before continuing with tablet
setup.
5Click
6 Open the Windows
7 Click the
OK to close the IP Configuration dialog.
Control Panel and double-click the
Network icon. The Network dialog displays.
Configuration tab and locate the network adapter
you identified in step 4.
8 Click the adapter to select it, and then click
Properties. The
TCP/IP Properties dialog displays.
9 Click the
IP Address tab.
10 Select the
Specify an I P address radio button, and then
enter the following values:
IP Address: 192.168.168.1
Subnet Mask: 255.255.255.0
11 Click OK twice to close the Network dialog.
12 If you are prompted to restart the computer, click
Note: If the adapter you updated is part of a home network, the
Yes.
IP addresses of all computers on the networ k must be updated t o
begin with 192.168.168.
You are now ready to continue setting up the tablet PC software.
1 Insert the Intel Web Tablet Setup CD in to the CD-ROM
drive.
2 Open the Windows
Control Panel.
3 Double-click the CD-ROM drive, and then double-click
setup.exe.
4 The setup program will continue where it left off. Follow
the instructions on the installation poster to complete
setting up the tablet.
INSTALLATION IN STRUCTIONS | 53
Page 61

GETTING HELP
Online Help and Quick Tour
If you have questions regarding your tablet, use the tablet’s
online
Info Center. At the Info Center, you’ll find a variety of
information, including:
• Answers to our custom e rs’ most frequently asked
questions.
• A Quick Tour of the tablet.
• An online User Guide containing topics on how to use the
tablet and perform tablet tasks.
• Information about technical issues.
T o access the Info Center from the tablet, touch the link on your
home page. If you can’t get to the Info Center using the tablet,
use your PC Internet browser to go to:
www.intel.com/home/webtablet/support
To learn more about a specific tablet panel, touch the help
button on the panel. This context help provides information
about the features that are available on the panel and how they
work.
Contacting Customer Support
Our customer support team wants to hear from you. Touch the
Contact Us link at the bottom of your home page or at the Info
Center to send your ideas and suggestions or to submit a
problem report. You can call our customer support group toll
free at (877) 777-2203 or email us at
Webtablet_support@intel.com.
Troubleshooting
Low or bad wireless signal
Distance from the PC’s wireless adapter and interference from
household appliances (cordless phones, microwave ovens,
remote controls) are the most common reasons for low or bad
signals. To achieve a stronger signal, try the following:
• Move the tablet closer to the PC.
• Raise the tablet’s antenna.
• Change the location of the PC’s wireless adapter—move it
to a high point, like a shelf.
• Rotate the PC’s wireless adapter to different positions.
• Move the location of the appliance that is causing the
interference or turn the appliance off.
Low battery
A low battery warning message indicates that the charge in your
tablet’s battery is running low.
T o recharge the battery , conn ect the AC adapter directly to the
tablet, or connect the AC adapter to the charging cradle and set
the tablet into the cradle.
Leave the tablet plugged in for at least six hours to fully charge
the battery. You can continue to use the tablet while it is
recharging.
54 | GETTING HELP
Page 62

INDEX
A
AC power adapter
access panel 9, 37
adding a favorite 10
adding a tablet 28, 50
antenna 9, 37
AnyPoint home network
wireless network
B
back/forward button
battery 12, 16, 38, 55
battery charge 11
battery cover 9, 37
blank or partially-loaded web pages 17
button bar 10
C
charging cradle
cleaning and maintaining the touch screen 12, 38
connecting to the Internet 4
control panel 10
controls button 10
customer support
contacting
phone number 16, 55
web site 16, 55
customized web experience 3
E
13
email
F
favorites button
favorites list 13
favorites panel 10
flip stand 9, 37
9, 11, 16, 37
23, 45
9, 37
9, 11, 16, 37
46
10
frequently asked questions 16, 55
G
going places on the web
H
hanging up the phone line
from the PC
from the tablet 14, 39
in an emergency 14, 39
help 10, 16, 55
help button 10
history list 13
home buttons 9, 13, 37
home page 13
horizontal scroll arrows 10
I
Info Center
installation instructions 19, 41
Intel AnyPoint Wireless Home Network 4
Internet connection 4
always connected Internet connection 14, 39
dial-up Internet connection 14, 39
security 6
K
keyboard
attaching a PS/2 keyboard
keyboard jack 9, 11, 37
keyboard requirements 33
on-screen keyboard 11
knowing who is using the tablet 10
14, 39
13, 16, 55
13
9, 11, 33, 37
INDEX | 55
Page 63

L
loading bar
lock icon 10
low battery 16, 55
low or bad signal 16, 55
M
multiple tablets
my page setup 13
N
network code
O
on/off controls
online help 16, 55
on-screen keyboard 11
ordering accessories or replacement parts 3, 12, 38
P
parental control
PC requirements 33, 35
power jack 9, 37
print button 9, 11, 37
privacy 6
progress indicator 10
proxy settings 6
Q
quick tour of the tablet
R
reload button
requirements 33, 35
reset button 9, 37
S
screen saver
scroll arrows 10
scroll wheel 9, 37
10
5, 28, 50
6
10
6
16, 55
10
11
searching the web 13
secure site 10
secure transactions 6
security 6
setting up your home page 13
software updates 15, 40
stop button 10
stylus 9, 37
stylus tether anchor 9, 37
suggestions 3
T
tablet care
tablet diagrams 8, 36
tablet neighborhood 13
tablet news 3
technical issues 16, 55
touch screen 9, 12, 37, 38
touch screen accuracy 17
touch screen brightness and contrast 10
troubleshooting 16, 55
turning the screen saver on and off 11
turning the tablet on and off 10
typing with the tablet 11
U
URL
using multiple tablets 5
using the tablet 2
using your tablet with your PC 5
V
volume control
12, 38
10
10
56 | INDEX
Page 64

W
web address
web content
going places on the web
keeping content fresh 15, 40
tablet neighborhood 13
web panel 10, 13
web/search button 10
wireless network code 6
wireless signal strength 11
10
13
INDEX | 57
Page 65

CONTACTING CUSTOMER SUPPORT
When you need help...
Contact our customer support group.
•
From the tablet:
T o uch th e Info Center link on your home page or
neighborhood pages. To send feedback or submit a
problem report, touch the
of your home page.
•
From your PC web browser:
Go to: www.intel.com/home/webtablet/support
• Or call our customer support group toll free at
(877) 777-2203.
Contact Us link at the bottom
 Loading...