

Page 1
™
AnyPoint
Wireless II Network
User’s Guide
Share
internet
access
printers, files,
games,
and more…
Page 2

Contents
1 Understanding your
AnyPoint™ Wireless II Network..................................... 1
What is a network?..................................... ... ...................... .... ... ...................... .... ... ........... 2
Components required to connect a PC to a network.................. ........................................ 2
Your Wireless II network adapter.............................................................................. 2
Device driver and wireless adapter settings............................................................... 2
The AnyPoint Connectivity Software Suite CD ........................................................ 3
How does my Wireless II adapter operate?........................................................................ 3
Peer-to-Peer mode...................................................................................................... 3
Infrastructure mode.................................................................................................... 4
How do I use my Wireless II laptop in different locations?............................................... 5
What is the AnyPoint Connection Manager? ..................................................................... 6
What are Wireless II adapter and operating system settings?.................................... 6
What is a profile?..... .... ... ...................... .... ... .... ...................... ... .... ............................. 7
What is network switching?....................................................................................... 7
What settings are switched in a network profile? ...................................................... 7
What is sharing and mapping?........................................................................................... 8
What is Internet Sharing Software (ISS)?.......................................................................... 9
What is a Firewall?..................................................................................................... 9
What is Web site filtering?....................................................................................... 10
Guidelines for setting up your network............................................................................ 10
2 Set Up the
AnyPoint™ Wireless II Network................................... 11
Where do I begin?............................................................................................................ 11
Install the AnyPoint software........................................................................................... 11
Share drives and printers.................................................................................................. 15
Configure the Internet Sharing Software (ISS) server..................................................... 18
Configure the ISS connection............................................................................. .... . 19
Set up the Firewall................................................................................................... 20
Set up Parental Control ............................................................................................ 23
Set up AnyPoint Connectivity Suite Extras............................................................. 26
Registration...................................................................................................................... 26
ii
Page 3

3 Share Drives and Printers.......................................... 27
Use network drives........................................................................................................... 27
Use files across the network............................................................................................. 28
Viewing video files across the netwo r k.............................. .... ... ...................................... 28
Change drive sharing and mapping.................................................................................. 29
Change drive access................................................................................................. 29
Change drive mapping............................................................................................. 30
Change printer sharing and mapping............................................................................... 30
Change printer sharing............................................................................................. 30
Change printer mapping........................................................................................... 30
Install printer drivers................................................................................................ 31
Unmap a printer........................................................................................................ 31
Share and map automatically................................................................................... 32
Multiple user profiles....................................................................................................... 32
4 Connect to the Internet ............................................. 33
Connect to the Internet using ISS..................................................................................... 33
Connect from the ISS server.................................................................................... 33
Connect from an ISS client ...................................................................................... 34
Exiting or bypassing ISS when connecting to the Internet .............................................. 35
View connection status and settings................................................................................. 36
Change the ISS server...................................................................................................... 36
Connecting with Virtual Private Network (VPN)............................................................ 37
5 Managing your Wireless II
Network .................................................................... 38
Using the AnyPoint Connection Manager ....................................................................... 38
Wireless Control Panel tab....................................................................................... 38
Profile Manager tab................................................. .... .... ......................................... 38
View and edit current settings using the Wireless Control Panel tab.............................. 39
Activate a profile................................ .... .... ..................... .... .... ... ...................... .... ... ......... 40
Creating a new profile....................................... ... ............................................ .... ... ......... 41
What are the profile configuration types?................................................................ 41
What are the profile modes? .................................................................................... 41
Scan for public access points ........................................................................................... 42
Create a profile for a public access point...... .... ... .... .... ......................... .... ... .................... 43
Create an AnyPoint profile for your home or small office .............................................. 46
Create a profile for a corporate wired network................................................................ 50
iii
Page 4

6 Troubleshooting ......................................................... 51
I can’t see a network PC from another PC............... .... ... ................................................. 51
I have an insufficient permissions error when running Windows 2000........................... 52
Remove incompatible network adapters.......................................................................... 53
I can’t connect to my ISP from an ISS client PC............................................................. 54
I keep getting disconnected from the Internet without hanging up.................................. 55
Can I use Internet sharing software from more than one manufacturer?......................... 55
ISS and ICS (Internet Connection Sharing)..................................................................... 56
Network game problems .................................................................................................. 57
I can’t see a drive or printer on a network PC.................................................................. 58
I can’t map or print to a printer........................................................................................ 58
I can’t map to a drive........................................................................................................ 59
I can’t write or save files to a drive on a network PC...................................................... 59
Printer drivers not found .................................................................................................. 59
My laptop has speaker noise............................................................................................ 60
I am trying to access my Wireless II network with an Intel PRO/Wireless adapter........ 60
I am trying to install a Wireless II adapter into an Intel PRO/Wireless network............. 61
My Wireless II connection keeps getting interrupted ...................................................... 62
What do the lights on my Wireless II adapter mean? ...................................................... 62
7 Internet Service Provider
Reference.................................................................. 63
Set up the network to share Internet access.............................................................. 63
Set up America Online* (AOL*) with ISS.............................................................. 63
Set up AT&T WorldNet* with ISS.......................................................................... 64
Set up CompuServe* 2000 with ISS........................................................................ 65
Set up continuous Internet connections with ISS..................................................... 66
8 Technical Support Option .......................................... 67
E-mail and Web Support................................... ... ...................... .... ... ............................... 67
Phone Support.................................................................................................................. 67
Agency Notices ......................................................... 68
Glossary .................................................................... 70
Specifications ............................................................ 73
Index ......................................................................... 76
iv
Page 5
Understanding your
AnyPoint™ Wireless II Network
. . . . . . . . . . . . . . . . . . . . . . . . . . . . . . . . . .
This chapter provides a basic understanding of network principles, so you
can begin to take adv a nta g e of yo ur ne w An yPoint™ Wireless II Network.
It also gives you useful information that will help you modify your network
to meet your changing needs.
To get the most out of your home or small business network, think about
what you can gain when you connect all your PCs together so they work as
a group. For example, with two or mo re PCs connected together, you can:
• Share an Internet connection
• Share a printer
• Share files such as spreadsheets and written documents
• Play digital audio from another PC
• Play head-to-head multi-play er ga mes
• Use your laptop at home and at work
And the included Firewall and Web site filtering features help you to:
• Protect your network from electronic intrusion
• Block access to objectionable Web sites
1
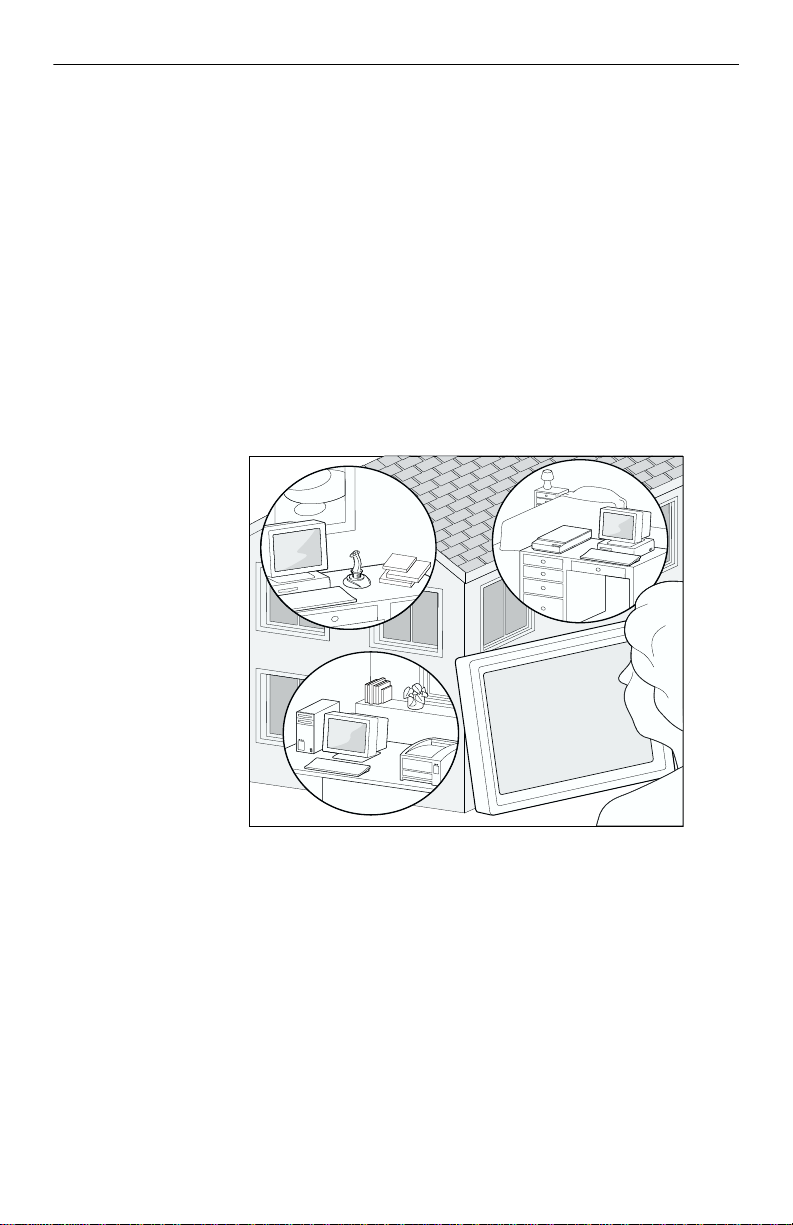
A network allows multiple users to share resources.
AnyPoint
Wireless Home
Network
1
Page 6

CHAPTER 1 Understanding your AnyPoint™ Wireless II Network
What is a network?
A computer network consists of two or more PCs that are able to
communicate with each other. Through a network, multiple PCs can share
resources, such as printers, an Internet con nection, or stored data. It costs
less to share resources than provide every PC with its own printer or
Internet connection.
You can also access a file located on other PCs in the network just as if the
file was locate d on yo ur own P C. For in stance, from a PC upstai rs, yo u may
want to listen to a larg e music file or view digital p hotos loc ated on a nother
PC downstairs. You can keep the files for large applications on a system
with a larger drive capacit y and then access those files with other PCs in the
network.
Components required to connect a PC to a net work
To make your Any P oi nt ™ Wireless II network function, you need three
components.
1 A Wireless II network adapter for each PC
2 A device driver and wireless settings
3 An AnyPoint™ Connectivity Suite CD
Your Wireless II network adapter
A network adapter is a hardware device that provides the co nnection
between your PC and the network. The adapter converts the data inside
your PC to a form that c a n be sent to other PCs. It connects externally to
your PC through the Universal Serial Bus (USB), or in the case of a laptop
PC, through a PC card.
Wireless adapters use radio waves as the means of connection, and transmit
data through the air just like a cordless telephone; no connecting wires
between PCs are necessary. The wireless adapter can communicate with all
PCs in the network as long as they are in close proximity to each other (up
to 300 feet). Keeping the adapters physically close to one another will
improve the speed of data transmission.
Device driver and wireless adapte r set tings
Your Wireless II adapter requires a device driver to function. The driver is
actually software code that specifically controls how the PC and the adapter
communicate with each other. The
your Wireless II adapter communicates with the other adapters in the
network. You cannot change the device driver software, but as you will
learn later in this chapter, you can change the adapter settings.
2
wireless adapter settings control how
Page 7

Understanding your AnyPoint™ Wireless II Network CHAPTER 1
The device driver and adapter settings are installed when you first set up
your AnyPoint™ Wireless II Network using the Installation Guide.
The AnyPoint Connectivity Software Suite CD
The AnyPoint Connectivity Softwa re Suite is on your CD. I t contains
programs for your home and small business network. During network
installation, you install this software:
• Device driver for yo ur ne tw o rk adapter
• AnyPoint Sharin g an d Ma pping software
• AnyPoint Internet Sharing software (ISS)
• Firewall for Internet security
• Web site filtering for Parental Control
• The AnyPoint Connect ion Manager to manage your Wireless II
network
• Anypoint Extras for additional entertainment applications
For instructions to install the AnyPoint Connectivity Software Suite, see
"Install the AnyPoi nt software" on page 11.
How does my Wireless II adapter operate?
The network mode is one of the adapter settings you must enter during
installation. Wireless networks can operate in one of two mo des:
1 Peer-to-Peer (sometimes called Ad Hoc)
2 Infrastructure
Peer-to-Peer mode
In the peer-to-peer mode, sometimes called ad-hoc mode, PCs transmit and
receive data directly with other PCs in the network using radio waves.
Coordination of data traffic between PCs is d one automatically. The
3
Page 8
CHAPTER 1 Understanding your AnyPoint™ Wireless II Network
following figure shows PCs with Wireless II adapters in various rooms of a
house communicat ing directly with one another in peer-to-peer mode.
Infrastructure mode
In the Infrastructure mode, PCs transmit and receive data to and from a
gateway or an access point (AP). Many corporate networks use access
points, which serve as a commu nications hub for all PCs u s ing 802.11b
wireless adapters to connect to a wireless or wired LAN. A residential
gateway can be used in home networks to connect to the Internet.
The following figures show examples of two types of
networks
point in an airport. These acce ss points are sometimes called hotspots. The
4
Infrastructure
. The first illustration shows a wireless PC and a public access
Page 9
Understanding your AnyPoint™ Wireless II Network CHAPTER 1
laptop with a PC card adapter is accessing the Internet by transmitting and
receiving data from the access point.
The second illustration shows how wireless PCs connect to a corporate
network through an access point. Laptops with wireless adapters can access
the resources on the wired network including the Internet and servers.
Wired Network
How do I use my Wireless II laptop in different locations?
You can conn ec t yo ur la ptop to potentially an y ne twork with 802.11b
technology. In your home, you can carry your laptop from room to room
and stay connected. You can take your laptop to your office, change a few
wireless adapter settings, and connect to you r of fi ce ne two rk. And while at
5
Page 10

CHAPTER 1 Understanding your AnyPoint™ Wireless II Network
work, you can travel between your office, a conference room, and an
outdoor courtyard and remain connected to the work network and its
resources.
To easily connect to other networks, you can use the AnyPoint Connection
Manager software.
What is the AnyPoint Connection Mana ger?
The AnyPoint C onnect ion M anager is a s oftware to ol th at is ava ilable when
you install your AnyPoint Wireless II adapter. The basic job of the
AnyPoint Connection Manager is twofold:
Edits Wireless settings - Y ou can quickly edit your current Wireless II
•
settings of your adapter.
Creates Profiles - You can save the Wireless II adapter and operating
•
system settings into a single network profile. The software lets you
create as many profiles as you wish, and switch between them at any
time.
Before you can perform these tasks, you need to understand three concepts:
1 Wireless II adapter and operating system settings
2 Profiles
3 Network switching
What are Wireles s II ada pte r and operating syst em settings?
The wireless II adapter settings are wireless controls that t he adapter
needs to communicate with the network. Within the standard 802.11b
technology, there are several settings as defined by Institu te of Electrical
and Electronics Engineers (IEEE). To use your Wireless II laptop in
multiple networks, you need to chang e a few of these settings usin g the
AnyPoint Connection Manager
tab" on page 38). The major settings include:
• Network ID Code (SSID) - This is the network identification code. All
devices that you are connecting to mus t ha ve the same SSID to
communicate with each other.
Mode - There are two operating transmission modes: P eer-to- Peer, or
•
Infrastructure. See page 3 in this chapter for more details.
Encryption password- This is a security feat ure. The encryption
•
password i s a un ique fe ature of the A nyP oint so ftwar e. Ever y AnyP oint
Wireless II adapter in the network must have the same encrypti on
password, which the AnyPoint software uses to automatic a lly ge nera te
the required 802.11b encryption keys.
6
Profile Manager tab (see "Profile Manager
Page 11

Understanding your AnyPoint™ Wireless II Network CHAPTER 1
• Other settings - In some networks, you will be prompted to provide
other 802.1 1b settin gs.
The operating system se ttings define shared and mapped drives, printers,
browsers, TCP/IP (addressing) functions and standard windows operating
settings. You can also save these settings in network profiles using the
Profile Manager tab.
What is a profile?
Network profiles contain all the setting listed in the previous section. For
example, you can set up several network profiles — one for your AnyPoint
home network; another for your place of business, and yet another for
public access points. The AnyP oint Connection Manager software lets you
setup as many profiles as you need.
Note: You rarely change profil es on your desktop PC, unless you
are adding an access point or gateway into your network. For a
laptop PC, you may add several profile s f o r use in several
networks.
What is network switching?
The AnyPoint Connection Manager lets you easily witch between multiple
networks. When shutting down or starting your PC, you can select which
network profile to use. For more details, see "Using the AnyPoint
Connection Manager" on page 38.
What settings are switched in a network profile?
Each network profile contains the setting s foun d in the Netwo rk Con trol
Panel, as well as a few othe rs.
Wireless settings:
• All 802.11b settings including network ID code, mod e, channel, and
encryption
Operating system settings:
• Microsoft Internet Explorer* (4.0 and later) proxy settings
• Network resource settings, such as file and printer sharing settings,
default printers, mapped drives (Windows 95 and Windows 98 only),
and shared folders
• Some TCP/IP settin gs (found on the networ k control panel’s TCP/IP
properties tab)
• Windows domain settings
• User name and Host name
• Software running at startup for the AnyPoint applications
7
Page 12
CHAPTER 1 Understanding your AnyPoint™ Wireless II Network
What is sharing and mapping?
The concept of sharing and mapping is actually a two-fold process that
allows two or more PCs to locate and use each other’s drives and printers as
if they were on one single PC. The two processes work together. The
AnyPoint Sharin g an d Ma pp in g so f tw a re allo w s you to f irs t dec id e whi ch
drives and printers on each PC are to be shared with the network. Then, the
software allows you to map to each shared drive and printer from each PC.
The sharing process lets you control the degree of access by setting the
share status for each of your drives and printers. For drives, you would
select either
you would select either
printers" on page 15 for a description of each type of share status. The
mapping process sets up a drive letter on your PC that points to ea ch s h ar ed
drive on the other PC . You can even assign your own letters to a drive (if
they are not already used by the system).
Shared-Full, Shared-Read Only or Not Shared. For printers,
Shared or Not Shared. Refer to "Share drives and
E:
F:
D:
Printer
8
D: Home Office
E: Joe's Room
F: Jane's Room
Printer
Page 13

Understanding your AnyPoint™ Wireless II Network CHAPTER 1
What is Internet Sharing Software (ISS)?
AnyPoint Internet Sharing Software (ISS) allows all of your PCs to share
one PC’s Internet connection. With AnyPoint Wireless II adapters, ISS is
available only in Peer-to Peer mode, when all PCs communicate directly
with each other. You merely set up the PC with the Internet connection as
an ISS server. You then set up the remaining PCs as ISS clients. The ISS
server PC directs data between the Internet and all PCs on the network.
Because each client PC connects to the Internet through the server, only the
server PC needs the actual physica l connection to the Internet (see
"Connect to the Internet" on page 33). With the server on, any other PC in
the network has access to the Internet. Also, for connecting to virtual
private networks with Internet access, see "Connecting with Virtual Private
Network (VPN)" on pa ge 37.
The ISS server also provides Internet security with Firewall and Web site
filtering.
Note: If you are connecting to a n et w or k such as an access point
or a gateway, you cannot use ISS, the Firewall, and Web site
filtering. Refer to the documentation for the access point or
gateway for setting up connections to the Internet.
What is a Firewall?
A Firewall helps prevent intruders (h ackers) from br eaking in to your h o me
or office network. When your connection to the Internet is active, the
Firewall acts like a barrier to outside intrusion.
9
Page 14

CHAPTER 1 Understanding your AnyPoint™ Wireless II Network
Once you install the Firewall through your ISS server, it works silently to
protect your PC whenever the ISS server PC is operating.
The Firewall has four security levels:
Paranoid
. Inbound traffic is blocked acco rding to the security level you
Trusting, Cautious, Nervous and
select. The more restrictive the security level, the more likely the Firewall
will block unsolicited inbound traffic.
Trusting is the least restrictive. Refer to the section "Set up the Firewall" on
Paranoid is the most restrictive and
page 20 for more information.
Importa nt: A Firewall provides pro te cti on against unauthorized
access by hackers, but you will still need additional software to help
protect you against computer viruses.
What is Web site filteri ng?
The AnyPoint Connectivity So ftware Suite identifies and filters Web page
content in specified categories (such as pornography, hate speech, weapons,
drugs, and gambling) . At home, you can set up Parental Control to block
undesirable Web pages from appearing on specific PCs on your network.
Refer to the section "Set up Parental Control" on page 23 to set up each PC
with different levels of Web access:
• Select the option
objectionable sites. Yo u c an ad d exc e pt ion s to the au to matic op tio n for
sites you wish to allow or filter.
• Select
Allow these sites only to specify an acceptable list of Web sites
each PC can visit. You must click
HTTP sites you want to allow.
• Select
No restrictions to disable Parental Control.
Web site filtering does not block chat programs, download sites, e-mail, or
news groups.
Automatically filter Web sites to automatically filter
Configure and type the specific
Guidelines for setting up your network
It is easy to set up your network, but you need to plan a little. Draw a
diagram showing the location of PCs and printer(s). Ind icate the locati on of
data or printers you want to be available t o everyone on the network and
other data or printers you do not want to be available to everyone. It is
important to identify the PC you will use for your shared Internet
connection. This is usu a lly th e PC with th e fast est c onnec tio n thro ug h y our
modem (or cable).
10
Page 15

Set Up the
AnyPoint™ Wireless II Network
. . . . . . . . . . . . . . . . . . . . . . . . . . . . . . . . . .
Where do I begin?
See "What is a
network?" on
.
page 2
See "What is
sharing and
mapping?" on
page 8.
See "What is
Internet Sharing
Software (ISS)?"
on page 9
.
There are four steps to successfully insta lli ng and configuring your
AnyPoint™ Wireless II Network:
1 Install the hardware a nd drivers and your 802.11b wireles s s ettings.
Refer to the AnyPoint Wireless II Network Installation Guide (the
poster included with the adapter) for detailed, step-by-step instructions.
2 Install the AnyPoint Connectivity Software Suite.
3 Share drives and printers.
"Share drives and printers" on page 15 exp lains how to share your
network drives and printers for the first time.
4 Set up the Internet Sharing Software (ISS) server.
ISS also enables the Firewall and Parental Control features on the
AnyPoint Wireless II Network. See "Configure the Internet Sharing
Software (ISS) server" on page 18.
Important: If you already have BlackIce Defender* installed on your
system, you may want to choose between AnyPoint or Black I C E
Firewalls befor e installing your software. To help you decide, review
the table in the section"Set up the Firewall" on page 20.
2
Importa nt: If you are upgrading your operating system, uninst all
your AnyPoint™ software first, perform the upgrade, then install the
AnyPoint Software.
Importa nt: (Windows* 2000 users) You will receive a screen
notifying you not to install the AnyPoint Wireless II Network unl ess
you log in to an account that has administrative rights.
Install the AnyPoint software
Once you’ve installed the hardware and drivers using the Installation
Guide, you are ready to install the software using the setup program and the
instructions from this chapter. The setup program guides you through the
11
Page 16
CHAPTER 2 Set Up the AnyPoint™ Wireless II Network
installation process. During installation, you will be making decisions that
will affect the way your network operates, so be sure to pay careful
attention to the screens.
1 Insert the AnyPoint Connectivity Suite CD in the CD-ROM drive.
Using Windows Explorer, double-click the CD -ROM drive, then
double-click
2 Click Install. An installation summ ary sc reen a ppe ars. Clic k Next. The
Setup to begin. The main presentation screen appears.
license agreement screen appears.
See "Your
Wireless II
network adapter"
on page 2
.
The PC name
can have up to
15 characters,
including any
combination of
letters (A-Z),
numerals (0-9),
and dashes (-).
If Setup detects an incompatible network adapter already installed on
your PC, the
More than one network adapter found screen appears. If
you receive this screen, refer to "Remove incompatible network
adapters" on page 53, which will show you how to resolve the adapter
conflict. If you do not receive this screen, go to the next step.
3 Click I Accept or I decline the agreement. If you decline, the Setup
program exits . If you click
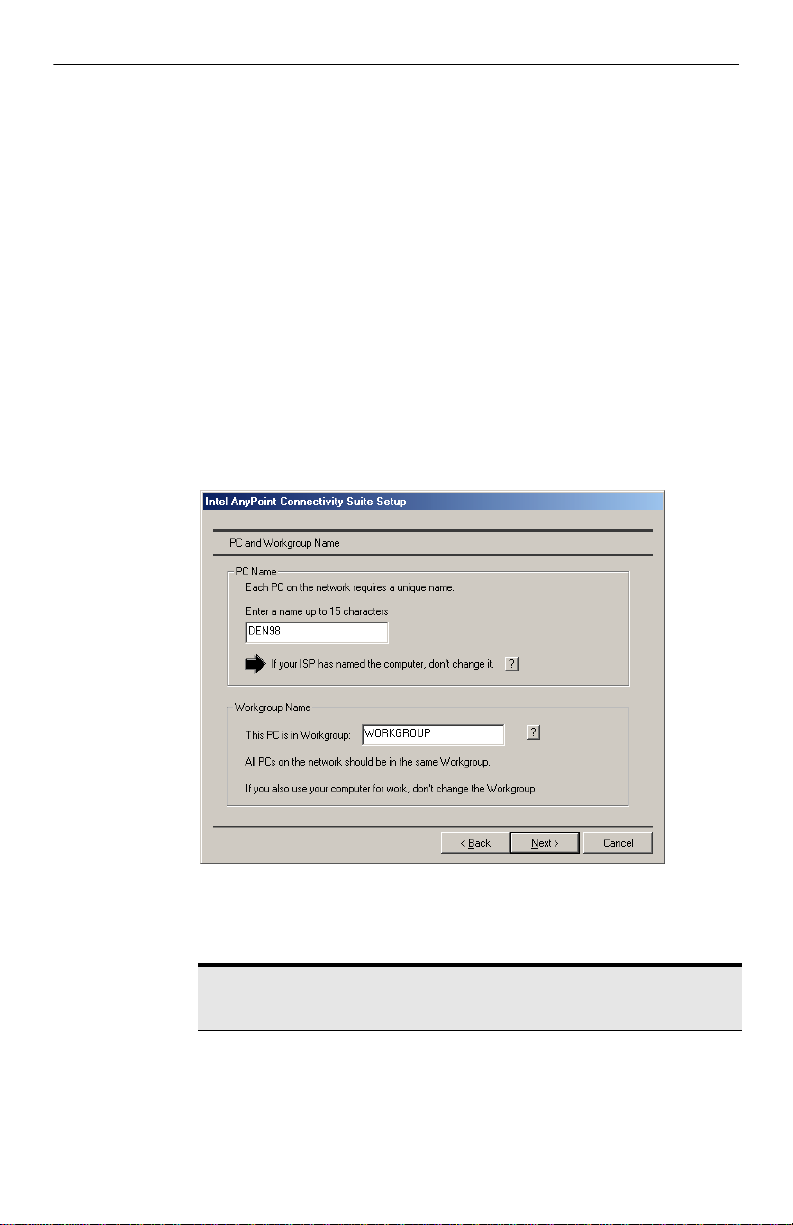
4 Click Next to select the de fault directory. The PC name screen appears.
Accept, the destination directory appears.
12
5 Assign a name to the PC. Be sure to use a different na me for each PC
on the network. Make a note of the Workgroup name. All PCs
must use
the same Workgroup name.
Importa nt: If your ISP has named the PC, don’t change the PC’s
name.
Page 17
Set Up the AnyPoint™ Wireless II Network CHAPTER 2
6
When the summary screen appears, review your network configuration
choices carefully before you click
Install. Once you install, you can not
come back to this screen without reinstalling the software.
7 You will be notified tha t your software installed suc cessfully. Click OK.
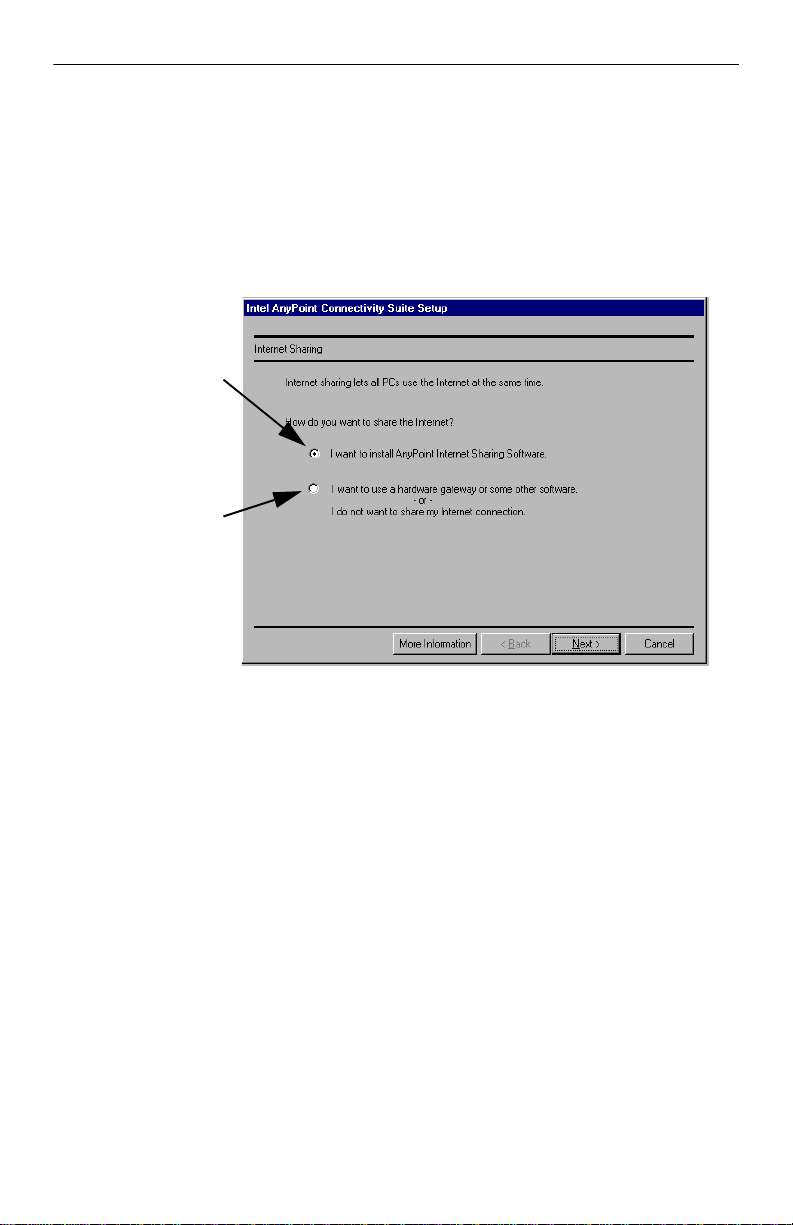
The following screen helps you decide if you want to install the
AnyPoint Internet Sharing Software (ISS) for use with an Internet
Service Provider (ISP).
Click here if you want
to install ISS on your
server PC.
If you use other
software for Internet
sharing or you have
chosen not to have
Internet Sharing
Service, then click
here. Also, if you plan
to install a gateway,
an access point
device, or a Virtual
Private Network, do
not install Internet
Sharing Software.
8 Select one of the following options:
I want to insta ll AnyPoint Int e r net Sharing Software. Choose this
•
default option if you want to use the AnyPoint Internet Sharing
Software (ISS) to share Internet access with all PCs in your home
network. For more information on ISS, refer to "Connect to the
Internet using ISS" on page 33. If you choose this option, go to step 9.
I do not want to share my Internet connection. Choose this option if
•
you use other software for Internet sharing, a Virtual Private Network
(VPN), a gatew ay o r acc ess point , or do not wa nt An yP oint™ Internet
Sharing Service (you can always install it later). For installing to
VPN, refer also to "Connecting with Virtual Private Network (VPN)"
on page 37.
After you select one of the above options, click
Next.
If you do not install the Internet Sharing Software, the install program
will skip the remain ing ISS screens.
13
Page 18
CHAPTER 2 Set Up the AnyPoint™ Wireless II Network
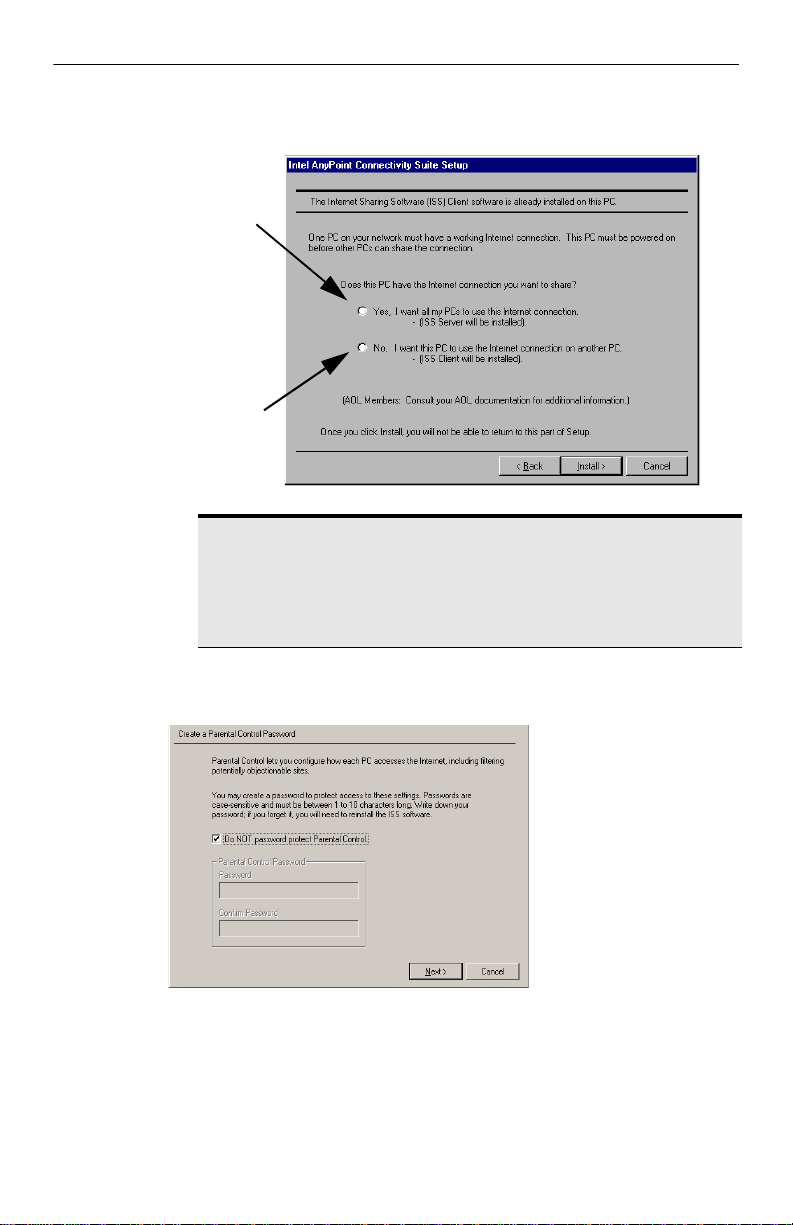
9
A decision screen appears. Decide whether this PC is going to be the
ISS server or an ISS client, then click
ISS Server
The network can have only
one ISS server and it must be
set up and running (not
turned off) to share its
Internet connection with ISS
clients.
ISS Client
ISS clients can access the
Internet through the ISS
server PC.
Install.
Note: For most Internet Service Providers (ISPs), the Internet
connection is shared au t om at i cal ly w hen you install ISS. However,
some ISPs may require extra steps to work with ISS. Cable
modems and DSL ma y al so require special steps (see
Service Provider Reference" on page 63
for more information).
"Internet
14
10 If this PC is the ISS server , typ e in a Parental Control password for Web
site filtering. If you don’t want a password, just click
Next.
Be sure to write
down the password
you enter. If you forget
the password later,
you will have to
uninstall and then
reinstall the AnyPoint
Connectivity Software
Suite to make any
changes to the
Parental Control
settings.
The password can be from 1-10 characters and is case-sensitive.
Therefore,
PASSWORD, Password, and password would each be
considered unique. If you choose to create a password, no one can
make changes to the Parental Control settings unless they enter the
password when prompted.
Page 19

Set Up the AnyPoint™ Wireless II Network CHAPTER 2
11
Click Next then Finish. A confirmation screen appears notifyi ng you
that your software has successfully installed. You will then be
prompted to restart the PC.
12 When your PC restarts, you are prompted to type a user name to log on
to the network.
Important: Do
not click Cancel!
If you do, this PC
will not connect to
the network.
The Windows user name can be
different from the PC name you
typed when you installed the
AnyPoint Wireless II Network
software. You do not need to
have different user names at
each PC, but you can if you
wish.
Note: At this point, your system includes a def ault netwo r k profile.
To view or edit those values, see
using the Wireless Control Panel tab" on page 39
Share drives and printers
See "What is
sharing and
mapping?" on
.
page 8
The Sharing and Mapping Software lets you locate and use drives and
printers from several PCs as if they were on one single PC. The first time
you run the Setup pr ogram, the Sharing an d Mapping Software runs
automatically (skip to step 2 below).
Important: Windows 2000 users should see "I have an in sufficient
permissions error when running Windows 2000" on page 52
Windows passwords are associated
with user names. If you don’t create a
password now, you are not prompted
to type your user name each time you
restart this PC. If you create a
password, you must type the same
password each time you log on to this
PC with this user name.
"View and edit current settings
.
.
To share a drive:
Click Start > Programs > Intel AnyPoint Network > Sharing and
1
Mapping Software
15
Page 20
CHAPTER 2 Set Up the AnyPoint™ Wireless II Network
A decision screen asks if you want to set up your PC to share drives and
printers. Click
Mapping appears. Click
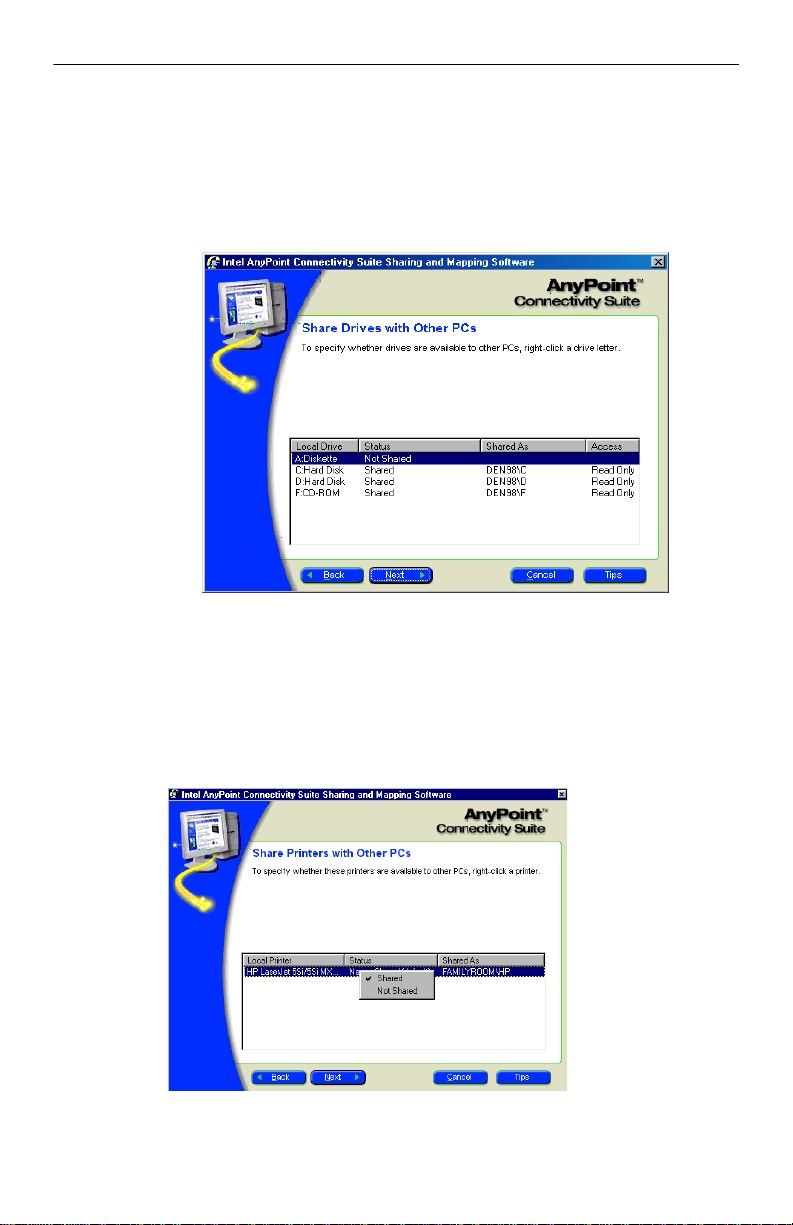
2 In the Share Drives With Other PCs screen, right-c lick on an y drive to
Yes. An informational screen describing Shari ng and
Next to continue.
change the share status, selecting options from the menu. By default, all
drives, except floppy disk drives, are set up as
If you don’t want others to use the drive, select Not Shared.
If you want others to see or copy the files and folders from the
shared drive, but not change, save, or delete them on the
shared drive, select Shared - Read Only.
If you want others to view, copy, change, save, or delete the
files and folders on the shared drive, select Shared - Full.
3 Click Next. The Share Printers with Other PCs screen appears.
Shared - Read Only.
16
Printers are shared
by default. If you
don’t want to share
a printer, right-click
the printer in the list
and select Not
Shared.
Page 21

Set Up the AnyPoint™ Wireless II Network CHAPTER 2
4
Click Next. The Map Drives on Other PCs screen appears.
Note: The following screen does not appear if the drives on other
networked PCs have not been shared (for example, if this is the first
PC on the network), or if the other PCs are turned off.
To unmap a drive, select the drive from the Mapped
Drives box then click the right arrow to move it to the
Unmapped Drives box.
To change a mapped drive letter, right-click the drive,
point to Properties, select another available letter from
the Drive box, and click OK.
Note: When you map to a drive, an icon for that PC is
automatically placed on your Windows desktop. You can quickly
access a mapped drive by double-clicking the desktop i co n. For
Windows 95 users, yo u w i ll nee d t o cr eat e t he shortcut manually.
17
Page 22
CHAPTER 2 Set Up the AnyPoint™ Wireless II Network
5
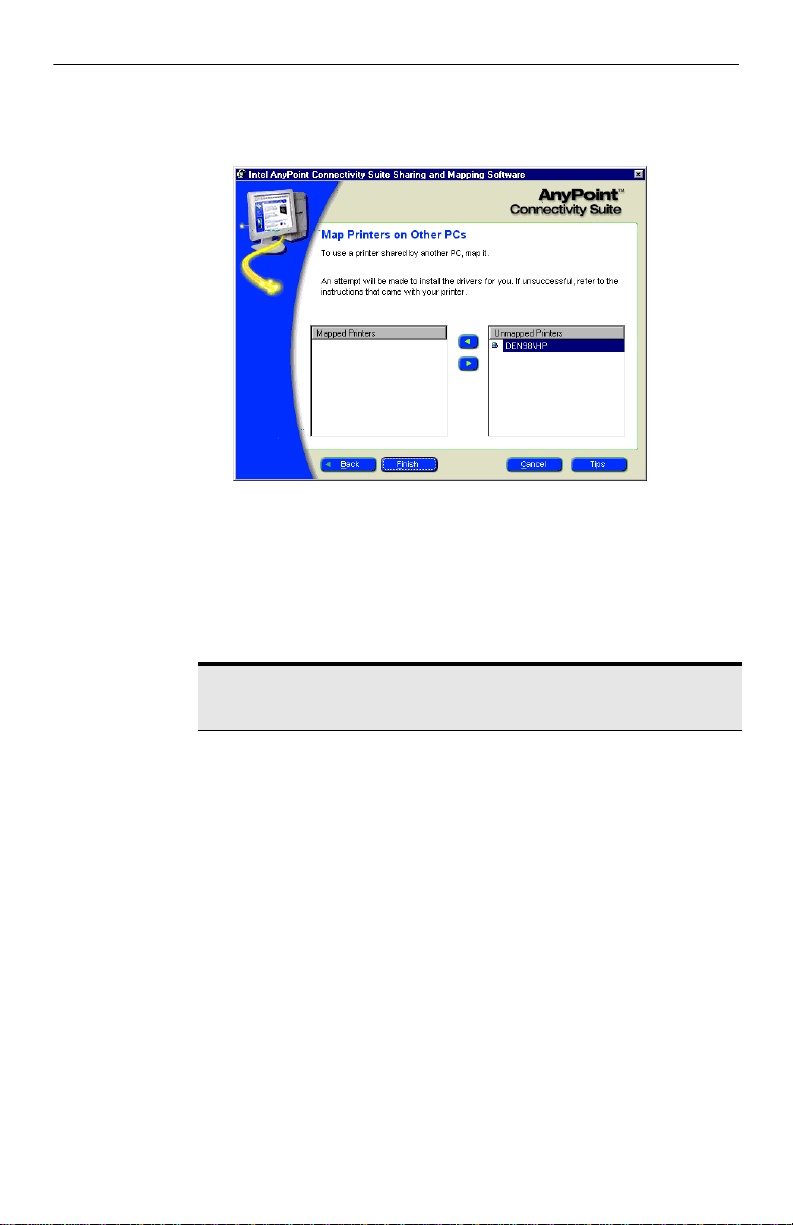
Click Next. The Map Printers on Other PCs screen appears. To use a
shared printer, you need to map it. Printers are not mapped by default.
• Select the printer in the Unmapped Printers box then click the left
arrow to move it to the Mapped Printers box.
• Windows should start the Add Printer Wizard. Make sure you
have the printer software disks that came from the printer
manufacturer or with the printer. To add the printer, follow the
instructions on the screen.
Note: The screen does not appear if other networked PCs haven’t
shared their printers, or if al l oth er PCs are turned off.
To map another printer, repeat step 5.
6 Click Finish after mapping to your printers and drives.
Your printers and drive shares are set up for Sharing and Mapping!
Configure the Internet Sharing Software (ISS) server
See "What is
Internet Sharing
Software (ISS)?"
on page 9
18
.
Now that you have finished installing the software and configuring shared
drives and printers, you are rea dy to conf igure the ISS serve r. This includes
configuring the network’s:
• Connection settings
• Firewall
Page 23
Set Up the AnyPoint™ Wireless II Network CHAPTER 2
• Parental Control for Web site filtering
Importa nt: If you are usin g a gateway or access point in yo ur
network, do not install ISS. Refer to the documentation f or tho se
devices for instructions on connecting to the Internet.
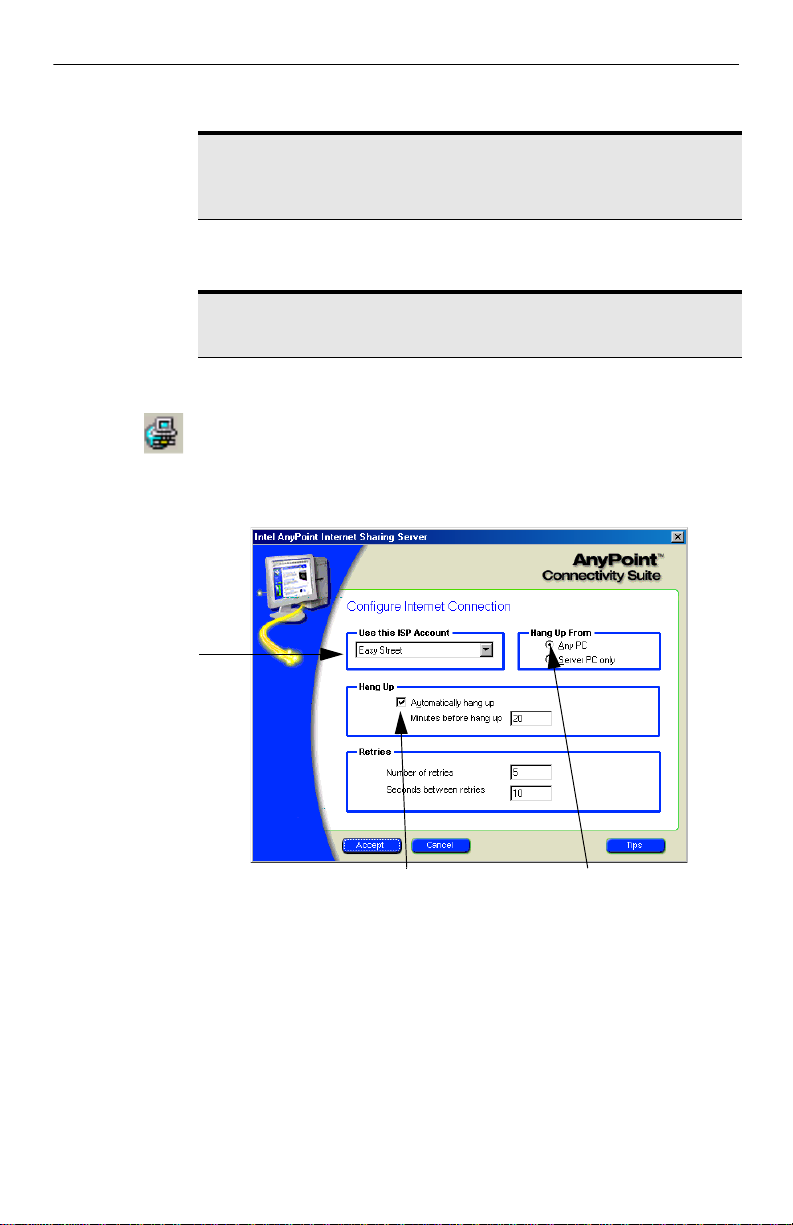
Configure the ISS connection
Note: If you use a DSL service, cable modem, or other continuous
connection, the only set t in g yo u can change is the default ISP.
To configure the ISS connection:
At the ISS server PC, open ISS by double-clicking the ISS icon in the
1
taskbar.
2 Click Configure. The Internet sharing server screen appears.
To change the
default ISP , select
an account name
from the list.
Type the number
of times you want
ISS to redial
when the line is
busy and the
number of
seconds to wait
between redials.
Type the number of minutes of
inactivity you want ISS to wait
before ending the Internet
connection. T o disable automatic
hang up, uncheck Automatically
hang up.
3 Click Accept. The changes take effect the next time you connect to the
Select whether Any PC should
be able to hang up the
connection, or whether this
should be allowed from the ISS
Server PC only.
Internet through ISS.
19
Page 24

CHAPTER 2 Set Up the AnyPoint™ Wireless II Network
Set up the Firewall
See "What is a
Firewall?" on
page 9.
The AnyPoint Connectivity So ftware Suite includes a Firewall, which
helps protect your network from hackers trying to gain access. By defaul t,
the Firewall is enabled when you install the ISS server software.
Importa nt: If you use a third-party Firewall prod uct other th an
BlackICE Defender (suc h as N orton Internet Security* or McAfee) ,
reinstall the ISS portion of the AnyPoint software after installing the
firewall software. Use the instructions in
software" on page 11
need to make additional configuration changes to use the ot her
manufacturer’s Internet security software (see manufacturer’s
manual) with your AnyPoint Wireless II Network .
(be sure to install as an ISS server). You may
"Install the AnyPoint
If you already have BlackICE Defender* by NetworkICE installed on your
system, you ma y want to choo se betw een An yPoint or Black ICE Fire wall s.
For details, review the following table.
If you have BlackICE
installed
and you want to use BlackICE:
1 Uninstall BlackICE Defender
software using instructions
from the manufacturer.
2 Disable the Anypoint Firewall
through the ISS software (see
page 22).
3 Restart the PC.
4 Reinstall BlackICE Defender.
If you do not have BlackICE
installed
and you want to use BlackICE:
1 Disable the Anypoint Firewall
through the ISS software (see
page 22).
2 Restart the PC.
3 Install BlackICE Defender
software using instructions
from the manufacturer.
20
and you want th e ISS Firewall:
Uninstall BlackICE Defender
1
software using instructions
from the manufacturer.
2 Restart the PC.
3 Install the AnyPoint Internet
Sharing Software (ISS) on the
Server PC.
and you want th e ISS Firewall:
Proceed with normal ISS
configuration instructions.
Page 25

Set Up the AnyPoint™ Wireless II Network CHAPTER 2
Select a securi ty le vel
The Firewall has four security levels: Paranoid (most restrictive),
Nervous, Cautious, and Trusting (least restrictive).
Security Level Description
Paranoid
Blocks all inbound intrusions and restricts some
Web browsing and interactive content.
Nervous
Restricts some interactive content on Web sites.
Does not affect streaming media and other
application-specific Internet usage.
Cautious (default) Blocks some inbound i ntrusions and does not
interfere with normal Internet us age. This settin g
is best for regular use of the Internet.
Trusting
Blocks file sharing over the Internet. Internet file
sharing allows the user to share file s on their di sk
with others across the Internet. Blocking Internet
file sharing ensures that hackers cannot
download files to your computer. Does not affect
file sharing on yo ur A ny Point network, even
though Internet file sharing is disabled.
Change the se curit y l ev el
By default, the security level is set to Cautious, which prevents many
common Internet attacks while still letting y ou use most Internet prog rams.
To change the security level:
Double-click the ISS icon to open ISS.
1
Note: When you click on the IS S ser ver icon and select the
Firewall tab, the
Status tells you if the Firewall is running. The More Information
button provides details about your Firewall.
Status and More Information buttons appear.
21
Page 26

CHAPTER 2 Set Up the AnyPoint™ Wireless II Network
2
Click the Firewall tab. The security level screen appears.
3 Select the desired security level, then click Apply.
Disable the Firewall
If you do not want the protection of the Firewall (for example, if you have
another Firewall program), you can choose to turn it off.
To disable the Firewall:
1
Double-click the ISS icon to open ISS.
2 Click the Firewall tab.
22
3 Click to clear the Enable Firewall check box, and click Apply.
4 At the prompt to restart your PC, click Yes.
Page 27

Set Up the AnyPoint™ Wireless II Network CHAPTER 2
Set up Parental Control
See "What is Web
site filtering?" on
page 10.
Setting up and changing the Parental Control password
The Parental Control feature lets you filter the Web sites each PC can visit.
With Parental Control, you can assign different restrictions to each PC
running ISS. You can also specifically block or approve different sites. You
must use the ISS server to set up Web site filtering features. Also, client
PCs on the network must enter the Internet through the server for Parental
Control features to operate. If a client PC dials the Internet through a
separate modem, Parental Control features will not operate or protect the
client PC.
To set up a password:
Click Start > AnyPoint software > Internet Sharing Server.
1
2 Click the Parental Control tab.
3 Type a password and click OK.
The password can have up to 15 characters, including any combination
of letters (A-Z), numerals (0-9), and dashes (-)
T o cha nge th e P arent al Con tro l pass word , clic k
Change. At the dialog box,
type the old password, new password, and confirmation.
Set up the Server and Client PCs
Before you can set up a client PC on the Parental Control tab of the
Internet Sharing Server, launch a Web browser at a client PC and connect to
the Internet.
To set up the server and client PCs:
From the client PC, verify that you ca n access the Internet. Open your
1
Web browser and access any Internet site. The server PC connects and
the client displays the Web page.
2 From the ISS server PC, refresh the Parental Control tab (click another
tab and then click
You should now see the client PC you want to configure on the
Parental Control tab.
Parental Control).
23
Page 28

CHAPTER 2 Set Up the AnyPoint™ Wireless II Network
Configure Parent a l Co nt r o l
To configure Parental Control:
Double-click the ISS icon to open ISS.
1
2 Click the Parental Control tab.
3 T ype the pa ss word , if p rompt ed . You are prompte d for a pa sswo rd on ly
if you entered one while running the Setup prog ra m. Remem ber, the
password is case-sensitive.
From the list of
PCs, click t he
one you want to
configure.
24
Choose the type of Web access control for
that PC:
• To disable Parental Control for the
selected PC, keep the setting at No
restrictions (default).
• To block material in predefined
categories, click Automatically filter
Web si tes.
• To allow access to only specific W eb sites,
click Allow these sites only.
To specify exceptions to
automatic filtering or to set up
the Web sites that this PC can
visit, Click Configure. See
“Set up exceptions to
automatic filtering” later in thi s
chapter for more information.
Set up exceptions to automatic filtering
The automatic filtering mechanism in Parental Control blocks sites based
on its analysis of their content. Sometimes innocent sites (news sites, for
example) include language or other content that looks suspic ious to the
software, so it blocks t hem. If Parental Control blocks sites you want a PC
to be able to visit, you can configure Parental Control to ignore those sites.
To set up exceptions for automatic filtering:
From the list of PCs in the Parental Control tab, c lick the one you want
1
to configure.
Page 29

Set Up the AnyPoint™ Wireless II Network CHAPTER 2
2
Click Automatically filter Web sites, and then click Configure.
Click Add to set
up the sites the
PC can visit.
Click Add to
specify sites you
want to block.
Type the Web
address (URL),
and click OK.
Configure a PC to visit onl y certai n We b sites
You may want to allow a PC to visit only specific Web sites, regardless of
how Parental Control would normally handle the sites. For example, you
might want the PC for a child or employee to be restricted to visiting sites
in a favorites list that you define for its Web browser. It’s important to
remember that Parental Control blocks access to all sites except the ones
you specify, but
restriction methods.
To configure a P C to visit only certain Web sites:
1
From the list of PCs, click the one you want to configure.
2 Click Allow these sites only, and then click Configure.
3 Once you see the configure screen, click Add to set up the sites the PC
can visit.
4 Type the Web address (URL), and click OK.
does not filter the sites you specify with its normal
25
Page 30

CHAPTER 2 Set Up the AnyPoint™ Wireless II Network
Set up AnyPoint Connectivity Suite Extras
Note: The extras you receive will vary, depending on your
operating system an d the AnyPoint software version in your PC.
Click Start > Programs > Intel AnyPoint Network > AnyPoint Extras to
select the AnyPoint Connectivity Suite extras:
Registration
26
From the PC that you have designate d as t he server, a registration screen
appears in a da y or s o . I t as ks you questions that help u s se r v e yo u better in
the future. If you wish, you can fill it out at a more convenient time.
Page 31

Share Drives and Printers
. . . . . . . . . . . . . . . . . . . . . . . . . . . . . . . . . .
This chapter explains how to use and change shared drives and printers
after you’ve set up the AnyPoint™ Wireless II Network. For conceptual
information, see "W hat is sharing and mapping?" on page 8.
Note: Windows* 2000 user s can set different mapping
configurations for se par at e ac counts so that they can use a laptop
at home on one account and use the other account at work. Refer
to "How do I use my Wireless I I laptop in different locations?" on
page 5 for more information.
Use network drives
3
See "What is
sharing and
mapping?" on
page 8.
When a PC shares a drive, other users on the network can share information
on the drive as though it were directly attach ed to th e ir PC. Wh en yo u map
to a shared drive, you allow your PC to access shared drives on other PCs in
your network.
For example, to view the shared drives and printers on your home network,
double-click
for a PC to see that PC’s shared drives and printers. In this example, the
Kitchen PC is sharing drives C and D and a printer.
Note: For Windows 2000 and W indows Millennium Edition
(Windows Me) users, w hen you are instructed to look in
Neighborhood
Network Neighborhood on t he desktop. Double -click the icon
Network
, look in My Network Places.
27
Page 32

CHAPTER 3 Share Drives and Printers
It may take several minute s for the PC to ap pear in Networ k Neighbor hood.
If it does not appear, see "I can’t see a network PC from ano the r PC" on
page 51.
You can view the mapped drives on your own PC by looking in the
following places:
• Network Neighborhood
• My Computer
• Windows desktop icons (shortcuts)
• Open and Save file di alog boxes
• Sharing and Mapping Software
• Windows Explorer
Note: If you are a Windows 2000 user and have installed the
AnyPoint Connection Manager (ACM), the sharing and m apping
software only shares information for the drives when it detects an
AnyPoint adapter in the ac tive profile. With a different network
profile, different shared drives are visible.
Use files across the net work
When you have access to drives from other PCs on the network, you can
open files as though the drive is physically attached to your PC.
Drive access
What you can do with
the other PC’s drive
Open files on this drive yes yes no
Save files on this drive yes no no
Copy files to this drive yes no no
Copy files from this drive yes yes no
Delete files on this drive yes no no
Print files on this drive yes yes no
Shared - Full
Shared -
Read Only
Viewing video files across the ne twork
Video files that you download off the Internet (or create with a PC camera)
can be viewed on most connected PCs. PCs with less than 32MB of RAM
may experience problems viewing video. PCs with Pentium II processors
(and later versions) using 64 MB RAM (or more) and Windows Media
28
Not Shared
Page 33

Share Drives and Printers CHAPTER 3
Player (default on most Windows PCs and availa ble for free download
from Microsoft’s website) are rec ommended. Simply open Windows
Explorer and double-click on the video file you wish to view.
Certain video formats may r equi re installati on of additio nal so ftware call ed
a codec (compression/decompressi on). The codec allows the PC to
uncompress the video f or mat, such as the DiVX codec for certain MPEG4
videos. You can use Media Player to automatically download and install
many of these codecs for you.
Note: Third party software, such as SnapStream PVS*
(www.snapstream.com), offers additional video sharing and TV
recording capabilitie s and makes sharing video co nt ent on your
Wireless II network simpler and more enjoyable.”
Change drive sharing and mapping
When you first view the Sharing and Mapping screens, the following
defaults are applied to your drives:
• All drives are shared except diskette drives.
• All shared drives have
• All shared drives are mapped.
Shared - Read Only access.
Change drive access
Changing access to your drives will allow (or prevent) others from
changing files on your PC.
To change drive access (at the PC physically attached to the drive):
Click Start > Programs > Intel AnyPoint Network > Sharing and
1
Mapping Software
2 On the Share Drives with Other PCs screen, right-click the drive you
want to change access.
3 Select the access level you want to assign to the selected drive (Shared,
Shared - Read Only, or Shared - Full).
4 Click Next until the Finish bu tto n ap pe a r s , the n click Finish.
.
29
Page 34

CHAPTER 3 Share Drives and Printers
Change drive mapping
To change mapping for a specific drive (at the PC from which you
access a shared drive):
1
Click Start > Programs > Intel AnyPoint Network > Sharing and
Mapping Software
Note: If your PC detects new drive s or pr inte rs to shar e or m ap,
the AnyPoint Sharing and Mapping Software runs automaticall y.
2 Click Next until the Map Drives on other PCs screen appears.
.
Select the drive and then click the appropriate arrow (right or left)
when you want to move it f r om one box to the other. For example, if
you do not want to map the Kitchen’s C drive, select it, then click the
right arrow to move it from the
Drives
box.
3 Click Next until you have finished mapping drives. Then, click Finish.
Mapped Drives box to the Unmapped
Change printer sharing and mapping
You can use the AnyPoint Sharing and Mapping Software to change how
you share and map printers with other net w orked PCs.
Change printer sharing
To change printer sharing (at the PC physically attached to the printer):
1
Click Start > Programs > Intel AnyPoint Network > Sharing and
Mapping Software
2 Click Next until the Share Printers with Other PCs screen appears.
3 Right-click the printer you want to change.
4 Select Shared to share a printer. Select Not Shared to stop sharing.
5 Click Next until you have completed sharing printe rs. Then click
Finish.
Change printer mapping
To change printer mapping (at the PC from which you want to use the
network pri nter):
1
Click Start > Programs > Intel AnyPoint Network > Sharing and
Mapping Software
2 Click Next until the Map Printers on other PCs screen appears.
30
.
.
Page 35

Share Drives and Printers CHAPTER 3
3
Select the printer from the Unmapped Printers box and click the leftarrow button to move it to the
4 Windows starts the Add Printer Wizard. Make sure you have the
driver disk(s) for the printer
Mapped Printers box.
(you may need them). To add the printer
driver, follow the instructions on the screen.
5 To map another printer, repeat steps 3 and 4.
6 On the Map Printers on other PCs screen, Click Finish.
Install printer drivers
To map a network printer, its printer driver must be installed on each PC
that will print to that printer. The printer driver is software that enables your
PC to communicate with that particular kind of printer.
When mapping a printer, the Sharing and Mapping So ftware automatically
runs the Windows Add Printer Wizard and tries to copy the printer drivers
from the PC attached to the printer. If this doesn’t work, you may need to
install the printer drivers manually using the printer software.
Some printers come with custom installation software. These printers do
not use the Windows Add Printer Wizard to install and configure the
printer. To map a printer that uses custom installation software, first
manually install the printer software on each PC that will use the printer.
Refer to the printer documentation for installation procedures.
Unmap a printer
To unmap a printer (at the PC that no longer needs access to the
network pri nter):
Click Start > Programs > Intel AnyPoint Network > Sharing and
1
Mapping Software
2 Click Next several times until the Map Printers on other PCs screen
appears.
3 Click the printer in the Mapp ed Printers box then click the left-arrow
button to move it to the
4 To unmap another printer, repeat step 3; otherwise, click Finish.
.
Unmapped Printers box.
31
Page 36

CHAPTER 3 Share Drives and Printers
Share and map automatically
When new drives or pri nters are added to your n e twork, the AnyPoint
Sharing and Mapping software detects them and automatically offers you
the opportunity to share or map them.
To disable automatic sharing and mapping:
Click Don’t prompt when there are new drives or printers in the message
box.
To enable automatic sharing and mapping:
Click Start > Programs > Intel AnyPoint Network > Sharing and
1
Mapping Software
2 Click the system menu in the upper -l eft corner of the title b ar , and clic k
Automatic Prompt.
.
Multiple user profiles
Multiple user profiles let different people who use the same PC customize
their Windows settings. A user profile becomes active when the user logs
on to the network at a PC with multip le user pro files turne d on, usin g his or
her unique user name and password.
Note: If a PC has multi ple user profiles, each user must map the
network drives they want to access.
To find out if your PC has multiple user profiles, click Start > Settings >
Control Panel > Passwords > User Profiles
computer use the same preferences and desktop settings
multiple user profiles are turned off.
32
tab. If All users of this
is selected,
Page 37

Connect to the Internet CHAPTER 4
Connect to the Internet
. . . . . . . . . . . . . . . . . . . . . . . . . . . . . . . . . .
With AnyPoint™ Internet Sharing Software (ISS), you can connect to the
Internet on multiple PCs at the same time, all with just on e modem and one
Internet or broadband cable account. The PC with the Internet connection is
called the ISS server, and all the other PCs on the netwo r k that are sharing
the Internet account through the ISS server are called ISS clients.
Important: If you have installed your AnyPoint Wireless II adapter
into a network through an access point or a gateway, ISS and its
features are not available. Refer to documentation for those
devices for instructions on connecting to the Internet.
Note: If you are using Virtual Private network (VPN) software, refer
to
"Connecting with Virtual Private Network (VPN)" on page 37.
Refer also to the
www.intel.com/anypoint/support/ for information.
Connect to the Inte rnet using I SS
T o see if IS S is ru nnin g on the IS S serv er, look for the ISS icon on the right
side of the Windows* taskbar. If the icon is present, ISS is running.
If the icon is not present, you can manually start ISS on the server by
selecting
Server
Start > Programs > Intel AnyPoint Network > Internet Sharing
.
AnyPoint Wireless II Network Onl ine Support site,
4
Connect from the ISS server
To connect from the ISS server:
Make sure that ISS is running on your ISS server PC.
1
2 Start an Internet browser (such as Netscape Navigator* or Microsoft
Internet Explorer*), and ISS automatically connec ts y ou to th e Int erne t.
Note: To close the shared Internet connection from the server PC,
double-click the ISS icon in the status area of the Windows taskbar,
and select Hang Up.
33
Page 38

CHAPTER 4 Connect to the Internet
Connect from an ISS client
1 Make sure the ISS server PC is turned on and that ISS is running.
Even though the se rver PC does not need to b e connected to the
Internet, it does need to be running ISS.
2 At the ISS client, star t any Internet program (su c h as a web browser).
ISS automatically connects the ISS server to the Internet and shares the
connection with the ISS client. If AOL*, AT&T WorldNet*,
CompuServe* 2000 , Gateway.net*, or Prodigy* is your Internet
Service Provider, see "Internet Service Provider Reference" on page 63.
Reading mail after connecting to ISS
When your server and client PCs are connected to ISS, keep the following
notes in mind:
• Only your server PC needs to connect to your primar y Internet Service
Provider (ISP).
• The client PCs do not need to have a modem for you to read e-ma il; just
run the mail application and mail is retrieved through the ISS server.
During installation of ISS, you can configure your mail application to
connect to a LAN and not a dial-up connection.
• You can download e-mail from a server or a client PC.
• Utilize a co mmo n “Mbox” on your network so tha t all P Cs can vi ew all
e-mail. refer to your email documentation for details.
34
Disconnect or hang up from the ISS server
1 Double-click the ISS icon and click Hang Up.
2 If you can’t hang up the Internet connection by clicking Hang Up, exit
ISS to close the connection.
3 Restart the ISS server from the Start menu.
Note: You cannot hang up a continuous connection like DSL or
cable modems.
Page 39

Connect to the Internet CHAPTER 4
Disconnect or hang up from an ISS client
From an ISS client, you can close the shared connection only if the settings
on the ISS server allow any PC to hang up. When any PC hangs up the
shared connection, t he connection closes for all PCs on the network.
• To disconnect or hang up from an ISS client without hanging up the
shared connection, quit all Internet programs on the ISS client.
• T o end the ne twork ’s shared Internet connection and disconnect all
PCs, double-click the ISS icon, and click
available, the I SS server has not granted permission for clients to end
the connection, or, in the case of continuous connections like cable
modems and DSL lines, you cannot disconnect the connection.
Hang Up. If Hang Up is not
Exiting or bypassing ISS when connecting to the Internet
If you need to connect your PC to the Internet without using the AnyPoint
Internet Sharing Software, use these instructions to e xit or bypass ISS.
Choose one of two methods of connecting to the Internet without ISS:
• Exit ISS from the ISS server to prevent all PCs on the network from
using the shared Internet connection, or
• Bypass ISS from any PC. This bypasses ISS only on th at PC.
None of the ISS services are available in th is mode of operation.
Note: If your network uses a gateway or an access point, refer to
the documentation for th ese devices for connecting to the Int ern et .
Exit ISS from the ISS server
To prevent all PCs on the network from using the shared connection, quit
ISS at the ISS server. This closes the ISS window and disconnects all
network PCs from the shared Internet connection.
To quit ISS:
At the server PC, right-click the ISS icon on the right side of the
1
Windows taskbar.
2 Click Exit.
ISS starts again when you restart the ISS server PC or when you start ISS
manually at the ISS server.
35
Page 40

CHAPTER 4 Connect to the Internet
Bypass ISS from any PC
You can bypass ISS at either an ISS cl ient or at the ISS server. You m ight
want to bypas s IS S i n ord er to pla y a no n-Inte rnet gam e with an ot her PC o n
your AnyPoint™ Wireless II Net w ork. To bypass ISS, right-click the ISS
icon on the taskbar, and clic k to dese le ct
Through ISS
Note: ISS clients can use the shared Internet connection even
when the server PC has bypassed ISS.
Note: If you have questions abou t connectin g to the Internet, you can
.
refer to the AnyPoint Wireless II Network Online Support site,
www.intel.com/anypoint/support/.
To undo the ISS bypass and share the Internet connection, right-click the
ISS icon in the status area, and click to select
Through ISS
.
Internet Programs Connect
Internet Programs Connect
Note: If you bypass ISS and then res ta rt the PC , IS S re m ai ns
bypassed. Click the ISS icon in the service tray to re-enable.
View connection status and settings
To view the connection settings and status at any PC, double-click the
ISS icon, then click the
Connection tab.
You can view the connection status and settings from either the ISS server
or an ISS client, but you can change the settings only at the ISS server.
Change the ISS server
You can either add a new PC to the network and designate it as the ISS
server or you can make an existing ISS client the ISS server. Remember
that the ISS server must have a way to connect to the Internet. If possible,
you should choose the PC with the fastest Interne t connectio n as the se rver.
There can be only one ISS server on the network.
36
Page 41

Connect to the Internet CHAPTER 4
To change the ISS server:
1
At each PC, click Start and then click Shut Down.
2 If there is already an ISS server on the network, re i nst all the AnyPoint
software on the ISS server, and choose
ISS client in the server/client
setup screen.
3 Turn on the PC that you want as the new ISS server.
4 Install (or reinstall) the AnyPoint software on the new server PC, and
choose
ISS server in the server/client setup screen.
5 Restart the new ISS server.
6 Restart the other PC s on the network.
Connecting with Virtual Priv ate Network ( VPN)
Importa nt: If you use or plan to install a VPN, you wi ll no t wan t to
install Internet Sharing Softw are (ISS). To optim iz e your network
with VPN, you may want to consider purchasing a Wireless
Gateway or use Micro sof t ’s Internet Connection Software (ICS)
provided with windows.
If you need more information on VPN, check the AnyPoint Wireless
II Network Online Support site at:
Importa nt: www.intel.com/anypoint/support/
A VPN is an encrypted network that provi des a secure private connection,
usually for a corporate network. If you use VPN, note the following:
• We recommend an 802.11b Wireless Gateway, which work s with most
VPNs. See
www.intel.com/anypoint for more information.
• Without a gateway, install the AnyPoint Connectivity Software Suite,
but choose not to install Internet Sharing Software when prompted. If
users have a Win98 SE (or higher), install Microsoft’s ICS to share
Internet access.
• Do not install the VPN client software on the sam e computer as the ICS
server (the computer with the Internet connection).
With these considerations in mind, refer to your VPN manual for
installation instructions.
37
Page 42

CHAPTER 5 Managing your Wireless II Network
Managing your Wireless II
Network
. . . . . . . . . . . . . . . . . . . . . . . . . . . . . . . . . .
When you installed your AnyPoint™ Wireless II adapter, you configured
your adapter settings to work in your primary network. For desktop PCs,
you rarely need to change these settings. For laptop PCs that you want to
use in different locations, you need to change the settings everytime you
connect to anot he r ne tw or k .
This chapter describes various tasks you might enc ounter when managing
your Wireless II network.
Note: For a description of all netw orking concepts, refer to
Understanding your AnyPoint™ Wireless II Network on page 1.
Using the AnyPoint Connection Manager
You can use the AnyPoint Connection Manager to edit wireless settings,
create profiles, and connect to any network profile. You can use one of two
tabs:
Wireless Control Panel tab
Use the Wireless Control Panel (WCP) tab to view or edit current
wireless settings, such as Network ID code (SSID), Mode (Peer-to-peer or
Infrastructure), channel, header, and encryption keys. This tab is the first
screen you see when you open the AnyPoint Connection Manager.
On desktop PCs, you can view and edit the settings on this tab when you
are changing your network, such as adding a new PC or gateway. On laptop
PCs, you can easily change settings on this tab to connect to a different
network.
5
Profile Manager tab
Use the Profile Manager tab to create, edit, and switch profiles. Profiles
contain all the wireless settings and operating system settings such as
shared drives, printer s , browsers, TCP/IP addressing, and windows
settings. You can also use this tab to
public access points on page 42 for details.
38
Scan for other networks. See Scan for
Page 43

Managing your Wireless II Network CHAPTER 5
Y ou may use this tab frequently if you carry your laptop from home to work
or to public access points. It provides a wizard for changing basic settings.
Once you select and connect to a given profile, the connection manager
software loads the appropriate settings.
View and edit current settings using the Wireless Control Panel tab
You can view and edit current wireless settings using the Wireless Control
Panel. When you open the AnyPoint Connection manager, you see the
Control Panel tab.
Wireless Control Panel shows you Status, Statistics, and Wireless
The
Settings.
Note: To get more details for each of the settings, click Help on the
Wireless Control Panel screen.
• Status - Shows the basic connection settings. The settings include
network ID code, operating mode, and encryption. If you click
you will see additional wireless settings.
• Statistics:
Signal strength - This provides an indication of how well your
•
adapter is receiving and transmitting ra d io sig nals. To maximize the
signal strength , you can move your la ptop P C to various locations of
your room, or you can adjust the ant enna on your USB adapter.
Details,
39
Page 44

CHAPTER 5 Managing your Wireless II Network
• Signal quality - This prov ides an indication of how much
background noise is interfering with your signal. Poor signal quality
may mean you are too close to a microwave or cordless phone in
operation.
Wireless settings - Provides an Edit button to modif y yo ur s et tings. If
•
you want to edit settings for a network that has all AnyPoint devices,
select AnyPoint wireless network. You will see a series of Wizard
screens with current values. You can change any value in the screens.
Or, if you want to edit settings for a ne twork does not have all
AnyPoint devices, choose
Once you make your cha nges, click
Manual wireless networ k conf iguration.
Finish to keep all changes.
Activate a profile
The Profile tab of the AnyPoint Connection Manager lists all available
profiles on your computer. When you installed your adapter, the profile
manager automatically created a default pr ofile, named AnyPoint. Each
time you create a new profile, the name is added to the list on the
Manager
To activate an existing profile on your Profile Manager tab:
1
tab.
Click Start > Programs > Intel AnyPoint Network > AnyPoint
Connection Manager
. You can also click the AnyPoint Connection
Manager icon in the lower right service tray.
2 Click Profile Manager. The Profile Manager screen and the list of
current profiles will appear.
Profile
40
3 Click one of the pro files listed under the Profile Name column.
Page 45

Managing your Wireless II Network CHAPTER 5
4
Select Activate then Close. Your computer will load the settings for the
selected profile and reboot if necessary.
Creating a new profile
If you plan to use your laptop in several networks, you can create a profile
for each network. All profiles contain the wireless and operating system
settings including:
• profile name
• profile network configuration type
• network mode
• encryption
• Windows network settings
What are the profile configuration types?
With your Wireless II network, there are two ways to configure profiles:
1 AnyPoint wireless network configuration - Choose this profile type if
your network uses on ly An yPoin t Wireless II devices. This profile type
is the easiest to create. The profile wizard merely asks you for a name
and password, and an encryption code. Using your input, the software
defaults the other settings.
2 Manual wireless network configuration - Choose this profile type if
your network includes any wireless adapter (using 802.11b technology)
other than an AnyPoint Wireless II adapter. In this case, the profile
wizard prompts you for more input for specific 802.11b setting s .
What are the profi le modes?
When you create a profile, you will select one of two profile modes: Peer-
to-Peer
(or ad hoc) mode or the Infrastructure mode.
Before you can make that decision, you must know which type of profile
you want to create. To help you decide, consider the following options.
Configure a n Infrastructure profile if you want to connect:
• to a public access point, such as an airport or coffee house.
• to a home or small office network with a gateway.
• to a corporate wired network or in a network that uses a gat eway.
Configure a Peer-to-Peer profile if you want to connect to:
• a home or small office network with only PCs (and no gateway).
41
Page 46

CHAPTER 5 Managing your Wireless II Network
Refer to one of the remaining sections that best represents the type of
network profile you want to creat e. The steps in each section help you
select profile type, mode, and 802.11b settings for each.
Note: For information explaining the technical differences between
the mode variations, see page 3.
Scan for public access points
The Profile Manager tab of the AnyPoint Connection Manager includes a
button to scan for access points. If you want to see if any access points are
in range of your adapter, click the
To scan for public access points:
From the Profile Manager tab of the AnyPoint Conne ction Manager,
1
Scan. The Detect Wireless Access Points screen appears. You
click
will see a listing of all access points in the area.
Scan button.
42
2 Click the access point you want to connect to.
3 Click Connect to obtain all the settings for that access point. If
encryption is not needed for the access point, the
Access Point
screen disappears and you will be connected.
Detect Wireless
Page 47

Managing your Wireless II Network CHAPTER 5
If the network has encryption, you will see the Enter the Encryption
Key
screen.
If you are ac cess in g an An yP oint ne two rk, you c an e nter a pas sw ord. If
not, manually enter the Enc r yption number and key for the access
point.
Create a profile for a public access point
Note: These instructions represent an example of an infrastructure
network. For conceptual information, refer to
page 4.
The following instructions hel p you to create a profile that connects your
laptop to a public access point.
The administrator for the network must provide you with the values of all
the settings, like the network ID code (SSID), channel, and encryption
codes. Open the AnyPoint™ Connection Manager and use the followi ng
instructions to start a new profile and enter those settings.
Note: For any screen or dialog box tha t appears on your monitor,
you can click
Help to provide more informatio n.
Infrastructure mod e on
43
Page 48

CHAPTER 5 Managing your Wireless II Network
To create a profile connecting your PC to an access point (AP):
1
Click Start > Programs > Intel AnyPoint Network > AnyPoint
Connection Manager
. Alternatively, you can click the AnyPoint
Connection Ma nager icon in the service tray.
2 Click the Profile Mana ger tab . You will see the Profile Manager scree n
and the list of current profiles.
3 Click New. The Create New Profile screen appears.
4 Type a Profile name for your new profile, a brief Description, then
click
Next. The Choose a profile Configuration screen appears.
44
5 Since you are creating a profile for a network that uses an access point,
a gateway, or adapters that are not Anypoint Wireless II adapters, select
Manual
Wireless Network Configuration.
6 Click Next. The Wireless Settings screen appears.
Page 49

Managing your Wireless II Network CHAPTER 5
Enter these settings:
• Mode
• Network ID code (SSID)
• Transfer Rate
• Preamble (or header)
• Channel
For a description of each, click Help .
7 Click Next. The Encryption (WEP) Key screen appears.
8 Select the encryption security level (either 40/64 bit or 128 bit). Select
the default encr yption key (a number from 1 to 4). Then enter the
encryption key in hexad eci mal characters. For more information, click
Help.
Note: The Hexadecimal ch aracter set consists of alpha-numeric
characters 0 through 9 a nd A through F.
9 Click Next. The Finish screen appea rs. C lick Finish to add your profile
to the profile list of the AnyPoint Connection Manager.
If you want to activate the profile immediately, go to the AnyPoint
profile Manager tab, select the profile you created and click
Activate. If
you want to wait and connect later, refer to Activate a profile on
page 40.
45
Page 50

CHAPTER 5 Managing your Wireless II Network
Create an AnyPoint profile for your home or small office
Note: These instructions do not cover installing home or small
office networks with gatewa ys or access points. See the
instructions in the documentatio n for those devices.
The following instructions help you create a profile to use in your home or
small business office. These instructions illustrate a Peer-to-Peer network.
For conceptual information, refer to Peer-to-Peer mode on page 3. Use
these instructions if you are creating a pro file that us es only An y Poi nt
devices.
To create a new AnyPoint profile.
1
Click Start > Programs > Intel AnyPoint Network > AnyPoint
Connection Manager
Connection Ma nager icon in the service tray
2 Click the Profile Mana ger tab . You will see the Profile Manager scree n
and the list of current profiles.
3 Click New. The Choose a Profile Name screen appears.
. Alternatively, you can click the AnyPoint
46
Page 51

Managing your Wireless II Network CHAPTER 5
4
Type a Profile Name for your new profile, a brief Profile Description,
then click
5 Select the AnyPoint Wireless Network Configuration type (only if all
devices in your netwo r k are An yPoint hardware). Click
Choose a Network Mode screen appears.
Next. The Choose a Profile Configuration screen appears.
Next. The
47
Page 52

CHAPTER 5 Managing your Wireless II Network
6
Select Peer-to-Peer (Connect directly to other PCs) an d c lic k Next.
Choose a Network ID Code screen appears.
The
7 Create and type a unique network ID code (SSID). The code you create
must be 32 characters or less. The code is case-sensitive. Use this same
code for all the PCs in the network. Make sure the
additional LAN settings
8 Click Next. The Data Encryption screen appears.
box is left unchecked.
I want to configure
48
Page 53

Managing your Wireless II Network CHAPTER 5
Importa nt: Data Encryption is the method that the wireless
communications industry uses to ensure secure transmission of
your data. It is an 802.11b standard.
Create and type an encryption password. The code you create must be
32 characters or less. The code is case-sensitive. Enter the same code
for all the peer PCs in the network.
For more information describing the encryption password, see What
are Wireless II adapter and operating system settings? on page 6.
If you are not concerned with security of your tra nsm itted data, ch e ck
Disable Data Encryption box. This will slightly increase the
the
performance of any data transfer between PCs. Unchecking the box
will slightly decrease the performance, but will increase security. We
recommend leaving the box unchecked. Click
Next. The Finished
screen appears.
9 Click Finish. Your profile will be added to the existing Profile
Manager
tab of the AnyPoint C onnection Manager.
If you want to activate the profile immediately, go to the AnyPoint
profile Manager tab, select the profile you created and click Activate. If
you want to connect later, refer to Activate a profile on page 40.
49
Page 54

CHAPTER 5 Managing your Wireless II Network
Create a profile for a corporate wired network
Importa nt: If you connect your la ptop t o a corporate network,
contact an MIS or IT representative.
In the off ice env iro nment, lapt op s e quipp ed wi th w ireles s networ k a dap ters
connect to the corporate network through an access point or gateway, which
acts as a bridge to connect your wireless laptop to the hard-wired
infrastructure of your office network. Often, access points are mounted on
walls or ceilings, so users can access the corporate network from any
location in the building or campus.
Once connected, your laptop functions in the same way on the corporate
network as it does usin g a wired connection.
Use AnyPoint Connection Manager to create your corporate network
profile. Your IT representative can provide val ues for any of the wireless
settings listed below.
• Profile Name
• Profile Description (optional)
• Profile Type
• Mode
• Network ID (SSID or ESSID)
• Transfer Rate (TxRate)
• Preamble (header) Length
• Channel
• Encryption Level (WEP)
• Encryption Password
• Manually entered encryption key (optional)
• IP Address (manual or auto assigned)
• DNS Server Address (manual or auto assigned)
• Automatically Detect Proxy Settings
• Automatic Proxy Configura tio n Scrip t
• Use Proxy Server
• Do not use Proxy Server for Intranet
• Use Same Proxy Server for all Protocols
• Proxy Excepti on s
50
Page 55

Troubleshooting
. . . . . . . . . . . . . . . . . . . . . . . . . . . . . . . . . .
This chapter addresse s some of the most common problems people have
with their AnyPoint™ Wireless II Network. If the information you need is
not here, check the AnyPoint Wireless II Network Online Support sit e at:
www.intel.com/anypoint/support/
I can’t see a network PC from another PC
First, make sure both PCs are turned on, and that the network adapters’
hardware and software are correctly installed . Follow these steps in order.
Make sure the adap ter s an d ca b les a r e in sta ll ed c orrec t ly
For information about installation and cables, refer to the Installation
Guide (the poster that came with your adapter).
Make sure you are l o gged o n t o t he ne tw ork
Restart all the PCs on the network. When Windows* restarts, the Enter
Network Password
settings. If it does appear, type a new user name (or accept the default),
create a password (optional), and then click
screen may appear, depending on your previous system
OK.
6
Do not click Cancel!
If you click Cancel, you will
not be on the network.
See page 15 for more information on user names and net w ork passwords.
Make sure the PC s o n t he n etwo rk ar e i n t he sam e wo rkgro up
To verify work group settings:
Click Start > Settings > Control Panel.
1
2 Double-click Network.
3 Click the Identification tab.
4 Change the Workgroup setting to the same name on all PCs.
51
Page 56

CHAPTER 6 Troubleshooting
Check the IP address and subnet mask on PCs running Windows* 95, Windows 98, and Windows Me
Most of the time, the AnyPoin t software o r W i ndows aut omatica lly sets t he
IP address and subnet mask on your PC. If you have problems, you can
manually specify an IP address.
To verify an IP address and subnet mask for your adapter:
Click Start then click Run.
1
2 In the Run box, ty pe “winipcfg” then click OK. The IP Configuration
appears,
screen
Note: For Windows 2000 Prof e ssi onal, view the IP address at the
command prompt. Then type the following: command
C:> ipconfig /all.
3 View the Intel AnyPoint Wireless II Adapter and verify that the
address is in the same subnet range (such as 192.254.10.10, subnet
255.255.255.0).
If you need to change the IP address, reference th e fol lowing URL,
www.intel.com/anypoint/support, and read the document entitled, “I
want to change my adapter's IP (Internet Protocol) address.”
I have an insufficient permissions error when running Windows 2000
Any user who is not a member of the Administrator’s group will not have
permissions to run the AnyPoint™ software.
To add the current user to the Administrator’s group:
Log on as an administrator or as a member of the Administrators group.
1
2 Click Start > Settings > Control Panel.
3 Double-click Users and Passwords.
4 Under Users for this computer, click the user you want to change and
then click
5 On the Group Membership tab, click Standard user (Administrators
Group)
6 Click OK to close all dialog boxes.
52
Properties.
Page 57

Troubleshooting CHAPTER 6
Remove incompat ible ne twork ad apte rs
If the Setup progr am determines you have an additional network ad apter,
the following screen appears.
To resolve the conflict between adapters:
1
If you already know which adapter in the list can be disabled, select
Some of these adapters are not used and can be disabled. If you are
not sure which adapter to remove or y ou ne ed all o f the a dap ter s listed ,
go to step 4.
2 If you have selected Some of these adapters are not used and can be
disabled
adapters appears.
3 Select the adapter you want to remove, click Disable and then click
Continue.
The Setup program continu es with the soft ware i nstallation . Go back to
the Setup chapter, "Install the AnyPoint software" on page 11, and
continue with the instructions.
, then click Continue. A screen showing the conflicting
4 If you selected All of these adapters used because, then click
Continue. A dialog box appears that provides more information to help
you decide which ad apter to disable.
5 Exit the Setup program and assign a different IP/Subnet address for the
the adapter. For instructions to do this, refer to the customer support
site: www.intel.com/anypoint/support/.
Once you reach the support site, fin d t he topic “I want to change my
adapter IP address.”
53
Page 58

CHAPTER 6 Troubleshooting
I can’t connect to my ISP from an ISS client PC
Try the following acti on s in order. After each step, try connecting to your
ISP. If your attempt is unsuccessful, go to the next step.
Make sure the ISS server PC is turned on and running the ISS software
T o tell if ISS is running, look for th e ISS icon in the status area of the server
PC’s Windows taskbar.
Make sure both t he ISS se rve r a n d ISS cl ie nt PC s are o n t he network
To find out if both PCs are on the network, open Network Neighborhood on
the client PC. If you can see the ISS server PC, bot h PCs are on the
network. Otherwise, refer to "I can’t see a network PC from another PC" on
page 51.
If you are using AOL*, check the AOL software
At the ISS client PC, make sure the AOL* software is not running.
At the ISS server PC, check if you need to enter your AOL password or
close an advertising screen. If the server PC is waiting for user input on
either of these things you will not be able to connect at the client PC (see
"Set up America Online* (AOL*) with ISS" on page 63).
54
If you are usi n g AT&T WorldNe t*, o r Com puSe rve 20 00* , ch ec k their settings
Make sure you have set up ISS to work with your ISP.
• AT&T WorldNet. See "Set up AT&T WorldNet* with ISS" on page 64.
• CompuServe 2000. See "Set up CompuServe* 2000 with ISS" on page
65.
Find out if the problem is ISS or your ISP connection
To rule out ISS as the problem:
Use ISS to connect at the server PC. If you can connect to the Internet
1
from the ISS server PC, reinstall ISS on the
2 If the problem persists, try to connect from the se rver PC withou t using
ISS. See "Exiting or by pas sin g ISS w he n co nne cting to th e In ter net" on
page 35.
• If you can connect to your ISP
PC.
• If you can’t connect to your ISP with or without using ISS, the
problem is not ISS . Check your ISP connecti on settings.
without ISS, reinstall ISS on th e server
client PC.
Page 59

Troubleshooting CHAPTER 6
I keep getting disconnected from the Internet without hanging up
Check automatic hang-up settings
ISS has an automatic feature that hangs up a connection after a certain
amount of time with no Internet activity. Change the automatic hang-up
setting to wait for a longer amount of time.
Windows also ha s an automatic t imeout sett ing. If necessary, change it so it
is longer than the ISS timeout setting.
To check automatic hang-up settings:
1
Click Start > Settings > Control Panel, then double-click Internet.
2 Select the Connection tab, and click Settings.
Check how long a connection can be idle bef ore being disconnected. If
it is less time than the automatic hang-up setting in ISS, increase the
amount of time.
Verify that your ISP connection information is correct
Check the settings in the program you use for dialing your ISP.
Contact your Internet Service Provider
If none of these steps solves the problem, there may be a problem with your
ISP. Contact your ISP.
Can I use Internet sharing software from more than one manufacturer?
No. All PCs on the network must run Internet sharing software from the
same manufacturer. See the next section for more information.
55
Page 60

CHAPTER 6 Troubleshooting
ISS and ICS (Internet Connection Sha ring)
Note: If you have or are planning to ins tall Virtual Private Network
(VPN), you may want to use Inter net Connection Sharing. For
details, see
page 37
Configuring your browser to use the Microsoft Internet Connection Wizard
If the Microsoft Internet Connection W izard starts when you r un an Internet
program, make sure you select the option that says you
Internet account on the computer
connection.
• In Internet Explorer* 3.0, select
set up on this computer and do not want to change it.
• In Internet Explorer 4.0, select My computer is already set up for the
Internet. Do not show this wizard again.
• In Internet Explorer 5.0, select I want to set up my Internet
connection manually, or I want to connect through a local area
network (LAN).
Selecting any other option prevents ISS from working properly.
"Connecting with Virtual Private Network (VPN)" on
.
already have an
when asked about the Internet
I already have an Internet connection
56
What is the difference between ISS and Microsoft’s ICS?
The AnyPoint Internet Sharing Software (ISS) enables all PCs on your
network to access the Internet through one shared connection. Micro soft’s
Windows 98 Second Edition has an optional feature, Internet Connection
Sharing (ICS), that provides similar capabilities.
Do ICS and ISS work together?
Yes, they can co-exist, but this is not re commen ded. Se lect o ne or the o ther.
See "How do I decide if I should use ISS or ICS?" on page 56.
How do I decide if I should use ISS or ICS?
If you have only Windows-based PCs on your network, use ISS and leave
ICS uninstalled. ISS provides better st atus reporting and con trol of the
shared connection. If you have other devices, such as a Macintosh* or PCs
running other operating systems or VPNs on your network, use ICS.
Page 61

Troubleshooting CHAPTER 6
Check PCs running Internet Connection Sharing (ICS)
To determine which PC has ICS installed:
On the PCs running Windows 98, Second Edition, click Start >
1
Settings > Control Panel > Add/Remove Progra m s
2 Select the Windows Setup tab.
3 Select Internet Tools in the list, and click Details.
4 If Internet Connection Sharing is checked, ICS is installed on that PC .
To restore PCs to a home network that has a PC with ICS installed:
Determine which PC has ICS installed.
1
2 Shut down all network PCs.
3 Restart the PC with ICS installed first.
4 Restart the other network PCs.
.
Network game problems
Make sure the PC s y ou wan t t o us e are t urn ed o n a n d are o n t he network
With some network games, you will need to see if other clients are on the
network before you can play computer games. To find out if the PCs are on
the network, open Network Neighborhood (or My Network Places for
Window s M e) . I f y ou c a n s e e th e oth e r PC, both PCs are on the network. If
you cannot, refer to "I can’t see a network PC fro m an othe r PC" on p age 51 .
Make sure the game is insta lled on eac h PC you want to use
To play a game across the network, each participating PC must have a copy
of the game installed. Some games also require you to us e a different CD
for each PC. See the documentation included with the game or the
manufacturer’s Web site.
Make sure the network sett ings are corre ct for the ga me
See the game’s documentation for information about required network
settings. In particular, make sure you are using the same protocol (TCP/IP
or IPX) for the game on each PC.
Also, some games require that only client PCs are oper ational, and not the
Server PC. In those cases, you will need to right-click the ISS icon and
remove the check from the message
ISS
. This will prevent the ISS server from interrupting the game.
Internet Programs Connect through
57
Page 62

CHAPTER 6 Troubleshooting
Make sure you are a cce ssi ng th e game c or rec tly
See the game’s documentation to find out how to access the game on a
network.
I can’t see a drive or printer on a network PC
Open My Computer and look for the drive or printer (printers are in the
Printer folder) after each step. If you cannot see it, go to the next step.
To view a drive or printer on a network PC:
Make sure to turn on the PC where the drive or printer is located.
1
2 Make sure both PCs are o n the network.
3 Make sure the PC has shared the drive or printer.
Network Neighborhood. If you can see the other PC, both PCs
Open
are on the network. Otherwise, refer to "I can’t see a network PC from
another PC" on page 51.
I can’t map or print to a printer
If you can’t map to a pri nter, try to map again each time you verify one of
the following:
• Make sure the PC that has the printer physically attached to it is on the
network and turned on.
• At the PC mapping the printer, open
can see the PC sharing the printer, both PCs are on the net work. If you
cannot, refer to "I can’t see a network PC from another PC" on page 51.
• Make sure the printer is shared. Printers m ust be sh ared before they can
be mapped. See "Change printer sharing and mapping" on page 30.
• Make sure the printer driver is installed on the PC mapping the printer.
See "Install printer drivers" on page 31.
If you cannot print to a mapped printer, try printing after the following:
• Make sure the printer and the PC sharing the printer are turned on.
• Make sure both PCs are o n the network.
Network Neighborhood. If you can see the other PC, both PCs
Open
are on the network. If you cannot, refer to "I can’t see a networ k PC
from another PC" on pa ge 51.
• Make sure the printer is shared and mapped. See "Change printer
sharing" on page 30 and "Change printer mapping" on page 30.
Network Neighborhood. If you
58
Page 63

Troubleshooting CHAPTER 6
I can’t map to a drive
After each of the following steps, try mapping the drive. If you still cannot
map the drive, go to the next step.
1 Make sure the PC sharing the drive is turned on and on the network.
2 At the PC mapping the drive, open Network Neighborhood. If you can
see the other PC, both PCs are on the network. If you cannot, refer to "I
can’t see a network PC from another PC" on page 51.
3 Make sure the drive is shared. If it is not, go to the PC and share the
drive. See "Change drive acc ess" on page 29.
I can’t write or save files to a drive on a network PC
Make sure your drives are operational. Check also that the drive access
permissions are set for
access from
access" on page 29.
Note: After you cha nge the drive’s access to Shared - Full, you
may need to save the file to another location, c lo se th e fi le , re ope n
it, and select Save again.
Shared - Read Only to Shared - Full, see "Change drive
Shared - Read Only access. To change the drive’s
Printer drivers not found
The printer driver you need may not be installed on the PC trying to print.
This should be installed automatically when you map to the printer, but
some printers require manual installation.
Some printer manufacturers have their own printer installation software.
You may have to install this software on all PCs that will use the printer.
Use the CD or disk(s) that came with your printer, and follow the printer
manufacturer’s instructions for installing the printer drivers. Often this
requires you to run the Windows Add Printer wizard (click
> Printers
page 31.
, then double-click Add Printer). See "Install printer drivers" on
Start > Settings
59
Page 64

CHAPTER 6 Troubleshooting
My laptop has speaker no ise
Certain types and brands of laptops experience static noise throug h
speakers due to PC Card or radio frequency networking products.
One work-around is to plug in either an external speaker or headphones.
Note: If you have troubl eshooting questions not contained in this
manual, you can find more information at the AnyPoint Wireless II
Network Online Support site,
www.intel.com/anypoint/support/.
I am trying to access my Wireless II network with an Intel PRO/Wireless adapter
The following instructio ns he lp y ou u s e a PC with an Intel® PRO/Wireless
adapter in an existing Wireless II network. The instructions in this method
are similar to those for accessing an Any Po int™ Wireless II network with
any 802.11 b PC card. Basically, you will use the profile switching software
from the PRO/Wireless unit to switch to the settings of the Wireless II
network.
To access your AnyPoint Wireless II Network with a PRO/Wireless
adapter:
On any PC with an AnyPoint Wireless II adapter (already on the
1
network), open the An yPoint Connection Manager.
2 Click the Details button on the Control Panel tab. This displays the
Detailed Settings information box.
3 Print this information box.
4 On the PRO/Wireless PC, start the Profile Manager software (WLAN
places), create a new profile, and copy the following settings into the
profile.
• Profile mode (Peer-to-Peer or Infrastructure)
• Encryption Code (Enabled or Disabled ). If the en cryption is
Enabled, then the specific encryption keys must match the Wireless
II code
• Channel
• SSID Network ID name (sometimes referred to as ESSID)
• Header length (short or long)
60
Page 65

Troubleshooting CHAPTER 6
5
Save the new Profile and name it (Anypoint, for example).
Note: If the PC card is not an Intel PRO/Wireless adapter, then
you will need to change set t ings in another manner.
I am trying to install a Wireless II adapter into an Intel PRO/Wireless network
Use the following instructions if you have an existing 802.11 network
(other than an AnyPoint Wireless II network) and you want to add one or
more AnyPoint Wireless II adapters to the network.
Note: These instructions are generic and will work with most
models in the PRO/W irel ess series.
To install a laptop with an AnyPoint Wireless II adapter into a ProWireless network:
1
On the PRO/Wireless PC, start the Profile Manager software (WLAN
places) and write down the following sett in gs from the profile.
• Profile mode (Peer-to-Peer or Infrastructure)
• Encryption Code (Enabled or Disabled. If the encryption is Enabled,
then the specific encryption keys must match the Wireless II code
• Channel
• SSID Network ID name (sometimes referred to as ESSID)
• Header length (short or long)
• TCP/IP addressing
2 On the PC with the AnyPoint Adapter, install the AnyPoint software
and restart your PC.
3 Start the AnyPoint Connection Manager.
4 Click the Profile Manager tab.
5 Click New to create a new profile.
6 Select the Wireless Profile.
7 Enter the same values printed from the 802.11b network. All adapters
in the network must match these 802.11b settings.
8 Save the new profile, then click Activate.
61
Page 66

CHAPTER 6 Troubleshooting
My Wireless II connection keeps get ting interrupted
Occasionally, frequencies from your wireless II adapters can conflict with
some cordless phones which use the same frequency range (2.4 Ghz). Also,
some interferenc e ma y occur if your 802. 1 1b equip men t is phys icall y cl ose
to microwave units. If possible, keep your cordless phones and microwave
units several feet away from the Wireless II adapter.
What do the lights on my Wireless II adapter mean?
The Wireless II adapte rs include special Ligh t Emitting Diodes (LEDs) tha t
informs you of its operating state.
For the USB adapter, the lights indicate:
Power light - ON indicates power
•
Link - OFF indicates that the device is unconfigured. ON (but not
•
blinking) indicates that the device driver is loaded, but there is no
network connection. A blinking light indicates connection to the
network.
For the PC card adapter, the lights indicate:
Link - OFF indicates no power or that the device is unco nfigured. ON
•
(but not blinki ng ) in dic at es c on nec tio n to the network. A blinking ligh t
indicates that the device driver is loaded, but there is no network
connection.
62
Page 67

Internet Service Provider
Reference
. . . . . . . . . . . . . . . . . . . . . . . . . . . . . . . . . .
Set up the network to share Internet access
Internet Sharing Software (ISS) lets multiple PCs on the AnyPoint™
Wireless II Network access the Internet simultaneously, using only one
modem (or other Internet connection) and one Internet account.
Important: If you have installed your AnyPoint Wireless II adapter
into a network through an access point, VPN, or a gateway, you
cannot use ISS and its feature s.
For most Internet Service Providers (ISPs), the Internet connection is
shared automatically when you install ISS. However, some ISPs (such as
America Online* and AT&T WorldNet*) require extra steps to work with
ISS. Continuous connections, such as cable modems or DSL, also require
special procedures to set up the connection. If you access the Internet
through any of these systems, see the appropriate section below.
Note: If you can’t find the ISP or the inform ati on you are looking
for, visit the AnyPoint™ Wireless II Network Online Support site at:
www.intel.com/anypoint/support/
7
Set up America Online* (AOL*) with ISS
In addition to Internet access, AOL* provides other services to its
subscribers. Only the ISS server can access those services through AOL’s
software. ISS clients can use Internet programs such as Netscape
Navigator* or Microsoft Internet Explorer* to access the Internet through
the ISS server’s connection. Users as ISS clients can also access AOL
services, like e-mail, at AOL’s Web site (www.aol.com).
The AnyPoint Internet Sharing Software is compatible with AOL versions
3.0 or higher. To find out which version of AOL you are using:
• Start AOL, and click
Note: AOL versions 5.0 and higher include an option to make AOL
the default Internet application. Do not enable this option.
Help > About America Online.
63
Page 68

CHAPTER 7 Internet Service Provider Reference
Save your AOL password
When AOL starts, it prompts you for a password. You can set up AOL to
remember your password permanently.
If you don’t set up a password, ISS client users must enter the password at
the ISS server every time they connect to AOL.
To save an AOL 4.0/ 5.0/6.0 password:
1
From the ISS server, start and sign on to AOL.
2 From the My AOL menu, select Preferences > Passwords.
3 Type the password, and click OK.
4 For each screen name, repeat step 3.
To save an AOL 3.0 password:
At the server PC, start AOL.
1
2 From the Members menu, select Members > Preferences >
Passwords
3 Type the password in the password text box, and cl ick OK.
4 For each screen name, repeat step 3.
.
Disable AOL’s special offer screens
AOL might display a pop- up advertising screen when it starts. If you don’t
move past or disable this screen at the ISS server, the ISS client cannot
share the Internet connection. By disabling the advertisin g screen, you can
avoid trips to the server PC every time an ISS client establishes an Intern et
connection.
To disable the sp eci al offer screens:
At the ISS server, start AOL.
1
2 Click Keyword, type Marketing Preferences, and then click Go.
3 Click POP-UP > Continue, and select No, I do not want to receive
special AOL members only pop-up offers
4 Click OK, and follow the instructions on the screen to exit ou t of the
Marketing Preferences screens.
.
Set up AT&T WorldNet* with ISS
AT&T WorldNet software creates a file that identifies your account to
AT&T’s system when you dial in. This file is called account.txt or
att_account.txt. You must copy this file to all ISS clients th at use the AT&T
WorldNet software.
64
Page 69

Internet Service Provider Reference CHAPTER 7
To set up AT&T WorldNet on your AnyPoint Wireless II network:
1
On the ISS server PC, install AT&T WorldNet software. For more
information, refer to AT&T’s documentation.
2 Copy the account.txt or att_account.txt file to a disk.
Note: If you don’t kno w wh er e t he f ile is, us e th e Fi nd feature in
Windows (Start > Find > Files or Folders) to locate it.
T o i nst al l AT&T WorldNet o n I SS cl ient PCs
1 On an ISS client, begin installing the AT&T W orl dNe t software.
2 At the Register Account screen, select I already have an account that
I would like t o u s e
3 Select By importing an account file, and click Next.
4 Insert the disk containing t he a cco un t.tx t o r att_ acc ount .tx t file in to the
disk drive.
Note: Make sure the location of the account file rea ds
“a:\account.txt” or “a:\att_account.txt” (where “a” is the letter of the
disk drive). If it does not, c lick Browse, and locate it on your disk
drive.
, and click Next.
5 Click Next, and follow the screen prompts to finish installation.
6 Repeat steps 1-5 for each ISS client.
Set up CompuServe* 2000 with ISS
You can use a PC with a CompuServe* 2000 account as your ISS server
PC. For details on setting up ISS with earlier versions of CompuServe, see
the AnyPoint Wireless II Network Online Support site at
anypoint/support
Note: CompuServe 2000 doesn’t appear in the ISP list in the ISS
setup program. To select CompuServe 2000 as your ISP, select
“America Online” from the drop-down list.
In addition to Internet access, CompuServe 2000 provides other services to
subscribers. Only the ISS server can use the CompuServe 2000 program to
access those services.
ISS clients can use programs such as Netscape Naviga tor or Microsoft
Internet Explorer to access the Internet.
and search for “CompuServe.”
www.intel.com/
65
Page 70

CHAPTER 7 Internet Service Provider Reference
Save your CompuServe 2000 pass word
When CompuS erve 2000 st art s, it prompts you f or a pas swor d. You can set
up CompuServe 2000 t o remember your password perm anently. If you
don’t, ISS client users must enter their password at the ISS server PC
every time they connect to CompuServe 2000.
To save your CompuServe 2000 password:
1
At the ISS server, connect to CompuServe 2000.
2 From the Access menu, click Preferences > Passwords.
3 Type the password for each member name, and then select the Connect
check box.
4 Click OK.
Set up continuous Internet connections with ISS
ISS treats continuous Internet conne ctions (cable modems, DSL lines,
satellite connections) like dial-up Internet accounts, with some exceptions:
• You can’t hang up the connection
• The connection doesn’t time out
To make sure your cable or DSL service is set up properly:
Click Start > Intel AnyPoint Network > Internet Sharing Server.
1
2 Click on the Connection tab and select DSL service or Cable Modem.
To use a continuous Internet connection from an ISS server or client, run an
Internet application li ke Micro soft Inte rnet Exp lorer o r Netscap e Naviga tor.
66
An important note on PC naming with continuous Internet connections
When continuous Internet connections are installed, it is often necessary for
the installer to rename your PC. Do not change this name. Changing the
name assigned by the installer may make the PC unable to access the
Internet.
If you have already changed the PC name, reset it:
From the Start menu, click Settings > Control Panel > Network.
1
2 Click the Identification tab.
3 In the Computer name text box, type the PC name the installer
provided, and then click
Note: If you have questions about Internet Service Providers, you
can find information at the AnyPoint Wireless II Online Support site,
www.intel.com/anypoint/support/.
OK.
Page 71

Technical Support Option
. . . . . . . . . . . . . . . . . . . . . . . . . . . . . . . . . .
E-mail and Web Support
You will find several self-help tools at www.intel.com/anypoint/support .
On this site you can try our interactive troubleshooting guide, find a
solution to your specific error message, check for compatibility and
software updates. You are also able to submit a question to us via the web
and review any pervious cases you have had with us should you encounter
the same issue in the future.
Phone Support
Find your serial number
For external adapters, including PC Cards, the serial number is located on
the adapter.
To find out the serial number for an internal adapter:
Click Start > Settings > Control Panel, then double-click Network.
1
2 In the list of network components, select the Intel® AnyPoint™
adapter
.
3 Click Properties.
4 Click the Advanced tab.
Phone number and hours
8
(916) 377-0283
Monday-Friday 7AM-8PM Pacific time
Saturday 7AM-3PM Pacific time
We are closed on these US holidays: New Year’s Day, Memorial Day,
Independence Day, Labor Day, Thanksgiving Day, and Christmas Day.
67
Page 72

Agency Notices
. . . . . . . . . . . . . . . . . . . . . . . . . . . . . . . . . .
All notices apply only to products bearing the associated marks.
Underwriter Laboratories Statement
This product complies with the safety requirements for Information Technology Equipment, and is Listed by Underwriters
Laboratories, Inc. to UL 60950 and CSA C22.2 No. 950 for the U.S. and Canada.
FCC Compliance Statement
FCC Rules and Regulations - Part 15
This product has been tested and found to comply with the limits for a Class B computing device pursuant to Part 15 of the
FCC rules. These limits are designed to provide reasonable pro te ction ag ainst harmful interference in a residential
installation. Installed correctly, it probably will not interfere with radio or TV reception. However, we do not guarantee the
absence of interference.
This product generates and uses energy of about the same frequency as radio and TV broadcasts. Installed incorrectly, it
may interfere with reception of radio and TV broadcasts. If you suspect this product is causing interference, turn your
computer on and off while the radio or TV is showing interference. If the interference disappears when you turn the
computer off and reappears when you turn the computer on, something in the computer is causing interference.
To reduce interference, try these suggestions:
• Change the direction of the radio or TV antenna.
• Move the computer, radio, or TV. For example, if the computer is to the right of the TV, move it to the left of the TV . Or
move them farther apart.
• Plug the computer into a different electrical outlet than the radio or TV.
• Ensure that all expansion slots (on the back or side of the computer) are covered. Also ensure that all metal retaining
brackets are tightly attached to the computer.
Note: This device complies with Part 15 of the FCC Rules. Operation is subject to the following two c onditi ons: (1) Thi s
device may not cause harmful interference, and (2) this device must accept any interference received, including
interference that may cause undesired operation.
Caution: If the device is changed or modified without permission from Intel, the user may void his or her authority to
operate the equipment.
If you experience trouble with this telephone equipment, please contact Intel Customer Support, at 800-228-4549 for
information on obtaining service or repairs. The telephone company may ask that you disconnect this equipment from the
network until the problem has been corrected or until you are sure that the equipment is not malfunctioning.
There are no user serviceable parts contained in this equipment.
This equipment may not be used on coin service provided by the telephone company. Connection to party lines is subject to
state tariffs.
FCC RF exposure compliance
Warning: Install or position the USB device so that the antenna is at least 20 cm (8 in.) distance from the user or other
persons. Failure to locate the antenna at this minimum distance may result in exceeding the FCC limits for human exposure
to RF (radio frequency) energy. Als o, do not operate in conjunction with any other antenna or transmitters. For laptop PC
card antenna, there is no minimum distance. The pc card has been tested and found compliant with FCC requirements for
human exposure to RF energy.
68
Page 73

Canadian compliance (Industry Canada)
This digital apparatus does not exceed the Class B limits for radio noise emissions from digital apparatus set out in the
interference-causing equipment standard entitled “Digital Apparatus”, ICES-003 of the Canadian Department of
Communications.
Cet appareil numérique respecte les limite s brui ts radioélectriques applicables aux appareils numériques de Class B
prescrites dans la norme sur le matériel brouil leur: “Appareils Numériques”, NMB-003 édictée par le Ministre Canadien
des Communications.
This equipment complies with Canada 210.
Operation is subject to the following two conditions: (1) this device may not cause interference, and (2) this device must
accept any interference, including interference that may cause undesired operation of the device. To prevent radio
interference to the licensed service, this device is intended to be operated indoors and away from windows to provide
maximum shielding. Equipment (or its transmit ante nna ) that is inst al le d outdoors is subject to lic e nsi ng."
69
Page 74

Glossary
. . . . . . . . . . . . . . . . . . . . . . . . . . . . . . . . . .
802.11b: A specific networking standard creat ed by IEEE that defines engineering design
parameters for high-speed wireless data transmission. The 802.11b standard allows different
manufacturers to create wireless products that are compatible with each other.
Ad Hoc Mode: (or peer-to-peer) A software setting for 802.11b wireless adapters. Ad-Hoc
mode allows independent peer-to-peer connectivity from one PC to another in a wireless
network. See also Access Point and Infrastructure Mode.
Adapter (network adapter or NIC): A hardware device that allows yo ur PC to connect to a
network. Internal adapters install inside your PC like other expansion cards. External adapters
connect to your PC through the USB or a serial port like other exter n al de v i c es.
Access Point (AP): A hardware device that serve s as a communications “hub” for 802.11b
wireless PCs and can also provide a connection to a wired network. An AP can double the range
of wireless client PCs and provide enhan ced security.
Channel:
Client: Any PC that requests services (files, print capability) from another member of the
network. Typically, a group of client PCs depend on the functions of a server PC. Similarly,
client wireless adapters can depend on a variety of functions provided by an access point.
Driver (Device Driver): Special software programs required for any device to install properly
on a PC. Devices include network adapters, printers, scanners, modems, audio cards, CD
drives, monitors etc. Drivers enable the device to coordinate its activities with the PC to which
it is attached.
Encryption: A method of converting all of the information that is transmitted over a wireless
network into a form that cannot be read by unauthorized persons. Encrypt ion provides
additional data security in 802.11b wireless networks.
Ethernet: The most widely used netw ork a cces s met hod. E the rne t is de fine d by t he IEEE 80 2.3
standard. Ethernet networks op erat e at 10Mbps using CSMA/CD (Carrier-Sense Multiple
Access) to run over 10BaseT cables.
Gateway: A network device that provides a bridge or entrance to another network. For
example, a residential gateway can allow a wireless network to conn ect to a phoneline or
Ethernet networ k.
Infrastructure Mode: A software setting for 802.11b wireless adapters allowin g connecti vity to
a central access point (AP). The AP not only mediates wireless network traffic in the immediate
neighborhood, but also provides communicati on with a wired network. See AD-Hoc and
Access Point.
IEEE: The Institute of Electrical and Electronics Engineers.
ISP (Internet Service Provider): An organization that provides access to the Internet. Users
connect with the ISP using a conventional or broadband modem. The major online services
70
Page 75

such as America Online* and CompuServe 2000* provide Internet access but are still known as
“online services”, not ISPs.
LAN (Local Area Network): A computer network that serves users within a defined
geographical area. The benefits include the sharing of Internet access, files and equipment like
printers and storage devices. LANs use Ethernet cabling (10BaseT), existing phone lines or
radio waves to transmit data between the PCs. LANs include home and small-business
networks.
Mapping: Lets your PC recognize and communicate with a drive or printer located on another
PC in the network. For example, in orde r to c opy files from a hard driv e locat ed in a no ther PC,
you must “map to the drive” from your PC
and make sure the drive is shared at the ot her end.
See also Sharing.
Mbps: Megabits per second, a measure of data transmission speed.
PCI: A local bus standard that ap plies to internal PC devices such as network cards or sound
cards. The standard defines the way data tr avels between the CPU, system memory and the
device as well as the physical dimensions of the connector.
Peer-toPeer: See Ad Hoc.
Preamble (Header):
Profiles (Network Profiles): A collection of software settings and network identification
information that is unique for each network. When a single PC disconnect s from one network
and reconnects with a different network, the active network profile must also be changed.
Protocols (Net work Pr otocol s): Define the rules for a ll aspects of d ata commun ication just lik e
a written language uses rules for spelling, sent ence structure, etc. Proto cols describe the way
data is organized, transmitted and received. The TCP/IP protocol is one of the most common.
Resources (Network resources): Software or hardware shared by the users of a network.
Resources can include software applications, documents, digital pictures and music, games,
numeric data, and devices such as printers , modems and disk drive s.
Roaming: Moving seamlessly from one access point coverage area to another with no loss in
connectivity.
Server: Indicates a relationship where the server PC provides specific functions for a group of
client PCs. The server component of AnyPoint Internet Sharing Software (ISS) provides the
Internet connection as well as firewall and parental-control protection for other PCs in the
network that have I SS client installed.
Sharing: Makes drives and printers on your PC accessible to ot her PCs on the network. The
user sets the “share status” for each drive or prin ter on his or her own PC. The user selec ts eithe r
Shared - Fu ll, Shared-Read Only or Not Shared for each drive and printer. (Note: You “share”
resources on your own PC and “map to” resources on othe r PCs.)
Transfer rate:
SSID: Stationary Set ID. To communicate with each other, all wireless devices on the same
network must use the same SSID. The SSID allows two or more wirel ess networks to fun ction
in the same vicinity without interfering with each other. The SSID can be a word or a
combination of le tters and numbers.
71
Page 76

A peripheral bus standard that enables external devices to attach to a PC while the PC is
USB:
powered on. The flat shaped USB connect or pl ugs into a similar shaped socket on the PC.
VPN: Virtual Private Network. A VPN i s a type of computer network that functions like a
private network but uses public phone lines to carry data. VPNs use special communication
protocols and security techniques to maintain privacy at a lower cost than is possible with
dedicated phon e lines.
72
Page 77

Specifications
. . . . . . . . . . . . . . . . . . . . . . . . . . . . . . . . . .
The following technical specifications are for reference purposes only. Actual product
performance and compliance with local telecommunications regulations may vary from country
to country. Intel Corpora ti on will only ship products that are type approved in the destination
country.
AnyPoint Wireless II Network Adapters
USB External
Connection type External USB connection on PC
Frequency Band 2.400–2.4835 GHz
Data Rate 11 Mbps, 5.5 Mbps, 2 Mpbs , 1 Mbps
Output Power 13 dBm TYP
Range Up to 300 feet
Operating
Temperature
Humidity Maximum 95% no nc on d en s ing
Roaming
Operating Voltage 5 V
Number of Channels
Security 40/64 and 128 bit WEP encryption
0°C to +40°C
Full mobility and seamless roaming from
cell to cell and across access points
11– United States and Canada
13 – Most European Countries
4 – France
13 – Japan (14 optional)
73
Page 78

USB External
Warranty 3 year
Standards IEEE 802.11b, Wi-Fi compliant
Network Protocols TCP/IP, IPX
Network Architecture
Types
Supports peer-to-p eer networking and
communication to wired networks via
Access Points
Note: Data rate and range will vary with environmental conditions. Product
automatically “steps-back” to lower data rates to maintain connectivity.
PC Card
Connection type Type II 16–bit PC card
Frequency Band 2.400–2.4835 GHz
Dynamic rate shifting: (auto selects
Data Rate
highest possible rate) 11 Mbps, 5.5 Mbps,
2 Mpbs, 1 Mbps
Output Power 13 dBm TYP
Range Up to 300 feet
Operating
0°C to +55°C
Temperature
74
Humidity Maximum 95% no nc on d en s ing
Roaming
Full mobility and seamless roaming from
cell to cell and across access points
Page 79

PC Card
11– United States and Canada
Number of Channels
13 – Most European Countries
4 – France
13 – Japan (14 optional)
Security 40/64 and 128 bit WEP encryption
Warranty 3 year
Standards IEEE 802.11b, Wi-Fi compliant
Network Protocols TCP/IP, IPX
Network Architecture
Types
Supports peer-to-p eer networking and
communication to wired networks via
Access Points
75
Page 80

Index
. . . . . . . . . . . . . . . . . . . . . . . . . . . . . . . . . .
A
Access point 4, 70
Accessing
the Internet through ISS
the Internet without ISS 35
Ad hoc mode (see peer-to-peer) 70
America Online* (AOL*)
Connection problems
Setting up to use with ISS 63
AOL* password 64
Automatic filt e ring 24
63
54
B
Browsers, see Web browsers
Bypass ISS 36
C
Cable modem
and ISS
66
Setting up 66
Change the ISS server 36
Channel 70
Client 70
Client PC
Cannot connect to the Internet
Defined 14
Disconnecting from the Inte rn e t 35
CompuServe* 65
Configure Parental Control 24
Configure the ISS connection 19
Connecting
to the Internet with ISS
to the Internet with out I SS 35
Connecting to a profile, with ACM 40
Connection manager, AnyPoint 38
Create a new profile 46
Creating infrastruct u re pr ofile 43
Creating peer-to-peer profile 46
54
63
D
Disable automatic sharing and mapping 32
Drives
Accessing across the network
Mapping 30
Sharing 29
27
E
Enable automatic sha r ing a nd ma pping 32
Encryption 70
Encryption keys 45
ESSID (See SSID) 71
Exit ISS 35
F
Files
Accessing and sharing
Opening across the netw ork 28
Firewall
Changing the security level
Configuring 20
Disabling 22
Security levels 21
Firewall concepts 9
2
21
G
Games
Troubleshooting
Gateway 70
57
H
Header (Se e Preamble) 71
I
ICS
and ISS
56
Troubleshooting 57
Infrastructure mode 4, 70
Installation
AnyPoint software
Printer driv ers 31
Intel PRO/Wirele ss 60
Internet connection methods 10
Internet Explorer
and America Online*
and CompuServe 65
and Connecting to the Internet using ISS 33
IP address 52
ISP (Internet Serv ice Provider) 70
ISPs
Connecting with ISS
Connecting without ISS 35
ISS
and ICS
56
Bypassing 36
Client PC, see Client PC
From more than one manufactur e r 55
Server PC, see Server PC
11
63
63
L
Logging on to Windows 15
76
Page 81

M
Mapping 71
Drives 30
Printers 30
Multiple user profiles 32
N
Netscape
and America Online*
and CompuServe 65
and Connecting to the Internet usi ng I SS 33
Network Identification code (See SSID) 71
Network Neighborhood
Verifying network connections
Viewing network drives 27
Network profile, with ACM 7
Network setup
Guidelines
Network switching concepts 7
Not Shared 16
10
63
57
P
Parental Control 23
Concepts 10
Passwords
America Online*
Windows logon 15
PC Name 12
PCs
Name and workgroup
Naming 66
Peer-to-peer mode 3
Phone support 67
Preamble 71
Printer drivers
Installing
Not found 59
Printers
Mapping
Sharing 30
Troubleshooting 58
Unmapping 31
PRO/Wireless 61
Profiles 71
Profiles, user 32
54, 64
12
31
30
R
Removing
Incompatible netw or k adapters
53
S
Security levels 21
Server 71
Server PC
Defined
14
ICS 56
Shared - Full 16
Shared - Read Only 16
Sharing 71
Drives 29
Printers 30
Sharing drives 16
SSID 71
Support, phone 67
Support, Web 67
Switching between networks, w ith AC M 7
T
Transfer rate 71
Troubleshooting
Internet connection hanging up
ISS client PC cannot connect to IS P 54
Mapping drives 59
Network games 57
Printer driv ers 59
Saving files across the network 59
Viewing a network PC from another P C 51
Viewing drives and p rinters acr oss the net work
55
58
U
Unmapping
Drives
30
Printers 31
User name 15
User prof iles 32
V
Video files, viewing 28
View connection status 36
Virtual Private Network 37
VPN, connecting with 37
W
Web brows e rs
and Connecting to the Internet using ISS
Web support 67
WEP (see Encryption) 70
Windows logon
Password
15
User name 15
Wired Equivalent Privacy (see Encr ypt ion) 70
Wireless networking 5
33
77
Page 82

************
78
 Loading...