

Page 1

Intel® Wireless Gigabit v2.6
User Guide
May 2016
Revision 3.9
Intel Confidential
Document Number: 537178-3.9
Page 2

Notice: This document contains information on products in the design phase of development. The information here is subject to
change without notice. Do not finalize a design with this information.
INFORMATION IN THIS DOCUMENT IS PROVIDED IN CONNECTION WITH INTEL PRODUCTS. NO LICENSE, EXPRESS OR IMPLIED,
BY ESTOPPEL OR OTHERWISE, TO ANY INTELLECTUAL PROPERTY RIGHTS IS GRANTED BY THIS DOCUMENT. EXCEPT AS
PROVIDED IN INTEL’S TERMS AND CONDITIONS OF SALE FOR SUCH PRODUCTS, INTEL ASSUMES NO LIABILITY WHATSOEVER
AND INTEL DISCLAIMS ANY EXPRESS OR IMPLIED WARRANTY, RELATING TO SALE AND/OR USE OF INTEL PRODUCTS INCLUDING
LIABILITY OR WARRANTIES RELATING TO FITNESS FOR A PARTICULAR PURPOSE, MERCHANTABILITY, OR INFRIN G EMENT OF ANY
PATENT, COPYRIGHT OR OTHER INTELLECTUAL PROPERTY RIGHT.
A "Mission Critical Application" is any application in which failure of the Intel Product could result, directly or indirectly, in personal
injury or death. SHOULD YOU PURCHASE OR USE INTEL’S PRODUCTS FOR ANY SUCH MISSION CRITICAL APPLICATION, YOU
SHALL INDEMNIFY AND HOLD INTEL AND ITS SUBSIDIARIES, SUBCONTRACTORS AND AFFILIATES, AND THE DIR ECTOR S,
OFFICERS, AND EMPLOYEES OF EACH, HARMLESS AGAINST ALL CLAIMS COSTS, DAMAGES, AND EXPENSES AND REASONABLE
ATTORNEYS' FEES ARISING OUT OF, DIRECTLY OR INDIRECTLY, ANY CLAIM OF PRODUCT LIABILITY, PERSONAL INJURY, OR
DEATH ARISING IN ANY WAY OUT OF SUCH MISSION CRITICAL APPLICATION, WHETHER OR NOT INTEL OR ITS SUBCONTRACTOR
WAS NEGLIGENT IN THE DESIGN, MANUFACTURE, OR WARNING OF THE INTEL PRODUCT OR ANY OF ITS PARTS.
Intel may make changes to specifications and product descriptions at any time, without notice. Designers must not rely on the
absence or characteristics of any features or instructions marked “reserved” or “undefined.” Intel reserves these for future
definition and shall have no responsibility whatsoever for conflicts or incompatibilities arising from future changes to them. The
information here is subject to change without notice. Do not finalize a design with this information.
Intel software products are copyrighted by and shall remain the property of Intel Corporation. Use, duplication, or disclosure is
subject to restrictions stated in Intel’s Software License Agreement, or in the case of software deli vered to the government, in
accordance with the software license agreement as defined i n FAR 52.2 2 7 -7013.
The products described in this document may contain design defects or errors known as errata which may cause the product to
deviate from published specifications. Current characterized errata are available on request.
The code names presented in this document are only for use by Intel to identify products, technologies, or services in development
that have not been made commercially available to the public, i.e., announced, launched, or shipped. They are not "commercial"
names for products or services and are not intended to function as trademarks.
Contact your local Intel sales office or your distributor to obtain the latest specifications and before placing your product order.
Copies of documents which have an order number and are referenced in this document, or other Intel literature may be obtained by
calling 1-800-548-4725 or by visiting Intel’s website at http://www.intel.com/design/literature.htm.
Intel is a trademark of Intel Corporation or in the US and other countries.
* Other brands and names may be claimed as the property of others.
Copyright © 2016 Intel Corporation. All rights reserved.
Intel® Wireless Gigabit v2.6
User Guide May 2016
2 Intel Confidenti a l Document Number: 537178-3.9
Page 3

Contents
1 Introduction ................................................................................................................. 8
1.1 Scope ................................................................................................................. 8
1.2 References .......................................................................................................... 8
1.3 Wireless dockin g .................................................................................................. 8
1.3.1 “Place to Dock, S nap to Go” experience .................................................. 8
1.3.2 Wireless Docking (WiDock) and Wireless Display (WiDi) ............................ 8
1.3.3 Wireless peripheral .............................................................................. 9
1.4 Key features ........................................................................................................ 9
1.5 SW and HW deliverables ........................................................................................ 9
1.6 Notebook platfor m p r ep a r ations for WiDock ............................................................. 9
1.7 Known limitations ................................................................................................. 9
2 Software Install .......................................................................................................... 10
2.1 NB-side installation .............................................................................................. 10
3 WiGig Applica tion User Manual for W indows 7*/8*/8.1* ........................................... 13
3.1 User manual ....................................................................................................... 13
3.1.1 Launch the Intel® Wireless Dock Manager .............................................. 13
3.1.2 Make the first c onnection ..................................................................... 13
3.1.3 Automatic conne c tion default ............................................................... 16
3.1.4 Automatic conne c tions ......................................................................... 17
3.1.5 Manually conn e c t to a dock .................................................................. 17
3.1.6 Automatic conne c tion in S3 (depends on BIOS configura tion) ................... 18
3.1.7 Automatic conne c tion in connected standby ........................................... 18
3.1.8 Disconnect from the dock .................................................................... 19
3.1.9 PIN-based pairing ............................................................................... 21
3.1.10 Disable and enable WiGig ..................................................................... 22
3.2 Change dock settings ........................................................................................... 23
3.3 Dock software update .......................................................................................... 25
3.3.1 Update during connection .................................................................... 25
3.4 Diagnostic inf or m ation ......................................................................................... 27
3.4.1 Details ............................................................................................... 28
3.5 Manage docks ..................................................................................................... 29
3.6 Notification messages .......................................................................................... 31
3.6.1 Unable to Connect............................................................................... 31
3.6.2 No Available Docks Found .................................................................... 31
3.6.3 Weak Connection ................................................................................ 32
3.6.4 WiGig is Not Working........................................................................... 32
3.6.5 WiGig disabled: cr itical temperature ...................................................... 34
3.6.6 WiGig disabled by hardware RF kill s witch .............................................. 34
3.6.7 WiGig disabled by airplane m ode .......................................................... 35
4 WiGig Applica tion User Manual for W indows 10* ....................................................... 36
4.1 User manual ....................................................................................................... 36
4.1.1 Launch the Intel® Wireless Dock Manager .............................................. 36
4.1.2 Make the first c onnection ..................................................................... 36
4.1.3 Automatic conne c tion default ............................................................... 41
4.1.4 Automatic conne c tions ......................................................................... 41
4.1.5 Manually conn e c t to a d oc k .................................................................. 42
4.1.6 Automatic conne c tion in S3 (depends on BIOS configura tion) ................... 42
4.1.7 Automatic conne c tion in connected standby ........................................... 42
4.1.8 Disconnect from the dock .................................................................... 43
4.1.9 PIN-based pairing ............................................................................... 43
Intel® Wireless Gigabit v2.6
May 2016 User Guide
Document Number: 537178-3.9 Intel Confide nt ial 3
Page 4

4.1.10 Disable and enable WiGig ..................................................................... 43
4.2 Change dock settings ........................................................................................... 43
4.3 Dock software update .......................................................................................... 43
4.4 Diagnostic inf or m ation ......................................................................................... 44
4.5 Manage docks ..................................................................................................... 44
4.6 Notification messages .......................................................................................... 45
4.6.1 Not found .......................................................................................... 45
4.6.2 Try connecting your devic e a ga in .......................................................... 46
4.6.3 Couldn’t connect ................................................................................. 47
4.6.4 Weak connection ................................................................................ 47
4.6.5 WiGig disabled: cr itical temperature ...................................................... 48
4.6.6 WiGig is Not Working........................................................................... 49
5 The Wireless Dock and Multiple Displays .................................................................... 50
5.1 Intel® WiGig A/V wireles s capabilities ..................................................................... 50
5.1.1 Intel® WiGig DisplayPort Bandwidth and other limitations ........................ 50
5.2 User experience w hen connecting more than two displays to the wireless dock ........... 50
6 WiGig events in Windows Event Vie we r ...................................................................... 53
6.1 WiGig Event Properties ......................................................................................... 53
6.2 WiGig Event Data ................................................................................................ 53
6.3 Accessing WiGig Events Log .................................................................................. 53
Intel® Wireless Gigabit v2.6
User Guide May 2016
4 Intel Confide n tial Document Number: 537178-3.9
Page 5

Figures
Figure 1-1 WiDock use models ............................................................................................ 9
Figure 2-1 End User License Agreement dialog box ...............................................................10
Figure 2-2 Success message ..............................................................................................10
Figure 2-3 Windows security message ................................................................................11
Figure 2-4 Product Improvement Progra m dialog box ...........................................................11
Figure 2-5 Changing Intel® Product Improvem ent Program sele ction ......................................12
Figure 3-1 Tray icon indications .........................................................................................13
Figure 3-2 Welcome OSD message .....................................................................................14
Figure 3-3 Dock select ......................................................................................................14
Figure 3-4 Dock confirmation message ...............................................................................15
Figure 3-5 Dock confirmation OSD .....................................................................................15
Figure 3-6 Dock connected message ...................................................................................16
Figure 3-7 Automatically Connect to this Dock message ........................................................16
Figure 3-8 Disabling the auto-connect settin g ......................................................................17
Figure 3-9 Manual dock connection .....................................................................................18
Figure 3-10 Dock disconnection mesage ...............................................................................19
Figure 3-11 Manual discon nect option ...................................................................................20
Figure 3-12 Ready to connect message .................................................................................20
Figure 3-13 Enabling PIN-based pairing ................................................................................21
Figure 3-14 PIN-based pairing in OSD ..................................................................................22
Figure 3-14 Disable WiGig using the gear icon .......................................................................22
Figure 3-15 Disable WiGig warning message .........................................................................23
Figure 3-16 WiGig disabled confirmation message ..................................................................23
Figure 3-17 Dock Management button ..................................................................................24
Figure 3-18 Dock management dialog box ............................................................................24
Figure 3-19 Dock software Update Requ ir ed mes s a ge .............................................................26
Figure 3-20 OSD Update Required message ..........................................................................26
Figure 3-21 Dock update progress .......................................................................................27
Figure 3-22 OSD update progress messa ge ...........................................................................27
Figure 3-23 Advanced diagnostics window .............................................................................28
Figure 3-24 Choosing Manage Remembered Doc ks .................................................................30
Figure 3-25 Manage Remembered Docks a uto-connect feature ................................................30
Figure 3-26 Unable to Connect message ...............................................................................31
Figure 3-27 No Available Docks Found message .....................................................................31
Figure 3-28 Weak Connection message .................................................................................32
Figure 3-29 WiGig is Not Working m e s sage (with exam p le error c ode 0x1000) ..........................32
Figure 3-30 WiGig disabled due to overheating message .........................................................34
Figure 3-31 WiGig disabled by hardware RF kill switch message ...............................................34
Figure 3-32 WiGig disabled by airplane mode message ...........................................................35
Figure 4-1 Welcome OSD message .....................................................................................37
Figure 4-2 Network & Internet page showing Airplane mode sett in gs ......................................37
Figure 4-3 Action Center link .............................................................................................38
Figure 4-4 Connect pane ...................................................................................................38
Figure 4-5 Connect pane during connecting stage ................................................................39
Figure 4-6 Connect OSD message ......................................................................................40
Figure 4-7 Dock connected message ...................................................................................40
Figure 4-8 Dock connected OSD message ...........................................................................41
Figure 4-9 Disable the auto connect settin g .........................................................................42
Figure 4-10 WiGig disabled confirmation message ..................................................................43
Figure 4-11 Dock update required toas t ................................................................................44
Intel® Wireless Gigabit v2.6
May 2016 User Guide
Document Number: 537178-3.9 Intel Confide nt ial 5
Page 6

Figure 4-12 Remove device button .......................................................................................44
Figure 4-13 Remove device approval dia log box.....................................................................45
Figure 4-14 Device not found message .................................................................................45
Figure 4-15 Try connecting your device again message ..........................................................46
Figure 4-16 Couldn’t connect message .................................................................................47
Figure 4-17 Weak connection toast ......................................................................................48
Figure 4-18 Weak connection message in Dock Manager .........................................................48
Figure 4-19 WiGig disabled due to overheating toa st ..............................................................48
Figure 4-20 WiGig disabled due to overheating message in Dock Man a ger ................................49
Figure 5-1 DisplayPort topology viewer ...............................................................................51
Figure 5-2 Windows Screen Resolution c ontrol panel ............................................................52
Figure 5-3 Graphics control panel .......................................................................................52
Tables
Table 1–1 References ........................................................................................................ 8
Table 3–1 Error code cases and possible recov er y methods ..................................................33
Table 6–1 List of groups for Task Category parameter in WiGig Events ...................................53
Intel® Wireless Gigabit v2.6
User Guide May 2016
6 Intel Confide n tial Document Number: 537178-3.9
Page 7

Revision His tory
Revision Description Date
1.0 Initial release. May 16, 2013
1.1 Alpha update November 25, 2013
2.0 Beta update April 9, 2014
2.1 Beta 1.5 update June 30, 2014
2.2 Beta 2 update September 11, 2014
2.3 Chapter 2.2 flashing dock instructions October 23, 2014
3.0 PV version updates November 26, 2014
3.1 Added 4.1.1. Maple Peak DisplayPort Bandwid th and o ther
limitations
3.2 SW version 2.0 March 30, 201 5
3.3 Added win10 user guide August 5, 2015
3.4 Update sections 1.2 & 3.4 October 27, 2015
3.5 Update Intel Product Improvement Program (chapter 2)
Update to v2.2
3.6 Updated welcome screen and no scanning time after disconnect March, 12, 2016
3.7 Added WiGig events in Windows Event V i ewer, add ed Pin based
pairing capability
3.8 Update section 3.1.9 May 1, 2016
3.9 Update section 3.1.9 with additional info o n PIN based pair ing May 10, 2016
January 8, 2015
December 2, 2 015
April, 17, 20 16
§
Intel® Wireless Gigabit v2.6
May 2016 User Guide
Document Number: 537178-3.9 Intel Confide nt ial 7
Page 8

Introduction
1 Introduction
This chapter provides an overview of the Intel® Wireless Gigabit (WiGig) solution, which comprises the
®
Intel
Tri-Band Wireless-AC17265 (Client), Intel® Tri-Band Wireless-AC18265 (Client), the Intel®
Wireless Gigabit Sink W13100 (Doc k), and the Intel
(Antenna).
1.1 Scope
This document familiarizes customers with the Intel® WiGig software (SW) solution components and
provides installat ion and configur a tion details.
1.2 References
Table 1–1 References
Document name Description
Ref 1
Ref 2
Ref 3
Ref 4
Ref 5
537180_Maple_Peak_External_Product_Specification
_Rev.3.1
557654_Maple_Peak_WiGig_SNK_EPS_Rev1.0 Maple Peak WiGig SNK Ex ter nal Prod uc t
557232_WiGig_RFEM_External_Product_Specification_Rev1.0
553630_Intel_Wireless_Douglas_Peak_and_Pine_Pea
k_EPS_Rev1.0
545844_Inte l _W iGig_Maple _Peak _API_SDK Rev3.0 WiGig SDK Package
®
Wireless Gigabit Antenna-M 10041/2R
Maple Peak External Product Specifications (EPS)
Specifications (EPS)
WiGig R-FEM External Product Specifications
(EPS)
Douglas Peak and Pine Peak External Product
Specifications (EPS)
Ref 6
Ref 7
557869_Intel_Wireless_TriBand_18260_DgP_WiGig_W11000_PnP_PDG_Rev2.0
Intel_Wireless_Gigabit_DFCDFB_Tool_User_Guide_Rev3.3
Douglas Peak and Pine Peak Platform Design
Guidelines
DFC and DFB Tools User Guide
1.3 Wireless docking
The main use of Intel® WiGig at product launch is wireless dock ing in conjunction with the Maple Peak
SNK.
Wireless docking generally occurs when the user is working 2–4 feet from the display(s). The user
experiences the same kind of responsiveness as operating a workstation/desktop.
1.3.1 “Place to Dock, Sna p to Go” experience
Wireless dockin g is d esigned to minimiz e user actions. After the initial WPS-based pairing, the typical
user is able to auto-dock, meaning the device automatically connects to the dock a nd peripheral when
in range of the dock. In other w or ds , by the time the device is on the desk, it is a lrea dy docked.
Undocking is as simple, allowing the user to grab the device an d w a lk away.
1.3.2 Wireless Docking (WiDock) and Wireless Display (WiDi)
WiDock differs from other models, su ch as Miracast* or Intel® Wireless Display, in which the u ser is
further from the screen (such as on the couch or in a conference room), and is focused on content
Intel® Wireless Gigabit v2.6
User Guide May 2016
8 Intel Confide n tial Document Number: 537178-3.9
Page 9
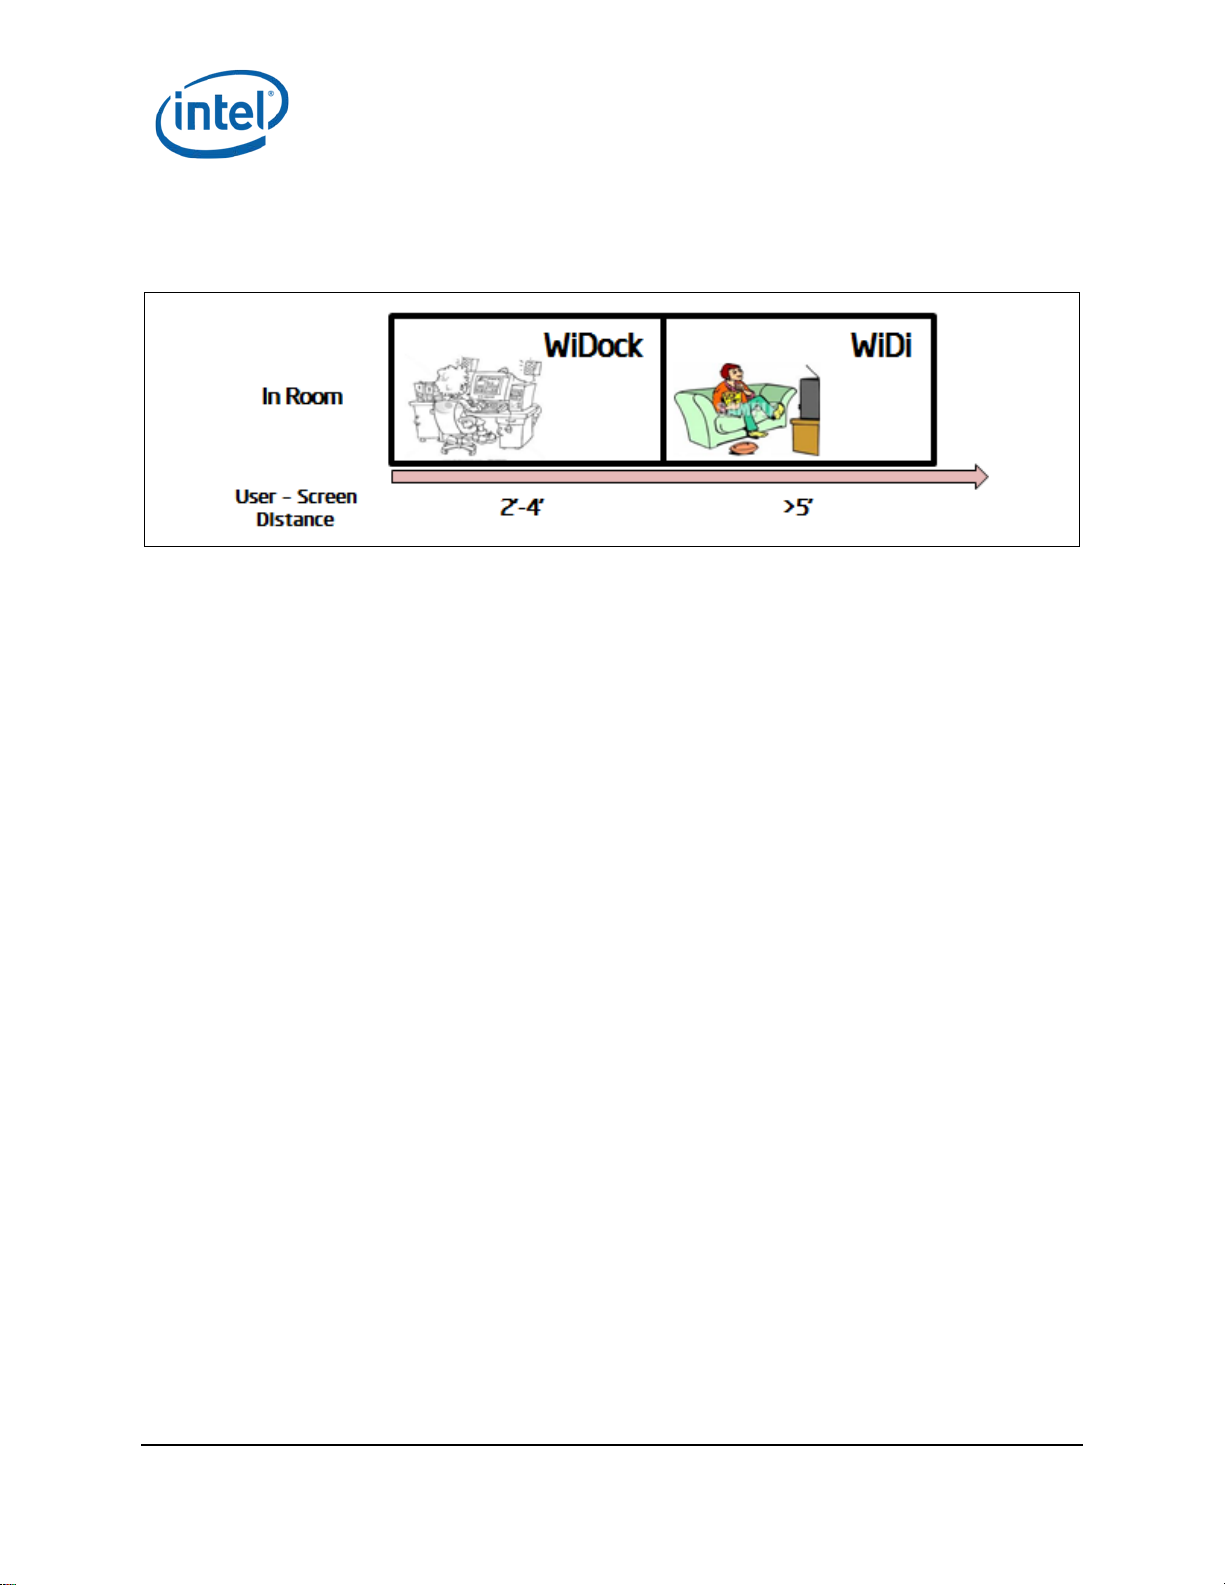
consumption (watching a video, sharing a screen with oth er s, gaming) rather than productivity or
content creation.
Figure 1-1 WiDock use models
Introduction
1.3.3 Wireless peripheral
The wireless periphera l feature allows a d evice to interact with high-speed USB peripherals over
WiGig. For example, a directly atta c hed storage device equipped w ith Maple Peak SNK would allow a
high-speed USB 3.0 connection with Intel WiGig equipp ed ta blet or notebook.
When connecting, man y of the w ir eless doc king capabilities would be applic a ble (excluding of cour s e
the display capabilities), allowing USB 3.0 like throughputs (> 1 Gbps) for on-desk distances.
1.4 Key features
See Ref 4 (EPS document).
1.5 SW and HW deliverables
See Ref 4 (EPS document).
1.6 Notebook platform preparations for WiDock
Operating system:
– Microsoft Windows 7* 32/64, Microsoft Windows 8.1* U 64, Micros oft Windows 10*
1.7 Known limitations
See Ref 4 (EPS document).
§
Intel® Wireless Gigabit v2.6
May 2016 User Guide
Document Number: 537178-3.9 Intel Confidential 9
Page 10
Software Inst al l
2 Software Install
2.1 NB-side installation
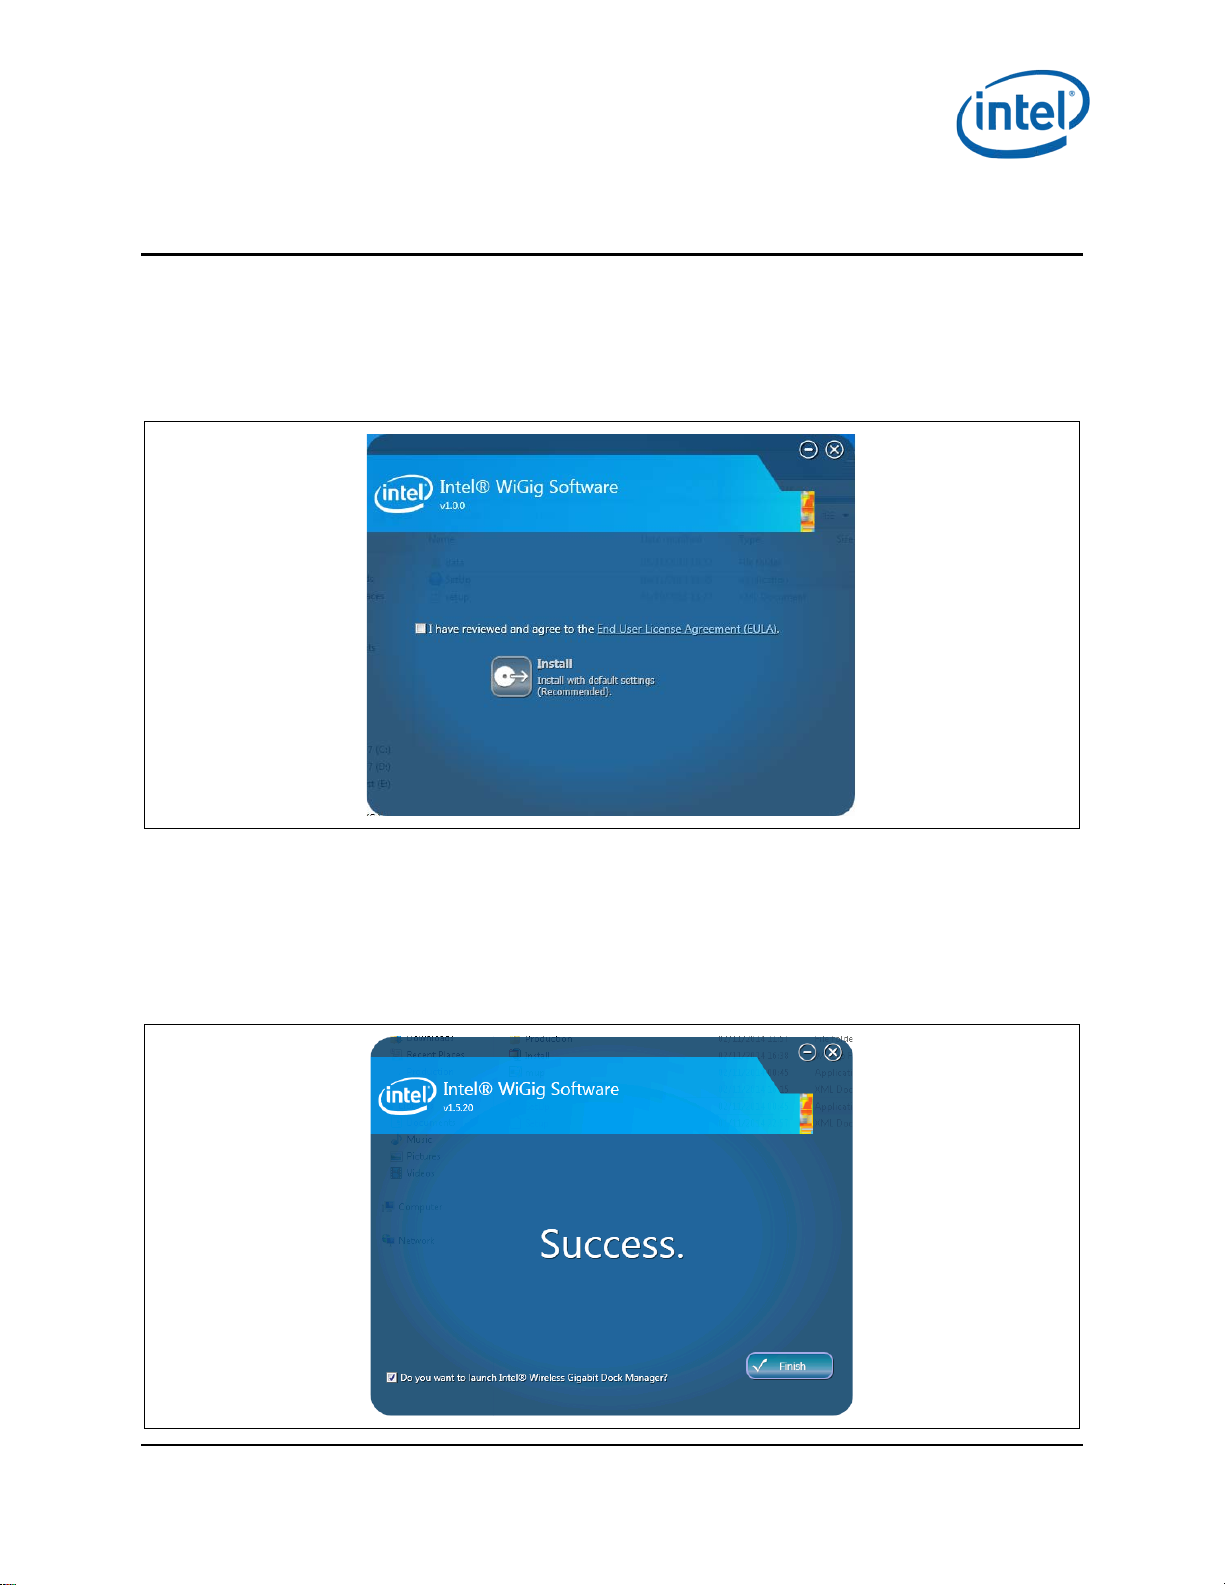
1. Go to G Layout\Win7Plus\ and run Setup.exe.
2. Setup.exe installs the relevant insta lle r for either a 32-bit platform or a 64-bit platform.
Figure 2-1 End User License Agreement dialog box
3. Check the I have reviewed and agree to th e E U LA box, and click Install. This w ill ins ta ll the
operational WiGig software for the NB.
4. When the application is successfu lly installed, select the Do you want to launch Intel® Wireless
Gigabit Dock Manager? check box. Click Finish.
5. You will b e a b le to launch the Intel
later if you do not select this option.
Figure 2-2 Success message
®
Wireless Dock Manager application from th e desktop shortcut
Intel® Wireless Gigabit v2.6
User Guide May 2016
10 Intel Confidential Document Number: 537178-3.9
Page 11
Software Inst al l
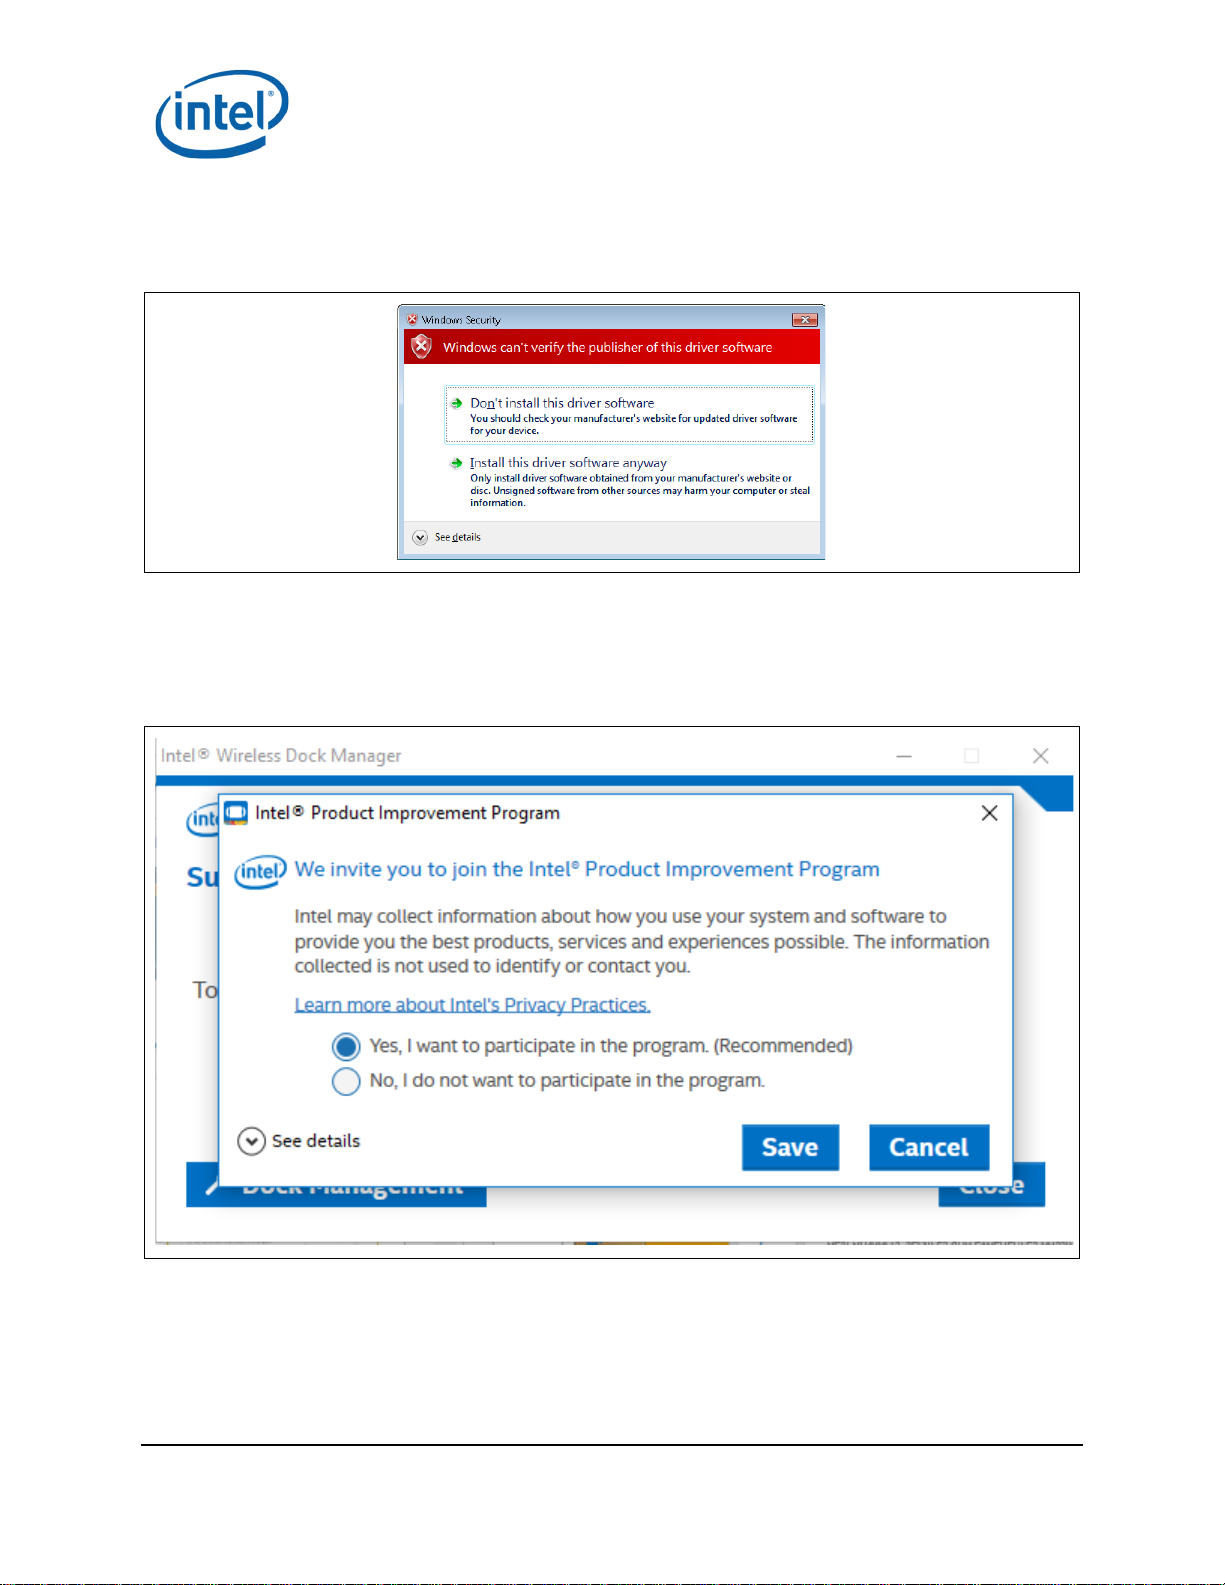
6. During the first installa tion, the device driver is installed. If the Windows Security message shown
in Figure 2-3 appears, choose Install this driv e r s oftware anyway to contin ue the installation.
Figure 2-3 Windows security message
To avoid this window, run the certificate file (iCert.spc) from the Certificates layout.
To run the installer in silent mode, run the command setup.exe –q from a command line.
7. By the end of the installation, the user will be asked to par ticipate in the Product Improvemen t
Program, as shown in Figure 2-4.
Figure 2-4 Product Im provement Prog r a m dialog box
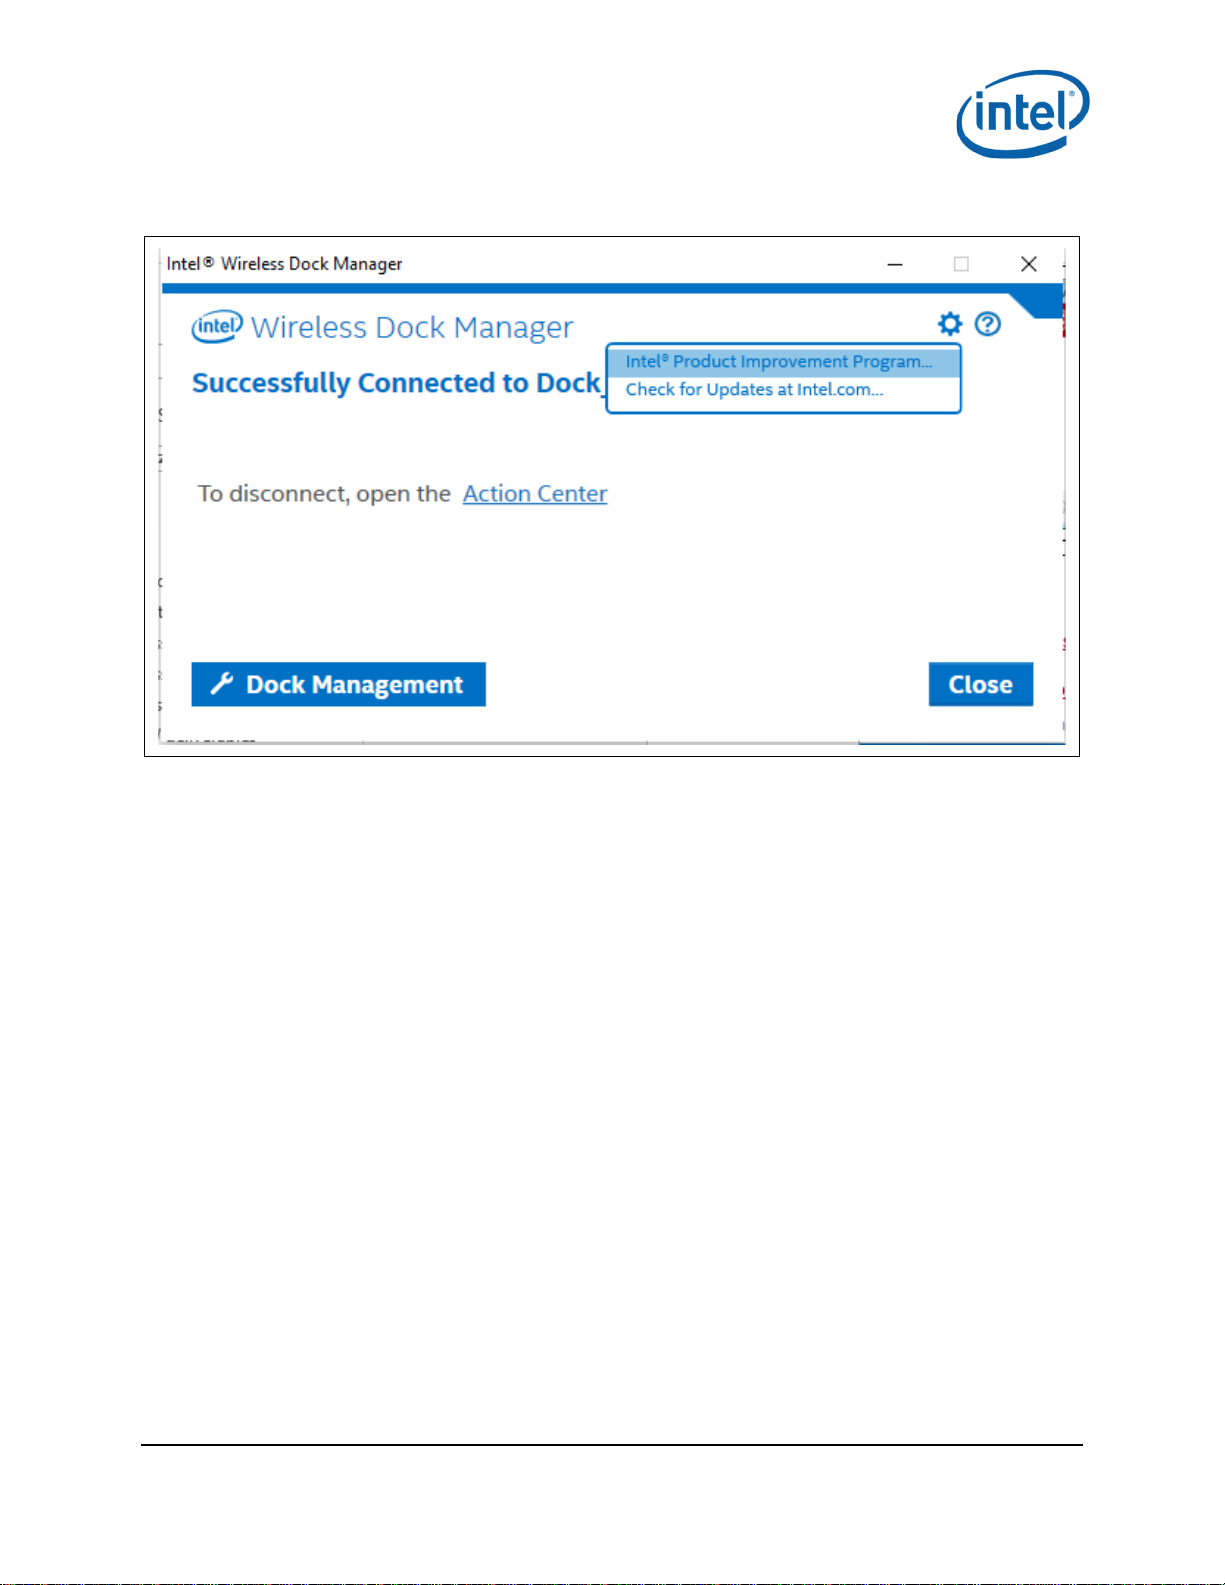
8. You may change your selection at any time on the Settings menu of the In te l Wirele s s Dock
Manager; see Figure 2-5.
Intel® Wireless Gigabit v2.6
May 2016 User Guide
Document Number: 537178-3.9 Intel Confidential 11
Page 12
Software Inst al l
Figure 2-5 Changing I nt el® Product Improve ment Program s election
§
Intel® Wireless Gigabit v2.6
User Guide May 2016
12 Intel Confidential Document Number: 537178-3.9
Page 13
WiGig Application User Manual for Windows 7*/8*/8.1*
3 WiGig Application User Manual for
Windows 7*/8*/8.1*
3.1 User manual
The Intel® Wireless Dock Manager is a dedicated applicat ion that runs on the client and allows the
user to find, connect to, and configure docks.
LEDs on the dock, and an on-screen display (OSD) on the monitor conn ected to the dock, provide
further feedback about the dock status, and assist the user in performing actions.
The activity bu tton on the dock is use d in some of the flows (like pairing and
connection/disconnection).
3.1.1 Launch the Intel® Wireless Dock Manager
The Intel® Wireless Dock Manager starts automatically with W indows.
®
To invoke the Intel
labeled Intel
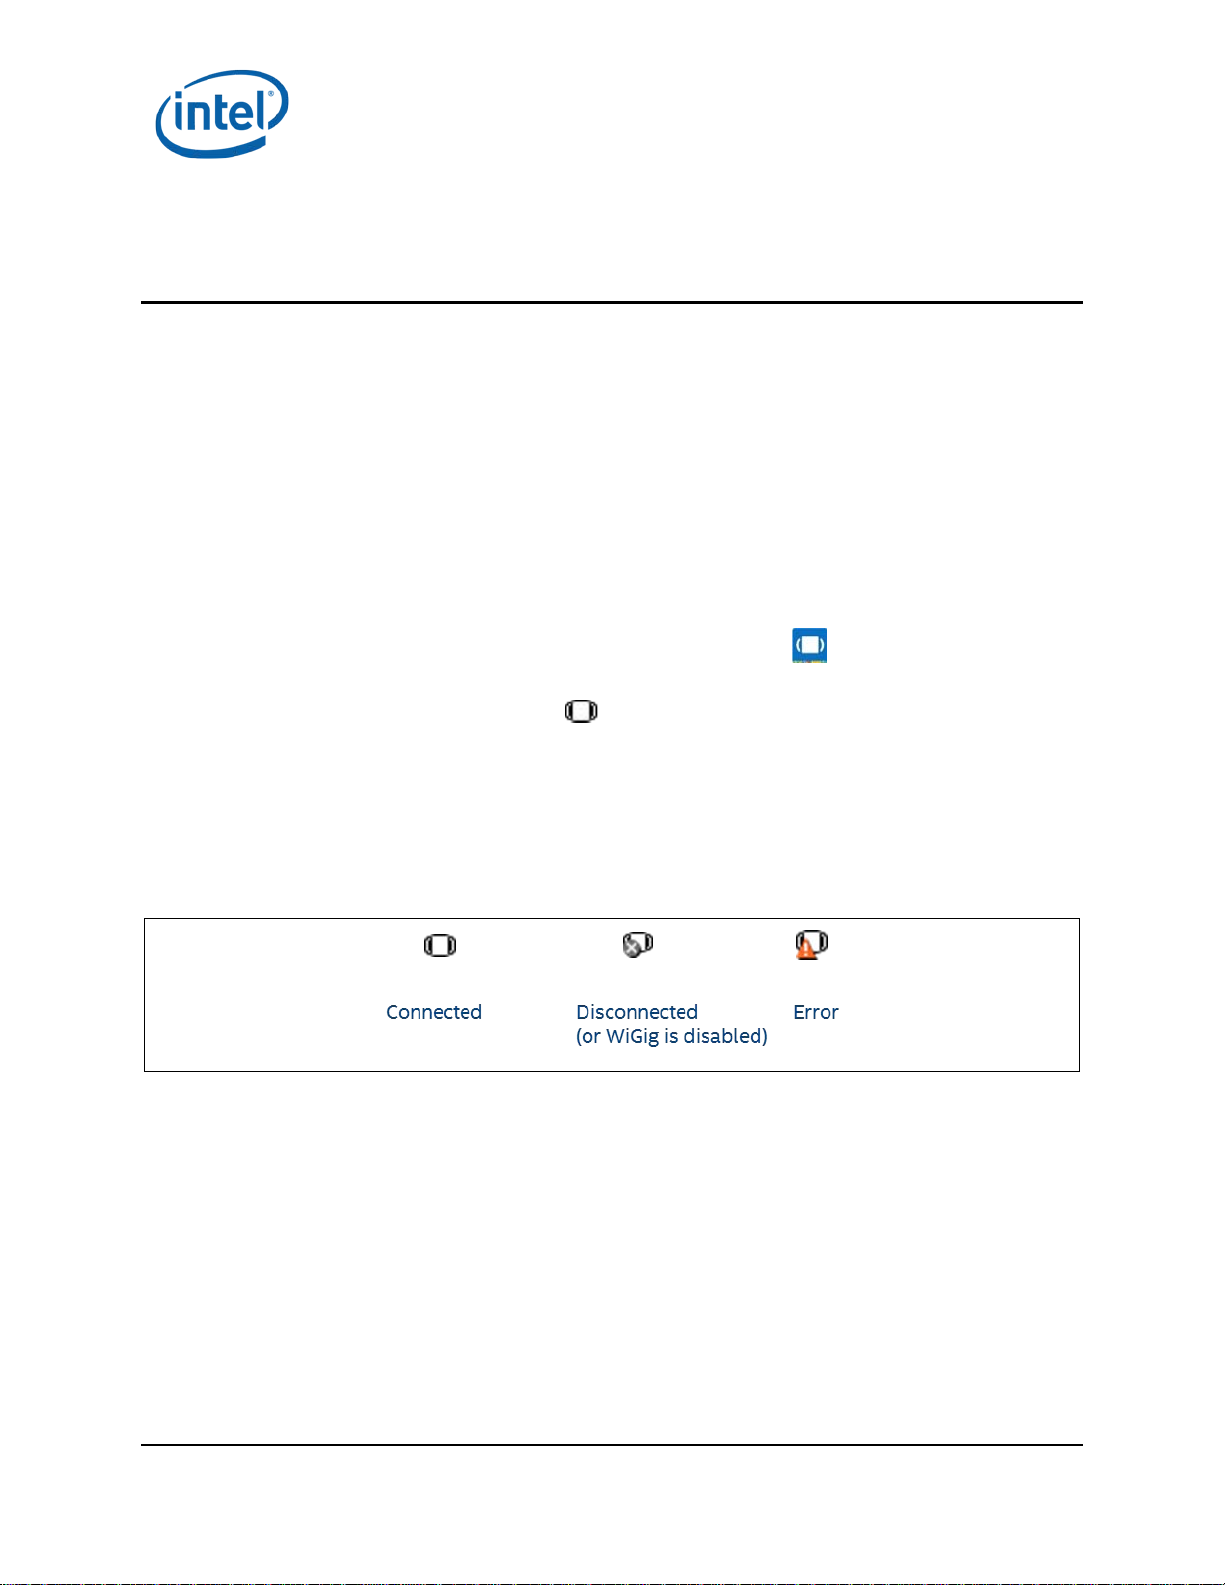
Alternatively , double-click the WiGig tray icon , or right-click and choose View available docks.
A dedicated tray icon can initiate the Intel
shown in Figure 3-1:
Connected: The NB is connected to a dock
Disconnected: The NB is not connected to a dock
Error: Error while connecti ng or weak connection (hover to see the er r or r e a son)
®
Wireless Dock Manager interface, double-click the icon on the desktop,
Wireless Dock Manager.
®
Wireless Dock Manager and indicate the relevant status as
Figure 3-1 Tray icon indications
Note: The Intel® Wireless Dock Manager application keeps running f r om th e sys tem tra y even if
you click the X (close window) ic on on the application.
3.1.2 Make the first connection
1. Turn on the power on your dock. When the dock is ready to accept connections , the external
monitor will ligh t up and show the welc om e O SD message shown in Figure 3-2.
Intel® Wireless Gigabit v2.6
May 2016 User Guide
Document Number: 537178-3.9 Intel Confidential 13
Page 14
WiGig Application User Manual for Windows 7*/8*/8.1*
Figure 3-2 Welcome OSD message
2. This screen remain s until the connection is m a d e. After a few minutes of inactivity, the mon itor
turns off to conserve power. Press the dock activity button to wake up the monitor and continue
with the connec tion.
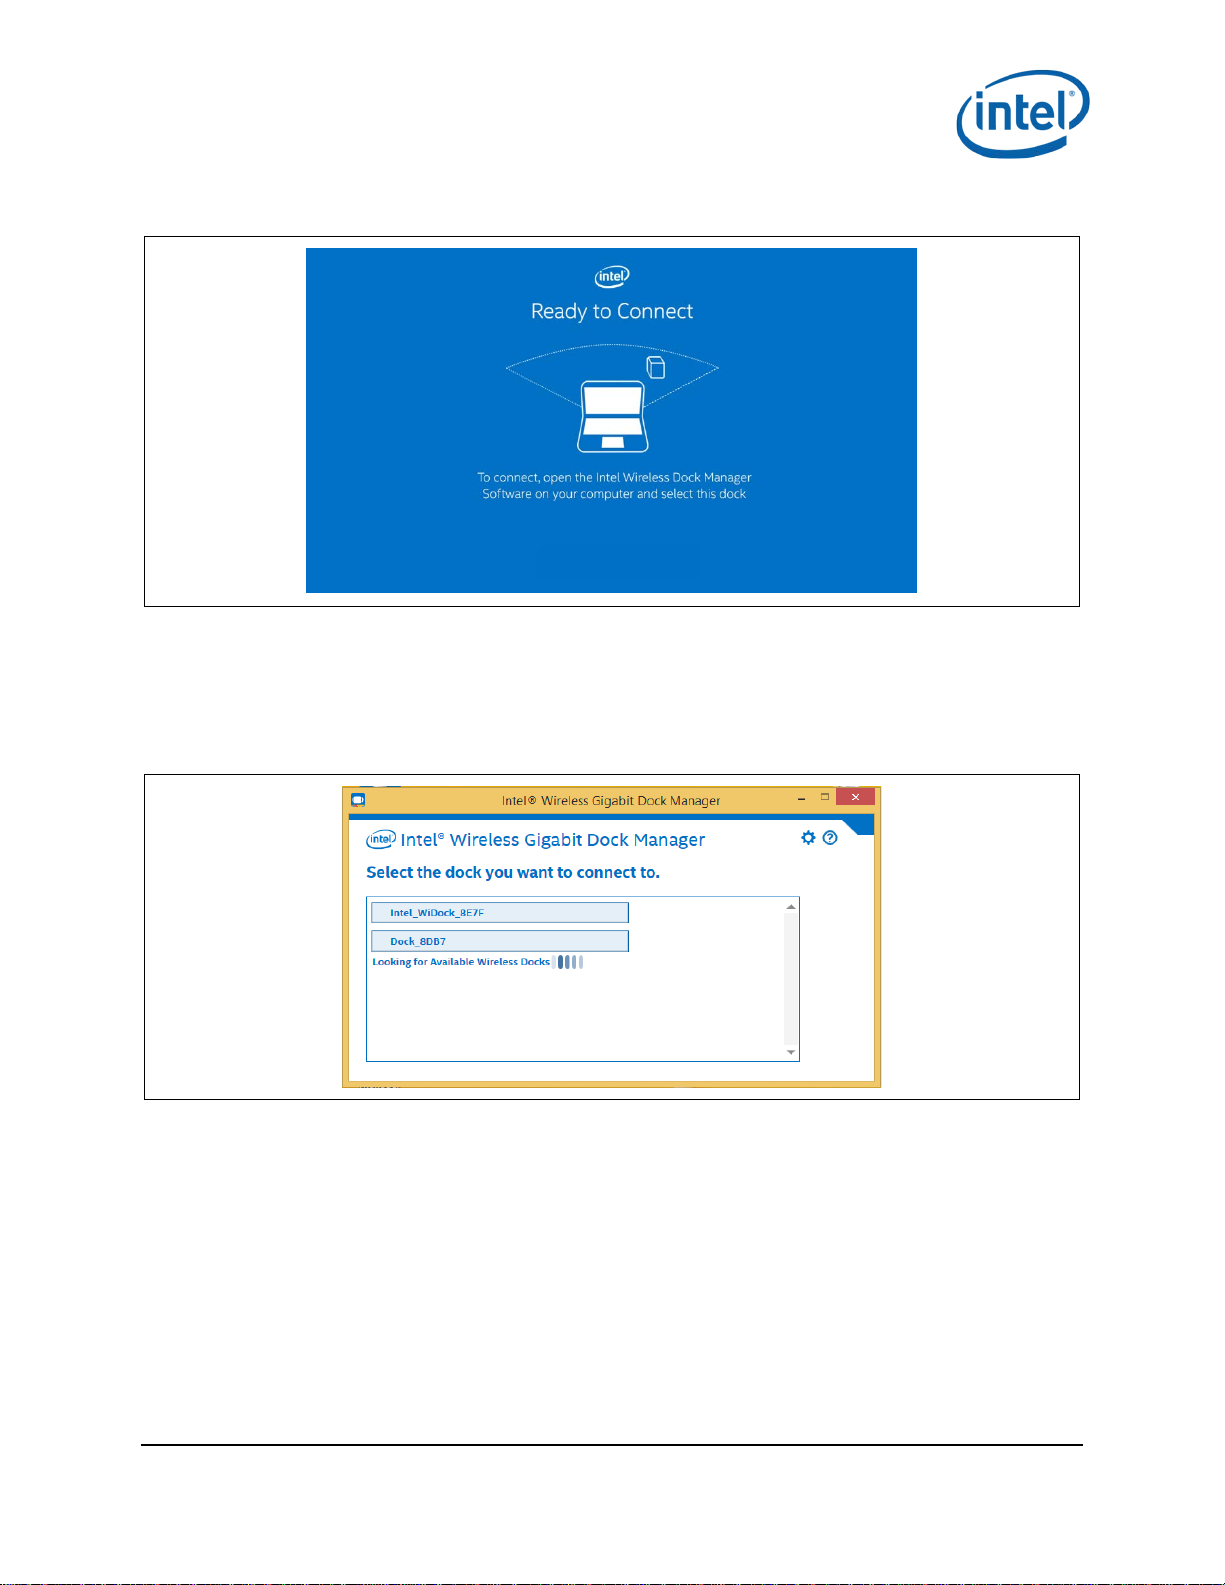
3. WiGig will star t s canning for docks in your vicinity. You will see a window similar to that shown in
Figure 3-3.
Figure 3-3 Dock select
4. Choos e the dock you wish to connect to by clicking it.
Note: Since this is the first time y ou are connecting to this dock, you will need to pair with it.
Pairing creates a s e t of authentication keys that uniquely identify your c lient and dock
pair, and allow them to communicate in a secured, encry pted ma nner over-the-air.
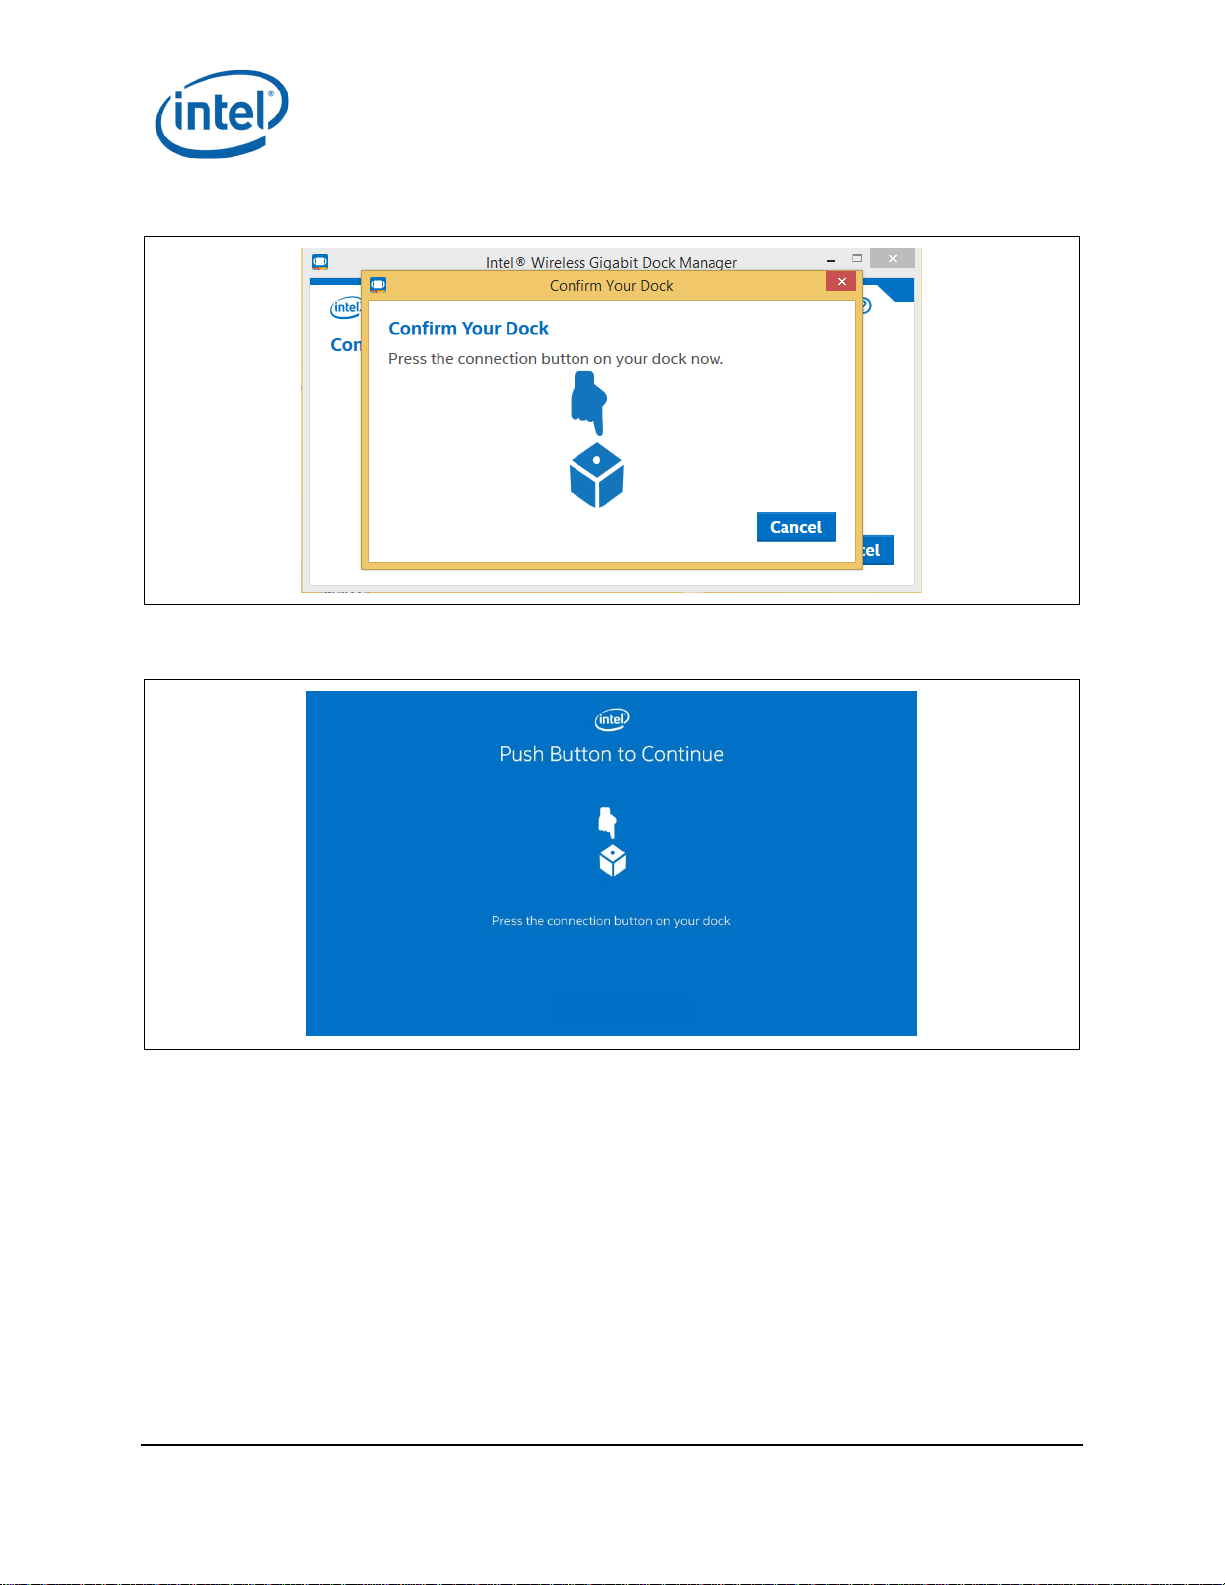
5. Press the connection button on your dock to confirm it, as indicated in Figure 3-4.
Intel® Wireless Gigabit v2.6
User Guide May 2016
14 Intel Confidential Document Number: 537178-3.9
Page 15
WiGig Application User Manual for Windows 7*/8*/8.1*
Figure 3-4 Dock confirmation message
6. A corresponding OSD will appear on the exter nal monitor, as shown in Figure 3-5.
Figure 3-5 Dock confirmation OSD
7. Press the activ ity button on the doc k to complete the pa iring process. Th e Connected dialog box
appears shortly after, as shown in Figure 3-6.
Intel® Wireless Gigabit v2.6
May 2016 User Guide
Document Number: 537178-3.9 Intel Confidential 15
Page 16
WiGig Application User Manual for Windows 7*/8*/8.1*
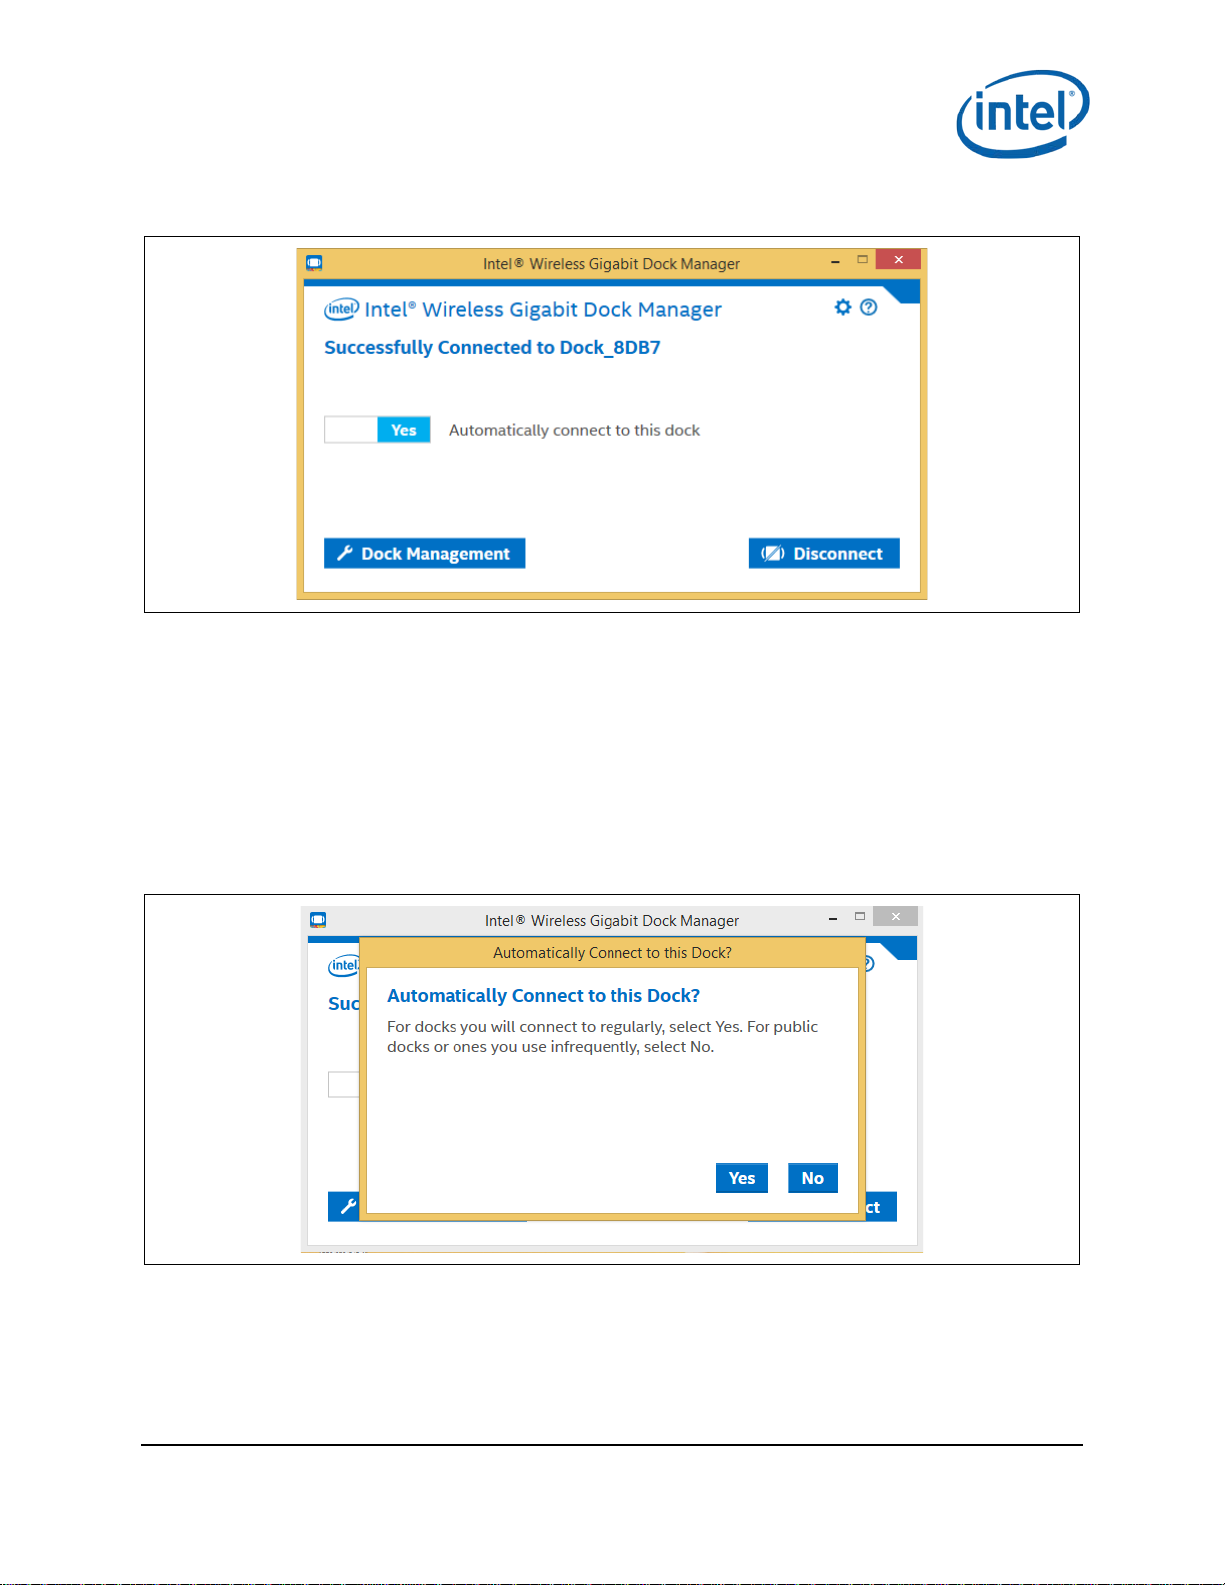
Figure 3-6 Dock connected message
Note: A successful connection is also indicated by the dock LED (if available), and the external
monitor and USB devices being c onnected and enumerated on y ou r c lien t ( you will hear
the Windows hot-plug audio tone cues).
Congratulations! You have made y our first wireless docking connection.
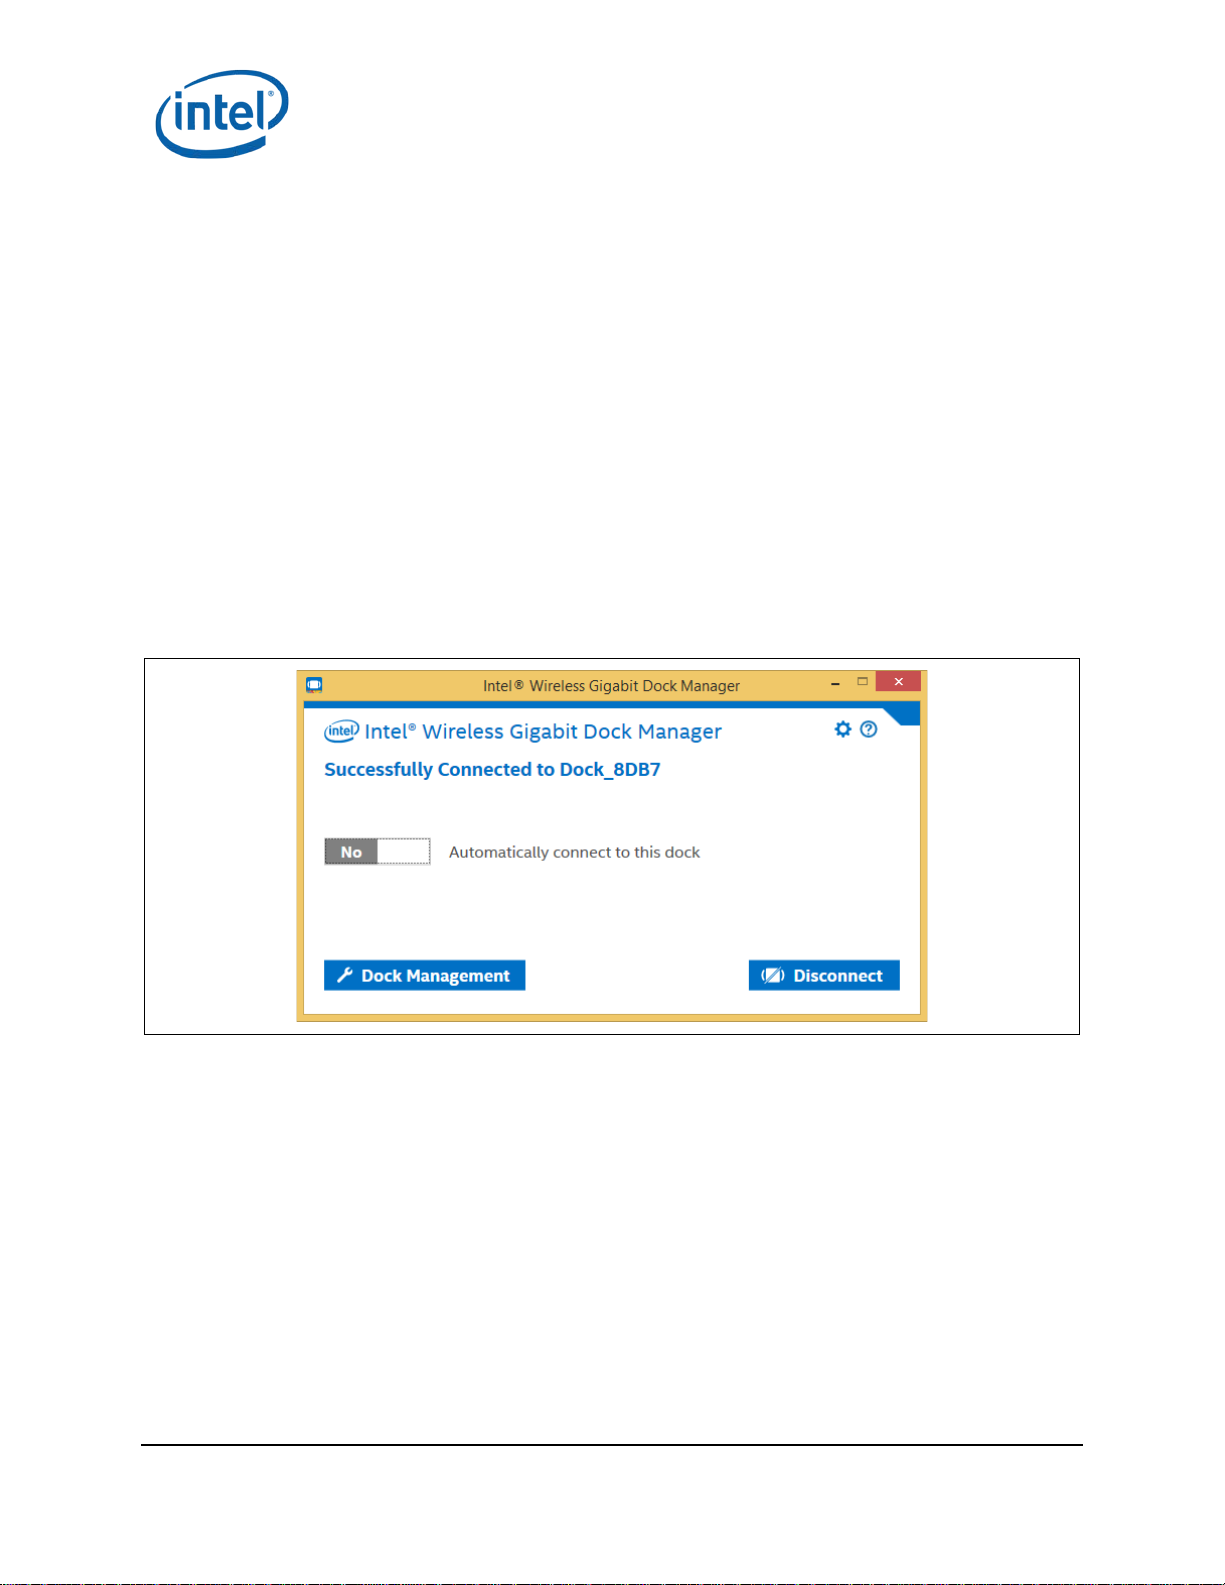
3.1.3 Automatic connection default
While connecting to the dock for the first time, you will see the message to set the dock to be
automatically c onnected or not, as shown in Figure 3-7.
Figure 3-7 Automati c a lly Connect to thi s Dock message
For docks you connect to regularly, s ele c t Yes. For public docks or ones you use rarely , select No.
Intel® Wireless Gigabit v2.6
User Guide May 2016
16 Intel Confidential Document Number: 537178-3.9
Page 17
WiGig Application User Manual for Windows 7*/8*/8.1*
3.1.4 Automatic connections
If a dock is set to con nect automatically, WiGig will attem p t to automatically connect to this dock once
in range. To this end, WiGig keeps s c a nning in the background, while con suming very little power.
To connect, simply place your client (assumed to be in S0) near the dock. Within several seconds,
WiGig will discover the dock and will con nect to it automatically. You do not have to invoke the
Wireless Dock Manager, open the lid or take any action, just wait until the external screen c om e s up
and USB devices are enumerated, a nd you can start working.
When successfully connected to a dock, the dock LED changes color (c olor is specific to dock vendor).
Note: For the c onnection to be fully completed automa tic ally, as describe d a b ove, the client
needs to be powered on and active (such as in S0). If the client is in S3, WiGig will
automatically discover the dock, and then you can use the dock button to wa ke up the
client and complete the doc king procedure. See Section 3.1.6 for more details. Ability to
wake up the client from the dock is ven d or s p ecific and is conf igured in the BIOS.
You can disable auto-connect by changing th e tog gle on the main Wireless Dock Manager screen while
connected, as shown in Figure 3-8.
Figure 3-8 Disabl ing the auto-connect setting
You can only change a dock between automatic and manual connection when you are actively
connected to the dock.
Once auto-connect is disabled, the client w ill no longer connect automatically a nd you will have to
manually select the dock from the client, as described in Section 3.1.5.
3.1.5 Manually connect to a dock
To manually connect to a dock, choos e th e dock from the list of dock s by clicking on it, as shown in
Figure 3-9.
Intel® Wireless Gigabit v2.6
May 2016 User Guide
Document Number: 537178-3.9 Intel Confidential 17
Page 18

WiGig Application User Manual for Windows 7*/8*/8.1*
Figure 3-9 Manual do c k c onnection
Docks that you have alr ea d y paired with in the past will appear with a d a r k background color. Docks
that you have n ever paired with will app ea r with a light background color.
The list is being refreshed au toma tically, as WiGig keeps scan ning in the background.
Another method to con nect to a dock is via the tray icon. If ther e is only a single paired d oc k in range
(that is, a dock you h ave already pa ir ed with in the past), you can right-click the tray icon and choose
Connect to <dock name>. Right-clicking when there is more than one paired dock in range, or n o
paired docks, will give you the option to open the Wireless Dock Manager (View available docks),
where you can ch oos e your desired dock fr om the list.
When successfully connected to a dock, the dock LED changes color (color is specif ic to dock vendor).
3.1.6 Automatic connection in S3 (depends on BIOS
configuration)
When getting in range with a paired doc k that is set to auto-con nect, and the clien t is sleeping (S3),
the WiGig radio wi ll d is cover the dock and establish a low powe r link to it, known a s low-power
connected. This mode may be indicated by the LED changing color.
While in this mode, the system is kept in its low power state (S3), an d WiGig will wait for an ind ic a tion
from the dock side to wake up the syste m a nd complete the connection procedur e. This can be
achieved by pres s ing the activity button on the dock. When the button is pressed , the client is moved
to S0, and the con nection completes autom atically.
Once fully connected, the dock LED may change color.
3.1.7 Automatic connection in connected standby
When getting in range with a paired doc k that is set to auto-con nect, and the clien t is connected
standby low-power mode, th e WiGig radio will automatically con nect to the dock. Th e d evices
connected to the d oc k will be connected and enumerated on th e c lie nt, however the external monitor
will not come up and the system will remain in connected standby.
To take the system out of connected standby, and light up the s creen, press the activity button on the
dock, or alternatively click the mouse or press the keyboard.
Intel® Wireless Gigabit v2.6
User Guide May 2016
18 Intel Confidential Document Number: 537178-3.9
Page 19

WiGig Application User Manual for Windows 7*/8*/8.1*
3.1.8 Disconnect from the dock
There are sever a l m e thods in which you c an disconnect an active connection:
1. First, you can simply take your client and walk out of range fr om the dock. WiGig will even tually
lose the link, a nd the dock will be disconnected. Once disconnected, WiGig automatically star ts
scanning again to discover auto-connect docks in range.
This method is also known as auto-disconnect. In this case, the OSD will display the message
pictured in Figure 3-10 after disconnecting.
Figure 3-10 Dock disconne c tion mesage
Note: Disconnecting by getting out of range (auto-disconnect) is experienced by the system as a
USB surprise-removal event. While Win dow s has become better and better over the years
with handling surprise removals, there is still always a chance of data loss/corruption
when surprise-removing USB Mass Storage dev ices c onnected to the dock (other devices,
such as HID, USB LAN, USB audio, etc., do not suffer). If this is a conce r n, for example, if
you have a Mass Storage device connected to your dock, an d you ha ve just recently
finished accessing this device, it may be advisable to safely remove this USB device (rightclick on the USB icon in the system tray) , or to disconnect W iGig manually, as descr ib ed
below. In any ca s e , it is advised to act in a simila r manner to un docking from a wired
dock, as the same issues are present there as well.
2. To manually disconnect, invoke the Wireless Dock Manager and click the Disconnect button in the
main window. Alternativ ely, you can right-click the system tray icon and choose Disconnec t from
<dock name>.
Intel® Wireless Gigabit v2.6
May 2016 User Guide
Document Number: 537178-3.9 Intel Confidential 19
Page 20

WiGig Application User Manual for Windows 7*/8*/8.1*
Figure 3-11 Manual disconnect option
3. Anoth er method for manually disconnecting is to press and ho l d the activity button on the dock for
more than four seconds. This method is especially useful for closed-lid operations, or if you a r e
trying to manually disconnect a system where you cannot access the Wireless Dock Manager (like
when the system is locked an d you do not know the password).
Once disconnected, the dock LED chan ges color (color is specific to dock vendor ), and the OSD
shows the Ready to Connect message, as shown in Figure 3-12.
Figure 3-12 Ready to connect message
Note: Manually disconnecting from a dock that is set to connect automatically will tempor a rily
disable auto-connect to this dock. This is to prevent the connection fr om be ing recovered
immediately. To re-enable automatic connections to this dock, the client needs to get out
of range (for about 13 seconds) and then return.
Intel® Wireless Gigabit v2.6
User Guide May 2016
20 Intel Confidential Document Number: 537178-3.9
Page 21

WiGig Application User Manual for Windows 7*/8*/8.1*
3.1.9 PIN-based pairing
Intel Wireless Dock Manager version 2.6 or newer a llows WiGig pairing using a PIN, without the need
to push the button on the dock. To enable PI N -based pairing, select the PIN entry option from the
Dock Management menu, as shown in Figure 3-13.
Figure 3-13 Enabling PIN-bas ed pairing
There are dock products tha t have no push button option. Such docks are configured in the factory
with no PBC button available. (See Ref 7). For these dock products, PIN-based pairing is the default
pairing method, and the Confirmation S ettings options do not appea r in the Dock Management menu.
Once the PIN entry is configured, the user is prompted to enter the PIN number when trying to
connect to the dock, as shown in Figure 3-14. The PIN number will be shown in an OSD on the
monitor connected to the dock.
Intel® Wireless Gigabit v2.6
May 2016 User Guide
Document Number: 537178-3.9 Intel Confidential 21
Page 22

WiGig Application User Manual for Windows 7*/8*/8.1*
Figure 3-14 PIN-based pairi ng in OSD
3.1.10 Disable and enable WiGig
1. To disab le WiGig, click on the gear icon in the u p pe r righ t of the main Wireless Dock Manager
screen, shown in Figure 3-14. A popup-menu will come up.
Figure 3-15 Disable Wi G ig using the gear icon
2. Choose the first menu op tion, Disable WiGig. A warning may appear, depending on wh ether you
are currently connected or not.
Intel® Wireless Gigabit v2.6
User Guide May 2016
22 Intel Confidential Document Number: 537178-3.9
Page 23

WiGig Application User Manual for Windows 7*/8*/8.1*
Figure 3-16 Disable Wi G ig warning message
3. Choose Yes to disable WiGig.
4. When WiGig is disabled, you cannot find an d c onnect to wireless dock s; the message shown in
Figure 3-16 appears. Disabling WiGig minimizes the power consumption of the WiGig radio in the
client.
Figure 3-17 WiGig disabled confirmation message
5. To enable WiG ig, click the En a b le WiGig button.
3.2 Change dock settings
1. To access the dock settings, c lick the Dock Management button on the main Wireless Dock
Manager window while connected to a dock, as shown in Figure 3-17.
Intel® Wireless Gigabit v2.6
May 2016 User Guide
Document Number: 537178-3.9 Intel Confidential 23
Page 24

WiGig Application User Manual for Windows 7*/8*/8.1*
Figure 3-18 Dock Management button
2. This will open up the Dock Management dialog box, as shown in Figure 3-18.
Figure 3-19 Dock management dialog box
3. In the Dock Management dialog box, you can configure the following settings:
– Information
Name: This field determines how will the dock be called and presented in the scan list in
the Wireless Dock Manager. This field accepts only Latin letters, digits, and a few special
characters such as space and underscore.
Note: The factory s e tting for dock name is a pre fix, Doc, and an automatic suffix of the last four
nibbles of the MAC address of the dock. This helps users to dis tinguish between similar
docks whose names hav e not been c ustomized. Once the user changes the dock name,
the last four nibbles of the MAC address a r e no longer appended to it. To re-enable th is
behavior, the doc k must be reset to the factory defaults by pressing the recovery bu tton
on the dock for 10 seconds.
Intel® Wireless Gigabit v2.6
User Guide May 2016
24 Intel Confidential Document Number: 537178-3.9
Page 25

Software: This shows the version of the c urrently installed software. Clicking this item will
allow you to manu ally update your dock software, as described in Section 3.3.1. Also,
when an update is available for your dock, it will show up next to the version numbe r .
Click the Update Available link to start the software update procedure.
– Dock Access Setti ngs
Individual: Allows automatic connec tions. This setting enables the auto-connect toggle on
connected clients, as described in Section 3.1.3. This is the only setting with which the
dock can be automatically connected to, and is particularly suitable for private docks for
individuals.
Shared: Requires manua l con firmation. This s e tting forces manual connections by
disabling the auto-connect toggle on connected clients. This setting is part ic ularly suitable
for shared docks in multi-users environmen ts , wh er e it ma y be undesirable to allow
automatic connection to prevent users from inadvertently connecting to th e dock while in
range (remember that a dock that is currently connected to a user cannot accept other
user’s connections, and will not be seen in their scan list).
Public: Requires pairing for all connections. This settings for ces the user to pair on ev e r y
connection (such as. pa ir ing data is lost upon disconnect). T his is the most secure se tting,
and is mostly suitable for docks w here the convenience of connection is le s s of a concern,
for example in airp or ts, cafes or hote ls .
– Signal Preferences
Preferred Radio Channel: Allows you to assign a specific operating channel, or enable
automatic selection by the dock. It is recommended to leave this as Auto, as this will allow
the dock to select the best ch a nn el to operate in, based on interferenc e a nd other factors.
– Password
Enable this to assign a password for pr otecting the dock setting page, prev enting
unauthorized access.
WiGig Application User Manual for Windows 7*/8*/8.1*
3.3 Dock software update
Your dock software can be u pgr a ded ov er the air, from the client.
3.3.1 Update during connection
1. When connecting to the doc k, the Wireless Dock Manager might inform the use r of a mandatory
dock software update.
2. On mandatory dock software updates, the Wireless Dock Manager will present the message shown
in Figure 3-19 while tryin g to connect.
Intel® Wireless Gigabit v2.6
May 2016 User Guide
Document Number: 537178-3.9 Intel Confidential 25
Page 26

WiGig Application User Manual for Windows 7*/8*/8.1*
Figure 3-20 Dock software Update Required message
3. In addition, the OSD on the e xternal monitor w ill s how the message shown in Figure 3-20.
Figure 3-21 OSD Update Re quired message
4. Choosing No will disconnect. The user cann ot connect and work w ith this dock without perf or ming
a software update.
5. Choosing Yes will start the dock software update process. A screen similar to the one in Figure
3-21 appears, with a bar in dic a tin g pr ogress.
Intel® Wireless Gigabit v2.6
User Guide May 2016
26 Intel Confidential Document Number: 537178-3.9
Page 27

WiGig Application User Manual for Windows 7*/8*/8.1*
Figure 3-22 Dock update progress
6. During the software update process, the doc k LED changes color (c olor is specific to dock vendor),
and the OSD will show the message pictured in Figure 3-22, with bars to indicate prog ress.
Figure 3-23 OSD update pro gress message
7. Once th e update process is complete, the dock is reset, and the client will either automatically re-
connect (auto-connect enabled) or the user will need to m a nually re-conn e c t to the dock (autoconnect disabled).
3.4 Diagnostic information
Information s hown in diagnostics window will help tec hnical support in tr oubleshooting your wireless
docking experience. I n order to open the diagnostics window, click the Advanced Diagnostics button in
the About window.
Intel® Wireless Gigabit v2.6
May 2016 User Guide
Document Number: 537178-3.9 Intel Confidential 27
Page 28

WiGig Application User Manual for Windows 7*/8*/8.1*
Figure 3-24 Advanced dia gnostics window
3.4.1 Details
This PC tab
The information in the This PC tab provides a diagnostic report for the client.
The reported fields are:
Release: Version of W iG ig release, including all SW components in host and device
F/W: Version of firmware running in device
User mode driver: Version of software running in user-mode driver
WSE HPAL driver: Version of software running in WSE-HPAL driver
WSE hub driver: Version of software running in WSE-hub driver
SDK-API: Version of SDK-API
Operational SDK W r a pper: Version of Operationa l SDK DLL
Common SDK Wrapper: Version of Common S D K DLL
OTP Content: Version of image burned in OTP
CU: Version of CU Application
MAC H/W: Version of M-Chip Si. Possible values are:
– 6560-6567: For MpL-C4
– 6568-6575: For MpL-C5
R-FEM H/W: Version of R-Chip. Possible values are:
– 4-5: in case of R-FEM1
– 6: in case of R-FEM2
Device ID: 0x93C, meanin g MpL Si
Subsystem ID: Value representing WiGig HW SKU. Details are given in Ref 4.
OEM ID: String configured in OEM-Lock field in BIOS. See more details in Section 8.1.2 in Ref 6.
Device State: See details for Device status field in Section 5.2.1.1.1 in Ref 5.
Intel® Wireless Gigabit v2.6
User Guide May 2016
28 Intel Confidential Document Number: 537178-3.9
Page 29

WiGig Application User Manual for Windows 7*/8*/8.1*
Device State Reason: See details for Reason for Status field in Section 5.2.1.1.1 in Ref 5.
Last Disconnec t Reason: See details for Failed Connec tion Details field in Section 5.4.11 in Ref
5.
H/W status 1: M-chip junction temperatu r e, in Celsius.
H/W status 2: R-chip junction temperatu r e, in Celsius.
Dock Tab
The information in the This PC tab provides a diagnostic report for the dock.
The reported fields are
F/W (main): Version of firmware burned in main slot in Flash
F/W (factory): Version of firmware burned in factory slot in Flash
Active F/W: See details for A ctive FW field in Section 5.7.20 in Ref 5.
OTP Content: Version of image burned in OTP
MAC H/W: Version of M-Chip Si. Possible values are
– 6560-6567: For MpL-C4
– 6568-6575: For MpL-C5
R-FEM1 H/W: Version of R-Chip. Possible values are
– 4-5: In case of R-FEM1
– 6: In case of R-FEM2
R-FEM2 H/W: Version of R-C h ip. Possible values are the same as for R-FEM1.
MST Hub H/W: Version of MST Hub hardware
MST Hub F/W: Version of MST Hub firmware
Signal Quality: See details for the Peer-Signal-Quality field in Section 5.4.8 in Ref 5.
Performance Quality: See details for the Peer-Performance-Quality field in Section 5.4.8 in Ref
5.
Active Channel: See details for the Active Channel field in secti on 5.4.8 in Ref 5.
Last F/W update res ult: See details for the Status field in Section 5.2.1.6 in Ref 5.
H/W status 1: M-chip junction temperatu r e, in Celsius
H/W status 2: R-chip junction temperatu r e, in Celsius
3.5 Manage docks
The user may manage docks that were previously connected to. For each dock, the user may delete
the dock or remove the auto-connect option. To manage docks, click on the Manage Remembered
Dock dialog box from the Settings button, as shown in Figure 3-24 and Figure 3-25.
Intel® Wireless Gigabit v2.6
May 2016 User Guide
Document Number: 537178-3.9 Intel Confidential 29
Page 30

WiGig Application User Manual for Windows 7*/8*/8.1*
Figure 3-25 Choosing Manage Remembered Docks
Figure 3-26 Manage Remembered Docks auto-connect feature
Intel® Wireless Gigabit v2.6
User Guide May 2016
30 Intel Confidential Document Number: 537178-3.9
Page 31

WiGig Application User Manual for Windows 7*/8*/8.1*
3.6 Notification messages
There are notific ation messages th a t inform the user about the different application activities , like
possible limitations or errors.
3.6.1 Unable to Connect
The “Unable to Connect” message is displayed if there is an error durin g the connection or pairing
process, as shown in Figure 3-26.
Figure 3-27 Unable to Conne c t message
3.6.2 No Available Docks Found
As shown in Figure 3-27, the “No Available Docks Found” message is displayed if scanning was done
but no docks have been detected.
Figure 3-28 No Available Docks Found message
Intel® Wireless Gigabit v2.6
May 2016 User Guide
Document Number: 537178-3.9 Intel Confidential 31
Page 32

WiGig Application User Manual for Windows 7*/8*/8.1*
3.6.3 Weak Connection
The “Weak Connection” message is displayed if the connection is weak but conn ec te d , as sh own in
Figure 3-28.
Figure 3-29 Weak Connection message
3.6.4 WiGig is Not Working
The “WiGig is Not Working” message will be displayed if WiGig driver or device is not responding, as
shown in Figure 3-29. The message will also pr ovide an error code value. Table 3–1 provides a list of
error code cases and possible recovery methods.
Figure 3-30 WiGig is Not Working message (with example error code 0x1000)
Intel® Wireless Gigabit v2.6
User Guide May 2016
32 Intel Confidential Document Number: 537178-3.9
Page 33

WiGig Application User Manual for Windows 7*/8*/8.1*
Table 3–1 Error code cases and possible recovery methods
Item Error
Description Recovery Method
Code
1 0x1000 Device is disabled In Device Manager,
• If WiGig devic e is dis a bled,
enable this device.
• If WiGig device is enabled,
disable this device and then
enable.
2 0x100C Device Version (OTP) is incompatible with
SW Version.
Replace Device with compatible Device
Version (OTP) or Install compatible SW
Version
3 0x1010 FW continuous error In Device Manager, disable th is dev ic e
and then enable.
In case this does not solve the problem,
you may need to install other SW
Version, containing a fix. Please con tact
Intel support.
4 0x1014 RTC Data corruption Replace Coax Cable and/or RFEM
5 0x1018 RFEM Type is incompatible with SW
Version
Replace RFEM with compatible RFEM
Type or Install c om p a tible SW Version
6 0x101C Device SKU is Incompatible with SW
Version.
7 0x1021 Device Product is Incompatible with SW
Version.
Replace Device SKU or Install
compatible SW Version
Replace Device with compatibl e Device
Product or In s ta ll compatible SW
Version
8 0x1020 RTC disconnected, upon RF-On Replace/Reconnect Coax Cable and/or
RFEM
9 0x1100 Unrecognized fatal error In Device Manager, disable th is dev ic e
and then enable.
In case this does not solve the problem,
you may need to install another SW
version, conta ining a fix. Please con ta c t
Intel support.
Intel® Wireless Gigabit v2.6
May 2016 User Guide
Document Number: 537178-3.9 Intel Confidential 33
Page 34

WiGig Application User Manual for Windows 7*/8*/8.1*
3.6.5 WiGig disabled: critical temperature
The “WiGig is disabled due to overheating” message is displayed if the WiGig driver or device is
disabled due to a critical temperature error, as shown in Figure 3-30.
Figure 3-31 WiGig disabled due to o verheating message
3.6.6 WiGig disabled by hardware RF kill switch
The “WiGig is disabled” message is displayed if the WiGig driver or device is disabled by the physical
radio on/off sw itc h, as shown in Figure 3-31.
Figure 3-32 WiGig disabled by ha rdware RF kill switch message
Intel® Wireless Gigabit v2.6
User Guide May 2016
34 Intel Confidential Document Number: 537178-3.9
Page 35

WiGig Application User Manual for Windows 7*/8*/8.1*
3.6.7 WiGig disabled by airplane mode
The “WiGig is disabled” message is displayed if the WiGig driver or device is disabled because the
device is in airplane mode, as shown in Figure 3-32.
Figure 3-33 WiGig disabled by a irplane mode message
§
Intel® Wireless Gigabit v2.6
May 2016 User Guide
Document Number: 537178-3.9 Intel Confidential 35
Page 36

WiGig Application User Manual for Windows 10*
4 WiGig Application User Manual for
Windows 10*
4.1 User manual
This chapter is very similar to the previous chapter an d c ontains the WiGig behavior in the
Windows 10* OS.
In Windows 10*, the OS controls the network-related functionality . This includes ha ndling the radio
state, scanning, connecting, and managing the profiles. Th e OS controls this via th e setting and the
action center pane, as described below.
The Intel
user to do all the activities that are not related to network management, like manage th e doc k, get
diagnostic inf o, do FWU, etc.
LEDs on the dock, and an on-screen display (OSD) on the monitor connecte d to the dock, provide
further feedback about the dock status, and assist the user in performing actions.
The activity bu tton on the dock is use d in some of the flows (lik e pairing and
connecting/disconnecting).
4.1.1 Launch the Intel® Wireless Dock Manager
®
Wireless Dock Manager is a dedicate d a pplication that r uns on the client an d a llows the
The Intel® Wireless Dock Manager starts automatically with Windows.
To invoke the Inte l
labeled “Intel
Alternatively , double-click the WiGig tray icon while the device is connected to a dock ( th e
connected icon as shown in Figure 3-1
The Intel® Wireless Dock Manager application keeps running as an application even if you click the X
(close window) icon on the application. To stop it, you must use the Windows Task Manager.
®
®
Wireless Dock Manager interface, double-click the icon on the desktop,
Wireless Dock Manager”.
).
4.1.2 Make the first connection
1. Turn on the power to your dock . When the dock is ready to accept connec tions, the external
monitor lights up and shows the Welcome OSD message, as shown in Figure 4-1.
Intel® Wireless Gigabit v2.6
User Guide May 2016
36 Intel Confidential Document Number: 537178-3.9
Page 37

WiGig Application User Manual for Windows 10*
Figure 4-1 Welcome OSD message
2. This message persists until the connection is made. After a few minutes of inactivity, the monitor
turns off to conse r ve power. Press th e dock’s Activity button to w ake up the monitor and continue
with the connec tion.
3. Click the Wireless Settings link to access the Airplane mode section of the Network & Internet
page (Figure 4-2) containing controls that let you turn on (or off) th e WiGig RF mode in addition to
the RF state of other devices. WiGig will be O N b y default.
Figure 4-2 Network & Internet page showing Airplane m ode settings
4. An alterna tive way to get to this page is via Settings -> Networ k & Internet -> Airplane mode.
5. Once you set the WiGig radio bu tton to on, you will find all docks in range. In Windows 10*, you
won’t be able to see the scan results in the Connect pane or in the Intel® Wireless Dock Manager.
6. To get to the Connect pane, click on the Action C e nter link (Figure 4-3) or press the k eyboard
shortcut Win+k; the Connect pane opens on the right side of th e m onitor (Figure 4-4).
Intel® Wireless Gigabit v2.6
May 2016 User Guide
Document Number: 537178-3.9 Intel Confidential 37
Page 38

WiGig Application User Manual for Windows 10*
Figure 4-3 Action Center link
Figure 4-4 Connect pa ne
7. Choose the dock you wish to connect to by clicking it in the Connect pane.
Intel® Wireless Gigabit v2.6
User Guide May 2016
38 Intel Confidential Document Number: 537178-3.9
Page 39

WiGig Application User Manual for Windows 10*
Note: Since this is the first time con necting to the dock, you need to pair with it. Pairing creates
a set of authentication keys that uniquely identify your client and dock p a ir , and allows
them to communicate in a secu r ed, encrypted manner over the air.
8. After c onnecting, the Con nect pa ne directs you to follow the instructions on the dock, as shown in
Figure 4-5.
Figure 4-5 Connect pa ne during connect ing stage
9. A corr esponding OSD will appe a r on the external mo nitor, as shown in Figure 4-6.
®
10. Unlike in Win7/8/8.1, you won’t see the indication to pus h the dock button on Intel
Wireless
Dock Manager.
Intel® Wireless Gigabit v2.6
May 2016 User Guide
Document Number: 537178-3.9 Intel Confidential 39
Page 40

WiGig Application User Manual for Windows 10*
Figure 4-6 Connect OSD message
11. Press the activity button on the dock to complete the pairing proc e s s. The “Successfully
Connected” message appears shortly after, as shown in Figure 4-7.
Figure 4-7 Dock connected message
Note: A successful connection is indicated by the dock L ED (if available), and the external
monitor and USB devices being c onnected and enumerated on y ou r c lien t ( you will hear
the Window’s glin g -g ling hot-plug audio cues).
In addition you are also able to see that y ou are connected via the Connect pane by clicking the Action
Center link, or by pressing the keyboard shortcut Win+K, as shown in Figure 4-8.
Intel® Wireless Gigabit v2.6
User Guide May 2016
40 Intel Confidential Document Number: 537178-3.9
Page 41

Figure 4-8 Dock connec t ed OSD message
WiGig Application User Manual for Windows 10*
Congratulations! You have made y our first wireless docking connection.
4.1.3 Automatic connection default
This section is n ot a p plicable to Win10* as in Win7*/8*/8.1*. In Windows 10*, the dock is in
automatically connect mode.
4.1.4 Automatic connections
If a dock is set to con nect automatically, WiGig attempts to automatically connect to the dock once in
range. To this end, WiGig keeps s c a nning in the background, wh ile consuming very little power.
To connect, simp ly place your client ( a ssumed to be in S0) near the dock. Within several seconds,
WiGig will discover the dock and connect to it automatically. You do not have to invoke the Wireless
Dock Manager, open the lid or take any action; just wait until the external s c r e en comes up and USB
devices are enumerated, and you can sta r t working.
When successfully connected to a dock, the dock LED changes color (specific to the dock vendor).
Note: For the connection to be fully completed automatic ally, as describe d above, the client
needs to be powered on and active (such as in S0). If the client is in S3, W iG ig will
automatically discover the dock, and then you can use the dock button to wak e up the
client and complete the doc king procedure. See Section 3.1.6 for m or e d etails. Ability to
wake up the client from the dock is ven d or s p ecific and is conf igured in the BIOS.
Intel® Wireless Gigabit v2.6
May 2016 User Guide
Document Number: 537178-3.9 Intel Confidential 41
Page 42

WiGig Application User Manual for Windows 10*
You can disable auto connect by deselecting the Connect automatically check box while connected, as
shown in Figure 4-9.
Figure 4-9 Disable the auto connect setting
You can change a dock between automatic and manual connection only when you are actively
connected to the d oc k.
Once auto-connect is disabled, the client no longer connects automatically, and you have to manually
select the dock f r om the client as described in Section 3.1.5.
4.1.5 Manually connect to a dock
When the dock is defined as manual, the connection is done similarly to the connec tion flow that was
describe above, without the stage where the user is requested to push the button.
4.1.6 Automatic connection in S3 (depends on BIOS
configuration)
Same as in Section 3.1.6.
4.1.7 Automatic connection in connected standby
Same as in Section 3.1.7.
Intel® Wireless Gigabit v2.6
User Guide May 2016
42 Intel Confidential Document Number: 537178-3.9
Page 43

WiGig Application User Manual for Windows 10*
4.1.8 Disconnect from the dock
Same as in Section 3.1.8.
The only differentiation is that to manually d is c onnect, the user c annot disconnect fr om the Intel®
Wireless Dock Manager, but instead has to do it from the Connect pane.
4.1.9 PIN-based pairing
Same as in Section 3.1.9
4.1.10 Disable and enable WiGig
1. In Win10, the ability to disable WiGig is available only from the Windows Airplane mode settings
page (Settings-> Network & Internet -> Airplane mode).
2. When WiGig is disabled, you cannot find and connect to wireless doc ks; the screen shown in
Figure 4-10 comes up in case the Intel
power consumption of the WiGig radio in the client.
Figure 4-10 WiGig disabled confirmation message
®
Wireless Dock Manager is open. Disabling minimizes the
3. To ena b le WiGig, go to the Airpla ne mode settings page by c licking the Wireless S ettings link or by
clicking Settings -> Network & Internet -> Airplane mode and turning on WiGig.
4.2 Change dock settings
Same as in Section 3.2.
4.3 Dock software update
Your dock software can be u pgr a ded ov er the air, from the client.
1. When connecting to the doc k, the Wireless Dock Manager might inform the us e r of mandatory
dock software update.
2. For mandatory dock software updates, you will get a toast notifying you that the dock update is
required, as shown in Figure 4-11.
Intel® Wireless Gigabit v2.6
May 2016 User Guide
Document Number: 537178-3.9 Intel Confidential 43
Page 44

WiGig Application User Manual for Windows 10*
Figure 4-11 Dock update required toast
3. Click ing on this toast will p op up the Intel® Wireless Dock Manager application.
4. From this point forward, the process of updating the dock is similar to the process des c r ib e d in
Section 3.3.
4.4 Diagnostic information
Same as in Section 3.4.
4.5 Manage docks
User may delete connected docks that are no longer needed.
1. To delete docks, go to Connected devices ( Settings ->Devices -> Connected devices), clic k on the
dock you want to rem ove, and then click the Remove device button, as shown in Figure 4-12.
Then, you can approve it as shown in Figure 4-13.
Figure 4-12 Remove device button
Intel® Wireless Gigabit v2.6
User Guide May 2016
44 Intel Confidential Document Number: 537178-3.9
Page 45

WiGig Application User Manual for Windows 10*
Figure 4-13 Remove device approval dialog box
4.6 Notification messages
This section lists the messages tha t s how possible dev ic e lim itations or errors .
4.6.1 Not found
When no device can be found, the Connect pane appears with a request to verify that the RF is on, as
shown in Figure 4-14.
Figure 4-14 Device not f ound message
Intel® Wireless Gigabit v2.6
May 2016 User Guide
Document Number: 537178-3.9 Intel Confidential 45
Page 46

WiGig Application User Manual for Windows 10*
4.6.2 Try connecting your device again
When there is a problem in the pairing flow (bef ore the user has the dock prof ile) the Connect pane
returns the error “Try connecting your device again ”, as shown in Figure 4-15.
Figure 4-15 Try connecti ng your device again message
Intel® Wireless Gigabit v2.6
User Guide May 2016
46 Intel Confidential Document Number: 537178-3.9
Page 47

WiGig Application User Manual for Windows 10*
4.6.3 Couldn’t connect
When there is a problem in the connecting flow (after the user has the dock profile), the Connect pane
returns the error “Couldn’t connect”, as shown in Figure 4-16.
Figure 4-16 Couldn’t connect message
4.6.4 Weak connection
The weak connection message displays if the c onnection is weak, as shown in Figure 4-17. If the
®
Intel
Wireless Dock Manager application is open, it also notifies the user about this state , as shown in
Figure 4-18.
Intel® Wireless Gigabit v2.6
May 2016 User Guide
Document Number: 537178-3.9 Intel Confidential 47
Page 48

WiGig Application User Manual for Windows 10*
Figure 4-17 Weak connecti on toast
Figure 4-18 Weak connecti on message in Doc k M a nager
4.6.5 WiGig disabled: critical temperature
When the WiGig is disabled due to overheating, the message shown in Figure 4-19 will pop up. Also,
when the Intel
shown in Figure 4-20.
Figure 4-19 WiGig disabled due to overhea ting toast
®
Wireless Dock Manager application is open it will n otify the user abou t this state, as
Intel® Wireless Gigabit v2.6
User Guide May 2016
48 Intel Confidential Document Number: 537178-3.9
Page 49

Figure 4-20 WiGig disabled due to overhea ting message in Dock Ma nager
WiGig Application User Manual for Windows 10*
4.6.6 WiGig is Not Working
Same as in Section 3.6.4.
§
Intel® Wireless Gigabit v2.6
May 2016 User Guide
Document Number: 537178-3.9 Intel Confidential 49
Page 50

The Wireless Dock and Multiple Displays
5 The Wireless Dock and Multiple
Displays
5.1 Intel® WiGig A/V wireless capabilities
Intel® WiGig is seen by the Intel® Display Driver as a DP V1.2 Branch device. It advertises its
capabilities to the driver using sta ndard DisplayPort V1.2a tools.
The capabilities include A/V band width, as well as other capabilities related to the internal A/V
subsystem.
®
Intel
WiGig HW can support up to two A/V str ea ms. This limitation is advertised to the Intel
DisplayPort Driver, which then limits the number of active streams sent over the Intel
interface.
When the user connects three displays to the MST hub at the output of the Intel
only two out of the three displays connected can be active at the same time.
5.1.1 Intel® WiGig DisplayPort Bandwidth and other limitations
The DisplayPort V1.2a standard defines mechanisms that allow branch devices to advertise their
capabilities and limitations to the Display Driver. There are two main limitations which may affect the
user experience:
1. DisplayPort Bandwidth (A KA PBN): Intel
This results in a n a b ility to support single display resolutions of up to 2560×1600@60 Hz or Dual
Display Resolutions of 1920×1200@60 Hz.
For example, if the user connects 2 1600p60 capable displays to th e dock, it cannot drive the
native resolution to both display s d ue to the DP BW limitation . The Display Drive r will remove
some of the video mo des from one of the disp la ys while allowin g native resolution to the 2nd
display.
2. Wireless Branch Device Limitations (AKA CCS): Intel® WiGig DP interface advertises Wireless
Branch Device lim itations related to the capabilities of the integrated v ideo Encoders and
Decoders.
Currently the a d vertised limitations are as follows:
a. Frame Width <= 2560
b. Frame Height < = 1600
c. Max Frame Rate = 60 Hz
d. Min Frame Rate = 59 Hz
e. Max Pixel Clock = 268 MHz
f. RGB: Only color space modes supported
g. Progressive only modes supported
All display modes not meeting the criteria above will be rem oved by the display driver and not
shown by the Resolution Manager.
®
WiGig DP interface operates at 4 × 2.7 gbps speed.
®
WiGig DP
®
WiGig-based dock,
5.2 User experience when connecting more than two
displays to the wireless dock
The driver initially selects two default disp la ys. These will be th e displays connected to the output
ports #1 and #2 of the MST hub device. T he display connected to port #3 will not be used and will not
appear in the Windows Screen Resolution contr ol panel.
Intel® Wireless Gigabit v2.6
User Guide May 2016
50 Intel Confidential Document Number: 537178-3.9
Page 51

The Intel® Display Driver generates a pop-up window, stating “DisplayPort Topology Notificati on. A
new DisplayPort Topology has been identified”. Click the window to open the Intel
The Wireless Dock and Multiple Displays
®
HD Graphics
control panel’s DisplayPort Topology Viewer (see Figure 5-1). T he user is requested to select the two
displays to be activated for the Intel® WiGig selected port. Selected displays a r e marked in light blue.
Figure 5-1 DisplayPort topology viewer
Once the user selects the active displays, the display driver will re-initiate the A/V link setup process
and activate the selected displays.
Only the selected displays w ill be seen in the Windows Screen Res olution control pane l. The
unselected displa y will not be show n (see Figure 5-2). The user c an s elec t th e oper a tin g m ode
(duplicate/extend), and activate and deactivate the screens using the Screen Resolution control pan el.
Intel® Wireless Gigabit v2.6
May 2016 User Guide
Document Number: 537178-3.9 Intel Confidential 51
Page 52

The Wireless Dock and Multiple Displays
Figure 5-2 Windows Screen Resolution control panel
The same behavior occurs when the user uses the Intel® Graphics Con tr ol Panel’s Display tab (see
Figure 5-3). In this window, only the two displays selected in the Topology Man a ger will be seen.
Figure 5-3 Graphics control panel
§
Intel® Wireless Gigabit v2.6
User Guide May 2016
52 Intel Confidential Document Number: 537178-3.9
Page 53

WiGig events in Windows Event Viewer
6 WiGig events in Windows Event
Viewer
WiGig SW provides logging inf or m ation to Windows Event View er , both for local clien t m achine and for
the connected WiGig dock. This information appears in Windows Event Viewer under Applications and
Services Logs -> Intel® WiGig.
6.1 WiGig Event Properties
The events are distinguished by the follow ing list of properties:
• Log Name: Intel® WiGiG
• Level: can be
o Information – Events with this level provides informative data of WiGig f low.
o Error - Event with this level provides data f or erroneous WiGig flow.
• Source: can be
o iWiGig-Local – Events logged from loc a l Client side
o iWiGig-Remote – Events logged from r e m ote Docking side, that is, WiGig conn ected to
the Client
• Event ID: Will be always 256
• Task Category: Th e index for this parameter may belon g to th e gr ou ps listed in Table 6–1.
Table 6–1 List of groups for Task Category parameter in WiGi g Events
Task Category index range Group type
1 0-199 General Inf r a & Platform Events
2 200-299 Dock FW-Update Events
3 300-399 MAUSB Events
4 600-699 WDE Events
6.2 WiGig Event Data
The data per each e vent provides the following information:
• Release: WiGig SW release version
• Self MAC Addres s : WiGig MAC Address value of Client side
• Peer MAC A ddr es s : WiGig MAC Address of connected peer dockin g s ta tion
• The next inform a tion presented is low-level debug data, per each event.
6.3 Accessing WiGig Events Log
The steps to access the WiGig Events log are
1. Open the Windows Event Viewer.
Intel® Wireless Gigabit v2.6
May 2016 User Guide
Document Number: 537178-3.9 Intel Confidential 53
Page 54

WiGig events in Windows Event Viewer
2. On the left-hand pane, Go to Applications and Services Logs->Intel® WiGig.
The middle pane disp lays the list of WiGig events.
3. The user can click on each event and see its specific details on the bottom pane.
4. By right-clicking on Applications and Services Logs->Intel® WiGig (on the left-hand pane),
user may save the WiGig Events log or perform o ther operations as a llow ed by the Event
Viewer.
Intel® Wireless Gigabit v2.6
User Guide May 2016
54 Intel Confidential Document Number: 537178-3.9
 Loading...