

Page 1

EXHIBIT C – User Guide
FCC ID EJM123112960
Page 2

The Intel® Wireless Series Installation Guide for
•Base Station
•Keyboard
•Mouse
•Gamepad
Page 3

Copyright 1999 - 2000 Inte l Cor poration.
All rights reserved. Patents pending.
Intel Corporation
5200 NE Elam Young Parkway
Hillsboro OR 97214-6497
Intel Corporation assumes no responsibility
for errors or omissions in this publication,
nor does Intel make any committment to
update the information contained herein.
*Other product and corporate names may
be the trademarks of other companies and
are used only for explanation and to the
owner’s benefit without intent to infringe.
First Edition August 2000 A21065-001
Page 4

1
Introducing the
Intel® Wireless Series
Thank you for buying Intel® Wireless Series peripherals for
your computer. This installation guide contains in structions
for setting up the Intel Wireless Series Base Station and I ntel
Wireless Series peripherals (sold separately).
Important! Each package includes an installation guide so
be sure to use the latest edition. The edition and publication
date are located in the inside cover of each book.
Minimum system requirements
• Windows* 98 or Windows 98SE
• Available Universal Serial Bus (USB) Port
• CD-ROM or DVD drive
Before you begin
Here are a few important things to remember about setting
up your devices:
• You must install and connect the Intel Wireless
Series Base Station first. Turn to page3 f or
instructions.
• Always install the device software before
attempting to connect the device.
• If you’re setting up an Intel Wi r ele s s Ser ies
Keyboard and/or Intel Wireless Series Mouse,
don’t disconnect your PS/2* keyboard and/or PS/2
mouse until you have verified that the wireless
device is properly connected and working. Each
section of the Installation Guide tells you how to
verify the new device and when it is safe to
disconnect the old device.
• Keep your old PS/2 keyboard and mouse a s backup devices.
Troubleshooting information for connecting and using Intel
Wireless Series peripherals starts on page31.
Keep this
installation guide
for future
reference!
It contains
important
troubleshooting
information.
1
Page 5

2
Setting up the Intel
Wireless Series Base Station
What’s in this package
Inside the Intel® Wireless Series Base Station Accessory
box, you will find:
• Intel Wireless Series Base Station
• Intel Wireless Series Base Station software
CD-ROM
• Power cord
• Installation Guide
• Information card
Important! Be sure to install the Base Station software
before connecting the Base Station to your computer. For
instructions, turn to page 4 .
Introducing the Intel Wireless Series Base
Station
The Base Station is a 900MHz radio-based device th at lets
you connect and use simultaneously up to eight (8) Intel
Wireless Series peripherals with your computer. As you use
Intel Wireless Series peripherals with the Base Station, its
lights show you the current status of your wireless devices.
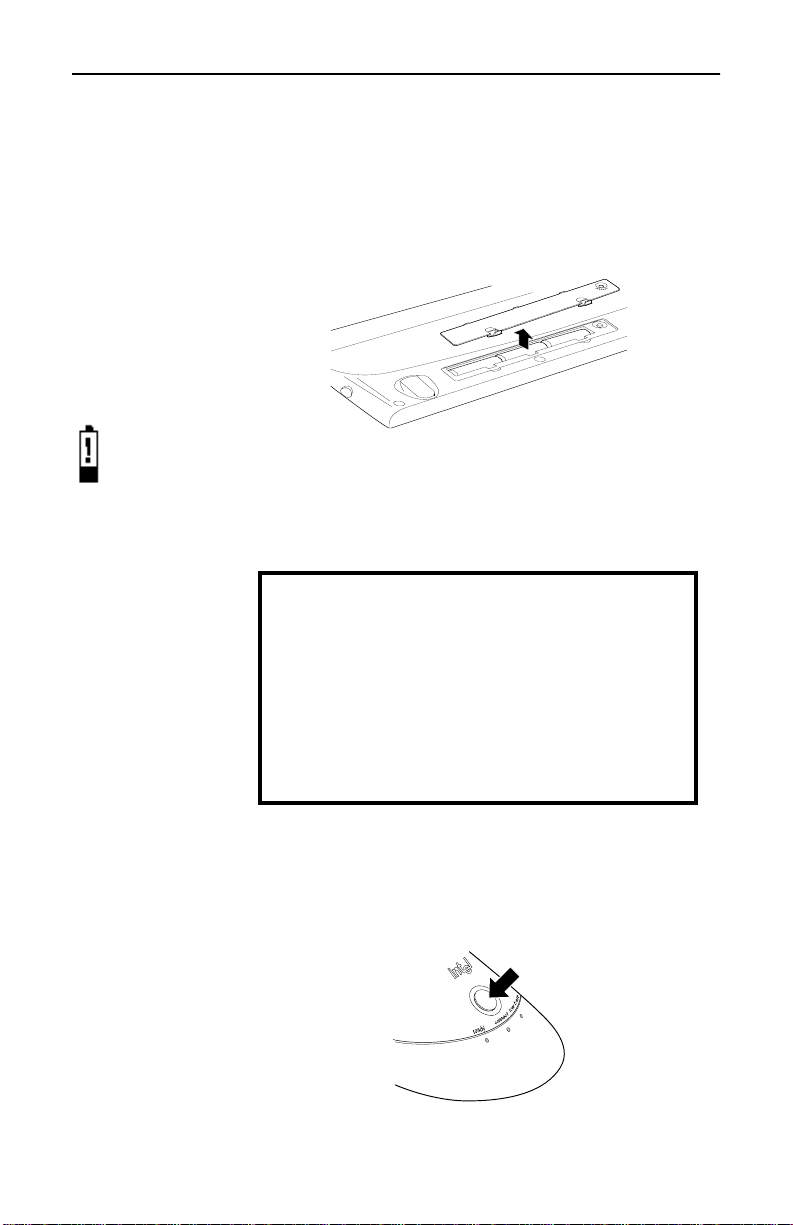
USB cable
Power cord
Connect button
“low batt” light
flashes when the
batteries in a wireless
device need to be
changed
®
“ready” light
• flashes quickly as
wireless devices
are used
• glows steadily
with proper USB
connection
• flashes slowly
when there is no
USB connection
“connect” light
• flashes slowly when
searching for a
wireless device
• flashes quickly as it
connects a wireless
device
• glows steadily when
one or more wireless
devices are connected
3
Page 6

C H A P T E R 2 Setting up the Intel® Wireless Series Base Station
Setup at a glance
• Install the Intel Wireless Series Base Station
software.
• Restart your computer, if prompted.
• Connect the Base Station to your computer.
• Verify that the Base Station is connected to your
computer.
Install the Intel® Wireless Series Base Station Software
Put the Intel Wireless Series Base Station CD into
1
the CD or DVD drive of your computer and wait for
the Setup program to start. This may take several
seconds.
Follow the on-screen instructions to install the
2
software.
To register your product, follow the on-screen
3
instructions. Registered users periodically receive
information about updates, upgrades, and spec ial
offers
.
At the end of Setup , follow th e on-sc reen instru ction s
4
to finish the software installation and connect your
Intel Wireless Series Base Station.
If prompted, restart your computer.
5
If the Setup
program does
not start
automatically
1 Click
Start >
Programs >
Windows
Explorer
2 Click on the
drive with the
CD icon and the
words “Setup.”
3 Double-click
“Setup.exe” and
follow the
on-screen
instructions.
.
4
Where to put the Intel Wireless Series Base Station
Y ou can put the Intel Wireless Series Base Station anywhere
on your desktop. You don’t have to place t he Base Sta tion in
clear view of the Intel Wireless Series peripherals connected
to it.
Because the Base Station is a 900 MHz radio-based device,
we recommend that you do not put the Base Station near the
receiving unit for other 900 MHz cordless home appliances,
such as cordless phones, baby monitors, wireless speakers
and wireless headphones.
If you experience interference with your cordless phone or
other cordless device, page 45 has several suggestions for
reducing interference.
Page 7

Setting up the Intel® Wireless Series Base Station C H A P T E R 2
Connect the Intel® Wireless Series Base Station
Important! Don’t disconnect your PS/2* keyboard or PS/2
mouse until you are instructed to do so later in this book. If
you disconnect these devices too soon, you won’ t be able to
successfully connect and use the Intel Wireless Series
Base Station and Intel Wireless Series peripherals.
Connect the power cord to the back of the Base
1
Station and plug the power cord into an electrical
outlet.
With your comput er tur ned on, connect the Base
2
Station to any USB port on your computer
On-screen, the Windows*
3
New Hardware Found
wizard takes a few seconds to detect the Base Station.
The wizard may ask to search your Windows CDROM, so have it available.
Important!
If the wizard asks to search your Intel
Wireless Series Base Station CD-ROM:
Make sure the correct version of the Intel
a
CD-ROM is in the CD or DVD drive of your
computer . If you need to put the CD-ROM in th e
If the New
Hardwar e Found
wizard detects
an “Unknown
Device”
1 Click
stop the wizard.
2 If you installed
the Base Station
software, restar t
your computer
and proceed
through the
wizard when it
starts.
3 If you didn't
install the Base
Station software,
disconnect the
Base Station,
turn to page4,
and follow the
installation and
connection
instructions.
Cancel
to
drive, wait a few seconds for your computer to
detect the C D -ROM . Cl ic k OK.
If the DVD
drawer won’t
open when the
wizard prompts
you for a CD
1 Open Windows
Explorer: click
Start >
Programs >
Windows
Explorer
2 Right-click the
DVD drive and
click
Eject
.
.
b
c
If the
Browse
In the
Insert Disk
button.
Open
dialog box appears, click the
dialog box, select from the
list the drive that contains the Intel CD-ROM.
Double-click the folder for your operating
d
system, such as “Win98,” and click OK.
Click OK again in the
e
Insert Disk
proceed through the wizard.
After the wizard finishes, if the Setup program
4
started, click
and remove the Intel CD-ROM
Exit
from the drive.
Drives
dialog to
5
Page 8

C H A P T E R 2 Setting up the Intel® Wireless Series Base Station
Verify that the Intel Wireless Series Base Station is
Connected
Open the Intel Wireless Series Control Panel to verify
1
that the Base Station is properly connected: click
Start > Programs > Intel Wireless Series > Intel
Wireless Series Control Panel
.
You should see the Base Station picture in full color
If the picture glows when you point your mouse at it,
the Base Station is properly installed and connected.
Important! If the Base Station doesn’t appear in full
color, if the Base St ation shows an alert icon, as
shown below
or if you’re having trouble connecting the Base Station, don’t disconnect y our old keyboard or mouse
yet, and turn to the Troubleshooting section on
page 31.
Now you’re ready to connect an Intel Wireless Series
peripheral to the Base Station, so turn to the section for the
device(s) that you want to connect:
• Intel Wireless Series Keyboard - turn to page 7 .
• Intel Wireless Series Mouse - turn to pag e15.
• Intel Wireless Series Gamepad - turn to page 23.
6
Page 9

3
Setting up the Intel
Wireless Series Keyboard
What’s in this package
Inside the Intel® Wireless Series Keyboard Accessory box,
you will find:
• Intel Wireless Series Keyboard
• Intel Wireless Series Keyboard software CD-ROM
• 3 AA disposable alkaline batteries
• Installation Guide
• Information card
Setup at a glance
• Install the Intel Wireless Series Keyboard software.
• Restart your computer, if prompted.
• Insert the batteries into the keyboard.
• Connect the keyboard.
• Verify that the keyboard is connected.
• Disconnect your old keyboard.
®
Install the Intel Wireless Series Keyboard Software
Put the In tel Wire less Se ries Keyb oard CD-ROM into
1
the CD or DVD drive of your computer and wait for
the Setup program to start. This may take several
seconds.
Follow the on-screen instructions to install the
2
keyboard soft ware.
T o register your product, follow the on-screen
3
instructions. Registered users periodically receive
information about updates, upgrades, and special
offers
.
At the end of Setup, follow the on-screen instructions
4
to finish the software installation and connect your
Intel Wireless Series Keyboard.
If prompted, restart your computer.
5
If the Setup
program does
not start
automatically
1 Click
Start >
Programs >
Windows
Explorer
2 Click on the
drive with the
CD icon and the
words “Setup”.
3 Double-click
“Setup.exe” and
follow the
onscreen
instructions.
.
7
Page 10
C H A P T E R 3 Setting up the Intel® Wireless Series Keyboard
Insert the Batteries into the Intel Wireless Series Keyboard
Conserving the
batteries
After 2 hours of
inactivity, a
connected
keyboard goes
to sleep.
• To awaken the
keyboard, press
any key.
Low batteries
It’s time to
change the
batteries
when the
battery icon
appears in the
display on the
front of the
keyboard.
The keyboard uses 3 AA alkaline batteries. Rechargeable
batteries are not recommended.
Remove the battery compartment c over from the
1
bottom of the keyboard.
Insert the batteries. Make sure that the “+” and “-” on
2
each battery matches the “+” and “-” on each slot.
Put the cover on.
3
Connect the Intel Wireless Series Keyboard
Before you connect the Intel
Wireless Series
Keyboard, double-check the following:
Be patient while
connecting the
keyboard
It may take up to 3
minutes to connec
the keyboard.
8
the Intel Wireless Series Base Station is
1
installed and connected to your computer.
For instructions, see p age7.
the Intel Wireless Series Keyboard software
2
is installed and, if prompted, you restarted
your computer
Important! Don’t disconnect your old PS/2* keyboard until
you have verified that the Intel Wireless Series Keyboard is
properly connected to your computer
Press the connect button on the front of the Base
1
Station. The “connect” light flashes slowly.
Page 11

Setting up the Intel® Wireless Series Keyboard C H A P T E R 3
Press the connect button on the bottom of the
2
keyboard.
If the New
Hardwar e Fo und
wizard detects an
“Unknown
Device”
The “connect” light flashes faster when the Base Station detects the keyboard. When the keyboard is connected, the Base Station’s “connect” light stays on
steadily.
On-screen, the Windows*
3
New Hardware Found
wizard runs briefly after the keyboard connects. The
wizard may ask to search your Windows CD-ROM,
so have it available.
Important! If the wizard asks to search your Intel
Wireless Series Keyboard CD-ROM:
Make sure the correct version of the Intel
a
1 Click
stop the wizard.
2 If you installed
the keyboard
software, restar t
your computer
and proceed
through the
wizard when it
starts.
3 If you didn't
install the
keyboard
software, turn to
page 7 and
follow the
installation and
connection
instructions.
Cancel
to
CD-ROM is in the CD or DVD drive of your
computer . If you need to put the CD-ROM in th e
drive, wait a few seconds for your computer to
detect the C D -ROM . Cl ic k OK.
If the
b
c
Browse
In the
Insert Disk
button.
Open
list the drive that contains the Intel CD-ROM.
Double-click the folder for your operating
d
system, such as “Win98,” and click OK.
Click OK again in the
e
proceed through the wizard.
After the wizard finishes, if the Setup program
4
started, click
Exit
from the drive.
dialog box appears, click the
dialog box, select from the
Insert Disk
Drives
dialog to
and remove the Intel CD-ROM
If the DVD
drawer won’t
open when the
wizard prompts
you for a CD
1 Open Windows
Explorer: click
Start >
Programs >
Windows
Explorer
2 Right-click the
DVD drive and
click
Eject
.
.
9
Page 12
C H A P T E R 3 Setting up the Intel® Wireless Series Keyboard
Verify that the Intel Wireless Series Keyboard is Connected
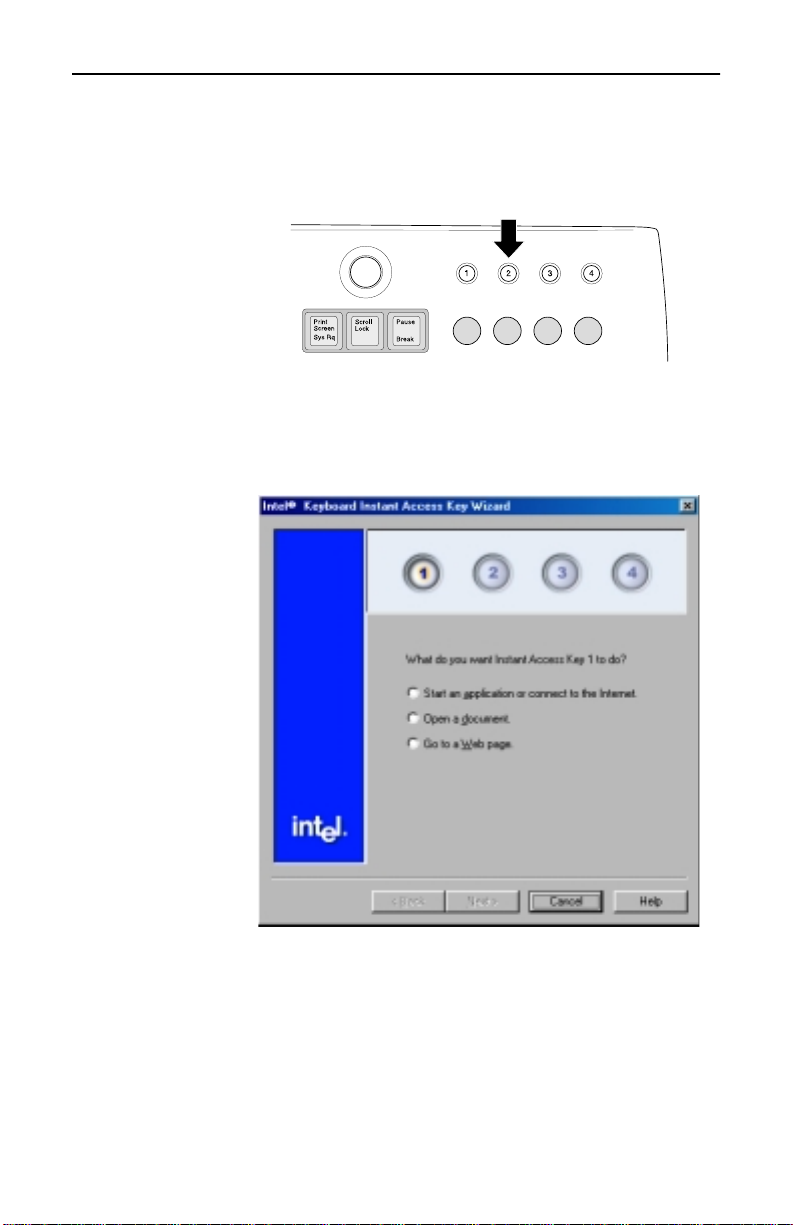
Press one of the Instant Access Keys, located on the
1
upper right side of the keyboard:
If the Instant Access Keys wizard starts, as shown
2
below, the keyboard is properly installed and
connected. Click
to close the Instant Access
Exit
Keys wizard. You can configure these later.
Keep your old
PS/2 keyboard
After you have
successfully
installed and
connected your
Intel Wireless
Series Keyboard,
keep your PS/2
keyboard as a
back-up.
10
Important! If the Instant Access Keys wizard didn’t
start or you’re having trouble connecting the keyboard, don’t disconnect your old keyboard yet and
turn to the Troubleshooting secti on on page31.
Page 13

Setting up the Intel® Wireless Series Keyboard C H A P T E R 3
After you have verified that the keyboard is connected,
you’re ready to disconnect your old PS/2 keyboard:
If the keyboard is properly c onnected, s hut down
1
Windows: click
Start > Shut Down
, click “Shut
Down” and then click OK.
Turn off your computer.
2
Disconnect your old keyboard and turn on your
3
computer
Now you’re ready to use your new Intel Wireless Series
Keyboard. For a brief summary of its features and
configuration instructions, turn to p age12.
If have anot he r Intel Wireless Ser i es periph er al to connect,
turn to the appropriate section of this book:
• Intel Wireless Series Mouse - turn to page15.
• Intel Wireless Series Gamepad - turn to page 23.
11
Page 14
C H A P T E R 3 Setting up the Intel® Wireless Series Keyboard
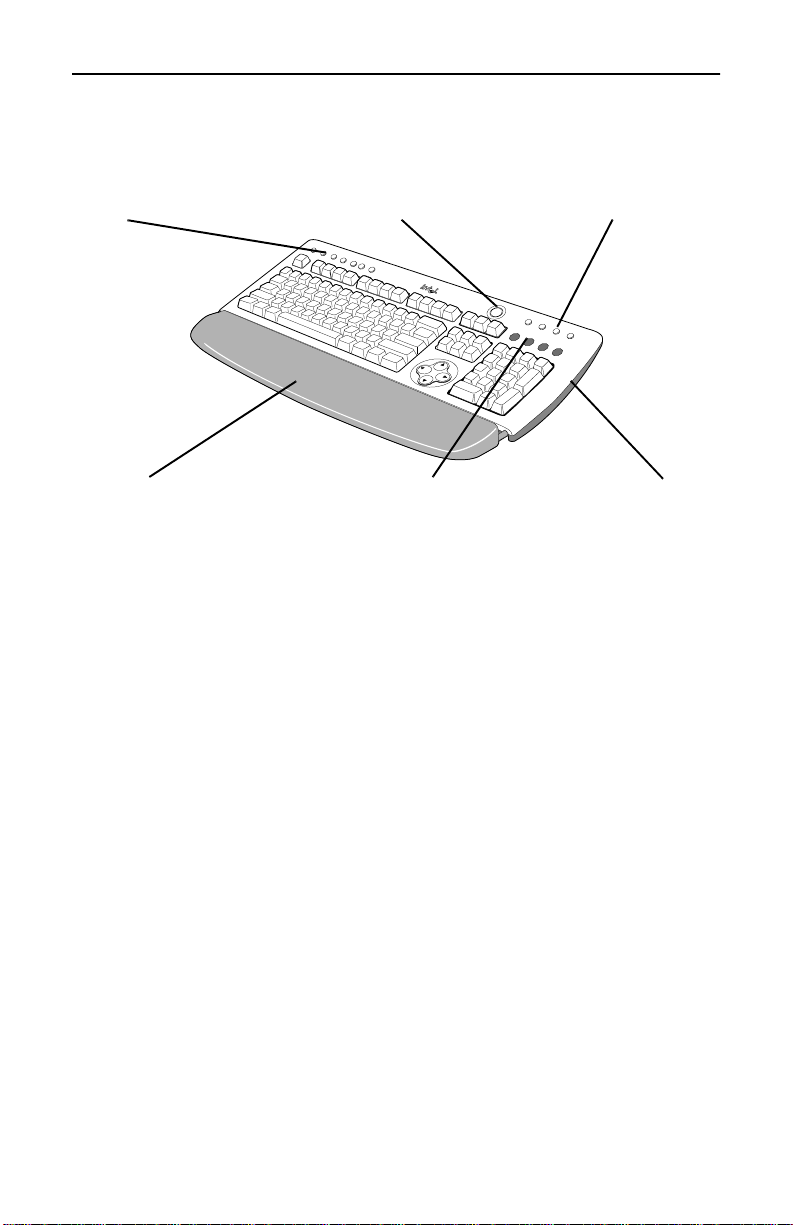
Using the Intel
CD Player Keys
control the Windows*
CD Player and system
volume
Palm Rest
folds under the keyboard
for easy storage
The Intel Wireless Series Keyboard has several sets of
special keys to make it easier to use frequently used files,
programs and settings on your computer. There ’s also a
folding palm rest to support your wrists when you take a
break from typing. For more information, check the online
Help: click
Help
Wireless Series Keyboard
Control Panel Key
opens the Intel® control panel
for managing Intel peripherals
Keyboard Display
shows when Num Lock,
Caps Lock, Scroll Lock are
turned on and Low Battery
indicator
Instant Access Keys
4 keys for opening files,
programs, or your Internet
connection
Palm Rest Release
press the button on each
side to unfold the palm rest
Start > Programs > Intel Wireless Series >
.
12
Using the Instant Access Keys
You can configure each of the four Instant Access Keys to
open a file, start a program, start your Internet connection or
open a Web page.
Click the
1
double click the
In the Keyboard Properties dialog box, click the
2
Instant Access Keys
T o configure an Instant Access Keys click the
3
Start > Settings > Control Panel
Keyboard
icon.
tab.
button next to the key.
Follow the on-screen instructions in the Instant
4
Access Keys wizard.
Click
5
to close the wizard.
Finish
and
Assign
Page 15

Setting up the Intel® Wireless Series Keyboard C H A P T E R 3
Using the CD Player Keys
Your Intel W ireless Series Keyboard includes keys that let
you control the Windows CD Player on your computer. By
default, the CD Player Key actions appear on the screen
when you press a CD Player Key on your keybo ard. For
example, if you press the Play key on your keyboard, the
word “Play” appears on your screen and disappears after a
few seconds. You can modify the appearance of the onscreen actions or turn them off if you don’t want to see them.
T o modify the on-screen appearance of the CD Player
Keys actions
Click the
1
double click the
In the Keyboard Properties dialog box, click the
2
Player Keys
Click the
3
Start > Settings > Control Panel
Keyboard
icon.
tab.
button to open the Font dialog box.
Font
Change the font’s type, size and/or color, and then
click OK.
If you change your mind and want to use the original
4
Intel settings on a tab, click the tab’s
button.
To close the Keyboard Properties and save your
5
settings, click OK.
To close the Keyboard Properties without saving any
6
changes, click
Cancel
.
and
CD
Use Defaults
To turn off the display of CD Player Key actions
Click the
1
double click the
In the Keyboard Properties dialog box, click the
2
Player Keys
Clear the
3
Start > Settings > Control Panel
Keyboard
icon.
tab.
Show CD Player Key actions on-screen
and
check box.
If you change your mind and want to use the original
4
Intel settings on a tab, click the tab’s
Use Defaults
button.
To close the Keyboard Properties and save your
5
settings, click OK.
To close the Keyboard Properties without saving any
6
changes, click
Cancel
.
CD
13
Page 16

C H A P T E R 3 Setting up the Intel® Wireless Series Keyboard
Using the Palm Rest
The palm rest folds under the keyboard for easy storage. To
use the palm rest, press the blue button on each side of the
Intel Wireless Series Keyboard and lift up the palm rest.
When you want to put the palm rest away, fold the palm rest
under the keyboard making sure the palm rest support is flat
against the palm rest before you press the palm rest firmly
into place. If you need to replace the palm rest support,
attach it to the palm rest with the smooth side against the
palm rest.
Safe Usage Suggestions
Ergonomics on the
Web
Visit
http://
www.intel.com/
wireless_series
more information.
for
Caution!
Although the data are inconclusive, some
experts believe that using a keyboard in certain ways (e.g.
excessive keying forces, p oor posture, impro per workstatio n
set up, and/or repetitive, extended typing) may be associated
with some forms of acute sprains/strains or chronic upper
extremity musculoskeletal disorders. If at any time you
experience pain, soreness, numbness, tingling, throbbing,
aching, stiffness, weakness or a burning sensation in your
hands, wrists, arms, shoulders, neck or back, promptly
consult a qualified health professional.
Do not ignore these
warning signs; they may indicate the presence of a
serious medical condition.
To increase your comfort and minimize the potential for
injury when using a keyboard, follow these guidelines:
• Place the keyboard within comfortable reach;
avoid over-extending to reach the keyboard.
• Adjust your position relative to the keyboard so
that your wrists and forearms are straight and
parallel to the floor. This may mean adjusting your
chair, your computer table or desk (if adjustable),
and, if you us e on e, your keyboard tray.
• When you type, keep your wrists straight and avoid
placing them on the palm rest pad. Use the palm
rest to rest your hands only when you ar en't typing.
• Take frequent breaks from using the keyboard, at
least once per hour.
• Vary your tasks throughout the day.
14
Page 17

4
Setting up the Intel
Wireless Series Mouse
What’s in this package
Inside the Intel® Wireless Series Mouse Access ory box, you
will find:
• Intel Wireless Series Mouse
• Intel Wireless Series Mouse software CD-ROM
• 3 AAA disposable alkaline batteries
• Installation Guide
• Information card
Setup at a glance
• Install the Intel Wireless Series Mouse software.
• Restart your computer, if prompted.
• Insert the batteries into the mouse.
• Connect the mouse.
• Verify that the mouse is connected.
• Disconnect your old mouse.
®
Install the Intel Wireless Series Mouse Software
Put the Intel Wireless Series Mouse CD into the CD
1
or DVD drive of your computer and wait for the
Setup program to start. This may take several
seconds.
Follow the on-screen instructions to install the mouse
2
software.
T o register your product, follow the on-screen
3
instructions. Registered users periodically receive
information about updates, upgrades, and special
offers
.
At the end of Setup, follow the on-screen instructions
4
to finish the software installation and connect your
Intel Wireless Series Mouse.
If prompted, restart your computer.
5
If the Setup program does not
start automatically
1 Click
Start >
Programs >
Windows
Explorer
2 Click on the
drive with the
CD icon and the
words “Setup.”
3 Double-click
“Setup.exe” and
follow the
on-screen
instructions.
.
15
Page 18

C H A P T E R 4 Setting up the Intel® Wireless Series Mouse
Insert the Batteries into the Intel® Wireless Series
Mouse
The mouse uses 3 AAA alkaline batteries. Rechargeable
Conserving the
batteries
After 20 minutes
of inactivity, a
connected mouse
goes to sleep.
• To awaken the
mouse, press
any button.
Low batteries
It’s time to
change the
batteries
when the
low battery icon
appears near the
mouse picture in
the Intel Wireless
Series Control
Panel: click
> Programs >
Intel Wireless
Series > Intel
Wireless Series
Control Panel
Start
.
batteries are not recommended.
Remove the battery compartment co ver as shown
1
below:
Insert the batteries. Make sure that the “+” and “-” on
2
each battery matches the “+” and “-” on each slot.
Put the cover on.
3
Connect the Intel® Wireless Series Mouse
Before you connect the Intel
® Wireless Series
Mouse, double-check the following:
the Intel Wireless Series Base Station is
1
installed and connected to your computer.
For instructions, see p age4.
the Intel Wireless Series Mouse software is
2
installed and, if prompted, you restarted
your computer
Be patient while
connecting the
mouse
It may take up to 3
minutes to connect
the mouse.
16
Important! Don’ t d i s conn ect y o ur ol d PS/2* mou se un ti l
you have completed t his s ecti on and confirme d th at the In tel
Wireless Series Mouse is connected to your computer.
Press the connect button on the front of the Base
1
Station. The “connect” light flashes slowly.
Page 19

Setting up the Intel® Wireless Series Mouse C H A P T E R 4
Press the connect button on the bottom of the mouse.
2
If the New
The “connect” light flashes faster when the Base Station detects the mouse. When the mouse is connected,
the Base Station’s “connect” light stays on steadily.
On-screen, the Windows*
3
New Hardware Found
wizard runs briefly after the mouse connects. The
wizard may ask to search your Windows CD-ROM,
so have it available.
Important! If the wizard asks to search your Intel
Wireless Series Mouse CD-ROM:
Make sure the correct version of the Intel
a
CD-ROM is in the CD or DVD drive of your
computer . If you need to put the CD-ROM in th e
drive, wait a few seconds for your computer to
detect the C D -ROM . Cl ic k OK.
b
c
If the
Browse
In the
Insert Disk
button.
Open
dialog box appears, click the
dialog box, select from the
Drives
Hardwar e Fo und
wizard detects an
“Unknown
Device”
1 Click
2 If you installed
3 If you didn't
to
Cancel
stop the wizard.
the mouse
software, restar t
your computer
and proceed
through the
wizard when it
starts.
install the mouse
software, turn to
page 15 and
follow the
installation and
connection
instructions.
list the drive that contains the Intel CD-ROM.
Double-click the folder for your operating
d
system, such as “Win98,” and click OK.
Click OK again in the
e
Insert Disk
proceed through the wizard.
After the wizard finishes, if the Setup program
4
started, click
and remove the Intel CD-ROM
Exit
from the drive.
dialog to
If your DVD
drawer won’t
open
1 Open Windows
Explorer: click
Start >
Programs >
Windows
Explorer
2 Right-click the
DVD drive and
click
Eject
.
.
17
Page 20

C H A P T E R 4 Setting up the Intel® Wireless Series Mouse
Verify that the Intel Wireless Series Mouse is Connected
Open the Intel Wireless Series Control Panel: click
1
Start > Programs > Intel Wireless Series > Intel
Wireless Series Control Panel
You should see the picture of the mouse in full color
2
Click the mouse picture and select
.
Configure Device
from the menu. If the Mouse Properties dialog box
appears, as shown below, the mouse is properly
installed and connected:
Keep your old
PS/2 mouse
After you have
successfully
installed and
connected your
Intel Wireless
Series Mouse,
keep your PS/2
mouse as a backup.
18
Important! If you don’t see all the tabs in the Mouse
Properties or you’re having trouble connecting the
mouse, don’t disconnect your old mouse yet, and turn
to the Troubleshooting secti on on page31.
If the mouse is properly connected, shut down
3
Windows: click
Start > Shut Down
, click “Shut
Down” and then click OK. Turn off your computer
Disconnect your old mouse and turn on your
4
computer.
Now you are ready to use yo ur Intel Wireless Series Mouse.
T o customize the mouse, turn to pa ge19. If have another
Intel Wireless Series peripheral to connect, turn the
appropriate section of this book:
• Intel Wireless Series Keyboard - turn to page 7 .
• Intel Wireless Series Gamepad - turn to page 23.
Page 21

Setting up the Intel® Wireless Series Mouse C H A P T E R 4
Using your Intel
The Intel® Wire l e ss Series Mouse has several settings that
you can customize to make it easier to use your computer.
You can customize its buttons and scrolling wheel, track
your mouse usage, and set break time reminders.
These instructions show you how to change some of the
more commonly used features of the mouse. For
information about customizing other mouse features, check
the online Help: click
Series > Help
To customize the mouse buttons
1
2
3
4
5
.
Click the
double click the
In the Mouse Properties dialog, click the
and change the
action for each button and the scroll wheel.
If you change your mind and want to use the original
Intel settings on a tab, click the
T o close the Mouse Properties and save your settings,
click OK.
To close the Mouse Properties without saving your
changes, click
Start > Settings > Control Panel
Cancel
Wireless Series Mouse
Start > Programs > Intel Wireless
and
icon.
Mouse
tab
button.
Primary Mouse Button
Use Defaults
.
Buttons
settings and
To customize the mouse wheel
Click the
1
double click the
In the Mouse Properties dialog, click the
2
and change the
Speed
If you change your mind and want to use the original
3
Intel settings, click the
T o close the Mouse Properties and save your settings,
4
click OK.
To close the Mouse Properties without saving your
5
changes, click
To set a reminder to take a break
Click the
1
double click the
Start > Settings > Control Panel
icon.
Mouse
Scrolling Speed, Pan/Auto-scroll
and
Universal Scrolling
Use Defaults
Mouse
.
icon.
Cancel
Start > Settings > Control Panel
settings.
button.
and
Wheel
and
tab
19
Page 22

C H A P T E R 4 Setting up the Intel® Wireless Series Mouse
On the
2
• To set a reminder to take a break after a certain
amount of time, select the
box, and then type the number of minutes (10 to
120 minutes) to wait before r e minding you to take
a break.
• To set a reminder to take a break after a certain
number keystrokes, select the
box, and then typ e the number o f keystrokes (1 ,000
to 20,000 keystrokes) to wait before reminding you
to take a bre ak.
• To set a reminder to take a break after a specified
number of clicks, select the
box, and then type the number of click s (100 to
2000) to wait before remind ing you to take a br eak.
• To cancel the reminder when you haven’t used
your computer for a certain amount of time, type
the number of minutes in the
idle for check box.
If you change your mind and want to use the original
3
Intel settings, click the
T o close the Mouse Properties and save your settings,
4
click OK.
To close the Mouse Properties without saving your
5
changes, click
Extras
tab in the
.
Cancel
Break time
Elapsed minutes
Keystrokes
Button clicks
Cancel
Use Defaults
section:
reminder if
button.
check
check
check
20
Safe Usage Suggestions
Caution!
experts believe that using a computer in certain ways (e.g.,
excessive keying forces, poor posture) may be associated
with some forms of acute sprains/strains or chronic upper
extremity musculoskeletal disorders.
If at any time you experience pain, soreness, numbness,
tingling, throbbing, aching, stiffness, weakness or a burning
sensation in your hands, wrists, arms, shoulders, neck or
back, promptly consult a qualif ied health professional.
Do not ignore these warning signs; they may indicate the
presence of a serious medical condition.
Although the data are inconclusive, some
Page 23

Setting up the Intel® Wireless Series Mouse C H A P T E R 4
To increase your comfort and minimize the potential for
injury when using a mouse , fo llow these guid elines:
• Use a mouse pad with wrist support, which will
cushion and support your wrists
• Minimize repetitive actions by assigning mouse
buttons to the features you use frequently. See
Windo ws* Help for more information about
configuring t he mouse buttons.
• Assign the mouse pointer speed and acceleration,
as well as the double-click speed, so that they are
comfortable.
• Set a reminder to take a break after a certain period
of time, number of keystrokes or clicks.
• Customiz e th e m ous e po inter so it move s to a
specific position each time you open a new
window or after a certain amount of inactivity.
• Use the Intel Wired Control Panel to quickly open
the property pages for all Intel Wired peripherals.
Ergonomics on the
Web
Visit
http://
www.intel.com/
wireless_series
more information.
for
Safety Warning for Parents of Small Children
/!\ WARNING:
CHOKING HAZARD
- all standard mice, including this
one, have a small ball inside. Not for use by children under 3
years of age.
Keep mouse away from children. Wh en removing the
mouse ball to clean the mouse or for any reason, do not let
children put the mouse ball in their mouths!! Children could
choke on the mouse ball, resulting in serious injury or death.
21
Page 24

5
Setting up the Intel
Wireless Series Gamepad
What’s in this package
Inside the Intel Wireless Series Gamepad Accessory box,
you will find:
• Intel Wireless Series Gamepad
• Intel Wireless Series Gamepad software CD-ROM
• 3 AAA disposable alkaline batteries
• Installation Guide
• Information card
Setup at a glance
• Install the Intel Wireless Series Gamepad software.
• Restart your computer, if prompted.
• Insert the batteries into the gamepad.
• Connect the gamepad.
• Verify that the gamepad is connected.
Install the Intel Wireless Series Gamepad Software
Put the Intel Wireless Series Gamepad CD into the
1
CD or DVD drive of your co mputer and wait for the
Setup program to start. This may take several
seconds.
Follow the on-screen instructions to install the
2
gamepad software.
T o register your product, follow the on-screen
3
instructions. Registered users periodically receive
information about updates, upgrades, and special
offers
.
At the end of Setup, follow the on-screen instructions
4
to finish the software installation and connect your
gamepad.
If prompted, restart your computer.
5
If the Setup program does not
start automatically
1 Click
Start >
Programs >
Windows
Explorer
2 Click on the
drive with the
CD icon and the
words “Setup.”
3 Double-click
“Setup.exe” and
follow the
on-screen
instructions.
.
®
23
Page 25

C H A P T E R 5 Setting up the Intel® Wireless Series Gamepad
Insert the Intel Wireless Series Gamepad Batteries
Conserving the
batteries
After 15 minutes
of inactivity, a
connected
gamepad goes to
sleep.
• To awaken the
gamepad, press
any button.
• When the
device number
appears on the
gamepad's
display, the
gamepad is
awake and
ready to play.
• It’s time to
change the
batteries when
the battery icon
appears on the
gamepad’s
display.
The gamepad uses 3 AAA alkaline batteries. Rechargeable
batteries are not recommended.
Remove the battery compartment co ver, as shown:
1
Insert the batteries. Make sure that the “+” and “-” on
2
each battery matches the “+” and “-” on each slot.
Put the cover on.
3
Connect the Intel Wireless Series Gamepad
Before you connect the Intel
Wireless Series
Gamepad, double-check the following:
the Intel Wireless Series Base Station is
1
installed and connected to your computer.
For instructions, turn to pa ge3.
the Intel Wireless Series Gamepad software
2
is installed and, if prompted, you restarted
your computer
24
Important! Be patient while connecting the gamepad. It
may take up to 3 minutes to connect the gamepad.
Press the connect button on the front of the Base
1
Station. The “connect” light flashes slowly.
Page 26

Setting up the Intel® Wireless Series Gamepad C H A P T E R 5
Press the connect button on the bottom of the
2
gamepad.
If the New
Hardwar e Fo und
wizard detects an
“Unknown
Device”
The “connect” light flashes faster when the Base Station detects the gamepad. When the gamepad is connected, the Base Station’s “connect” light stays on
steadily.
On-screen, the Windows*
3
New Hardware Found
wizard runs briefly after the gamepad connects. The
wizard may ask to search your Windows CD-ROM,
so have it available.
Important! If the wizard asks to search your Intel
Wireless Series Gamepad CD-ROM:
Make sure the correct version of the Intel
a
CD-ROM is in the CD or DVD drive of your
1 Click
stop the wizard.
2 If you installed
the gamepad
software, restar t
your computer
and proceed
through the
wizard when it
starts.
3 If you didn't
install the
gamepad
software, turn to
page 23 and
follow the
installation and
connection
instructions.
Cancel
to
computer . If you need to put the CD-ROM in th e
drive, wait a few seconds for your computer to
detect the C D -ROM . Cl ic k OK.
If the
b
c
Browse
In the
Insert Disk
button.
Open
list the drive that contains the Intel CD-ROM.
Double-click the folder for your operating
d
system, such as “Win98,” and click OK.
Click OK again in the
e
proceed through the wizard.
After the wizard finishes, if the Setup program
4
started, click
Exit
from the drive.
dialog box appears, click the
dialog box, select from the
Insert Disk
Drives
dialog to
and remove the Intel CD-ROM
If the DVD
drawer won’t
open when the
wizard prompts
you for a CD
1 Open Windows
Explorer: click
Start >
Programs >
Windows
Explorer
2 Right-click the
DVD drive and
click
Eject
.
.
25
Page 27

C H A P T E R 5 Setting up the Intel® Wireless Series Gamepad
Verify that the Intel Wireless Series Gamepad is
Connected
On the gamepad display, you should see the number
1
“1” (or, if this is a second or third gamepad connected
to the Base Station, “2” or “3”), such as:
You can also check the Intel Wireless Series Control
2
Panel: click
Series > Intel Wireless Series Control Panel
Start > Programs > Intel Wireless
. You
should a picture of the gamepad in full color.
Important! If you don’t see the gamepad number or
the full color picture in the control panel or you’re
having trouble connecting the gamepad, turn to the
Troubleshooting s e c tion on page 31.
Now you are ready to use your new Intel Wireless Series
Gamepad. For a brief summary of its features and software,
turn to pag e27.
26
If you have another Intel Wireless Series peripheral to
connect, turn to the appropriate section of this book:
• Intel Wireless Series Keyboard - turn to page 7 .
• Intel Wireless Series Mouse - turn to pag e15.
Page 28

Setting up the Intel® Wireless Series Gamepad C H A P T E R 5
Using the Intel Wireless Series Gamepad
This is a brief overview of the basic features and software
for the Intel Wireless Series Gamepad. For detailed
discussion, instructions and solutions to common problem s:
click
Start > Programs > Intel Wireless Series > Help
The gamepad has the following buttons and controls:
.
D-Pad
Shift button
Triggers
Action buttons
“Start” button
“Mouse” button
Controls forward, backward, sideways and diagonal
D-Pad
movement as you play a game.
Shift button Supports alternate actions for the 6 action
buttons.
Triggers There is a trigger on the end of each handle.
Action buttons Six buttons to control the main actions in a
game.
“Start” button Push once to start a game.
“Mouse” button Push to start and stop the gamepad's
Mouse Mode, which lets you use the gamepad as a mouse.
Display screen Displays the following icons and numbers
representing impor t an t gamepad i nformation:
1, 2, 3, 4, 5, 6, 7, 8
When one or more gamepads
are connected to the Base Station, the display shows
the number identifying each gamepad. This number
is also displayed in the Intel Wireless Series Control
Panel and the Intel Game Profile Activator, so you
can activate a profile for a specific gamepad.
Display Screen
27
Page 29

C H A P T E R 5 Setting up the Intel® Wireless Series Gamepad
The mouse icon indicates that the gamepad is
currently in Mouse Mode.When Mouse Mode
is turned off, the Mouse symbol is not displayed.
The battery icon indicates that the batteries in
the gamepad need to be changed. When the bat-
tery symbol appears, the batteries have one to
several days of usage remaining. We recommend that
you change the gamepad's batteries promptly
The dash indicates that the gamepad is on, but
not connected to the Intel Wireless Series Base
Station or the gamepad is too far away from the Base
Station.
Using Mouse Mode
The gamepad can work as a mouse for any program on your
computer, in addition to playing games. To start Mouse
Mode, press the “mouse” button on the gamepad. Mouse
Mode has the following default settings:
Your regular
mouse still works
when you use
Mouse Mode
• Start and stop Mouse Mode by pressing the
“Mouse” button on the gamepad.
• The left mouse button defaults to Button A.
• The middle mouse button (pressing down on the
scroll wheel) defaults to Button B.
• The right mo use button defau lt s to Button C.
You can customize the Mouse Mode settings by assigning
mouse buttons and functions to the gamepad's buttons and
use the D-Pad to move the mouse pointer. For more
information about using Mouse Mode, check the online
Help:
Start > Programs > Intel Wireless Series > Help
.
28
Using Profiles with the Intel Wireless Series
Gamepad
Profiles, a great way to extend your gaming experience, are
files that contain gamepad settings which define actions for
a game. By using profiles, you can customize the actions
that take place when you click the D-Pad, buttons, and
triggers. For example, you can create a profile that includes
all the keyboard and mouse clicks for your favorite game.
When you play a game and act ivate this profile, your
gamepad takes the place of your keyboard and mouse.
Page 30

Setting up the Intel® Wireless Series Gamepad C H A P T E R 5
The gamepad software includes p rofiles for 50 popular
games and you can download profiles from the Intel Profile
Exchange Web site. Y o u can access the Profile Exchange
from the Intel Game Profile Editor and Intel Game Profile
Activator.
Intel Game Profile Editor
Use the Intel Game Profile Editor to create and manage
profiles for the Intel Wireless Series Gamepad. With the
Profile Editor, you can:
• record game actions
• assign keystrokes and macros to gamepad buttons
• copy or cut and paste actions from one profile to
another profile between profiles
• restore a button's default action, as defined by the
game
• create macros for diagonal movement
• view a list of all keystrokes and macros in a profile
• activate a profile after you create or edit it
• enable and configure Mouse Mode for a profile
You can also open the Intel Profile Exchange Web site,
where you can download new gamepad profiles and upload
your gamepad profile s to share them with other gamepad
users.
Getting to the
Profile Exchange
on the Web
1 In the Profile
Editor or Profile
Activator, click
the globe icon.
2 Select
Download New
.
Profiles
3 Follow the on-
screen
instructions.
To open the
Profile Editor
• Click
Start >
Programs >
Intel Wireless
Series > Intel
Game Profile
Editor
Intel Game Profile Activator
Use the Intel Game Profile Activator to activate a profile
and turn off a profile for each connected gamepad. You can
activate the same profile or a different profile for each
connected gamepad. Profiles are files which contain
gamepad settings that define actions in a game.
The Profile Activator also shows basic information about
each connected gamepad, such as whether it is using a
profile. If you want to edit an active profile, view the actions
in an active profile, or create a new profile, you can open the
Intel Game Profile Editor directly from the Activator. There
are also links that open the Intel Wireless Series Control
Panel and the Windows* Game Controllers control panel.
To open th
Profile Activator
• click
Start >
Programs >
Intel Wireless
Series > Intel
Game Profile
Activator
29
Page 31

C H A P T E R 5 Setting up the Intel® Wireless Series Gamepad
Safe Usage Suggestions
Ergonomics on the
Web
Visit
http://
www.intel.com/
wireless_series
more information.
for
Caution!
Although the data are inconclusive, some
experts believe that using electronic devices in certain ways
(e.g. excessive keying forces, poor posture, improper
workstation set up, and/ or repetitive, extended typing) may
be associated with some forms of acute sprains/strains or
chronic upper extremity musculoskeletal disorders.
If at any time you experience pain, soreness, numbness,
tingling, throbbing, aching, stiffness, weakness or a burning
sensation in your hands, wrists, arms, shoulders, neck or
back, promptly consult a qualif ied health professional.
Do
not ignore these warning signs; they may indicate the
presence of a serious medical condition.
To increase your comfort and minimize the potential for
injury when using the Intel Wireless Series Gamepad,
follow these guidelines:
• Sit comfortably with good posture.
• As you use the gamepad, change the position of
your wrists and hands periodically.
• Avoid holding your wrists in a bent position for
extended periods of time.
• Avoid gripping the gamepad tightly. This can tire
your hands.
• Minimize repetitive actions. For playing games,
you can create profiles with macros that function
as your most frequently used keystrokes and other
game actions.
• Take frequent breaks when using the gamepad, at
least once per hour.
• Use the Intel Wireless Series Control Panel to
quickly jump to property pages for all Intel
peripherals.
.
30
Page 32

6
This section contains troubleshooting information for
situations you may encounter with Intel Wireless Series
peripherals, such as:
• Difficulty connecting a wireless device (see below)
• Base Station appears with alert symbol in Intel
Wireless Series Control Panel (see page32 )
• Wireless device doesn’t work (see page33)
• Base Station doesn’t work (see pag e34)
• Wireless keyboard and/or mouse doesn’t work in
MS-DOS*, Safe mode and other non-Windows*
modes (see page 33)
• Other situations you may encounter (see pa ge40)
• Suggestions for reducing interference (see page45)
• Tips for using more than one Base Station (see
page 46)
Additional troubleshooting information is available in the
Intel Wireless Series Control Panel Help: click
Programs > Intel Wireless Series Peripherals > Help
You can also find the latest technical support i nformation on
the World Wide Web at:
Troubleshooting
Start >
.
http://support.intel.com/support/peripherals/
Important! Before you continue, have available a PS/2*
keyboard, a working mouse, your Intel Wireless Series
CD-ROMs and your Windows CD-ROM. You may need
them while troubleshooting a problem.
Difficulty Connecting a Wireless Device
Check the fo l lowing:
Is the Base Station’s power cord firmly plugged in to
1
the back of the Base Station and a working electrical
outlet? The “ready” light glows when the Base
Station is receiving power
31
Page 33

C H A P T E R 6 Troubleshooting
Is the Base Station’s USB cable firmly connected to
2
the USB port on your computer?
Are the batteries properly inserted in the device? The
3
“+” and “-” on the batteries must match the “+” and
“-” on the slots. If the batteries aren’t inserted
correctly, the device won’t work.
Move your device closer to the Base Station, push
4
your Base Station’s connect button again and then the
device’s connect button again.
Important! If you have more than one Base Station
plugged in, connecting a device can take up to 3 minutes, so be patient. If your device still isn’t connected
after 3 minutes, unplug the other Base Station’
power cord. Then, try connecting the devices agai n
to the Base Station that is still plugged in, as
described in the appropriate section of this book.
Base Station Appears with an Alert Symbol in
Intel Wireless Series Control Panel
If you see the alert icon, shown at left, in the control
panel, check the following:
32
Is the Base Station’s power cord firmly plugg ed in to
1
the back of the Base Station and a working electrical
outlet? The “ready” light glows when the Base
Station is receiving power. If you connected any
devices, the “connect” glows, too.
Is the Base Station’s USB cable firmly connected to
2
the USB port on your computer?
If you have verified that the connections are good but
3
you still see the alert icon, don’t disconnect or unplug
the Base Station. Install the Intel Wireless Series
Base Station software again, as described on page4,
and re-start your computer .
After Windows starts, the
wizard should detect the Base Station. The wizard
may ask to search your Windows CD-ROM, so have
it available.
New Hardware Found
Page 34

Troubleshooting C H A P T E R 6
Important! If the wizard asks to search the Intel
Wireless Series Base Station CD-ROM:
Make sure the correct version of the Intel CD-
a
ROM is in the CD or DVD drive of your
computer . If you need to put the CD-ROM in th e
drive, wait a few seconds for your computer to
detect the C D -ROM . Cl ic k OK.
In the
b
Insert Disk
dialog box, click the
Browse
button.
In the
c
dialog box, select from the
Open
Drives
list the drive that contains the Intel CD-ROM.
Double-click the folder for your operating
d
system, such as “Win98,” and click OK.
Click OK again in the
e
Insert Disk
dialog to
proceed through the wizard.
If you connected any wireless devices to the
Base Station, the wizard may ask to search the
CD-ROM for each connected Intel Wireless
Series peripheral. Follow these instructions
again for each CD-ROM.
If the Setup program starts after you complete
f
the wizard, click
. You can remove the CD
Exit
from the drive.
If the DVD
drawer won’t
open when the
wizard prompts
you for a CD
1 Open Windows
Explorer: click
Start >
Programs >
Windows
Explorer
2 Right-click the
DVD drive and
click
Eject
.
.
Wireless Device Doesn’t Work
Check the fo l lowing:
Did you install the software that came with your
1
device? If not, turn to the following pages for
installation and connection instructions:
• Intel Wireless Series Base Station - page 4
• Intel Wireless Series Keyboard - page 7
• Intel Wireless Series Mouse - page
• Intel Wireless Series Gamepad - page 23
Are the batteries properly inserted in the device? The
2
“+” and “-” on the batteries must match the “+” and
“-” on the slots. If the batteries aren’t inserted
correctly, the device won’t work.
If you have been using the device for a while, do you
3
need to change the batteries? Check the Intel Wireless
33
Page 35

C H A P T E R 6 Troubleshooting
Series Control Panel for low battery indicators: click
Start > Programs > Intel Wireless Series > Intel
Wireless Series Control Panel
If you have addressed each of these conditions and your
device still doesn’t work, there may be a problem with the
Base Station. Proceed to the section below to troubleshoot
the Base Station.
.
Base Station Doesn’t Work
Before you proceed, you’ll need the following items:
• A working mouse must be connected to your
computer
• Your Windows CD-ROM
• The CD-ROM for each installed Intel Wireless
Series peripheral.
• In one case, you’ll also need a PS/2 keyboard, so
have one available to connect to your computer.
Check the fo l lowing:
Is the Base Station’s power cord firmly plugg ed in to
1
the back of the Base Station and a working electrical
outlet? The “ready” light glows when the Base
Station is receiving power. If you connected any
devices, the “connect” light glows, too.
Is the Base Station’s USB cable firmly connected to
2
the USB port on your computer?
If the connections are good, re-start your computer. If
3
the
New Hardware Found
detect your Base Station and any connected wireless
devices. Your Base Station and devices should no
work.
If the
4
New Hardware Found
don’t disconnect or unplug the Base Station. Install
the Intel Wireless Series Base Station software again,
as described on page 4 , and re-start your computer
wizard starts, it should
wizard didn’t start,
34
After you restart your computer, the
wizard should detect your Base Station and
Found
any connected devices. Your Base Station and
devices should work now.
New Hardwar
Page 36

Troubleshooting C H A P T E R 6
If the New Hardware Found wizard didn’t start after
5
re-installing the software, check Device Manager for
the Base Station as described in the next section.
I. Check the Device Manager for the Base Station
Click
1
2
3
Start > Settings > Control Panel
Double-click the
Click the
devices by type
Double-click the
4
System
icon.
Device Ma n age r
.
Universal Serial Bus controller
tab and then click
.
View
category and look for the “Intel Wireless Series Base
Station.”
• If you don’t see the Base Station, check the USB
settings on yo ur compute r, as described below in
"Check the USB Settings on your computer."
• If you see the Base Station in the list:
Select the Base Station.
a
Click the
b
Click OK to remove this dev ic e from your
c
Remove
button.
system.
Click the
d
Click OK to close Device Manager.
e
Restart your computer.
f
Open Device Manager again and look for
g
Refresh
button.
the Base Station, as described above in Steps
1-4.
• If you see the Base Station, the Base Station
should work now.
• If you don’t see the Base Station, check the
USB settings on your computer, as
described below in "Check the USB Settings
on your computer."
II. Check the USB settings on your computer
Click
1
2
3
4
Start > Settings > Control Panel
Double-click the
Click the
Device Ma n age r
devices by type
System
.
icon.
tab and then click
Scroll to the bottom of the device list and look for the
Universal serial bus controller
• If you don’ t see the
controller
category, then USB is probably
Universal serial bus
category.
.
View
35
Page 37

C H A P T E R 6 Troubleshooting
disabled or does not exist on your computer.
Turn to page 37 for instructions on enabling
USB.
If you see the
5
Universal serial bus controller
category, make sure that USB is properly configured
on your computer.
Double-click the
6
Universal serial bus controller
category. If USB is properly installed, the following
devices appear in the list:
•
USB Host Controller
The manufacturer name
and model of the host controller device may
vary.
• USB Root Hub
If the device list includes either the Host Controller or
7
the Root Hub but not both, remove and refresh the
existing device, as follows:
Select the remaining USB device in the
a
Universal serial bus controller
Click the
b
Click OK to remove this dev ic e from your
c
Remove
button.
list.
system.
d
Click the
Refresh
button.
If the DVD
drawer won’t
open when the
wizard prompts
you for a CD
1 Open Windows
Explorer: click
Start >
Programs >
Windows
.
Explore
2 Right-click the
DVD drive and
click
Eject
.
36
Windows should detect the USB hardware and may
ask to search your Windows CD-RO M, so have it
available.
Important! If the wizard asks to search an Intel
CD-ROM:
Make sure the correct version of the Intel CD-
a
ROM is in the CD or DVD drive of your
computer. If yo u need to put the CD-ROM in the
drive, wait a few seconds for your computer to
detect the CD-ROM. Click OK.
b
c
If the
Browse
In the
Insert Disk
button.
Open
dialog box appears, click the
dialog box, select from the
Drives
list the drive that contains the Intel CD-ROM
Double-click the folder for your operating
d
system, such as “Win98,” and click OK.
Page 38

Troubleshooting C H A P T E R 6
Click OK again in the
e
Insert Disk
dialog box to
proceed through the wizard.
If you connected any wi reless d evices to the Base
Station, the wizard may ask to search the CDROM for each connected Intel Wireless Series
peripheral. Follow these instructions again for
each CD-ROM.
If the Setup program started, click
f
Exit
remove the CD from the drive .
If there is an exclamation mark on either USB device,
8
USB is not functioning co rrectly. Y ou can doubleclick the exclamation mark to see information about
the problem in the system status area.
You may need to consult the documentation that
came with your computer or contact your computer
manufacturer if you need assistance correcting the
problem. After the problem is corrected, USB s hould
work.
If there is a red “X” on either USB device, then this
9
device has been disabled. To enable it, double click
the red “X” and click the
Enable
button for this
device. Click OK and then click OK again to close.
. You can
If there are no USB devices listed anywhere in
Device Manager, your computer's USB port is not
enabled. You need to enable the USB in your computer's BIOS, as describe d in the next se ction on
page 37.
III. Check Your Computer's BIOS for USB support
T o use any USB devices, such Intel Wireless Series
peripherals, the USB port mus t be enabled and properly configured in your computer’s BIOS.
WARNING! Making incorrect changes to your computer’s BIOS can cause ser ious, system-wide problems.
Please follow these instructions explicitly.
Shut down your computer and connect a PS/2
1
keyboard to the PS/2 keyboard port.
BIOS
Contains your
computer’s basic
hardware
configuration
settings. It stand for
“Basic Input/Output
System”
37
Page 39

C H A P T E R 6 Troubleshooting
If you cannot
change the BIOS
settings
Either because you
cannot determine
how to access them
or you are
uncomfortable
editing them
yourself, contact your
computer
manufacturer for
additional
instructions.
Turn on your computer and enter the System
2
Setup for BIOS before Windows starts.
Each computer and BIOS have different ways
Note
of entering the BIOS settings, such as pressing F1,
, or the
F2
key when the system is counting
Delete
memory right after you turn on or restart you r computer. Your computer may be different. When you
turn on your computer, watch the screen for instructions about how to enter the BIOS settings, such as
“Press F2 for Setup.” If the startup information
scrolls too quickly for you to read, press the
key to see the start-up sequence.
Tab
After you enter the BIOS, look for the
3
Output Ports
menu or
Peripheral Setup
Esc
Input/
option.
or
Your BIOS may be different. Consult the
documentation that came with your computer or
contact your computer manufacturer if you need
assistance.
After you find th e appropriat e U S B setting,
4
change it to
Enabled. Do not change any other
BIOS settings.
Save the settings and exit the BIOS. Allo
5
Windows to start.
After Windows starts, the
6
Found
port. Click
wizard and click
wizard starts and detects the enabled USB
through each screen of the
Next
Finish
New Hardwar
on the final screen.
BIOS
Contains your
computer’s basic
hardware
configuration
settings. It stand for
“Basic Input/Output
System”
38
Wireless Keyboard and/or Mouse Doesn’t
Work in MS-DOS, Safe Mode and Other NonWindows Modes
Depending on your computer’s settings, it may not fully
support USB devices outside the W indows environme nt. For
your Intel Wireless Series Keyboard and Mouse to work
with MS-DOS-based utilities (such as ScanDisk) and in
non-Windows modes (such as Safe mode or MS-DOS
mode), your computer must have legacy support for USB
devices. USB Legacy Support allows the BIOS to interact
with a USB keyboard, and in limited cases, a USB mouse.
You can check for and enable USB Legacy support in your
computer’s BIOS using a PS/2 key boa rd.
Page 40

Troubleshooting C H A P T E R 6
I. Check for and Enable USB Legacy Support
WARNING! Making incorrect changes to your computer’s BIOS can cause ser ious, system-wide problems.
Please follow these instructions explicitly.
Shut down your computer: c li ck
1
, select “Shut Down” and then click OK.
Down
Start > Shut
Turn off your computer.
Connect a PS/2 keyboard to your computer
2
Turn on your computer and enter the System
3
Setup for BIOS bef ore Windows starts.
Each computer and BIOS have different ways
Note
of entering the BIOS settings. Typically, you press
F1, F2
, or the
key when the system is count-
Delete
ing memory right after you turn on or restart your
computer. Your computer may be different. When
you turn on your computer, watch the screen and it
may display instructions for how to enter the BIOS
settings, such as “Press F2 for Setup.” If the startup
information scrolls too quickly for you to read, press
the
or
Esc
After you enter the BIOS, look for the
4
Legacy Support
found under the
Peripheral Configuration
key to see the start up sequence .
Tab
setting. Usually, this setting is
Advanced, Peripheral
menu, however your
USB
, or
BIOS may be different.
5
Select
USB Legacy Support
setting to
Enabled. Do not chan ge any other
and change the
BIOS settings.
Save the settings and exit the BIOS. Allow
6
Windows to start.
If you cannot
change the BIOS
settings
Either because you
cannot determine
how to access them
or you are
uncomfortable
editing them
yourself, contact your
computer
manufacturer for
additional
instructions.
II. If the BIOS does not have any settings for USB
Legacy Support
You need to upgrade your computer's BIOS, if possible. Contact your computer manufacturer about
obtaining the BIOS upgrade software and instructions.
Important! After you complete the BIOS upgrade,
restart your computer, enter the BIOS's System Set-
39
Page 41

C H A P T E R 6 Troubleshooting
tings as described on page 39 and chec k whether
USB Legacy Support is enabled. If necessary, enable
it and save the BIOS settings before you exit.
III. If the new BIOS does have not a USB Legacy
Support setting, if the BIOS cannot be upgraded or
if you choose not to upgrade the BIOS
You will be limited to using a PS/2* keyboard and, in
the case of Safe mode, a PS/2 mouse to address any
of the following situations:
• Running you r co mputer i n Safe mode.
• Starting your computer in MS-DOS mode
(instead of opening a MS-DOS session from
Windows).
• Starting your computer from a floppy disk or
leaving a floppy disk in the drive when you turn
on or restart your compute r.
• Windows “blue screen” errors that ask you to
“Press any key to continue.”
• Responding to ScanDisk and other messages
during the start-up sequence.
• Editing or upgrading the BIOS.
• Entering a BIOS password.
40
Other Situations You May Encounter with Intel
Wireless Series Peripherals
You disconnect ed the Intel Wireless Base Station
from one USB port and connected it to another one.
Solution
a new device, so Windows starts the
Found
wizard again, reconnect the Base Station to the original USB port.
If you want to keep the Base Station connected to the
new USB port, follow the on-screen instructions in
the wizard.
Y our computer interprets this as connecting
New Hardware
wizard. If you don’t want to go through the
Page 42

Troubleshooting C H A P T E R 6
Important! If the wizard asks to search an Intel
CD-ROM:
Make sure the correct version of the Intel
a
CD-ROM is in the CD or DVD drive of your
computer . If you need to put the CD-ROM in th e
drive, wait a few seconds for your computer to
detect the C D -ROM . Cl ic k OK.
b
c
If the
Browse
In the
Insert Disk
button.
Open
dialog box appears, click the
dialog box, select from the
Drives
list the drive that contains the Intel CD-ROM.
Double-click the folder for your operating
d
system, such as “Win98,” and click OK.
Click OK again in the
e
Insert Disk
dialog to
proceed through the wizard.
If you connected any wireless devices to the
Base Station, the wizard may ask to search the
CD-ROM for each connected Intel Wireless
Series peripheral. Follow these inst ructions again
for each CD-ROM.
If the Setup program started, click
f
Exit
. You can
remove the CD from the drive .
If the DVD
drawer won’t
open when the
wizard prompts
you for a CD
1 Open Windows
Explorer: click
Start >
Programs >
Windows
Explorer
2 Right-click the
DVD drive and
click
Eject
.
.
You connected the Intel Wireless Series Base Station
to a multi-port USB hub and your device doesn't work
after your computer has been idle for a period of time.
Solution
You need to by-pass the hub.
Disconnect the Base Station from the hub.
1
Connect your Base Station directly into a USB port
2
on your computer.
The
3
New Hardware Found
wizard takes a few
seconds to detect the Base Station and may ask to
search your Windows CD-ROM.
Important! If the wizard asks to search an Intel
CD-ROM:
Make sure the correct version of the Intel CD-
a
ROM is in the CD or DVD drive of your
computer . If you need to put the CD-ROM in th e
41
Page 43

C H A P T E R 6 Troubleshooting
drive, wait a few seconds for your computer to
detect the CD-ROM. Click OK.
b
c
If the
Browse
In the
Insert Disk
button.
Open
dialog box appears, click the
dialog box, select from the
Drives
list the drive that contains the Intel CD-ROM
Double-click the folder for your operating
d
system, such as “Win98,” and click OK.
Click OK again in the
e
Insert Disk
dialog to
proceed through the wizard.
If you connected any wireless devices to the
Base Station, the wizard may ask to search the
CD-ROM for each connected Intel Wireless
Series peripheral. Follow these instructions again
for each CD-ROM.
If the Setup progra m started, cl i ck
f
Exit
. You can
remove the CD from the drive.
You can’t find the Intel Wireless Series Control Panel
on the Programs menu.
42
Solution
You need to install the software on the Int el
Wireless Series peripherals CD that came with your
device.
Your software is properly installed, but you don’t see
the Intel Wireless Series Control Panel icon in the
Windows System Tray.
Solution
You need to “show” the icon in your Win-
dows* System Tray
From the Start menu: click
1
Wireless Series > Intel Wireless Control Panel
Right click on th e
2
3
Select
Show Tray Icon
Get Help
Programs > Intel
.
icon.
.
Page 44

Troubleshooting C H A P T E R 6
There is a “No keyboard found” or “Keyboard error”
message and your computer won’t start.
- or -
Your Intel Wireless Series Keyboard or Mouse doesn't
work until Windows has started.
- or -
You need to change your System Settings in the BIOS
but your Intel Wireless Serie s Keyboard doesn't work
when you try to enter the BIOS.
Solution
You need to enable USB Legacy Support in
the BIOS, as described on p age39. If you continue to
see this error after addressing USB Legacy Suppor t
issues, there may be a problem with basic USB support on your computer. Turn to page35 f or instructions on checking USB on your computer.
Your computer prompts you for a password before
Windows starts, but your Intel Wireless Series Keyboard doesn't work when you type the password.
Solution
You need to enable USB Legacy Support in
the BIOS, as described on page 39.
You started your computer in MS-DOS Mode or Safe
Mode and your Intel Wireless Series Keyboard or
Mouse don’t work even though you have enabled
USB Legacy Support in the BIOS.
Solution
You need to upgrade your computer's
BIOS, if possible. Your computer manufacturer must
supply you with the BIOS upgrade software and
instructions.
Important! After you complete the BIOS upgrade,
restart your computer, enter the BIOS's System Settings as described on page 39, and check whether
“USB Legacy Support” is enabled. If necessary,
enable it and s ave the BIOS se ttings before you exit.
43
Page 45

C H A P T E R 6 Troubleshooting
You need to disconnect a wireless device but you
don’t have the Intel Wireless Series Control Panel
You must use Device Manager to disconnect a wireless
device if you don’t have the Intel Wireless Series Control
Panel.
Important! If you are disconnecting an Intel Wireless
Series Keyboard, Mouse or Base Station, you need to
connect a working PS/2 keyboard or PS/ 2 mouse for normal
system operations. Have alternative devices available before
you proceed.
Shut down your computer and connect a PS/2
1
keyboard or PS/2 mouse to the appropriate PS/2 port
on your computer.
Turn on your computer.
2
Click
3
4
5
6
7
Start > Settings > Control Panel
Double-click the
Click the
Click
Device Ma n age r
View devices by type
System
icon.
Double-click the list for the device(s):
for the keyboard, double-click
a
tab.
.
.
Keyboard
and
select “Intel Wireless Series Keyboard.”
for the mouse, double-click
b
Mouse
and select
“Intel Wireless Series Mouse.”
for the gamepad, dou ble-click
c
game controllers
(or similar category on your
Sound, video and
computer) and select “Intel Wireless Series
Gamepad.”
for the Base Station, double-click
d
Serial Bus controller
and select “Intel Wireless
Universal
Series Base Station.”
5
Click the
Remove
button
44
Important! Do not remove any other devices in any
other categories.
To confirm that you want to remove the device, click
6
.
Yes
Windows removes the device software from your
computer. All device-related items are also removed
from
Device Manager
.
Page 46

Troubleshooting C H A P T E R 6
Reducing Interference with Other Wireless
Devices
All 900MHz radio-based devices are subject to interference
from other 900MHz radio-based devices, such as cordless
telephones, cordless baby monitors, cordless headphones,
and cordless speakers. If you experience static, clicking, or
humming with another radio-based device after you have
connected your Intel Wireless Series Base Station and one
of its devices, the Base Station may be causing the
interference.
It may be helpful to move the Base Station and the base uni t
for the other wireless device (such as cordless telephone
cradle) as far apart as possible. You may need to experiment
to determine the locations that are best for your
environment.
Keep in mind that it’s not necessary to place the Intel
Note
Wireless Series Base Station in clear view of the devices
that are connected to it.
If you have difficulty connecting an Intel Wireless
Series peripheral:
Increase the distance between the Intel Wireless
1
Series Base Station and other base units (such as a
cordless telephone).
Turn off the other wireless devices, or their base
2
units, that are in close proximity to the Intel Wireless
Series Base Station.
Try connecting the Intel Wireless Series Device
3
again.
T o verify that yo ur device is connected and working
4
properly, open a document or game and try the
device.
If you experience static, clicking, or other interference
on your cordless telephone handset or speaker
phone
Move the handset or speaker phone away from the
1
Intel Wireless Series Base Station.
Increase the distance between the Intel Wireless
2
Series Base Station and the cordless telephone base
unit.
45
Page 47

C H A P T E R 6 Troubleshooting
For additional suggestions, read the FCC Compliance
Statement on page 51.
Using Multiple Intel Wireless Series Base Stations
If you are using more than one Intel Wireless Series Base
Station, it may take up to 3 minutes to connect a wireless
device. As a general rule when connecting a wireless device,
make sure the other Base Station is not also trying to
connect to a device, whic h happens w henever you pus h a
Base Station’s connect button.
As you connect a wireless device, be sure to watch the
“connect” light on the front of the Base Station. As the Base
Station searches for the wireless device signal, it blinks
slowly; after the connection is successful, the “connect”
light will blink rapidly several times and then glow steadily.
If you aren’t able to connect an Intel Wireless Series
device in a multi-base setting:
Unplug the other Base Station(s) from its electrical
1
outlet.
On the Base Station to which you want to connect the
2
device, press the connect button.
Press the device’s connect button.
3
To verify that your device is connected and working
4
properly, open a document or game and try the
device.
After verifying that the device is connected to the
5
right Base Station, you can plug the other Base
Station(s) in to an electrical outlet.
46
Page 48

7
Intel warrants that the Intel Wireless Series Base Station,
Keyboard, Mouse and Gamepad Hardware Product if
properly used and installed, and the CD-ROM on which the
accompanying software is provided, will be free from
defects in material and workmanship for a period of one (1 )
year after the date of purchase.
If the Base Station, Keyboard, Mouse or Gamepad
Hardware Product or the CD-ROM which is the subject of
this Limited Warranty is defective in material or
workmanship during the warranty period, Intel, at its option,
will:
REPAIR the Base Station, Keyboard, Mouse or Gamepad
Hardware Product by means of hardware and/or software;
OR
REPLACE the Base Station, Keyboard, Mouse or Gamepad
Hardware Product or CD-ROM with a replacement Base
Station, Keyboard, Mouse or Gamepad Hardware Product or
CD-ROM; OR,
if Intel is unable to repair or replace the Base Station,
Keyboard, Mouse or Gamepad Hardware Produc t or CDROM, REFUND the then-current value of the Base Station,
Keyboard, Mouse or Gamepad Hardware Produc t or CDROM.
THIS LIMITED WARRANTY, AND ANY IMPLIED
WARRANTIES THAT MAY EXIST UNDER STATE
LAW, APPLY ONLY TO THE ORIGINAL PURCHASER
AND LAST ONLY FOR AS LONG AS SUCH
PURCHASER CONTINUES TO OWN THE BASE
STATION, KEYB OARD, MOUSE OR GAMEPAD
HARDWARE PRODUCT AND CD-ROM.
Limited Warranty
47
Page 49

C H A P T E R 7 Limited Warranty
Extent of Limited Warranty
This warranty does NOT cover the performance or
functionality of any computer software included in the
package with the Base Station, Keyboard, Mouse or
Gamepad Hardware Product, th is warranty only covers
defects in the CD-ROM media such as a broken CD-ROM
or a defect in the CD-ROM that would prevent the CDROM from bei ng read by your personal computer's CDROM drive. INTEL MAKES NO WARRANTY THAT
THE SOFTWARE PROVIDED WITH THIS BASE
STATION, KEYB OARD, MOUSE OR GAMEPAD
HARDWARE PRODUCT WILL FUNCTION WITHOUT
INTERRUPTION OR OTHERWISE BE FREE OF
ANOMALIES, ERRORS OR "BUGS". INTEL MAKES
NO WARRANTY WITH REGARD TO AN Y SOFTWARE
PROVIDED WITH THIS BASE STATION, KEYBOARD,
MOUSE OR GAMEPAD HARDWARE PRODUCT
UNLESS SPECIFICALLY SET FORTH OTHERWISE IN
A LICENSE AGREEMENT ACCOM PANYING SUCH
SOFTWARE.
This limited warranty does not cover any costs relating to
removal or replacement of any Base Station, Keyboard,
Mouse or Gamepad Hardware Product, CD-ROM, or
software installed on your computer.
This limited warranty does not cover damages due to
external causes, including accident, problems with electrical
power, usage not in accordance with product instructions,
misuse, neglect, alteration, repair, or improper installation.
48
How To Be Eligible For Warranty Coverage
In order to be eligible for warranty coverage, You MUST
register the Base Station, Keyboard, Mouse or Gamepad
Hardware Product with Intel within thirty (30) days of
purchase. Registration can be co mpleted by foll owing the
instructions in the "Register Online" program that is
included on the CD-ROM that is included in the package
with the Base Station, Ke yboard, Mouse and Gamepad
Hardware Product.
Page 50

Limited Warranty C H A P T E R 7
How to Obtain Warranty Service
To obtain warranty service, you must return the Base
Station, Keyboard, Mouse or Gamepad Hardwar e Product to
Intel. Before returning the Base St at ion , Keyboard, Mouse
or Gamepad Hardware Product to Intel, you must contact
Intel's Customer Support Group at +1-916-377-7000.
If you obtain warranty service from Intel, upon Intel's
verification that the Base Station, Keyboard, Mouse or
Gamepad Hardware Product or CD-ROM may be defective,
you will be issued a Return Material Authorization (RMA).
When you return the Base Station, Keyboard, Mouse or
Gamepad Hardware Product and CD-ROM to Intel, you
must include the RMA number on the outside of the
package. Intel will not accept any returned Base Station,
Keyboard, Mouse or Gamepad Hardware Produc t or CDROM that has no RMA number on the package.
If you return the Base Station, Keyboa rd, Mouse or
Gamepad Hardware Product and/or CD-ROM to Intel, you
must assume the risk of damage or loss during shipping. You
must use the original packaging or the equivalent, and you
must pay the postage.
Intel may elect to replace or repair the Base Station,
Keyboard, Mouse or Gamepad Hardware Product and/or
CD-ROM with either a new or reconditioned product. The
returned product sh al l become I n tel ' s proper ty on receipt by
Intel.
The replacement Base Station, Keyboard, Mouse or
Gamepad Hardware Product and/or CD-ROM is warranted
under this written warranty and is subject to the same
limitations and exclusions for the remainder of the original
warranty period or ninety (90) days, whichever is longer.
WARRANTY LIMITATIONS AND EXCLUSIONS
THESE WARRANTIES REPLACE ALL OTHER
WARRANTIES, EXPRESS OR IMPLIED INCLUDING,
BUT NOT LIMITED TO, THE IMPLIED WARRANTIES
OF MERCHANTABILITY AND FITNESS FOR A
P ARTICULAR PURPOSE. INTEL MAKES NO EXPRESS
WARRANTIES BEYOND THOSE STATED HERE.
INTEL DISCLAIMS ALL OTHER WARRANTIES,
49
Page 51

C H A P T E R 7 Limited Warranty
EXPRESS OR IMPLIED INCLUDING, WITHOUT
LIMITATION, IMPLIED WARRANTIES OF
MERCHANTABILITY AND FITNESS FOR A
PARTICULAR PURPOSE. SOM E STATES DO NOT
ALLOW THE EXCLUSION OF IMPL IED WARRANTIES
SO THIS LIMITATION MAY NOT APPLY TO YOU.
ALL EXPRESS AND IMPLIED WARRANTIES ARE
LIMITED IN DURATION TO THE LIMITED
WARRA NTY PERIOD. NO WARRANTIES APPLY
AFTER THAT P E RIO D . SOME STATES DO NOT
ALLOW LIMITATIONS ON HOW LONG AN IMPLIE
WARRANTY LASTS, SO THIS LIMITATION MAY NOT
APPLY TO YOU.
LIMITATIONS OF LIABILITY
INTEL'S RESPONSIBILITY UNDER THIS, OR ANY
OTHER WARRANTY, IMPLIED OR EXPRESS, IS
LIMITED TO REPAIR, REPLACEMENT OR REFUND,
AS SET FORTH ABOVE. THESE REMEDIES ARE THE
SOLE AND EXCLUSIVE REMEDIES FOR ANY
BREACH OF WARRANTY. INTEL IS NOT
RESPONSIBLE FOR DIRECT, SPECIAL, INCIDENTAL,
OR CONSEQUENTIAL DAMAGES RESULTING FROM
ANY BREACH OF WARRANTY OR UNDER ANY
OTHER LEGAL THEORY INCLUDING, BUT NOT
LIMITED TO, LOST PROFITS, DOWNTIME,
GOODWILL, DAMAGE TO OR REPLACEMENT OF
EQUIPMENT AND PROPERTY, AND ANY COSTS OF
RECOVERING, RE PROGRAM MING, OR
REPRODUCING ANY PROGRAM OR DATA STORED
IN OR USED WITH A SYSTEM CONTAINING YOUR
BASE STAT ION, KEYBOARD, MOUSE OR GAMEPAD
HARDWARE PRODUCT CD-ROM OR
ACCOMP ANYING SOFTWARE.
SOME ST ATES DO NOT ALLOW THE EXCLUSION OR
LIMITATION OF INCIDENTAL OR CONSEQUENTIAL
DAMAGES, SO THE ABOVE LIMITATIONS OR
EXCLUSIONS MAY NOT APPLY TO YOU.
THIS LIMITED WARRANTY GIVES YOU SPECIFIC
LEGAL RIGHTS, AN D YOU MAY ALSO HAVE OTHER
RIGHTS THAT VARY FROM STATE TO STATE.
50
Page 52

8
FCC Compliance and
Technical Specifications
FCC Compliance Statement
This device complies with Part 15 of the FCC Rules.
Operation is subject to the two following conditions:
This device may not cause harmful interference.
1
This device must accept any interference received,
2
including interference that may cause undesired
operations.
The product has been tested and verified to be within the
energy emission limits for Class B digital devices as defined
in Part 15 of the FCC Rules. These limits are designed to
provide reasonable protection against harmful interference
in a residential situation. This product generates, uses and
can radiate radio frequency energy and, if not installed and
used in accordance with the instructions, may cause harmful
interference to radio communications. Installed correctly, it
probably will not interfere with your radio or TV. However,
we do not guarantee the absence of interference.
If you modify the product in any way, without getting
approval from Intel Corporation, your product may violate
FCC regulations. Violation of FC C regulations may cause
the FCC to void your right to use the unit.
If you suspect this product is causing interference, turn your
computer on and off while your radio or TV is showing
interference. If the interference disappears when you turn
the computer off and reappears when you turn the computer
on, something in the computer is causing interference.
To reduce interference, try these suggestions:
• Change the direction of the radio or TV antenna.
• Move the computer or the radio or TV. For
example, if the computer is to the right of the TV,
move it to the left of the TV. Or, move the
51
Page 53

C H A P T E R 8 FCC Compliance and Technical Specifications
computer farther away from the radio or TV.
• Plug the computer into a different outlet. Don’t
plug your radio or TV into the same circuit as your
computer.
• Ensure that all expansion slots (on the back or side
of the computer) are covered. Also, ensure that all
metal retaining brackets are tightly attached to the
computer.
If these suggestions don’t help, consult your computer
dealer or an experienced radio/TV technician for more
suggestions.
Industry Canada’s Compliance Statement
This Class B digital apparatus meets all requirements of the
Canadian Interference-Causing Equipment Regulations.
Cet appareil numérique de la classe B respecte toutes les
exigences du Règlement sur le matériel brouilleur du
Canada.
Technical Specifications
Table 1: Physical Dimensions and Weight
Device Length Width Height Weight
Intel Wireless Series Base
Station
Intel Wireless Series
Keyboard
Intel Wireless Series Mouse 135mm 70mm 40mm 450gr
Intel Wireless Series
Gamepad
52
155mm 135mm 90mm 400gr
482mm 177mm 36mm 1,200gr
155mm 160mm 45mm 600gr
Page 54

FCC Compliance and Technical Specifications C H A P T E R 8
Safety Standards
UL 1950/CSA C22.2 950
EMC Standards
FCC part 15, sub-part J, class B Unintentional Radiated emissions and Intentional Radiated Emissions.
Interface
any version of USB supported by Windows* 98 or
Windows 98SE
Operating Temperature Range
5 to 40 degrees C
20 - 90% relative humidity
Non-condensing over temperature range
Power consumption for Base Station
5volts - 500mA Max. (USB)
Radio Frequency Information
Transmitter/Receiver Frequency Range:
902.5 - 927.0 MHz
Radio Frequency Transmit Po wer
Base Station - 193mW
Keyboard, Mouse, and Gamepad - 1.54mW
Radio Frequency Receive Power
-70dBm
Battery type
Base Station - none; DC power via adapter
Mouse - 3 AAA alkaline batteries
Keyboard - 3 AA alkaline batteries
Gamepad - 3 AAA alkaline batteries
53
Page 55

Intel Customer Support
Before you con ta ct Intel Customer Support, we suggest that you check the
following sources for information and additional troubleshooting tips:
Intel Help Files and Read Me Files
View the online help for instructions on configuring and using your Intel
Wireless Series peripherals as well as additional troubleshooting information. To
open the online Help:
Click
Start > Programs > Intel Wireless Series > Help
The Read Me file, which is installed with the Intel Wireless Series peripherals
software, contains late-breaking information about your devices. To op en the
Read Me file:
Click
Start > Programs > Intel Wireless Series > Read Me
Contacting Intel Customer Support
Click your way to a fast answer! The Intel Customer Support web site is a great
place to find answers about Intel peripherals — 24 hours a day, every day. Visit
us at:
http://support.intel.com/support/peripherals/
If you don’t have access to automated services
Contact your local retailer or call one of Intel’s Customer Support Centers.
Intel Customer Support Technicians
Important! At the time of your call, please be at your computer and have your
product serial number available. Support options are subject to change without
notice.
North America: 1-916-377-7000
For the most current information on support hours and offerings, refer to:
http://support.intel.com/support/9089.htm
 Loading...