


CCP+™ User Guide
INTEGRATED CONTROL CORPORATION PROPRIETARY
THIS DOCUMENT AND THE INFORMATION DISCLOSED HEREIN ARE THE PROPRIETARY DATA OF
INTEGRATED CONTROL CORPORATION. NEITHER THIS DOCUMENT NOR THE INFORMATION
CONTAINED HEREIN SHALL BE REPRODUCED, USED OR DISCLOSED TO OTHERS WITHOUT THE
WRITTEN AUTHORIZATION OF INTEGRATED CONTROL CORPORATION.
896095-1(B) Integrated Control Corp.
®
Page 1 of 36
2016
©
CCP+™
User Guide
CCP+™ is a handheld HACCP device that wirelessly measures
and logs temperatures of food.

CCP+™ User Guide
PROPRIETARY DATA OF INTEGRATED CONTROL CORPORATION
896095-1(B) Integrated Control Corp.
®
Page 2 of 36
2016
©
Page Intentionally
Left Blank

CCP+™ User Guide
PROPRIETARY DATA OF INTEGRATED CONTROL CORPORATION
896095-1(B) Integrated Control Corp.
®
Page 3 of 36
2016
©
990095-1, CCP+™
Contents
1. QUICKSTART! Operation
2. Operation Details
2.1 Next CCP
2.2 Task List
2.2.1 Hold/Warm/Cool
2.2.2 Scheduled
2.2.3 Unscheduled
2.3 Sign In/Sign Out
2.4 Settings
2.4.1 System Settings
2.4.2 Admin Settings
2.4.3 Sync Files
3. Rules for Numeric Entry
4. CCP Types
5. CCP+™ Specifications
6. Limited Factory Warranty
7. Service Support
CCP+™ User Guide
PROPRIETARY DATA OF INTEGRATED CONTROL CORPORATION
896095-1(B) Integrated Control Corp.
®
Page 4 of 36
2016
©
1 - QUICKSTART! Operation
1.1 Power Up and Joystick
1.2 Sign In and Station Select
1.3 Initialize Radio
1.4 Sync Files
1.5 Link Temp Probe
1.6 Take Temperature
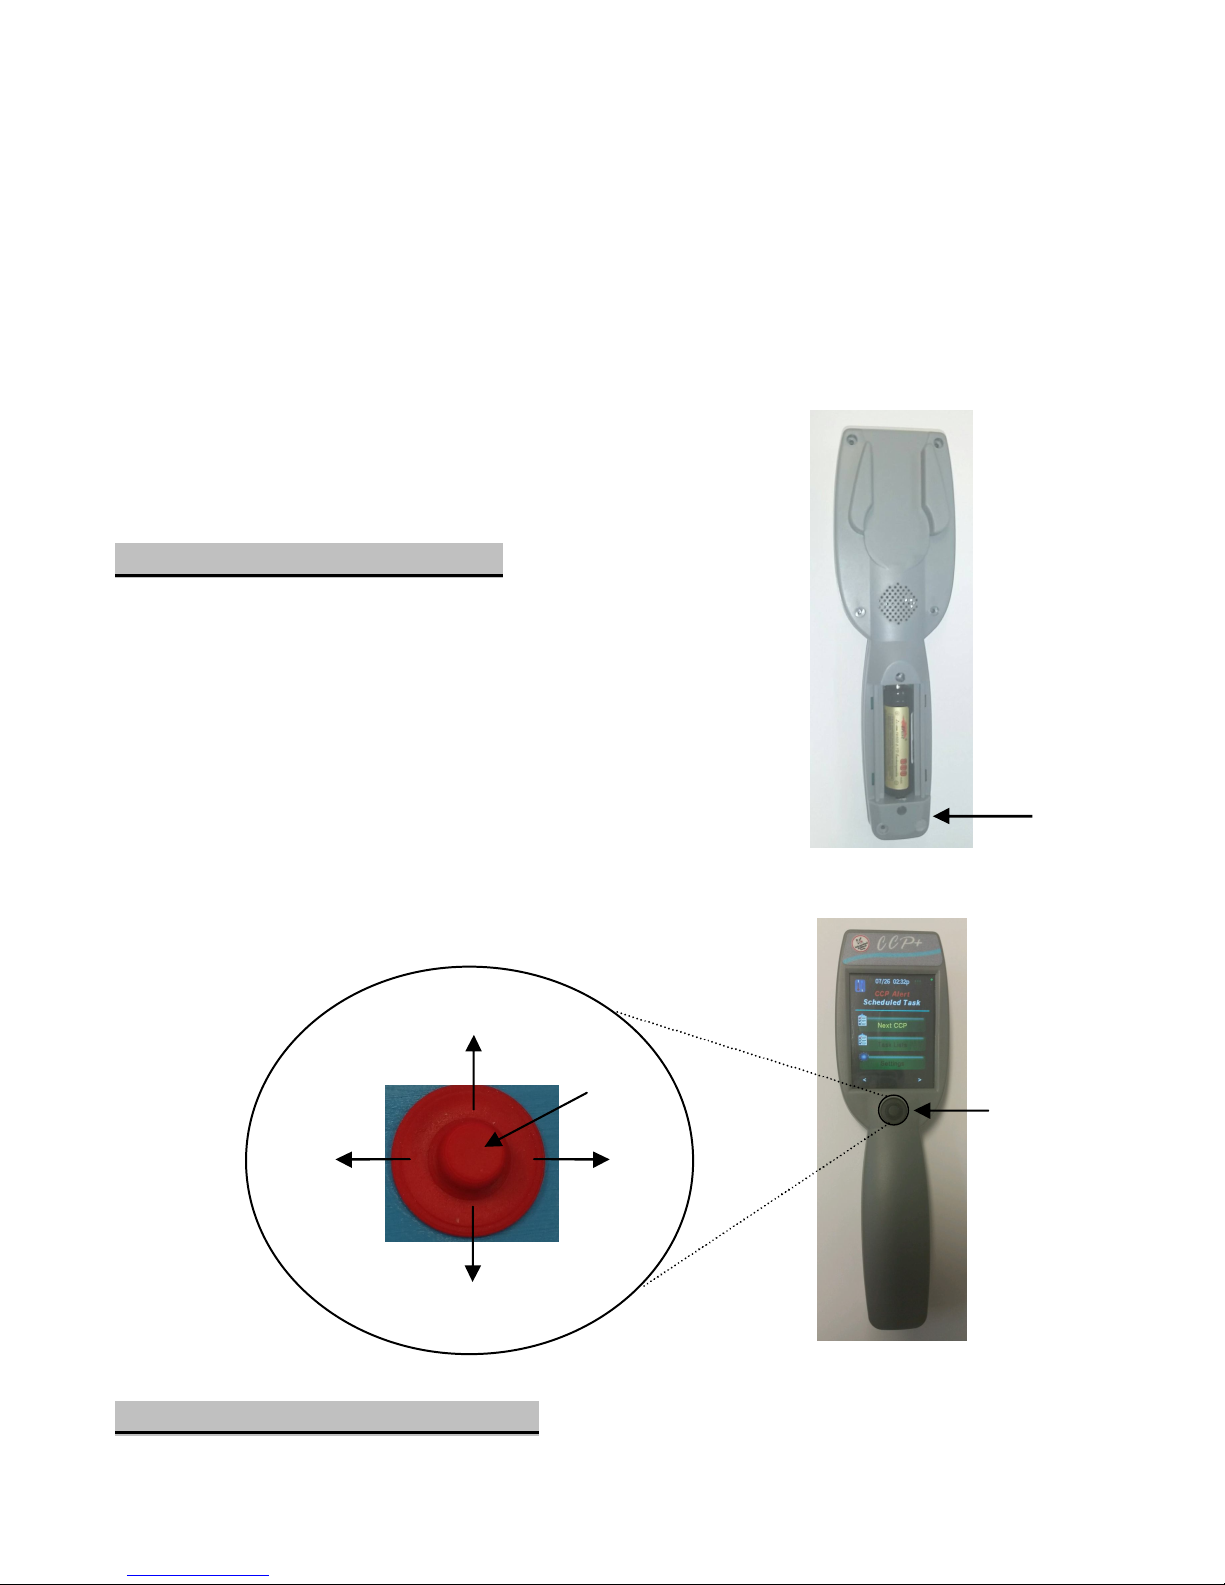
1.1 Power up and Joystick
The CCP+™ is powered by a rechargeable
battery. Press center of the joystick to wake up
the unit.
To charge the CCP+™, plug the charger into the
charging port (Fig. 1). Refer to Figure 2 for the
functionality of the CCP+™ joystick.
1.2 Sign In and Station Select
Figure 2: CCP+
TM
Joystick
Figure 1: Back view of
CCP+TM.
_
Charging
Port
Left or
go back
Up
Right
Down
Select
(push in)
Joystick
CCP+™ User Guide
PROPRIETARY DATA OF INTEGRATED CONTROL CORPORATION
896095-1(B) Integrated Control Corp.
®
Page 5 of 36
2016
©
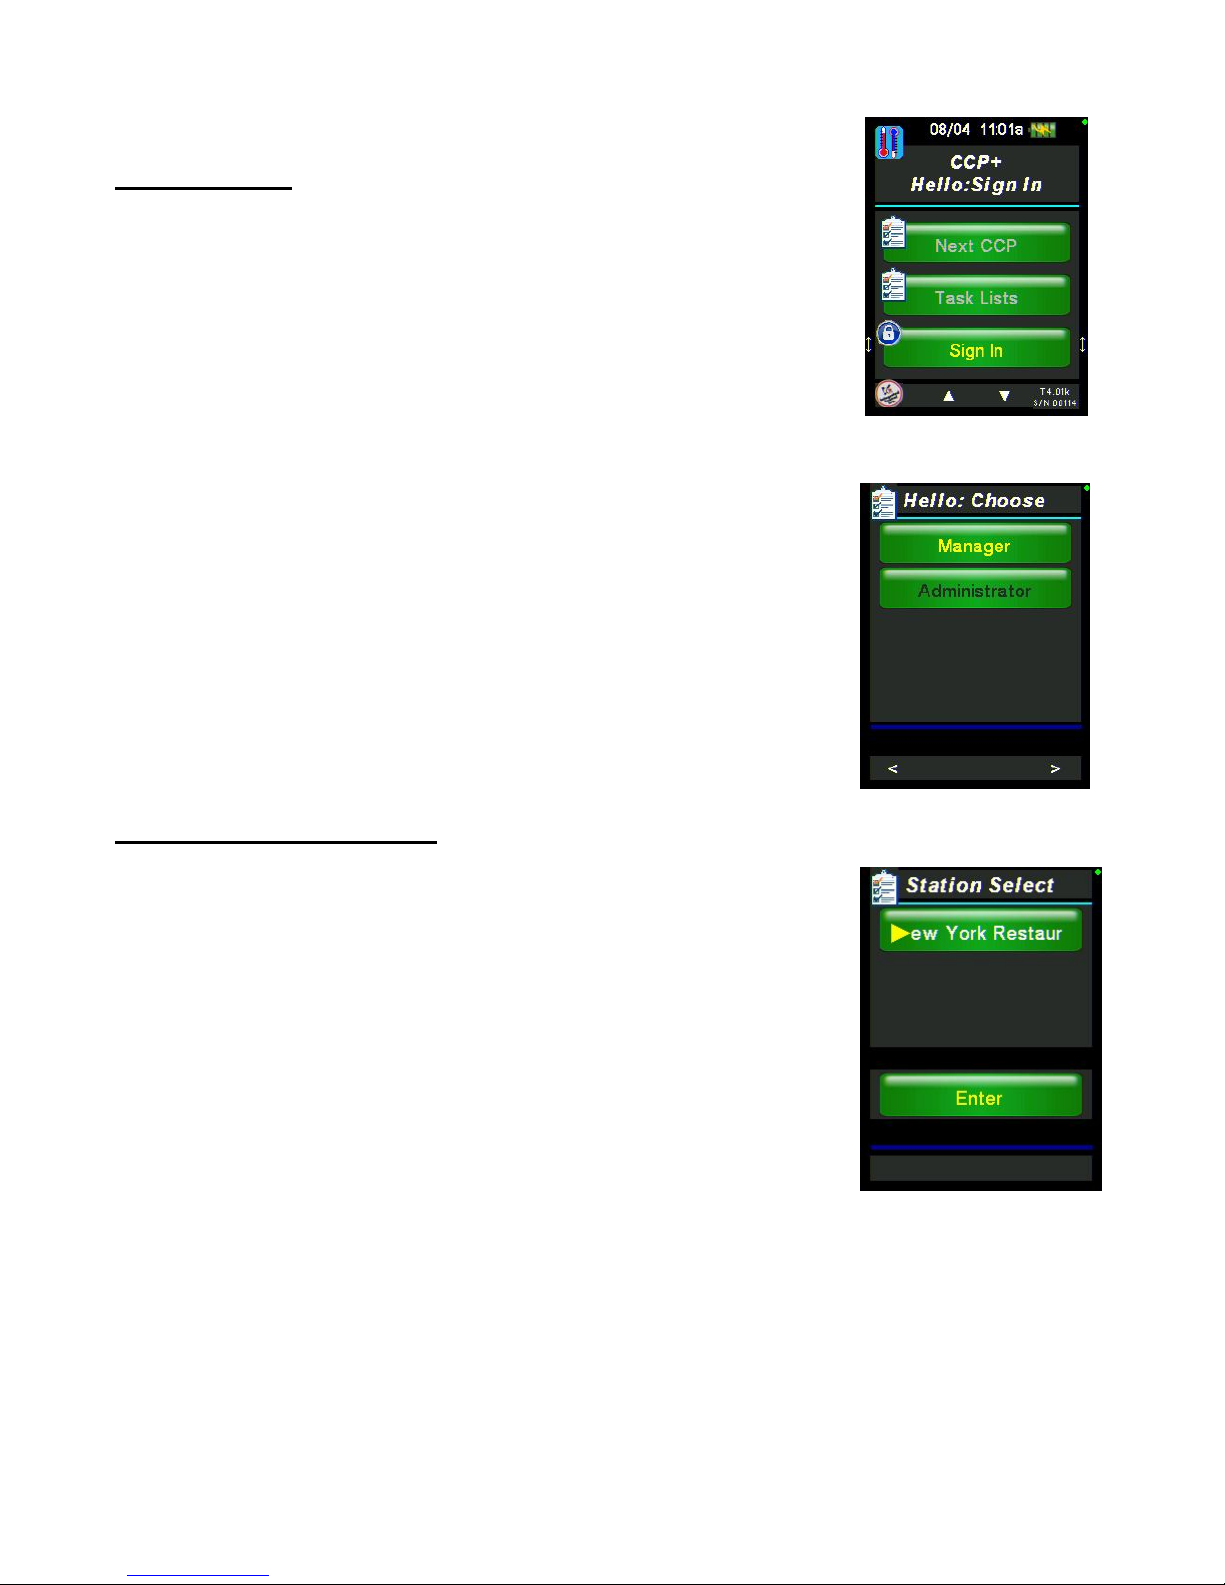
1.2.1 Sign In
When the unit is powered up or when logged out,
the unit shows the Sign In (Home) screen (Fig. 3).
To begin, touch Sign In using the touch screen or
press the center button on the joystick to select.
Never use a pen, pencil or any sharp object on
the graphic display screen.
To login, after touching/selecting Sign In, select
your user name on the next screen (Fig. 4). For
administrators, click on the Administrator button
and enter the password 9999.
1.2.2 Station Selection
After you have signed in, you may be directed to the
Station Select screen (Fig. 5). The Station
Selection option can be turned on or off by going
into the Station Select section under System
Settings (see section 2.4.1).
On this screen, choose the station(s) that you would
like to take temperatures for. Simply touch the
desired station button, or use the arrows to highlight
or un-highlight a selected station.
Touch/select Enter to select the station(s).
Figure 5: Station Select
Figure
3: Home/Main Menu
Figure 4: Sign In

CCP+™ User Guide
PROPRIETARY DATA OF INTEGRATED CONTROL CORPORATION
896095-1(B) Integrated Control Corp.
®
Page 6 of 36
2016
©
Figures 6 &
7
: Clicking Init Radio
brings you to Set UP Radio
1.3 Initialize Radio
The CCP+™ can download the current date and time, the CCP
schedule and the user lists from, and upload recorded data to, the
ICC website via a gateway. The gateway can be either a Temp
Minder™ or an iPrint™. Follow the steps below to ensure the CCP+™
radio and the gateway radio are configured properly to allow for
communication.
Radio setup for CCP+™
1. Go to Settings Admin Settings Init Radio to enter the Set
up Radio screen (Fig. 6).
2. Choose Set Gateway NodeID (Fig. 7) to enter
the gateway using the numeric touchpad and
press accept when finished. The
Gateway ID can be set to any number between
10 and 90 in intervals of ten (i.e.
10,20,30....etc.) The Gateway ID MUST MATCH
the Node ID entered into the Temp
Minder™ or iPrint™.
3. Choose Set CCP+ Node ID to enter the
CCP+ ID using the numeric touchpad and press accept when finished
If the Gateway ID is set to 10 the CCP+ ID can be set to any
number between 11-19. Similarly, if the Gateway ID is set to 20
the CCP+ ID can be set to any number between 21 and 29. NO
MORE than nine CCP+™ units can be connected to a single gateway.
*Note: Screen Navigation*
The up and down arrows at the
bottom of the screen indicate
that there are more menu
options available.
Use the joystick or touch the
arrows to navigate among the
options, return to the previous
screen or to the home screen.
Previous screen Home screen
Move down Move up

CCP+™ User Guide
PROPRIETARY DATA OF INTEGRATED CONTROL CORPORATION
896095-1(B) Integrated Control Corp.
®
Page 7 of 36
2016
©
Radio setup for Temp Minder™
1. Press Menu on the touchpad.
2. Press System Adjust using the touch
screen.
3. Press ICC Radio Setup.
4. Press Init - Enter the NODE ID using the
numeric touchpad that appears on the Temp
Minder™ display. The NODE ID can be set
to any number between 10 and 90 in
intervals of ten (i.e. 10,20,30....etc.) The
NODE ID MUST MATCH the Gateway ID
that was entered into the CCP+™.
5. Press OK to save. - The screen will go
through an "initializing" process then return
to ICC Radio Setup.
6. Press Menu.
7. Press List to return home.
F
igure
8:
Temp Minder™ Radio Set Up
CCP+™ User Guide
PROPRIETARY DATA OF INTEGRATED CONTROL CORPORATION
896095-1(B) Integrated Control Corp.
®
Page 8 of 36
2016
©
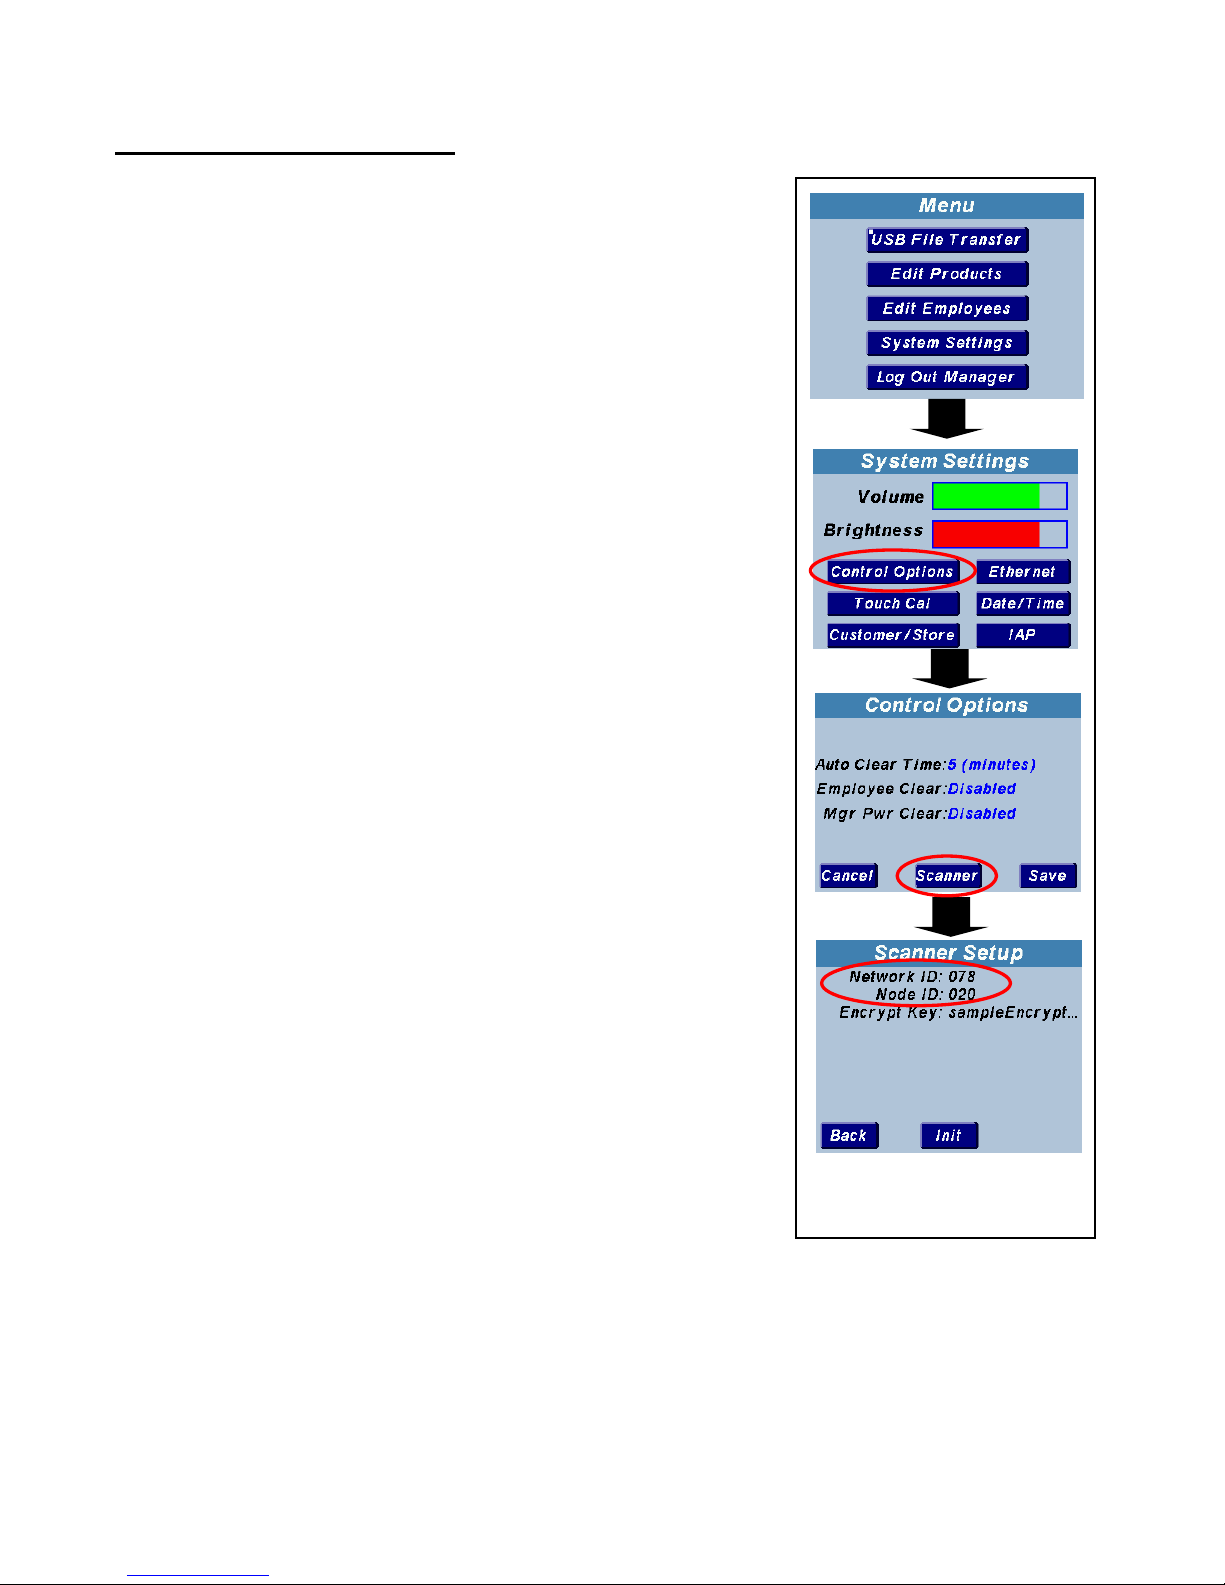
Radio setup for iPrint™
1. Login to the iPrint™ as Administrator.
2. Press the blue Home bar across the top of
the screen.
3. Press System Settings.
4. Press Control Options.
5. Press and hold Scanner for 3-5 seconds then
release.
6. Press Init Enter the NODEID using the
numeric touchpad that appears on the iPrint™
display.
The NODE ID can be set to any number
between 10 and 90 in intervals of ten (i.e.
10,20,30....etc.) The NODE ID MUST MATCH
the Gateway ID that was entered into the
CCP+™.
Figure
9:
iPrint™ Radio Set Up

CCP+™ User Guide
PROPRIETARY DATA OF INTEGRATED CONTROL CORPORATION
896095-1(B) Integrated Control Corp.
®
Page 9 of 36
2016
©
The last ID to setup is the CCP+ Node ID.
This ID is your device's unique ID. Every
CCP+™ device should have its own
CCP+ ID. A CCP+ Node ID must match
the first number of the Gateway Node ID.
An example, seen in Figures 10 & 11, is if
the Gateway Node ID is 20, then the
CCP+ Node ID must be 21-29. Multiple
CCP+™ devices can have the same
Gateway ID, but it's the CCP+ ID that
distinguishes them apart.
1.4 Sync Files
Each CCP+™ device has additional data that needs
to be downloaded.
Time/Version
Schedule
User List (if any)
To download this data, you must go to the File Sync
screen.
To get to the File Sync screen, go to the Main
Menu Sign Out Settings. (When operating with
a user list, you must be signed out to sync files.)
On the Settings screen (Fig. 12), select Sync Files,
to access the File Sync screen.
To download the additional data, click on each box in
the File Sync screen (Fig. 13).
Note: After getting the Time/Version download, the
screen will indicate whether newer versions of the schedule and/or
user list are/is available on the gateway. If they are available,
press/select Get Schedule or Get User List to download.
Figure 12: Settings
Figure 13: File Sync
Figure
10
:
Gateway Node ID
Figure
11
:
CCP+ Node ID

CCP+™ User Guide
PROPRIETARY DATA OF INTEGRATED CONTROL CORPORATION
896095-1(B) Integrated Control Corp.
®
Page 10 of 36
2016
©
1.5 Link Temp Probe
Go to Settings Admin Settings Link Temp
Probe. The screen will prompt you to wake up the
probe (Fig. 14). To wake up the Temp Probe, press
the red Wake button (Fig. 15).
A screen will pop up on your CCP+™ device asking to
link to that specific probe you have just woken up
(Fig. 16).
Click Link Probe and now your CCP+™ is linked to your
temperature probe. If you select Don’t Link Probe,
transmissions from that probe will be ignored
during the link probe process.
Figure 16: Link Probe
Press “Wake”
button to
wake Temp
Probe.
Figure 15: Temp Probe
Figure 1
4
: Prompt to wake
CCP+™ User Guide
PROPRIETARY DATA OF INTEGRATED CONTROL CORPORATION
896095-1(B) Integrated Control Corp.
®
Page 11 of 36
2016
©
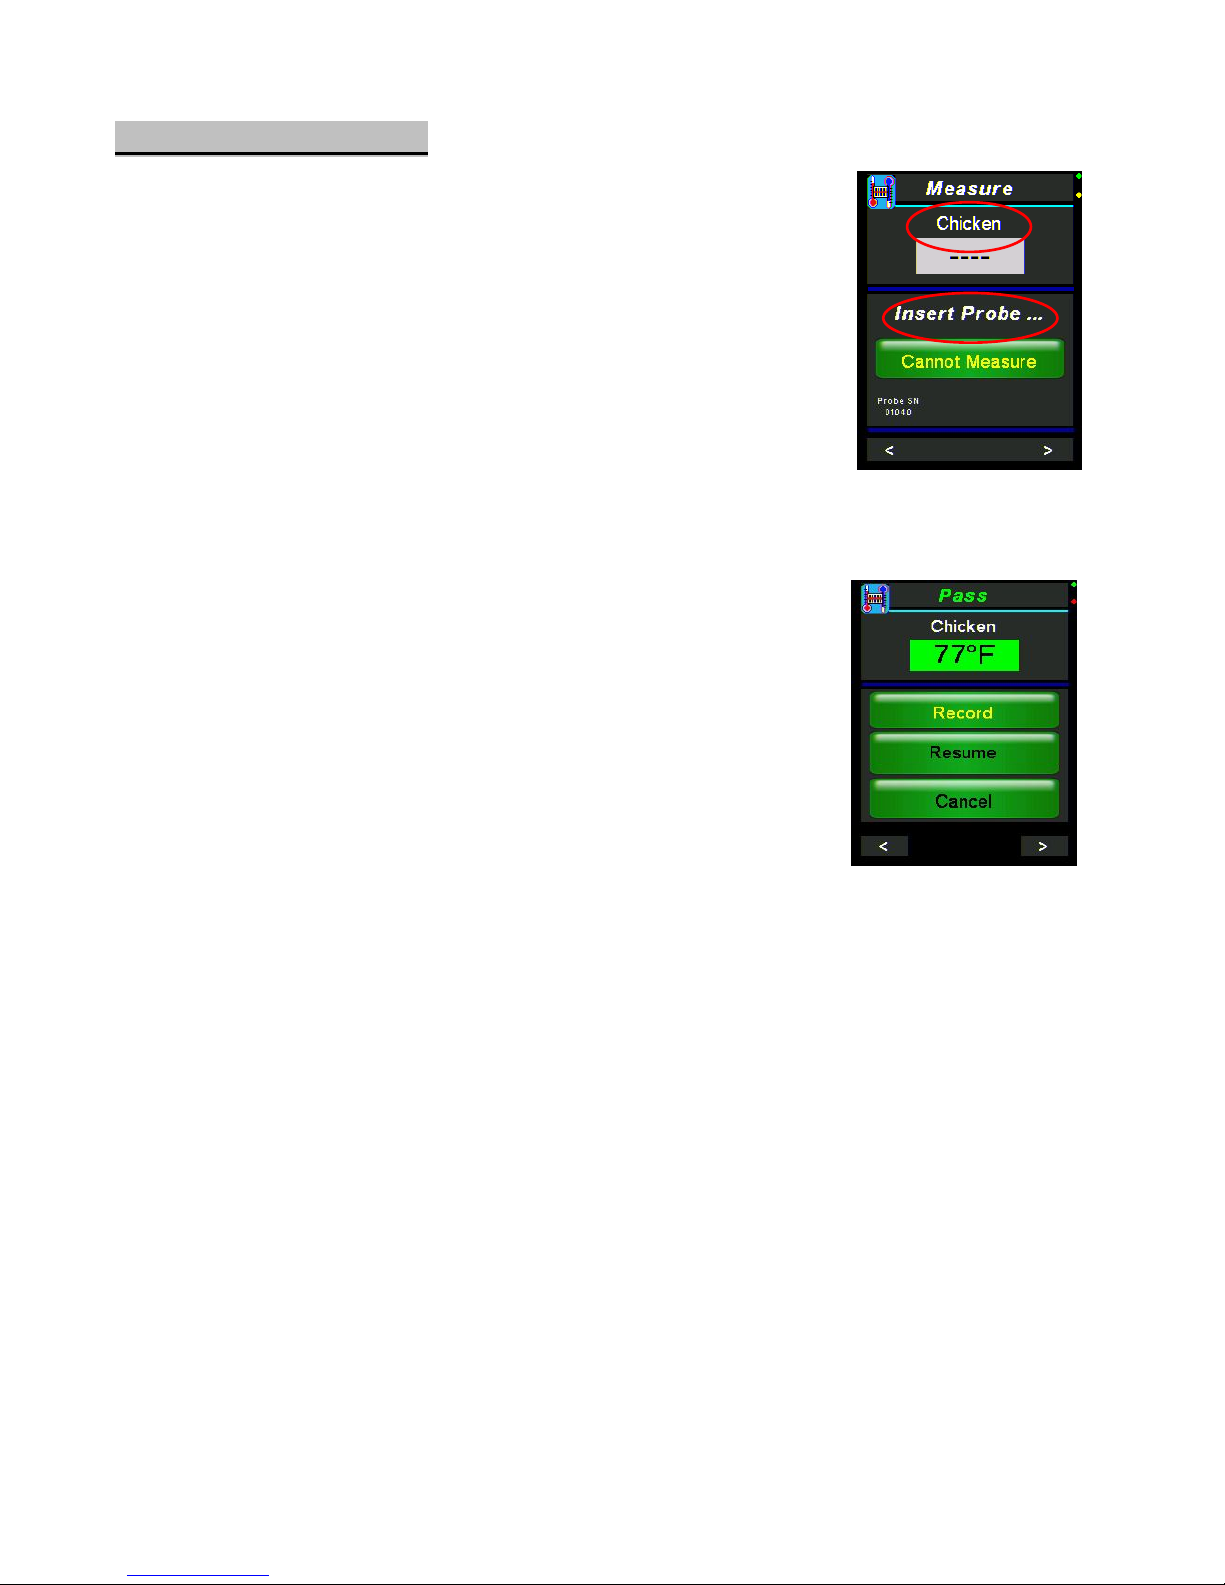
1.6 Take Temperature
After you select the food product you want to
measure, you will see it on the screen prompting you
to insert your temperature probe (Fig. 17).
Press the red Wake button on the Temp Probe, and
now the two devices should be connected.
To take a temperature measurement of the selected
food, insert the probe into the food product and wait
for the measurement and an Accept Reading
button to appear on the screen. When the
measurement stops changing, a results screen will
appear.
A temperature reading will be highlighted ggrreeeenn if it
is within the desired temperature range for the
selected product (Fig. 18). A temperature will be
highlighted rreedd if it is not within the desired range
and in need of corrective action.
Cannot Measure (Fig. 17) can be used when a
product is unavailable. After it is pressed, a list will
appear with reasons why product was unavailable
(e.g. sold out). Press/select one and continue.
Figure 1
8: G
reen
passing temperature
within desired range.
Figure 1
7:
Product Temperature
Measurement

CCP+™ User Guide
PROPRIETARY DATA OF INTEGRATED CONTROL CORPORATION
896095-1(B) Integrated Control Corp.
®
Page 12 of 36
2016
©
2 – Operation Details
Not covered in the QUICKSTART! Operation
Main Menu
The Main Menu (Home) screen (Fig. 19) is the first
screen you will be directed to after the Initialization
screen.
The four options on the Main Menu screen are:
2.1 Next CCP
2.2 Task Lists
2.3 Sign In/Out
2.4 Settings
You may need to scroll down using joystick or touch
arrows at bottom of screen to select Settings.
Select the option using the touch screen, or by
pressing the joystick to select the desired option.
Refer to page 4 or 6 for details on how to use the
joystick or arrow touch buttons.
2.1 Next CCP
Next CCP presents scheduled tasks that are due.
See Scheduled (Section 2.2.2) for description.
Once you select the CCP to be performed from
the screen or from the task list (Section 2.2),
wake your temperature probe by pressing the red
Wake button (Fig. 15). When prompted (Fig. 21),
insert the probe into the food for temperature
reading.
If the temperature taken is within the desired
range for the product, the product will pass. If the
temperature taken is not within the desired range,
the product will fail and additional tasks will need
to follow.
Figure 1
9:
Main Menu/ Home
Figure
21
: Measure
screen
featuring assigned probe and
probe’s battery level
Figure
20: Home
Screen scrolled down

CCP+™ User Guide
PROPRIETARY DATA OF INTEGRATED CONTROL CORPORATION
896095-1(B) Integrated Control Corp.
®
Page 13 of 36
2016
©
Typically, the user may resume taking temperature, or if the
temperature is not stable, may press the Accept Reading button to
accept the reading.
2.1.1 Pass
If a temperature taken for a product is within the
desired range, then a PPaassss screen will appear (Fig.
22).
To continue, press Record. If the given temperature is
not what you want, press Resume to retake the
temperature. Press Cancel to leave the screen without
logging a result.
2.1.2 Fail
If a temperature taken for a product is not within the
desired range, then a FFaaiill screen will appear (Fig.
23).
Similar to the PPaassss screen, there will be three
options:
Record
Resume
Cancel
Press Record to continue.
Once the temperature is recorded, a corrective action
screen will display (Fig. 24). There could be up to six
corrective action selections. Select a corrective action
from the pre-programmed list by touching the screen
or using the joystick.
Press Resume to resume taking the temperature if
you want more time for a better reading.
Press Cancel to exit screen.
Figure 22: Pass
Fi
gure 23:
Sample
f
ail
ed
measurement.
Figure 24
:
Corrective Actions

CCP+™ User Guide
PROPRIETARY DATA OF INTEGRATED CONTROL CORPORATION
896095-1(B) Integrated Control Corp.
®
Page 14 of 36
2016
©
2.1.3 Auto Measuring
The CCP+™ automates the temperature
measuring process by evaluating the temperature
changes and results (Fig. 25).
When the CCP+™ prompts the user to insert the
probe into the substance to measure, it evaluates
temperature changes and informs the user that the
measurement is complete.
The following icons show the user the state of the auto measuring
function.
Begin Measurement
When the temperature measurement is first started, the level icons
are shown. The color represents the status at the start of the
measurement.
BLUE
TEMP TOO COLD
GREEN
TEMP IN RANGE
RED
TEMP TOO HOT
Figure 25: Example of
the icon showing
product’s temperature
trend.

CCP+™ User Guide
PROPRIETARY DATA OF INTEGRATED CONTROL CORPORATION
896095-1(B) Integrated Control Corp.
®
Page 15 of 36
2016
©
Rising Temperature- When the measured temperature raises more
than 7°F from the start, or 3.6°F per second, one of the following
icons is shown.
Stable End of Measurement (Rising) - When the rising temperature
measured becomes stable, one of the following icons is shown.
A B
C
Started too Cold
A – Rising too cold
B - Rising to in range
C - Rising to too hot
A B
Started in Range
A – Rising in range
B - Rising too hot
A
Started Too Hot
A - Rising to hot
A B C
Started too Cold
A – Stable End too cold
B – Stable End in range
C – Stable End to too hot
A
B
Started in Range
A – Stable End in range
B – Stable End too hot
A
Started Too Hot
A – Stable End too hot

CCP+™ User Guide
PROPRIETARY DATA OF INTEGRATED CONTROL CORPORATION
896095-1(B) Integrated Control Corp.
®
Page 16 of 36
2016
©
Falling Temperature - When the measured temperature falls more
than 7°F from the start, or 3.6°F per second, one of the following
icons is shown.
Stable End of Measurement (Falling) - When the falling temperature
measured becomes stable, one of the following icons is shown.
A
Started too Cold
A – Falling too cold
A
B
Started in Range
A – Falling in range
B - Falling too cold
A B C
Started Too Hot
A - Falling too hot
B – Falling in range
C – Falling too cold
A
Started too Cold
A – Stable too cold
A B
Started in Range
A – Stable in range
B – Stable too
c
old
A
B C
Started Too Hot
A - Stable too hot
B – Stable in range
C – Stable too cold

CCP+™ User Guide
PROPRIETARY DATA OF INTEGRATED CONTROL CORPORATION
896095-1(B) Integrated Control Corp.
®
Page 17 of 36
2016
©
2.1.4 Pass/Fail Inspection
This section is used to complete an inspection
process with a Pass/Fail option.
On the Inspect screen (Fig. 26), press Pass or Fail
for the CCP.
If the CCP passes (Fig. 27), press Record to
continue.
If the CCP fails (Fig. 28), press Record to continue to a screen listing
corrective actions. Select a corrective action by using the touch
screen or the joystick. There can be up to six corrective action choices
which are user defined.
Select Resume button to retake a measurement.
Cancel can be selected to exit the Pass/Fail inspection without
recording a result.
Figure 26
:
Pass/Fail
Inspection
Figure 27: Sample
Pass CCP screen
Figure 28: Sample Fail CCP screen followed by
screen with listing corrective actions.

CCP+™ User Guide
PROPRIETARY DATA OF INTEGRATED CONTROL CORPORATION
896095-1(B) Integrated Control Corp.
®
Page 18 of 36
2016
©
2.1.5 Scored Inspection
This section is used to complete a manual inspection process with a
1-10 Scoring option (Fig. 29).
2.1.6 Manual Temp
You can manually record a temperature for a product that
is programmed as a manual Temperature Check (Fig. 30).
To do this, select the product and enter the measured
temperature in either Fahrenheit or Celsius. To change
the temperature units refer to the Deg. F or C section on
Pg. 24.
After the temperature has been entered press Accept
and then Record on the next screen (Fig. 31). If the
temperature fails you will be prompted to select a
corrective action.
Figure 29:
Two inspection examples
(left) Inspection score passed. Press Record to continue.
(right) Inspection score failed. A screen follows with corrective actions.
Figure 3
0
: Enter
Temperature
Figure 3
1
: Manual
Temperature Pass

CCP+™ User Guide
PROPRIETARY DATA OF INTEGRATED CONTROL CORPORATION
896095-1(B) Integrated Control Corp.
®
Page 19 of 36
2016
©
2.2 Task Lists
On the Task Selection screen (Fig. 32) you can
access all the different types of tasks that you have.
In this screen there are 3 options:
2.2.1 Hold/Warm/Cool
2.2.2 Scheduled
2.2.3 Unscheduled
Note: Not all buttons may appear on this screen
depending on the types of CCPs included in your
schedule.
2.2.1 Hold/Warm/Cool
In this section, there are three different types of processes that can
appear:
Cook/Chill
Cold Holding
Hot Holding
When a food is selected, scheduled to be checked,
and reselected, it will appear in this section. Each
food will appear with a time to be re-checked.
To manually update the temperature reading for a
specific item, using the joystick, scroll to that item
until it is highlighted yellow and select (Fig. 33). Just
wake up your temperature probe and retake the
temperature of the item.
When the assigned time for a task is up, the
sounder will alarm and the item will be highlighted
in yellow and flashing.
Figure 32: Task Selection
Figure 33: Hold/Warm/Cool

CCP+™ User Guide
PROPRIETARY DATA OF INTEGRATED CONTROL CORPORATION
896095-1(B) Integrated Control Corp.
®
Page 20 of 36
2016
©
2.2.2 Scheduled
On the Main Menu select Task Lists Scheduled to
get to the Scheduled Tasks. The Schedule screen
(Fig. 36) displays the list of CCP’s that are pending for
the day. The CCP’s are sorted by time due, then
alphabetically, and are removed as they are completed.
CCP's highlighted green can be completed. CCP’s
highlighted gray are not due yet. CCP’s highlighted red
are past due, cannot be completed, and will be
removed from the list once it reaches the top.
Touch or use joystick to select the scheduled CCP to be
performed.
If the CCP+™ is asleep, the unit will wake to remind you
of CCP’s that are due. Reminders are seen on the CCP
Alert! screen (Fig. 35) and heard with a sounding alarm.
In this screen you have 3 options:
Next CCP
Task Lists
Settings
Click Next CCP to see the next task that is ready to do
(Fig. 36).
Press Start to start a Scheduled Task.
Press Next to scroll through Scheduled Tasks.
Press Cannot Measure if you are unable to perform a
Scheduled Task.
Status provides a summary of the CCP scheduled task
completion.
Task Lists brings you to the Task Selection screen
(Fig. 32), the main task menu. This screen also allows
you to scroll through the Scheduled Tasks and to choose one to
perform (Fig. 34).
Settings will take you to options available to update the settings of
the device.
Figure 3
6
:
Scheduled Task
Figure 35:
CCP Alert!
Figure 3
4
:
Sample Schedule

CCP+™ User Guide
PROPRIETARY DATA OF INTEGRATED CONTROL CORPORATION
896095-1(B) Integrated Control Corp.
®
Page 21 of 36
2016
©
2.2.3 Unscheduled
On the Main Menu select Task Lists Unscheduled
to get to the Unscheduled CCP’s . Any CCP can be
recorded at any time from this screen. From the “New
Unscheduled” screen (Fig. 37), select the “CCP Group”
of items to choose from. From the CCP group of items,
select the CCP that you would like to perform.
2.3 Sign In/Sign Out
On the Main Menu (Fig. 38A), press the Sign In option and then
choose your username on the next screen (Fig. 38B).
If you are an Administrator or a user with a pass code,
the Pass Code screen (Fig. 38C) will appear after you
choose your user name.
On the Pass Code screen, if you are using your finger,
use the number keyboard. If you are using the joystick,
move up to raise the pass code number, and move
down to lower the pass code number. The lowest you
can go is 0. Then press Accept to save the pass
code number or press Cancel to not save that
number and exit the screen.
Sign Out (Fig. 38D) when you are done with the tasks for the day.
Figure 3
7:
Unscheduled Tasks
Figure 38A
:
Main Menu
Figure 38B
:
Sign In Names
Figure 38C:
Enter Pass Code here.
Figure 38D: Sign Out
option in yellow.

CCP+™ User Guide
PROPRIETARY DATA OF INTEGRATED CONTROL CORPORATION
896095-1(B) Integrated Control Corp.
®
Page 22 of 36
2016
©
2.4 Settings
In the Settings screen (Fig. 39) you can access the
System Settings and Admin Settings if you are logged
in.
If you are not logged in you can only access the
Sync Files option. If logged in Sync Files is not
accessible (unless there is no user list).
2.4.1 System Settings
Touch the System Settings button to go to its
screen (Fig. 40).
In this screen there are 8 options:
Volume
Power Save
Snooze Time
Log Out Time
Task Wake-Up
Deg. F or C
Station Select
Check Calibration
Volume
On the Volume screen (Fig. 41), use the joystick
button (move up to raise volume, and move down
to lower volume), or your finger (use the number
keyboard), to change the volume of the unit’s
sounder. Then press Enter to save the desired
volume. The changes are immediate and
automatically saved.
Figure 39: Settings
Figure 4
1: Volume
featuring
number keyboard.
Figure 40: System Settings

CCP+™ User Guide
PROPRIETARY DATA OF INTEGRATED CONTROL CORPORATION
896095-1(B) Integrated Control Corp.
®
Page 23 of 36
2016
©
Power Save
This option (Fig. 42) is used to determine how long
in seconds the screen will stay on with the device
inactive before going into sleep mode.
See Section 3 for how to enter/change values
using the touch keypad or the joystick.
Snooze Time
This option (Fig. 43) determines how frequently
the CCP+™ should wake up when the user still
has tasks left to complete. This option is
controlled the same way as Power Save (above).
See Section 3 for how to enter/change values
using the touch keypad or the joystick.
Log Out Time
This option (Fig. 44) determines how long until
the user will be logged out due to inactivity. This
option is controlled the same as the Power Save
option (above).
See Section 3 for how to enter/change values
using the touch keypad or the joystick.
Task Wake-Up
This option (Fig. 45) determines if the user wants
the device to wake up after a certain period of
time, determined by the Snooze Time option. If
there are scheduled tasks and they become due,
the CCP+™ will wake unless device is disabled.
To enable or disable this option, press either
Enable or Disable. Press Enter to save.
See Section 3 for how to enter/change values
using the touch keypad or the joystick.
Figure 45: Task Wake-Up
Figure 42: Power Save
Figure 43: Snooze Time
Figure 44: Log Out Time

CCP+™ User Guide
PROPRIETARY DATA OF INTEGRATED CONTROL CORPORATION
896095-1(B) Integrated Control Corp.
®
Page 24 of 36
2016
©
Deg. F or C
This option (Fig. 46) determines in what units the user
wants the temperature to be displayed: Fahrenheit or
Celsius.
To change the temperature units to Fahrenheit or
Celsius, press the desired option on screen. Press
Enter to save.
Station Select
This option (Fig. 47) appears when the user logs on
and determines which station(s) the user will be
working (Section 1.2.2). To use this option, or to
turn it off, press Enable or Disable respectively.
Press the Enter to save the option.
Note: Selecting stations limits the items available
under Task Lists.
Check Calibration
The Check Calibration option (Fig. 48) calibrates the
temperature probe. To calibrate probe, press the red
Wake button and temperature will begin to be
measured.
Note: The user must be logged in as Administrator to
adjust the calibration.
When the temperature reading is within ± 2°C of 0°C
(ice bath) or 100°C (boiling water), a correction value
will be displayed. It can be adjusted by pressing up or
down on the joystick.
To finish the calibration and to accept the reading,
touch the Accept Reading (Fig. 49).
Figure 46: Degrees F or C
Figure 47: Station Select
Figure 4
8
: Initial Check
Calibration
screen
Figure 4
9
: Finished
Calibration Check

CCP+™ User Guide
PROPRIETARY DATA OF INTEGRATED CONTROL CORPORATION
896095-1(B) Integrated Control Corp.
®
Page 25 of 36
2016
©
2.4.2 Admin Settings
Touch the Admin Settings button on the Settings
screen (Fig. 39) to display its screen. On the
Admin Settings screen (Fig. 50) there are 6
options:
Init Radio
Link Temp Probe
Set Time
Set Date
Calibrate Screen
System Resets
Init Radio
Refer to 1.3. Initialize Radio for a description of this option, including
how to set Gateway and CCP+ ID's (Fig. 51).
Link Temp Probe
This option links a temp probe to a
CCP+™ device.
You must wake up the temp probe by
pressing the Wake button (Fig. 15). Each
probe has its own serial number (Fig. 52).
Press Link Probe to link your
Scan’n’Temp™ to a specific probe.
Press Don't Link Probe to not link your device.
Figure 50: Admin Settings Options
Figure 51: Initializing the Radio by setting the Gateway and CCP+ ID’s.
Figures 52: Linking Probe
CCP+™ User Guide
PROPRIETARY DATA OF INTEGRATED CONTROL CORPORATION
896095-1(B) Integrated Control Corp.
®
Page 26 of 36
2016
©
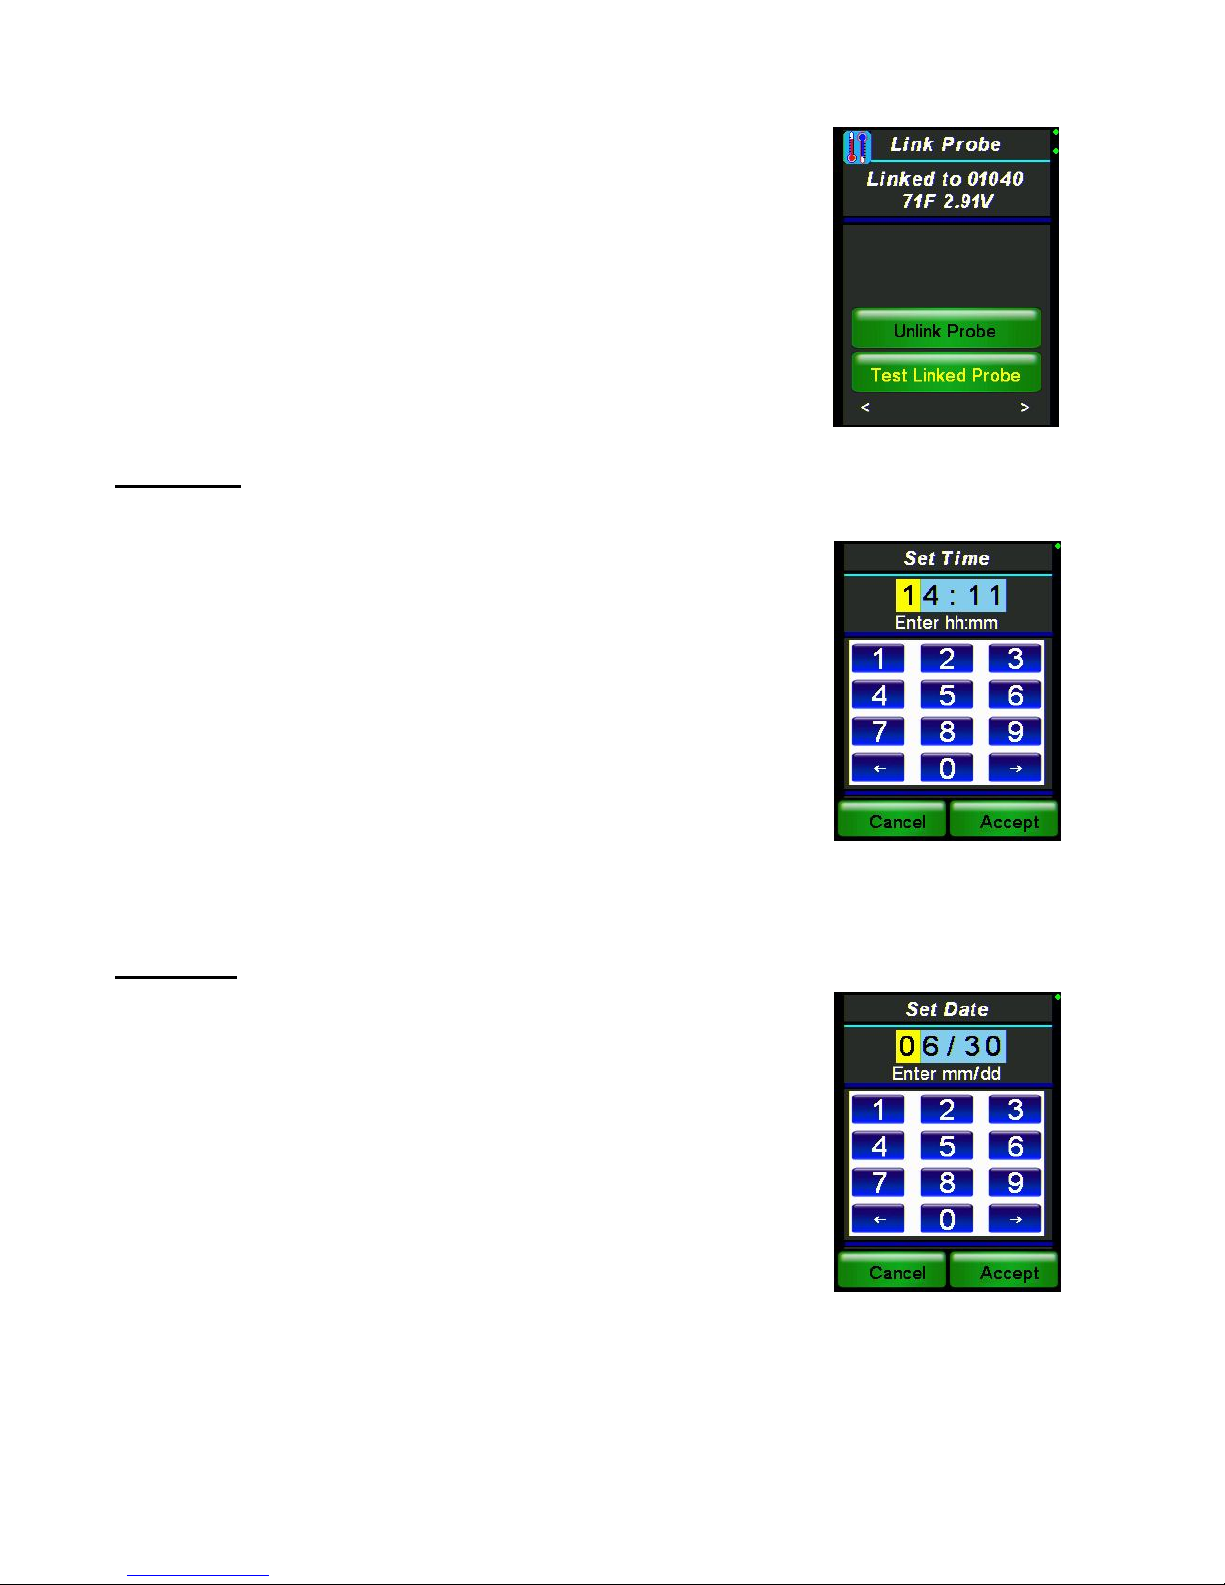
If your device is already linked to a probe and you
want to use another probe, or no probe at all, press
Unlink Probe (Fig. 53).
To test the probe to make sure it is getting good
temperatures press Test Linked Probe.
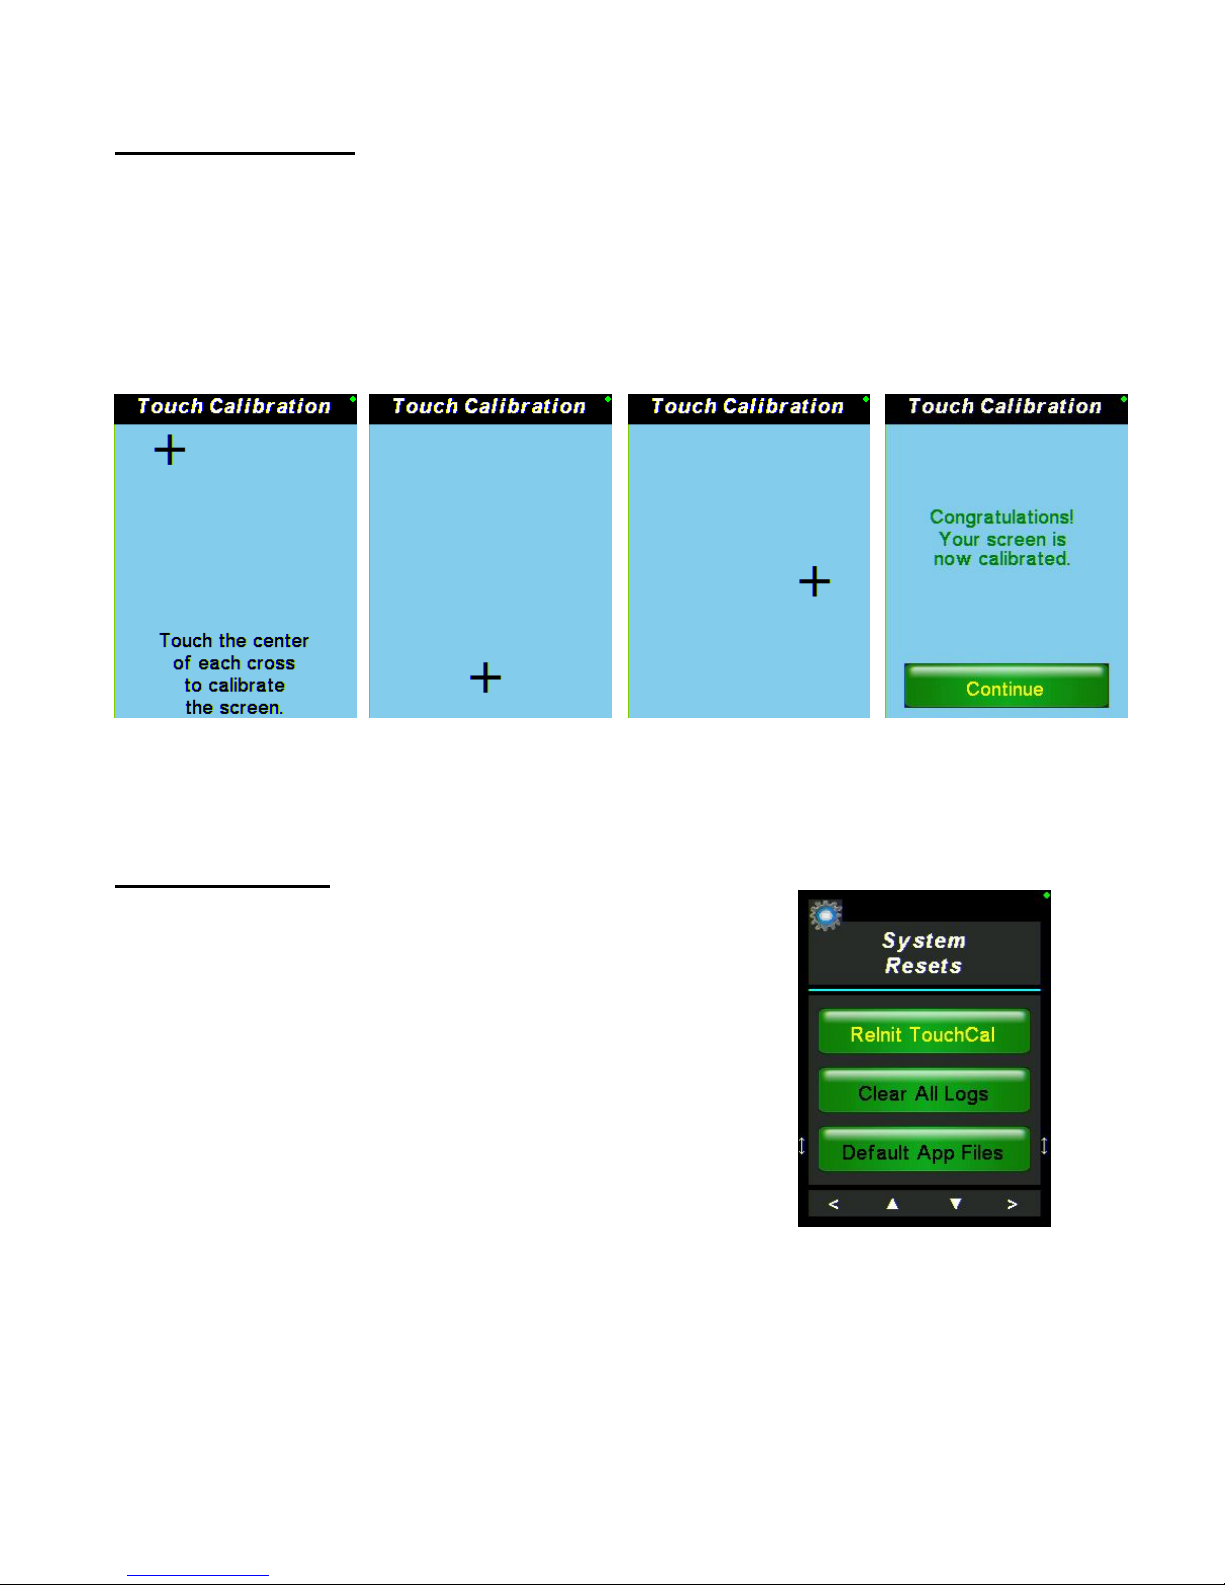
Set Time
This option (Fig. 54) sets the time for the device.
You must enter the time in this 24-hour hh:mm
format.
To change the time, use the number keyboard with
your finger. Or if using the joystick, move up or
down to raise or lower the time; left or right to move
between fields.
Press Accept to save the desired time. Changes
are immediate.
Set Date
This option (Fig. 55) is used to set the date for the
CCP+™ device. You must enter the date in this
mm/dd format.
To change the date, use the number keyboard with
your finger. If using the joystick, move up or down
to raise or lower the time; left or right to move
between fields.
Press Accept to save the desired time. Changes
are immediate.
Figure 5
3:
Unlink or Test Probe
Figure 54: Set Time
Figure 55: Set Date
CCP+™ User Guide
PROPRIETARY DATA OF INTEGRATED CONTROL CORPORATION
896095-1(B) Integrated Control Corp.
®
Page 27 of 36
2016
©
Calibrate Screen
Pressing the Calibrate screen option displays the Touch Calibration
screen (Fig. 56). Calibration should be performed with your finger if
the buttons become offset from the screen.
Follow the instructions on the screen and press Continue when you
receive the green Congratulations message.
System Resets
This option (Fig. 57) brings all settings back to
their system default.
There are 5 options that bring individual settings
back to their default:
ReInit TouchCal
Clear All Logs
Default App Files
Erase App Flash
System Reset
Figure 56: Example of the Calibration screens and instructions.
Use your fingertip to touch each cross to calibrate.
Figure 57:
System Resets

CCP+™ User Guide
PROPRIETARY DATA OF INTEGRATED CONTROL CORPORATION
896095-1(B) Integrated Control Corp.
®
Page 28 of 36
2016
©
2.4.3 Sync Files
On this System Settings option (2.4.), press the
Sync Files button (Fig. 58) to sync the latest version
of files needed for your CCP+™ device. Click on
each option to sync each file. The following files
available to sync are:
Time/Version
Schedule
User List
Note: You must be signed out to do file sync.
The files sync with the gateway that the CCP+™
device is connected to. Upon entry to the File Sync
screen, the current versions of the schedule and
user list that are in the CCP+™ device are
displayed (Fig. 59).
While syncing, a progress bar will show at the
bottom of the screen. When a file syncs
properly, an “Updating” message will appear
(Fig. 60).
Once files are updated successfully, a “No New Files
Available” will show (Fig. 61) after getting time and
versions.
If the CCP+™ device and the gateway are not
properly connected, an error message will appear
based on the type of file you are trying to sync. An
example error message is shown below.
Figure 5
8
: Sync Files
button on Settings menu.
Figure 5
9
: Current
v
ersions of
schedule and user list shown.
Figure 61: No New Files Available
Figure 60: Sync Files
Example of time sync error.
CCP+™ User Guide
PROPRIETARY DATA OF INTEGRATED CONTROL CORPORATION
896095-1(B) Integrated Control Corp.
®
Page 29 of 36
2016
©
3 – Rules for Numeric Entry
There are 2 types of numeric entry fields: Variable Width and Fixed Width.
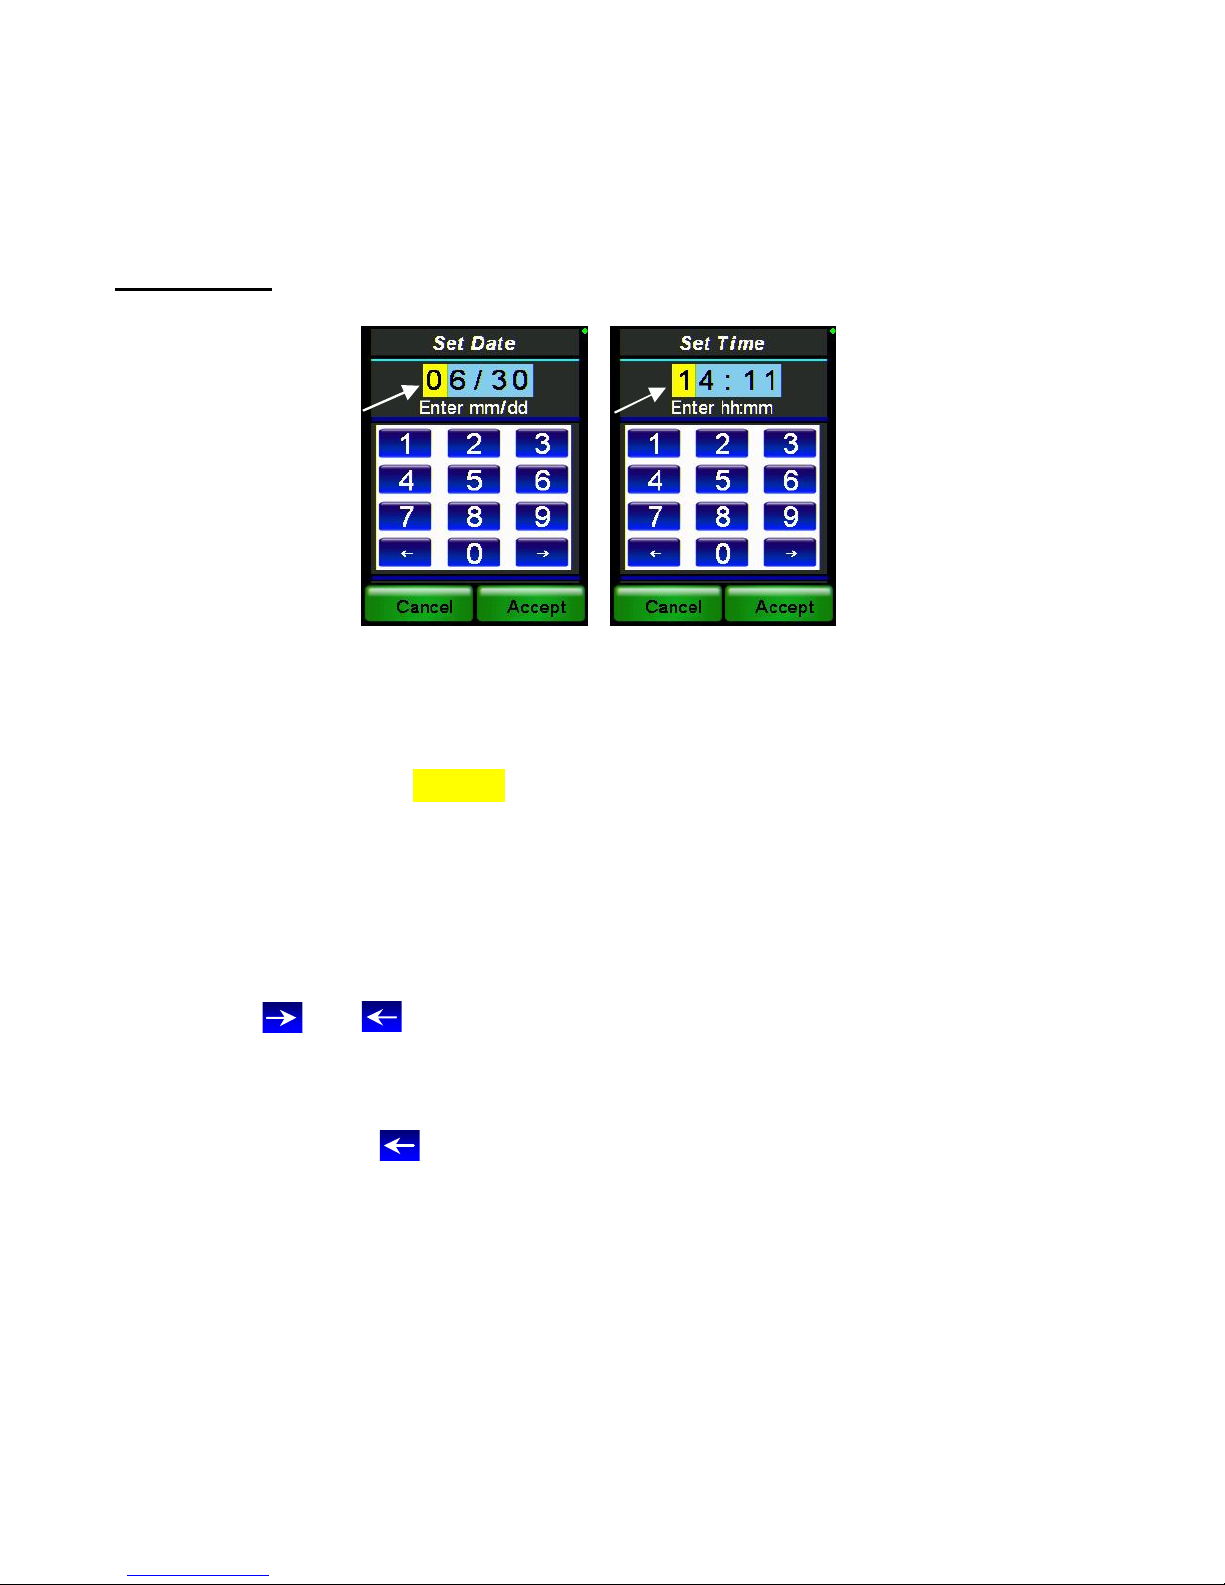
Fixed Width – numbers enter from the left (Date and Time).
Specifically for Fixed Width Fields
The cursor position (i.e. the position of the digit that can be entered)
is highlighted in yellow.
Touching the Accept button or pushing the joystick in will end the
numeric field entry and save the displayed value.
The moving the joystick up increments and joystick down
decrements the digit at the cursor position.
The Cancel button will exit you from the screen.
Touching a digit (0...9) button, moving the joystick right or touching
the or button will enter the digit at the cursor position and
advance to the next digit to be entered (i.e., moves the cursor one
position to the right and cycles back to the leftmost position when
advancing from the rightmost position).
Touching the button or moving the joystick left will enter the
digit at the cursor position and backspace to the next digit to be
entered (i.e., moves the cursor one position to the left and cycles
back to the rightmost position when backspacing from the leftmost
position).
Fig. 62: Examples of Fixed Width Entry Fields
CCP+™ User Guide
PROPRIETARY DATA OF INTEGRATED CONTROL CORPORATION
896095-1(B) Integrated Control Corp.
®
Page 30 of 36
2016
©
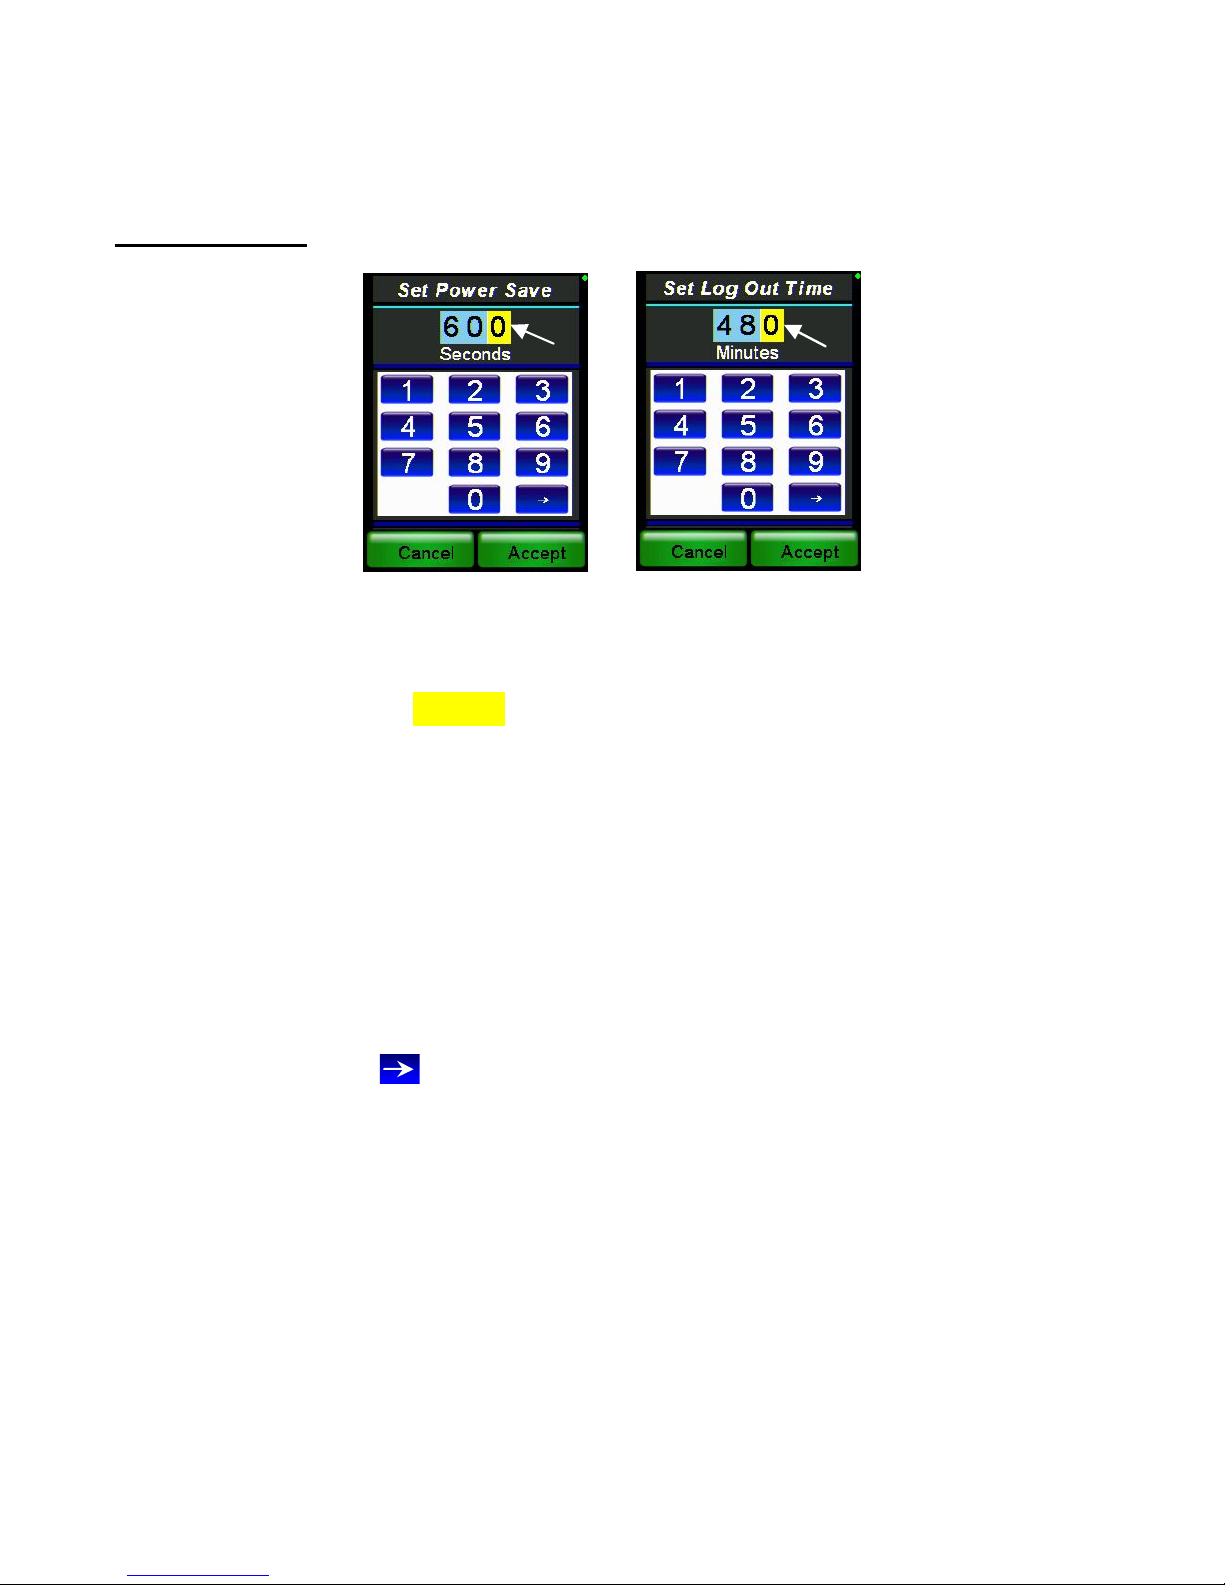
Variable Width – numbers enter from the right (System Settings other than
date and time)
Specifically for Variable Width Fields
The cursor position (i.e. the position of the digit that can be entered)
is highlighted in yellow.
Touching the Accept button or pushing the joystick in will end the
numeric field entry and save the displayed value.
The moving the joystick up increments and joystick down
decrements the digit at the cursor position.
The Cancel button will exit you from the screen.
Touching a digit (0...9) button or moving the joystick left will enter
the digit at the cursor position (the least significant digit) and
advance to the next digit to be entered (i.e., shifts the entered digits
to the left and displaying 0 in the rightmost position which remains
the cursor position).
Touching the button or moving the joystick right will
"backspace" (i.e., shifts the entered digits right one position dropping
the least significant digit while leaving the cursor in the rightmost
position).
Fig. 63: Examples of Variable Width Entry Fields

CCP+™ User Guide
PROPRIETARY DATA OF INTEGRATED CONTROL CORPORATION
896095-1(B) Integrated Control Corp.
®
Page 31 of 36
2016
©
4 – CCP Types
Cook and Chill - Used for starting the cook/chill process.
The user records a temperature of cooked food. If the
temperature is above the requirement, the item is
added to the task lists under hold/warm/cool category.
The user will be prompt to record the temperature every
hour until the 70 degree temperature is reached within
two hours and the 40 degree temperature is reached
within six hours.
Take Temp - Used for recording a temperature.
Scored Inspection - Used for entering a 1-10 score for a
visual inspection.
Pass/Fail - Used for entering a pass/fail for a visual
inspection.
Manual Temp - Used for entering a temperature
manually into the CCP+™ device.

CCP+™ User Guide
PROPRIETARY DATA OF INTEGRATED CONTROL CORPORATION
896095-1(B) Integrated Control Corp.
®
Page 32 of 36
2016
©
Page Intentionally
Left Blank

CCP+™ User Guide
PROPRIETARY DATA OF INTEGRATED CONTROL CORPORATION
896095-1(B) Integrated Control Corp.
®
Page 33 of 36
2016
©
5 – CCP+™ Specifications
990095-1, CCP+™
Dimension:
-2.2”W x 7.5”H x 1.4”D, 4.5 oz
-Probe - 1.2”W x 7.1”H x 0.4”D, 1.0 oz
Screen:
-320x240 resolution
-2.6-Inch TFT-LCD touch-screen display
Temperature:
-Range -40˚F to 500˚F (-40˚C to 260˚C)
-Accuracy ± 0.9˚F (± 5.0˚C Total
System) ± 0.5% of Reading
-Resolution Whole Degree in
Fahrenheit / Tenth Degree in Celsius
Probes:
-Fast Response 4" Probe
-Standard K- type thermocouple
Processor:
-Low Power AVR ATmega328P 8-bit 8MHz Microprocessor
-32KBytes Flash Memory
-1KBytes EEPROM
-2KBytes SRAM
Radio:
-915MHz Transceiver
Temperature Sensor:
-National Semiconductor LM73
-Temp Accuracy: -10C to 80C +/-1.0C
-25C to 115C +/-1.5C
-40C to 150C +/-2.0C
-Temp Resolution 0.25C to 0.03125C
Power:
-USB - 5.vdc 400 mA Charge Current
With supplied charging station
Storage:
-4.0 GB User Data and Storage

CCP+™ User Guide
PROPRIETARY DATA OF INTEGRATED CONTROL CORPORATION
896095-1(B) ©2016 Integrated Control Corp.
®
Page 34 of 36
Page Intentionally
Left Blank

CCP+™ User Guide
PROPRIETARY DATA OF INTEGRATED CONTROL CORPORATION
896095-1(B) ©2016 Integrated Control Corp.
®
Page 35 of 36
6 – Limited Factory Warranty
Integrated Control Corp. (ICC) warrants the products listed below that it manufactures and distributes
(the “Products”) to be free from defects in materials and workmanship, under normal use and service,
for periods as stated starting on installation or first data transmission.
ICC warrants the following Product components to be free from defects in materials and workmanship
commencing with installation for the period(s) of time and on the conditions listed below:
CCP+™
1 Yr. Depot Service
990095-1
Return Authorization must
be requested in advance
12 Months - Excludes Battery
Replacements require a credit
card guarantee prior to shipping
This Warranty covers normal wear and tear of parts, factory service labor charges, shop fees,
disposal fees, ground freight charges to end users, help desk fees, troubleshooting and diagnostic
fees.
THE FOREGOING WARRANTIES ARE EXCLUSIVE AND IN LIEU OF ANY OTHER WARRANTY,
EXPRESSED OR IMPLIED, INCLUDING BUT NOT LIMITED TO ANY IMPLIED WARRANTY OF
MERCHANTIBLILITY OR FITNESS FOR A PARTICULAR PURPOSE OR PATENT OR OTHER
INTELLECTUAL PROPERTY RIGHT INFRINGEMENT.
Without limiting the generality of the foregoing, SUCH WARRANTIES DO NOT COVER: Product
misuse, tampering or misapplication, improper installation or application of improper voltage, water
damage, cleaning solution damage, overheating from environment, battery life, condensation, data
not programmed or acts of God.
Use of any Peripherals NOT supplied by ICC VOIDS the Warranty of the Electronic Units
: ICC’s liability and Buyer’s exclusive remedy hereunder will
be limited solely, at ICC’s option, to repair or replacement of part under warranty, with respect to any
claim made within the applicable warranty period referred to above. Without limiting the foregoing, all
Products shall be returned by Buyer, at its sole expense, to ICC for replacement or repair. ICC
reserves the right to accept or reject any such claim, in whole or in part. ICC will not accept the return
of any Product without prior written approval from ICC.
ICC WILL NOT BE LIABLE, UNDER ANY CIRCUMSTANCES, FOR CONSEQUENTIAL OR
INCIDENTAL DAMAGES, INCLUDING, BUT NOT LIMITED TO LABOR COSTS OR LOST
PROFITS or PRODUCTS RESULTING FROM THE USE OR INABILITY TO USE THE PRODUCTS
OR FROM THE PRODUCTS BEING INCORPORATED IN OR BECOMING A COMPONENT OF
ANY OTHER PRODUCT OR GOODS OR FOR ILLNESS, INJURY OR LOSS OF LIFE.
NO OTHER WARRANTIES ARE EXPRESSED OR IMPLIED, INCLUDING BUT NOT LIMITED TO,
ANY WARRANTIES OF MERCHANTABILITY OR FITNESS FOR A PARTICULAR PURPOSE.

CCP+™ User Guide
PROPRIETARY DATA OF INTEGRATED CONTROL CORPORATION
896095-1(B) ©2016 Integrated Control Corp.
®
Page 36 of 36
7 – Service Support
Customer Care Support
For Customer Care call: Integrated Control
+1-631-673-5100
Support available: 8:30am to 5pm ET
*All returns require a return authorization number that may be
requested through the Customer Care telephone number.
*Replacements will require a credit card guarantee prior to
shipping.
 Loading...