


Installation and operating instructions
CALEC ® energy master
The benchmark for energy
Short version
Firmw
are Version 1.00
measurement technology
VD 3-135 e, 05.2019

1 Contents
1
Contents 2
2 Information and references 3
2.1 Information 3
2.2 Documents 3
3 Safety notices 4
3.1 Symbols used 4
3.2 Intended use 4
3.3 Inappropriate use 4
3.4 Installation guidelines 5
4 View of device with protective housing 6
5 View of device without protective housing
(Mod) 7
6 Mounting the device with protective
housing (Prot) 8
6.1 Scope of supply, tools and mounting
material (Prot) 8
6.2 Installation (Prot) 8
7 Mounting the device without protective
housing (Mod) 12
7.1.1 Rail mounting 12
7.1.2 Connecting to mains power supply
230 VAC 12
7.1.3 Connecting to low voltage supply 24
VDC 13
7.1.4 Connecting signal cables 13
9 Operation 16
9.1 PC-Software AMBUS Win II 16
9.2 Display 16
9.2.1 Key functions 17
9.3 Right of access, security levels 17
10 Menu overview 18
10.1 Main display and main menu 18
10.2 Submenus 19
11 Use under operating conditions 21
11.1 The main display 21
11.2 The measured values submenu 22
11.2.1 Measured values 22
11.2.2 Meter readings 22
11.2.3 Current values 22
11.2.4 Billing date values 22
11.2.5 Logger values 22
12 Dimensional drawings and technical
specifications 23
12.1 Drawings of device with protective
housing (Prot) 23
12.2 Drawings of device without protective
housing (Mod) 23
12.3 Technical specifications 13
Declaration of conformity
25
28
8 Electrical connections 14
8.1 Connection instructions 14
8.2 Wiring diagram, module and signal
numbers 14
8.3 Numbering rules 15
CALEC® energy master installation and operating instructions 2

2 Information and references
2.1 Information
These installation and operating instructions describe the installation and commissioning of a standard device. The chapters describe the topics and tasks in the sequence in which they are needed
during commissioning.
•
Safety instructions
• Information about the device
• Installation
• Electrical connections
• Operation
• Fault
• Technical data
clearan
ce
Always co
mply with the safety instructions.
2.2 Documents
The installation and operating instructions VD 3-135 vary in scope, depending on the version and
items covered by the delivery. The information required for ancillary modules and optional functions
is described in additional document extracts (VD 3-136).
Parameterisation software AMBUS Win II
The parameterisation software AMBUS Win II is available for setting the parameters. It can be
downloaded free of charge (see below).
Downloads
The current documents and AMBUS Win II are available as free downloads at
www.aquametro.com /downloads.
CALEC® energy master installation and operating instructions 3
3 Safety notices
3.1 Symbols used
Important information
Non-observance can le
General warning
Non-observance can le
Warning of dangerous electric voltage
Non-observance can le
ad to malfunction.
ad to damage or malfunction.
ad to physical injury!
3.2 Intended use
The device is used as an energy calculator for heating, cooling and air conditioning applications in
district heating or cooling, in building management services and in industrial energy metering.
It is part of a combined heating/cooling or air conditioning meter, consisting of a calculator, a pair of
temperature sensors and a flow meter, or as a transducer for a flow meter.
The environmental conditions described in the technical specifications, as well as the installation and
operating instructions must be complied with.
3.3 Inappropriate use
The device must not be used:
In explosion-risk zone
•
• In a wet environment (condensing, splashing or dripping water)
•
Outdoors, without suitable protection
• In environmental conditions (temperature, humidity, vibrations, electromagnetic interference etc.) that do not comply with the technical specifications
• In all other instances that do not conform to its intended use
The device can be dangerous if it is not used as intended, or not in accordance with the installation
and operating instructions. In order to avoid this, it is essential that the safety instructions, operating
conditions (see technical specifications) and the relevant chapters of these instructions are strictly
adhered to.
The manufacturer accepts no liability for damage arising from inappropriate use.
s (no ex-risk protection!)
4 CALEC® energy master installation and operating

3.4 Installation guidelines
The installation should be performed by authorised, skilled p
the regulations in force (EN1434 part 6 Regulations and recommendations for installation
and operation) and the recommendations of the industry-specific associations (e.g. the
AGFW series of leaflets on district heating supplies).
The skilled personnel must have read and understood these instructions
ments in the instructions and the applicable regulations on electrical installations must always be observed.
Work on electrical circu
carried out by authorised, skilled people, in compliance with the locally applicable regulations!
its with hazardous voltages (> 24 VAC or >42 VDC) may only be
ersonnel, in compliance with
. The require-
CALEC® energy master installation and operating instructions 5

4 View of device with protective housing
Device with closed protective housin
1 Housing cover
2 Operating keys
3 Dot-matrix LCD
4 Type plate with CE marking
5 IR interface on display module
(EN13757-2 / -3 M-Bus)
IrDA interface on CPU module
6 Housing screws, covered by security sealing
caps
Device with opened protective housing
Operating keys
2
3 Display, LCD dot matrix
5
IR interface (EN13757-2 / -3 M-Bus)
IrDA interface
7 Display module
8a Upper terminals, plug-in
8b Lower terminals, plug-in
9 Clip-on holder for modules
10 3 Fastening holes for wall mounting
11 Clip-on holder for rail mounting
12 Strain relief
13 Cover hinges
g
The wiring diagram is on the inside of the housing cover.
View of the protective housing from below
Clip for rail
11
14 Cable duct supply 14 mm
15
Cable ducts 10 mm
16 Cable ducts 14 mm
6 CALEC® energy master installation and operating

5 View of device without protective housing (Mod)
The following diagram shows the device without protective housing.
2 Operating keys
3 Display, LCD dot matrix
IR interface (EN13757-2 / -3 M-Bus)
5
IrDA interface
7 Display module
8a Upper terminals, plug-in
8b Lower terminals, plug-in
9 Clip-on holder for modules
The Display can be installed at a remote location e.g. in a control panel by using the two
Remote Display Adapters:
11
12
13
11
Remote Dis
RDA/CPU
12 Remote Display Adapter
RDA/Display
13 Network cable
p
lay Adapter
CALEC® energy master installation and operating instructions 7

6 Mounting the device with protective housing (Prot)
6.1 Scope of supply, tools and mounting material (Prot)
Warning! Precision measuring devices! Protect against heat, humidity, dirt and vibra-
tion. Only unpack the d
age or malfunction.
evice when ready to install. Non-observance can result in dam-
• One Installation and Operating Instructions manual
1) Support rail optional
6.2 Installation (Prot)
Opening the housing
8 CALEC® energy master installation and operating

Mounting on support rail (DIN-EN 50222)
Choose the location for installation
• which is protected against humidity, heat, direct sunlight and damage
• with easy access for reading, operation and installation
• with sufficient distance from sources of electromagnetic interference
1. Drill holes
2. Screw on support rail
3. Clip device onto support
rail
Wall mounting
Remove clip-on holder
to get a stable support.
Only mount device on a
flat surface!
CALEC® energy master installation and operating instructions 9

Wiring diagram
The wiring diagram is on the
inside of the housing cover.
Connecting to mains power supply 100 - 240 VAC
The mains supply must be connected via a two-pole separator and be adequately protected
against unauthorised interruption.
The mains supply 100 - 240 VAC
may only be connected to the following terminals:
The device must be protected by a 10 AT external fuse.
The device is fully isolated and requires no grounding connections.
Connection to other terminals is extremely dangerous and can permanently dam-
age the instrument!
Connecting to low volt
age supply 24 VDC
Terminals L, N (supply module)
Terminals 110, 115 (relay module 2
VAC)
x240
10 CALEC® energy master installation and operating

Connecting signal cables
Closing housing
1.
Pierce sealing membra
ne with en-
closed awl
2. Insert
cable
3. Attach cable to terminal screws
according to wiring diagram on the
inside cove
4.
Affix strain relief clamp
r
1. Insert the cover into the hinge from
above and turn to close
2. Tighten the two fixing screws
3. Engage the security sealing caps
with the smooth side on the outside.
Once the caps e
have been fitted,
any unauthorised opening of the device can be detected.
Removing the caps:
Insert a pointed tool and lever out.
The cap is damaged as a result and
must be replaced.
CALEC® energy master installation and operating instructions 11

7 Mounting the device without protective housing (Mod)
7.1.1 Rail mounting
1. Drill fastening holes
2. Screw on support rail
3. Clip modules onto support
rail
7.1.2 Connecting to mains power supply 230 VAC
Refer to the wiring diagram before starting wiring!
The mains supply may only be connected to terminals L and N!
The device is fully isolated and requires no grounding connections.
All other terminals are only for low voltage (<50 V) and measuring signals. Connection
to these terminals is extremely dangerous and can permanently damage the instrument!
1. Strip the power cable as
shown in drawing.
2. Connect power cable to
supply module (see enclosed wiring diagram)
12 CALEC® energy master installation and operating

7.1.3 Connecting to low voltage supply 24 VDC
7.1.4 Connecting signal cables
1. Strip cable as shown in
drawing
2.
Attach cable to the connect module (see enclosed wirin
1. Attach signal cables to
terminal screws according to enclosed wiring
diagram
g diagram)
2. The terminal blocks can
be plugged in.
CALEC® energy master installation and operating instructions 13

8 Electrical connections
8.1 Connection instructions
Devices with 100 - 240 VAC connections must have a safety fuse with a max. 10 AT, and
must be capable of being made voltage-free by means of an isolating element!
The device must be connected to the same electric circuit and the same fusing, switching
and isolating elements as the corresponding heating or cooling system.
If the device is additionally connected via fusing, switching and isolating elements, then
these must be protected against unauthorised access (e.g. by security seals), so that the
device cannot be put out of operation by unauthorised persons.
8.2 Wiring diagram, module and signal numbers
Below are two examples of wiring diagrams in which the module numbers and signal numbers or signal designations are shown:
Basic unit with 3 modules (right
to left): M-101-Prot-AC[I]-CT
• CPU module 2 x Pt100
• Input module for flow sig-
nal
• Mains power supply (supply module)
• Designation:
• Module numbers
• Signal designation accord-
ing to standard diagram of
the application
Input
Qv, Qv1
Qv2, STA
CPU
Modul 1Modul 2
Th
Tc
Fully assembled unit with 7 modules (right to left):
EM-101-Prot-AC[MMOOI]-CT
• CPU module 2 x Pt100
• Input module for flow signal
• 2 output modules for 4 analogue output signals, e.g. for a
building services management system
• 2 M-Bus modules for data reading with 2 M-Bus master units
• Mains power supply (supply module)
• Designation:
• Signal numbers, without signal designation
• Signal designation according to the standard diagram of the
application
M-Bus M-Bus Output Output Input CPU
Modul 1Modul 2Modul 3Modul 4Modul 5Modul 6
Schnittst.1Schnittst.2
Ausgang 3
Ausgang 4
Ausgang 1
Ausgang 2
Eingang 1
Eingang 2
Pt100 1
Pt100 2
Note on input module: Left-hand pair of terminals: Power via calculator
Right-hand pair of terminals: External supply
14 CALEC® energy master installation and operating
8.3 Numbering rules
Basic rule: The signals are numbered from right to left and f
rom the top down.
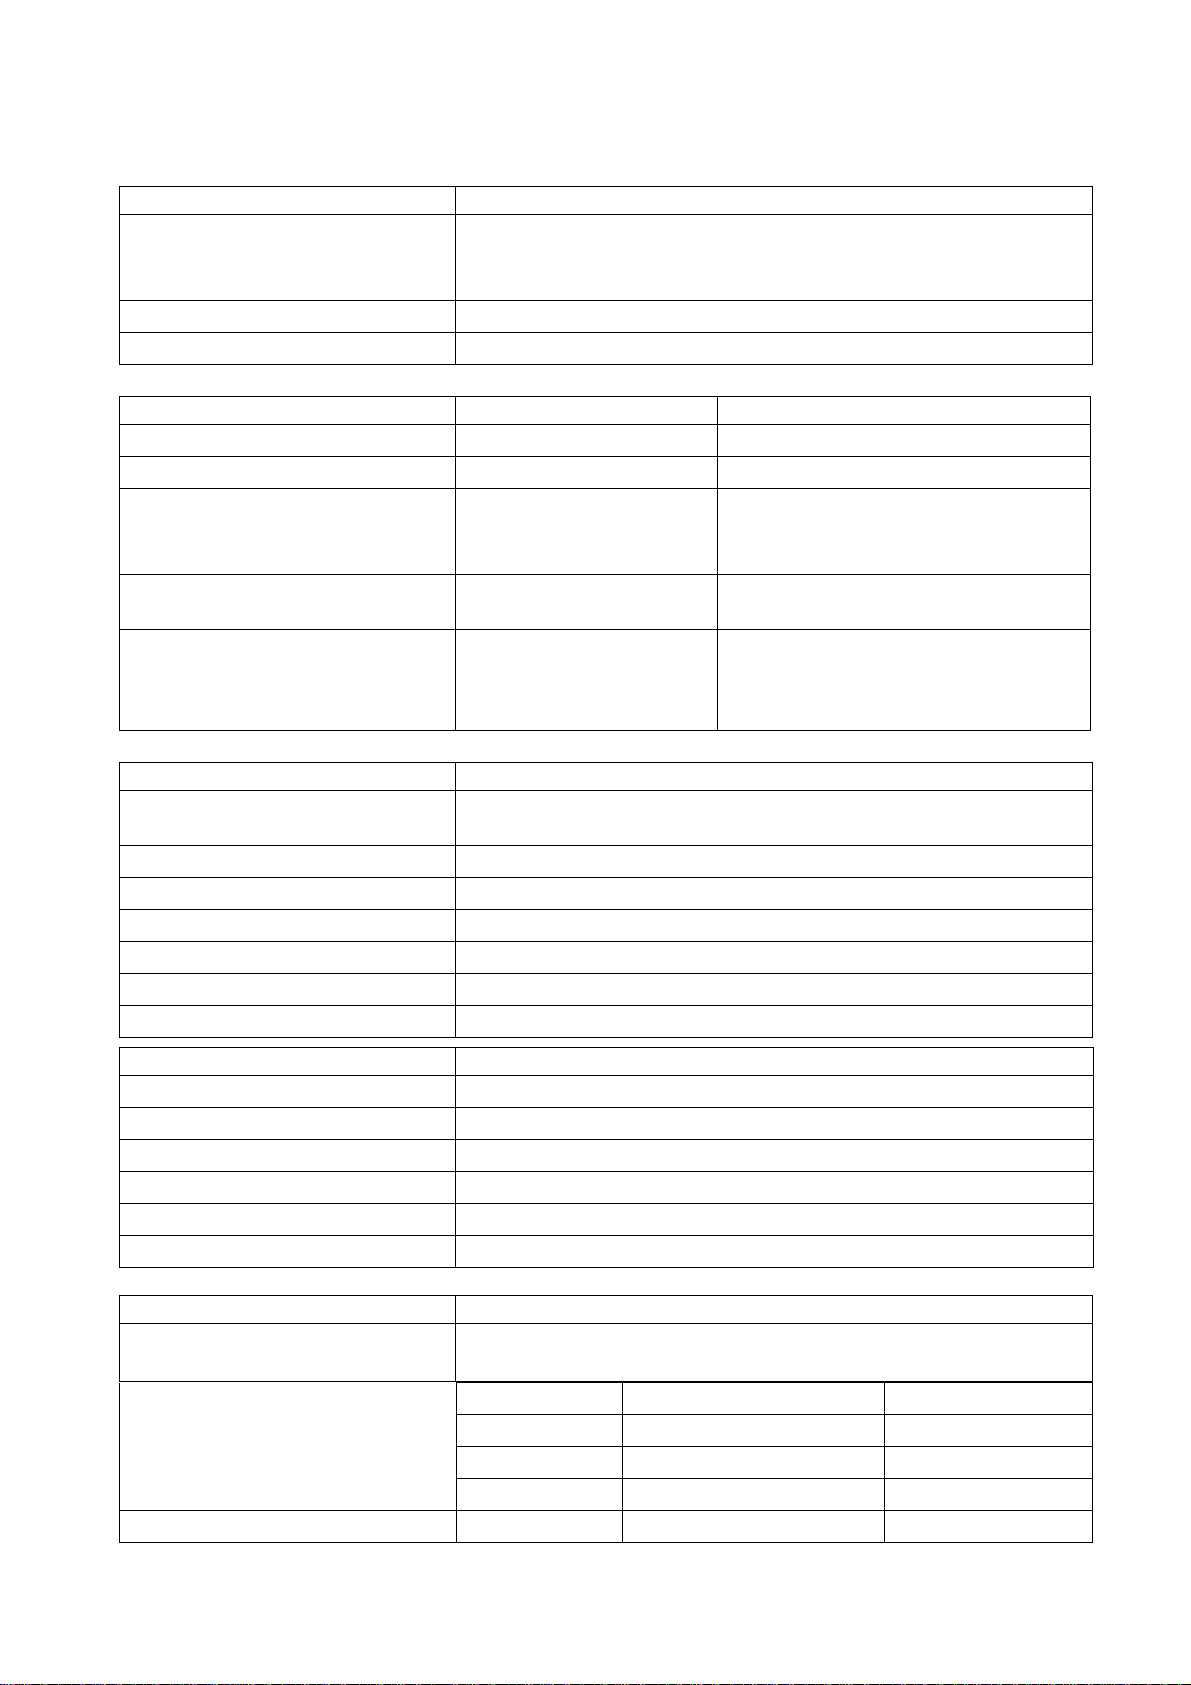
This table shows the elements that have a number, and their maximum number.
Element Display/number Explanation
Module Mod-No.1… 6 (Prot) *
Mod-No.1…15 (Mod) *
Input Input 1…8 Pulse, current or frequency signal
Pt100 input Pt100 No.1…6 Pt100 inputs for temperature measurement
Output Output 1…8 (Prot) *
Output 1…12 (Mod)
Terminals Trm.No. 82-10-11 See terminal marking
Tariff register R1 … R4 4 tariff registers per active calculator
Interfaces Interface 1 … 5 1 Internal bus between the modules
Numbers according to assembly from right to left
No. 1 is the CPU module
The module for power supply has no number
Output 1 …8, (short designation e.g. A1)
Output 9 …12 can be used virtually
Display example: R 1 A2+
Tariff register 1 is active when output 2 is switched on.
2 Optical M-Bus interface in the display module
3 IrDA interface in the CPU module
4 M-Bus module 1
5 M-Bus module 2
*: Prot: Device version with protective housing
Mod: Device version without protective housing
CALEC® energy master installation and operating instructions 15

9 Operation
9.1 PC-Software AMBUS Win II
The parameters of the device can be set both via keys and display and via one of the data interfaces
with the PC parameterising software AMBUS Win II.
With AMBUS Win II, the meter reading data can be saved, and parameter settings that have to be
executed repeatedly can be stored as macros, which can then be reloaded and run. AMBUS Win II
and the associated operating instructions can be downloaded free of charge at www.aquametro.com.
The use of AMBUS Win II offers advantages if:
• large data records have to be read,
• several devices require identical or similar parameter settings,
• complex applications with inputs/outputs are to be parameterized.
AMBUS Win II and instructions are available as free downloads at www.aquametro.com.
9.2 Display
3
1
1 Operating keys
see section 9.2.1 Key functions.
IR interface, M-Bus
2
4
3 LCD display, dot matrix 128 x 64
(see section 18.3)
5
4 Title for display window
5 Display field, up to 4 values with
6
2
Symbols on t
, , no lock
he status bar
identification and units
6 Status bar
Currently available keys
A flow signal is being
Edit mode active, input possible
Protection level (see section 0)
user, service, programming mode
detected
16 CALEC® energy master installation and operating

9.2.1 Key functions
Keys Function in display mode Function in edit mode
Move line/image up or down
Setting of figures and/or characters
Selection from a preset list
No function in the main menu
Change channel / input / output
Change billing date / logger period
Keys Short ( < 0.5 s ) Long ( > 0.5 s ) Key operation
Confirm
Back to a pre
abort process
vious level,
Activate/deactivate the 3 additional decimal points in the
meter settings
Back to the standard display Abort input / selection
Select setting position in the edit window
Change list inside a double-list
Accept set value
Accept selected value
Finish edit mode
In double list: finish process
9.3 Right of access, security levels
The parameters for the device can be set entirely via the keys or via the interfaces. The security level
(lock level) determines which parameters can be altered. At the time of delivery, the devices are in
user mode.
Symbol Security level Settings Code At delivery
User mode Only operating language
All values that are not relevant for calibration,
e.g. initial parameter settings, date/time, measuring point designation etc.
All parameters can be set, e.g. initial settings,
resetting/synchronising of meter readings etc.
S-Code 1111
P-Code 3132
no lock
Service mode
Programming
mode
The codes can be chang
In EU-compliant devices, activating p
ed in the Basic setting/System submenu.
rogramme mode will result in the invalidation of the
calibration! The date and time will be recorded in the calibration log and the device displays an error.
Warning: If you change a code, make sure that you keep it in a safe place. If the code
ist lost
CALEC® energy master installation and operating instructions 17
, reprogramming is necessary by a service technician on site or in the factory.

10 Menu overview
10.1 Main display and main menu
The content and sequence of the main display may vary.
The diagram shows, by way of example, the status of a heat meter on delivery.
The content and sequence of the main display may vary.
The diagram shows, by way of example, the status of a heat meter on delivery.
18 CALEC® energy master installation and operating

10.2 Submenus
p
g
mode
eratin
Overview Submenu Measured values
CALEC® energy master installation and operating instructions 19
Overview Submenu O

g
These parameters are only displayed if they are relevant for the selected function
Overview Submenu Basic settin
20 CALEC® energy master installation and operating
Overview Submenu Diagnosis

11 Use under operating conditions
11.1 The main display
Start
Main display
ImpVal 1.00000 L
Side Q cold side
C.-Dat. 21.04.09
Valid 31.12.13
After switching on the device, the page
marked ‘start’ of the main display appears.
The arrow keys can be used to move
between a maximum of 4 pages of the
main display:
1: Calibration-relevant data
2: Meter readings and designation
3: Current values
4: other values, if configured
Segment test (display test)
Error display
Main menu
The segment test shows a chequerboard pattern to test the display.
In the error message window, an error
message is displayed if an error occurs
In the main menu, the submenus can
be selected and displayed to show or
set further values.
If no operation is carried out for
Submenus
approx. 5 min., the device will display
the main menu page marked ‘Start’.
Notes:
The content of the main display depends on the device version. The main display can contain up to
four pages with up to four values (i.e. up to 16 values). In standard CALEC
®
energy master devices,
only three pages are displayed with the values shown above.
The display values of the main display are predefined at delivery. These values and their sequence
can be altered in a non-CE conformity assessed device using the software AMBUS Win II.
CALEC® energy master installation and operating instructions 21

11.2 The measured values submenu
11.2.1 Measured values
Measured values
Meter readings Meter readings for energy, volume (mass)
Current values Current values: temperatures, volume/mass flow rates, power
Billing date 1 values Meter readings on the set billing dates
Billing date 2 values
Logger values Meter readin gs per calculator at the set times
11.2.2 Meter readings
Meter Display calc1, calc2 and 3 Explanation
Energy E E 2: E
2: EVolume V, V- 2: V, 2: V- 3: V, 3: V- Volume meter reading, E, E- respectively
Mass M, M- 2: M, 2: M- 3: M, 3: M- Mass meter reading E, E- respectively
11.2.3 Current values
Current value Display Explanation
Power P Thermal power
Volume flow Qv Volume flow rate
Mass flow Qm Mass flow rate
Temperatures Th, Tc Temperature of the heat transfer medium hot / cold side
Temp. difference dT Temperature difference: dT = Th - Tc
Density Den Density of the heat transfer medium (Den: Density)
K-factor K-F Heat coefficient
Enthalpy Hh, Hc Enthalpy of the heat transfer medium hot / cold side
Current values of calc2 and 3, or with a negative prefix, are displayed similarly ( 2: P or P- ).
If a current value exceeds 999 999 (6 digits), Overflow is displayed
3: E
3: E-
Energy meter reading, positive
Energy meter reading negative, in options BDE / BDV
11.2.4 Billing date values
Shows the meter readings saved on the two set billing dates. The billing dates can be set under
Operating settings/time settings/Billing and Billing2. The meter readings are saved at 23:59 each
time.
11.2.5 Logger values
In version 1.0, only the meter readings can be recorded.
Logger values 1 1. Logger value, select with keys
Date/T 01.05.08
E 24.567 MWh Energy meter reading at this time
V 1000.12 m3 Volume meter reading at this time
M 982.1 t Mass meter reading at this time
M 982.1 t Mass meter reading at the displayed time
22 CALEC® energy master installation and operating
Date/time when the value was chosen
The time interval for the logger
function can be set under
Operating settings/
Time settings/Logger
.

12 Dimensional drawings and technical specifications
12.1 Drawings of device with protective housing (Prot)
12.2 Drawings of device without protective housing (Mod)
CALEC® energy master installation and operating instructions 23

Dimensional drawings of modules with low voltage
Massbilder Module mit Netzspannung
In supply module 100-240 VAC and output module 2 x relays 240 VAC, the terminals are protected
against accidental contact by two lateral partition walls.
Dimensional drawing of display module
The dimensions in the diagram refer to the size
of the section.
Dimensions of the module are:
W x H x D: 132 x 72 x 7.8 mm
24 CALEC® energy master installation and operating
12.3 Technical specifications
Standards
CE Directives
Standards EN 1434, EN 61000-6-2, EN 61000-6-3, EN 60950
EC comformity assessment Module B, DE-07-MI004-PTB029
2014/32/EU (MID) Measuring Instruments Directive
2014/130/EU (EMC) Electromagnetic compatibility
2014/35/EU (LVD) Low voltage directive
Housing, modules With protecti
Mounting On support rail or wall On support rail
Protective housing size W x H x D 140 x 202 x 83 mm
Module housing size W x H x D 3 poles: 17.5 x 117.4 x 63.5 mm
Type of ingress protection according to EN60529
Maximum number of modules
Environmental conditions
Ambient temperature during operation
Storage temperature 0 °C … 60 °C
Humidity Max. 95% rel. humidity, without producing condensation
Cable cross-sections
Power supply 0.8 …2.5 mm2
Pulses, frequency, analogue 0.35 …2.5 mm2
Pt100 0.8 … 2.5 mm2 (preferably large)
IP54 IP20
6 – 7, including 1 CPU
and 1 supply module,
max. 2 communications
modules
+ 5… +55 °C, EN 1434 class C
ve housing Without protective housing
3 poles: 240 V: 17.5 x 129.5 x 63.5 mm
4 poles: 22.5 x 117.4 x 63.5 mm
16, including 1 CPU and 1 supply
module,
max. 2 communications modules
Power supply Supply module 100-240VAC
Nominal voltage 100 … 240 VAC, 50 … 60 Hz
Operating voltage 86 … 265 VAC, 47 … 63 Hz
Current input Max. 300 mA
Protection class II
Isolat.-voltage primary/secondary 3000 VAC
additional approvals UL 60950, EN 60950 (via CSA-NRTL/C)
CPU module 2*Pt100
Accuracy of energy calculation Energy error in % Ec <= 20 mK / ∆T (mK)
Significantly below EN 1434-1: Ec <= 0.5% + (∆T/∆Tmin)
∆T [K] Ec CALEC energy master Ec EN 1434-1
3 0.7% 1.5%
6 0.3% 1%
20 0.07% 0.65%
100 0.02% 0.53%
CALEC® energy master installation and operating instructions 25

CPU module 2*Pt100
Data backup in case of
EEPROM > 10 years
power failure
Backup battery (button cell) Lithium 3 V, 48 mAh, Type CR1225, soldered
Life of backup battery Typically >10 years in normal operation (T < 45 °C)
Typically > 6 years without mains supply
Data logger 100 values of all meter readings with time stamp in the ring memory
Logger interval: 15 min.., 30 min., 1 hr., 1 day, 15 days, 1 month
Billing dates 2 billing dates, dates adjustable
Optical interface IrDA V1.0 with 57600 baud and M-Bus protocol, max. distance 70 m
Measuring and calculating cycle 1 second
Temperature measurement CPU-module 2*Pt100 and Input-module 2*Pt100
Temperature range
Temperature deviation
Temperature differential range
Deviation ∆T ( Ta = 5 … 55°C )
-50 … +550 °C according to MID/EN1434: 1 … 200 °C
< ± 10 mK
0 … 550 K according to MID/EN1434: 3 … 198 K
< ± 15 mK
Temperature sensor type Pt 100 (IEC751, paired according to EN1434 ), 2-, 3- or 4-wire cable
Resolution ADC 24 Bit
Display module
Dimensions W x H x D 132 x 72 x 7.8 mm
Dimension of cut-out W x H 128 x 68 mm
Display Alphanumeric LCD, 128 x 64 pixel
Backlight White, flashes red when fault occurs
Display Title bar, 4 lines each of 21 characters, status line
Language Settable: German, English, French, Italian
Keys 6 keys: 4 arrow keys for navigation, OK, Esc
Detachable display module Max 100 m with Remote Display Adapters (RDA)
Optical interface
IEC 870-5, 300, 2400 or 9600 baud, M-Bus protocol
( Display module)
Input-Module 2*Pulse/frequency/analogue
Number of inputs 2
Pulse input Pulse input: 0.003 … 12.5 kHz
Min. pulse width 40 µs
Types settable according to EN 1434, see below
Frequency input Frequency input 0 … 10 kHz (PFM)
Measuring error: typ. < 0.1%
Analogue input Measuring range 0 or 4 … 20 mA
absolute measuring range 0 … 22 mA
Accuracy 0.025% full scale, drift 15ppm / K
Load
50 Ω
Measuring transducer power supply 24V
26 CALEC® energy master installation and operating

Input-Module 2*Pulse/frequency/analogue
Measuring transducer
6, 8 or 24 VDC, settable, max. 25 mA, short-circuit proof
power supply
Error detection Short circuit and interruption (settable)
Pulse input ty
pe according to EN 1434
Max. pulse fr
eq. Pulse length Input resistance Ri
Meas. transducer
power supply
Class IB 5Hz ≥ 100 ms 100 kΩ 6 V
Class IC 200 Hz ≥ 2 ms 100 kΩ 6 V
Class ID 200 Hz ≥ 2 ms 1 kΩ 8 V
Class IE 12.5 kHz ≥ 0.04 ms 1 kΩ 8 V
PFM 12.5 kHz ≥ 0.04 ms 150 Ω 24 V
Switching level: low < 1.5 V, high > 2.1 V, 0.6 V Hysteresis
Output module 2*relays 24V, analogue
Number of outputs Two
Output type settable Relay functions: Pulse / status / limit value / limit value 2
Analogue functions: 0 … 20 mA / 4 … 20 mA
Test functions: Relay test / analogue test
Relay output (solid state relay) Max. contact voltage: 24 VDC
Max. current: 100 mA
Frequency: max. 50 Hz at *
* Pulse width: 10 ms, 50 ms, 250 ms, 1 s, settable
Duty cycle: 50%
Normal state: Contact closed or open, settable
Leak current: < 30 µA corresp. to > 800 kOhm at 24 VDC
Analogue output Current range 0 … 20 mA or 4 … 20 mA
Accuracy 0.1% full scale, drift 50 ppm / K
Max. load R = (Uext - 4V) / 22 mA
Galvanic isolation 50 V
Measuring transducer power sup-
24 VDC, max. 25 mA, short-circuit proof
ply
M-Bus module M-Bus interface EN1434-3, 2007
Transmission rate 300, 2400, 9600 Baud
Current requirements 1.5 mA (1 M-Bus load)
Addressing Point-to-point, primary address, secondary address
One address per active calculator (max. 3)
Galvanic isolation Max. 50 V
CALEC® energy master installation and operating instructions 27

13 Declaration of conformity
28 CALEC® e
nergy master installation and operating

info@integra-metering.com
www.integra-metering.com
Änderungen vorbehalten / Sous réserve de modifications / Modification rights reserved
Copyright © INTEGRA METERING AG, Switzerland
Art.Nr. 20765
 Loading...