

Page 1
VIAFLO ASSIST Operating instructions
127950_V07
Page 2

Declaration of conformity
INTEGRA Biosciences AG – 7205 Zizers, Switzerland
declares on its own responsibility that the device
complies with:
Zizers, November 4, 2016
Description Model
VIAFLO ASSIST 4500
EU Directives (DoW: Date of Withdrawal) Before DoW DoW After DoW
Low Voltage Equipment 2006/95/EC 20.04.2016 2014/35/EU
Electromagnetic Compatibility 2004/108/EC 20.04.2016 2014/30/EU
Restriction of Hazardous Substances 2011/65/EU
Waste Electrical and Electronic Equipment 2012/19/EU
Radio Equipment Directive 1999/5/EC 13.06.2016 2014/53/EU
EU Regulations
Registration, Evaluation, Authorisation and Restriction of Chemicals (REACH)
1907/2006
Ecodesign - Power supplies 278/2009
Standards for EU
Safety requirements for electrical equipment for measurement,
control and laboratory use - General requirements.
EN 61010-1: 2010
Particular requirements for automatic and semi-automatic
laboratory equipment for analysis and other purposes.
EN 61010-2-81: 2015
Electrical equipment for measurement, control and laboratory
use - EMC requirements.
EN 61326-1: 2013
Standards for Canada and USA
Safety requirements for electrical equipment for measurement,
control and laboratory use - General requirements.
CAN/CSA-C22.2
No. 61010-1
Safety requirements for electrical equipment for measurement,
control and laboratory use - General requirements.
UL 61010-1
Operation is subject to the following two conditions:
(1) this device may not cause harmful interference, and
(2) this device must accept any interference received, including
interference that may cause undesired operation.
Part 15 of the
FCC Rules
Contains FCC ID:
PI4410B
Elmar Morscher
CEO
Thomas Neher
Quality Manager
Page 3

VIAFLO ASSIST – Operating instructions V07
www.integra-biosciences.com 3
Table of Contents
Chapter 1 Introduction
1.1 Symbols used...................................................................................5
1.2 Intended use.....................................................................................6
1.3 Safety notes .....................................................................................7
Chapter 2 Description of the device
2.1 Scope of delivery..............................................................................8
2.2 Overview of the VIAFLO ASSIST.....................................................8
2.2.1 VIAFLO ASSIST device........................................................8
2.2.2 Keypad..................................................................................8
2.3 Overview of VIAFLO II Electronic Pipette.........................................9
2.3.1 VIAFLO II pipette parts .........................................................9
2.3.2 Display ..................................................................................9
Chapter 3 Installation
3.1 Operating environment...................................................................10
3.2 Relocating VIAFLO ASSIST...........................................................10
3.3 Charging the battery of the VIAFLO II Electronic Pipette ...............10
3.4 Adapting the pipette holder ............................................................10
3.5 Attaching and removing a VIAFLO II Electronic Pipette.................11
3.6 Toolbox settings .............................................................................11
3.6.1 Enabling ASSIST mode ......................................................11
3.6.2 Connection between VIAFLO ASSIST and pipette ............. 11
3.6.3 Setting tip type ....................................................................12
3.6.4 Adjusting the plate alignment..............................................12
3.6.5 Move Speed........................................................................13
Chapter 4 Operation
4.1 Turn on/off the VIAFLO ASSIST device .........................................14
4.2 Turn on/off the VIAFLO II Electronic Pipette ..................................14
4.3 Bluetooth connection ......................................................................14
4.4 Running a program.........................................................................14
4.5 Pipetting in 96 and 384 well plates.................................................15
4.6 Troubleshooting..............................................................................16
Page 4

VIAFLO ASSIST – Operating instructions V07
4 INTEGRA Biosciences AG
Chapter 5 Programming
5.1 Overview pipetting modes ..............................................................17
5.2 Setting up a program......................................................................18
5.3 Modify existing programs ...............................................................18
5.4 Detailed description of pipetting modes .........................................19
5.4.1 General parameters ............................................................19
5.4.2 Serial Dilution mode............................................................21
5.4.3 Repeat dispense mode .......................................................23
5.4.4 Variable Dispense mode.....................................................25
5.4.5 Multi Aspirate mode ............................................................26
5.4.6 Custom program mode .......................................................27
Chapter 6 Maintenance
6.1 Cleaning .........................................................................................29
6.2 Decontamination ............................................................................29
6.3 Servicing.........................................................................................29
6.4 Equipment disposal ........................................................................29
Chapter 7 Technical Data
7.1 Environmental conditions ...............................................................30
7.2 Specification of the device..............................................................30
7.2.1 Maximum labware height on plate carrier ...........................30
7.3 Intellectual Property........................................................................30
Chapter 8 Accessories
8.1 Accessories for VIAFLO ASSIST ...................................................31
8.2 Accessories for VIAFLO II Electronic Pipettes ...............................31
8.3 Consumables .................................................................................32
Imprint ...................................................................................................35
Page 5
VIAFLO ASSIST – Operating instructions V07 Introduction
www.integra-biosciences.com 5
1 Introduction
These operating instructions contain all the information required for installation, operation
and maintenance of the VIAFLO ASSIST. This chapter informs about the symbols used in
these operating instructions, the intended use of the VIAFLO ASSIST and the general
safety instructions.
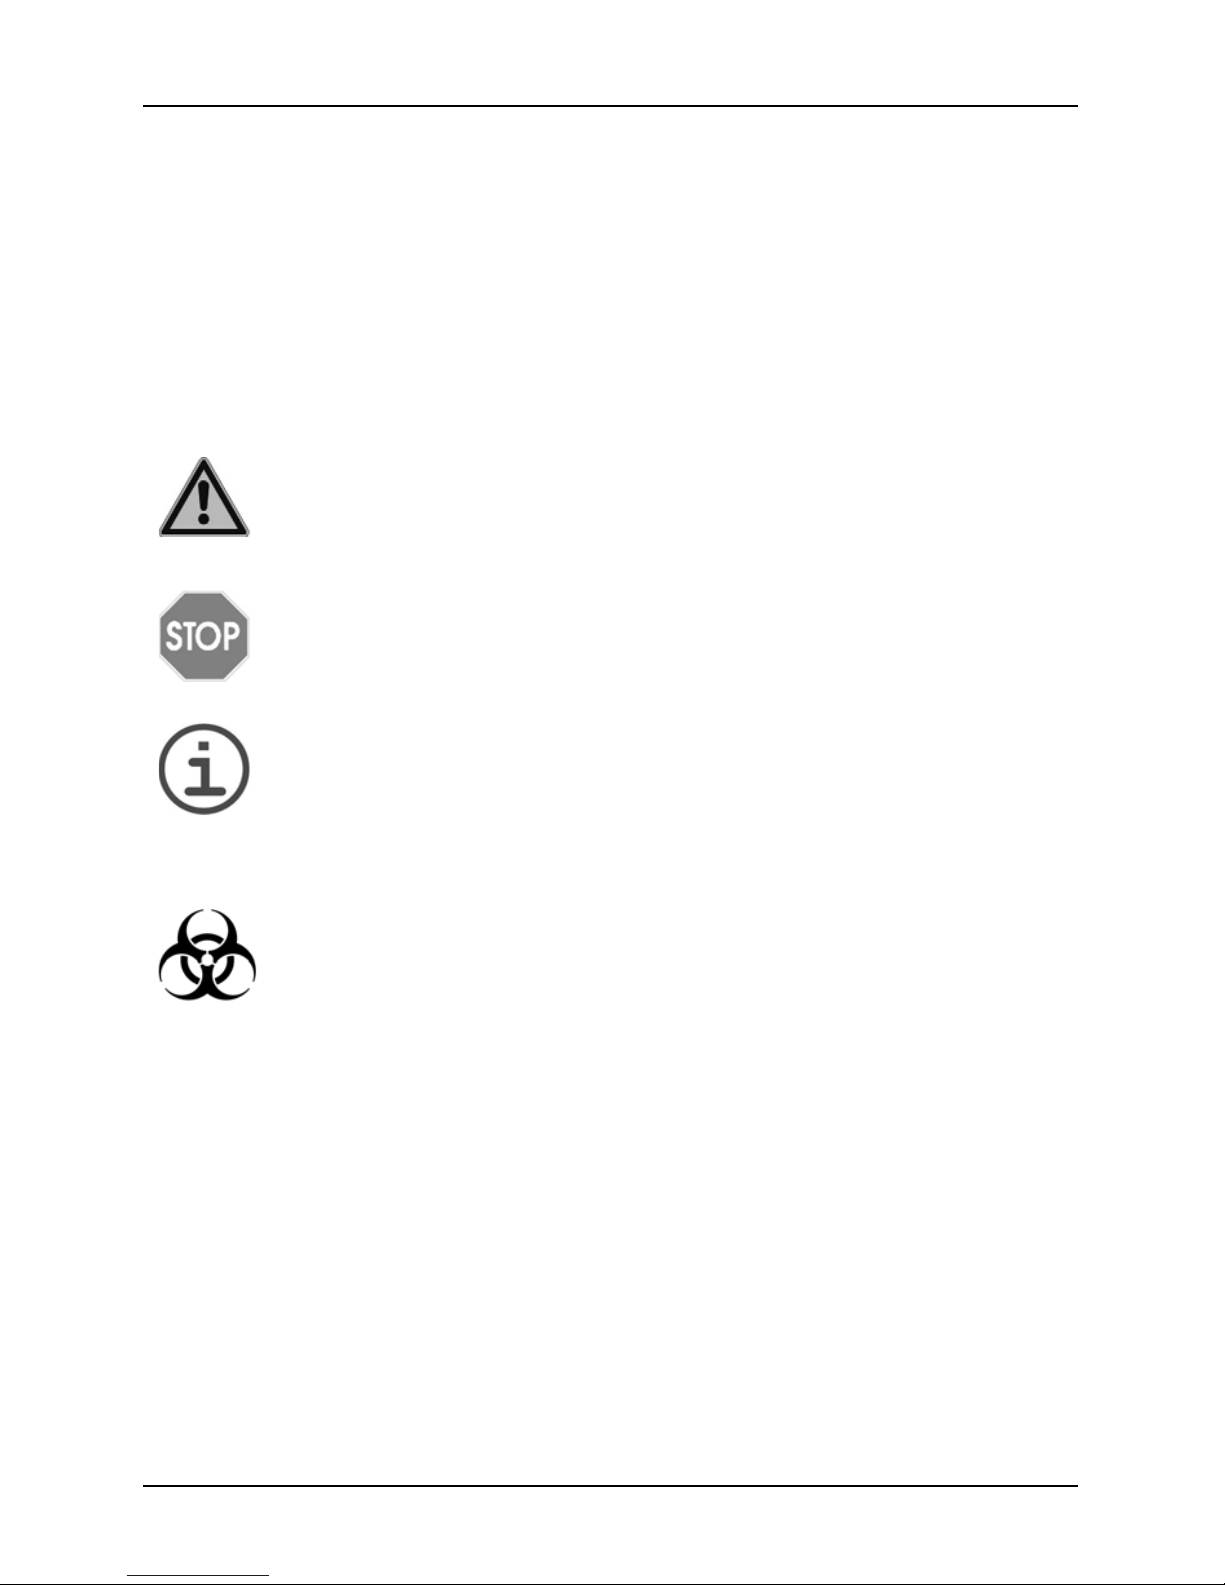
1.1 Symbols used
The operating instructions specifically advise of residual risks with the following symbols:
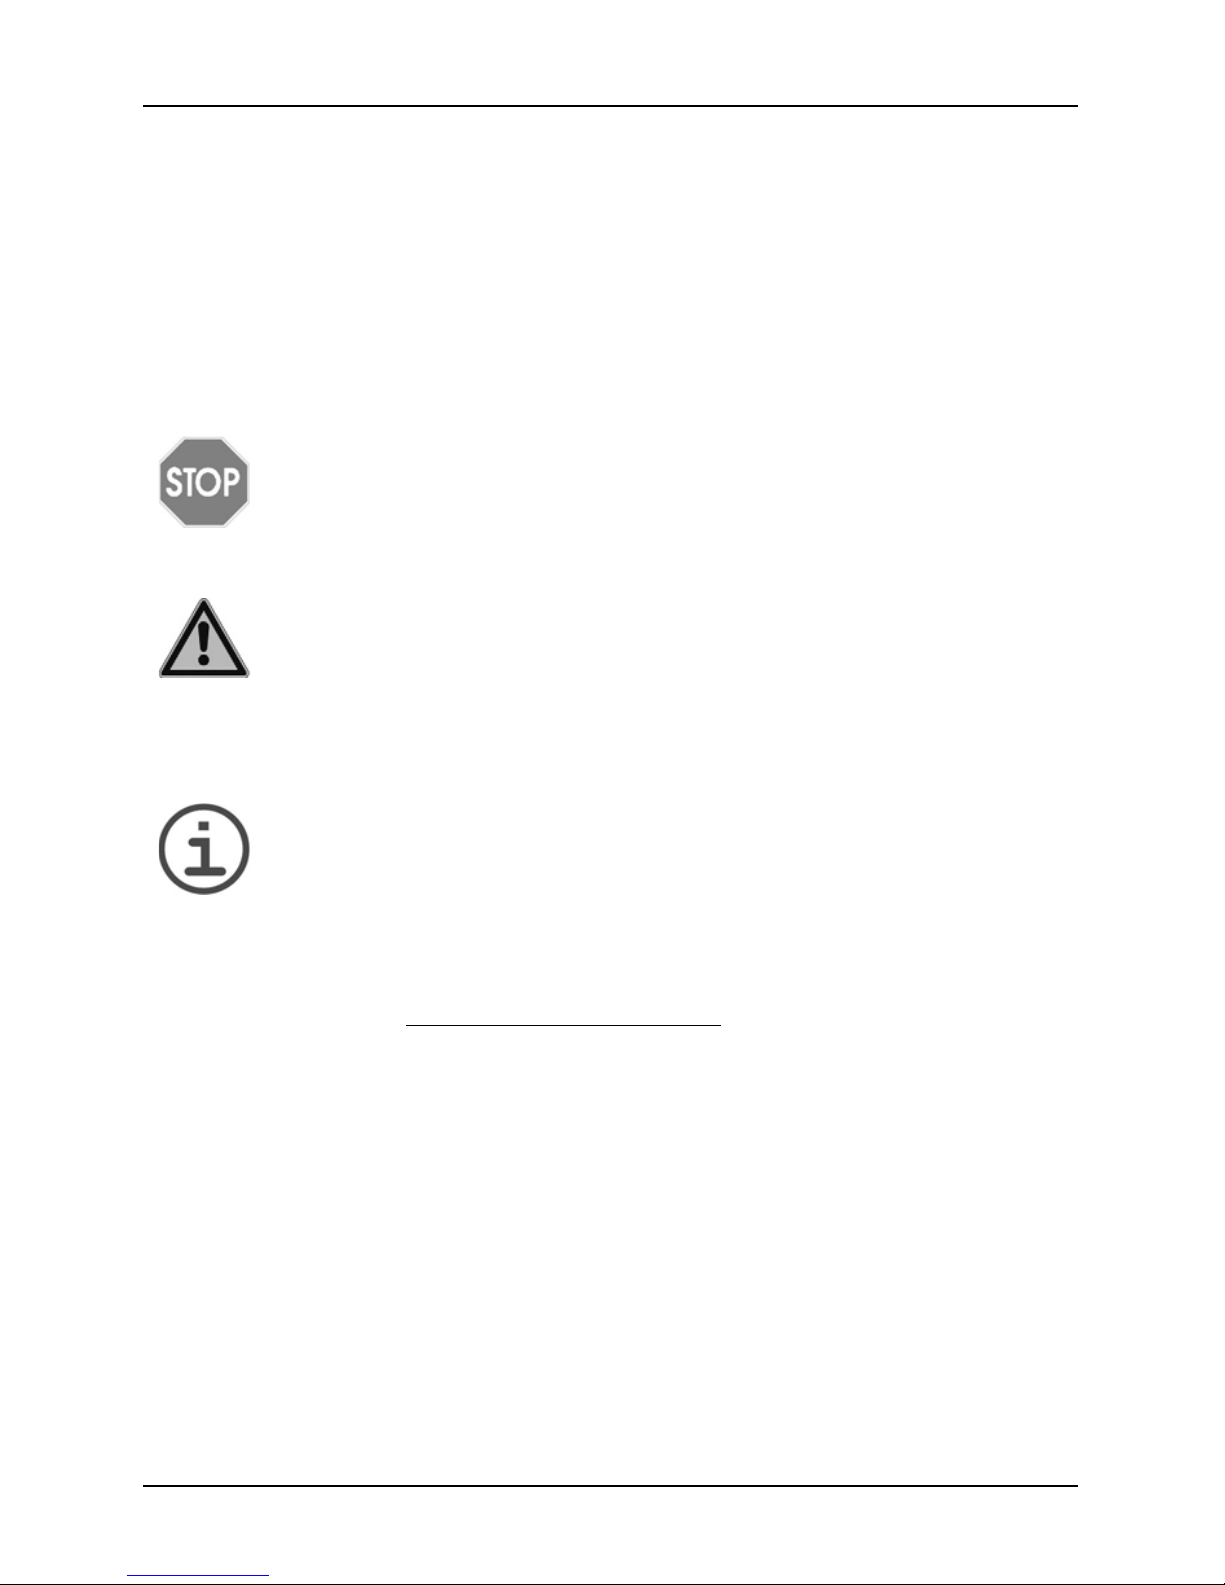
W
ARNING
This safety symbol warns against hazards that could result in injury. It also
indicates hazards for machinery, materials and the environment.
It is essential that you follow the co rresponding precautions.
C
AUTION
This symbol cautions against potential material damage or the loss of data in
a microprocessor controller. Follow the instructions.
N
OTE
This symbol identifies important notes regarding the correct operation of the
device and labor-saving features.
The device is marked with the following symbol:
B
IOHAZARD
The instrument can be potentially biohazardous due to the use of
biozazardous substances by the operator.
Page 6

VIAFLO ASSIST – Operating instructions V07 Introduction
6 INTEGRA Biosciences AG
1.2 Intended use
This is a general-purpose laboratory instrument for use in research only. Any use of this
instrument in a medical or IVD setting is the sole responsibility of the user.
With a VIAFLO II electronic multichannel pipette attached, VIAFLO ASSIST performs
pipetting operations in microplates automatically.
N
OTE
Only VIAFLO II multichannel pipettes (as of serial number 600 000 and
firmware version 3.00 or higher) can be used with VIAFLO ASSIST. The
VIAFLO II pipette needs its own Bluetooth module, which has to be ordered
separately (part no. 4221).
VIAFLO II Electronic Pipettes are microprocessor controlled and stepper motor driven
pipettes. They are used for aspirating and dispensing liquids in the volume range of 0.5–
1250 µl using GripTip pipette tips. Please refer to the VIAFLO II Electronic Pipettes
operating instructions for more detailed informations on www.integra-biosciences.com
.
Page 7
VIAFLO ASSIST – Operating instructions V07 Introduction
www.integra-biosciences.com 7
1.3 Safety notes
VIAFLO ASSIST complies to the recognized safety regulations and is safe to operate.
VIAFLO ASSIST can only be operated when in intact condition and while observing these
operating instructions.
The device may be associated with residual risks if it is used or operated improperly by
untrained personnel. Any person operating the VIAFLO ASSIST must have read and
understood these operating instructions, and particularly, the safety notes, or must have
been instructed by supervisors so that safe operation of the device is guaranteed.
C
AUTION
Do not open or modify the VIAFLO ASSIST in any way . Repairs m ay only be
performed by INTEGRA Biosciences AG or by an authorized after-sales
service member. Parts may be replaced with original INTEGRA Biosciences
parts only.
W
ARNING
Do not use the VIAFLO ASSIST near flammable material or in explosive
areas. Also, do not pipette highly flammable liquids such as acetone or ether.
When handling dangerous substances, comply with the material safety data
sheet (MSDS) and with all safety guidelines such as the use of protective
clothing and safety goggles.
N
OTE
Prolonged exposure of the VIAFLO ASSIST to UV-light can cause
discoloration and/or yellowing. However, this will not affect the performance
of the device in any way.
Regardless of the listed safety notes, additional applicable regulations and guidelines of
trade associations, health authorities, trade supervisory offices, etc. must be observed.
Please visit our website www.integra-biosciences.com
on a regular basis for up to date
information regarding REACH classified chemicals contained in our products.
Page 8
VIAFLO ASSIST – Operating instructions V07 Description of the device
8 INTEGRA Biosciences AG
2 Description of the device
2.1 Scope of delivery
• VIAFLO ASSIST (VIAFLO II Electronic Pipette to be ordered separately)
• Mains adapter
• Sample pack 10 ml, 25 ml and 100 ml reagent reservoir
C
AUTION
Verify the scope of delivery when unpacking the device and check for
potential transportation damage. Do not operate a device that is dama ged,
instead contact your local dealer.
2.2 Overview of the VIAFLO ASSIST
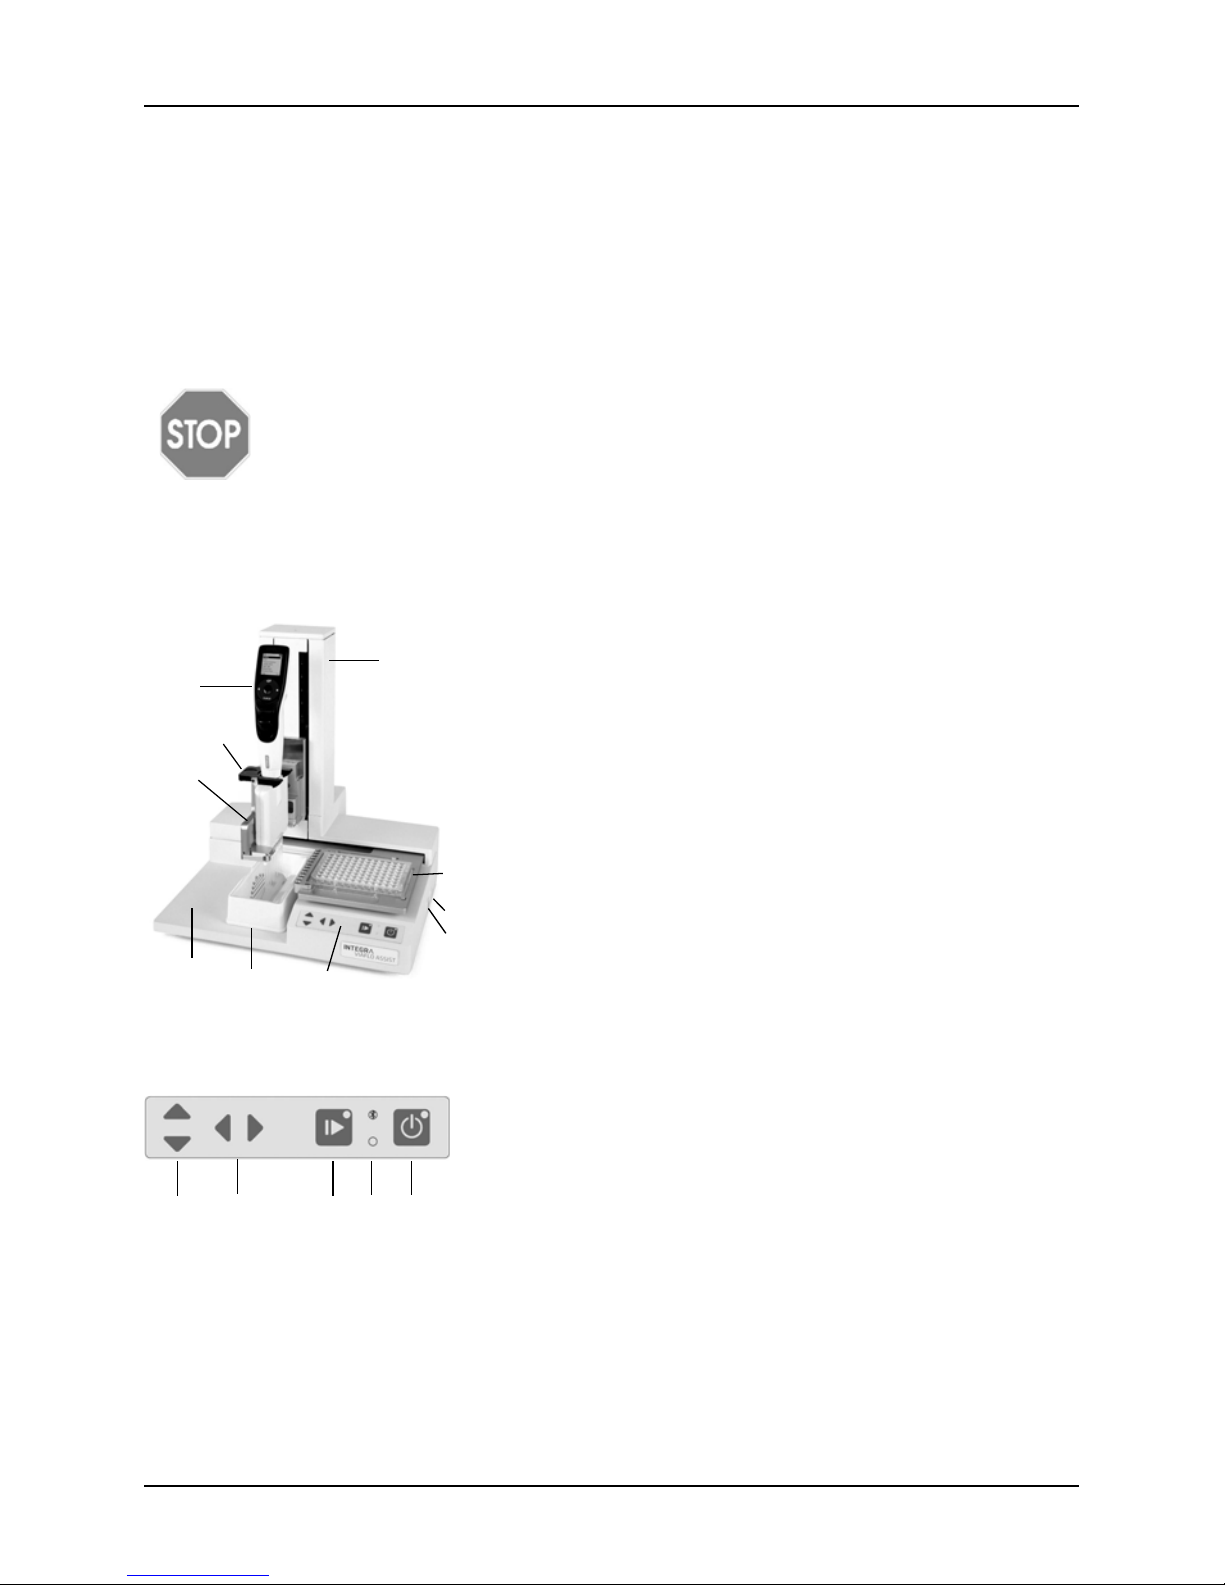
2.2.1 VIAFLO ASSIST device
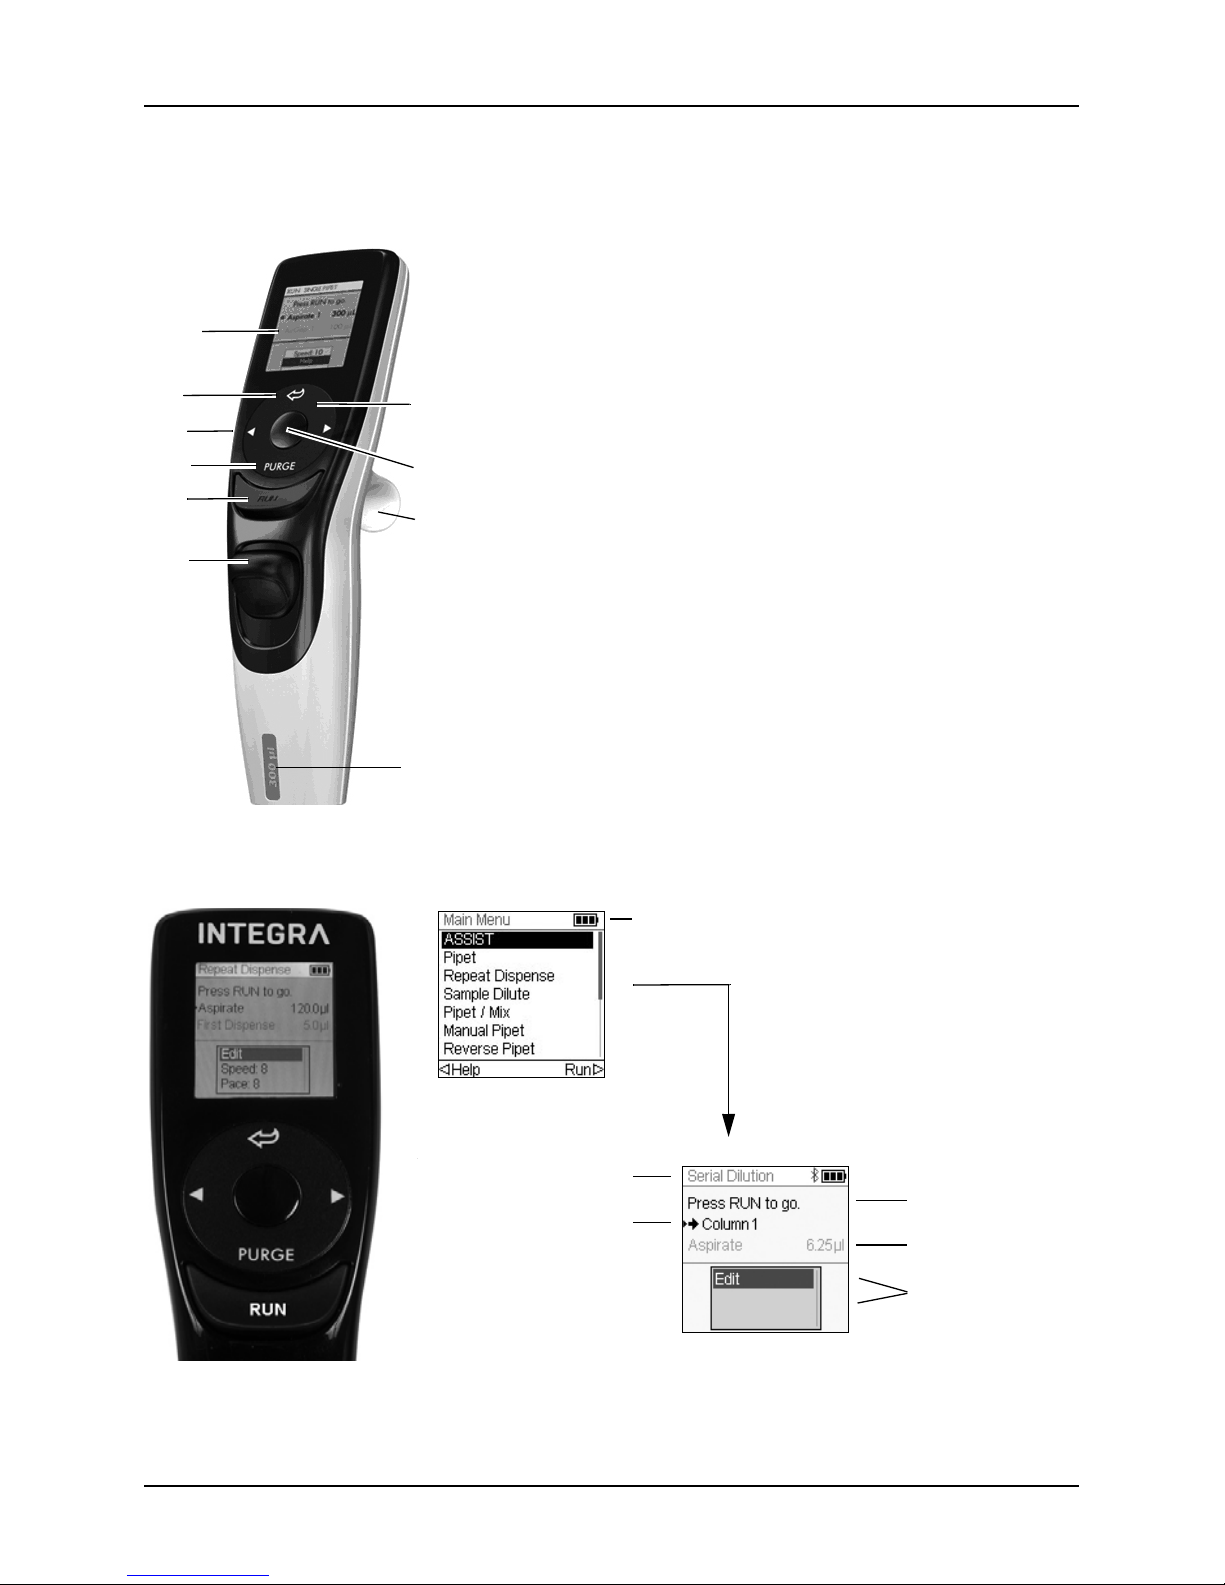
2.2.2 Keypad
1 Tower with pipette arm. Arm moves in Z-direction
2 Plate carrier, moves in X-direction
3 Power connection
4 USB port, for firmware updates
5 Keypad
6 Reservoir position
7 Instrument base
8 Pipette holder on pipette arm with lever to shift the
pipette in Y-direction
9 Gripper, lever to release the pipette
10 VIAFLO II Electronic Pipette
11 Up and Down arrow keys move the pipette
along the Z-axis to teach pipetting heights.
12 Left and Right arrow keys move the plate
carrier along the X-axis to adjust the plate carrier
position.
13 Start/Pause key, to start/stop operations.
Green LED blinks: press to start operation/homing
Green LED lights: operation performed
14 Bluetooth control LED (lights blue if connection is
active) and Error LED (flashes red in case of error)
15 On/Off key (lights green if On)
3
9
5
6
8
2
10
1
7
4
11
12
13
14
15
Page 9
VIAFLO ASSIST – Operating instructions V07 Description of the device
www.integra-biosciences.com 9
2.3 Overview of VIAFLO II Electronic Pipette
2.3.1 VIAFLO II pipette parts
2.3.2 Display
The Display shows all pipetting options.
16 Display
17 Back button, to navigate backward
18 Touch wheel, spin to scroll and move the cursor
19 OK button, to make a selection
20 Left and right arrow buttons, for selections
21 Purge button, to empty tips
22 Run key, to start operations
23 Tip ejector
24 Finger hook, facilitates easy operation
25 Volume indicator label, color matches GripTip box
insert.
Battery life indicator
Instruction
Volume
Options
16
17
20
21
22
23
18
19
24
25
Current mode
Active step
OK Serial Dilution,
select program
Page 10

VIAFLO ASSIST – Operating instructions V07 Installation
10 INTEGRA Biosciences AG
3 Installation
3.1 Operating environment
VIAFLO ASSIST has been designed for use in a laboratory. It shall be operated in a dry
and dust-free location with a temperature of 5–40°C and a maximal (non-condensing)
relative humidity of 80 %, see “7.1
Environmental conditions” on page 30.
3.2 Relocating VIAFLO ASSIST
Before VIAFLO ASSIST can be relocated, clear the Instrument base (7). Switch off the
device and disconnect it from the electricity mains. Lift the VIAFLO ASSIST on both sides
of the Instrument base. Never lift the instrument on the Towe r.
3.3 Charging the battery of the VIAFLO II Electronic Pipette
The battery indicator in the upper right corner of the pipette screen informs about the
battery status. When it turns red, the pipette needs to be charged.
C
AUTION
Use only the approved INTEGRA battery, power supply or charging stand.
Use of an incompatible power transformer can damage the pipette.
The battery can be charged using either the mains adapter or a charging stand, see (“8.2
Accessories for VIAFLO II Electronic Pipettes” on page 31).
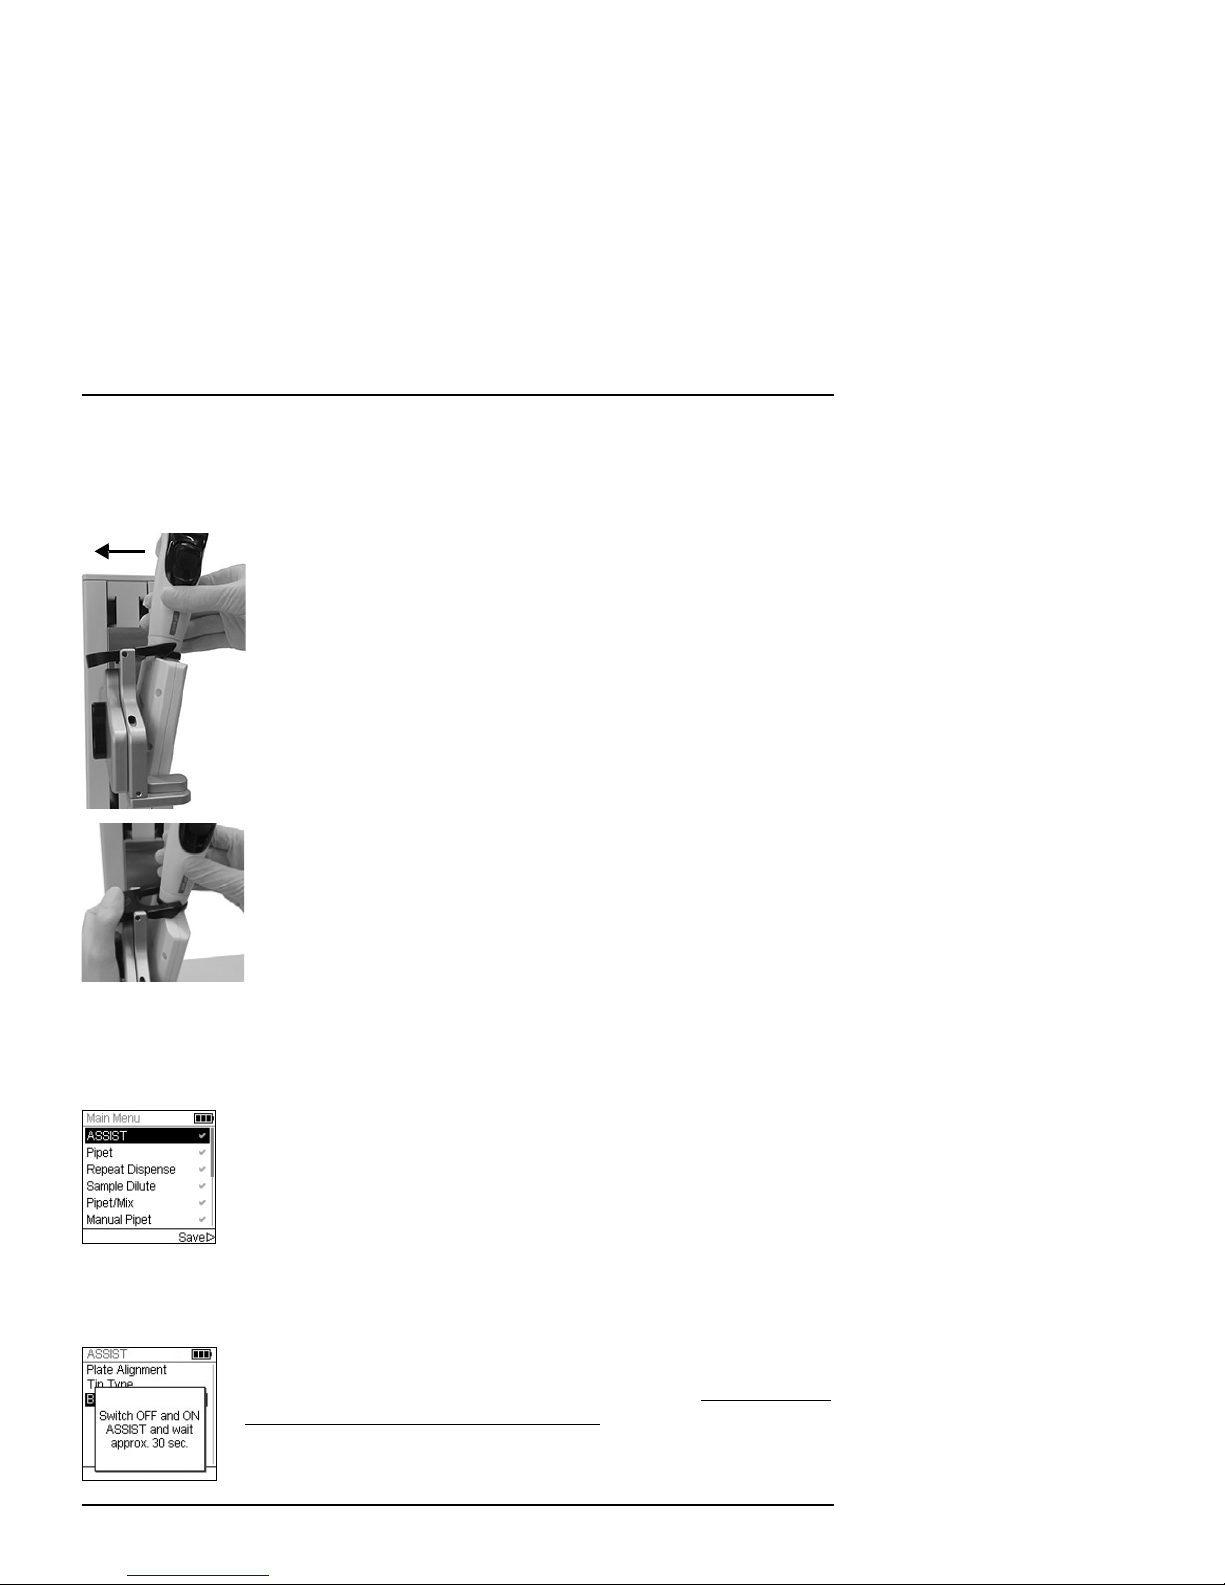
3.4 Adapting the pipette holder
The pipette holder can be adapted to the type of the VIAFLO II Electronic Pipette.
Insert the mains adapter connector into the receptacle on the top
back of the pipette. Plug the mains adapter into a wall outlet.
To adapt the holder for an 8- or 16-channel pipette, pull the silver
lever down as shown beside.
Lift the lever up to insert a 12-channel pipette.
Page 11
VIAFLO ASSIST – Operating instructions V07 Installation
www.integra-biosciences.com 11
3.5 Attaching and removing a VIAFLO II Electronic Pipette
Rotate the lower hosing of the VIAFLO II Electronic Pipette by 90 degrees as displayed in
the picture.
3.6 Toolbox settings
3.6.1 Enabling ASSIST mode
The ASSIST mode is hidden from the Main Menu of the VIAFLO II pipettes by default.
3.6.2 Connection between VIAFLO ASSIST and pipette
The first time a specific VIAFLO II pipette is going to be connected to the VIAFLO ASSIST,
both instruments need to be paired. Scroll to the Toolbox and press OK.
To install a pipette, hold it at an angle and insert it into the pipette
holder.
Then lift up until the black gripper snaps in place.
To release the VIAFLO II Electronic Pipette lift the black gripper by
pushing down on one end.
Use the Touch w h e el to select Toolbox from the Main Menu and pre ss
OK.
Select Preferences and then Main Menu. Enable the ASSIST mode by
pressing OK (green ) and press to save your settings.
From the ASSIST option select Bluetooth Pairing.
Switch OFF and ON the VIAFLO ASSIST device, see “4.1
Turn on/off
the VIAFLO ASSIST device” on page 14, and wait approx. 30 sec.
until the message “Pairing successful” is displayed. Press OK.
Page 12

VIAFLO ASSIST – Operating instructions V07 Installation
12 INTEGRA Biosciences AG
3.6.3 Setting tip type
VIAFLO II Electronic Pipettes of 12.5 µl size can be used with standard or long GripTips.
In order to teach the correct heights for VIAFLO ASSIST movements, the used tip type
must be specified. Go to the Toolbox of the VIAFLO II pipette, select ASSIST and press
OK.
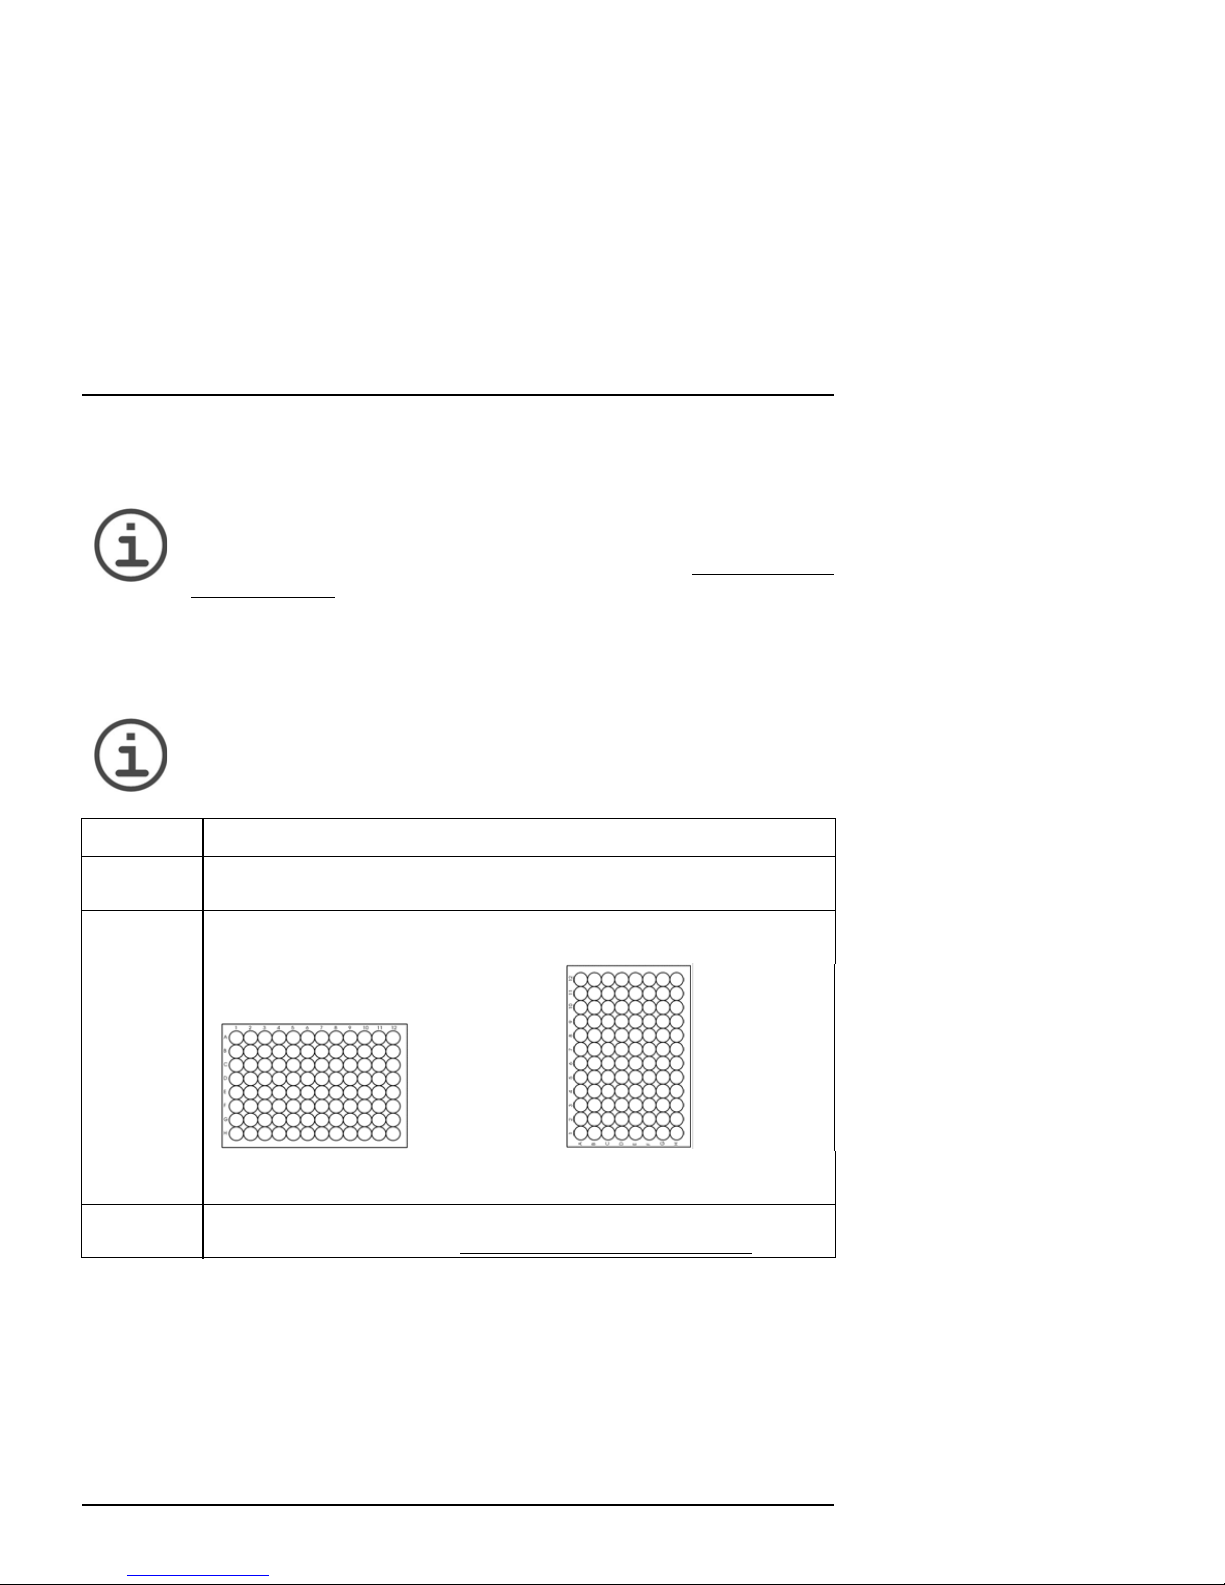
3.6.4 Adjusting the plate alignment
The Plate Alignment option is used to align the pipette's tips along the X-axis with the
center of the wells in the first row/column of a microplate (depending on plate orientation).
Select ASSIST on the Toolbox and press OK.
With GripTips attached, install the VIAFLO II pipette on the VIAFLO ASSIST and put a
plate on the plate carrier. Use the Left arrow key to positon row A / column 1 below the
tips. Press the arrow keys until the tips target the center of the wells. Press Set to save
this position.
N
OTE
Plate alignments with 384 well plates require a 16-channel VIAFLO II
Electronic Pipette. When working with 8- or 12-channel pipettes in a 384 well
plate, the plate alignment is made on a 96-well plate nevertheless.
Select Tip Type and press OK.
Use the Touch wheel to highlight Standard or Long. Press OK to
select the correct tip type (green ) and Save your settings.
Select Plate Alignment and press OK.
Define the number of wells of your plate (e.g. 96 for a
96-well plate) and choose the plate orientation from
either landscape or portrait. Use the Touch wheel to
select an option and press OK.
For fine adjustment of the pipette tips along the Y-axis turn the
screw on the pipette holder (a) with a flathead screw driver size 2.
Turning clockwise moves the pipette to the rear, counterclockwise
to the front. The maximum Y-shift is +/- 5 mm.
a
Page 13

VIAFLO ASSIST – Operating instructions V07 Installation
www.integra-biosciences.com 13
3.6.5 Move Speed
Allows to change the move speed of the pipette arm (1
, Z-axis) and the plate carrier (2, X-
axis) on ASSIST.
Select Move Speed and press OK.
Use the Touch wheel to select Slow, Medium or Default (=fast) and
press OK. Save your settings.
Page 14

VIAFLO ASSIST – Operating instructions V07 Operation
14 INTEGRA Biosciences AG
4 Operation
4.1 Turn on/off the VIAFLO ASSIST device
Connect VIAFLO ASSIST to the power supply with the supplied mains adapter. Turn on
VIAFLO ASSIST by pressing the On/Off key (15), which is confirmed by the green LED
lighting up.
Press the Start/Pause key when it is blinking to home the VIAFLO ASSIST device.
W
ARNING
Remove hands from VIAFLO ASSIST during homing.
After homing the LED of the Start/Pause key will turn off.
To turn off VIAFLO ASSIST press the On/Off key two seconds. It’s LED switches off.
4.2 Turn on/off the VIAFLO II Electronic Pipette
Press and release the Run key (22) to turn on the pipette.
To turn off the pipette, press and hold the Back button (17
) for 3 seconds.
4.3 Bluetooth connection
If the connection fails, press to retry the connection or refer to “4.6 Troubleshooting” on
page 16. Alternatively, continue Offline . During offline mode VIAFLO ASSIST cannot be
operated. It is possible to create programs, however without teaching of active heights.
4.4 Running a program
Select the ASSIST mode in the Main Menu of the VIAFLO II pipette
and press OK. The pipette establishes the Bluetooth connection.
When the blue Bluetooth symbol ( ) next to the battery indicator is
displayed and the Bluetooth control LED (14
) alights, both
instruments are connected.
From the ASSIST menu select the Pipetting mode and the stored
program you want to run and press OK.
Press the Run key (22
).
Page 15

VIAFLO ASSIST – Operating instructions V07 Operation
www.integra-biosciences.com 15
You are prompted to place the pipette on the VIAFLO ASSIST device, see “3.5 Attaching
and removing a VIAFLO II Electronic Pipette” on page 11. When attached press the green
blinking Start/Pause key (13
) on the VIAFLO ASSIST device. It switches to solid green
and the program will be performed automatically.
W
ARNING
Keep hands out of area of moving VIAFLO ASSIST parts during the run.
A program can be interrupted by pressing the Start/Pause key (13
). Either press the
Start/Pause key again to continue the program or press Abort on the pipette to abort
the program.
4.5 Pipetting in 96 and 384 well plates
The standard option to fill a 384 well plate is to use a 16-channel pipette. To access a 384
well plate with an 8- or 12-channel pipette, the pipette needs to be shifted in Y-direction.
To do so, switch the lever (a) on the pipette holder to the front or rear position. The center
position is used for 96 well plates.
The rear position of the
lever (a) moves the pipette
to the rear to accommodate the rear positions of
384 well plates.
Set the lever (a) to the
center to pipette in 96 well
plates.
The front position of the
lever (a) moves the pipette
to the front to accommodate the front positions of
384 well plates.
a
a
a
Page 16

VIAFLO ASSIST – Operating instructions V07 Operation
16 INTEGRA Biosciences AG
4.6 Troubleshooting
Problem Probable cause Remedy
The connection
between pipette and
ASSIST cannot be
established.
• The two instruments have not
been paired or the pairing
was lost.
• From the main menu of the
pipette go to Toolbox -> ASSIST
and select Bluetooth Pairing,
see “3.6.2
Connection between
VIAFLO ASSIST and pipette”
on page 11. Follow the instructions on the pipette screen.
Error LED (14
)
blinks red
• VIAFLO ASSIST motor lost
steps during movement.
• Pipetting heights were set
wrong and the pipette
crashed into the plate.
• Follow the instructions on the
pipette display.
After firmware
update, the Error
LED (14
) blinks red
and VIAFLO
ASSIST cannot be
started.
• No firmware installed. • Contact service for VIALINK
special firmware update.
GripTips are not
aligned in X-position.
• Plate alignment not set. • Perform plate alignment, see
“3.6.4
Adjusting the plate
alignment” on page 12.
The tip height is not
correct using 12.5 μl
GripTips.
• Wrong tip type set. • Enter the tip type used, see
“3.6.3 Setting tip type” on
page 12.
Page 17

VIAFLO ASSIST – Operating instructions V07 Programming
www.integra-biosciences.com 17
5 Programming
5.1 Overview pipetting modes
The table below shows pipetting modes which can be performed automatically in combination with VIAFLO ASSIST. All modes are accessed from the ASSIST Menu of a
VIAFLO II Electronic Pipette. You can create and store up to 20 different programs in each
of Serial Dilution, Repeat Dispense, Variable Dispense or Multi Aspirate mode and up to
40 different Custom programs.
Pipetting mode Description
Serial Dilution Allows aspirating a transfer volume followed by a mix. Columns
and Mix Cycles are tracked on the display.
Repeat Dispense Allows dispensing multiple aliquots of the same volume without
refilling the tips after each dispense for fast microplate filling and
processing.
Variable Dispense Allows dispensing multiple aliquots of different volumes.
Multi Aspirate Allows aspirating multiple aliquots of the same or different
volumes from a microplate.
Custom Allows to create and store multi-stepped user-defined pipetting
protocols.
Page 18

VIAFLO ASSIST – Operating instructions V07 Programming
18 INTEGRA Biosciences AG
5.2 Setting up a program
NOTE
If no Bluetooth connection is available, you can also use the offline mode to
create a new program. Live teaching of pipetting heights is not possible in
offline mode.
To run the program, select the stored program and press OK on the VIAFLO II Electronic
Pipette, see 4.4 “
Running a program” on page 14.
5.3 Modify existing programs
Use the Touch wheel to scroll to your desired pipetting mode and
press OK.
Press New to create a new program of the selected mode. Your are
prompted to enter a name.
Use the Tou c h wheel to select characters and press OK. Once
finished, press to save the name. The programs can later be
renamed, see 5.3 “
Modify existing programs” on page 18.
Define all parameters of your program and press Save .
At any program display, use the Touch wh e e l to highlight an existing
program.
Press Options, use the Touch wheel to select an option (View/Edit,
Delete, Copy, Rename) to modify the program and press OK.
Page 19
VIAFLO ASSIST – Operating instructions V07 Programming
www.integra-biosciences.com 19
5.4 Detailed description of pipetting modes
5.4.1 General parameters
N
OTE
Perform all position settings with GripTips attached. For 12.5 µl volume
pipettes the correct tip type needs to be defined first, see 3.6.3 “ Setting tip
type” on page 12.
Plate
The following basic plate setup is part of every pipetting mode. Use the Touch wheel to
select an option, define the required parameters and press OK. If a parameter is out of
range, the VIAFLO II pipette beeps. Press Error to read the error message.
N
OTE
Keep the Arrow keys (, , , ) pressed to increase the movement
speed of the plate carrier or pipette holder during position teaching.
Options Description
Wells Press OK and use the Touch wheel to choose the kind of well plate used
(6-384). Press OK.
Orientation Choose the orientation of the plate. Press OK to toggle between
landscape and portrait:
Landscape
Columns
Portrait
Rows
Note: Switching to portrait requires to adapt default parameters like
“Rows”, “Columns” or “Count”.
Clear Height The travel height at which the GripTips move from well to well. The tips
must be above the plate, see “
Adjust the tip heights” on page 20.
Page 20

VIAFLO ASSIST – Operating instructions V07 Programming
20 INTEGRA Biosciences AG
Adjust the tip heights
Press OK to display the setting dial showing the current selected height. The required
heights can be entered directly with the Touch wheel, if known:
• Reservoir or Tube Strip are chosen as container: The height is the distance between
the end of the GripTips and the Instrument base (7
).
• Column or Row: If the plate or container is located on the Plate carrier (2
), the lower
point of reference is the Plate carrier (2
).
Alternatively, adjust the tip height by moving the GripTips in the teach position:
• Reservoir or Tube Strip are chosen as container, located on Reservoir position (6
):
move the plate carrier out of the way with the Right arrow key of VIAFLO ASSIST.
• Column or Row: If the plate or container is located on the Plate carrier (2), use the
Left and Right arrow keys of VIAFLO ASSIST to move the plate carrier into
position, so that the pipette tips target above the center of any wells or the container.
• Press OK to display the setting dial. Press the Up and Down keys to position the
GripTips at the desired height and press OK to save current settings.
Description of the tracking distances
The tracking distance is the distance the pipette automatically follows during aspirating,
dispensing or mixing allowing a constant tip immersion depth, e.g. 2 mm below the
surface.
Source Source Mix (
↕):
Start tracking from (hs). Height (hs)
is defined in the Source section.
Source Asp (↓):
Start tracking from (hs). Height (hs) is
defined in the Source section.
Ta rg e t Target Disp (↑):
Start tracking from (ht).
Height (ht) is defined in
the Target section.
Tar g e t M i x (↕):
Start tracking from (x):
Height (x) is calculated
automatically: (h
t
) +
Target Disp distance.
Target Aspirate (
↓):
Start tracking from (x):
Height (x) is calculated
automatically: (h
t
) +
Target Disp distance.
(hs)
(hs)
(ht)
(x)
(ht)
(x)
(ht)
Page 21

VIAFLO ASSIST – Operating instructions V07 Programming
www.integra-biosciences.com 21
5.4.2 Serial Dilution mode
Plate setup
For plate setup option see “
Plate” on page 19.
Source
Target
Options Description
Location Use the Touch wheel to choose one of the source containers where the
initial sample is aspirated from:
• Reservoir: reagent reservoir
• Tube Strip: for PCR tubes
• Tip: samples can be aspirated before the automatic program is started.
• Column 1-24 or Row A-P: the sample is in the selected column/row of
the plate.
Height This is the sample aspiration height
of the source container.
See “Adjust the tip heights” on page 20 to set the tip height.
Aspirate Set the sample volume that will be transferred from well to well.
Asp Speed Set speed uniquely for aspiration (1 = low, 10 = fast)
Mixing Mixes the sample in the source container before the first aspiration.
•Press OK to toggle between on (green ) and off (red , default).
• If on, define Mix volume, Mix Speed and number of Mix Cycles.
Options Description
First Column
or First Row
Set the destination for the first transfer of the serial dilution (column 1-24
or row A-P).
Columns or
Rows
Set the number of columns or rows to dilute (1-n, including the first
column/row).
Options Description
Height This is the dispense, mix and aspiration height in the target container
when the tracking option is disabled, see “
Adjust the tip heights” on
page 20.
If tracking is enabled, this height is used as base from which the tracking
for dispense starts, see “
Description of the tracking distances” on page 20.
Mix Set the mixing volume after dispensing. It does not affect the transfer
volume.
Mix Speed Set the mixing speed (1 = low, 10 = fast).
Mix Cycles Set the number of mixes per well (1-30).
Page 22

VIAFLO ASSIST – Operating instructions V07 Programming
22 INTEGRA Biosciences AG
Last Dispense
Advanced
Press to save your settings. This will return you to the list of Serial Dilution programs.
Options Description
Location Choose the destination where the last dispense should be purged:
• Reservoir: the reagent reservoir serves as waste position
• Tube Strip: for PCR tubes
• Tip: last dispense remains in the GripTips and is purged manually
• Column 1-24 or Row A-P: the last dispense is dispensed in the
selected column/ row of the plate.
Disp. Speed Set speed uniquely for last dispense (1 = low, 10 = fast).
BlowOut at The Blowout is following the last dispense and expels extra air to
discharge residual liquid from the tips. It should be set below the liquid
level for best results. Adjust the blow out height, see “
Adjust the tip
heights” on page 20.
Option Description
Tracking Press OK to toggle between on (green ) and off (red , default). If
switched on, the pipette automatically follows the liquid level, see
“
Description of the tracking distances” on page 20.
• Source Mix: moves the set distance down and up during mixing in the
source location.
• Source Asp: moves the set distance down during aspiration from the
source location.
• Target Disp: moves the set distance up during dispensing in the target
location. The same distance is used to move down during aspiration in
the target location.
• Tar g e t M i x : moves the set distance down and up during mixing in the
target location.
Page 23

VIAFLO ASSIST – Operating instructions V07 Programming
www.integra-biosciences.com 23
5.4.3 Repeat dispense mode
Plate setup
For plate setup option see “
Plate” on page 19.
Aspirate/Source
If Tracking is disabled (red , default), define the following heights:
Alternatively, press OK to enable Tracking (green ). The pipette automatically follows the
liquid level during dispensing. Define the required parameters:
Options Description
Location Use the Touch wheel to choose one of the source containers where the
initial sample is aspirated from:
• Reservoir: reagent reservoir
• Tube Strip: for PCR tubes
• Tip: samples can be aspirated before the automatic program is started.
• Column 1-24 or Row A-P: the sample is in the selected column/row of
the plate.
Options Description
Start Height The VIAFLO ASSIST will automatically refill the GripTips if the total
dispense volume required for the target exceeds the maximum volume of
the pipette. The first aspiration will be at the start height and for
consecutive aspiration steps the pipette will go lower until it reaches the
end height.
See “
Adjust the tip heights” on page 20 to set the height for the first
aspiration.
End Height Set the height for the last aspiration step.
Options Description
Plate count Press OK and use the Touch wheel to select the total number of plates
(1-9) used in the current run.
Reservoir
type
Select the INTEGRA reagent reservoir for multichannel pipettes, see 8.3
“Consumables” on page 32.
Start volume Set the filling volume that is currently in the INTEGRA reagent reservoir.
Tip
immersion
Set the approx. immersion depth of the pipette tips (2-3 mm are
recommended).
Page 24

VIAFLO ASSIST – Operating instructions V07 Programming
24 INTEGRA Biosciences AG
Continue with the following steps:
Dispense
Press to save your settings. This will return you to the list of Repeat Dispense programs.
Options Description
Asp Speed Set the aspiration speed (1 = low, 10 = fast).
Mixing If required, set a mixing step before aspiration.
•Press OK to toggle between on (green ) and off (red , default).
• If on, define Mix volume, Mix Speed and number of Mix Cycles.
Options Description
First
Dispense
The First Dispense is discarded back to the source immediately after
aspiration. A First Dispense volume should be selected to improve
accuracy and precision. Suggested volume: at least 5% of the pipette's
maximum volume.
•Press OK to toggle between on (green , default) and off (red ).
• If on, define the First Dispense volume.
Count Set the total number of dispensing steps.
First Column
or First Row
Define the column/ row where dispensing of the first volume should be
started.
Dispense Set the volume to be dispensed in each well. The total aspiration volume
is calculated automatically. The pipette cannot be overfilled.
Disp. Speed Set speed of all dispensing steps (1 = low, 10 = fast).
Height Set the height for the dispensing steps.
TipTouch It is highly recommended to activate a tip touch after a dispensing step. It
removes drops that may cling to the pipette tips.
• Select where the tip touch should be performed. If set to “Liquid”, the
tips will dip into the center of the wells. If set to “Side”, the tips will touch
to the side of the wells.
• Define the height for the tip touch (TipTouch at).
Last
Dispense
The Last Dispense is discarded back to the source container. A Last
Dispense volume should be selected to improve accuracy and precision.
Suggested volume: at least 5% of the pipette's maximum volume.
•Press OK to toggle between on (green , default) and off (red ).
• If on, define the location (Source or Tip) and the volume of Last
Dispense and the blowout height (BlowOut at, only activated if Tracking
is disabled). Set the Blowout height below the liquid in the wells for best
results.
Page 25

VIAFLO ASSIST – Operating instructions V07 Programming
www.integra-biosciences.com 25
5.4.4 Variable Dispense mode
Parameters
The settings remain the same as already described in section 5.4.3 “
Repeat dispense
mode” on page 23. Only one dispense option is unique to Variable Dispense and not
described in the previous section.
Dispense
Press to save your settings. This will return you to the list of Variable Dispense
programs.
Option Description
Dispense
1 to n
Set the different dispense volumes for every variable dispense step.
Page 26

VIAFLO ASSIST – Operating instructions V07 Programming
26 INTEGRA Biosciences AG
5.4.5 Multi Aspirate mode
Plate setup
For plate setup option see “
Plate” on page 19.
Aspirate
Dispense
Advanced
Press to save your settings. This will return you to the list of Multi Aspirate programs.
Options Description
Count Set the total number of aspiration steps.
First Column
or First Row
Define the column/row where the first volume should be aspirated from.
Repeat
Volume
If repeat volume is ticked (green ), identical volumes are aspirated.
•Press OK to toggle between on (green , default) and off (red ).
• If off, define the different volumes for aspiration.
Aspirate Set the volume(s) to be aspirated (for every aspirate step).
Asp Speed Set the aspiration speed for all aspiration steps (1 = low, 10 = fast).
Height Set the (start) height for all aspiration (and mixing) steps, see “Adjust the
tip heights” on page 20.
Mixing If required, set a mixing step before aspiration.
•Press OK to toggle between on (green ) and off (red , default).
• If on, define Mix volume, Mix Speed and number of Mix Cycles.
Options Description
Location Use the Touch wheel to choose one of the target containers where the
aspirated sample is dispensed to:
• Reservoir: reagent reservoir
• Tube Strip: for PCR tubes
• Column 1-24 or Row A-P: dispense to the selected column/row of the
current plate.
Disp. Speed Set speed of dispensing (1 = low, 10 = fast).
Height Set the height for dispensing, see “
Adjust the tip heights” on page 20.
Option Description
Tracking Press OK to toggle between on (green ) and off (red , default). If
switched on, the pipette automatically follows the liquid level, see
“Description of the tracking distances” on page 20.
• Source Asp: set the distance in mm, which the pipette should move
down (or up) during aspirating (and mixing) from the source plate,
Page 27

VIAFLO ASSIST – Operating instructions V07 Programming
www.integra-biosciences.com 27
5.4.6 Custom program mode
The custom program allows for a step-based set up of up to 40 individual pipetting
protocols. Each program can contain up to 98 steps.
From the ASSIST Menu select “Custom”, press OK and New . Define and save a name
of your program.
After adding the first step, the selection should now be on the second line. Press OK again
to define the second step. Continue adding steps until your entire pipetting protocol is
defined.The individual steps based upon the following basic operations:
The first line is highlighted. Press OK.
Use the Touch wheel to select a first step from the
menu. Press OK, define the required parameters and
press OK to add the step.
Step Description
Aspirate Sets an aspiration volume, tracking distance (
↓)
1
and pipetting speed.
1. Tracking distance: the distance the pipette automatically follows during
aspirating, dispensing or mixing allowing a constant tip immersion depth, see
“Description of the tracking distances” on page 20.
Dispense Sets a dispense volume, tracking distance (
↑)
1
and pipetting speed.
Mix Performs a mixing cycle. Defines the number of cycles, mixing volume,
tracking distance (
↕)
1
and mix speed.
Purge Purges all remaining liquid currently in the GripTips with the selected
purge speed.
Prompt Pauses the program and displays a message. Three lines with 12
characters each are available. To continue the program, press the RUN
key.
Move X,Z Moves the pipette in Z direction and the plate carrier in X direction to the
selected coordinates. Use the Arrow keys on VIAFLO ASSIST to teach
the position or enter the coordinates manually on the pipette’s screen. To
show the actual coordinates, tap any of the Arrow keys on the VIAFLO
ASSIST device. Click on the pipette to set the coordinates.
Move X The plate carrier travels the set distance in X-direction relative to the
current position by X mm. Setting a negative value (mm) moves it to the
left, setting a positive value (mm) moves it to the right.
The distance from well to well for a 96 well plate is 9 mm and for a 384 well
plate 4.5 mm.
Page 28

VIAFLO ASSIST – Operating instructions V07 Programming
28 INTEGRA Biosciences AG
When finished, press to save the Custom program. To run the program, press OK.
Step Description
Move Z Moves the pipette in Z direction to the selected coordinates. Use the
Arrow keys on VIAFLO ASSIST to teach the position or dial the height
manually on the pipette’s screen. Press OK on the pipette to accept the
settings.
BlowOut Performs a blow out. A blow out needs to be performed after the last
dispense to remove liquid that may cling to the tips.
Note: When using “Purge” to empty the tips, a blowout/blowin is performed
automatically and does not need to be programmed.
BlowIn After a blow out, a blow in has to follow at some point. It does not have to
follow immediately and can have steps in between. E.g. after the blow out
a move step can be programmed to move the tips out of the liquid, and is
then followed by the blow in.
Delay A delay is a pause between the last and the next step. Define a delay time
(in seconds) or a manual input (pressing the RUN key) to continue.
Loop A loop repeats the steps between the selected step and the loop
command as many times as defined. E.g. if the program reaches the loop
step, it goes back to step 3 and repeats the steps until there 2 times.
The number of program steps can often be shortened by adding a loop.
Call Calls another custom program to run as subprogram in the current
program. This can be utilized to run frequently used sequences, e.g. a tip
touch after a dispense, without programming the individual steps every
time.
Beep Sets a beep. The sound is only active, if under Preferences - Sounds the
option Messages is set to On.
Page 29

VIAFLO ASSIST – Operating instructions V07 Maintenance
www.integra-biosciences.com 29
6 Maintenance
WARNING
Always turn off power and disconnect the VIAFLO ASSIST from the mains
when carrying out maintenance work.
6.1 Cleaning
The materials used on the exterior of the VIAFLO ASSIST support regular cleaning
intervals. Clean the external components with a lint-free cloth lightly soaked with mild soap
solution in distilled water or with a 70 % dilution of Isopropyl or Ethano l. Never use aceto ne
or other solvents.
6.2 Decontamination
From regular use VIAFLO ASSIST should not come into direct contact with liquids. If
aerosols or biohazadous fluids splash on the surfaces, they must be decontaminated in
accordance to good laboratory practice. Wipe the clean surface with a lint-free cloth,
lightly soaked e. g. with the following disinfectants:
• Ethanol 70%
• Microcide SQ 1:64
• Glutaraldehyde solution 4%
• Virkon solution 1-3%
Follow the instructions provided with the disinfectants.
6.3 Servicing
For any service or repairs, please contact your local service technician.
W
ARNING
VIAFLO ASSIST needs to be cleaned before sending it to service. The
declaration on the absence of health hazards must be signed. This is
necessary to protect service personnel.
6.4 Equipment disposal
The VIAFLO ASSIST must not be disposed of with unsorted municipal waste.
Dispose the VIAFLO ASSIST in accordance with the laws and regulations in
your area governing disposal of devices.
Page 30

VIAFLO ASSIST – Operating instructions V07 Technical Data
30 INTEGRA Biosciences AG
7 Technical Data
7.1 Environmental conditions
7.2 Specification of the device
7.2.1 Maximum labware height on plate carrier
Maximum distance between piptte tip end and plate carrier.
7.3 Intellectual Property
The VIAFLO ASSIST is covered under the following patents:
Operation
Temperature range operation 5– 40 °C
Temperature range storage -10–50°C
Humidity range Max. rel. humidity 80% for temperatures up to
31°C, decreasing linearly to 50 % rel. humidity at
40°C.
Power supply Input: 100–240 VAC, 50/60 Hz
Output: 24 VDC, 3.0 A
Dimensions (H x D x W) 400 mm x 360 mm x 340 mm
(with pipette attached: height 510 mm)
Weight 10 kg
Material of surfaces Polyurethane (Housing)
Stainless steel (painted or blank)
Aluminium
Tip type Distance
12.5 µl SHORT 129.9 mm
12.5 µl Standard 121.3 mm
12.5 µl LONG 112.5 mm
50 µl / 125 µl 101.3 mm
300 µl 96.0 mm
1250 µl 54.1 mm
Patent Number Country Title Apply to
9,321,048 USA Sample Distribution System And Pro-
cess
ASSIST
Page 31

VIAFLO ASSIST – Operating instructions V07 Accessories
www.integra-biosciences.com 31
8 Accessories
8.1 Accessories for VIAFLO ASSIST
8.2 Accessories for VIAFLO II Electronic Pipettes
VIAFLO II Electronic Pipettes Part No.
8-channel pipette, 0.5–12.5 μl 4621
8-channel pipette, 2–50 μl 4626
8-channel pipette, 5–125 μl 4622
8-channel pipette, 10–300 μl 4623
8-channel pipette, 50–1250 μl 4624
12-channel pipette, 0.5– 12.5 μl 4631
12-channel pipette, 2– 50 μl 4636
12-channel pipette, 5– 125 μl 4632
12-channel pipette, 10– 300 μl 4633
12-channel pipette, 50– 1250 μl 4634
16-channel pipette, 0.5– 12.5 μl 4641
16-channel pipette, 2– 50 μl 4646
16-channel pipette, 5– 125 μl 4642
Charging options and Bluetooth Part No.
Mains adapter for electronic pipettes 4200
Pipette Li-ion battery 4205
Single pipette charging stand, incl. mains adapter 4210
Charging/communication stand for 1 pipette, incl. mains adapter 4211
Carousel charging stand for 4 pipettes, incl. mains adapter 4215
Linear stand, holds up to 4 charging stations 3215
Mains Adapter for linear stand and carousel charging stand 3216
Charging station for linear stand, incl. connection cable 3217
Charging/communication station for linear stand, incl. connection cable
and USB cable
3218
Bluetooth module for VIAFLO II pipettes 4221
Bluetooth PC module with PC software 4225
Page 32

VIAFLO ASSIST – Operating instructions V07 Accessories
32 INTEGRA Biosciences AG
8.3 Consumables
Reagent Reservoirs Part No.
10 ml Disposable reagent reservoirs, individually sealed,
30 reservoirs per case, sterile
4331
Disposable reagent reservoirs, four sleeves of 50 reservoirs,
200 reservoirs per case, sterile
4332
Reservoir Base, 10 pack 4306
25 ml Disposable reagent reservoirs, individually sealed,
30 reservoirs per case, sterile
4311
Disposable reagent reservoirs, four sleeves of 50 reservoirs,
200 reservoirs per case, sterile
4312
Reservoir Base, 10 pack 4304
100 ml Disposable reagent reservoirs, individually sealed,
30 reservoirs per case, sterile
4321
Disposable reagent reservoirs, four sleeves of 50 reservoirs,
200 reservoirs per case, sterile
4322
Reservoir Base, 10 pack 4305
Page 33

VIAFLO ASSIST – Operating instructions V07 Accessories
www.integra-biosciences.com 33
GripTips for all INTEGRA Pipettes Part No.
Purple
SHORT:
12.5 μl
5 XYZ racks of 384 tips, sterile, filter, SHORT 6475
Purple
LONG:
12.5 μl
Bulk pack, 1 bag of 1000 tips, non-sterile, LONG 4401
5 inserts of 384 tips, non-sterile, LONG, GREEN CHOICE 4402
5 racks of 384 tips, non-sterile, LONG 4403
5 racks of 384 tips, sterile, LONG 4404
5 racks of 384 tips, sterile, filter, LONG 4405
5 inserts of 384 tips, pre-sterilized, LONG, GREEN CHOICE 4406
Purple
LONG:
12.5 μl
low
retention
5 racks of 384 tips, non-sterile, LONG 6503
5 racks of 384 tips, sterile, LONG 6504
5 racks of 384 tips, sterile, filter, LONG 6505
Purple:
12.5 μl
Bulk pack, 1 bag of 1000 tips, non-sterile 4411
5 inserts of 384 tips, non-sterile, GREEN CHOICE 4412
5 racks of 384 tips, non-sterile 4413
5 racks of 384 tips, sterile 4414
5 racks of 384 tips, sterile, filter 4415
5 inserts of 384 tips, pre-sterilized, GREEN CHOICE 4416
Purple:
12.5 μl
low
retention
5 racks of 384 tips, non-sterile 6553
5 racks of 384 tips, sterile 6554
5 racks of 384 tips, sterile, filter 6555
Yel low:
50 μl,
125 μl
Bulk pack, 1 bag of 1000 tips, non-sterile 4421
5 inserts of 384 tips, non-sterile, GREEN CHOICE 4422
5 racks of 384 tips, non-sterile 4423
5 racks of 384 tips, sterile 4424
5 racks of 384 tips, sterile, filter 4425
5 inserts of 384 tips, pre-sterilized, GREEN CHOICE 4426
Yel low:
50 μl,
125 μl
low
retention
5 racks of 384 tips, non-sterile 6563
5 racks of 384 tips, sterile 6564
5 racks of 384 tips, sterile, filter 6565
Page 34

VIAFLO ASSIST – Operating instructions V07 Accessories
34 INTEGRA Biosciences AG
Green:
300 μl
Bulk pack, 1 bag of 1000 tips, non-sterile 4431
5 inserts of 96 tips, non-sterile, GREEN CHOICE 4432
5 racks of 96 tips, non-sterile 4433
5 racks of 96 tips, sterile 4434
5 racks of 96 tips, sterile, filter 4435
5 inserts of 96 tips, pre-sterilized, GREEN CHOICE 4436
Green:
300 μl
low
retention
5 racks of 384 tips, non-sterile 6533
5 racks of 384 tips, sterile 6534
5 racks of 384 tips, sterile, filter 6535
Blue:
1250 μl
Bulk pack, 1 bag of 500 tips, non-sterile 4441
5 inserts of 96 tips, non-sterile, GREEN CHOICE 4442
5 racks of 96 Tips, non-sterile 4443
5 racks of 96 Tips, sterile 4444
5 racks of 96 Tips, sterile, filter 4445
5 inserts of 96 tips, pre-sterilized, GREEN CHOICE 4446
Blue:
1250 μl
low
retention
5 racks of 384 tips, non-sterile 6543
5 racks of 384 tips, sterile 6544
5 racks of 384 tips, sterile, filter 6545
GripTips for all INTEGRA Pipettes Part No.
Page 35

VIAFLO ASSIST – Operating instructions V07
www.integra-biosciences.com 35
Imprint
© 2017 INTEGRA Biosciences AG
All rights to this documentation are reserved. In particular the rights of reproduction,
processing, translation and the form of presentation lie with INTEGRA Biosciences AG.
Neither the complete documentation nor parts thereof may be reproduced in any way, or
stored and processed using electronic media or distributed in any other way without the
written consent of INTEGRA Biosciences AG.
This operating instruction manual has part number 127950, the version is V07. It applies
as of (see Toolbox - Device information):
of VIAFLO ASSIST until a newer revision is released.
VIAFLO, VIALINK, and GripTip are trademarks of INTEGRA Holding, Switzerland.
Manufacturer
Customer service
Please contact your local INTEGRA Biosciences representative.
To find out name and address go to www.integra-biosciences.com
.
Further information and operating instructions in other languages are available on
www.integra-biosciences.com
or on request info@integra-biosciences.com.
FW version VIAFLO II Pipettes 3.40 or higher
FW version VIAFLO ASSIST 1.07 or higher
INTEGRA Biosciences AG
CH-7205 Zizers, Switzerland
T +41 81 286 95 30
F +41 81 286 95 33
INTEGRA Biosciences Corp.
Hudson, NH 03051, USA
T +1 603 578 5800
F +1 603 577 5529
info@integra-biosciences.com
www.integra-biosciences.com
 Loading...