

Page 1

Using the RC-550M Remote Controller
You can use the RC-550M remote controller to control
your other AV components, including those made by
other manufacturers. To do this you can:
• Enter a remote control code for the component that
you want to control (e.g., DVD, TV, VCR).
• Learn commands directly from the other component’s
remote controller (see page 6).
• Use the Macro function to learn a sequence of actions
(see page 7).
• You can also edit the remote controller modes (see
page 9).
Entering a Remote Control Code
By entering the appropriate remote control code for each
of your components, you can control each component by
selecting the relevant remote controller mode: DVD, TV,
VCR, CBL (cable), or SAT (satellite).
1
2
Look up the appropriate remote
control code for the component.
See “Remote Control Codes” on
page 2
Press and hold down the [Custom] button for more than three
seconds.
The remote controller enters Custom
mode.
5
6
Use the number buttons to enter
the 4-digit remote control code.
If the code is accepted, the following
appears on the display for awhile, and
then the normal display reappears.
If the code is not accepted, after the
message “RETRY” has been displayed,
the code entry display reappears, and
you should try entering the code again.
To cancel this procedure at any point,
press the [Custom] button.
Select the remote controller
mode, point the remote controller at the component, and check
its operation.
3
Roll the scroll wheel to select
“PRGRM,” and then press the
scroll wheel.
Remote Control Codes for an Integra/
Onkyo DVD Player
The remote control code that you use with an Integra/
Onkyo DVD player depends on whether it’s connected
via , as follows:
5001: Use this code if you’ve connected an cable
4
Roll the scroll wheel to select the
the remote controller mode you
want to use with the component,
and then press the scroll wheel.
The following remote controller modes
can be selected: DVD, TV, VCR, CBL,
or SAT.
and an RCA/phono analog audio cable to your
DVD player. This is the default setting, so if
you’re using , you don’t need to change it.
Point the remote controller at the DTR-8.4 to
operate the DVD player.
5002: Use this code if your DVD player doesn’t have
an socket, or you’re not using . Point
the remote controller at the DVD player to
operate it.
1
Page 2
Using the RC-550M Remote Control —Continued
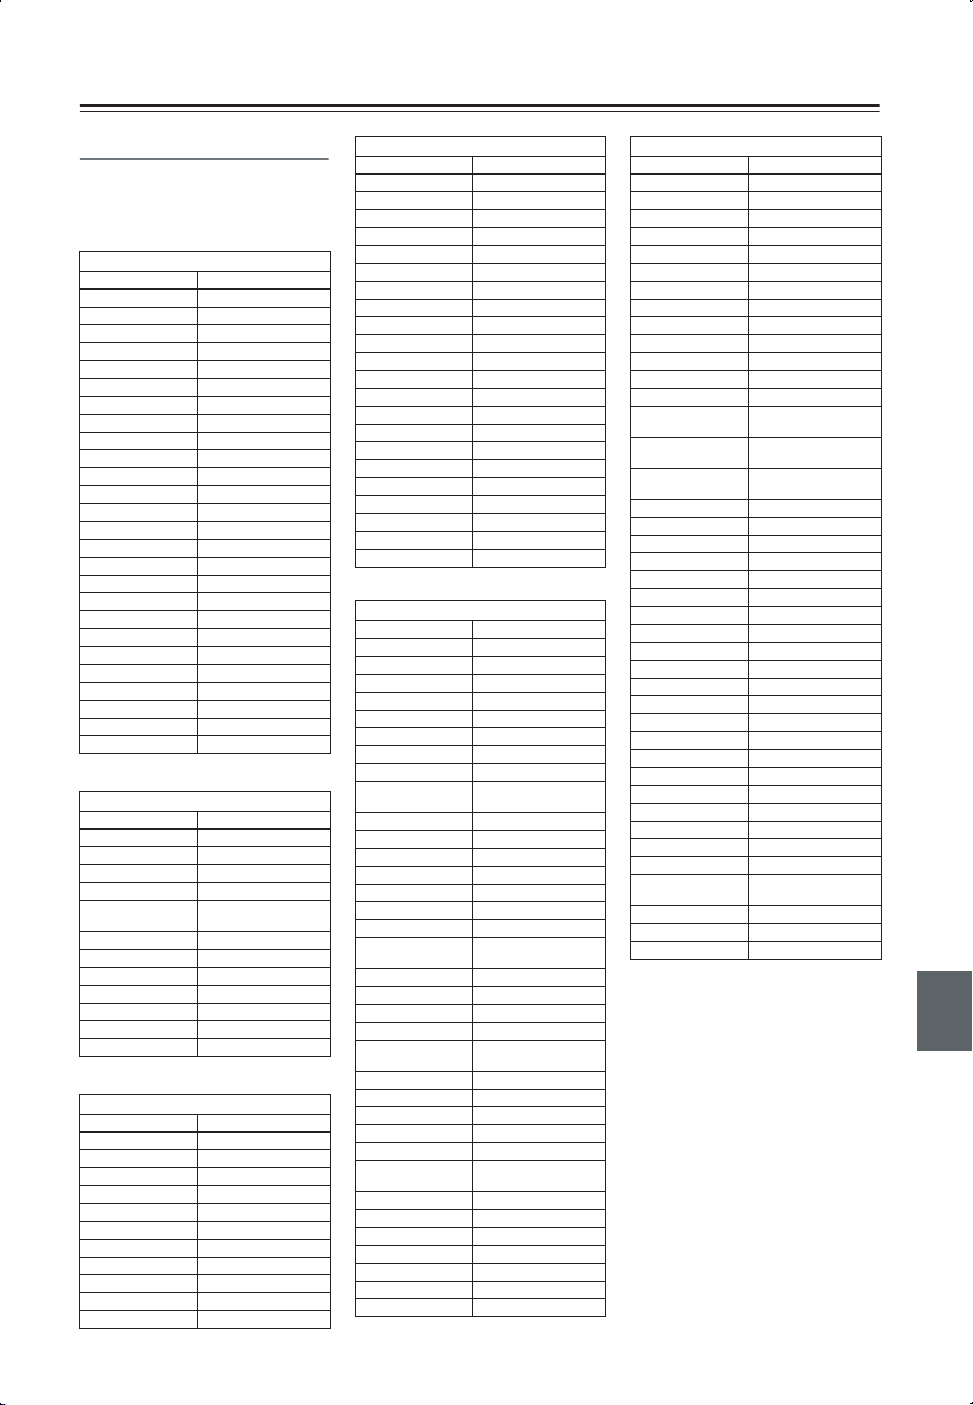
Remote Control Codes
When two or more codes are given,
try each one in turn, and choose the
one that works best.
DVD (DVD player)
Manufacturer Control code
Aiwa 5010
Apex 5015, 5016
Denon 5017, 5020
GE 5003
Hitachi 5009
Integra 5001, 5002
Integra Research 5001, 5002
JVC 5023
Kenwood 5017
Magnavox 5004
Marantz 5025, 5026
Mitsubishi 5005
Onkyo 5001, 5002
Panasonic 5011, 5017, 5020
Philips 5004
Pioneer 5006
Proscan 5003
RCA 5003
Sanyo 5012
Sony 5007, 5013
Technics 5020
Thomson 5022, 5024
Toshiba 5008
Xbox 5022
Yamaha 5020
Zenith 5014
SAT (satellite receiver)
Manufacturer Control code
Dishnet 4008
Echostar 4010
GE 4001, 4002
General Instruments 4003
Hughes Network
Systems
JVC 4009
Panasonic 4006
Primestar 4007
Proscan 4001, 4002
RCA 4001, 4002
Sony 4005
Toshiba 4004
CBL (cable receiver)
Manufacturer Control code
ABC 3001, 3002
Archer 3006
Cableview 3004
Contec 3009
Eastern 3010
GE 3001, 3002
Gemini 3011
General Instruments 3002
Hamlin 3012
Hitachi 3002
Jerrold 3002, 3011, 3013
4011
CBL (cable receiver)
Manufacturer Control code
Magnavox 3014
Memorex 3015
Movie Time 3016
NEC 3003
NSC 3016
Oak 3009
Panasonic 3020
Philips 3007, 3008, 3014
Pioneer 3017
Proscan 3001, 3002
RCA 3004, 3020
Realistic 3006
Samsung 3017
Signature 3002
Sprucer 3020
Standard Component 3018
Starcom 3011
Stargate 3011
Tocom 3013
Universal 3005, 3006
View Star 3009, 3014, 3016
Zenith 3019
VCR
Manufacturer Control code
Aiwa 2012
Akai 2003, 2004
Bell & Howell 2007
Canon 2010, 2011
Carver 2014
Citizen 2008, 2009
Colortyme 2005
Craig 2008
Curtis Mathes
Daewoo 2012
Dimensia 2001
Emerson 2003, 2010, 2012
Fisher 2007
Fuji 2004, 2010
Funai 2012
Garrard 2012
GE
GoldStar 2005, 2009
Gradiente 2012
Harman Kardon 2005
Hitachi 2013
JC Penney
Jensen 2013
JVC 2005, 2006, 2007, 2009
Kenwood 2005, 2006, 2007, 2009
Kodak 2010
Magnavox 2010, 2011, 2014
Marantz
Matsushita 2010
Memorex 2007, 2008, 2010, 2012
Minolta 2013
Mitsubishi 2013
Motorola 2010
MTC 2008
Multitech 2008, 2012
2001, 2005, 2008, 2009,
2010, 2011
2001, 2002, 2008, 2010,
2011
2005, 2006, 2007, 2008,
2011, 2013, 2014
2005, 2006, 2007, 2009,
2010, 2014
VCR
Manufacturer Control code
NEC 2005, 2006, 2007, 2009
NOBLEX 2008
Olympus 2010
Optonica 2017
Panasonic 2010, 2011
Pentax 2013
Pentex Research 2009
Philco 2010, 2011, 2014
Philips 2010, 2014, 2017
Pioneer 2006, 2013
Proscan 2001, 2002
Quasar 2010, 2011
Radio Shack 2017
Radio Shack/Realistic
RCA
Realistic
Samsung 2008
Sansui 2006
Sanyo 2007, 2008
Scott 2015
Sears 2007, 2010, 2013
Sharp 2016, 2017
Shintom 2004
Singer 2010
Sony 2004, 2018
STS 2010
Sylvania 2010, 2011, 2012, 2014
Symphonic 2012
Tandy 2007
Teac 2012
Technics 2010
Teknika 2010, 2012
Toshiba 2013, 2015
Totevision 2008
Unitech 2008
Vector Research 2005, 2006
Video Concepts 2005, 2006
Wards
XR-12000 2010, 2012
Yamaha 2005, 2006, 2007, 2009
Zenith 2004
2007, 2008, 2010, 2011,
2012, 2017
2001, 2002, 2003, 2008,
2010, 2013
2007, 2008, 2010, 2011,
2012, 2017
2008, 2010, 2012, 2013,
2017
2
Page 3
Using the RC-550M Remote Controller —Continued
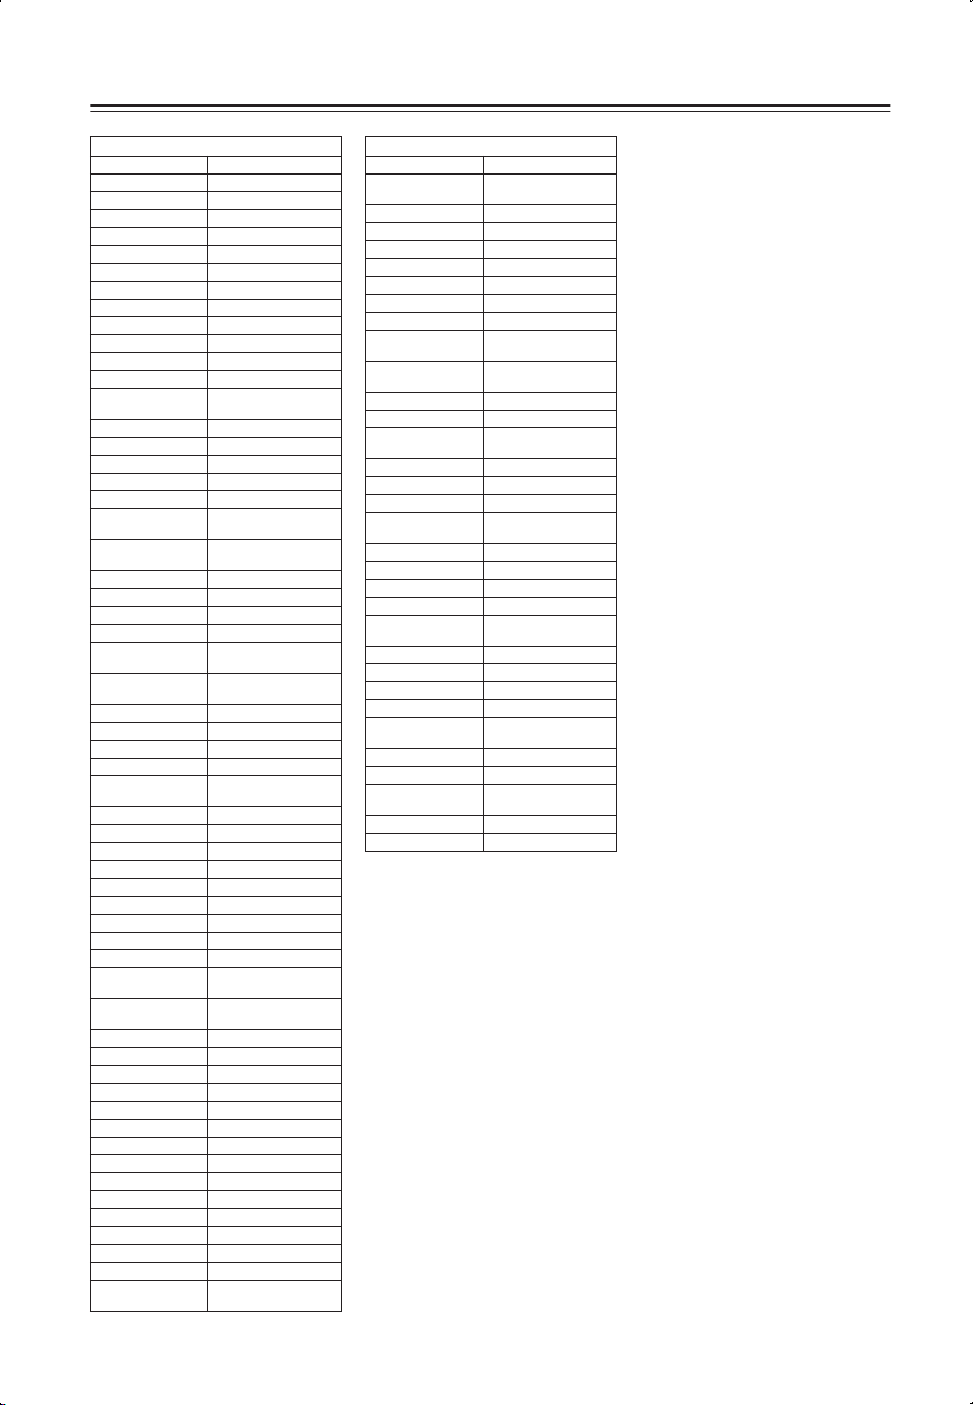
TV
Manufacturer Control code
Akai 1002
Amtron 1009
Anam National 1003, 1009
AOC 1004, 1005, 1006
Audiovox 1009
Bell & Howell 1010, 1017
Celebrity 1002
Citizen 1004, 1006, 1009, 1017
Colortyme 1004, 1006
Contec/Cony 1007, 1009
Craig 1009
Crown 1009, 1014
Curtis Mathes
Daewoo 1004, 1005, 1006
Daytron 1004, 1006
Dimensia 1001
Dumont 1004
Electroband 1002
Electrohome
Emerson
Envision 1004, 1006
Fisher 1010, 1017
Fujitsu 1070
Funai 1009
GE
GoldStar
Hallmark 1004, 1006
Hitachi 1004, 1006, 1007, 1013
Infinity 1014
JBL 1014
JC Penney
Jensen 1004, 1006
JVC 1007, 1012, 1013, 1015
Kawasho 1002, 1004, 1006
Kenwood 1004, 1006, 1008
Kloss Novabeam 1009
KTV 1009
LG 1005
Loewe 1014
Luxman 1004, 1006
LXI
Magnavox
Marantz 1004, 1006, 1014
Megatron 1006
Memorex 1005, 1006, 1010, 1017
MGA 1004, 1005, 1006, 1008
Mitsubishi 1004, 1005, 1006, 1008
Motorola 1003
MTC 1004, 1005, 1006
Multitech 1009
NAD 1006
NEC 1003, 1004, 1005, 1006
Nikko 1006
Onwa 1009
Orion 1029
Panasonic 1003, 1012, 1014
Philco
1001, 1004, 1006, 1010,
1017
1002, 1003, 1004, 1006,
1008
1004, 1006, 1007, 1009,
1010, 1017, 1029
1001, 1003, 1004, 1006,
1011, 1012
1004, 1005, 1006, 1007,
1008
1001, 1004, 1005, 1006,
1011, 1012, 1016
1001, 1006, 1010, 1014,
1016, 1017
1004, 1006, 1008, 1014,
1018
1003, 1004, 1005, 1006,
1007, 1008, 1014, 1018
TV
Manufacturer Control code
Philips
Pioneer 1004, 1006
Portland 1004, 1005, 1006
Prism 1012
Proscan 1001
Proton 1004, 1006, 1007
Quasar 1003, 1012
Radio Shack 1010, 1017
Radio Shack/Realistic
RCA
Realistic 1010, 1017
Sampo 1004, 1006
Samsung
Sansui 1029
Sanyo 1004, 1010, 1017
Scott 1004, 1006, 1007, 1009
Sears
Sharp 1004, 1006, 1007
Sony 1002, 1030, 1032
Soundesign 1004, 1006, 1009
Starlite 1009
Sylvania
Symphonic 1009
Tatung 1003
Technics 1012
Techwood 1004, 1006, 1012
Teknika
Toshiba 1010, 1016, 1017
Universal 1011
Wards
Yamaha 1004, 1005, 1006, 1008
Zenith 1004
1003, 1004, 1007, 1008,
1014, 1018
1001, 1004, 1006, 1007,
1009, 1010, 1017
1001, 1003, 1004, 1005,
1006, 1008
1004, 1005, 1006, 1007,
1008
1001, 1004, 1006, 1008,
1010, 1015, 1016, 1017
1004, 1006, 1008, 1014,
1018
1004, 1005, 1006, 1007,
1009
1001, 1004, 1005, 1006,
1008, 1011, 1014, 1018
3
Page 4
Using the RC-550M Remote Controller —Continued
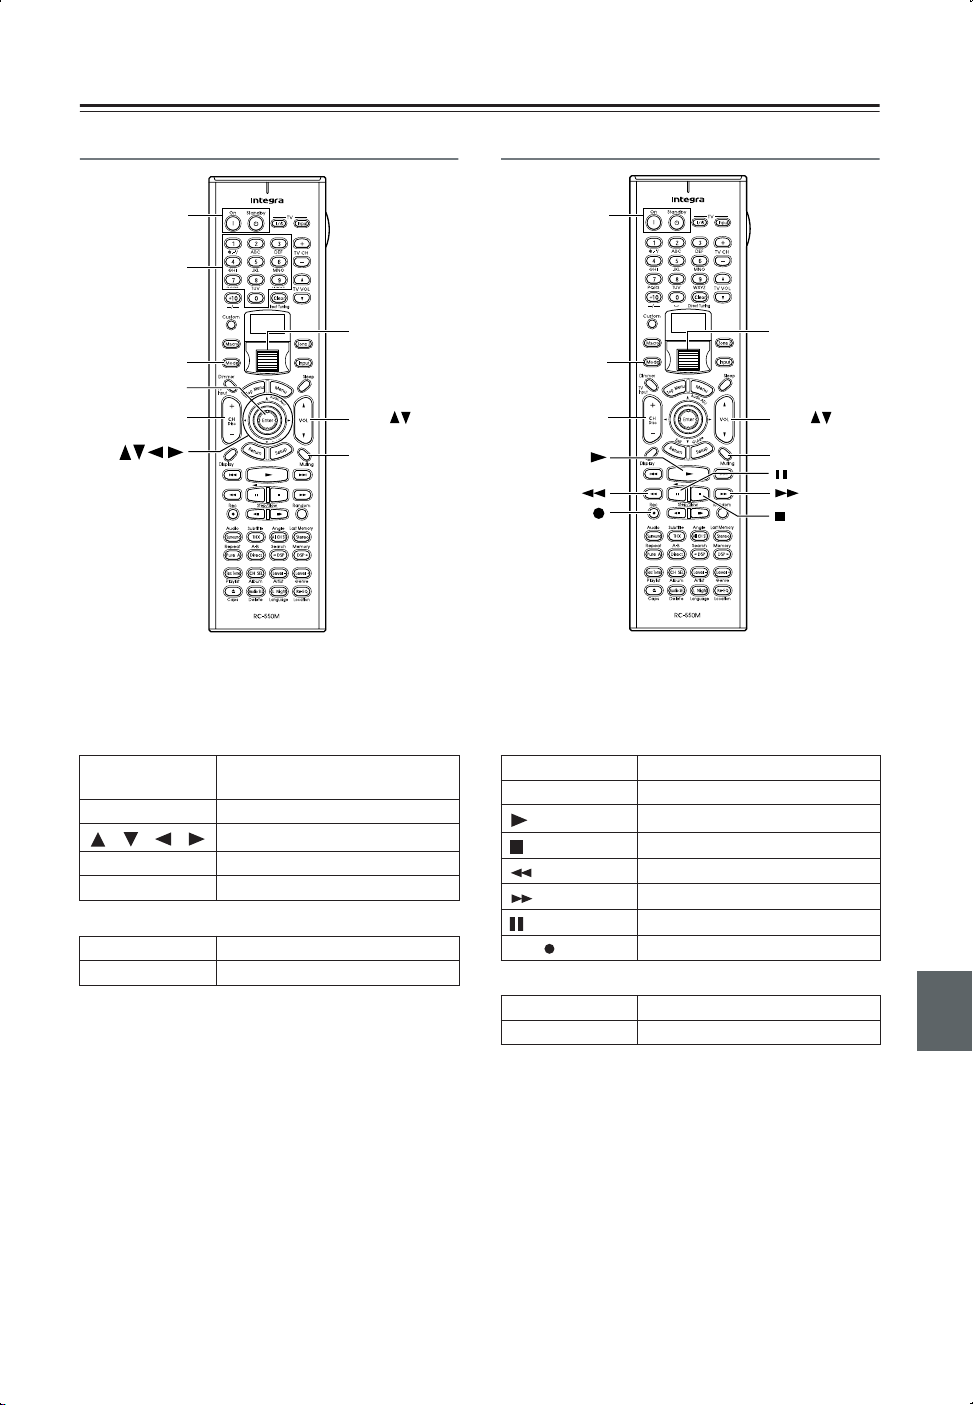
Controlling a Satellite Receiver
On,
Standby
Number
buttons
Scroll wheel
Mode
Enter
CH/ Disc + –
1. Press the [Mode] button, and then roll the scroll
wheel to select “SAT.”
2. Point the remote controller at your satellite
receiver, and use the following buttons (you must
enter appropriate remote control code first).
[On], [Standby]
[CH/Disc] Select satellite channels
[ ]/[ ]/[ ]/[ ]
[Enter] Confirm selection
Number buttons Enter numbers
Set the satellite receiver to On or
Standby
Select menu items
The following buttons control the Integra AV receiver.
[VOL] Adjust the receiver volume
[Muting] Mute the receiver
VOL
Muting
Controlling a VCR
On,
Standby
Scroll wheel
Mode
CH/Disc + –
Rec
1. Press the [Mode] button, and then roll the scroll
wheel to select “VCR.”
2. Point the remote controller at your VCR, and use
the following buttons (you must enter appropriate
remote control code first).
[On], [Standby] Set the VCR to On or Standby
[CH/Disc] Select TV channels
[]
[]
[]
[]
[]
Rec [ ] Record
Play
Stop
Rewind
Fast forward
Pause
The following buttons control the Integra AV receiver.
[VOL] Adjust the receiver volume
[Muting] Mute the receiver
VOL
Muting
4
Page 5

Using the RC-550M Remote Controller —Continued
Controlling a TV
*
On,
Standby
Number
buttons
Mode
TV Input
CH/Disc + –
1. Press the [Mode] button, and then roll the scroll
wheel to select “TV.”
2. Point the remote controller at your TV, and use
the following buttons (you must enter appropriate
remote control code first).
[On], [Standby] Set the TV to On or Standby
TV [ ]
TV CH [+]/[–] Select TV channels
Number buttons Enter numbers
[CH/Disc] Select cable channels
[TV Input] Select TV or VCR input
TV VOL [ ]/[ ]
*: Buttons marked with an asterisk can always be used to con-
trol a TV regardless of the currently selected remote controller mode. These buttons do not work with the additional TV
modes.
TV on/off
Adjust the TV volume
TV CH + –*
TV VOL
Scroll wheel
VOL
Muting
*
Controlling a Cable Receiver
ON STANDBY
123
456
789
CLEAR
10 0
DIRECT TUNING
M
U
N
E
E
N
M
U
P
O
T
A
U
D
I
O
A
D
ENTER
E
E
D
X
I
I
U
T
G
R
E
T
U
U
T
R
E
N
S
STEP/SLOW
SUBTITLE
THX All ST
SEARCHA-BREPEAT
DIRECT
DSP DSP
CH SEL
ALBUM ARTIST GENRE
L NIGHT
AUDIOSEL
LANGUAGE LOCATION
TV
INPUT
+
TV CH
-
TV VOL
Scroll wheel
ZONE
2
INPUTMODE
SLEEP
J
VOL
VOL
P
RANDOMREC
LAST MANGLE
MEMORY
-
STEREO
LEVEL+LEVEL
Re-EQ
MUTING
Muting
On,
Standby
Number
buttons
Mode
CH + –
@.-'/ ABC DEF
GHI JKL MNO
PQRS TUV WXYZ
+
--/---
CUSTOM
MACRO
DIMMER
TV
INPUT
+
CH
DISC
-
DISPLAY
AUDIO
SURR
PURE A
TEST TONE
PLAYLIST
CAPS DELETE
1. Press the [Mode] button, and then roll the scroll
wheel to select “CBL.”
2. Point the remote controller at your cable receiver,
and use the following buttons (you must enter
appropriate remote control code first).
[On], [Standby]
[CH/Disc] Select cable channels
Number buttons Enter numbers
Set the cable receiver to On or
Standby
The following buttons control the Integra AV receiver.
[VOL] Adjust the receiver volume
[Muting] Mute the receiver
The following buttons control the Integra AV receiver.
[VOL] Adjust the receiver volume
[Muting] Mute the receiver
5
Page 6

Using the RC-550M Remote Controller —Continued
Learning Commands from Another
Remote Controller
You can teach the RC-550M remote controller new
commands simply by transmitting commands from
another remote controller one at time. For example, by
transmitting the Play and Stop commands from your CD
player’s remote controller, the RC-550M remote controller can be taught to transmit those commands when
its Play [ ] and Stop [ ] buttons are pressed in CD
mode.
This is convenient when you want to add commands to
buttons after entering a remote control code (page 2).
1
2
3
4
Press and hold the [Custom] button for more than three seconds.
The remote controller enters Custom
mode.
Roll the scroll wheel to select
“LEARN,” and then press the
scroll wheel.
Roll the scroll wheel to select the
the remote controller mode you
want to teach a new command,
and then press the scroll wheel.
The following remote controller modes
can be selected: DVD, TV, VCR, CBL,
or SAT.
On the RC-550M remote controller, press the button you want to
teach the new command.
If you press a button that cannot be
taught a new command, the message
“RETRY” appears and you should
press another button.
5
6
Notes:
• The following buttons cannot be taught new commands: [Light], [Custom], [Macro], [Mode], [Input],
[Zone 2], and the scroll wheel button.
• The RC-550M remote controller can learn a total of
150 commands. However, the commands of some
remote controllers may use a lot of memory, in which
case, this total will be reduced.
• If the message “FULL” appears, the remote controller
cannot learn any more commands because its memory
is full.
• By default, the RC-550M remote controller knows the
commands for controlling an Integra/Onkyo CD
player, cassette deck, DVD player, and MD player
(e.g., Play, Stop, Pause, etc., buttons). You can teach
these buttons new commands, although the defaults
will be restored if the remote controller is reset.
• To teach a new command to a button that has already
been taught a command, simply repeat this procedure.
• Like most remote controllers, the RC-550M remote
controller uses infrared. Commands from remote controllers that don’t use infrared cannot be learnt.
• When the remote controller’s batteries expire, all
learnt commands will be lost and will have to learnt all
over again, so don’t discard your other remote controllers.
Point the remote controllers at
each other, about 2 to 6 inches
(5–15 cm) apart, and then, on the
other remote controller, press the
button whose command you
want to learn.
When the command has been learnt
successfully, “OK” appears on the display. You may need to press the button
several times.
If the command is not learnt successfully, after the message “FAIL” has
been displayed, the mode select display
reappears (step 3), and you should try
again.
To teach the RC-550M remote
controller more new commands,
repeat steps 3 through 5.
Press the [Custom] button when you’ve
finished.
6
Page 7

Using the RC-550M Remote Controller —Continued
Using Macros
With the Macro function you can program the remote
controller to perform a sequence of actions with one
press of a button. For example, normally you need to perform the following actions to use a CD player that’s connected to the Integra AV receiver:
1. Press the scroll wheel, (to select AMP mode).
2. Press the [On] button (to turn on the DTR-8.4).
3. Roll the scroll wheel to select CD (to select the CD
remote controller mode and the CD input source).
4. Press the Play [ ] button (to start the CD
player).
With the Macro function you can program the remote
controller to do all of this with one press of a button.
Making Macros
You can make up to eight macros, and each macro can
perform up to eight actions.
1
2
Press and hold the [Custom] button for more than three seconds.
The remote controller enters Custom
mode.
Roll the scroll wheel to select
“MACRO,” and then press the
scroll wheel.
4
5
Roll the scroll wheel to select a
macro, and then press the scroll
wheel.
Macros are numbered from 1 to 8.
Macro #1 selected
Action #1
On the remote controller, press
the buttons whose actions you
want to program into the macro
in the order you want them performed.
To program the CD example in the left
column into a macro: press the scroll
wheel, press the [On] button, roll the
scroll wheel to select CD, press the
scroll wheel, and then press the Play
[ ] button.
Actions are numbered from 1 to 8.
Macro #1 selected
8 actions learnt
After each button is pressed, “SET” followed by “KEY” is displayed.
To add an action that selects an input
source for the main room or Zone 2,
3
Roll the scroll wheel to select
“EDIT,” and then press the scroll
wheel.
6
press the [Input] button or [Zone 2] button, respectively, roll the scroll wheel to
select the input source, and then press
the scroll wheel.
When you’ve finished, press the
[Macro] button.
After the following appears on the display, the display returns to normal.
7
Page 8

Using the RC-550M Remote Controller —Continued
Running Macros
Programmed macros can be run as follows.
1
2
Press the [Macro] button.
Roll the scroll wheel to select the
macro’s number, and then press
the scroll wheel.
The actions in the macro are performed
in the order in which they were programmed.
Naming Macros
You can name your macros as follows. Names may contain of up to five characters.
1
2
Press and hold the [Custom] button for more than three seconds.
The remote controller enters Custom
mode.
Roll the scroll wheel to select
“MACRO,” and then press the
scroll wheel.
Macro #1 selected
1st character
5
6
Roll the scroll wheel to select a
character, and then press the
scroll wheel to set it.
The following characters are available.
0 1 2 3 4 5 6 7 8 9 A B C D E F G H I J
K L M N O P Q R S T U V W X Y Z + –
_
= < > _ / * space
Macro #1 selected
1st character set
Repeat step 5 until you’ve
entered all 5 characters.
The previous menu reappears.
If the name you are entering consists of
less than five characters, enter spaces at
the end to make it up to five.
3
4
Roll the scroll wheel to select
“NAME,” and then press the
scroll wheel.
Roll the scroll wheel to select the
number of the macro that you
want to name, and then press the
scroll wheel.
8
Page 9

Using the RC-550M Remote Controller—Continued
Editing Remote Controller Modes
Adding New Remote Controller Modes
You can add additional modes (DVD, TV, VCR, CBL,
SAT) to the remote controller. This is useful if, for example, you have several DVD players or TVs.
1
2
3
Press and hold the [Custom] button for more than three seconds.
The remote controller enters Custom
mode.
Roll the scroll wheel to select
“MODE,” and then press the
scroll wheel.
Roll the scroll wheel to select
“ADD,” and then press the scroll
wheel.
Reordering the Remote Controller Modes
You can change the order in which the remote controller
modes appears when you roll the scroll wheel. The position of the AMP mode cannot be changed.
1
2
3
Press and hold the [Custom] button for more than three seconds.
The remote controller enters Custom
mode.
Roll the scroll wheel to select
“MODE,” and then press the
scroll wheel.
Roll the scroll wheel to select
“SORT,” and then press the scroll
wheel.
4
4
Roll the scroll wheel to select the
type of mode you want to add,
and then press the scroll wheel.
5
You can add up to 8 additional modes:
4 DVD, 2 TV, 1 VCR, and 1 CBL.
Roll the scroll wheel to select the
mode you want to move, and
then press the scroll wheel.
Roll the scroll wheel to select the
mode before which you want to
insert the specified mode, and
then press the scroll wheel.
Here the specified mode will be
inserted before the “VCR” mode.
If the move is successful, after “OK”
has been displayed, the SORT display
(step 3) reappears.
9
Page 10

Using the RC-550M Remote Controller —Continued
Deleting Remote Controller Modes
You can delete remote controller modes that you don’t
need, such as modes for components that you don’t have.
The AMP mode cannot be deleted.
1
2
3
Press and hold the [Custom] button for more than three seconds.
The remote controller enters Custom
mode.
Roll the scroll wheel to select
“MODE,” and then press the
scroll wheel.
Roll the scroll wheel to select
“DEL,” and then press the scroll
wheel.
Assigning Remote Controller Modes
With this function you can assign a remote controller
mode to an input source. This is useful when you connect, say, a CD recorder to the TAPE IN/OUT sockets.
By assigning the CDR remote controller mode to the
TAPE input source, you can use the remote controller to
control the CD recorder.
1
2
3
Press and hold the [Custom] button for more than three seconds.
The remote controller enters Custom
mode.
Roll the scroll wheel to select
“MODE,” and then press the
scroll wheel.
Roll the scroll wheel to select
“ASSIGN,” and then press the
scroll wheel.
4
Roll the scroll wheel to select the
mode you want to delete, and
then press the scroll wheel.
If the mode is deleted successfully,
after “OK” has been displayed, the
DEL display (step 3) reappears.
4
5
Roll the scroll wheel to select an
input source, and then press the
scroll wheel.
Roll the scroll wheel to select the
mode you want to assign to the
specified input source, and then
press the scroll wheel.
If the assignment is successful, after
“OK” has been displayed, the ASSIGN
display (step 3) reappears.
10
Page 11

Using the RC-550M Remote Controller —Continued
Changing the Remote Controller’s
Transmission Signal Format (IR/RF)
You can set the remote controller’s transmission signal
format to either infrared (IR) or radio frequency (RF).
The default setting is IR.
This is useful when, for example, the Integra receiver is
installed in a rack or is not in line of sight of the remote
controller as it allows you to use a commercially available RF receiver to pick up commands from the remote
controller, which are then fed to the AV receiver via its
IR IN socket. For this to work, you must assign the same
ID and channel to the remote controller and RF receiver.
1
2
3
Press and hold the [Custom] button for more than three seconds.
The remote controller enters Custom
mode.
Roll the scroll wheel to select
“SETUP,” and then press the
scroll wheel.
Roll the scroll wheel to select “IR/
RF,” and then press the scroll
wheel.
6
Roll the scroll wheel to select the
same channel as the RF receiver,
and then press the scroll wheel.
Channels 0 to 3 can be selected.
If the ID and channel have been set successfully, “OK” appears on the display.
Resetting the Remote Controller
You can reset the remote controller to its default settings.
1
2
Press and hold the [Custom] button for more than three seconds.
The remote controller enters Custom
mode.
Roll the scroll wheel to select
“MODE,” and then press the
scroll wheel.
3
4
Roll the scroll wheel to select
“IR” or “RF,” and then press the
scroll wheel.
When you select “IR.”
4
5
If you select “RF,”roll the scroll
wheel to select the same ID as
the RF receiver, and then press
the scroll wheel.
IDs 0 to 9 and A to F can be selected.
Roll the scroll wheel to select
“RESET,” and then press the
scroll wheel.
Roll the scroll wheel to select
“YES,” and then press the scroll
wheel.
The remote controller is reset to its
default settings.
11
 Loading...