

Integra NAS-2.3 Owner's Manual

Audio Network Server
NAS-2.3
Instruction Manual
Contents
Before using
Important Safety Instructions ................... 2
Important Safety Notices ......................... 3
Precautions ................................................ 4
Features ...................................................... 5
Accessories ................................................ 5
Quick Start Guide ...................................... 6
Using your Audio Network
Server
Controls and Connections ....................... 8
Registering your Audio Network Server .... 14
The Audio Network Server Main Menu ..... 16
Recording Music ...................................... 17
Playing Music ........................................... 19
Organizing your Music Collection ......... 23
Advanced Settings.................................. 26
Using your Audio Network Server with
Net-Tune Network Clients .................. 28
Thank you for purchasing the Integra Audio Network
Server.
Please read this manual thoroughly before making
connections and plugging in the unit. Following the
instructions in this manual will enable you to obtain
optimum performance and listening enjoyment from
your new Audio Network Server. Please retain this
manual for future reference.
Appendix
Getting Help............................................. 30
Specifications........................................... 30
Index ......................................................... 31

Important Safety Instructions
READ INSTRUCTIONS - All the safety and
operating instructions should be read before the
product is operated.
KEEP INSTRUCTIONS - The safety and operating
instructions should be kept for future reference.
HEED WARNINGS - All warnings on the product
and in the operating instructions should be adhered
to.
FOLLOW INSTRUCTIONS - All operating and use
instructions should be followed.
CLEANING - Unplug this product from the wall
outlet before cleaning. The product should be
cleaned only with a soft dry cloth. Never clean
with furniture wax, benzene, insecticides, or other
volatile liquids since they may corrode the cabinet.
ATTACHMENTS - Do not use attachments not
recommended by the product manufacturer as they
may cause hazards.
WATER AND MOISTURE - Do not use this product
near water - for example near a bathtub, washbasin,
kitchen sink, or laundry tub; in a wet basement; or
near a swimming pool; and the like.
ACCESSORIES - Do not place this product on an
unstable cart, stand, tripod, bracket, or table. The
product may fall, causing serious injury to a child
or adult, and serious damage to the product. Use
only with a cart, stand, tripod, bracket, or table
recommended by the manufacturer, or sold with
the product. Any mounting of the product should
follow the manufacturer’s instructions and should
use a mounting accessory recommended by the
manufacturer.
CART - A product and cart combination should be
moved with care. Quick stops, excessive force and
uneven surfaces may cause the product and cart
combination to overturn:
VENTILATION - Slots and openings in the cabinet are
provided for ventilation and to ensure reliable
operation of the product and to protect it from
overheating. Do not block any ventilation openings.
The openings should never be blocked by placing the
product on a bed, sofa, rug, or other similar surface.
This product should not be placed in a built-in
installation such as a bookcase or rack unless proper
ventilation is provided. Install in accordance with the
manufacturer’s instructions.
POWER SOURCES - This product should be
operated only from the type of power source
indicated on the marketing label. If you are not
sure of the type of power supply to your home,
consult your product dealer or local power
company.
LOCATION - The appliance should be installed in a
stable location.
NONUSE PERIODS - The power cord of the appliance
should be unplugged from the outlet when left unused
for a long period of time.
GROUNDING OR POLARIZATION - If this
product is equipped with a polarized alternating
current line plug (a plug having one prong wider
than the other), it will fit into the outlet only one
way. This is a safety feature. If you are unable to
insert the plug fully into the outlet, try reversing the
plug. If the plug does not fit into the outlet, contact
your electrician to replace your obsolete outlet. Do
not defeat the safety purpose of the polarized plug.
If this product is equipped with a three-wire
grounding type plug, a plug having a third
(grounding) pin, it will only work in a grounding
type power outlet. This is a safety feature. If you are
unable to insert the plug into the outlet, contact your
electrician to replace your obsolete outlet. Do not
defeat the safety purpose of the grounding type plug.
POWER CORD PROTECTION - Power supply
cords should be protected from being walked on or
being pinched, particularly at plugs, convenience
receptacles, and the point where they exit from the
product.
OUTDOOR ANTENNA GROUNDING - If an
outside antenna or cable system is connected to the
product, be sure the antenna or cable system is
grounded so as to provide some protection against
voltage surges and built-up static charges. Article
810 of the National Electric Code. ANSI/NFPA70
provides information with regard to proper
grounding of the mast and supporting structure,
grounding of the lead-in wire to an antenna
discharge unit, connection to grounding electrodes,
and requirements for the grounding electrode. See
Figure A.
LIGHTNING - For added protection for this product
during a lightning storm, or when it is left
unattended and unused for long periods of time,
unplug it from the wall outlet and disconnect the
antenna or cable system. This will prevent damage
to the product due to lightning and power-line
surges.
POWER LINES - An outside antenna system should
not be located in the vicinity of overhead power
lines or other electric light or power circuits, or
where it can fall into such power lines or circuits.
When installing an outside antenna system, extreme
care should be taken to keep from touching such
power lines or circuits as contact with them might
be fatal.
OVERLOADING - Do not overload wall outlets,
extension cords or integral convenience receptacles
as this can result in a risk of fire or electric shock.
OBJECT AND LIQUID ENTRY - Never push
objects of any kind into this product through
openings as they may touch dangerous voltage
points or short-out parts that could result in a fire
or electric shock. Never spill liquid of any kind on
the product.
SERVICING - Do not attempt to service this product
yourself as opening or removing covers may
expose you to dangerous voltage or other hazards.
Refer all servicing to qualified service personnel.
DAMAGE REQUIRING SERVICE - Refer all
servicing to qualified service personnel. Servicing
is required when the apparatus has been damaged
in any way, such as if a power supply cord or plug
is damaged, liquid has been spilled or objects have
fallen into the apparatus, the apparatus has been
exposed to rain or moisture, does not operate
normally, or has been dropped.
REPLACEMENT PARTS - When replacement parts
are required, be sure the service technician has
used replacement parts specified by the
manufacturer or that have the same characteristics
as the original part. Unauthorized substitutions
may result in fire, electric shock, or other hazards.
SAFETY CHECK - Upon completion of any service
or repairs to this product, ask the service technician
to perform safety checks to determine that the
product is in proper operating condition.
WALL OR CEILING MOUNTING - The product
should not be mounted to a wall or ceiling.
HEAT - Do not install near any heat source such as
radiators, heaters, stoves, or other apparatus
(including amplifiers) that produce heat.
The lightning flash with arrowhead symbol, within an
equilateral triangle, is intended to alert the user to the
presence of uninsulated “dangerous voltage” within the
product’s enclosure that may be of sufficient magnitude
to constitute a risk of electric shock to persons.
The exclamation point within an equilateral triangle is
intended to alert the user to the presence of important
operating and maintenance (servicing) instructions in
the literature accompanying the appliance.
2
Important Safety Notices
The serial number for this equipment is located on the rear panel.
Please write this serial number on your enclosed warranty card and
keep it in a secure area. This is for your security.
For U.S. models
CAUTION:
shielded cables and connectors are used to connect the unit to other
equipment. To prevent electromagnetic interference with electric
appliances such as radios and televisions, use shielded cables and
connectors for connections.
This product satisfies FCC regulations when
NOTE: This equipment has been tested and found to comply
with the limits for a Class B digital device, pursuant to Subpart
J, Part 15 of the FCC rules. These limits are designed to provide
reasonable protection against harmful interference in a
residential installation. This equipment generates, uses, and can
radiate radio frequency energy and, if not installed and used in
accordance with the instructions, may cause harmful
interference to radio communications. However, there is no
guarantee that interference will not occur in a particular
installation. If this equipment does cause harmful interference to
radio or television reception, which can be determined by
turning the equipment off and on, the user is encouraged to try to
correct the interference by one or more of the following
measures:
• Reorient or relocate the receiving antenna.
• Increase the separation between the equipment and receiver.
• Connect the equipment into an outlet on a circuit different
from that to which the receiver is connected.
• Consult the dealer or an experienced radio/TV technician for
help.
Changes or modifications may cause this unit to fail to comply
with Part 15 of the FCC Rules and may void the user’s authority
to operate the equipment.
CAUTION
• Use of controls or adjustments or performance of procedures
other than those specified herein may result in hazardous
radiation exposure.
• The use of optical instruments with this product will increase
eye hazard.
Information to User
Alteration or modifications carried out without appropriate
authorization may invalidate the user’s right to operate the
equipment.
For Canadian models
NOTE:
Canadian ICES-003.
Cet appareil numérique de la Classe B est conforme à la norme
NMB-003 du Canada.
This Class B digital apparatus complies with
CAUTION: TO PREVENT ELECTRIC SHOCK, MATCH
WIDE PRONG OF PLUG TO WIDE SLOT, FULLY INSERT.
ATTENTION: POUR ÉVITER LES CHOCS
ÉLECTRIQUES, INTRODUIRE LA LAME LA PLUS LARGE
DE LA FICHE DANS LA BORNE CORRESPON-DANTE DE
LA PRISE ET POUSSER JUSQU’AU FOND.
For European models
NOTE: This product has been designed and type-tested to comply
with the limits set out in EN55013, EN55020, EN60950, EN55022:
1998 CLASS B4, EN65024: 1998, FCC RULES PART 15
SUBPART B CLASS B. AS/NZS 3548:1995 CLASS B
CAUTION:
LASER SAFETY: This unit employs a LASER. Only a qualified
person should remove the cover or attempt to service the device,
due to possible eye injury.
“CAUTION-USE OF CONTROLS OR ADJUSTMENTS OR
PERFORMANCE OF PROCEDURE OTHER THAN THOSE
SPECIFIED HEREIN MAY RESULT IN HAZARDOUS
RADIATION EXPOSURE.”
CLASS 1 L ASER
PRODUCT
1. This unit is a CLASS 1 LASER PRODUCT and employs a laser
inside the cabinet.
2. To prevent the laser from being exposed, do not remove the
cover. Refer servicing to qualified personnel.
3
Precautions
General precautions
When installing the equipment ensure that:
• the ventilation holes are not covered.
• air is allowed to circulate freely around the equipment.
• it is placed on a vibration free surface.
• it will not be exposed to excessive heat, cold, moisture, or dust.
• it will not be exposed to direct sunlight.
• it will not be exposed to electrostatic discharges.
In addition, never place heavy objects on the equipment.
If a foreign object or water does enter the equipment, contact your
nearest dealer or service center.
Do not pull out the plug by pulling on the power cord; grasp the
plug.
It is advisable when leaving the house, or during a thunderstorm, to
disconnect the equipment from the electrical wall outlet.
WARNING:
TO REDUCE THE RISK OF FIRE OR ELECTRIC SHOCK, DO
NOT EXPOSE THIS APPLIANCE TO RAIN OR MOISTURE.
Do not remove the cover from the equipment. There are no user
serviceable parts inside, and opening the case will invalidate your
warranty.
Do not insert anything into the equipment through the ventilation
holes.
Do not handle the power cord with wet hands.
To avoid overheating, do not position the Audio Network Server
near heat sources, and ensure that the ventilation holes are not
blocked.
CAUTION: This product contains a lithium battery. Danger of
explosion if battery is incorrectly replaced. Replace only with the
same or equivalent type recommended by Integra/Onkyo. Dispose
of batteries according to the manufacturer’s instructions.
WARNINGS
Do not expose the equipment to rain or moisture.
Do not remove the cover from the equipment.
Do not insert anything into the equipment through the
ventilation holes.
Do not cover the ventilation holes with any items such as
tablecloths, newspapers, curtains, etc.
Do not place an open flame, such as lighted candles, on the
equipment.
Do not handle the power cord with wet hands.
Allow adequate ventilation. Leave a gap of 0.1 m on all sides of
the unit.
Do not splash or spill water on the unit. Do not place objects
filled with liquid (such as vases) on the unit.
CD handling precautions
• Handle discs carefully so as not to damage or scratch the front
side. Always keep the disc surface clean.
• To protect the disc avoid placing it in the following locations:
- In direct sunlight or near a source of heat like a heater.
- In a place that is damp or dirty.
- In a place that could be exposed to rain, such as near a window.
• Do not use a disc with a special shape.
DTS encoded discs
Caution - When playing DTS encoded CDs excessive noise will be
heard on the analog outputs jacks of the Audio Network Server. To
avoid possible damage to the audio system you should ensure that
the correct connections are made to your amplification system for
replaying this type of disc.
Power cord precautions
Your Integra product complies with the household power and
safety requirements in your area.
COPYRIGHT NOTICE
This equipment must not be used for unauthorized duplication
of CDs or any other works protected by copyright. No license to
infringe on copyrights is granted by the sale of this equipment.
Recording and playback of some material may require
permission. For further information refer to the following:
• Copyright Act 1956
• Dramatic and Musical Performers Act 1958
• Performers Protection Acts 1963, and 1972
• Any subsequent statutory enactments and orders.
CAUTION
When disposing of used batteries, please comply with
governmental regulations or environmental regulations or
environmental public instruction’s rules that apply in your
country or area.
POWER BUTTON
When this button is pressed once, the power turns On and
information will appear on the display. When pressed again,
press the Off action key or the
switch to Off mode.
When the unit is in Off mode the “Standby” indicator is lit; the
apparatus is not disconnected from the AC power supply in this
mode.
Copyright notice
NET-TUNE is a trademark of Onkyo Corporation.
The NAS-2.3 Audio Network Server software is copyrighted
materials. No part of the Audio Network Server software may be
reproduced, transmitted, transcribed, stored in a retrieval system,
or translated into any language, or computer language, in any form
or by any means without prior written permission from Imerge.
XiVA is a registered trademark of Imerge Ltd. All other product
names are trademarks or registered trademarks of their respective
owners.
Cover art illustration from the XiVA online service ©2002 Muze Inc.
Music recognition technology and related data are provided by
Gracenote and the Gracenote CDDB
Gracenote is the industry standard in music recognition technology
and related content delivery. For more information go to
www.gracenote.com
key on the remote control to
®
Music Recognition Service
SM
.
4

Precautions
Gracenote is CDDB, Inc. d/b/a “Gracenote.” CD-related data from
Gracenote CDDB
Gracenote CDDB Client Software, copyright 1999, 2000, 2001,
2002 CDDB, Inc., U.S. Patents Numbers #5,987,525; #6,061,680;
#6,154,773, and other patents issued or pending.
CDDB is a registered trademark of Gracenote. The Gracenote logo
and logotype, the Gracenote CDDB logo and logotype, and the
“Powered by Gracenote CDDB” logo are trademarks of Gracenote.
Music Recognition Service and MRS are service marks of Gracenote.
MPEG Layer-3 audio coding technology licensed from Fraunhofer
IIS and THOMSON multimedia.
The information in this guide is believed to be correct as of the date of
publication. However our policy is one of continuous development and
so the information in this guide is subject to change without notice, and
does not represent a commitment on the part of Integra.
This guide was designed and produced by Imerge Ltd.
XiVA™ NEW MEDIA BROUGHT TO LIFE
XiVA™ is a highly portable software framework that powers nextgeneration media appliances. XiVA™ blends hard disk technology,
advanced software design, and embedded Internet technology to
provide amazing features. Audio, video, text, graphics, and all forms
of streaming new media are all brought to life through a wealth of
interactive user interface options. Powerful personalized software
accesses online content like never before. The next generation media
appliance is powered by XiVA™.
Gracenote CDDB Flow-Down License Terms
This product contains technology and data from Gracenote of
Berkeley, California (“Gracenote”). The technology from Gracenote
(the “Gracenote Embedded Software”) enables this product to do
disc identification and obtain music-related information, including
name, artist, track, and title information (“Gracenote Data”), which
is included on the Gracenote Database (the “Gracenote Database”).
You agree that you will use Gracenote Data, the Gracenote Database, and
Embedded Software for your own personal non-commercial use only. You
agree that you will access Gracenote Data only by means of the standard end
user functions and features of this product. You agree not to assign, copy,
transfer or transmit the Embedded Software or any Gracenote Data to any
third party, YOU AGREE NOT TO USE OR EXPLOIT GRACENOTE
DATA, THE GRACENOTE DATABASE, OR GRACENOTE
COMPONENT, EXCEPT AS EXPRESSLY PERMITTED HEREIN.
You agree that your non-exclusive license to use the Gracenote Data, the
Gracenote Database, and Embedded Software will terminate if you
violate these restrictions. If your license terminates, you agree to cease any
and all use of the Gracenote Data, the Gracenote Database, and Gracenote
Embedded Software. Gracenote reserves all rights in the Gracenote Data,
Gracenote Database, and Gracenote Embedded Software, including all
ownership rights. You agree that Gracenote may enforce its rights under
this Agreement against you directly in its own name.
The Embedded Software and each item of Gracenote Data are licensed
to you “AS IS.” Gracenote makes no representations or warranties,
express or implied, regarding the accuracy of any Gracenote Data.
Gracenote reserves the right to delete data or to change data categories in
any Data updates and for any cause that Gracenote deems sufficient. No
warranty is made that the Embedded Software is error-free or that
functioning of the Embedded Software will be uninterrupted. Gracenote
is not obligated to provide you with any new enhanced or additional data
types or categories that Gracenote may choose to provide in the future.
GRACENOTE DISCLAIMS ALL WARRANTIES EXPRESS OR
IMPLIED. INCLUDING, BUT NOT LIMITED TO, IMPLIED
WARRANTIES OF MERCHANTABILITY, FITNESS FOR A
PARTICULAR PURPOSE, TITLE, AND NONINFRINGEMENT. GRACENOTE DOES NOT WARRANT THE
RESULTS THAT WILL BE OBTAINED BY YOUR USE OF THE
GRACENOTE COMPONENT OR ANY GRACENOTE SERVER.
IN NO CASE WILL GRACENOTE BE LIABLE FOR ANY
CONSEQUENTIAL OR INCIDENTAL DAMAGES OR FOR
ANY LOST PROFITS OR LOST REVENUES.
®
, copyright 1999, 2000, 2001, 2002 Gracenote.
Features
Welcome to the NAS-2.3 Audio Network Server from Integra. The
NAS-2.3 is a revolutionary way of filling your home with music.
Your Audio Network Server stores and catalogs your music
collection, allowing you to select any album or track at the press of a
key.
You can browse through your albums and tracks using convenient
on-screen menus displayed on your television, showing full album,
track, and artist names downloaded from the Gracenote CDDB
Music Recognition Service as well as album cover art illustration
from the XiVA™ online service. Your Audio Network Server also
lets you organize your music collection and create selections for
different occasions to suit your mood.
Incredible capacity
Your Audio Network Server is a hard disk based audio system which
can store hundreds of hours of music, all with the convenience of
instant access, at the touch of a key.
Convenient TV screen
Play music, record CDs, or organize your library using convenient
on-screen menus which show the full album, artist, and track names,
allowing you to select the one you want with a few simple selections.
Internet access for track listings
Your Audio Network Server records the CDs from your music
collection at faster than real time. It then automatically connects to
the Gracenote CDDB Music Recognition Service via the built-in
modem or Ethernet connection. This database provides album and
track details for a wide range of CDs. This information can be
downloaded and stored with each CD you record, allowing you to
select any item in your music collection by album name, artist name,
track name, or genre, giving you total flexibility in the way you
access and control your music collection.
Create your own playlists
Your Audio Network Server allows you to compile personal
playlists and then automatically play tracks from the playlist you
have selected. Playlists let you customize your Audio Network
Server for each member of the family, or for matching the music to
the occasion or mood.
Instant access, irrespective of your music collection
Whether you select a track by title, album, artist, or genre, your
Audio Network Server locates it instantly and plays it at the press of
a key. All this is achieved with an extremely simple and intuitive
user interface, operated using a few keys on the front panel or remote
control.
Accessories
Stereo RCA cable ........................................................................1
Video cable ..................................................................................1
Modem cable ............................................................................... 1
Power cord. ..................................................................................1
Remote control unit .....................................................................1
AAA (R03P) dry cell batteries ....................................................2
5
Quick Start Guide
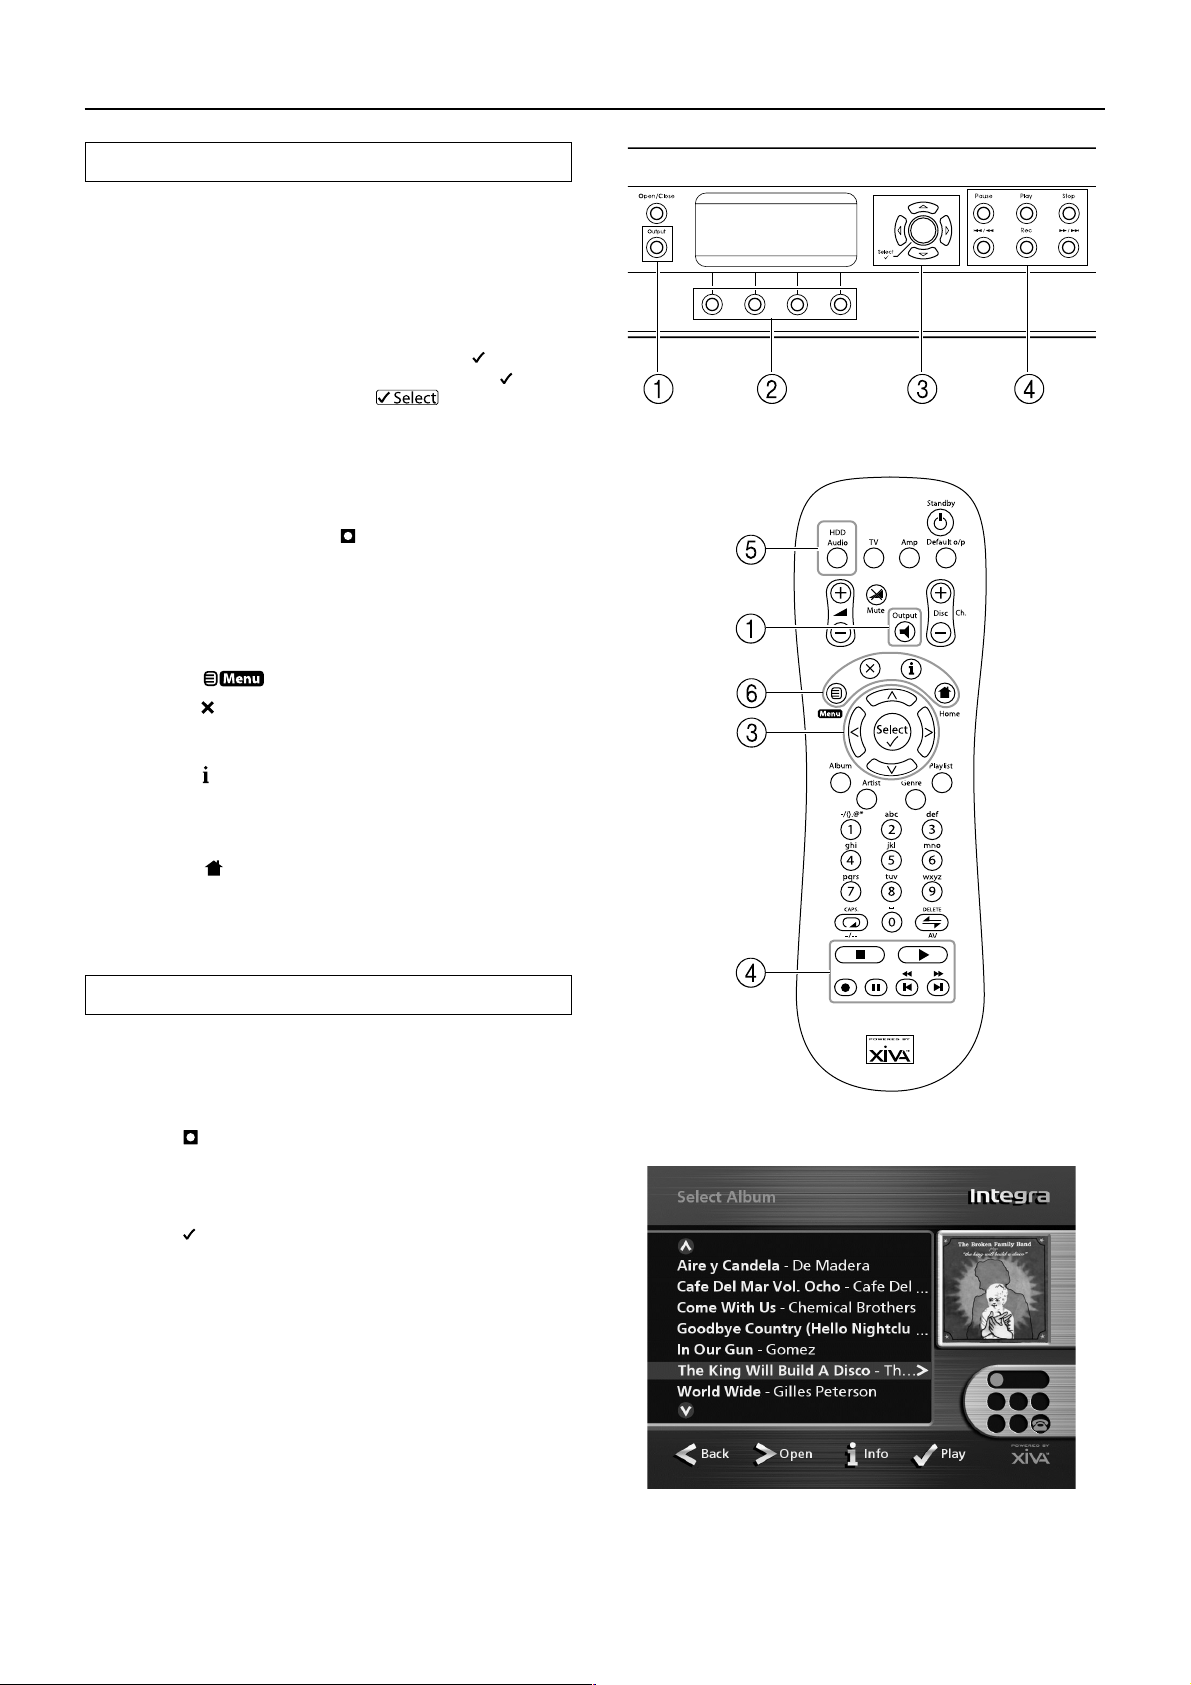
Controls
1. Output button: Press this button to display information on the
music currently playing.
Press this button again to switch to the next output on the Audio
Network Server. This function is enabled by an optional future
software upgrade.
2. Front panel action keys: These four keys correspond to the
different actions clearly visible by reading the front panel
display. For example, in the display opposite, the
key will begin playback of the selected album. The
indicates that you can also press the key on the remote
control to begin playback.
3. Navigation keys: Move up, down, left, and right through the
menu system. The button in the center selects the currently
highlighted option.
4. Transport keys: Controls the playback of music on the
currently selected output. The
used on some menu screens to begin a recording or to modify a
playlist.
5. HDD Audio button: Press this button to control the Audio
Network Server.
6. Remote control action keys:
• Press the
• Press the key whenever this symbol is displayed on the TV
screen or on the front panel to cancel, exit or delete the current
operation according to the information on the screen.
• Press the key whenever this symbol is displayed on the TV
screen or on the front panel to edit text information, or
confirm a new text entry according to the information on the
screen.
• Press the
function. For instance, when browsing the library press this
key to return to the Library menu.
key to display the main menu at any time.
key to return to the “home” page of the current
Record key is an action key
Play action
symbol
Fig. A - Front Panel Display
Recording from a CD
• Press the Open/Close key on the front panel to open the CD tray.
• Place a CD in the tray.
• Push the Open/Close key on the front panel.
The CD detected prompt is displayed.
• Press the
The Please select Auto or Custom record display then allows
you to chose whether to do a quick (one touch) record or specify
individual record options.
• Press the
The display confirms when the recording is finished.
Note: You can play music from your music library while you are
recording a CD.
Record action key to proceed.
Auto action key to do a one touch recording.
Fig. B - Remote Control
Fig. C - TV User Interface
6
Quick Start Guide
Playing music
• Display the Main Menu by pressing the key on your
Audio Network Server remote control, or the Menu action key
on the front panel.
The Main Menu will be displayed.
• Press the
• Press the Select action key.
The Library menu lets you choose how you want to browse
your music collection. You can browse items by album, artist,
genre, or playlist.
• Press the
For example, if you select Albums you will see an alphabetical
list of your album titles.
To play music
• Use the and keys to highlight the item you would like to
play.
• Press the
• Press the Play action key.
To stop play
• Press the ■ key on the front
panel or the Audio Network
Server remote control.
To pause play
• Press the key on the front
panel or your Audio Network
Server remote control.
To skip to the next or previous track
• Press the
Server remote control.
To seek within a track
• Hold down the or key on the front panel or your Audio
Network Server remote control.
Play resumes from the new position when you release the key.
and keys to highlight Library.
and keys to step between categories.
key to view the contents of the selected item.
or key on the front panel or your Audio Network
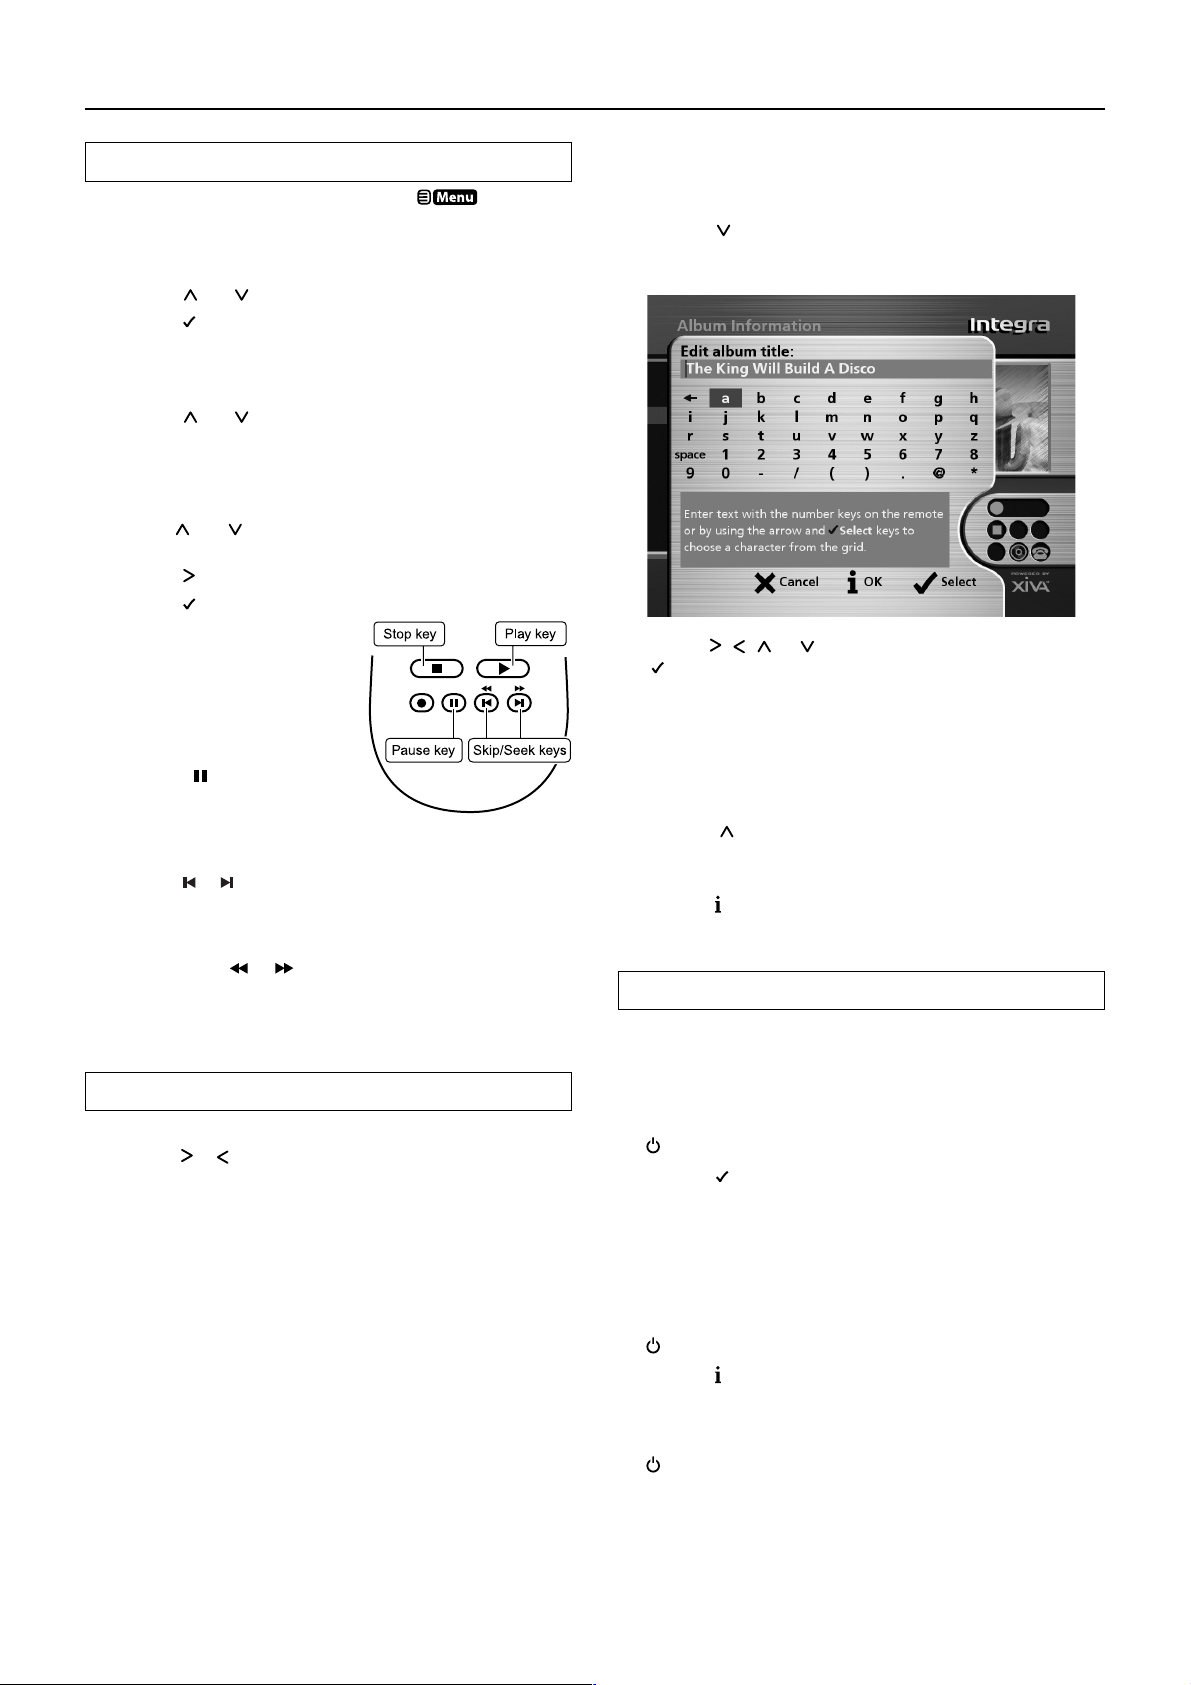
Entering text
To enter text using the alphanumeric keypad
• Press the or keys to move the cursor to the required position.
• Use the keys on the alphanumeric keypad to enter a letter.
For example, to enter S press the 7 key four times, because S is the
fourth letter on the 7 key.
• Press the DELETE key on your Audio Network Server remote
control to delete letters.
• Press the CAPS key on either the front panel or your Audio
Network Server remote control to switch between upper case
and lower case letters.
To select letters from a grid
Alternatively, the Grid provides a convenient way of selecting
letters:
• Press the
The currently selected letter is highlighted:
• Use the , , or keys to move the cursor and press the
Select action key to enter each letter.
• Use the CAPS key on either the front panel or the Audio
Network Server remote to switch between upper and lower case
letters.
If at any time you need to enter text in a different part of the text
field, or you want to return to entering text using the alphanumeric
keypad:
• Press the
field.
Finally, when you have finished entering the name:
• Press the OK action key.
key to move the cursor into the grid area.
key repeatedly until the cursor returns to the text
Switching on and off
To switch to standby mode
Standby mode should be used when the Audio Network Server is not
being used for a short period of time. Do not disconnect the power
from the Audio Network Server in this mode.
• Press the Standby key on the front panel or the
Standby key on the remote control.
• Press the Standby action key to enter standby.
To switch to off mode
Off mode should be used when the Audio Network Server is not
being used overnight (or for several days). When the unit is in off
mode it consumes very little power. You can safely disconnect the
power from the Audio Network Server in this mode.
• Press the Standby key on the front panel or the
Standby key on the remote control.
• Press the
Off action key to enter off mode.
To switch on from standby or off mode
• Press the Standby key on the front panel or the
Standby key on the remote control.
7
Controls and Connections
Front View
This section provides information on the controls and connections
available on your Audio Network Server.
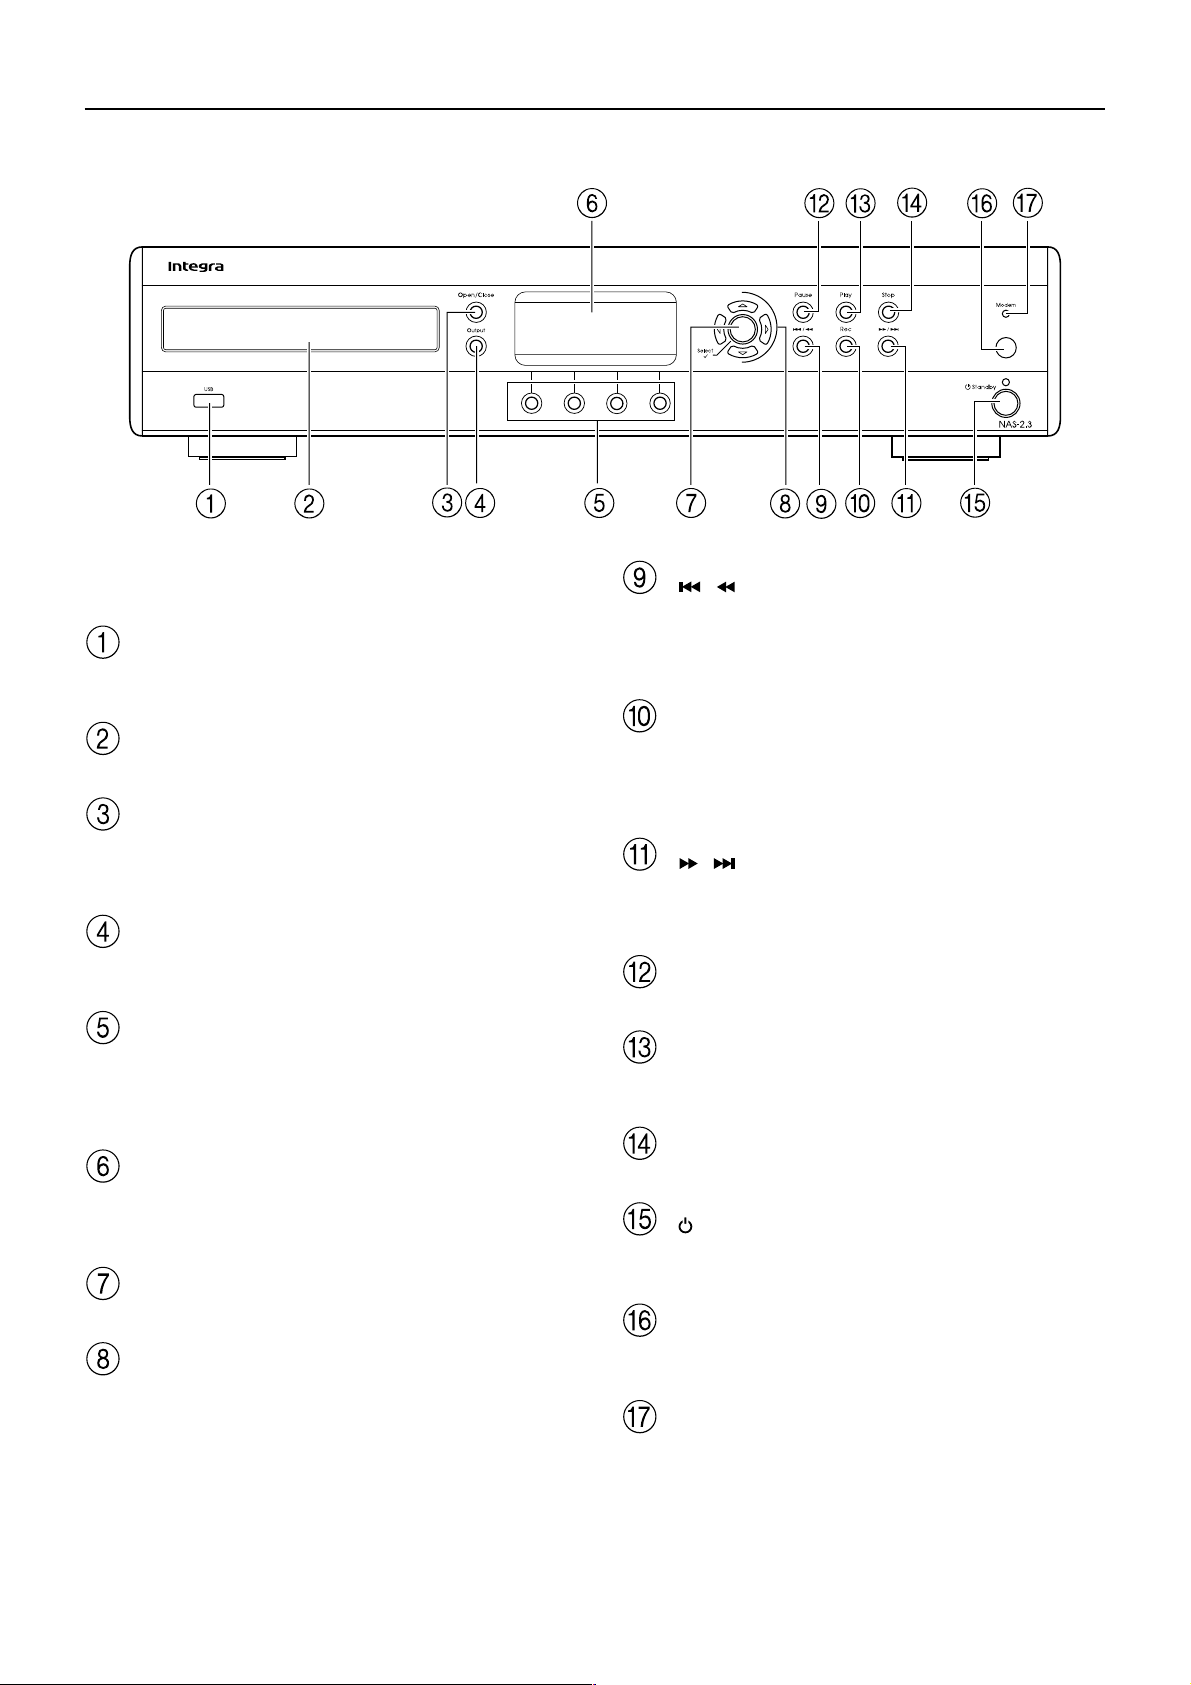
USB
Allows the Audio Network Server to communicate with supported
USB devices.
Disc Tray
Insert a disc with the label side up.
Open/Close button
Pressing the Open/Close button opens the disc tray. Place a compact
disc on the tray with the label side facing up. Press the button again
to close the tray.
Output button
Press the Output button to display what music is playing on the
currently selected output.
Action buttons
Action buttons allow you to perform specific operations dependent
on the current menu screen. For more information on using the
action buttons see Using the Audio Network Server action keys on
page 14.
Display
The display shows information about the music available on the unit,
the status of the Audio Network Server (for instance if the unit is
currently playing), and the current configuration of the unit.
Select button
Selects the option currently visible on the display.
Navigation buttons
The Navigation buttons allow you to move up, down, left, or right
through the menus shown on the display.
/ button
When the button is pressed briefly during playback, play restarts at
the beginning of the current track. A second brief press moves to the
beginning of the previous track. When the button is held for a longer
period of time the music will rewind at high speed.
Rec button
The Rec button is an action key - on some menu screens you can use
this button to begin a recording from the CD inside the unit. When
managing playlists this button is also used to create new playlists or
add tracks to an existing playlist.
/ button
When the button is pressed briefly during playback, play restarts at
the beginning of the next track. When the button is held for a longer
period of time the music will fast forward at high speed.
Pause button
Press the Pause button to interrupt playback temporarily.
Play button
Press the Play button to resume playback if the music has been
stopped or paused.
Stop button
Press the Stop button to halt playback on the current output.
Standby
Press to put your Audio Network Server into either standby or off
mode, press again to switch your Audio Network Server back on.
Remote Sensor
This window receives signals transmitted from the remote control
unit.
Modem
The online indicator is illuminated when the modem is active.
8
Controls and Connections
Rear View
DATA
CONTROLLER
IN
IR
USB
ETHERNET
(
NET-TUNE
)
MODEM
VIDEO OUT DIGITAL
VIDEO
VGA
VIDEO S
OPTICAL
IN OUT
COAXIAL
IN IN OUT
OUT
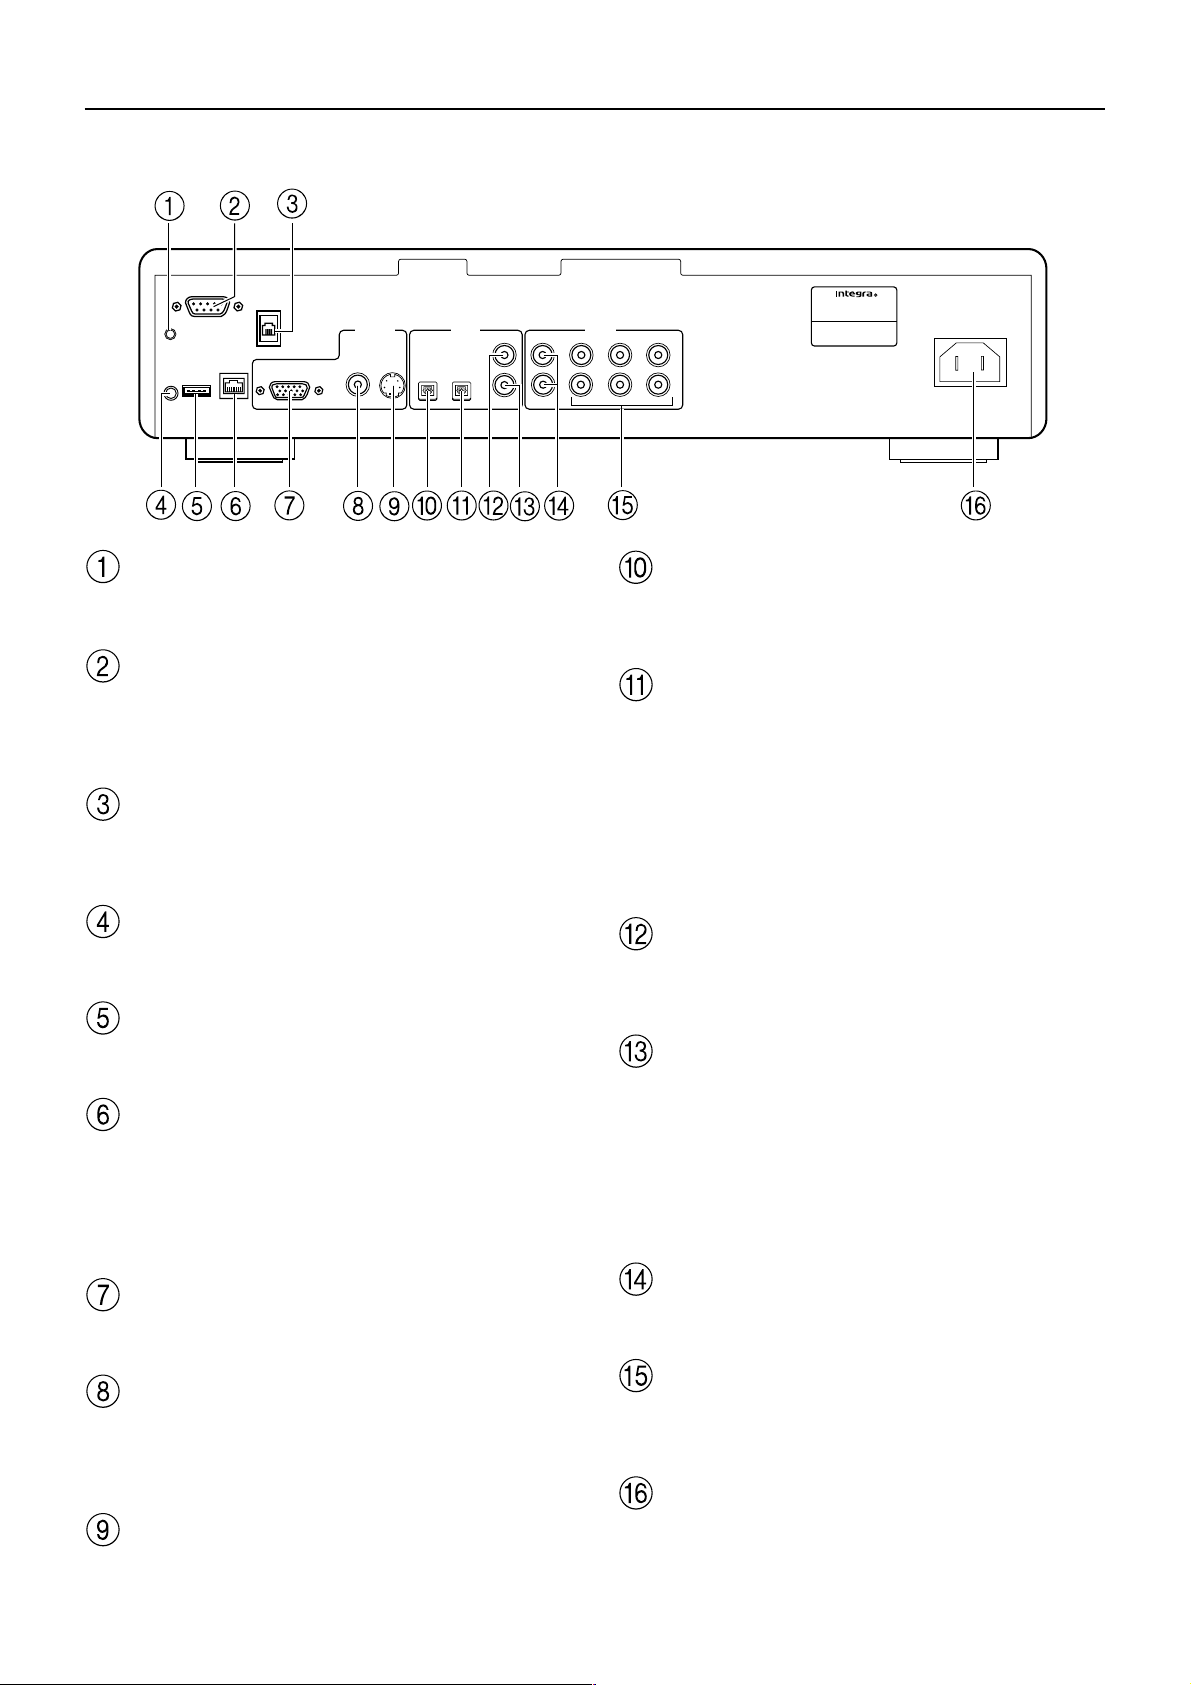
IR IN
The IR IN connection allows remote control information to be
carried from other devices directly into the Audio Network Server.
CONTROLLER
The CONTROLLER port provides serial communication with
supported devices. For instance, a multiroom control system may
communicate with the Audio Network Server using the XiVA
TM
-Link
protocol.
MODEM
The MODEM port can be used to connect the Audio Network
Server to a standard analog telephone line for internet access (using
the supplied cable).
AUDIO NETWORK SERVER
-
MODEL NO.
NAS
2.3
ANALOG
)
)
(
1
L
R
(
OUT
2
OUT
3
L
R
AC INLET
F3.15AL, 250 V
DIGITAL OPTICAL IN*
High quality recordings can be made onto the Hard Disk of the
Audio Network Server using an optical connection from a suitable
device (such as Minidisc or DAT).
DIGITAL OPTICAL OUT
The digital optical output can be used to transmit high quality audio
to a device with a digital optical input (D/A convertor, A/V
amplifier, etc.) using an optical fiber cable. The advantage of using
the optical output is that it has low signal loss due to cables and is
completely isolated from the ground loop. The audio output of the
DIGITAL OUT connector is the same as the audio output of the
ANALOG AUDIO OUT 1 connector.
Note:
This output cannot be used for making a digital copy of your media.
DATA
Allows the Audio Network Server to send control information to
other supported devices.
USB
Allows the Audio Network Server to communicate with supported
USB devices.
ETHERNET (NET-TUNE)
The Ethernet port can be used to connect a Net-tune device (such as
the NAC-2.3) for remote network playback of your music collection.
It may also be used to connect the Audio Network Server to a high
speed internet connection, and to connect supported software
applications to your device. A shielded Ethernet cable should be
used in conjunction with this connection.
VIDEO OUT VGA
The VGA connector may be used to connect a VGA monitor or a
suitable plasma screen for displaying the TV User interface.
VIDEO OUT VIDEO
Connect the Composite VIDEO output of the Audio Network Server
to the composite input of a TV to display the TV User Interface. You
may also need to switch the TV to the relevant AUX input to display
the picture.
VIDEO OUT S-VIDEO
Connect the S-VIDEO output of the Audio Network Server to the SVIDEO input of a TV to display the TV User Interface. You may also
need to switch the TV to the relevant AUX input to display the picture.
DIGITAL COAXIAL IN*
High quality recordings can be made onto the Hard Disk of the
Audio Network Server using a coaxial connection from a suitable
device (such as Minidisc or DAT).
DIGITAL COAXIAL OUT
By connecting this jack to a digital audio component (D/A
convertor, digital sound processor, etc.), digital signals from the
Audio Network Server can be transmitted directly from the system
without first being converted to analog. The audio output of the
DIGITAL OUT connector is the same as the audio output of the
ANALOG AUDIO OUT 1 connector.
Note:
This output cannot be used for making a digital copy of your media.
ANALOG IN*
Analog sources (such as cassette or vinyl LP) may be recorded onto
the Hard Disk of the Audio Network Server using this connection.
ANALOG OUT 1, 2, 3
Currently, only the ANALOG OUT 1 output is available. The
ANALOG OUT 2 and 3 outputs are reserved for optional future
upgrade.
AC INLET
Connect the supplied power cord to this connector to provide power
to the unit.
* To be enabled in a future software release.
9
Controls and Connections
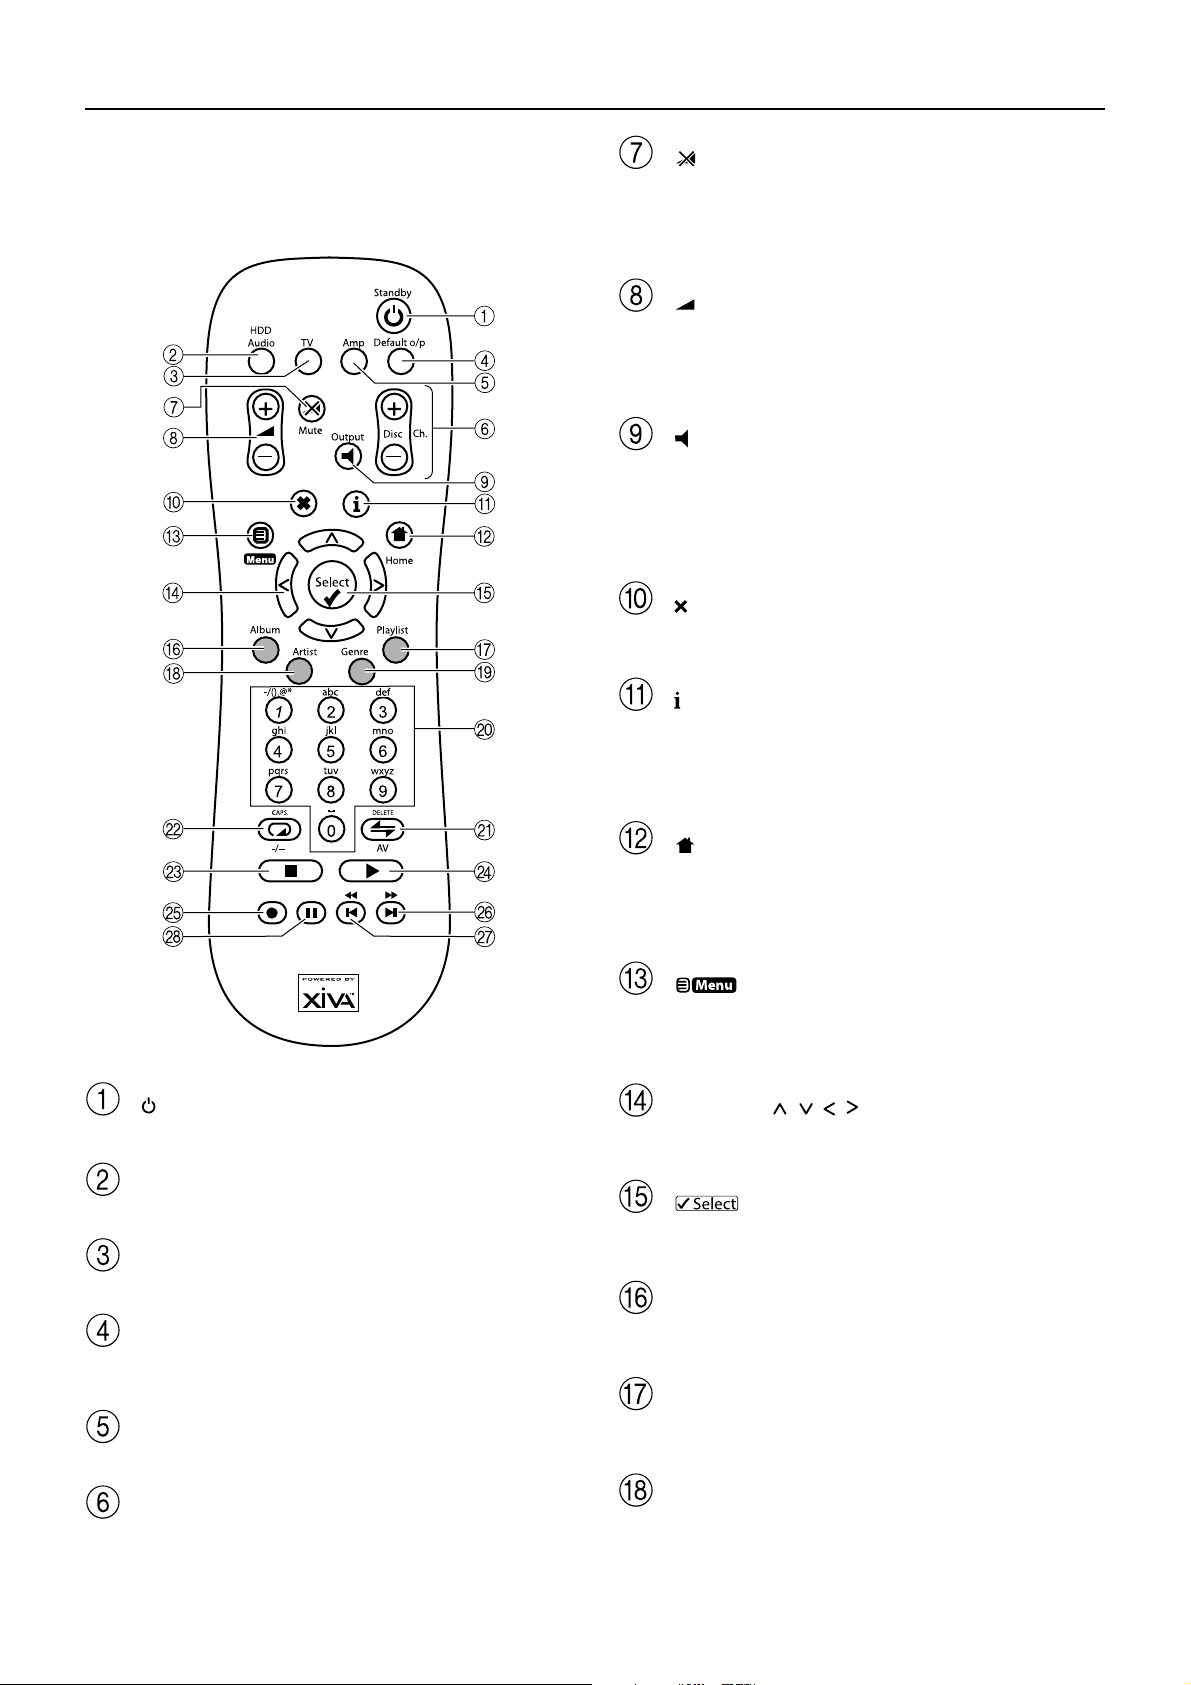
Remote Control
The following diagram explains the function of the keys on your
Audio Network Server remote control:
Mute button
Provided that the Audio Network Server output volume is set to
variable, this button will mute the output of the Audio Network
Server. For more information see the chapter Advanced Settings on
page 26.
(Volume +/–) buttons
Provided that the Audio Network Server output volume is set to
variable, these buttons will increase/decrease the volume of the
Audio Network Server output. For more information, see Advanced
Settings on page 26.
Output button
Press the Output button to display what music is playing on the
currently selected output.
In certain situations, pressing the output button for a second time will
select the next output in sequence. This function is enabled by an
optional future software upgrade.
(Cancel) button
The Cancel button is an action key - on some menu screens this is
used to cancel an operation which you no longer wish to continue.
(Info) button
The Info button is an action key - on some menu screens this is used
to display additional information which may not be currently
displayed; on other menu screens it may also be used to edit text on
the screen.
Standby button
Places the Audio Network Server in/out of standby or off mode.
HDD Audio button
Selects the Audio Network Server as the device to be controlled.
TV button
This button is not used for this Audio Network Server.
Default o/p button
This function is enabled by an optional future software upgrade.
Currently, this button displays the library menu.
Amp button
This button is not used for this Audio Network Server.
(Home) button
The Home button is an action key - it can be used to return to the top
page of a particular function. For instance, if you are browsing the
music library and you wish to look for a different album you may use
the home button to return to the main Library menu.
button
The Menu button is an action key - pressing this key will always
return the TV screen and front panel to the Main Menu. Use this
button if you wish to start a new operation.
Navigation , , , buttons
The navigation buttons are used to move up, down, left, or right
through the menu pages.
button
Select is used to activate the currently highlighted option. When
browsing the library this key will start playback of the selected item.
Album button
The Album button can be used to jump to the album list in the music
library.
Playlist button
The Playlist button can be used to jump to the playlist list in the
music library.
Disc/Ch. buttons
Selects the next/previous album (or playlist) on your Audio Network
Server.
10
Artist button
The Artist button can be used to jump to the artist list in the music
library.
 Loading...