

Page 1

Audio Network Receiver
NAC-2.3
Contents
Before using 2
Instruction Manual
Thank you for purchasing the Integra Audio
Network Receiver.
Please read this manual thoroughly before
making connections and plugging in the unit.
Following the instructions in this manual will
enable you to obtain optimum performance
and listening enjoyment from your new Audio
Network Receiver.
Please retain this manual for future reference.
Connections 18
Operations 26
Other Information 62
E
Page 2

WARNING:
TO REDUCE THE RISK OF FIRE OR ELECTRIC
SHOCK, DO NOT EXPOSE THIS APPLIANCE TO
RAIN OR MOISTURE.
CAUTION:
TO REDUCE THE RISK OF ELECTRIC SHOCK, DO
NOT REMOVE COVER (OR BACK). NO USER-SERVICEABLE PARTS INSIDE. REFER SERVICING TO
QUALIFIED SERVICE PERSONNEL.
Important Safeguards
The lightning flash with arrowhead symbol, within an equilateral
triangle, is intended to alert the user to the presence of uninsulated
“dangerous voltage” within the product’s enclosure that may be
of sufficient magnitude to constitute a risk of electric shock to
persons.
The exclamation point within an equilateral triangle is intended to
alert the user to the presence of important operating and maintenance (servicing) instructions in the literature accompanying the
appliance.
1. Read Instructions – All the safety and operat-
ing instructions should be read before the appliance is operated.
2. Retain Instructions – The safety and operat-
ing instructions should be retained for future
reference.
3. Heed Warnings – All warnings on the appli-
ance and in the operating instructions should be
adhered to.
4. Follow Instructions – All operating and use
instructions should be followed.
5. Cleaning – Unplug the appliance from the wall
outlet before cleaning. The appliance should be
cleaned only as recommended by the manufacturer.
6. Attachments – Do not use attachments not rec-
ommended by the appliance manufacturer as
they may cause hazards.
7. Water and Moisture – Do not use the appli-
ance near water –for example, near a bath tub,
wash bowl, kitchen sink, or laundry tub; in a
wet basement; or near a swimming pool; and
the like.
8. Accessories – Do not place the appliance on an
unstable cart, stand, tripod, bracket, or table.
The appliance may fall, causing serious injury
to a child or adult, and serious damage to the
appliance. Use only with a cart, stand, tripod,
bracket, or table recommended by the manufacturer, or sold with the appliance. Any mounting
of the appliance should fol-
PORTABLE CART WARNING
low the manufacturer’s instructions, and should use a
mounting accessory recommended by the manufac-
S3125A
turer.
9. An appliance and cart combination should be
moved with care. Quick stops, excessive force,
and uneven surfaces may cause the appliance
and cart combination to overturn.
10. Ventilation – Slots and openings in the cabinet
are provided for ventilation and to ensure reliable operation of the appliance and to protect it
from overheating, and these openings must not
be blocked or covered. The openings should
never be blocked by placing the appliance on a
bed, sofa, rug, or other similar surface. The appliance should not be placed in a built-in installation such as a bookcase or rack unless proper
ventilation is provided. There should be free
space of at least 20 cm (8 in.) and an opening
behind the appliance.
11. Power Sources – The appliance should be op-
erated only from the type of power source indicated on the marking label. If you are not sure
of the type of power supply to your home, consult your appliance dealer or local power company.
12. Grounding or Polarization – The appliance
may be equipped with a polarized alternating
current line plug (a plug having one blade
wider than the other). This plug will fit into the
power outlet only one way. This is a safety feature. If you are unable to insert the plug fully
into the outlet, try reversing the plug. If the
plug should still fail to fit, contact your electrician to replace your obsolete outlet. Do not defeat the safety purpose of the polarized plug.
13. Power-Cord Protection – Power-supply cords
should be routed so that they are not likely to be
walked on or pinched by items placed upon or
against them, paying particular attention to
cords at plugs, convenience receptacles, and
the point where they exit from the appliance.
2
Page 3

Important Safeguards
14. Outdoor Antenna Grounding – If an outside
antenna or cable system is connected to the appliance, be sure the antenna or cable system is
grounded so as to provide some protection
against voltage surges and built-up static
charges. Article 810 of the National Electrical
Code, ANSI/NFPA 70, provides information
with regard to proper grounding of the mast and
supporting structure, grounding of the lead-in
wire to an antenna-discharge unit, size of
grounding conductors, location of antenna-discharge unit, connection to grounding electrodes, and requirements for the grounding
electrode. See Figure 1.
15. Lightning – For added protection for the appli-
ance during a lightning storm, or when it is left
unattended and unused for long periods of time,
unplug it from the wall outlet and disconnect
the antenna or cable system. This will prevent
damage to the appliance due to lightning and
power-line surges.
16. Power Lines – An outside antenna system
should not be located in the vicinity of overhead power lines or other electric light or
power circuits, or where it can fall into such
power lines or circuits. When installing an outside antenna system, extreme care should be
taken to keep from touching such power lines
or circuits as contact with them might be fatal.
17. Overloading – Do not overload wall outlets,
extension cords, or integral convenience receptacles as this can result in a risk of fire or electric shock.
18. Object and Liquid Entry – Never push ob-
jects of any kind into the appliance through
openings as they may touch dangerous voltage
points or short-out parts that could result in a
fire or electric shock. Never spill liquid of any
kind on the appliance.
19. Servicing – Do not attempt to service the appli-
ance yourself as opening or removing covers
may expose you to dangerous voltage or other
hazards. Refer all servicing to qualified service
personnel.
20. Damage Requiring Service – Unplug the ap-
pliance form the wall outlet and refer servicing
to qualified service personnel under the following conditions:
A. When the power-supply cord or plug is
damaged,
B. If liquid has been spilled, or objects have
fallen into the appliance,
C. If the appliance has been exposed to rain or
water,
D. If the appliance does not operate normally
by following the operating instructions.
Adjust only those controls that are covered
by the operating instructions as an improper adjustment of other controls may result in damage and will often require extensive work by a qualified technician to restore the appliance to its normal operation,
E. If the appliance has been dropped or dam-
aged in any way, and
F. When the appliance exhibits a distinct
change in performance – this indicates a
need for service.
21. Replacement Parts – When replacement parts
are required, be sure the service technician has
used replacement parts specified by the manufacturer or have the same characteristics as the
original part. Unauthorized substitutions may
result in fire, electric shock, or other hazards.
22. Safety Check – Upon completion of any ser-
vice or repairs to the appliance, ask the service
technician to perform safety checks to determine that the appliance is in proper operation
condition.
23. Wall or Ceiling Mounting – The appliance
should be mounted to a wall or ceiling only as
recommended by the manufacturer.
24. Heat – The appliance should be situated away
from heat sources such as radiators, heat registers, stoves, or other appliances (including amplifiers) that produce heat.
25. Liquid Hazards – The appliance shall not be
exposed to dripping or splashing and no objects
filled with liquids, such as vases shall be placed
on the appliance.
FIGURE 1:
EXAMPLE OF ANTENNA GROUNDING AS PER NATIONAL ELECTRICAL CODE, ANSI/NFPA 70
ANTENNA
LEAD IN
WIRE
GROUND
CLAMP
ELECTRIC
SERVICE
EQUIPMENT
NEC – NATIONAL ELECTRICAL CODE
S2898A
ANTENNA
DISCHARGE UNIT
(NEC SECTION 810-20)
GROUNDING CONDUCTORS
(NEC SECTION 810-21)
GROUND CLAMPS
POWER SERVICE GROUNDING
ELECTRODE SYSTEM
(NEC ART 250, PART H)
Other Information
3
Page 4

Precautions
1. Recording Copyright
Recording of copyrighted material for other than
personal use is illegal without permission of the
copyright holder.
2. AC Fuse
The fuse is located inside the chassis and is not
user-serviceable. If power does not come on, contact your Integra/Onkyo authorized service station.
3. Care
From time to time you should wipe the front and
rear panels and the cabinet with a soft cloth. For
heavier dirt, dampen a soft cloth in a weak solution
of mild detergent and water, wring it out dry, and
wipe off the dirt. Following this, dry immediately
with a clean cloth. Do not use rough material,
thinners, alcohol or other chemical solvents or
cloths since these could damage the finish or remove the panel lettering.
4. Power
WARNING
BEFORE PLUGGING IN THE UNIT FOR THE
FIRST TIME, READ THE FOLLOWING SECTION CAREFULLY.
The voltage of the available power supply differs
according to country or region. Be sure that the
power supply voltage of the area where this unit
will be used meets the required voltage (e.g., AC
120 V, 60 Hz) written on the rear panel.
Setting the Standby button to standby does not shut
off the power completely. So the power cord should
be removed from the AC outlet when the unit is not
used for a prolonged time.
Note to CATV system installer:
This reminder is provided to call the CATV system
installer’s attention to Station 820-40 of the NEC,
which provides guidelines for proper grounding
and, in particular, specifies that the cable ground
shall be connected to the grounding system of the
building, as close to the point of cable entry as practical.
FCC Information for User
CAUTION:
The user changes or modifications not expressly
approved by the party responsible for compliance
could void the user’s authority to operate the equipment.
NOTE:
This equipment has been tested and found to comply with the limits for a Class B digital device, pursuant to Part 15 of the FCC Rules. These limits are
designed to provide reasonable protection against
harmful interference in a residential installation.
This equipment generates, uses and can radiate radio frequency energy and, if not installed and used
in accordance with the instructions, may cause
harmful interference to radio communications.
However, there is no guarantee that interference
will not occur in a particular installation. If this
equipment does cause harmful interference to radio
or television reception, which can be determined by
turning the equipment off and on, the user is encouraged to try to correct the interference by one or
more of the following measures:
• Reorient or relocate the receiving antenna.
• Increase the separation between the equipment
and receiver.
• Connect the equipment into an outlet on a circuit different from that to which the receiver is
connected.
• Consult the dealer or an experienced radio/TV
technician for help.
4
Page 5

Precautions
For Canadian models
NOTE: THIS CLASS B DIGITAL APPARA-
TUS COMPLIES WITH CANADIAN ICES-003.
For models having a power cord with a polarized
plug:
CAUTION: TO PREVENT ELECTRIC
SHOCK, MATCH WIDE BLADE OF PLUG TO
WIDE SLOT, FULLY INSERT.
THIS CLASS B DIGITAL APPARATUS COMPLIES WITH CANADIAN ICES-003.
Modèle pour les Canadien
REMARQUE: CET APPAREIL
NUMÉRIQUE DE LA CLASSE B EST CONFORME À LA NORME NMB-003 DU CANADA.
Sur les modèles dont la fiche est polarisée:
ATTENTION: POUR ÉVITER LES CHOCS
ÉLECTRIQUES, INTRODUIRE LA LAME LA
PLUS LARGE DE LA FICHE DANS LA BORNE
CORRESPONDANTE DE LA PRISE ET
POUSSER JUSQU’AU FOND.
CET APPAREIL NUMÉRIQUE DE LA CLASSE
B EST CONFORME À LA NORME NMB-003
DU CANADA.
Memory Preservation
This unit does not require memory preservation
batteries. A built-in memory power back-up system preserves the contents of the memory during power failures and even when the unit is unplugged. The unit must be plugged in order to
charge the back-up system.
The memory preservation period after the unit
has been unplugged varies depending on climate
and placement of the unit. On the average,
memory contents are protected over a period of
a few weeks after the last time the unit has been
unplugged. This period is shorter when the unit
is exposed to a highly humid climate.
Other Information
5
Page 6

Contents
Before using
Important Safeguards.................................................................................. 2
Precautions .................................................................................................. 4
Contents ....................................................................................................... 6
Features ........................................................................................................9
Net-Tune features ................................................................................................................9
Internet radio features .........................................................................................................9
Receiver features .................................................................................................................9
Other features ...................................................................................................................... 9
Supplied accessories ................................................................................ 10
Supplied accessories ..........................................................................................................10
Connecting the power cord ............................................................................................... 10
Installing the remote controller batteries ..........................................................................11
Using the remote controller...............................................................................................11
Index parts and facilities ........................................................................... 12
Front Panel.........................................................................................................................12
Display ...............................................................................................................................13
Rear Panel .......................................................................................................................... 15
Remote Controller .............................................................................................................16
Changing the remote controller mode .............................................................................. 17
Connections
Connecting the NAC-2.3............................................................................18
Connecting the AM antenna..............................................................................................18
Connecting the FM antenna ..............................................................................................19
Connecting for listening to Internet radio and the Audio Network Server ...................... 20
Connecting audio devices to the NAC-2.3 .......................................................................22
Connecting the NAC-2.3 with a television monitor ......................................................... 23
Connecting speaker systems ............................................................................................. 24
Operating components not reached by the remote controller signals (IR IN) ................. 25
6
Page 7

Contents
Operations
Understanding the basic operations before using the NAC-2.3 ........... 26
Connecting the power cord ............................................................................................... 26
Turning on the power ........................................................................................................26
Selecting your desired source ...........................................................................................26
How to adjust the volume..................................................................................................27
Temporarily turning off the sound ....................................................................................27
Setting the clock ........................................................................................28
Setting date and time .........................................................................................................28
Displaying the date and time............................................................................................. 29
Changing the Clock Display ............................................................................................. 29
Listening to Music Saved on the Audio Network Server ....................... 30
Listening to a music track contained in the music library on the server ......................... 30
About Play Modes .............................................................................................................31
Various Playback Modes ...................................................................................................32
Searching for a track .........................................................................................................32
Viewing Information on the display .................................................................................33
Listening to Radio Broadcasts................................................................. 35
Manually tuning to a station .............................................................................................35
Presetting FM/AM stations ...............................................................................................35
Listening to a preset station .............................................................................................. 37
Using timer functions ................................................................................ 40
Alarm feature ..................................................................................................................... 40
Turning on or off the alarm function ................................................................................ 42
Stopping the activated alarm .............................................................................................42
Snooze feature ...................................................................................................................42
Sleep timer .........................................................................................................................43
Listening to Internet radio ........................................................................ 44
Listening to Internet radio ................................................................................................. 44
Presetting Internet radio stations.......................................................................................46
Listening to a preset Internet radio station ....................................................................... 49
Viewing information on the display.................................................................................. 49
Supported Music Formats ................................................................................................. 49
Other Information
7
Page 8

Contents
Listening to Music from an External Player............................................ 50
Configuring Various Settings ................................................................... 51
Network Settings ...............................................................................................................51
Ethernet settings ................................................................................................................52
Changing the remote control code to resolve conflicts ....................................................57
Setting the Brightness in Standby Mode .......................................................................... 58
Changing the On Screen Display Background Color ....................................................... 59
Setting the duration before the screen saver activates ......................................................59
Net-Tune Server Settings ..................................................................................................60
On Screen Display (OSD) .......................................................................... 61
OSD menu flowchart ......................................................................................................... 61
Other Information
Troubleshooting ......................................................................................... 62
POWER ............................................................................................................................. 62
SPEAKER .........................................................................................................................62
FM/AM TUNER................................................................................................................62
REMOTE CONTROLLER ...............................................................................................62
TIMER ...............................................................................................................................62
ETHERNET NETWORK ................................................................................................. 63
Error messages ..................................................................................................................64
Specifications ............................................................................................ 66
8
Page 9

Features
The NAC-2.3 is a network audio client that is
connected via a LAN to the Audio Network
Server with Net-Tune System Protocal such as
NAS-2.3 and allows you to enjoy music files
saved on the server, as well as Internet radio, from
anywhere in your home. The NAC-2.3 is
integrated with the Audio Network Server that
helps you to take full advantage of your home
networking and also to seamlessly integrate the
NAC-2.3 with existing audio devices.
Net-Tune features
Connecting the NAC-2.3 and the Audio Network
Server through a network allows you to enjoy
digitally recorded music everywhere. It is also
possible to set up a network in which the Audio
Network Server and existing audio system are
interconnected via the NAC-2.3.
By operating the Audio Network Server in
conjunction with the NAC-2.3, you can take full
advantage of the NAC-2.3. For example, you can:
• Save various music files on the Audio
Network Server, and digitally play back them
through your audio system
• Play digitally recorded music files in MP3
and WAVE formats
• Easily search for custom playlists by title,
artist, album, or genre
Internet radio features
Receiver features
• An innovative circuit, VLSC (Vector Linear
Shaping Circuitry), is adopted that generates
pure analog signals from digital signals.
• The preset memory feature allows you to
preset up to 40 FM and AM stations.
• Three ports are available for interaction with
external audio devices: an AUX input port
that can connect to a CD player or similar
device, an Audio Line FIXED OUT port that
can connect to a receiver with volume control,
and an Audio Line VARIABLE OUT port
that can connect to an amplifier without
volume control.
Other features
• Alarm feature that allows you to play as the
alarm sound a music file contained in the
music library on the server and can be easily
enabled/disabled
• Sleep timer
• Large-sized 20 × 4 dot matrix display
• OSD (On Screen Display) feature that allows
you to easily view playlists and select tracks
* VLSC and the VLSC logo are registered trademarks of
Onkyo Corporation.
* NET-TUNE is a registered trademark of Onkyo
Corporation.
The NAC-2.3 provides enhanced support for
Internet radio and allows you to:
• Listen to both WMA and MP3 audio
streamed from Internet radio stations
• Select stations by genre
• Preset up to 20 Internet radio stations
Other Information
9
Page 10
Supplied accessories
Supplied accessories
The package include the following (note that the quantity of each item is shown between parentheses):
NAC-2.3 (1)
IR remote controller RC-509S (1) Infrared remote controller.
Batteries - AA or R6 (2) Batteries for the remote controller.
AC power cord
AM antenna Antenna for receiving AM broadcasts
FM antenna Antenna for receiving FM broadcasts
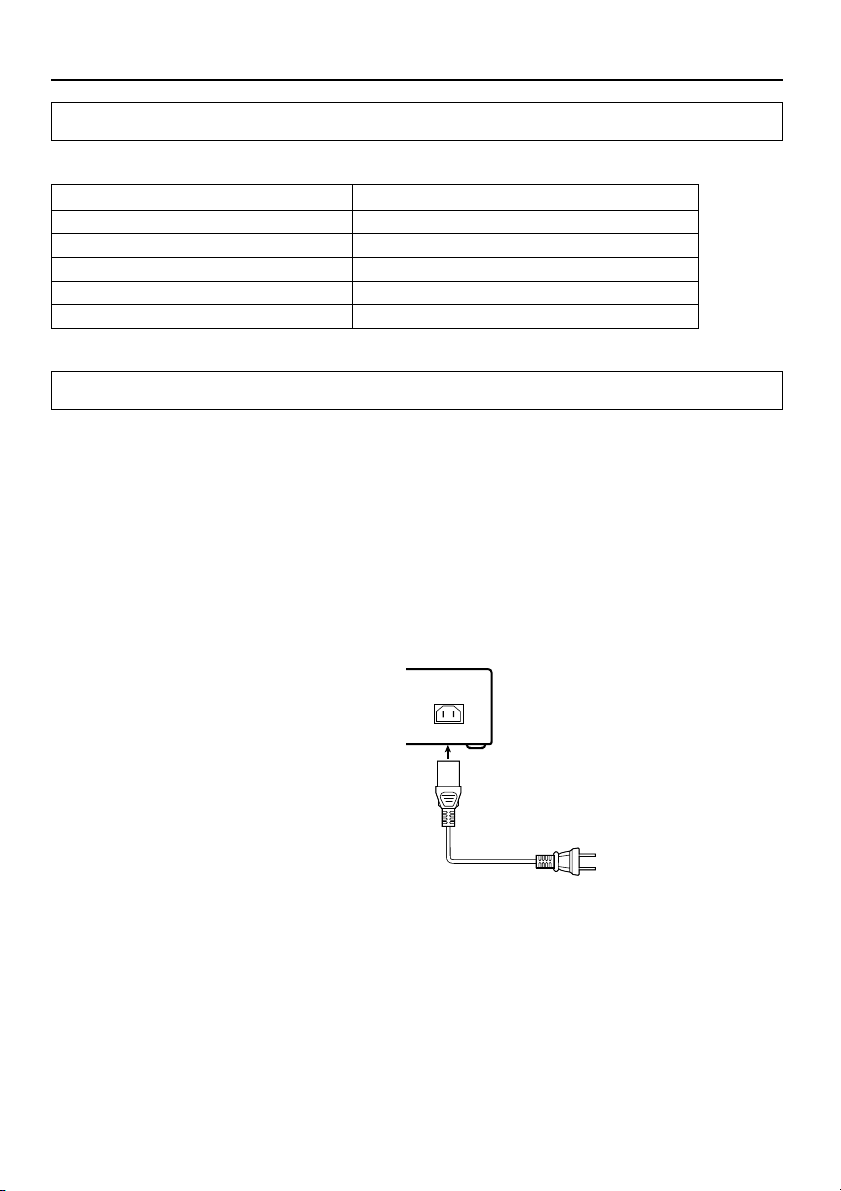
Connecting the power cord
Plug the supplied power cord into this AC INLET.
• Do not use a power cord other than the one supplied with the NAC-2.3. The power cord supplied is
designed for use with the NAC-2.3 and should not be used with any other device.
• Never have the power cord disconnected from the NAC-2.3 while the other end is plugged into the
wall outlet. Doing so may cause an electric shock. Always connect by plugging into the wall outlet
last and disconnect by unplugging from the wall outlet first.
10
AC INLET
Power cord
(supplied)
DO NOT connect
the power cord at
this time.
Page 11
Supplied accessories
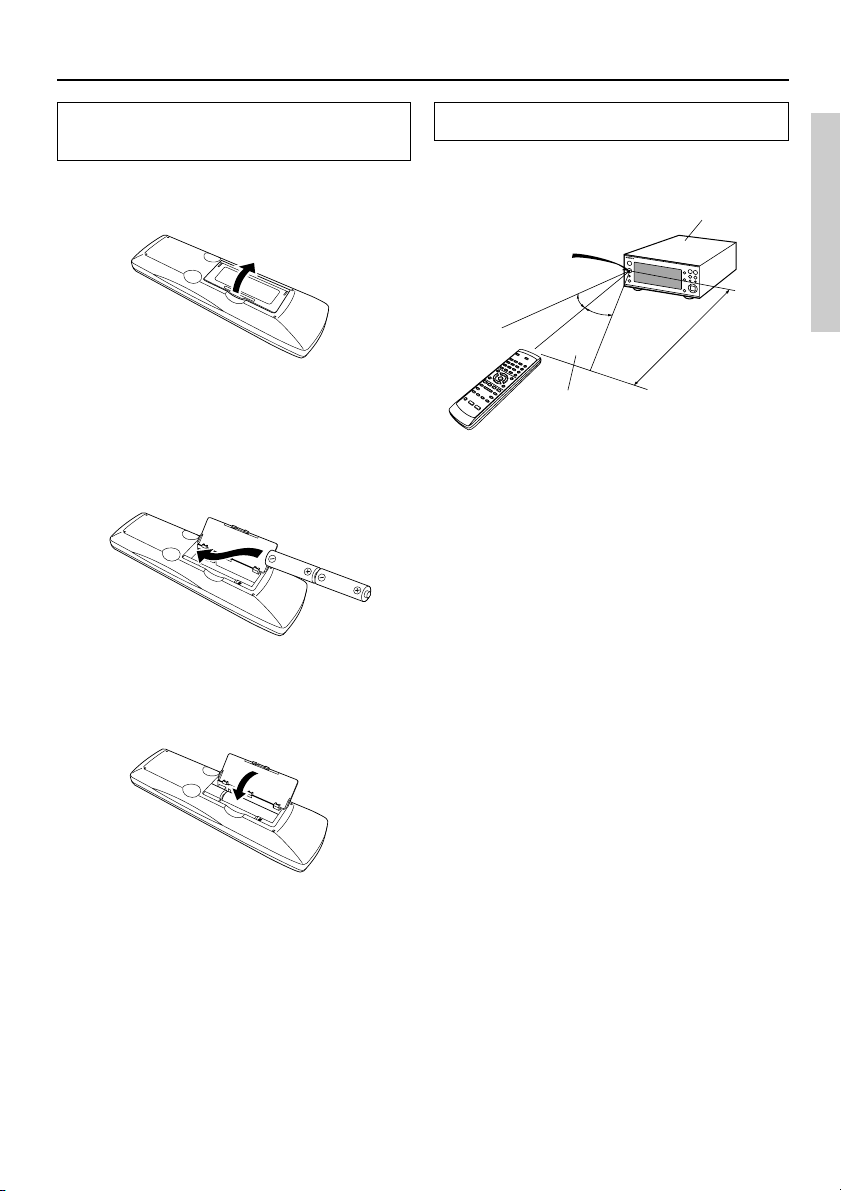
Installing the remote controller
batteries
1. Detach the battery cover by pressing
the tab and pulling up the cover.
2. Insert two AA-size batteries into the
battery compartment.
Carefully follow the polarity diagram
(positive + and negative – symbols) inside the
battery compartment.
3. After batteries are installed and seated
correctly, attach the compartment
cover.
Notes:
• Do not use a new battery and an old battery
together or different kinds of batteries.
• To avoid corrosion, remove the batteries if the
remote controller is not to be used for a long
time.
• Remove dead batteries immediately to avoid
damage from corrosion. If the remote
controller doesn’t operate smoothly, replace
both the batteries at the same time.
• The life of the batteries supplied is about six
months but this will vary depending on usage.
Using the remote controller
Point the remote controller toward the remote
control sensor.
NAC-2.3
Remote control
sensor
30°
30°
About 16 feet
(5 m)
Control
range
Notes:
• Place the unit away from strong light such as
direct sunlight or inverted fluorescent light
which can prevent proper operation of the
remote controller.
• Using another remote controller of the same
type in the same room or using the unit near
equipment which uses infrared rays may
cause operational interference.
• Do not put any object such as a book on the
remote controller. The buttons of the remote
controller may be pressed by mistake and
drain the batteries.
• Make sure the audio rack doors do not have
colored glass. Placing the unit behind such
doors may prevent proper remote controller
operation.
• If there is any obstacle between the remote
controller and the remote control sensor, the
remote controller will not operate.
Other Information
11
Page 12

Index parts and facilities
Front Panel
Standby/On
Remote
control
sensor
Standby
Setup
Phones
1 Standby indicator
Lights when the NAC-2.3 is in the Standby
mode.
2 Standby/On button
Switches the power mode between Standby
and On.
3 Audio Input button
Changes the playback source.
4 Display button
Changes the screen content.
Volume
Audio
Input
Stop Play/ Pause
Display
Select
NAC-2.3
8 / -Skip buttons
Moves to the previous or next track. Holding
down the either button fast-forwards or fastrewinds the current track.
9 Cursor Up/Down/Right/Left buttons
Use these buttons when navigating through
various settings, change a value, or move to
another menu.
0 Select button
Determines your selection or saves a new
setting.
5 Volume / buttons
Adjusts the volume.
6 Play/Pause button
Starts or pauses playback.
7 Stop button
Stops playback.
12
A Phones jack
Connects the stereo headphones mini plug.
B Setup button
Activates Setup/Menu mode.
Page 13

Index parts and facilities
Display
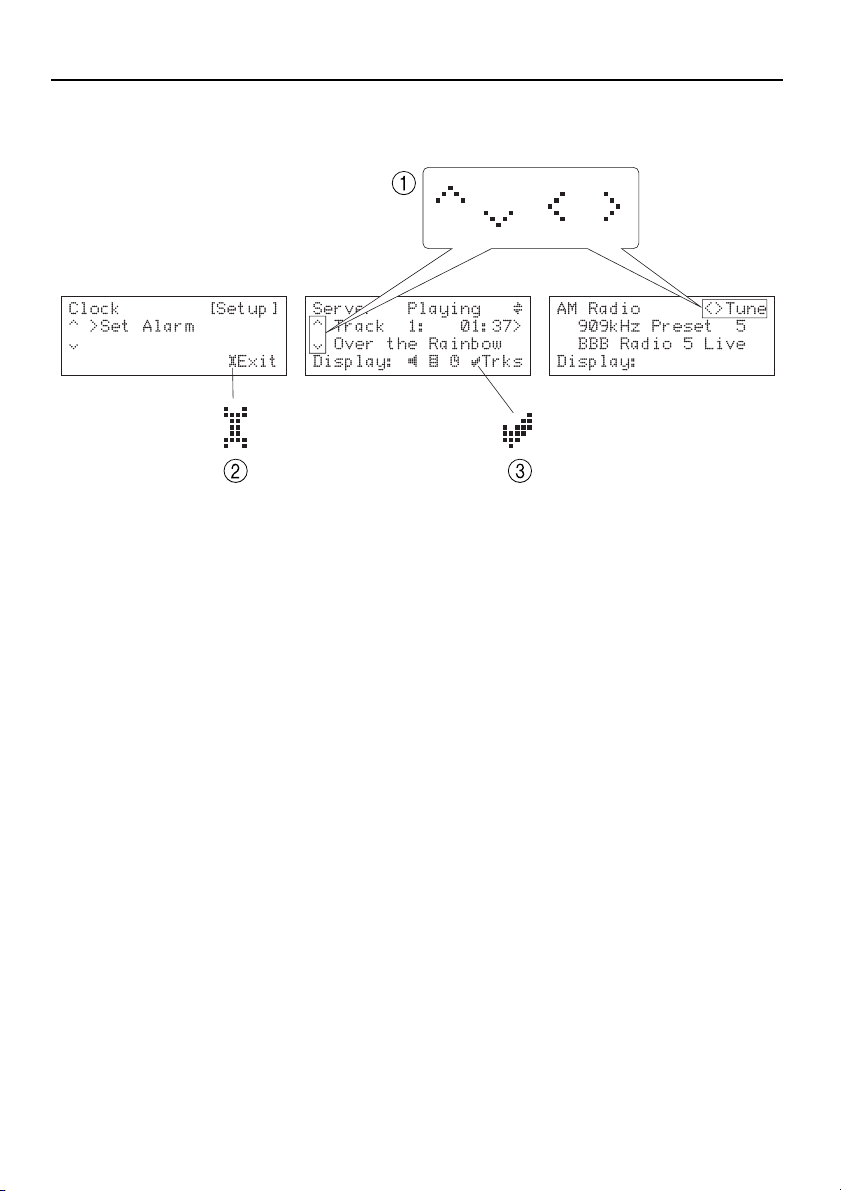
(1) Status display icons
1 Random
This icon is displayed to indicate that the NAC-2.3 is in random playback mode.
2 Repeat
This icon is displayed to indicate that the NAC-2.3 is in repeat mode.
3 Status
This icon is enclosed in square brackets to indicate that the NAC-2.3 is in normal mode.
4 Browse
This icon is enclosed in square brackets to indicate that the NAC-2.3 is in browse (title selection)
mode.
5 Clock
This icon is enclosed in square brackets to indicate that the NAC-2.3 is in clock display mode.
Other Information
13
Page 14
Index parts and facilities
(2) Operation guide icons
1 Up Arrow/ /Down Arrow/Left Arrow/Right Arrow
These icons are displayed to indicate that the corresponding cursor buttons are enabled to perform
specific actions.
Example: “< >
when the FM/AM radio feature is selected.
Tune” indicates that you can use the Cursor Left and Right buttons to perform tuning
2 Setup
This icon is immediately followed by the command you can execute by pressing the Setup button.
Example: When the Setup icon is immediately followed by “Exit”, you can press the Setup button
to exit from the current menu.
3 Select
This icon is immediately followed by the command you can execute by pressing the Select button.
14
Page 15
Index parts and facilities
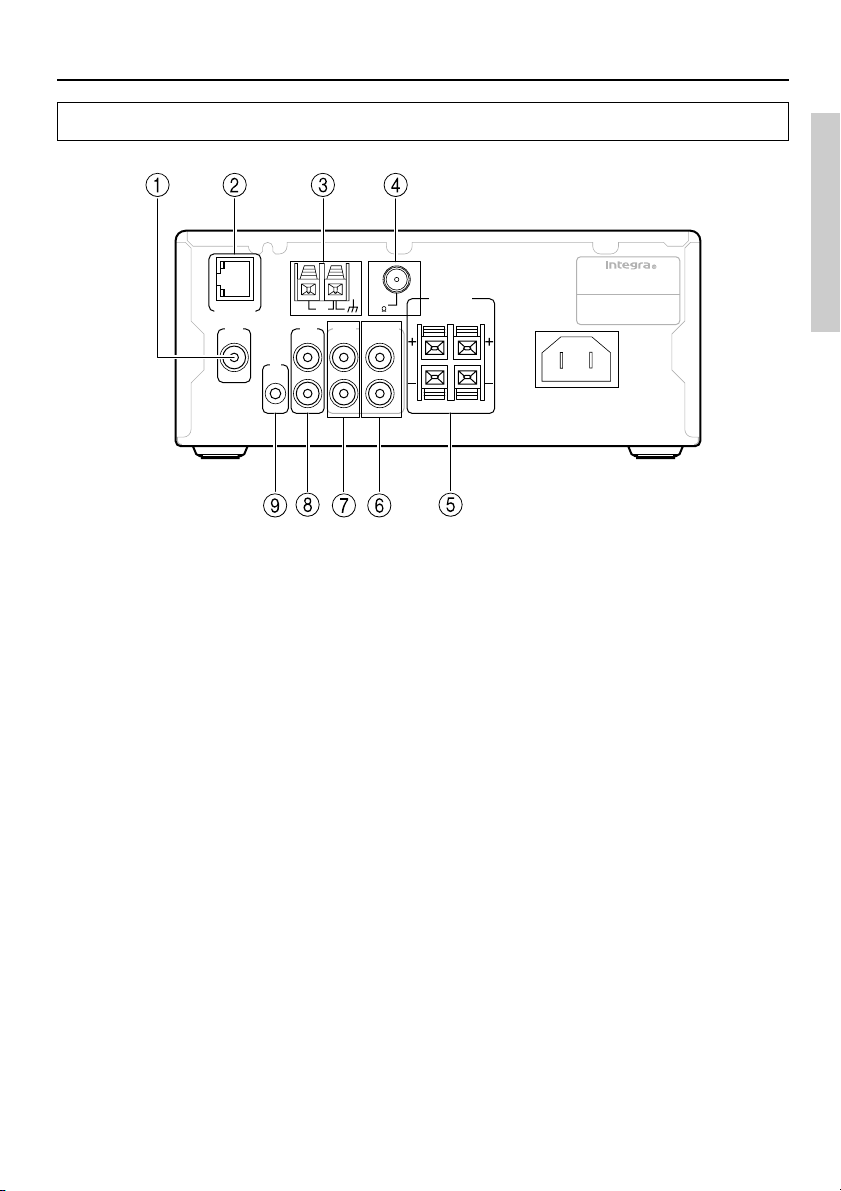
Rear Panel
ETHERNET
OSD
AUX
L
IR
IN
R
AM
FIXED VARIABLE
INOUT OUT OUT
1 OSD OUT
This port can be used to redirect screen output
from the front panel display to a television
screen for quick and easy large-screen
viewing.
2 ETHERNET
This port connects to a broadband mode,
router, hub, etc.
3 AM
This port connects to the AM radio antenna.
ANTENNA
AUDIO NETWORK RECEIVER
SPEAKERS
FM
(
)
6 OHMS MIN.
75
L
R
R
L
MODEL NO.
NAC
AC INLET
-
2.3
8 AUX
This port connects to an auxiliary device.
9 IR IN
If the NAC-2.3 is located inside a rack or a
cabinet that will not allow infrared beams to
reach its IR sensor, you will need to relay
beams with an external sensor.
Connect the external sensor to IR IN input.
Then, place the sensor in an unblocked
location at which you can easily point with
the remote controller.
4 FM
This port connects to the FM radio antenna.
5 SPEAKERS
The terminals connect to the speakers.
6 VARIABLE OUTPUT
This port connects to an amplifier without
volume control.
7 FIXED OUT
This port connects to the input port of a
receiver with volume control.
Other Information
15
Page 16
Index parts and facilities
Remote Controller
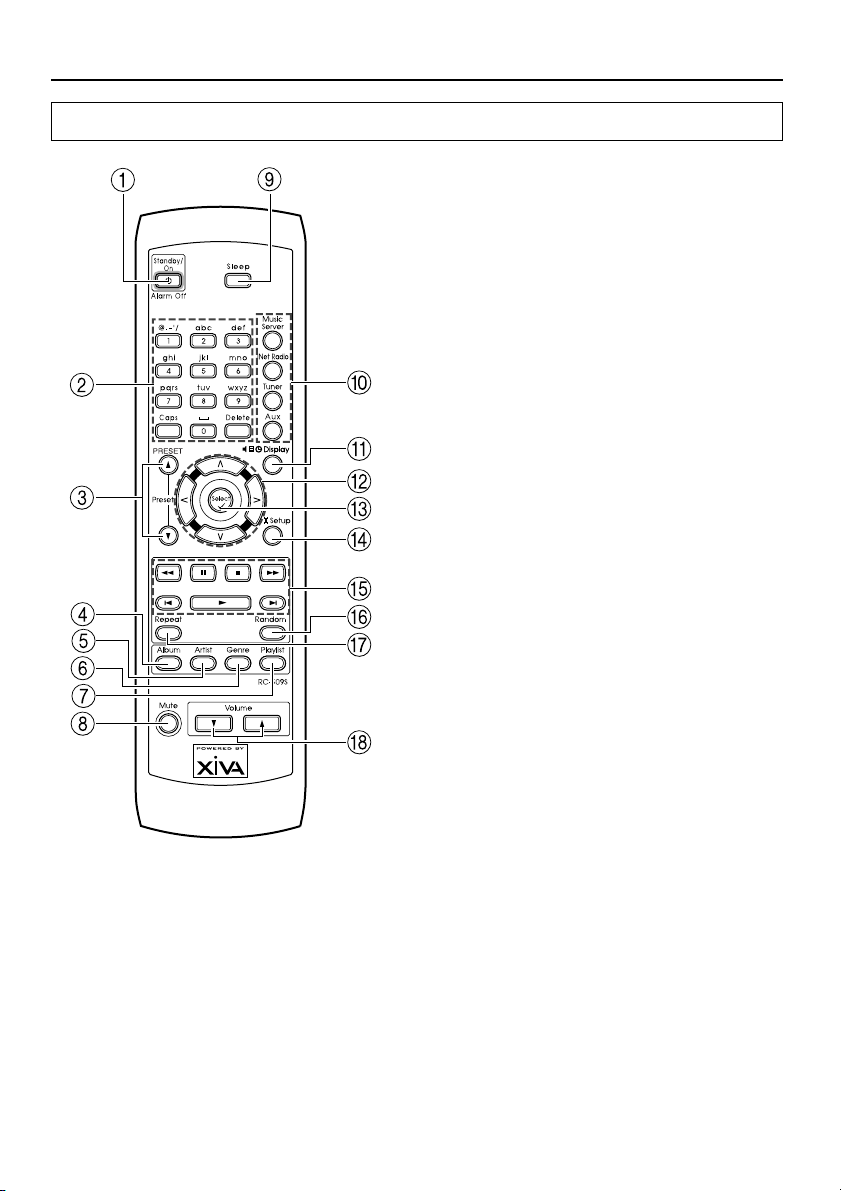
1 Standby/On button
Turns on the NAC-2.3 or place it in standby
mode.
2 Numeric keys
Press to select one of the preset stations or the
track you want to play. When entering text,
you use these buttons to type in letters and
special characters.
3 Preset Up/Down buttons
Press to navigate through preset stations for
Internet radio or FM/AM radio.
4 Album button
Press to invoke the Album selection menu
when working with the NAS-2.3.
5 Artist button
Press to invoke the Artist selection menu
when working with the NAS-2.3.
16
6 Genre button
Press to invoke the Genre selection menu
when working with the NAS-2.3.
7 Playlist button
Press to invoke the Playlist selection menu
when working with the NAS-2.3.
8 Mute button
Press to activate the mute function. Press the
button again to disable the mute function.
9 Sleep button
Press to set the sleep function.
0 Music Server/iNet Radio/Tuner/Aux
buttons
Press to select an input source. The Tuner
button toggles between FM and AM.
Page 17

Index parts and facilities
A Display button
Press to change the display mode.
B Cursor / / / buttons
Press to locate your selection.
C Select button
Determines your selection or saves a new
setting.
D Setup button
Press to set up the NAC-2.3.
E Operation buttons
, (FR/FF) buttons
Press to fast-rewind or fast-forward the
current track.
(Pause) button
Press to pause the playback.
(Play) button
Press to start playback.
(Stop) button
Press to stop the playback.
, B/F-Skip buttons
Press to move to the previous or next track.
F Random button
Press to play the selected track list at random.
Changing the remote controller
mode
When you use any Integra/Onkyo products other
than the NAC-2.3 in the same room, the
operations made with the NAC-2.3’s remote
controller may also cause the other Integra/Onkyo
products to operate. To avoid this, you can change
the remote controller mode both for the NAC-2.3
and its remote controller choosing from three
modes (1, 2 or 3).
To change the remote controller mode for the
remote controller, hold the Standby button on the
remote controller and press the Select button, then
release these buttons simultaneously. Within 5
seconds after releasing the buttons, enter the
appropriate mode (1, 2 or 3) using the numeric
keys. The default mode is 1 for both the remote
controller and NAC-2.3.
After changing the remote controller mode, make
sure that the remote control “Remote ID code” on
the NAC-2.3 is set to the same mode as the remote
controller. (see Page 57)
G Repeat button
Press to repeat the selected single track or
track list.
H Volume / buttons
Press to adjust the volume.
Other Information
17
Page 18

Connecting the NAC-2.3
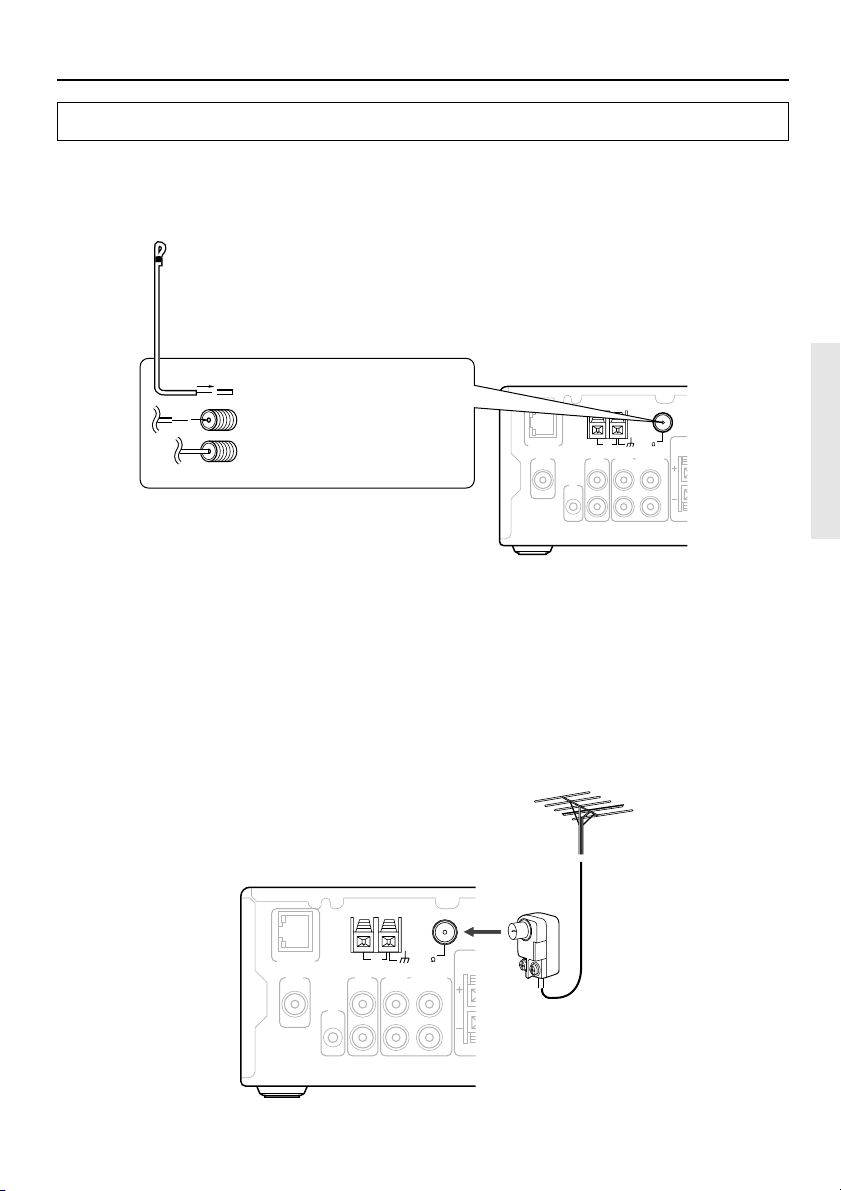
Connecting the AM antenna
Assembling the AM loop antenna
Assemble the loop antenna as shown in the illustration.
Insert into the hole
Connecting the antenna cable
1. Press down the lever. 3. Release the lever to replace
2. Insert the wire into the
hole.
it.
Connecting the AM loop antenna
The AM loop antenna is for indoor use only. Set it
L
IR
IN
R
AM
AUX
FIXED VARIABLE
INOUT OUT OUT
AM
AUX
INOUT OUT OUT
L
IR
IN
R
ANTENNA
FM
75
ANTENNA
FIXED VARIABLE
L
R
FM
75
L
R
in the direction and position where you receive
the clearest sound. Put it as far as possible away
from this unit, TV, speaker cables, Audio
Network Server, hub, router, power cords, and
other units of NAC-2.3.
Connecting an AM outdoor antenna
When reception is not satisfactory with the
supplied AM loop antenna alone, connection of
an outdoor antenna is recommended.
The outdoor antenna will be more effective if it is
stretched horizontally above a window or outside.
• Do not remove the AM loop antenna.
• To avoid the risk of lightning and electrical
shock, grounding is necessary. Follow item
Outdoor antenna
Insulated antenna
cable
ETHERNET
OSD
ETHERNET
OSD
14 of the “Important Safeguards” on page3
when you install the outdoor antenna.
18
Page 19
Connecting the NAC-2.3
Connecting the FM antenna
FM indoor antenna
The supplied FM antenna is for indoor use only. Move the antenna in various directions until the
clearest signal is received. Fix it with push pins or similar implements in the position that will cause the
least amount of distortion.
Remove the insulation at the tip
of the cable, and insert the
cable securely, fully to the end
of the exposed tip.
ETHERNET
OSD
L
IR
IN
R
ANTENNA
AM
AUX
FIXED VARIABLE
INOUT OUT OUT
FM
75
L
R
FM outdoor antenna
If the reception is not very clear with the supplied FM antenna, the use of an outdoor antenna is
recommended.
Please make sure that you follow the considerations below regarding the location.
• Keep the antenna away from noise sources (neon signs, busy roads, etc.)
• It is dangerous to put the antenna close to power lines. Keep it well away from power lines, etc.
• To avoid the risk of lightning and electrical shock, grounding is necessary. Follow item 14 of the
“Important Safeguards” on page 3 when you install the outdoor antenna.
ANTENNA
FM
75
ETHERNET
OSD
AUX
L
IR
IN
R
AM
FIXED VARIABLE
INOUT OUT OUT
L
R
Other Information
19
Page 20

Connecting the NAC-2.3
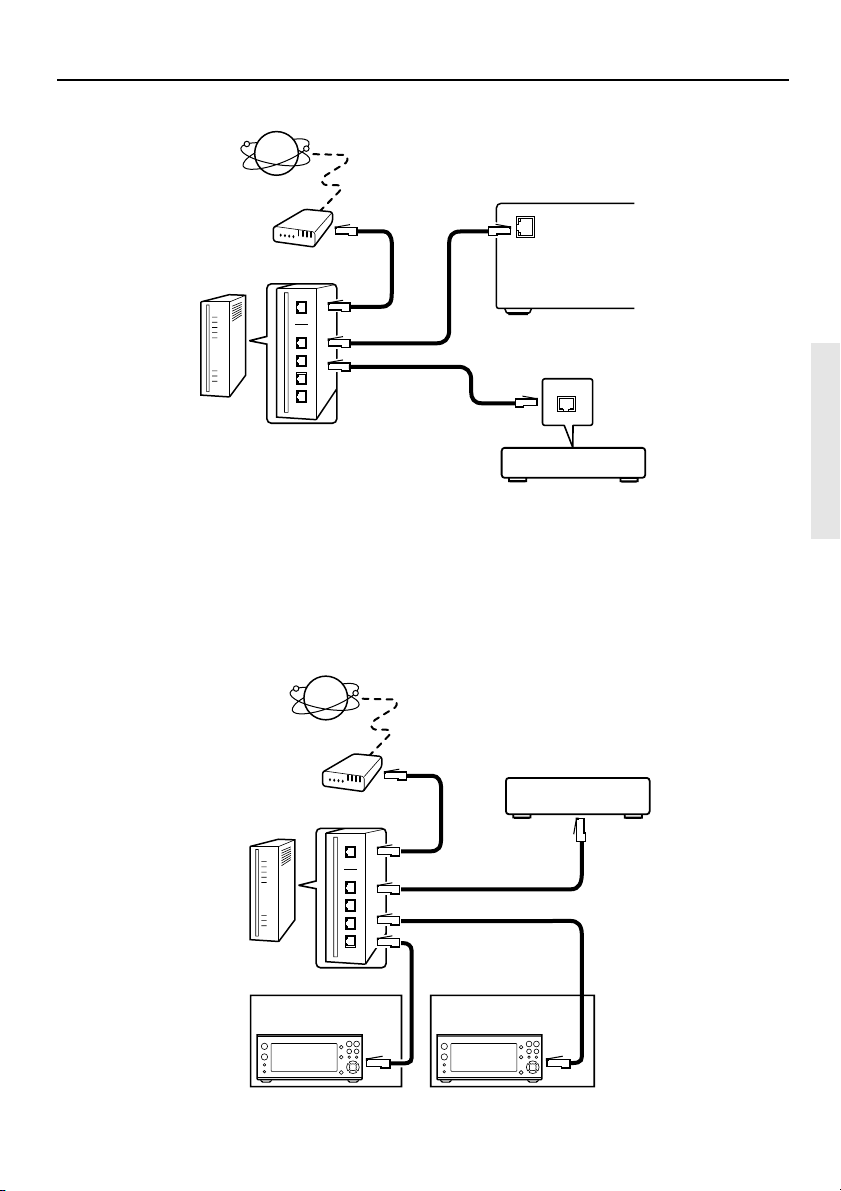
Connecting for listening to Internet radio and the Audio Network Server
Listening to Internet radio stations requires the following:
■ Modem (a device that provides Internet connections via leased lines; e.g., a cable modem, xDSL
modem, terminal adapter)
* To have access to Internet, you typically need to make a contract with an Internet service provider
(ISP). Modem requirements differ from ISP to ISP; for detailed information, consult with your ISP
or PC retailer.
■ Router (gateway) (gateway) (a device that enables multiple PCs or devices to connect to the
Internet simultaneously)
An IP address can be obtained automatically by using the router’s DHCP function.
* Some routers have built-in modem functionality. Router requirements differ from ISP to ISP; for
detailed information, consult with your ISP or PC retailer.
■ Ethernet CAT-5 cable
■ Minimum Internet Connection Requirements:
• Broadband Internet Connection
• DHCP (Dynamic Host Configuration Protocol) based network (requires a DHCP-enabled router)
• 100Base-TX switch built-in broadband router (recommended)
Connecting for listening to both Internet radio stations and music files saved on Audio Network Server
such as NAS-2.3 requires setting up the Audio Network Server as well as completing connections and
meeting the requirements described above.
What is Audio Network Server with Net-Tune System Protocol?
Audio Network Server streams digitally recorded music files over a LAN so that they can be played by
NAC-2.3 functionality. One server can stream to multiple units of NAC-2.3 at the same time.
The music streaming service is build on Onkyo’s proprietary NTSP protocol, which is an extension to
TCP/IP, thereby providing high response times.
In addition to providing the music streaming server functionality, the Audio Network Server allows
you to automatically searches music files saved on its hard disk, then easily register the files with the
server.
Supported music formats include WAVE (PCM) and MP3. The WAVE (PCM) format provides noncompressed high-quality audio data. The MP3 format, widely used over the Internet, accomplishes data
compression at near-CD sound quality.
20
Page 21
Connecting the NAC-2.3
Internet
Modem
To the WAN side
To LAN side port
Router
To LAN side port
NAC-2.3
Audio Network Server
Tips:
Connecting more than one unit of NAC-2.3 to a router enables several users to listen to Internet radio or
music pieces contained on the Audio Network Server.
Internet
Modem
Router
To the WAN side
To LAN side port
To LAN side port
NAC-2.3
Room 1 Room 2
NAC-2.3
Audio Network Server
Other Information
21
Page 22

Connecting the NAC-2.3
Connecting audio devices to the NAC-2.3
Connecting a player
The NAC-2.3 supports various audio player devices.
To use a player in conjunction with the NAC-2.3, connect the audio connection cable between the
NAC-2.3’s AUX IN port and the player’s AUDIO OUT port.
L
IR
IN
R
ANTENNA
AM
AUX
FIXED VARIABLE
INOUT OUT OUT
SPEAKERS
FM
(
)
6 OHMS MIN.
L
R
RL
75
CD player
Signal
ETHERNET
OSD
Advanced techniques for connecting external devices
The NAC-2.3 can also be connected with a receiver that is already connected with a speaker set, player,
or recorder.
If the receiver is complete with volume control, connect the audio connection cable between the NAC-
2.3’s FIXED OUT port and the receiver’s input port. In this case, use the receiver to adjust the volume.
CD recorder
CD player
L
IR
IN
R
ANTENNA
AM
AUX
FIXED VARIABLE
INOUT OUT OUT
SPEAKERS
FM
(
)
6 OHMS MIN.
L
R
RL
75
Receiver
Signal
ETHERNET
OSD
22
Page 23

Connecting the NAC-2.3
If the powered ampifier does not have volume control, connect the audio connection cable between the
NAC-2.3’s VARIABLE OUT port and the powered ampifier’s input port. In this case, use the NAC-
2.3 to adjust the volume.
L
IR
IN
R
ANTENNA
AM
AUX
FIXED VARIABLE
INOUT OUT OUT
SPEAKERS
FM
(
)
6 OHMS MIN.
L
R
RL
75
Powered
ampifier
Signal
ETHERNET
OSD
Connecting the NAC-2.3 with a television monitor
You can connect the NAC-2.3 with a television receiver to redirect screen output from the front panel
display to the television screen for quick and easy large-screen viewing.
To do so, connect the NAC-2.3’s OSD OUT port to the television receiver’s VIDEO IN port.
TV monitor
ETHERNET
OSD
L
IR
IN
R
ANTENNA
AM
AUX
FIXED VARIABLE
INOUT OUT OUT
SPEAKERS
FM
(
)
6 OHMS MIN.
L
R
RL
75
Other Information
23
Page 24

Connecting the NAC-2.3
Connecting speaker systems
Before connecting
• The load impedance of each speaker must be at least 6 Ω.
• Do not use unnecessarily long or extremely thin speaker cords. Otherwise, the DC resistance of the
speaker cords may become too high, lowering the damping factor and causing the sound quality to
deteriorate.
• Do not connect the speaker cord to the L and R connectors at the same time and do not connect two
or more speakers to the same speaker connectors.
R
L
Preparing the speaker cords for connection
1. Strip 15 mm from
the end of each
cord.
5/8"
(15mm)
2. Twist the stripped
end of the cord.
Note:
To prevent damage to
circuits never shortcircuit the positive (+)
and negative (–)
speaker wires.
Connecting the speaker cords to the speaker connectors
R
L
Right
speaker
Left
speaker
R
L
1. Press down the lever.
2. Insert the wire into the
hole.
24
NAC-2.3
ETHERNET
OSD
L
IR
IN
R
ANTENNA
AM
AUX
FIXED VARIABLE
INOUT OUT OUT
AUDIO NETWORK RECEIVER
-
MODEL NO.
NAC
SPEAKERS
FM
(
)
6 OHMS MIN.
75
R
L
L
R
2.3
AC INLET
3. Release the lever to
replace it.
Page 25

Connecting the NAC-2.3
Operating components not reached by the remote controller signals
(IR IN)
The following equipment (sold separately) is essential for operation:
Onkyo’s Multi-Room System kits (IR Remote Controller Extension System), or
Multiroom A/V distribution and control systems from Niles® and Xantech® to name a few.
If the remote controller signal does not reach the NAC-2.3 remote sensor
If the NAC-2.3 is located inside a cabinet or other enclosure where the infrared rays from the remote
controller cannot enter, then operation with the remote controller will not be possible. In such a case, it
will be necessary to install a remote sensor at a location outside of the cabinet for the infrared rays from
the controller to reach.
IR IN
NAC-2.3
In the
cabinet
Connecting
block
Remote controller
IR Receiver
Signal flow
Make connection as shown below. Do not plug the equipment into the power source until the
connection is complete.
Mini plug
cable
NAC-2.3
IR
IN
From connecting
block
Other Information
25
Page 26

Understanding the basic operations before
using the NAC-2.3
Connecting the power cord
Plug the power cord into wall socket.
Turning on the power
When the power cord is connected, the display
shown below appears.
Press the Standby/On button on the NAC-2.3 or
remote controller to turn on the power.
NAC-2.3 Remote controller
Standby/On
Selecting your desired source
You can press the Audio Input button to switch
among the available input sources as follows:
(FM)
(AM)
(externally
connected
audio device)
(Server)
(iNet Radio)
You can also switch among the input sources
using the selector on the remote controller.
26
Audio
Input
Music Server................. Net-Tune server
iNet Radio..................... Internet radio
Tuner ............................ FM/AM tuner.
The button toggles
between FM and AM.
Aux ............................... External input
Page 27

Understanding the basic operations before using the NAC-2.3
How to adjust the volume
Use the Volume / buttons on the main unit or
remote controller of the NAC-2.3.
The volume display appears when a volume
button is pressed and disappears 2 seconds after
the volume button is pressed or immediately after
the other button is pressed.
NAC-2.3 Remote controller
Volume
Temporarily turning off the sound
To turn off the sound momentarily, press Mute
button on the remote controller. When pressed
“Muting” is displayed on the NAC-2.3. Press the
Mute button again to turn the sound back on. You
can also turn the sound back on by pressing the
Volume
/ buttons.
Remote controller
Other Information
27
Page 28

Setting the clock
Setting date and time
1. Activate menu mode.
Press the Setup button to display the setup
items in the display area.
NAC-2.3 Remote controller
Setup
2. Press the Select button.
3. Press the Cursor / button to display
“Set Clock” in the display area.
Press Select button.
4. Press the Cursor / button to set the
time.
5. Press the Cursor button to display
“Mins”.
Press the Cursor
/ button to set the minute.
6. Press the Cursor button to display
“AM/PM”.
Press the Cursor
“AM” or “PM”.
7. Press the Cursor button to display
“Month”.
Press the Cursor
8. Press the Cursor button to display
“Day”.
Press the Cursor
the month.
9. Press the Cursor button to display
“Year”.
Press the Cursor
/ button to select either
/ button to set the month.
/ button to set the day of
/ button to set the year.
28
Note:
Press the Select button to save the settings you
have just made.
To return to normal display, press the Setup
button.
Page 29

Setting the clock
Displaying the date and time
The display changes each time you press the
Display button.
NAC-2.3 Remote controller
Display
(Ex.)
Changing the Clock Display
You can select the clock display mode from the
“12H AM/PM” or “24H” type.
1. Activate menu mode.
Press the Setup button to display the setup
items in the display area.
NAC-2.3 Remote controller
Setup
2. Press the Select button.
3. Press the Cursor / button to display
“Mode[12Hour]” in the display area.
Press the Select button.
4. Press the Cursor / button to select
the “12H AM/PM” or “24H” type.
5. Press the Select button to save the
change.
To return to normal display, press the Setup
button.
29
Other Information
Page 30

Listening to Music Saved on the Audio
Network Server
The Audio Network Server with Net-Tune System
Protocol connected with the NAC-2.3 via a LAN
enables you to use the NAC-2.3 to listen to any
music track contained in the music library
residing on the server.
Listening to a music track
contained in the music library on
the server
1. Make sure that the Audio Network
Server is turned on.
For more information, refer to the instruction
manual of the server used for the Audio
Network Server.
2. Set the NAC-2.3’s input source to
“Server”:
Press the Audio Input button repeatedly or the
Music Server button on the remote controller
to display “Server”.
4. Select your desired album, artist,
genre, or playlist.
Choose your desired album, artist, genre, or
playlist respectively according to your
selected search mode using the Cursor
button.
Press the Select button.
5. Choose your desired track.
Press the Cursor / button repeatedly to
select the track you want to play.
Indicates that the
selected track is the first
of five tracks contained
in the current album.
/
3. Select a key for searching tracks:
Press the Display button to switch to browse
mode.
Press the Cursor
browse to one of the available search modes
(Albums, Artists, Genres, Playlists) and then
press the Select button.
/ button repeatedly to
30
6. Press the Select button to play.
Page 31

Listening to Music Saved on the Audio Network Server
About Play Modes
On the Audio Network Server, you can define play
modes that allow you to play tracks by album, by
genre, and so on. For more information, refer to
the instruction manual of the server.
Playback by album
1. Press the Display button to switch to browse
mode.
2. Select “Albums” using the Cursor
3. Press Select button to display the album list.
4. Select your desired album using the Cursor
/ button and then press the Select button.
5. Select your desired tracks using the Cursor
/ button.
6. Press the Select button to start playing the
tracks that belong to your selected album.
Playback by artist
1. Press the Display button to switch to browse
mode.
2. Select “Artists” using the Cursor
3. Press Select button to display the artist list.
4. Select your desired artist using the Cursor
button and then press the Select button.
5. Select your desired tracks using the Cursor
/ button.
6. Press the Select button to start playing the
tracks that belong to your selected artist.
/ button.
/ button.
Playback by genre
1. Press the Display button to switch to browse
mode.
2. Select “Genres” using the Cursor
3. Press Select button to display the genre list.
4. Select your desired genre using the Cursor
/ button and then press the Select button.
5. Select your desired tracks using the Cursor
/ button.
6. Press the Select button to start playing the
tracks that belong to your selected genre.
Playback by playlist
1. Press the Display button to switch to browse
mode.
2. Select “Playlists” using the Cursor
button.
3. Press Select button to display the list of
playlist names.
4. Select your desired playlist using the Cursor
/ button and then press the Select button.
5. Select your desired tracks using the Cursor
/ button.
6. Press the Select button to start playing the
/
tracks that belong to your selected playlist.
Tips:
It may take some time for the server to start the
playback because it must process the data after
you have operated the NAC-2.3.
/ button.
/
Other Information
31
Page 32

Listening to Music Saved on the Audio Network Server
Various Playback Modes
• Random mode
You can press the Random button on the remote
controller to switch to Random mode, in which
the NAC-2.3 plays the tracks contained in your
selected album or track list at random. To exit
from Random mode, press the Random button
again.
Random On
Random Off
• Repeat mode
You can press the Repeat button on the remote
controller to switch to Repeat mode, in which the
NAC-2.3 repeatedly plays all the tracks in your
selected album or track list. You can use Repeat
mode combined with Random mode.
Pressing the Repeat button once will repeat the all
the tracks, and then pressing the Repeat button
again will repeat the current track.
To exit from Repeat mode, press the Repeat
button repeatedly until “Repeat Off” displayed.
Searching for a track
Search by track number
When the NAC-2.3 is in the browse mode after
pressing the Display button, you can use the
numeric keys on the remote controller to directly
specify the number of your desired track.
Just type in the number of your desired track and
press the Select button to start playing the track.
Numeric keys
Select button
32
Repeat
All tracks
Repeat
1 track
Repeat
Off
Page 33

Listening to Music Saved on the Audio Network Server
Search by initial letter
You can search for a Album title, Artist name,
Genre, or Playlist name by just typing in its initial
letter using a numeirc button on the remote
controller.
Pressing a numeric button on the remote
controller jumps to the first track or album that
begins with that letter. If there is no item
beginning with the letter, the display remains the
same. Note that this feature is case-insensitive.
For example, each press of the 2 button cycles
through the letters assigned to the button in the
following order:
A → B → C → 2 → A ...
Album list
A
Agains
AQUA
addictied
B
Babe in Arms
BABBLING
bon vivant
C
CHERCY
close to ...
color Blind
M
Man From The Past
mirpline
Viewing Information on the display
Status Messages
Different status messages appear on the display,
depending on the playback status.
Playing: .............The current track is playing.
Stopped: ............The current track is stopped.
Paused: .............. The current track is paused.
Seeking< ...........The current track is fast-
Seeking> rewinding or fast-forwarding.
Playback Information
While a track is playing, you can press the Cursor
/ button to cycle through three types of
playback information: Title, Album, and Artist.
(Title)
N
Night and Day
(Album)
Other Information
(Artist)
33
Page 34

Listening to Music Saved on the Audio Network Server
Track Information
While a track is playing, you can press the Cursor
button to cycle through the elapsed time and
remaining time of the current track.
The elapsed time of
the playback track
The remaining time of
the playback track
34
Page 35

Listening to Radio Broadcasts
You can listen to radio broadcasts either by
manually tuning to a station or by selecting a
preset station.
Manually tuning to a station
1. Press the Audio Input button
repeatedly to display “FM Radio” or
“AM Radio”.
When using the remote controller, press the
Tuner button repeatedly to switch between
“FM Radio” and “AM Radio”.
2. Press the Cursor / button
repeatedly until your desired station’s
frequency is selected.
Autotuning
For FM broadcasts, you can press and hold the
Cursor
it to have the NAC-2.3 search for a station by
tuning the frequency up or down.
(Note autotuning does not store stations in
memory.)
With “<>Tune” displayed the frequency is tuned
up or down until an receivable station is found.
While the scanning is in progress, a “Scanning”
message are displayed on screen.
(Ex.)
or button for a while and then release
Indicates that pressing
Indicates stereo
reception.
or will scan
through frequencies.
Presetting FM/AM stations
The NAC-2.3 provides a preset memory feature
that allows you to preset up to 40 FM and AM
stations by tuning to your desired station and then
assigning the station your desired preset number.
You can define a station name of up to 15
characters for each preset station.
Caution: Leaving the NAC-2.3 unpowered (.e.g.,
with the power cable disconnected) for 2 weeks or
longer may result in losing all the memory
contents including your preset stations and text
information. If this occurs, you will need to
preset your desired stations over again.
1. Set the NAC-2.3’s selector to FM Radio
or AM Radio.
2. Tune to your desired station
(frequency) by pressing the Cursor
/ button repeatedly.
✔Store; indicates that you can preset the
station by pressing the Select button.
Press [Select] to store.
3. Press the Select button.
You are prompted to enter the station name.
Frequency
counts up.
Other Information
(continued on next page)
35
Page 36

Listening to Radio Broadcasts
4. Press the Display button to select
which type of characters to enter.
Each time you press the Display button, the
character type cycles as follows.
ABCDEFGHIJKLMNOPQRSTUVWXYZ
↓
abcdefghijklmnopqrstuvwxyz
↓
1234567890 !"#$%&'()*+,-./:;<=>?@[
_`{|}~
Also, you can switch between the former and
latter halves of the character groups by
pressing the Cursor
Tips:
Pressing the Select button after selecting on
the display deletes the blinking character.
When using the remote controller, press the
Caps button to switch the character type.
5. Select your desired character by
pressing the Cursor
repeatedly.
/ button.
/ button
6. Press the Select button to enter the
selected character.
Repeat the step 5 and 6 until you enter all the
]^
character for the station name. You can enter
up to 14 characters for a station name.
7. Press the Setup button.
An available preset number appears.
If all the preset numbers are already in use,
the NAC-2.3 displays preset number 1.
Automatically displays first
empty preset number.
8. Select your desired preset number
and assign it to the station.
Press the Cursor
desired preset number.
To cancel the preset operation, press the
Setup button.
/ button to display your
To enter characters using the remote
controller:
Each time you press a numeric button on the
remote controller, the button cycles through a
number of assigned letters as shown in the
following example: A → B → C → A → . . .
You can press the numeric key “1” on the
remote controller to enter a symbol.
To enter the next character, press the
button.
36
9. Press the Select button to save the
preset station.
If your selected preset number is already in
use, the new station overwrites the existing
station.
Page 37

Listening to Radio Broadcasts
Listening to a preset station
1. Set the input selector to FM Radio or
AM Radio
Press the Audio Input button repeatedly to
display “FM Radio” or “AM Radio”.
When using the remote controller, press the
Tuner button repeatedly to switch between
“FM Radio” and “AM Radio”.
2. Press the Display button to switch to
browse mode.
NAC-2.3 Remote controller
Display
3. Select the preset number of your
desired station using the Cursor
button.
(Up/Down arrows appear on the left side of
the display.)
Preset Up/Down
Switching among display modes
The display changes each time you press the
Display button.
/
Switching between FM Auto and FM
Mono modes
When you are receiving FM broadcasts, you can
switch between Auto and Mono modes:
1. Activate menu mode.
Press the Setup button to display the setup
items in the display area.
With the remote controller, you can use the
Preset Up/Down feature to directly select
your desired preset number without having to
change the display mode.
2. Press the Cursor / button to display “FM
Radio” in the display area.
You are presented with the following menu
items in this order: Clock, Server, iNet Radio,
FM Radio, AM Radio, and System.
Other Information
37
Page 38

Listening to Radio Broadcasts
3. Press the Select button.
4. Press Cursor / button to display “FM
Mode”. Press the Select button.
5. Press Cursor
/ button to select either
“Auto” or “Mono”.
6. Press Select button to save the change.
To return to normal display, press the Setup
button.
Stereo display mode
Indicates stereo
reception.
• Renaming a preset station
You can enter or edit the name of a preset
channel:
1. Activate menu mode.
Press the Setup button to display the setup
items in the display area.
2. Press the Cursor
/ button to display “FM
Radio” or “AM Radio” in the display area.
You are presented with the following menu
items in this order: Clock, Server, iNet Radio,
FM Radio, AM Radio, and System.
Press the Select button
3. Press the Cursor
/ button to display
“Rename Preset” in the display area.
Press the Select button.
4. Use Cursor / button to select the preset
station whose name you want to change.
Monaural display mode
Indicates mono
reception.
38
Press the Select button.
5. Press the
or button to
select the character to be replaced and press
the Cursor
/ button to select the new
character. Press the Select button to enter the
new character. After you have made all the
necessary changes, press the Setup button.
To return to normal display, press the Setup
button.
Page 39

Listening to Radio Broadcasts
• Deleting a preset station
You can delete a preset station:
1. Activate menu mode.
Press the Setup button to display the setup
items in the display area.
2. Press the Cursor
Radio” or “AM Radio” in the display area.
You are presented with the following menu
items in this order: Clock, Server, iNet Radio,
FM Radio, AM Radio, and System.
Press the Select button.
3. Press the Cursor
Preset”.
Press the Select button.
4. Use the Cursor / button to select the preset
station you want to delete.
Press the Select button.
The preset station is deleted.
/ button to display “FM
/ button to display “Delete
Other Information
To return to normal display, press the Setup
button.
39
Page 40

Using timer functions
The following flow chart presents the setup menu screens you navigate through when setting up the
alarm:
Set
Alarm
Set
Alarm
Alarm feature
Alarm Settings
When the set time is reached, the NAC-2.3 will be
turned on and start playing audio from the
specified input source. The alarm feature works
in standby power mode only. Once you have
configured the settings, switch to standby power
mode.
1. Activate menu mode.
Press the Setup button to display the setup
items in the display area.
2. Press the Select button.
3. Press the Cursor / button to display
“Set Alarm” in the display area.
Press the Select button.
4. Set the alarm start time and alarm
source.
For details, see “Setting the alarm start time”
and “Setting the alarm source” on page 41.
5. Press the Standby/On button to allow
the NAC-2.3 to enter the standby
mode.
While the NAC-2.3 is turned on, the alarm
function will not be activated.
The clock display while the
timer function is set
40
Page 41

Using timer functions
Setting the alarm start time
After completing the step 3 on page 40, do the
following procedures.
1. Press the Cursor
Time” in the display area.
Press the Select button.
2. Press the Cursor / button to set the hour.
3. Press the Cursor
Press the Cursor / button to set the minute.
4. Press the Cursor
PM” when you use the 12-hour format.
Press the Cursor
“AM” or “PM”.
5. Press the Select button to save the settings
you have just made.
To return to normal display, press the Setup
button.
/ button to display “Alarm
button to display “Mins”.
button to display “ AM/
/ button to select either
Setting the alarm source
After completing the step 3 on page 40, do the
following procedures.
You can select the server, Internet radio, or FM/
AM radio as the playback source.
1. Press the Cursor
Source” in the display area.
Press the Select button.
2. Use Cursor
Press the Select button to save the settings
you have just made.
3. Select a track (server) or preset station (AM/
FM radio/Internet radio) to play.
• When using the server as the playback source,
you can select the title to play with the Cursor
/ button, just as you do in normal play
mode selection.
• When using Internet radio as the playback
source, you can select your desired preset
station number with the Cursor
• When using FM/AM radio as the playback
source, you can select your desired preset
station number with the Cursor
Press the Select button to save the settings
To return to normal display, press the Setup
button.
Note:
If you select a title on the server or an Internet
radio title and the title cannot be played for some
reason (such as the Audio Network Server being
turned off), the NAC-2.3 will automatically
choose the FM or AM station that was used the
last time.
/ button to display “Alarm
/ to select the playback source.
/ button.
/ button.
Other Information
41
Page 42

Using timer functions
Turning on or off the alarm
function
You can turn on or off the alarm function.
1. Activate menu mode.
Press the Setup button to display the setup
items in the display area.
NAC-2.3 Remote controller
Setup
Press the Select button.
2. Press the Cursor / button to display
“Alarm On/Off” in the display area.
Press the Select button.
Stopping the activated alarm
Press the Standby button either on the NAC-2.3
or the remote controller, and then the NAC-2.3 is
turned off.
If you press the Display button instead of the
Standby button, the timer function is disabled and
the NAC-2.3 remains to be turned on.
To stop the activated alarm, press the Standby/On
button to let the NAC-2.3 enter the standby state.
(When the time you set comes on the next day, the
alarm will be activated again.)
Snooze feature
While the timer playback works, the NAC-2.3
provides a snooze feature that temporarily
silences the alarm and sounds the alarm again
after 5 minutes.
Enabling the snooze feature
Pressing the Select button while the timer is
operating puts the NAC-2.3 into snooze standby
mode.
After 5 minutes, the snooze feature sounds the
alarm again.
4. Press the Cursor / button to select
“On” or “Off”.
5. Press the Select button to save the
change.
To return to normal display, press the Setup
button.
42
Page 43

Using timer functions
Sleep timer
The sleep timer puts the NAC-2.3 into standby
mode when the set time elapses.
The sleep timer can be configured from the
remote controller only.
Press the Sleep button to set the time that must
elapse before the NAC-2.3 is put into standby
mode.
When you press the Sleep button on the remote
controller for the first time, the “Sleep 90 Min”
appears in the display, meaning that the NAC-2.3
will be put into standby mode after 90 minutes.
Subsequently, each time you press the button, the
time setting is reduced in decrements of 10
minutes.
You can use the Cursor
time setting in minutes.
While the sleep timer function is set, “[Sleep]”
appears in the display.
/ button to change the
To disable the sleep timer setting, press the Sleep
button repeatedly until “Sleep” indication
disappears.
Other Information
43
Page 44

Listening to Internet radio
Internet radio refers to radio stations that
broadcast music and other programs via
streaming audio access on the Internet. The NAC-
2.3 allows you to enjoy Internet radio at a high
sound quality.
When you turn on the NAC-2.3 from the standby
mode, the NAC-2.3 will connect to the station last
time you listened to.
Listening to Internet radio
1. Make sure that you are connected to
the Internet.
For information on configuring the NAC-
2.3’s network settings, see “Configuring
Various Settings” (see page 51).
2. Set the NAC-2.3’s input source to
“Internet Radio”:
Press the Audio Input button repeatedly or the
iNet Radio button on the remote controller to
display “Internet Radio”.
3. Select a key for searching your
desired programs:
Press the Display button to switch to browse
mode.
Press the Cursor / button repeatedly to
select one of the available search keys
(Genres, Location, Language) and then press
the Select button.
• Genre
Press the Cursor
select “Genre” and then press the Select
button.
/ button repeatedly to
44
Press the Cursor
select “Sub Genres” and then press the Select
button.
/ button repeatedly to
Page 45

Listening to Internet radio
Press the Cursor / button to select your
desired station.
To return to normal display, press the Setup
button.
• Location
Press the Cursor
select your desired country and then press the
Select button.
Press the Cursor / button to select your
desired station.
• Language
Press the Cursor / button repeatedly to
select your desired language and then press
the Select button.
/ button repeatedly to
4. Start receiving Internet radio:
Press the Select button to start receiving
Internet radio.
The NAC-2.3 starts buffering the radio data,
and after the buffering status comes to
“100%”, the NAC-2.3 starts playing the
Internet radio.
It will take few tens of seconds to complete
buffering.
Tip:
While the Internet radio station service is not
available, “Stream Access Error” is displayed.
Press the Cursor
desired station.
/ button to select your
Other Information
45
Page 46

Listening to Internet radio
Presetting Internet radio stations
The NAC-2.3 allows you to save your favorite
Internet radio station in the preset memory. Once
you have saved your favorite stations in the preset
memory, you can directly select one of the preset
stations using the Preset
controller. You can preset up to 20 stations.
Caution: Leaving the NAC-2.3 unpowered (.e.g.,
with the power cable disconnected) for 2 weeks or
longer may result in losing all the memory
contents including your preset stations and text
information. If this occurs, you will need to
preset your desired stations over again.
1. Tune to your desired station.
2. Press the Select button.
You are prompted to enter the station name.
If you don’t need to enter the station name,
press the Setup button.
3. Press the Display button to select
which type of characters to enter.
Each time you press the Display button, the
character type cycles through uppercase
letters, lowercase letters, and numerals/
symbols.
Also, you can switch between the former and
latter halves of the character groups by
pressing the Cursor
/ button on the remote
/ button.
When using the remote controller, press the
Caps button to switch the character type.
4. Select your desired character by
pressing the Cursor
repeatedly.
To enter characters using the remote
controller:
Each time you press a numeric button on the
remote controller, the button cycles through a
number of assigned letters as shown in the
following example: A → B → C → A → . . .
You can press the numeric key “1” on the
remote controller to enter a symbol.
5. Press the Select button to enter the
selected character.
Repeat the step 4 and 5 until you enter all the
character for the station name. You can enter
up to 14 characters for a station name.
6. Press the Setup button.
An available preset number appears.
If all the preset numbers are already in use,
the NAC-2.3 displays preset number 1.
7. Select your desired preset number
and assign it to the station.
Press the Cursor
desired preset number. To cancel the preset
operation, press the Setup button.
/ button to display your
/ button
Tips:
Pressing the Select button after selecting
the display deletes the blinking character.
46
on
Page 47

Listening to Internet radio
8. Press the Select button to save the
preset station.
If your selected preset number is already in
use, the new station overwrites the existing
station.
• Renaming a preset Internet radio
station
You can enter or edit the name of a preset
channel:
1. Activate menu mode.
Press the Setup button to displays the setup
items in the display area.
2. Press the Cursor / button to display “iNet
Radio” in the display area.
You are presented with the following menu
items in this order: Clock, Server, iNet Radio,
FM Radio, Am Radio, and System.
Press the Select button
3. Press the Cursor
“Rename Preset” in the display area.
/ button to display
Press the Select button.
4. Use Cursor / button to select the preset
station whose name you want to change.
Press the Select button.
5. Press the
select the character to be replaced and press
the Cursor
character. Press the Select button to enter the
new character. After you have made all the
necessary changes, press the Setup button.
To return to normal display, press the Setup
button.
or button to
/ button to select the new
47
Other Information
Page 48

Listening to Internet radio
• Deleting a preset station
You can delete a preset station:
1. Activate menu mode.
Press the Setup button to display the setup
items in the display area.
2. Press the Cursor
Radio” in the display area.
You are presented with the following menu
items in this order: Clock, Server, iNet Radio,
FM Radio, AM Radio, and System.
Press the Select button.
3. Press the Cursor
Preset”.
Press the Select button.
4. Use the Cursor / button to select the preset
station you want to delete.
Press the Select button.
The preset station is deleted.
/ button to display “iNet
/ button to display “Delete
To return to normal display, press the Setup
button.
48
Page 49

Listening to Internet radio
Listening to a preset Internet radio
station
1. Set the input selector to Internet
Radio.
2. Select the preset number of your
desired station using the Preset
button on the remote controller.
Viewing information on the display
For some Internet radio stations, you can change
the station information using the Cursor /
button.
Supported Music Formats
The NAC-2.3 supports both WMA and MP3
audio streamed from Internet radio stations.
/
Other Information
49
Page 50

Listening to Music from an External Player
1. Set the input source to Auxiliary Input.
2. Start the external player connected to
the NAC-2.3.
External player
50
Page 51

Configuring Various Settings
Network Settings
Before you can use the NAC-2.3 to play music contained in the music library on the Audio Network
Server and listen to Internet radio, you must correctly configure the NAC-2.3’s network settings so that
it can connect to your LAN and the Internet.
It is strongly recommended to use a broadband connection (via an xDSL or CATV leased line) and a
router. If you are connected to the Internet via a narrowband dialup connection, you may not be able to
enjoy Internet radio as you expect or at all.
Before setting up the NAC-2.3, make sure that you are already using a router that provides Internet
access and that the NAC-2.3 is correctly connected with your router or hub via a LAN cable.
For more information on Internet connectivity, consult with your ISP (Internet Service Provider) or
refer to the documentation of your router.
System Ethernet Setting IP Address
Proxy Setup
Client
Remote ID Select Remote ID
DHCP
IP Address
IP Mask
Gateway
IP DNS 1
IP DNS 2
Proxy On/Off
Por t No
Proxy Address
Client Name
Wakeup on LAN
MAC address
Net-Tune port
Turn ON/OFF DHCP
Specify IP Address
Specify Net mask
Specify Gateway
address
Specify IP DNS 1
address
Specify IP DNS 2
address
Turn On/Off Proxy
Specify Port number
Specify Proxy
Address
Specify Client name
Enable/Disable
Wakeup on LAN
Check MAC address
Specify Net-Tune
port number
Other Information
Display Standby
On Screen Display Background Color
Specify Standby
mode
Select background
color
Specify screen saver Screen Saver
51
Page 52

Configuring Various Settings
Ethernet settings
If you use broadband router, you do not have to
perform the Ethernet settings because the DHCP
function on the broadband router is enabled by
default. To use the NAC-2.3 with the DHCP
function disabled, you are required to be familiar
with network.
After your setting completes, it will take about
two seconds to write the setting to the NAC-2.3.
If you turned off the NAC-2.3 before completing
writing the setting, the setting will be lost. In such
case, do the necessary setting again.
1. Activate menu mode.
Press the Setup button to display the setup
items in the display area.
NAC-2.3 Remote controller
Setup
2. Select the System setting menu.
Press the Cursor / button repeatedly to
display “System” in the display area.
You are presented with the following menu
items in this order: Clock, Server, iNet Radio,
FM Radio, AM Radio and System.
Note:
The display shown above may not appear
immediately after the power is turned on.
IP Address settings:
From the “System” → “Ethernet Settings,”
select “IP Address” using the Cursor /
button, and press the Select button.
• Turning on or off the DHCP feature:
From the “System” → “Ethernet Settings” →
“IP Address” setup menu, select “DHCP”
using the Cursor
Select button.
Set this setting to On if your router is enabled
for DHCP using the Cursor / button.
With the DHCP feature set to On, the NAC-
2.3 automatically configures all the network
settings. This means that you do not have to
configure the following IP Address settings.
If you opt to turn off the feature, then you
need to configure the following IP Address
settings manually.
Press the Setup button to confirm the new
setting.
/ button. Then press the
Press the Setup button.
3. Select “Ethernet Setting.”
Select “Ethernet Setting” using the Cursor
/ button, and press the Select button.
52
Page 53

Configuring Various Settings
• Specifying the IP address:
(This setting is required only when you
turn off the DHCP function.)
From the “System” → “Ethernet Settings” →
“IP Address” setup menu, select “IP Address”
using the Cursor
/ button. Then press the
Select button.
Enter the IP address using the Cursor /
button to select the digit to change and the
Cursor
/ button to change the number.
Press the to increment and to decrement
the number. Then press the Select button to
confirm the new setting.
Specify the IP address within the following
range:
CLASS A: 10.0.0.0 to 10.255.255.255
CLASS B: 172.16.0.0 to 172.31.255.255
CLASS C: 192.168.0.0 to 192.168.255.255
Because the most of the routers commercially
available is set to the CLASS C IP address,
specify the CLASS C IP address for the NAC-
2.3. If you set the IP address out of the ranges
shown above, you cannot use the Net-Tune
function.
Enter the IP mask using the Cursor /
button to select the digit to change and the
Cursor / button to change the number.
Press the
to increment and to decrement
the number. Then press the Select button to
confirm the new setting.
• Specifying the gateway address:
(This setting is required only when you
turn off the DHCP function.)
From the “System” → “Ethernet Settings” →
“IP Address” setup menu, select “Gateway”
using the Cursor
/ button. Then press the
Select button.
Enter the gateway address using the Cursor
/ button to select the digit to change and
the Cursor
/ button to change the number.
Press the to increment and to decrement
the number. Then press the Select button to
confirm the new setting.
• Specifying the IP mask:
(This setting is required only when you
turn off the DHCP function.)
From the “System” → “Ethernet Settings” →
“IP Address” setup menu, select “IP Mask”
using the Cursor
/ button. Then press the
Select button.
• Specifying the DNS address:
(This setting is required only when you
turn off the DHCP function.)
From the “System” → “Ethernet Settings” →
“IP Address” setup menu, select “IP DNS1”
using the Cursor
/ button. Then press the
Select button.
Other Information
53
Page 54

Configuring Various Settings
Enter the DNS1 address using the Cursor /
button to select the digit to change and the
Cursor / button to change the number.
Press the
the number. Then press the Select button to
confirm the new setting.
From the “System” → “Ethernet Settings” →
“IP Address” setup menu, select “IP DNS2”
using the Cursor
Select button.
Enter the DNS2 address using the Cursor
button to select the digit to change and the
Cursor
Press the to increment and to decrement
the number. Then press the Select button to
confirm the new setting.
to increment and to decrement
/ button. Then press the
/ button to change the number.
Proxy settings:
From the “System” → “Ethernet Settings”
setup menu, select “Proxy Setup” using the
Cursor
button.
• Turning On/Off Proxy
From the “System” → “Ethernet Settings” →
“Proxy Setup” setup menu, select “Proxy On/
Off” using the Cursor
the Select button.
/
When you use the proxy server for security
enhancement, set this setting to “On” to
specify the Port No. and URL. When you do
not use the proxy server, set this setting to
“Off”.
/ button. Then press the Select
/ button. Then press
54
Page 55

Configuring Various Settings
• Specify Port number
(This setting is required only when you
turn off the DHCP function.)
From the “System” → “Ethernet Settings” →
“Proxy Setup” setup menu, select “Port No”
using the Cursor
Select button.
Enter the port number using the Cursor / /
/ button, and then press the Select button to
confirm the new setting.
• Specifying Proxy Address
(This setting is required only when you
turn off the DHCP function.)
From the “System” → “Ethernet Settings” →
“Proxy Setup” setup menu, select “Proxy
Address” using the Cursor
press the Select button.
/ button. Then press the
/ button. Then
Client Settings:
From the “System” → “Ethernet Settings” →
setup menu, select “Client” using the Cursor
/ button. Then press the Select button.
• Specifying the client name (a name
used to identify your NAC-2.3 on the
network)
You can specify the name for the NAC-2.3 as
the client name.
From the “System” → “Ethernet Settings” →
“Client” setup menu, select “ClientName”
using the Cursor
Select button.
Press the Display button to select the
character type to enter. Each time you press
the Display button, the character type cycles.
Press the Cursor
select your desired character. Press the Select
button to enter the selected character.
/ button. Then press the
/ button repeatedly to
Select the character to enter using the Cursor
/ / / button, then press the Select button
to enter the selected character.
After completing entering the Proxy Address,
press the Setup button.
After entering the client name, press the Setup
button to confirm the new setting.
Note:
If you connect two or more NAC-2.3 to the
same LAN, use the separate client name for
each of the NAC-2.3s.
55
Other Information
Page 56

Configuring Various Settings
• Turning on or off the WOL (Wakeup On
LAN) feature
WOL (Wakeup On LAN) allows you to turn
on or off the NAC-2.3 from some other
device on the network.
This setting is reserved for future extension
and not currently available. Leave the setting
at its default, “Disable”.
From the “System” → “Ethernet Settings” →
“Client” setup menu, select “Wakeup on
LAN” using the Cursor
press the Select button.
Select either “Enable” or “Disable”.
Press the Select button to confirm the new
setting.
• Checking the MAC address
Open the “System” → “Ethernet Settings” →
“Client” setup menu, and press the Cursor
button repeatedly to display the MAC address
of the NAC-2.3 (the address specific to the
network-interface of NAC-2.3).
/ button. Then
• Specifying the Net-Tune port
From the “System” → “Ethernet Settings” →
“Client” setup menu, select “Net-Tune Port”
using the Cursor
Select button.
Enter the Net-Tune Port using the Cursor /
/ / , and then press the Select button to
save the entered number.
Press the Setup button again to confirm the
new setting.
/
/ button. Then press the
(The MAC address shown in the display
differs for respective NAC-2.3s.)
The MAC address cannot be modified.
56
Page 57

Configuring Various Settings
Changing the remote control code
to resolve conflicts
When you use multiple NAC-2.3s, you can
change the remote control code to avoid multiple
Integra/Onkyo products from operating
simultaneously with one remote controller.
1. Activate menu mode.
Press the Setup button to display the setup
items in the display area.
NAC-2.3 Remote controller
Setup
2. Select the System setting menu.
Press the Cursor / button repeatedly to
display “System” in the display area.
You are presented with the following menu
items in this order: Clock, Server, iNet Radio,
FM Radio, AM Radio and System.
4. Press the Cursor / button to change
the remote ID.
Press the Select button to save the change.
To return to normal display, press the Setup
button.
Tips:
• Make sure to use the same remote ID as the
one for the remote controller (see page 17).
If the remote IDs do not match between the
NAC-2.3 and remote controller, the NAC-
2.3 will not work properly when operating
with the remote controller.
• If you leave the remote controller with the
batteries removed for a while, the settings
you made will reset to the default settings.
Press the Select button.
3. Press the Cursor / button to display
“Remote ID” in the display area.
Press the Select button.
Other Information
57
Page 58

Configuring Various Settings
Setting the Brightness in Standby
Mode
You can change the brightness in the display
while the NAC-2.3 is in the standby mode.
1. Activate menu mode.
Press the Setup button to display the setup
items in the display area.
NAC-2.3 Remote controller
Setup
2. Select the System setting menu.
Press the Cursor
display “System” in the display area.
You are presented with the following menu
items in this order: Clock, Server, iNet Radio,
FM Radio, AM Radio and System.
/ button repeatedly to
4. Press the Cursor / button to select
your desired brightness setting.
Bright: bright
Dim: dimmed
Off: turned off
Press the Select button to save the change.
To return to normal display, press the Setup
button.
Press the Select button.
3. Press the Cursor / button to display
“Display Standby” in the display area.
Press the Select button.
58
Page 59

Configuring Various Settings
Changing the On Screen Display
Background Color
You can change the On Screen Display
background color. If you use multiple NAC-2.3s,
it is easier to identify each NAC-2.3 by using
different colors.
1. Activate menu mode.
Press the Setup button to display the setup
items in the display area.
NAC-2.3 Remote controller
Setup
2. Select the System setting menu.
Press the Cursor / button repeatedly to
display “System” in the display area.
You are presented with the following menu
items in this order: Clock, Server, iNet Radio,
FM Radio, AM Radio and System.
• Changing the background color
Press the Cursor / button to display
“Background Color.”
Press the Select button.
Press the Cursor
favorite color.
You can choose a background color from
seven colors: Blue 1, Blue 2, Green 1, Green
2, Magenta, Red 1, or Red 2.
Press the Select button to confirm the new
setting.
/ button to select your
Setting the duration before the
screen saver activates
Press the Cursor / button to display
“Screen Saver.”
Press the Select button.
3. Press the Cursor / button to display
“On Screen Display” in the display
area.
Press the Select button.
Press the Select button.
Press the Cursor
desired duration.
You can choose from the following duration
setting: “Off” or 1-60 minutes (in minutes).
Press the Select button to confirm the new
setting.
To return to normal display, press the Setup
button.
/ button to select the
59
Other Information
Page 60

Configuring Various Settings
Net-Tune Server Settings
If multiple Audio Network Servers exist on the
same LAN, you have to select the Audio Network
Server to which the NAC-2.3 is connected. (Be
sure to use the NAC-2.3 and the Audio Network
Server within the same network. If they reside on
different networks, the NAC-2.3 cannot
recognize the Net-Tune Audio Network Server.)
The NAC-2.3 searches for a server when it is
connected to the network for the first time, and
sets the preferred server parameter to the first
server found; however, you can change this
setting any time from the setup menu. Once you
have selected a server from the menu, that server
will be used as the preferred server; that is, the
NAC-2.3 will first attempt to access your selected
server next time it is connected to the network.
If there is no server accessible on the network, the
NAC-2.3 displays a “Server Timeout” message.
1. Make sure that the Audio Network
Server is running.
2. Make sure that the NAC-2.3 is
connected to the same network as the
server in the step 1 above is
connected to.
3. Choose your desired server.
Press the Setup button, select “Server” using
the Cursor
button.
You are presented with the “Select Server”
setup menu.
Press the Select button to list the names of
available servers.
Press the Cursor
select your desired server and then press the
Select button.
/ button, and press the Select
/ button repeatedly to
60
Page 61

On Screen Display (OSD)
OSD menu flowchart
(Internet Radio)
AUDIO INPUT Cursor Cursor SELECT DISPLAY
AUDIO INPUT
AUDIO INPUT
Auxiliary Input
FM Radio
AM Radio
Cursor
Tune to station
Tune to station
Select station
to preset
Select station
to preset
Select
character type
Select
character type
Cursor SELECT DISPLAY
, SELECT
Input station
name
, SELECT
Input station
name
SETUP
SETUP
Select preset
number
Select preset
number
SELECT
SELECT
Save preset
station
Save preset
station
SELECT SELECT SELECT
Select album
title
SELECT
SELECT
Select artist
name
>Artists
Select genre
SELECT SELECT SELECT
SELECT
Select Genre
SELECT SELECT
Select Location
SELECT SELECT
Select
Language
Cursor
Cursor
Select track
Select album
title
SELECT
Select album
title
SELECT
Select trackSelect playlist
Select Sub
Genre
Select station
Select station
SELECT
SELECT
SELECT
Server
DISPLAY
>Albums
Cursor
Cursor
AUDIO INPUT
>Genres
Cursor
>Playlists
AUDIO INPUT
Internet Radio Select station
(FM Radio)
DISPLAY SELECT
>Genres
Cursor
>Location
Cursor
>Language
Playback
Select track
Select track
Playback
SELECT
Playback
SELECT
Playback
Other Information
61
Page 62

Troubleshooting
POWER
The power to system is not turned on.
➞ Make sure that power cable is plugged into
the AC outlet (see pages 10, 26).
➞ Unplug the power cable from AC outlet, wait
for five seconds or more, then plug the cable
in again (see page 26).
➞ The top cover may become hot, but this is not
failure.
SPEAKER
The sound is not heard
➞ Make sure the speakers are connected
correctly and the speaker cables’ core wires
touch the speaker connectors (see page 24).
➞ Check to see if the volume level is set to
minimum (see page 27).
➞ If the Muting indicator is flashing, the sound
is muted. Cancel the muting function (see
page 27).
REMOTE CONTROLLER
The remote controller does not function
correctly.
➞ Make sure that the batteries have been
installed in the correct direction (polarity
+/–) (see page 11).
➞ Replace both batteries with new ones. (Do not
mix different types of batteries or new and old
batteries.) (See page 11.)
➞ The distance between the remote controller
and the remote control sensor may be too far.
Or, there may be an object between them (see
page 11).
➞ The remote control sensor on the unit may be
receiving a strong beam of light (inverter
fluorescent light or sunlight) (see page 11).
➞ Make sure to use the same Remote ID code
both for the remote controller and NAC-2.3
(see pages 17, 57).
➞ If you leave the remote controller with the
batteries removed for a while, the Remote ID
code setting for the remote controller will
reset to the default settings.
FM/AM TUNER
Noise is heard during broadcast, or too much
white noise is heard during an FM stereo
broadcast.
➞ Change the location of the antenna (see page
19).
➞ Locate the unit further from the TV or
computer (see page 19).
➞ Driving cars nearby or flying airplanes could
cause noise.
➞ The broadcasting radio signal may be weak if
a concrete wall obstructs the signal path .
➞ Try to setting FM mode to ‘Mono’ (see page
38).
➞ Noise may be heard when you operate the
remote controller during AM reception.
➞ If nothing can improve the reception, install
an outdoor antenna (see pages 18, 19).
62
TIMER
Timer playback does not work.
➞ The clock should be set correctly. If the clock
is not set, timer playback does not work.
Make sure you program the current day and
time (see page 28).
➞ If you select “Server” or “iNetRadio” and the
media cannot be played for some reason (such
as the server being turned off), the NAC-2.3
will automatically receive FM or AM radio
(see page 41).
Page 63

Troubleshooting
ETHERNET NETWORK
The unit fails to activate the Internet radio or
music server feature.
• Imperfect network connection.
➞ Check the connection between this unit
and the LAN side port of your router
(gateway) (see pages 20, 21).
➞ Make sure that the modem and router
(gateway) are correctly connected. Also,
make sure that the power is on (see pages
20, 21).
The unit fails to obtain a station list from an
Internet radio site.
• The radio site is now out of service or
otherwise inaccessible due to some other
reason such as maintenance.
➞ Try to access the site after a while.
Selecting the “Server” fails to play music or
fails to connect to the server.
• The Audio Network Server is not turned on.
➞ Turn on the Audio Network Server.
• No audio files found on the server.
➞ Create MP3, and/or WAVE audio files on
your server.
Search by genre returns no match.
• The audio file list of the Audio Network
Server contains no files that have genre
names.
➞ Assign genre names to the files contained
in the audio file list of the Audio Network
Server.
No playlist can be selected.
• You have not yet created any playlist in the
Audio Network Server.
➞ Create playlists in the Audio Network
Server.
Search by album returns no match
• The audio file list of the Audio Network
Server contains no files that have album
names.
➞ Assign album names to the files contained
in the audio file list of the Audio Network
Server.
Search by artist returns no match.
• The audio file list of the Audio Network
Server contains no files that have artist
names.
➞ Assign artist names to the files contained
in the audio file list of the Audio Network
Server.
Other Information
63
Page 64

Troubleshooting
Error messages
Input source
Server
Server
Server
Server
Server
Server
Server
Server
Server
Server
Server
Internet Radio
Internet Radio
Internet Radio
Internet Radio
Client FL display message
No Albums
No Artists
No Genres
No Playlists
No Tracks
Unsupported Format
List Changed
Server Timeout
Server not available
Stream Error
TrackList Over →
[1 of 999]
AlbumList Over →
[1 of 999]
ArtistList Over →
[1 of 999]
PlaylistList Over →
[1 of 999]
No Genres
No Languages
No Countries
No Sub Genres
Meaning
Unable to find the album information during searching the
music library.
Unable to find the artist information during searching the
music library.
Unable to find the genre information during searching the
music library.
Unable to find the playlist during searching the music
library.
Unable to find the track during searching the music library.
The track using unsupported format was selected during
searching the music library.
The music library on the Net-Tune server is updated. The
selected list is discarded and the selecting operation is reset.
Select tracks for new playlist again.
The Net-Tune server does not respond. Check the operation
status for the Net-Tune server.
The Net-Tune server function is not available. A global IP
address may be set for the IP address setting.
There is an error for playing the audio stream. The server
load may be increased, which may result from too many
client connections, too much PCM stream distribution, any
other applications on the Net-Tune server, and so on. Take
the appropriate measures
The list you selected contains 1,000 or more tracks.
You can add up to 999 tracks per list. Divide the list into
several lists so that each list contains 999 or fewer tracks,
which enables you to play all tracks in a list (see the NetTune Central Help).
Unable to retrieve the genre information during searching
the Internet radio stations.
Unable to retrieve the language information during
searching the Internet radio stations.
Unable to retrieve the country information during searching
the Internet radio stations.
Unable to retrieve the sub-genre information during
searching the Internet radio stations.
64
Page 65

Troubleshooting
Input source
Internet Radio
Internet Radio
Internet Radio
Internet Radio
FM/AM/
Internet Radio
Server/
Internet Radio
Client FL display message
No Stations
Stream Access Err
No Stream
iNet Radio Timeout
No Presets
Playback Denied
Unable to connect the station during searching the Internet
radio stations.
Unable to receive the streaming data from the selected
Internet radio station.
Unable to play the selected Internet radio station. Select
other Internet radio stations.
Receiving the streaming data from the Internet radio station
is timed out.
There are no preset radio stations for FM, AM and Internet
radio.
Tried to play the content with protection.
Cancel the protection before ripping the content.
This product used a microcomputer to perform
various advanced functions. However, noise,
radio interference, or static electricity could
occasionally cause the unit to malfunction. In this
case, unplug the power cable from the AC outlet,
then plug it in again in five seconds.
Integra/Onkyo is not responsible for damages
(such as CD rental fees) due to unsuccessful
recordings caused by the unit’s malfunction.
Before you record important data, make sure that
the material will be recorded correctly.
Meaning
Restoring the factory default settings:
To reset all the stored settings to the factory
default conditions, while the power to the NAC-
2.3 is on, press and hold down the STOP button
on the unit, and press Standby/On button.
Other Information
65
Page 66

Specifications
Amplifier Section
Power output
FTC 15 watts per channel, min RMS, at 8 ohms,
both channels driven 1 kHz, with no more
than 0.1%
DIN 2 × 17 watts at 6 Ω, 1 kHz
2 × 15 watts at 8 Ω, 1 kHz
Dynamic power output
2 × 27 watts at 6 Ω
2 × 24 watts at 8 Ω
Total harmonic distortion
0.1% at rated power
IM distortion
0.6% at rated power
Damping factor
30 at 8 Ω
Input Sensitivity and Impedance
AUX: 150 mV, 50 kΩ
Output Level and Impedance
FIXED: 150 mV, 2.2 kΩ
VARIABLE: 2 V, 470 Ω
Frequency and response
10 to 50,000 Hz +0 /–3 dB
Signal to noise ratio
100 dB (IHF-A)
Muting
–40 dB
AC Inlet
IEC type × 1
66
Tuner Section
Tuning range
FM: 87.50–108.00 MHz (100 kHz steps)
(U.S. & Canadian models)
87.5–108.00 MHz (50 kHz steps)
(Other area models)
AM: 530–1710 kHz (10 kHz steps)
(U.S. & Canadian models)
522–1611 kHz (9 kHz steps)
(Other area models)
Usable sensitivity
FM: Mono 11.2 dBf,
1.0 µV (75 Ω IHF)
0.9 µV (75 Ω DIN)
Stereo 17.2 dBf,
2.0 µV (75 Ω IHF)
23.0 µV (75 Ω DIN)
AM: 30 µV
50 dB Quieting sensitivity
FM: Mono 17.2 dBf, 2.0 µV (75 Ω)
Stereo 37.2 dBf, 20.0 µV (75 Ω)
Capture ratio
FM: 2.0 dB
Image rejection ratio
FM: 40 dB (U.S. & Canadian models)
85 dB (Other area models)
AM: 40 dB
IF rejection ratio
FM: 90 dB
AM: 40 dB
Signal to noise ratio
FM: Mono 73 dB, IHF
Stereo 67 dB, IHF
AM: 40 dB
Selectivity
FM: 50 dB DIN
(±300 kHz at 40 kHz Devi.)
AM Suppression Ratio
50 dB
Harmonic distortion
FM: Mono 0.2%
Stereo 0.3%
AM: 0.7 %
Frequency response
FM: 30–15,000 Hz (±1.5 dB)
Stereo separation
FM: 45 dB at 1,000 Hz
30 dB at 100 to 10,000 Hz
Stereo threshold
FM: 17.2 dBf, 2.0 µV (75 Ω)
Page 67

Specifications
General
Sound format supported by the Net-Tune
WAVE (PCM), MP3, WMA
Clock precision
monthly error: ±30 seconds
(at 25 °C (77 °F) )
Power supply
AC 120 V, 60 Hz
Power consumption
58 W (120 V, 60 Hz)
Standby power
8 W
Dimensions (W × H × D)
205 × 91 × 279 mm
8-1/16" × 3-9/16" × 11"
Weight
3.9 kg, 8.6 lbs
Specifications and external appearance are
subject to change without notice as a result of
product improvement.
Other Information
67
Page 68

Integra Division of
ONKYO U.S.A. CORPORATION
18 Park Way, Upper Saddle River, N.J. 07458, U.S.A.
Tel: 201-785-2600 Fax: 201-785-2650 http://www. integrahometheater.com
Integra Division of
ONKYO CORPORATION
Sales & Product Planning Div. : 2-1, Nisshin-cho, Neyagawa-shi, OSAKA 572-8540, JAPAN
Tel: 072-831-8111 Fax: 072-831-8124
Printed in Japan
SN 29343425
D0211-1
 Loading...