

Page 1
103950_V09
MEDIAJET Operating instructions
Page 2

Declaration of Conformity
INTEGRA Biosciences AG – 7205 Zizers, Switzerland
declares on its own responsibility that the devices
comply with:
EU Regulations
Standards for EU
Standards for Canada and USA:
Zizers, November 4, 2016
Description Models
MEDIAJET 103005, 103 006
MEDIAJET vario 113000, 113001, 113002
EU Directives (DoW: Date of Withdrawal) Before DoW DoW After DoW
Low Voltage Equipment 2006/95/EC 20.04.2016 2014/35/EU
Electromagnetic Compatibility 2004/108/EC 20.04.2016 2014/30/EU
Restriction of Hazardous Substances 2011/65/EU
Waste Electrical and Electronic Equipment 2012/19/EU
Registration, Evaluation, Authorisation and Restriction of Chemicals (REACH) 1907/2006
Safety requirements for electrical equipment for laboratory use EN 61010-1: 2010
Particular requirements for automatic and semi-automatic laboratory equipment for analysis and other purposes.
EN 61010-2-81: 2015
Electrical equipment for laboratory use - EMC requirements EN 61326-1: 2013
Safety requirements for electrical equipment for measurement,
control and laboratory use - General requirements
UL 61010-1
Operation is subject to the following two conditions:
(1) this device may not cause harmful interference, and
(2) this device must accept any interference received, including
interference that may cause undesired operation.
Part 15 of the
FCC Rules
Class A
Elmar Morscher
CEO
Thomas Neher
Quality Manager
Page 3

MEDIAJET – Operating instructions V09
3
www.integra-biosciences.com
Table of Contents
Chapter 1 Introduction
1.1 Intended Use.................................................................................. 5
1.2 General safety instructions............................................................. 5
1.3 Symbols used................................................................................. 6
Chapter 2 Description of the device
2.1 Scope of delivery............................................................................8
2.2 Overview of MEDIAJET ...............................................................11
2.3 Operating panel............................................................................ 12
2.4 MEDIAJET in detail...................................................................... 12
2.5 MEDIAJET vario in detail ............................................................. 13
2.6 Reverse side and interfaces.........................................................14
Chapter 3 Installation
3.1 Unpacking ................................................................................... 15
3.2 Preconditions ...............................................................................15
3.3 Removing and fitting the conversion set of MEDIAJET vario....... 17
3.4 Assembly...................................................................................... 19
3.5 Biplate option ............................................................................... 21
3.6 Turbo mode option....................................................................... 22
3.7 TUBEFILLER option.....................................................................23
Chapter 4 Operation
4.1 Overview MAIN MENU functions ................................................. 25
4.2 Adapt system parameter......................................
........................ 26
4.3 Loading Petri dishes.....................................................................28
4.4 Adapting a dish filling program..................................................... 30
4.5 Run dish filling program ............................................................... 34
4.6 Removing filled Petri dishes......................................................... 38
4.7 Process documentation................................................................ 39
4.8 Dosing function ............................................................................ 41
4.9 Mixing additives into the agar.......................................................42
4.10 TUBEFILLER option...................................................................44
Page 4

MEDIAJET – Operating instructions V09
4 INTEGRA Biosciences AG
Chapter 5 Maintenance
5.1 Cleaning .......................................................................................48
5.2 UV Lamp exchange......................................................................50
5.3 Leak test.......................................................................................51
5.4 Servicing.......................................................................................52
5.5 Fault notifications .........................................................................52
5.6 Disposal........................................................................................53
Chapter 6 Technical data
6.1 Specification of the device............................................................54
6.2 Petri dish specifications................................................................55
6.3 Configuration specifications .........................................................56
6.4 Test tube compatibility chart.........................................................57
Chapter 7 Optional functions and required accessories
7.1 General accessories.....................................................................58
7.2 Accessories for different Petri dish sizes......................................58
7.3 Consumables ...............................................................................60
7.4 Imprinting dishes ..........................................................................60
7.5 Turbo mode option .......................................................................61
7.6 Accessories for dosing function....................................................62
7.7 Driving a second pump.................................................................63
7.8 TUBEFILLER option.....................................................................64
Imprint ..........................................................................................................................66
Page 5

MEDIAJET – Operating instructions V09 Introduction
5
www.integra-biosciences.com
1 Introduction
This operating instructions contain all information required for installation,
operation and regular maintenance of MEDIAJET. It summarizes all important
technical data and provides an overview of available accessories and options.
Purpose This chapter informs you regarding the general safety instructions and the
symbols used in the operating instruction manual.
1.1 Intended Use
This is a general-purpose laboratory instrument. Any use of this instrument in a
medical or IVD setting is the sole responsibility of the user.
The MEDIAJET is used in laboratories to fill Petri dishes of various sizes, Petri
dishes with two compartments or test tubes of various diameters and length.
1.2 General safety instructions
The MEDIAJET conforms to the state of technology and the recognized safety
rules, and is operationally safe. Operate the MEDIAJET only when in a perfect
condition and observing this operating instruction manual.
Residual dangers can emanate from the device if it is used or operated
incorrectly by untrained personnel.
All persons entrusted with operation of the MEDIAJET must have read and
understood this operating instruction manual and, in particular, the safety
instructions, or must have been instructed by their superior such that they are
able to operate the device without danger.
Irrespective of the safety instructions set out here, applicable provisions and
regulations must be observed in addition; for example, GLP, GMP, FDA, of the
employer's liability insurance associations, of the health authorities and of the
trading standards authorities.
Please observe the danger references on the device.
Do not carry out any conversion work or alterations on the device.
Please visit our website www.integra-biosciences.com
on a regular basis for up
to date information regarding REACH classified chemicals contained in our
products.
Page 6

MEDIAJET – Operating instructions V09 Introduction
6 INTEGRA Biosciences AG
1.3 Symbols used
This operating instruction manual makes specific reference to residual dangers
using the symbols shown.
1.3.1 Safety alert symbol
1.3.2 Severity levels of hazards in these operating instructions
The signal word in the top panel designates the hazard severity level.
1.3.3 Work reference
SAFETY SIGN
This is the general warning sign. It is used to alert the user to potential personal
injury hazards. In addition, hazards for machinery, materials and the
environment are possible. All safety messages that follow this sign shall be
obeyed to avoid possible harm.
WARNING
Indicates a hazard with a medium level of risk, which, if not avoided, could
result in death or serious injury.
CAUTION
Indicates a hazard with a low level of risk, which, if not avoided, could result in
minor or moderate injury.
NOTICE
Means that material damage or data loss in a micro-processor control could
occur, if the corresponding precautionary measures are not taken.
ASSISTANCE
This symbol identifies important notes regarding the correct operation of the
device and labor-saving features.
Page 7

MEDIAJET – Operating instructions V09 Introduction
7
www.integra-biosciences.com
1.3.4 Warning labels on the device
DANGER UV LAMP
Do not directly stare into the UV lamp.
MOVING PARTS
Keep hands out of area of moving parts.
ROTATING COG WHEELS
Keep hands out of cog wheels, risk to squash your fingers.
BIOHAZARD
The instrument can be potentially biohazardous due to the use of
biozazardous substances by the operator.
Page 8
MEDIAJET – Operating instructions V09 Description of the device
8 INTEGRA Biosciences AG
2 Description of the device
MEDIAJET is a laboratory device designed for the filling of Petri dishes with agar
nutrient media. MEDIAJET is available in two different device versions. The
standard version is limited to the filling of 90/100 mm (nominal size) diameter
Petri dishes. The MEDIAJET vario version is convertible and provides the
possibility to fill Petri dishes of 35 mm, 60 mm and 90/100 mm diameter (nominal
size). The MEDIAJET vario with biplate option (Part No. 113 002) allows the
filling of Petri dishes with two compartments.
Purpose This chapter describes the most important components of the MEDIAJET and
introduces you to the specific terminology.
2.1 Scope of delivery
This section gives an overview of all required parts of an operable MEDIAJET
unit. Please also refer to packing list included in the shipment, as the total scope
of delivery is dependent on the respective device version and possible additional
accessories.
Basic device
(Part No. 103 005, 103 006, 113 000, 113 001
or 113 002)
Safety cover
(Part No.103 422) or
Biplate safety cover with reflector for alignment
sensor
(Part No. 113 801)
Rotor, different sizes possible
(Part No. 103 271, 103 272, 113 460, 113 271,
113 276 or 113 272) or
rotor for biplate option
(Part No. 113 806)
Page 9
MEDIAJET – Operating instructions V09 Description of the device
9
www.integra-biosciences.com
Base plate for filling nozzle holder for Petri
dishes with a height above 21 mm
(Part No. 103 212) or
Base plate for filling nozzle holder for Petri
dishes with a height above 21 mm
(MEDIAJET vario with biplate option only)
(Part No. 113 821)
Tubing set, including 1.5 m silicone tubing and
filling nozzle (two sets for MEDIAJET vario with
biplate option)
(Part No. 103 030 or 113 030)
Spirit level
(Part No. 103 095)
Line cord
Conversion set installed, applies to MEDIAJET
vario only,
(Part No. 113 051, 113 055, 113 052, 113 056
or 113 053)
Page 10
MEDIAJET – Operating instructions V09 Description of the device
10 INTEGRA Biosciences AG
2.1.1 TUBEFILLER option
The TUBEFILLER option (Part No. 103 010) converts the MEDIAJET into a test
tube filler.
10 pack O-rings (MEDIAJET vario with biplate
option only)
(Part No. 113 822)
Carousel, in a separate box
(Part No. 103 020, 103 021, 113 022, 113 020
or 113 021)
Support plate, can accommodate 3 test tube
racks.
Filling arm, consisting of carrier piece (1), rod
(2) and radial arm (3).
Silicone tubing set, consisting of silicone tubing
3.0 mm ID, 2.5 m length, stainless steel
aspirating and dispensing tube, each of 10 cm
length.
3
2
1
Page 11

MEDIAJET – Operating instructions V09 Description of the device
11
www.integra-biosciences.com
2.1.2 Turbo mode option
The turbo mode option accelerates the filling process by using a second pump
head installed. This option requires the turbo mode kit (Part No. 103 036)
including:
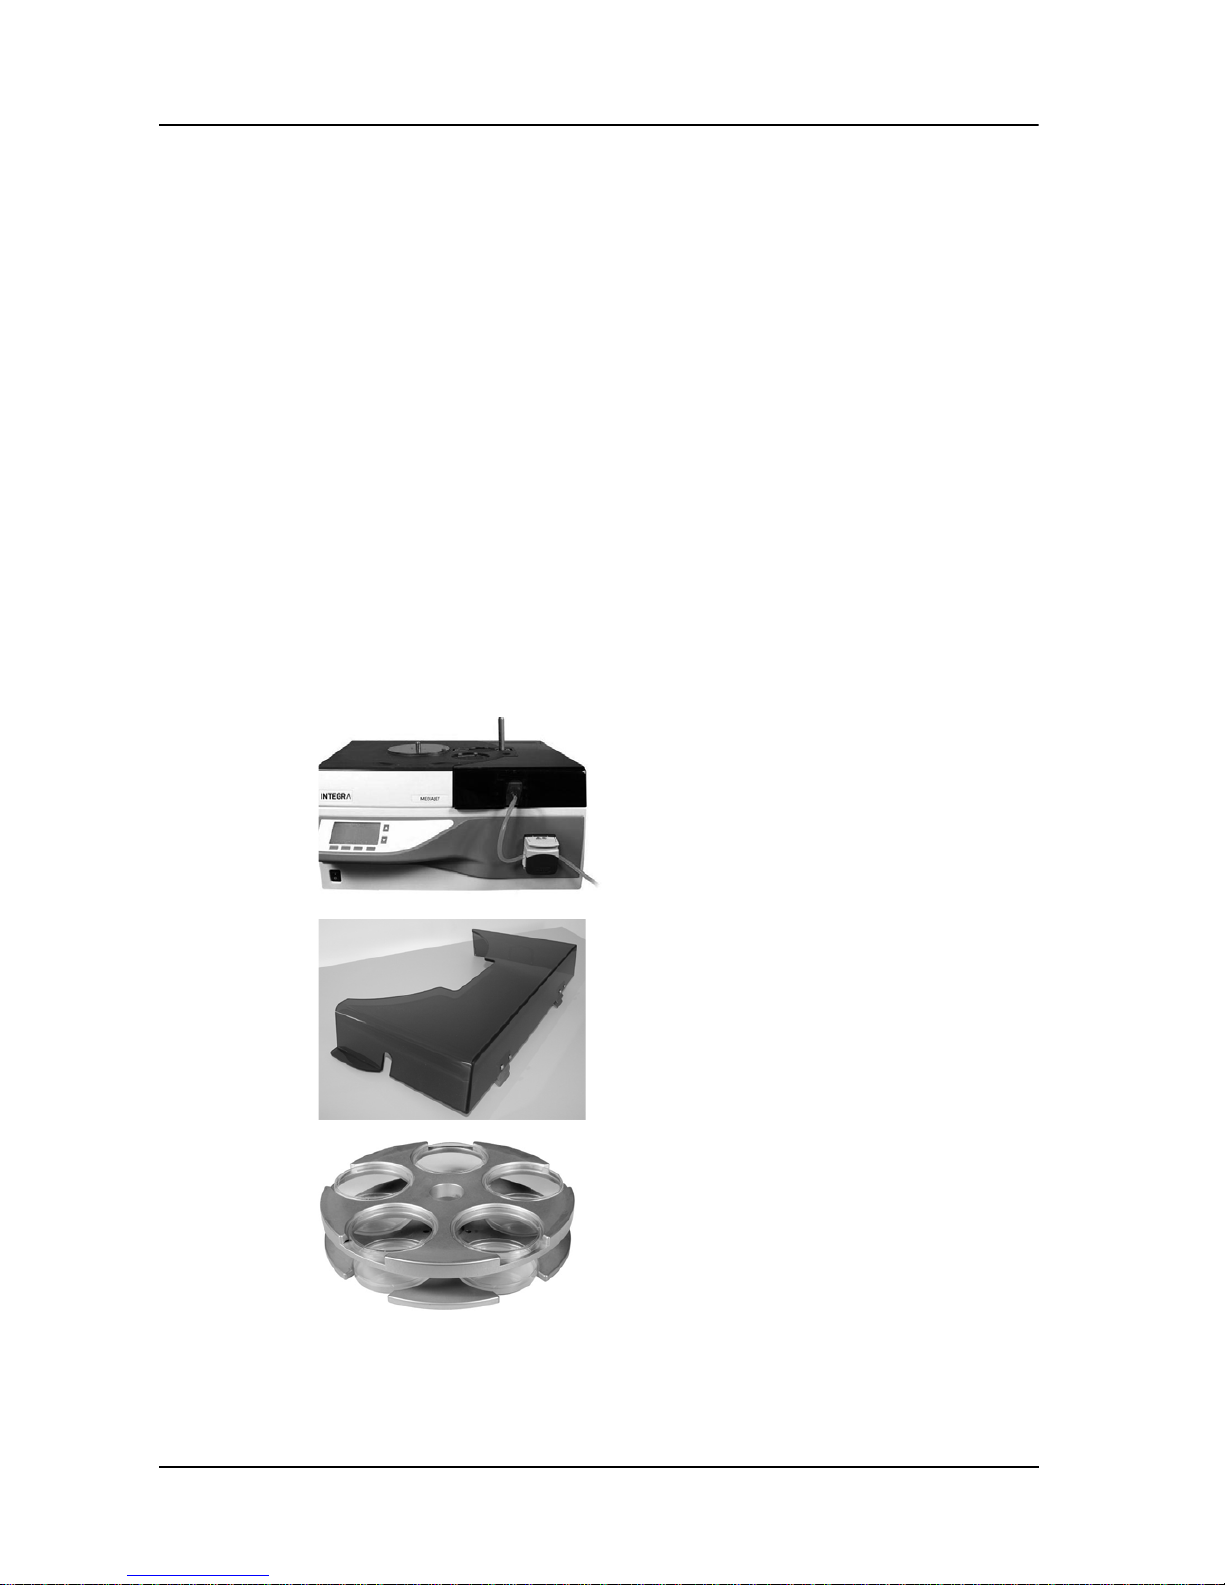
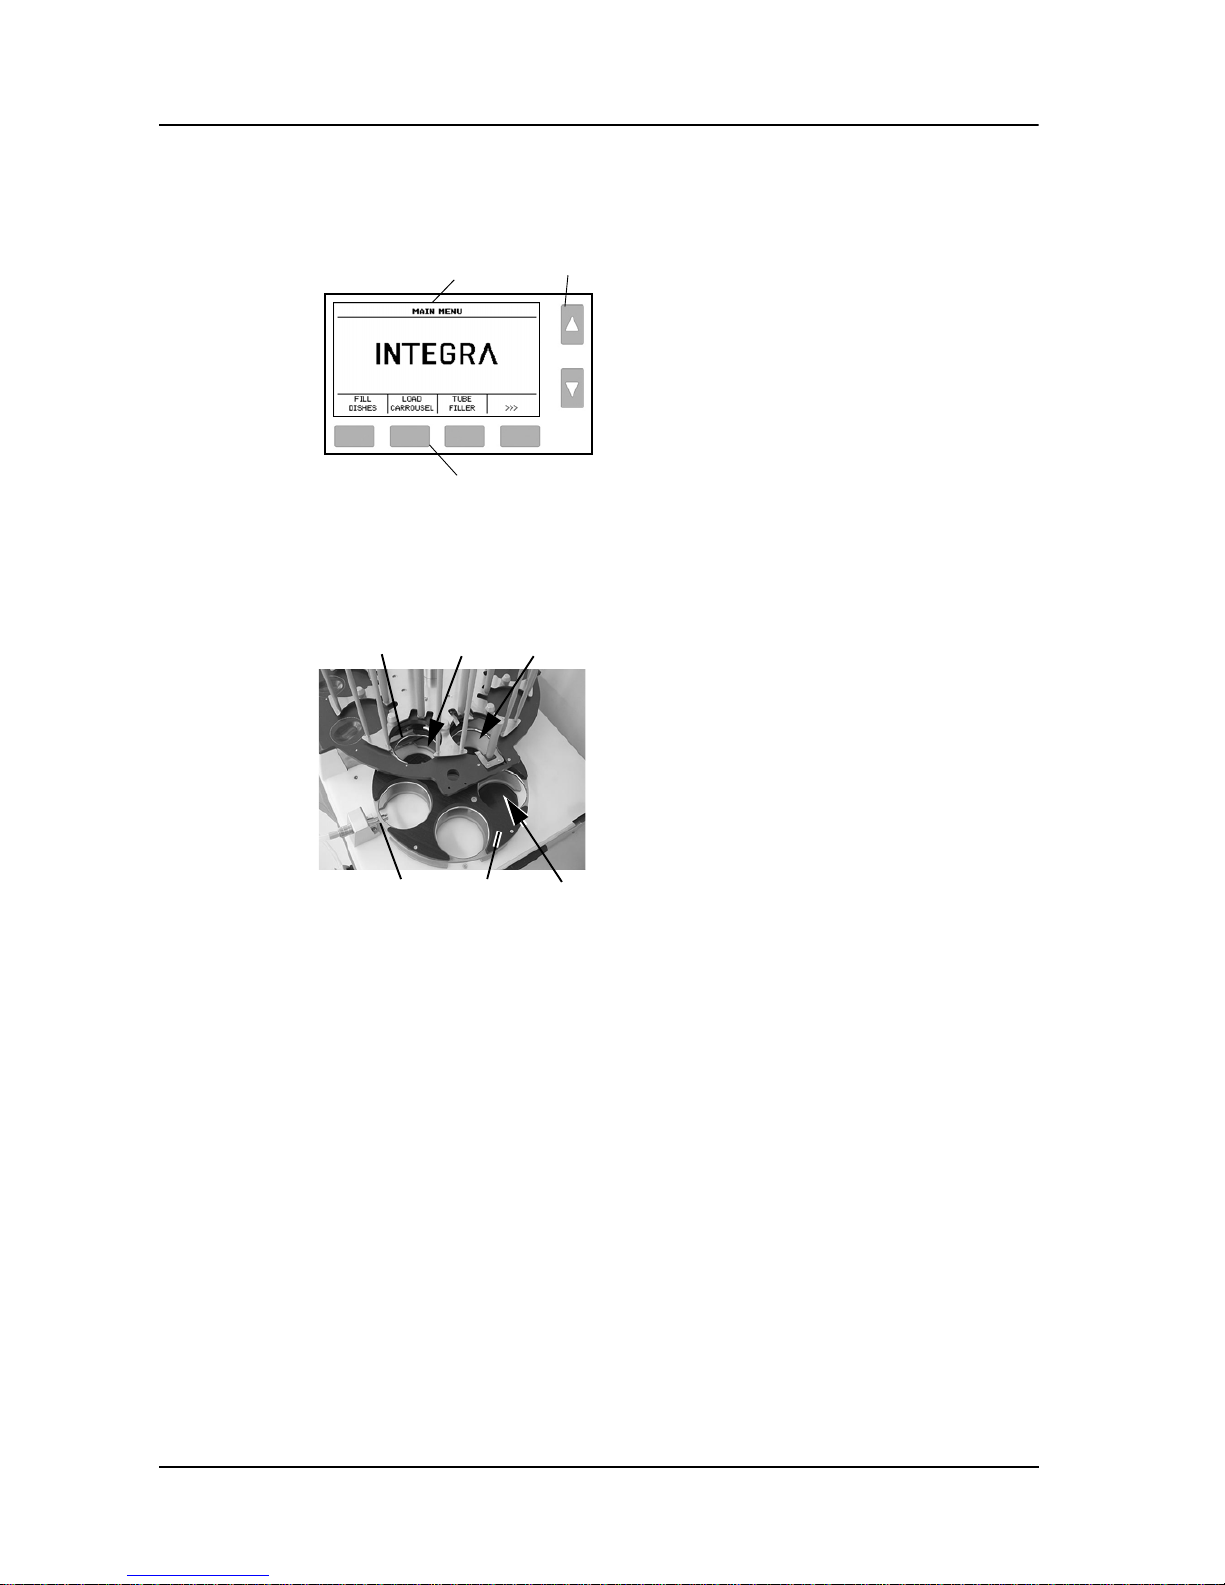
2.2 Overview of MEDIAJET
Extension pump head (Part No. 171 090)
Tubing set for Turbo mode (Part No. 103 035),
inner diameter 6 mm, length 2.0 m.
1 Carousel
A standard carousel can accommodate
360 Petri dishes divided up into nine
stacks of 40 dishes. One position in the
carousel must be kept free at all times to
enable perfect working of the device.
2 Safety cover
The safety cover from Plexiglas reduces
the penetration of germs from the ambient
air into the filling chamber and protects the
user against UV radiation.
3 Peristaltic pump
4 Operating panel
(see 2.3)
5 Main switch
1
5
4
3
2
Page 12
MEDIAJET – Operating instructions V09 Description of the device
12 INTEGRA Biosciences AG
2.3 Operating panel
2.4 MEDIAJET in detail
12 Cooling plate (factory option)
This cooling plate, which is available as a factory option built into the base
unit, accelerates the solidification of the agar medium in the Petri dish.
13 Rotor
The rotor separates the dish lid from the bottom, and transports the dishes
from the feeder position via the filling position to the stacker position.
14 Filling nozzle
The filling nozzle is part of the tubing set and establishes contact between
the MEDIAJET and the media preparator (MEDIACLAVE). It is positioned
correctly in the device by the filling nozzle holder.
6 Graphic user surface
7 Arrow keys
8 Function keys for operation of the
MEDIAJET
6
7
8
9 UV lamp
A UV lamp for decontamination of the
filling chamber is built in and switches off
automatically when the safety cover is
open.
10 Feeder position
At this position, the Petri dishes are
transferred from the carousel into the rotor
by the feeder piston.
11 Stacker position
At this position, the stacker piston transfers
the filled Petri dishes from the rotor back
into the carousel.
9
14 13 12
1110
Page 13
MEDIAJET – Operating instructions V09 Description of the device
13
www.integra-biosciences.com
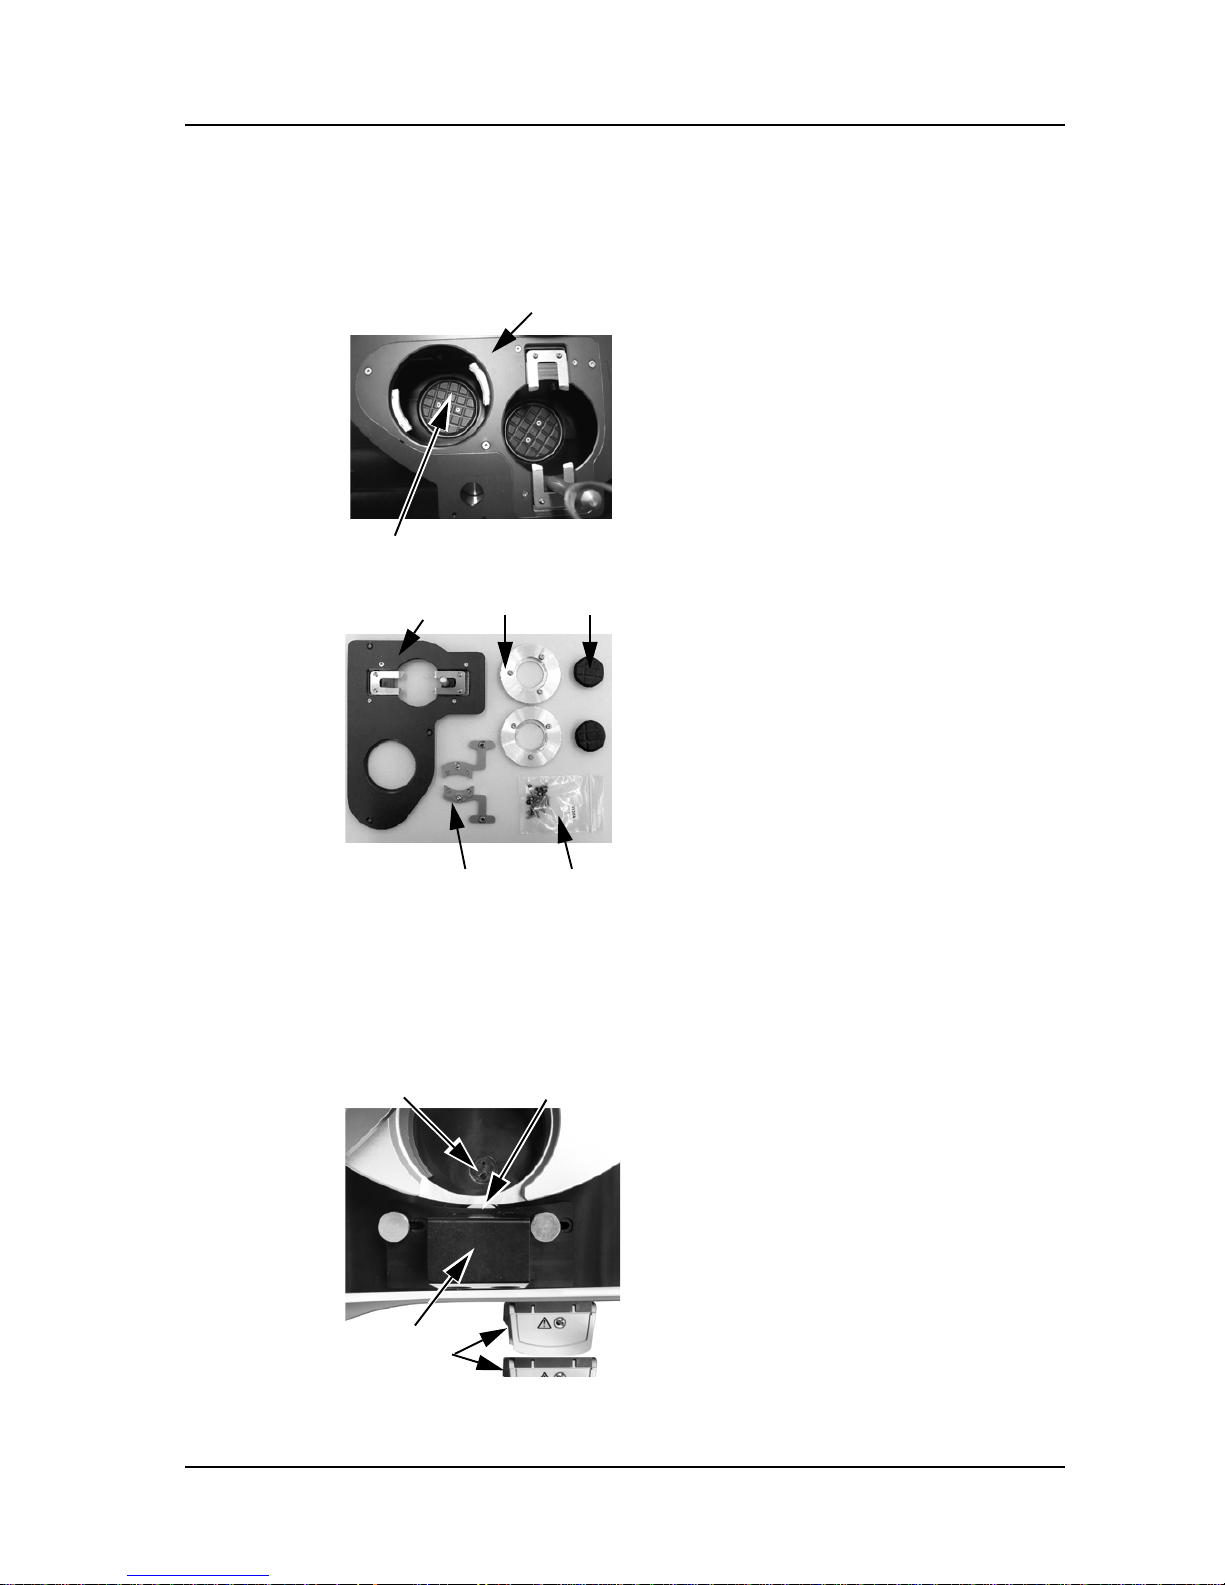
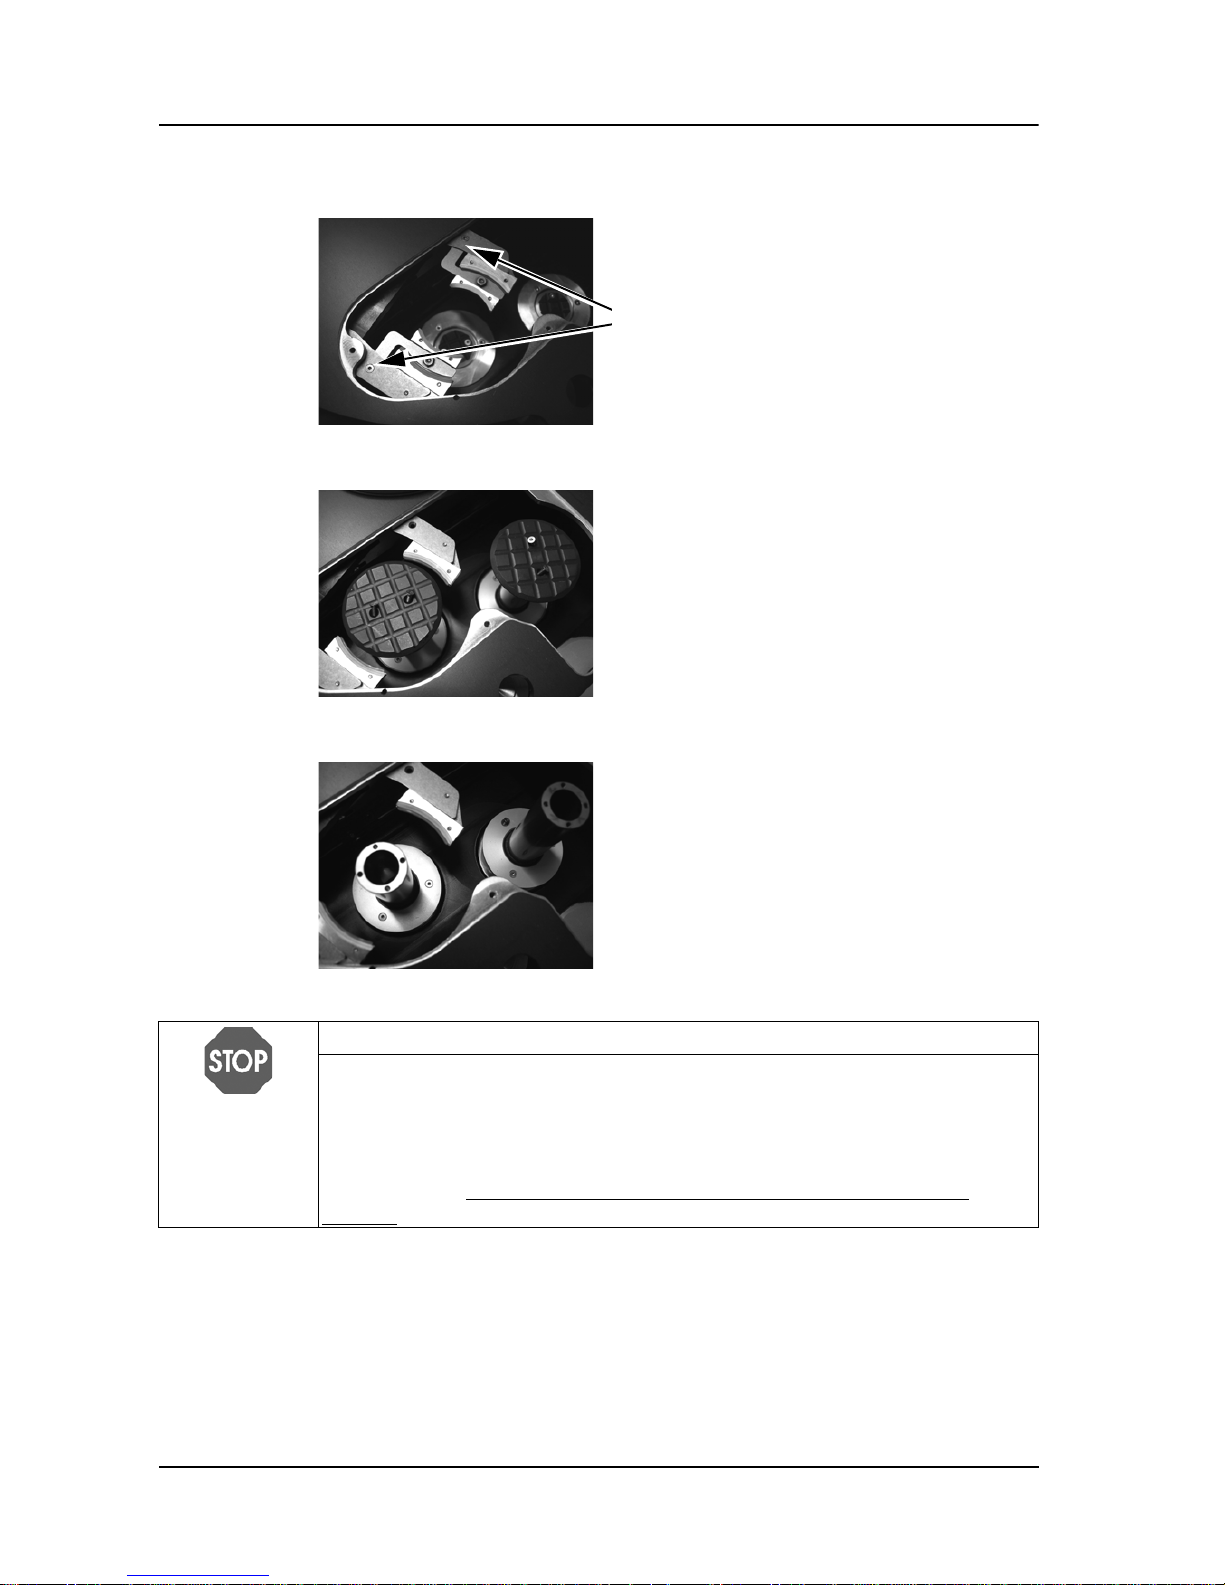
2.5 MEDIAJET vario in detail
MEDIAJET vario can be adapted to different diameters of Petri dishes, using a
conversion set.
The following parts of the conversion set can be exchanged:
The carousel, rotor and filling nozzle must also fit to the Petri dish size.
Description of MEDIAJET vario with biplate option:
The biplate option is used for filling Petri dishes with two compartments.
The following parts are specific for the biplate option.
The different parts of the conversion set are
already installed on the device.
15 Adaptation insert for Petri dishes of the
desired diameter.
16 Head plates for feeder and stacker piston
and flanges, laid underneath.
17 Adaptation insert with petri dish
guide pin.
18 Flanges for feeder and stacker.
19 Head plates for feeder a n d stacker
piston.
20 Extension gripper lever (applies
to conversion set for
35 and 60
mm Petri dishes only).
21 Set of spare screws and O-rings.
22 Alignment sensor at filling
position.
23 Drive wheel for rotating the Petri
dishes.
24 Filling nozzle holder with
integrated drive wheel.
25 Double pump head.
The Safety cover has a reflector,
needed for the alignment sensor.
15
16
17 18 19
20 21
22 23
24
25
Page 14
MEDIAJET – Operating instructions V09 Description of the device
14 INTEGRA Biosciences AG
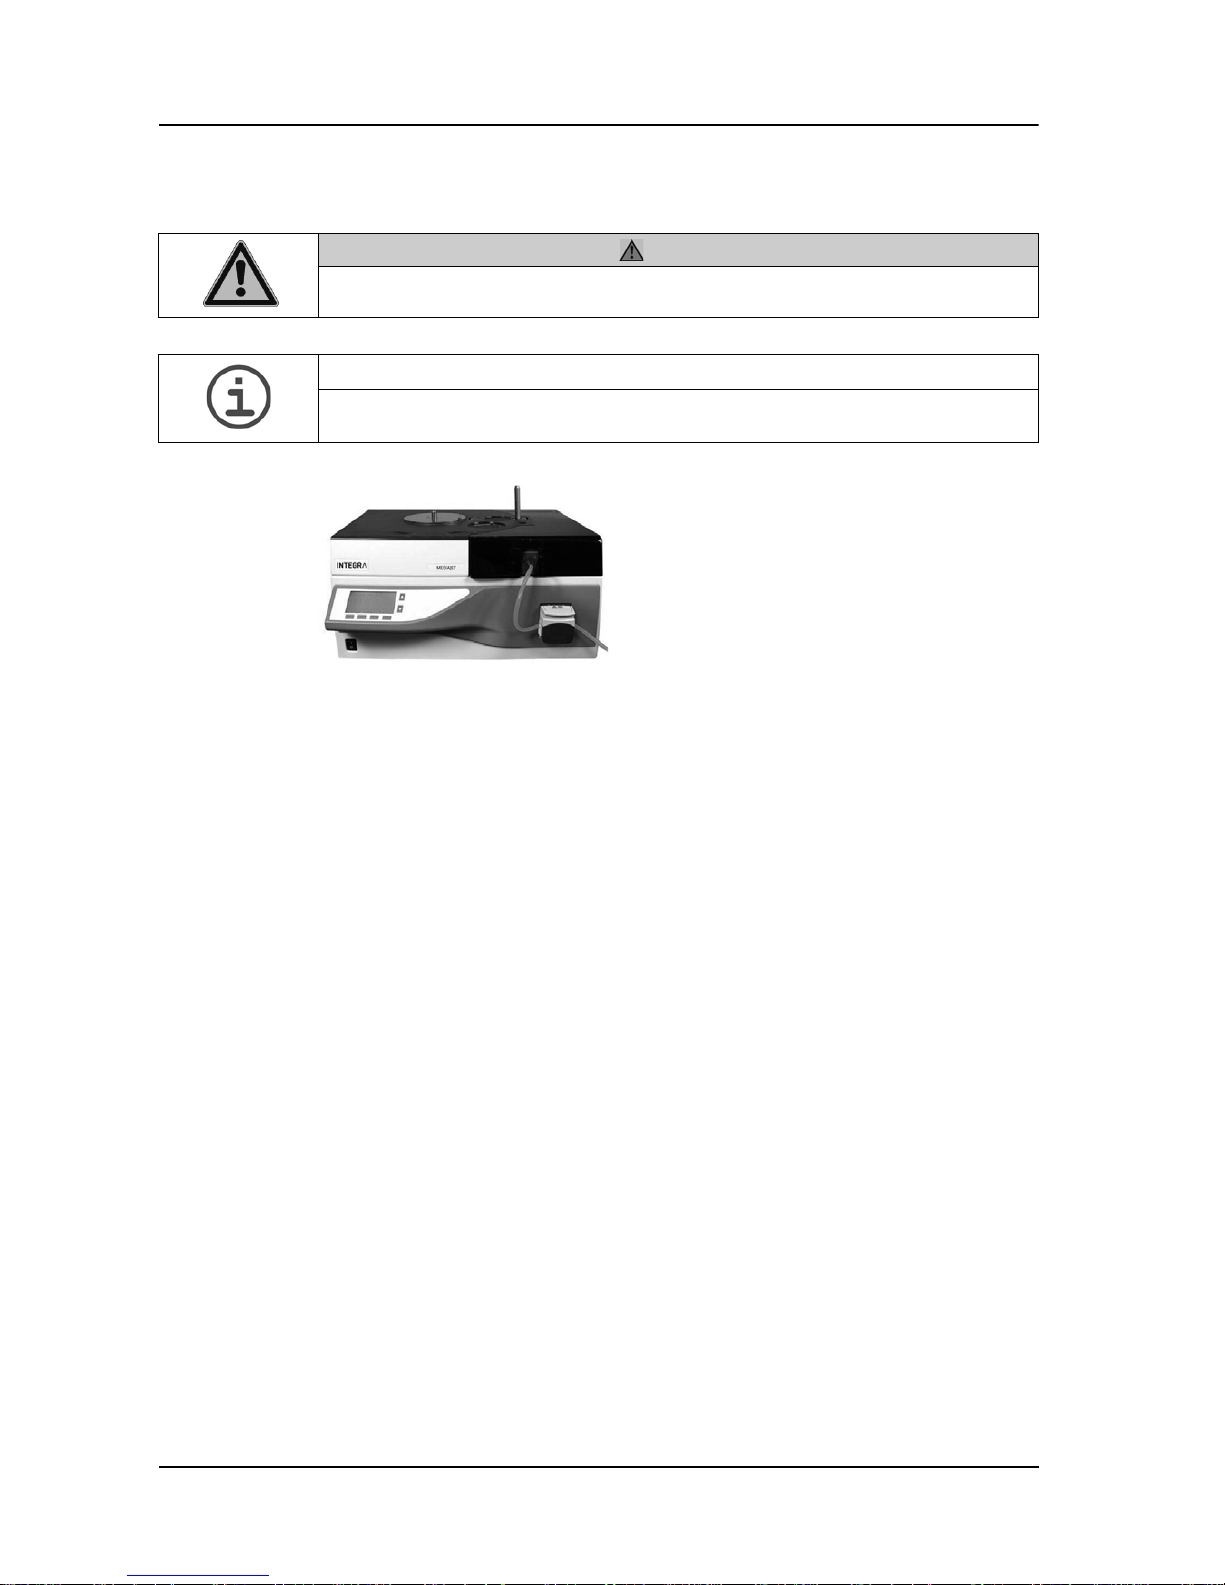
2.6 Reverse side and interfaces
Interface Function
26 FOOT-
SWITCH
Connection for the foot-switch
27 RS232(1) Service connection
28 RS232(2) Connection to an external protocol printer or to
MEDIACLAVE
29 INKJET Connection for an inkjet printer
30 PUMP Connection for controlling an additional peristaltic pump
31 AUX Potential-free connection for an external alarm system
32 SPARE Without function
26 27 28 29 30 31 32
Page 15

MEDIAJET – Operating instructions V09 Installation
15
www.integra-biosciences.com
3 Installation
Purpose This chapter shows the unpacking and installation of MEDIAJET.
3.1 Unpacking
3.2 Preconditions
3.2.1 Operating environment
Generally inadmissible are locations with which there is a risk of spray water or
of contact with chemicals. The correct location satisfies the form of protection IP
21 and has a stable, horizontal base.
In the event of failure to observe the ambient conditions for the location, the
capacity to function and the safety cannot be guaranteed.
ASSISTANCE
Check the scope of delivery for any transport damage and notify your local
INTEGRA Biosciences AG representative (see last page of the operating
instructions).
Unpack the MEDIAJET and check the
scope of delivery (see “2.1 Scope of
delivery” on page 8).
Ambient temperature for operation 15-35°C
Maximum relative humidity Non-condensing, 30-80 % for up to
35 °C
Voltage fluctuations of the mains
supply
+/-10 % from the nominal value
Degree of contamination 2 as per IEC 60664-1
Ingress protection according to IEC 60529:
IP20 - Protection against objects >12.5 mm
Page 16
MEDIAJET – Operating instructions V09 Installation
16 INTEGRA Biosciences AG
3.2.2 Setting up
CAUTION
The basic device must only be set up on a cleaned, dry and perfectly
horizontal surface, capable of supporting a minimum weight of 80 kg.
ASSISTANCE
Leave sufficient space behind the device to allow easy connection of the
mains cable.
At least two persons are required to lift the
instrument. Lift the instrument holding it
steady and firmly at the base of both sides
beside the feet.
Set up the basic device on the bench. In
order to obtain a perfectly horizontal
alignment of the unit, use the included spirit
level and adjust the height of the equipment
feet with a 13 mm flat spanner.
Page 17
MEDIAJET – Operating instructions V09 Installation
17
www.integra-biosciences.com
3.3 Removing and fitting the conversion set of MEDIAJET vario
The MEDIAJET vario can handle different Petri dish sizes. To adapt the device
to the desired Petri dishes, the appropriate conversion set must be mounted.
3.3.1 Overview
3.3.2 Dismounting in detail
Removing the adaption insert
Conversion from
90 mm
to
35 or 60 mm Petri dish size
Conversion from
35 or 60 mm
to
90 mm Petri dish size
Removing the conversion set:
• Remove the adaption insert
• Unscrew the piston head plates
• Remove the flanges
Removing the conversion set:
• Remove the adaption insert
• Remove the extension gripper
lever
• Take off the piston head plates
• Remove the flanges
Inserting the conversion set for
35 or 60 mm Petri dishes:
• Insert the corresponding flanges
• Insert the corresponding head
plates tightly
• Mount the extension gripper lever
• Mount the adaption insert
Inserting the conversion set for
90 mm Petri dishes:
• Insert the corresponding flanges
• Mount the corresponding head
plates
• Mount the adaption insert
NOTICE
Make sure that the head plates of the
35 or 60 mm conversion set are tightly
inserted. Otherwise the Petri dishes may not be handled properly.
To exchange the conversion set, switch to the
CLEANING mode of the MAIN MENU.
Remove safety cover, carousel and rotor.
Unscrew the three countersink screws
M4x8 on the adaptation insert.
Remove the adaptation insert.
Page 18
MEDIAJET – Operating instructions V09 Installation
18 INTEGRA Biosciences AG
Removing or mounting the extension gripper lever
Removing the piston head plates
Removing the flanges
Applies to conversion set for
35 and 60 mm
Petri dishes only:
Unscrew the two sink screws M3x6 of the
right and left extension gripper lever for
small petri dishes.
Keep the STACKER or FEEDER keys of
the operating panel pressed and
consecutively move both pistons up to the
high of the carousel plate using the
ARROW KEYS.
If present, unscrew the four piston head
screws M3x6 of the head plates and remove
the plates.
Unscrew the six piston head screws M3x6
of the flanges.
To lift the flanges move feeder and stacker
all to the top.
Remove the two flanges.
NOTICE
For an error free performance of MEDIAJET vario with the desired Petri dish
size, make sure that the corresponding conversion set, including the
adaptation insert, extension gripper lever, head plates and flanges is
completely installed and that the correct rotor and carousel are mounted.
After every exchange of the conversion set perform the dish sensor teach-in
procedure, see “4.2.2
Dish sensor teach-in (teach-in sensors only)” on
page 27.
Page 19
MEDIAJET – Operating instructions V09 Installation
19
www.integra-biosciences.com
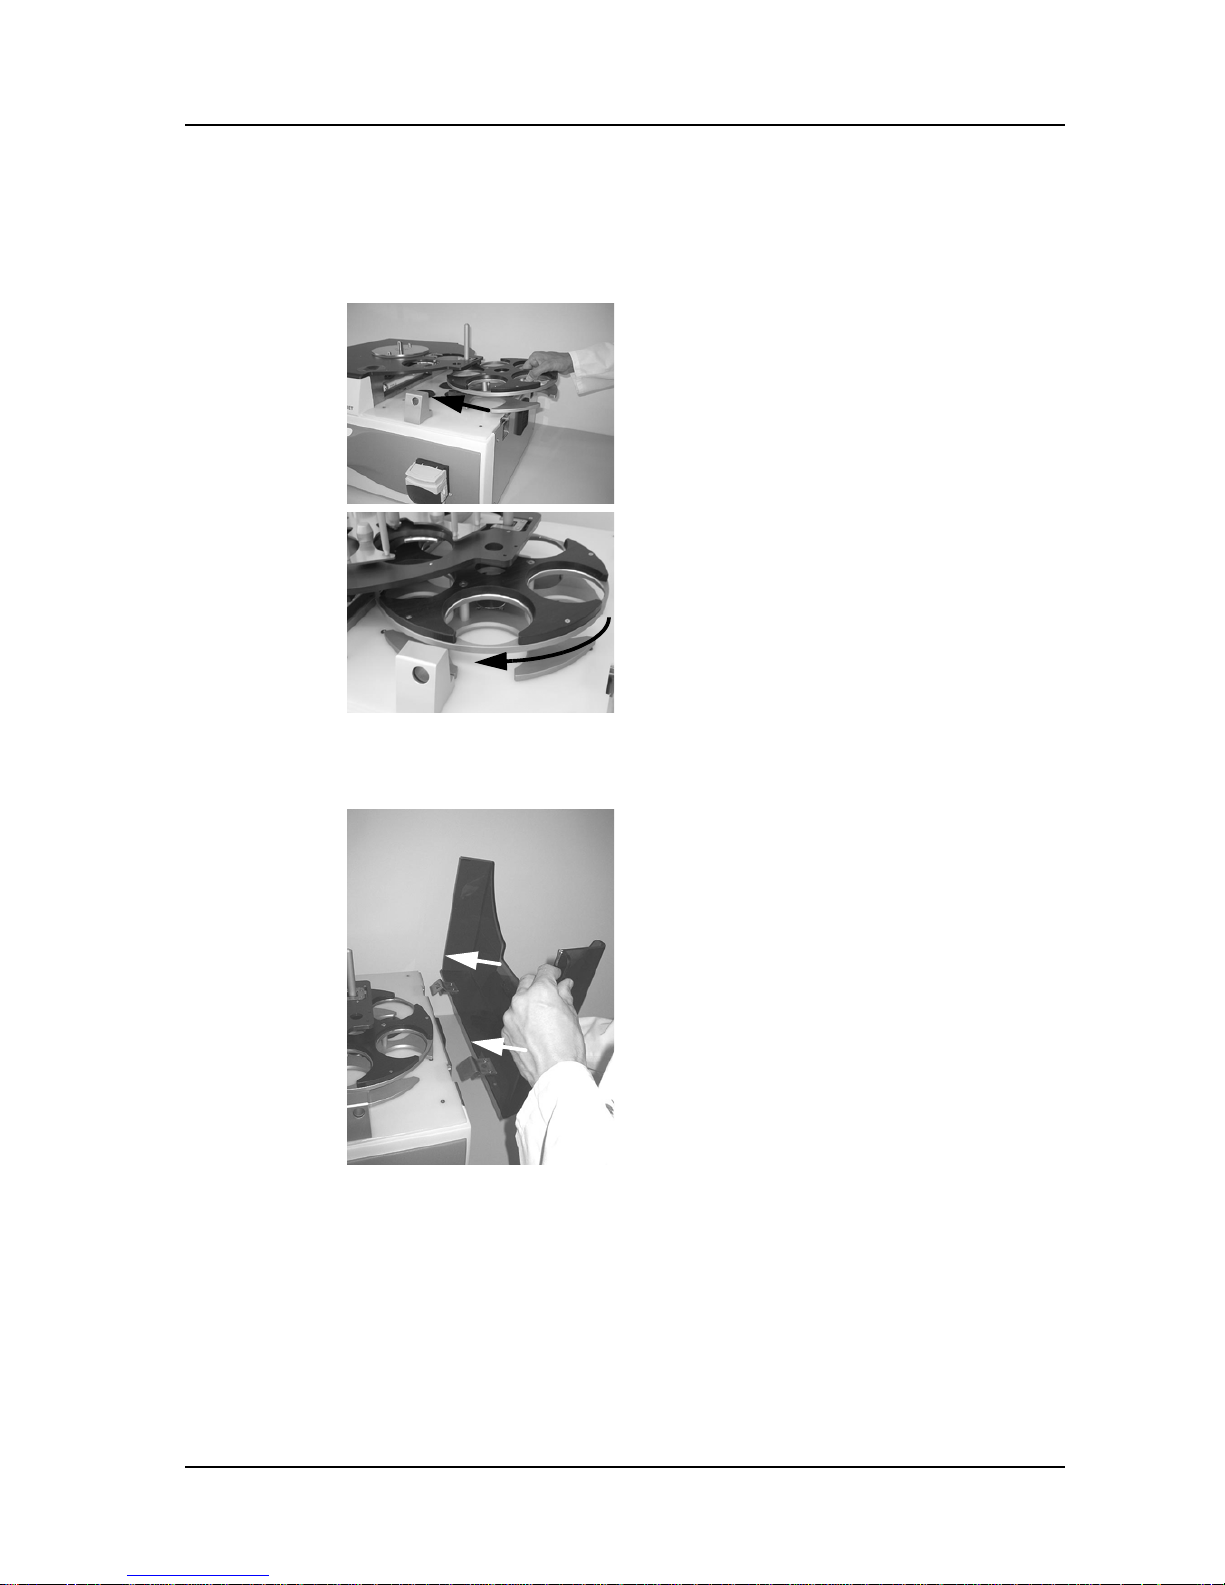
3.4 Assembly
3.4.1 Rotor
3.4.2 Safety cover
Slide the rotor under the black plate.
Turn the rotor until the anchor bolt locks into
position.
Hang the safety cover into the two hinges
on the right hand side of the device.
Page 20
MEDIAJET – Operating instructions V09 Installation
20 INTEGRA Biosciences AG
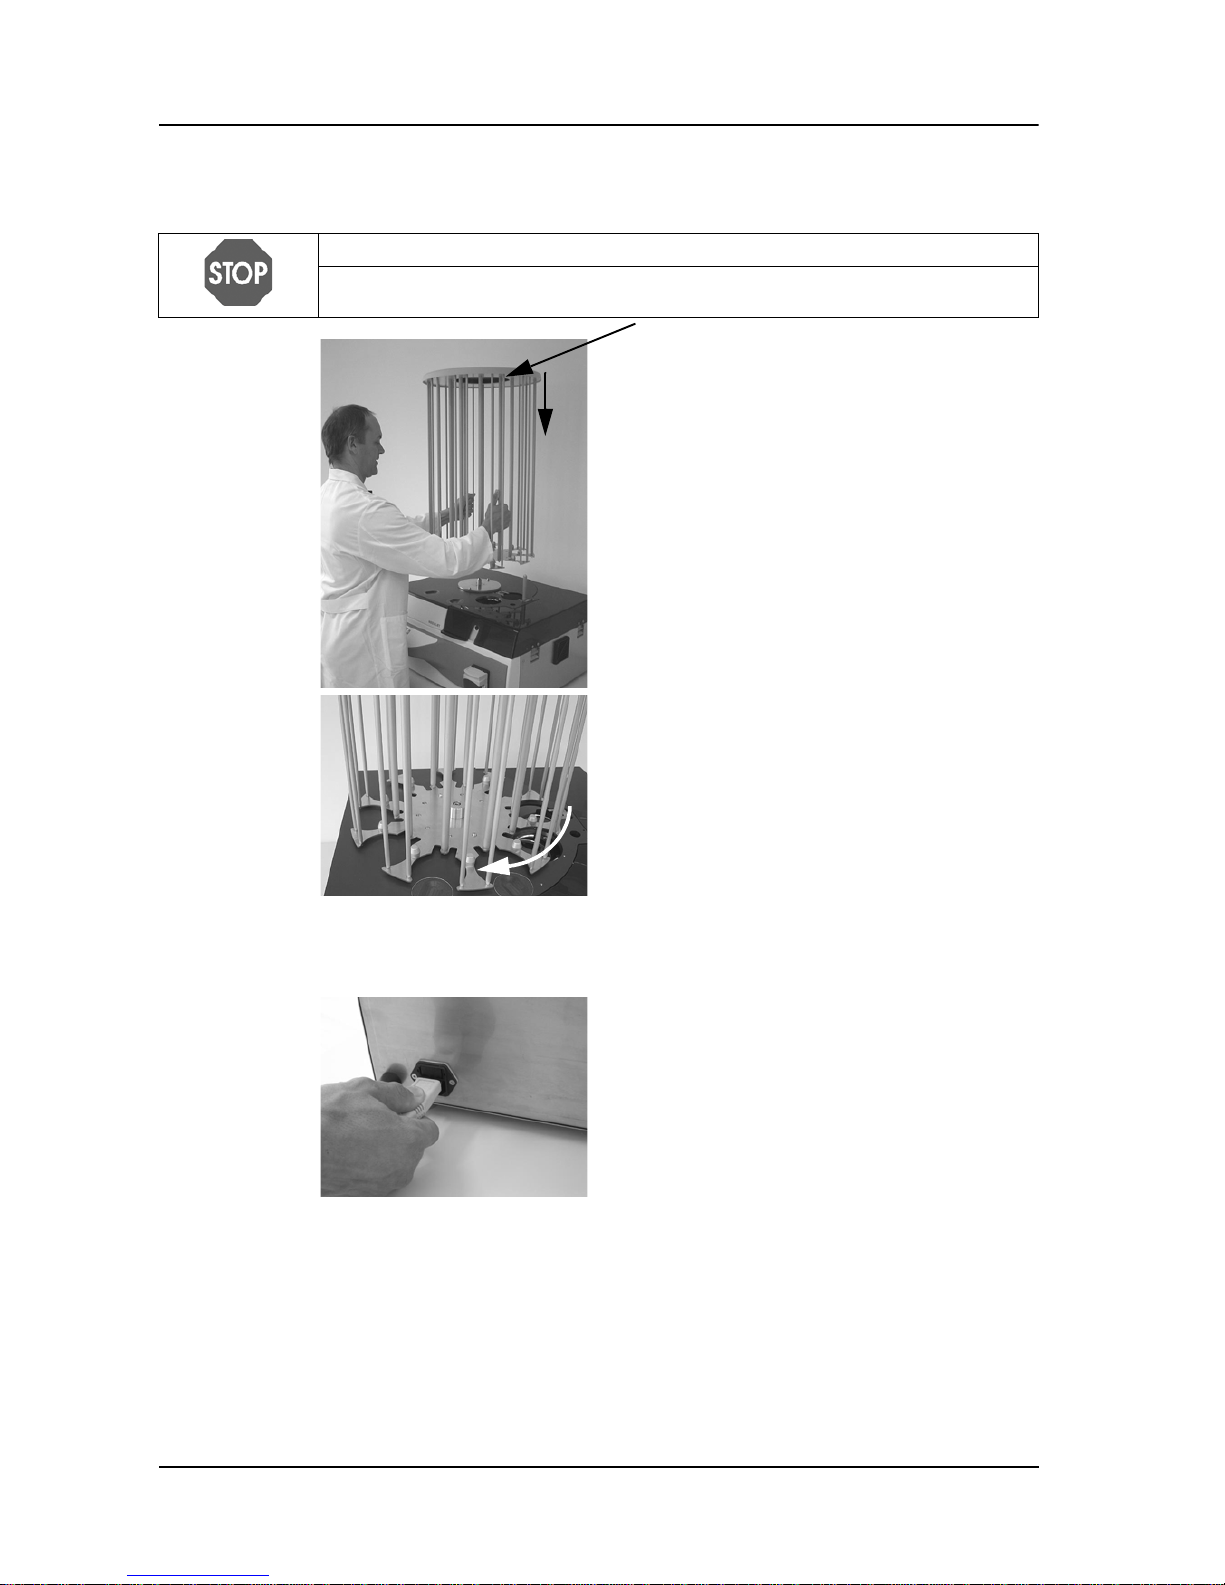
3.4.3 Carousel
3.4.4 Electricity supply
The device is now fully assembled.
Now switch on the device at the main switch.
Wait until the device has completed the automatic software initialization.
When the main menu with INTEGRA logo appears on the screen, the device
has been installed and is ready for use.
NOTICE
Always lift the carousel on the thick central rods, never on the outer, flexible
rods.
Keep the carousel vertical and place it on
the bolt in the center of the black carousel
base plate.
Turn the carousel until the anchor bolt locks
into position.
Plug the electricity cable into the socket on
the rear of the device.
Subsequently connect it to the electricity
mains.
Page 21

MEDIAJET – Operating instructions V09 Installation
21
www.integra-biosciences.com
3.4.5 Base plate for filling nozzle holder
For filling of Petri dishes with a height above 21 mm a base plate, used as a
spacer, must be mounted.
For MEDIAJET vario with biplate option, a special base plate must be mounted,
if Petri dishes with a height above 21 mm are filled:
3.5 Biplate option
The biplate option allows the filling of two Petri dish compartments in parallel by
two filling nozzles and a double pump head (available only with MEDIAJET vario
with biplate option, Part No. 113 002).
Remove the two screws below the caps on
the filling nozzle holder.
Place the base plate under the filling nozzle
holder and fix it with the long screws
supplied with the base plate.
Put the screw caps on the screws.
Remove the two screws of the filling nozzle
holder.
Place the base plate for biplate option under
the filling nozzle holder, so that the two Lshaped openings of the base plate are
stacked below those of the filling nozzle
holder.
Fix the stack with the screws of the filling
nozzle holder.
The filling nozzle holder must be adjusted,
see “4.2.3
Biplate (optional)” on page 27.
Enable the biplate alignment under program
configuration, see “4.2 Adapt system
parameter” on page 26.
Page 22

MEDIAJET – Operating instructions V09 Installation
22 INTEGRA Biosciences AG
3.6 Turbo mode option
The turbo mode option is used to accelerate the filling process. For this option
the turbo mode kit (Part No. 103 036) must be installed. For dish filling speeds
see “6.1 Specification of the device” on page 54
.
When placing the silicone tubing set (Part No. 103 035) into the double pump
head assembly, gently stretch the tubing so that inside the pump head the
tubing is taut (avoid loading the tubing in a loose, slackened way).
Finally, enable the turbo mode option under program configuration, see “4.2
Adapt system parameter” on page 26.
The turbo mode option is ready to start.
WARNING
Always switch off the MEDIAJET when assembling the double pump head.
Be aware of the sharp edges of the pump heads when assembling them and
when opening and closing the first pump head for tubing insertion.
Keep the lever on the right side of the
original pump head pressed and turn the
pump head to the left. Pull off the original
pump head and replace it by the extension
pump head. Turn the extension pump head
to the right and ensure that the lock
mechanism engages with an audible click.
Assemble the two pump heads by locking
the original pump head onto the extension
pump head in the same way. Turn the
original pump head to the right until it
audible locks in place.
Important: The rollers of the two pump
heads must be out of phase in order to avoid
excessive strain on the motor (torque limits)
and to obtain a reduction in flow pulsation.
Page 23

MEDIAJET – Operating instructions V09 Installation
23
www.integra-biosciences.com
3.7 TUBEFILLER option
ASSISTANCE
In order to install and use the TUBEFILLER option, MEDIAJET has to be
equipped with the software version 1.12 or higher. In case you need to
upgrade your MEDIAJET software version please contact your local INTEGRA
BIOSCIENCES dealer for support.
Place the support plate on the carousel axis
of MEDIAJET and turn it until the anchor
bolt locks into position.
Mount the filling arm carrier piece onto the
rotor axis inside the filling chamber.
Position the filling arm rod from the top into
the carrier piece.
Fix the carrier piece upright by tightening
the side lever.
Both levers (the one on the carrier plate and
the one on the filling arm) can be put into an
idle mode by pulling the lever outward on its
axis.
This helps to position the levers in a way
which allows to firmly tighten them.
ASSISTANCE
Check if the rod is mounted vertical in a 90° angle to the base unit in order to
guarantee a failure-free operation of the TUBEFILLER.
Page 24

MEDIAJET – Operating instructions V09 Installation
24 INTEGRA Biosciences AG
The TUBEFILLER is now installed.
Mount the radial arm onto the rod and
tighten it with the side lever in order to
prevent it from moving during the
dispensing phase.
NOTICE
To avoid contact of the side lever with the test-tubes during the filling process
make sure the lever is always on the right side of the rod.
Page 25

MEDIAJET – Operating instructions V09 Operation
25
www.integra-biosciences.com
4 Operation
Purpose This chapter describes how to adapt the general device settings and how to
program and carry out a petri dish filling process.
4.1 Overview MAIN MENU functions
The list below provides an overview of the selectable functions in the MAIN
MENU of the operating panel.
Press >>> in order to reach the second page of the MAIN MENU.
FILL DISHES: To adapt and store (see “4.4
Adapting a dish filling program” on
page 30), as well as execute (see “4.5 Run dish filling program” on page 34 and
“4.9
Mixing additives into the agar” on page 42) up to 19 individual Petri dish
filling programs.
LOAD CAROUSEL: This function supports the operator to load the carousel
with empty Petri dishes (see “4.3
Loading Petri dishes” on page 28) and remove
the filled agar plates after termination of the dispensing process (see “4.6
Removing filled Petri dishes” on page 38).
TUBE FILLER: Requires the optional available accessory TUBEFILLER, which
allows to automatically fill test-tube racks on MEDIAJET.
This function allows the operator to adapt, store and execute 19 individual testtube filling programs (see “4.10
TUBEFILLER option” on page 44 and “7.8
TUBEFILLER option” on page 64 for more information).
CLEANING: The piston of the feeder or stacker can be moved for cleaning by
this function (see “5.1
Cleaning” on page 48).
DOSING FUNCTION: Function for independent volumetric dosing applications
using the peristaltic pump of MEDIAJET (see “4.8
Dosing function” on page 41).
SYSTEM PARAMETER: To adapt the general device parameters (see “4.2
Adapt system parameter” on page 26).
Page 26

MEDIAJET – Operating instructions V09 Operation
26 INTEGRA Biosciences AG
4.2 Adapt system parameter
The following table gives an overview about the other parameters to be set
under the menu option SYSTEM PARAMETER, if required.
System
parameter
Description and function
Language
selection
Sets the desired language.
Time/date Sets the local time and date.
UV lamp Displays the operating hours of the UV-lamp.
Allows to switch the UV-lamp on or off and to reset the
operating-hour counter.
Display
contrast
Altering the display contrast.
Protocol
printing
Provides choice of printing the process data on an independent
external printer or on MEDIACLAVE and to execute a test print
(see more in “4.7
Process documentation” on page 39).
Program
configuration
Enabling/disabling functions in program parameters:
• Turbo mode: OFF
• Shaker level (Pour Plate): OFFBatch mode: OFF
• Power Stacker: OFF
(Allows handling stack weights that are at the upper limit of
the stacker force, e.g. filling Petri dishes with large volumes
of agar medium.)
• Pump Options: OFF
(Enabling this function allows pumping back the medium to
the source.)
• Biplate alignment (only MEDIAJET vario with biplate
option): OFF
Cooler
(optional)
Allows to switch off the cooling plate, in case the option is
installed.
Dish
sensor
teach-in
(optional)
Procedure to adjust the optical dish sensor, see “4.2.2
Dish
sensor teach-in (teach-in sensors only)” on page 27.
Biplate
(optional)
To fill Petri dishes with two compartments, see “4.2.3
Biplate
(optional)” on page 27.
Info General information on the device:
• Software and electronics version
• Series number
• Operating-hour and dish counter.
System
messages
Displays information on the status of the device (only shown, if
a message available).
Page 27

MEDIAJET – Operating instructions V09 Operation
27
www.integra-biosciences.com
4.2.1 Language selection
Press >>> in order to reach the second page of the MAIN MENU.
Select a language under SYSTEM PARAMETER / LANGUAGE
SELECTION.
4.2.2 Dish sensor teach-in (teach-in sensors only)
The dish sensor teach-in is a procedure to adjust the optical sensor to the used
type of Petri dishes. Whenever the type of Petri dishes is replaced (different
brand or size) the teach-in procedure should be carried out.
Select DISH SENSOR TEACH-IN under SYSTEM PARAMETER.
4.2.3 Biplate (optional)
This function supports the adjustment of the filling nozzle holder for dispensing
into two-compartment Petri dishes and tests the automatic alignment of the
dividing wall of the dishes. Before you perform a biplate filling program, follow
this procedure:
Select PROGRAM CONFIGURATION under SYSTEM PARAMETER and
enable the biplate alignment.
Press SAVE.
The screen will appear in the language
selected.
Follow the instructions on the screen. Press
START and later CONTINUE.
If “Teach-in successful” is displayed press
END.
Select BIPLATE under SYSTEM
PARAMETER.
Initialise the rotor by pressing INIT ROTOR.
Page 28

MEDIAJET – Operating instructions V09 Operation
28 INTEGRA Biosciences AG
.
Move the filling nozzle holder in the direction of the Petri dish, so that the drive
wheel pushes against the Petri dish without tilting it up. The drive wheel
should rotate the Petri dish easily.
Tighten the screws of the filling nozzle holder.
Press TEST to check the automatic alignment of the dividing wall of the Petri
dish.
The dividing wall is aligned at a right angle to the filling nozzle holder and
“Test: OK” is displayed.
4.3 Loading Petri dishes
Select LOAD CAROUSEL in the MAIN MENU and choose the mode of the
planned filling process:
I nse r t a Pet r i dis h into t he ro t or i n f ron t o f the
filling nozzle.
Unscrew the two screws of the filling nozzle
holder and move it to the leftmost position.
Press ON / OFF DRIVE to start the drive
unit for adjusting.
ASSISTANCE
If the biplate option is not required, move the filling nozzle holder to the
rightmost position and use the right filling nozzle.
Press NORMAL to prepare filling of all
dishes stack by stack or BATCH for filling
the dishes in the Batch mode, see “4.4
Adapting a dish filling program” on page 30.
MEDIAJET now carries out an automatic
self-calibration process.
ASSISTANCE
The two positions refer to the two locations situated directly in the front side of
the carousel towards the operator above the two cavities in the black cover
plate.
Page 29

MEDIAJET – Operating instructions V09 Operation
29
www.integra-biosciences.com
Press BACK and MAIN MENU in order to return to the MAIN MENU.
The MEDIAJET is now loaded with dishes.
Load sterile Petri dishes stack by stack from
top to bottom into the carousel at the
loading positions 2.
Only fill the loading positions as far as the
notch 1.
2
1
NOTICE
Under no circumstances load dishes above the marked notches, as a
sufficient space between the uppermost dish of the stack and the cover of the
carousel is fundamental for error-free functioning of the device.
CAUTION
Pay attention to your fingers. There is a risk of your fingers being squeezed
when you press ROTATE.
Press ROTATE.
The carousel turns two positions in a
clockwise direction.
Repeat the procedure described above until
nine of the ten positions (Batch mode: only
every second position) have been filled with
Petri dishes.
NOTICE
Fill only nine of the ten positions in the carousel with dishes to ensure perfect
functioning of the device. If using the Batch mode, only every second position
must be filled.
Page 30

MEDIAJET – Operating instructions V09 Operation
30 INTEGRA Biosciences AG
4.4 Adapting a dish filling program
Press FILL DISHES in the MAIN MENU in order to reach the stored
programs.
The following table gives an overview about the parameters to be set:
ASSISTANCE
If you are using the MEDIAJET for the first time, please adjust the program
parameters to your requirements before starting the filling process.
Select the desired program using the arrow
keys.
Press PROGRAM SETTINGS in order to
adjust the program.
Using the arrow keys, select a parameter
that you wish to change.
Press CHANGE.
Now follow the information on the screen.
ASSISTANCE
It is recommended to define a program name that easily identifies the program
mode, e. g. Standard, Turbo mode, Batch mode or Pour plate. Alternatively,
reserve a block of numbers for the particular program modes.
Program
parameter
Description Value
range
Basic
setting
Number of
dishes
Determines the number of
dishes to be filled in the
program.
0-9999 360
Dispensing
Volume (ml)
Defines the filling volume of a
Petri dish.
1-99.9 ml 18 ml
Pump speed (%) The setting 100 %
corresponds to a flow rate of
approx. 500 ml/min.
30-100 % 60 %
Anti-drip Prevents drop formation at the
end of a dosage.
ON
OFF
OFF
Pause time (s) Selectable pause time
between the filling of two Petri
dishes.
0-9.9 s 0 s
Page 31

MEDIAJET – Operating instructions V09 Operation
31
www.integra-biosciences.com
Dish height (mm) Stacking height of the Petri
dishes used (see below). To
use dishes with a height of
more than 21 mm, underlay
the filling nozzle holder with the
supplied base plate (see “3.4.5
Base plate for filling nozzle
holder” on page 21).
12-25 mm 16 mm
Rotor movement Sets of the speed of the rotor.
“Slow” is particularly well
suited for preventing
overflowing of the dishes with a
high filling volume.
“Spread” is used in order to
achieve homogenous
distribution of the agar with low
filling volumes.
Slow
Normal
Spread
Normal
Continuous
filling
Allows to switch the
continuous filling on or off.
“ON” continuously fills the
number of dishes specified in
the program. The process
does not stop when all dishes
in the carousel are filled.
“OFF” pauses the process
after all dishes in the carousel
are filled.
(For further information see
“4.4.2
Filling dishes
continuously or
discontinuously” on page 32.)
ON
OFF
OFF
Shaker level
(Pour plate)
Sets the shaking speed of the
rotor for pour plate applications
(has to be enabled in program
configuration, see “4.2
Adapt
system parameter” on
page 26).
1-5
OFF
OFF
Batch mode Allows highly planar agar
surfaces by filling a defined
number of dishes (i. e. a batch)
per carousel stack, see “4.4.3
Filling dishes in Batch mode”
on page 33 (has to be enabled
in program configuration, see
“4.2
Adapt system parameter”
on page 26).
1-20
dishes/
batch
OFF
OFF
Program
parameter
Description Value
range
Basic
setting
Page 32

MEDIAJET – Operating instructions V09 Operation
32 INTEGRA Biosciences AG
4.4.1 Adapt dish height parameter
Measure the height of a stack of 10 using a ruler.
4.4.2 Filling dishes continuously or discontinuously
The carousel has a capacity of 360 and 540 Petri dishes respectively. However,
the program parameter ‘Number of dishes’ can be set up to 9999 dishes to be
filled. If the number of Petri dishes programmed exceeding the capacity of the
carousel, the filled dishes must be removed and empty ones must be loaded
during the filling process. For this there are two possibilities: Continuous or
discontinuous filling.
Biplate
alignment
(option)
To fill Petri dishes with two
compartments (with automatic
alignment of the dividing wall,
has to be enabled in program
configuration, see “4.2
Adapt
system parameter” on
page 26).
ON
OFF
OFF
Turbo mode
(option)
To accelerate filling of Petri
dishes (has to be enabled in
program configuration, see
“4.2
Adapt system parameter”
on page 26).
ON
OFF
OFF
Program
parameter
Description Value
range
Basic
setting
ASSISTANCE
It is important to always adapt the program setting dish height to ensure perfect
functioning of MEDIAJET.
NOTICE
In case you are working with Petri dishes higher than 21 mm you need to
underlay the filling nozzle holder with the supplied Base plate.
Press PROGRAM SETTINGS, choose the
parameter dish height and press CHANGE.
Enter the measured value.
Press SAVE in order to save this value.
The program adjustment is now complete.
Page 33

MEDIAJET – Operating instructions V09 Operation
33
www.integra-biosciences.com
Continuous filling
If the program parameter continuous filling is switched on, the MEDIAJET fills
the total number of programmed plates without pause and the exchange of the
Petri dishes must be performed during the filling process.
Discontinuous filling
Alternatively, with the parameter continuous filling off, the filling process will be
paused automatically once all the dishes in the nine carousel positions have
been filled.
4.4.3 Filling dishes in Batch mode
The Batch mode can be used for applications where it is important to have a
highly planar agar surface, as for example automatic colony counting. In the
batch mode, only every second position of the carousel must be filled with empty
Petri dishes. These dish stacks are then processed by user-defined batches of
1-20 Petri dishes. This allows the agar of the filled batch to solidify before it gets
lifted by the next batch. That prevents that the uppermost dishes of the stack
become slightly tilted before the agar is solidified, resulting in very planar
surfaces. To enable this option, see “4.2
Adapt system parameter” on page 26.
The device will then offer you a possibility in
the dialogue FILLING PROCESS ON HOLD to
continue the filling process with the dishes on
the next two carousel positions.
MEDIAJET will request you to remove the filled
dishes from the loading positions.
Remove the filled dishes from the two
loading positions.
Fill both positions again with empty dishes.
Press CONTINUE in order to fill the two new
stacks.
Continue this process until the programmed
number of Petri dishes have been filled.
You stop the program with ABORT
PROCESS.
Page 34

MEDIAJET – Operating instructions V09 Operation
34 INTEGRA Biosciences AG
4.4.4 Shaker level (pour plate)
Total viable count determination is often carried out by using the pour plate
method. The built in shaker supports the mixing of the sample with the agar
medium.
To enable this option, see “4.2 Adapt system parameter” on page 26.
Press SAVE in order to save this value.
4.5 Run dish filling program
Select the desired program under FILL DISHES.
Press START PROGRAM.
4.5.1 Connecting the tubing set
Press PROGRAM SETTINGS and choose
the parameter shaker level.
Using the arrow keys, select the shaker
level according to your needs (depending
on the filling volume and viscosity of the
culture medium).
NOTICE
Please ensure that the filling nozzle holder is correctly installed and the sensor
in front of this holder is clean when running a program with Biplate alignment
ON.
The dialogue window PREPARE FOR
FILLING PROCESS appears.
An empty Petri dish is automatically placed
in the filling position of the rotor.
ASSISTANCE
The tubing set must be autoclaved prior to use, in order to avoid contamination
during the filling process. If PUMP OPTIONS in SYSTEM PARAMETER is
enabled, press first PUMP OPTIONS to prime or to calibrate.
CAUTION
Never press PRIME if the cover of the pump head is open. Risk to squash
your fingers.
Page 35

MEDIAJET – Operating instructions V09 Operation
35
www.integra-biosciences.com
The tubing set is now connected.
Open the cover of the pump head.
Turn the adjusting screws 1 on both sides of
the pump head as far to the right (anticlockwise) as possible.
The V-shaped tubing mountings 2 drop to
the lowest possible position.
Place the tubing set into the pump such that
the filling nozzle is lying on the left hand side
of the pump head.
For an optimum function of the pump, the
tubing needs to centered on the rollers leading
through the two V-shaped mountings.
You require approximately 30 cm of tubing 3
between the pump and the filling-nozzle
mountings.
Now close the pump cover and make sure
that the tubing leads correctly through the
V-shaped mountings.
Make sure that the filling nozzle is inserted
into the filling nozzle holder as far as
possible.
For programs with the parameter “Biplate
alignment ON” place a second tubing set
into the double pump head to allow the
filling of two compartments in parallel
(MEDIAJET vario with biplate option only).
1
2
3
Page 36

MEDIAJET – Operating instructions V09 Operation
36 INTEGRA Biosciences AG
4.5.2 Filling the tubing
The preparations for the filling are now complete.
4.5.3 Calibration of the pump before filling
Before you start the actual filling process, you have the option of carrying out a
calibration of the dosing volume. This is particularly important if you work with
tubing(s) not obtained from INTEGRA Biosciences, as the dosing quantity is
directly dependent on the diameter of the tubing.
Biplate option
The double head pump squeezes two tubings in parallel. To guarantee a correct
filling volume, identical tubing must be used. Connect both tubing sets, calibrate
the pumps as described above with two graduated cylinders and enter the mean
of the measured volumes.
Connect the tubing set(s) to the media
source.
Keep the PRIME key pressed until the
tubing or both tubings (biplate option) are
completely filled respectively.
The empty Petri dish in the filling position of the
rotor prevents accidental contamination of the
filling chamber.
Press CALIBRATE
The dialogue window PUMP
CALIBRATION opens.
Before you start the calibration, make sure
that the tubing is completely filled with
medium.
Hold the filling nozzle in a suitable
graduated cylinder and press START or
DELAYED START (dosing will start after 5
seconds).
Enter the volume measured and press
SAVE.
Following calibration, insert the filling nozzle
into the filling nozzle holder.
The pump is now calibrated.
Page 37

MEDIAJET – Operating instructions V09 Operation
37
www.integra-biosciences.com
4.5.4 Start the filling process
4.5.5 Calibration of the pump during the filling process (option)
This calibration routine is specifically suited for user which like to determine the
filling volume of the Petri dishes using weight measurement.
Following calibration, insert the filling nozzle into the filling nozzle holder.
The pump is now calibrated.
4.5.6 Altering program settings of the filling process
While a process is running, you can adjust the program parameters at any time.
CAUTION
While the MEDIAJET is in operation, pay attention to your fingers when
operating the carousel. Be particularly careful if your hands are in the
immediate vicinity of the loading positions.
Press START.
The screen always shows you how many
dishes you have already filled and how much
time there is remaining until the end of the
filling process.
Press PAUSE.
Press CALIBRATE.
Enter the volume measured and press
SAVE.
ASSISTANCE
If PUMP OPTIONS in SYSTEM PARAMETER is enabled, press first PUMP
OPTIONS and then CALIBRATE.
ASSISTANCE
Alterations to program parameters, carried out during the filling process, are
not automatically saved. Following ending of the filling process, you will be
asked whether you wish to save the alterations in the program.
Press PAUSE.
Press PROGRAM SETTINGS.
You can now alter the desired program
settings.
Page 38

MEDIAJET – Operating instructions V09 Operation
38 INTEGRA Biosciences AG
4.5.7 Automatical end of the filling process
Following ending of the filling process, the PRIME function enables you to clean
the tubing set with warm water.
With the BACK key you return to the MAIN MENU.
4.5.8 Stopping the filling process
The filling process can be ended manually at any time.
Press PAUSE and then press ABORT PROCESS in order to end the process
finally.
4.6 Removing filled Petri dishes
As soon as the desired number of dishes have
been filled, the MEDIAJET will stop
automatically and will show the dialogue
FILLING PROCESS TERMINATED on the
screen.
ASSISTANCE
If PUMP OPTIONS in SYSTEM PARAMETER is enabled, press first PUMP
OPTIONS and then PRIME.
Press LOAD CAROUSEL in the MAIN
MENU.
Press UNLOAD.
CAUTION
While the MEDIAJET is in operation, pay attention to your fingers when
operating the carousel. Be particularly careful if your hands are in the
immediate vicinity of the loading positions.
Page 39

MEDIAJET – Operating instructions V09 Operation
39
www.integra-biosciences.com
4.7 Process documentation
The MEDIAJET enables you to document all process-relevant data. You can
issue this data on a label printer with a serial interface by connecting this printer
to the RS232 (2) port on the back of the MEDIAJET.
Alternatively, it is possible to transfer the data onto the built in printer of
MEDIACLAVE. This requires a MEDIACLAVE (Part No. 135 0xx) equipped with
a software version 1.9.1 or higher and communication interface cable (see “7.1
General accessories” on page 58).
If using MEDIACLAVE 10 (Part No. 136 0xx) or MEDIACLAVE 30 (Part No.
136 05x) all process relevant data of the MEDIAJET will also shown up in the
MEDIACLAVE electronic log file.
Remove the filled dishes from the two
loading positions.
Press ROTATE.
The carousel will turn two positions in
counter-clockwise direction.
Repeat the procedure described until all
Petri dishes have been removed.
The dishes have now been removed.
Page 40

MEDIAJET – Operating instructions V09 Operation
40 INTEGRA Biosciences AG
The following data (example) is printed out:
In the SYSTEM PARAMETERs, the possibility exists of carrying out the
following test print:
The RS232(2) Interface settings are fixed as follows:
Following calibration When starting the filling
process
Following completion of the
filling process
========================
MEDIAJET (SN:12345678)
***Calibration done
Time: hh:mm
Date: dd.mm.yyyy
========================
========================
MEDIAJET (SN:12345678)
***Start Filling Process
Time: hh:mm
Date: dd.mm.yyyy
***Program Settings
Name: TEST
Number of dishes: 360
Volume: 18.0 ml
Pump speed: 60 %
Anti-drip: ON
Pause time: 0.0 s
Dish height: 15.7 mm
Rotor move: NORMAL
Cont. filling: OFF
Shaker level: OFF
Batch mode: OFF
Biplate: ON
***System Parameter
UV-Lamp: OFF
Cooler: OFF
========================
========================
MEDIAJET (SN:12345678)
***End Filling Process
Time: hh:mm
Date: dd.mm.yyyy
***Program Settings
Name: TEST
Dishes filled:
10 of 360
Volume: 18.0 ml
Pump speed: 60 %
Anti-drip: ON
Pause time: 0.0 s
Dish height: 15.7 mm
Rotor move: NORMAL
Cont. filling: OFF
Shaker level: OFF
Batch mode: OFF
Biplate: ON
Turbo mode: ON
========================
========================
MEDIAJET (SN:12345678)
***Test Printout
LEFT RIGHT
123456789012345678901234
========================
Transmission Speed 9600 bps
Databits 8 bits
Partity No
Stopbits 1
Handshake X ON / X OFF
Page 41

MEDIAJET – Operating instructions V09 Operation
41
www.integra-biosciences.com
4.8 Dosing function
This function uses the peristaltic pump of the MEDIAJET for volumetric dosing
with a 6 mm ID tubing. The dosing can be optionally controlled with a foot switch
(see available accessories in “7.6
Accessories for dosing function” on page 62).
Press DOSING FUNCTION in the MAIN MENU to reach the parameter for
volumetric dosing.
Here the parameters and the value ranges are listed:
Press PRIME to fill the tubing and DOSING to start the program.
Use the arrow keys to select a parameter to
be changed.
Press CHANGE, and enter the desired
value.
Program
parameter
Description Value
range
Basic
setting
Dosing
volume
Defines the dosing volume. 1-999.9 ml 10 ml
Pump speed The setting 100 % corresponds to
the maximum conveying amount
of the MEDIAJET pump of approx.
500 ml/min.
30-100% 60%
Anti-drip Prevents drop formation at the
end of a dosage.
ON
OFF
OFF
Pause time Enables adherence to a defined
waiting period between two dosing
steps. If set to manual, the dosing
is triggered by the push of the key
or by the foot switch.
0.1-9.9
manual
2 s
ASSISTANCE
If PUMP OPTIONS in SYSTEM PARAMETER is enabled, press DOSING PUMP OPTIONS - PRIME to fill the tubing and DOSING - START to start the
program.
Page 42

MEDIAJET – Operating instructions V09 Operation
42 INTEGRA Biosciences AG
4.9 Mixing additives into the agar
The MEDIAJET, in connection with the peristaltic pump DOSE IT, can mix
continuously an additive in the concentration of 3 to 10 % into the medium. This
setup is typically used for the preparation of blood agar. Please also refer to the
DOSE IT operating instructions.
4.9.1 Installation
Place the DOSE IT pump close to the right side of the MEDIAJET. Plug one
side of the electrical interface cable into the socket marked with “Pump” on
the back of the MEDIAJET and the other side to the foot switch socket on the
back side of the DOSE IT pump.
4.9.2 MEDIAJET Settings
Press FILL DISHES in the MAIN MENU for adapting a dish filling program.
Select the desired program and press PROGRAM SETTINGS in order to
adjust it (see also “4.4
Adapting a dish filling program” on page 30).
You need this value for the DOSE IT program parameters (see below).
4.9.3 Determine the dosing volume of the additive
Determine the volume of additive to be added per dishes to achieve the desired
percent mixture.
For example, if the total dispensing volume in the Petri dish is 18 ml and the final
concentration of additive is 5 %, the dosing volume of the additive is 0,9 ml
(18 ml × 0.05). You need to enter this value in the DOSE IT program parameter
(see next page).
When connecting a sterilized Tubing set for the
preparation of blood agar, the small diameter
tubing (2 x 5 mm) has to be entered into
DOSE IT pump head and the big diameter
tubing (6 x 9 mm) into the MEDIAJET pump
head. The glass T-piece needs to be located
ahead of the MEDIAJET pump head.
Set the desired total Dispensing volume
(agar and additive) to be filled into the Petri
dishes.
Select Pump speed and press CHANGE to
get the ‘Estimated dosing time’ displayed,
automatically calculated by the MEDIAJET.
Page 43

MEDIAJET – Operating instructions V09 Operation
43
www.integra-biosciences.com
4.9.4 DOSE IT settings
Switch on the DOSE IT, the APPLICATION window appears. Select one of the
programs listed and press PARAMETER to configure it. Use the arrow keys to
select the parameters and press CHANGE to set different values.
With these settings, an optimal mixing of additive and medium is reached.
Exit the program by pressing START.
In case you are connecting the DOSE IT and the MEDIAJET for the first time or
when working with a new Tubing set it is recommended to confirm the pump
settings again and to perform the calibration routine of the DOSE IT.
4.9.5 Operation of MEDIAJET in combination with DOSE IT
Once MEDIAJET and DOSE IT are connected and the settings are adjusted as
described above, the instruments are ready to start the dish filling process.
Consider the following important points:
Select the adjusted program in the APPLICATION window of the DOSE IT
and press START.
Then select the desired program of the MEDIAJET under FILL DISHES and
press START PROGRAM. Press PRIME until the big diameter tubing is
entirely filled with media up to the Filling nozzle.
Press START on the MEDIAJET to start the dish filling process.
Set the Type to “DISPENSE” and the
Tubing-ID to “2.0 mm”.
Enter the desired volume of the additive,
e.g. 0.9 ml.
Change the Flow rate with the arrow keys
so that the displayed ‘Dispensing time’ is
equal to or slightly shorter than the
‘Estimated dosing time’ shown in the
MEDIAJET program (see above).
Set Repetitions to ““ and Pause to
“manual”.
Press PRIME to fill the small diameter
tubing in the DOSE IT pump with the
additive up to the glass T-piece.
After priming press START. The DOSE IT is
now ready to get started by the MEDIAJET.
Page 44

MEDIAJET – Operating instructions V09 Operation
44 INTEGRA Biosciences AG
4.10 TUBEFILLER option
The TUBEFILLER option allows to automatically fill test-tube racks on
MEDIAJET. Please ensure that the option is correctly installed as described in
“3.7
TUBEFILLER option” on page 23.
4.10.1 Adapting a TUBEFILLER program
Press TUBE FILLER in the MAIN MENU to reach the individually stored
programs. Adjust the program with the function PROGRAM SETTINGS in th e
same way as described in “4.4
Adapting a dish filling program” on page 30.
The following table gives an overview about the parameters to be set:
Program
parameter
Description Value range Basic
setting
Program
name
Defines the desired name of
the individual programs.
PRG xx
Rack type Defines the type of racks
used in the program.
Choosing the right rack type
is crucial to ensure the right
filling pattern during the
dispensing process.
13mm 6x15
16mm 5x12
20mm 4x10
25mm 3x8
30mm 3x7
16 mm 5x12
Dispensing
Volume (ml)
Defines the filling volume of
the test tubes.
0.5-99.9 ml 5 ml
Number of
racks
Defines the number of racks
to be filled in the program.
1-99 3
Tubing
inner
diameter
(mm)
Defines the type of silicone
tubing used in the program.
Choose the right tubing to
influence both dosing
accuracy and dosing time.
2.0 mm
3.0 mm
4.0 mm
3.0 mm
Pump
speed (%)
The setting 100 %
corresponds to a maximal
flow rate of approx. 500 ml/
min.
30-100 % 60 %
Anti-drip Prevents drop formation at
the end of a dosage.
ON
OFF
OFF
Pause time
(s)
Selectable pause time
between the dosing of two
individual test tubes.
0-9.9 s 0 s
Continuous
filling
When switched on the
number of programmed racks
will be continuously filled.
When switched off the unit
automatically stops after 3
racks are filled.
ON
OFF
ON
Page 45

MEDIAJET – Operating instructions V09 Operation
45
www.integra-biosciences.com
4.10.2 Prepare tube filling process
Select the desired program in the TUBEFILLER menu using the arrow keys and
press START PROGRAM.
The dialogue window PREPARE FOR FILLING PROCESS appears.
Connect the tubing for the media source as described in “4.5.1 Connecting
the tubing set” on page 34. Especially consider the following important
points:
The dialogue window TUBE FILLING appears
again summarizing the most important settings
of the selected program.
Manually turn the support plate until the
arrow printed on the edge of the plate points
to the filling arm.
Close the safety cover.
Press START to execute the automatic
adjustment of the support plate.
The adjustment of the screws (1) on both sides
of the pump depends on the tubing type used:
For 2 mm ID tubing the 1.6 marking has to
be on a level with the 4.8 marking on the
pump head (2).
For 3 mm ID tubing the 1.6 marking has to
be on a level with the 6.4 marking on the
pump head (2).
For 4 mm ID tubing the 1.6 marking has to
be as low as possible (2).
Fix the dispensing tube, lying on the left
hand side of the pump, onto the front end of
the filling arm and firmly tighten the screw in
order to prevent the dispensing tube from
moving during the dosing process.
1
2
Page 46

MEDIAJET – Operating instructions V09 Operation
46 INTEGRA Biosciences AG
Connect the tubing set to the media source and hold the PRIME key pressed
to fill the entire tubing with media.
The preparations for the filling process are now completed.
Before starting the filling process, it is possible to calibrate the actual dosing
volume in the same way as described in “4.5.5
Calibration of the pump during
the filling process (option)” on page 37. Start the calibration in the dialog window
PREPARE FOR FILLING PROCESS.
4.10.3 Start the filling process
NOTICE
To avoid spillage during the filling process, only use test tubes with an outer
diameter matching the available racks from INTEGRA BIOSCIENCES. Find a
test tube compatibility chart in “6.4
Test tube compatibility chart” on page 57.
Place the test tube racks completely even
onto the support plate and neatly fitted into
the six surrounding green bolts.
NOTICE
To avoid spillage during the filling process, double-check that the test tube rack
on the TUBEFILLER is the same type specified in the program parameters.
Working with test tubes longer than 15 cm
requires the use of a rack specific centring
plate. This centring plate maintain the tubes
in a perpendicular position and thereby
ensure a error free dosing process. See
also test compatibility chart in “6.4
Test tube
compatibility chart” on page 57.
Page 47

MEDIAJET – Operating instructions V09 Operation
47
www.integra-biosciences.com
While the process is running, the program parameters can be adjusted at any
time by pressing the PAUSE button as described in “4.5.6
Altering program
settings of the filling process” on page 37.
4.10.4 End filling process
Manually move the filling arm to align the tip
of the dispensing needle with the first tube
all to the right in the rack position 1 on the
support plate. Make sure that the
dispensing needle is exactly centred over
the tube to ensure a smooth filling process.
Press START in the PREPARE FOR
FILLING PROCESS window.
The status of the filling process will
continuously be displayed.
ASSISTANCE
If PUMP OPTIONS in SYSTEM PARAMETER is enabled, press first PUMP
OPTIONS and then PRIME.
The filling process can be stopped manually at
any time by pressing PAUSE followed by
ABORT PROCESS.
As soon as the desired number of racks are
processed, MEDIAJET will automatically stop
and the dialogue FILLING PROCESS
TERMINATED will appear on the screen.
The PRIME function enables to empty or clean
the tubing.
With BACK you can return to the MAIN MENU.
Page 48

MEDIAJET – Operating instructions V09 Maintenance
48 INTEGRA Biosciences AG
5 Maintenance
Purpose This chapter describes the regularly required maintenance procedures of the
MEDIAJET.
5.1 Cleaning
Press CLEANING in the MAIN MENU.
Remove remaining Petri dishes from the carousel.
Hold the carousel on the central, thick rods and lift it vertically from the axis.
Remove the safety cover.
Lift the rotor from the axis and move it to the right out of the filling chamber.
-
MEDIAJET vario with biplate option: Thoroughly clean the glass plate of the
alignment sensor positioned in front of the filling nozzle holder.
Clean the base plate rotor and the base plate carousel. Remove any residual
(agar, petri dish abrasion) and soiling in the sensitive areas of the flap
bearing, UV-lamp and Feeding/Stacking pistons.
Clean the filling chamber, the rotor and the safety cover thoroughly.
WARNING
Before carrying out repair or maintenance work, the device must always be
switched off and disconnected from the electricity supply.
NOTICE
Do not clean the Plexiglas safety cover with organic solvent, Acetone or pure
alcohol.
ASSISTANCE
Regular cleaning of the MEDIAJET is important in order to maintain the device
in a good condition and thus ready for operation. We recommend carrying out
the cleaning protocol described below following each filling process.
Moisten a soft, fluff-free cloth with a mixture
of water and washing-up liquid.
Clean the glass window in front of the
reflection light sensors thoroughly (those
sensors are positioned above and below the
UV lamp). Make sure that the glass
windows are dry and free of soiling.
Page 49

MEDIAJET – Operating instructions V09 Maintenance
49
www.integra-biosciences.com
Remove the O-ring of the drive wheel by dismounting the filling nozzle holder
and wash it with water. Replace the O-ring if, if necessary (only MEDIAJET
vario with biplate option).
Subsequently disinfect the filling chamber using 70 % Ethanol.
Regularly apply a very thin coat of grease (Klüber Microlube GBU-Y131, Part
No. 200 150) to the anchor bolts of the rotor/carousel axis.
If necessary, the CLEANING dialogue also allows you to clean beneath the
feeder and stacker pistons.
The MEDIAJET is now clean and ready for another filling process.
The moving parts of the pumphead should
be checked from time to time for freedom of
movement.
Occasionally lightly grease the lever (1) and
the rollers with Teflon lubrication oil (see
image).
Keep STACKER or FEEDER pressed and
move the corresponding piston using the
ARROW KEYS.
Clean the lifter rod of feeder and stacker
(the rear side of the dish plate in particular).
Apply a very thin coat of grease (Klüber
Microlube GBU-Y131, Part No. 200 150) to
the feeder/stacker pistons above the
sealing. Place the feeder and stacker piston
back to the starting position.
Re-install rotor, safety cover and carousel.
1
Page 50

MEDIAJET – Operating instructions V09 Maintenance
50 INTEGRA Biosciences AG
5.2 UV Lamp exchange
The aim of the UV lamp is to reduce the risk of contamination during the plate
filling process.
The UV-C lamp has an average life of 8000 hours. UV light intensity stabilizes
at about 85 % of initial output after 4000 hours. Risk of failure during a run can
be minimized by changing the bulb after 1000 operating hours. When 1000
operating hours are achieved a message is displayed after switching on the
MEDIAJET. Proceed as follow to replace the UV Lamp:
Switch off the MEDIAJET.
Remove the safety cover.
Lift the rotor from the axis and move it to the right out of the filling chamber.
Slide out the UV lamp from the lamp holders.
Fit the new UV lamp in the lamp holders.
Completely pull up the red lever positioned on the left side of the lamp holder.
Switch on the MEDIAJET.
Access the UV-LAMP menu of the system parameter and press RESET to
set the counter back.
The MEDIAJET UV lamp is now ready to operate.
ASSISTANCE
To guarantee optimum germicidal effect of the UV lamp, we recommend
replacing it at the latest after 1000 operating hours.
Completely pull down the red lever
positioned on the left side of the lamp
holder.carousel
Page 51

MEDIAJET – Operating instructions V09 Maintenance
51
www.integra-biosciences.com
5.3 Leak test
It is recommended to perform a leak test about every 3 months or when dosing
errors occur. A leak test will reveal worn or defect tubing or pumphead.
Procedure:
1 Load a silicone tubing in the pumphead.
2 Position the dispensing end of the tubing below the pumphead height into a
container.
3 Put the aspiration tube in liquid and keep the PRIME key pressed to fill the
tubing completely without any bubbles.
4 Lift the aspirating end of the tubing as high as possible above the
pumphead. The system is tight, if the liquid level do not decrease and no
liquid flow out of the lower dispensing end.
If the system is leaking, you have to check whether the tubing or the pumphead
is worn:
Repeat the leak test with a new tubing (only use original INTEGRA tubings, see
“7.3
Consumables” on page 60).
• If system is tight, the tubing was worn and the problem is solved.
• If the system is still leaking, the pumphead is worn (e.g. lever loose,
mechanical play) and need to be replaced, see “7.1
General accessories” on
page 58.
ASSISTANCE
Work around until a new pumphead is available: Put a rubber band (5 to 8 mm
wide) around the pumphead to help holding it fully closed during operation.
Repeat the leak test to confirm that the work around works.
Page 52

MEDIAJET – Operating instructions V09 Maintenance
52 INTEGRA Biosciences AG
5.4 Servicing
We recommend that you have the MEDIAJET serviced once per year.
Servicing work and repairs must only be carried out by experts using original
replacement parts. For any service or repairs, please contact your local service
technician.
If the surface of the MEDIAJET has been in contact with biohazardous material,
it must be decontaminated in accordance to good laboratory practice. Do not
spray directly on the instrument but use a lint-free cloth, lightly soaked with a
disinfectant and wipe dry directly after decontamination. Never use acetone or
other solvents! Follow the instructions provided by the disinfectant
manufacturer.
5.5 Fault notifications
In the event of a fault an acoustic alarm sounds.
Switch off the active alarm tone by pressing the sign.
Now read the alarm text on the display and follow the instructions.
When the fault has been removed you can continue working.
ASSISTANCE
If the MEDIAJET is one year in operation since the last service, a service
reminder is displayed in the MAIN MENU and stored in SYSTEM
PARAMETER - SYSTEM MESSAGES, where it can be re-displayed.
WARNING
MEDIAJET needs to be cleaned before sending it to service and the
declaration on the absence of health hazards must be signed. This is
necessary to protect service personnel.
ASSISTANCE
There are various fault codes for quick and easy fault diagnosis. Some of them
are of relevance to you as user.
In case a TECHNICAL ERROR is displayed by MEDIAJET please contact the
local customer service department.
Page 53

MEDIAJET – Operating instructions V09 Maintenance
53
www.integra-biosciences.com
5.6 Disposal
The MEDIAJET is labelled with the “crossed-out bin” symbol to indicate that this
equipment must not be disposed of with unsorted municipal waste. Instead, it is
your responsibility to correctly dispose of your waste equipment by handing it
over to an authorised facility for separate collection and recycling.
It is also your responsibility to decontaminate the equipment in case of
biological, chemical, and/or radiological contamination so as to protect from
health hazards the persons involved in the disposal and recycling of equipment.
For more information about where you can drop off your waste equipment for
recycling, please contact your local dealer from whom you originally purchased
the product or your local council.
By doing so, you will help conserve natural resources and you will ensure that
your waste equipment is recycled in a manner that protects human health and
the environment. Thank you!
Page 54

MEDIAJET – Operating instructions V09 Technical data
54 INTEGRA Biosciences AG
6 Technical data
6.1 Specification of the device
Dimensions
Basic device (H x W x D) 330 mm x 655 mm x 634 mm
With 360 carousel (H) 1070 mm
With 540 carousel (H) 1405 mm
Maximal Petri dish stacking height
Carousel 360
683 mm
Carousel 540
1017 mm
Weight
Basic device 47.0 kg
360 carousel 6.8 kg
540 carousel 8.3 kg
Materials
Housing Polyurethane (PUR)
Safety cover Acrylic glas (PMMA)
Bare metal Stainless steel
Black carousel base plate Aluminium/PTFE
Rotor base plate (surface below
rotor)
Polyethylene (PE)
Electricity supply
Electricity consumption 200 W
Fuses T 2A (2x)
Input voltage 100-240 V 50/60 Hz
Connectors
Panel connector male (IEC C14)
For power cord with connector female (IEC C13)
Pump
Dosing range per dish 1–99.9 ml
Maximum dosing rate 500 ml/min
Maximum tube dosing rate 260 ml/min
Standard dish filling rate circa 900 dishes/hour (up to 15 ml)
Turbo dish filling rate circa 1100 dishes/hour (up to 24 ml)
Tube filling speed 1000 test tubes/hour (10 ml, 4 mm ID
tubing)
Dosing reproducibility circa 1% (at 15 ml)
Tube filling precision <1% (1–99 ml)
Page 55

MEDIAJET – Operating instructions V09 Technical data
55
www.integra-biosciences.com
6.2 Petri dish specifications
As there are no official standards for Petri dishes, the actually measured
dimension of the Petri dishes deviate from the nominal dimensions given by the
manufacturer. Thus for an optimal performance of MEDIAJET we recommend
to use dishes as specified in this section which apply to most of the com m e rcially
available dishes. In general we recommend using dishes with ventilation cams
on the inside of the dish lid.
The dish height (1) can vary between 12-25 mm and can be independently set
in the individual dish filling program, as described in chapter “4.4
Adapting a dish
filling program” on page 30.
The lid outer diameter (2) and the ground clearance (3) are critical for an optimal
performance of MEDIAJET and have to be in the range specified in the table
below.
For an updated compatibility list of the Petri dishes tested on MEDIAJET and
recommended by INTEGRA Biosciences please contact our local distribution
partner.
UV lamp
Output 11W (2.1 W UV-C, 253.7 nm)
1 Dish height
2 Lid outer diameter
3 Ground clearance
Manufacturer
nominal
size
in mm
Dish
height (1)
in mm
Ground
clearance
(3) in mm
Measured
lid outer
diameter (2)
in mm
MEDIAJET
configuration
90–100 12–25
6 90.8–92.0 90S
91.8–93.0 90 (standard)
93.1–94.5 90L
91.8–93.0 90 (biplate)
55–60
5 58.1–59.5 60 (standard)
56.7–58.1 60S
35 38.0–39.4 35 (standard)
Page 56

MEDIAJET – Operating instructions V09 Technical data
56 INTEGRA Biosciences AG
6.3 Configuration specifications
The table below shows all available MEDIAJET configurations listing the
corresponding accessories compatible with the different Petri dish sizes
specified above. A detailed overview of all the listed parts is shown in “7.2
Accessories for different Petri dish sizes” on page 58.
Special configurations for other Petri dish formats are available on request.
MEDIAJET
configuration
MEDIAJET
base units
version
Rotor
Part No.
Carousel
Part No.
Conversion set
Part No.
Compatible
accessories
Part No.
Tubing set 103 030
Tubing set 113 030
Tubing set 103 040
Tubefiller 103 010
90 (standard) standard 103 271 103 020 or
103 021
not applicable x x x
vario 113 051 x x x
90S standard 103 272 103 020 or
103 021
not applicable x x x
vario 113 051 x x x
90L vario 113 460 113 022 or
113 023
113 055 x x x
90 (biplate) vario 113 806 103 020 or
103 021
113 051 x x x
60 (standard) vario 113 271 113 020 113 052 x x
60S vario 113 276 113 020 113 056 x x
35 (standard) vario 113 272 113 021 113 053 x x
Page 57

MEDIAJET – Operating instructions V09 Technical data
57
www.integra-biosciences.com
6.4 Test tube compatibility chart
In order to avoid spillage, INTEGRA BIOSCIENCES recommends to work with
test tubes of an outer diameter fitting the racks as tight as possible. The chart
below lists the maximal test tube diameter compatible with the available racks
and gives a recommendation on the maximal possible variations in size which
ensure an error free dosing process. For test tubes with an outer diameter of 16,
20, and 25 mm which are longer than 150 mm the use of a centering plate is
required. For an overview of the available accessories refer to the next chapter.
Tube Dimensions Rack Type
Max.
outer
diameter
(mm)
Height
(mm)
Test tube
capacity
Part No. Part No.
centring
plate
required
ID of
dispensing
nozzle
(mm)
12.5–13.0 100–120 6 x 15 103 070 - 2–3
15.5–16.0 100–130 5 x 12 103 071 - 2–3
15.0–16.0 130–200 5 x 12 103 071 103 065 2–3
19.5–20.0 100–130 4 x 10 103 072 - 3–4
19.0–20.0 130–200 4 x 10 103 072 103 066 3–4
24.0–25.0 100–130 3 x 8 103 073 - 4
24.0–25.0 130–200 3 x 8 103 073 103 067 4
29.0–30.0 100–130 3 x 7 103 074 - 4
29.0–30.0 130–200 3 x 7 103 074 - 4
Page 58

MEDIAJET – Operating instructions V09 Optional functions and required accessories
58 INTEGRA Biosciences AG
7 Optional functions and required accessories
There are a number of accessories and optional functions that adapt the
MEDIAJET to particular application requirements.
Purpose This chapter describes the general accessories and the available optional
functions as tube filler, imprinting on dishes, independent pump function or how
to drive a second pump.
7.1 General accessories
7.2 Accessories for different Petri dish sizes
In its standard configuration, MEDIAJET (Part No. 103 005 and 103 006) is
delivered with a standard Rotor for Ø 90 mm Petri dishes and the corresponding
tubing set.
The MEDIAJET vario base units (Part No. 113 000, 113 001 and 113 002) are
convertible for various Petri dish sizes. One of the following conversion sets,
carousels and rotors must be added.
Accessories Part No.
Communication interface cable MEDIAJET to
MEDIACLAVE, for process documentation on
MEDIACLAVE printer.
103 046
UV lamp TUV11W to reduce the risk of
contamination during the filling process.
103 705
Pumphead 313D 103 520
Page 59

MEDIAJET – Operating instructions V09 Optional functions and required accessories
59
www.integra-biosciences.com
Accessories Part No.
Conversion set for
90 mm Petri dishes for
MEDIAJET vario, including all adaptation parts
and tubing set with filling nozzle.
113 051
Conversion set for large
90 mm ( 90L) Petri
dishes for MEDIAJET vario, including all
adaptation parts and tubing set with filling
nozzle.
113 055
Conversion set for
60 mm Petri dishes for
MEDIAJET vario, including all adaptation parts
and tubing set with filling nozzle.
113 052
Conversion set for small
60 mm ( 60S) Petri
dishes for MEDIAJET vario, including all
adaptation parts and tubing set with filling
nozzle.
113 056
Conversion set for
35 mm Petri dishes for
MEDIAJET vario, including all adaptation parts
and tubing set with filling nozzle.
113 053
Carousel for
90 mm Petri dishes, capacity of
360.
103 020
Carousel for
90 mm Petri dishes, capacity of
540.
103 021
Carousel for large
90 mm ( 90L) Petri
dishes, capacity of 360.
113 022
Carousel for large
90 mm ( 90L) Petri
dishes, capacity of 540.
113 023
Carousel for
60 mm Petri dishes, capacity of
360.
113 020
Carousel for
35 mm Petri dishes, capacity of
360.
113 021
Rotor for
90 mm Petri dishes. 103 271
Rotor for small
90 mm ( 90S) Petri dishes. 103 272
Rotor for large
90 mm ( 90L) Petri dishes. 113 460
Rotor for
90 mm biplate Petri dishes. Can
also be used for standard
90 mm Petri dishes.
113 806
Rotor for
60 mm Petri dishes. 113 271
Rotor for small
60 mm ( 60S) Petri dishes. 113 276
Rotor for
35 mm Petri dishes. 113 272
Tubing set for
90 mm Petri dishes, including
1.5 m silicone tubing (6 x 9 mm) and filling nozzle
for
90 mm Petri dishes.
103 030
Tubing set for
60 or 35 mm Petri dishes,
including 1.5 m silicone tubing (6 x 9 mm) and
filling nozzle for
60 mm Petri dishes.
113 030
Page 60

MEDIAJET – Operating instructions V09 Optional functions and required accessories
60 INTEGRA Biosciences AG
7.3 Consumables
7.4 Imprinting dishes
Different optionally available inkjet printer connection kits allow the connection
of three different brands of inkjet printers (MARKEM-IMAJE, LINX, Domino). All
inkjet printer systems permit to apply a wide variety of information onto the Petri
dishes, like alphanumeric text, expiry/production date or barcodes.
The available inkjet printer connection kits allow site wall imprinting of the Petri
dishes with all supported inkjet printer types. Imprinting Petri dishes on the side
wall has the advantage of not interfering with any plate reader or colony counter.
Alternatively, dishes can be imprinted on the bottom using the LINX 4900 inkjet
printer module.
Filling nozzle for
90 mm Petri dishes,
6 x 9 mm tubing.
103 032
Filling nozzle for
60 or 35 mm Petri dishes,
6 x 9 mm tubing.
113 032
Accessories Part No.
Consumables Part No.
Silicone tubing 6 x 9 mm, length 25 m for
MEDIAJET.
171 036
O-rings for drive wheel, 10 pack (biplate option) 113 822
Grease (Kübler Microlube GBU-Y131, 50 g), for
greasing feeder/stacker piston and anchor bolt
of carousel/rotor axis.
200 150
Page 61

MEDIAJET – Operating instructions V09 Optional functions and required accessories
61
www.integra-biosciences.com
7.5 Turbo mode option
:
Accessories Part No.
Connection kit for IMARKEM-IMAJE 9020/
9028 inkjet printer, including fixing device and
interface cable, compatible with
90 mm,
60 mm or
35 mm Petri dishes.
103 080
Connecting kit for MARKEM-IMAJE 9232/
9410 inkjet printer, including the fixing device
and the interface cable, for Ø 90 and Ø 60 mm
Petri dishes.
103 091
Connection kit for LINX 5900 (4900) inkjet
printer (bottom printing) with interface cable
MEDIAJET to Linx 4900, ex factory.
113 840
Connection kit for LINX 5900 (4900)/CJ400
inkjet printer (side wall printing), including the
fixing device and the interface cable, for Ø 90
and Ø 60 mm PD.
113 845
Connecting kit for Domino A320i/A420i inkjet
printer including the fixing device and the
interface cable, for Ø 90 and Ø 60 mm PD.
113 060
Table stand for IMAJE 9020 inkjet printer. 103 085
Cart with compartment for Linx 4900 inkjet
printer (bottom printing) and opening for
connecting the printer head to MEDIAJET.
113 841
Accessories Part No.
Turbo mode kit for accelerating the filling rate,
this includes:
103 036
Extension pump head for double pump head
assembly
171 090
Tubing set for Turbo mode, including filling
nozzle for
90 mm Petri dishes and tubing for
double pump head configuration (6 mm ID),
length 2.0 m.
103 035
Page 62

MEDIAJET – Operating instructions V09 Optional functions and required accessories
62 INTEGRA Biosciences AG
7.6 Accessories for dosing function
The MEDIAJET pump can be used independently for other applications, such
as for the manual filling of small tubes or bottles. The delivery can be controlled
comfortably with the foot-switch available as an option.
Accessories Part No.
Foot switch with connection cable. 143 200
Aspiration/dispensing tube, for 6 mm inner
diameter silicone tubing as suction or end-piece
nozzle, 6 mm inner diameter, 10 cm length,
stainless steel, one end dented.
171 056
Aspiration/dispensing tube, 6 mm inner
diameter, 35 cm length, stainless steel, one end
dented.
171 066
Tube collar for 4-6 mm ID tubes, used as clamp
spacer for the dispensing tube or as weight for
the aspiration tube.
171 074
Page 63

MEDIAJET – Operating instructions V09 Optional functions and required accessories
63
www.integra-biosciences.com
7.7 Driving a second pump
The MEDIAJET permits the control of a second, independent DOSE IT
peristaltic pump. This accessory is particularly useful for the continuous mixing
in of additives, such as blood, into the agar immediately prior to filling of the
dishes, through which the thermal denaturing of the additive is minimized.
Accessories Part No.
Peristaltic pump DOSE IT. 171 000
Tubing set for the preparation of blood agar in
90 mm Petri dishes (suitable to add of 3 to 10 %
blood in combination with the peristaltic pump
DOSE IT). Consisting of filling nozzle, tubings for
media (6 x 9 mm) and additive (2 x 5 mm), glass
T-piece and suction needle stainless steel.
103 040
Electric interface cable for combination of
peristaltic pump DOSE IT and MEDIAJET.
103 047
High-grade steel suction needle. 179 147
Consumables Part No.
Silicone tubing 2 x 5 mm, length 2.5 m,
autoclavable.
171 022
Glass T-piece for MEDIAJET blood agar set. 103 505
Page 64

MEDIAJET – Operating instructions V09 Optional functions and required accessories
64 INTEGRA Biosciences AG
7.8 TUBEFILLER option
The TUBEFILLER option is a perfect expansion to the functionality of
MEDIAJET. It allows quick conversion of MEDIAJET into a test tube filler. The
option has to be ordered separately from INTEGRA BIOSCIENCES.
The following accessories are available for the TUBEFILLER:
Device Option Part No.
TUBEFILLER option for MEDIAJET, including
filling arm, support plate compatible with racks
of
13, 16, 20, 25 or 30 mm test tubes and a
3.0mm silicone tubing set with two dispensing/
aspiration tubes.
103 010
Accessories Part No.
Test tube Racks
10 units of autoclavable at max. 121°C
polypropylene test tube racks.
Rack for
13 mm test tubes, 6 x 15 capacity 103 070
Rack for
16 mm test tubes, 5 x 12 capacity 103 071
Rack for
20 mm test tubes, 4 x 10 capacity 103 072
Rack for
25 mm test tubes, 3 x 8 capacity 103 073
Rack for
30 mm test tubes, 3 x 7 capacity 103 074
Centring Plates
required to provide an accurate positioning of
16, 20 or 25 mm test tubes, which are longer
than 15 cm, during the filling process.
Centring plate for 16 mm test tube rack 103 065
Centring plate for
20 mm test tube rack 103 066
Centring plate for
25 mm test tube rack 103 067
Aspiration/dispensing tubes
Aspiration/dispensing tube 2.0 mm ID, 10 cm
length, stainless steel
171 052
Aspiration/dispensing tube 3.0 mm ID, 10 cm
length, stainless steel
171 053
Aspiration/dispensing tube 4.0 mm ID, 10 cm
length, stainless steel
171 054
Tube collar as weight
for aspiration tubes with 1-3 mm ID 171 071
for aspiration tubes with 4-6 mm ID 171 074
Page 65

MEDIAJET – Operating instructions V09 Optional functions and required accessories
65
www.integra-biosciences.com
Consumables Part No.
Tubings
Silicone tubing 2.0 mm ID, 2 m length 171 022
Silicone tubing 3.0 mm ID, 2 m length 171 023
Silicone tubing 4.0 mm ID, 2 m length 171 024
Silicone tubing 2.0 mm ID, 25 m length, bulk
package
171 032
Silicone tubing 3.0 mm ID, 25 m length, bulk
package
171 033
Silicone tubing 4.0 mm ID, 25 m length, bulk
package
171 034
Page 66

MEDIAJET – Operating instructions V09
66 INTEGRA Biosciences AG
Imprint
All rights to this documentation are reserved. In particular the rights to
reproduction, processing, translation and the form of presentation lie with
INTEGRA Biosciences AG. Neither the complete documentation nor parts
thereof may be reproduced in any way, or stored and processed using electronic
media or distributed in any other way without the written consent of INTEGRA
Biosciences AG.
© INTEGRA Biosciences AG, 2017
This operating instruction manual has the part number 103 950 and version
number V09. It is valid for software version 2.16 or higher until a newer revision
is released.
Manu-
facturer
Customer
service
Please contact your local INTEGRA Biosciences AG representative. The name
and address can be found at www.integra-biosciences.com
.
Further information and other languages are available on
www.integra-biosciences.com
or on request (info@integra-biosciences.com).
INTEGRA Biosciences AG
CH-7205 Zizers, Switzerland
T +41 81 286 95 30
F +41 81 286 95 33
INTEGRA Biosciences Corp.
Hudson, NH 03051, USA
T +1 603 578 5800
F +1 603 577 5529
www.integra-biosciences.com
info@integra-biosciences.com
 Loading...