

Page 1
Axium Keypad Manager
OVERVIEW
The Axium Keypad Manager is a Windows program that easily and quickly configures AX-KPC
2.8 touch panels and AX-KPB keypads. Touch Panels are configured using a powerful page
designer with predefined and user galleries of images and sounds. A public database of
predefined commands as well as a user database is available for storing learnt commands.
Command databases are presented using a tree view to group commands to models and
models to makes. This provides an efficient method for finding the required commands for
programming the keys of AX-KPB keypads and the virtual keys displayed by the touch panels.
Infra-Red commands using the HEX format may be pasted directly either to keys or the
database tree.
Keypads and touch panels are connected via USB to a PC for programming or downloading of
their configurations. Such configurations can be saved and later reused for programming
more keypads and touch panels.
MAIN WINDOW
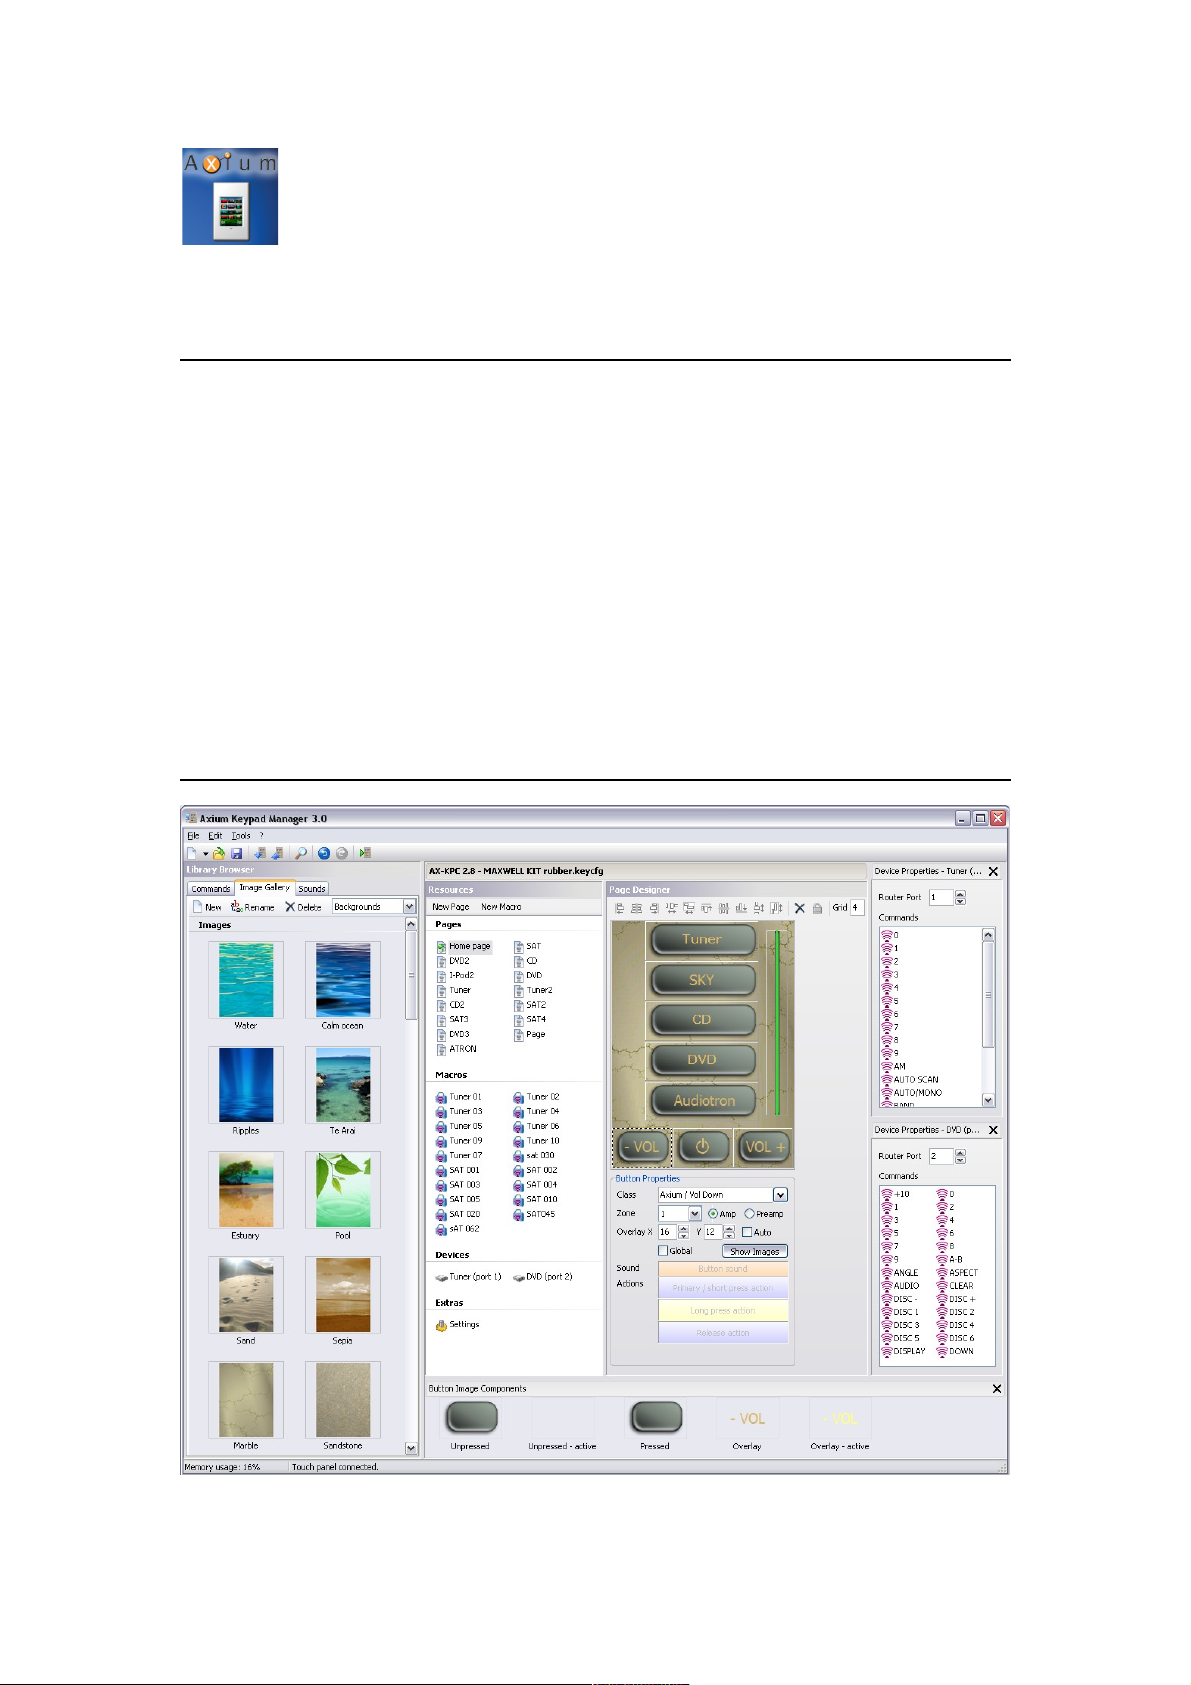
Image 1 - The main window
1
Page 2
The main window provides most of the functionality of Axium Keypad Manager. It contains a
menu and toolbar, a library browser consisting of objects useful for programming a touch
panel or keypad device and a device dependent designer is displayed on the right.
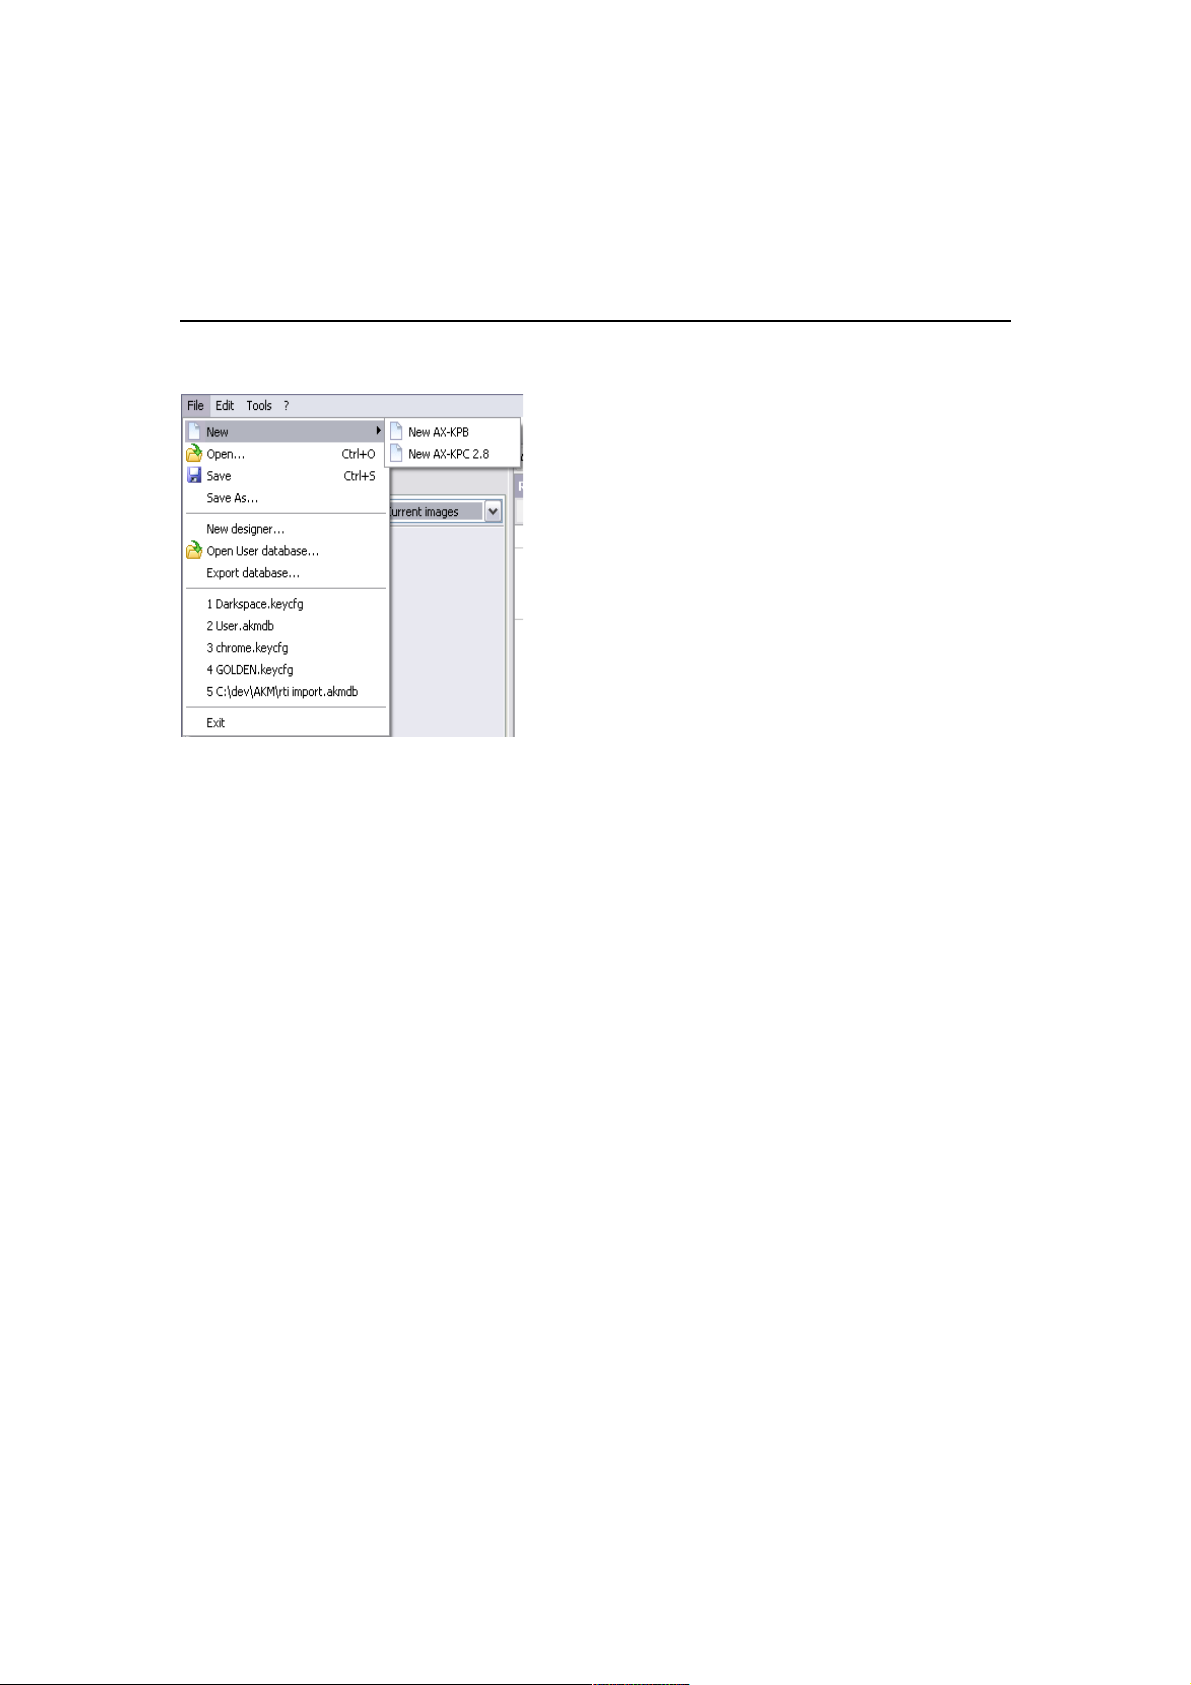
FILE MENU
The commands in the file menu are for managing configuration and database files.
Image 2 - The File menu
New: Opens a blank configuration for a specific type of device. If a new AX-KPB
configuration is selected, the KPB designer will be opened with blank keys. If a new
AX-KPC 2.8 configuration is selected, the touch panel designer will be opened with a
single blank home page and with default settings. This is the state when AKM starts.
Open: Loads a saved keypad or touch panel configuration. This can be a configuration
downloaded from a keypad or touch panel or it can be one that has been designed in
the Axium Keypad Manager using the available commands, images and other objects.
Save: Saves the current configuration. Configurations are also autosaved (see Autosave).
Save As: Saves the current configuration under a different name or path.
New designer (KPC only):
Opens a window containing a touch panel designer. A separate configuration can be
opened or designed in this window and objects can be dragged & dropped or copied
& pasted between the designers.
Open User database:
Opens another database file and adds it to the database tree. User databases are a
means to exchange infra-red and RS-232 commands to other computers. Using this
command, any number of user databases can be opened. Commands, models and
makes can be dragged and dropped between the databases.
2
Page 3

User databases should usually be stored in the “Axium Keypad Manager” folder in
“My Documents”, which is where the predefined “User” database is located. The
public database is stored in the common application data folder, which on Windows
XP is typically C:\Documents and Settings\All Users\Application Data.
Export database:
Exports all open IR-command databases as HEX commands to a CSV file. Specific
branches of a database (e.g. specific makes or models) can be exported using the
database’s context menu or the Edit menu rather than using this command.
Exit: Closes Axium Keypad Manager.
3
Page 4
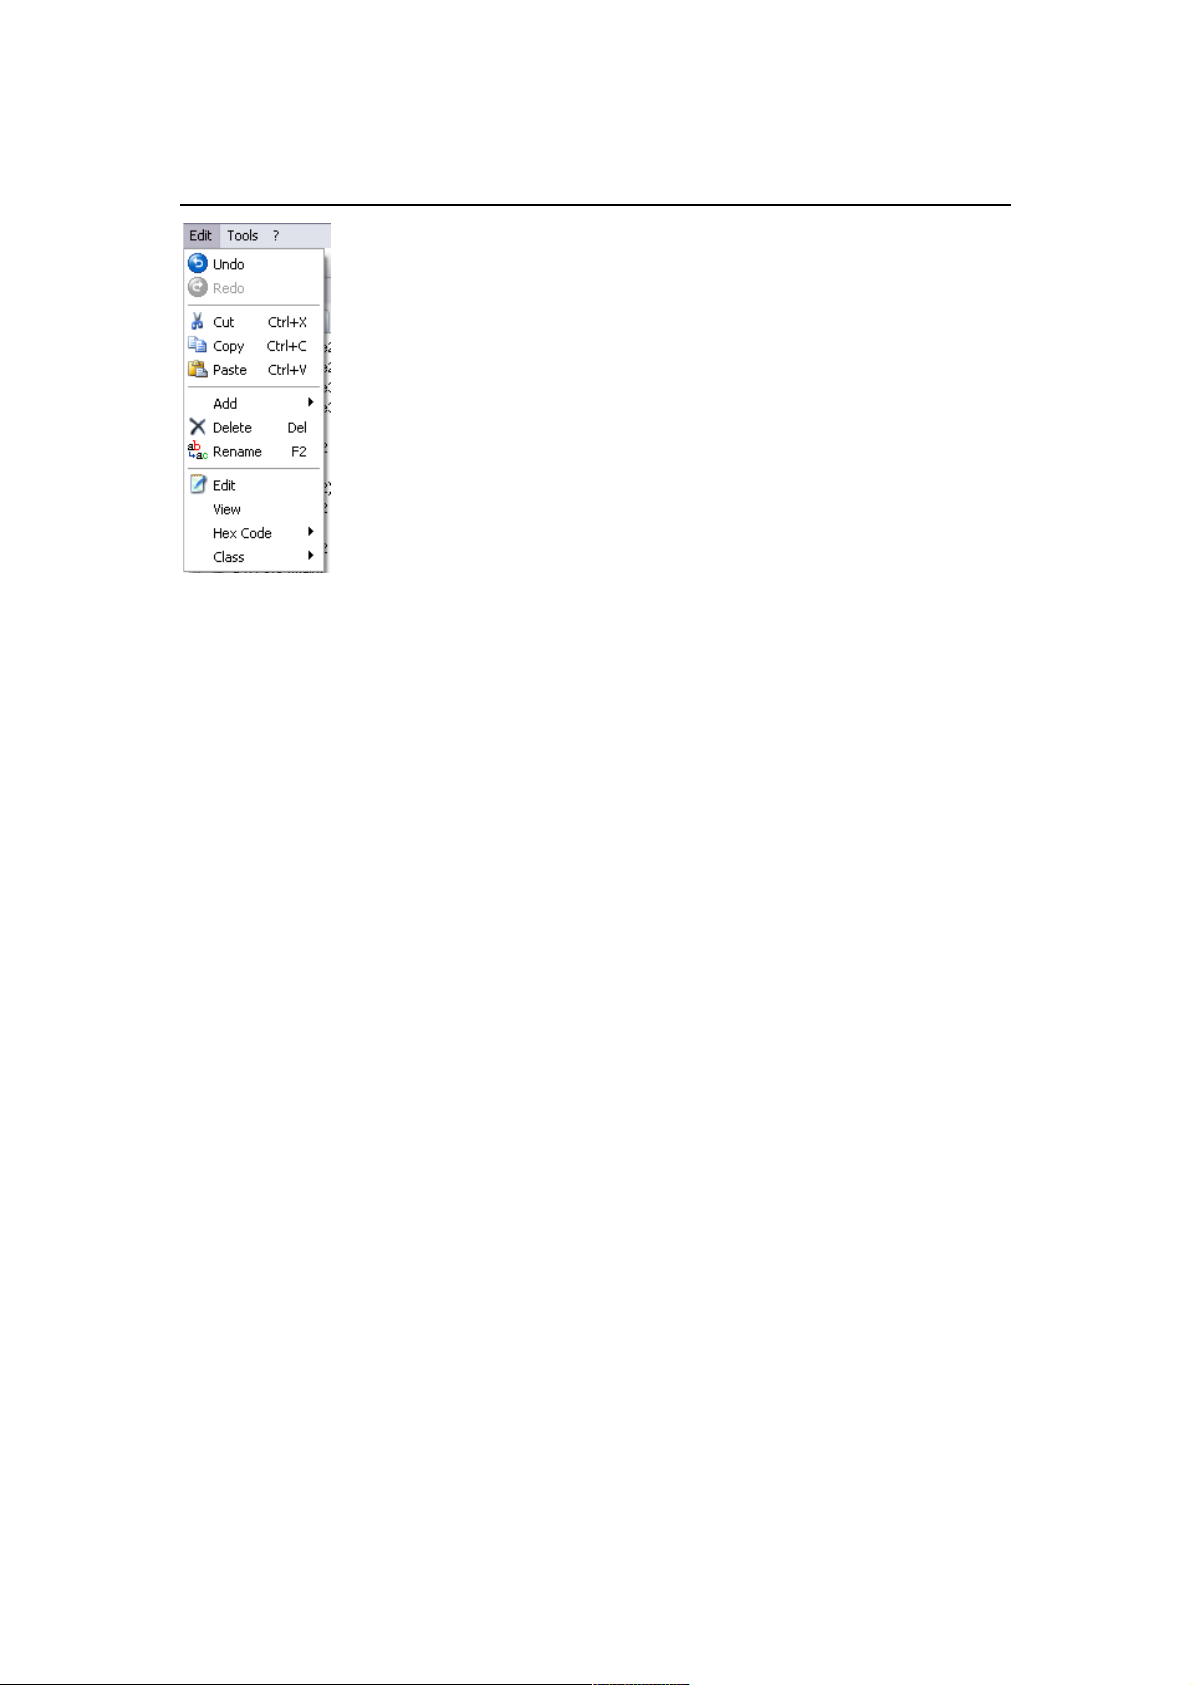
EDIT MENU
Image 3 - The Edit menu
Undo: Undoes the last change. The Axium Keypad Manager boasts with a powerful undo
feature capable of undoing up to 50 individual changes of any type.
Redo: Redoes a change that was just undone by the “Undo” function.
Cut: Available only when a make, model or command in the user database is selected or
when an object in one of the designers is selected. Selects the object for pasting and
deletes it from its original Position.
Copy: Available only when a make, model or command in a database is selected or when an
object in one of the designers is selected. Selects the object for pasting.
Paste: Available when an object has been cut or copied and another object is selected that
can accept the copied/cut object. For example: if a command has been cut from a
key in one of the designers, it can be pasted to a model in the user database or to
another key in the designer.
Add: For adding new makes, models or commands to the user database. The “New
Commands…” command creates a specific number of new commands and numbers
them from 1 to the number given. Any new commands are of course initially
undefined but can be filled with hex code, for example.
Delete:
Deletes the selected object in the user database or in a designer. When deleting a
make, it is not necessary to delete its models and commands first. Likewise when
deleting a model, it is not necessary to delete its commands first.
Rename:
Initiates rename mode for the selected object in the user database or in a designer, if
4
Page 5
applicable. Rename mode can also be initiated using the F2 key or by clicking on the
selected node (as in the Windows Explorer).
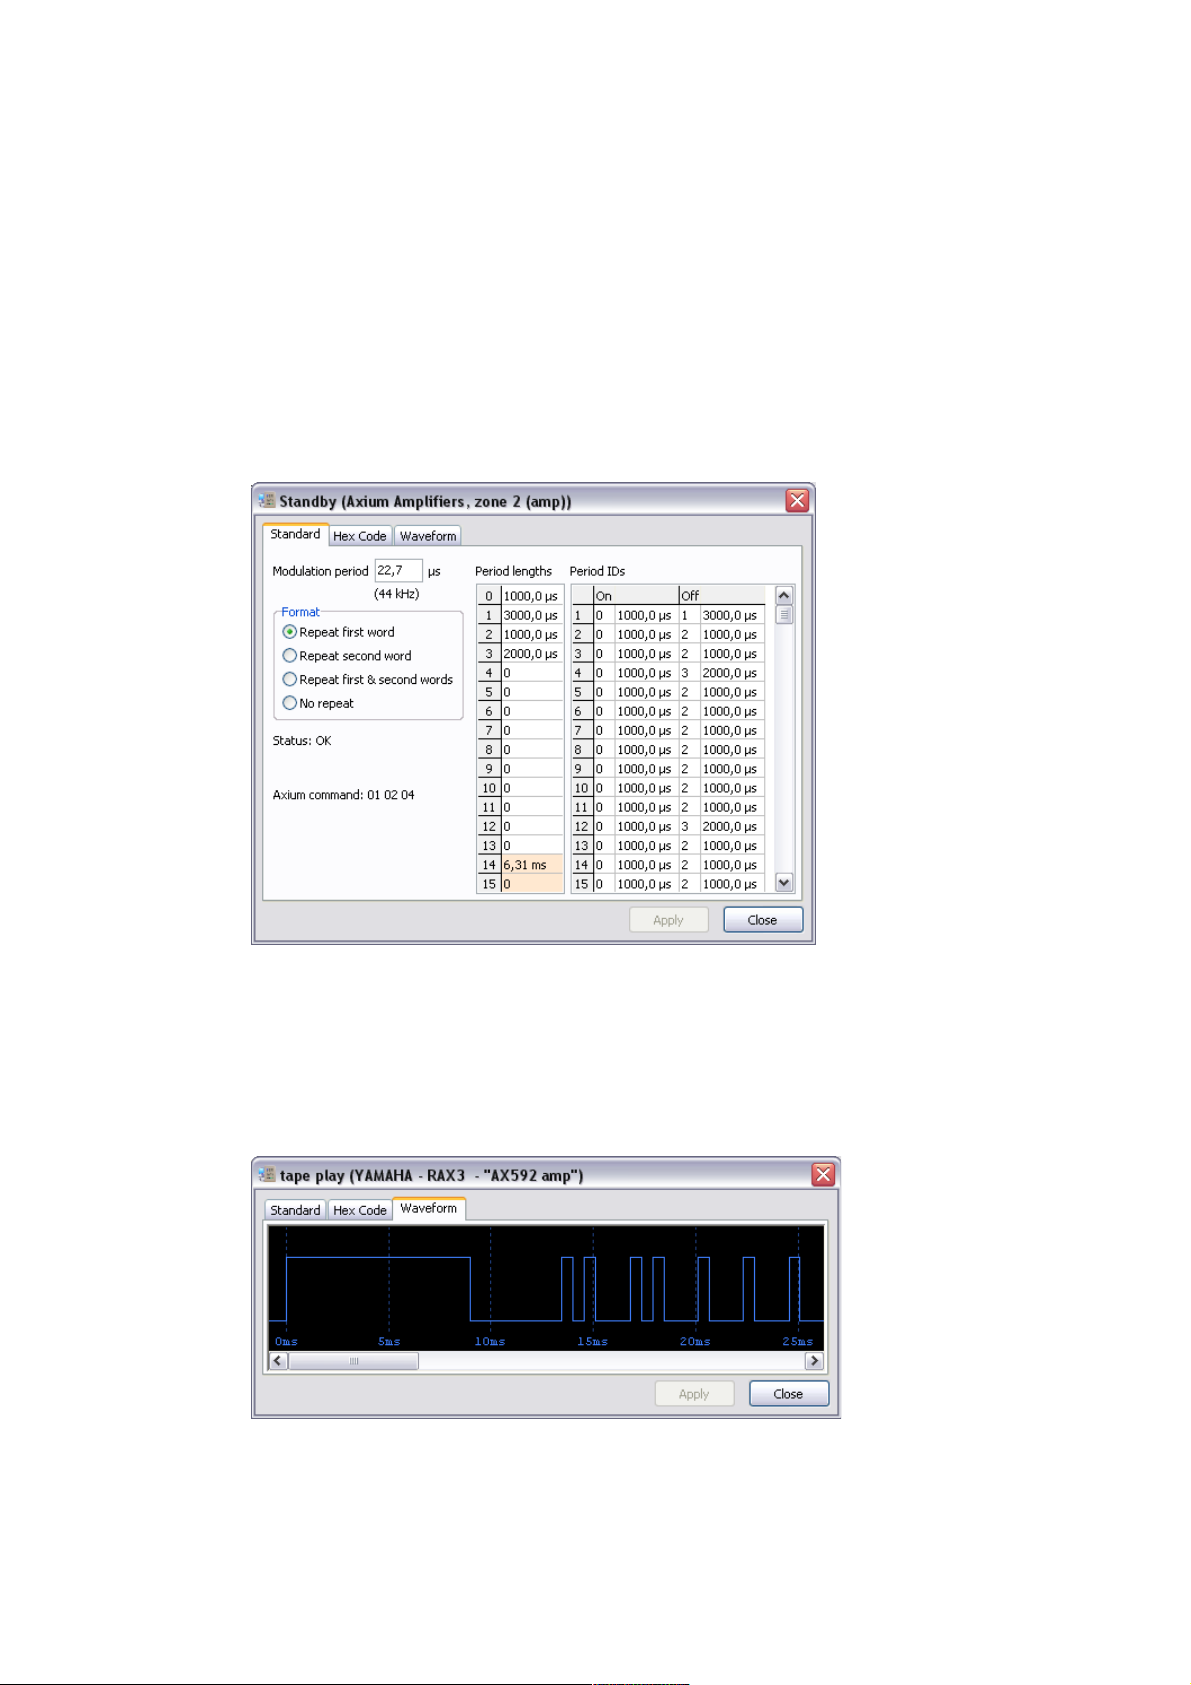
Edit: Opens a dockable window for editing or viewing the selected command in a
command database. In the case of an infra-red command, details of the command’s
Modulation frequency, sequential ON / OFF periods and format can be viewed. For
RS-232, details of the baud rate, number of data & stop bits, type of parity and
command data can be viewed and edited. When viewing Axium IR-commands, the
Axium command is also displayed, which is useful for verifying the Axium protocol
RS-232 command string. The “Hex Code” tab displays a hex code representation of
the IR-command. The hex code may be copied to and from the clipboard and other
applications. Only commands in a user database can be edited.
Image 4 - The Edit window for infra-red commands
View: Opens the edit window with the waveform tab selected. This provides a graphical
representation of the IR command along. Pulse and pause period lengths are shown
when the mouse is held over high and low levels. Holding the mouse over a rising or
falling edge shows when the pulse or pause begins. The edit window can be left open
while selecting other IR commands, thus allowing a comparison of IR commands.
Image 5 - The Waveform tab
Hex code sub menu:
5
Page 6

Edit: Opens the command edit window with the “Hex Code” tab selected. The
hex code may be copied to and from the clipboard and other
applications.
Copy: Available when a command is selected. Copies a Hex code
representation of the command to the clipboard.
Paste: Available when a new undefined command has been created in the user
database. Pastes the code from the clipboard.
Paste new:Pastes a hex code from the clipboard into a new command in the user
database.
Auto paste:
This is useful for pasting a series of hex codes from another application
without swapping between the application and the Axium Keypad
Manager. This is done by first creating a group of new commands in the
user database (e.g. by using Add – New commands) and then selecting
the first command in the group. The user then selects “Auto paste”,
switches to the other application and copies hex codes from that
application into the clipboard. Each time a hex code is copied, it is
automatically pasted from the clipboard into the selected command. The
command selection is then advanced to the next command ready for the
next hex code to be copied. If the “paste names” option in the autopaste window is selected, the command names can be copied along with
the hex-codes.
Export: Exports the selected make, model or command as HEX commands to a
CSV file.
Class sub menu:
There are a number of very common functions that often appear on various equipment.
There are many examples of this such as “Play”, “Pause” and “Stop” are found on equipment
ranging from cassette players to video streaming servers. “Standby”, “volume up”, “volume
down” are further functions that are almost universally found on equipment. The purpose of
the class sub menu is to assign one or more classes to infra-red and RS-232 commands so
that their purpose is known thus enabling the designer to make well-informed suggestions for
the types of buttons to use and which commands to assign to them.
Add <default> class:
This option appears if the name of the command matches a built-in
pattern for one of the classes. The F10 function key can be used as a
short cut for selecting this function.
Add <group> class:
Sub menus are provided for the following groups of classes: “transport”,
“numeric”, “cursor” and “system”.
Remove <class>:
This option appears if a class has been assigned to the command and
allows the user to remove the class.
6
Page 7
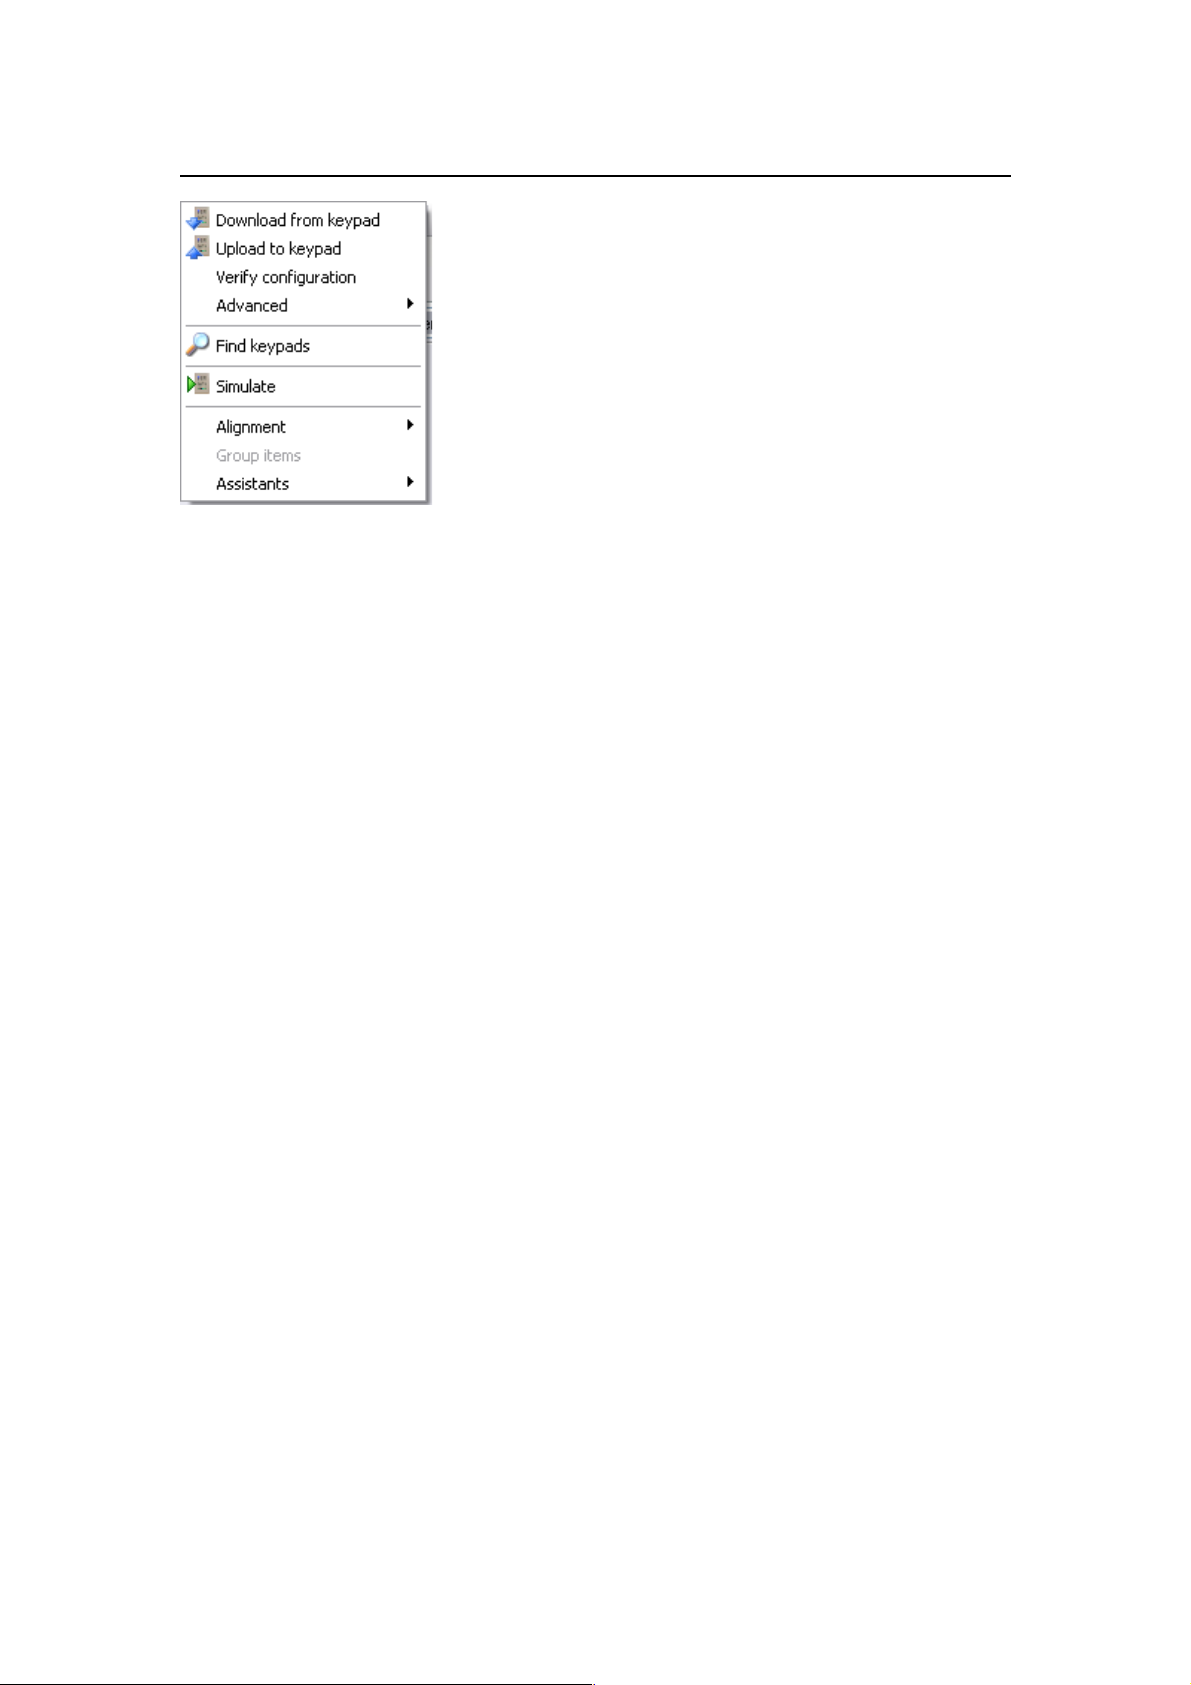
TOOLS MENU
Image 6 - The Tools menu
Download from keypad:
Downloads the configuration from a connected AX-KPB keypad or AX-KPC 2.8 touch
panel to the Axium keypad manager. This can be useful for:
Downloading infra-red commands that have been learnt on a KPB or KPC.
Downloading configurations that have not been previously saved to disk for
programming other KPBs or KPCs.
Note that due to storage restrictions on the KPC 2.8, downloaded images and sounds
may not have the original quality. Also, to prevent unnecessary duplication, do not
mix downloaded images and sounds with the same images and sounds from the
galleries.
Note that the term “download” is synonymous with “receiving” data from the PC's
perspective.
Upload to keypad:
Uploads the current configuration to a connected AX-KPB keypad or AX-KPC 2.8
touch panel. Any existing configuration will be erased. This command can also be
understood as “programming” the keypad or touch panel.
Note that the term “upload” is synonymous with “sending” data from the PC's
perspective.
Verify Configuration (KPC only):
Compares the configuration in the connected AX-KPC 2.8 to the current configuration.
This is useful for ensuring that an upload has been performed error free or for
checking if a particular saved configuration has been used on a KPC or not.
Advanced (KPC only):
Contains advanced features for firmware updates and diagnostics.
Axium Settings (KPB only):
Opens the Axium settings window, where the Axium Zone, Device (amplifier or
preamplifier), Source assignments, IR receiver enable/disable, Source, Volume
Indicator and Backlighting brightness settings in the configuration can be set. See
Configuring Axium Settings.
7
Page 8

Find Keypads:
Searches for all connected keypads & touch
panels and displays the keypads serial
number, zone allocation, and connection
path:
Direct (KPB or KPC on USB port)
Network connected (via amplifier stack,
KPB only)
Network connected keypads must be
registered with the amplifier by pushing the
keypad SET key twice. Selecting a connected
keypad in the connection tree will enable the
download and upload tools.
Simulate (KPC only):
Opens a window that simulates a touch panel programmed with the current
configuration. This is useful for testing basic aspects of the configuration, such as
page navigation, without having to program a touch panel. See Simulator.
Context Menus: Context menus - opened by right mouse clicks – are available for the
databases, image & sound galleries and the designers. AX-KPB context menus are
available for keys and key details. AX-KPC 2.8 context menus are available wherever
a context menu is applicable, e.g. the resources list, page designer, action and sound
panels, button image components window, device window, macro editor, image and
sound galleries, etc.
Toolbar: a toolbar is provided for easy access to some of the most useful menu functions.
The symbols in the toolbar correspond to the same symbols shown in the menus.
Docked windows: various windows in AKM may be docked so that are large flat workarea
can be set up rather than have many overlapping windows. Docking can be prevented by
holding down the Ctrl-key while dragging the window to another position. To undock a
docked window, double click its caption.
Autosave: keypad configurations are saved automatically into the temporary “My
Documents\Axium Keypad Manager\autosave” folder. This occurs immediately when a
configuration is loaded from disk or downloaded from a keypad and then after every ten
minutes if changes are made. Each time the configuration is autosaved, a new backup file is
created thus making it possible to revert to an earlier version if there is a problem with the
last backup(s) or if something from an earlier version is required.
The autosave folder is moved into the Windows trash can (“Recycle Bin”) when AKM is
closed. This is done to prevent backups from consuming large amounts of disk space
unnecessarily. Over time, a number of autosave folders will appear in the trash, where each
one represents an AKM session when at least one file was autosaved.
If AKM is not running when a backup needs to be restored, the autosave folder will probably
be in the trash. The user must find the appropriate folder (the “Date Deleted” is a good
indication of which session each folder represents) and restore it. AKM can then be started.
8
Page 9

In order to load a backup configuration, it should first be moved out of the autosave folder as
this folder is only temporary and will be deleted when AKM is closed again. Once the file has
been moved, it can be opened using File – Open.
9
Page 10
AX-KPB PROGRAMMING
When designing or viewing a configuration for an AXKPB, the area on the right of the main window
represents the keypad. Below the keypad is an area
showing the details of the selected key. The six source
select keys at the top of the keypad select the six
banks, selection is indicated by the blue LED. When a
key is shown with a depressed appearance, it is loaded
with a command. Placing the mouse cursor over a key
displays a tool tip showing the key’s name.
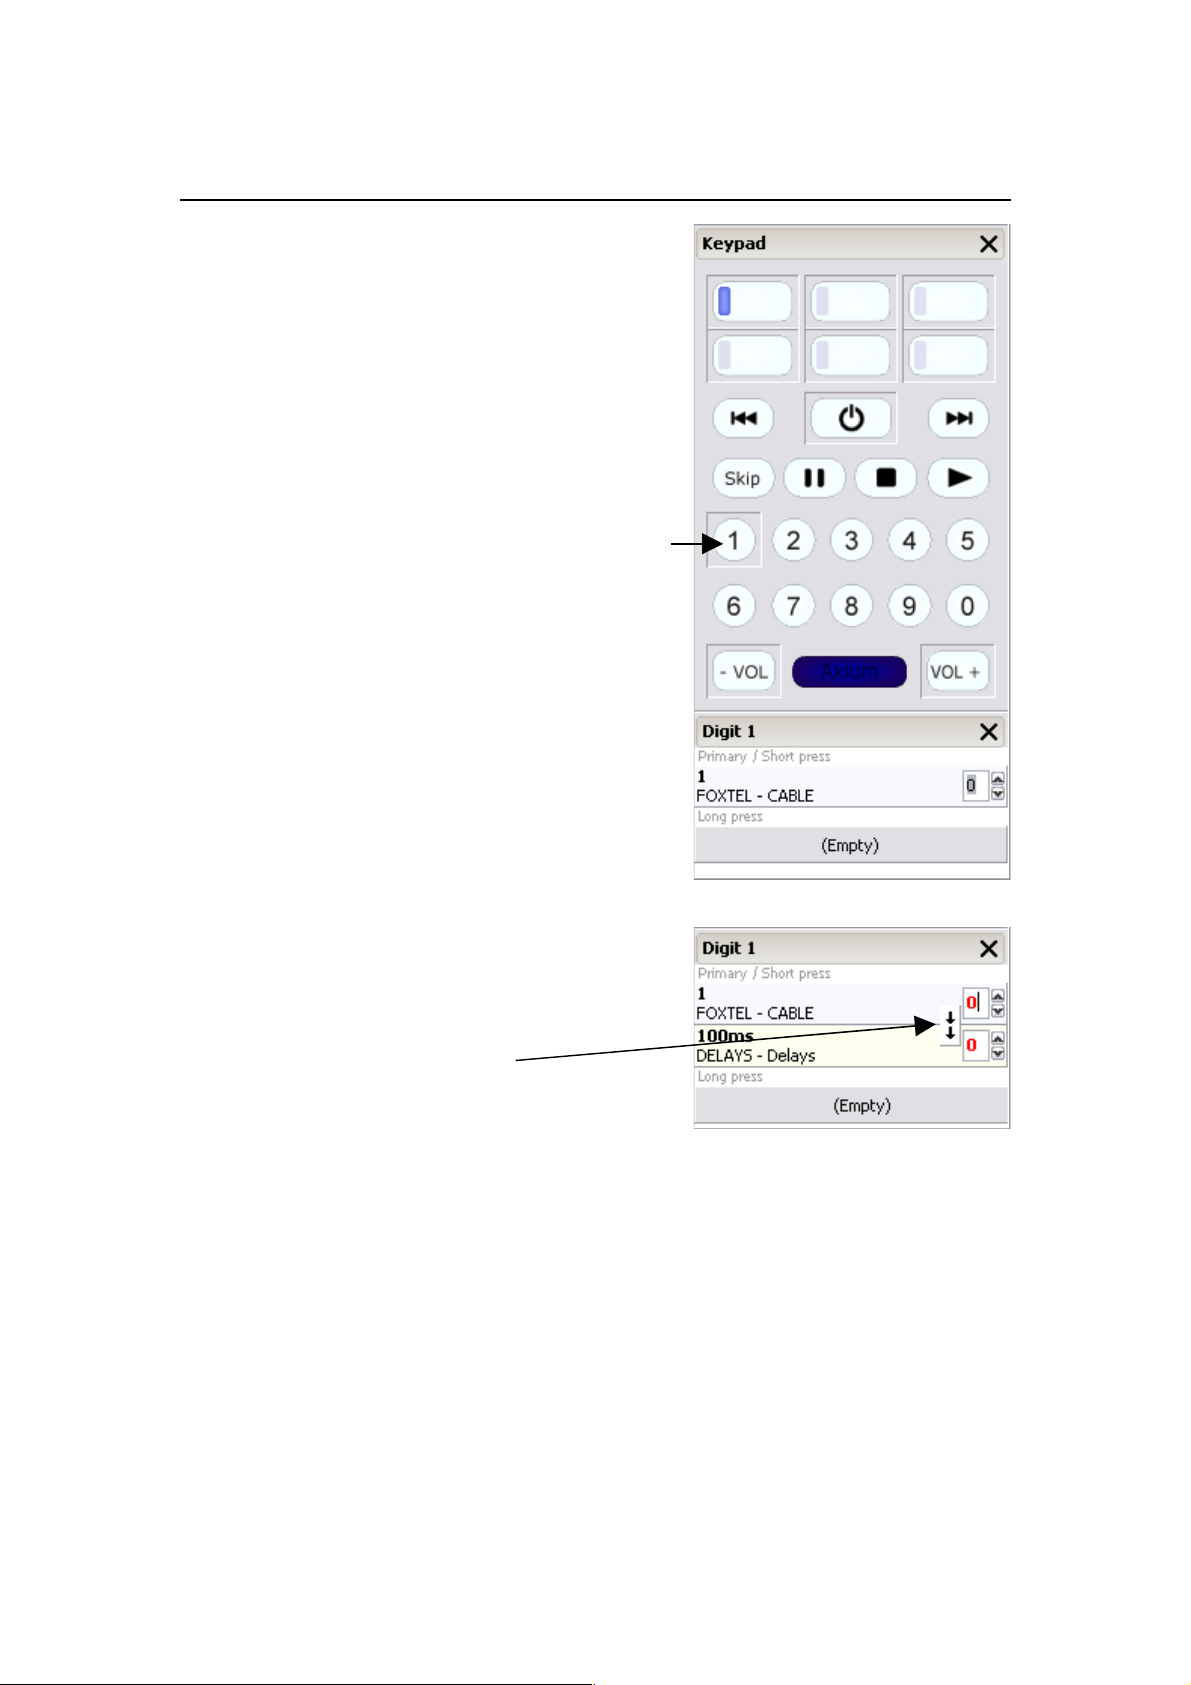
Loading a key with a command:
Select the bank for programming and drag a command
from a database and drop it onto the desired key.
Example: FOXTEL / CABLE / 1 command is dropped
onto the digit 1 key. Digit 1 remains depressed
indicating the key has a command loaded, and the
programming detail window displays the command,
make and model.
If the PC clipboard has a Hex code copied to it, then it
may be pasted directly to a key by right clicking the key
and selecting; Hex code / Paste new.
Loading a key with a Sequential macro:
For sequential macro’s simply drag and drop commands
in the correct order onto the same key – up to 32
commands.
When just two commands have been dropped onto a
key the ‘Macro Type’ button pops up.
Both arrows down indicate a sequential macro.
Arrows pointing outwards indicate an alternating
macro.
Click the Macro Type button to make the selection.
When more than two commands are dropped onto a key the sequential macro is assumed
and the Macro Type button disappears.
The number of code repeats may be adjusted from 1 – 15.
Some brands of equipment require a delay between commands before they will correctly
respond to a sequence, various delay times with repeats are provided in the public database
under Axium / Delays / _ _
10
Page 11
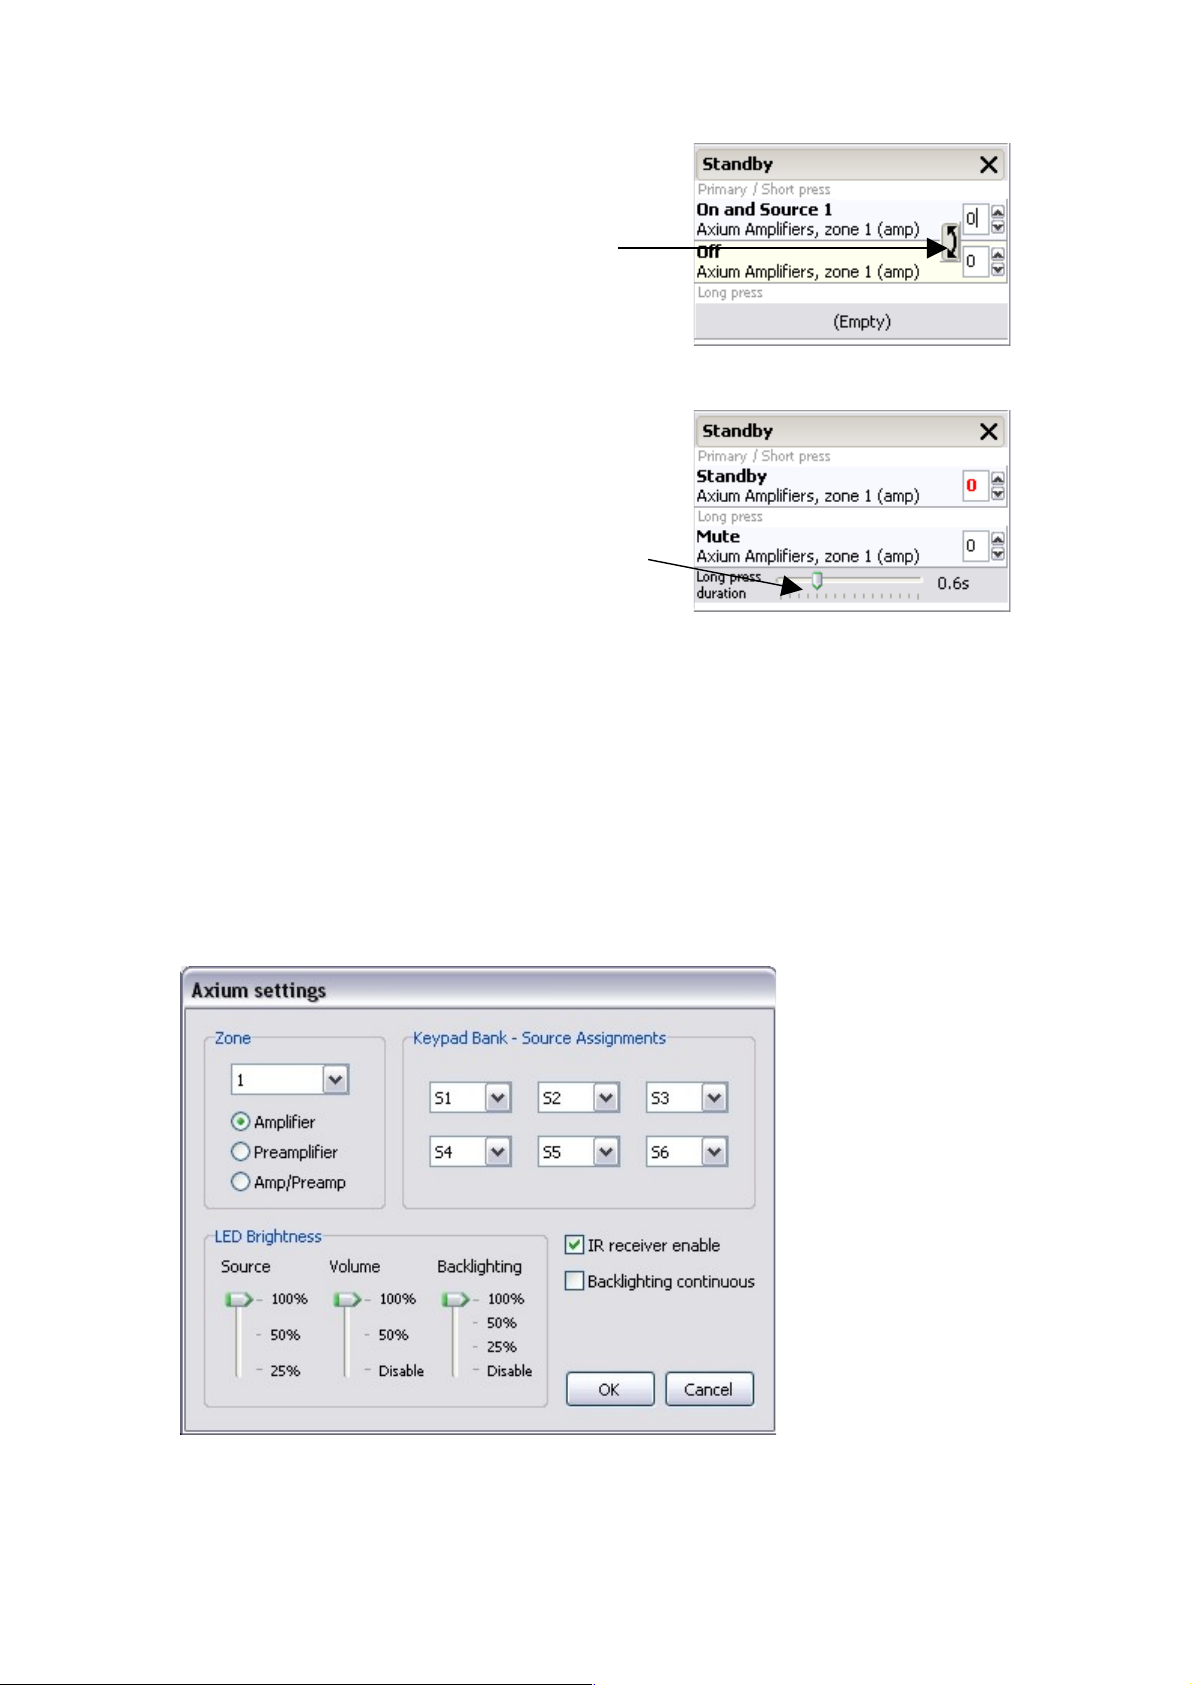
Loading a key with an Alternating macro:
Alternating macro commands alternate with pushes.
Simply drag and drop two commands to the same key,
and select Alternate in the Macro Type button
Example shows a typical alternating macro, where ON
+ S1 command is sent on the first push, while on the
second push the Off command is sent.
Loading a Key with a Long-Press function:
Drag and drop a command to a key, followed by the
long-press command but drop this onto the long-press
area in the key details.
The long press duration may be adjusted between 0.2
and 1.7 seconds using the slider
Some brands of equipment require repeats of the
command before they correctly operate, this can be
adjusted using the repeat adjustment.
The short press or long press functions may also be sequential
or alternating macros. Simply drop further commands into either the short or long-press tabs
in the programming details window.
Clearing a Key:
Right click over the key to be cleared and select Clear.
Configuring Axium Settings
Image 7 - The Axium settings window
The keypad may be quickly programmed to address an Axium Zone and its sub device the
preamplifier.
11
Page 12
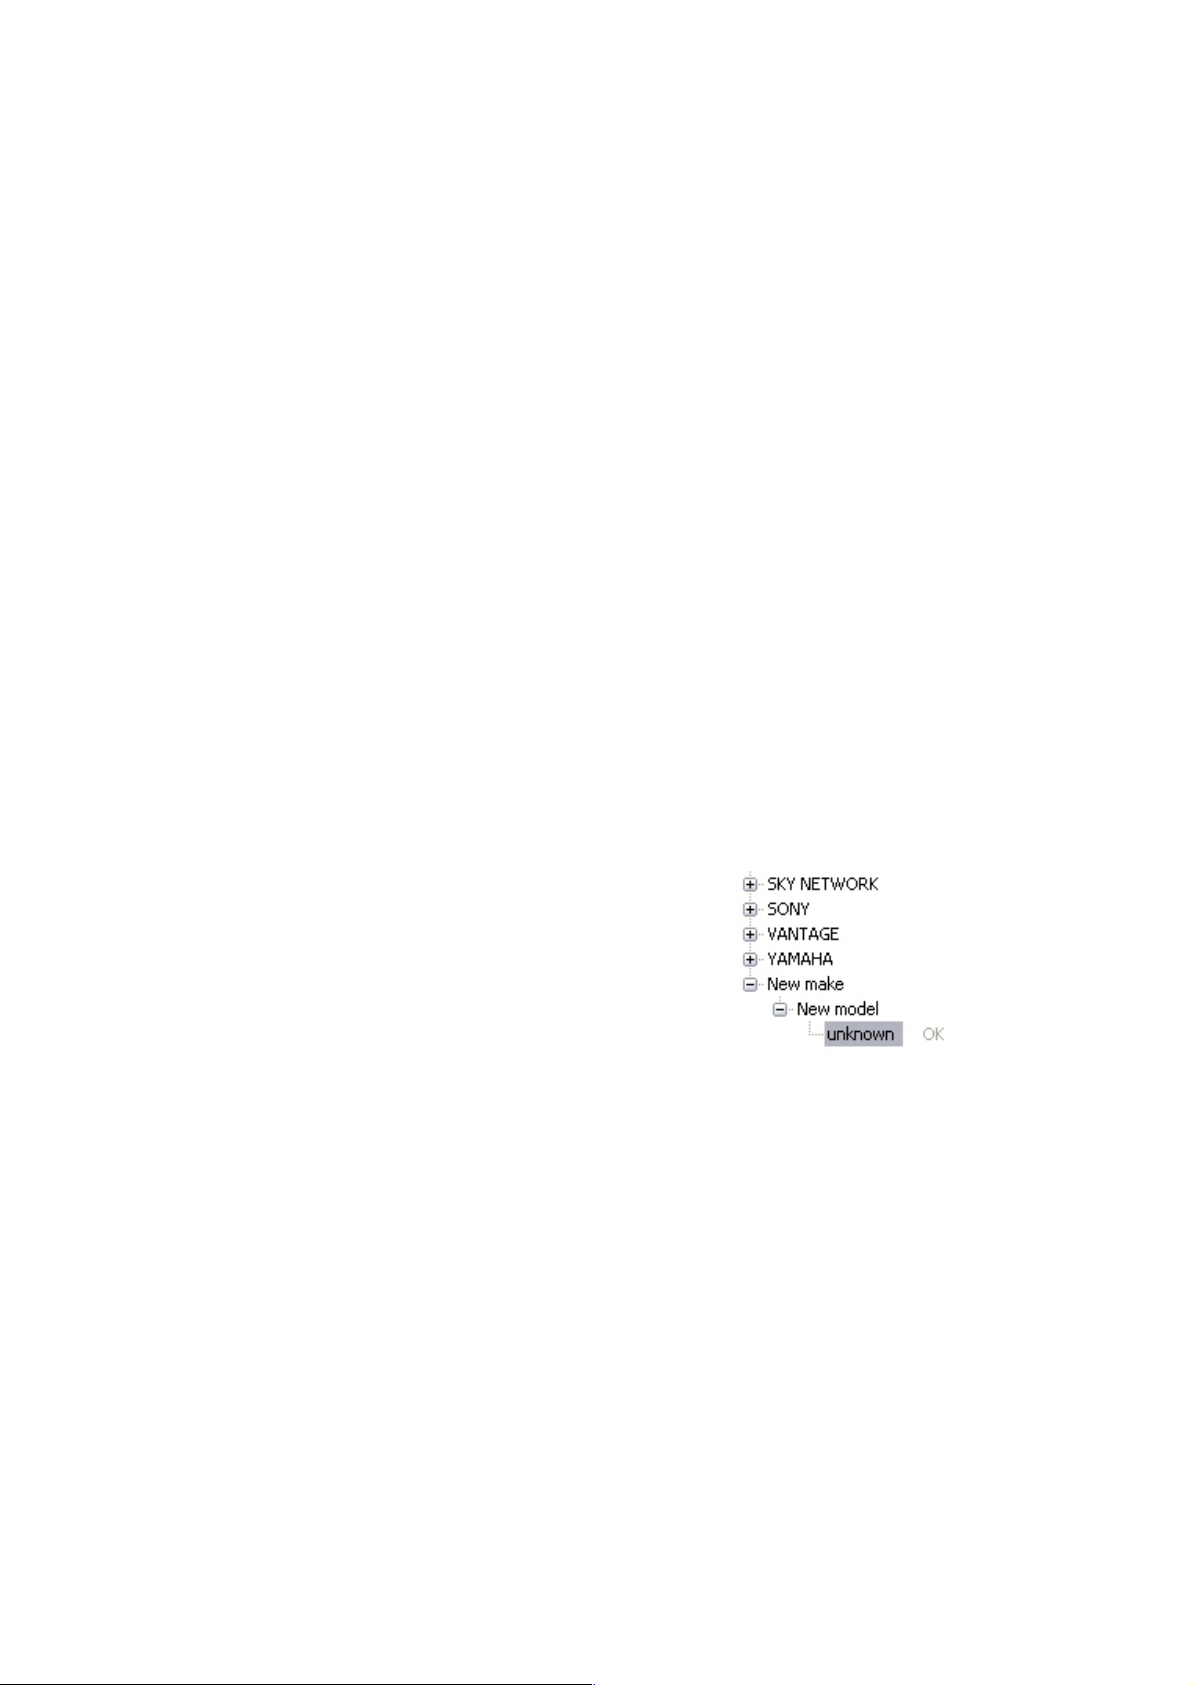
If Amp/Preamp is selected then the bank6 key is sacrificed and used to toggle the Keypad
Volume and Standby functions between the Amplifier and Preamplifier.
The six Source Select Key commands may be assigned to any of the eight 451/452AV source
inputs.
It is important to make assignment in the Axium Settings window so that the AX-KPB can
track the 451/452AV source selection. Ensure that a source is not assigned to several keys.
The IR receiver may be enabled / disabled and the Source and Volume LED indicator
brightness adjusted. If ‘Backlighting Continuous’ is selected then the backlighting will be
constantly illuminated, if de-selected then the backlighting is illuminated for 30 seconds after
a keypress.
Push the OK button to store the Axium settings to the keypad configuration and exit the
Axium Settings window.
Note:
• The configuration must be uploaded to the keypad before settings take effect.
• The Axium Settings provide greater source select flexibility than manually programming
the keypad. A keypad programmed using AKM and then manually re-assigned is not
recommended – the source select IR commands and source/bank assignments may not
be in sync.
Available memory
Memory usage is shown at the bottom left of the main window. There is more than sufficient
memory – with commands on all keys in all banks only 51% of memory is used.
Adding a command to the user database
When adding a Learnt command to the user database, a
new make and model must first be created in the database
using the Add function in the Edit menu.
After downloading the AX-KPB’s configuration, drag and
drop the learnt command(s) from the Key to the new make/
model.
A new command is generated and should then be named –
using the Rename function in the Edit menu, or right click
the new command (labelled Unknown) and select Rename –
enter correct text. Rename the make and model in the same way.
When commands are added to the database they are compared with known IR command
formats.
If acceptable an OK is displayed next to the command. If a warning is given it would be
advisable to test the IR command or relearn the code. Commands are also compared in the
Model context and if a different formats are found amongst the commands this is reported
alongside the Model – “Formats differ”. This can be an indication that one or some of the
commands have not been learnt correctly.
An alternate command source may be from an external HEX code database or application.
These codes may be copied to the clipboard and pasted either directly to a key or onto the
model. Right click the model, select Hex code and then Paste. The command should then be
renamed.
12
Page 13

Exporting Learnt commands in Hex format
Commands in the database tree may be copied in the Hex format to the clipboard for pasting
into other applications. Simply right click on the command, select Hex code and copy.
Naming Source select keys
To aid installation the Source select keys may be
named.
The Source Keys must first be programmed with IR
commands before labels are saved.
Move the cursor over the Source select key and right
click the mouse; a context menu pops up with the label
option.
Select Label, then enter the text and push Enter to
save to the keypad configuration.
13
Page 14

AX-KPC 2.8 PROGRAMMING
When designing or viewing a configuration for a AX-KPC 2.8 touch panel, the area on the
right of the main window is split into two sections: the resources list and an editor, which
depends on the type of object selected.
The resources list provides access to important objects.
Pages
Like pages in the internet, pages are what characterizes the look and feel of the user
interface by displaying images and defining how events are responded to. Pages are a central
aspect of the touch panel and are consequently designed to be flexible and offer a large
number of features and options. Each configuration has a single “home page”, which is the
top most page that is initially displayed. Beginning with the home page, pages can be
arranged into a hierarchy for categorising the areas to be controlled or however the user
prefers. Pages are created by clicking on “New Page”. The Page Designer is displayed when a
page is selected.
Macros
Macros are typically used for transmitting a sequence of commands or for alternatively
selecting a command to transmit each time it is executed. However the AX-KPC 2.8 goes
beyond this and allows pages or even other macros to be commands in macros. Page
commands will display the page and nested macros are executed much like a subroutine in a
computer program. Sequential macros also offer control flow features and alternating macros
can be useful for changing the purpose and appearance of a button each time it is pressed
(e.g. first select source 1, then source 2, then source 3, etc). Macros are created by clicking
on “New Macro”. Selecting the macro displays the macro designer, see Macro Designer for
more information.
Devices
Devices are abstract entities associated with a device or a group of devices connected or
coupled with a specific port on an AX-R4 router. Devices have a port property and a list of
infra-red and/or RS-232 commands assigned to them. If these commands are transmitted by
anything (such as a button), they will be transmitted on the device's port, where the type of
the port corresponds to the type of command (i.e. IR port for IR commands, RS-232 port for
RS-232 commands). Devices are easily created either by dragging a device (model) from a
database into the resources list or by right clicking the resources list and selecting “Add new
device”. Commands can be added to the device by dragging them from a database into the
device's command list. Multiple devices may share the same port, although this does not
make sense for RS-232, it does make sense for controlling more than one device using a
common IR emitter. Note that if IR-commands are used without a device, they will be
broadcast on all ports. Devices are also used by Applets for RS-232 and Ethernet control and
feedback.
Devices can be configured for Ethernet control, in which case the name or IP address of the
host being controlled is entered into the URL field. Name resolving is only implemented via
DNS based services, which means that local NetBIOS computer names may not be resolved.
In this case IP addresses must be used instead. The port field will be automatically set to the
default port for the applet. This should only be changed if the port for the application is
changed on the server or device being accessed.
Settings
General settings such as display brightness behaviour, display orientation and the standard
action sound (e.g. for all key presses) can be defined under Settings.
14
Page 15

Page Designer
The Page Designer displays a representation of the page
with some extra graphical elements to assist editing.
Depending on the orientation selected in the settings, the
page will be displayed either in portrait or landscape
format. Below this the properties of the selected item are
shown. When elements such as buttons are selected, the
properties of those objects are displayed, otherwise the
page’s own properties are displayed.
Everything displayed in a page is an image or a
compound-image type. These elements can be found in
the image galleries and dragged and dropped onto the
designer. Alternatively the elements can be added to the
page by double clicking them or using copy and paste.
The Grid Size field allows the user to set a raster for
helping page elements to be neatly aligned with one
another. Smaller values allow a finer level of control but
increases the difficulty in aligning elements.
Page Properties
Page properties are displayed for viewing and editing when a page is selected. If another
element such as a button is selected, clicking on the background image will re-display the
page properties.
Pages have the following properties:
Zone and Amp / Preamp are used for controlling and displaying feedback from
Axium equipment. Buttons and volume controls in the page will use these settings,
unless they are overridden in the controls themselves. Setting a zone in the page is a
quick way to make all buttons in the page have a zone, so if a button must not be
zoned (e.g. for displaying the “Ampon” state), the page’s zone should be left
undefined and the buttons should be individually zoned.
Home page decides which of the pages is the home page, which is the first page
displayed by the touch panel when started. Beginning from this page it should be
possible to access all other pages within a configuration (optionally via any number of
other pages) and these other pages normally provide a way for the user to navigate
back to the home page. Only one page per configuration can be the home page.
Load sound is for playing a sound when a page is loaded, i.e. displayed. A sound
can be dragged or copied from a sound gallery into the field. A context menu is
displayed when the field is clicked with the right mouse button providing editing
functions and sound playback.
Load action is for executing a command when a page is loaded. This may be useful
for selecting a function on some equipment that is relevant to the context of the
page. Commands can be dragged or copied from a database and macros can be
dragged or copied from the resource list into the field. A context menu is displayed
when the field is clicked with the right mouse button providing editing functions.
Backgrounds
If no background is defined, the page is displayed with a plain white background.
Backgrounds can be added to the selected page by selecting one from an image gallery
15
Page 16

(under “Images”). Images with the correct orientation should be used to avoid cropping the
right or bottom edges of the background.
It is possible to place simple images on top of the background image. This means that pages
can be built using common image components without having to resort to duplicating similar
backgrounds with only minor differences. By using smaller images placed on top of a
common background image, a significant amount of memory can be saved.
Buttons
Buttons are interactive image elements that can execute a command or perform built in
functions such as controlling Axium series equipment. Buttons can also change their
appearance to represent their state and are therefore composed of multiple images.
Buttons can be added to a page by selecting one from an image gallery (under “Buttons”).
Note that simple images that may have the appearance of buttons do not have button
functionality until the images have been added to a button object. See Creating new buttons
on how to do this.
Buttons have the following properties:
Class is for either selecting a built-in function or a generalized class for the button.
Creating buttons with a general class (such as “Transport / Play”) is useful for
designing buttons that are automatically assigned commands corresponding to the
appearance and placement of the button. General classes are found under
“Transport”, “Numeric”, “Cursor” and “System”. Another category of classes under
“Applets” exist for applet control (see “Applets”). Built-in Axium functions can make
defining any further button actions unnecessary, the following built-in classes are
available (under “Axium”):
o Standby is for switching on and off equipment. If a zone is selected in the
button or page, commands to control Axium series equipment are
transmitted when the button is pressed and the button becomes active when
the zone is switched on. If the zone is not defined, the button is active when
the “ampon” input is high. In this case an appropriate command is required
for switching equipment on and off.
o Mute is for muting zones on Axium series equipment. The button is active
when the zone is muted. A zone must be selected in the button or page.
o Vol Up & Vol Down are for increasing and decreasing the volume on Axium
series equipment. A zone must be selected in the button or page.
o Home page is for navigating back to the home page.
o Back is for navigating to the previous page.
o Source selects / Source 1 .. Source 8 are for selecting a source on Axium
series equipment. The button is active when the corresponding source is
selected. A zone must be selected in the button or page.
o Presets / Preset 1 .. Preset 6 are for selecting a preset on Axium series
equipment.
o Alarms / Alarm off, on and sleep are for controlling the alarm function on
Axium series equipment.
o All zones off is for switching off all zones on Axium series equipment.
o Panel brightness +/- are for increasing and decreasing the brightness.
The brightness setting is displayed in percent on the display and can range
from the panel dim brightness setting up to 100%. The panel brightness
classes can be useful for designing a page for allowing the user to change
brightness and behaviour.
o Panel dim brightness +/- are for increasing and decreasing the dimmed
brightness, which is the brightness when the touch panel is not in use. The
16
Page 17

brightness setting is displayed in percent on the display and can range from
0% up to the panel brightness setting.
o Panel dim time +/- are for changing the duration in seconds before the
panel brightness changes to the dimmed setting.
o Microphone enables the microphone while the button is pressed. The
microphone is disabled again when the button is released. The page preset is
selected while the button is pressed.
Zone and Amp / Preamp are used in combination with the class if appropriate. It is
not necessary to set the zone for every button on a page, in which case the selection
can just be set to “(page)” and the zone can be set in the page properties. However
a zone can be explicitly set in the button to override the page’s zone for controlling
multiple zones within a single page.
Overlay X / Y and Auto is used for positioning the overlay image within the button.
The overlay image is usually smaller than the button image itself and therefore
requires positioning to place it in the desired position. The “Auto” selection simply
places the overlay image in the button centre. See Button Image Components for
more information on overlay images.
Global is used for making the button appear in every page. This is useful if all the
pages have some buttons in common, such as for navigation or volume control, etc.
The individual instances of the buttons can be edited or deleted after the global
setting has been set.
Sound is for overriding the “Standard action sound” under settings and for playing a
specific sound when a button is pressed. A sound can be dragged or copied from a
sound gallery into the field or directly onto the button in the designer. A context
menu is displayed when the field is clicked with the right mouse button providing
editing functions and sound playback.
Actions define commands that are executed for a variety of press and release
events. Commands can be dragged & dropped or copied into one of the action fields
or dropped directly onto the button in the designer. A context menu is displayed
when one of the action fields are clicked with the right mouse button providing
editing functions. The following action types are available:
o Primary / short press is the command that is executed when the button is
pressed. If the long press action is defined, this action becomes the
command for short presses, i.e. when the button is held for less time than
the long press duration.
o Long press is the command that is executed when the button is held longer
than the long press duration. The command is executed as soon as the long
press duration has elapsed.
o Release is the command that is executed when the button is released.
The following types of objects can be used in button actions:
o Infra-red commands will be transmitted as long as the button is held. Note
that if a short press or a release action is used, the IR-command may not be
transmitted for long enough to register. In this case a macro can instead be
used to transmit the command with a specific number of repeats. IRcommands can be dragged from a command database into buttons or their
action fields. If a button is programmed with an IR-command or with a
macro containing an IR-command and the button is assigned to a button
class which also transmits an IR-command, the class's IR-command will be
transmitted last. IR-commands may be used in combination with a device for
17
Page 18

routing the IR to a specific IR-port (if an AX-R4 is used). See Devices for
more information.
o RS-232 commands will be transmitted once. Unlike IR-commands, RS-232
commands must be used in combination with a device (see Devices).
o If the object is a page, it will be loaded and displayed. Pages can be dragged
from the resource list into buttons or their action fields.
o If the object is a macro, it will be executed. Macros can be dragged from the
resource list into buttons or their action fields.
Long press duration is visible when a long press action is defined. This is for
setting the delay before a button press is deemed to be a long press. If the button is
released before the time expires, the short press action is executed.
Button Image Components
Buttons are composed of up to five image components:
The “Unpressed” image is the default image that is normally displayed. This image
type is mandatory.
The “Unpressed – active” image is displayed when the user is not pressing the button
but the button state is set to “active”. This occurs for some button classes when
feedback from the network has been received that the selected function is enabled.
For example if the class is “Mute”, the button will be active if the selected zone is
muted. This image is optional. If not defined, the “Pressed” image will be displayed,
if available.
The “Pressed” image is displayed when the user is pressing the button. This image is
optional although its use is recommended for providing visual feedback and
enhancing the user’s experience. If not defined, the “Unpressed” image is displayed.
The “Overlay” image is drawn over the top of the main button image. Similar looking
buttons with only minor differences are composed using overlays. This makes it
unnecessary to create many different button images and unnecessarily waste
memory. For example an array of buttons for source selection could be created,
which all use the same basic button images but with small text overlays such as
“CD”, “DVD, “Radio”, etc. The use of this image type is optional. If not defined, no
overlay is displayed or an overlay may be derived from the button command, if
supported.
The “Overlay – active” image is like the “Overlay” image but is displayed when the
button is active. This makes it possible to change a text based on the button’s state
(e.g. “mute” vs. “muted” or “unmute”) or to display different images such as the
image of an LED that is illuminated or not. The use of this image is optional. If not
defined, the “Overlay” image is used, if available.
If the button’s primary action is an alternating macro, overlay images can instead be defined
for each command in the macro. Alternating macros toggle between two or more commands
and by using button overlays in the macro, the button can reflect the next command in the
macro’s sequence. The button’s own overlay images have priority so these must be left
undefined if overlay images from a macro are to be used.
Images are standalone objects and are only referenced by buttons. As a result memory usage
increases only when a button is first added to a configuration. Adding buttons that use the
same images will not increase memory usage further. Customizing the buttons by using
18
Page 19

individual overlay images will increase memory usage but overlays are typically much smaller
in area than the actual button images and use considerably less memory.
The Show Images button opens the dockable “Button Image Components” window which
shows the images composing a button. Simple images can be dragged or copied from an
image gallery into one of the image components in the window or directly to the button in
the page designer. A context menu provides the following functions:
Edit text opens a text editor for creating and editing simple text based overlay
images. A new image is created and assigned to the button if the overlay image is
empty, otherwise the existing image is modified. See Text Based Images.
Load new image imports an image from the file system directly into the button.
Clear clears the image component. If the image is not used anywhere else, it will not
be uploaded to the touch panel and memory usage will be reduced. However the
image remains in the configuration file and can be seen under Current Images.
Properties displays the image under Image Properties.
Image 8 - The Button Image Components Window
The buttons in the page designer also have a context menu:
Cut cuts the selected button from the page for pasting into another page or into an
image gallery.
Copy copies the selected button for pasting into a page or into an image gallery.
Pasting the button into the same page will duplicate it.
Paste assigns the copied object to the button. This can be any object that is relevant
for a button, i.e. sound, command, macro, page or image. If the purpose of the
object is unclear (such as what the exact purpose of an image is), another context
menu is displayed for selecting which component to set.
Apply properties applies the properties of another page element to the selected
button. All properties common to both types of page element are copied. This
function can be especially useful when copying properties between similar types of
applet.
Delete deletes the button.
Clear sub menu removes specific references to other objects. This includes the five
image components, the three button actions and the button press sound.
Edit text (overlay) & Edit text (overlay - active) opens a text editor for creating
and editing simple text based overlay images. A new image is created and assigned
to the button if the overlay image is empty, otherwise the existing image is modified.
See Text Based Images.
Show Images opens and closes the “Button Image Components” window.
Group items will convert the selected items into a group. This is useful for bundling
buttons and other components together into one unit. Selecting multiple items is
done by clicking on them while holding down the shift key. It may be useful to first
select the lock function (in the toolbar) so that the items to not shift accidentally
when they are clicked.
19
Page 20

Jump to displays a list of pages which can be used for assigning a page to the
button. The predefined options “Home page” and “Previous page” use button classes
for performing the navigation.
Modifying button appearance
The buttons in the image galleries generally do not have any label or icon. Adding a label or
icon to a button is as important as adding a function to the button and this is best done using
button overlays.
A label (i.e. text) can be added to a button either by:
Clicking on the button with the right mouse button and selecting “Edit text
(overlay)...”.
Using the “Button Image Components” window, select the “Overlay” item and either
select “Edit text...” from the context menu or double click the item.
The text and other settings can be entered into the window that appears. See Text Based
Images.
If a text overlay in combination with an icon is required, first add the icon to the button and
then use the “Edit text (overlay)...” function. The text will always be placed to the right of the
icon.
To add an image or icon to a button, first an appropriate image must be located in the
“Images” group in an image gallery. Predefined galleries containing useful images for this
purpose are “Channel logos”, “Icons”, “Radio logos”, “Sirius” and “XM”. Alternatively an
image can be imported into “Current Images” (see Current Images). The image can then be
added to a button either by:
Dragging the image from the image gallery and dropping it onto the button. In the
context menu that appears, select “Overlay image”.
Using the “Button Image Components” window, drag the image from the image
gallery and drop it onto the “Overlay” item in the window.
The overlay position can then be adjusted in the button properties. If the image does not fit
into the button, a larger button will need to be used.
If the “Overlay – active” item is selected for any of the above functions, the label or icon will
be used when the button is active.
Creating new buttons
Button styles not found in the image galleries can freely be created by the user. The first step
is to create or find suitable images for a button and then import them into the current images
gallery (see Current Images). Depending on the shape of the button, a clipping region could
be defined for each of the images (see below). The button is then created by opening the
context menu for a page and selecting “Add new button”. An empty frame will then appear in
the top left corner of the page. The images under current images are then dragged and
dropped or copied and pasted into this frame or into the appropriate image component in the
“Button Image Components” window.
Once the images have been assigned to the button, the button can be copied and pasted into
a user defined image gallery for later use.
Clipping is an advanced feature for creating buttons that are not strictly rectangular, allowing
complex shapes to be placed closer to each other than what would otherwise be possible.
This is because (1) the clipping region defines a non-rectangular shape that is rendered thus
reducing problems with overlap and (2) the touch detection for the button checks if the touch
20
Page 21

position is within the region rather than simply checking if it is within the button's left/right
and top/bottom boundaries. The clipping regions are polygons but there are some limitations
on their shape:
● The polygons have a maximum of 10 vertices.
● The polygons must be convex in the Y domain, i.e. a horizontal line drawn at any
point through the polygon cannot intersect it more than once.
● The sides of the polygon cannot cross each other.
Clipping regions are defined under “Image Properties”.
Groups
Buttons, volume controls and images can be grouped to make management and placement of
arrays of components easier. Groups are also used in combination with the “Add device”
assistant, which suggests groups based on the device's functions and the functions found in
the grouped buttons. Some examples where grouping is useful:
Image 9 - Examples of groups
Groups do not have any properties of their own. In order to access the components
themselves, they must be ungrouped using the “Ungroup items” command in the context
menu.
Volume Controls
Volume controls are interactive image elements used with Axium series equipment or
together with certain applets for controlling and displaying the volume setting or other
analogue quantities. They can be added to a page by selecting one from an image gallery
(under “Volume Controls”). Note that simple images that may have the appearance of a
volume control do not have volume control functionality until the images have been added to
a volume control object. See Creating new volume controls on how to do this.
There are two styles of volume control:
21
Page 22

Volume bars can be oriented either horizontally or vertically. It is essentially a track
in which an optional slider can move about for displaying an analogue representation
of the volume. The track is filled with a coloured bar either from the left or from the
bottom indicating the volume level along with the position of the slider. This is the
only style of interactive volume control. By touching a position in the track, the slider
can be moved or dragged to a new position. Commands will be sent to the specified
zone or appropriate device to set the level.
Image 10 - Volume bar style
Volume read-outs show the level in digital form. They are not interactive but can
be used in combination with a volume bar for providing control along with an
analogue and a digital display of the volume. They can alternatively be used
alongside two buttons for increasing and decreasing the volume as shown below.
Image 11 - Volume read-out with buttons for volume increase and decrease
Volume controls have the following properties:
Mode chooses the style of the volume control. Available options are “Horizontal
volume bar”, “Vertical volume bar” and “Volume read-out”. The selected mode must
correspond to the look of the frame image. Changing the mode does not change the
image's appearance.
Zone and Amp / Preamp must be defined since the control otherwise can have no
purpose (unless the volume control is assigned to an applet). However the zone
property can just be left set to “(page)” if the page has a zone setting. A zone may
be explicitly set in the volume control in order to control multiple zones within a
single page.
Global is used for making the volume control appear in every page in the
configuration. This is useful if all the pages have some volume controls in common.
The individual instances of the volume controls can be edited or deleted after the
global setting has been set.
Display area is used for setting up the rectangle for the track on volume bars or for
the area where digits are displayed on volume read-outs.
Volume controls can be used in combination with certain applets for controlling and
displaying various analogue quantities such as the dimming level in a lighting system. To
assign a volume control to an applet, it must be placed completely inside of the applet's
window in the page designer.
Volume Image Components
Volume controls are composed of two image components:
The “Frame” image is basically the back of the control. Volume bars should have an
area where the track will be displayed and volume read-outs need a large enough
area for displaying the digits. Volume bar frame images must be at least as wide as
the slider image so that “droppings” are not left on the background by the slider
when it moves. If the frame is to appear narrower than the slider (as shown by the
volume bar example above), transparency is used in the frame image to make it
seem narrower than it actually is. Transparent areas are re-drawn when the slider is
moved ensuring a proper update of the affected area.
22
Page 23

The “Slider/digits” image is the optional slider on volume bars or the digits used for
volume read-outs. As discussed above, the slider must not be wider than the frame
image. Digit images needed for volume read-outs are discussed below under Digit
Images.
Volume controls in the page designer have a context menu:
Cut cuts the selected volume control from the page for pasting into another page or
into an image gallery.
Copy copies the selected volume control for pasting into a page or into an image
gallery. Pasting the volume control into the same page will duplicate it.
Paste assigns an image to the volume control.
Apply properties applies the properties of another page element to the selected
volume control. All properties common to both types of page element are copied.
Delete deletes the volume control.
Clear sub menu removes specific image components.
Edit digit image is used for creating or editing an image of digits needed for
volume read-outs. This function is discussed below in Digit Images.
Digit Images
Digit images for volume read-outs contain the digits 0..9 equally spaced from left to right.
Instead of rendering digits on the touch panel, an image containing digits is used in the place
of the slider image. Clicking on “Edit digit image…” in the context menu will create the
necessary image of digits. A window is displayed containing the required text (i.e.
0123456789) where the desired font style and its colour can be selected. See Text Based
Images for more information.
Creating new volume controls
As with buttons, volume controls not found in the image galleries can freely be created by the
user. The first step is to create or find suitable images for a volume control and then import
them into the current images gallery (see Current Images). The volume control is then
created by opening the context menu for a page and selecting “Add new volume box”. An
empty frame will then appear in the top left corner of the page. The images under current
images are then dragged and dropped or copied and pasted into this frame.
Once the images have been assigned to the volume control, the mode and display area must
be set. Then the volume control can be copied and pasted into a user defined image gallery
for later use.
Applets
Applets are mini applications embedded in the KPC firmware for providing interaction with
specific types of equipment. Applets for the following types of equipment are currently
provided:
Integra DVD Player
Integra Tuner
Integra Receivers (zones 1 - 3)
iPort (docking station for iPods)
Vantage
Applets are created on a page by right clicking the page, selecting the “Add new applet” submenu and then one of the listed applet types. A window for the applet is then placed onto
23
Page 24

the page, which contains a rudimentary display of how the applet may appear when it is
used. The applet window can be resized to the required size by dragging the edges of the
window. The applet properties are displayed in the page designer when the applet is
selected. Some applets have their own specific properties but there are a number of
properties common across all applets:
Font – creates or selects the font used by the applet for displaying text. See Fonts for
more information.
Text colour – selects the colour of most text displayed by the applet.
Background colour – selects the colour of the background when the transparent
option is not selected.
Transparent – selects between transparent and opaque backgrounds. Note that
controls cannot overlap the applet window if an opaque background is used.
Device – selects the device to be controlled by the applet. Interaction with the
equipment occurs via a serial port on the AX-R4 router, which means that a device
must be configured and selected in the applet (see Devices).
Applets that apply to radio stations have a list of frequencies with their station names and
icons, which are displayed in the applet when the appropriate frequencies are selected. (Note
that the frequencies must be written exactly as displayed by the applet, e.g. “FM 89.40” and
not “FM89.4”.) Depending on the applet, other properties may exist for further text colours,
sound effects, etc.
Applet specific button classes also exist. This allows buttons to control an applet and to
display feedback based on data known to the applet. The applet specific classes are found in
the button class selection under “Applets”. The selected class will only work if the
corresponding applet is used in the same page.
Some applets will use volume controls if they are assigned to the applet. To assign a volume
control to an applet, it must be placed completely inside of the applet's window in the page
designer. The following applets use volume controls:
Integra Receiver applet, for controlling the receiver's volume setting.
Vantage, for controlling load levels.
Restrictions:
A page can contain a maximum of two applets on the KPC 2.8.
Each type of applet should only be used once on a page, otherwise the applet
corresponding to any button classes will be ambiguous. (However multiple Integra
Receivers for different zones is not a problem as each zone is a different type of
applet.)
Fonts
Applets are able to display high quality anti-aliased text using fonts. Each font contains data
for displaying characters in one particular size and style only. For example, “Arial, 12pt” and
“Arial, 16pt” are two separate fonts. Unicode is supported for devices such as the iPort and
currently extended Latin, Greek and Cyrillic character subsets can be optionally included into
the font. Other subsets may be supported in the future should the need arise.
Note that the font colour and “Script” options are not relevant.
24
Page 25

Alignment functions
The alignment functions are found in the page designer’s toolbar and in its context menu and
are enabled when two or more elements in a page are selected. Selecting multiple page
elements is done by clicking them while holding down the shift key. The behaviour of some of
the commands depends on the last element that was selected.
Horizontal alignment functions:
Align left aligns the left edges of the selected elements with the last element
selected.
Align centre aligns the centres of the selected elements with the last element
selected.
Align right aligns the right edges of the selected elements with the last element
selected.
Space equally moves the elements between the leftmost and rightmost elements so
that they are equally spaced. Only a single row of at least three elements can be
selected for this function.
Centre in page moves the group of selected elements so the group is centred
horizontally in the middle of the page.
Vertical alignment functions:
Align top aligns the top edges of the selected elements with the last element
selected.
Align centre aligns the centres of the selected elements with the last element
selected.
Align bottom aligns the bottom edges of the selected elements with the last element
selected.
Space equally moves the elements between the topmost and bottommost elements
so that they are equally spaced. Only a single column of at least three elements can
be selected for this function.
Centre in page moves the group of selected elements so the group is centred
vertically in the middle of the page.
Page design restrictions
Care must be taken so that page elements do not overlap each other. The page designer will
display red shapes around overlapping regions to indicate that these areas will not be drawn
correctly. The simulator also attempts to simulate the affects of overlapping elements.
25
Page 26

Assistants
To make setting up a configuration quicker and easier, three assistants are provided:
New Touch Panel Configuration Assistant
This assistant is displayed whenever a new touch panel configuration is created and it
provides a means to quickly select the orientation and theme. The theme will be used for
setting the background on all pages and will be the default theme selection used in the other
assistants.
Add Device Assistant
This assistant is displayed when a model from a command database or a device is dragged
onto a page. Under “matching groups” the groups in the selected theme will be shown where
the classes assigned to the buttons correspond to the classes assigned to the commands in
the device. If “Remove unused buttons” is checked, the buttons in the groups that do not
correspond to an available command will be removed.
The assistant can add the controls for the device to the selected page. Alternatively it can
create a new page for the controls and place a button on the selected page for accessing the
new page.
Add Command Assistant
This assistant is displayed when a single command is dragged onto a page. The assistant
displays all free buttons in the theme with the command name written on the button in the
selected font. After the user has adjusted the font settings and chosen a button, a button
with the command will be added to the selected page. After making these selections once,
the user can press the shift key when dropping other commands onto a page for creating
more buttons using the same settings.
The assistants can be disabled or re-enabled using the “Tools” - “Assistants” menu.
26
Page 27

Macro Designer
The macro designer is displayed when a macro is selected in
the resources list. It is used for designing two types of
macro:
Sequential macros: these macros execute a
sequence of commands. Control flow instructions are
available for conditionally executing parts of the
macro depending on the state of flags.
Alternating macros: these macros execute the
next command in the list each time they are
invoked. Once all the commands have been
executed, the macro resets back to the first
command. This type of macro can define button
overlays corresponding to the next command to be
transmitted.
The designer consists of a list of the commands in the
macro. Commands can be added to the macro by dragging
and dropping objects such as infra-red or RS-232 commands, pages and other macros into
the list. Macros execute from top to bottom, so the order of the commands in the list is
relevant. The toolbar contains buttons for moving commands up and down in the list and for
deleting individual commands. Below the list is a field where the user can enter comments
about the macro to explain its purpose, etc. Below that is an area for editing properties,
which depend on the selected command.
Commands have the following properties, which are useful in sequential macros:
Repeat defines the number of times an Infra-red command is repeated before the
macro executes the next command or terminates. If the command is not repeated, it
may not be transmitted long enough for the equipment to respond.
Delay defines an optional delay before the macro executes the next command. This
is useful for separating the transmission of commands in case equipment does not
respond to its commands if preceded immediately by other infra-red transmissions or
other commands of its own (such as a power-on command).
Button overlays can be assigned to commands in alternating macros by dragging images from
an image gallery and dropping them onto the commands in the list. The image will then
appear at the bottom of the designer. The “Remove” button, which also appears, will remove
the overlay image when clicked.
27
Page 28

Control Flow
Control flow is used mainly for tracking the state of equipment
and executing commands depending on the anticipated state.
Essentially control flow controls the behaviour of a macro
based on flags that have previously been set or cleared, either
by the same macro or by other macros. Aside from using it to
track the expected state of equipment, it can also be used for
implementing simple applications such as a page requiring an
access-code.
A control flow instruction can be added to a sequential macro
using the context menu (right click the list) and selecting an
instruction under “Flags and control flow”.
When an instruction involving a flag is used, a dropdown list of
all the flags is displayed. The user can select an existing flag or
select “<new flag>” to create a new one. Up to 32 flags can be
defined. Names can be assigned to the flags by editing the
default flag name.
The instructions for testing the state of flags always contain a “then” branch and an “else”
branch. The “then” branch is a sequence of commands that is executed when the state of the
flag matches the state required by the instruction. To avoid confusion, this branch should
always be used and not be left empty. The “else” branch is a sequence of commands that is
executed when the state of the flag does not match the required state. This branch can be
left empty should it not be needed.
The example macro shown above emulates an alternating macro that transmits the infra-red
commands “Source 4”, “Source 5” and “Source 6”.
28
Page 29

Image Properties
The image properties editor is accessible from the Button Image Components window or from
the Properties option in the Current Images context menu.
The toolbar provides functions for loading an image from disk,
saving an image to disk and for creating or editing text based
images (see Text Based Images).
One of the image properties that can be modified is the type
of transparency used:
None – the image does not have transparent areas.
Useful for background images. This is the only option
available for JPEG images.
Transparent colour – the specified colour will not
be drawn thus making parts of the image with that
colour transparent. Useful for simple but crude
transparent effects.
Alpha blending – the image employs alpha
blending, for advanced image composition features
such as translucency and smooth contours on any
background (both effects demonstrated by the button
image on the right). Alpha blended images use 50%
more memory and will be drawn more slowly than
other image types, particularly if the image has large
translucent areas. This option is only available when a PNG image with an alpha
channel is imported from disk or for text based images. If this option is not selected
for such images, transparent or partially transparent pixels will be rendered on to the
selected transparent colour.
The other image property that can be modified is its clipping region. This is an advanced
feature useful for creating non-rectangular buttons (see “Creating new buttons”). The button
“Clipping...” accesses the function for configuring the clipping regions.
The dimensions and size of the image are shown for information only. The user can view the
image on a hashed background, which is useful for evaluating its transparency. The image
can be centred in the window if the top left edges of the image are otherwise difficult to
view. An option for showing the image boundaries draws a box around the image to visually
show its full size.
Text Based Images
Labelling buttons and pages with text is achieved
using images with text in them. Here the text, font
style and font colour can be selected. In addition
the image size and the text position can be
adjusted. This is useful for example when creating
overlay images for a button where texts with
different lengths, such as “On” and “Off” should
remain centred on the button.
29
Page 30

Image Galleries and Themes
Image Galleries are the primary source for all images and image based elements used for
designing pages. The list of images is split into the following categories:
Images lists simple images such as backgrounds. Such images can be dropped onto
a page and used as static (i.e. without user interaction) images.
Buttons lists predefined buttons, which can be dragged & dropped directly onto
pages. Some button properties, such as the actions, will need to be configured once
the button has been placed into a page. See Buttons for more information.
Groups lists groups of buttons and other components. These are useful for dropping
a whole array of pre-defined components onto a page. Once the group is positioned,
the items can be ungrouped and individually configured. See Groups for more
information.
Volume Controls lists volume controls, which can be dragged & dropped directly
onto pages. Some properties such as the zone may need configuring. See Volume
Controls for more information.
All images (Current Images only) lists all discrete images in the current
configuration.
Predefined image galleries are read-only so changes made by users are not lost when an
update is installed. However users can create their own used-defined galleries alongside the
predefined galleries. Also see Current Images for information on the predefined current
images gallery.
The Image Galleries are found under Library Browser on the left hand side of the main
window. When the “Image Gallery” tab is clicked, one of the galleries is displayed.
Image 12 - Image Gallery selection and management
The dropdown list selects the gallery to be viewed. This effectively lists all the files with the
.gallery extension in the program directory. New, Rename and Delete are for creating new
user galleries, renaming them and deleting them respectively. Deleted galleries are moved
into the Windows recycler (trash) so that they can be recovered if necessary.
Images can be added to the “Images” category of user defined galleries by dragging PNG,
BMP, JPG or GIF image files from the Windows Explorer and dropping them onto the gallery
or by selecting “Add new image” from the context menu. Buttons, groups and volume
controls can be added to user defined galleries by copying them from the page where they
have been designed and pasting them into the gallery.
Themes are used by the assistants for selecting the look of the configuration. A theme is
basically the image gallery combined with its background images. Typically an image gallery
contains buttons and volume controls with a single common graphical style, such as glass or
gel, etc., and a number of backgrounds that work well with the graphical style.
30
Page 31

User defined image galleries are stored under “My Documents” in the “Axium Keypad
Manager” folder. Predefined image galleries are stored in the common application data folder,
which on Windows XP is typically C:\Documents and Settings\All Users\Application Data.
Current Images
This gallery is a kind of scratchpad and shows all image components used in the current
configuration. Compound image objects such as buttons are not shown as such, instead their
discrete image components are listed separately. This is useful in case another object such as
a new button is to be designed using some of the same images that are already used
elsewhere.
Images can be imported from disk into the configuration either by dragging them from the
Windows Explorer and dropping them onto the list or by selecting “Add new image…” from
the context menu.
Another use of Current Images is to get a quick overview of all the images that a
configuration uses. If duplicate images appear in the list then memory is being wasted
unnecessarily. In this case the user should try to delete one of the duplicates and correct the
pages that were using the deleted image to use the undeleted one.
Background Images
Background images can easily be formatted for use on a touch panel without using an
external graphics program. The only requirement is that the original image is larger than the
final size. This is done by adding a large image such as a photo into an image gallery and
then selecting “Format background…” in the context menu. (Note that the menu option will
only be enabled for large images.) A window will be displayed where the zoom factor and
orientation can be adjusted and where the image can be dragged into the desired position
using the mouse. Clicking “OK” will save the formatted image into the gallery, overwriting the
original one.
Since alpha blending is unnecessary overhead for background images, any alpha blending
information in the original image will be removed. Transparent and semi-opaque areas will be
blended with the image’s transparent colour, which can be set using the Image Properties
window.
Selecting a zoom factor below 100% results in a smoothly scaled image. However since this
can be a CPU intensive process, a rough preview is temporarily displayed while the final
image is prepared in the background. Clicking “OK” or “Cancel” while the background process
is still executing will result in a short delay.
31
Page 32

Image Duplication
Care should be taken not to import the same image file more than once into Axium Keypad
Manager. Doing so can cause an unnecessarily high memory usage on the touch panel as
multiple image objects with an identical appearance may be uploaded. However, once an
image is imported, it can be copied to other image galleries and used in other configurations
without causing this effect. This is because Axium Keypad Manager recognizes that they are
all the same image.
Sound Galleries
Sound galleries are the source of sounds and are much like image galleries in their
management. Sounds can be added to user defined sound galleries by dragging WAV files
from the Windows Explorer and dropping them onto the gallery or by selecting “Add new
sound” from the context menu. All imported sounds will be converted to 1 channel, 8 bit PCM
with a maximum sample rate of 22kHz. As with images, care should be taken not to import
the same sound file more than once into Axium Keypad Manager.
The Sound Galleries are found under Library Browser on the left hand side of the main
window. When the “Sounds” tab is clicked, one of the galleries are displayed.
User defined sound galleries are stored under “My Documents” in the “Axium Keypad
Manager” folder. Predefined sound galleries are stored in the common application data folder,
which on Windows XP is typically C:\Documents and Settings\All Users\Application Data.
Standard Sound
One sound can be defined as the standard sound. This is the default sound that is assigned
to the standard action sound (under Settings) in all new configurations. The selected sound is
shown in bold in the sound gallery list.
32
Page 33

Simulator
The simulator is a useful tool for quickly checking a
configuration before uploading to a touch panel. Verifying
the inter-page navigation is important and this is made
especially easy when using this feature.
The following features are simulated:
Page navigation.
Zones for Axium series equipment are simulated in
order to test behaviour and interaction of volume
controls and buttons.
All button action types.
Macros, including delays and control flow functions.
Problems caused by overlapping elements, e.g.
buttons.
Infra-red and RS-232 commands are logged.
Sounds.
Not simulated:
Applets.
Dimming and the related “on dim” and “on undim” actions.
IR learning.
33
Page 34

USB DRIVER SETUP
Windows XP
If the software has been installed using the Axium Software suite then the PC will detect and
install the correct USB driver for the AX-KPB keypad.
Should the PC encounter a setup problem follow the driver installation procedure:
When first connecting a USB port to a powered AX-KPB keypad or AX-KPC 2.8 touch panel,
Windows XP finds new hardware and the “New Hardware Wizard” is displayed:
Select “No, not this time” then push “Next >”.
34
Page 35

Select “Install the software automatically (Recommended)” then push “Next>”.
The wizard searches and finds the AX-KPB driver, select it and push “Next>”.
The USB driver is installed for the attached USB port.
Push “Finish” to exit.
The procedure described above is the same for the AX-KPC 2.8 touch panel.
35
Page 36

Windows Vista
When first connecting a USB port to a powered AX-KPB keypad or AX-KPC 2.8 touch panel,
Windows Vista finds new hardware and a “New Hardware” window is displayed:
Select “Locate and install driver software”. The drivers should be located automatically. If
not, the drivers are usually located in C:\Windows\Inf.
In typical Windows Vista style, the user must confirm that independent software can be
trusted in order to continue:
Select “Install this driver software anyway”.
The driver is then installed and a confirmation should appear:
36
Page 37

The exact message displayed will depend on system configuration and the number of times
the device has already been connected to different USB ports.
37
Page 38

Minimum System Requirements
Windows XP or later
1 available USB 1.1 port
256 MB RAM
1024x768 pixel resolution monitor
16 bit colour quality
PDF reader recommended
38
 Loading...