

Page 1
OPERATOR'S MANUAL
MANUEL de L'UTILISATEUR
MANUAL del OPERADOR
Catalog No.
No de Cat.
Catálogo No.
8940-20
HEAVY-DUTY COMMERCIAL VACUUM CLEANER
EXTRA ROBUSTE ASPIRATEUR COMMERCIAL
HEAVY-DUTY ASPIRADORA COMMERCIAL
TO REDUCE THE RISK OF INJURY, USER MUST READ AND UNDERSTAND OPERATOR'S MANUAL.
AFIN DE RÉDUIRE LE RISQUE DE BLESSURES, L'UTILISATEUR DOIT LIRE ET BIEN COMPRENDRE LE
MANUEL DE L'UTILISATEUR.
PARA REDUCIR EL RIESGO DE LESIONES, EL USUARIO DEBE LEER Y ENTENDER EL MANUAL DEL
OPERADOR.
Page 2

GENERAL SAFETY RULES
WARNING!
READ AND UNDERSTAND ALL INSTRUCTIONS
Failure to follow all instructions listed below, may result in
electric shock, fire and/or serious personal injury.
SAVE THESE INSTRUCTIONS.
To reduce the risk of fire, electric shock or injury:
1. Do not leave appliance when plugged in. Unplug from outlet
when not in use and before servicing.
2. Do not expose vacuum cleaner to rain. Store indoors.
3. Do not allow to be used as a toy. Close attention is necessary
when used by or near children.
4. Use only as described in this manual. Use only manufacturer’s
recommended attachments.
5. Do not use with damaged cord or plug. If appliance is not
working as it should, has been dropped, damaged, left outdoors, or
dropped into water, return it to a service center.
6. Do Not: pull or carry by cord, use cord as a handle, close a
door on cord, or pull cord around sharp edges or corners.
Do not run appliance over cord. Keep cord away from heated
surfaces.
7. Do not unplug by pulling on cord. To unplug, grasp the plug not
the cord.
8. Do not handle plug or appliance with wet hands.
9. Do not put any object into openings. Do not use with any
openings blocked; keep free of dust, lint, hair, and anything else that
may reduce air flow.
10. Keep hair, loose clothing, fingers, and all parts of body away
from openings and moving parts.
11. Turn off all controls before unplugging.
12. Use extra care when cleaning on stairs.
13. Use special care when emptying heavily loaded tanks.
14. Do not leave the cord lying on the floor once you have
finished the cleaning job. It can become a tripping hazard.
15. Do not pick up anything that is burning or smoking such as
cigarettes, matches, or hot ashes.
16. Do not use to pick up flammable or combustible liquids
such as gasoline or use in areas where they may be present.
17. Do not use in the presence of explosive liquids or vapors.
18. Vacuum cleaners have motors and other parts that can pro-
duce sparks during normal use. Do not use within 30 feet of
areas where explosive gases may be present (such as gasoline
pumps and places where liquids like paint thinners, cleaners, solvents, etc. are stored).
19. Do not use where oxygen or anesthetics are used.
20. To avoid spontaneous combustion, empty tank after each use.
21. Do not use your vacuum cleaner as a sprayer of flammable
liquids such as oil based paints, lacquers, household cleaners,
etc.
22. Connect to a properly grounded outlet only. See grounding
instructions.
23. Unplug power cord whenever motor head is removed from
tank.
24. Do not use without dust bag and filter in place.
25. Do not pick up wood or coal ash, soot, cement, plaster or
drywall dust without full cloth filter or collection bag in place.
These are very fine particles that may pass through the foam and
disc filters and affect the performance of the motor or be exhausted
back into the air. Full cloth filters and additional collection filter bags
are available.
26. To reduce the risk of health hazards from vapors or dust, do
not vacuum toxic, carcinogenic or other hazardous materials such
as asbestos, arsenic, barium, berylium, lead, pesticides or other
health endangering materials.
27. Always wear safety goggles when operating vacuum.
28. STAY ALERT. Watch what you are doing and use common sense.
Do not use vacuum cleaner when you are tired, distracted or under
the influence of drugs, alcohol or medication causing diminished
control.
29. Wear electrically insulated footwear, such as rubber boots,
when vacuuming wet material.
30. WARNING! Some dust created by power sanding, sawing, grinding,
drilling, and other construction activities contains chemicals known
to cause cancer, birth defects or other reproductive harm. Some
examples of these chemicals are:
• lead from lead-based paint
• crystalline silica from bricks and cement and other masonry
products, and
• arsenic and chromium from chemically-treated lumber.
Your risk from these exposures varies, depending on how often
you do this type of work. To reduce your exposure to these chemicals: work in a well ventilated area, and work with approved safety
equipment, such as those dust masks that are specifically designed
to filter out microscopic particles.
page 2
Page 3
Symbology
Double Insulated
Canadian Standards Association
Underwriters Laboratories, Inc.
Volts Alternating Current
Amps
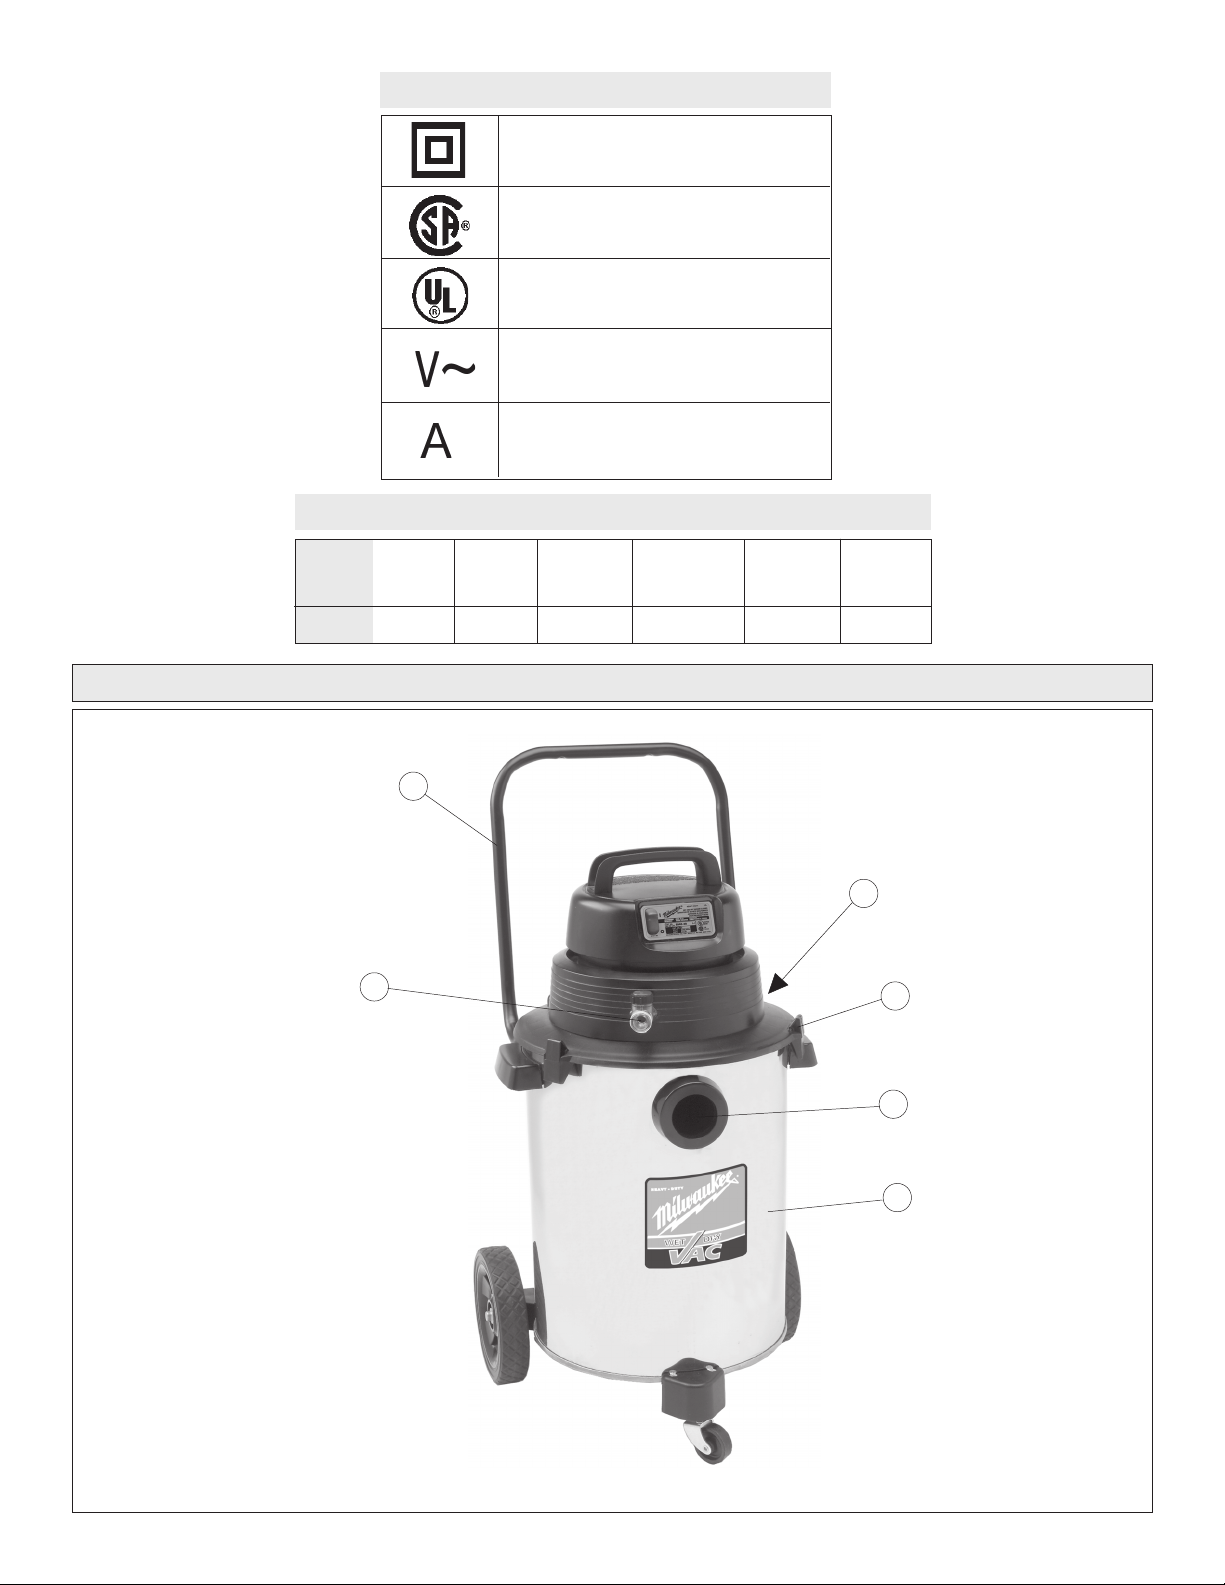
Specifications
1. Handle
2. Exhaust port
3. Tank latch
4. Intake port
5. Tank
6. Shut-off assembly
Catalog
No.
8940-20
6
Volts
AC
120
1
Amps
11.5
Tank
Capacity
(gallons)
8
Air Flow
(cubic feet
per minute)
140
FUNCTIONAL DESCRIPTION
Sealed
Suction in
Water
60"
For
Materials
Wet or Dry
2
3
4
5
page 3
Page 4
GROUNDING EXTENSION CORDS
WARNING!
Improperly connecting the grounding wire can
result in the risk of electric shock. Check with a
qualified electrician if you are in doubt as to
whether the outlet is properly grounded. Do not
modify the plug provided with the tool. Never
remove the grounding prong from the plug. Do not
use the tool if the cord or plug is damaged. If
damaged, have it repaired by a
service facility before use. If the plug will not fit the
outlet, have a proper outlet installed by a qualified
electrician.
MILWAUKEE
Grounded tools require a three wire extension cord. Double insulated
tools can use either a two or three wire extension cord. As the distance
from the supply outlet increases, you must use a heavier gauge extension cord. Using extension cords with inadequately sized wire causes
a serious drop in voltage, resulting in loss of power and possible tool
damage. Refer to the table shown to determine the required minimum
wire size.
The smaller the gauge number of the wire, the greater the capacity of the
cord. For example, a 14 gauge cord can carry a higher current than a 16
gauge cord. When using more than one extension cord to make up the
total length, be sure each cord contains at least the minimum wire size
required. If you are using one extension cord for more than one tool, add
the nameplate amperes and use the sum to determine the required minimum wire size.
This vacuum cleaner must be grounded. If it should malfunction or break
down, grounding provides a path of least resistance for electric current
to reduce the risk of electric shock. This vacuum cleaner is equipped
with a cord having an equipment grounding conductor and grounding
plug. The plug must be inserted into an appropriate outlet that is properly
installed and grounded in accordance with all local codes and ordinances.
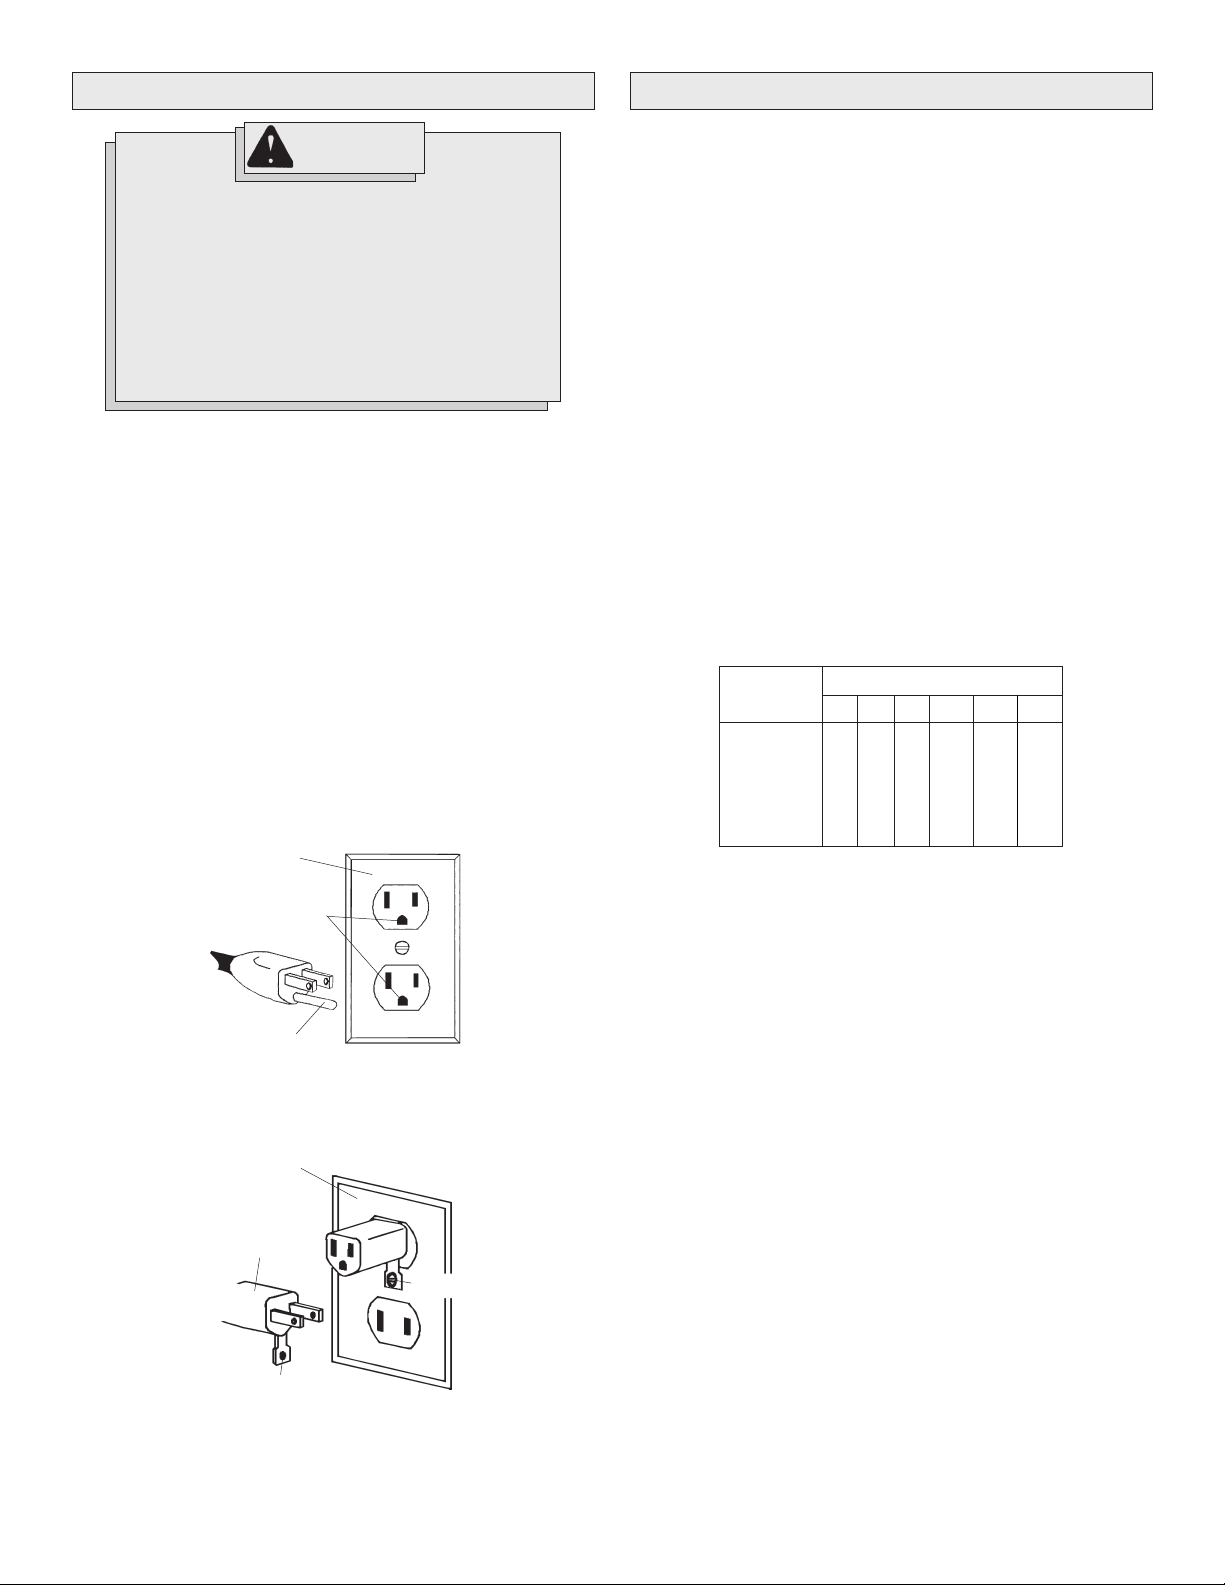
This vacuum cleaner is for use on a nominal 120-volt circuit, and has a
grounded plug that looks like the plug illustrated in Figure A. A temporary
adaptor that looks like the adaptor illustrated in Figure B may be used to
connect this plug to a 2-pole receptacle as shown in Figure B if a properly grounded outlet is not available. The temporary adaptor should be
used only until a properly grounded outlet (Figure A) can be installed by
a qualified electrician. The green colored rigid ear, lug, or the like
extending from the adaptor must be connected to a permanent ground
such as a properly grounded outlet box cover. Whenever the adaptor is
used, it must be held in place by a metal screw.
The Canadian Electrical Code prohibits the use of temporary adapters.
Cover of
grounded outlet
box
Outlet ground
Guidelines for Using Extension Cords
• If you are using an extension cord outdoors, be sure it is marked
with the suffix “W-A” (“W” in Canada) to indicate that it is acceptable
for outdoor use.
• Be sure your extension cord is properly wired and in good electrical
condition. Always replace a damaged extension cord or have it
repaired by a qualified person before using it.
• Protect your extension cords from sharp objects, excessive heat
and damp or wet areas.
Recommended Minimum Wire Gauge
Nameplate
Amperes
8.1 - 12
12.1 - 15
15.1 - 20
* Based on limiting the line voltage drop to five
volts at 150% of the rated amperes.
for Extension Cords*
25'
0 - 5
5.1 - 8
16
16
14
12
10
Extension Cord Length
100'
50'
16
16
14
12
10
75'
16
14
12
10
10
14
12
10
10
150'
12
10
--
--
--
--
200'
12
--
--
--
--
READ AND SAVE ALL INSTRUCTIONS FOR
FUTURE USE.
page 4
Grounding
prong
Cover of
grounded outlet
box
Temporary
adapter
Green grounding
ear
Fig. A
Screw
Fig. B
Page 5
TOOL ASSEMBLY
WARNING!
To reduce the risk of injury, always unplug vacuum
cleaner before attaching or removing accessories
or making adjustments. Use only specifically
recommended accessories. Others may be
hazardous.
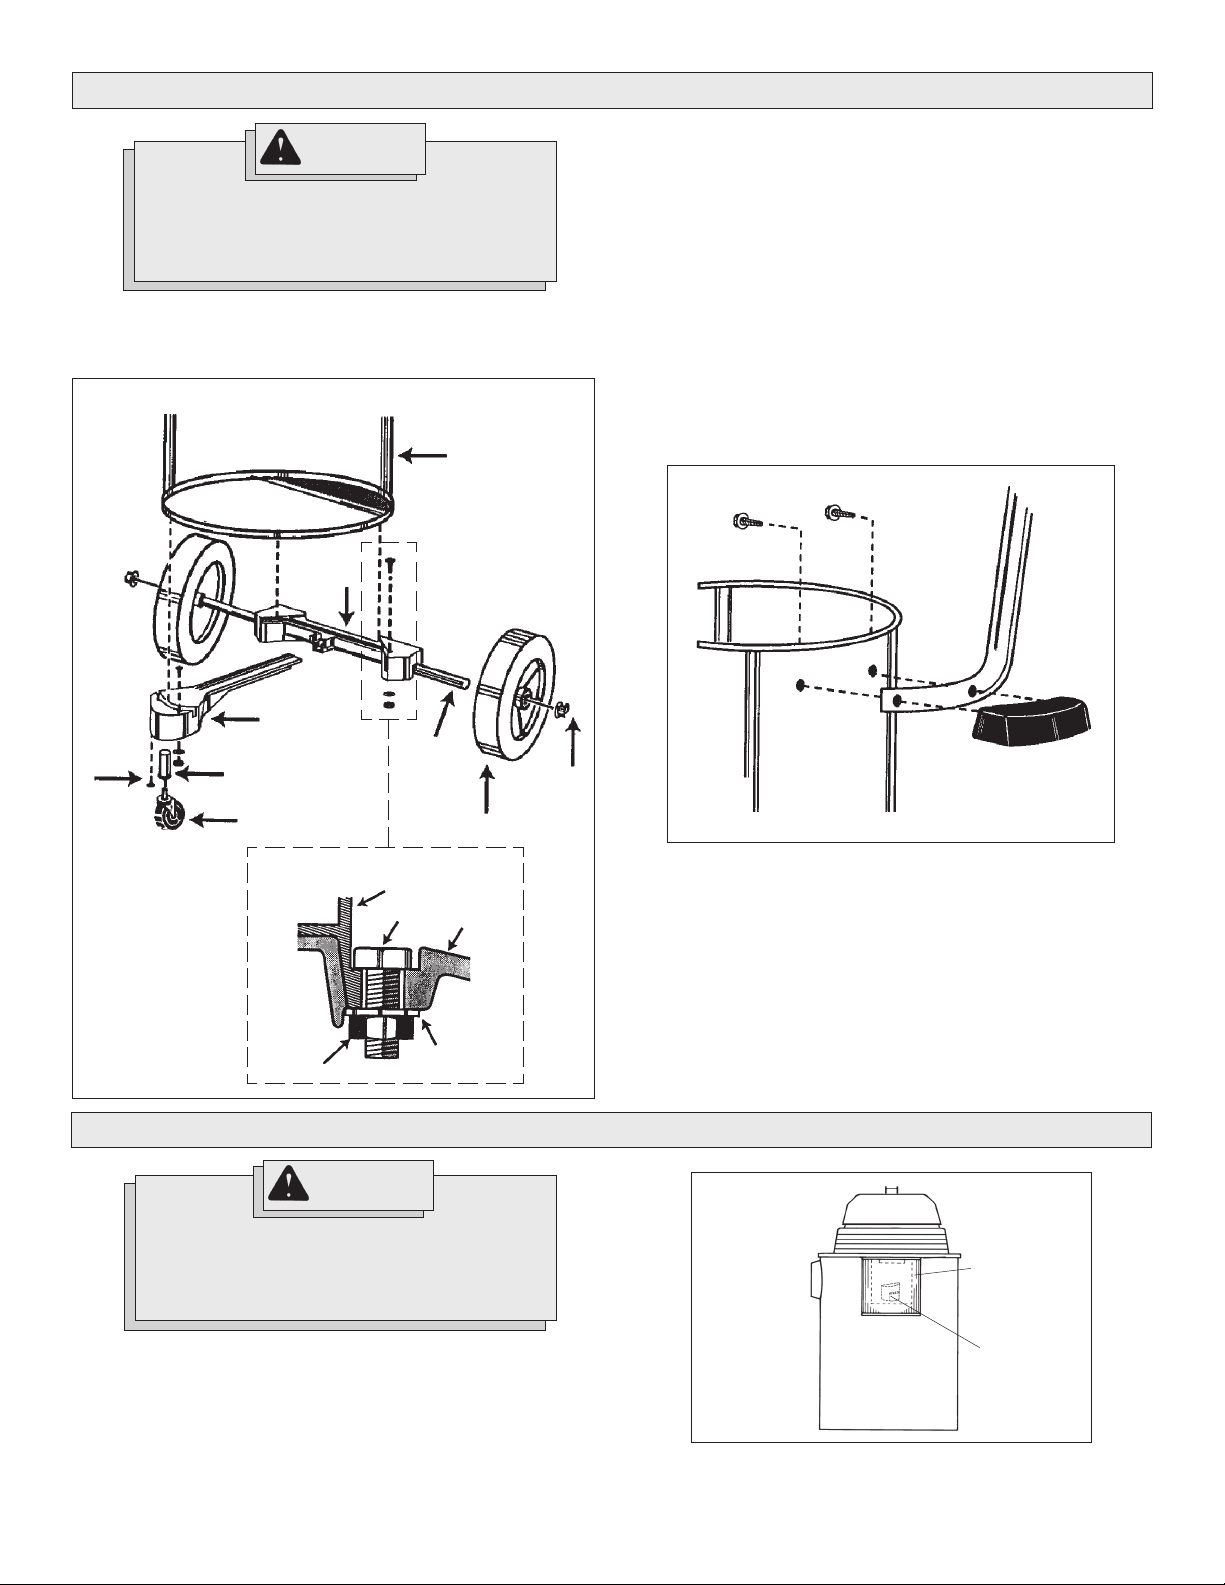
Assembling Dolly (Fig. 1)
Assemble as shown in the diagram. You will need a hammer and a
Phillips screwdriver.
Fig. 1
A
B
F
C
I
G
E
1. Place wheels on rear frame (B) by tapping in the axle (C), fitting the
wheel (D) on the axle and tapping a cap nut (E) on with a hammer.
2. Insert caster socket (G) into front frame (F) and secure it with the
phillips screw (I).
3. Align front frame (F) and rear frame (B) so that they fit together and
fit lip of tank (J) into the grooves in front and rear frames.
4. Secure frame (B and F) to the tank by placing the hex bolts (K)
through the holes in dolly and securing them with nut (N) and washer
(M) as shown.
5. Insert caster (H) into caster socket (G) and push down until caster
snaps into place.
Installing Handle (Fig. 2)
You will need either a flat blade screwdriver or a socket driver and a
wrench or a pair of pliers.
Fig. 2
H
J
K
N
D
L
M
OPERATION
WARNING!
If the float is clean and moves freely and the
suction does not shut off when tank is filled (you
will be able to see water in the exhaust port),
send motorhead to the nearest
service facility for repair.
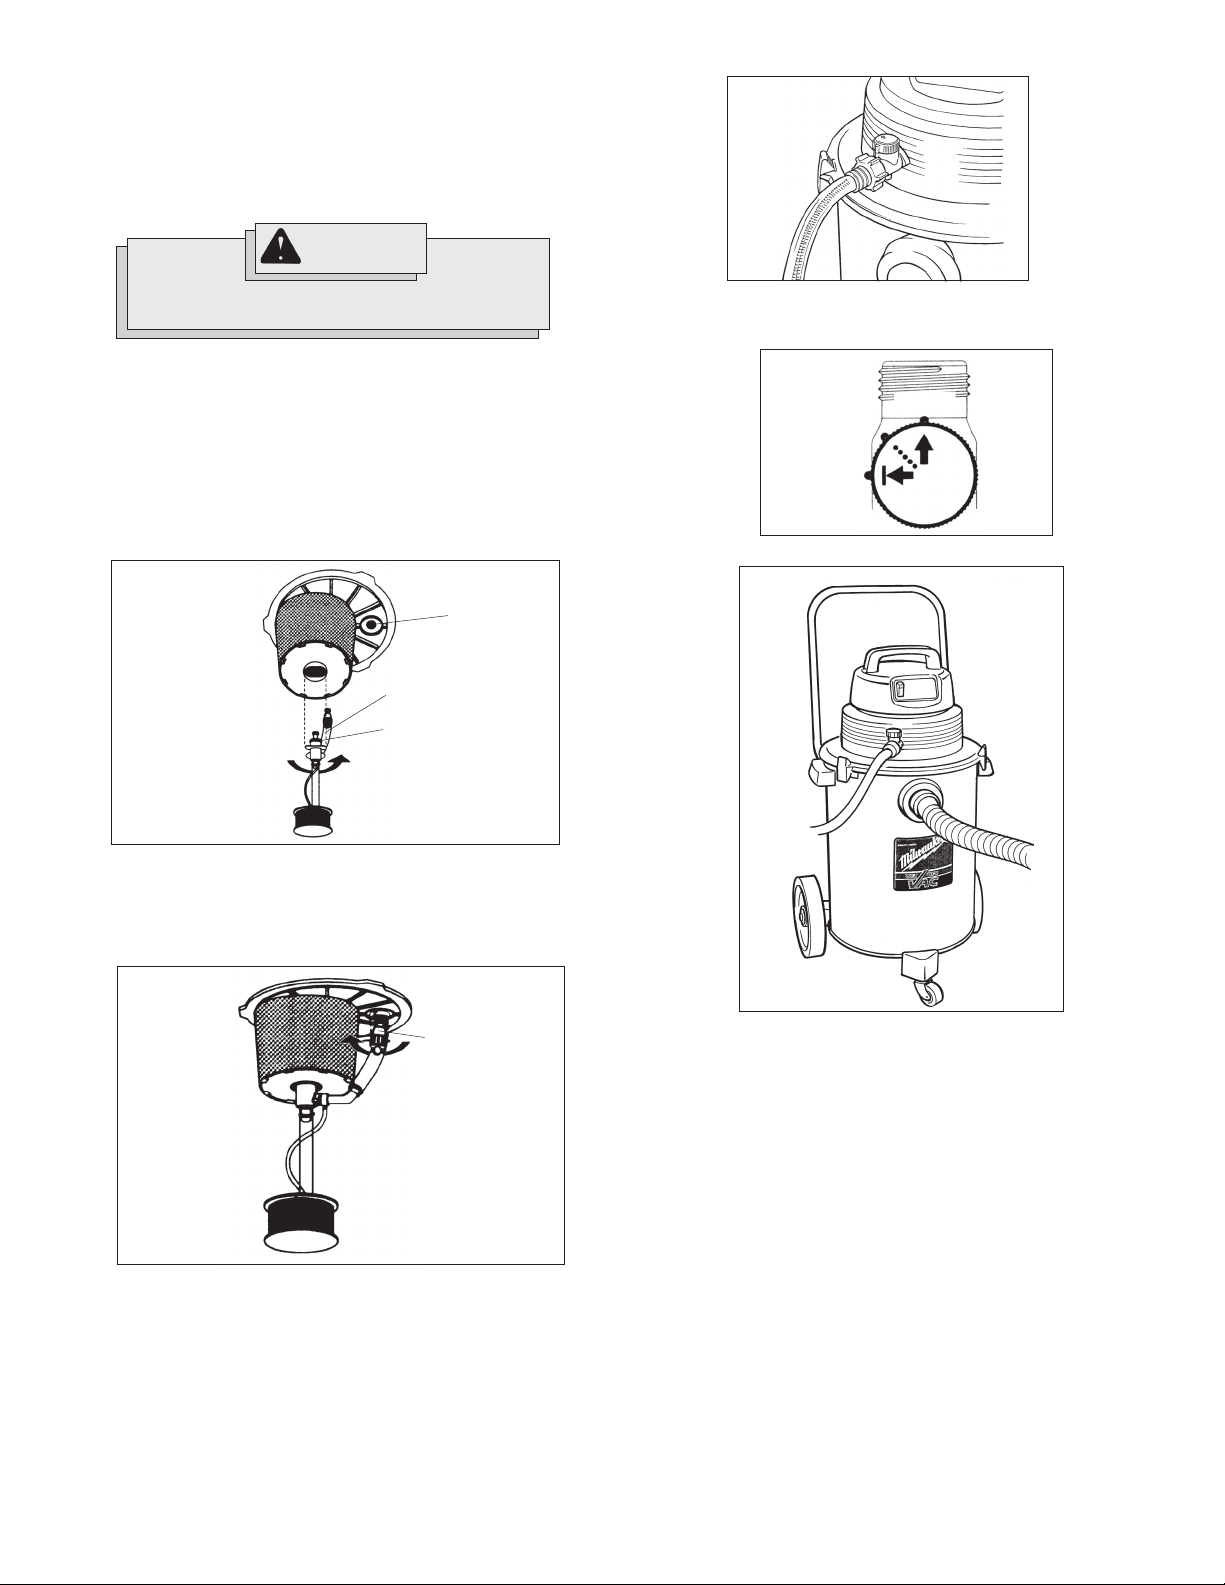
Vacuuming Wet Materials (Fig. 3)
When vacuuming wet materials, either the filter cartridge or the
foam sleeve is required. Remove all dry pick-up filters. A float valve
shuts off suction when the tank is full (Fig. 3). If you are vacuuming a
large amount of liquid, the filter cartridge can become saturated and a
mist can appear from the exhaust port. If this happens, dry the filter by
running the vacuum (without picking up anything) for 10
minutes.
MILWAUKEE
1. Place dolly handle between tank and side handle on either side of
the tank.
2. Fasten tightly with slotted hex head screws.
Fig. 3
float cage
float
page 5
Page 6
Starting and Stopping Vacuum Cleaner
1. To turn vacuum cleaner on, turn the ON/OFF switch to the ON
position.
2. To turn vacuum cleaner off, turn the ON/OFF switch to the OFF
position.
NOTE: Switch will automatically return to the neutral position.
WARNING!
Fig. 6
To reduce the risk of electric shock, do not direct
discharge stream at vacuum cleaner.
Vacuuming Wet Materials Using Pump (Fig. 4 - 8)
1. Always unplug vacuum cleaner before removing the tank cover.
2. Remove the tank cover and dry pick-up filters. Tank should be cleaned
of any dirt or debris.
3. Make sure the foam sleeve is properly installed for wet vacuuming
(see “When Vacuuming Wet Materials”).
4. Insert the pump pick-up assembly's inlet fitting into the bottom of the
motor housing on the tank cover. Rotate until the discharge hose
lines up with the plug on the bottom of the tank cover (Fig. 4).
Fig. 4
plug
discharge hose
inlet fitting
8. Before starting the pumping operation, check to see that the shut-off
valve is in the OFF position (Fig. 7).
Fig. 7
ON
PRIMED
OFF
9. Attach the 1-1/4" vacuum hose to the tank inlet (Fig. 8).
Fig. 8
5. Remove plug from discharge hole. Insert the discharge fitting and
rotate clockwise to lock into place (Fig. 5).
NOTE: Do not cut the security loop which fastens the plug to the lid
cage. The plug must be used for vacuuming dry materials.
Fig. 5
discharge fitting
6. Replace tank cover and secure with lid latches to the tank.
7. Connect a standard garden hose (not supplied) to the shut-off valve
(Fig. 6).
page 6
10. Plug in vacuum cleaner. Turn ON/OFF switch to ON position.
NOTE: Switch will automatically return to the neutral position.
11. Start wet pick-up.
NOTE: To start the pumping feature, you will need approximately 4"
of water in the bottom of the tank. At that time you can start the
pump or continue with the standard wet pick-up until the tank has
reached capacity. The vacuum cleaner will automatically shut off
when full.
Removing Liquid from the Vacuum Cleaner Tank Using Pump
1. To empty a full tank by pumping, remove the vacuum hose from the
liquid. The ON/OFF switch must be manually held in the ON position
with the shut-off valve in the priming position.
NOTE: The vacuum hose must be attached to the vacuum cleaner in
order to prime.
NOTE: If the vacuum cleaner fails to prime, restrict airflow to the
vacuum by capping the end of hose.
2. Once the liquid begins to flow through the garden hose, the shut-off
valve should be turned to the full ON position to achieve the maximum flow. You will have to manually hold the ON/OFF switch in the
ON position for approximately 10-15 seconds. This will allow the
water level to reduce significantly. Pumping will continue automati-
Page 7
cally. The vacuum cleaner will continue to discharge liquid until
there is about 4" left in the tank.
NOTE: The vacuum cleaner is capable of wet vacuuming while
pumping. If the vacuum cleaner should shut off, the pick-up volume
may be greater than the discharge volume. Repeat steps 1 and 2.
3. After wet vacuuming and pumping has been completed, the remaining liquid should be emptied from the tank and the pump pick-up
assembly should be removed and cleaned.
NOTE: Keep shut-off valve in the OFF position when not pumping.
Removing Liquid from the Vacuum Cleaner Tank Without Pump
1. Unplug vacuum cleaner.
2. Remove motor head and set aside.
3. Block wheels.
4. Carefully dump contents into a drain. Do not dump through intake
tube.
5. Rinse and dry tank.
NOTE: Do not store vacuum cleaner with liquid in tank. Run the
vacuum cleaner for about 10 minutes without picking up anything to
dry the inside of the tank and the filter cartridge.
Vacuuming Dry Materials
When vacuuming dry materials, either the filter cartridge or the foam
sleeve AND the cloth filter are required. The reusable dry disc filter
should always be in position over the foam sleeve for dry pick up. There
are other filters that can be used with the required filters to provide
additional filtration when vacuuming dry material. Follow the instructions
included with these filters. Empty tank and clean filter frequently. Be
sure filters are dry before using the vacuum cleaner to pick up dry
material. Dry material will clog wet filters and make them difficult to clean.
Starting and Stopping Vacuum Cleaner
1. To turn vacuum cleaner on, turn the ON/OFF switch to the ON
position.
2. To turn vacuum cleaner off, turn the ON/OFF switch to the OFF
position.
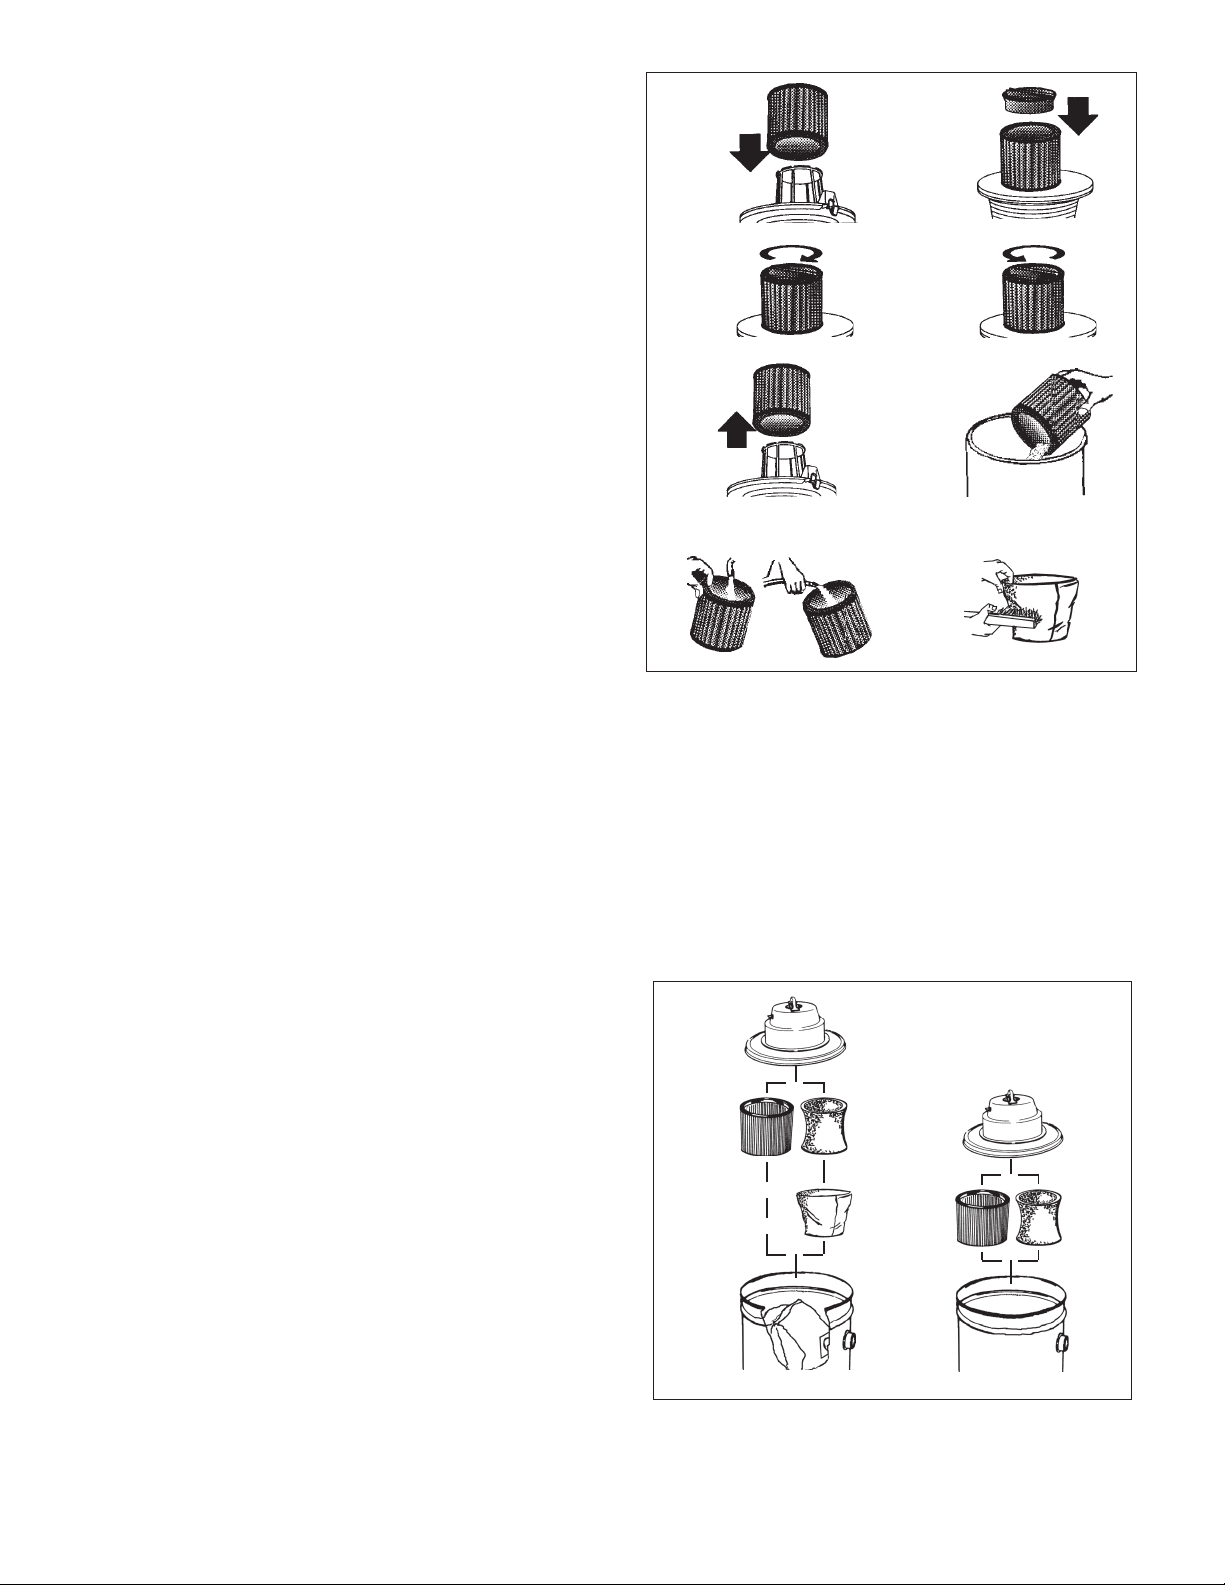
Filter Cleaning and Changing (Fig. 9)
To install filter:
1. Slide cartridge filter down over filter cage (Fig. 9A).
2. Insert filter retainer into top of cartridge filter (Fig. 9B).
3. Hold base of lid cage with one hand and turn retainer clockwise to
tighten (Fig. 9C).
4. To remove filter for cleaning, hold base of lid cage with one hand and
turn retainer counterclockwise to loosen (Fig. 9D).
5. Slide filter off filter cage (Fig. 9E).
6. Clean dry filter by tapping filter on side of waste can (Fig. 9F).
Clean wet filter by rinsing from the inside (Fig. 9G).
Clean cloth filters by shaking off loose material and brushing the filter
with a soft bristle brush (Fig. 9H).
NOTE: When wet (to prevent mold and/or mildew build-up), the car-
tridge filter should be removed and allowed to air dry for a 24-hour
period before being re-installed back into the filter cage.
Fig. 9A
Fig. 9C
Fig. 9E Fig. 9F
Fig. 9G Fig. 9H
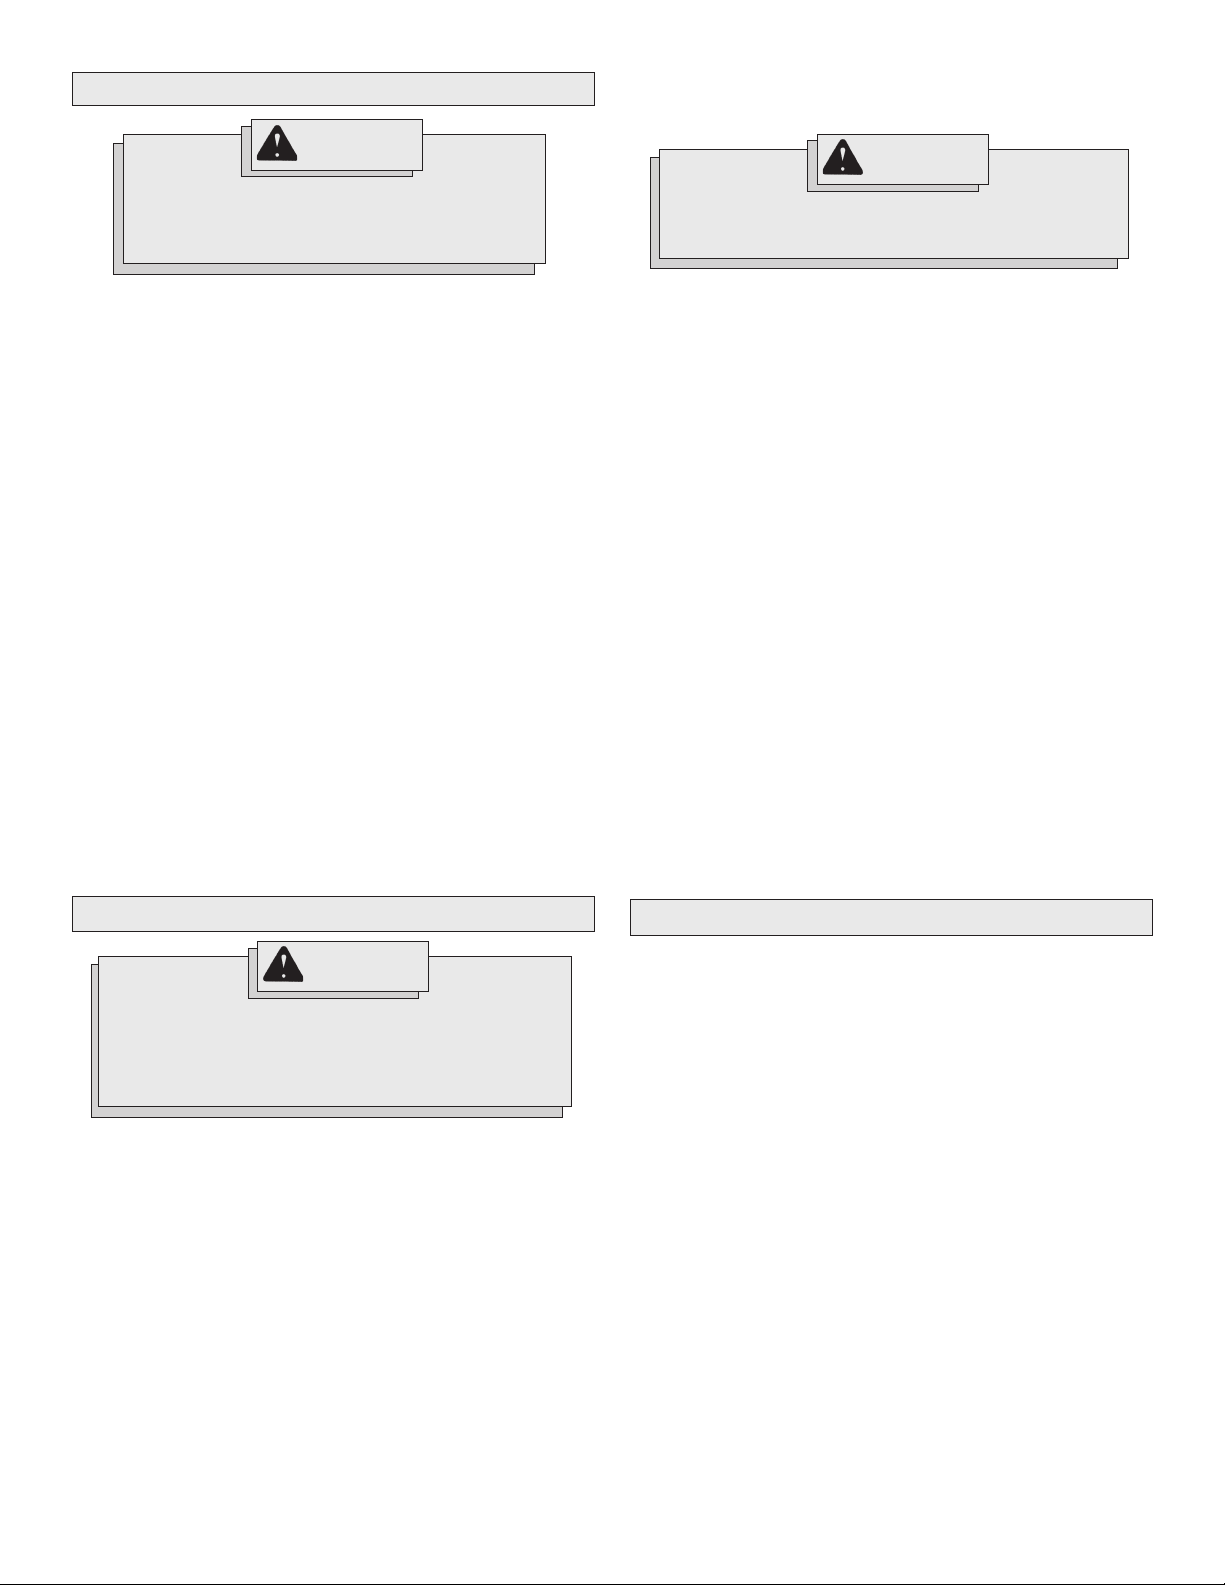
Installing Filters (Fig. 10)
1. Unplug vacuum cleaner.
2. Remove motor head and set aside.
3. Attach cartridge filter or foam sleeve to motor head (Fig. 10).
• If you plan to vacuum dry material into a filter bag, expand the
paper filter bag and fit cardboard collar onto the intake tube as
far as possible.
• If you plan to vacuum dry material and you are using the foam
sleeve, you must also use the cloth filter.
CAUTION: Use care when handling motor head. Dropping motor
head may cause permanent damage.
4. Replace motor head and snap down tank latches.
Fig. 10
Fig. 9B
Fig. 9D
dry materials wet materials
page 7
Page 8
ACCESSORIES
• Electrical inspection (switch, cord, armature, etc.)
• Testing to assure proper mechanical and electrical operation
WARNING!
To reduce the risk of injury, always unplug the
tool before attaching or removing accessories.
Use only specifically recommended accessories. Others may be hazardous.
For a complete listing of accessories refer to your
Tool catalog or go on-line to www.mil-electric-tool.com. To obtain a catalog, contact your local distributor or a service center listed on the back
cover of this operator’s manual.
Wet/Dry Cartridge Filter
Catalog No. 49-90-1830
Foam Sleeve
Catalog No. 49-90-0770
High Efficiency Filter Bags (package of 5)
Catalog No. 49-90-0445
10' x 1-1/4" Plastic Hose
Catalog No. 49-90-0110
1-1/4" Diameter Extension Wand
Catalog No. 49-90-2100
Wand connects to 1-1/4" ID hose.
12" Squeegee Insert
Catalog No. 49-90-2120
MILWAUKEE
Electric
WARNING!
To reduce the risk of injury, electric shock and damage
to the tool, never immerse your tool in liquid or allow a
liquid to flow inside the tool.
Cleaning
Clean dust and debris from vents. Keep the tool handles clean, dry and
free of oil or grease. Use only mild soap and a damp cloth to clean your
tool since certain cleaning agents and solvents are harmful to plastics
and other insulated parts. Some of these include: gasoline, turpentine,
lacquer thinner, paint thinner, chlorinated cleaning solvents, ammonia
and household detergents containing ammonia. Never use flammable or
combustible solvents around tools.
Repairs
If your tool is damaged, return the entire tool to the nearest service
center listed on the back cover of this operator’s manual.
12" Floor Nozzle
Catalog No. 49-90-2110
12" Brush Insert
Catalog No. 49-90-2130
MAINTENANCE
WARNING!
To reduce the risk of injury, always unplug your tool
before performing any maintenance. Never disassemble the tool or try to do any rewiring on the tool's
electrical system. Contact a
for ALL repairs.
Maintaining Tools
Keep your tool in good repair by adopting a regular maintenance program. Before use, examine the general condition of your tool. Inspect
guards, switches, tool cord set and extension cord for damage. Check
for loose screws, misalignment, binding of moving parts, improper mounting, broken parts and any other condition that may affect its safe operation. If abnormal noise or vibration occurs, turn the tool off immediately
and have the problem corrected before further use. Do not use a damaged tool. Tag damaged tools “DO NOT USE” until repaired
(see “Repairs”).
Under normal conditions, relubrication is not necessary until the motor
brushes need to be replaced. After six months to one year, depending
on use, return your tool to the nearest
the following:
• Lubrication
• Brush inspection and replacement
• Mechanical inspection and cleaning (gears, spindles, bearings,
housing, etc.)
page 8
MILWAUKEE
MILWAUKEE
service facility
service facility for
TWO YEAR TOOL LIMITED WARRANTY
Every
MILWAUKEE
ranted to be free from defects in material and workmanship.
will repair or replace (at
tool (including battery chargers) which examination proves to be defective in material or workmanship from two (2) years after the date of
purchase. Return the tool and a copy of the purchase receipt or other
proof of purchase to a
Branch location or
paid and insured. This warranty does not cover damage from repairs
made or attempted by other than
abuse, normal wear and tear, lack of maintenance, or accidents.
Battery Packs, Flashlights, and Radios are warranted for one (1) year
from the date of purchase.
THE REPAIR AND REPLACEMENT REMEDIES DESCRIBED HEREIN ARE
EXCLUSIVE. IN NO EVENT SHALL
INCIDENTAL, SPECIAL, OR CONSEQUENTIAL DAMAGES, INCLUDING
LOSS OF PROFITS.
THIS WARRANTY IS EXCLUSIVE AND IN LIEU OF ALL OTHER WARRANTIES, OR CONDITIONS, WRITTEN OR ORAL, EXPRESSED OR IMPLIED FOR
MERCHANTABLILITY OR FITNESS FOR PARTICULAR USE OR PURPOSE.
This warranty gives you specific legal rights. You may also have other
rights that vary from state to state and province to province. In those
states that do not allow the exclusion of implied warranties or limitation
of incidental or consequential damages, the above limitations or exclusions may not apply to you. This warranty applies to the United States,
Canada, and Mexico only.
tool is tested before leaving the factory and is war-
MILWAUKEE
MILWAUKEE
MILWAUKEE
MILWAUKEE
’s discretion), without charge, any
Factory Service/Sales Support
Authorized Service Station, freight pre-
MILWAUKEE
MILWAUKEE
authorized personnel,
BE LIABLE FOR ANY
Page 9

RÈGLES DE SÉCURITÉ GÉNÉRALES
AVERTISSEMENT!
VOUS DEVEZ LIRE ET COMPRENDRE TOUTES LES INSTRUCTIONS
Le non-respect, même partiel, des instructions ci-après entraîne un risque de choc
électrique, d'incendie et/ou de blessures graves.
CONSERVEZ CES INSTRUCTIONS.
Pour réduire les risques d’incendie, de choc électrique ou de
blessure:
1. Ne laissez pas l’appareil branché sans surveillance.
Débranchez-le pour en faire le service ou s’il ne sert pas.
2. N’exposez pas l’aspirateur à la pluie. Rangez-le à l’intérieur.
3. Ne laissez pas l’aspirateur servir de jouet. Soyez prudent si
vous laissez des enfants s’en servir ou si vous travaillez auprès
d’enfants.
4. Utilisez l’aspirateur selon les instructions contenues dans
ce manuel. N’employez que des accessoires approuvés par le
fabricant.
5. N’employez pas l’aspirateur si le cordon ou la fiche sont
avariés. S’il ne fonctionne pas comme il devrait ou s’il a subi un
choc ou des dommages, s’il a été oublié dehors ou s’il a été immergé,
retournez-le à un centre de service.
6. Ne tirez pas l’aspirateur et ne le soulevez pas par son
cordon. Évitez de coincer le cordon dans une porte ou de
forcer le cordon contre des objets acérés ou des angles
pointus. Ne faites pas rouler l’aspirateur sur le cordon et éloignez
le cordon des sources de chaleur.
7. Ne débranchez pas l’aspirateur en tirant sur le cordon. Pour
débrancher, empoignez la fiche et tirez-la hors de la prise.
8. Ne manipulez pas la fiche ou l’appareil si vous avez les mains
mouillées.
9. N’obstruez pas les ouvertures de l’aspirateur et ne vous en
servez pas si des ouvertures sont obstruées. Enlevez la poussière,
la mousse et les poils qui pourraient réduire le débit d’air.
10. Gardez cheveux, vêtements lâches, doigts et autres par-
ties du corps à l’écart des ouvertures et des pièces en
mouvement.
11. Fermez toutes les commandes avant de débrancher
l’aspirateur.
12. Soyez extrêmement prudent lorsque vous aspirez dans
les marches d’escalier.
13. Faire preuve de prudence pour vider les réservoirs très
pleins.
14. Ne laisser pas le cordon sur le plancher une fois le nettoyage
terminé.
15. N’aspirez pas des objets enflammés ou fumants, telles les
cigarettes, allumettes ou cendres chaudes.
16. N’utilisez pas l’aspirateur pour ramasser des liquides
inflammables ou combustibles tels que la gazoline et ne
vous servez pas de l’aspirateur dans des endroits où de tels liquides
sont gardés.
17. N’employez pas l’aspirateur en présente de liquides ou de
vapeurs explosifs.
18. Le moteur et les autres pièces des aspirateurs électriques
peuvent produire des étincelles lorsqu’ils sont en marche.
N’utilisez pas un aspirateur en deça de 30 pieds d’un endroit où des
gaz explosifs peuvent être dégagés (ex. le voisinages des pompes
à gazoline, les endroits où sont gardés des diluants, nettoyants et
solvants à peinture, etc.).
19. Évitez les endroits où de l’oxygène ou des anesthésiques
sont en usage.
20. Pour empêcher la combustion spontanée, vider le réservoir
après chaque usage.
21. Ne pas utiliser l’appareil pour vaporiser des liquides
inflammables, tels que des peintures à l’huile, des laques, des
produits ménagers de nettoyage, etc.
22. Branchez l’aspirateur sur une prise correctement mise à la
terre (voir instructions de mise à la terre).
23. Débranchez le cordon lorsque vous retirez le moteur aspir-
ant de la cuve de l’aspirateur.
24. N’utilisez pas l’aspirateur sans son filtre et son sac à
poussière.
25. Ne pas ramasser de cendres de bois ou de charbon, de
suie, de ciment, de plâtre ou de poussière de cloisons
sèches si le filtre en tissu ou si le sac-filtre de ramassage
n’est pas en place. Ces particules sont très fines et peuvent
passer par le filtre en mousse et le filtre à disques et nuire au
rendement du moteur ou bien elles peuvent être renvoyées dans
l’air. Des filtres en tissu et d’autres sacs-filtres de ramassage sont
disponibles. Consulter le bon de commande ci-joint.
26. Pour minimiser les risques pour la santé que représentent
les vapeurs ou la poussière ne vous servez pas de l’aspirateur
pour ramasser des déchets toxiques, cancérigènes ou d’autres
matériaux à risque tels que l’amiante, l’arsenic, le baryum, le béryllium,
le plomb, les pesticides et tout autre produit dangereux pour la santé.
27. Toujours porter des lunettes de protection pendant que
l’aspirateur fonctionne.
28. DEMEURER VIGILANT et toujours faire attention à ce que l’on fait et
faire preuve de bon sens. Ne pas utiliser l’aspirateur lorsque l’on est
fatigué, distrait ou sous l’influence de drogues, d’alcool ou de
médicaments qui peuvent diminuer la vigilance.
29. Portez des chaussures isolantes, telles des bottes de caoutch-
ouc, pour ramasser des déchets humides.
30. AVERTISSEMENT! La poussière degage par perçage, sclage,
perçage et autres travaux de construction contient des substances
chimiques reconnues comme pouvant causer le cancer, des malformations congénitales ou d’autres troubles de reproduction. Voici
quelques exemples de telles substances :
• Le plomb contenu dans la peinture au plomb.
• Le silice cristallin contenu dans la brique, le béton et divers
produits de maçonnerie.
• L’arsenic et le chrome servant au traitement chimique du bois.
Les risque associés à l’exposition à ces substances varient,
dépendant de la fréquence des travaux. Afin de minimiser l’exposition
à ces substances chimiques, assurez-vous de travailler dans un
endroit bien aéré et d’utiliser de l’equipement de sécurité tel un masque
antipoussière spécifiquement conçu pour la filtration de particules
microscopiques.
page 9
Page 10

Pictographie
Spécifications
Double Isolation
l'Association Canadienne de
Normalisation
Underwriters Laboratories Inc.
Tension CA
Amprères
No de
Catalogue
8940-20
Volts
CA
120
Amp
11.5
Capacité du
réservoir
(gallons)
8gal. (30L)
DESCRIPTION FONCTIONNELLE
Débit
d’air
(pi. cu. min.)
140
Aspiration
étanche
à l’eau
60" (152cm)
Pour
déchets
sec et humide
1. Poignée
2. Sortie d’air
3. Loquet
4. Conduit d'admission
5. Cuve
6. Dispositif de fermeture
1
2
6
3
4
5
page 10
Page 11

MISE À LA TERRE
CORDONS DE RALLONGE
AVERTISSEMENT!
Si le fil de mise à la terre est incorrectement raccordé,
il peut en résulter des risques de choc électrique. Si
vous n’êtes pas certain que la prise dont vous vous
servez est correctement mise à la terre, faites-la
vérifier par un électricien. N’altérez pas la fiche du
cordon de l’outil. N’enlevez pas de la fiche, la dent qui
sert à la mise à la terre. N’employez pas l’outil si le
cordon ou la fiche sont en mauvais état. Si tel est le cas,
faites-les réparer dans un centre-service
MILWAUKEE
fiche du cordon ne s’adapte pas à la prise, faites
remplacer la prise par un électricien.
Cet aspirateur doit être mis à la terre. S'il fonctionne mal ou s'il tombe en
panne, la mise à la terre offre un trajet de moindre résistance pour le
courant électrique, réduisant ainsi le risque de chocs électriques. Cet
aspirateur est équipé d'un cordon doté d'un conducteur et d'une broche
de mise à la terre. La fiche doit être branchée dans une prise bien
installée et mise à la terre selon tous les codes et règlements municipaux.
Cet aspirateur fonctionne sur le courant de 120 volts et sa fiche avec
mise à la terre ressemble à celle illustrée au Figure A. Un adaptateur
temporaire ressemblant à l'adaptateur illustré aux Figure B peut être
utilisé pour brancher cette fiche dans une prise de courant à 2 trous,
comme il est illustré au Figure B, si une prise de courant adéquatement
mise à la terre n'est pas disponible. L'adaptateur temporaire ne doit êrte
utilisé que jusqu'à ce qu'une prise de courant adéquatement mise à la
terre (Figure A) puisse être installée par un électricien qualifié. La patte
de couleur verte qui dépasse de l'adaptateur doit êrte branchée sur une
prise de terre permanente comme le couvercle d'une prise de courant
adéquatement mise à la terre. Chaque fois que l'adaptateur est utilisé, il
doit êrte retenu en place par une vis métallique.
L' installation d'un adaptateur temporaire est prohibée par le Code
Canadien de L'Electricité.
accrédité avant de vous en servir. Si la
Couvercle de la prise mise à
la terre
Si l’emploi d’un cordon de rallonge est nécessaire, un cordon à trois fils
doit être employé pour les outils mis à la terre. Pour les outils à double
isolation, on peut employer indifféremment un cordon de rallonge à deux
ou trois fils. Plus la longueur du cordron entre l’outil et la prise de courant
est grande, plus le calibre du cordon doit être élevé. L’utilisation d’un
cordon de rallonge incorrectement calibré entraîne une chute de voltage
résultant en une perte de puissance qui risque de détériorer l’outil.
Reportez-vous au tableau ci-contre pour déterminer le calibre minimum
du cordon.
Moins le calibre du fil est élevé, plus sa conductivité est bonne. Par
exemple, un cordon de calibre 14 a une meilleure conductivité qu’un
cordon de calibre 16. Lorsque vous utilisez plus d’une rallonge pour
couvrir la distance, assurez-vous que chaque cordon possède le calibre minimum requis. Si vous utilisez un seul cordon pour brancher
plusieurs outils, additionnez le chiffre d’intensité (ampères) inscrit sur la
fiche signalétique de chaque outil pour obtenir le calibre minimal requis
pour le cordon.
Directives pour l’emploi des cordons de rallonge
• Si vous utilisez une rallonge à l’extérieur, assurez-vous qu’elle est
marquée des sigles “W-A” (“W” au Canada) indiquant qu’elle est
adéquate pour usage extérieur.
• Assurez-vous que le cordon de rallonge est correctement câblé et
en bonne condition. Remplacez tout cordon derallonge détérioré ou
faites-le remettre en état par une personne compétente avant de
vous en servir.
• Tenez votre cordon de rallonge à l’écart des objets ranchants, des
sources de grande chaleur et des endroits humides ou mouillés.
Calibres minimaux recommandés pour
les cordons de rallonge*
Fiche
signalétique
Ampères
0 - 5
5,1 - 8
8,1 - 12
12,1 - 15
15,1 - 20
Longueur du cordon de rallonge
25'
16
16
14
12
10
50'
16
16
14
12
10
75'
16
14
12
10
10
100'
14
12
10
10
--
150'
12
10
--
--
--
200'
12
--
--
--
--
Mise à la terre de la prise
Broche de mise à la terre
Couvercle de la prise mise
à la terre
Adaptateur
temporaire
Crampon vert de mise à la terre
* Basé sur sur une chute de voltage limite de 5
volts à 150% de l’intensité moyenne de courant.
LISEZ ATTENTIVEMENT CES INSTRUCTIONS
ET CONSERVEZ-LES POUR LES
CONSULTER AU BESOIN.
Fig. A
Vis
Fig. B
page 11
Page 12

MONTAGE DE L'OUTIL
AVERTISSEMENT!
Afin de réduire le risque de blessures, débranchez toujours
l’outil avant d’y faire des réglages, d’y attacher ou d’en
enlever les accessoires. L’usage d’accessoires autres que
ceux qui sont spécifiquement recommandés pour cet outil
peut comporter des risques.
Montage du chariot (Fig. 1)
Suivez le schéma de montage. Vous aurez besoin d’un marteau et d’un
tournevis Phillips.
Fig. 1
A
B
F
C
I
G
H
J
K
D
L
E
1. Posez les roues sur le chassis arrière (B). Tapez d’abord l’essieu
(C) dans le chassis, puis insérez la roue (D) sur l’essieu et fixez
l’écrou borgne (E) au bout de l’essieu avec un marteau.
2. Insérez la gaine de roulette (G) dans le chassis avant (F) et fixez-la
à l’aide de la vis Phillips (I).
3. Alignez le chassis avant (F) sur le chassis arrière (B) pour qu’ils se
joignent et placez le rebord de la cuve (J) dans les rainures des
chassis avant et arrière.
4. Fixez les chassis (B et F) à la cuve. Posez les boulons hex (K) dans
les trous du chariot et fixez-les avec un écrou (N) et une rondelle
(M), tel qu’indiqué.
5. Insérez la roulette (H) dans la gaine (G) et pressez-la au fond jusqu’à
ce qu’elle s’encliquette.
Installation de la poignée (Fig. 2)
Prenez soit un tournevis à bout plat, un tourne-douille, une clé ou une
paire de tenailles.
Fig. 2
N
M
AVERTISSEMENT!
Si, malgré que le flotteur soit propre et libre, la succion
n’arrête pas lorsque la cuve est pleine (vous apercevrez
l’eau par la sortie d’air), faites réparer le moteur aspirant
au centre-service
page 12
MILWAUKEE
le plus près.
1. Insérez la poignée du chariot de chaque côté de la cuve en deça de
la poignée latérale.
2. Serrez-la solidement avec les vis à tête hex. fendue.
MANIEMENT
Ramassage des déchets humides (Fig. 3)
Pour ramasser des déchets humides, la cartouche filtrante ou le
manchon-filtre en mousse sont requis. Déposer les filtres d’aspiration de
déchets secs. Une soupage à flotteur arrête la succion lorsque la cuve
est pleine (Fig. 3). Pour que la soupage fonctionne bien, il faut que le
flotteur soit propre et qu’il se déplace librement dans sa cage. Si
vousramassez une grande quantité de liquide, la cartouche filtrante pourra
devenir saturée et une vapeur d’eau s’échappera de la sortie d’air. En tel
cas, asséchez le filtre en laissant fonctionner l’aspirateur sans rien
ramasser durant 10 minutes.
Page 13

Fig. 3
cage
flotteur
Fig. 5
raccord de
refoulement
Démarrage et arrêt l’aspiratear
1. Pour mettre l’aspirateur en marche, placez l’interrupteur MARCHEARRÊT (ON/OFF) à la position MARCHE (ON).
2. Pour arrêter l’aspirateur, placez l’interrupteur MARCHE-ARRÊT
(ON/OFF) à la position ARRÊT (OFF).
AVERTISSEMENT!
Pour réduire les risques de secousses électriques, ne
pas diriger le jet de refoulement vers l’appareil.
Ramassage des déchets humides plein à l’aide du dispositif
de pompage (Fig. 4 - 8)
1. Toujours débrancher la fiche du cordon électrique de la prise de
courant avant de déposer le couvercle du réservoir.
2. Déposer le couvercle du réservoir et les filtres d’aspiration de déchets
secs. Le réservoir doit être débarrassé de toutes les saletés et de
tous les débris.
3. Pour aspirer des déchets humides, s’assurer que le manchon en
mousse est bien posé (se “Pour ramasser des déchets humides”).
4. Introduisez le raccord de sortie de dispositif de pompage dans la
partie inférieure du carter du moteur du couvercle du réservoir. Le
tourner jusqu’à ce que le tuyau de refoulement s’aligne avec le
bouchon qui se trouve au fond du couvercle du réservoir (Fig. 4).
Fig. 4
bouchon
6. Reposer le couvercle et le faire tenir sur le réservoir avec les
crochets.
7. Brancher un tuyau d’arrosage (pas fourni) sur le robinet (Fig. 6).
Fig. 6
8. Avant de commencer toute opéracion de pompage, s’assurer que le
robinet est bien fermé «sur OFF» (Fig. 7).
Fig. 7
MARCHE
AMORÇAGE
FERME
9. Brancher le tuyau souple de 1-1/4" (32mm) sur l’arrivée du réservoir
(Fig. 8).
Fig. 8
tuyay de refoulement
raccord de sortie
5. Enlever le bouchon du trou de refoulement. Introduire la raccord de
refoulement et le tourner à droite pour le verrouiller en place (Fig. 5).
N.B. Ne coupez pas la boucle de sécurité qui le bouchon au logement
du couvercle. Le bouchon sert au ramassage des déchets solides.
page 13
Page 14

10. Brancher le cordon de l’aspirateur dans la prise de courant. Mettre
l’interrupteur sur MARCHE (ON).
N.B. L’interrupteur revient automatiquement à la position neutre.
11. Commencer l’aspiration des déchets humides.
N.B. Pour déclencher l’opération de pompage, le réservoir doit contenir
environ 4" (10cm) d’eau. Àce moment-là, on peut démarrer la pompe
ou continuer d’aspirer les déchets humides jusqu’à ce que le réservoir
ait atteint sa capacité. L’appareil s’arrête alors automatiquement
lorsqu’il est plein.
Pour vider un réservoir plein à l’aide du dispositif de
pompage
1. Pour vider un réservoir plein à l’aide du dispositif de pompage,
débrancher tout d’abord le tuyau d’aspiration du liquide. L’interrupteur
MARCHE-ARRÊT (ON/OFF) devra alors être manuellement tenu dans
la position MARCHE (ON), le robinet étant dans la position amorçage.
N.B. Le tuyau d’aspiration doit être branché sur l’appareil pour
permettre l’amorçage.
N.B. Si l’aspiration ne s’amorce pas, resteignez le débit d’air de
l’aspirateur en obstruant l’entrée d’air du boyau.
2. Lorsque le liquide commence à couler par le tuyau d’arrosage, le
robinet doit être complètement ouvert (ON) pour obtenir un débit
maximum. L’interrupteur MARCHE-ARRÊT doit être maintenu
manuellement dans la position MARCHE (ON) pendant environ 10 à
15 secondes pour que le niveau d’eau baisse considérablement; le
pompage se poursuivra ensuite automatiquement. L’appareil
continuera de pomper le liquide jusqu’à ce qu’il ne reste plus qu’environ 4" (102mm) dans le réservoir.
N.B. Pendant le pompage, il est possible d’aspirer des déchets
humides avec l’appareil. Le volume d’aspiration de déchets humides
est supérieur au volume de refoulement et les opérations 1 et 2
devront peut-être être répétées si l’appareil est arrêté.
3. Aprés avoir terminé l’aspiration des déchets humides et le pompage,
vider le liquide restant dans le réservoir, puis déposer et nettoyer le
dispositif de pompage.
N.B. Pendant le pompage, laisser le robinet fermé (OFF).
Nettoyage et changement des filtres (Fig. 9)
Installation des filtres:
1. Glisser le filtre-cartouche par-dessus la cage du filtre (Fig. 9A).
2. Poser la fixatíon du filtre enhaut du filtre-cartouche (Fig. 9B).
3. L’immobiliser dans la base de la cage du couvercle avec une main et
tourner la fixatíon à droite pour serrer (Fig. 9C).
4. Pour déposer le filtre afin de la nettoyage, l’immobiliser à nouveau
dans la base de la cage du couvercle avec une main et tourner la
fixatíon à gauche pour desserrer (Fig. 9D).
5. Sortir la filtre de la cage du filtre (Fig. 9E).
6. Nettoyage le filtre humide en la rincant par l’intérieur (Fig. 9F).
Reposez le filtre en le posant par-dessus le porte-filtre et en forcant
fermement dessus pour le mettre en position (Fig. 9G).
Nettoyage let filtre en tissu en le secount pour le débarrasser des
déchets et en le brossant avec une brosse à poils souples (Fig. 9H).
N.B. Lorspu’il eset humide (et pour empêcher l’accumulation de moisi
et/ou de mildiou), le filtre-cartouche doit être dépose et il faut laisser
sécher à l’air libre pendant 24-heures avant de le reposer dans sa
cage.
Fig. 9A Fig. 9B
Fig. 9C Fig. 9D
Fig. 9E Fig. 9F
Pour évacuer les liquides de la cuve
1. Débranchez l’aspirateur.
2. Enlevez le moteur filtrant et l’adaptateur pour déchets humides et
mettez-les de côté.
3. Calez les roulettes.
4. Versez soigneusement le contenu de la cuve dans le siphon de sol.
5. Rincez et asséchez la cuve.
N.B. Ne rangez pas l’aspirateur sans avoir vidé la cuve. Pour
assécher la cuve, laissez marcher l’aspirateur durant environ 10
minutes sans ramasser de déchets.
Ramassage des déchets secs
Pour ramasser des déchets secs, la cartouche filtrante ou le
manchon-filtre en mousse et le filtre en tissu sont requis. Le filtre à
disques sec réutilisable doit toujours être en place sur le manchon-filtre
en mousse pour le ramassage des détritus secs. Il existe d’autres genres
de filtres qui peuvent être ajoutés aux filtres requis pour assurer une
meilleure filtration des déchets secs. Suivez les instructions qui
accompagnent ces filtres. Videz la cuve et nettoyez les filtres
fréquemment. Assurez-vous que les filtres soient secs avant de
ramasser des déchets secs. Les déchets secs peuvent encrasser les
filtres humides et les rendre difficiles à nettoyer.
Démarrage et arrêt l’aspiratear
1. Pour mettre l’aspirateur en marche, placez l’interrupteur MARCHEARRÊT (ON/OFF) à la position MARCHE (ON).
2. Pour arrêter l’aspirateur, placez l’interrupteur MARCHE-ARRÊT
(ON/OFF) à la position ARRÊT (OFF).
Fig. 9G Fig. 9H
Fig. 10
déchets secs déchets humides
page 14
Page 15

Installation des filtres (Fig. 10)
1. Débranchez l’aspirateur.
2. Enlevez le moteur aspirant et mettez-le de côté.
3. Fixez la cartouche filtrante ou le manchon-filtre en mousse au
moteur (Fig. 10).
• Pour ramasser des déchets secs dans un sac-filtre, déployez
le sac-filtre en papier et insérez le collet cartonné du sac sur
le conduit d’admission aussi loin que possible.
• Pour ramasser des déchets secs en employant le manchonfiltre en mousse, il vous faut aussi employer le filtre en tissu.
ATTENTION: Enlevez le moteur avec soin. Si vous le laissez choir,
vous pourrez lui causer des dommages irréparables.
4. Remettez le moteur en place sur la cuve et abaissez les loquets.
pouvant en rendre le fonctionnement dangereux. Si un bruit ou une
vibration insolite survient, arrêtez immédiatement l’outil et faites-le vérifier
avant de vous en servir de nouveau. N’utilisez pas un outil défectueux.
Fixez-y une étiquette marquée “HORS D’USAGE” jusqu’à ce qu’il soit
réparé (voir “Réparations”).
Normalement, il ne sera pas nécessaire de lubrifier l’outil avant que le
temps ne soit venu de remplacer les balais. Après une période pouvant
aller de 6 mois à un an, selon l’usage, retournez votre outil à un centre de
service
MILWAUKEE
• Lubrification
• Inspection et remplacement des balais
• Inspection et nettoyage de la mécanique (engrenages, pivots,
coussinets, boîtier etc.)
• Inspection électrique (interrupteur, cordon, induit etc.)
• Vérification du fonctionnement électromécanique
accrédité pour obtenir les services suivants:
ACCESSOIRES
AVERTISSEMENT!
Pour minimiser les risques de blessures, débranchez
toujours l’outil avant d’y installer ou d’en enlever les
accessoires. L’emploi d’accessoires autres que ceux
qui sont expressément recommandés pour cet outil
peut présenter des risques.
Pour une liste complète des accessoires, prière de se reporter au catalogue
MILWAUKEE
www.mil-electric-tool.com. Pour obtenir un catalogue, il suffit de contacter
votre distributeur local ou l'un des centres-service énumérés sur la page
de couverture de ce manuel.
Cartouche filtrante sec/humide
No de catalogue 49-90-1830
Manchon en mousse
No de catalogue 49-90-0770
Sacs-filtres haut rendement (paquet de 5)
No de catalogue 49-90-0445
Boyau de plastique de 10pi. x 1-1/4po. (3m x 32mm)
No de catalogue 49-90-0110
Rallonge tubulaire de 1-1/4po. (32mm) de diamétre
No de catalogue 49-90-2100
La tubulaire se raccorde au boyau de 1-1/4" (32mm) de diamètre intérieur.
Raclette amovible 12po. (30cm)
No de catalogue 49-90-2120
Bec à plancher 12po. (30cm)
No de catalogue 49-90-2110
Brosse amovible 12po. (30cm)
No de catalogue 49-90-2130
Electric Tool ou visiter le site internet
MAINTENANCE
AVERTISSEMENT!
Pour minimiser les risques de blessures, débranchez
toujours l’outil avant d’y effectuer des travaux de maintenance. Ne faites pas vous-même le démontage de
l’outil ni le rebobinage du système électrique. Consultez
un centre de service
les réparations.
Entretien de l’outil
Gardez l’outil en bon état en adoptant un programme d’entretien ponctuel.
Avant de vous en servir, examinez son état en général. Inspectez-en la
garde, interrupteur, cordon et cordon de rallonge pour en déceler les
défauts. Vérifiez le serrage des vis, l’alignement et le jeu des pièces
mobiles, les vices de montage, bris de pièces et toute autre condition
MILWAUKEE
accrédité pour toutes
AVERTISSEMENT!
Pour minimiser les risques de blessures, choc
électrique et dommage à l'outil, n'immergez jamais
l'outil et ne laissez pas de liquide s'y infiltrer.
Nettoyage
Débarrassez les évents des débris et de la poussière. Gardez les
poignées de l’outil propres, à sec et exemptes d’huile ou de graisse. Le
nettoyage de l’outil doit se faire avec un linge humide et un savon doux.
Certains nettoyants tels l’essence, la térébenthine, les diluants à laque
ou à peinture, les solvants chlorés, l’ammoniaque et les détergents
d’usage domestique qui en contiennent pourraient détériorer le plastique
et l’isolation des pièces. Ne laissez jamais de solvants inflammables ou
combustibles auprès des outils.
Réparations
Si votre outil doit être réparé, retournez-le en entier au centre-service le
plus près selon la liste apparaissant à la dernière page de ce manuel.
GARANTIE LIMITÉE DE L’OUTIL DE DEUX ANS
Tous les outils
garantis exempts de vice de matériau ou de fabrication.
réparera ou remplacera (à la discrétion de
tout outil (y compris les chargeurs de batterie) dont l’examen démontre le
caractère défectueux du matériau ou de la fabrication dans les deux (2)
ans suivant la date d’achat. Retourner l’outil et une copie de la facture ou
de toute autre preuve d’achat à une branche Entretien usine/Assistance
des ventes de l’établissement
agréé par
pas les dommages causés par les réparations ou les tentatives de
réparation par quiconque autre que le personnel agréé par
les utilisations abusives, l’usure normale, les carences d’entretien ou les
accidents.
Les batteries, les lampes de poche et les radios sont garanties pour un
(1) an à partir de la date d’achat.
LES SOLUTIONS DE RÉPARATION ET DE REMPLACEMENT DÉCRITES
PAR LES PRÉSENTES SONT EXCLUSIVES.
ÊTRE RESPONSABLE, EN AUCUNE CIRCONSTANCE, DES DOMMAGES
ACCESSOIRES, SPÉCIAUX OU INDIRECTS, Y COMPRIS LES MANQUES À
GAGNER.
CETTE GARANTIE EST EXCLUSIVE ET REMPLACE TOUTES LES AUTRES
GARANTIES OU CONDITIONS, ÉCRITES OU ORALES, EXPRESSES OU
TACITES DE QUALITÉ MARCHANDE OU D’ADAPTATION À UNE
UTILISATION OU UNE FIN PARTICULIÈRE.
Cette garantie vous donne des droits particuliers. Vous pouvez aussi
bénéficier d’autres droits variant d’un état à un autre et d’une province à
une autre. Dans les états qui n’autorisent pas les exclusions de garantie
tacite ou la limitation des dommages accessoires ou indirects, les limitations ou exclusions ci-dessus peuvent ne pas s’appliquer. Cette garantie
s’applique aux États-Unis, au Canada et au Mexique uniquement.
MILWAUKEE
MILWAUKEE
sont testés avant de quitter l’usine et sont
MILWAUKEE
MILWAUKEE
MILWAUKEE
, en port payé et assuré. Cette garantie ne couvre
ou à un centre d’entretien
), sans frais,
MILWAUKEE
MILWAUKEE
NE SAURAIT
page 15
,
Page 16

INSTRUCCIONES GENERALES DE SEGURIDAD
¡ADVERTENCIA!
LEA Y ENTIENDA TODAS LAS INSTRUCCIONES
Se debe seguir todas las instrucciones a continuación para evitar una
descarga eléctrica, incendio y/o lesiones graves.
GUARDE ESTAS INSTRUCCIONES.
Para reducir el riesgo del fuego, de descargas eléctricas o
lesiones:
1. No desatienda el aparato mientras esté enchufado.
Desenchúfelo cuando no lo esté utilizando y antes de darle
mantenimiento.
2. No exponga las aspiradoras a la lluvia. Guárdelas dentro del
edificio.
3. Se requiere vigilancia y cuidado extremos cuando se utilice cerca
de los niños. No permita que se utilice como juguete.
4. Utilícese únicamente conforme a lo descrito en este manual.
No emplee otros aditamentos más que los recomendados por el
fabricante.
5. No lo use si el cordón o el enchufe están averiados. Si el
aparato no está funcionando debidamente, se le ha caído, está
averiado, se dejó a la intemperie o se cayó al agua, llévelo a un
centro de reparaciones.
6. No lo cargue ni lo jale del cordón; no use el cordón como
agarradera; no cierre la puerta sobre el cordón ni lo arrastre
por orillas o esquinas filosas. No arrastre el aparato sobre el
cordón. Mantenga el cordón alejado de superficies calientes.
7. No desenchufe el aparato tirando delcordón. Para
desenchufarlo, tómelo del enchufe, no del cordón.
8. No toque el enchufe o el aparato con manos mojados.
9. No ponga ningún objeto en las ranuras o aberturas del
aparato. No lo utilice cuando alguna de las aberturas esté bloqueada;
manténgalas libre de polvo, pelusa, cabellos, o cualquier cosa que
pueda disminuir el flujo de aire.
10. Mantenga su cabello, ropa suelto, dedos y en general todas
partes del cuerpo lejos de las aberturas y de las partes
móviles del aparato.
11. Apague todos lo controles antes de desconectar el aparato.
12. Sea muy cuidadoso cuando use el aparato para limpiar
escaleras.
13. Tenga especial cuidado al vaciar los tanques de carga
pesada.
14. No deje el cordón en el suelo después de haber terminado
de utilizar su aspiradora, ya que alguien podría tropezarse
o endredarse con él.
15. No use el aparato para recoger algo que esté quemándose
o echando humo como cigarros, cerillas o cenizas calientes.
16. No lo use para recoger líquidos inflamables o explosivos
como la gasolina ni lo use en áreas donde puedan estar presentes.
17. No lo use en la presencia de líquidos o vapores explosivos.
18. Los aspiradores al vacío tienen motores y otras partes que
pueden causar chispas durante el uso normal. No las use a
9m (30 pies) de áreas donde haya gases explosivos (como las
bombas de gasolina y lugares donde se almacenen líquidos como
diluyentes de pintura, limpiadores, solventes, etc.).
19. No las use donde se utilice oxígeno o anestesia.
20. Para evitar una combustión espontánea, vacíe el tanque
después de cada uso.
21. No utilice su aspiradora como rociador de líquidos
inflamables tales como pinturas de aceite, lacas, limpiadores
domésticos, etc.
22. Conecte a tierra su aparato. Vea “Conexión a tierra”.
23. Desenchufe el cable de alimentación cada vez que la parte
superior del motor sea retirada del tanque.
24. No lo use sin la bolsa ni los filtros necesarios.
25. No aspire ceniza de madera o carbón; cemento, yeso p polvo
seco de la pared sin harbor colocado un filtro de tela o una
bolsa de recolección de papel. Estas, son partículas muy finas
que pueden penetrar los filtros de espuma y disc y afectar así el
funcionamiento del motor o pueden ser lanzadas hacia el aire. Existen
filtros de tela y filtros adicionales de recolección. Véase la orden
adjunta.
26. Para reducir los riesgos contra la salud debido a vapores o
polvos, no lo use con materiales tóxicos, cancerígenos u otros
materiales peligrosos, tales como asbestos, arsénico, bario, berilio,
plomo, pestícidas u otros materiales que puedan poner en peligro la
salud.
27. Siempre utilice lentes de protección (goggles) al operar su
aspiradora.
28. PERMANEZCA ALERTA. Observe lo que esté haciendo, utilice el
sentido común. No use la aspiradora cuando esté cansado, distraído
o bajo la influencia de drogas, alcohol o algún medicamento que
cause un control disminuído.
29. Póngase calzado de aislamiento, como botas de goma, cuando
aspire material húmedo.
30. ¡ADVERTENCIA! Algunas partículas de polvo resultantes del lijado
mecánico, aserrado, esmerilado, taladrado y otras actividades
relacionadas a la construcción, contienen sustancias químicas que
se saben ocasionan cáncer, defectos congénitos u otros daños al
aparato reproductivo. A continuación se citan algunos ejemplos de
tales sustancias químicas:
• plomo proveniente de pinturas con base de plomo
• sílice cristalino proveniente de ladrillos, cemento y otros
productos de albañilería y
• arsénico y cromo provenientes de madera químicamente
tratada.
El riesgo que usted sufre debido a la exposición varía dependiendo
de la frecuencia con la que usted realiza estas tareas. Para reducir
la exposición a estas sustancias químicas: trabaje en un área bien
ventilada, y utilice equipo de seguridad aprobado como, por ejemplo,
máscaras contra el polvo que hayan sido específicamente diseñadas
para filtrar partículas microscópicas.
page 16
Page 17

Simbología
Especificaciones
Con doble aislamiento
Canadian Standards
Association
Underwriters Laboratories, Inc.
Voltaje de corriente continua y
alterna
Amperes
Capacidad del
Catálogo
No.
8940-20
Volts
AC
120
Amps
11.5
tanque en
galones
DESCRIPCIÓN FUNCIONAL
30L
(8gal.)
Flujo de aire en
pies cúbicos por
minuto
140
Aspiración
sellada
de agua
152cm
(60")
Para
materiales
mojados o secos
1. Mango
2. Orificio de escape
3. Pestillo del tanque
4. Puerto de entrada
5. Tanque
6. Conjunto de cierre
1
2
6
3
4
5
page 17
Page 18

TIERRA EXTENSIONES ELECTRICAS
¡ADVERTENCIA!
Puede haber riesgo de descarga eléctrica se se
conecta el cable de conexión a tierra incorrectamenta.
Consulte con un electricista certificado si tiene dudas
respecto a la conexión a tierra de la caja del enchufe.
No modifique el enchufe que se proporciona con la
herramienta. Nunca retire la clavija de conexión a tierra
del enchufe. No use la herramienta se el cable o el
endhufe está dañado. Si está dañado, haga que un
centro de servicio
usarlo. Si el enchufe no encaja en la caja del enchufe,
haga que un electricista certificado instale una caja de
enchufe adecuada.
Esta aspiradora debe estar conectada a tierra. En caso de que exista un
mal funcionamiento o de una avería, la conexión a tierra ofrece una
menor resistencia a la corriente eléctrica, lo que ayuda a reducir el
riesgo de un choque eléctrico. Esta aspiradora está equipada con un
cable que cuenta con un conductor y un enchufe para toma de tierra. El
enchufe debe conectarse a una salida apropiada de energia que esté
instalada adecuadamente de acuerdo con todas los códigos y
reglamentos locales.
Esta aspiradora es para uso en un circuito nominal de 120 voltios, y
cuenta con un enchufe para toma de tierra, que es como el enchufe que
se muestra en la Figure A. Un adaptor temporal que es como el que se
muestra en la Figure B, el cual puede utilizarse para conectar este
enchufe a un receptáculo de 2 polos como se muestra en Figure B, en
caso de que no se cuente con una salida a tierra adecuada. El adaptador
temporal debe usarse solo hasta que una salida a tierra adecuada (Figure A) sea instalada por un electrista especializado. La oreja rígida de
calor verde o el talón que se extiende desde el adaptador debe conectado
a tierra permanentemente, tal como la cubierta de una salida conectada
a tierra adecuadamente. Cuando se utilice el adaptador, éste debe ser
puesto en su lugar por un tornillo de metal.
El Código Eléctrico Canadiense prohibe el uso de adaptadores temporales.
Cubierta de un toma corriente
conectado a “tierra”
MILWAUKEE
lo repare antes de
Las herramientas que deben conectarse a tierra cuentan con clavijas de
tres patas y requieren que las extensiones que se utilicen con ellas sean
también de tres cables. Las herramientas con doble aislamiento y clavijas
de dos patas pueden utilizarse indistintamente con extensiones de dos a
tres cables. El calibre de la extensión depende de la distancia que exista
entre la toma de la corriente y el sitio donde se utilice la herramienta. El
uso de extensiones inadecuadas puede causar serias caídas en el
voltaje, resultando en pérdida de potencia y posible daño a la herramienta.
La tabla que aquí se ilustra sirve de guía para la adecuada selección de
la extensión.
Mientras menor sea el número del calibre del cable, mayor será la
capacidad del mismo. Por ejemplo, un cable calibre 14 puede transportar
una corriente mayor que un cable calibre 16. Cuando use mas de una
extensión para lograr el largo deseado, asegúrese que cada una tenga
al menos, el mínimo tamaño de cable requerido. Si está usando un cable
de extensión para mas de una herramienta, sume los amperes de las
varias placas y use la suma para determinar el tamaño mínimo del cable
de extensión.
Guías para el uso de cables de extensión
• Si está usando un cable de extensión en sitios al aire libre, asegúrese
que está marcado con el sufijo “W-A” (“W” en Canadá) el cúal indica
que puede ser usado al aire libre.
• Asegúrese que su cable de extensión está correctamente cableado
y en buenas condiciones eléctricas. Cambie siempre una extensión
dañada o hágala reparar por una persona calificada antes de volver
a usarla.
• Proteja su extensión eléctrica de objetos cortantes, calor excesivo
o areas mojadas.
Calibre mínimo recomendado para
cables de extensión eléctrica*
Amperes
(En la placa)
0 - 5,0
5,1 - 8,0
8,1 - 12,0
12,1 - 15,0
15,1 - 20,0
Largo de cable de Extensión EN(M)
30,4
14
12
10
10
45,7
60,9
12
12
10
--
--
--
--
7,6
16
16
14
12
10
15,2
16
16
14
12
10
22,8
16
14
12
10
10
--
--
--
--
Entrada para “pata” a tierra
“Pata” a tierra
Cubierta de un toma corriente
conectado a “tierra”
Adaptador temporal
“Oreja” del cable verde de “tierra”
page 18
* Basado en limitar la caída en el voltaje a 5
volts al 150% de los amperes.
LEA GUARDE TODAS LAS INSTRUCCIONES PARA
FUTURAS REFERANCIAS.
Fig. A
Tornillo
Fig. B
Page 19

ENSAMBAJE DE LA HERRAMIENTA
¡ADVERTENCIA!
A fin de reducir el riesgo de lesionarse, desconecte
siempre la aspiradora antes de fijar o retirar accesorios,
o antes de efectuar ajustes. Utilice sólo los accesorios
específicamente recomendados. El uso de otros
accesorios puede ser peligroso.
Ensamblaje de la carretilla (Fig. 1)
Ensamble como se muestra en el diagrama. Necesitará un martillo y un
destornillador Philips.
Fig. 1
A
B
F
C
I
G
H
J
K
D
L
E
Instalación del mango (Fig. 2)
Necesitará ya sea un destornillador de punta plana, o bien, una llave de
cubo y una Ilave inglesa, o un par de alicates.
Fig. 2
1. Coloque el mango de la carretilla entre el tanque y el mango lateral a
cada lado del tanque.
2. Apriete firmamente con tornillos de cabeza hexagonal ranurada.
N
M
1. Coloque las ruedas en el bastidor trasero (B) dando golpecitos en el
eje (C), encajando la rueda (D) en el eje y colocando un capuchón
roscado (E) con un martillo.
2. Inserte las piezas de las ruedecillas (G) en el bastidor delantero (F)
y asegúrelas con el destornillador Philips (I).
3. Alinee el bastidor frontal (F) y el bastidor trasero (B) de manera que
encajen y hagan encajar el borde del tanque (J) un las ranuras de
los bastidores frontal y trasero.
4. Asegure los bastidores (B y F) en el tanque colocando los pernos
hexagonales (K) a través de los agujeros de la carretilla y
asegurándolos con tuerca (N) y arandela (M) según se muestra.
5. Inserte las ruedecillas (H) en las piezas de las ruedecillas (G) y
apriete hasta que las ruedecillas encajen.
page 19
Page 20

OPERACION
¡ADVERTENCIA!
Si el floatador está limpio y se mueve libremente y sin
embargo la succión no se cierra cuando el tanque se llena
(lo puede notar si ve agua en el orificio de escape), envíe
la parte superior del motor a la instalación de servicios de
reparación
Aspirar materiales húmedos (Fig. 3)
Al aspirar materiales húmedos, se require ya sea el cartucho de
filtros o el manguito de caucho de los filtros. Quiet los filtros para aspirar
sólidos. Una válvula de flotador cierra la succión cuando el tanque está
lleno (Fig. 3). Asegúrese de que el flotador está limpio y se mueve
libremente el la caja del flotador para asegurar que la vávula del flotador
funciona.Si está aspiradora un gran cantidad de líquido, el cartucho de
filtro se puede saturar y puede sair como una neblina por el orificio de
escape. Si esto ocurre, seque el filtro haciendo funcionar la aspiradora
durante 5 minutos sin aspirar nada.
Fig. 3
MILWAUKEE
más cercana.
caja
floatador
Fig. 4
tapón
agurero de descarga
dispositivo de
entrada
5. Quite el tapón del agujero de descarga. Inserte el dispositivo de
descarga y gírelo en dirección de las manecillas del reloj para
asegurarlo en su lugar (Fig. 5).
NOTA: No corte el lazo de seguridad que fija el enchufe a la reja
metálica de la cubierta. El enchufe deberá utilizarse cuando se aspiren
materiales secos.
Fig. 5
dispositivo de
descarga
Cómo accionar y detener la aspriradora
1. Para encender la aspiradora, ponga el interruptor de encendido y
apagado (ON/OFF) en la posición de encendido (ON).
2. Para apagar la aspiradora, ponga el interruptor de encendido y
apagado (ON/OFF) en la posición de apagado (OFF).
¡ADVERTENCIA!
Para reducir el riesgo de un choque electrico, no dirija la
corriente de descarga a la aspiradora.
Aspirar materiales húmedos mediante el bombeo (Fig. 4 - 8)
1. Siempre desconecte el enchufe del receptáculo de pared antes de
quitar la cubierta del tanque.
2. Quite la cubierta del tanque y los filtros para aspirar sólidos. El
tanque deberá limpiarse también de cualquier escombro o basura.
3. Asegúrese que el manguito de espuma esté correctamente instalado
para aspirar líquidos (Vea “Al aspirar materiales húmedos”).
4. Inserte el aditamento de entrada de la bomba en la base del alojamiento
del motor, sobre la cubierta del tangue. Girelo hasta que el agujero
de descarga quede alineado con el tapón ubicado en la superficie
inferior de la cubierta del tanque (Fig. 4).
6. Vuelva a colocar la cubierta del tanque y asegúrela al tanque con
los pasadores de sujeción.
7. Conecte una manguera para jardín estándar (no incluida) a la válvula
de cierre (Fig. 6).
Fig. 6
8. Antes de comenzar la operación de bombeo, revise que la válvula
de cierre esté en la posición de apagado (OFF) (Fig. 7).
Fig. 7
ENCEDIDO
CEBAR
APAGADO
page 20
Page 21

9. Una la manguera de 32mm (1-1/4") a la toma del tanque (Fig. 8).
Fig. 8
10. Conecte la aspiradora. Active el interruptor en la posición de
enciendido (ON).
NOTA: El interruptor volverá automáticamente a una posición
neutral.
11. Empiece su aspiración de líquidos.
NOTA: Para emplear la característica de bombeo, usted necesitará
aproximadamente 102mm (4") de agua en el fondo del tanque. En
ese momento, usted puede encender la bomba o continuar con la
aspiración de líquidos estándar hasta que el tanque alcance su
máxima capacidad. La aspiradora se apagará automáticamente
cuando esté llena.
Para vaciar un tanque ileno mediante el bombeo
1. Para vaciar un tanque lleno mediante el bombeo, primero separe la
manguera del líquido. Luego el interruptor de encendido y apagado
(ON/OFF) deberá sostenerse manualmente en la posición de
encendido (ON) con la válvula de cierre en la posición de cebar
(priming).
NOTA: La manguera deberá estar instalada a la aspiradora para
poder cebar.
NOTA: Si su aspiradora no abreva, restrinja el flujo de aire, tapando
el extremo de la manguera.
2. Una vez que el líquido comience a fluir a través de la manguera para
jardín, la válvula de cierre deberá activarse a la completa posición
de encendido (ON) para lograr el máximo fluído. Usted tendrá que
sostener manualmente el interruptor de encendido y apagado (ON/
OFF) en la posición de encendido (ON) durante aproximadamente
de 10 a 15 segundos para permitir que el nivel del agua reduzca lo
suficiente y que luego el bombeo continúe automáticamente. La
aspiradora continuará descargando el liquido hasta que den
aproximadamente 102mm (4") de agua en el tanque.
NOTA: La aspiradora es capaz de aspirar al mismo tiempo que
bombea. El vomumen de la aspiracion de líquidos es mayor que el
volumen de descarga y los pasos 1 y 2 habrá necesidad de repetirlos
en caso de que la aspiradora se apagara.
3. Después de haber completado la aspiración y el bombeo, el líquido
restante deberá vaciarse del tanque y el ensamblaje de la bomba
recogedora deberá quitarse y limpiarse.
NOTA: Mantenga la válvula de cierre en la posición de apagado
(OFF) cuando no esté bombeando.
Cómo sacar el líquido del tanque de la aspiradora
1. Desconecte la aspiradora.
2. Retire la parte superior del motor y el adaptador húmedo y póngalos
aparte.
3. Bloquee las ruedas.
4. Vacíe cuidadosamente el contenido en el desagüe del piso.
5. Enjuague y seque el tanque.
NOTA: No guarde la aspiradora si tiene líquido dentro. Haga funcionar
la aspiradora durante unos 10 minutos sin recoger nada para secar
el interior del tanque.
Aspirar materiales secos
Al aspirar materiales secos, se require ya sea el cartucho o el
manguito de caucho de los filtros y el filtro de tela. Coloque el anillo de
montaje sobre el filtro seco de uso repetido y presione hacia abajo hasta
que el anillo esté colocado contra las pestañas de la cubierta del tanque.
Hay otros tipos de filtros que se pueden utilizar con los filtros requeridos
para proporcionar filtración adicional cuando se aspira materiales secos.
Siga las instrucciones que se incluyen con estos filtros. Vacíe el tanque
y limpie los filtros con frequencia. Asegúrese de que los filtros estén
secos antes de usar la aspiradora para recoger material seco. El material seco atasca los filtros húmedos y hace que sea difícil limpiarlos.
Cómo accionar y detener la aspriradora
1. Para encender la aspiradora, ponga el interruptor de encendido y
apagado (ON/OFF) en la posición de encendido (ON).
2. Para apagar la aspiradora, ponga el interruptor de encendido y
apagado (ON/OFF) en la posición de apagado (OFF).
Limpieza y cambio del filtro (Fig. 9)
Instalación delos filtros:
Fig. 9A Fig. 9B
Fig. 9C Fig. 9D
Fig. 9E Fig. 9F
Fig. 9G Fig. 9H
1. Deslice el filtro de cartucho sobre la jaula (Fig. 9A).
2. Coloque el retén del filtro em la parte superior del filtro de cartucho
(Fig. 9B).
3. Sostenga la base de la jaula de la cubierta con una mano y gire el
retén en dirección delas manecillas del reloj para apretarlo (Fig. 9C).
4. Para quitar el filtro con el fin de limpiarlo, vuelva a sostener la base de
la jaula de cubierta con una mano y gire el retén en dirección contraria
a las manecillas del reloj para aflojarlo (Fig. 9D).
page 21
Page 22

5. Deslice el filtro hacia fuera de la jaula (Fig. 9E).
6. Limpie el filtro seco al dar pequeños golpecitos en le interior del
contenedor (Fig. 9F).
Lipmie el filtro seco al enjuagarlo por la parte interna (Fig. 9G).
Limpie los filtros de tela sacudiendo el material suelto y limpiando el
filtro con un cepillo de cerdas suaves (Fig. 9H).
NOTA: Cuando aspire líquidos (con el fin de evitar que una formación
de moho), asegúrese que el filtro de cartucho esté completamente
seco antes de ser instalado nuevamente en la jaula.
Instalación de los filtros (Fig. 10)
1. Deconecte la aspiradora.
2. Retire la parte superior del motor y póngala a un lado.
3. Coloque el cartucho o el manguito de caucho de los filtros en la parte
superior del motor (Fig. 10).
• Si piensa aspirar material seco con una bolsa, abra la bolsa de
filtro de papel y coloque el cuello de cartón en el tubo de toma
de entrada tan a fondo como sea posible.
• Si piensa aspirar material seco y está usando el manguito de
caucho de los filtros, debe usar también el filtro de tela.
Fig. 10
MANTENIMIENTO
¡ADVERTENCIA!
Para reducir el riesgo de una lesión, desconecte siempre
la herramienta antes de darle cualquier mantenimiento.
Nunca desarme la herramienta ni trate de hacer
modificaciones en el sistema eléctrico de la misma.
Acuda siempre a un Centro de Servicio
TODAS las reparaciones.
Mantenimiento de las herramientas
Adopte un programa regular de mantenimiento y mantenga su herramienta
en buenas condiciones. Antes de usarla, examine las condiciones generales de la misma. Inspeccione guardas, interruptores, el cable de la
herramienta y el cable de extensión. Busque tornillos sueltos o flojos,
malos alineamientos y dobleces en partes móviles, asi como montajes
inadecuados, partes rotas y cualquier otra condición que pueda afectar
una operación segura. Si detecta ruidos o vibraciones anormales, apague
la herramienta de inmediato y corrija el problema antes de volver a usarla.
No use una herramienta dañada. Colóquele una etiqueta que diga “NO
DEBE USARSE” hasta que sea reparada (vea “Reparaciones”).
Bajo condiciones normales, no se requiere lubricación hasta que haya
que cambiar los carbones. Despues de 6 meses a un año, dependiendo
del uso dado, envíe su herramienta al Centro de Servicio
mas cercano para que le hagan:
• Lubricación
• Inspección y cambio de carbones
• Inspección mecánica y limpieza (engranes, flechas, baleros,
carcaza, etc.)
• Inspección eléctrica (interruptor, cable, armadura, etc.)
• Probarla para asegurar una adecuada operación
mecánica y eléctrica
MILWAUKEE
MILWAUKEE
para
materiales secas materiales húmedos
PRECAUCIÓN: Tenga cuidado al manejar la parte superior del motor.
Si se cae esta parte, se puede dañar irremediablemente.
4. Vuelva a colocar la parte superior del motor y cierre los pestillos del
tanque.
¡ADVERTENCIA!
Para reducir el riesgo de una lesión, descarga eléctrica
o daño a la herramienta, nunca la sumerja en líquidos ni
permita que estos fluyan dentro de la misma.
Limpieza
Limpie el polvo y suciedad de las ventilas. Mantenga los mangos y
empuñaduras limpios, secos y libres de aceite o grasa. Use solo jabón
neutro y un trapo húmedo para limpiar su herramienta ya que algunos
substancias y solventes limpiadores son dañinos a los plásticos y
partes aislantes. Algunos de estos incluyen: gasolina, turpentina, thíner,
lacas, thíner para pinturas, solventes para limpieza con cloro, amoníaco
y detergentes caseros que tengan amonia. Nunca usa solventes
inflamables o combustibles cerca de una herramienta.
Reparación
Si su herramienta se daña o descompone, envíela completa al centro de
servicio más cercano de los listados en la cubierta posterior de este
manual del operario.
page 22
Page 23

ACCESORIOS
GARANTÍA LIMITADA DE DOS AÑOS
¡ADVERTENCIA!
Para reducir el riesgo de lesión, desconecté siempre
su herramienta antes de colocar o retirar un
accesorio. Use solo accesorios recomendados
específicamente. Otros puenden ser peligrosos.
Para una lista completa de accessorios, refiérase a su catálogo
MILWAUKEE
www.mil-electric-tool.com. Para obtener un catálogo, contacte su
distribuidor local o uno de los centros de servicio listos en la página de
cubierta de este manual.
Cartucho de filtros seco/húmedo
Catálogo No. 49-90-1830
Manguito de caucho
Catálogo No. 49-90-0770
Bolsas filtros sumamenta eficaces (paquete de 5)
Catálogo No. 49-90-0445
Manguera de plástico de 3m x 32cm (10pi. x 1-1/4pulg.)
Catálogo No. 49-90-0110
Tubo extensor de 32mm (1-1/4pulg.) de diámetro
Catálogo No. 49-90-2100
La varilla se conecta a las mangueras con un diámetro interno de 32mm
(1-1/4").
Electric Tool o visite nuestro sitio en Internet:
Todas las herramientas
fábrica y se garantiza que no presentan defectos ni en el material ni de
mano de obra. En el plazo de dos (2) años a partir de la fecha de
compra
MILWAUKEE
baterías inclusive) cuyo examen determine que presenta defectos de
material o de mano de obra. Devuelva la herramienta, con gastos de
envío prepagados y asegurada, y una copia de la factura de compra, u
otro tipo de comprobante de compra, a una sucursal de reparaciones/
ventas de la fábrica
autorizado por
ocasionados por reparaciones o intentos de reparación por parte de
personal no autorizado por
normal, falta de mantenimiento o accidentes.
Las baterías, linternas y radios tienen una garantía de un (1) año a partir
de la fecha de compra.
LOS DERECHOS A REPARACIÓN Y REEMPLAZO DESCRITOS EN EL
PRESENTE DOCUMENTO SON EXCLUSIVOS.
NINGÚN CASO RESPONSABLE DE DAÑOS INCIDENTALES, ESPECIALES
O CONSECUENTES, INCLUYENDO LA PÉRDIDA DE GANANCIAS.
ESTA GARANTÍA ES EXCLUSIVA Y SUSTITUYE A TODA OTRA GARANTÍA,
O CONDICIONES, ESCRITAS U ORALES, EXPRESAS O IMPLÍCITAS DE
COMERCIALIZACIÓN O IDONEIDAD PARA UN USO O FIN DETERMINADO.
Esta garantía le proporciona derechos legales específicos. Es posible
que usted tenga otros derechos que varían de estado a estado y de
provincia a provincia. En aquellos estados que no permiten la exclusión
de garantías implícitas o la limitación de daños incidentales o
consecuentes, las limitaciones anteriores pueden que no apliquen. Esta
garantía es válida solamente en los Estados Unidos, Canadá y México.
MILWAUKEE
), sin cargo alguno, cualquier herramienta (cargadores de
MILWAUKEE
reparará o reemplazará (a discreción de
MILWAUKEE
MILWAUKEE
MILWAUKEE
se prueban antes de abandonar la
o a un centro de reparaciones
. Esta garantía no cubre los daños
, abuso, desgaste y deterioro
MILWAUKEE
NO SERÁ EN
Barredora de goma de 30cm (12pulg.)
Catálogo No. 49-90-2120
Broquilla de 30cm (12pulg.) para limpiar pisos
Catálogo No. 49-90-2110
Cepillo de 30cm (12")
Catálogo No. 49-90-2130
page 23
Page 24

UNITED STATES
CANADA
MILWAUKEE Service
To locate the
authorized service station nearest you, call
factory
SERVICE CENTER or
1-800-414-6527
TOLL FREE • NATIONWIDE
Monday-Friday • 8:00 AM - 4:30 PM • Local Time
In addition, there is a worldwide network of
distributors ready to assist you. Check your
“Yellow Pages” under “Tools-Electric” for the names
of those nearest you.
For further information on
or authorized service station locations,
visit our website at:
www.mil-electric-tool.com
factory
SERVICE CENTER
Service MILWAUKEE
Milwaukee Electric Tool (Canada) Ltd
755 Progress Avenue
Scarborough, Ontario M1H 2W7
Tel. (416) 439-4181
Fax: (416) 439-6210
En outre le réseau de distributeurs est à la disposition de la
clientèle d’un océan à l’autre. Consultez les pages jaunes de
l’annuaire téléphonique pour l’adresse du centre le plus près
de chez vous.
In addition, there is a worldwide network of distributors ready to
assist you. Check your “Yellow Pages”under “Tools-Electric”
for the names of those nearest you.
Corporate Product Service Support -
Warranty and Technical Information
Brookfield, Wisconsin USA
1-800-729-3878
MEXICO
Servicios de MILWAUKEE
Milwaukee Electric Tool
División de : Atlas Copco Mexicana S.A. de C.V.
Blvd. Abraham Lincoln no. 13
Colonia Los Reyes Zona Industrial
Tlalnepantla, Edo. México C.P. 54073
Tels. 5565-1414 5565-4720
Fax: 5565-0925
Además se cuenta con una red nacional de distribuidores
listos para apoyarlo. Vea en las “Páginas Amarillas” sección
“Herramientas Eléctricas”.
MILWAUKEE ELECTRIC TOOL CORPORATION
A Company within the Atlas Copco Group
13135 West Lisbon Road • Brookfield, Wisconsin, U.S.A. 53005
58-14-5130d3 08/03 Printed in U.S.A.
 Loading...