


PC Company Edit Package
User Guide
Insurance Services Office, Inc.
October 2009

Contents
Please Note! 1
Overview 2
Introduction ............................................................................................................................... 2
About This User Guide .............................................................................................................. 2
Minimum System Requirements................................................................................................ 3
Removing Prior Versions........................................................................................................... 3
Installation Instructions.............................................................................................................. 4
Product Support ......................................................................................................................... 5
Getting Started 6
Launching the CEP .................................................................................................................... 6
Main Menu ................................................................................................................................ 6
How to Edit Data 8
Run Edit Job .............................................................................................................................. 8
Re-Run Edit Job ....................................................................................................................... 11
View Submission Analysis Reports ......................................................................................... 12
Delete Edit Jobs ....................................................................................................................... 14
How to Correct Data 16
Run Error Correction Job ......................................................................................................... 16
Re-Run Error Correction Job ................................................................................................... 26
View Error Correction Reports ................................................................................................ 27
Delete Error Correction Jobs ................................................................................................... 28
How to Prepare Submissions 30
Run TL/SC Create Job ............................................................................................................. 30
Re-Run TL/SC Create Job ....................................................................................................... 36
View TL/SC Control Reports .................................................................................................. 38
Delete TL/SC Create Jobs ........................................................................................................ 39
View and/or Print External Tables 41
Appendix A – SAR Reports for Each Statistical Plan 43
Appendix B – Error Correction Reports for each Statistical Plan 44
PC Company Edit Package User Guide Contents • i

Appendix C – TL/SC Reports for each Statistical Plan 45
Appendix D – TL and SC Records Layout 46
Glossary of Terms 47
PC Company Edit Package User Guide Contents • ii

Please Note!
Please read the following important notice before using the information contained in this guide.
IMPORTANT NOTICE FOR USERS OF ISO PRODUCTS AND SERVICES
Please make sure that your company has authorized your use of this product and has complied with the requirements
applicable in the jurisdiction where you plan to use it.
We distribute both state-specific and multistate products and services. We do not distribute all the multistate products
and services for use in every jurisdiction due to corporate policy, regulatory preference, or variations or lack of clarity in
state laws.
We provide participating insurers with information concerning the jurisdictions for which our products and services are
distributed. Even in those jurisdictions, each insurer must determine what filing requirements, if any, apply and whether
those requirements have been satisfied.
Now, as in the past, all of our products and services are advisory, and are made available for optional use by participating
insurers as a matter of individual choice. Your company must decide for itself which, if any, ISO products or services are
needed or useful to its operation and how those selected for use should be applied. We urge that you be guided by the
advice of your attorneys on the legal requirements.
October 2009
© Insurance Services Office Inc., 2009
ISO is a registered trademark of Insurance Services Office, Inc.
All other product or corporate names are trademarks or registered trademarks of their respective companies.
PC Company Edit Package User Guide Please Note! • 1

Overview
Introduction
The ISO Company Edit Packages (CEPs) assist users in detecting errors in their statistical data prior to
submitting it to ISO. The editing criteria contained in the CEPs are the same as thos e used to check your
data at ISO as part of our receipt and acceptance systems. In addition to being able to pre-edit data, the
CEPs also allow users to view reports, correct data and prepare it for submission. Using the CE P to correct
data errors prior to submission to ISO can reduce possible assessments and, ultimately, ensure better data
quality.
The PC CEPs include a graphical user interface (GUI) that facilitates easy navigation through the various
functions. Each screen that can be accessed from the Main Menu follows in a logical manner. All of the
information required for each function is contained on a single screen.
About This User Guide
This guide provides system requirements, installation procedures and detailed instructions for the use of the
Personal Computer (PC) version of ISO’s Company Edit Packages. This guide applies to the PC CEPs for
the following ISO statistical plans:
Commercial Statistical Plan (CSP/CSP+) and Commercial Statistical Plan – Intermediate Level
(CSP-I) - Statistical Plans combined and referred to as "CSP" in the CEP
Commercial Statistical Agent Plan (CSAP)
Personal Automobile Statistical Plan/Personal Lines Statistical Agent Plan for Automobile
(PASP/PLSAP(AUTO))
Personal Lines Statistical Plan for Other than Automobile/Personal Lines Statistical Agent Plan
for Other than Automobile (PLSP(OTA)/PLSAP (O TA ))
The sample screens shown in this user guide are from the CSP CEP; however, the screens for the PC CEPs
for all the statistical plans are similar. Specific notations are included where there are differences in the
CEP screens among the plans.
This guide assumes familiarity with statistical reporting requirements (as detailed in ISO’s Annual Calls for
Statistics and other related ISO statistical circulars a nd pu blications) and a basic knowledge of your
personal computer, which includes navigating through Microsoft
®
Windows.
PC Company Edit Package User Guide Overview • 2

Minimum System Requirements
The following system requirements apply to the ISO PC CEPs:
Currently supported Microsoft
Microsoft
®
Office 2003
Pentium II Processor or higher
64 MB of RAM
CD-ROM drive (for installation only)
372 MB hard disk space for CSP installation
300 MB hard disk space for CMSP installation
10 MB hard disk space for PASP and PLSP(OTA) installation
Additional storage for output files as dictated by company’s volume of data
Note: CEP's have not been extensively tested for Microsoft's Vista Operating Systems
Your screen resolution should be set to 1024 by 768 pixels. If it is not set to that resolution, the screens of
the CEP may be cut off.
Due to variations among the many versions of Windows, and in an effort to most effectively address PC
CEP questions, we are limiting our technical support to Microsoft
this is not to suggest that the PC CEPs will not function in environments not currently supported by
Microsoft
®
.
We believe the PC CEPs will function in some of the older environments but since we do not test on those
operating systems, we cannot make any guarantees. There will be limited support available to those
companies installing and running the CEPs in unsupported Microsoft
respond to company questions to the best of our ability, but we may not be able to resolve all prob lems.
The applications are designed to be installed and run only on a local drive, not on a network drive. ISO
does not support the installation and running of the PC CEPs on a network. How ever, this does not mean
that your data files cannot be stored on a network drive.
Microsoft
required. If MS
Wordpad or MS
®
Word is recommended for viewing the SAR, error correction and TL/SC reports, but it is not
®
Word is not installed on your computer, the reports will automatically open in MS®
®
Notepad.
®
Windows operating systems
®
supported operating systems. However,
®
environments. We will attempt to
Removing Prior Versions
It is important that you remove any prior versions of a particular CEP before installing subsequent versions
– e.g. you must remove the second quarter CSP CEP before installing the third quarter CSP CEP.
To remove prior versions of the CEP from your PC, follow the instructions below. If you are a first time
user of the CEP or have no prior versions installed, proceed to the Installation Instructions
The ISO CEPs update and access a database behind the scenes for job trackin g pur poses and application
use. Please note that when removing a CEP from your machine, this database is also removed.
1. Click on the Start button and choose Settings.
2. Click on the Control Panel and select Add or Remove Programs.
3. Select the older version of the CEP from your hard drive.
4. Click on the “Change/Remove” button.
5. Click the “Yes” button on the confirm deletion message box.
6. Click the “Yes to All” button on the remove shared files message box.
7. Click the “OK” button on the remove program from your computer message box.
8. Click the “OK” button to return to the Control Panel.
PC Company Edit Package User Guide Overview • 3
section.

Installation Instructions
Before installing the CEP, please be sure that no prior versions of the particular CEP that you want to
install are loaded on your PC. For instructions on Removing Prior Versions
1. Start up Windows. It is recommended that no other applications be open.
2. Place the CEP CD in the CD-ROM drive. The CEP CD includes an installation wizard that will
guide you through the installation process. The Wizard will automatically start up.
3. The screen that is first displayed is the Welcome screen. This screen tells you to exit all other
programs before installing the CEP. If you still have applications open at this point, exit the
wizard and close all open applications. Otherwise, click “Next”.
4. The TL Group# registration screen is next and requires that you enter the 4 digit TL Group# that is
associated with the subscription of the CEP that is being installed on your PC. When you have
completed this information, click “Next”.
5. Choose the destination for the location of the program. The application will default to your C:
drive and will put the programs into the <Stat Plan>#Qyy folder, where <Stat Plan> will be either
CSP, , PASP or PLSP, the #Q will be the number of the quarter and the yy will be the last two
digits of the year of the release. For example, CSP1Q08 will be the default for the first quarter
2008 CSP release. When you have selected the desired location for the program, click “Next”.
Please note that the ISO CEPs cannot be installed or run on a network drive.
6. The next screen confirms that there is enough information to start copying the program files to
your computer. If you would like to change any of the information on the previous screens, use
the “Back” button. If not, click “Next”.
7. The CEP programs will now install. Some of the files that are installed are .dll files. There may
be a point in the installation where you will be asked if you want to replace the .dll files that you
have on your machine with a newer version from the CEP CD. If you have customized your
system files in any way or you have other applications that rely on the old .dll files, keep the old
ones or contact ISO for more information.
8. When the installation is complete, click the “Finish” button to exit the setup.
9. Re-boot your computer.
The following folders are created on your machine as part of the CEP installation:
CSP/CSP-I CSAP PASP PLSP(OTA)
, see the previous section.
Batch
Data
FrontEnd
Load
MerantRTS
Tables
Help
X X
X X X X
X X
X X
X X
X X X X
X X X X
PC Company Edit Package User Guide Overview • 4

Product Support
New Enhancements to our Data-Editing Resources Website:
http://www.iso.com/dcs/data-editing.html
In an ongoing effort to improve our customer service, and be more responsive to the needs of our
customers, we have made enhancements to our website that will broaden the channels of communication
for all of ISO's statistical data-editing resources. This enhanced website includes detailed information
regarding ISO's Company Edit Packages, Actuarial Edit Definitions, EditTables, and product ordering.
Some of the key enhancements to this website include:
Detailed Product Descriptions
Minimum System Requirements
Anticipated Release Schedule for the Company Edit Packages
Customer and Support Information
User Guides and Product Documentation
Periodic Product Announcements
Frequently Asked Questions (FAQs)
Product Ordering Instructions and Forms
We continue to look for new ways to improve our customer service and encourage you to visit our website.
For all feedback and questions regarding these enhancements and our products and services, please contact
us at DataControl@iso.com.
Customer support is provided by the ISO User Help Desk. The User Help Desk is available to answer any
questions you may have regarding the CEPs. Support is available Monday through Friday from 7:30 a.m.
to midnight Eastern Standard Time. The telephone number for all area codes is (800) 888-4476.
PC Company Edit Package User Guide Overview • 5

Getting Started
Launching the CEP
Once the CEP has been successfully installed, the programs can be accessed for your use in one of three
ways.
You can invoke the CEP programs by selecting Start>Programs>(CEP Name)>(CEP)FrontEnd. For
example, for the first quarter 2008 CSP CEP, select Start>Programs>CSP1Q08>CSPFrontEnd.
You can also invoke the CEP by going into Windows Explorer and selecting the executable file from the
FrontEnd folder. The executable file names are as follows:
For CSP and CSP-I= CSP#Qyy.exe
For CSAP = CSAP#Qyy.exe
For PASP = PASP#Qyy.exe
For PLSP(OTA) = PLSP#Qyy.exe
The #Q is the number of the quarter (1Q for first quarter, 2Q for second quarter, etc). The yy is the last two
digits of the year of the release. So for the first quarter 2008 CSP CEP, the name of the .exe would be
CSP1Q08.exe.
You can also choose to create a shortcut on your desktop for launching the CEP. To do this, locate the
folder where you installed the CEP. In the FrontEnd folder, right click the CEP .exe and choose “Send to”
from the menu that appears. Select “Desktop (create shortcut)”. This will put an icon on your desktop for
easier access to the application, named in the same way as the executable file.
When the program is launched, the first screen displayed is the Main Menu.
Main Menu
The Main Menu is the starting point for all of the utilities available for checking and reviewing your data.
Each button on the Main Menu accesses a particular function.
The functions are grouped into categories. These categories are Edit Data, Correct Data, Prepare
Submission and View/Print External Tables (CSP and CSAP only).
PC Company Edit Package User Guide 2BGetting Started • 6

A screen print of the Main Menu is shown below followed by a brief description of ea ch cat ego ry .
The options in the Edit Data category allow you to run your statistical data files through the edit programs,
review the results and delete any old edit jobs that were previously run. This can be accomplished by
utilizing the following functions: Run Edit Job, Re-Run Edit Job, View Submission Analysis Reports an d
Delete Edit Jobs.
The options in the Correct Data category allow you to correct any data that may have been flagged in error
when edited, view reports and delete any old error correction jobs that were previously run. This can be
accomplished by utilizing the following functions: Run Error Correction Job, Re-Run Error Correction
Job, View Error Correction Reports and Delete Error Correction Jobs.
The options in the Prepare Submission category assist you in preparing your data for submission to ISO.
You can create Transmittal Letter and Submission Control (TL and SC) records, view TL/SC reports and
delete any old TL/SC create jobs that were previously run. This can be accomplished by utilizing the
following functions: Run TL/SC Create Job, Re-Run TL/SC Create Job, View TL/SC Control Reports and
Delete TL/SC Create Jobs.
The View/Print Tables option in CSP and CMSP allows you to view and print external tables.
In addition, the Main Menu also includes Help and Exit command buttons. The Help button will allow you
to access an online version of this user guide. The online guide is easily accessible from all of the screens
in the CEP and provides helpful search features.
The Exit button will exit you from the CEP.
The title bars on each screen will tell you exactly where you are, linking the current screen to the function
you selected on the previous screen.
PC Company Edit Package User Guide 2BGetting Started • 7
How to Edit Data
Run Edit Job
The Run Edit Job option (within Edit Data on the Main Menu) allows you to check the validity of your
data. Examining your data with the help of the CEP allows you to find errors as soon as possible so you
can then correct them prior to submitting the data to ISO. The edits check fields and also check th e
relationships between the fields. Field edits check whether the code or value report e d in a specific field on
a transaction record is valid. Relationship edits check whether the relationships between two or more fields
on a transaction record are valid. The edits contained in the CEPs are the same edits used to check your
data at ISO.
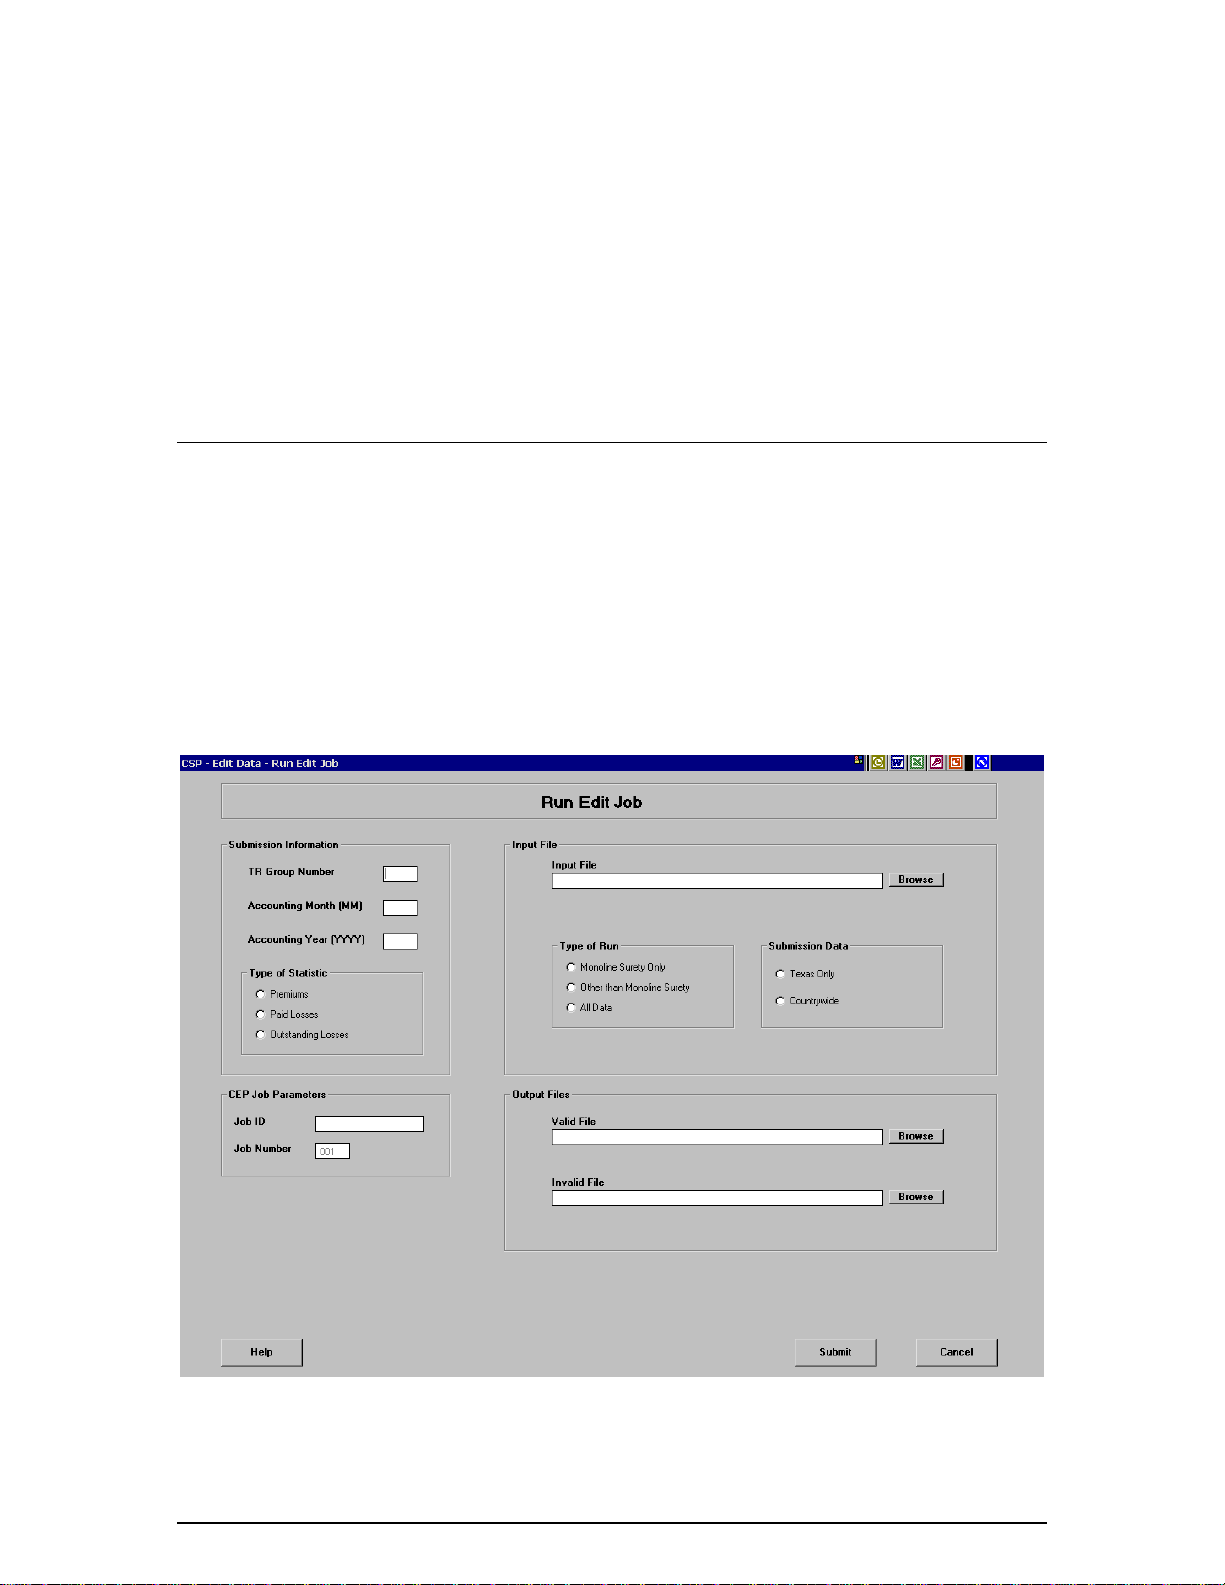
A sample print of the Run Edit Job screen is shown below.
All of the information on the Run Edit Job screen must be completed. If any of the boxes or option buttons
is left blank or filled in with invalid information, an error message for each invalid entry will be displayed
upon submitting.
PC Company Edit Package User Guide 3BHow to Edit Data • 8

Submission Information
The Submission Information section (in the upper left of the Run Edit Job screen) consists of the TR Group
Number, Accounting Month, Accounting Year and Type of Statistic.
The TR Group Number is the four digit statistical reporting number under which you report your data to
ISO. The TR Group Number must be selected from the drop-down menu.
The Accounting Month refers to the month the transactions were entered on the company books (not to the
month of the edit run). The Accounting Month must be a two digit number between 01 and 12, e.g. 01 =
January, 02 = February, ..., 12 = December. The Accounting Month must be typed in.
For groups that report on a monthly basis, the accounting month is the month in which transactions
were entered on the company books (01 to 12).
For groups that report on a quarterly basis, the accounting month is the last month of the quarter (03,
06, 09 or 12).
For groups that report on an annual basis, the accounting month is December (12).
The Accounting Year refers to the year the transactions were entered on the company books (not to the
year of the edit run). The Accounting Year must be a four digit number, e.g. 2007, 2008, etc. The
Accounting Year must be typed in.
The Type of Statistic refers to whether the input data file that is being prepared for an edit run contains
premium, paid loss or outstanding loss records. Click on the radio button that applies. The Type of
Statistic is not a required selection for the PLSP(OTA) CEP and the radio buttons will be grayed.
CEP Job Parameters
The CEP Job Parameters section (in the lower left of the Run Edit Job screen) consists of the Job ID and
Job Number.
The Job ID is specified by the user and helps to uniquely identify each job. You may find it helpful to
specify a Job ID that you can easily associate with a particular edit job. The Job ID can be any name you
choose up to 16 characters. For example: RUN_PAIDLOSS_001.
The Job Number is what uniquely identifies each edit job to the program. The information for the jobs
you run is stored in a database. The database requires that each job have a unique identifier that will
maintain the individuality of each job. The program automatically assigns a Job Number which you will
not be able to change. You may also find the Job Number helpful for remembering what was run in a
particular job.
Input File
The Input File section (in the upper right of the Run Edit Job screen) consists of the Input File, Type of Run
and Submission Data informati on.
The Input File contains the transaction records that you would like processed through the edits. The input
file must be in ASCII format. Acceptable file extensions for input files are .dat and .txt. The path of the
file can be typed directly into this box or you may use the “Browse” button to locate the file on your hard
drive or network drives. You will not be able to read from a floppy drive or CD-ROM drive -- only from
the hard drive or network drives.
Please be sure that the records in the Input File have the correct record length for each statistical plan. For
CSP/CSP+/CSP-I, the record length must be 150 bytes. For CSAP, the record length must be 80 bytes.
For PASP, the record length must be 300 bytes. For PLSP(OTA), the record length must be 150 bytes. It
is not necessary for your input files to contain TL or SC records in order to edit them in the CEP.
PC Company Edit Package User Guide 3BHow to Edit Data • 9

For CSP/CSP-I and CSAP, the Type of Run must be selected. The purpose of the Type of Run is to tell
the program whether Monoline Surety data is or is not included in the input file. The Type of Run options
are Monoline Surety Only, Other than Monoline Surety and All Data. ISO collects and processes Surety
and Monoline Fidelity data on behalf of the Surety Association of America. The Surety and Monoline
Fidelity edits are included in the CEP as a courtesy to companies reporting other lines of business to ISO.
These edits are known as the V module edits.
Select Monoline Surety Only if the input file contains only surety and monoline fidelity data. The
input file will be run through the V module edits only.
Select Other than Monoline Surety if the input file does not contain surety or monoline fidelity
data. The input file will be run through all edit modules other than the V module. It will not be
processed through the V module edits.
Select All Data if the input file contains both monoline surety and other than monoline surety data.
The input file will be run through all of the edits (i.e. all edit modules including the V module edits).
For CSP/CSP+, the Submission Data indicates that the input file includes either Texas Only data or
Countrywide data. The Submission Data parameter acts as a proxy for the submission count, which is used
for identifying submissions to ISO. The radio buttons for Submission Data will be grayed out for all
statistical plans other than CSP/CSP+.
Select Texas Only if the input file contains CSP+ data only (reported to ISO as a supplemental
submission with a submission count of 42 or greater).
Select Countrywide if the input file contains records for some or all of the states (i.e. other than
Texas CSP+ data submissions).
For editing purposes, your CSP data must be processed separately from your CSP+ data, consistent with the
way in which it is reported to ISO.
Output Files
In the Output Files section (in the lower right of the Run Edit Job screen), you must designate the output
files to which valid and invalid records will be written.
The Valid File will include all the records that have passed the edit criteria.
The Invalid File will include all the records that did not pass the edit criteria (i.e. those that generated
errors).
The path of the files can be typed into these boxes or you may use the “Browse” button to locate the
directory or folder where the files are to be saved. You cannot save output files to your floppy drive or
CD-ROM drive -- only to the hard drive or network drives.
When you have completed all the information on the Run Edit Job screen, you can then run the job by
clicking the “Submit” button at the lower right of the screen. When the file has run through to completion,
the following message will be displayed:
PC Company Edit Package User Guide 3BHow to Edit Data • 10

The Cancel button on the Run Edit Job screen will return you to the Main Menu at anytime prior to
selecting “Submit”. However, if you have already submitted a job, selecting the Cancel button will not
stop that job from running.
The reports generated for the edit jobs (including the error listing report) can be viewed by accessing the
View Submission Analysis Reports selection from the Edit Data box on the Main Menu. The Valid and
Invalid output files will be written to the location you specified in the Run Edit Job screen.
Re-Run Edit Job
The Re-Run Edit Job option allows you to re-process jobs that were previously run through the edit
programs. You may want to re-run an edit job if incorrect information was specified for the original edit
job run, if the output files or SAR reports from the original run were deleted, or if you directly modified
data in the input file. Using the Re-Run Edit Job option (instead of the Run Edit Job option) will save you
a little work in specifying job parameters.
When you select the Re-Run Edit Job option from the Edit Data box on the Main Menu, a window will be
displayed listing the jobs that are available for re-processing.
A sample print is shown below.
The jobs are listed according to the Job Number, Accounting Date (mm/yyyy) and Job ID and are ordered
by the Job Number. Select (by single clicking) the desired job from the window, and the information
regarding the job as originally specified will be populated to a Re-Run Edit Job screen (which is the same
as the Run Edit Job screen).
You will be able to change all of the fields on the screen except for the Job Number. The Job Number
cannot be changed because this is what uniquely identifies a particular job in the program’s datab a se. It is
important that each job have a unique identifier so that the information associated with each job can be
easily recalled and is not confused with information from another job. Any information entered on the rerun screen will replace the information that was originally entered for that job. You will not be able to go
back to what was entered prior to re-running, unless you cancel before submitting.
PC Company Edit Package User Guide 3BHow to Edit Data • 11

For example: If on the original edit run you entered 03 as the month for Job Number 001, then changed the
month to 06 on the re-run and submitted the job, the 03 will be replaced by the 06 as the month for Job
Number 001. If, however, you changed the month to 06 and then cancelled before submitting, the
information will still reflect what was originally entered for that job (03).
The SAR reports will also reflect any new information that was specified when re-running a job.
Please refer to the Run Edit Job section of this guide for instructions on completing the information on the
Re-Run Edit Job screen.
When you have completed all the information on the Re-Run Edit Job screen, you can then run the job by
clicking the “Submit” button at the lower right of the screen. When the file has run through to completion,
a message, similar to the one after running an edit job, will be displayed.
The Cancel button on the Re-Run Edit Job screen will return you to the Main Menu at any time prior to
selecting “Submit”. However, if you have already submitted a job, selecting the Cancel button will not
stop that job from running.
The reports generated for the Re-Run Edit Jobs (including the error listing report) can be viewed by
accessing the View Submission Analysis Reports selection from the Edit Data box on the Main Menu. The
Valid and Invalid output files will be written to the location you specified in the Re-Run Edit Job screen.
View Submission Analysis Reports
After a job has been run (or re-run), the SAR reports can be viewed by accessing the View Submission
Analysis Reports selection from the Edit Data box on the Main Menu. Upon selecting this option, you will
be presented with a window that lists the jobs that have reports available for viewing. These jobs are listed
according to the Job Number, Accounting Date (mm/yyyy) and Job ID and are ordered by the Job Number.
A sample print of the View Submission Analysis Reports screen is shown below.
PC Company Edit Package User Guide 3BHow to Edit Data • 12

To view the SAR report for a specific job, select the job (by single clicking) from the window. A window
will then display a list of the SAR reports created.
A sample print of the report list is shown below.
Select (by double clicking) the desired report from the window. The SAR reports will automatically be
opened with MS
of the headings on the SAR reports are not aligned, be sure that the font is set to Courier New, 8 point. If it
is not, select all and change the font to Courier New, 8 point. If MS
computer, the SAR reports will open in MS
®
Word. Standard MS® Word functionality will apply for navigation and printing. If any
®
®
Wordpad or MS® Notepad.
Word is not installed on your
The SAR reports include an Error Listing (showing each transaction record together with any errors
assigned), along with a number of control reports. Reference Appendix A for a list of the SAR reports that
are available for each statistical plan.
The Module and State Summary Reports of the SAR will tell you whether each module would be accepted
or rejected by ISO. An accepted module may or may not require error correction. A rejected module
requires some corrective action.
If the module is assigned an Accepted – Error Correction not Required (Accepted within
Tolerance) status, this means that the module has no errors or a small enough volume of errors to fall
within the tolerances allowed by ISO. No error correction is required. If this is the status of all
modules in the file, you may be ready to prepare your submission to send to ISO. Please refer to the
Prepare Submission section of this user guide for inst r ucti o ns.
If the module is assigned an Accepted – Error Correc tion Re quired (Accepted and Exceeds
Tolerances) status, this means that there are enough errors to exceed the tolerances allowed by ISO.
Error corrections would have to be performed if the file were sent to ISO as is. To avoid this, you
could correct the records that are in error using the Error Correction function of the CEP. Please refer
to the Correct Data section of this user guide for instructions.
If the module is assigned a Rejected – Resubmission Required (Rejected) status, this means that a
significant portion of the dollar amounts and/or record counts are in error. If sent to ISO as is, you
would be required to resubmit. To avoid this you could correct the records that are in error using the
PC Company Edit Package User Guide 3BHow to Edit Data • 13

Error Correction function of the CEP. Please refer to the Correct Data section of this user guide for
instructions.
If the module is assigned a Rejected – Resubmission not Allowed status, this means that some data
is incorrectly coded and it could not be assigned to any module. The data is routed to the Invalid
Module. If the data that is routed to this module should not be reported to ISO, then delete it from
your input file. If the data should be reported, then error corrections would have to be performed.
Refer to the Correct Data section of this user guide for instructions.
Delete Edit Jobs
You may want to delete edit jobs if they are incorrect or outdated. Deleting a job will remove all of the
information associated with that job from the application’s database and the job will no longer be available
for re-running or viewing reports. It will not, however, delete the output files (Valid and Invalid data files)
that were created.
To delete edit jobs, select Delete Edit Jobs from the Edit Data box on the Main Menu. Upon selecting this
option, a window listing the jobs that are available for deletion will be displayed. The jobs are listed
according to the Job Number, Accounting Date (mm/yyyy) and Job ID and are ordered by the Job Number.
A sample print of the Delete Edit Jobs screen is shown below.
To delete a specific job, select it (by single clicking) from the window and click “Delete” at the lower right
of the screen. A warning message will appear confirming whether or not you want to delete the one that
was chosen.
To delete more than one job at a time, select the first one that you would like to delete, then hold down the
Control key while selecting the second, third, etc. and click “Delete”.
If you would like to delete a block of jobs, select the first job, hold down the Shift key, then select the last
job in the block and click “Delete”.
PC Company Edit Package User Guide 3BHow to Edit Data • 14

A warning message will appear for each job that was selected, confirming whether or not you would like to
delete the jobs. Clicking “No” in any of the confirmation messages will cancel the delete request and
return you to the Delete Edit Jobs window. Clicking “Yes” will delete the job(s) and they will be removed
from the list.
PC Company Edit Package User Guide 3BHow to Edit Data • 15

How to Correct Data
Run Error Correction Job
The Error Correction feature (within Correct Data on the Main Menu) allows you to make corrections to
data that was found to be in error by the edit programs. Instead of modifying your statistical data directly,
you may choose to use this feature.
An Error Correction Job requires the creation of parameter records. The parameter records tell the
application which fields on the input invalid records are to be corrected and what the new values should be.
The parameter records use sequence numbers to identify the transaction records to be corrected. The
sequence numbers can be found on the SAR Error Listing Report, which can be viewed by accessing the
View Submission Analysis Reports selection from the Edit Data box on the Main Menu.
The Run Error Correction Job screen allows you to create the necessary parameter records and to run an
error correction job. After the error correction job has been submitted, data that was in error will have been
modified according to your specifications.
Running an error correction job simply modifies the statistical records that you specify. It does not indicate
whether the modifications made are valid. To check the validity of the changes applied to the records, you
should run the Corrected File through the edits by selecting Run Edit Job (or Re-Run Edit Job) from the
Edit Data box on the Main Menu.
Please be aware that you cannot use the CEP to correct data that was found to be in error after
submitting to ISO. The error correction feature in the CEP is strictly for correcting errors in data
prior to submitting to ISO. Also, any mention of the SAR in the Error Correction section or any other
section of this user guide refers to the SAR that is generated from the CEP, not an SAR that is returned to
you from ISO for data submitted.
PC Company Edit Package User Guide 4BHow to Correct Data • 16

A sample print of the Run Error Correction Job screen is shown below.
All of the information on the Run Error Correction Job screen must be completed. If any of the boxes or
option buttons are left blank or filled in with invalid information, an error message for each invalid entry
will be displayed upon submitting.
Error Correction Submission Information
The Submission Information section (in the upper left of the Run Error Correction Job screen) consists of
the TR Group Number, Accounting Month and Accounting Year.
The TR Group Number is the four digit statistical reporting number under which you report your data to
ISO. The TR Group Number must be selected from the drop-down menu.
The Accounting Month refers to the month the transactions were entered on the company books (not to the
month of the error correction run). The Accounting Month must be a two digit number between 01 and 12,
e.g. 01 = January, 02 = February, … 12 = December. The Accounting Month must be typed in.
For groups that report on a monthly basis, the accounting month is the month in which transactions
were entered on the company books (01 to 12).
For groups that report on a quarterly basis, the accounting month is the last month of the quarter (03,
06, 09 or 12).
For groups that report on an annual basis, the accounting month is December (12).
The Accounting Year refers to the year the transactions were entered on the company books (not to the
year of the error correction run). The Accounting Year must be a four digit number, e.g. 2003, 2004, etc.
The Accounting Year must be typed in.
PC Company Edit Package User Guide 4BHow to Correct Data • 17

Error Correction CEP Job Parameters
The CEP Job Parameters section (in the lower left of the Run Error Correction Job screen) consists of the
Job ID and Job Number.
The Job ID is specified by the user and helps to uniquely identify each job. You may find it helpful to
specify a Job ID that you can easily associate with a particular error correction job. The Job ID can be any
name you choose up to 16 characters. For example: EC_PREM_001.
The Job Number is what uniquely identifies each error correction job to the program. The information for
the jobs you run is stored in a database. The database requires that each job have a unique identifier that
will maintain the individuality of each job. The program automatically assigns a Job Number which you
will not be able to change. You may also find the Job Number helpful for remembering what was run in a
particular job.
Error Correction Input Files
The Input Files section (in the upper right of the Run Error Correction Job screen) consists of the Input
Files (Invalid File generated as output of an edit job and the Parameter Correction File created as part of
this screen), Type of Statistic, Action, and Parameter Information.
The Invalid File contains the records which need correcting. This file is the output invalid file that was
generated as part of an edit job.
The Input Invalid file must be in ASCII format. Acceptable file extensions are .dat and .txt. The path can
be typed directly into this box or you may use the “Browse” button to locate the file on your hard drive or
network drives. You will not be able to read from a floppy drive or CD-ROM drive -- only from the hard
drive or network drives.
The Parameter Correction File will contain the parameter records created by the user on this screen. You
can choose a parameter file that already exists, in which case the parameter records contained in the file
will be populated to the screen.
The Parameter Correction file must be in ASCII format. Acceptable file extensions are .dat and .txt. The
path cannot be typed directly into this box. You must use the “Browse” button to name a new Parameter
Correction file or locate an existing Parameter Correction file on your hard drive or network drives.
Attempting to type or delete anything in the box will flash a message up on the screen reminding you to use
the “Browse” button. You will not be able to read from a floppy drive or CD-ROM drive -- only from the
hard drive or network drives.
The Action describes the type of error correction parameter record you are creating for error correction
purposes. The Action is used in combination with the corrective parameter information also specified on
this screen. The corrective parameter information consists of the Starting Sequence number, Ending
Sequence number, Start Position, Length and New Value.
The Starting Sequence is the sequence number of the first record to which modifications will be
applied. It is 8 positions long and can be found on the SAR and is displayed to the right of each
invalid transaction in the SAR error listing report. The starting sequence number must have leading
zeros, which the program will automatically populate. For example, if the sequence number is
00000001, enter a 1 in the starting sequence box and the program will fill in the leading zeros.
The Ending Sequence is the sequence number of the last record to which modifications will be
applied. It is 8 positions long and can be found on the SAR and is displayed to the right of each
invalid transaction in the SAR error listing report. Leading zeros will also be automatically populated.
PC Company Edit Package User Guide 4BHow to Correct Data • 18

The Start Position is the three digit number identifying the first (left most) position of the data string
being corrected. The start position does not need to correspond to the actual first position of a
statistical plan field – just the first position of any string that you would like to change. Leading
are required and will be automatically populated by the program. For example, the first position of
the transaction record would be 001, the second position would be 002, etc.
he Length is the single digit number having a value of 1 through 9 which specifies the length of the
T
data string to be corrected. The length does not need to correspond to the actual length of a statistical
plan field – just the number of positions of any string that you would like to change. For example, if
the number of bytes to be changed is 1 position long, the length would be 1, if the number of bytes to
be changed is two positions long, the length would be 2, etc.
he New Value is the modified value needed to correct the error. It should be left justified. The
T
remaining positions of the field are to be left blank. The number of positions of the new value mu
match the length that was indicated in the “Length” field.
When cr ting parameter records, you may choose to make single record modifications or global record
modifications. Single Record Modifications involve correcting one record at a time. The starting and
ending sequence numbers will be the same. Global Record Modifications involve correcting more than
one record at a time, in a continuous range. The starting sequence would be the first record and the ending
sequence would be the last record in the range.
T
outstanding loss record. It must be selected for each action taken. The type of statistic for the parameter
records must be the same as those in the (input) invalid file that you are correcting.
A
correction. An action must be selected for each set of parameters that are entered. The four actions that
can be used for error correction are Accept, Change, Continuation and Delete.
ea
he Type of Statistic refers to whether the parameters records will be applied to a premium, paid loss or
s stated above, the action determines how the records in the (input) invalid file will be handled for error
zeros
st
The Accept Action
The Accept action is what is c only referred to as the Accept “feature” of the package.
he Accept action instructs the program to put a record into the output file, without regard to the
T
errors assigned to the record. In other words, this allows you to put an unedited record or a record
cannot pass the edits directly into the output file.
ou will only have to enter the Starting Sequence and Ending Sequence numbers of the records that
Y
you would like to accept. The Start Position, Length and New Value boxes will be grayed out. See
examples 1 and 2 below:
xample 1 (Single Record Accept): Accept record 00000118 as shown below.
E
omm
that
PC Company Edit Package User Guide 4BHow to Correct Data • 19

Example 2 (Global Record Accept): Accept records 00000010 to 00000014 as shown below.
hen the Starting and Ending Sequence number boxes have been filled in, click th e “Add” button.
W
This will create a parameter record and add it to the box at the right.
The parameter that is added to the window will look something like this:
99993310000001000000014
A
The A in the 1
The 2
The 6
The 7
The 8
The 9
nd
th
used. For October, 0 (zero) is used. For November, - is used. For December, & is used.
th
th
represented by a 2 and Outstanding Loss is represented by a 3.
th
The 17
st
position i ccept action.
to the 5th positions are the group number (in this case 99
position is the month (in this case 3). For January through Se
ndicates that this is an A
99).
ptember, 1 through 9 is
position is the year. This represents the last digit of the year (in this case 3).
position is the Type of Statistic – Premium is represented by a 1, Paid Loss is
to the 16th positions are the starting sequence number (00
th
to the 24th positions are the ending sequence number (00000014).
000010).
lease note that for PASP CEP, the parameters that are added to the window will not include the
P
group number, month, year or type of statistic.
If an e r was made when completing the information in the Starting and Ending Sequence boxes,
rro
and you would like to delete it, select it from the box at the right, then click the “Delete” button to
remove it.
The Change Action
The Change action is the most ommonly used action. It permits the correction of field(s) in error on
c
any record or range of records as identified by the sequence numbers. For CSP/CSP-I, CSAP and
PLSP(OTA), you may make up to four changes to a particular record or group of records. If more
than four changes are necessary, then you can use the Continuation parameter record. For PASP, yo
u
may make up to nine changes to a particular record or group of records at one time. No additional
record changes can be made and the Continuation parameter record does not apply.
PC Company Edit Package User Guide 4BHow to Correct Data • 20

A sample print of the PASP parameter section is shown below.
ou will have to enter the Starting Sequence number, Ending Sequence number, Start Position,
Y
Length and New Value for the records that you would like to change. See examples 3 to 6 below
xample 3 (Single Record Change): If you have one record from the invalid file that has an error, you
E
can enter the sequence number of the record (00000002) as the starting and ending sequence,
specifying the Start Position (60), Length (5) and New Value (12345) as sho wn below. This wil
change what is currently in positions 60 to 64 of the invalid record with sequence number 2 from its
original value to 12345.
Example 4 (Single Record Change): If you have one record from the invalid file that has several
errors, you can enter the sequence number of the record (00001016) as the starting and ending
sequences, specifying the Start Positions (1, 8 and 10), Lengths (4, 1 and 6) and New Values (444
and 123456) as shown below.
:
l
4, 1
PC Company Edit Package User Guide 4BHow to Correct Data • 21

Example 5 (Global Record Change): If you have twenty consecutive records from the invalid file
(00000001 – 00000020) that have the same error and you wou ld like to change the fields in error
those records to the same new value, you can enter the sequence number of the first record to the
twentieth record, specifying the Start Position (32), Length (1) and New Value (2) as shown below
on
.
Example 6 (Global Record Change): If you have ten consecutive records from the invalid file
(00000100 – 00000110) that have the same errors that you would like to chang e to the same va
you can enter the sequence number of the first record to the tenth record, specifyin g the Start
Positions (15, 25, 30 and 50), Lengths (1, 2, 3 and 9) and New Values (8, NN, 916 and 000052
shown below.
hen the Starting Sequence number, Ending Sequence number, Start Position, Length and New
W
Value have been filled in, click the “Add” button. This will create a parameter record and add it t
box at the right.
The parameter that is added to the window will look something like this:
lues,
652) as
o the
C9999331000001000000011001518 0252NN 0303916 0509000052652
The C in the 1
The 2
The 6
The 7
The 8
The 9
nd
th
October, 0 (zero) is used. For November, - is used. For December, & is used.
th
th
represented by a 2 and Outstanding Loss is represented by a 3.
th
The 17
The 25
The 28
The 29
The next positions are filler followed by the start posi
st
position indicates that this is a Change action.
to the 5th positions are the group number, in this case it is 9999.
position is the month. For January through September, 1 through 9
is used. For
position is the year. This is represented by the last digit of the year.
position is the Type of Statistic – Premium is represented by a 1, Paid
to the 16th positions are the starting sequence number.
th
to the 24th positions are the ending sequence number.
th
to the 27th positions are the first start position.
th
position is the first length.
th
to the 36th positions are the
first new value.
tion length and new value of the second
Loss is
to fourth changes.
lease note that for PASP CEP, the parameters that are added to the window will not include the
P
group number, month, year or type of statistic.
PC Company Edit Package User Guide 4BHow to Correct Data • 22

If an error was made when completing the information in any of the fields, and you would like to
delete it, select it from the box at the right, then click the “Delete” button to remove it.
Multiple change records created for a single sequence number or for an overlapping range of
sequence numbers will not be applied correctly.
The Continuation Action
The Continuation action is similar to the Change action. While the Change action allows up to four
changes for a single record or range of records, the Continuation action allows you to create four
additional changes for that same single record or range of records.
he Continuation action does not apply to PASP and the option button will be grayed out.
T
ou will have to enter the Starting Sequence number, Ending Sequence number, Start Position,
Y
Length and New Value for the records that you would like to continue to change. Please refer to
change action instructions to complete the fields.
or example, if you have to make more than four changes to a single record or range of records, code
F
the Change record for that single record or range of records using all four Change boxes and add to
the box at the right. Then use the Continuation action to indicate the 5
th
and each additional change
that is needed for the same single record or range of records as shown below.
When the Starting Sequence number, Ending Sequence number, Start Position, Length and New
Value have been filled in, click the “Add” button. This will create a parameter record and add it t
box at the right.
he parameter that is added to the window will look something like this:
T
the
o the
9999331000001000000011000241234 0222TT
T
The T in the 1
The 2
The 6
The 7
The 8
The 9
nd
th
October, 0 (zero) is used. For November, - is used. For December, & is used.
th
th
represented by a 2 and Outstanding Loss is represented by a 3.
th
The 17
The 25
The 28
The 29
PC Company Edit Package User Guide 4BHow to Correct Data • 23
st
position indicates that this is inuation action.
to the 5th positions are the group number, in this case it is 99
a Cont
99.
position is the month. For January through September, 1 through 9
position is the year. This is represented by the last digit of the year.
position is the Type of Statistic – Premium is represented by a 1, Pai
to the 16th positions are the starting sequence number.
th
to the 24th positions are the ending sequence number.
th
to the 27th positions are the first start position.
th
position is the first length.
th
to the 36th positions are the
first new value.
is used. For
d Loss is

The next positions would be filler followed by the start position length and new value of the
second to fourth changes.
If an error was made when completing the information in any of the fields, and you would like to
delete it, select it from the box at the right, then click the “Delete” button to remove it.
You cannot create two continuation records for one change record.
The Delete Action
The Delete action allows for the deletion of records from a file that are in error. The Delete action
should be used with discretion so as to avoid inadvertently deleting records required to be reported to
ISO -- all applicable recorded statistics should be reported for a given accounting period.
You will only have to enter the Starting Sequence and Ending Sequence numbers of the records that
you would like to delete. The Start Position, Length and New Value boxes will be grayed out. See
examples 7 and 8 below:
Example 7 (Single Record Delete): Delete record 00000006 as shown below.
Example 8 (Global Record Delete): Delete records 00000101 to 00000201 as shown below.
When the Starting and Ending Sequence number boxes have been filled in, click th e “Add” button.
This will create a parameter record and add it to the box at the right.
The parameter that is added to the window will look something like this:
D99993310000010100000201
The D in the 1
The 2
The 6
The 7
nd
th
October, 0 (zero) is used. For November, - is used. For December, & is used.
th
st
position indicates that this is a Delete action.
to the 5th positions are the group number, in this case it is 9999.
position is the month. For January through September, 1 through 9 is used. For
position is the year. This is represented by the last digit of the year.
PC Company Edit Package User Guide 4BHow to Correct Data • 24

The 8th position is the Type of Statistic – Premium is represented by a 1, Paid Loss is
represented by a 2 and Outstanding Loss is represented by a 3.
th
The 9
The 17
to the 16th positions are the starting sequence number.
th
to the 24th positions are the ending sequence number.
Please note that for PASP CEP, the parameters that are added to the window will not include the
group number, month, year or type of statistic.
If an error was made when completing the information in the Starting and Ending Sequence boxes,
and you would like to delete it, select it from the box at the right, then click the “Delete” button to
remove it.
Error Correction Output Files
In the Output Files section (in the lower right of the Run Error Correction Job screen), you must designate
the output files that will hold the corrected and invalid results of the error correction run.
The Corrected File will contain all of the records that you attempted to correct, either by changing
(continuing) or deleting. In other words, it is the result of the parameter records applied to the (Input)
Invalid File records that you specified. The records in the corrected file are in statistical plan format.
For the CSAP and PLSP(OTA) CEPs, an Accepted File will be generated, in addition to the Corrected
File. The Accepted File will contain all of the records in which the accept action was applied. The
records in the accepted file are in statistical plan format. For CSP/CSP-I and PASP, the accepted
records will be in the Corrected File.
The Invalid File contains records from the (Input) Invalid File which you did not correct or for which
no matches were found against the parameter records. Parameter records may not match records in
the input invalid file if you use incorrect sequence numbers. The records in the (Output) Invalid File
are in statistical plan format.
The path of the output files can be typed into these boxes or you may use the “Browse” button to locate the
directory or folder where the files are to be saved. You cannot save output files to your floppy drive or
CD-ROM drive -- only to the hard drive or network drives.
When you have completed all the information on the Run Error Correction Job screen, you can then run the
job by clicking the “Submit” button at the lower right of the screen. When the file has run through to
completion, the following message will be displayed:
The Cancel button on the Run Error Correction Job screen will return you to the Main Menu at anytime
prior to selecting “Submit”. However, if you have already submitted a job, selecting the Cancel button will
not stop that job from running.
The reports generated for the error correction jobs can be viewed by accessing the View Error Correction
Reports selection from the Correct Data Box on the Main Menu. The Corrected, Accepted and Invalid
output files will be written to the locations you specified in the Run Error Correction Job screen.
A reminder: Running an error correction job simply modifies the statistical records that you specified. It
does not indicate whether the modifications made are valid. To check the validity of the corrections
applied to the records, you should run the Corrected File through the edits by selecting Run Edit Job (or
Re-Run Edit Job) from the Edit Data box on the Main Menu.
PC Company Edit Package User Guide 4BHow to Correct Data • 25

Re-Run Error Correction Job
The Re-Run Error Correction Job option allows you to re-process jobs that were prev iously run through the
error correction programs. You may want to re-run an error correction job if incorrect information was
specified on the original error correction job run or if the output fi l es or err or correct ion reports from the
original error correction run were deleted. Using the Re-Run Error Correction Job option (instead of the
Run Error Correction Job option) will save you a little work in specifying job parameters.
When you select the Re-Run Error Correction Job option from the Correct Data box on the Main Menu, a
window will be displayed listing the jobs that are available for re-processing.
A sample print is shown below.
The jobs are listed according to the Job Number, Accounting Date (mm/yyyy) and Job ID and are ordered
by the Job Number. Select (by single clicking) the desired job from the window, and the information
regarding that job as originally specified will be populated to a Re-Run Error Correction Job screen (which
is the same as the Run Error Correction Job screen).
You will be able to change all of the fields on the Re-Run Error Correction Job screen except for the Job
Number. The Job Number cannot be changed because this is what uniquely identifies a particular job in the
program’s database. It is important that each job have a unique identifier so that the information associated
with each job can be easily recalled and is not confused with information from another job. Any
information entered on the re-run screen will replace the information that was originally entered for that
job. You will not be able to go back to what was entered prior to re-running, unless you cancel before
submitting.
For example: If on the original error correction run you entered 03 as the month for Job Number 001, then
changed the month to 06 on the re-run and submitted the job, the 03 will be replaced by the 06 as the month
for Job Number 001. If, however, you changed the month to 06 and then cancelled before submitting, the
information will still reflect what was originally entered for that job (03).
The Error Correction reports will also reflect any new information that was specified when re-running a
job.
PC Company Edit Package User Guide 4BHow to Correct Data • 26

Please refer to the Run Error Correction Job section of this guide for instructions on completing the
information on the Re-Run Error Correction Job screen.
When you have completed all the information on the Re-Run Error Correction Job screen, you can then run
the job by clicking the “Submit” button at the lower right of the screen. When the file has run through to
completion, a message, similar to the one after running an error correction job, will be displayed.
The Cancel button on the Re-Run Error Correction Job screen will return you to the Main Menu at anytime
prior to selecting “Submit”. However, if you have already submitted a job, selecting the Cancel button will
not stop that job from running.
The reports generated for the Re-Run Error Correction Jobs can be viewed by accessing the View Error
Correction Reports selection from the Correct Data box on the Main Menu. The Corrected, Accepted and
Invalid output files will be written to the location you specified in the Re-Run Error Correction Job screen.
A reminder: Re-running an error correction job simply modifies the statistical records that you specified.
It does not indicate whether the modifications made are valid. To check the validity of the corrections
applied to the records, you should run the Corrected File through the edits by selecting Run Edit Job (or
Re-Run Edit Job) from the Edit Data box on the Main Menu.
View Error Correction Reports
The Error Correction reports summarize the correction information that was entered and also indicate if
there were any problems matching a corrective parameter record to a transaction record in the invalid file.
After an error correction job has been run (or re-run), the error correction reports can be viewed by
accessing the View Error Correction Reports selection from the Correct Data box on the Main Menu.
Upon selecting this option, you will be presented with a window that lists the jobs that have reports
available for viewing. These jobs are listed according to the Job Number, Accoun ting Date (mm/yyyy) and
Job ID and are ordered by the Job Number. A sample print of the View Error Correction Reports screen is
shown below.
PC Company Edit Package User Guide 4BHow to Correct Data • 27

To view the Error Correction Report for a specific job, select the job (by single clicking) from the window.
A window will then display a list of the Error Correction Reports created.
A sample print of the report list is shown below.
Select (by double clicking) the desired report from the window. The report will automatically be opened
with MS
headings on the error correction reports are not aligned, be sure that the font is set to Courier New, 8 point.
If it is not, select all and change the font to Courier New, 8 point. If MS
computer, the error correction reports will open in MS
®
Word. Standard MS® Word functionality will apply for navigation and printing. If any of the
®
®
Wordpad or MS® Notepad.
Word is not installed on your
Reference Appendix B for a list of the Error Correction reports that are available for each statistical plan.
Delete Error Correction Jobs
You may want to delete error correction jobs if they are incorrect or outdated. Deleting a job will remove
all of the information associated with that job from the application’s database and the job will no longer be
available for re-running or viewing reports. It will not, however, delete the output files (Corrected,
Accepted and Invalid data files) that were created.
To delete error correction jobs, select Delete Error Correction Jobs from the Correct Data box on the Main
Menu. Upon selecting this option, a window listing the jobs that are available for deletion will be
displayed. The jobs are listed according to the Job Number, Accounting Date (mm/yyyy) and Job ID and
are ordered by the Job Number.
PC Company Edit Package User Guide 4BHow to Correct Data • 28

A sample print of the Delete Error Correction Jobs screen is shown below.
To delete a specific job, select it (by single clicking) from the window and click “Delete” at the lower right
of the screen. A warning message will appear confirming whether or not you want to delete the one that
was chosen.
To delete more than one job at a time, select the first one that you would like to delete, then hold down the
Control key while selecting the second, third, etc. and click “Delete”.
If you would like to delete a block of jobs, select the first job, hold down the Shift key, then select the last
job in the block and click “Delete”.
A warning message will appear for each job that was selected, confirming whether or not you would like to
delete the jobs. Clicking “No” in any of the confirmation messages will cancel the delete request and
return you to the Delete Error Correction Jobs window. Clicking “Yes” will delete the job(s) and they will
be removed from the list.
PC Company Edit Package User Guide 4BHow to Correct Data • 29

How to Prepare Submissions
Run TL/SC Create Job
The Run TL/SC Create Job feature assists you in preparing your data for submission to ISO. It merges all
the individual input files you specify together by type of statistic and creates the Transmittal Letter (TL)
and Submission Control (SC) records that are required for submission. The Transmittal Letter (TL) is a
record which identifies the statistical data submission for a group reporting to ISO. The Submission
Control (SC) records indicate the dollar amounts and record counts contained in each module of the
submission.
The TL/SC Create Job function of the CSP/CSP+/CSP-I, CSAP and PLSP(OTA) CEPs can process
multiple types of statistics in a single job, creating multiple submission files that are each type of statistic
specific. The TL/SC Create Job function of the PASP CEP, however, requires users to run TL/SC Create
jobs separately for each type of statistic.
A sample print of the Run TL/SC Create Job screen is shown below.
PC Company Edit Package User Guide 5BHow to Prepare Submissions • 30

The TL record must be the first record in the submission. It will precede the SC record(s) and the
transaction records. Examples of TL records are:
TL99990103031101
TL99990103031202X
TL99990103031301 101
TL99990103031601
A description of the TL record layout can be found in Appendix D.
The SC records must appear after the TL record. They may precede or follow the transaction records. The
TL/SC function of the CEP will put the Submission Control records at the end of the file. Examples of SC
records are:
SC0199993311010000001000000000011
SC0299993322030000001250000000008
A description of the SC record layout can be found in Appendix D.
The files that are used in the TL/SC Create Job are the output files from your edit runs. Also, please be
sure that the files you specify contain records. You will get empty output files if the Valid or Invalid files
contain no data.
It is recommended that you check that your data is within the tolerances allowed by ISO one final time
before actually submitting. One way to check whether the submission is under tolerance is to create the
TL/SC records, then run the output file(s) through the Run Edit Job program. You should then check the
Module and State Summary Report to verify that the submission is under tolerance.
1REPORT NO. CPN95250C * * * C S P C O M P A N Y E D I T P A C K A G E * * * PAGE NO. 1
VERSION NO. 034 RUN-ID
CSP SUBMISSION ANALYSIS REPORT
MODULE SUMMARY PAGE
TYPE OF STATISTICS-PAID LOSSES BUSINESSOWNERS
REPORTED DETAIL DOLLAR AMOUNT 2,000 REPORTED DETAIL RECORD COUNT 20
ERROR DOLLAR AMOUNT 0 ERROR RECORD COUNT 0
DOLLAR AMOUNT ERROR RATIO 0.00 RECORD COUNT ERROR RATIO 0.00
PART A PART B PART C
ERROR DOLLAR AMOUNT 0 0 0
ERROR RECORD COUNT 0 0 0
MODULE PROCESSING STATUS-ACCEPTED WITHIN TOLERANCE.
Tells you the status of the
module.
All of the information on the Run TL/SC Create Job screen must be completed. If any of the boxes or
option buttons are left blank or filled in with invalid information, an error message for each invalid entry
will be displayed upon submitting.
TL/SC Submission Information
The Submission Information section (in the upper left of the Run TL/SC Create Job screen) consists of the
TR Group Number, Accounting Month, Accounting Year, Submission Type and Submission Count.
The TR Group Number is the four digit statistical reporting number under which you report your data to
ISO. The TR Group Number must be selected from the drop-down menu.
PC Company Edit Package User Guide 5BHow to Prepare Submissions • 31

The Accounting Month refers to the month the transactions were entered on the company books (not to the
month of the TL/SC run). The Accounting Month must be a two digit number between 01 and 12, e.g. 01 =
January, 02 = February, ... 12 = December. The Accounting Month must be typed in.
For groups that report on a monthly basis, the accounting month is the month in which transactions
were entered on the company books (01 to 12).
For groups that report on a quarterly basis, the accounting month is the last month of the quarter (03,
06, 09 or 12).
For groups that report on an annual basis, the accounting month is December (12).
The Accounting Year refers to the year the transactions were entered on the company books (not to the
year of the TL/SC run). The Accounting Year must be a four digit number, e.g. 2007, 2008, etc. The
Accounting Year must be typed in.
The Submission Type denotes whether the submission that is being prepared is a Full Original, Partial
Original, Resubmission or Supplemental. You cannot use the CEP to create an Error Correction
submission to ISO (i.e. a submission which does not contain statistical plan records but instead contains
parameter records.)
The Submission Count is the number of the submission.
If the submission is a Full Original, it indicates the reporting of all transactions entered on the
company books for the type of statistic and the accounting period indicated. A Full Original
submission must have a Submission Count of 01. The program will default to a Submission Count of
01.
If the submission is a Partial Original, it indicates the reporting of part of the transactions entered on
the company books for the type of statistic and the accounting period indicated. The Submission
Count must also be specified. It must be a two digit number from 01 to 99. Please Note: It is
recommended and preferred that Full Original submissions be reported whenever possible. The
reporting of partial submissions increases handling and processing expenses to your organization.
The Final Partial Indicator is an indication that the partial original being prepared for submission is
the final partial. (i.e. completes the reporting for the group, the type of statistic and accounting period
indicated). The Final Partial Indicator can only be used if the submission count of the Partial Original
is 02 or greater.
If the submission is a Resubmission, it indicates the reporting of experience previously rejected by
ISO or the replacement of previously submitted data in which the company has detected errors. The
Submission Count must also be specified. When the Resubmission option is selected, a separate box
labeled Submission Type - Corrected will appear where you must specify whether the resubmission is
for a Full Original, a Partial Original or a Supplemental submission. The Submission Count Corrected must also be specified. It must be a two digit number from 01 to 99 corresponding to the
submission type – corrected.
If the submission is a Supplemental, it indicates the reporting of additional experience not contained
in the original submission(s) for the type of statistic and the accounting period because the original
submission(s) was (were) incomplete, the group is correcting detail record errors, or is a Texas CSP+
submission. The Submission Count must also be specified. It must be a two digit number from 01 to
99. For Texas reporting (CSP+), the type of submission must be a Supplemental with a Submission
Count of 42 or greater.
TL/SC CEP Job Parameters
The CEP Job Parameters section (in the lower left of the Run TL/SC Create Job screen) consists of the Job
ID and Job Number.
PC Company Edit Package User Guide 5BHow to Prepare Submissions • 32
The Job ID is specified by the user and helps to uniquely identify the job. You may find it helpful to
specify a Job ID that you can easily associate with a particular TL/SC job. The Job ID can be any
name you choose up to 16 characters. For example: TLSC_PREM_001.
The Job Number is what uniquely identifies each TL/SC job to the program. The information for the
jobs you run is stored in a database. The database requires that each job have a unique identifier that
will maintain the individuality of each job. The program automatically assigns a Job Number which
you will not be able to change. You may also find the Job Number helpful for remembering what was
run in a particular job.
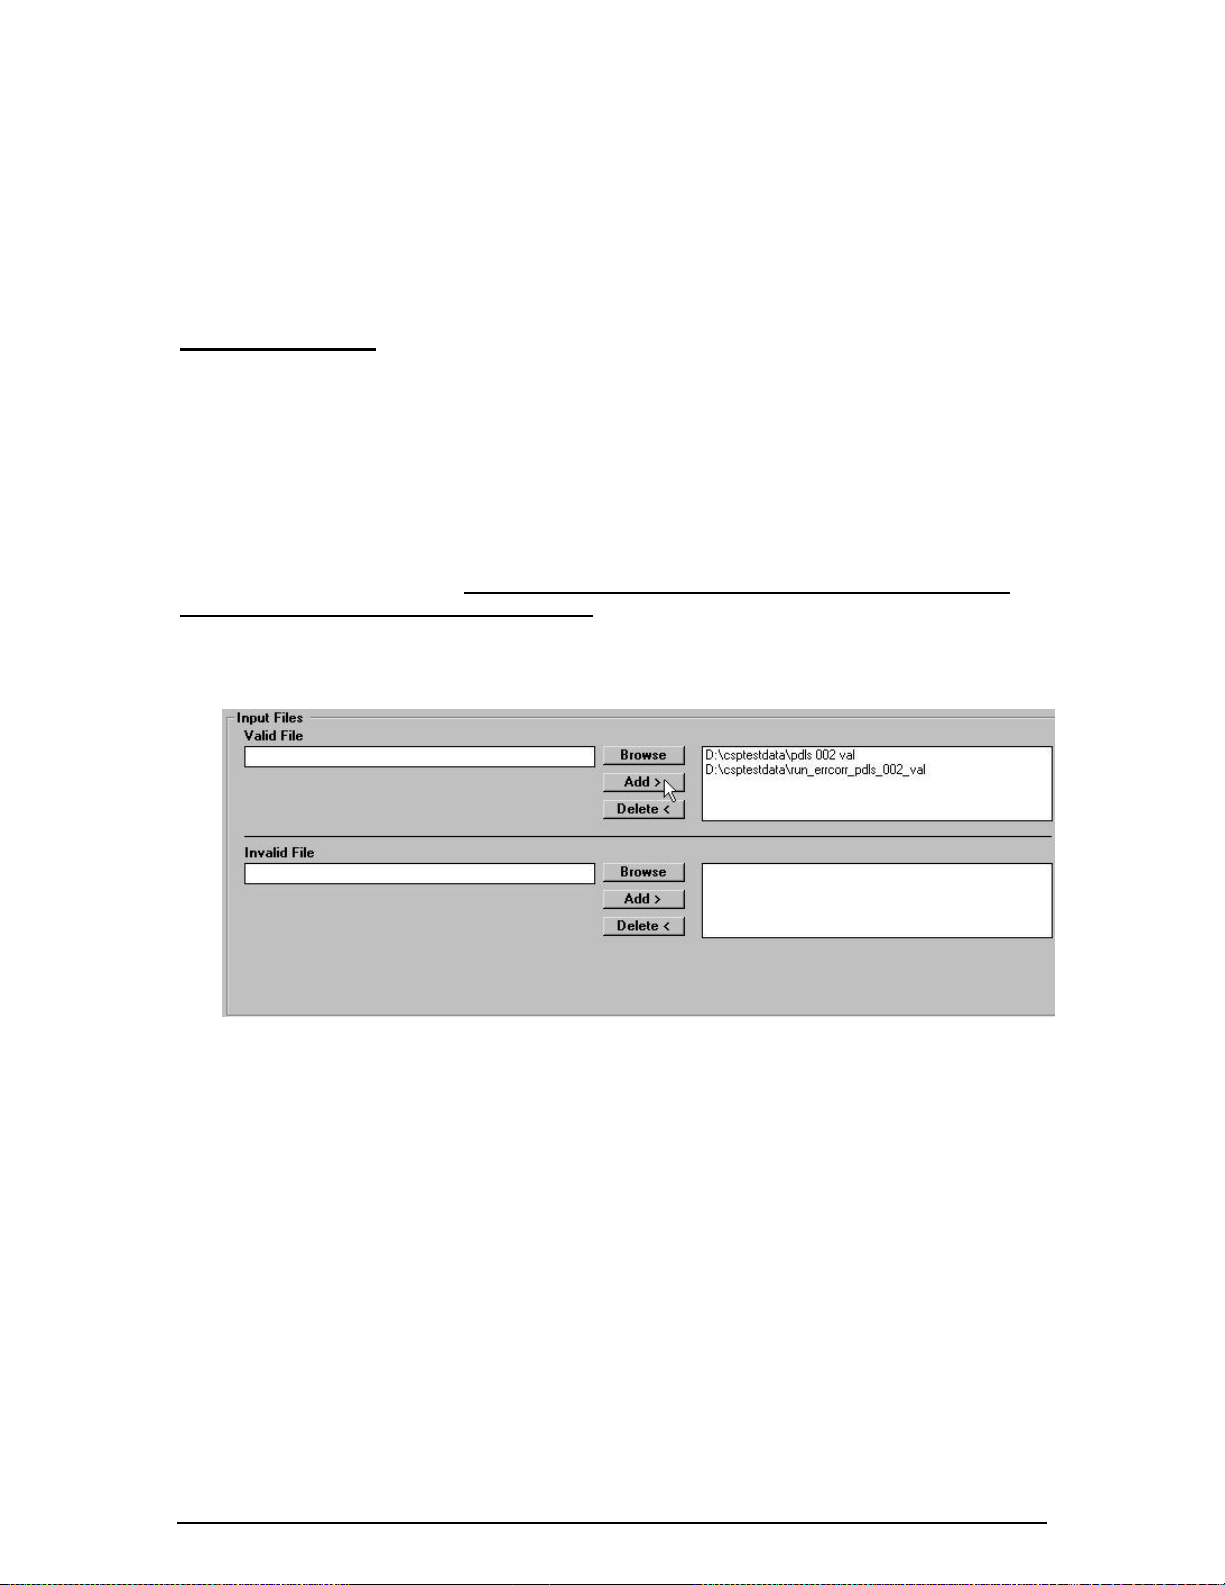
TL/SC Input Files
The Input Files section (in the upper right of the Run TL/SC Create Job screen) consists of the Valid Files
and Invalid Files that you would like to include in your submission.
The Valid Files are the files that contain records that have been validated by the edits.
The Invalid Files are the files that contain records that you have chosen not to correct.
The path of the files can be typed into these boxes or you may use the “Browse” button to locate the file on
your hard drive or network drives. You cannot add files that are saved on a floppy disk or CD, only
those saved on the hard drive or network drives.
When the correct files have been identified, click the “Add” button. This will place the files into the box at
the right and will be included in the submission.
You can add as many Valid and Invalid files as are necessary. It is important, however, that the dollar
amount and number of records that you started with have been accounted for at this point in the process.
To remove a Valid or Invalid file that has been added incorrectly, select the file in the box at the right, then
click the “Delete” button to remove it.
For CSP/CSP+/CSP-I, CSAP and PLSP(OTA), the input files can contain all types of statistics. The
program will group the records into separate output files for each type of statistic.
For these statistical plans, there may be instances in which you may not have any Invalid Files to include in
the submission. However, if you are including invalid files in the submission, a sentence will appear below
the invalid files boxes that states: “Invalid transaction types should be processed as ¤ Premiums ¤ Paid
Losses ¤ Outstanding Losses”. The purpose of this prompt is to tell the program how to process
transaction records in the invalid files that may have an invalid transaction type. Only one selection can be
made and it will apply to all invalid files added.
PC Company Edit Package User Guide 5BHow to Prepare Submissions • 33

For example: If you have a transaction type on records in two of the invalid files that you have selected to
be included in the submission that have values other than those valid for premium, paid loss or outstanding
loss (see the Statistical Plans for valid transaction types), such as a “#”, and you don’t want to correct these
values because the submission as it stands is under tolerance, you can select premium, paid loss or
outstanding loss from the choices provided. (If you select premium, the program will process the “#” and
any other invalid transaction type records as a premium record for all of the invalid transaction types
contained in your invalid files.) This function ensures that all of the transaction records in the invalid file
get routed to a premium, paid loss or outstanding loss output file.
For PASP, the input files for a single TL/SC Create Job can contain only one type of statistic. Only one
output file will be generated. Any invalid transaction type records will be included in this single output
file.
For PASP, unlike the other CEPs, a type of statistic parameter will have to be specified in all cases,
regardless of whether invalid files are being included in the submission. The type of statistic specified on
the PASP TL/SC Create screen tells the program what type of statistic to use for the TL and SC records in
the single output file.
TL/SC Output Files
In the Output Files section (in the lower right of the Run TL/SC Create Job screen), you must designate
output file names for the premium, paid loss and outstanding loss files that will be sent to ISO.
For CSP and CSAP, you must choose the Type of Run. The three options are Monoline Surety Only, Other
than Monoline Surety and All Data.
PC Company Edit Package User Guide 5BHow to Prepare Submissions • 34
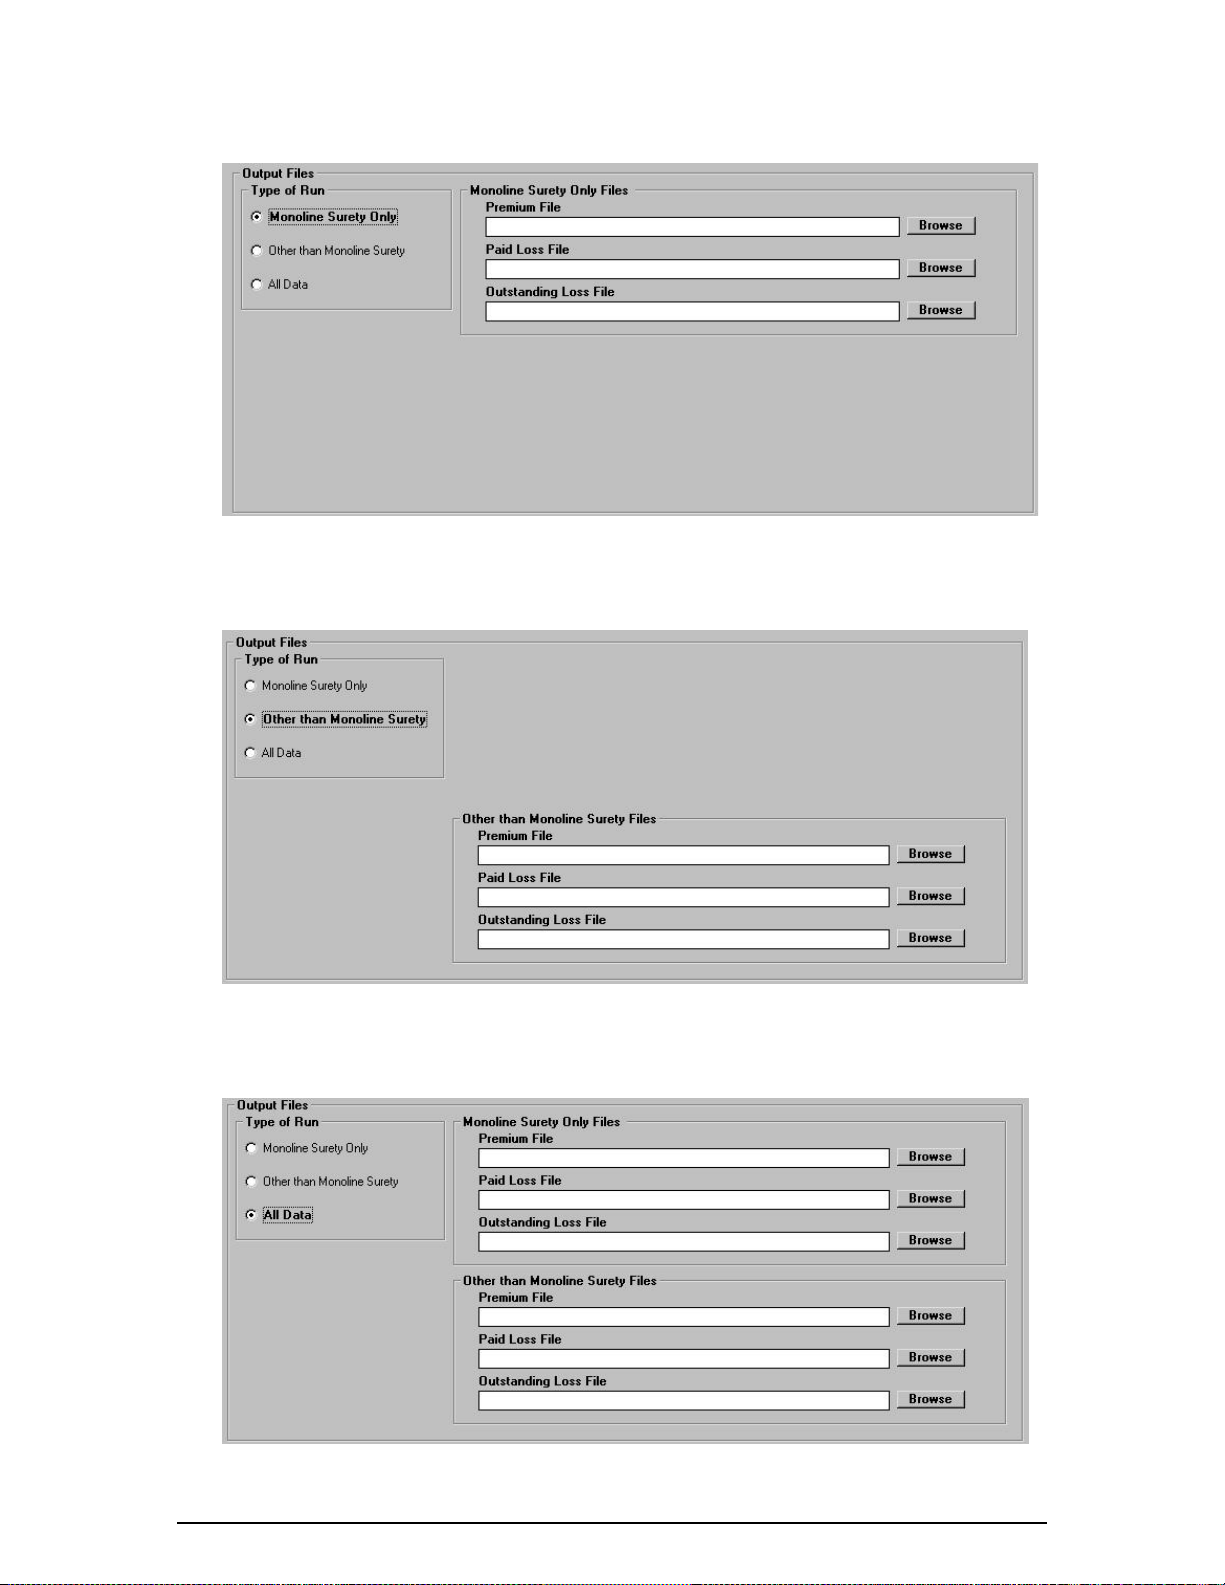
If the input files contain Monoline Surety Only data, click the radio button for that type of run and
specify a Premium, Paid Loss and Outstanding Loss file in the section labeled “Monoline Surety Only
Files”.
If the input files contain Other than Monoline Surety data, click the radio button for that type of run
and specify a Premium, Paid Loss and Outstanding Loss file in the section labeled “Other than
Monoline Surety Files”.
If the input files contain All Data, click the radio button for that type of run and specify a Premium,
Paid Loss and Outstanding Loss file in both the “Monoline Surety Only Files” and “Other than
Monoline Surety Files” sections.
PC Company Edit Package User Guide 5BHow to Prepare Submissions • 35

The path of the files can be typed into the boxes or you may use the “Browse” button to locate the directory
or folder where the files are to be saved. You cannot save outpu t files to your floppy drive or CD-RO M
drive -- only to the hard drive or network drives.
For PLSP(OTA) and PASP you will not have to select a Type of Run. There will be three output files
generated for PLSP(OTA), one for premium , one for paid loss and o ne for out st anding loss. Only one
output file at a time will be generated for PASP. Each type of statistic will have to be processed separately.
When you have completed all the information on the Run TL/SC Job Create screen, you can then run the
job by clicking the “Submit” button at the lower right of the screen. When the file has run through to
completion, the following message will be displayed:
The Cancel button on the Run TL/SC Create Job screen will return you to the Main Menu at anytime prior
to selecting “Submit”. However, if you have already submitted a job, selecting the Cancel button will not
stop that job from running.
The reports generated for the TL/SC jobs can be viewed by accessing the View TL/SC Control Reports
selection from the Prepare Submission box on the Main Menu. The output files will be written to the
location you specified in the Run TL/SC Create Job screen.
Be sure to keep track of all of the output files generated. It is important that the dollar amounts and number
of records you started with are accounted for at the end of the process.
Once your TL/SC records have been created and you are satisfied with your data, you can now submit it to
ISO. Acceptable modes of submission to ISO are on diskette, cartridge, CD or through ISOeSubm
more information regarding ISOeSubm
SM
, please contact customer service. The users are responsible for
SM
. For
downloading their submission files to the mode of their choice. There are specific labeling requirements
based upon report media. Please refer to the Call for Statistics Circulars for each statistical plan for more
detailed information regarding the external label.
Re-Run TL/SC Create Job
The Re-Run TL/SC Create Job option allows you to re-process jobs that were pr eviously run through the
TL/SC Create programs. You may want to re-run a TL/SC job if incorrect information was specified on the
original TL/SC Create job run or if the output files or TL/SC reports from the original TL/SC Create job
run were deleted. Using the Re-Run TL/SC Create Job option (instead of the Run TL/SC Create Job
option) will save you a little work in specifying job parameters.
When you select the Re-Run TL/SC Create Job option from the Prepare Data box on the Main Menu, a
window will be displayed listing the jobs that are available for re-processing.
PC Company Edit Package User Guide 5BHow to Prepare Submissions • 36

A sample print is shown below.
The jobs are listed according to the Job Number, Accounting Date (mm/yyyy) and Job ID and are ordered
by the Job Number. Select (by single clicking) the desired job from the window, and the information
regarding that job as originally specified will be populated to a Re-Run TL/SC Create Job screen (which is
the same as the Run TL/SC Create Job screen).
You will be able to change all of the fields on the screen except for the Job Number. The Job Number
cannot be changed because this is what uniquely identifies a particular job in the program’s datab a se. It is
important that each job have a unique identifier so that the information associated with each job can be
easily recalled and is not confused with information from another job. Any information entered on the rerun screen will replace the information that was originally entered for that job. You will not be able to go
back to what was entered prior to re-running, unless you cancel before submitting.
For example: If on the original TL/SC run you checked a partial original submission for Job Number 001,
then changed the submission type to a full original on the re-run and submitted the job, the p artial original
will be replaced by full original as the submission type for Job Number 001. If, however, you changed the
submission to full original and then cancelled before submitting, the information will still reflect what was
originally entered for that job (partial original).
The TL/SC reports will also reflect any new information that was specified when re-running a job.
Please refer to the Run TL/SC Create Job section of this guide for instructions on completing the
information on the Re-Run TL/SC Create Job screen.
When you have completed all the information on the Re-Run TL/SC Create Job screen, you can then run
the job by clicking the “Submit” button at the lower right of the screen. When the file has run through to
completion, a message, similar to the one after running a TL/SC create job, will be displayed.
The Cancel button on the Re-Run TL/SC Create Job screen will return you to the Main Menu at anytime
prior to selecting “Submit”. However, if you have already submitted a job, selecting the Cancel button will
not stop that job from running.
PC Company Edit Package User Guide 5BHow to Prepare Submissions • 37

The reports generated for the Re-Run TL/SC Create Job can be viewed by accessing the View TL/SC
Control Reports selection from the Prepare Submission box on the Main Menu. The output files will be
written to the location you specified in the Re-Run TL/SC Create Job screen.
View TL/SC Control Reports
After a TL/SC create job has been run (or re-run), the reports can be viewed by accessing the View TL/SC
Control Reports selection from the Prepare Submission box on the Main Menu. Upon selecting this option,
you will be presented with a window that lists the jobs that have reports available for viewing. These jobs
are listed according to the Job Number, Accounting Date (mm/yyyy) and Jo b ID and are ordered by the Job
Number. A sample print of the View TL/SC Control Reports screen is shown below.
To view the TL/SC report for a specific job, select the job (by single clicking) from the window. A
window will then display a list of the TL/SC reports created.
PC Company Edit Package User Guide 5BHow to Prepare Submissions • 38

A sample print of the report list is shown below.
Select (by double clicking) the desired report from the window. The reports will automatically be opened
®
Word. Standard MS® Word functionality will apply for navigation and printing. If any of the
in MS
headings on the TL/SC reports are not aligned, be sure that the font is set to Courier New, 8 point. If it is
not, select all and change the font to Courier New, 8 point. If MS
the reports will open in MS
The TL/SC reports summarize the input and output information that was entered when preparing a
submission and creating the TL/SC records.
Reference Appendix C for a list of the TL/SC Control reports that are available for each statistical plan.
®
Wordpad or MS® Notepad.
®
Word is not installed on your computer,
Delete TL/SC Create Jobs
You may want to delete TL/SC jobs if they are incorrect or outdated. Deleting a job will remove all the
information associated with that job from the application’s database and the job will no longer be available
for re-running or viewing reports. It will not, however, delete the output files that were created.
To delete TL/SC jobs, select Delete TL/SC Create Jobs from the Prepare Submission box on the Main
Menu. Upon selecting this option, a window listing the jobs that are available for deletion will be
displayed. These jobs are listed according to the Job Number, Accounting Date (mm/yyyy) and Job ID and
are ordered by Job Number.
PC Company Edit Package User Guide 5BHow to Prepare Submissions • 39

A sample print of the Delete TL/SC Create Jobs screen is shown below.
To delete a specific job, select it (by single clicking) from the window and click “Delete” at the lower right
of the screen. A warning message will appear confirming whether or not you want to delete the one that
was chosen.
To delete more than one job at a time, select the first one that you would like to delete, then hold down the
Control key while selecting the second, third, etc. and click “Delete”.
If you would like to delete a block of jobs, select the first job, hold down the Shift key, then select the last
job in the block and click “Delete”.
A warning message will appear for each job that was selected, confirming whether or not you would like to
delete the jobs. Clicking “No” in any of the confirmation messages will cancel the delete request and
return you to the Delete TL/SC Create Jobs window. Clicking “Yes” will delete the job(s) and they will be
removed from the list.
PC Company Edit Package User Guide 5BHow to Prepare Submissions • 40

View and/or Print External Tables
The External Tables are used by the edit programs as part of the editing process. Instead of hard coding all
of the information into the edits, some information is stored on tables. When a certain edit references a
table, the program goes out to the table and checks the transaction record against the information on the
table. For CSP/CSP-I and CSAP only, you may choose to view and/or print these External Tables from the
PC CEP. The tables will automatically be displayed in MS
apply for navigation and printing. If MS
®
Wordpad or MS® Notepad.
MS
To view or print external tables, select the External Tables button in the View/Print box on the Main Menu.
Upon selecting this option, you will be presented with the following window:
®
Word is not installed on your computer, the reports will open in
®
Word. Normal MS® Word functionality will
To choose a particular set of tables, select the radio button that applies and click “Create Report” at the
lower right of the screen.
PC Company Edit Package User Guide 6BView and/or Print External Tables • 41

The tables are grouped by module:
Error Messages (for all modules)
Eligibility Tables (all modules)
Common
Limited Coded
Commercial Fire and Allied Lines
Farmowners/Ranchowners
Inland Marine
Medical Professional Liability
General Liability
Miscellaneous Personal Coverages
Commercial Auto (except L900 Table)
Commercial Auto (L900 Table only)
Fidelity and Forgery
Glass
Boiler and Machinery
Earthquake
Businessowners
Monoline Fidelity/Forgery/Surety
Only one external table at a time can be viewed or printed.
Also, if you choose to print the Commercial Auto L900 table (classification codes), a message will be
displayed asking if you are sure that you want to print this table. The L900 table is extremely large
so it is
important that you be absolutely sure before responding yes. Printing this table in its entirety is not
advisable.
PC Company Edit Package User Guide 6BView and/or Print External Tables • 42

Appendix A – SAR Reports for Each Statistical Plan
Report Number
Report Name CSP/CSP-I CSAP PASP PLSP(OTA) Description
Error Code
Descriptions
Error Listing
Parts A, B and C
Error Listing
Part D –
Summary of
Part A Errors
Error Listing
Part E –
Summary of
Parts A, B and C
Errors
Error Code
Analysis Listing
Module and
State Summary
Reports
Record Count
Control Report
Field
Description
Index and
Template
Input TL/SC
Record Listing
State Summary
Report –
Voluntary vs.
involuntary
CPN11180A CPN11180B N/A N/A This report provides a listing of all the error
codes, together with a description of each
code. The report can be used as a reference
when reviewing the error listing portion of the
SAR.
CPN12020B CPN22081 PVN00345 PCN99300 This report shows invalid records, and errors
assigned to those records, broken down into
sections:
Part A – lists the records with errors common
to the whole submission.
Part B – lists the records with errors specific
to a module.
Part C – lists the records with errors by state.
CPN12020C N/A PVN00345 PCN99300 This report is a summary of the common
errors listed in Part A.
CPN12040B CPN22100 PVN00345 PCN99350B This report summarizes all of the errors
contained in Parts A, B and C.
CPN95250B CPN98250B N/A PCN99290B This report provides another summary of
errors assigned in the CEP. The report
summarizes error counts, percent of total error
count, total error dollar amount, percent of
error dollar amount and total records with
invalid premium and loss amounts. This
report also lists the counts of the total input
records broken down into total valid and total
error records processed.
CPN95250C CPN98250C PVN00330 PCN99290C This report provides an analysis of reported
detail dollar amounts and record counts, error
dollar amounts and record counts and error
ratios for each module included in the input
file.
This report also provides an analysis of
reporting detail dollar amounts, error dollar
amounts, minimum amount to be corrected,
and error ratio for each module/state.
N/A CPN98100A N/A PCN99100A This report provides a count of the total
records in the submission. It also shows this
total count broken down by premium records,
paid loss records, outstanding loss records and
other records
N/A N/A N/A The Field Description Index lists each data
element in both starting position order and
alphabetical order. It will help you locate and
correct invalid codes on error records.
The Field Description Template is an enlarged
print of the SAR heading fields. It is easier to
read than the small type at the top of the SAR
columns.
N/A N/A N/A PCN99200 Lists the TL/SC records that were included in
the Input File – if any.
N/A N/A N/A This report is a summary of valid and invalid
data by module, state and type of business
code groupings (Voluntary vs. Involuntary).
PC Company Edit Package User Guide Appendix A • 43

Appendix B – Error Correction Reports for each Statistical Plan
Report Number
Report Name CSP/CSP-I CSAP PASP PLSP(OTA) Description
Error
Correction
Parameter
Records
Parameter
Card Statistics
Error
Corrections
Report
Unmatched
Correction
Records
Error
Correction
Control
Report
CPN95405A CPN98405A PVN00500B PCN99500A
CPN95405D CPN98405D PVN00500A PCN99500D
CPN95415B CPN98415B PVN00505B PCN99550B
CPN95415C CPN98415C PVN00505C PCN99550C
CPN95415D CPN98415D PVN00505A PCN99550D
This report lists each parameter
card, valid or invalid along with
error messages.
This report provides the parameter
card statistics which tells how
many parameters were crea ted,
how many were rejected, how
many were global changes and
how many were single changes.
This report, for each error record,
lists the original data record, all
corrections made to that record
and the corrected data record. The
listing will be in error sequence
number order.
This report provides a listing of
file matching errors encountered
during the error correction
process. It also indicates whether
the global record table has been
exceeded.
This report lists the total number
of correction records by
transaction type, totals of
unmatched correction records and
a total correction record count.
PC Company Edit Package User Guide Appendix B • 44

Appendix C – TL/SC Reports for each Statistical Plan
Report Number
Report Name CSP/CSP-I CSAP PASP PLSP(OTA) Description
System
Control
Record Listing
System
Control
Report – Input
Data Totals
Input
Transmittal
Record Listing
System
Control
Report –
Output Data
Totals
Output
Transmittal
Letter Record
Listing
Output
Submission
Control
Record Listing
Output
Transmittal
Letter/
Submission
Control
Records
Listing
Deleted
Transmittal
Records
Report
Deleted
Submission
Control
Records
Report
CPN95300A CPN98300A N/A N/A
CPN95300B CPN98300B N/A PCN99410B
CPN95300TL CPN98300TL N/A N/A
CPN95310A CPN98310A N/A PCN99420A
CPN95420TL CPN98420TL N/A PCN99410T
CPN95420SC CPN98420SC N/A PCN99410A
N/A N/A PVN02000A N/A
N/A N/A PVN02000B N/A
N/A N/A PVN02000C N/A
This control report provides a
listing of submission control
records submitted with company
data.
This report accumulates
company data record counts and
amounts by type of statistic
within Module ID and indicates
whether or not these totals
balance to submission control
record totals.
This control report provides a
listing of transmittal records
submitted with company data or
displays the message “No
Transmittal Records Submitted”.
This report lists record counts
and amounts by Module ID for
valid and uncorrected records
coming out of the transmittal
program.
This control report provides a
listing of transmittal records
generated by the CEP or displays
the message “No Transmittal
Records Generated”.
This control report provides a
formatted listing of all
submission control records
created during the running of the
CEP.
This control report provides a
listing of transmittal records
generated by the CEP or displays
the message “No Transmittal
Records Generated”.
This control report provides a
formatted listing of all
submission control records
created during the running of the
CEP.
This report indicates whether
there were transmittal letter
records contained in the original
input file that had to be deleted in
creating the new transmittal letter
records.
This report indicates whether
there were submission control
records contained in the original
input file that had to be deleted in
creating the new submission
control records.
PC Company Edit Package User Guide Appendix C • 45

Appendix D – TL and SC Records Layout
The TL record layout is as follows:
The TL in the 1
The 3
The 7
The 9
The 13
The 14
The 15
The 17
The 18
The 19
The 21
rd
to the 6th positions are the TR Group Number.
th
and 8th positions are the Statistical Plan – 01 for CSP/CSP+/CSP-I, 02 for CSAP, 41 for
PASP and 11 for PLSP(OTA).
th
to the 12th positions are the Accounting Date (mmyy).
th
by a 2 and Outstanding Loss is represented by a 3.
th
Resubmission, 5 for Error Correction and 6 for Sup pl emental.
th
th
th
th
st
position and on is filler and is left blank
The SC records layout are as follows:
The SC in the 1
The 3
rd
and 4th positions indicate the Module Identification.
For CSP/CSP+/CSP-I and CSAP, the module identifiers are:
01 – Commercial Fire and Allied Lines
02 – Farmowners/Ranchowners
03 – Inland Marine
04 – Medical Professional Liability
05 – General Liability
06 – Miscellaneous (CSP only)
07 – Commercial Automobile
08 – Fidelity and Forgery
09 – Glass
10 – Crime
11 – Boiler and Machinery
12 – Earthquake
13 – Businessowners
14 – Non-Bureau
For PASP, the module identifiers are:
01 – Liability
02 – No Fault
03 – Physical Damage
For PLSP(OTA), the module identifiers are:
01 – Homeowners
02 – Mobilehomes
03 – Dwelling Fire and Allied
04 – Earthquake
05 – Inland Marine
06 – Personal Liability
The 5
The 9
The 10
The 11
The 12
The 13
The 15
The 25
th
to the 8th positions are the TR Group Number.
th
position is the Accounting Month. For January through September, 1 through 9 is used.
For October, 0 (zero) is used. For November, - is used. For December, & is used.
th
th
by a 2 and Outstanding Loss is represented by a 3.
th
th
th
th
st
and 2nd positions indicates that this is a Transmittal Letter record.
position is the Type of Statistic – Premium is represented by a 1, Paid Loss is represented
position is the Type of Submission – 1 for Full Original, 2 for Partial Original, 3 for
and 16th positions are the Submission Count.
position is the Final Partial Indicator.
position is the Type of Submission to be Corrected.
and 20th positions are the Count of the Type of Submission to be Corrected.
st
and 2nd positions indicates that this is a Submission Control record.
position is the Accounting Year. This is represented by the last digit of the year.
position is the Type of Statistic -- Premium is represented by a 1, Paid Loss is represented
position is the Type of Submission.
and 14th positions are the Count of the Submission.
to the 24th positions are the dollar amount. This number should be right justified.
to the 33rd position are the record count. This number should be right justified.
PC Company Edit Package User Guide Appendix D • 46

Glossary of Terms
Accepted File
In an Error Correction, this file will contain all of the records in which the accept
action was applied. The records in the accepted file are in statistical plan format.
The Accepted File will only be generated in the CSAP and PLSP(OTA) CEPs. For
CSP and PASP, the accepted records will be in the Corrected File.
Accounting Month
This refers to the month the transactions were entered on the company books. The
Accounting Month must be a two digit num ber bet wee n 01 and 12, e.g. 01 = January,
02 = February, ... 12 = December.
For groups that report on a monthly basis, the accounting month is the month in
which the transactions were entered on the company books (01 to 12).
For groups that report on a quarterly basis, the accounting month is the last month of
the quarter (03, 06, 09 and 12).
For groups that report on an annual basis, the accounting month is December (12).
Accounting Year
This refers to the year the transactions were entered on the company books. The
Accounting Year must be a four digit number, e.g. 2007, 2008, etc.
All Data
On the Run Edit Job screen, this is the option chosen if the input file contains both
monoline surety and other than monoline surety data. The input file will be run
through all of the edits (i.e. all edit modules including the V module edits).
PC Company Edit Package User Guide Glossary of Terms • 46

Corrected File
In an Error Correction, this file will contain all of the records that you corrected,
either by changing (continuing) or deleting. In other words, it is the result of the
parameter records applied to the (Input) Invalid File records that you specified. The
records in the corrected file are in statistical plan format.
Countrywide
Data that contains records for some or all of the states (i.e. other than Texas CSP+
data submissions).
Ending Sequence
In an Error Correction, this is the last record to which modifications will be applied.
It is 8 positions long and can be found on the SAR and is displayed to the right of
each invalid transaction in the SAR error listing report. The ending sequence
number must have leading zeros, which the program will automatically populate.
For example, if the ending sequence is 00000015, enter a 15 in the ending sequence
box and the program will fill in the leading zeros.
Final Partial Indicator
When selected, this indicates that the partial original being prepared for submission
is the final partial (i.e. it completes the reporting for the group, the type of statistic
and accounting period indicated). The Final Partial Indicator can only be used if the
submission count of the Partial Original is 02 or greater.
Full Original Submission
This type of submission indicates reporting of all transactions entered on the
company books for the type of statistic and the accounting period indicated. A Full
Original submission must have a Submission Count of 01. The program will default
to a Submission Count of 01.
Global Record Modifications
In an Error Correction, this involves correcting more than one record at a time, in a
continuous range. The starting sequence number would be the first record and the
ending sequence number would be the last record in the range.
PC Company Edit Package User Guide Glossary of Terms • 47

Input File
In an Edit Job, this file contains the transaction records that you would like processed
through the edits.
Invalid File
In an Edit Run, this is the output file which contains records that did not pass the
editing criteria (i.e. those that generated errors).
In an Error Correction, this is the input file which contains the records which need
correcting. This file is the output invalid file that was generated after an edit job was
run.
Also, in an Error Correction, this is an output file which contains records from the
(Input) Invalid File which you did not correct or for which no matches were found
against the parameter records. Parameter records may not match records in the input
invalid file if you use incorrect sequence numbers. The records in the (Output)
Invalid File are in statistical plan layout
In a TL/SC Create, this is the input file which contains records that you have chosen
not to correct.
Job ID
This helps to uniquely identify each job. You may find it helpful to specify a Job ID
so that you can easily remember what was run in that particular job. It can be any
name you choose up to 16 characters.
Job Number
This is what uniquely identifies each job to the program. The information for the
jobs you run is stored in a database. The database requires that each job have a
unique identifier that will maintain the individuality of each job. The program
automatically assigns the Job Number which you will not be able to change. You
may also find the Job Number helpful for remembering what was run in a particular
job.
Length
In an Error Correction, this is the single digit number having a value of 1 through 9
which specifies the length of the data string to be corrected. The length does not
need to correspond to the actual length of a statistical plan field – just the number of
positions of any string that you would like to change. For example, if the number of
bytes is only 1 position long, the length would be 1, if the number of bytes is two
positions long, the length would be 2, etc.
PC Company Edit Package User Guide Glossary of Terms • 48

Monoline Surety Only
On the Run Edit Job screen, this is the option chosen if the input file contains on ly
surety and monoline fidelity data. The input file will be run through the V module
edits only.
New Value
In an Error Correction, this is the modified value needed to correct the error. It
should be left justified. The remaining positions of the field are to be left blank. The
number of positions of the new value must match the length that was indicated in the
“Length” field.
Other than Monoline Surety
On the Run Edit Job screen, this is the option chosen if the input file does not contain
surety or monoline fidelity data. The input file will be run through all edit modules
other than the V module. It will not be processed through the V module edits.
Parameter Correction File
In an Error Correction, this file will contain the parameter records created by the user
on the screen. You can choose a parameter file that already exists, in which case the
parameter records contained in the file will be populated to the screen.
Partial Original Submission
This type of submission indicates reporting of part of the transactions entered on the
company books for the type of statistic and the accounting period indicated. The
Submission Count must also be specified. It must be a two-digit number from 01 to
99.
Resubmission
This type of submission indicates reporting of experience previously rejected by ISO
or replacing previously submitted data in which the company has detected errors.
The Submission Count must also be specified. When the Resubmission option is
selected, a separate box labeled Submission Type - Corrected will appear where you
must specify whether the resubmission is a Full Original, a Partial Original or a
Supplemental submission. The Submission Count - Corrected must also be
specified. It must be a two-digit number from 01 to 99 corresponding to the
submission type – corrected.
PC Company Edit Package User Guide Glossary of Terms • 49

Single Record Modifications
In an Error Correction, this involves correcting one record at a time. The starting
and ending sequences will be the same.
Start Position
In an Error Correction, this is the three digit number identifying the first (left most)
position of the data string being corrected. The start position does not need to
correspond to the actual first position of a statistical plan field – just the first position
of any string that you would like to change. Leading zeros are required and will be
automatically populated by the program. For example, the first position in the
transaction record would be 001, the second position would be 002, etc.
Starting Sequence
In an Error Correction, this is the first record to which modifications will be applied.
It is 8 positions long and can be found on the SAR and is displayed to the right of
each invalid transaction in the SAR error listing report. The starting sequence value
must have leading zeros, which the program will automatically populate. For
example, if the sequence number is 0000001, enter a 1 in the starting sequence box
and the program will fill in the leading zeros.
Submission Count
This is the number of the submission type being submitted to ISO.
Supplemental
This type of submission indicates the reporting of additional experience not
contained in the original submission(s) for the type of statistic and the accounting
period because the original submission(s) was (were) incomplete, the group is
correcting detail record errors, or is a Texas CSP+ submission. The Submission
Count must also be specified. It must be a two-digit number from 01 to 99. For
Texas reporting (CSP+), the type of submission must be a Supplemental with a
Submission Count of 42 or greater.
Texas Only
Data that contains records only for the state of Texas. This is a CSP+ submission
(reported to ISO as a supplemental submission with a submission count of 42 or
greater).
PC Company Edit Package User Guide Glossary of Terms • 50

TR Group Number
The four digit statistical reporting number u nder which you report your data to ISO.
Type of Statistic
This refers to whether the files that are being prepared for a job contains premium,
paid loss or outstanding loss records.
Valid File
In an Edit Job, this is an output file that contains records that have passed the edit
criteria.
In a TL/SC Job, this is the input file that is to be included in the submission to ISO.
PC Company Edit Package User Guide Glossary of Terms • 51

Doc-To-Help Company Edit Package Personal Computer User Guide • 51
 Loading...