

Page 1
FDM 3D Printer
INVENTOR PRO
Yiwu Instone 3D Technology Co.,Ltd
USER’S MANUAL
Page 2

Content
Declaration
............................................................................................................
- 3 -
Legal Statement
.....................................................................................................
- 3 -
Important Security Information
............................................................................
- 3 -
Brief Introduction
..................................................................................................
- 5 -
Overview
................................................................................................................
- 5 -
Get to know your INVENTOR PRO
.........................................................................
- 6 -
Product List
............................................................................................................
- 6 -
Open-package
........................................................................................................
- 7 -
Brief Introduction of User Interface
......................................................................
- 8 -
Machine Installation and Operation Guide
.........................................................
- 11 -
Software Installation and Operation Guide
........................................................
- 13 -
1. Install the Instone 3D
................................................................................
- 13 -
2. Basic settings
............................................................................................
- 14 -
3. Advanced parameters instruction
............................................................
- 15 -
4. Expert Settings
..........................................................................................
- 16 -
5. Load model file
.........................................................................................
- 17 -
6. Rotate
........................................................................................................
- 17 -
7. Scale
..........................................................................................................
- 18 -
8. Mirror
........................................................................................................
- 18 -
9. Right-mouse menu
...................................................................................
- 18 -
Online printing and firmware updates
................................................................
- 19 -
Precautions and FAQ
...........................................................................................
- 20 -
WIFI Module Operating Guide
............................................................................
- 22 -
Page 3

- 3 -
Declaration
All INVENTOR PRO 3D Printer will be tested and calibrated before delivery. With
more than 8-hour continuous printing test, the following phenomena are normal:
particle dust on the shell or the slight traces on the nozzle, etc.. Please read this
manual carefully before using the printer to avoid damaging both the body and
machine.
Legal Statement
We have all the rights to modify the relevant contents of this manual without
notice.
The machine case is flammable and there are heating components inside the
machine. So don’t leave the device unattended after power-on. If any abnormality is
found, please cut off the power supply in time to prevent the fire. Any accidents
caused by misoperation would not be assumed by us.
We are not responsible for any loss without following this manual (including
subsequent loss, misprints and publishing errors). No part of this manual can be
modified, photocopied, or translated without prior written authorization. This manual
is copyrighted and we reserves all the rights of the final explanation.
Important Security Information
Failure to follow the instructions in this manual may result in fire, equipment damage,
property loss or personal injury.
Before using the product, please refer to the Quick Start Guide and User's Manual.
Operation:
1.For INVENTOR PRO and power adapter, please keep the surrounding
temperature range 15~40℃, humidity range 20%~50%. Otherwise it may affect the
quality of the print model and even cause a security risk.
2.INVENTOR PRO 3D Printer can only use the company's standard power
adapter cable. The use of damaged cables, or power in damp environments may
damage the equipment or cause fire.
3.During the printing process, a slight odor is produced. The odor is non-toxic
but might cause slight discomfort to the human body. Therefore, it is recommended to
use in the well-ventilated environment.
4.Try to keep the printer away from strong airflow which might have a certain
impact on print quality.
5.Do not expose the printer to water or other liquids which might cause damage
Page 4

- 4 -
to the machine.
6.If INVENTOR PRO is dropped, burnt, punctured or crushed, it might be
damaged. Do not use the damaged INVENTOR PRO to keep away from personal
injury and property damage.
Maintenance: If INVENTOR PRO is damaged or malfunctioning, please contact our
company or authorized service provider. Do not open the INVENTOR PRO and try to
repair by yourself. Disassemble INVENTOR PRO might cause equipment damage or
personal injury.
Squeeze-Involve-cutting: The INVENTOR PRO has mounts of motion components.
Avoid contact with these moving parts during operation. To prevent the body is
squeezed, involved, cutting and other injuries.
Caution hot scald:
1.During working, the nozzle, floor and other components of machine will
produce high temperature. Please avoid direct skin contact with these parts.
2.Do not touch the high-temperature parts of the model, nozzles, printing
platforms, etc. when models just finish printing. Wait for these components to cool
sufficiently before removing the model and other subsequent operation.
Page 5

- 5 -
YIWU INSTONE 3D TECHNOLOGY CO.,LTD
Website: www.instone3d.com
Contact: Cathy/ Wilona
Support Email: sales01@instone3d.com
Tel: +86-579-89026661
Skype: live:instone01_1
Twitter: Instone_3D
Facebook: Instone 3D
Addr.:
Flr.3, Bld.2, Area B, No.E-21 Xinke Road, Yiwu Economic & Development
Zone, Yiwu, Zhejiang, China
Brief Introduction
1. How to use the manual?
This manual is divided into four sections, including overview, installation,
operation, and common troubleshooting. Please read this manual carefully before use,
and operate according to the manual. If necessary, please print it for reference.
2. How to protect the machine?
Do not turn the power off or unplug
the
SD card while the model is being loaded.
Otherwise, the model data will be lost.
During the printer debugging, the nozzle will squeeze out the material. Make sure
that the distance between the nozzle and the print platform is at least 50 mm, or the
nozzle might be blocked.
Overview
INVENTOR PRO series, with the ownership of several patents ,is the new generation
of 3D printer with independent design, development and manufacturer .After simple
training ,you are able to create whatever model you like even you have never used it
before. The principle of the printer is to melt and extrude the materials at high
temperature and then solidifies after rapid modeling to make it strong and durable .We
continuously improve our systems with implementing of functions such as half-way
reloading ,WIFI, touch screen etc. It will be more convenient to take the model by
adopting the modular design .Users will benefit from better vision ,free from long
bending operation and thus brings more choice and pleasant operating experience
with the touch screen on top of the machine.
Page 6
- 6 -
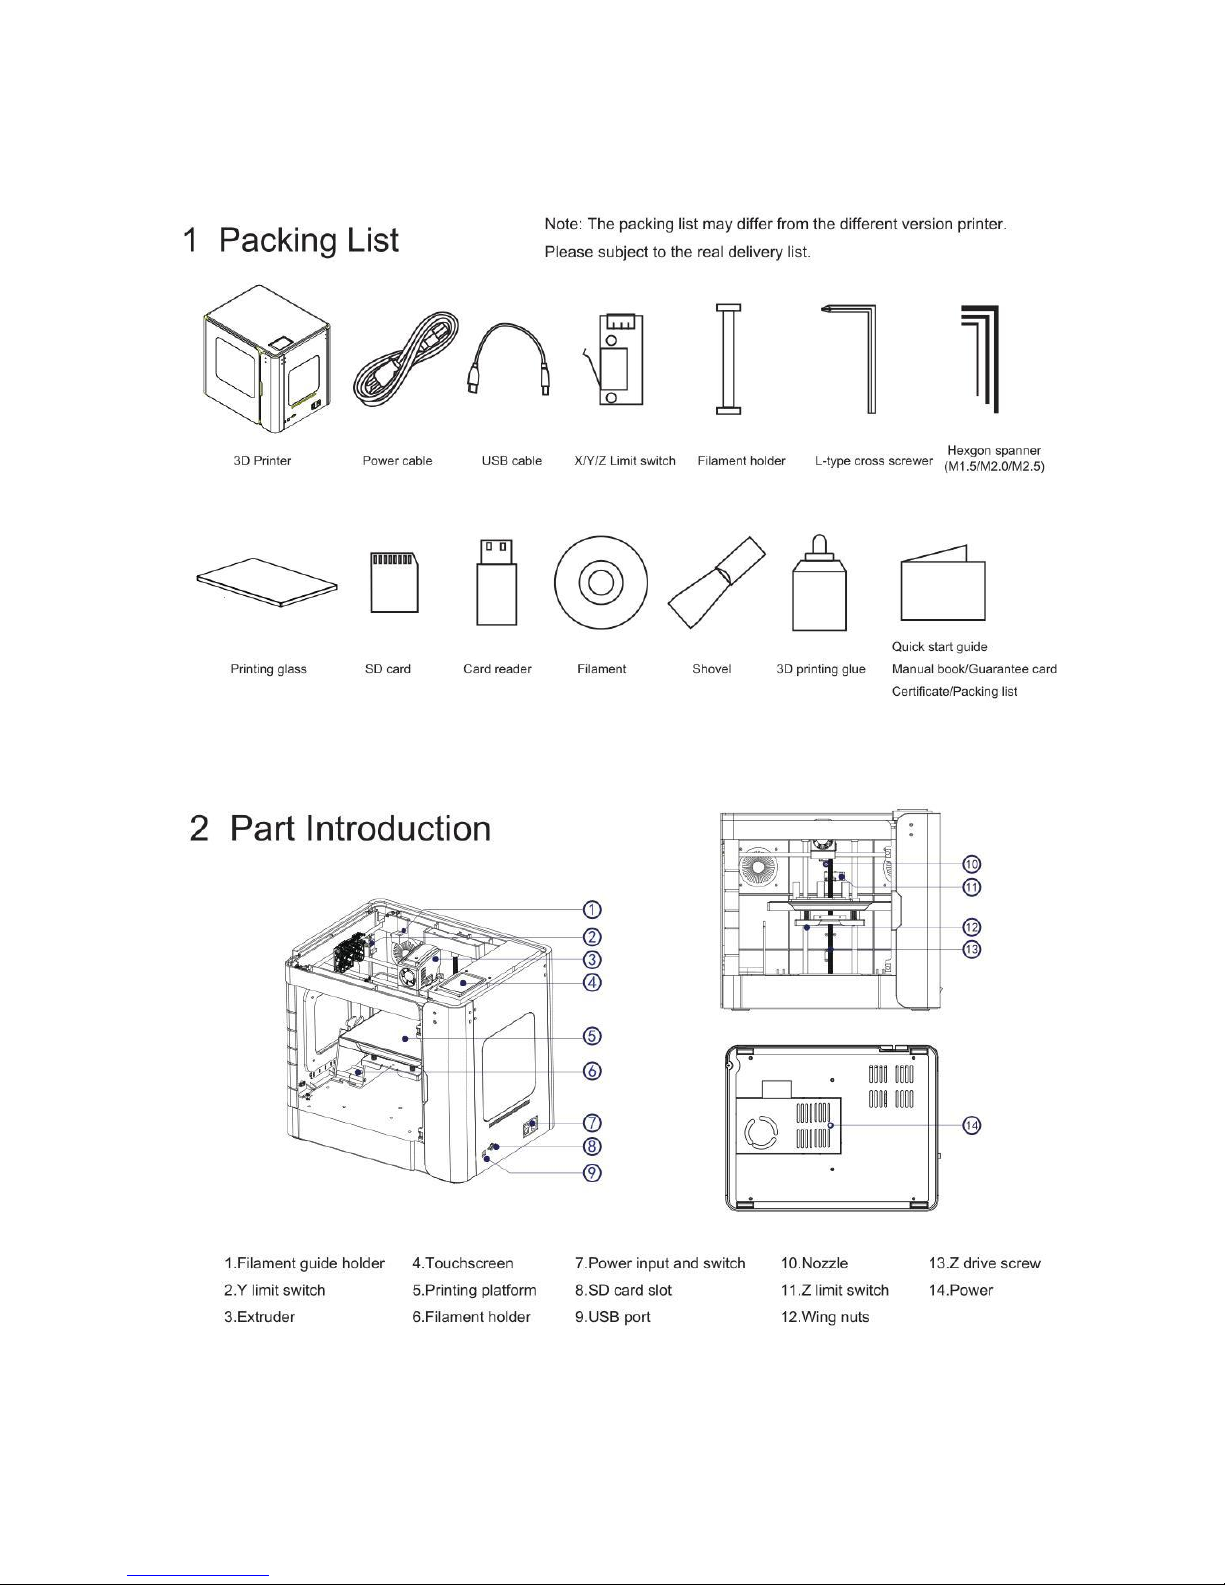
Get to know your INVENTOR PRO
Page 7
- 7 -
Basic parameters:
Product name: FDM 3D Printer Brand: Instone
Model: INVENTOR PRO Input voltage: 110V/220V AC 50/60Hz
Maximum power: 230W Forming principle: FDM
Nozzle temperature: 245℃(Max) Working condition: 10-40℃, Humidity 20-50%
Moulding size: 240x160x160mm Printing speed:40-150mm/s
Positioning accuracy: Axis Z: 0.0025mm, X/Y: 0.011mm
Printing accuracy: ±0.1mm Layer thickness: 0.1-0.3mm
Nozzle diameter: 0.4mm Nozzle number: Single
Changing material midway: Support WIFI: Support
User interface: 3.5 inch touchscreen
Software requirement:
Enclosed software: Inston3D, Cura
Extended software: Slic3r, Repetier-host,Simplify3D
File formats: STL,OBJ,G-Code OS: Windows,Linux,Mac
Consumables specifications:
Printing material: ABS,PLA Diameter: 1.75mm
Color: Colorful
Machine specification:
Size: 441x344x407mm Package size: 525x440x525mm
Machine material: Injection molding/Plastic shell
Product weight: 12KG Gross weight: 18KG
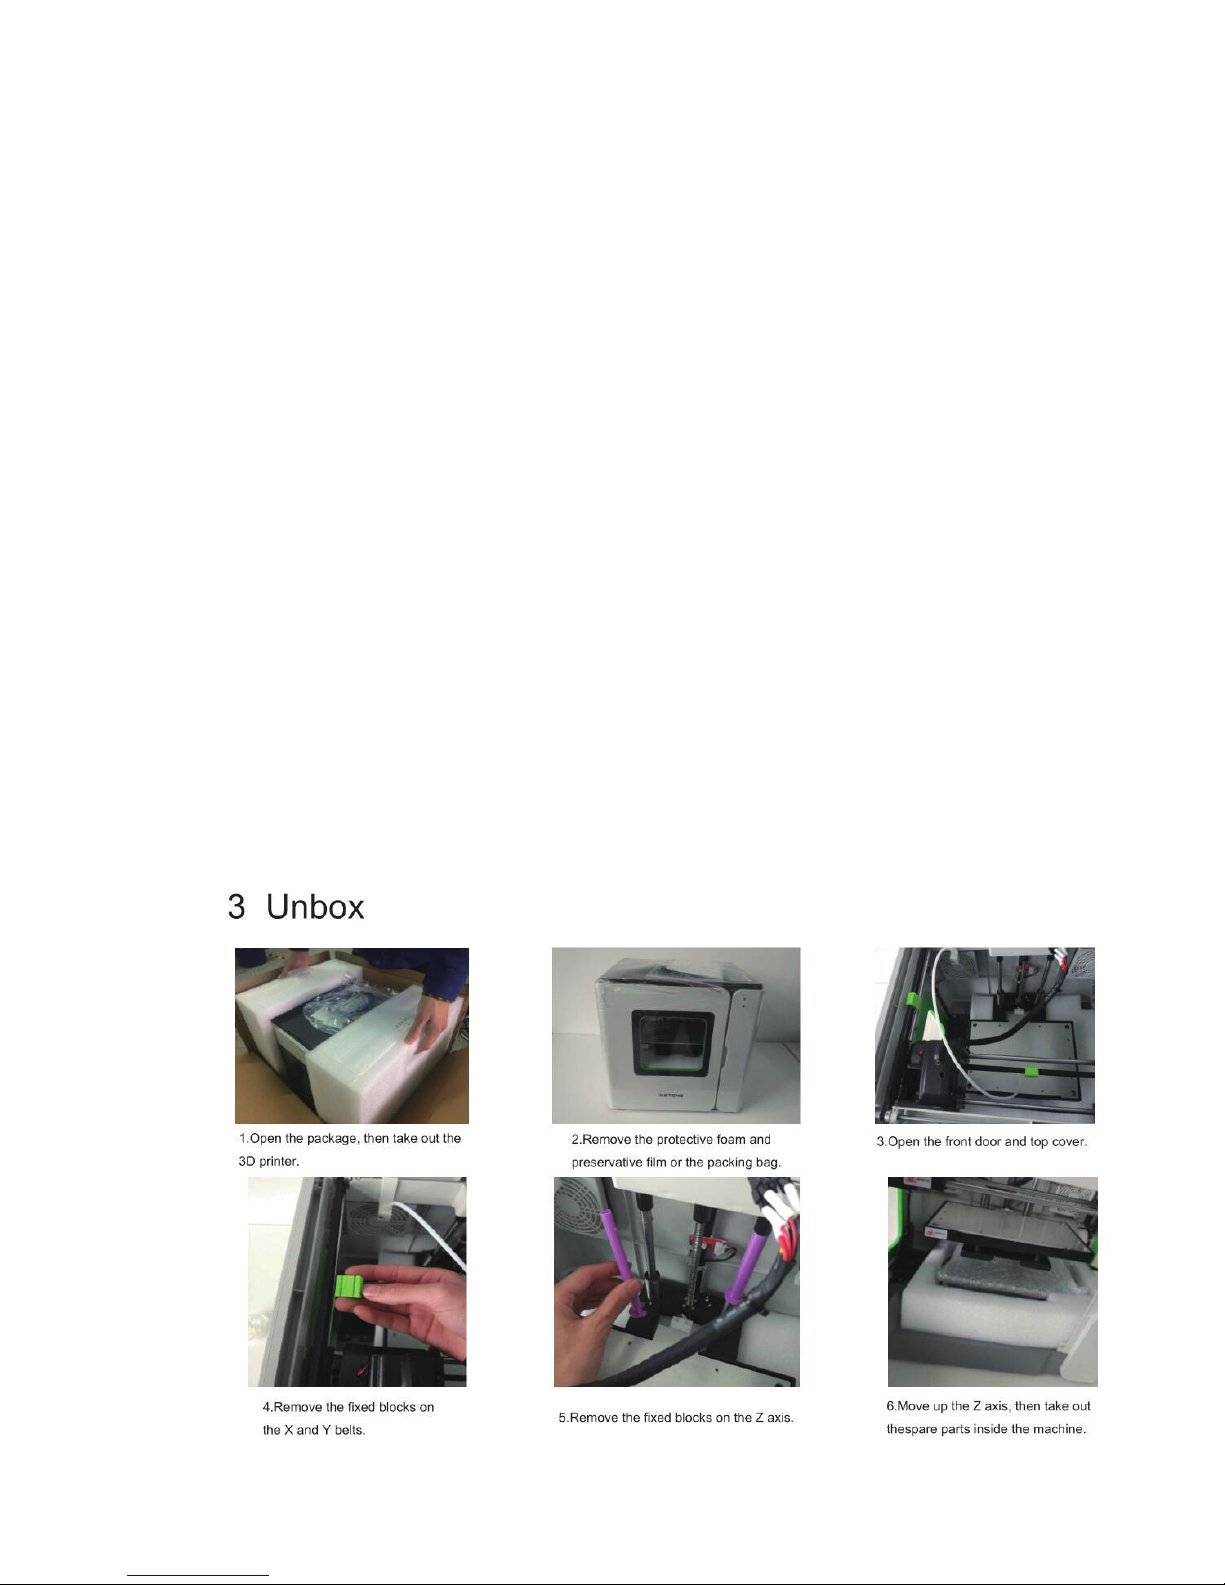
Open-package
Page 8

- 8 -
Brief Introduction of User Interface
Logical Relationship
HOMEPAGE
SYSTEM
Page 9

- 9 -
TOOL
FILE CHOOSE
FILE OPERATION
PRINTING INTERFACE
PRINTING TOOL
NUM KEYBOARD
MANUAL
PREHEAT
Page 10

- 10 -
FILAMENT
LEVEL
FAN
WORKING CONDITION
INFO
WIFI
Page 11

- 11 -
Machine Installation and Operation Guide
1) Remove the platform glass from the packaging carton and
apply a layer of printing glue or heat-resistant adhesive tape to
the upper surface.
In order to ensure the best printing state of model, we have to apply
a layer of 3D printing special glue to the glass platform. The glue can
increase the adhesion of the model and the bottom plate, as much as
possible to reduce the problem of edge lifting. ( After printing 4-5 times or glue invalid need to be
re-applied.)
As shown in the left figure, apply the special glue for 3D printing on the glass plate and level the
glue with the standard model shovel, then level it until it is covered with the bottom plate and glue it
on the Z-axis printing platform.
2) Consumables installation
Remove the accessory "consumables" from the packaging carton and install the filament tray
correctly on the carriage as shown in Figure 1&2, and the consumable material is drawn out from the
inside of the tray (strictly install in the direction shown. Don’t install upside down).
Trim the head of filament, then get it through the thread guide tube to the nozzle case (not really
get through the case). Then open the machine, select the preheat nozzle button, set the nozzle
temperature (PLA material around 200℃, ABS material around 220℃), until the nozzle heated to
the set temperature, and then press the nozzle assembly on the left clamping gear handle. Insert the
material into the throat forcedly, and observe the nozzle, a smooth material out shows that it is
installed successfully.
3) Adjust Printer Optical Flatness
The correct position of printing platform should be in the vertical plane with nozzle. This can
greatly reduce the print failure rate, ensure a more stable printing process, and get the better effect of
the print model. The printing platform is mechanically biased due to transportation or re-installation,
etc. If the following two conditions occur during the printing of the bottom border, the platform needs
to be leveled again.
Consumables not sticking on the platform means the platform is too low. Then it needs for
appropriate increase.
Consumables extruding not smoothly means the platform is too high. Then it needs for a
corresponding reduction.
Figure 1
Figure 3
Figure 2
Figure 4
Page 12

- 12 -
Level adjustment interface on the monitor Figure 1
Leveling method: As shown in Figure 2, the print platform can be raised or lowered by rotating the
bottom of the four knobs to achieve. From the bottom-up perspective, clockwise rotation makes the plat
lower, and counterclockwise rotation makes floor elevation.
Leveling steps:Rotate the four knobs clockwise, so that the printing platform and the nozzle has a
3-5mm gap;
Put an A4 paper on the printing platform, select TOOLS → LEVELING, the
interface displays as shown in Figure 1. Rotate the knob corresponding position of
the nozzle counterclockwise, while swinging A4 paper, when you feel significant
resistance between it and the nozzle, but still easy to swing, stop rotating the
knob, the position is the best leveling position, then click NEXT, repeat the
operation until the main interface says LEVELING SUCCESSFULLY.
4) Model Printing
Copy the already converted GCODE model file to the SD card (the standard
SD card already contains 3 test models). The SD card as shown in the left
Figure. Insert the SD card to the slot with gold finger side up, then select the
Print menu, in the file directory list, select the file you want to print, and wait
for printing to complete.
5) Printing completed
After the model has been printed, wear gloves and use a model blade to
carefully shovel the model down. If the model is braced, remove it
manually or immerse it in special solvent DISSOLUBLE for
approximately 2-5 hours . (The dissolution time is estimated based on the
model structure, and the model with internal cavity supports is longer.)
Warnings for solvent: DISSOLUBLE solvent is flammable; place in where the child can not reach;
do not eat; do not upside down to prevent solvent leakage. Storage of the product in sealed, cool and
dry condition.
Level knob Figure 2
Page 13

- 13 -
Software Installation and Operation Guide
1. Install the Instone 3D (Original ver.15.04.6)
1. Open the folder in the U disk with the machine, then double-click “Instone3D_15.04.6”.
Choose the installation directory in the first interface or default, then click “NEXT”.
2. All the requests during installation, just click “YES”. Then click “NEXT” to finish the
installation.
Page 14

- 14 -
2. Basic settings
Page 15

- 15 -
3. Advanced parameters instruction
Page 16

- 16 -
4. Expert Settings
Page 17

- 17 -
5. Load model file
6. Rotate
Page 18

- 18 -
7. Scale
8. Mirror
9. Right-mouse menu
Page 19

- 19 -
Online printing and firmware updates
Online printing:
Note: There is an offline risk of online printing: If the data cable is disconnected or the
computer shuts down unexpectedly, the machine will stop printing and can not continue from
the last time.
1. Install the driver, open the folder in the standard SD card, select "Driver". Please select the
corresponding file according to the OS used.
Windows: "windows"—"CP210xVCPInstaller_x64/x84.exe"(x64 is 64bit, x84 is
32bit)
Linux:"Linux"—"cp210x.c"
Mac:"Mac"—"SiLabsUSBDriverDisk.dmg"
2. Use the standard USB cable to connect computer and printer.
3. Run the software “Instone3D 15.04.6”, click menu bar “File”—“Machine settings”
—
“Communication settings”—“Serial port”—“COM1” (Please select according to the
allocation of pc ports); “Baudrate”—“115200”, then click “OK”.
4. When “Print with USB” shows above the icon which in the right figure, it means
successful connection.
5. Following the Operation Guide in last chapter, load the model in this program, adjust the
slice parameters, when slicing finished, click “Print with USB”, printer will start heating,
printing, etc. automatically.
Firmware updates:
The factory has installed the latest firmware program before delivery, please do not easily
update the firmware unless there’s a need for maintenance and debugging.
1. As previously described, after the successful connection between computer and printer,
click the “Machine”(on the menu bar)—“Install custom firmware”, then select the file
“INSTONE*.*.*.hex”.
2. Wait for the progress bar of dialog box to complete and display "Done! Installed firmware:
INSTONE *. *. *. hex" to indicate that the update is successful.
3. Turn the printer off and on again. The firmware update is complete.
Page 20

- 20 -
Precautions and FAQ
1. Precautions
A. High-temperature danger. There’s heating board inside the machine. Wait for cooling
down before maintenance.
B. Motor drive can cause crushing and cutting damage. Do not touch any part of the machine
while the machine is working.
C. When operating the equipment, it may cause irritating odor. Keep the environment
ventilated and open when using INVENTOR PRO.
D. Do not leave the INVENTOR PRO unattended while the INVENTOR PRO is operating.
E. When printing is complete, the nozzle and filament are still hot, remove it from the print
platform after cooling down.
2.FAQ
Question 1: Stop suddenly when printing online.
Causes
Solutions
The USB cable is loose or unplugged.
Check the USB port, re-plug cable or use SD card instead.
Program stops or crashes.
Restart the software or computer.
Problems of computer’s port.
Replace the computer, use SD card instead.
Question 2: No filament comes out from the nozzle.
A. If this problem happens with clatters from nozzle when install the new filament, please
check whether the filament head inserted to the tube inside the nozzle, whether it stuck in the
mouth of nozzle, then take out the filament, re-insert after trim.
B. If it is determined that the head has entered the heating head but with clatters, check if the
current temperature of the print head is correct.
C. If the nozzle just extrudes for a while then stops, and with clatters, this might be caused by
the deformation of the filament and stuck of nozzle resulting from too high temperature. Take
out the filament, re-insert after trim, and set the correct temperature.
D. Check if there’s knot and stuck of filament at the material hanger.
E. If the above solutions can’t solve the problems, you can try to open the nozzle cover,
remove the fan and radiator to be repaired. During the repair, it might require nozzle with
temperature, pay special attention not to touch the heating head to prevent burns.
Remove the plastic cover on the right Figure 1
Page 21

- 21 -
Question 3: The material does not stick to the glass board then becomes a mass, or fall off
for a while.
Causes
Solutions
The temperature of glass board is not enough.
High up the temperature or re-paint the
printing glue
The platform is not leveled correctly. Too
large gap between nozzle and platform.
Re-level the platform.
(With large gap, the filament can’t stick on
the board totally; with small gap, the risk of
nozzle stuck will be increased or even
broken the glass board. )
Remove the radiator and fan Figure 2
Clean the stuck material Figure3
Unblock test, if ok, install the right cover Figure4
Page 22

- 22 -
WIFI Module Operating Guide
Page 23

- 23 -
Thanks for choosing Instone!
- The End-
 Loading...