

Page 1

Keep this manual for future reference. If you sell this stroller or
give it away, make sure you give this manual to the new owner.
Ask them to read instructions c ompletely.
SATURN STROLLER
Operating Instructions
Important: Read and follow these Safet y Rules and Assembly Instructions before operating stroller. If you
have any questions concerning the safe use of this product, contact InSTEP, LLC at 1-800-242-6110, M-F,
8:00 a.m. – 5:00 p.m. C.T. or visit us at www.instep.net or E-mail us at info@instep.net before using.
Safety Rules:
WARNING: Failure to follow these warnings and assembly instructions could result in
serious injury or death.
WARNING: Immediately discard any plastic wrapping.
WARNING: Never allow children to fold, assemble or disassemble the stroller.
WARNING: Maximum weight capacity for the stroller is 50 lbs. or 22.7 kg. Excessive weight may cause a
hazardous, unstable condition if this load is exceeded. Maximum height of the child shall not
exceed 35" or 89 cm.
WARNING: Never plac e child in stroller with their head forward and feet rearward unless the child is in
an approved infant car seat and it is mounte d correctly to the stroller using the specially
designed car seat adapter bar. See step 9 in the instruction manual.
WARNING: Avoid serious injury from falling or sliding out. Always use seat belt.
WARNING: Never leave child unattended.
WARNING: Never use this stroller with roller skates or in-line skates.
WARNING: Never allow stroller to be used as a toy or allow children to give rides to others.
WARNING: Never use stroller if it becomes damage d.
WARNING: Always be aware of traffic around you when walking.
WARNING: Always engage brakes when you stop or when you let go of handle.
WARNING: Do not put or hang things on the canopy or handle. Accessories or parcels place d in or on
the stroller may cause it to become unstable.
WARNING: Maximum weight for objects in bottom basket is 5 lbs. or 2.2 kg. Excessive weight may cause
a hazardous, unstable condition.
WARNING: To avoid burns, never put hot liquids in the parent or child tray. To prevent tipping over do not
plac e more than 2 lbs. or 1 kg on either parent or child tray.
WARNING: Child may slip into leg openings and strangle. Never use in a reclined carriage position
unless waist and shoulder straps have been readjusted.
WARNING: Care must be taken when folding and unfolding the product to prevent finger entrapment.
1
Page 2
2
IMPORTANT
We appreciate your purchase of one of our many fine products. We are sure that you will be satisfied with your
selection. We regret that although great care and effort have been taken, occasionally problems may occur.
PLEASE DO NOT RETURN PRODUCT TO THE STORE. To ensure prompt and correct handling of problems, or to
answer questions, please contact us at either our Toll-Free Customer Service number or E-mail us at our address
listed below. Service will be quicker if you have your model number (found on the product and box) along with this
instruction sheet ready when calling. If you have any questions concerning the safe use of this product, please
contact us at 1-800-242-6110 and speak to our Customer Service Representative or E-mail us at info@instep.net or
visit us at www.instep.net
Tires are shipped deflated, DO NOT OVERINFLATE. Due to their size, PLEASE INFLATE SLOWLY WITH SHORT
BURSTS OF AIR to 20-25 PSI maximum. 25 PSI will provide a comfortable ride for your child.
Model SS100 and SS150 Saturn Stroller Assembly Instructions
Parts List
Description Qty. Description Qty.
Frame Assembly 1 Parent Console 1
Fender 1 Child tray 1
Fender screws #4 x 16mm 4 Infant car seat adapter bar 1
Front Wheel Assembly Dual 8" 1
Rear Wheels 10" 2
Stroller Assembly and Use Instructions
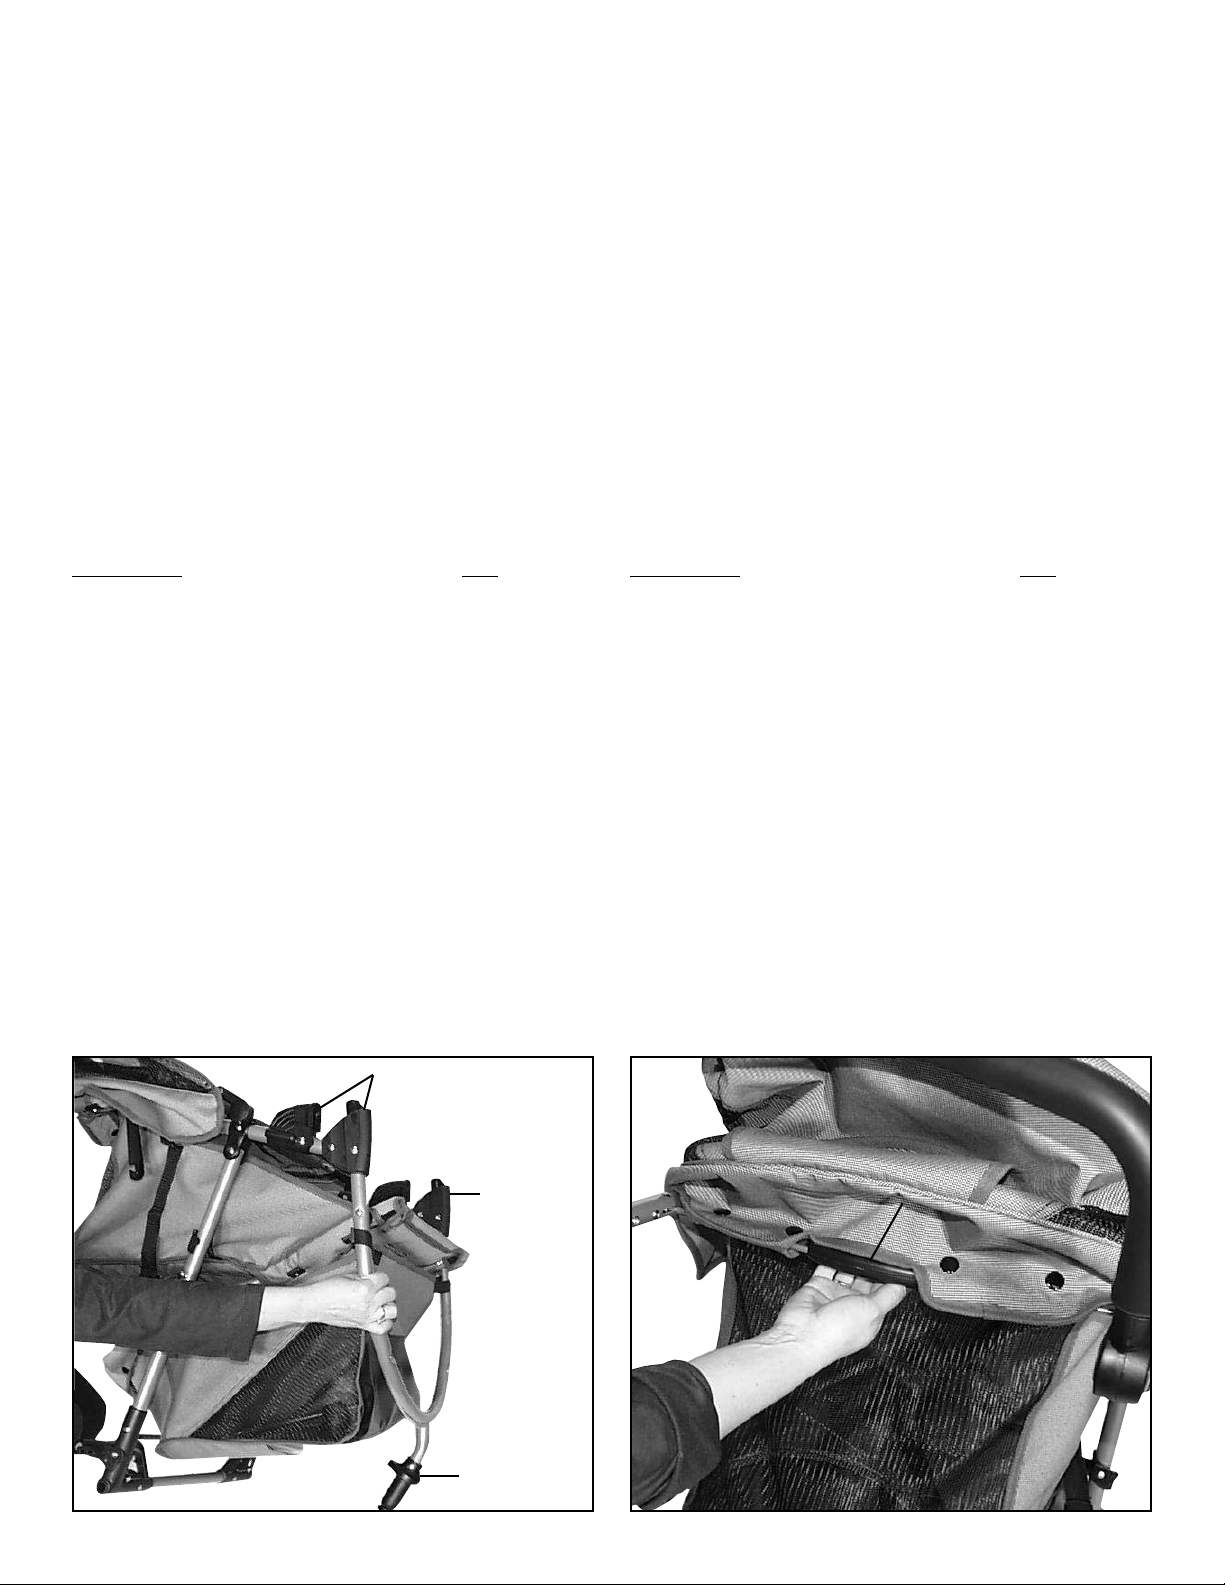
Step 1. Unfold Stroller
Grasp frame as shown and open until side latches engage (Figure A1).
To fold stroller:
Pull the one -hand fold handle toward the stroller handle, str oller will automatically begin to fold (Figure A2).
You can also fold the st roller by pulling the side latches towards the st roller handle (Figure A3). Continue
folding, pushing f rame together and hook the storage latch (Figure A4).
A1
Side Latc hes
A2
Side Latc hes
Front Wheel
Post
One-Hand
Fold Lever
Page 3
3
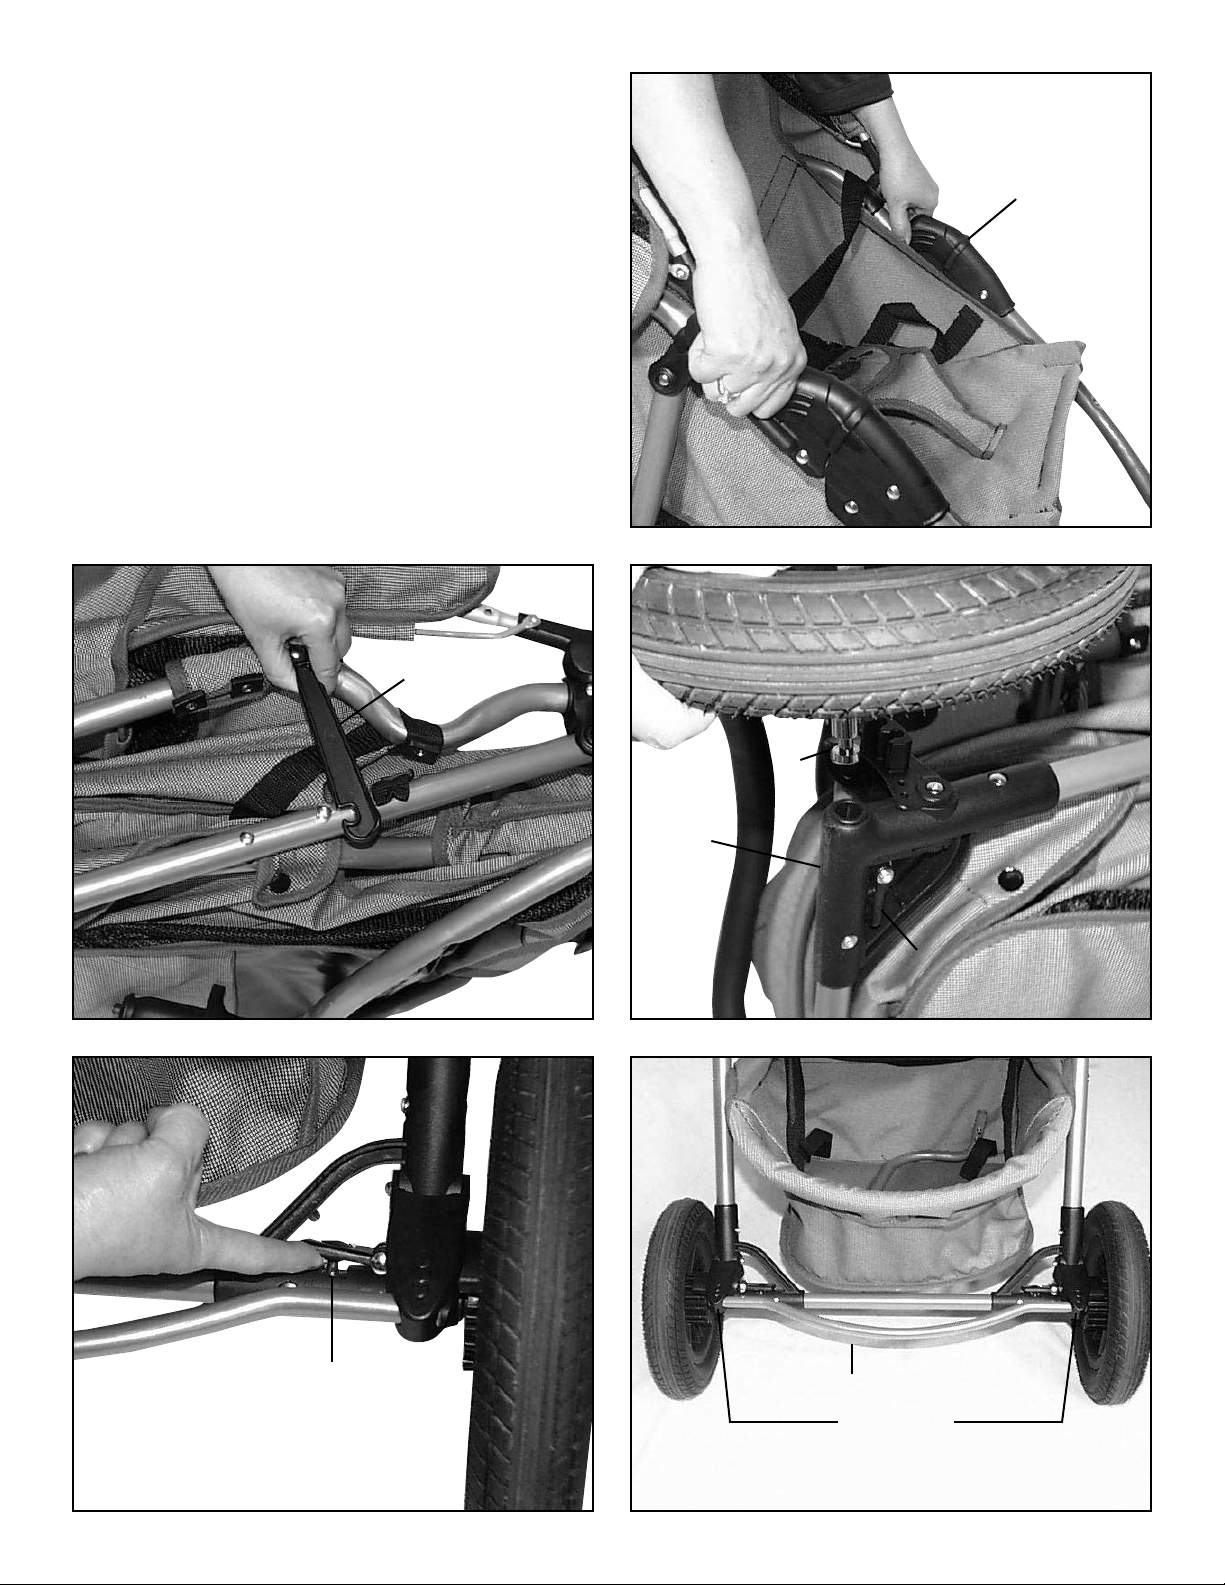
Step 2. Rear Wheel Assembly
Turn stroller onto its side. Grasp rear wheel in one
hand, slide wheel’s axle into hole in rear of frame
(Figure B1). Check to see that the wheel is properly
inserted by pulling on the wheel firmly, the wheel
should not come off if fully inserted/locked. Repeat
for other side. To release wheel push up on axle
release lever while pulling off wheel (Figure B2).
To engage rear brakes:
Step lightly on the side brake levers or rear brake
bar to engage brakes. To disengage, lift up on
brake levers or bar (Figure B3).
A3
A4
B2
B3
B1
Side Latc hes
Storage Latch
Rear
Axle
Axle Release Lever
Rear Bra ke Bar
Rear
Frame
Axle Release Lever
Brake Levers
Page 4

4
Step 3. Front Wheel Assembly
Turn stroller upright onto its rear wheels, then tip
stroller back so the handlebar is down on the
ground and the front is up. Slide the front wheel
assembly onto the front wheel post, push until the
wheel assembly locks into place (Figure C1).
Chec k to see that the wheel assembly is properly
inserted by pulling on the wheel firmly. To remove
wheel push on release tab and pull off wheel
(Figure C2).
To lock the front wheel from turning:
Push down on the front wheel’s lock lever to keep
the front wheel from turning. To unlock, lift up on
lever (Figure C3).
Step 4. Front Fender Assembly
While stroller is still upright on its rear wheels, align
the fender’s tabs with the holes in the front frame
and press on. Insert the #4 – 16mm screws into the
hole and tighten with a Phillips screwdriver, repeat
for the other 3 holes (Figure D).
WARNING: To avoid burns, never put hot
liquids in the parent or child tray. To prevent
tipping over do not place more than 2 lbs. or
1 kg on either parent or child tray.
C1
C2
C3 D
Front Wheel
Post
Front Wheel
Release Tab
Front Wheel
Lock Lever
Fender
Ta b
Front Wheel
Assembly
Front Fra me
Fender Holes
Page 5

5
Step 5. Installing Child Tray
Position tray as shown with the levers open, when
aligned close both levers to lock in place (Figure E).
To remove open both levers and pull off. Note the
child tray can not be used when using the car seat
adapter bar.
Step 6. Installing Parent’s Convenience
Tray
Snap parent tray onto the handlebar aligning the
tray’s holes with the handlebar’s knobs (Figure F).
Step 7. Adjusting Handle Height
While pushing both handle buttons in, rotate
handle to the desired height (Figure G).
Step 8. Proper use of Seat Belt,
Shoulder Straps, and Recline
WARNING: Avoid serious injury from falling
or sliding out. Always use seat belt.
1. Place child in stroller seat. Make sure T-shield is
between the child’s legs.
2. When child is seated, place shoulder straps over
the child’s shoulders and clip onto the waist ring.
3. Buckle the T-shield buckles into the side waist
buckles. Adjust the waist and shoulder straps
for snug fit (Figure H).
E
F
G H
Child Tray
Levers
Parent Tray Hole
Handle Adjust
Button
Shoulder
Stra ps
Handlebar Knob
Handle Adjust
Button
Waist
Stra p
T-shield
Page 6

To recline seat:
To fully recline, unhook buckle on back of the seat
(Figure I).
To place seat in upright position, push seat forward
and reconnect buckle located on back of seat.
Extra webbing can be placed in the rear pouch so
it does not hang down and drag.
To adjust the recline position, adjust the buckle on
the strap.
WARNING: Child may slip into leg openings
and strangle. Never use in a reclined carriage position unless the T-shield and
shoulder straps have been readjusted to
the new seat position.
Step 9. Using the infant car seat
adapter bar
When the car seat adapter bar is properly installe d
onto “The Everyday Stroller,” it is designed to be
used with the following infant car seat brands and
models. Graco
®
Snug Rider,®Century®Avanta,
®
Evenflo®On My Way.
®
The trade names and trademarks of Graco,
®
Century,®and Evenflo®are the trademarks of their
respective companies.
WARNING: Failure to follow these warnings
and assembly instructions could result in
serious injury or death.
The front child tray must be removed
before using the infant car seat
adapter bar.
Lift up the textile cover of the seat’s side tubes.
Insert adapter bar with buttons on the inside. Push
in the spring buttons while pushing adapter bar into
the seat’s side tubes end (Figure J1). Release button and continue pushing in the bar until the spring
buttons lock into the holes located on the inside of
the seat’s side tubes. Pull on bar to make sure it is
locked in place.
To remove adapter bar push in spring buttons
with your finger or pen and pull out the bar. Store
adapter bar in the under seat basket when not in
use (Figure J2).
6
I
J1
J2
Rear Recline
Stra p
Car Seat
Adapter Bar
Black
Spacers
Adapter Bar
Tex t il e
Cover
Spring Loc k
Buttons
Under Seat
Basket
Page 7

7
J3
J4
J6J5
Mounting infant car seat onto the
adapter bar
Note: The stroller seat should be in the full recline
position with the recline strap unbuckled prior to
placing car seat on. With the car seat adapter bar
installed on the stroller, position the infant car seat
(WITHOUT CHILD) so its mounting notch aligns
with bar. The car seat will be mounted rearward
facing towards the handle of the stroller. Push
firmly down on the car seat so the bar is in contact
with the car’s seat locking device or mounting
notch (Figure J3). Note: Some car seats do not lock
onto the bar, they just rest on the adapter bar.
Using the stroller’s recline strap reverse the strap
and insert the recline strap around the tubing and
slide into the car seat’s retention slots on both
sides of car seat and buckle (Figure J4). Cinch tight
the recline strap around the car seat to anchor in
place (Figure J5). Check to make sure the car seat
is mounted securely by rocking the car seat front
to back. The car seat should not wobble. If it does
check and adjust the tension of the recline/restraint
strap and make sure that the car seat mounting
notch is resting on the adapter bar (Figure J6).
DO NOT CHECK THE CAR SEAT MOUNTING
TO THE STROLLER WITH YOUR CHILD IN THE
CAR SEAT.
WARNING: Car seats may fall forward if the
strollers retention strap is not used. Do not
use the car seat without cinching tight the
retention/recline strap around the car seat.
Car Seat Locking
Mounting Notch
Car Seat
Retention
Slot
Car Seat
Retention
Slot
Adapter
Bar
Stra p Around
Frame Tube
Only – Do
Not Wrap
Over Canopy
Tube
NOTE:
For the Century
Avanta models,
remove the
2-black spacers
from the car seat
adapter bar.
Page 8

8
If you are unable to securely attach the infant car seat, discontinue use and contact our Customer
Service representative.
Please refer to the infant car seat manufacturers instruction’s and warnings for harnessing your
child in the car seat.
Do not lift stroller by using the infant car seat handle.
Care and Maintenance
Check fasteners
After one hour of use, check all fasteners to make sure they are secure. Adjust if necessary.
Periodically check the stroller to ensure that it is in good operating condition.
To clean seat and canopy:
If light cleaning is required, use a soft cloth with warm water and mild soap then air dry. Do not put into
washing machine. Do not put in dryer. DO NOT BLEACH.
To clean frame:
Wipe using a soft cloth with warm water and mild soap. Air dry. DO NOT USE polish or abrasives.
2425 Enterprise Drive, Suite #900
Mendota Heights, MN 55120 U.S.A.
Tel: 1-800-242-6110
or visit our website at www.instep.net
E-mail: info@instep.net
WARNING: If you have any questions concerning the safe use of this product, please contact
InSTEP LLC before using:
563736 12/01
 Loading...