

Page 1

Rocket
Bike Trailer and Stroller Owner’s Manual
For use with models: MK550, MK750, SC760, SC761, GT551, and GT751
Please keep this Owner’s Manual for future reference. If you sell or give this product to someone else, please include
this Owner’s Manual, and ask the new owners to read the instructions completely before operating.
Please read this Owner’s Manual completely before assembling or operating this product.
Assembly of this product should be carried out by an adult.
Do not return this product to the store! If any parts are missing or damaged, please contact one of our
Customer Service Representatives by phone at 1-800-242-6110, or by e-mail at Info@instep.net.
IMPORTANT SAFETY INFORMATION
WARNING Failure to follow these warnings and assembly instructions could result in serious injury or death!
WARNING Immediately discard all plastic bags and plastic wrapping materials!
WARNING Maximum weight capacity for one child is 50 pounds, and for two children is 100 pounds!
WARNING Never use this trailer/stroller if it becomes damaged!
WARNING To avoid serious injury, children should always wear the seat belt and the shoulder straps!
WARNING Never leave children unattended in or around this product!
WARNING Never allow children to assemble, fold, or disassemble this unit!
WARNING Accessories or parcels placed in trailer/stroller may cause it to become unstable!
WARNING Not for use with children under 12 months old! Children must be able to support their own heads!
WARNING Before using, be sure the product is correctly assembled according to the manufacturer’s instructions!
WARNING Inflate tires to within the range shown on the tire sidewall! Check tire pressure before each use!
WARNING Use a foot pump or hand pump to inflate tires! Pressurized air hoses can cause overinflation!
WARNING Periodically re-check all fasteners to make sure they are tight!
WARNING Do not use cleaning solvents! Clean only with mild soap and water!
WARNING To prevent injury, please use extreme care when folding and unfolding this product!
WARNING Make sure your bike brakes work properly! Braking distance is increased when pulling a trailer!
WARNING This trailer is wide! Allow extra clearance near curbs, signs, parked cars, and other obstacles!
WARNING A bicycle with trailer attached requires a wide turning radius! Do not turn sharply!
WARNING Each child must wear an approved safety helmet when riding in this product in trailer mode!
WARNING Never remove protective canopy when pulling children in the trailer!
WARNING Always use the safety flag when pulling this trailer!
WARNING When pulling one child in the trailer, seat him/her in the center!
WARNING Do not ride over curbs! Avoid bumps and holes! Always signal your turns!
WARNING Use extra caution when turning on uneven pavement, and going downhill!
WARNING Not for use at high speeds! Do not exceed 10 MPH!
WARNING Never ride a bike or pull this trailer at night!
WARNING Install a rearview mirror on your bike to check on children in trailer!
WARNING Be aware of exposure hazards such as windchill and heat exhaustion by less active trailer passengers in
prolonged exposure in colder temperatures, or by extended periods in warmer temperature without adequate ventilation and
hydration!
PRIOR TO ASSEMBLY
SAFE TOWING TIPS
1
Page 2
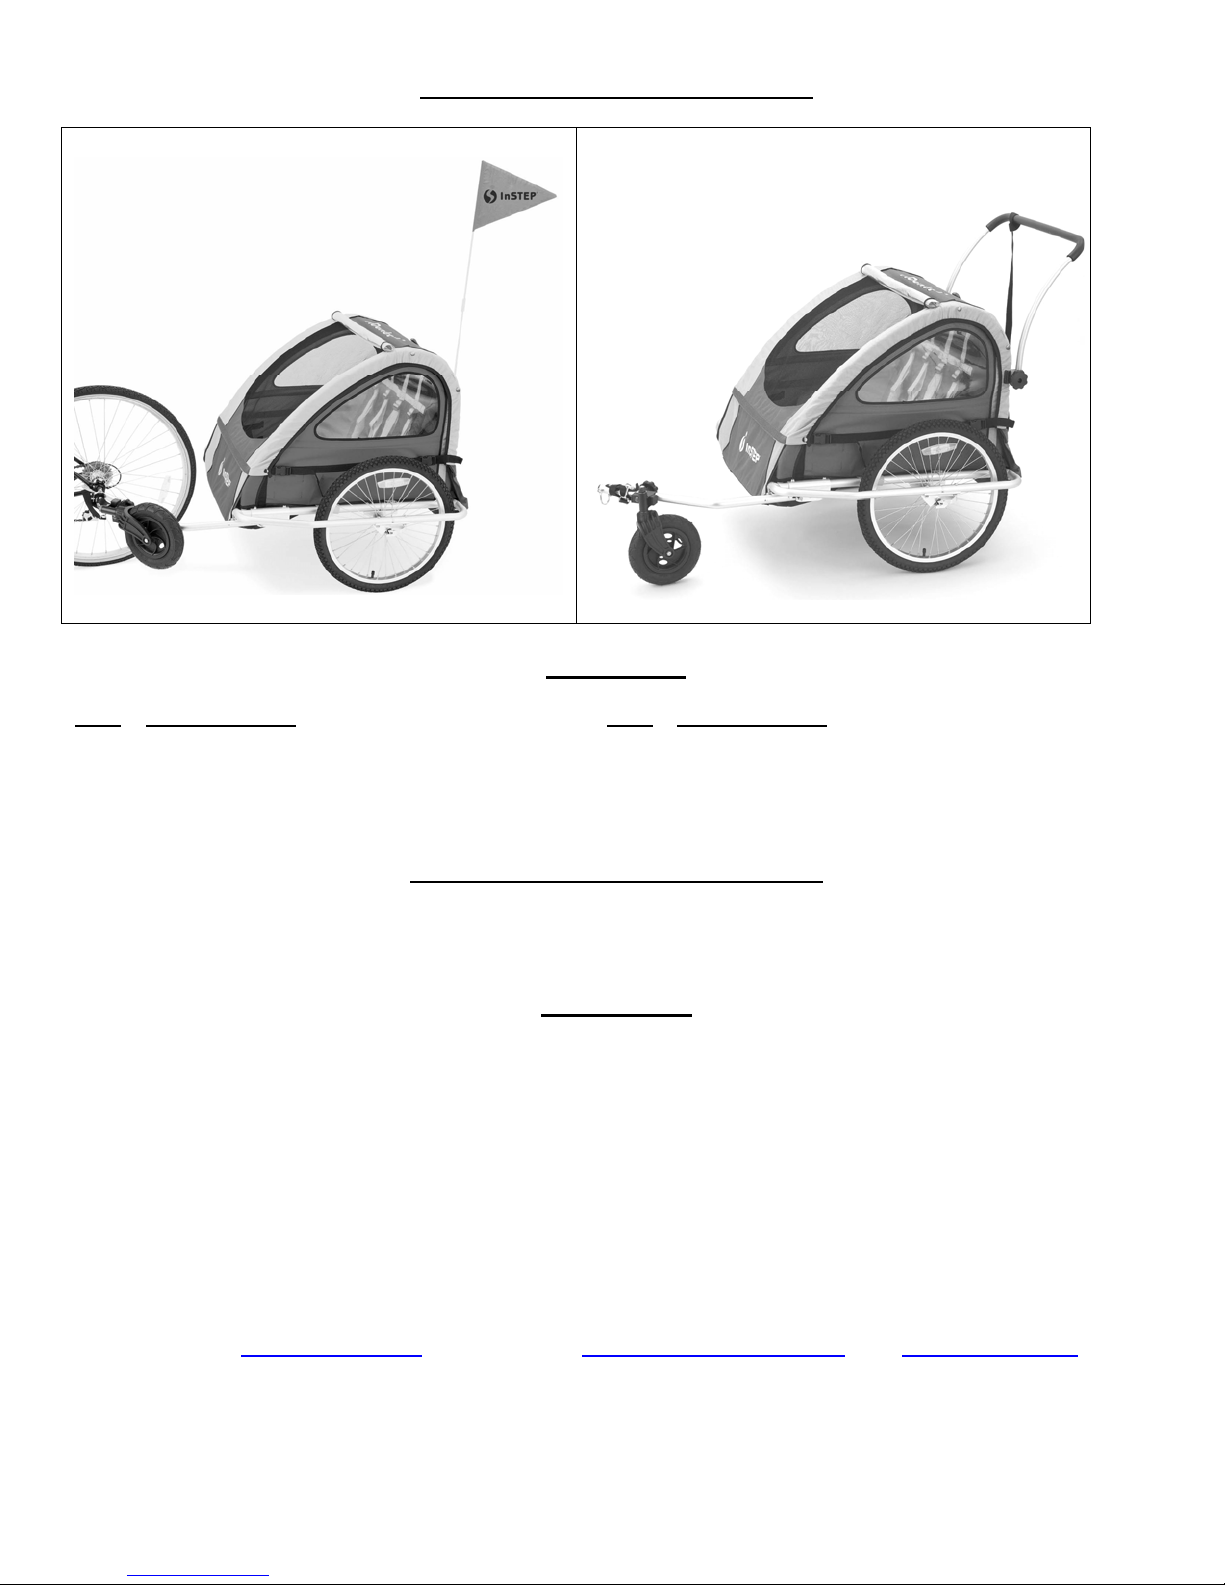
TRAILER AND STROLLER MODES
Trailer Mode
Stroller Mode
PARTS LIST
QTY DESCRIPTION QTY DESCRIPTION
1 Frame with canopy, sling seat with 5-point 1 Handlebar with safety wrist strap
safety harness, tow bar, tow bar coupler, 1 Safety flag with pole
and rear wheel brackets attached 2 20” Rear wheels
1 2-in-1 Rain cover 1 8” Swivel front wheel assembly
TOOLS REQUIRED FOR ASSEMBLY
No tools are required to assemble this trailer/stroller. However, for those bikes without a quick-release
axle on the rear wheel, an adjustable wrench is required to attach the coupler plate.
IMPORTANT!
We appreciate your purchase of this product, and hope you will be completely satisfied with your
selection. Although great care has been taken to assure the highest quality, some problems may
occur. PLEASE DO NOT RETURN THIS ITEM TO THE STORE! To ensure prompt and correct
handling of your problem, or to answer any questions you may have, please contact our Toll-Free
Customer Service Number listed below. Please have the model number (found on product ID sticker,
carton, or manual), date code, and assembly instructions ready when calling. If none is available,
please tell us the name of the product in question.
For questions concerning the safe use of this product, contact Pacific Cycle at
E-mail: info@instep.net Web site: www.pacific-cycle.com or www.instep.net
Please list your product’s identifying information below and keep for your records.
Model # _____________ Date Code ______________ Product Name _________________
1-800-242-6110
2
Page 3
ASSEMBLY AND OPERATING INSTRUCTION S
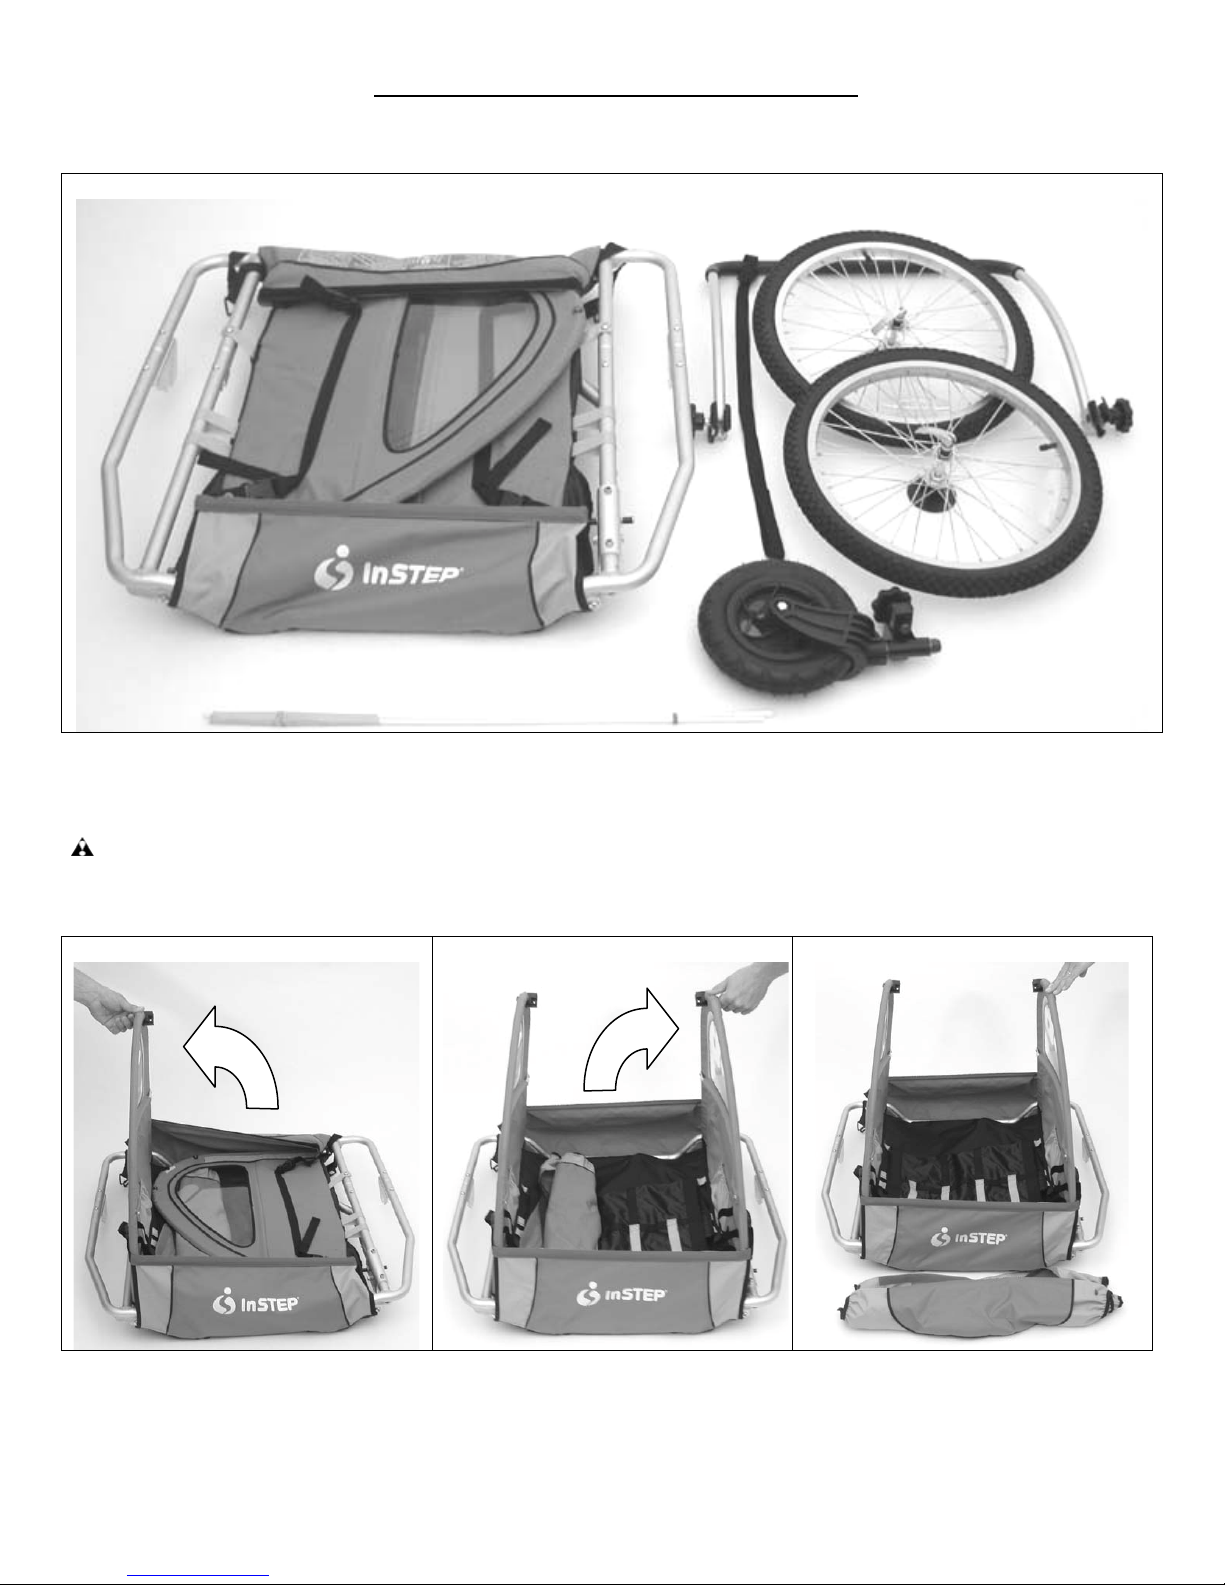
STEP 1 Remove the trailer from the carton and compare the contents with the parts list
1A
1A. Remove all contents from inside the carton and place them on a clean flat surface. Compare them with
the parts list to make sure that no parts are missing. (Note: the canopy is inside the trailer cabin.)
WARNING Immediately discard all plastic bags and plastic wrapping materials!
STEP 2 Open trailer and remove canopy
2A
2B
2C
2A. Lift the side cabin frame with window up so that it folds open.
2B. Lift the other side cabin frame with window up so that it folds open.
2C. Remove the canopy from inside the trailer compartment and set it aside.
3
Page 4
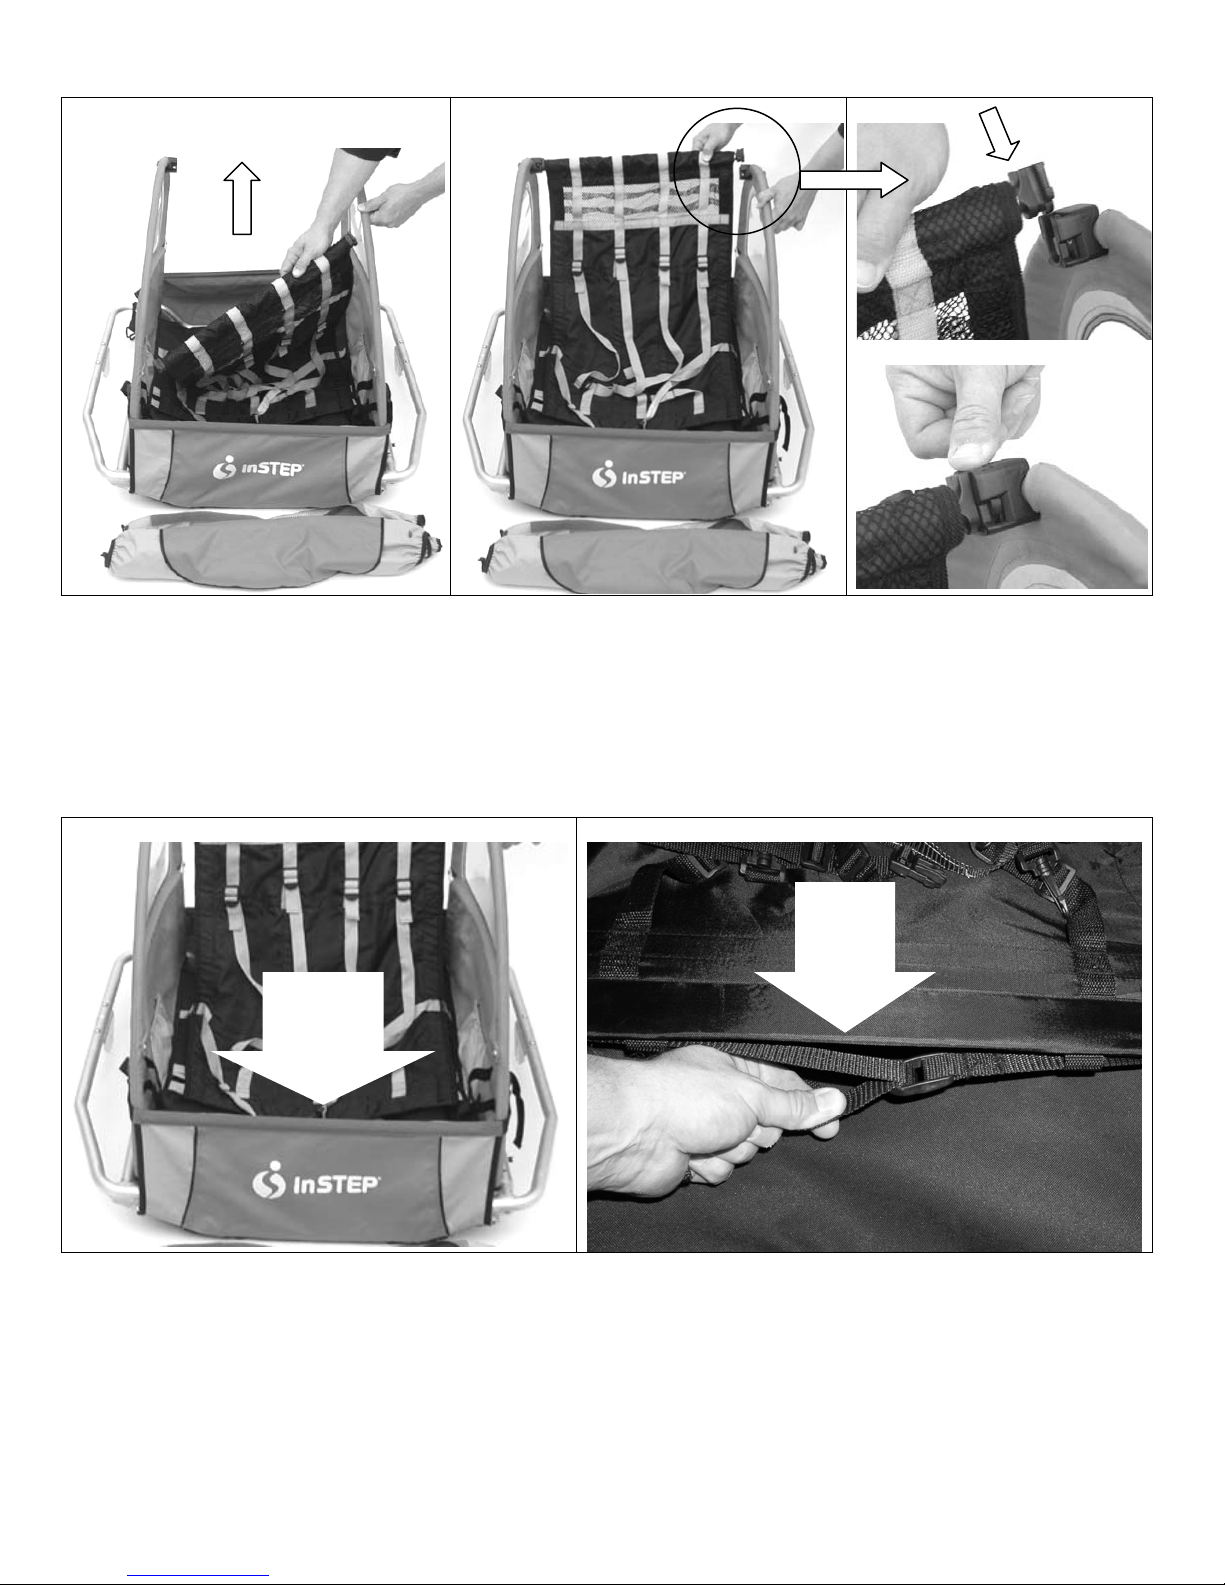
STEP 3 Link sling seat crossbar to side cabin frames
3A
3B
3C
3D
3A. Reach into the trailer, locate the sling seat and cross bar assembly and lift it up.
3B. Position the sling seat crossbar across the top of the trailer cabin frames.
3C. Slide the male joiner at the end of the cross bar into the female joiner on the cabin frame.
3D. Push the male joiner all the way down until secure. Repeat for the other side.
IMPORTANT! Pull up on both ends of the crossbar to make sure the joiners are secure!
STEP 4 Adjust the sling seat
4A
4B
Front
edge of
sling seat
4A. The underside of the front edge of the sling seat has two sets of adjustable straps, one behind the other.
4B. Tighten both sets of straps to provide support when children are seated in the trailer.
IMPORTANT! Loosen both sets of straps to allow the trailer to fold flatter for storage and transport.
4
Page 5

STEP 5 Begin attachment of the canopy to the cabin frame
5A
5B
5C
5D
5A. Drape the 2-in-1 rain cover over the cabin frame.
5B. Line up the snaps on each side of the canopy and those near the top of the cabin frame.
5C. Snap the canopy to the cabin frame snaps on one side of the trailer.
5D. Repeat for the other side.
STEP 6 Complete attachment of the canopy to the cabin frame
6A
6B
6C
6D
6A. Pull the canopy down in front and join the hook & loop tape at the top edge of the front panel.
6B. Attach the canopy snaps at each corner and pull the side straps tight.
6C. Pull the canopy down in back and join the hook & loop tape at the top edge of the rear panel.
6D. Attach the canopy snaps at each corner and pull the side straps tight.
STEP 7 Rear window flap and front rain shield adjustments
7A
7B 7C
7D
7A. To provide increased ventilation the rear window flap may be rolled up.
7B. Secure the rolled-up flap with the elastic bands at the top corners of the flap.
7C. Release the elastic bands that hold the front rain shield in place and roll the rain shield down.
7D. Secure it to the hook & loop tape running across the front edge of the canopy.
5
Page 6

STEP 8 Prepare wheels for attachment
8A
8B
8C
Axle
Wheel
brackets
Quick-release
axle nut
Quick-release
lever
Black spacer
nuts
8A. Lift the front end of the trailer up and rest the trailer on its back. The wheel bracket slots open upward.
8B. The wheel axles may come with black protective caps. These are for shipping and should be discarded.
8C. Open the quick-release lever and loosen the nut a few turns so the axle is visible and there is a space
between the quick-release axle nut and the black spacer nuts. Do not remove the quick-release nut.
STEP9 Insert wheels into wheel brackets
9A
9B
9C
9A. Slide the wheel all the way down into the wheel bracket slots with the quick-release lever to the outside.
The axle should rest at the bottom of the bracket slots to ensure that the wheel is properly aligned.
9B. Tighten the nut by hand and then clamp the lever down so that the wheel is secured.
9C. Repeat for the other wheel. Check to make sure that both wheels are secure and aligned.
STEP 10 Release tow bar and rotate into it position for use in trailer and stroller modes
10A
Tow bar
10B
10C
10D
Coupler
10A. The tow bar rests within a slotted bracket and is held in place by a spring-loaded latch.
10B. Grip the tow bar with your left hand and push both sides of the latch downward with your right hand.
Once the latch clears the slot, remove your right hand
WARNING To prevent injury, please use extreme care when folding and unfolding this product!
10C. Rotate the tow bar upward. Be mindful of the coupler at the end of the tow bar.
10D. Rotate the tow bar all the way up and press it into the bracket. The latch will engage automatically.
6
Page 7

STEP 11 Prepare front wheel assembly for attachment
11A
11B
Fork
11C
Carriage bolt
Bracket
Lock knob
11A. Carefully set the trailer back down with the towbar extended in front and the wheels mounted in place.
11B. Locate the front wheel assembly: wheel, fork, bracket, lock knob, washers, and carriage bolt.
11C. Unscrew the lock knob and remove it completely from the carriage bolt. Then, remove the washers from
the carriage bolt. Leave the carriage bolt within the bracket.
STEP 12 Position front wheel assembly to tow bar
12A
Hole in
towbar
12B
12C
12A. Hold the end of the tow bar with your left hand and the front wheel bracket in your right hand.
12B. Hold your thumb over the head of the carriage bolt and slide the end of the carriage bolt completely
through the hole in the tow bar so that that the bracket rests snugly against the tow bar.
12C. Place the washers over the end of the carriage bolt and tighten the lock knob completely.
STEP 13
13A
Handlebar
clamp
13B
13C 13D
13A. Loosen the lock knobs on the handlebar clamps but do not remove the lock knobs. Hold the handlebar
so that the clamps are positioned at the rear of the cabin frame.
13B. Pinch the clamp to open it and slide the clamp over the canopy and cabin frame tubing.
13C. Tighten the lock knob and repeat for the other side.
13D. The product is now ready for use in stroller mode.
WARNING Always use the safety wrist strap when pushing this product in stroller mode!
7
Page 8

STEP 14 Rotate front wheel assembly up for use in trailer mode
14A
Bracket
wing
14B
Bracket
wings
14C
14A. Loosen the front wheel lock knob enough to allow the bracket to separate from the tow bar.
14B. Rotate the wheel assembly up so that the bracket wings rest on top of the tow bar.
14C. Press the bracket firmly against the tow bar and tighten the lock knob to secure the wheel.
STEP 15 Coupler attachment for bikes with rear hub nuts.
(Note: If your rear bike tire has a quick-release rear axle please proceed to Steps 17 & 18)
15A
15B
15C
15D
15A. Loosen the rear bike hub nut with a wrench.
15B. Remove the hub nut and washer from the bike.
15C. Slide the tab washer over the axle so the tab fits into the slot in the bike frame dropout.
15D. Position the coupler plate over the axle so that the pegs on the back of the plate fit into the holes in the
tab washer, and the coupler plate is vertical with the large hole below the axle.
STEP 16 Attach trailer tow bar to bike
16A
16B
16C
16D
16A. Replace bike hub nut and washer and tighten by hand.
16B. Tighten the bike hub nut securely with a wrench.
16C. Insert the end of the trailer tow bar into the large hole and fasten the Q/R pin.
16D. Loop safety strap around bike frame and clip the end into the “D” ring at the end of the tow bar.
WARNING Safety strap must attach to the bike frame when using this product in trailer mode.
8
Page 9

STEP 17 Coupler attachment for bikes with quick-release rear axles.
(Note: If your rear bike tire has two hub nuts please refer to Steps 15 & 16.)
17A
17B
17C 17D
17A. Flip open the quick-release lever, and remove the nut and spring from the opposite side.
17B. Hold the lever and pull the axle skewer with spring out.
17C. Completely remove the skewer but leave the wheel in place.
17D. Slide the coupler plate and tab washer onto the skewer. IMPORTANT! The wide end of the spring
should face out and touch the lever, the bell of the coupler plate should face out, and the tab washer
hook should face in toward the wheel hub.
STEP 18 Attach trailer tow bar to bike
18A
18B
18C 18D
18A. Insert end of skewer through wheel hub and fit tab washer hook into slot in bike frame dropout.
18B. Replace the spring (wide end out) over the end of the skewer, followed by the nut. Tighten the nut by
hand and clamp the lever down.
18C. Insert the end of the trailer tow bar into the large hole and fasten the Q/R pin.
18D. Loop the safety strap around the bike frame and clip the end into the “D” ring at the end of the tow bar.
WARNING Safety strap must attach to the bike frame when using this product in trailer mode.
STEP 19 Install the safety flag. Important! The safety flag is for use in trailer mode only.
19A
Safety
flagpole
joiner
19A. Slide the ends of the safety flag pole together so they are secure within the flagpole joiner.
19B. Slide the bottom of the safety flagpole through the slit in the canopy down into the flagpole sleeve.
19C. Remove the handlebar. The product is now ready for use in the trailer mode.
19B
Flagpole slit
in canopy
Safety
flagpole
sleeve
19C
9
Page 10

STEP 20 Proper use of the 5-point safety harness for one or two children
20A
20B
WARNING To avoid serious injury children should always wear the seat belt and shoulder straps!
20A. Proper seating position for one child
A. Undo the lap belt buckle and seat the child in the center of the trailer/stroller.
B. Buckle the lap belt over the child’s lap, and pull the strap until the belt is snug.
C. Place the two center shoulder straps over the child’s shoulders, and clip both straps into the “D” ring
of the center crotch strap.
D. Adjust the shoulder strap height according to the height of the child, then pull the straps until they
are snug.
IMPORTANT! Adjust the straps so that the crotch strap and shoulder straps meet at the child’s
stomach level, not at chest level!
E. Clip the outer shoulder strap on either side into the “D” ring of the outer crotch strap directly below.
This will keep the straps that are not in use out of the way.
20B. Proper seating position for two children
A. Undo the lap belt buckle and seat the children side by side in the trailer/stroller.
B. Buckle the lap belt over both children’s laps, and pull the strap until the belt is snug.
(Note: There is only one lap belt for both children.)
C. Place one outer pair of shoulder straps over the shoulders of the child seated on that side, and clip
both straps into the “D” ring of the outer crotch strap directly below.
D. Adjust the shoulder strap height according to the height of the child, then pull the straps until they
are snug.
IMPORTANT! Adjust the straps so that the crotch strap and shoulder straps meet at the child’s
stomach level, not at chest level!
E. Repeat for the child seated on the other side.
(Note: The center crotch strap will not be clipped to any shoulder straps.)
Entering and exiting the passenger compartment
1. Unclip the front panel clasps near the front corners of the trailer/stroller.
2. Fold the front flap down and underneath the trailer/stroller so that it is out of the way.
3. Assist children as they enter and exit the passenger compartment. (See STEP 20 of the Owner’s
Manual for instructions on the proper use of the 5-point safety harness.)
REMOVAL, DISASSEMBLY, AND STORAGE INSTRUCTIONS
10
Page 11

Removal of the trailer from the bike
1. Remove children and all cargo from inside the passenger compartment.
2. Unclip the tow bar safety strap from the “D” ring.
3. Loop the strap back around the bike frame tube so that the strap is free of the bike frame.
4. Clip the end of the strap back on to the tow bar “D” ring.
5. Remove the quick-release pin from the tow bar coupler.
6. Slide the tow bar out of the tow bar coupler plate and re-insert the quick-release pin into the holes at
the end of the tow bar. The coupler plate may remain attached to the bike frame.
7. Set the front end of the trailer on the ground.
Storage
1. Remove the flag and pole and separate the three sections.
2. If handlebar is present, remove the handlebar and replace the pins in the brackets.
3. Release the quick-release lever on each rear wheel axle.
4. Remove the rear wheels and set them to the side.
5. Unscrew the lock knob of the front wheel assembly and separate the front wheel from the tow bar.
Set the wheel aside.
6. Release the tow bar quick-release latch at the front corner of the trailer.
7. Fold the tow bar back underneath the trailer and press the tow bar into the bracket to secure it.
8. Place all loose items inside the passenger compartment, and close the rain cover.
9. Loosen the straps under the front edge of the sling seat. Then, release the sling seat crossbar
joiners and carefully fold the trailer compartment flat. Use caution to avoid getting pinched!
10. Store the trailer in a dry place. If the storage area will get hot, release some of the air from the tire
inner tubes to prevent excessive expansion or popping.
Prior to next use
1. Make sure that all parts are in good working order, and that no parts are missing. Do not use this
product if any parts are broken or missing!
2. Check that all fasteners are securely tightened.
3. Check the tires to make sure they have the correct PSI.
4. If you have any questions concerning the proper use of this product after it has been stored, please
contact a qualified technician.
Please see the next page for information about contacting Pacific Cycle
and ordering accessories for your bicycle trailer.
11
Page 12

If you have any questions about the safe use or assembly of this product, please contact one of our
Customer Service Representatives by phone or e-mail at
1-800-242-6110 info@instep.net.
is a registered trademark of
TEL 1-800-242-6110 FAX 1-800-858-2800
Made in China
www.pacific-cycle.com
ACCESSORIES FOR YOUR TRAILER
Additional Coupler Kits allow you to switch your trailer from one bike to another.
The Coupler Kit includes the coupler plate, tab washer, and Q/R pin (not shown).
SA074
CUT HERE - - - - - - - - - - - - - CUT HERE - - - - - - - - - - - - - CUTHERE - - - - - - - - - - - - - CUTHERE
Bike Trailer Accessory Order Form
Model # Item Cost Shipping & Handling Quantity Amount
SA074 Coupler Kit 6.99 3.00 (U.S. and Canada)
MN residents add 6.5% sales tax. All prices are in US$. Canadian tax and duty are not included.
TOTAL AMOUNT OF ORDER
How to Order
Order accessories in one of four convenient ways:
1. Mail this form with a check or VISA or Master Card
number listed to: Pacific Cycle LLC
4730 East Radio Tower Lane
Olney, IL 62450
2. Fax this form with Credit Card information to:
1-800-858-2800
3. Call our Customer Service Dept. at:
1-800-242-6110
4. Order on line at our web site:
www.pacific-cycle.com
Please allow 7 to 10 business days for your shipment
to arrive.
or www.instep.net
VISA or Master Card Only
_________________________________________________________________
Card Number Expiration Date
_________________________________________________________________
Cardholder Signature
Ship To Name: ____________________________________________________
Street Address:____________________________________________________
City/State/Zip: ____________________________________________________
Contact Phone:____________________________________________________
Contact E-mail:____________________________________________________
12
 Loading...