

Page 1

Keep this manual f or future reference.If you sell this stroller or
give it aw ay , make sure y ou give this manual to the new owner .
Ask them to read instructions completely .
Strider STROLLER
Operating Instructions for Single and Double models
Important:Read and follow these Safety Rules and Assembly Instructions bef ore operating stroller .If you have
anyquestions concerning the safe use of this product, contact InSTEP, LLC at 1-800-242-6110, M-F, 8:00 a.m.–
5:00 p.m.CST or visit our web site at www
.instep.netor E-mail us at info@instep.netbefore using.
Safety Rules:
WARNING: Failure to follow these warnings and assembly instructions could result in
serious injury or death.
WARNING: Immediately discard any plastic wrapping.
WARNING: Never allow children to fold, assemb le or disassemble the stroller .
WARNING: Maximum weight capacity for the Single stroller is 50 lbs.or 22.7 kg.Double 85 lbs.
or 38.6 kg.
WARNING: Never place child in stroller on their back with their head forw ard and feet rearward.
WARNING: Avoid serious injury from falling or sliding out.Always use seat belt.
WARNING: Never leave child unattended.
WARNING: Never use this stroller with roller skates or in-line skates.
WARNING: Never allow stroller to be used as a toy or allo w children to give rides to others.
WARNING: Never use stroller if it becomes damaged.
WARNING: Always be aware of traffic around you when w alking or jogging.
WARNING: Always engage brakes when you stop or when y ou let go of handle.
WARNING: Always use an approved bicycle helmet on child.
WARNING: Always use wrist strap.
WARNING: Accessories or parcels placed in or on the stroller ma y cause it to become unstable .
WARNING: Maximum weight for objects in back pouch is 2.2 lbs.or 1 kg.Double 2.2 lbs.or 1 kg.in
each back pouch.Excessive weight may cause a hazardous, unstab le condition.
WARNING: Child may slip into leg openings and strangle.Never use in a reclined carriage position
unless T-shield and shoulder strap placement has been readjusted to the seat’s new
position.
1
Page 2
2
IMPORTANT
Tires are shipped deflated, DO NOT O VERINFLA TE.Please inflate slowly , with short bursts, to 20-25 PSI
maximum.25 PSI will provide a comfortable ride for your child.
We appreciate your purchase of one of our many fine products .We are sure that you will be satisfied with
your selection.We reg ret that although great care and effort have been taken, occasionally problems
mayoccur.PLEASE DO NOT RETURN PR ODUCT T O THE ST ORE.To ensure prompt and correct
handlingof problems, or to answer questions, please contact us at either our T oll-F ree Customer Service
Number or E-mail us at our number listed below .Service will be quick er if you have y our model number
(found on the product and box) along with this instruction sheet ready when calling.If you have an y questions
concerning the safe use of this product, Please contact us 1-800-242-6110 press “1”for customer service
and then “2 “to speak to a representative or E-mail us at inf
o@instep.netor visit our web site at
www
.instep.net.
EZStrider Assembly Instructions
Parts List
Description Qty . Description Qty .
Frame Assemb ly w/seat, Rear Wheel Assembly w/n uts 2
canopy , bask et and wrist strap 1 Front F ender 1
Front Wheel Assembly w/nuts #8 – 11⁄2" Phillips head screws 2 (Double
and tab washers 1 has 4)
T ools Required
Phillips screw driver
Adjustable wrench
Stroller Assembl y Instructions
Step 1.Unfold Stroller
Grasp handle with one hand, and pull up on the front axle mount with your other hand.Lock both plastic latches onto the lo wer
frame (Figures A1 and A2).
A1 A2
Latches Seat
Back
Rest
Front
Fork
Latches
Front
Fork
Handle
Page 3

3
Step 2.Rear Wheel Assembly
Remove the rear wheel lock n ut from the rear wheel axle.
Mount rear wheel to the rear wheel bracket b y inserting the
axlethrough the hole in the bracket.Attach the loc k nut and
tighten completely using an adjustable wrench.Repeat for
other side (Figure B).W ARNING:The interior jam nuts are
factory installed and do not need adjustment.
Step 3.Front Wheel Assembly
T urn stroller upright onto its rear wheels, then tip stroller back
so the handlebar is down on the ground and the front fork is
up.Attach the front wheel by loosening the e xterior lock nut
oneach side of the front wheel far enough to allow the axle
andtabwasher to slide into the front fork.The tab washer’s
tabshould be inserted into the small hole on the outside of
thefront fork (Figure C).Center the wheel between the front
fork.Tighten the nuts with an adjustab le wrench.
IMPORT ANT : The alignment of the front wheel determines
ifthe stroller will roll straight, or pull to the right or left during
use.In the event you notice the stroller pulling to one direction,
loosen front axle nuts, point the front wheel in the opposite
direction the stroller is pulling, ensure the tab washers are
seated in the holes and tighten the nuts.If you need help
making this adjustment, please call our Customer Service
department for assistance.
WARNING: The interior jam n uts are factory
installed and do not need adjustment.
Step 4.Front Fender Assembly
Insert the #8 – 11⁄2" screws into the holes located onthe
front support between the front forks.Align the 2 holes on
the bottom side of the fender with the screws and tighten
with a Phillips screwdriver .Note:The Double EZStrider has
4 screws (FigureD).
Step 5.Canopy Positioning
The canopy has adjustable positions .Pull the canopy down
tothe desired position.
Step 6.T o Attach Wrist Strap
Place strap on top of handle bar.The wrist strap has different
sized loops.The large loop will go on your wrist, the small
loopwill be on handlebar.Slide end with large loop through
thesmall loop, then grasp the end with the large loop and pull
strap to tighten on handlebar.
B
Rear
Wheel
Rear
Brake
Lock
Nut
D
C
Tab
Washer
Adjustment
Hole for Tab Washer
Locknut
Front
Wheel
#8 – 11⁄2"
Screws
Double has
4 Holes/Screws
WARNING: Whenever child is in stroller always usethe
wrist strap.Before y ou remove the wrist strap from your wrist make
sureyou first engage the rear brakes .
Congratulations – assembly is now complete!
Page 4

4
Use Instructions
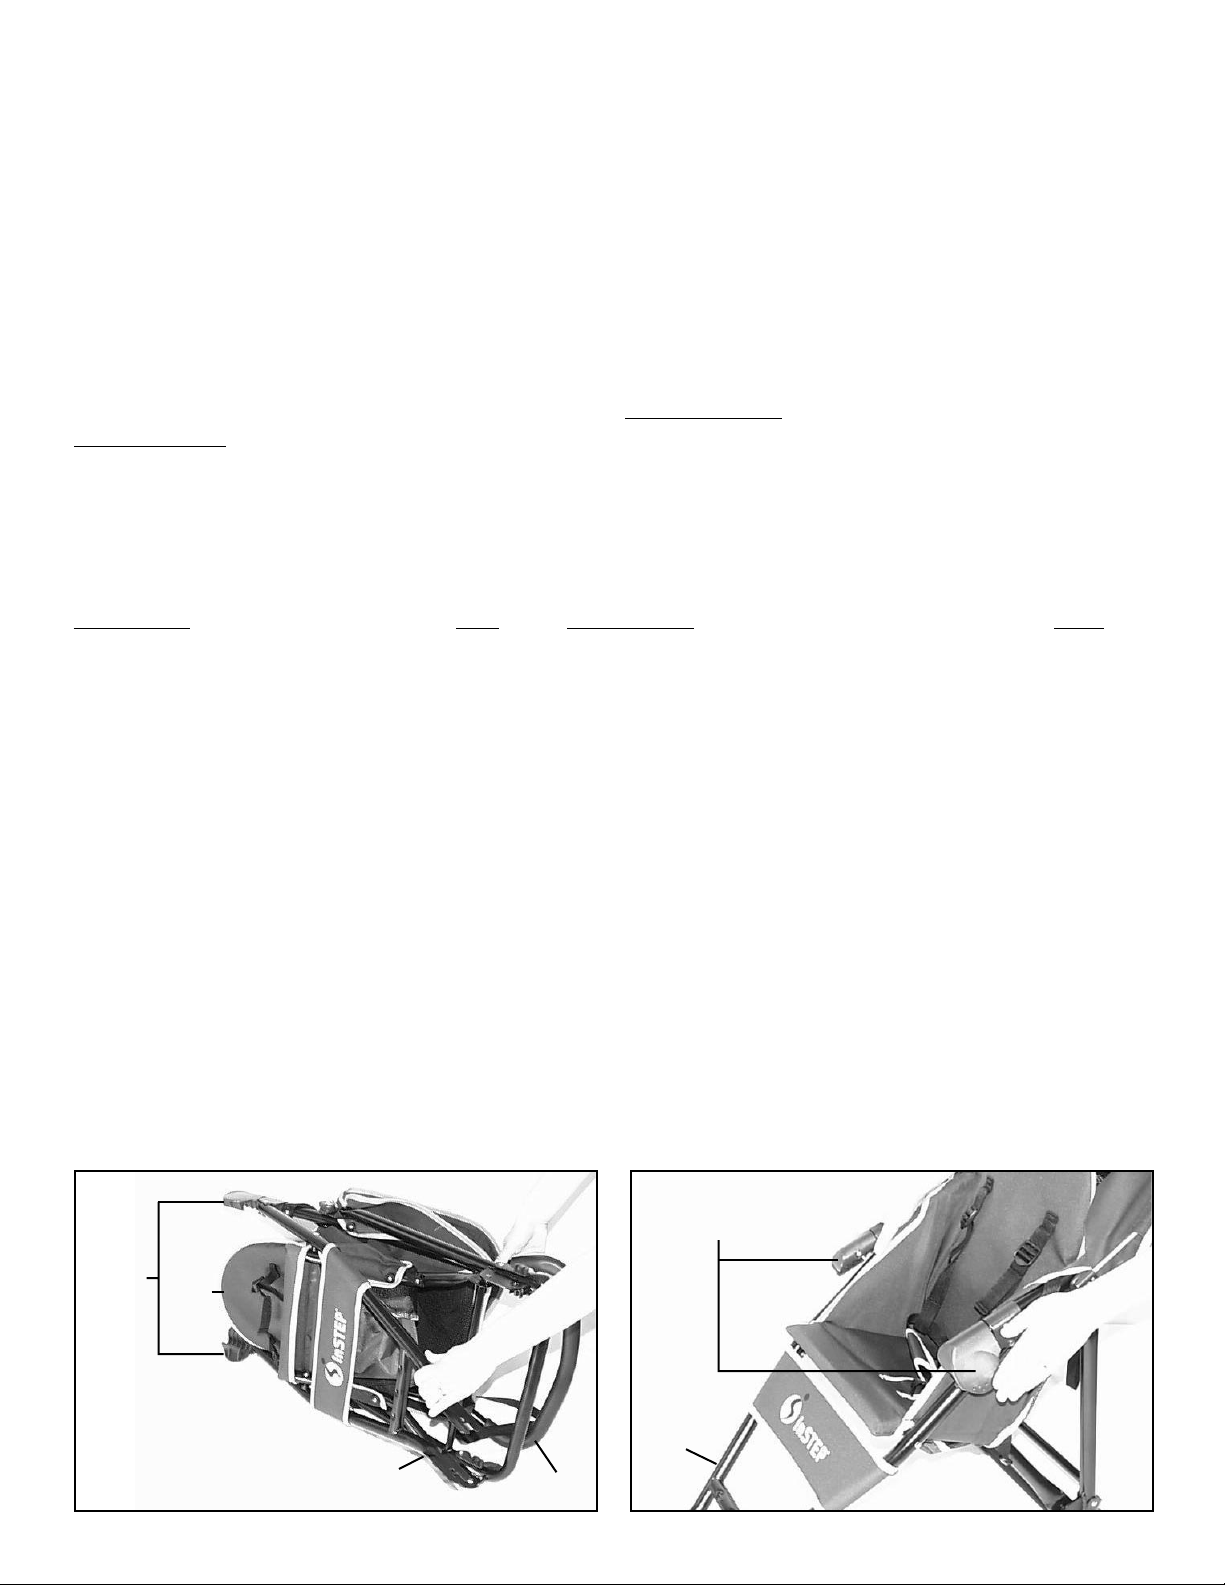
T o close/fold stroller:
WARNING: Always remove child from
strollerbefore folding.
Pull the seat/seats f orward, locate the plastic
latcheson the side of the stroller frame.Using one
hand on each lever , pull the lev ers from the lower
bar.The stroller will automatically begin to fold, the
front wheel will fold under frame and the handle will
fold backw ards ( Figure E).
NOTE: The stroller will be easier to f old if the seats
are not in the recline position.If the seats are in the
recline position please pull forward.
T o open stroller:
Grasp handle with one hand and pull up on the
frontaxle mount with your other hand.Lock both
plastic latches onto the lower frame (Figure F).
E
Latches
Pull Seat Forward
When Folding
F
Latches on
Both Sides
Single EZ Strider Double EZ Strider
Page 5

5
T o engage rear brakes:
Step lightly on the levers ne xt to the rear wheels
untilthe cogs of the brakes engage the cogs of the
wheel.Repeat on other side.T o release brak e,
liftlevers using your toe until cogs disengage
(FigureG).
Proper use of seat belts & shoulder
straps:
WARNING: Avoid Serious Injury .Always use
seat belts.
1. Place child in seat.Make sure T -shield is
betweenthe child’s legs.
2. When child is seated, place shoulder straps
overthe child’s shoulders.
3. Slide waist straps through lo wer loops of shoulLder straps, bring lap belt ends together and clip
into place around child’s w aist.Adjust waist and
shoulder straps for snug fit (Figure H).
T o recline seat:
T o fully recline, unhook b uckle on back of the seat.
(Figure I).
T o place seat in upright position, push seat forward
and reconnect buckle located on back of seat.
T o adjust the recline position, adjust the slide on
thestrap.
WARNING: Child may slip into leg openings
and strangle.Never use in a reclined carriage position unless T-shield and shoulder strap have been
readjusted to the new seat position.
G
Rear
Brakes
H
Shoulder Straps
Shoulder
Strap
Adjustment
Slides
Waist
Buckle
Adjustment
T-Shield
Waist
Belt
Waist
Belt
I
Page 6

6
Care and Maintenance
Check fasteners
After one hour of use, check all fasteners to mak e sure they are secure.Adjust if necessary.
Periodically check the stroller to ensure that it is in good operating condition.
T o adjust the stroller fr om pulling to the left or right (not rolling
straight):
Loosen the front axle nuts and check to see that the tab washers are inserted in the holes of the front fork.
Point the front wheel f orward or in the opposite direction the stroller is pulling, then tighten the nuts with an
adjustable wrench.
NOTE:Sometimes it is a very slight adjustment to eliminate the pulling and this step may need to be
repeated.
T o clean seat and canopy:
If light cleaning is required, use a soft cloth with warm water and mild soap then air dry.Do not put into
washing machine.Do not put in dryer.DO NOT BLEA CH.
T o clean frame:
Wipe using a soft cloth with warm water and mild soap.Air dry.DO NO T USE polish or abrasives.
WARNING: If you have any questions concerning the safe use of this product, please contact
InSTEP LLC before using:
1-800-242-61 10
InSTEP LLC
2425 Enterprise Drive
Suite 900
Mendota Heights,MN 55120
 Loading...