

Page 1

Operating Instructions Run Around™ 11-BA201, 11-BA202
Safety Rules:
WARNING: Failure to follow these warnings and assembly
instructions could result in serious injury or death.
· Immediately discard any plastic wrapping.
· Never allow children to fold, assemble or disassemble the stroller.
· Maximum weight capacity for the Single stroller is 50 lbs.
or 22.7 kg. Double 100 lbs. Or 45.4 kg. However, in the Double
model the weight of 1 child should not exceed 50 lbs.or 22.7 kgs.
· Never place child in stroller on their back with
their head forward and feet rearward.
· Avoid serious injury from falling or sliding out. Always use seat belt.
· Never leave child unattended.
· Never use this stroller with roller skates or in-line skates.
· Never allow stroller to be used as a toy or allow children
to give rides to others.
· Never use stroller if it becomes damaged.
· Always be aware of traffic around you when walking or jogging.
· Always engage brakes when you stop or when
you let go of handle.
· Always use wrist strap.
· Accessories or parcels placed in or on the stroller may
cause it to become unstable.
· Maximum weight for objects in back pouch is 2.2 lbs. or 1 kg.
Double 2.2 lbs. or 1 kg. in each back pouch. Excessive weight
may cause a hazardous, unstable condition.
· Child may slip into leg openings and strangle. Never use in a
reclined carriage position unless T-shield and shoulder strap
placement has been readjusted to the seat’s new position.
IMPORTANT: Read and follow these Safety Rules and Assembly Instructions
before operating stroller. If you have any questions concerning the safe
use of this product, contact Pacific Cycle at 1-800-242-6110, M-F,
8:00 a.m.-5:00 p.m. CST or visit us at www.instep.net or E-mail us
at info@instep.net before using.
IMPORTANT: Tires are shipped deflated, DO NOT OVERINFLATE.
Please inflate slowly, with short bursts, to 20-25 PSI maximum.
25 PSI will provide a comfort
able ride for your child.
PLEASE DO NOT RETURN PRODUCT TO THE STORE. To ensure prompt and correct
handling of problems, or to answer questions, please contact us at either our
Toll-Free Customer Service number
(1.800.242.6110) or E-mail us at info@instep.net.
Service will be quicker if you have your model number (found on the product and
box) along with this instruction sheet ready when calling. If you have any
questions concerning the safe use of this product
, please contact us immediately.
{Figure 1.a}
canopy
handle
locking pin
frame
parking brake
rear wheel
foot plate
M3_double_Platform.indd 2 9/26/05 3:54:14 PM
Page 2
Parts List:
Description Qty.
Frame assembly with seat,
canopy, and wrist strap
1
Front Wheel 1
Parent Console 1
Under-seat Basket 1
Rear Wheels 2
Front Fender 1
#8 – 11.2" Phillips head screws 4
Tools Req
uired: Phillips screw driver, adjustable wrench.
Stroller Assembly Instructions
Unfold Stroller: Remove from carton, and remove any packaging materials that
may be holding the frame in closed position. Grasp the handle and open the
frame. The stroller will lock into place. To ensure the stroller is locked, push the
handle down lightly. Be sure the stroller is locked in place before placing a child
in the stroller.
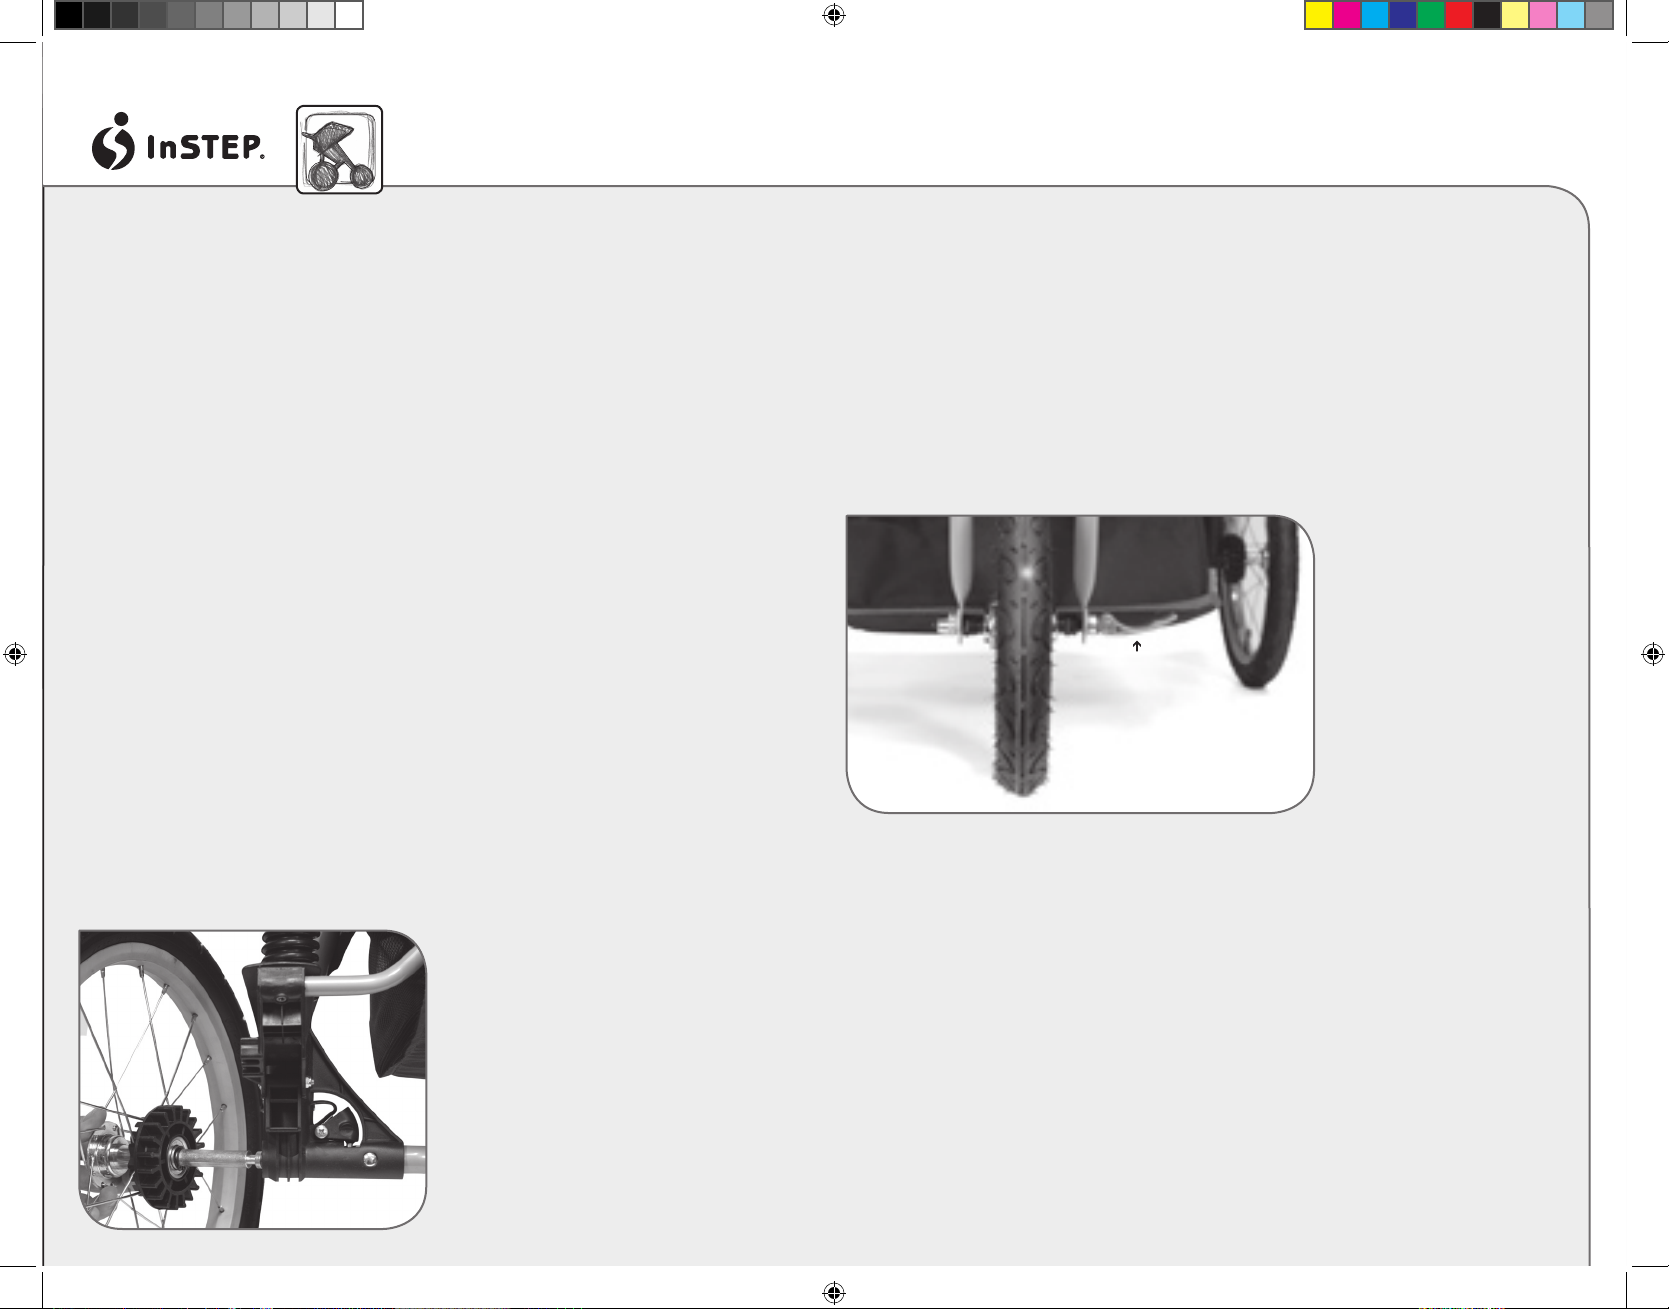
Rear Wheel Assembly
Grasp rear wheel in one hand, slide wheel’s axle into hole in rear of frame. Push
up on the axle release lever so that the wheel is fully inserted. Pull the wheel
firmly, the wheel should not come off if fully inserted/locked. Repeat for other
side. To release wheel push up on axle release lever and pull off wheel.
Front Wheel Assembly
Tip stroller back so that the handlebar is down on the ground and the front fork
is up. Attach the front wheel by loosening the wheel’s Quick Release (Q/R) lever
on the front wheel far enough to allow the axle to slide into the front fork. With
wheel’s Q/R lever in open position, hand tighten the cone nut until almost tight,
then flip wheel’s Q/R lever backward to the closed position to lock wheel in
place. Note this step may require minor adjustment until the Q/R lever flips back
with firm pressure. Pull outward on wheel to ensure it is locked in place.
Caution: The interior jam nuts are factory installed and do not need adjustment.
Close the front caliper brake by lowering the Q/R lever. Spin the front wheel
to make sure the brake pads do not rub and are properly aligned to the rim. If
brake pad alignment is off, loosen brake pad nut with an adjustable wrench,
align brake pad and retighten nut while holding brake pad in place.
Caution: Always be sure to reengage the brake by rotating the Q/R lever
forward (toward the front wheel) before using the stroller.
IMPORTANT
If you notice that the stroller steers to one direction you may need to adjust the
front wheel to align it. To do so loosen the front axle Q/R lever, points the front
wheel in the opposite direction the stroller is veering, and retighten the Q/R lever.
If you need help making this adjustment, please call our Customer Service
department for assistance.
quick-release
lever
(open position)
Front Wheel Assembly
Operating Instructions Run Around™ 11-BA201, 11-BA202...page 2
Rear Wheel Assembly
M3_double_Platform.indd 3 9/26/05 3:54:17 PM
Page 3

To recline seat
To fully recline, unhook buckle on back of the seat.To adjust the recline position;
adjust the slide on the strap to the desired length.
WARNING: Child may slip into leg openings and strangle. Never use in a
reclined carriage position unless T-shield and shoulder strap have been
readjusted to the new seat position.
Storage and folding
WARNING:
Always remove child from stroller before folding
Pull the back of the seats forward. It will be easier to fold if the seats are not in
the recline position. Remove locking pins from side latches on the stroller frame
(Double Models have 2 locking pins). Release the two latches from the frame. The
stroller may automatically begin to fold, the front wheel will fold under frame and
the handle will fold backwards.
Storage and folding
Front Fender Assembly
Insert the #8 – 1.5" screws into the holes located on the front support above
the wheel. Align the holes on the bottom side of the fender with the screws and
tighten with a Phillips screwdriver.
Parent Console
The parent console will attach to the push handle. It will snap in place above
the canopy and below the foam hand grip.
Tether Attachment
The wrist strap has different sized loops. The large loop will go on your wrist;
the small loop will be on handlebar. Slide end with large loop through the small
loop, then grasp the end with the large loop and pull strap to tighten on handlebar.
Caution: Whenever child is in stroller always use the wrist strap. Before you remove
the wrist strap from your wrist make sure you first engage the rear brakes.
Rear Parking Brakes:
Step on the levers next to the rear wheels until the cogs of the brakes engage the
cogs of the wheel. Repeat on other side. To release brake, lift levers using your
toe until cogs disengage.
Front Caliper Brake:
The front brake operates the same as a bicycle hand brake. Squeeze lever
located on handlebar to engage front brake. Release lever to disengage.
PROPER USE OF SEAT BELTS & SHOULDER STRAPS
WARNING: Avoid serious injury from falling or sliding out.
Always use seatbelt.
Place child in seat. Make sure T-shield is between the child’s legs.
When child is seated, place shoulder straps over the child’s shoulders.
Slide waist straps through lower loops of shoulder straps, bring lap belt
ends together and clip into place around child’s waist. Adjust waist and
shoulder straps for snug fit.
Operating Instructions Run Around™ 11-BA201, 11-BA202...page 3
M3_double_Platform.indd 4 9/26/05 3:54:18 PM
Page 4

CARE AND MAINTENANCE
Check fasteners after one hour of use; check all fasteners to make sure they are
secure. Adjust if necessary. Periodically check the stroller to ensure that it is in
good operating condition.
To adjust the stroller from pulling to the left or right (not rolling straight): Loosen
the front Q/R axle and point the front wheel in the opposite direction the stroller
is pulling, then tighten Q/R lever.
NOTE: Sometimes it is a very slight adjustment to eliminate the pulling and
this step may need to be repeated.
To adjust front brake caliper: If front caliper requires additional adjustment to
engage brake pads; first open Q/R brake lever, loosen the cable adjustment nut,
squeeze the brake pads together and while holding brake pads retighten cable
adjustment nut. Then close Q/R lever and check adjustment by squeezing hand
brake lever.
For micro adjustment, turn the front brake caliper’s adjusting sleeve counterclock
wise. Once the brake pads are adjusted to the desired distance from the rim,
tighten the lock ring. You will need to adjust the cable periodically since it is
normal for the cable to stretch from use.
To clean seat and canopy: If light cleaning is required, use a soft cloth with warm
water and mild soap then air dry. Do not put in washing machine. Do not put in
dryer.
DO NOT BLEACH.
To clean frame: Wipe using a soft cloth with warm water and mild soap. Air dry.
DO NOT USE polish or abrasives.
WARNING: If you have any questions concerning the safe use of
this product,please contact Pacific Cycle before using:
1.800.242.6110
8am-5pm CST, Monday-Friday, or MAIL to:
Pacific Cycle Inc.
4730 East Radio Tower Lane
Olney IL 62450
Tel: 1.800.242.6110
or visit us at www.instep.net
E-mail: info@instep.net
ONE YEAR LIMITED WARRANTY
Pacific Cycle warrants this product to be free of defective materials and
workmanship for 1 year from the date of original purchase.
THIS LIMITED WARRANTY IS THE ONLY WARRANTY APPLICABLE TO THIS
PRODUCT, AND IS EXPRESSLY IN LIEU OF ANY OTHER WARRANTY. ANY
IMPLIED WARRANTIES, INCLUDING ANY WARRANTY OF MERCHANTABILITY
AND WARRANTY OF FITNESS FOR A PARTICULAR PURPOSE IS LIMITED IN
DURATION TO THE DURATION OF THIS EXPRESS WARRANTY. This limited
warranty gives you specific legal rights and you may also have other rights
which may vary from state to state.
This warranty is extended only to the original consumer purchaser for
non-commercial use and does not cover tires or tubes, grips, brake shoes,
or other wear part, ordinary wear and tear, abuse, misuse, neglect, theft, or
damage due to accident.
PACIFIC CYCLE, INC., IS NOT RESPONSIBLE FOR INCIDENTAL OR
CONSEQUENTIAL DAMAGES. THIS LIMITED WARRANTY DOES NOT COVER
ANY PERSONAL INJURIES, DAMAGE TO, OR, FAILURE OF THE PRODUCT OR
ANY OTHER LOSSES DUE TO ACCIDENT, ABUSE, MISUSE, ALTERATION, NEGLECT,
NORMAL WEAR AND TEAR, IMPROPER ASSEMBLY, IMPROPER FIT, IMPROPER
MAINTENANCE OR USE OF UNAUTHORIZED REPLACEMENT PARTS NOT
DESIGNED FOR THE PRODUCT.
To make claim under warranty, notification of such defect must be given to Pacific
Cycle, Inc at the address stated below. You will be instructed on how the product
or part needing replacement should be shipped postpaid to Pacific Cycle, Inc.
Operating Instructions Run Around™ 11-BA201, 11-BA202...page 4
M3_double_Platform.indd 5 9/26/05 3:54:19 PM
 Loading...