

Page 1
Energy Display Owner’s Manual
Energy Display
INSTEON® In-Home Display
Model : 2448A2
Page 1 of 13 2448A2 - Rev: 8/23/2011 5:22 PM
Page 2

Energy Display Owner’s Manual
TABLE OF CONTENTS
ABOUT ENERGY DISPLAY..............................................................................................
Key Energy Display Features
What is Included with Energy Displ
INSTALLATI
Installing Energy Display
HOW TO SET UP ENERGY DISPLAY TO MONITOR AN APPLI
USING ENERGY DISPLAY
Display Mode
Setup Modes ............................................................................................................. ...
ADVANCED FEATURES OF ENERGY DISPLAY
Restoring Power to Energy Dis
Resetting Energy Display to its
ADDITIONAL RESOURCES ........................................................................................ ...
TROUBLESHOOTING................................................................................................................................11
SPECIFICATIONS, CERTIFICATION, AND WARRANTY ........................................................................ 12
Specifications ..........................................................................................................................................12
FCC & Industry Canada Compliance Statement..................................................................................... 12
Limited Warranty .....................................................................................................................................12
ON............................................................................................................. ...
............................................................................................................. ...
..................................................................................... ...
ay ........................................................................ ..
............................................................................................ ..
ANCE’S POWER C N
.......................................................................................... ..
...................................................... ...
play........................................................................... ..
Factory Default Settings.......................................... ...
...........................3
. ...........................3
.. ...........................3
. ...........................4
.. ...........................4
O SUMPTION......4
.. ................... ..... 4
.. ................... ..... 4
... ...........................5
.. ...........................5
.. ...........................7
.. ................... ... 10
... .........................10
... .................... ....10
.. .........................10
...Linking Energy Display to an INSTEON Meter Device .............................................. ..
...Unlinking an INSTEON Meter Device from Energy Display....................................... ..
...
Page 2 of 13 2448A2 - Rev: 8/23/2011 5:22 PM
Page 3
Energy Display Owner’s Manual
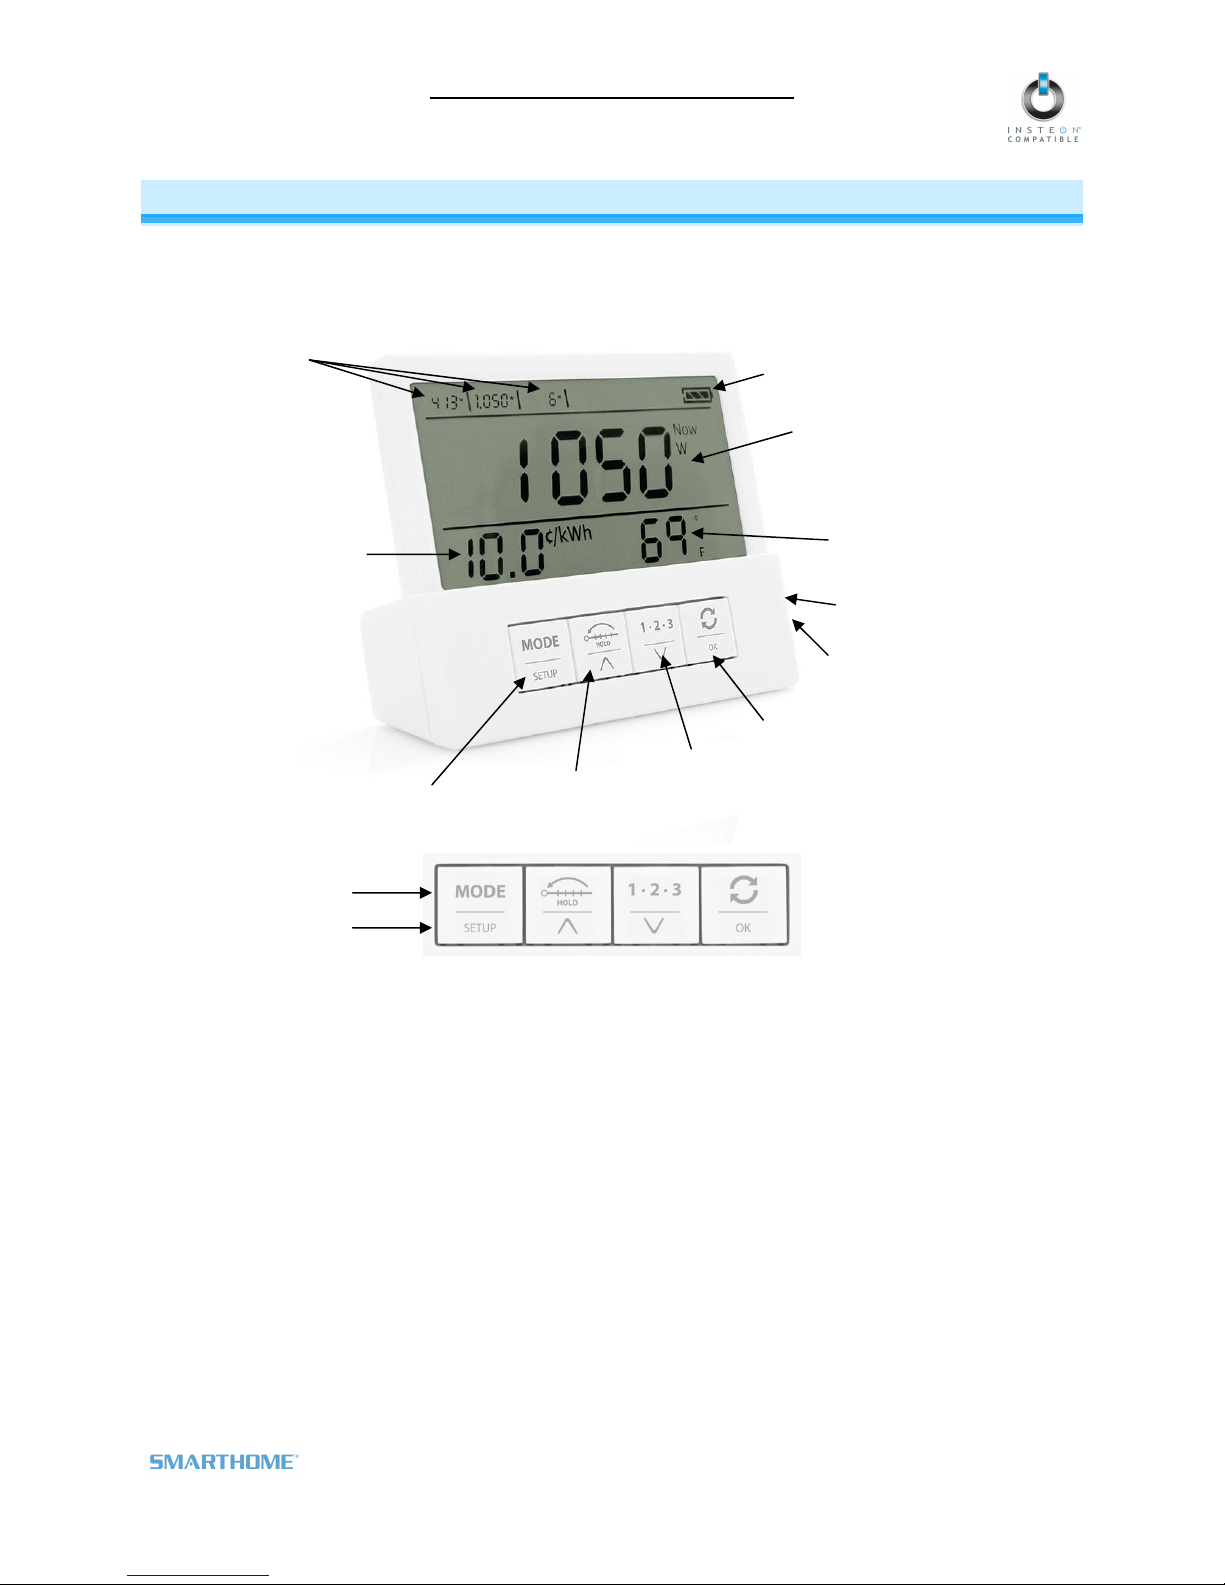
ABOUT ENERGY DISPLAY
The Energy Display allows you to view power consumption of your appliances (cu
average energy use per month, and average
act design uses radio
mp
co frequency (RF) to communicate and retrieve information from INSTEON
power mete s (e.g., iMeter Solo, #2423A1).
r device
Meter 1-2-3
cost per month based on your monthly billing rate). Its sleek,
Battery level
Display options:
Cost
Mode/Setup
Refresh/OK
1-2-3/Down
Restart/Up
n butto
button
button
button
rrent power use,
Watts
$/mo
kWh/mo
Temperature
Status LED
Set button
Display Mode Buttons
Setup Mode Buttons
Key Energy Display Features
Installs and Links to other INSTEON devices in minutes
Displays energy information from up to three power meter devices (current Watts used as well as cost
and en
Communicates wirelessly over radio
Built-in thermom
Indicates INST
Stores setup state in memory so settings aren’t lost when replacing batteries
Two-year warranty
ergy consumption per month
eter displays current temperature
EON setup mode activity and operational states with a Status LED and beeper
for each device)
frequency (RF) to eliminate messy and unsightly wires
What is Included with Energy Display
Energy Display – INSTEON In-Home Display
Two (2) AAA batteries
Quick-Start Guide
Page 3 of 13 2448A2 - Rev: 8/23/2011 5:22 PM
Page 4

Energy Display Owner’s Manual
INSTALLATION
Installing Energy Display
NOTE: Energy Display uses 2 AAA batteries which will provide approximately one year of use.
1) Be sure you have properly installed at least one dual-ban
device (such as iMeter Solo #2423A1)
2) Remove the battery compartment door from the rear of Energy Di
3) ment
door
The Energy Display screen will turn
After a few seconds, the screen will go to Display Mode
Energy Display is now ready to use. See Linking Energy Display to an INSTEON Met
bout your appliances. receiving energy information a
on and all the LCD segments will turn on
atteries, and then replace the battery compartObserve the polarity markings, install two AAA b
d INSTEON device and an INSTEON meter
splay
er Device
to begin
HOW TO SET UP ENERGY DISPLAY TO MONITOR AN APPLIANCE’S
POWER CONSUMPTION
Linking Energy Display to an INSTEON Meter Device
Follow these steps to Link Energy Display to an INSTEON meter device (e.g., iMeter Solo). See the meter
device’
The devices:
1) Make sure the meter device is properly installed with the appliance you wish to monitor
2) tion is blinking (Meter 1, 2, or 3)
3) ps (3 seconds)
4) On the meter device, press & hold the Set button until it beeps (3 seconds)
s Owner’s Manual for detailed instructions on how to properly install and Link
following will work for the most common INSTEON
Tap the 1-2-3/Down button until the desired meter posi
Set Energy Display to Linking Mode by pressing & holding the Set button until it bee
The Energy
You will have 4 minutes to complete the next step before
Energy Display will double
A few moments later the Energy Display scre
are metering
Display Status LED will begin blinking GREEN
Linking Mode automatically times out.
-beep and its Status LED will turn off.
en will display information for the meter device you
it to Energy Display.
Unlinking an INSTEON Meter Device from Energy Display
If you are no longer going to use an INSTEON meter device
Otherwise, Energy
down the system and reducing battery life.
The following will work on the most common INSTEON devices:
Display will retry gathering information from the unused meter device, thus slowing
, it is very important
that you Unlink it.
1) Use the 1-2-3,Down button to select the meter device you wish to Unlink
2) Set Energy Display to Linking Mode by pressing & holding the Set button until it beeps (3 seconds)
The Energy Display Status LED will begin blinking GREEN
3) Set Energy Display to Unlinking Mode by pressing & holding the Set button until it beeps again (3
seconds)
Page 4 of 13 2448A2 - Rev: 8/23/2011 5:22 PM
Page 5

Energy Display Owner’s Manual
The Energy Display Status LED will begin blinking red
You will have 4 minutes to complete the next step before Unlinking Mode automatically times out.
4) seconds)
Press & hold the meter device’s Set button until it beeps (3
Energy Display will double-beep and its Status LED will turn off
Confirm that
5) Unlinking was successful by checking the Energy Display screen
The Energy Display scre
Unlinked from
en will no longer display information for the meter device you just
USING ENERGY DISPLAY
Meter 1
Data is
Power-related information will display for one minute before Energy Display enters Standby Mode. In
Standby Mode, only the battery level and temperature will display. Tap any button to exit Standby Mode
and return to Display Mode.
retrieved when:
Energy Displa
Refre
Any button is tapped in Standby Mode
Cost setting
y is first Linked to a meter device
sh button is tapped while Energy Display is in Display Mode
Meter 3
Battery level
Display options
Temperature
Display Mode
N tes flas y D
OTE: Green text indica hing text on the Energ
Instantaneous Watts used Average cost per month Average energy used per month
Page 5 of 13 2448A2 - Rev: 8/23/2011 5:22 PM
isplay screen.
Page 6

Energy Display Owner’s Manual
Button Action
Mode/Setup
Restart/Up
1-2-3/Down
Refresh/OK
Set button
Tap to cycle between display
Instantaneous Watts use
setting options:
d (Now | W)
Average cost per month (Avg | $/mo)
erage energy used per month (Avg | kWh/mo)
Av
Press & hold until the cost setting field begins blinking to enter Setup Mode. See
Setup Modes
.
Press & hold for 10 seconds to reset the energy value for the currently displayed meter
(for calculating average energy used and cost/month)
Tap to cycle between each meter device to be displayed (Meter 1, 2, or 3)
The Energy Display will display in
seconds.
formation about your meter device after a few
p to read current information for all meter devices Ta
Press & hold for 3 seconds to Link a meter device to the current meter position on
Energy Display (Meter 1, 2, or 3). See Linking Energy Display to an INSTEON Meter
Device.
Page 6 of 13 2448A2 - Rev: 8/23/2011 5:22 PM
Page 7

Energy Display Owner’s Manual
Setup Mo
But on
t Action
Mode/Setup
To exit Setup Mode:
Tap the Refresh/OK button to accept the current value
Wait for Energy Display to time out and automatically accept the current value (~1 minute)
T
Once Energy Display exits a setup mode, it will return the
Cost Setting
NOTE: Green text indicates flashing text on the Energy Display screen.
Range is 0.1 to 999 cents/kWhr ($9.99/kWhr). Once the counter reaches 999 cents, it will reset to 0.1
cents. The default is 10 cents.
Button
des
To enter Setup Mode, press & hold the Mode/Setup button until the cost setting field
begins blinking. Then tap the Mode/Setup button to cycle to the desired settings.
ap the Mode button to accept the current value and move to the next Setup Mode
screen to Display Mode.
Action
Tap up to increase or down to decrease the cost.
Hold/ p U
1-2-3/Down
Refresh/OK
Mode/Setup
Page 7 of 13 2448A2 - Rev: 8/23/2011 5:22 PM
If cost is less than 100 cents, cost will change by 0.1 cents.
If cost is greater than 100 cents, cost will change by 1 cent.
Press & hold to continuously increase or decrea
Tap to accept current Cost setting and exit Setup Mode
Tap to cycle to the next setting mode (Temperature Format)
se cost.
Page 8

Energy Display Owner’s Manual
Temperature Format Setting
NOTE: Green text indicates flashing text on the Energy Display screen.
Format toggles between Celsius and Fahrenheit. The default is Fahrenheit.
Button Action
Hold/Up
1-2-3/Down
Refresh/OK
Mode/Setup
Tap to toggle the temperature display between Celsius and Fahrenheit
Tap to accept current Temperature Format setting and exit Setup Mode
Tap to cycle to the next setting mode (Temperature Calibration)
Page 8 of 13 2448A2 - Rev: 8/23/2011 5:22 PM
Page 9

Energy Display Owner’s Manual
Temperature Calibration Mode
NOTE: Green text indicates flashing text on the Energy Display screen.
The Energy Display temperature comes pre-calibrated. Only perform these steps if re-calibration is
necessary. Please allow 20 minutes for temperature to adjust when moving to an area with a significant
temperature change.
Button Action
Tap to set local temperature (based on a thermostat or other device)
Hold/Up
Note: Place Energy Display close to your temperature reference device (e.g.,
or approximately 20 minutes to ensure it is settled to a thermostat or thermometer) f
stable temperature.
1-2-3/Down
Refresh/OK
Mode/Setup
Tap to accept current local temperature
Tap to exit Setup Mode
Page 9 of 13 2448A2 - Rev: 8/23/2011 5:22 PM
Page 10

Energy Display Owner’s Manual
ADVANCED FEATURES OF ENERGY DISPLAY
Restoring Power to Energy Display
Energy Display stores all of its settings, such as Links to oth
Because settings are saved in this non-volatile memory, they w
er INSTEON devices, with non-volatile memory.
ill not be lost in the event of a power failure.
Resetting Energy Display to its Factory Default Settings
The factory reset procedure can be used to clear the Energy Display memory and restore
settings. This procedure will clear Energy Display of all INSTEON Links and Sett
procedure does not reset any INSTEON meter devices linked
1) If you are using Energy Display to retrieve power
devices from Energy Display. See
Remove the battery compartment cover on the back of Energy Display
2)
3) s
Remove one battery from Energy Display for at least 10 second
The Energy Display screen
4)
While holding down the Set button, reinsert the bat
Set button
The Energy Display sc
5) Continue to hold the Set button until the Energy Display screen goes blank (10 seconds) and then release
Once you rele
After a few
screen
Replace the battery compartment cover
6)
ase the Set
more seconds, Energy Display
will be in Display Mode
Unlinking an INSTEON Meter Device from Energy Display
will turn off
reen
will turn on and all LCD segments will turn on
button, Energy Display
will beep again and after a few flashes
to Energy Display.
consumption from an INSTEON device, Unlink those
tery into Energy Display, making sure not to let go of the
will beep
ings Mode changes. Note: this
its factory default
.
of the display, its
ADDITIONAL RESOURCES
Find home automation solutions, helpful tips, interactive demos, videos, user forums, and more at the
Smarthome Learning Center: www.smarthome.com/learningcenter.html
Page 10 of 13 2448A2 - Rev: 8/23/2011 5:22 PM
Page 11

TROUBLESHOOTING
Problem C Possible ause Solution
The Status LED o
Energy Displan y is
turning on and no
is displaying on th
screen.
not
thing
The batteries ma
missing or aimserted check that the batterie
properly.
e
The batteries ma
depleted.
Energy Display Owner’s Manual
y be Open the cover on t
re in
(according to the polarity m
y be
Replace the batte
ries with a fresh set.
he back of Energy Display to
s are installed properly
arkings).
The INSTEO
not be receivin
command.
Energy Display w
Link or work with an
INSTEON device.
Energy Display
doesn’t always
energy informat
from an INSTEO
device.
The temperatu
Energy Displa
not match th
temperatur
by my thermostat
Energy Display is not
showing the proper
energy usage for a
Linked INSTEON
device
appears on the
Energy Display screen
for that particular
INSTEON device.
Energy Display is
locked up.
If you have tried these solutions, reviewed this Owner’s Manual, and still cannot resolve an issue you are
having with Energy Display, please call:
– 65,535
dis
re on
y d
e
e repo
io
N
on’t
play
n
oes
rted
.
Energy Display may be
out of wireless
the INSTEON
be too weak.
Energy Display m
attempting to retrieve
energy informa
lost or bro
device.
Energy Display may not
be calibrated to i
environment.
The total power
that INSTEON d
e more than the
b
can display.
Fluctuating battery current
may have glitched Energy
Display.
N d
g
ra
sig
ken IN
evice may
the RF
nge or
nal may
ay be
tio
n from a
STEON
ts
u
sed for
evice may
digits
Be sure that you have properly
one dual-band INSTEO
Try using Energy Display from a different location,
closer to a dual-band INSTEON device.
Add additional INSTEON devic
existing INSTEON devices.
act as INSTEON network rep
If the INSTEON device is still available, Unlink it
from Energy Display. See Unlinking an INSTEON
Device from Energy Display.
Perform a factory reset on Energy Di
Resetting Energy Display to its Factory Default
Settings.
Calibrate the temperature. See Setup Modes
Use Display Mode to exhibit the particular
INSTEON device in the main
actual value.
View the energy informatio
mation software (e.g., HouseLinc).
auto
Remove the battery from Energy Display for 10
seconds, and then reinstall.
Install fresh batteries.
If the above doesn’t work, perform a factory reset.
See Resetting Energy Display to its Factory
Default Settings.
N device.
installed at least
es or move around
All INSTEON devices
eaters.
splay. See
.
display to see its
n via INSTEON home
Page 11 of 13 2448A2 - Rev: 8/23/2011 5:22 PM
INSTEON Gold Support Line
800-762-7845
Page 12

Energy Display Owner’s Manual
SPECIFICATIONS, CERTIFICATION, AND WARRANTY
Specifications
View specifications for Energy Display at: www.smarthome.com/2448A2.html
FCC & Industry Canada
This device complies with FCC Rules Part 15
subject to the following two conditions:
(1) This device may not cause harmful interference, and
(2) This device must accept any interference, including interference that may
operation of the device.
The digital circuitry of this device has been tested and found to comply with the limits fo
device, pursuant to Part 15 of the FCC Rules. These limits are designed to provide rea
against harmful interference in residential installations. This equipment generates, use
radio frequency energy and, if not installed and used in accordance with th
harmful interference to radio and television reception. However, there is not gu
will no occur in a particular installation. If this device d
by turning the device off and on, the user is encouraged to eliminate the interference
the following measures:
Re-orient or relocate the receiving antenna of
Increase the distance between this device and the receiver
Connect the device to an AC outlet on a circuit different from the one that sup
receiver
Consult the dealer or an experience
WARNING! Changes or modifications to this device not expressly approved by the pa
compliance could void the user’s authority to operate the equipment.
Compliance Statement
and Industry Canada RSS-210 (Rev. 7). Operation is
e instructions, may cause
arantee that interference
oes cause such interference, which can be verified
the device experiencing the interference
d radio/TV technician
cause undesired
r a Class B digital
sonable protection
s, and can radiate
by one or more of
plies power to the
rty responsible for
This device complies with Industry Canada license-exem
following two conditions:
(1) This device may not cause interference, and
(2) This device must accept any interference, including interference that may cause undesired
operation
Le present appareil est conforme aux CNR d'Industrie Canada applicables aux appa
de licence. L'exploitation est autorise aux deux conditions suivantes :
(1) l'appareil ne doit pas produire de brouillage, et
(2) l'utilisateur de l'appareil doit accepter tout brouillage radiolectrique subi, mme
susceptible d'en compromettre le fonctionnement.
of the device.
pt RSS standard(s). Operation is subject to the
reils radio exempts
si le brouillage est
Limited Warranty
Seller warrants to the original consumer purchaser of this product that, for a period of two years from the
date of purchase, this product will be free from defects in material and workmanship and will perform in
substantial conformity to the description of the product in this Owner’s Manual. This warranty shall not
apply to defects or errors caused by misuse or neglect. If the product is found to be defective in material
or workmanship, or if the product does not perform as warranted above during the warranty period, Seller
will either repair it, replace it, or refund the purchase price, at its option, upon receipt of the product at the
address below, postage prepaid, with proof of the date of purchase and an explanation of the defect or
Page 12 of 13 2448A2 - Rev: 8/23/2011 5:22 PM
Page 13

Energy Display Owner’s Manual
error. The repair, replacement, or refund that is provided for above shall be the full e
liability with respect to this product. For repair or replacement during the warranty pe
INSTEON Gold Support Line at 800-762-7845 with the Model # a
an RMA# a
Smarthome, Inc.
ATTN: Receiving
16542 M
Irvine, CA 92606-5027
nd send
the product, along with all other required materials to:
Dept.
illikan Ave.
nd Revision # of the device to receive
xtent of Seller’s
riod, call the
Limitations
The above warranty is in lieu of and Seller disclaims all other warranties, whether oral or
or implied, including any warranty or merchantability or fitness for a particular purp
warranty, incl
uding any warranty of merchantability or fitness for a particular purpose, whi
written, express
ose. Any implied
ch may not be
disclaimed or supplanted as provided above shall be limited to the two-year of the express
above. No other representation or claim of any nature by any person shall be bindin
g upon Seller or
modify the terms of the above warranty and disclaimer.
Home automation devices have the risk of failure to operate, incorrect operation, o
mechanical tampering. For optimal use, manually verify the device state. Any home
should be viewed as a convenience, but not as a sole method for controlling your home
In no event shall Seller be liable for special, incident
possession or use of th
permitted by law, personal injury, even if Se
damages. So
or limitatio
me states do not allow limitations on how long an implied warranty lasts and/or the exclusion
n of damages, in which case the above limitations and/or exclusions may not apply to you. You
is device, including without limitation damage to property and, to the extent
ller knew or should have known of the possibility of such
may also have other legal rights that may vary from state to st
al, consequential, or other damages resulting from
ate.
r electrical or
automation device
.
warranty
INSTEON Technology Patent
U.S Patent No. 7,345,998,
© Copyright 2011
Smarthome, 16542 Millikan Ave., Irvine, CA 92606, 866-883-9220, www.smarthome.com
International patents pending
Page 13 of 13 2448A2 - Rev: 8/23/2011 5:22 PM
 Loading...