

INSTEON LampLinc 2457D2 (Dual-Band), LampLinc 2457D2X Owner's Manual
LampLinc™
INSTEON® Plug-In Lamp Dimmer Module, 2-Pin
Model : 2457D2 (Dual-Band)
2457D2X (Single-Band)

LampLinc Owner’s Manual
TABLE OF CONTENTS
ABOUT LAMPLINC...................................................................................................................................... 3
Key LampLinc Features............................................................................................................................. 3
What is Included with LampLinc................................................................................................................ 3
WHAT IS INSTEON?....................................................................................................................................4
INSTALLATION............................................................................................................................................4
Preparing to Install LampLinc.................................................................................................................... 4
Installing LampLinc.................................................................................................................................... 5
USING LAMPLINC .......................................................................................................................................5
Using the Buttons ......................................................................................................................................5
Status LED and Beeper Activity ................................................................................................................ 5
ON-LEVELS AND RAMP RATES................................................................................................................ 6
Setting the On-Level.................................................................................................................................. 6
Setting the Ramp Rate .............................................................................................................................. 7
CONTROLLING INSTEON RESPONDERS FROM LAMPLINC................................................................. 8
Linking LampLinc to an INSTEON Responder.......................................................................................... 8
Unlinking an INSTEON Responder from LampLinc.................................................................................. 8
CONTROLLING LAMPLINC FROM AN INSTEON CONTROLLER........................................................... 9
Linking an INSTEON Controller to LampLinc............................................................................................ 9
Unlinking LampLinc from an INSTEON Controller .................................................................................... 9
CREATING INSTEON SCENES ..................................................................................................................9
ADVANCED FEATURES ........................................................................................................................... 10
Using LampLinc as a Phase Bridger (for LampLinc (Dual-Band) only) ..................................................10
Enabling/Disabling Load Sensing............................................................................................................ 10
Multi-Linking and Multi-Unlinking............................................................................................................. 11
Cross-Linking INSTEON Devices............................................................................................................ 12
Restoring Power to LampLinc ................................................................................................................. 13
Resetting LampLinc to its Factory Default Settings ................................................................................ 13
X10 PROGRAMMING OPTIONS ............................................................................................................... 14
Setting the X10 Address.......................................................................................................................... 14
Removing the X10 Address..................................................................................................................... 14
ABOUT INSTEON ......................................................................................................................................15
Using Dual-Band INSTEON Devices to Upgrade Your Network.............................................................15
Important Note about INSTEON Networks; Split Single-Phase vs. 3-Phase Installation .......................15
Further Enhancing Reliability ..................................................................................................................15
ADDITIONAL RESOURCES ...................................................................................................................... 15
TROUBLESHOOTING................................................................................................................................16
SPECIFICATIONS, CERTIFICATION, AND WARRANTY ........................................................................ 18
Specifications ..........................................................................................................................................18
Certification.............................................................................................................................................. 18
FCC & Industry Canada Compliance Statement..................................................................................... 18
Limited Warranty .....................................................................................................................................19
LampLinc Owner’s Manual
ABOUT LAMPLINC
LampLinc presents you with an elegant and stylish way to dim and remotely control any lamp or other
plug-in device in your home at the touch of a button. Send commands to LampLinc from an INSTEON
Controller. Or conveniently control other Linked INSTEON devices by using the buttons on the side of
LampLinc. The Load Sensing feature can control Linked INSTEON devices by turning the device on and
off from its built-in switch.
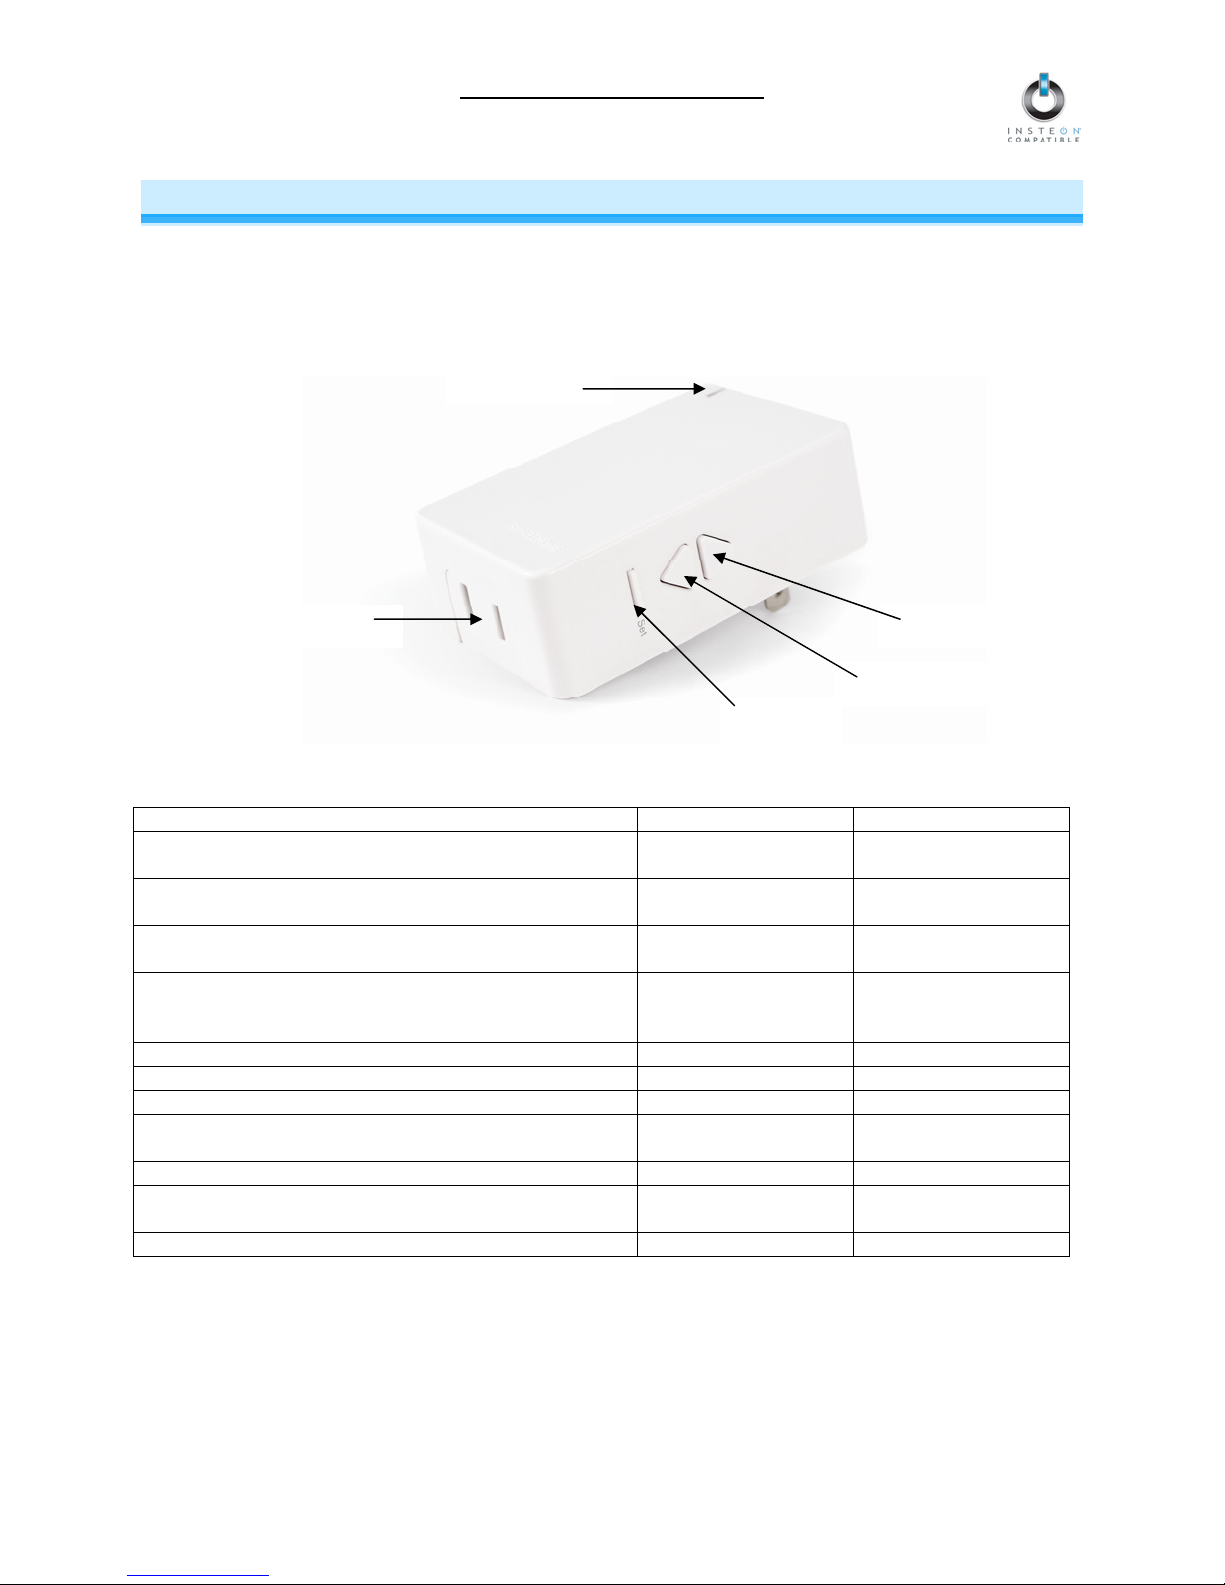
Outlet
Status LED
Up button
Set button
Down button
Key LampLinc Features
Feature 2457D2 (Dual-Band) 2457D2X
Installs and Links to other INSTEON devices in
minutes
Controls all standard incandescent lamps and other
plug-in devices up to 300 Watts
Responds to and controls other INSTEON devices as
well as X10 devices
Indicates INSTEON setup mode activity and
operational states with a dual-color Status LED and
beeper
Dims the load up to 32 brightness levels X X
Changes brightness at 32 Ramp Rates X X
Load Sensing easily disabled and re-enabled X X
Communicates simultaneously over both radio
frequency (RF) and the power line
Acts as an access point for INSTEON RF-only devices X
Stores setup state in memory so settings aren’t lost
during power outages
Two-year warranty X X
X X
X X
X X
X X
X
X X
What is Included with LampLinc
• LampLinc – INSTEON Plug-In Lamp Dimmer Module (Dual-Band), 2-Pin or LampLinc – INSTEON
Plug-In Lamp Dimmer Module, 2-Pin
• Quick-Start Guide
Page 3 of 19

LampLinc Owner’s Manual
WHAT IS INSTEON?
Since its inception in 2005, INSTEON has become a best-selling home-control networking technology, offering more
reliability and flexibility than any other home management system on the market. INSTEON systems are simple, reliable,
and affordable. Simple, because each device takes mere minutes to install. Reliable, because every INSTEON device works
as a network repeater, ensuring your commands will not be lost. Affordable, because INSTEON can be integrated into any
number of devices easily and at a very low cost. An INSTEON home grows in value with each added INSTEON device,
making life more convenient, safe, and fun.
How Does INSTEON Work?
What makes INSTEON the most reliable home automation network is its dual-mesh network. INSTEON devices use both
radio frequency (RF) signals and the home’s existing wiring to talk to each other. In an INSTEON network, every INSTEON
device also acts as a repeater, receiving and sending every message to all other devices in the network. So by integrating
more INSTEON devices you will strengthen the network and ensure no commands will be lost.
No central controller or networking setup is required with an INSTEON network. Simply install your devices and then use a
series of button presses or taps to Link your devices together. Throughout this Owner’s Manual, you may see the terms
“Controller” or “Responder”. These generic INSTEON terms refer to the components of an INSTEON scene, and are used
on a scene-by-scene basis.
• Controller – sends INSTEON commands to other devices
• Responder – reacts to commands sent out by another INSTEON device
An INSTEON device may act as a Controller, Responder, or sometimes both.
INSTEON networks are also extremely secure. Each INSTEON device is assigned a unique INSTEON ID, so unless
neighbors or would-be hackers have access to your particular device’s INSTEON ID, they won’t be able to control your
home, even if they are using similar products.
INSTALLATION
Preparing to Install LampLinc
CAUTION
Read and understand these instructions before installing and retain them for future reference.
LampLinc is intended for installation in accordance with the National Electric Code and local regulations in the United States
or the Canadian Electrical Code and local regulations in Canada. Use indoors only. LampLinc is not designed nor approved
for use on power lines other than 120V 60Hz, single phase. Attempting to use LampLinc on non-approved power lines may
have hazardous consequences.
Prior to installing LampLinc, please review the entire installation procedure and take the following precautions:
• Use indoors or in a properly insulated and weatherproof electrical box only
• Don’t plug LampLinc into an outlet controlled by a switch because if the switch is inadvertently turned off,
LampLinc won’t have power
• Don’t plug LampLinc into a filtered power strip or AC line filter
• Be sure the device you want to control is working and that the device’s built-in switch is in the on position
• If the lamp being controlled by LampLinc already has its own built-in dimmer, turn that dimmer to full-on and allow
LampLinc to control the lamp’s brightness
• To reduce the risk of overheating and possible damage to other equipment, use LampLinc to control incandescent
lamps only. Dimming an inductive load, such as a fan or transformer, could cause damage to the dimmer, the load
device, or both. If the manufacturer of the load device does not recommend dimming, use a non-dimming
INSTEON ApplianceLinc (#2456S) instead.
• Don’t use LampLinc to control devices that preserve, maintain, or contribute to human or animal safety or life
support
If you have any questions, please call:
INSTEON Gold Support Line
800-762-7845
Page 4 of 19
LampLinc Owner’s Manual
Installing LampLinc
1) Plug the lamp/device (the load) you want to control into the outlet on LampLinc
2) Plug LampLinc into an unswitched wall outlet
The load may turn on
If the LampLinc Status LED is solid green, installation is complete
If the Status LED is solid red, tap the Up button
The LampLinc Status LED will turn on solid green and the load will turn on
3) If the load does not turn on, turn it on manually using the switch on the load itself
NOTE: After completing installation, you will not be able to use the load’s built-in switch to control the load unless
Load Sensing is enabled. See Enabling/Disabling Load Sensing.
USING LAMPLINC
Using the Buttons
The LampLinc buttons will control the load and any Linked Responders. LampLinc or the Responders will behave
differently depending on whether you tap, double-tap, or hold down the buttons.
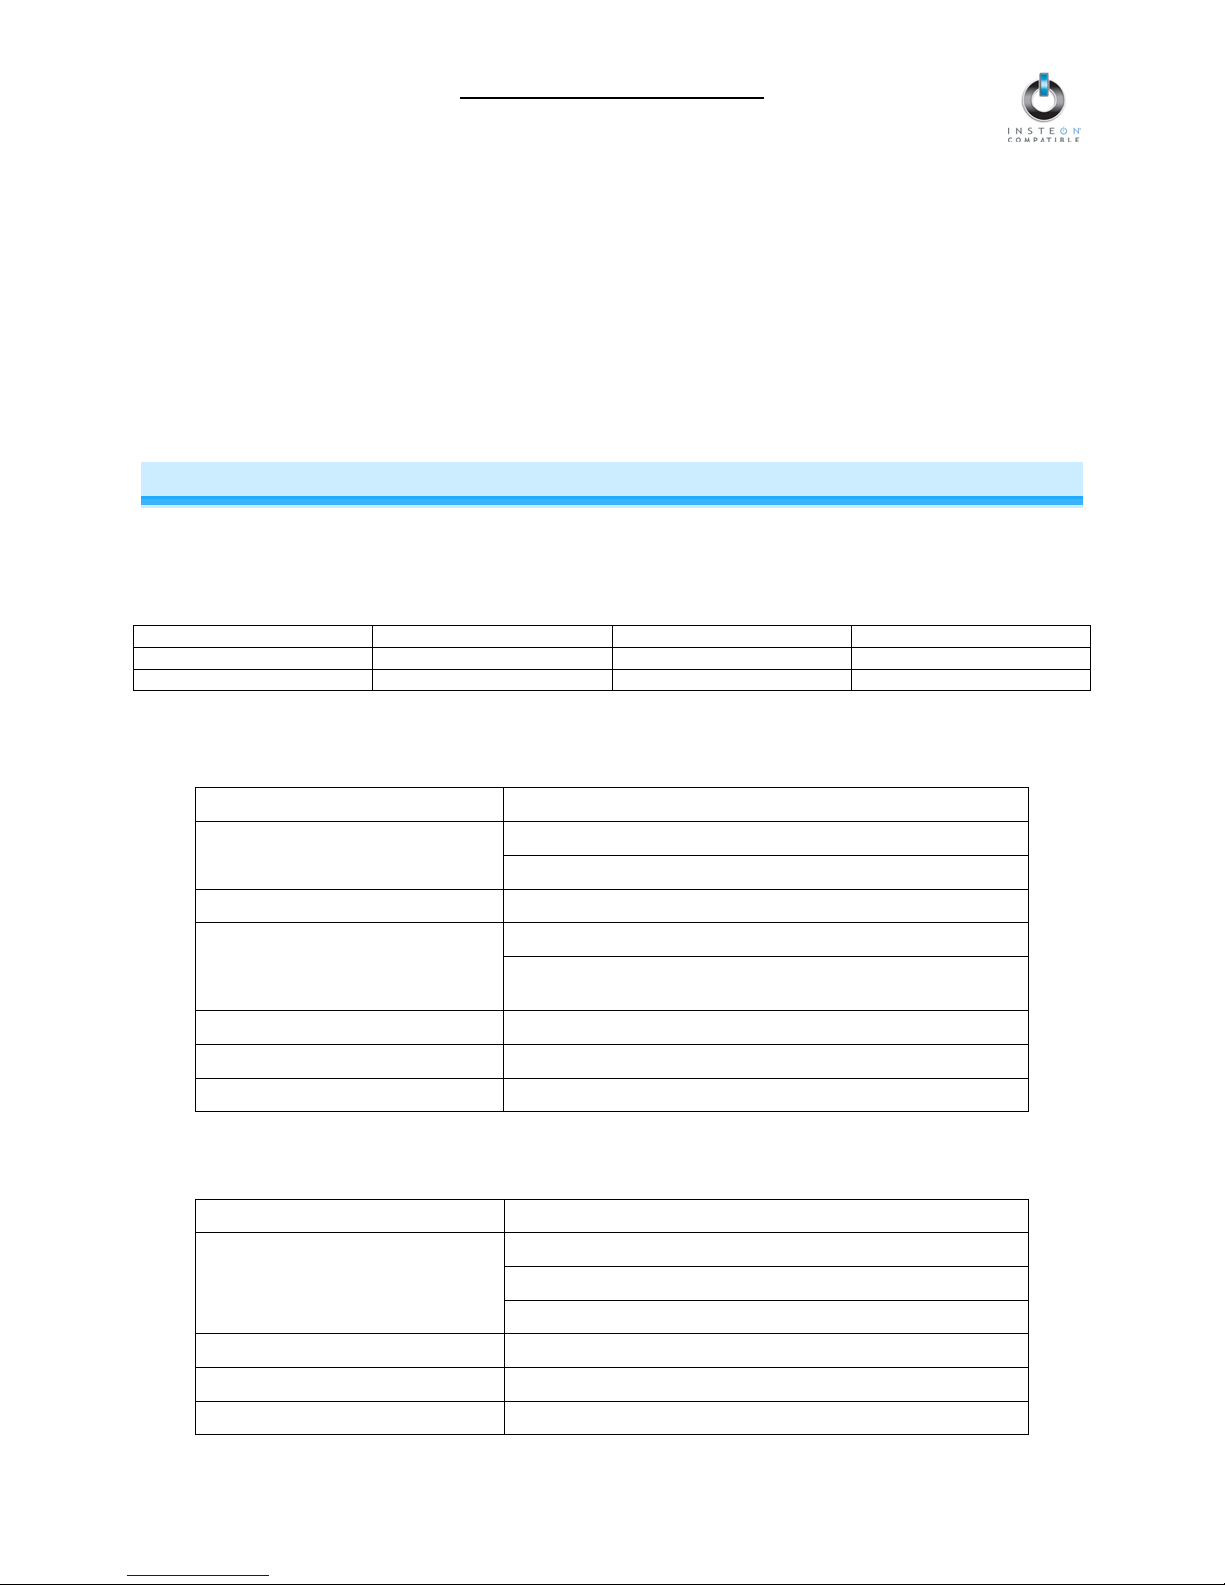
Button Tap Double-tap Press & hold
Up
Down
Ramp to On-Level Full-bright instantly Brighten until released
Ramp to Off Full-off instantly Dim until released
Status LED and Beeper Activity
Status LED Activity
Status LED Activity LampLinc Status/Setup Mode
Solid green
Solid red Load is off
Blinking green
Blinking red Unlinking Mode
Double-blinking green Multi-Linking Mode
Double-blinking red Multi-Unlinking Mode
Tapping the Set Button
If LampLinc is in a setup mode, tap the Set button to exit the setup mode and return to normal operation.
Beeper Activity
Beeper Activity LampLinc Status
Single beep
Double beep Link established – LampLinc will exit setup mode
Long beep Timed out of setup mode
Continuous beep (once per second) Initiated Phase Bridging Detection Mode
Load is on
Phase Bridging Detection Mode has been initiated
Linking Mode
Phases have been bridged (if used as a secondary device
during Phase Bridging Detection Mode)
Entered setup mode or moved to the subsequent setup mode
Exited setup mode (if Set button was tapped)
Feature was programmed (e.g., On-Level, Ramp Rate)
Page 5 of 19

LampLinc Owner’s Manual
ON-LEVELS AND RAMP RATES
The On-Level is the brightness that the load will go to when you turn it on. The On-Level is adjustable
from off to 100% brightness. The default is 100%.
The Ramp Rate is the amount of time it will take the load to go from full-off to full-on or from full-on to fulloff. The Ramp Rate is adjustable from 0.1 to 9 seconds to ramp between full-on and full-off and vice
versa. The default is 0.1 seconds.
You can set up a local On-Level/Ramp Rate, which is activated by tapping the buttons on LampLinc. Or
set up remote On-Levels/Ramp Rates that are activated when you tap an On/Off or Scene button on a
Linked Controller. A single LampLinc is capable of storing different On-Levels and Ramp Rates for each
Linked Controller (or each button if it is a multi-scene Controller).
On-Levels and Ramp Rates are locked in separately and can be set up in any order. When you do the
lock-in, the most recently set On-Level and Ramp Rate are locked in together.
Setting the On-Level
1) Use the Up and Down buttons on LampLinc to adjust the load to the desired brightness
2) Once the desired brightness has been achieved, tap the Set button on LampLinc
LampLinc
3) Test the On-Level setting by tapping the Up and Down buttons on LampLinc
LampLinc
The local On-Level has now been set. If you would like to set up a Controller to set LampLinc to the
programmed On-Level, proceed to Linking an INSTEON Controller to LampLinc and begin from step 2.
If LampLinc is blinking its Status LED, you held the Set button down too long. Holding down the Set
button for 3 seconds is an alternate way to place LampLinc into Linking Mode.
Linking Mode will time out after 4 minutes of inactivity. To manually exit Linking Mode, tap the Up or
Down button.
will beep and the load will flash once
will respond appropriately
NOTE:
Page 6 of 19
 Loading...