

Page 1
HouseLinc
INSTEON
®
Desktop Software Compatible with Interface:
Models : 2413S
2413U
2242-222
2412N
2412S
2412U
2448A7
TABLE OF CONTENTS
About HouseLinc ........................................................................................................................................................... 3
Page 1 of 28 HouseLinc - Rev: 2/14/2013 5:03 PM
Page 2

Key HouseLinc Features ............................................................................................................................................. 3
System Requirements ................................................................................................................................................. 3
Installing HouseLinc ..................................................................................................................................................... 3
1st Time HouseLinc Setup ............................................................................................................................................ 4
Set Up Location for Sunrise/Sunset ............................................................................................................................ 4
Set Up Options for HouseLinc Startup ........................................................................................................................ 4
Set Up Email Options .................................................................................................................................................. 6
Adding INSTEON Devices ............................................................................................................................................ 7
INSTEON Device Properties ......................................................................................................................................... 8
General Device Information ......................................................................................................................................... 9
Direct Control (Controlling a Device from HouseLinc) ................................................................................................. 9
Local Settings .............................................................................................................................................................. 9
Adding X10 Devices .................................................................................................................................................... 10
Creating Scenes .......................................................................................................................................................... 11
Creating Events ........................................................................................................................................................... 12
Create an Event ......................................................................................................................................................... 13
Modify an Event ......................................................................................................................................................... 14
Run / Test an Event ................................................................................................................................................... 14
IP Camera Support ...................................................................................................................................................... 14
Adding an IP Camera ................................................................................................................................................ 14
Using the IP Camera as an Action in an Event ......................................................................................................... 17
Activity Log .................................................................................................................................................................. 19
Other HouseLinc Features and Functions................................................................................................................ 19
Saving Configuration ................................................................................................................................................. 19
Backing Up Configuration .......................................................................................................................................... 19
Updating HouseLinc .................................................................................................................................................. 19
Removing a Device.................................................................................................................................................... 20
Swap Device .............................................................................................................................................................. 21
Synchronize Device ................................................................................................................................................... 23
Synchronize the Whole House .................................................................................................................................. 23
Phase Bridging with Dual-Band PLM ........................................................................................................................ 24
Running Signal Diagnostics ....................................................................................................................................... 24
Troubleshooting .......................................................................................................................................................... 25
Specifications, Certification, and Warranty .............................................................................................................. 27
Page 2 of 28 HouseLinc - Rev: 2/14/2013 5:03 PM
Page 3
About HouseLinc
HouseLinc allows you to manage your entire INSTEON network using your PC. Create scenes, timed events,
INSTEON triggered events and manually control devices from your computer.
Key HouseLinc Features
Controls and programs your INSTEON devices from your computer
Creates scenes in minutes– no need to individually program or link each device
Triggers timers and events as long as your computer remains on with HouseLinc running
Keeps logs of all links and tracks when each device/scene is activated or deactivated
Performs advanced features for your INSTEON devices that may not be available through manual programming
(varies with device)
Automatically checks for updates to the HouseLinc interface
Two-year warranty for hardware
System Requirements
INSTEON Computer Interface (also known as PowerLinc Modem or PLM)
Windows 2000, XP, Vista (32-bit or 64-bit), Windows 7 (32 or 64-bit), Windows 8 (32 or 64-bit)
15 MB of free disk space
Minimum 128MB RAM
Additional INSTEON devices to control
Installing HouseLinc
1) Be sure PowerLinc Modem or USB Adapter is not plugged into your computer
2) Go to www.insteon.com/houselinc.html to download HouseLinc
A File Download dialog box will appear
3) Click Download and save file to your desktop, then open/run the file
A HouseLinc Setup wizard will appear
4) Follow the instructions on the wizard to install HouseLinc
HouseLinc will install
5) Make sure the “Launch HouseLinc” box is checked and click “Finish”
Page 3 of 28 HouseLinc - Rev: 2/14/2013 5:03 PM
Page 4
HouseLinc will load and the Options window will appear and read “No Computer Interface
Found”
6) Connect INSTEON computer interface (also known as PLM):
PowerLinc Modem, Serial – Plug PowerLinc Modem into an unfiltered AC outlet. Then, plug the clear
end of the included DB-9 serial cable into PowerLinc Modem’s interface port and the black end of the
cable into an available serial port on your computer.
PowerLinc Modem, USB - Plug PowerLinc Modem into an unfiltered AC outlet. Then, plug the square
end of the included USB cable into PowerLinc Modem’s USB jack and the rectangular end into an
available port on your computer.
USB Adapter – Plug USB Adapter into an available USB port on your computer
Ethernet PowerLinc (Hub or SmartLinc) – Connect interface to your router using the Ethernet cable
included with the interface and plug into an unfiltered AC outlet.
7) In the Options window, click “Start”
HouseLinc will search for INSTEON computer interface
8) Select PowerLinc Modem or USB Adapter by clicking on it and then clicking “Activate”
The INSTEON computer interface will be added to the Devices list
9) If a HouseLinc Updates window pops up, click “Update”. Then, click “OK ” when the update is complete.
10) Select the System tab in the Options window and then select “Start HouseLinc when I log into PC”, if desired
11) Click “OK”
1st Time HouseLinc Setup
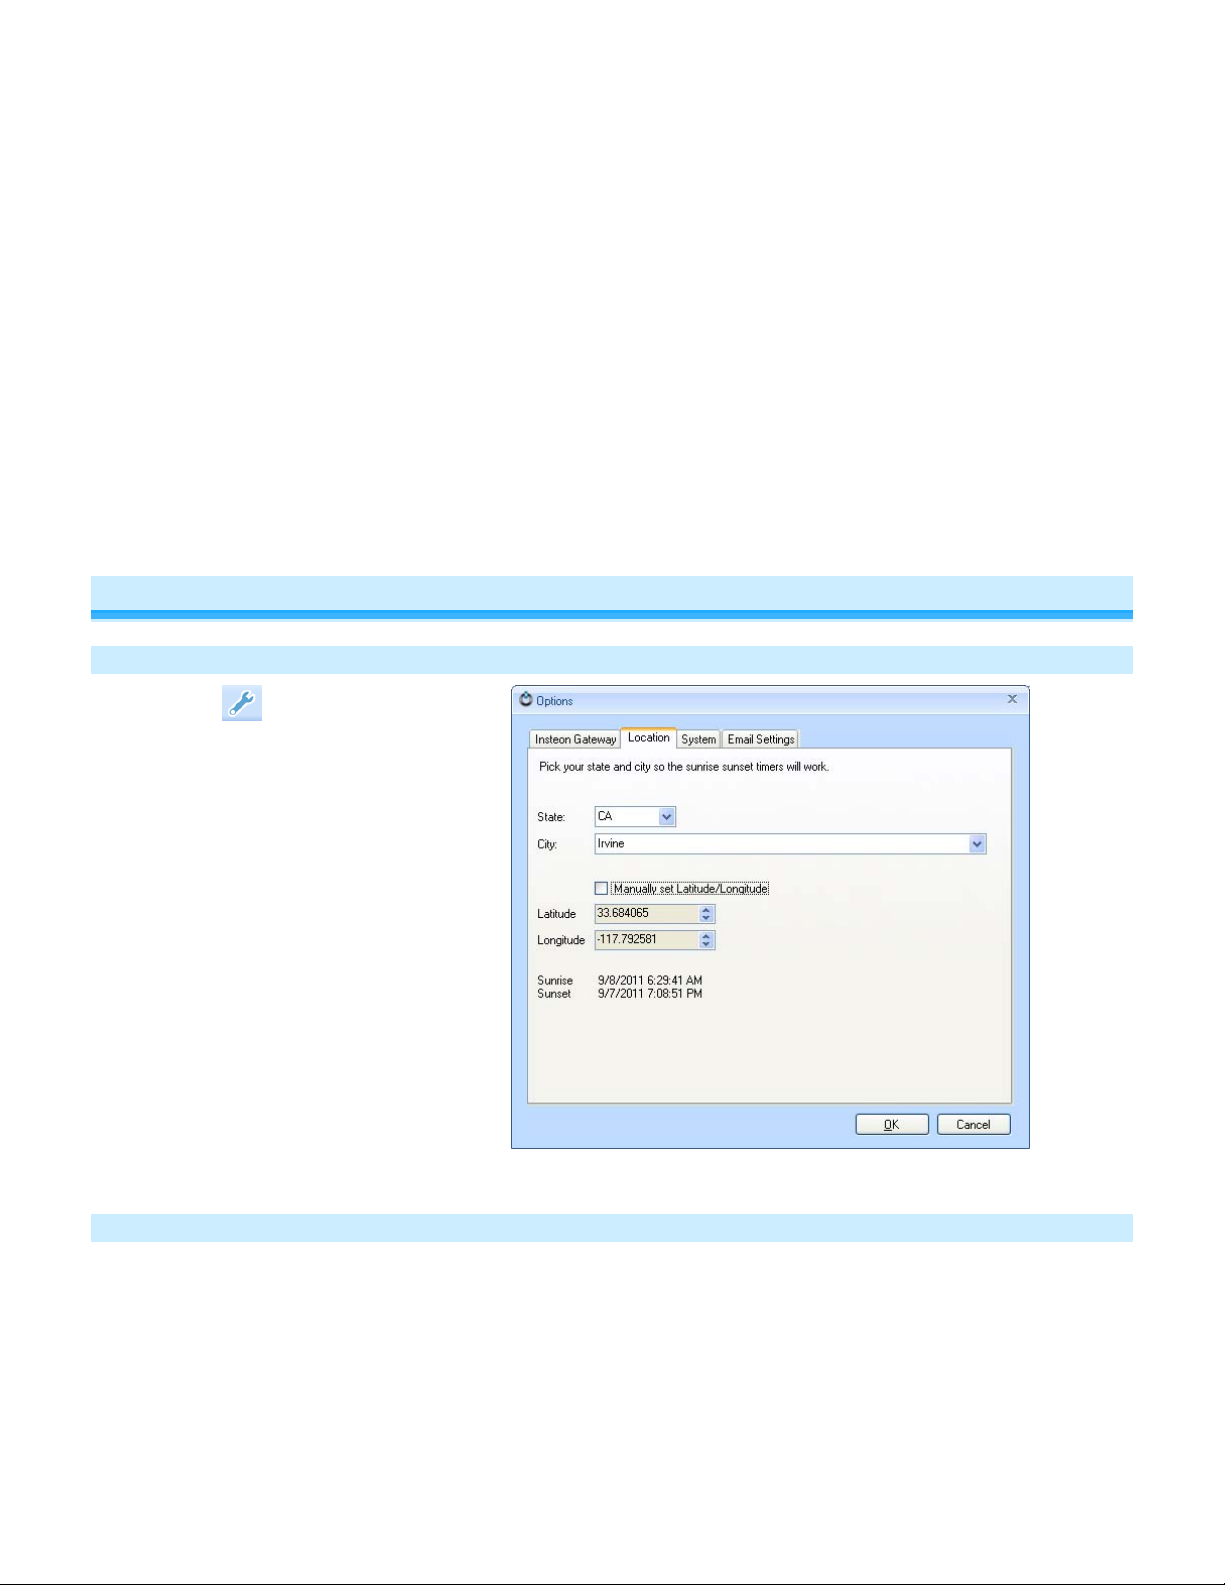
Set Up Location for Sunrise/Sunset
1) Click the icon
2) Click on the Location tab
3) Select the city and state from the dropdown menus. If the locations aren’t
displayed, either select the nearest
location or manually enter the latitude
and longitude.
NOTE: HouseLinc uses your
computer’s clock for date/time and the
location for sunrise/sunset
Set Up Options for HouseLinc Startup
1) Click on the System tab
2) Click on “Start HouseLinc when I log
into PC”. This is recommended
because HouseLinc needs to be
running for timer and INSTEON events
to function.
3) We recommend you Uncheck “Perform
Page 4 of 28 HouseLinc - Rev: 2/14/2013 5:03 PM
Page 5

Background Sync Process on Startup”
NOTE: If this option is grayed out,
make sure that “Ask for Sync Process
on Startup” is also unchecked
Page 5 of 28 HouseLinc - Rev: 2/14/2013 5:03 PM
Page 6
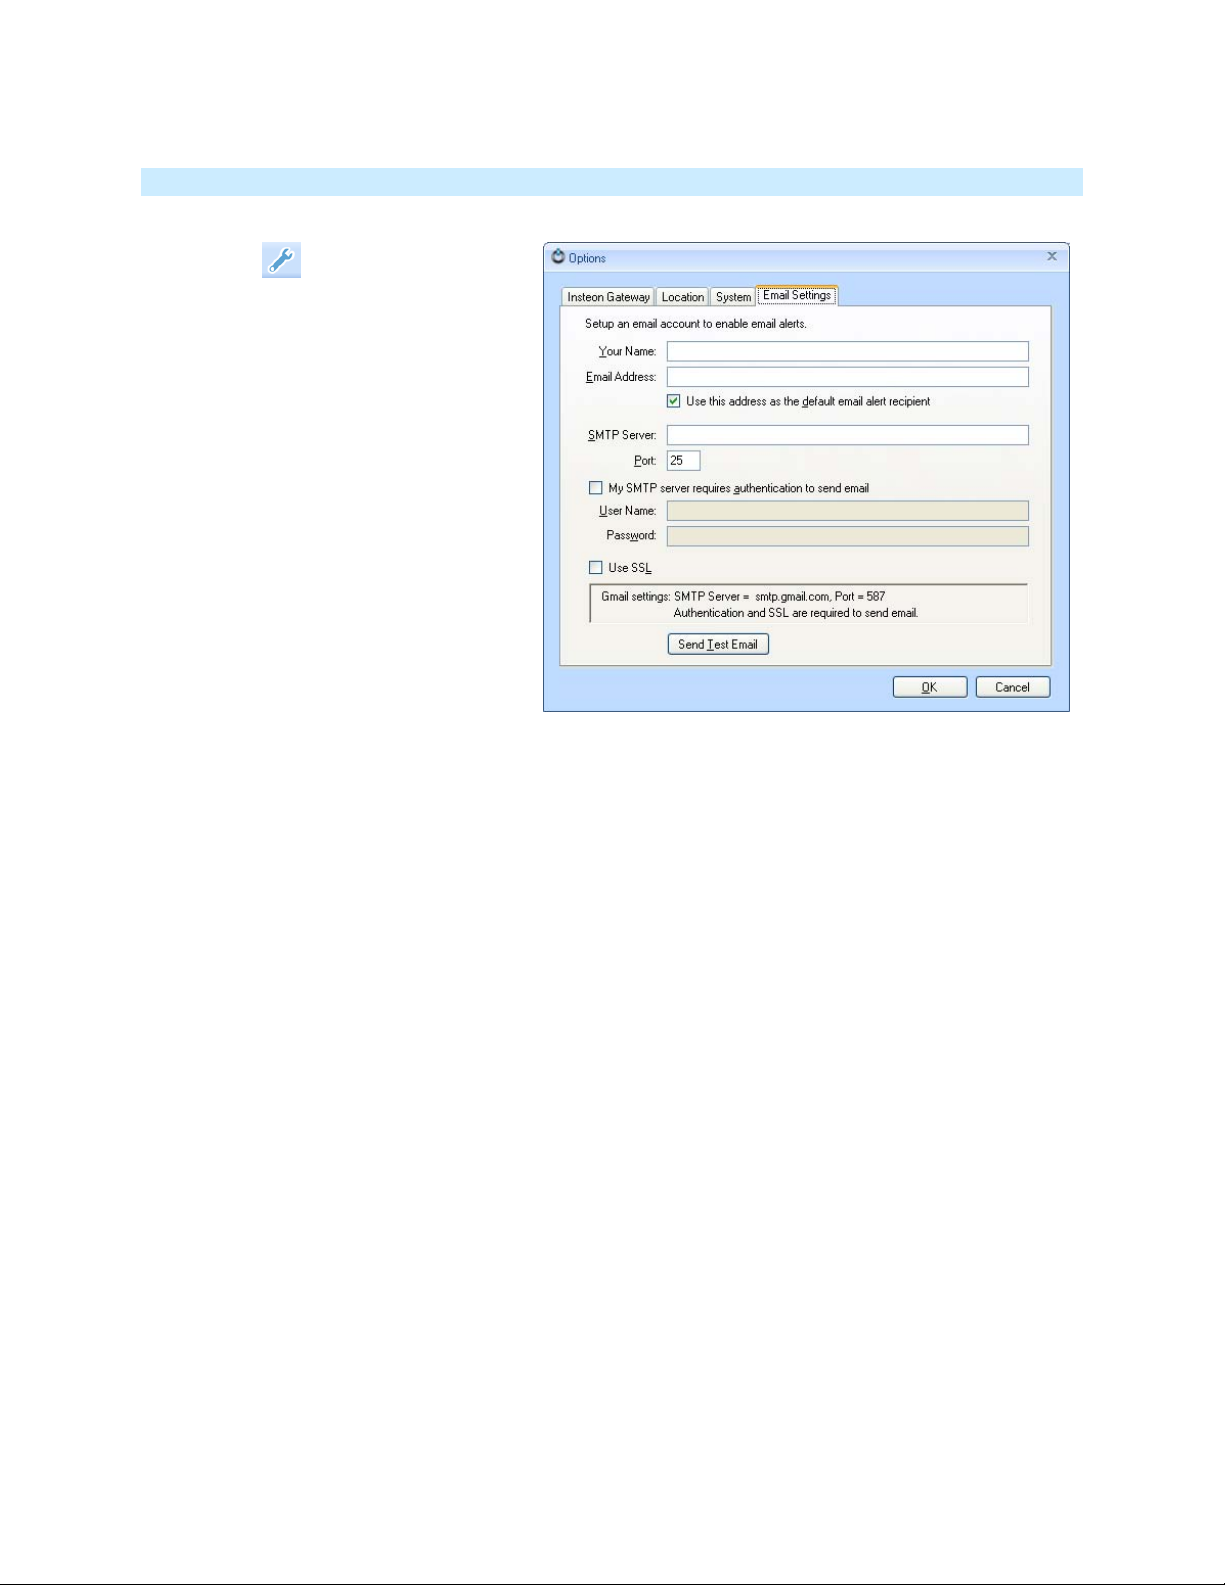
Set Up Email Options
1) Click the
icon and then select the
Email Settings tab
2) Type in your name and default email
address into their respective fields
3) Enter the SMTP server and port
(contact your email or internet service
provider for this information)
a. If your ISP requires it, check
the box “My SMTP server
requires authentication to
send email”
b. Enter the User Name and
Password into the respective
fields
c. If your ISP requires it, check
the box “Use SSL”
4) Click “Send Test Email”
5) Once the dialog box pops up, click “OK”
6) In the Options box, click “OK” to save the email address settings – and exit Options window
Within a few minutes, you will receive an email with the subject: “Testing from HouseLinc”
Page 6 of 28 HouseLinc - Rev: 2/14/2013 5:03 PM
Page 7
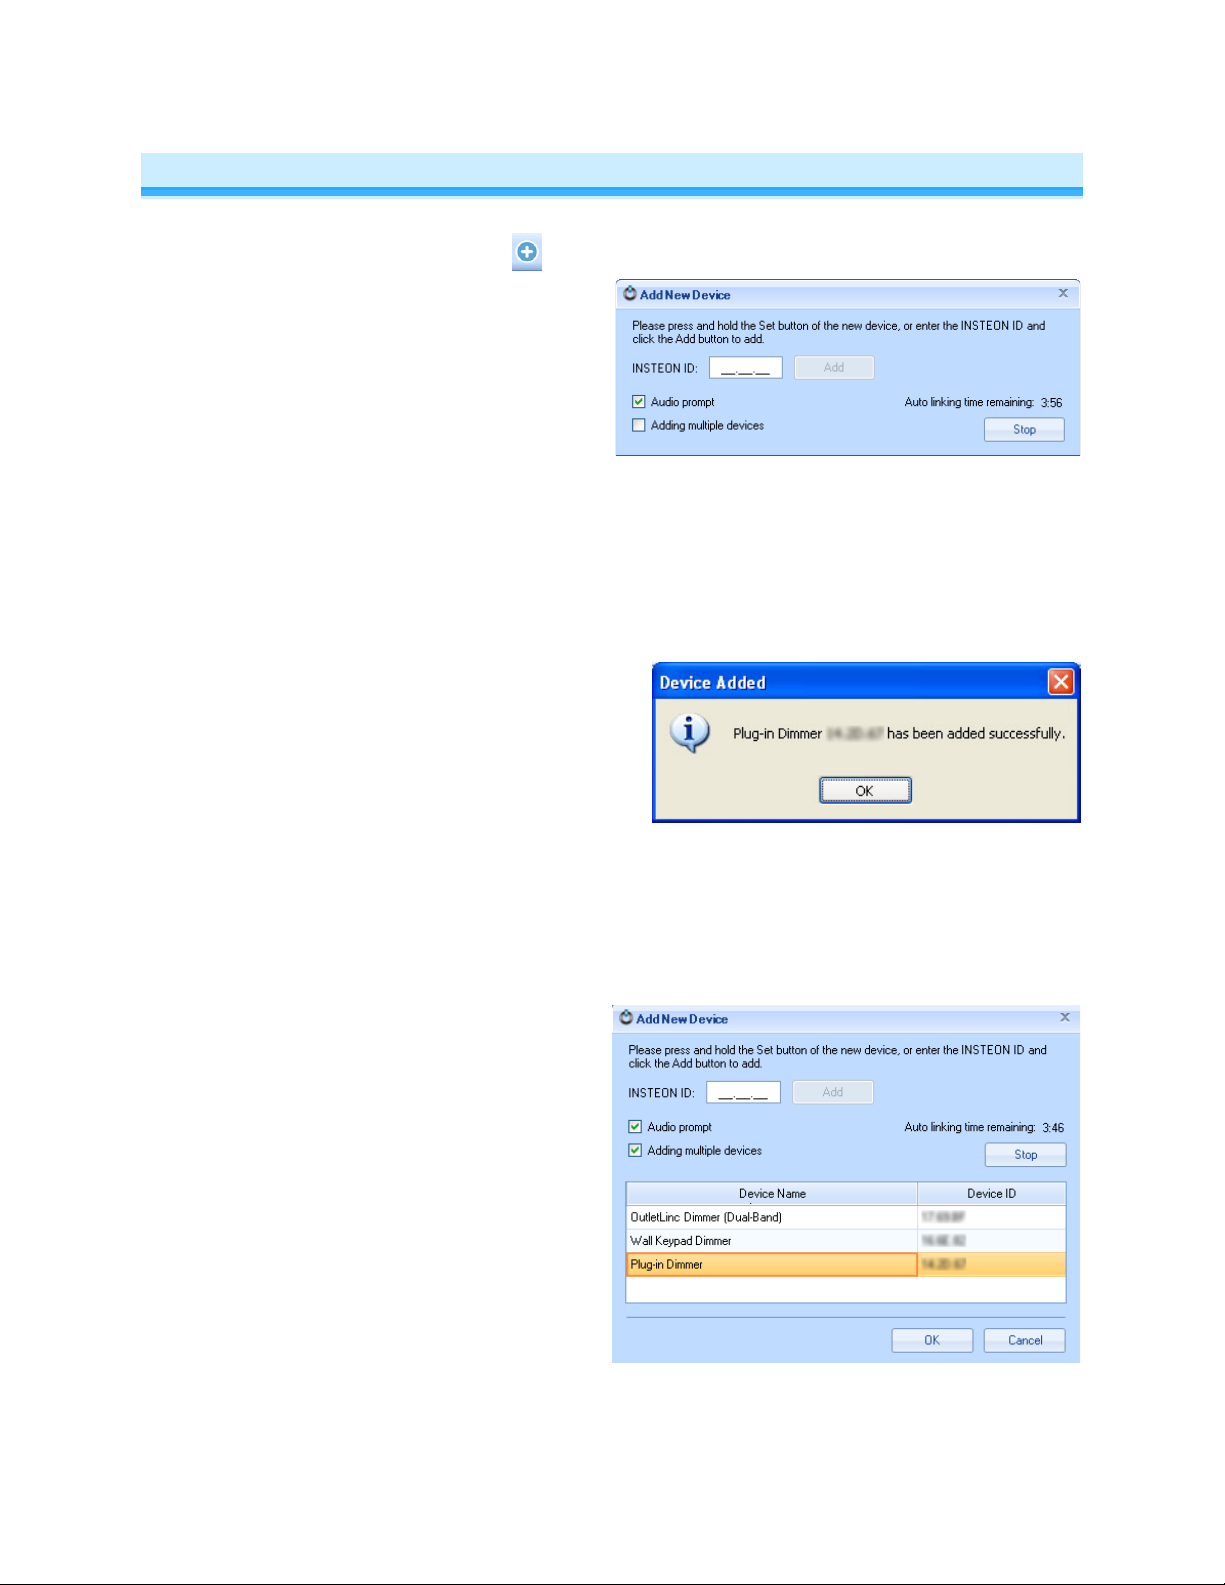
Adding INSTEON Devices
1) Select the Devices tab and click the
Add New Device window is displayed
HouseLinc puts PLM into linking mode
for 4 minutes
2) The Add New Device window allows you to
add devices three ways:
a. Add a single device by typing in the
INSTEON ID (located on the label in
XX.XX.XX format), and then click
Add
A confirmation window will appear
“DEVICE NAME XX.XX.XX has been
added successfully”
Click "OK" to synchronize
b. Add a single device by press &
holding the Set button on the device
you wish to add until it beeps (or its
LED blinks)
icon
A confirmation window will appear
“DEVICE NAME XX.XX.XX has been
added successfully”
Click "OK" to synchronize
c. Check the box "Adding multiple
devices" to add multiple devices
(one after another) by press &
holding the Set button on the
devices you wish to add until each
device beeps (or its LED blinks)
HouseLinc will announce success and
the device will display in the list.
When finished adding devices click the
device name to rename.
Click "OK" to immediately begin
synchronizing the devices.
Note: If the device is battery-powered,
HouseLinc will automatically start
synchronizing.
Page 7 of 28 HouseLinc - Rev: 2/14/2013 5:03 PM
Page 8

3) To set the devices name, location and
other settings, click on your device in
the Devices list and select the
Properties tab
4) Click on each new device in the
device list and enter its room and any
other information you wish to record
at this time. Note: it is highly
recommended that you at organize
your devices by room.
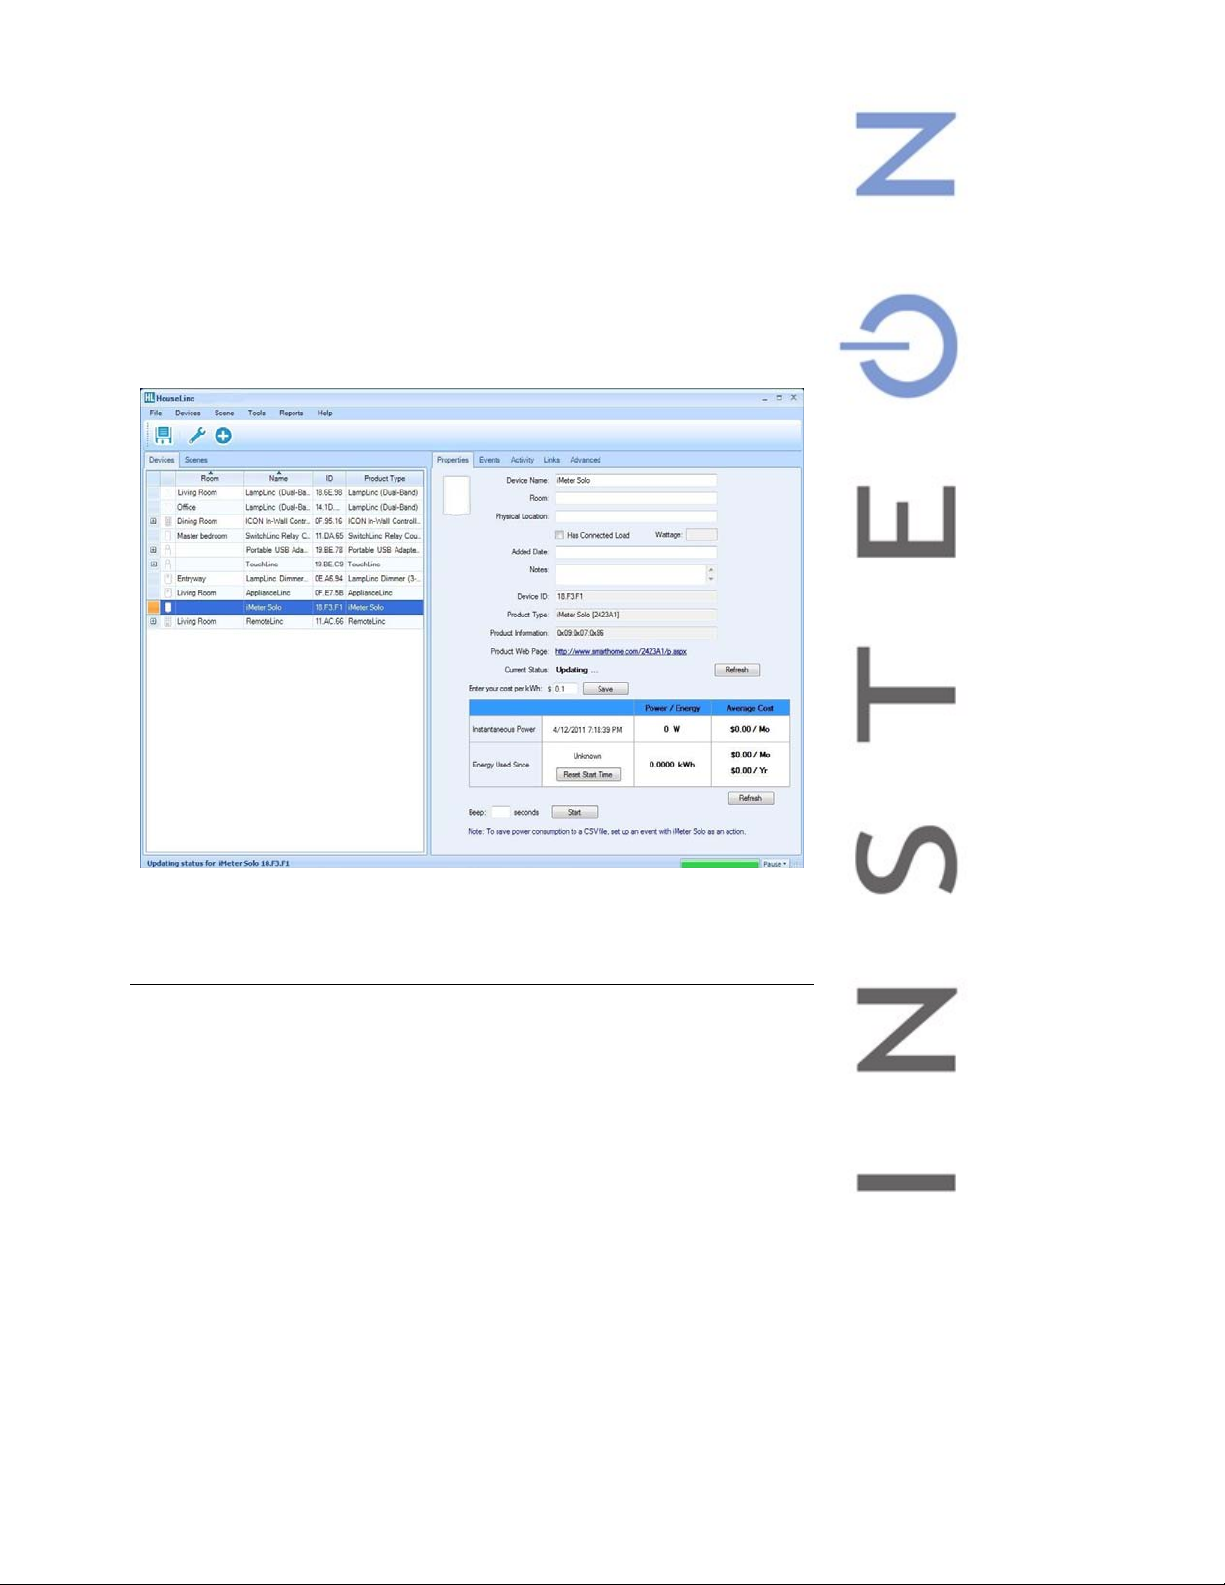
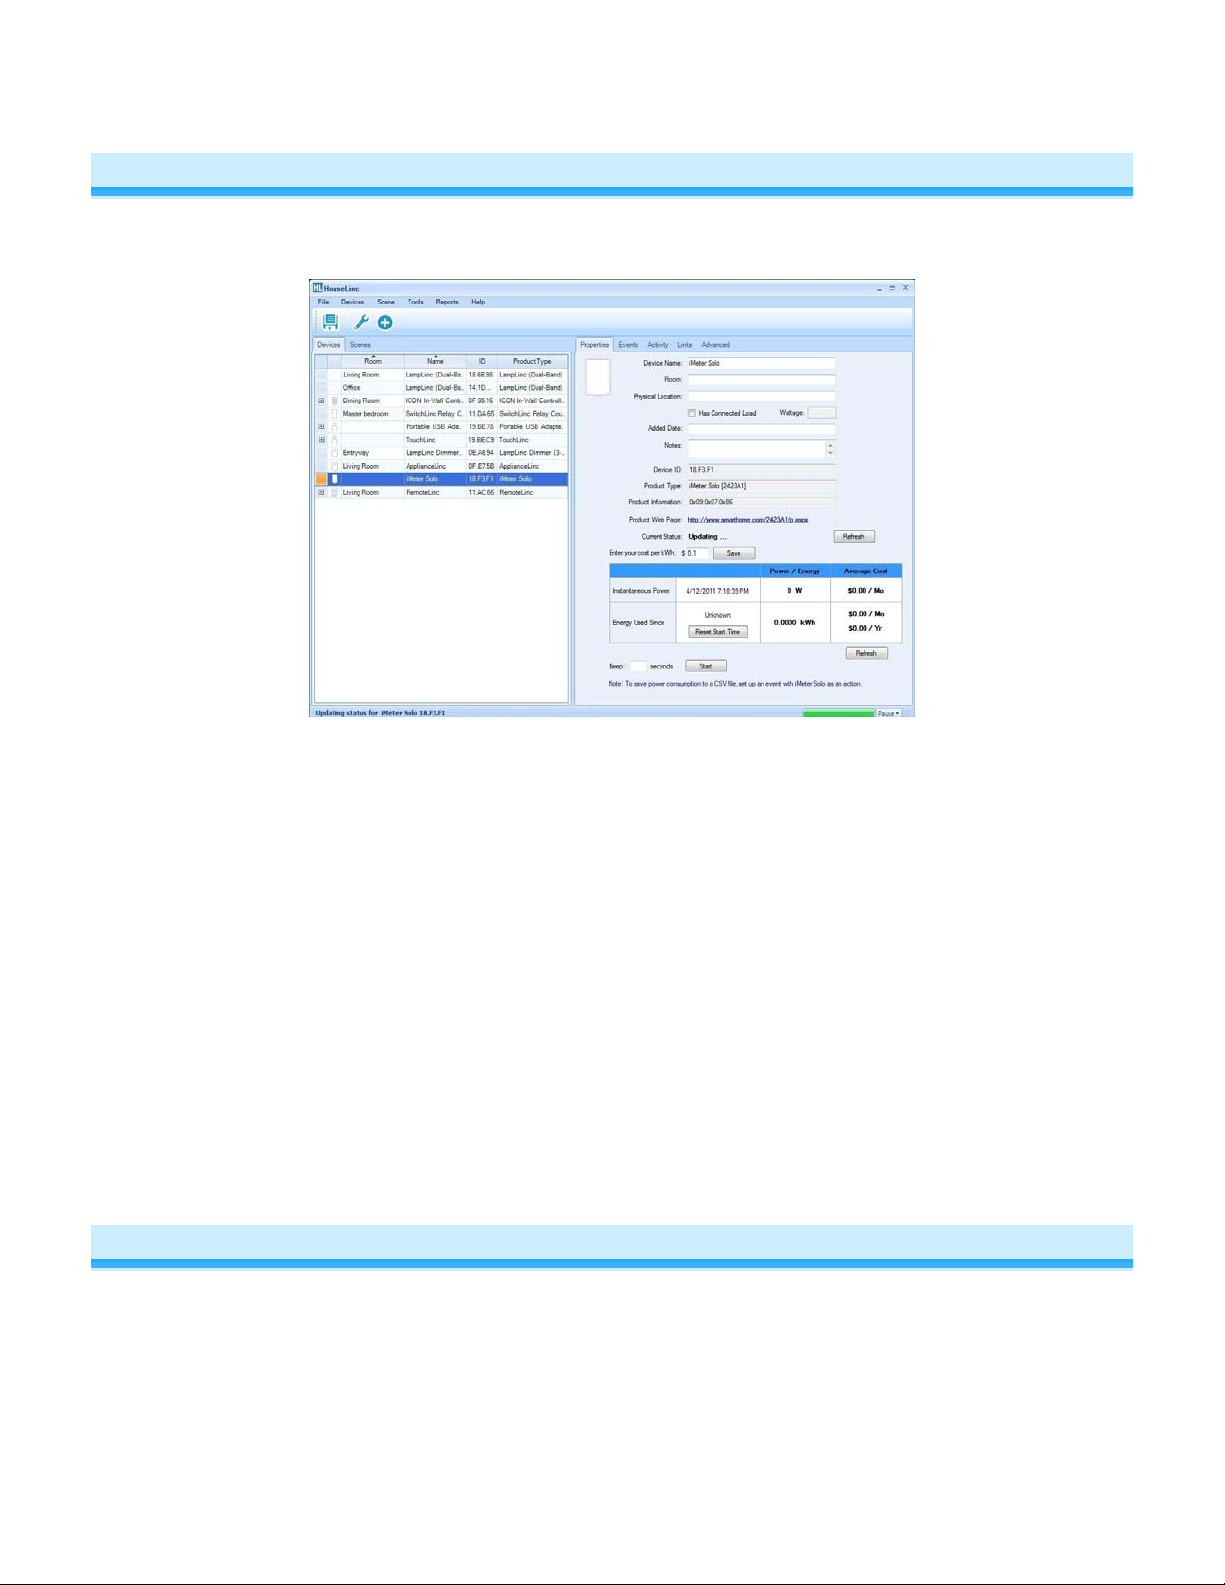
INSTEON Device Properties
The Properties tab provides a quick view into local settings, name, location and notes as well as offering
a direct control interface.
An example screenshot for a SwitchLinc Dimmer:
General
Device
Information
Direct Control
Local Settings
Page 8 of 28 HouseLinc - Rev: 2/14/2013 5:03 PM
Page 9

General Device Information
The general device section will allow you to set a name for your device, the location of your device as well
as a specific location within the room (physical location), the wattage of the load it is controlling, date it
was added and notes about the device.
The disable button allows you to stop a device from being managed by HouseLinc without having to
delete it. This is helpful for devices that are only used during the holidays (Christmas lights, Halloween
props, etc.). To start managing the device, simply uncheck this box .
You may also want to use this feature to prevent HouseLinc from managing other PLMs in your network
(e.g., if you run both HouseLinc and ISY-99 you may not want HouseLinc to make changes to ISY-99's
PLM).
Additional information includes Device ID, X10 Address (if used), Product Type and Product Information
(INSTEON Device Category, Subcategory and Product Key)
Direct Control (Controlling a Device from HouseLinc)
You can send direct control commands to your INSTEON device. The control buttons for most responder
devices consist of the following:
All responders:
Turn On
Turn Off
Dimmers only:
Fast On (bypass local ramp rate)
Fast Off (bypass local ramp rate)
Brighten (incremental)
Dim (incremental)
Percentage (On level)
For responder devices that have a beeper, HouseLinc enables you to start beeping the device for a
specified amount of time (in seconds). This is helpful when trying to locate a device.
Local Settings
HouseLinc makes it quick and easy to program the local settings for your device. For resp onder devices
you can set things like On Level and Ramp Rate. For controller devices you can change scene button
modes (e.g., Toggle, On only or Off only) or even button configurations (e.g., 4-scene to an 8-scene Mini
Remote / RemoteLinc 2). Both responder and controller settings can be set to Programming Lock whi ch
prevents manual changes from being made at the device.
Once you've finished making changes to your devices local settings, press the "Refresh" button. Note: for
battery powered devices, simply activate them to begin writing the changes.
Page 9 of 28 HouseLinc - Rev: 2/14/2013 5:03 PM
Page 10

Adding X10 Devices
If you own X10 devices you add them into HouseLinc as a device.
1) Select Add X10 Device from the Add drop down
2) Enter the device properties. You can make changes later under the Properties tab.
Page 10 of 28 HouseLinc - Rev: 2/14/2013 5:03 PM
Page 11

Creating Scenes
Scenes are a powerful INSTEON management tool. A scene can be made up of 2-200 + devices. For
each device you choose whether the device is a controller of the scene and/or a responder of the scene.
If the device is a responder, you also choose the devices settings for any given scene (e.g. brightness
level and ramp rate for a light).
1) In the left pane, right-click
anywhere in the scenes tab (or,
you can click on the
icon
2) Name the scene and click “OK”
3) In the right pane, click on your
column of choice to organize your
devices for scene inclusion (e.g.
Room)
4) For each device, click the
Controller and/or Responder
boxes
5) Repeat for all scene members
6) There are 2 ways to choose the scene settings for the device
a. Adjust all devices to desired settings in your home and click “Read” to capture the
current states
b. Or, repeat the following for each Responder:
- click “Edit”
- Set the state you wish the Responder to go to when the scene is activated
- Click “OK”
- Click “Test” to ensure the scene settings are as desired
Page 11 of 28 HouseLinc - Rev: 2/14/2013 5:03 PM
Page 12

7) Click “Save” to save the scene
NOTE: The
icon does not
save scene settings.
Creating Events
Events are a series of INSTEON, timer and/or email “Actions” executed upon an event “Trigger”, subject
to “Conditions”. You can define one or more Conditions which must be “true” for the event to function
(e.g. water the lawn at 7AM on the Condition that it is Monday, Wednesday or Friday)
Triggers
There are 3 Types of Triggers
Timers – (Drag the Clock Icon into the trigger window and click edit)
Time of day (you can randomize around the time of day)
Sunrise or Sunset (you can choose a + or – offsets)
Page 12 of 28 HouseLinc - Rev: 2/14/2013 5:03 PM
Page 13

INSTEON – (From the devices panel, drag the INSTEON device (or button) into the trigger
window and click edit)
X10 Commands – (Drag the X10 icon into the trigger window and click edit)
Conditions
Once triggered, the conditions are evaluated and if True, the Actions are carried out
Calendar – Choose to have the event activate only on certain days of the week
Clock – Choose to have the event activate only during a chosen time range, or when it is light or
dark (based on the local sunrise / sunset)
INSTEON Device State – Click edit to set a state value and then what logical test you wish to
confirm. Logical tests include:
= equals to
> greater than
< less than
>= greater than OR equal to
<= less than OR equal to
<> not equal to
o (Examples might include; device brightness level is = 50%, or > 20% or < 30% or >= 40%
or <= 80% or not equal to (<>) 100%.
HouseLinc will query the device when the event is triggered to perform the conditional test.
Actions
Steps which are executed when an Event is Triggered and all Conditions test true. Each step is executed
in the order in which they are displayed.
Scene Control – Turn a Scene On or Off (drag a scene into the Actions window and click edit)
INSTEON Device – Control a device already in your devices list. Example commands to send
include; On, Off, Beep, Set LED Brightness
1
, etc. (drag INSTEON device or button into the
Actions window and click edit)
Pause – Halts execution of Actions for a desired period of time (drag clock icon into Actions
window and click edit)
Email – Sends email to configurable address with customizable subject line and body text (drag
the envelope icon into the Actions window and enter details)
Send INSTEON Command – Advanced users can send custom co mmands (Direct Standard or
Direct Extended) to any device ID.
Create an Event
3) Click the Events tab
4) Click “Add Event” to create a new event or highlight an existing event and click “Edit Event” to make
changes
5) If you chose “Add Event”, name the event in the “Name of event” field
6) Set the Trigger by dragging the INSTEON device/button, Clock or X10 Icon into the Triggers window
(hint: you create multiple, independent Triggers to a scene)
1
NOTE: Setting the LED brightness does not turn on the device’s LED if it is off. If you would like
the event to turn on the LED as well, this can be set as a second action in the event.
Page 13 of 28 HouseLinc - Rev: 2/14/2013 5:03 PM
Page 14

7) Set Conditions by dragging an INSTEON device, the Clock icon or the Calendar icon into the
“Condition(s)” pane (hint: you can create multiple conditions)
8) Select Actions by dragging Scenes, INSTEON devices/buttons, Clock icon (for pauses), Email or
INSTEON icons into the “Action(s)” pane
9) When you are finished creating the event, click “OK” to save settings
Modify an Event
1) Click the Events tab
2) Click on the Event you wish to modify
3) Click the Edit Event Button
4) Click on the trigger, condition or action you wish to edit or remove
a. Click its “Edit” button to modify
b. Click on the “X” to the right to remove
Run / Test an Event
1) Click the Events tab
2) Click on the Event you wish to run / test
3) Click on the Test Button
IP Camera Support
HouseLinc allows you to capture IP Camera images and send them via email to you as part of an event.
For example: when the front door motion sensor is triggered, have HouseLinc email you a snapshot from
the front door IP Camera.
Adding an IP Camera
1) Click on the dropdown arrow and select Add Camera or select Devices->Add Camera Click on the
Event you wish to run / test
Page 14 of 28 HouseLinc - Rev: 2/14/2013 5:03 PM
Page 15

2) Configure the IP Camera within the Properties tab
Add the properties information as you
would with any other device but under
the Setting section, enter the following
information:
Camera URL (LAN) = local internet
address – camera
Camera URL (WAN) = global internet
address – camera
Login Required = Checked if camera
is password protected
User Name = set up to access the
camera
Password = set up to access the
camera
Page 15 of 28 HouseLinc - Rev: 2/14/2013 5:03 PM
Page 16

3) After you have entered the camera URL, HouseLinc will attempt to locate the IP Camera image at the
location provided by the user.
4) After the search, HouseLinc will display a selection to the user to confirm it's findings:
Note: different IP cameras support different functions. For example, the dialog below is for a camera
that supports Pan and Tilt along with different camera resolutions.
Page 16 of 28 HouseLinc - Rev: 2/14/2013 5:03 PM
Page 17

5) If your IP camera offers directional controls (Pan, Tilt, Zoom), you can control them from HouseLinc
Pan, Tilt
Controls
+ = Zoom In
- = Zoom Out
Using the IP Camera as an Action in an Event
Set up HouseLinc to email you a snapshot of your IP camera whenever your motion detector sees motion
or based on a time schedule.
1) Create a new event
2) Set up your Trigger and Conditions (e.g., Clock: 6AM, Motion Sensor: ON, etc.)
3) Drag and drop the camera as an Action
If you have not yet configured your email settings you will be prompted to do so.
Page 17 of 28 HouseLinc - Rev: 2/14/2013 5:03 PM
Page 18

Once you have entered your email settings, HouseLinc will prompt your to configure an email that will
be sent along with the IP camera image.
Save when done.
Page 18 of 28 HouseLinc - Rev: 2/14/2013 5:03 PM
Page 19

4) Click OK to save the Event
5) Test the event to make sure you receive the email with the IP camera image attachment
Activity Log
Click on the Activity log on the right hand pane to view a log of INSTEON commands in your home. A
detailed log file can also be viewed by clicking on the link near the top of the page. Note: You may notice
duplicate messages as wireless devices send their command twice.
Other HouseLinc Features and Functions
Saving Configuration
Your Home’s configuration / settings are stored:
A) on Your hard drive - There are 3 ways to save your settings/configuration to your hard drive
1) Automatically (HouseLinc will save every few minutes while making changes)
2) Exit HouseLinc
3) Click on the
B) In your INSTEON devices – which happens one of many ways
1) Most changes are saved in the background, automatically as you work
2) You can right-mouse click on a device in the device list and choose “synchronize device ”
3) You can click on the Tools drop down and select “synchronize house” (this may take a while
depending upon the number of devices)
Icon
Backing Up Configuration
Save using this method only if you need to back up the HouseLinc settings file.
1) Select File Save As… to back up the HouseLinc configuration
2) Select the desired file location, name it, and then click “Save”
Updating HouseLinc
Smarthome regularly publishes updates to HouseLinc. It is recommended to install updates a s so on as
they become available, as they will contain new features, additional product support and overall
improvements. NOTE: An Internet connection is required to receive updates.
HouseLinc software automatically checks for updates:
When the program is installed
When manually check (from Tools Check for Updates)
Every 24 hours, when running
Updating Instructions
Page 19 of 28 HouseLinc - Rev: 2/14/2013 5:03 PM
Page 20

1) If the HouseLinc Updates window is
not open, select Tools Check for
Updates
2) Click “Download”
NOTE: If no updates are available,
there will be “Check” in place of
“Download”.
3) Click “Install”
The HouseLinc Setup wizard will
appear
4) Click “Next” to continue the wizard
5) Select your HouseLinc installation folder and click Next
6) Click Next
The HouseLinc update will begin installing
7) When installation is complete, click “Close”
Removing a Device
HouseLinc has the ability to remove a device not only from the Devices list, but remove any links to it from
all devices in the Devices list. If you are replacing a device and want all links to be copied to the new
device, see Using the Swap Device Feature.
1) Right-click on the device you want to remove, and select
“Delete”
An "Are you sure?" dialog box will appear
2) Click “Yes” to continue or “No” to cancel
If you choose “No”, the dialog box will close
and return to the HouseLinc home screen. If
you choose “Yes”, HouseLinc will remove this
device from the Devices list and begin
deleting its links
Page 20 of 28 HouseLinc - Rev: 2/14/2013 5:03 PM
Page 21

NOTE: The software will find this device again if linked to from any other devices
Swap Device
If you are replacing (or upgrading) a device, you can use this feature
to:
Copy links from one device to the other
Update the events / timers to work with the new device
Delete links to and from the device being replaced
1) Be sure you have added the device. See Adding Devices Using Auto link or Adding Devices
Manually Using Their INSTEON IDs.
2) Right-click on the device being replaced in the Devices list and select “Swap”
3) Click Next to begin the Swap Device wizard
4) Read the “Important Note” and click “Next”
5) Check the box next to the device
you’ll like to copy the links to and
click “Next”
HouseLinc will run a basic
compatibility test between the
new device and the device
being replaced
7) Once compatibility has been
determined, click “Next”
Page 21 of 28 HouseLinc - Rev: 2/14/2013 5:03 PM
Page 22

8) Check the box next to each of
the desired options and then
click “Finish”
HouseLinc will begin making
changes to the INSTEON
network
9) Click “OK” to exit
Page 22 of 28 HouseLinc - Rev: 2/14/2013 5:03 PM
Page 23

Synchronize Device
HouseLinc will read-in any manual changes you might have made locally, at the device (e.g., changed the
local on-level). Synchronizing a device makes sure that HouseLinc has and displays the most current
information for the device. Note: HouseLinc will read the device and compare its database with
HouseLincs database. A comparison of that data determines whether HouseLinc keep s or deletes
links/settings.
1) Right-click on the device you wish to synchronize in the Device s list and select “Synchronize Device”
If the device needs to be synchronized, you will see a status update in the lower corn er bar of
HouseLinc
Synchronize the Whole House
1) Click on the Tools Drop down menu
2) Click on Synchronize House
Page 23 of 28 HouseLinc - Rev: 2/14/2013 5:03 PM
Page 24

HouseLinc will begin synchronizing all devices in the house. Please note that this proce s s takes
over one minute per device, on average.
3) Once the synch is complete you can click on Reports, Synchronization Report to view a complete
record of the synchronization (you can follow the same steps to view a report on the portion of the
synch that has already been performed even while it is running – and repeat to update report)
Phase Bridging with Dual-Band PLM
1) Start Phase Bridging Detection Mode by tapping the Set button on PowerLinc Modem four times
quickly
PowerLinc Modem will begin beeping continuously and the Status LED will be solid green
2) Check the LED behavior of the other dual-band devices to see if they are on the opposite phase
If at least one of the other dual-band device LEDs is blinking green
2
, continue to step 3
Otherwise, move dual-band devices until at least one of them exhibits the desired LED behavior
3) Tap the Set button on PowerLinc Modem to exit Phase Bridging Detection Mode
PowerLinc Modem will stop beeping and its Status LED will remain solid green
Running Signal Diagnostics
Signal Diagnostics measures the signaling statistics to each device. This tool helps to confirm that your
INSTEON network is properly configured, that devices are in range and that it will work as expected. If
the statistics measured are not acceptable, typically all that is required is the addition of one or more
FilterLincs and/or dual-band INSTEON products (such as an Access Point).
1) Click on the Tools Drop down menu
2) Click on Advanced
3) Click on Signal Diagnostics
4) Click on the DeviceName column header to sort alphabetically
5) Click on the Start Button
HouseLinc will begin 100 tests of each always-on INSTEON device in your home. It will test both
standard and extended length messages. Results are displayed in the SD Success and ED
Success Columns. Sequential test data for each device is listed in the lower pane.
6) We recommend that if any of your devices test out at below 99%, you consider adding additional
INSTEON devices (for hopping messages) and/or powerline FilterLincs to reduce noise and signal
attenuation in your home.
For more on signal diagnostics read Resolving INSTEON Network Issues Using HouseLinc Diagnosics.
2
or is bright solid white or blue, the device is on the opposite phase
Page 24 of 28 HouseLinc - Rev: 2/14/2013 5:03 PM
Page 25

Troubleshooting
Problem Possible Cause Solution
The settings change I
made on the device did
not take effect.
The device may need
to synchronize with
HouseLinc.
Right-click the device in the Devices List and
choose Synchronize Device.
I am unable to detect my
PLM
Plug-in or wired-in device
won’t synch with
HouseLinc
Battery powered device
won't synch with
HouseLinc
USB Drivers not
installed correct
Product may be out of
range
Unit may need to be
reset
Device was factory
reset and lost it's link
to HouseLinc
Product may be out of
range
Unit may need to be
reset
Download and install the latest USB drivers and
restart HouseLinc.
http://www.insteon.com/houselinc.html
Install FilterLincs or additional dual-band INSTEON
products to improve signaling
For plug-in devices, unplug the unit for 10 seconds
and then reinstall
For wired-in devices, use the air gap (pull the Set
button out as far as it will go or turn off circuit
breaker), wait 10 seconds and then push back in
or turn on circuit breaker.
Re-link to HouseLinc
Try moving the device closer to a dual-band device
or add additional dual-band INSTEON products to
improve signaling
Remove the battery, wait 10 seconds and then
reinstall. If the battery is non-removable use its
power switch to cycle power for 10 seconds.
Device was factory
reset and lost it's link
Re-link to HouseLinc
to HouseLinc
If you are in a time zone other than PST, doubleclick the time in the system tray and set the time to
the correct local time. Also be sure to adjust
daylight saving time settings as appropriate for
your time zone.
Events that are based on
time are happening at the
wrong time.
The time for the
HouseLinc system
may be set for the
incorrect time zone.
If you have tried these solutions, reviewed this Owner’s Manual, and still cannot resolve an issue you’re
having with HouseLinc, please call: 866-243-8022
Move HouseLinc to Another Computer
On the original computer:
1) Go to Start Programs HouseLinc View Data Folder
2) Open the Settings folder
3) Find the file “HouseLinc.settings.xml” and save to flash drive (or other).
Page 25 of 28 HouseLinc - Rev: 2/14/2013 5:03 PM
Page 26

BE CAREFUL: Many file names may be similar. Be sure you are saving the correct one.
On the new computer:
4) Be sure HouseLinc is properly installed, but not running. Open HouseLinc and then manually exit
(go to File Exit) to be sure HouseLinc is not running.
5) Go to Start Programs HouseLinc View Data Folder
6) Open the Settings folder
7) Place the HouseLinc.settings.xml file you saved from your old computer into the Settings folder
Your computer will ask if you want to replace the existing file with the new one
8) Overwrite/replace the existing HouseLinc.settings.xml file
9) Open HouseLinc
HouseLinc will display all the devices and configurations from the old computer
Releasing COM Ports in Windows Operating Systems
Windows operating systems will assign COM ports to devices that have been attached to the computer.
This most commonly happens with “virtual COM port drivers” that are actually USB products, but appear
to be COM ports to the computer (such as a PowerLinc Modem).
When the PowerLinc Modem is first connected to the computer, the operating system automatically
assigns a COM port number. This COM port number might be high, such as COM 11. A problem can
arise if the software only allows a limited range of COM ports, for example COM 1 through 8. Additionally,
each PowerLinc Modem contains a unique serial number burned in to the USB interface chip by the IC
manufacturer. If different PowerLinc Modems are connected to a computer, each one attached will cause
a new COM port to be reserved by Windows.
Try the following steps to release Windows-reserved COM ports from previously released hardware that
is no longer in use:
1) Go to Start Programs Accessories Command Prompt
2) At Command Prompt, type the command “set devmgr_show_nonpresent_devices=1” and hit Enter
3) Type “start devmgmt.msc” and hit Enter
4) Once Device Manager opens, go to View Show hidden devices
This will display devices that are not connected to the computer but still have space reserved for them
by Windows.
5) Expand the Ports (COM & LPT) section
6) Remove all devices in the list of ports that are grayed out but have a specific COM port number
assigned to them. Right-click on the grayed-out device, choose Uninstall and then click OK in the
dialog box.
7) When you are finished removing the devices, close Device Manager
8) At Command Prompt, type “exit” and hit Enter
Page 26 of 28 HouseLinc - Rev: 2/14/2013 5:03 PM
Page 27

Specifications, Certification, and Warranty
Brand INSTEON
Devices
PLM Links (max) 1,000
Devices (max) Only constrained by maximum number of PLM Links
Scenes
PLM Scenes (max) 256
Managed Network Scenes 10,000
Members Per Scene 1,000
Membership Types Controller only, Responder only and Both
Nested Scenes Not supported at this time
Manual Scene Setting Supported - Type in on levels, ramp rates, etc.
Automatic Scene Setting Supported - Simply adjust members to their desired states and "read"
into the scene
Events
Maximum Timer Events > 1,000
Timer Event Types Time of Day, Sunrise and Sunset
TOD Event Adjustments + or - up to 15 minutes random
Sunrise/Sunset Event
Adjustments
Sunrise/set Calculation Location based
Location Entry City & State (1,000 choices) or Lat/Lon Entry
Celestial Clock Yes
Maximum INSTEON
Triggered Events
INSTEON Trigger Types
On Pressed
Off Pressed
On Double-tapped
Off Double-tapped
Conditionals Event level
Conditional Types Day of week, INSTEON Device Status (polled at time of event trigger)
Time of day range
Night or Day (based on celestial clock)
Device state (On, Off, Relay Closed, Relay Open, On level =, > or < a
Up to 23 hours before or after
> 1,000
Selectable level, Thermostat mode and Temperature =, > or < a
Page 27 of 28 HouseLinc - Rev: 2/14/2013 5:03 PM
Page 28

Selectable level.
Action Types INSTEON Scene, INSTEON Command, Email/SMS, Timed Pause
Maximum Actions > 100 per event
General
Autostart Upon PC Startup Configurable
Autosynch House Upon
Configurable
Launch
Politeness Configurable (1-10,000 milliseconds)
Application Retries Configurable (0-10)
INSTEON Technology Patent
U.S and International Patents Pending (see www.insteon.com)
© Copyright 2013
INSTEON, 16542 Millikan Ave., Irvine, CA 92606, 866-243-8022
Page 28 of 28 HouseLinc - Rev: 2/14/2013 5:03 PM
 Loading...