

INSTEON HD WI-FI CAMERA Owner's Manual

Insteon HD Wi-Fi Cameras
Owner’s Manual

Contents
Getting Started
HD Wi-Fi Camera 4
Overview
Installation 5
Mounting 6
HD Outdoor Wi-Fi Camera 7
Overview
Installation 8
Mounting 9
Insteon app for iPhone, iPad and iPod touch
Congure a Camera for Wired Ethernet 11
Congure a Camera for Wi-Fi 13
Add an Already Congured Camera 15
Add a Remote Camera 18
Advanced Camera Conguration 20
Automatic Remote Access 23
Insteon app for Android
Congure a Camera for Wired Ethernet 25
Congure a Camera for Wi-Fi 27
Automatic Remote Access 30
Web Browser Interface
Web Interface 32
Firmware Update 34
Factory Reset
Indoor Camera 36
Outdoor Camera
Appendix
Specications 38
Troubleshooting 41
Certications and Warnings 42
Declaration of Conformity 43
Product Warranty 44

Getting Started
Everything you need to quickly get up and running.
3
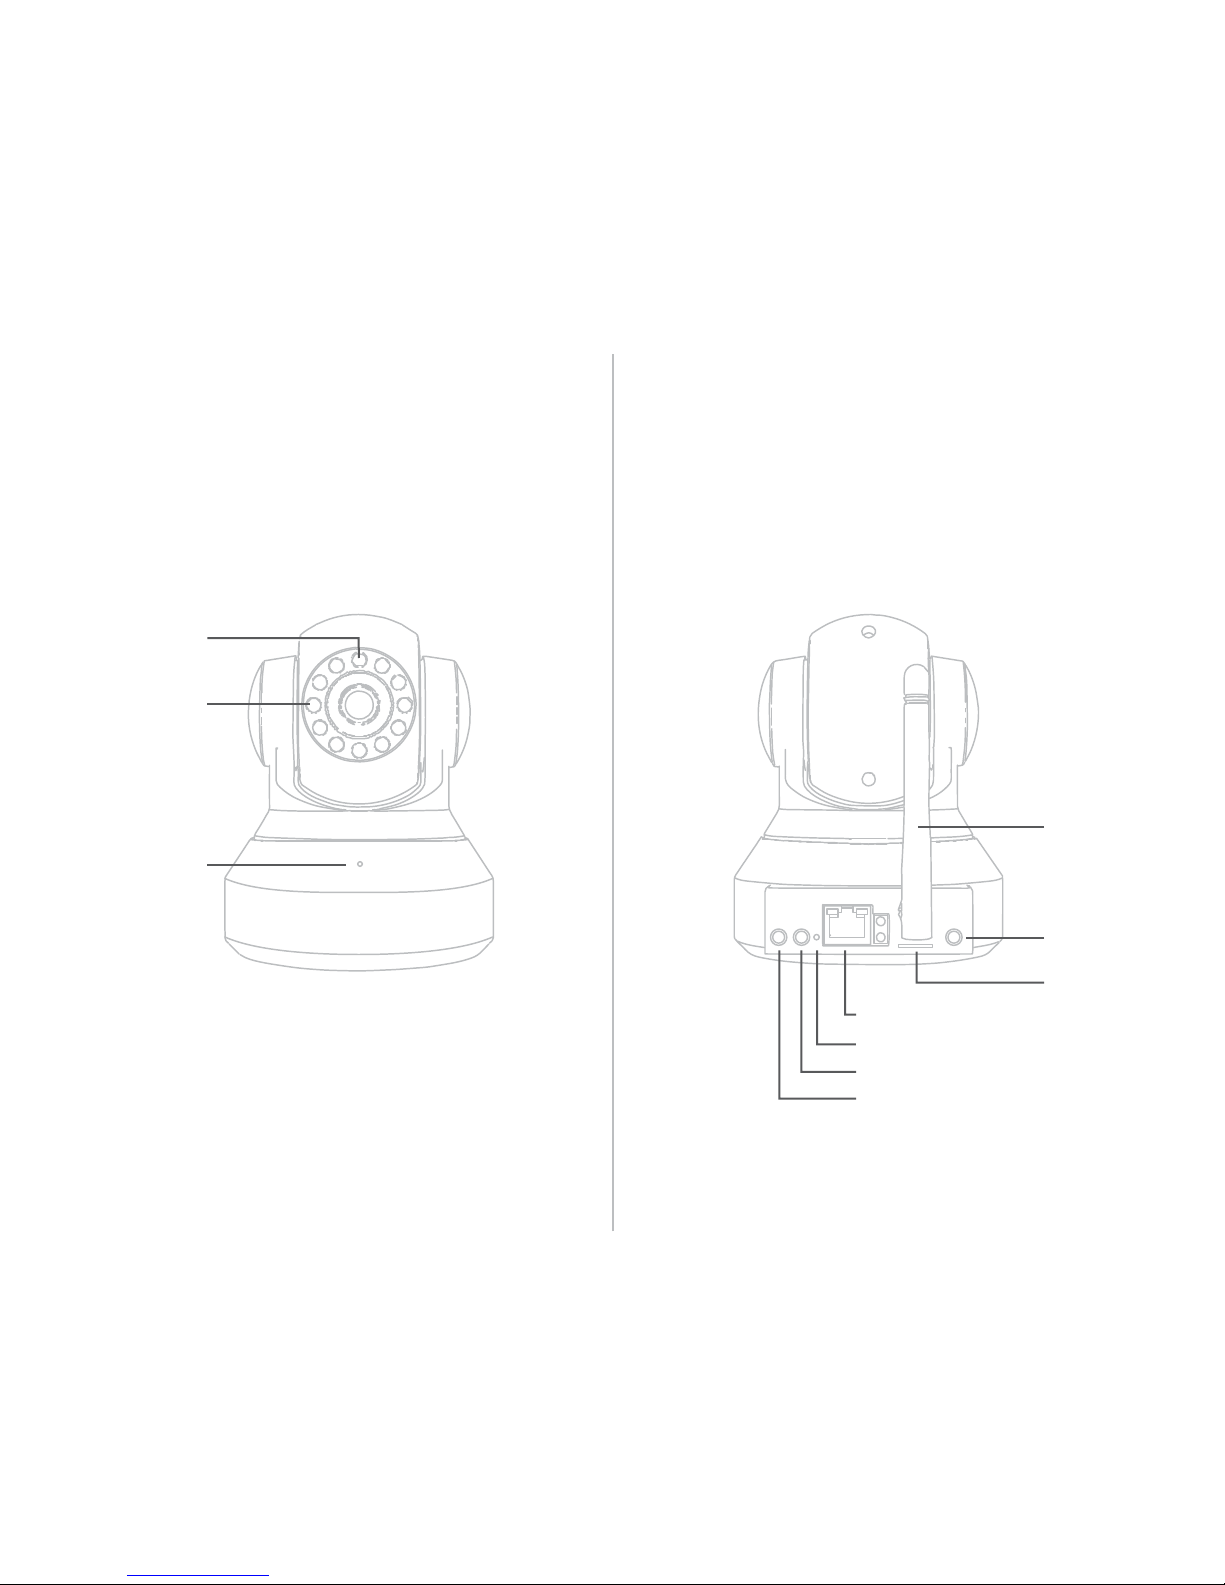
Day/Night Sensor
HD Wi-Fi Camera
Overview
BackFront
IR LEDs
Microphone
10/100 Ethernet
WPS Button
External Microphone
External Speaker
Wi-Fi Antenna
5V Power
Micro SD
Card Slot
4
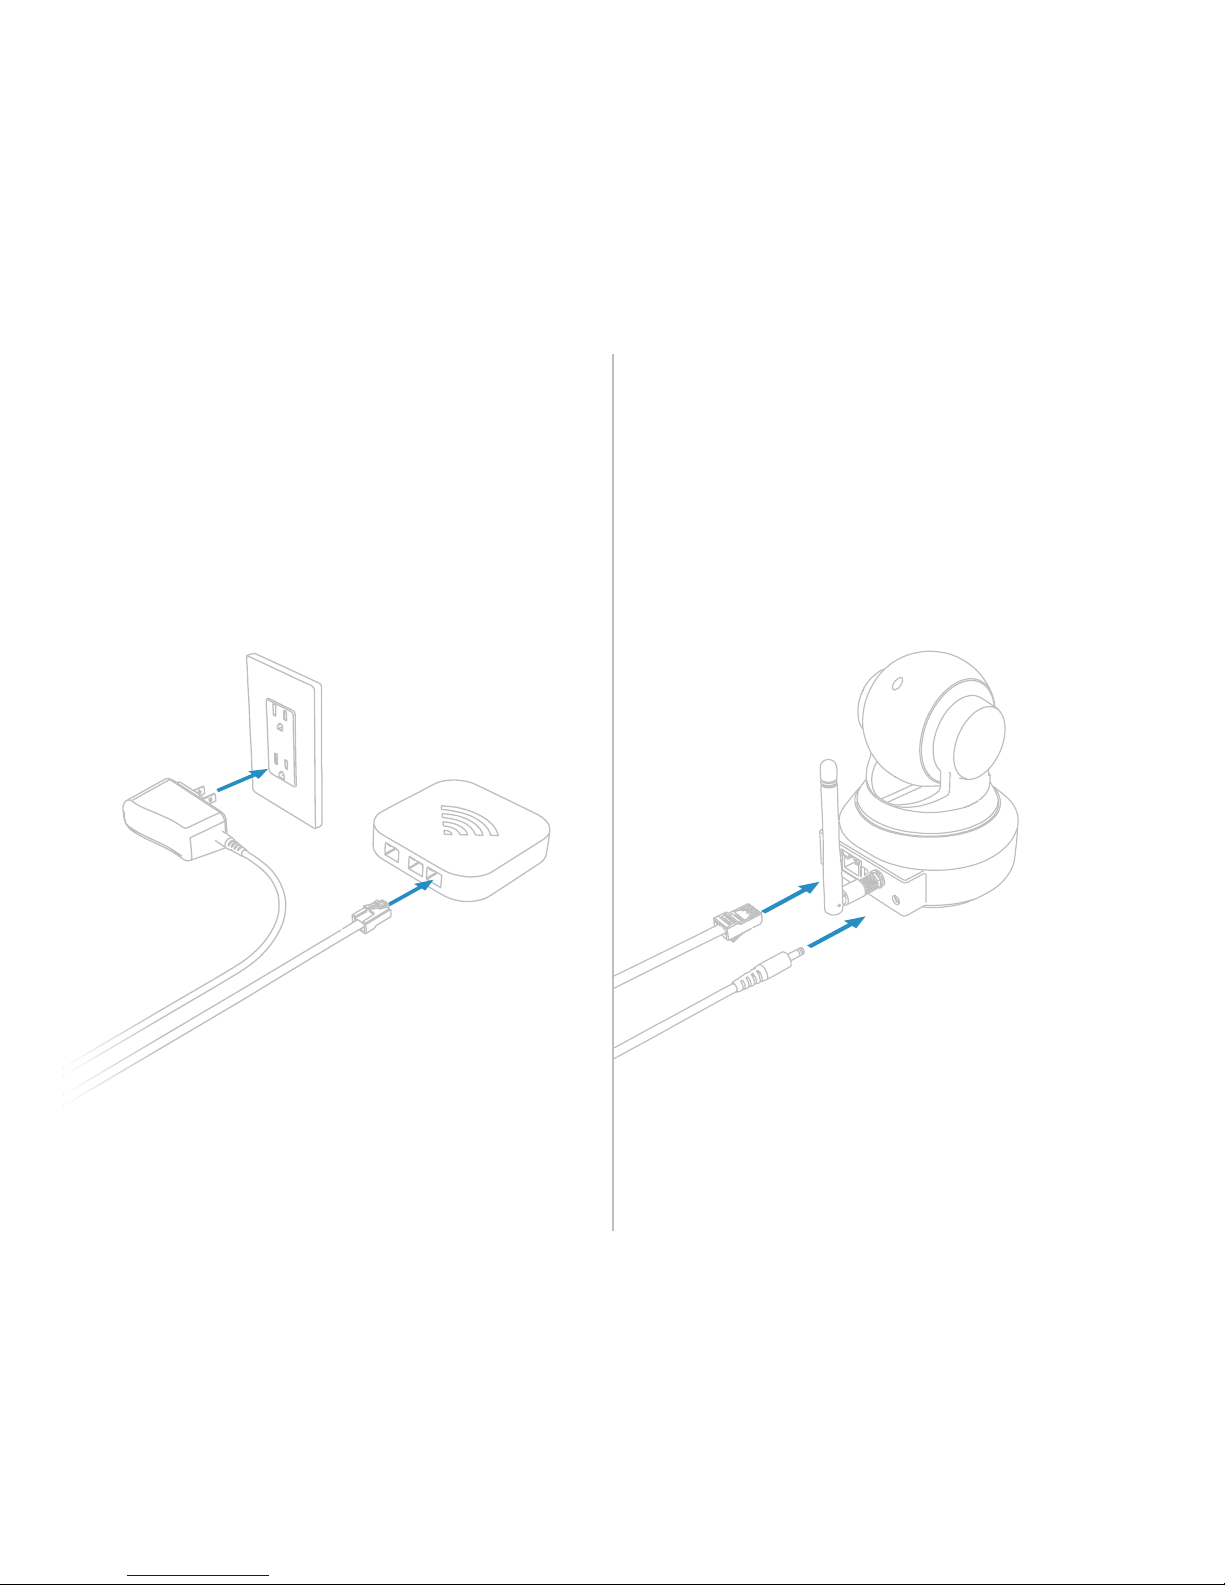
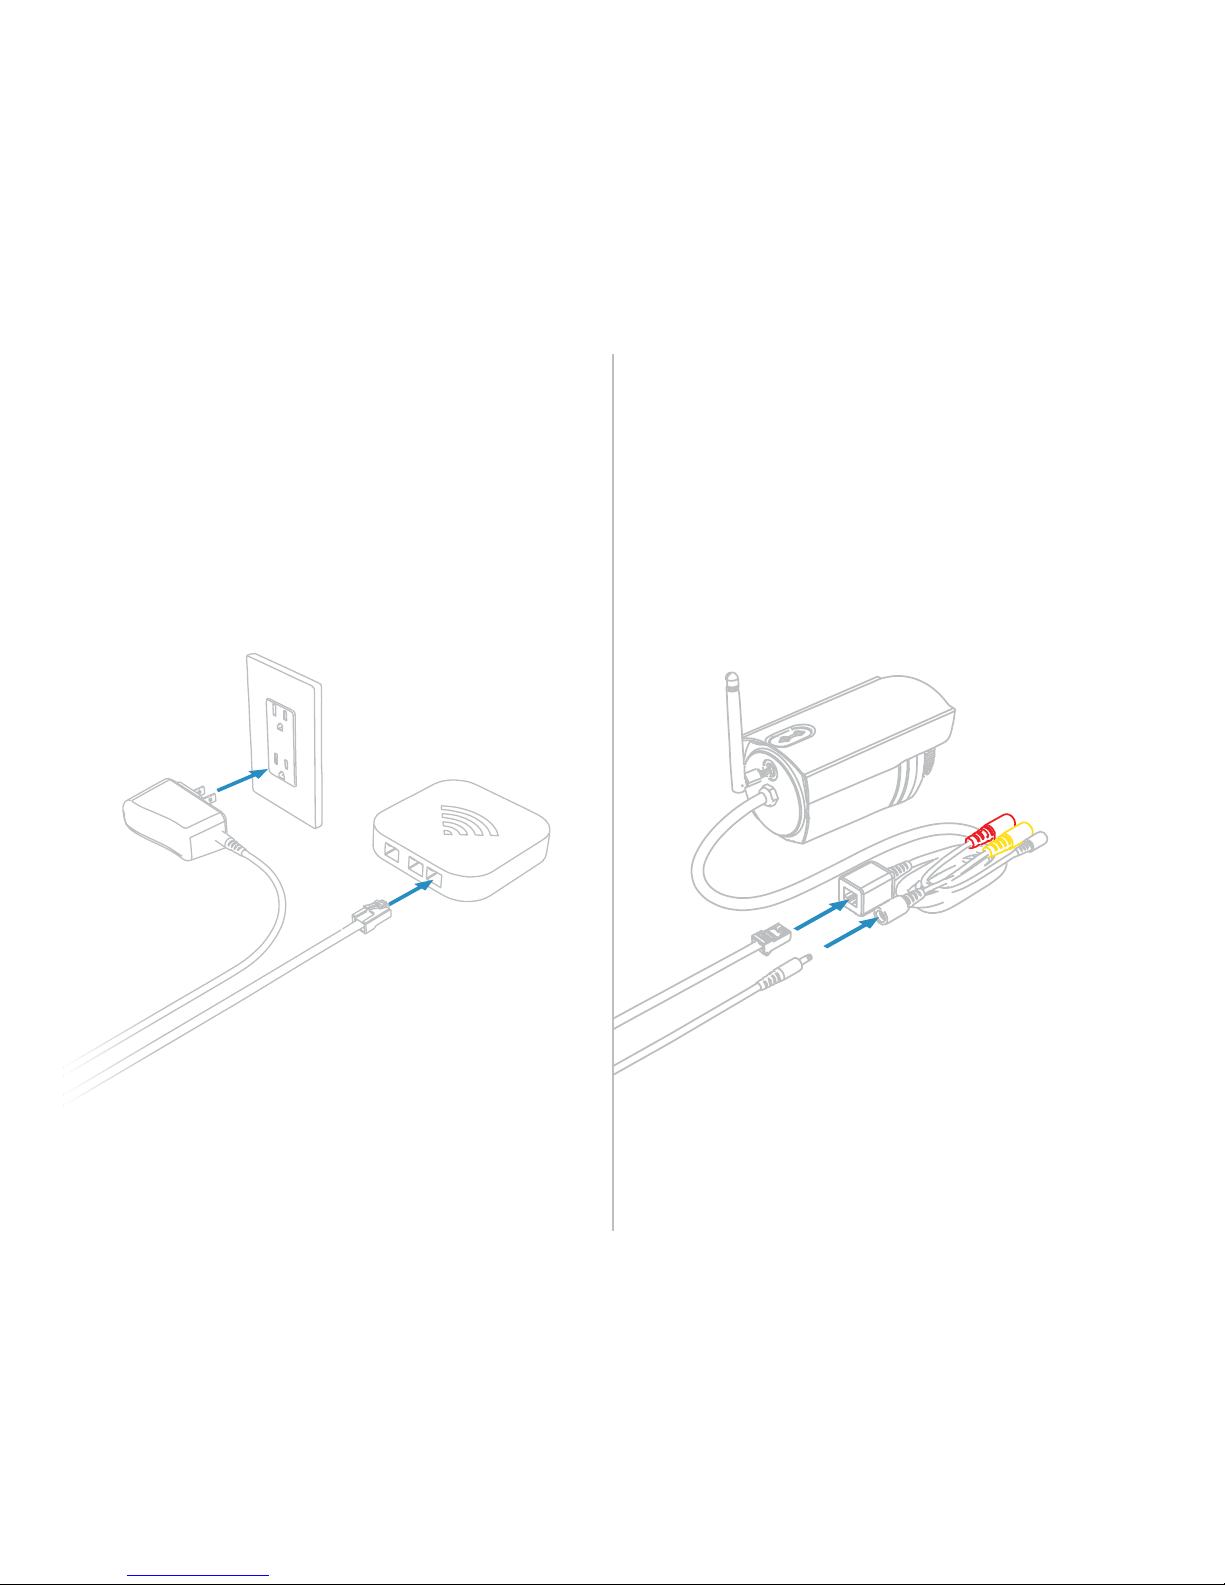
Connect the power adapter to an outlet and
connect the ethernet cable to your router.
HD Wi-Fi Camera
Installation
Camera ConnectionsOutlet Connections
Connect the antenna, ethernet cable and DC
power connector to your camera.
5
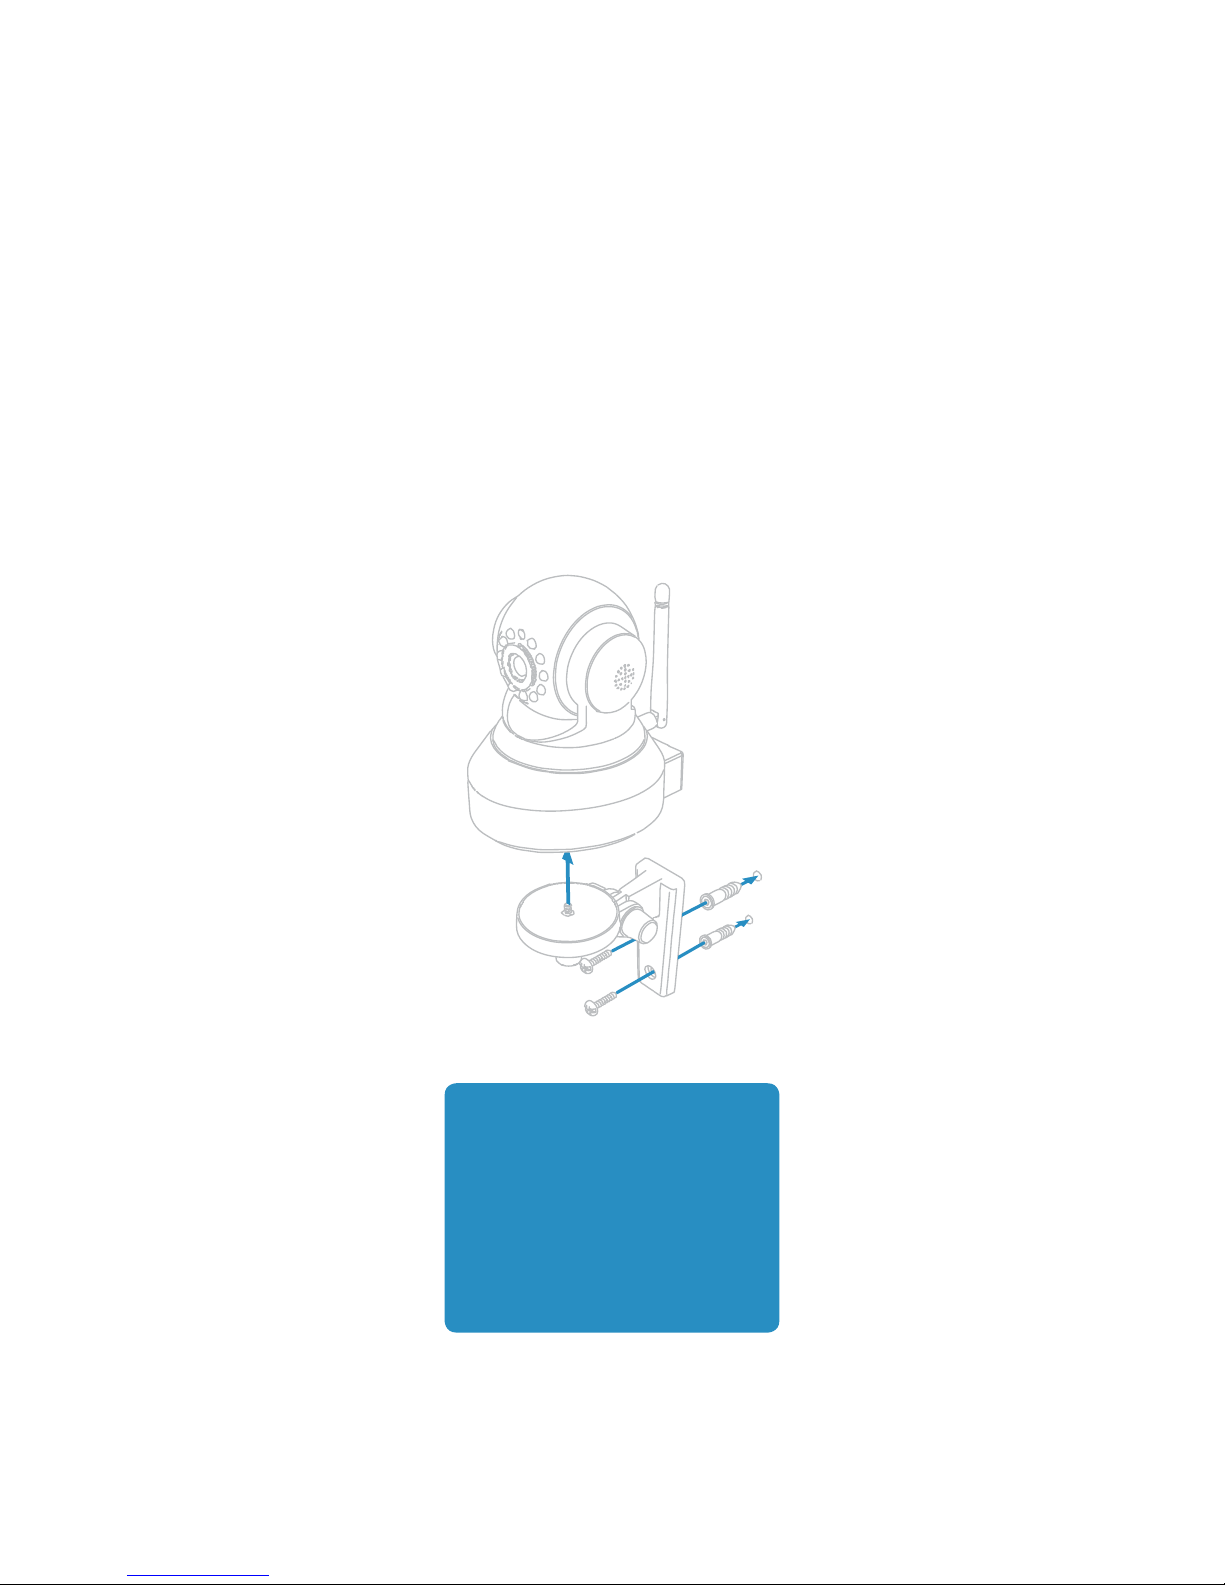
HD Wi-Fi Camera
Mounting
Mounting Bracket
Mount the optional bracket using screws and wall
anchors. You can position the camera right-side
up or upside down.
Dierent wall materials
?
require dierent screws
and anchors. Use the
appropriate type for your
mounting surface. Drywall
screws and anchors have
been provided. Use caution
when drilling holes in
walls that may contain live
electrical wires.
6
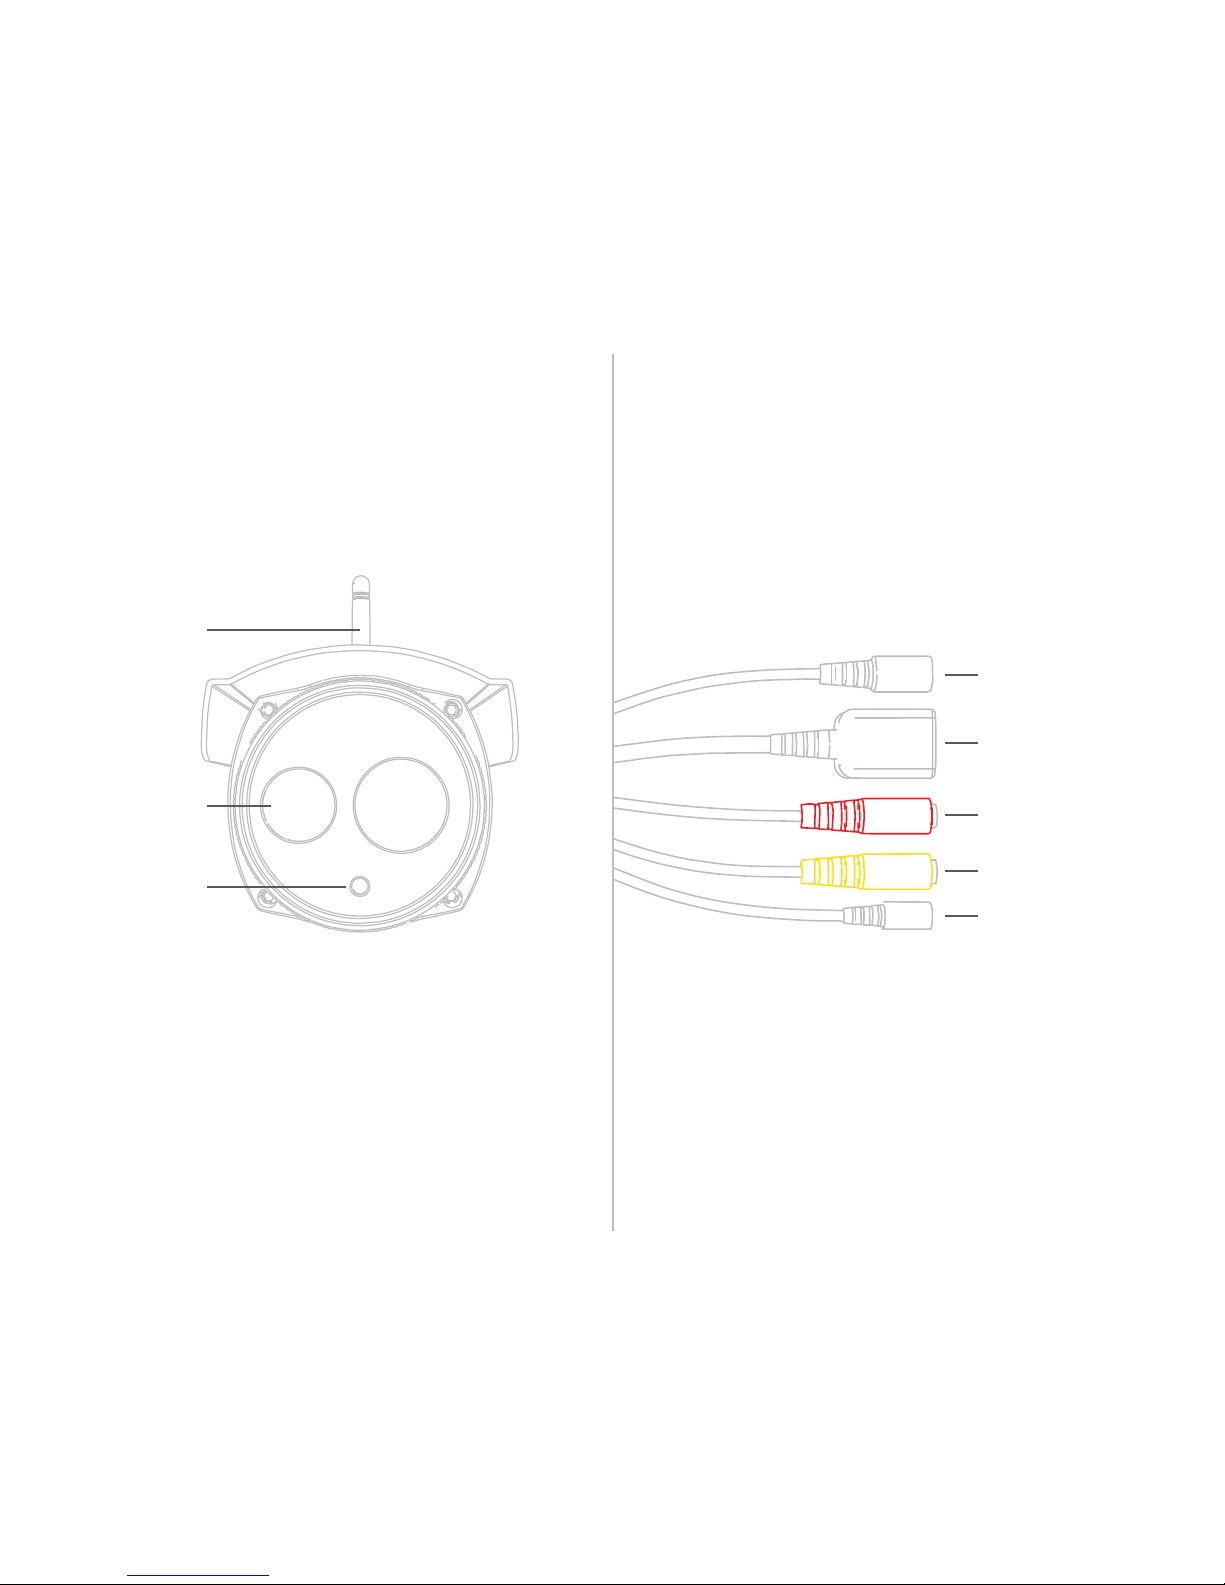
Wi-Fi Antenna
HD Outdoor Wi-Fi Camera
Overview
Cable BundleCamera
12V Power
IR LED
Day/Night Sensor
10/100 Ethernet
External Speaker
External Microphone
Reset Button
7
HD Outdoor Wi-Fi Camera
Connect the power adapter to an outlet and
connect the ethernet cable to your router.
Installation
Camera ConnectionsOutlet Connections
Connect the antenna, ethernet cable and DC
power connector to your camera.
8
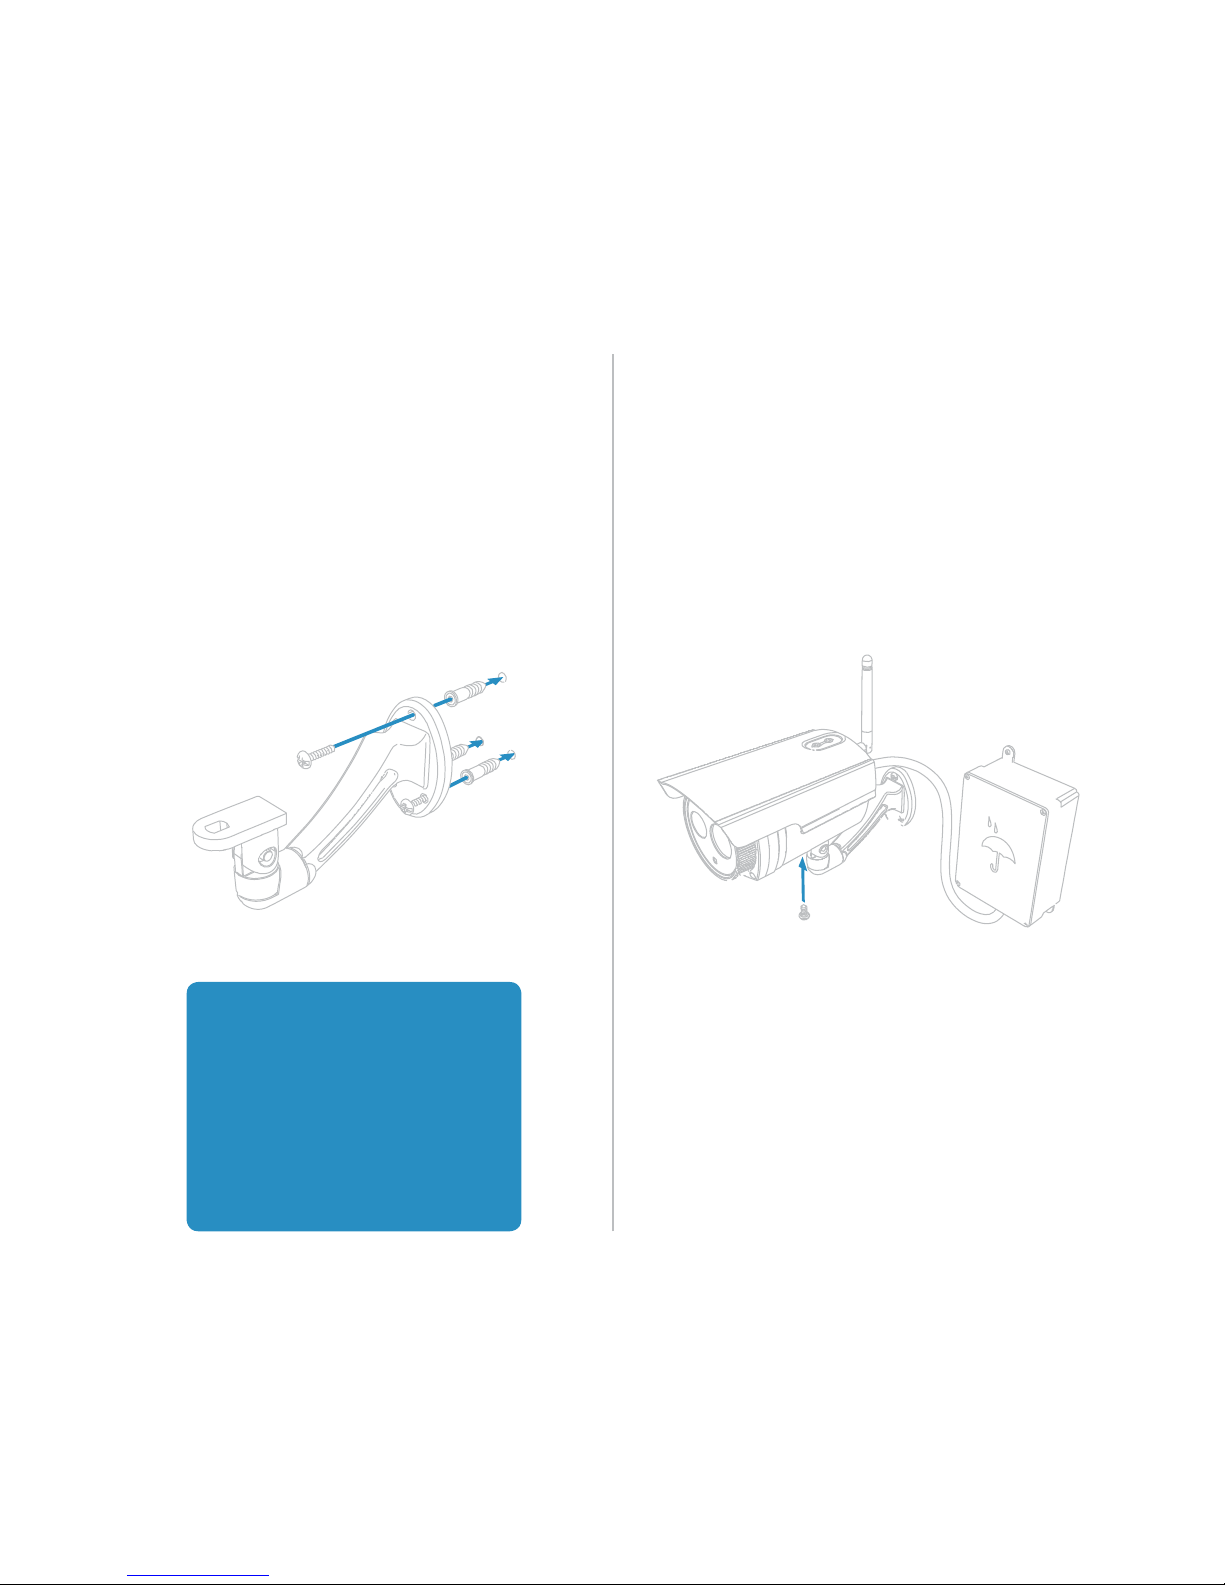
Mount the bracket using screws and wall
anchors. Set the camera’s position by
adjusting the various set screws with the
included hex key.
HD Outdoor Wi-Fi Camera
Mounting
Outdoor CamerasMounting Bracket
Ax the camera with the nal set screw.
Encase the camera cables in a weather-proof
electrical box.
Dierent wall materials
?
require dierent screws
and anchors. Use the
appropriate type for your
mounting surface. Drywall
screws and anchors have
been provided. Use caution
when drilling holes in
walls that may contain live
electrical wires.
9

Insteon app for iPhone, iPad and iPod touch
Use the Insteon app to congure and control your Insteon Wi-Fi Cameras.
Insteon HD Wi-Fi Cameras require Insteon Hub (2242-222) or (2245-222)
10

Congure a Camera for Wired Ethernet
iPhone, iPad and iPod touch
Launch the Insteon App
Tap Add a DeviceTap the drawer icon or swipe from
the right edge of the display to
open the drawer
Tap Camera Select the camera that you
If you have not already done so,
connect your camera to power and your
router using the supplied ethernet cable.
It can take up to two minutes for your
camera to complete its startup process.
When ready, tap Next.
would like to congure
11
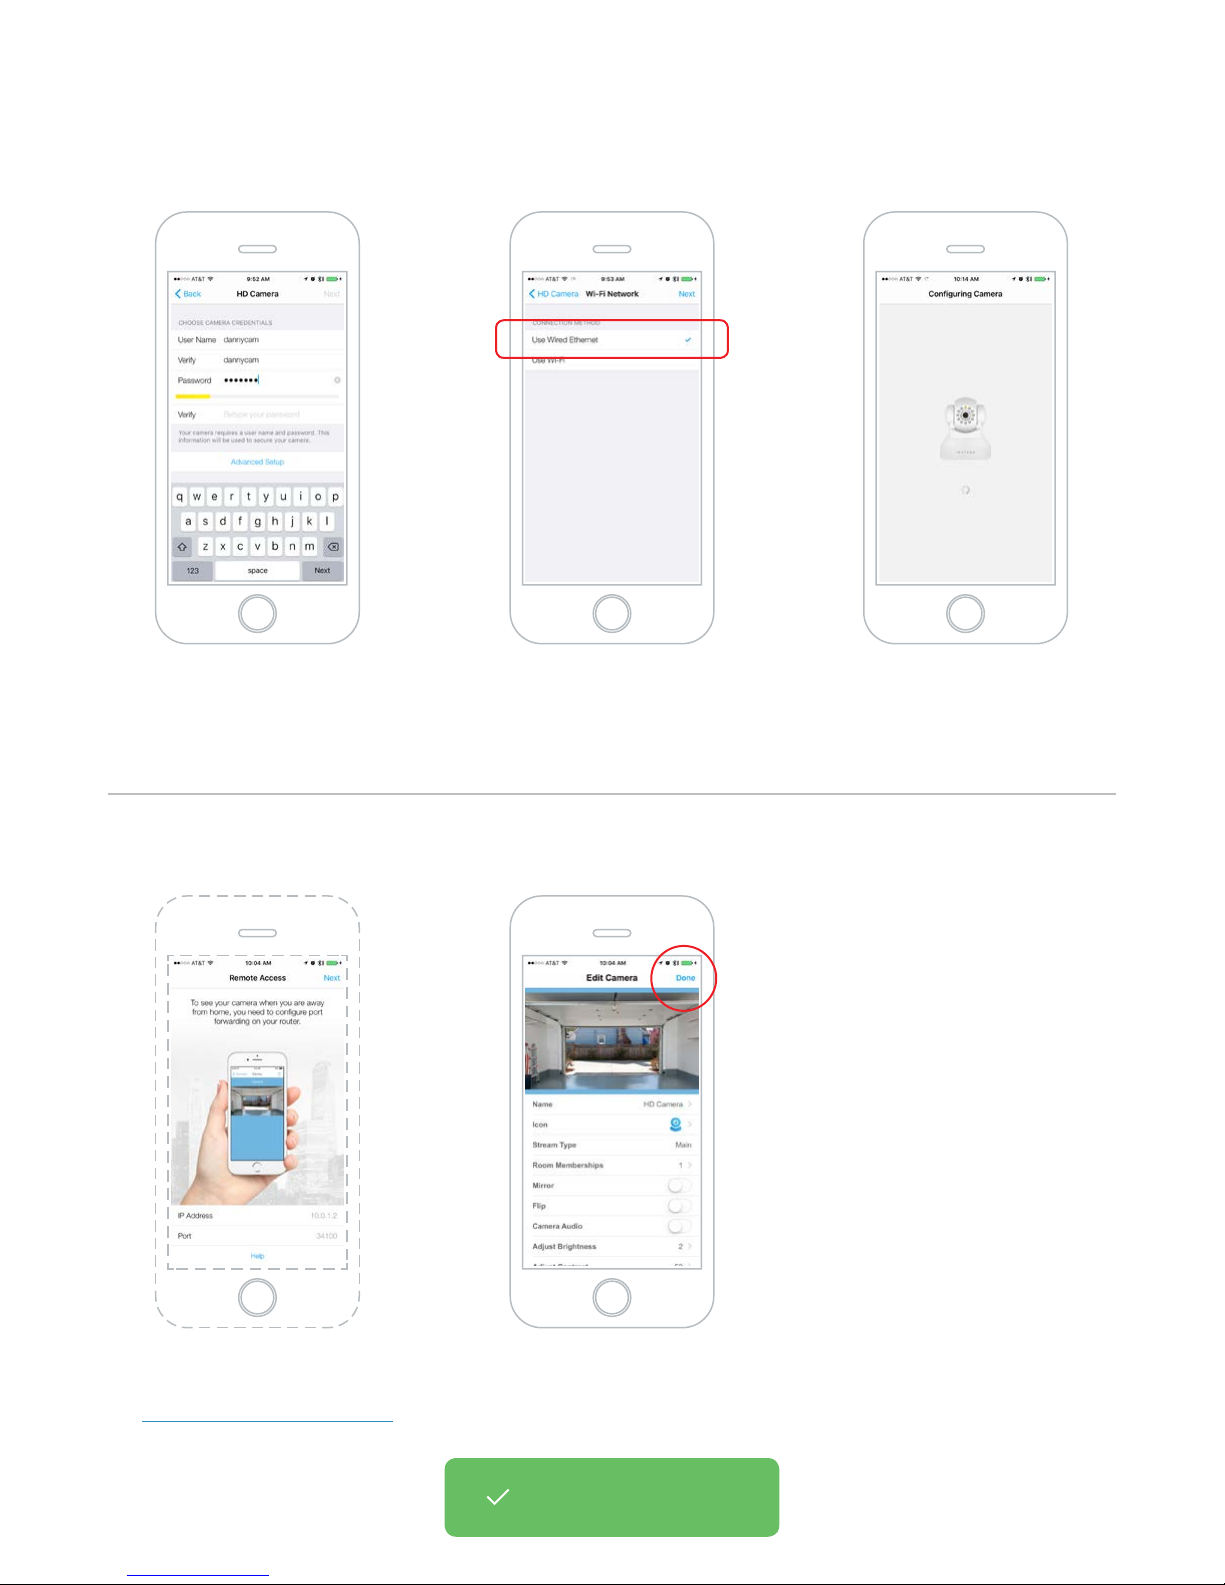
Congure a Camera for Wired Ethernet
iPhone, iPad and iPod touch
Give your camera a user
name and password. When
ready, tap Next.
Select Use Wired Ethernet
and then tap Next
Wait while your camera’s
settings are updated
If you are presented with information
about Remote Access, follow these steps
for Troubleshooting Remote Access.
Name your camera, select an
icon and add it to a room. When
nished, tap Done.
You’re done setting up your
Insteon Wi-Fi Camera.
12

Congure a Camera for Wi-Fi
iPhone, iPad and iPod touch
Launch the Insteon App
Tap Add a DeviceTap the drawer icon or swipe from
the right edge of the display to open
the drawer
Tap Camera Select the camera that you
If you have not already done so,
connect your camera to power and your
router using the supplied ethernet cable.
It can take up to two minutes for your
camera to complete its startup process.
When ready, tap Next.
would like to congure
13

Congure a Camera for Wi-Fi
iPhone, iPad and iPod touch
Give your camera a user
name and password. When
ready, tap Next.
Tap Use Wi-Fi and select your network
from the list. If you don’t see your
network, ensure that you’ve connected
the antenna to your camera.
Enter your Wi-Fi network’s
password and tap Next
Disconnect the ethernet cable from
your camera and restart the camera by
disconnecting and then reconnecting
your camera’s power cable. If you do
not disconnect the ethernet cable, your
camera will not switch to Wi-Fi.
If you are presented with information
about Remote Access, follow these steps
for Troubleshooting Remote Access.
Name your camera, select an
icon and add it to a room. When
nished, tap Done.
You’re done setting up your
Insteon Wi-Fi Camera.
14
 Loading...