

Page 1
Set button
Secondary
Quick Start Guide
Button
Type
Button LED
before Tap
Effect of First
Press and Hold
Effect of Subsequent Press and
Holds
(e.g. if last was brighten, it will dim)
(e.g. if last was brighten, it will dim)
Always On
Either
Brighten scene until release
Always Off
Either
Dim scene until release
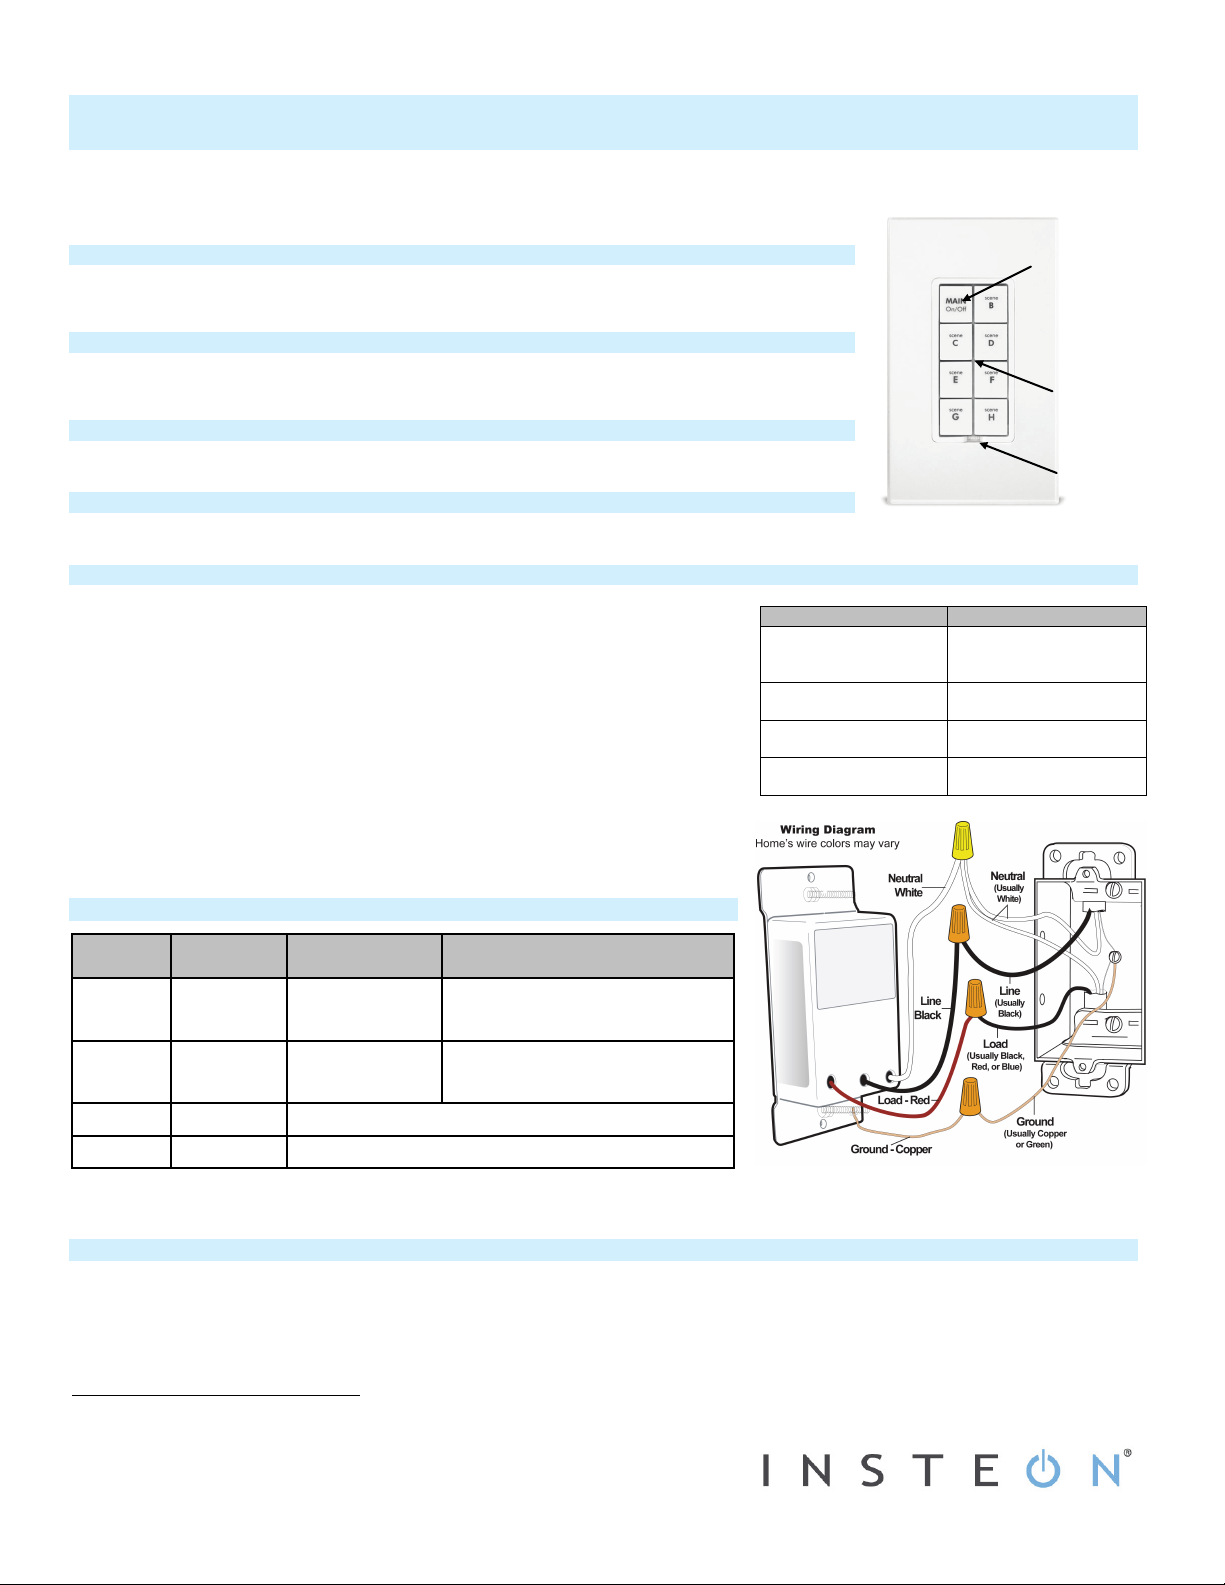
KeypadLinc Wire
Wall Box Wires
Ground
wire or green screw)
Neutral
(commonly white)
Load
(light, fan, etc.)
Line
(120V to ground)
MAIN
KeypadLinc™ Dimmer
INSTEON® Remote Control Keypad Switch
Model: 2486D – 8-button, Rev 5.0+
About KeypadLinc
Congratulations on your purchase of the elegant, high-quality KeypadLinc scene controller with built-in
dimmer. KeypadLinc stores up to eight INSTEON/X10 multi-device scenes. Additionally, each button has an
LED status indicator for virtually any INSTEON device or scene you wish to monitor.
Preparation
Installation should be performed only by a qualified electrician or a homeowner who is familiar and
comfortable with electrical circuitry. If you have any questions regarding installation, we suggest consulting an
electrician. If you have any questions regarding setup, contact INSTEON Support Line.
What’s in the box?
• KeypadLinc Dimmer (8-button)
• Four wire nuts
Tools Needed
• Flathead screwdriver • Phillips screwdriver
• Wire cutter/stripper
• Voltage meter
Installation
1) At electrical panel, turn off circuit breaker(s) and/or remove fuse(s) feeding wall box
(verify that power is off)
2) Remove wallplate from switch and unscrew switch you are replacing and gently pull out
3) Disconnect wires from switch
4) Turn power back on
5) Use a voltage meter to identify the line and load wires connected to the switch
6) Identify neutral and ground wires
7) Turn power back off
8) Connect wires as per table/diagram (confirm firm attachment with no exposed wire)
9) With button labels right-side up, gently place KeypadLinc into wall box and screw into
place
10) Turn power back on
KeypadLinc’s MAIN On/Off button and connected light will turn on
11) Verify KeypadLinc is working properly by toggling KeypadLinc’s MAIN button on and off
The load connected to KeypadLinc will respond appropriately
12) Reinstall the wallplate
1
Bare Copper
White
Black
On/Off
button
(commonly bare, green
Red
Using KeypadLinc Dimmer
Toggle Off
Toggle On
Notes:
• On an 8-button KeypadLinc, connected light(s) will react just like the scene responders to button taps of MAIN On/Off.
• LED will mimic the on/off status of a dimmer whose scene level is 100% bright.
Brighten scene
until release
Dim scene until
release
Opposite of last press and hold
Opposite of last press and hold
Add KeypadLinc Button to a Scene as an INSTEON Controller
Follow the steps below to control a scene (one or more INSTEON devices) from a KeypadLinc button
1) Tap the KeypadLinc button of choice
2) Press and hold KeypadLinc Set button until KeypadLinc beeps
KeypadLinc scene button LED will blink
3) Adjust the scene responder to the state you want when the scene is activated from KeypadLinc (e.g., 50%, 25% or even OFF)
4) Press and hold the responder’s Set button until it double-beeps (or until its LED flashes)
1
If the wires cannot be detached by unscrewing them, cut the wires where they enter the switch, then strip ½” of insulation off the ends
2
If the responder is a multi-scene device such as a KeypadLinc, tap the scene button you wish to control until its LED is in the desired scene state (on or off)
Limited Warranty – INSTEON warrants to original consumer of this product for a period of 2 years from
date of purchase, this product will be free from defects in material & workmanship & will perform in substantial
conformity with its Owner's Manual. Warranty shall not apply to defects caused by misuse or neglect.
Protected under U.S. and foreign patents (see www.insteon.com) © Copyright 2012
INSTEON, 16542 Millikan Ave., Irvine, CA 92606, 800-762-7845
2
Page 2

KeypadLinc will double-beep and its LED will stop blinking1
Responder’s LED will stop blinking and it may double-beep
1
5) Confirm that scene addition was successful by tapping on/off on the KeypadLinc scene button
The responder will toggle between the scene’s preset on-level and off
6) If you wish to add more responders to the scene, repeat steps 1-5 for each additional scene responder
Add KeypadLinc Button to a Scene as an INSTEON Responder
1) Press and hold the scene controller button until it beeps2
Controller’s LED will blink
2) Tap the KeypadLinc button you wish to be a responder of the scene at least once
3) Tap the button again if necessary to get button’s LED to desired state for the scene (press and hold if adding the main scene at a dimmed level)
4) Press and hold KeypadLinc Set button until it double-beeps
KeypadLinc scene button LED will flash once and return to previous state
Controller LED will stop blinking and it will double-beep
3
5) Confirm that scene addition was successful by toggling the controller scene button on and off
KeypadLinc button LED (and load if main scene) will toggle on and off
Owner’s Manual and Tech Support
Owner’s Manual and current Quick Start Guide: http://www.insteon.com/support
Call: INSTEON Support Line at 800-762-7845
CAUTION: To reduce the risk of overheating and possible damage to other equipment, do not install to control a receptacle, a motor-operated appliance, a fluorescent lighting fixture or a transformersupplied appliance.
Gradateurs commandant une lampe a filament de tungstene – afin de reduire le risqué de surchauffe et la possibilite d’endommagement a d’autres materiels, ne pas installer pour commader une prise,
un appareil a moteur, une lampe fluorescente ou un appareil alimente par un transformateur.
1
If either the KeypadLinc or responder LED continues to blink, the addition failed. Tap the device’s Set button until LED stops blinking and try again.
2
If the controller does not have a beeper, wait until its LED begins blinking
3
Most models
Limited Warranty – INSTEON warrants to original consumer of this product for a period of 2 years from
date of purchase, this product will be free from defects in material & workmanship & will perform in substantial
conformity with its Owner's Manual. Warranty shall not apply to defects caused by misuse or neglect.
Protected under U.S. and foreign patents (see www.insteon.com) © Copyright 2012
INSTEON, 16542 Millikan Ave., Irvine, CA 92606, 800-762-7845
 Loading...