

Page 1
INSTEON Limited Warranty – INSTEON warrants to original consumer of this product for a period of 2 years from date of purchase, this product will be f ree
INSTEON, 16542 Millikan Ave., Irvine, CA 92606, 800-762-7845, www.insteon.com
Installation
7) Test that 240V Load Controller is working properly by pressing the Set button to toggle the load on, and then off
Quick Start Guide
2477SA2 – Normally Closed Relay
Preparation
consulting an electrician.
Tools Needed
• Various tools to mount 240V Load Controller to a wall
Introduction
only).
Using 240V Load Controller
240V Load Controller Model (SKU #)
Relay Status
Active Status LED
Open
Off
Closed
Solid green
Open
Off
Closed with load on
Solid green
Closed with load off
Off
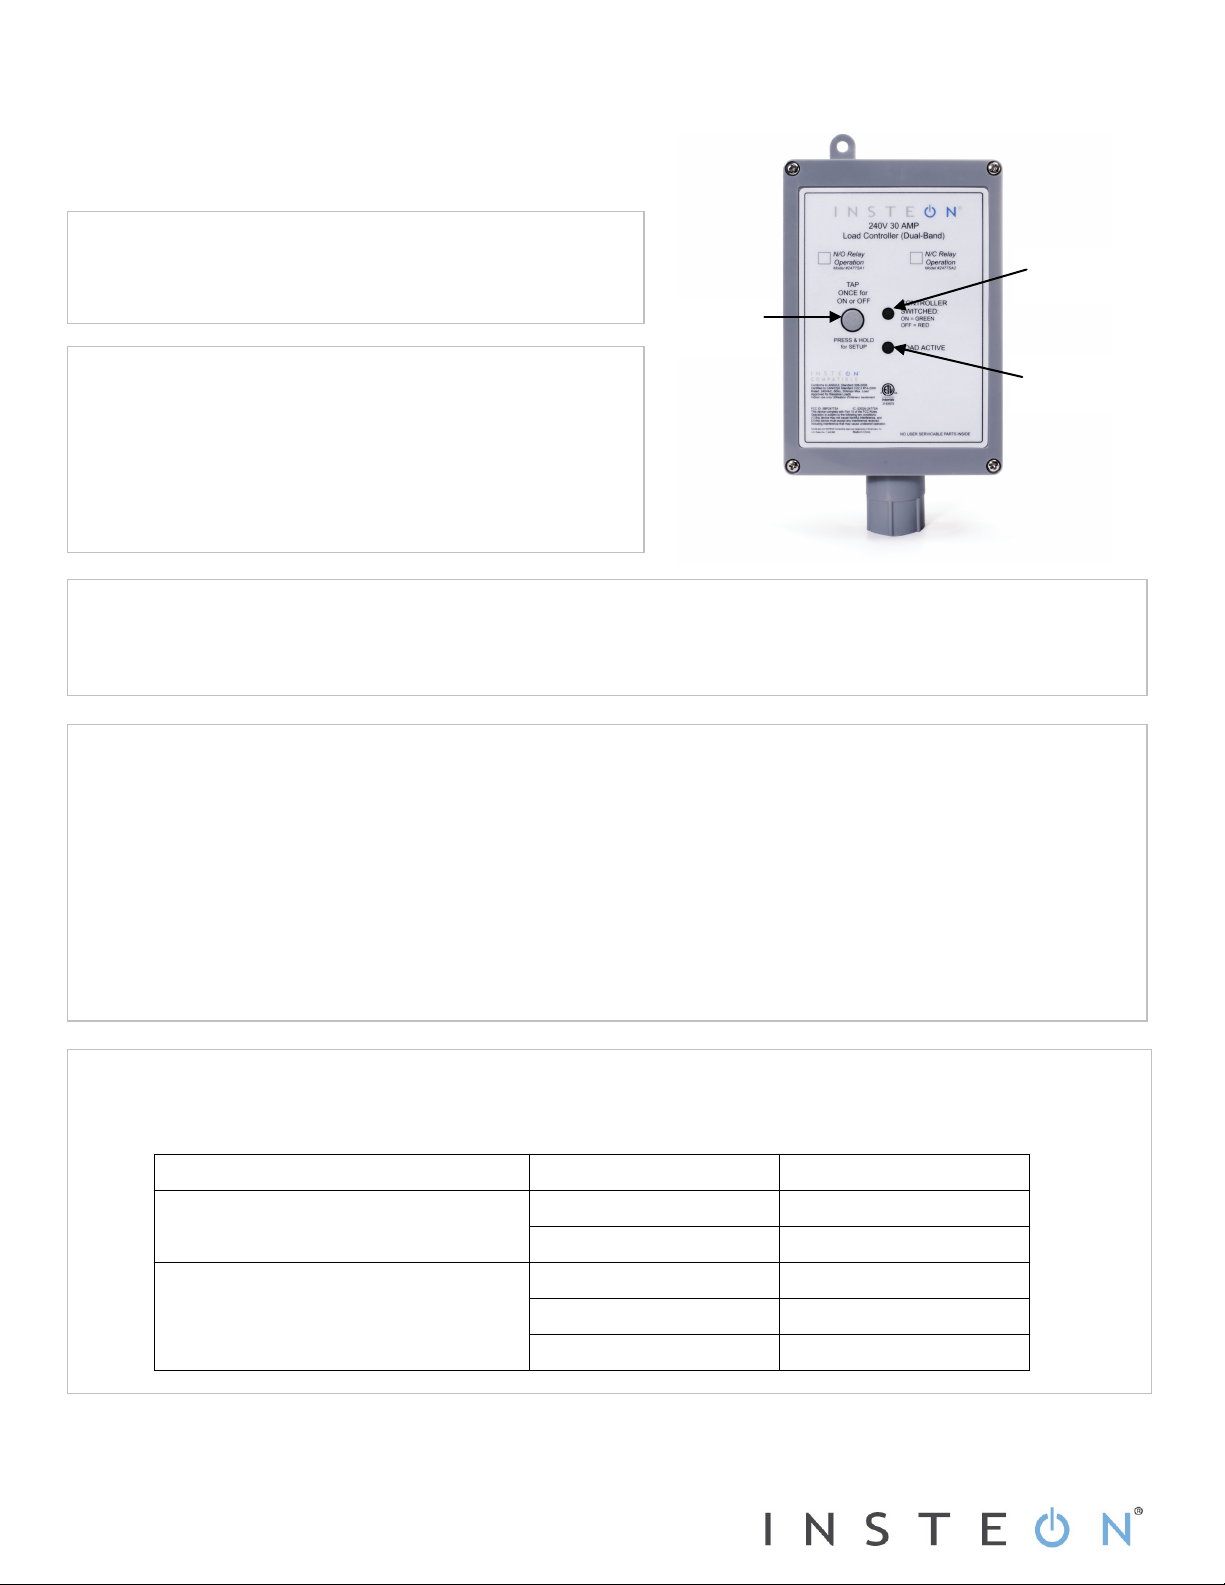
Set button
Status LED
Load Active
LED
INSTEON® 240V 30 Amp Load Controller (Dual-Band)
Models: 2477SA1 – Normally Open Relay
Remotely control your appliances that run on voltages
between 120 and 240 Volts, up to 30 Amps (resistive loads
Because this device involves high voltage levels, it is
recommended that installation be performed only by a
qualified electrician or by a homeowner who is extremely
knowledgeable and familiar with electrical circuitry. Please
take an extra level of precaution when installing this device.
If you have any questions regarding installation, we suggest
• Phillips and standard screwdrivers
• Wire cutter/stripper
1) If you plan to incorporate this with INSTEON-compatible software, you can write down the INSTEON I.D. and the
location of the fixture you’ll be controlling (e.g. 01.F7.G5, water heater)
2) At the circuit breaker or fuse panel, disable the circuit supplying power to the electrical junction box that is wired to
the appliance you wish to control with 240V Load Controller
3) Remove the cover of the junction box and disconnect the two supply lines coming from the circuit breaker,
ensuring that you have ½” of bare and clean copper wire on the ends
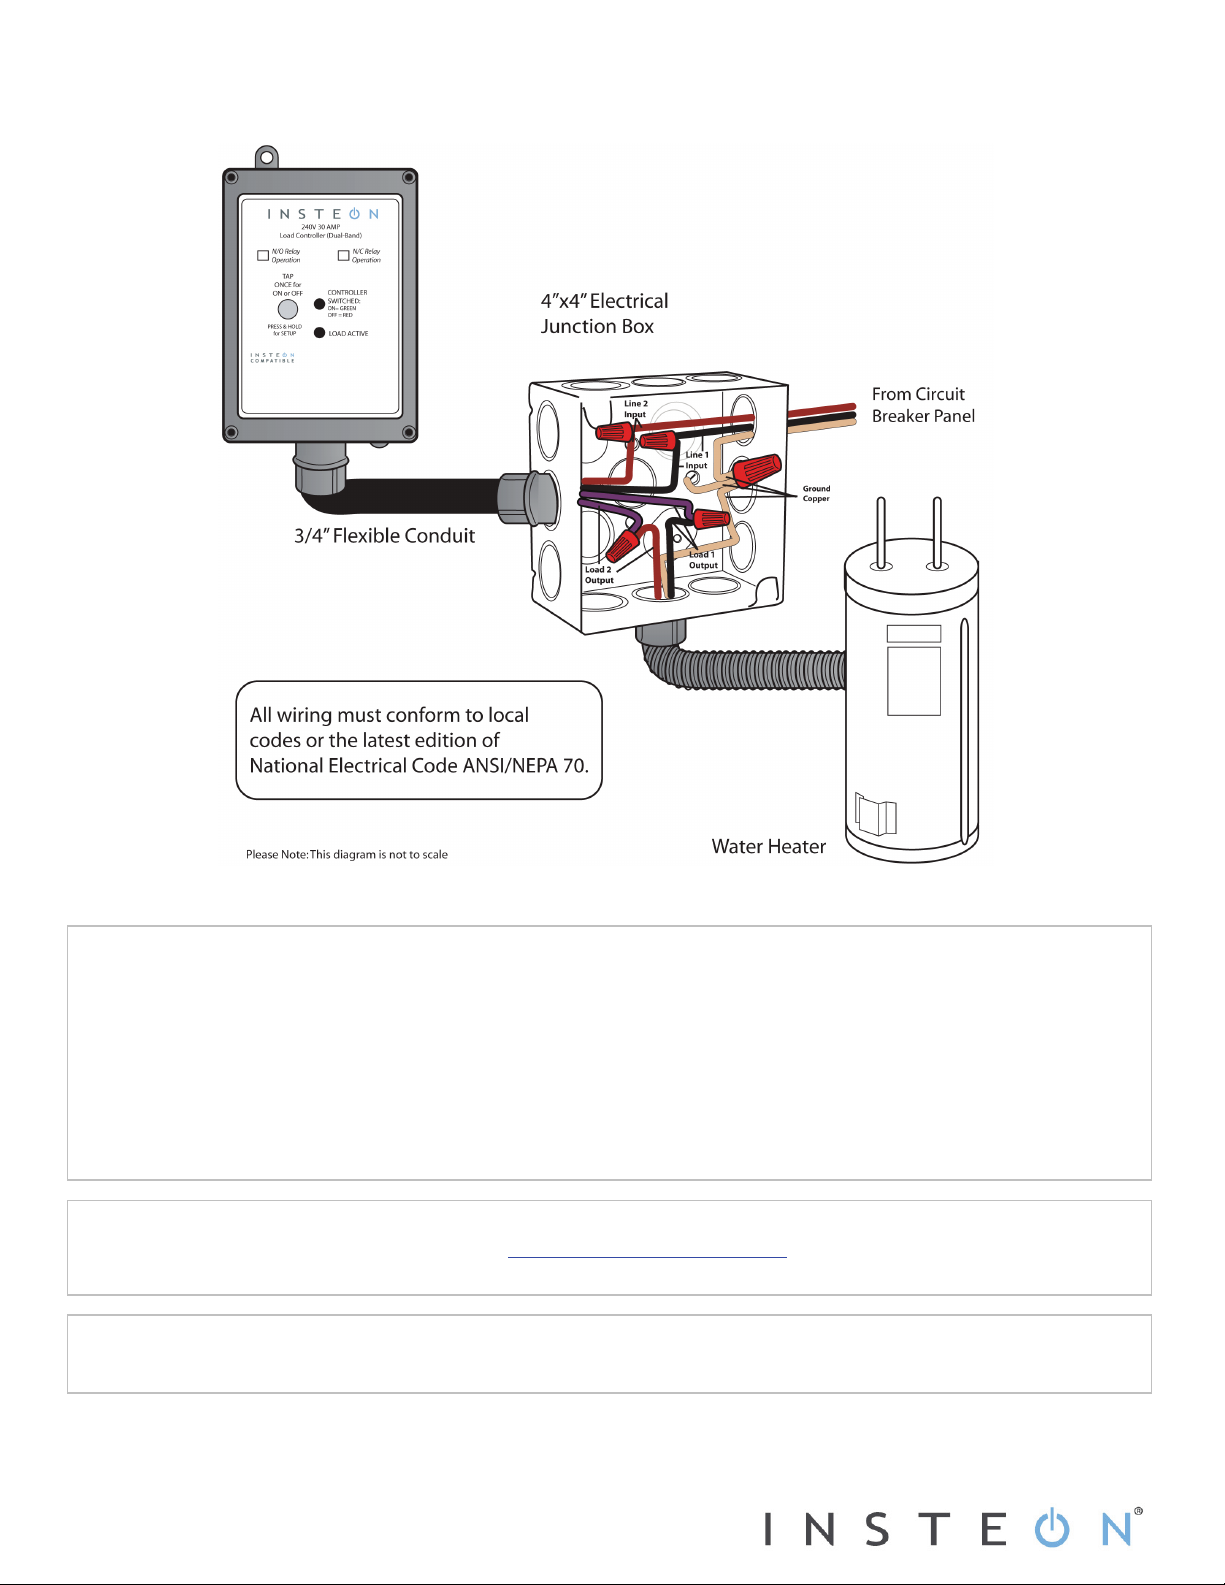
4) See Figure 1 on the next page to properly connect 240V Load Controller to the load and the junction box. The
Ground wire will not be connected to 240V Load Controller, so cap the ground wires off with a wire nut.
5) Ensure that all connectors are firmly attached and that there is not exposed copper except for the ground wire
6) Enable power to the junction box from the circuit breaker or fuse panel
Use the Set button on 240V Load Controller to toggle the load on and off.
Status LED will be solid green when the load is on and solid red when the load is off.
See the following table for the Active LED status:
Normally Open Relay (#2477SA1)
Normally Closed Relay (#2477SA2)
Page 1 of 2
Rev. 07-16-2012
from defects in materi al and workmanship and will perform in substant ial conformity with it s Owner's Manual. Warranty shal l not apply to defects caused by
misuse or neglect.
Protected under U.S. and foreign patent s (see www.insteon.com) © Copyright 2012
Page 2
INSTEON Limited Warranty – INSTEON warrants to original consumer of this product for a period of 2 years from date of purchase, this product will be f ree
INSTEON, 16542 Millikan Ave., Irvine, CA 92606, 800-762-7845, www.insteon.com
Complete Instructions, Troubleshooting and Tech Support
Linking 240V Load Controller as an INSTEON Responder
240V Load Controller will respond appropriately
Figure 1
This device complies with FCC Rules and Industry Canada license-exempt RSS standard(s). Operation is subject to the following two conditions: (1) this device may not cause harmful interference,
Quick Start Guide INSTEON 240V Load Controller (Dual-Band)
1) Use the Set button on 240V Load Controller to set the load to the state you wish to activate from the INSTEON
controller (turn it on if you wish it to be on or off if you wish it to be off when the controller activates the scene)
2) Set the controller to linking mode.* (For most controllers, press and hold an on or scene button for 10 seconds or the
Set button for 3 seconds.)
3) Press and hold 240V Load Controller Set button until it double-beeps (3 seconds)
4) Confirm that linking was successful by tapping the button you just linked to on the controller
The 240V Load Controller Status LED will flash once, and then turn on solid green if the load is on or solid red if
it is off
Owner’s Manual and current Quick Start Guide: http://www.insteon.com/support
Call: INSTEON Support Line at 800-762-7845
and (2) this device must accept any interference, including interference that may cause undesired operation of the device.
Le present appareil est conforme aux CNR d'Industrie Canada applicables aux appareils radio exempts de licence. L'exploitation est autorise aux deux conditions suivantes: (1) l'appareil ne doit pas
produire de brouillage, et (2) l'utilisateur de l'appareil doit accepter tout brouillage radiolectrique subi, mme si le brouillage est susceptible d'en compromettre le fonctionnement.
*Setup modes will automatically time out after 4 minutes.
from defects in materi al and workmanship and will perform in substant ial conformity with it s Owner's Manual. Warranty shal l not apply to defects caused by
Page 2 of 2
Rev. 07-16-2012
misuse or neglect.
Protected under U.S. and foreign patent s (see www.insteon.com) © Copyright 2012
 Loading...