

Page 1
INSTEON Limited W arranty – INSTEON warrants to original consumer of this product for a period of 2 years fr om date of
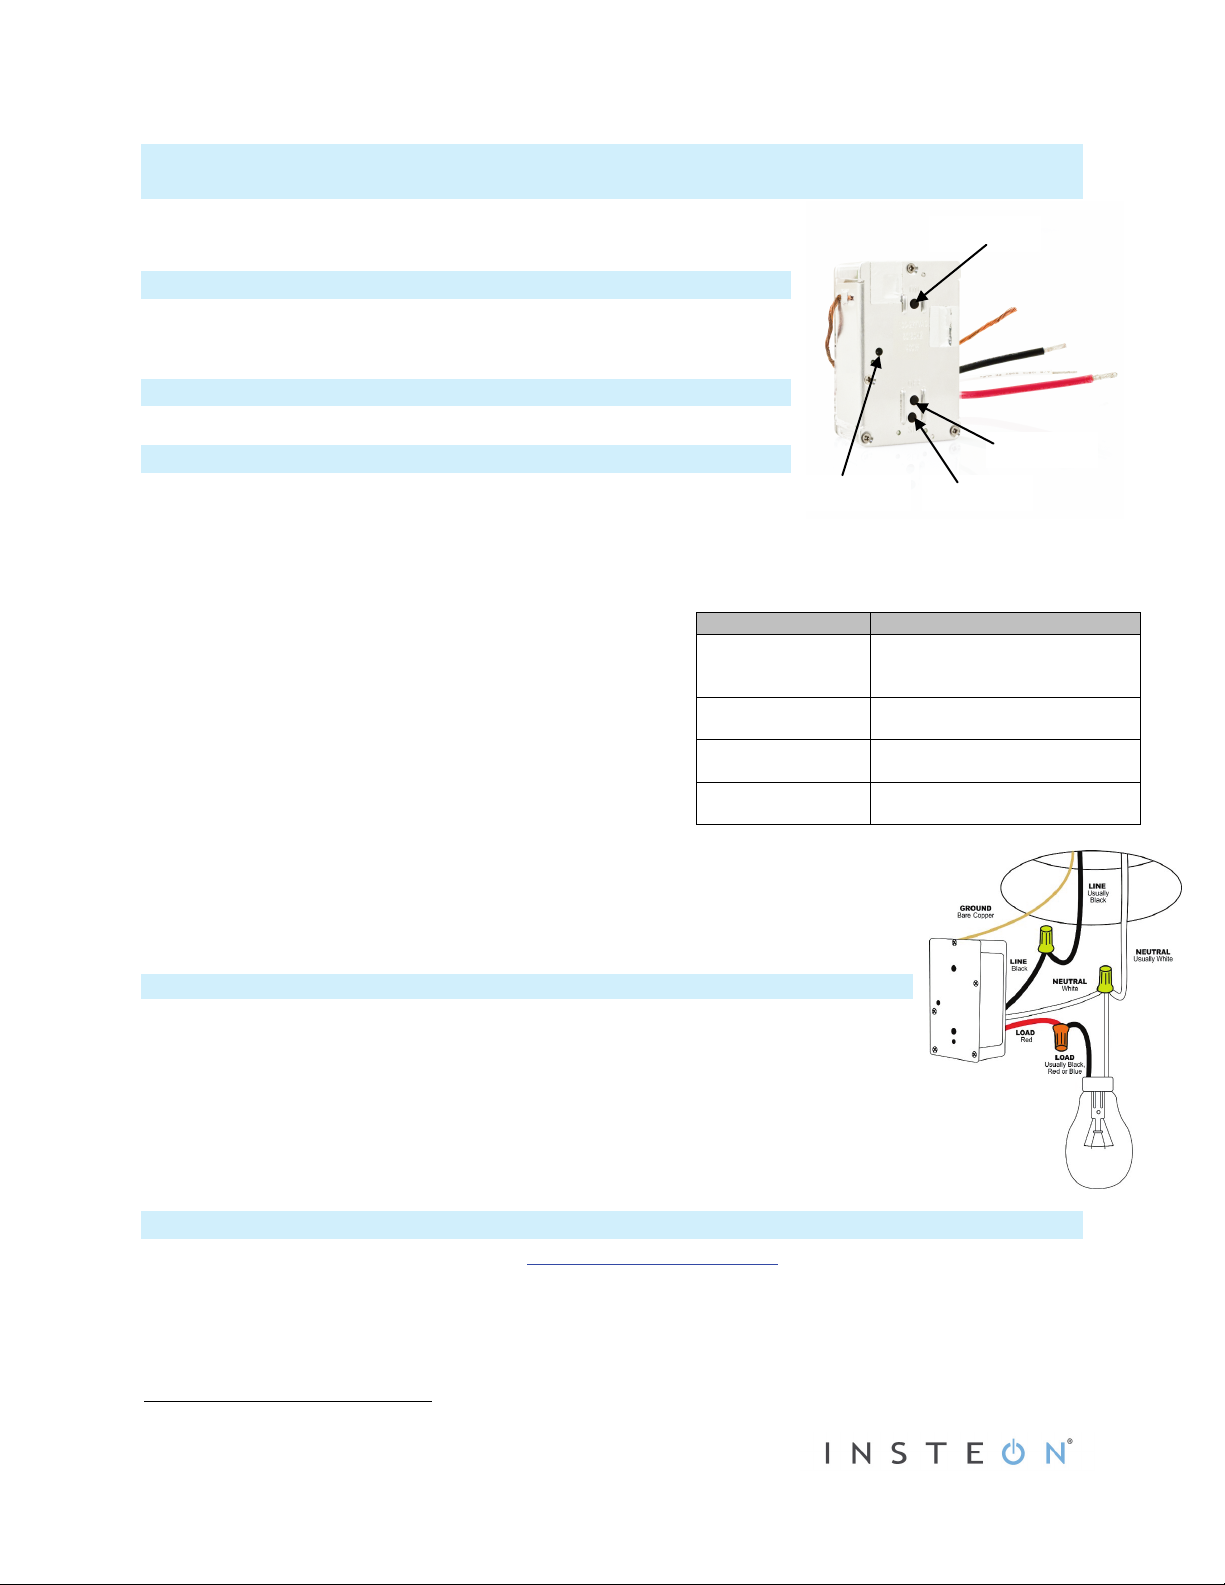
Home’s wire
Quick Start Guide
In-LineLinc Wire
Wall Box Wires
Ground
wire or green screw)
Neutral
(commonly white wire bundle)
Load
(light, fan, etc.)
Line
(100 - 277V to Ground)
Status LED
Set button
ON button
OFF button
®
INSTEON
In-LineLinc™ Dimmer, Dual-Band
Model: 2475DA1, 100 – 277VAC, 50/60 Hz
About In-LineLinc Dimmer Dual-Band
In-LineLinc Dimmer Dual-Band installs in-line with lighting fixtures, providing
INSTEON dimmer control and eliminating the need for a conventional light
switch, reducing the “switch sprawl” common in automation projects.
In the Box
- In-LineLinc Dimmer - Four (4) wire nuts
Installing In-LineLinc Dimmer Dual-Band
1) At electrical panel, turn off circuit breaker(s) and/or remove fuse(s) feeding
wall box (verify that power is off).
2) Remove wallplate from fixture, unscrew fixture you are replacing and gently remove from wall.
3) Disconnect wires from fixture. If the wires cannot be unscrewed, cut them where they enter the switch and strip
½” of insulation off the ends.
4) After ensuring wires are not touching, turn breaker back on.
5) Use a voltage meter to identify the Line and Load wires
connected to the fixture.
6) Identify Neutral and Ground wires.
7) Turn power back off.
8) Connect In-LineLinc Dimmer Dual-Band wires as shown in the
table/diagram (confirm firm attachment with no exposed wire).
9) Prior to reinstalling the fixture, turn power back on.
10) Test In-LineLinc Dimmer Dual-Band by pressing the ON and
OFF buttons.
The load will turn on and off.
11) Add In-LineLinc Dimmer Dual-Band as a responder with desired INSTEON devices.
12) Turn power back off.
13) Gently place In-LineLinc Dimmer Dual-Band into wall box, making sure nothing can
accidentally press any of the buttons on its face.
14) Reinstall the fixture.
15) Turn power back on.
Bare copper
White
Red
Black
(commonly bare copper, green
Adding In-LineLinc Dimmer Dual-Band as an INSTEON Responder
1) Press and hold the scene controller button until it beeps.
Controller LED will blink.
2) Press and hold In-LineLinc Dimmer Dual-Band’s ON and OFF buttons to adjust load
brightness.
3) Press and hold In-LineLinc Dimmer Dual-Band’s Set button until it double-beeps.
In-LineLinc Dimmer Dual-Band’s Status LED will flash, then turn green if the load
is on or red if off. Controller will double-beep2 and LED will stop blinking.
4) Test by sending on and off commands from controller.
The connected load will turn on (at scene level) and off.
Owner’s Manual and Support
Owner’s Manual and current Quick Start Guide: http://www.insteon.com/support
Call: INSTEON Support Line at 800-762-7845
This device complies with FCC Rules and Industry Canada license-exempt RSS standard(s). Operation is subject to the following two conditions: (1) this device may not cause
harmful interference, and (2) this device must accept any interference, including interference that may cause undesired operation of the device.
Le present appareil est conforme aux CNR d'Industrie Canada applicables aux appareils radio exempts de licence. L'exploitation est autorise aux deux conditions suivantes: (1)
l'appareil ne doit pas produire de brouillage, et (2) l'utilisateur de l'appareil doit accepter tout brouillage radiolectrique subi, mme si le brouillage est susceptible d'en
compromettre le fonctionnement.
1
If the controller does not have a beeper, wait until its LED begins blinking
2
Most models
Page 1 of 1
Rev. 07-05-2012
purchase, this product will be free from defects in material and workmanship and will perf orm in substantial conformity with
its Owner's Manual. Warranty shall not apply to def ects caused by misuse or neglect.
Protected under U.S. and foreign patent s (see www.insteon.com) © Copyright 2012
INSTEON, 16542 Millikan Ave., Irvine, CA 92606, 800-762-7845
1
colors may vary
 Loading...