


DC Power Supply
SPD-3606
99 Washington Street
Melrose, MA 02176
Phone 781-665-1400
Toll Free 1-800-517-8431
Visit us at www.TestEquipmentDepot.com
USER MANUAL
GW INSTEK PART NO. 82PD-36060M0
ISO-9001 CERTIFIED MANUFACTURER
This manual contains
proprietary information, which is protected by
copyrights. All rights are reserved. No part of this manual may be
photocopied, reproduced or translated to another language without
prior written consent of Good Will company.
The information in this manual was correct at the time of printing.
However, Good Will continues to improve products and reserves the
rights to change specification, equipment, and maintenance
procedures at any time without notice.
Good Will Instrument Co., Ltd.
No. 7-1, Jhongsing Rd., Tucheng City, Taipei County 236, Taiwan.

TABLE OF CONTENTS
SPD-3606 User Manual
FAQ ................................................................................ 56
Table of Contents
SAFETY INSTRUCTION ..................................................... 5
OVER
VIEW........................................................................ 9
SPD-3606 Main Features...................... 10
Principle of Operation.......................... 11
Front Panel Overview........................... 14
Rear Panel Overview ............................17
CV/CC Crossover Characteristics ......... 18
P............................................................................. 19
SETU
Installation Location ............................ 20
Power Up ............................................. 21
Over Voltage Protection Setup ............. 22
Load Cable Connection ........................ 24
Output On/Off..................................... 25
OPERA
TION.................................................................... 26
CH1/CH2 Independent Mode .............. 26
CH3 Independent Mode....................... 28
CH1/CH2 Tracking Series Mode........... 30
CH1/CH2 Tracking Parallel Mode ........ 36
APPENDI
IND
X ...................................................................... 57
Fuse Replacement................................ 57
Volume Guard (Optional).....................58
Specification ........................................ 59
Declaration of Conformity.................... 61
EX............................................................................. 62
REMOTE OUTPUT CONTR
PERFOR
MANCE VERIFICATION ...................................... 40
Output Voltage Verification.................. 42
Tracking Series Voltage Verification...... 45
Output Current verification.................. 47
OVP verification................................... 50
Recording Tables.................................. 54
OL.......................................... 39
3
4

SAFETY INSTRUCTION
y
SPD-3606 User Manual
Safety Guidelines
SAFETY INSTRUCTION
This chapter contains important safety instructions
that you must follow when operating SPD-3606
and when keeping it in storage. Read the
following before any operation to insure your
safety and to keep the best condition for SPD-3606.
Safety Symbols
These safety symbols may appear in this manual or on SPD-3606.
WARNING
CAUTION
Warning: Identifies conditions or practices that
could result in injury or loss of life.
Caution: Identifies conditions or practices that
could result in damage to SPD-3606 or to other
properties.
DANG
Attenti
ER High Voltage
on Refer to the Manual
General Guideline
CAUTION
• Do not place any heavy object on SPD-3606.
• Avoid severe impacts or rough handling that
leads to damaging SPD-360
• Do not discharge static electricity to SPD-3606.
• Do not block or obstruct the cooling fan vent
6.
opening.
• Leave a space around SPD-3606, at least 3cm to
the left an
• Do not perform measurement at circuits directl
d right.
connected to Mains (Note below).
• Do not disassemble SPD-3606 unless you are
alified as service person
qu
(Measurement categories) EN 61010-1:2001 specifies the
measurement categories and their requirements as follows. SPD3606 falls under category I.
• Measurement category IV is for measurement performed at the
source of low-voltage installation.
• Measurement category III is for measurement performed in the
building installation.
• Measurement category II is for measurement performed on the
circuits directly connected to the low voltage installation.
• Measurement category I is for measurements performed on
circuits not directly connected to Mains.
nel.
Protecti
ve Conductor Terminal
Earth (gro
und) Terminal
Power Su
Fuse
5
6
pply
WARNING
WARNING
• AC Input voltage: 115V/230V ±15%, 50/60Hz
• Connect the protective grounding conductor of
the AC powe
electrical shoc
• Fuse type: T10A/250V
• Make sure the correct type of fuse is installed
r cord to an earth ground, to avoid
k.
before power up.

SAFETY INSTRUCTION
• To ensure fire protection, replace the fuse only
with the specified type and rati
• Disconnect the power cord before fuse
ng.
replacement.
• Make sure the cause of fuse blowout is fixed
before fuse replacement.
SPD-3606 User Manual
Power cord for the United Kingdom
When using SPD-3606 in the United Kingdom, make sure the power
cord meets the following safety instructions.
NOTE: This lead/appliance must only be wired by competent persons
Cleaning SPD3
606
Operation
Environment
Storage
environment
• Disconnect the power cord before cleaning.
• Use a soft cloth dampened in a solution of mild
detergent a
• Do not use chemical or cleaner containing harsh
materi
nd water. Do not spray any liquid
al such as benzene, toluene, xylene,
.
and
acetone.
• Location: Indoor, no direct sunlight, dust free,
almost non-conductive pollution (Note
• Relative Humidity: < 80%
• Altitude: < 2000m
• Temperature: 0°C to 40°C
(Pollution Degree) EN 61010-1:2001 specifies the pollution degrees
and their requirements as follows. SPD-3606 falls under degree 2.
Pollution refers to “addition of foreign matter, solid, liquid, or
gaseous (ionized gases), that may produce a reduction of dielectric
strength or surface resistivity”.
• Pollution degree 1: No pollution or only dry, non-conductive
pollution occurs. The pollution has no in
• Pollution
• Pollution degree 3: Conductive pollution occurs, or dry, non-
• Location: Indoor
• Relative Humidity: < 70%
• Temperature: −10°C to 70°C
degree 2: Normally only non-conductive pollution
occurs. Occasionally, however, a temporary conductivity caused
by condensation must be expected.
conductive pollution occurs which becomes conductive due to
condensation which is expected. In such conditions, equipment
is normally protected against exposure to direct sunlight,
precipitation, and full wind pressure, but neither temperature
nor humidity is controlled.
fluence.
below)
WARNING: THIS APPLIANCE MUST BE EARTHED
IMPORTANT: The wires in this lead are coloured in accordance with
the following code:
Green/ Yellow: Earth
Blue: Neutral
Brown: Live (Phase)
As the colours of the wires in main leads may not correspond with the
colours marking identified in your plug/appliance, proceed as follows:
The wire which is coloured Green & Yellow must be connected to the
Earth terminal marked with the letter E or by the earth symbol
or
coloured Green or Green & Yellow.
The wire which is coloured Blue must be connected to the terminal
which is marked with the letter N or coloured Blue or Black.
The wire which is coloured Brown must be connected to the terminal
marked with the letter L or P or coloured Brown or Red.
If in doubt, consult the instructions provided with the equipment or
contact the supplier.
This cable/appliance should be protected by a suitably rated and
approved HBC mains fuse: refer to the rating information on the
equipment and/or user instructions for details. As a guide, cable of
0.75mm
2
should be protected by a 3A or 5A fuse. Larger conductors
would normally require 13A types, depending on the connection
method used.
Any moulded mains connector that requires removal /replacement
must be destroyed by removal of any fuse & fuse carrier and disposed
of immediately, as a plug with bared wires is hazardous if a engaged in
live socket. Any re-wiring must be carried out in accordance with the
information detailed on this label.
7
8

OVERVIEW
SPD-3606 User Manual
SPD-3606 Main Features
OVERVIEW
This chapter describes SPD-3606 in a nutshell,
including its main features and front / rear panel
introduction. After going through the overview,
follow the Setup chapter (page19) to properly
power up and set operation environment.
For initial inspection, refer to the Performance
verification chapter (page40).
60V/3A
30V/6A
Dual−Range DC Power Supply
OUTPUT CH2 CH1
O.V.P.
ON / OFF
SET C.V.
TRIP C.C.
CH1 / CH3CH2
CH2 CH1 CH3GND
0 60V , 3A
0 30V , 6A
TRACKING
INDEP.
SERIES
PARALLEL
0 60V , 3A
0 30V , 6A
SLAVE MASTER
C.V.
C.C.
PAR.
SPD-3606
VOLTAGEVOLTAGE CURRENTCURRENT
0.1 5V , 3A
CH1
CH3
CH3
OVER LOAD
VOLTAGE
Performance
Operation
• Low noise (≤ 50dB, Cooling fan controlled by
sink temperature)
Heat
• High efficiency power conversion, minimum
with full
70%
load
• Fast Output On/Off response (≤100ms)
• Low temperature coefficient
0ppm/°C+3mV, ≤150ppm/°C+3mA)
(≤10
• Compact size, light weight (6kg)
• Constant voltage operation
• Constant current operation
• Tracking Series operation
• Tracking Parallel operation
• Output On/Off control
• 3 outputs with full Voltage control
• Output range selection for CH1 and CH2,
V/3A or 30V/6A
60
• LED display
Main Feature SPD-3606 Main Features .................................10
Theory Principle of Operation ..................................... 11
Panel overview Front Panel Overview ......................................14
Protection
Interface
• Over voltage protection (OVP)
• Overload protection
• Reverse polarity protection
• Remote control output On/Off terminal
Rear Panel Overview........................................ 17
CV/CC CV/CC Crossover Characteristics.....................18
9
10

OVERVIEW
y
SPD-3606 User Manual
Principle of Operation
Block diagram
Power
Supply
EMI Filter
Rectifier/
Doubler
PCB A
Power supply converts the AC mains into DC
Power source for internal units. Channel 1/2/3
control and produce the actual DC output. Displa
shows output and OVP level, receiving feedback
from each channel. Internal components are placed
on four printed circuit boards, A ~ D.
Detailed description of each module starts on the
next page.
PCB B PCB C
CH2
Power
Stage
AUX
Power
CH1
AUX
Power
Power
Stage
CH3
Power
Stage
Output
Controller
Tracking
Controller
Controller
Output
Controller
Output
PCB D
Display
EMI Filter
Other than deleting conduction EMI
(electromagnetic interference), the EMI unit contains
protective circuits such as Inrush current limit
resistor and Surge absorber. Internal units are
protected under power-up sequence, normal
Rectifier / Doubler
operation, and AC mains fluctuation.
The Rect
ifier unit converts AC mains into DC
Power source. For 115V±15% AC, double-wave
rectification is used; for 230V±15% AC, full-wave
rectification. An internal selector automatically
switches the rectification circuit accordingly. The
final DC Voltage reaches 240V ~ 370V.
CH1/2 Power
Stage
The Power
stage for Channel1 and 2 produce the
outputs using the combination of Half-bridge
converter and Linear regulator. The Half-bridge
converter adopts PWM (pulse-width modulation)
with high frequency switching. The Linear
regulator adjusts the output Voltage down to 0V.
CH1/2 AUX Power
The AUX
Power for Channel 1 and 2 produces the
power source for auxiliary devices, such as
analog/digital controller, relay, LED display, and
cooling fan. Altogether four pairs of power source
are generated for different purpose: ±12V, +5V,
and +12V.
CH3 Power Stage
The Power
stage for Channel 3 produces both the
channel output and the power source for auxiliary
devices. It uses the combination of Flyback
converter and Linear regulator, carrying lower
efficiency compared to Channel 1 and 2. The
flyback converter also produces ±12V for ICs and
4~8V settable Voltage.
11
12

OVERVIEW
O.V.P
OUTPUT
SPD-3606 User Manual
CH1/2/3
Controller
Feedback control
unit
OVP setting unit
Fan control unit
Tr ac k in g
Controller
The C
ontroller for Channel 1, 2, and 3 takes care of
the interface between SPD-3606 and users. Several
sub-units comprise the Controller, including:
• Feedback control unit
• OVP setting unit
• Fan control unit
ailed description of each unit follows.
Det
The Feedback control unit receives the control
signal for Voltage/Current output level and the
level feedback signal from the actual output. The
difference between the two signals are amplified
and used as the control signal for the Power stage
to achieve stable output level.
The SVR (small variable resistor) sets the
protection point so that the OVP setting unit shuts
down the output when the output Voltage level
exceeds the configured level.
Using NTC (negative temperature coefficient)
resistor, the Fan control unit changes the control
Voltage for the cooling fan according to the
temperature change, achieving low-noise and
linear speed control.
The Tracking
controller controls Channel 2 output
level when in tracking series or parallel mode. In
tracking series mode, Channel2 output Voltage is
controlled by Channel1 output Voltage level. In
tracking parallel mode, Channel2 output Current
is controlled by Channel1 output Current level.
Front Panel Overview
Tracking Mode
Switches
CH2 CH1 CH3GND
0 60V , 3A
0 30V , 6A
Ground
TRACKING
SLAVE MASTER
C.V.
C.C.
PAR.
CH2
Te rm i na l
CH2 Output
Terminal
.
SET
TRIP
Switch
60V/3A
30V/6A
Dual−Range DC Power Supply
Output
Key
OVP
OUTPUT CH2 CH1
ON / OFF
Indicator
Power
Switch
CH2 Output
Knob
Power switch
OVP indicator
Output Key
CH2 MeterOutput Range
O.V.P.
SET C.V.
TRIP C.C.
Indicator
CH1/3 Meter
CH1/CH3
Meter Switch
CH1
CH1 / CH3CH2
CH3
SPD-3606
CH3 Overload
CH3
INDEP.
SERIES
PARALLEL
VOLTAGEVOLTAGE CURRENTCURRENT
OVER LOAD
VOLTAGE
Indicator
CH3 Voltage
Knob
0 60V , 3A
0 30V , 6A
CH1
0.1 5V , 3A
CH3 Output
Terminal
Indicator
CH1 Output
Te rm i nal
Turns On
CH1 Output
Knob
or Off the main power.
For power up sequence, see page20.
Turns green durin
g the OVP setup.
Turns red (tripped) when the output
Voltage exceeds the setting. For
OVP details, see page22.
Turns the o
utput On (green) or Off
(gray), all three channels at once.
LED Display
The LED d
isplay shows the Channel 1/2/3 output
ON / OFF
Voltage/Current level. The A/D converter
changes the analog signal coming from each
channel into digital format to be displayed.
13
Output range
switch
14
60V/3A
30V/6A
ects the output range, 60V/3A or
Sel
30V/6A.

OVERVIEW
TRA
CKIN
g
OVE
L
OAD
SPD-3606 User Manual
CH2 meter
T
racking mode
switches
CH1/3 meter +
switch
Displays Channel2 current (A) and voltage (V).
CH2
G
Acti
vates and selects the tracking
mode. For trackin
INDEP.
SERIES
PARALLEL
Independent
I
K
C
A
R
T
P
E
D
N
I
S
E
I
R
E
S
L
L
A
R
A
P
page30 (Series) and page36
(Parallel).
acking Serie s
Tr
G
N
.
L
E
TR
A
N
I
E
S
ARA
P
Displays Channel1 or Ch
G
N
I
K
C
.
P
E
D
S
E
RI
L
E
L
L
annel3 current (A) and
mode details, see
racking Parallel
T
G
N
I
K
C
A
R
T
.
EP
D
N
I
ES
I
R
E
S
L
E
L
L
A
R
PA
voltage (V). The switch on the right selects the
channel, 1 (up) or 3 (down).
Channel1 CV/CC
indicator
Channel2
CV/CC/PAR
indicator
C.V.
C.C.
C.V.
C.C.
PAR.
Turns green when operating in
Constant Voltage (CV) mode, red in
Constant Current (CC) mode. For
CV/CC characteristics, see page18.
Independent mode:
Turns green in Constant Voltage
(CV) mode, red in Constant Current
(CC) mode.
Tracking parallel mode (page36):
When operating in the Tracking
Parallel mode, the Channel2
indicator always stays red (PAR).
Channel1 indicator shows the
CV/CC status.
CH1
Channe
l3
overload indicator
R
CH1 / CH 3
Turns red wh
en Channel3 output
exceeds the current rating, 3A.
CH3
Channel3 switches from Constant
Voltage (CV) mode to Constant
Current (CC) mode.
Channel1/2/3
output terminal
CH3
0.1 5V , 3A
Accepts the load cables. For cable
connection details, see page24.
15
16

OVERVIEW
g
C
g
SPD-3606 User Manual
Rear Panel Overview
Remote Control
Terminal
OFF
ON
SER. NO. LB
Remote control
terminal
OVP setting point
Power cord / fuse
socket
OVP Settin
Point
O.V.P. SETNORMAL
CH3CH2CH1
O.V .P. SETNORMAL
CH3CH2CH1
Cooling Fan
Power Cord / Fuse
Socket
WARNING
DISCONNECT POWER CORD
BEFORE REPLACING FUSE
REPLACE FUSE
AS SPECIFIED
FUSE RATING
115V
T10A
250V
230V
550 WATTS
900 VA MAX
50/60 H z
Accepts remote output On/Of
AC
f
control connection. For details, see
page39.
Activates Over Voltage Protection
(OVP) and sets the protection
threshold for channel1/2/3. For
OVP setup details, see page22.
The power co
rd socket accepts the
AC mains: 115V/230V, 50/60Hz.
For power up details, see page20.
CV/CC Crossover Characteristics
Background
Diagram
SPD-3606 automatically switches
voltage mode (CV) and constant current mode
(CC), according to load condition.
When the current level is smaller than
the output setting, SPD-3606 operates
in Constant Voltage mode. The
indicator on the front panel turns green
(C.V.) The Voltage level is kept at the
setting and the Current level fluctuates
according to the load condition until it
reaches the output current setting.
When the curre
nt level reaches the
output setting, SPD-3606 starts
operating in Constant Current mode.
The indicator on the front panel turns
red (C.C.) The Current level is kept at
the setting but the Voltage level
becomes lower than the settin
to suppress the output power level
from overload. When the current level
becomes lower than the setting, SPD3606 goes back to the Constant Voltage
mode.
Vout
Vmax
Constant
Voltage
between constant
C.V.
.C.
C.V.
C.C.
, in order
The fuse holder contains the AC
Constant
Current
main fuse. For fuse replacement
details, see page57.
17
18
Imax
Iout

SETUP
O
SPD-3606 User Manual
Installation Location
SETUP
This chapter describes how to properly power up
and configure SPD-3606 before the operation. For
checking the functionality, refer to the
Performance verification chapter, page40.
O.V.P. SETNORMAL
CH3CH2CH1
D
2 G
H
C
A
3
,
V
0
6
A
6
,
0
V
0
3
0
N
UTPUT
ON / OFF
Ventillation space
ooling fan
C
opening
Leave at least 3cm around SPD-3606, to the left and
right.
The cooling fan is located on the rear panel.
Allocate extra space on the back of SPD-3606 so
that the cooling fan opening would not become
blocked.
Cooling
Fan
Installation Installation Location........................................20
Power Power Up ........................................................21
OVP Over Voltage Protection Set.............................22
Load Wire Load Cable Connection....................................24
Output Output On/Off ................................................25
19
20

SETUP
O
SPD-3606 User Manual
Power Up
Power On
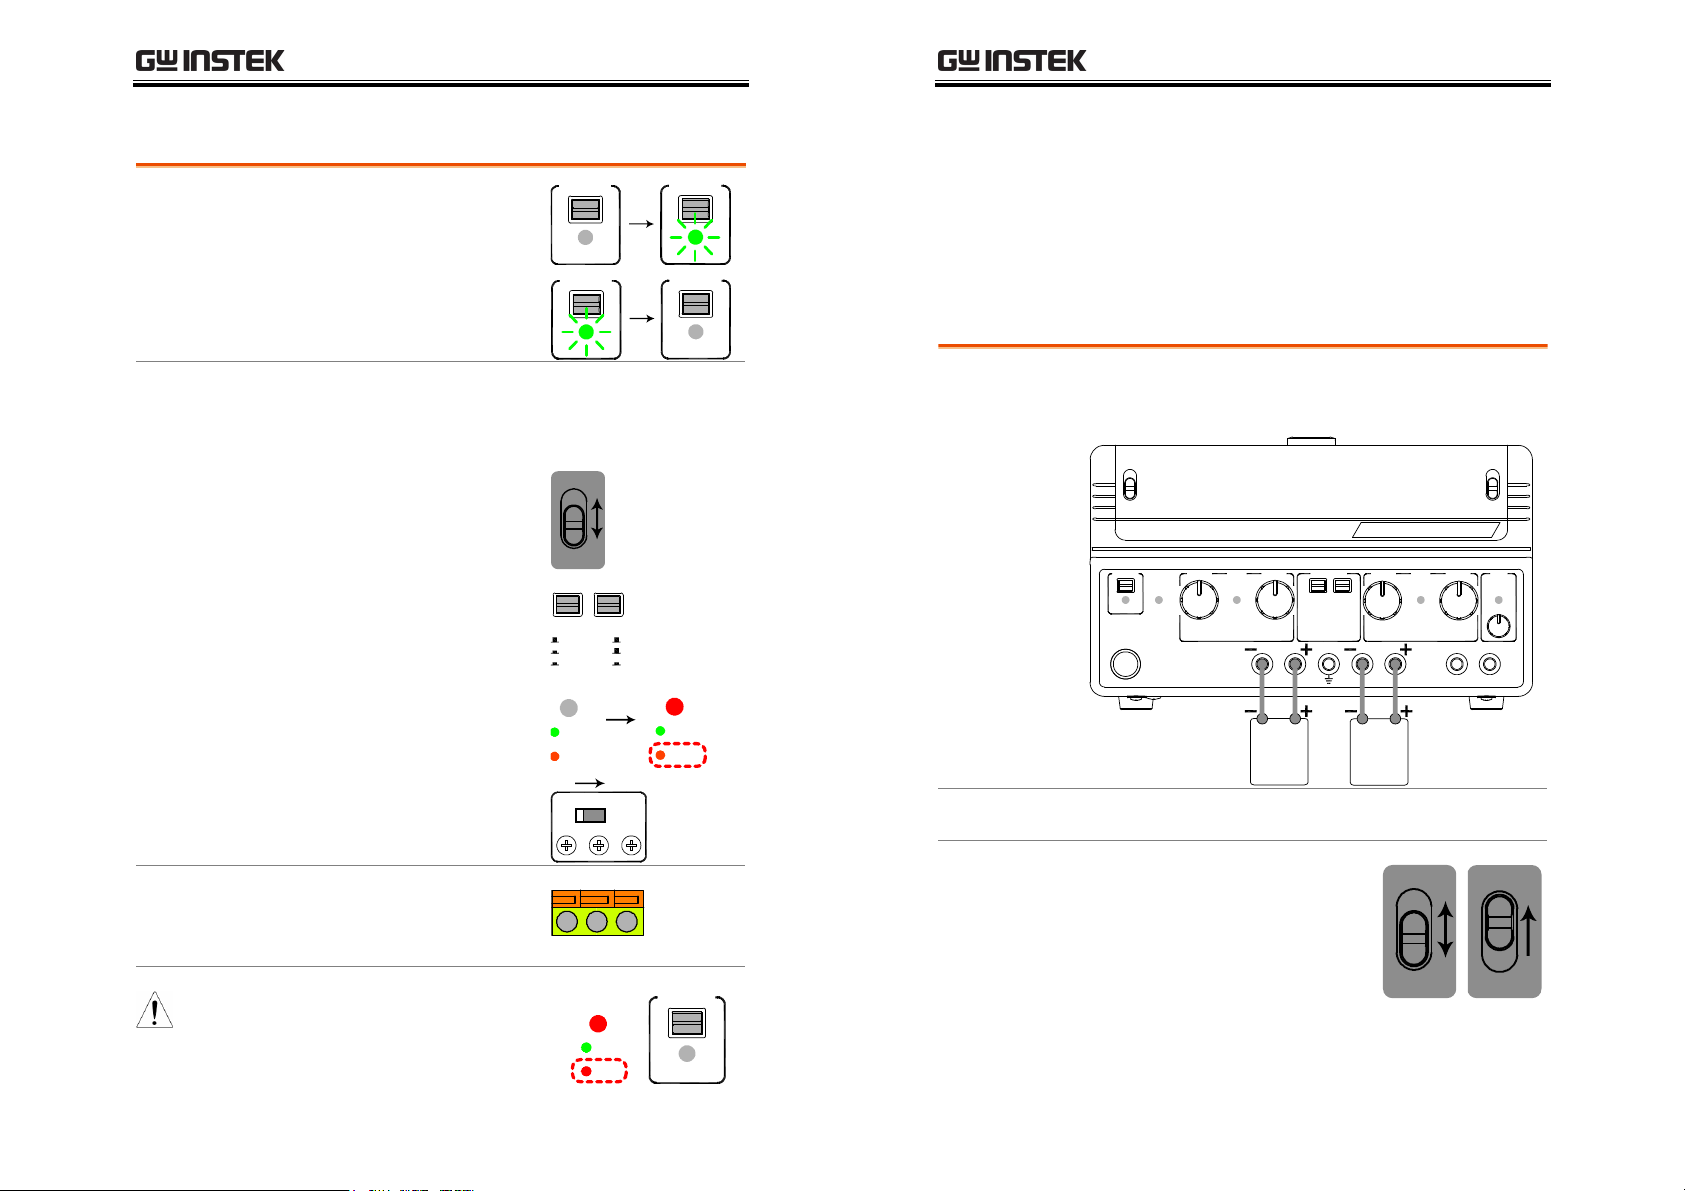
Press the Power switch to
turn On the power. The
CH1/CH2 indicators and
meters turn On.
CH1
VOLTAGECURRENT
MASTER
C.V.
C.C.
CH1
VOLTAGECURRENT
MASTER
C.V.
C.C.
CH2
CH2
SLAV E
CH2
SLAV E
C.V.
C.C.
PAR.
C.V.
C.C.
PAR.
VOLTAGECURRENT
VOLTAGECURRENT
CH1 / CH3
Over Voltage Protection Setup
Background
OVP setup
Over Voltage Protection (OVP) protects SPD and
DUT from excessive output Voltage. The user sets
the maximum output voltage limit before
operation. When the output voltage exceeds this
limit, the indicator shows the over voltage status
and the output is shut off immediately.
1. Slide the rear panel swit
to the “
O.V.P. SET”
position.
2. The OV
f
ront panel
ndicating OVP
i
3. The Vo
inst
show zero
P indica
tor on the
turns green,
setup.
ltage meters show the OVP setting leve
ead of the output level. The Current mete
(0.00)
.
ch
O.V.P. SETNORMAL
CH3CH2CH1
.V.P.
SET
TRIP
l
rs
CH2
Power Off
Press the Po
wer switch
again to turn Off the
power. After two
seconds, the meters and
indicators turn Off.
CH1 / CH3
21
22
CH1 / CH3 CH1 / CH3
4. Adjust the
g the rear panel
usin
terminal. The setti
the f
ront panel
change
Channel2
Setting range
s acco
level
OVP
DECREASE
ng on
meter
rdingly.
Channel1
1.0V ~ 67.0V
1.0V ~ 67.0V
Channe
l3
0.1V ~ 6.0V
CH1
INCREASE

SETUP
O
g
O
SPD-3606 User Manual
When OVP is
activated....
*
When setting the OVP for
channel3, select CH3 meter
using the CH1/CH3 meter
switch.
5. When finished, slide the
rear panel switch to the
“Normal” position. The
OVP indicator on the front
panel turns Off.
The OVP activates when one
of channel1/2/3 output
voltage exceeds the OVP
settin
. The indicator turns red
(tripped), and the output is
shut Off immediately.
O.V.P.
O.V.P.
SET
TRIP
OUTPUT
ON / OFF
SET
TRIP
CH1
CH3
Load Cable Connection
D
N
Standard
accessory
(GTL-104)
O. V.P. SETNORMAL
CH3CH2CH1
1. Turn the terminal
counterclockwise and
loose the screw.
2. Insert the cable
terminal.
H
C
1
0
6
0
0
3
0
2
.V.P.
SET
TRIP
.V.P.
SET
TRIP
OUTPUT
ON / OFF
3. Turn the terminal
clockwise and tighten
the screw.
Banana plug
Insert the plug into the
socket.
Wire type
When using load cables other than the attached,
make sure they have enough current capacity for
2
H
C
3
A
3
,
V
0
6
A
6
,
0
V
0
3
0
2
H
C
A
3
,
V
0
6
A
6
0
,
V
0
3
0
minimizing cable loss and load line impedance.
Voltage drop across a wire should not excess 0.5V.
The following list is the wire current rating at
450A/cm
2
.
G
2
A
3
,
V
A
6
,
V
D
N
G
D
N
G
Wire size (AWG) Maximum current (A)
20 2.5
18 4
16 6
14 10
12 16
23
24
Output On/Off
P
U
P
U
TRA
CKIN
RALLE
L
O.V
OUT
PUT
Panel operation
atic Output
Autom
Off
Pressing the Output key
once Turns On the output, all
channels 1/2/3 at once.
Pressi
output.
Any of the following actions during output On
automatically turns it Off. They might involve
sudden and harmful change in the output level.
Change the
Cha
nge the tracking SW
between independent /
series / parallel
OVP tripped
ng again turns Off the
range
OUT
ON / OFF
OUTPUT
ON / OFF
60V/3A
30V/6A
INDEP.
SERIES
PA
O.V.P.
SET
TRIP
SETUP
OUT
ON / OFF
OUTPUT
T
OPERATION
T
SPD-3606 User Manual
CH1/CH2 Independent Mode
ON / OFF
Background /
Connection
G
.P.
SET
TRIP
Channel1 and Channel2 outputs work
of each other and are separately controlled.
CH2
CH2
LOAD
CH1
CH1
LOAD
independent
O.V.P. SETNORMAL
CH3CH2CH1
Output ra
Setting step
ting
0 ~ 30V/0~6A or 0~60V/0~3A for each channel
1. Select the output rang
V/3A or 30V/6A. Set the
60
CH1/CH3 me
the CH1
positi
ter switch to
on.
e,
60V/3A
30V/6A
CH1
CH3
ote control
Rem
OVP SET
mode
When in remote control
mode (page39), front panel
output control is disabled.
Red CV/CC indicator when
CV/CC red
without output
output Off indicates internal
error. Contact the service
center.
C.V.
C.C.
+
ON / OFF
25
26

2. Set the tra
y
O
O
UTP
U
O
UTP
U
posi
tion to INDEP,
cking swit
ch
+ .
OPERATION
G
N
I
K
C
A
R
T
SPD-3606 User Manual
CH3 Independent Mode
P.
E
D
N
I
S
E
I
R
E
S
L
E
L
L
RA
A
P
3. Set the OVP
details, see page
if necessar
22.
. For
.V.P.
SET
TRIP
4. Connect the load to the front panel terminal
channel1 +/−, chann
2
CH
A
3
,
V
0
6
A
6
,
0
V
0
3
0
5. Set the output V
oltage an
Current using the control
knobs fo
r each
channel.
el2 +/−
D
N
.
1G
CH
A
3
,
V
0
6
A
6
,
0
V
0
3
0
CH1
d
MASTER
CH2
SLAVE
C.V.
C.C.
Background /
Connection
Channel3 rating is 0.1 ~ 5V, maximum 3A. It works
independently from Channel1 and 2, regardless of
their modes.
s,
CH3
CH3
LOAD
Output ra
No Tracking
VOLTAGECURRENT
Series/Parallel
ting
0.1 ~ 5V, 3A maximum
Channel3 does not have Tracking Series/Parallel
mode. Also, Channel3 output is not affected by
Channel1 and 2 modes:
independent/series/parallel.
Setting step
VOLTAGECURRENT
1. Set the CH1/CH3
tch to the CH3 positi
swi
meter
on.
CH1
C.V.
C.C.
PAR.
ON / OFF
T
27
28
6. Press the Out
Output i
ndica
ut key. The
p
tor turns
green.
T
ON / OFF
CH3

OPERATION
y
O
E
ge
D
g
SPD-3606 User Manual
CV → CC
2. Set the OVP
details, see page
if necessar
22.
. For
3. Connect the load to the fr
panel channel3
terminal
.
4. Set the output V
he Channel3 Voltag
t
+/−
oltage
using
e
control knob.
5. Press the Output key. The
Output i
ndica
tor turns
green.
When the o
utput Current level
exceeds 3A, the overload
indicator turns red and
Channel3 operation mode
switches from Constant Volta
to Constant Current.
ont
1
.
0
OUTPUT
ON / OFF
CH3
OVER LOAD
.V.P.
SET
TRIP
3
H
C
A
3
,
V
5
VOLTAG
OUTPUT
ON / OFF
CH3
OVER LOA
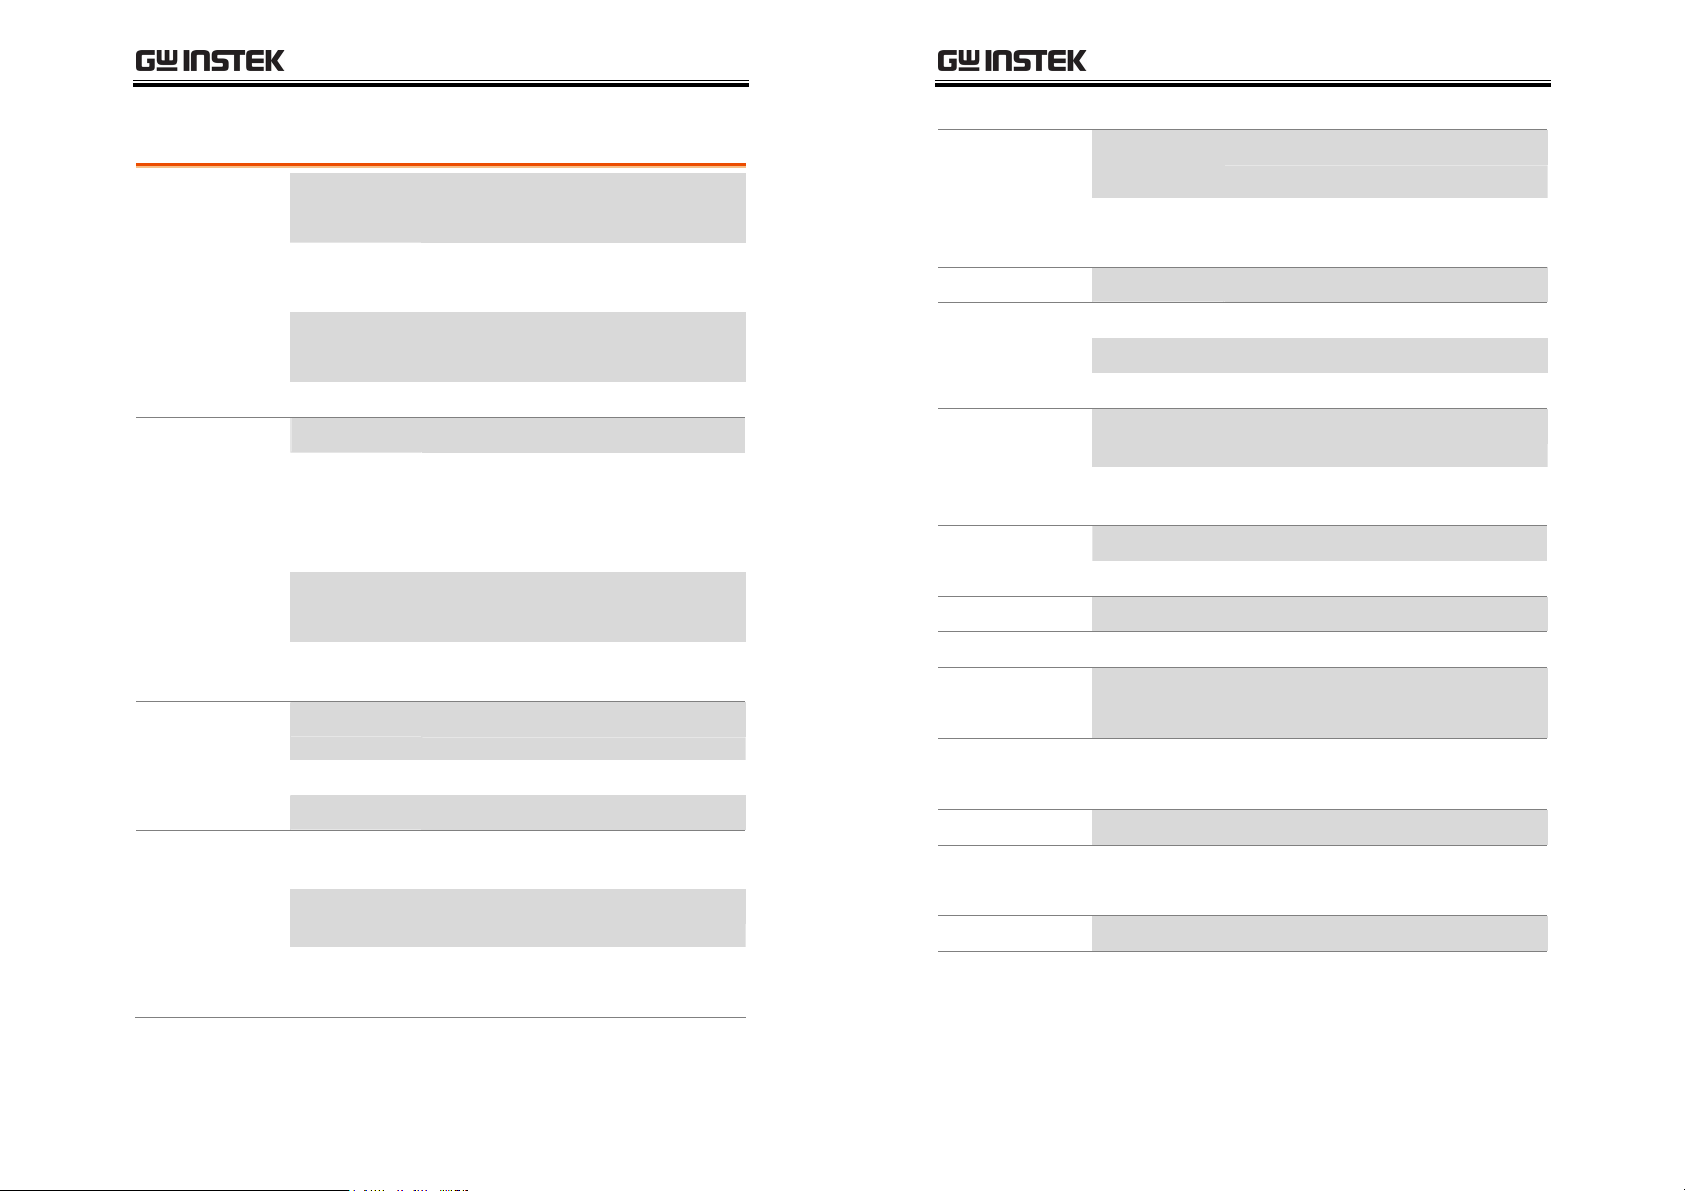
CH1/CH2 Tracking Series Mode
Background
Tracking series without common terminal
Connection
Tracking series operation doubles the Voltage
capacity of SPD-3606 by internally connecting
Channel1 (Master) and Channel2 (Slave) in serial
and combining the output to a single channel.
Channel1 (Master) controls the combined Voltage
output level.
The followin
describes two types of configuration
depending on the common ground usage.
CH2
CH1
Note: “overload” in this case
LOAD
does not mean abnormal
operation.
Output ra
Setting step
29
30
ting
0 ~ 120V/0 ~ 3A or 0 ~ 60V/0 ~ 6A
1. Select the output rang
6
0V(120V)/
0V(60V)/6
3
CH1
/CH3 me
the CH1
3A or
A. Set the
positi
ter switch to
on.
e,
60V/3A
30V/6A
CH1
CH3

2. Set the tra
M
OUT
PUT
OUT
PUT
posi
tion to Series,
cking swit
ch
+ .
OPERATION
G
N
I
K
C
A
TR
.
P
DE
N
I
S
E
RI
E
S
L
E
L
L
A
PAR
SPD-3606 User Manual
7. Refer to the Channel1 (Master) meter an
i
ndicator for the output setting level an
CV/CC status.
CH1
ASTER
d
d
3. Set the OVP
cking seri
tra
if necessar
es mode, set the
Channel2 (Slave)
the ma
OVP t
ximum level, so that
rips if the Channel1
(Master) setting is violat
OVP setup
details, see page
y. In
OVP setting
the
ed. For
22.
to
O.V.P.
SET
TRIP
4. Connect the load to the front panel terminal
channel1+ & channel2− (Single supply).
1
H
C
D
N
G
2
H
C
A
3
,
V
0
6
A
6
,
0
V
0
3
0
5. Turn up
C
urrent knob to maximum.
the
Channel2
A
3
,
V
0
6
A
6
,
0
V
0
3
0
CURRENT
SLAV E
CH2
CH1 / CH3
Current level
Channel1 meter reading shows
the output Current. (Channel2
C.V.
C.C.
Current control must be in the
Maximum position).
Voltage level
s,
Double the reading on the
Channel1 Voltage meter. (In the
above case, the actual output is
23.6 x 2 = 47.2V).
8. Press the Outp
Output i
green.
ndica
ut key. The
tor turns
ON / OFF
ON / OFF
CH1
VOLTAGECURRENT
6. Set the output V
oltage an
d
Current using the Channel1
aster) knob
(M
.
MASTER
C.V.
C.C.
31
32

OPERATION
SPD-3606 User Manual
Tracking series with common terminal
Connection
CH2
LOAD
Output ra
Setting step
ting
0~60V/0~3A or 0~30V/0~6A for CH1 ~ COM
0~–60V/0~3A or 0~–30V/0~6A for CH2 ~ COM
1. Select the output rang
0V(120V)/
6
3
0V(60V)/6
/CH3 me
CH1
the CH1
3A or
A. Set the
positi
ter switch to
on.
COM
e,
CH1
60V/3A
30V/6A
CH1
CH3
3. Set the OVP if necessar
cking seri
tra
Channel2 (Slave)
the ma
OVP t
es mode, set the
OVP setting
ximum level, so that
rips if the Channel1
(Master) setting is violat
OVP setup
details, see page
y. In
to
the
ed. For
22.
O.V.P.
SET
TRIP
4. Connect the load to the front panel terminal
channel1+ & channel2−. Us
terminal
5. Set the output V
the Cha
Volt
Cha
he output setting leve
t
as the common line
2
CH
A
3
,
V
0
6
A
6
,
0
V
0
3
0
oltage
nnel1 (Mas
ter)
age knob. Refer to th
nnel1 (Master)
D
N
meter for
e Channel1 (−
connection.
0
0
using
e
l.
1G
CH
A
3
,
V
0
6
A
6
,
V
0
3
Common
CH1
MASTER
C.V.
C.C.
)
s,
VOLTAGECURRENT
2. Set the tra
tion to Series,
posi
cking swit
ch
+ .
R
T
PARA
G
N
I
K
C
A
.
EP
D
N
I
S
E
I
ER
S
L
E
L
L
CH1(+)~COM Voltage = 23.6V in the above case
CH1 / CH3
CH2(–)~COM Voltage = –23.6V in the above case
33
34

6. Set the output Current
OUT
PUT
OUT
PUT
C
S
sepa
rately, usin
hannel1 (Master)
C
Channel
2 (Slave) Current
g both the
and
knob.
OPERATION
CH1
VOLTAGECURRENT
MASTER
C.V.
C.C.
CH2
VOLTAGECURRENT
SLAVE
C.V.
C.C.
PAR.
SPD-3606 User Manual
CH1/CH2 Tracking Parallel Mode
Background /
Connection
Tracking parallel operation doubles the Current
capacity of SPD-3606 by internally connecting
Channel1 (Master) and Channel2 (Slave) in parallel
and combining the output to a single channel.
Channel1 (Master) controls the combined output.
CH2
CH1 / CH3
CH1(+)~COM Current = 1.84A in the above case
CH2(–)~COM Current = 2.18A in the above case
ndica
ut key. The
tor turns
r
ON / OFF
CH1
MASTER
7. Press the Outp
Output i
green.
8. Refer to the Channel1
(Master) indicator fo
CH1(+) ~ COM CV/CC
st
atus, and the Channel2
(Slave) indicator
(–) ~ CO
CH2
status.
for
M CV/CC
C.V.
.C.
ON / OFF
CH2
LAVE
C.V.
C.C.
PAR.
Output ra
ting
Setting step
CH2
CH1
LOAD
0 ~ 30V/0 ~ 12A or 0 ~ 60V/0 ~ 6A
1. Select the output rang
V/3A(6
60
30
V/6A(12A). Set th
CH1
the CH1
2. Set the tra
posi
A) or
/CH3 me
positi
ter switch to
on.
cking swit
tion to Parallel,
e,
e
ch
+ .
60V/3A
30V/6A
CH1
CH3
G
N
I
K
C
A
R
T
.
P
E
D
N
I
S
E
I
R
E
S
L
E
L
L
A
R
A
P
35
36

OPERATION
OUT
PUT
OUT
PUT
M
SPD-3606 User Manual
3. Set the OVP if necessary. In
tracking parallel mode, set
the Channel2 (Slave) OVP
setting to the maximum
level, so that the OVP trips if
the Channel1 (Master)
setting is violated. For OVP
setup details, see page22.
4. Connect the load to the front panel terminals,
channel1 +/−.
2
H
C
A
3
,
V
0
6
A
6
,
0
V
0
3
0
5. The Channel2 (Slave)
indicator turns red,
indicating Tracking Parallel
(PAR). The CV/CC status of
tracking parallel mode is
displayed in the Channel1
(Master) indicator.
O.V.P.
SET
TRIP
7. Refer to the Channel1 meter for the output
setting level.
CH1 / CH3
Current level
Double the reading on the
Channel1 meter. In the above
case, the actual output is 1.84 x 2
= 3.68A.
1
H
C
D
N
G
A
3
,
V
0
6
A
6
,
0
V
0
3
0
Voltage level
Channel1 meter reading shows
the actual output Voltage.
8. Press the Output key. The
Output indicator turns
CH1
ASTER
C.V.
C.C.
ON / OFF
C.V.
C.C.
PAR.
C.V.
C.C.
PAR.
green.
9. Refer to the Channel1
(Master) indicator for the
ON / OFF
CV/CC status.
CH1
VOLTAGECURRENT
6. Set the output Voltage and
Current using the Channel1
(Master) control knobs.
Channel2 control knobs are
MASTER
C.V.
C.C.
disabled.
37
38

REMOTE OUTPUT CONTROL
SPD-3606 User Manual
REMOTE OUTPUT
CONTROL
Background
Wire connecti
Remote control
Off (front panel
control)
The remote c
rear panel can turn the output
On/Off, just like the Output key on
the front panel. This feature is useful
for automated measurement and
testing using externally connected
control device, such as in production
line or incoming quality inspection.
on
Connect the terminals using
bare wires. Use a minus
driver to push the orange
part, insert the wire, then
release the orange part.
When there is no connection,
Output On/Off is entirely
controlled from the front panel.
ontrol terminal on the
OUTPUT
2
ON / OFF
3
PERFORMANCE
VERIFICA
Overview
Background
Verification item
1
Equipment
Digital Multimeter
TION
Performance verification checks SPD functionality
before the operation or at the incoming inspection.
Recording tables are attached at the end of this
chapter.
• Output Voltage
• Tracking Series Voltage
• Output Current
• OVP
• DCV Accuracy < 0.1%
• DCA Accuracy < 0.5%
Output always Off
Output always On
When the left two terminals are
connected, the Output is always
Off. The front panel Output key is
disabled.
When the right two terminals are
connected, the Output is always
On. The front panel Output key is
disabled.
39
Multimeter
PD ca
– S
Philips screw
driver
40
ble
• DCA range: ≥ 12A
• Resolution ≥ 4 ½ digit
• Recommended model: GDM-8245, GDM-8246
• Voltage rating > 70V
• Current rating > 12A
• < 3mm (for OVP adjustment)

PERFORMANCE VERIFICATION
OLT
A
CURRENT
CURRENT
SPD-3606 User Manual
Default SPD-3606 setting
The following is the required front and rear panel setting before
running each verification.
Range
OVP setting SW
Channe
l1/3 meter
SW
60V/3A
60V/3A
30V/6A
• Output Voltage
• Tracking Series
• OVP
Normal pos
ition
CH1 position
30
V/6A
• Output Current
• Tracking Parallel
60V/3A
30V/6A
O.V.P. SETNORMAL
CH1
Output Voltage Verification
Check item
Connection
CH3CH2CH1
Verification step
• Minimum output Voltage accuracy
• Maximum output Voltage accuracy
• Voltage meter accuracy (Output On)
• Voltage meter accuracy (Output Off)
SPD-3606
Digital Multimeter
V
A
1. Set the SPD panel according to the Default
setting list, page41.
CH1
0 60V , 3A
0 30V , 6A
acking SW
Tr
Channe
l1/2/3
Voltage knob
Channe
l1/2
Independent position,
Minimum position
Minimum position
+ .
CH3
2. Connect SPD
Digit
G
N
I
K
C
A
R
T
.
P
E
D
N
I
S
E
I
SER
L
E
L
L
A
PAR
V
GE
3. Power up SPD and Digital Multimeter.
4. Turn up the SPD Current knob to
al Multimeter Voltag
nal
termi
the ma
ximu
Channel 1 an
.
m.
d
e
Current knob
41
42

PERFORMANCE VERIFICATION
UTPUT
UTPUT
VOLTA
g
0
6
A
A
SPD-3606 User Manual
5. Turn On the SPD output.
Minimum output
Vol tag e
6. Record the Multimeter reading as the Minimum
output Voltage. Here is the acceptance range.
Channel1/2
Channel3
7. Turn up
the ma
Mult
the SPD Voltage kn
m. Switch the
ximu
imeter Voltage terminal if
necessary.
Maximum output
Vol tag e
8. Record the Multimeter readin
output Voltage. Here is the acceptance range.
Channel1/2
Channel3
Vol tage meter
accuracy
9. Compare and record the difference betw
Voltage meter and the Multimeter read
SPD
as t
he Voltage meter accuracy (Out On).
Then turn the output Off,
and check the SPD
reading again (Out Off).
O
< 0V
< 100mV
61.5V ~ 62.5V
5.20V ~ 5.30V
OUTPUT
O
ON / OFF
ON / OFF
ob to
as the Maximum
een the
OUTPUT
ON / OFF
GE
ing
ON / OFF
Example:
Multimeter (Out On) = 30.00V
Tolerance = ±(0.005*30 + 0.2) ≈ ±0.4V
Accepted SPD reading(Out On)= 29.6V~30.4V
Accepted SPD reading (Out Off)=29.6V~30.4V
Channel2
10. Connect the Multimeter to
SPD Channel2 and repeat step
4 to 9.
Channe
l3
11. Switch the CH1/CH
meter swi
positi
Mult
tch to CH3
on. Connect the
imeter to Channel3
and repeat step 5 to
*
Skip step 4 since Channel 3 does not ha
Current knob.
CH2
0 60V , 3A
30V,
3
CH1
CH3
CH3
0.1 5V , 3
9.
ve
Here is the acceptance range and example.
Channel1/2/3
difference < ±(0.5% of reading +
2 digits) of Multimeter
43
44

PERFORMANCE VERIFICATION
CURRENT
UTPUT
UTPUT
VOLTA
0
A
VOLTA
0
A
SPD-3606 User Manual
Tracking Series Voltage Verification
Check item
C
onnection
Verification step
• Minimum output Voltage accuracy
• Maximum output Voltage accuracy
SPD-3606
Digital Multimeter
V
A
1. Set the SPD panel according to the Default setting
list, page41, except for the tracking switch (see
below).
2. Set the tracking switch position
to Series,
3. Connect SPD
Digit
termi
+ .
Channel 1 an
al Multimeter Voltag
.
nal
d
e
4. Power up SPD and Digital Multimeter.
NG
CKI
RA
T
.
P
E
D
N
I
S
E
I
R
E
S
L
E
L
L
ARA
P
CH1
0 60V , 3A
0 30V , 6A
Minimum
tracking series
output voltage
Maximum
tracking series
output voltage
5. Turn up the SPD Curr
knob, both Channel
ent
1 and
Channel2, to the maximum.
6. Turn On the SPD output.
7. Turn up
Volt
Mult
the SPD Channel1
age knob until th
e
imeter reading shows
1.000V.
8. Connect the Multimeter to
SPD Channel2
the
reading. Here is the
acceptance
Channel2
and record
range.
0.985V ~ 1.015V
9. Connect Digital Multimeter
back
to SPD Channel1.
. Turn up
10
Volt
Mult
60.00V
the SPD Channel1
age knob until th
e
imeter reading shows
.
11. Connect the Multimeter to
SPD Channel2
the
reading. Here is the
acceptance
Channel2
and record
range.
59.69V ~ 60.31V
O
ON / OFF
GE
CH2
0 60V , 3A
30V, 6
CH1
0 60V , 3A
0 30V , 6A
GE
CH2
0 60V , 3A
30V, 6
O
ON / OFF
(1.000V)
(60.00V)
45
46

PERFORMANCE VERIFICATION
V
OLT
OUTPU
T
OUTPU
T
g
RRENT
g
0
A
SPD-3606 User Manual
Output Current verification
Check item
C
onnection
Verification step
• Minimum output Current accuracy
• Maximum output Current accuracy
• Current meter accuracy (Output On)
• Current meter accuracy (Output Off)
Digital Multimeter
1. Set the SPD panel according to the Default
setting list, page41.
2. Connect SPD
Digit
al Multimeter Current
terminal
Channel 1 an
.
3. Power up SPD and Digital Multimeter.
4. Turn up
the ma
the SPD Voltage kn
m.
ximu
SPD-3606
V
A
d
ob to
CH1
0 60V , 3A
0 30V , 6A
AGE
Minimum output
Current
6. Record the Multimeter readin
output Current. Here is the acceptance range.
Channel1/2
7. Turn up the SPD Current knob to
Maximum output
Current
the ma
imeter Current terminal to
Mult
high cu
8. Record the Multimeter readin
output Current. Here is the acceptance range.
Channel1/2
m. Switch the
ximu
rrent range.
Channel3
Current meter
accuracy
9. Compare and record the difference betw
urrent meter and the Multimeter read
SPD C
as the
Current meter accuracy (Out On
Then turn the output Off,
and check the SPD
reading again (Out Off).
is the acceptance range and example.
Here
Channel1/2/3
Example:
Multimeter (Out On) = 3.000A
Tolerance = ±(0.005*3 + 0.02) ≈ ±0.04A
Accepted SPD reading(Out On)= 2.96A~3.04A
Accepted SPD reading (Out Off)= 2.96A~3.04A
as the Minimum
< 0A
CU
as the Maximum
6.15A ~ 6.25A
3.05A ~ 3.15A
een the
ing
).
OUTPUT
ON / OFF
OUTPUT
ON / OFF
difference < ±(0.5% of reading +
2 digits) of Multimeter
CH2
5. Turn On the
SPD output.
10. Connect the Multimeter to
SPD Channel2 and repeat step
4 to 9.
0 60V , 3A
ON / OFF
ON / OFF
47
48
30V, 6

PERFORMANCE VERIFICATION
O.V
SPD-3606 User Manual
. Connect the Mult
11
t
o SPD Channel3 an
eat step 4, 5, 8, 9.
rep
Skip step 6 and 7 since Channel 3 does no
*
imeter
minimum current verific
CH1
d
CH3
ation and Current knob.
CH3
0.1 5V, 3A
t have
OVP verification
Check item
C
onnection
Verification step
• OVP setting accuracy (Minimum)
• OVP functionality (Minimum)
• OVP setting accuracy (Maximum)
• OVP functionality (Maximum)
1. Set the SPD panel according to the Default
setting list, page41.
2. Power up SPD.
3. Set the OVP setti
the “O.
SPD-3606
(No connection)
ng switch
V.P. SET” position.
to
O.V.P. SETNORMAL
CH3CH2CH1
.P.
SET
TRIP
CH1
ng
O.V.P.
SET
TRIP
DECREASE
4. The O.V.P. i
f
ront panel
5. Turn down t
termi
nal to minimum.
49
50
tor on the
ndica
turns green.
he OVP setti

PERFORMANCE VERIFICATION
j
g
U
TPU
T
U
TPU
T
VOL
T
O.V.P
O.V
j
g
SPD-3606 User Manual
Minimum OVP
g
settin
6. Record the SPD Voltage meter readin
nimum OVP setting accuracy. Here is
Mi
acceptance range.
Channel1/2
Channel3
ust the OVP settin
7. Ad
terminal until the SPD
meter shows
ollowing value.
f
Channel1/2
Channel3
8. Set the OVP setti
the “
Normal” positi
P indica
OV
panel t
urns
9. Turn On the
10
. Slowly
turn up the
SPD Voltage knob
unt
il the OVP
indica
tor turns red
≤ 1.0V
≤ 0.50V
DECREASE
the exac
t
1.0V
0.50V
ng switch
on. The
tor on the front
Off.
SPD output.
to
AGE
CH1
O
ON / OFF
O.V.P.
SET
TRIP
(tripped).
g as the
the
INCREASE
O.V.P. SETNORMAL
CH3CH2CH1
O
ON / OFF
SET
TRIP
OUTPUT
ON / OFF
O.V.P. SETNORMAL
CH3CH2CH1
.P.
SET
TRIP
INCREASE
g as the
the
Maximum OVP
g
settin
ng
OUTPUT
ON / OFF
to
O.V.P.
SET
TRIP
CH1
12. Turn Off the SPD output.
13
. Set the OVP setting switch
the “O.
14
. The O.V.P. indica
f
15
. Turn up the OVP setti
V.P. SET” position.
ront panel
turns green.
tor on the
terminal to maximum.
16. Record the SPD Voltage meter readin
Ma
ximum OVP setting accuracy. Here is
acceptance range.
Channel1/2
Channel3
ust the OVP settin
. Ad
17
.
terminal until the SPD
meter shows
ollowing value.
f
Channel1/2
Channel3
65.0 ~ 68.0V
6.00 ~ 7.00V
the exac
t
60.0V
5.0V
DECREASE
CH1
INCREASE
Minimum OVP
functionality
11
. Record the SPD Voltage meter readin
Minim
um range OVP functionality.
acceptance range.
Channel1/2
Channel3
0.5V ~ 1.5V
0.00V ~ 1.00V
g as the
Here is the
51
52
. Set the OVP setting switch
18
the “
Normal” positi
P indica
OV
panel t
urns
tor on the front
Off.
on. The
to
O.V.P. SETNORMAL
CH3CH2CH1

PERFORMANCE VERIFICATION
P
U
P
U
VOL
T
O.V.P
. Turn On the SPD output.
19
OUT
SPD-3606 User Manual
OUT
T
T
Recording Tables
Maximum OVP
functionality
ON / OFF
20
. Slowly
turn up the
AGE
SPD Voltage knob
il the OVP
unt
indica
tor turns red
(tripped).
21
. Record the SPD Voltage meter readin
Ma
ximum range OVP functionality.
acceptance range.
Channel1/2
Channel3
. Turn Off the SPD output.
22
. Repeat step 3 to 22 for
23
24
. Repeat step 3 to 22 for
59.2V ~ 60.8V
4.47V ~ 5.53V
OUTPUT
ON / OFF
Channel2.
Channel3.
O.V.P.
SET
TRIP
ON / OFF
.
SET
TRIP
g as the
Here is the
OUTPUT
ON / OFF
Output voltage verification (Minimum/Maximum)
Item Channel Min. limit Result Max. limit
Minimum
Output Voltage
CH1 –3
CH2 –30mV 0mV
0mV 0mV
CH3 0mV 100mV
CH1 61.5V 62.5V Maximum
Output Voltage
CH2 61.5V 62.5V
CH3 5.2V 5.3V
Output voltage verification (Meter accuracy)
Tolerance = ± (0.5%*Multimeter +0.2) V
Channel Multimeter Tolerance SPD (On)
Channel1
~
SPD (Off)
Channel2 ~
Channel3 ~
Tracking series voltage verification
Item Channel Min. limit Result Max. limit
acking Serie s
Tr
CH2 0.985V 1.015V
Minimum
Tracking Seri e s
CH2 59.69V 60.31V
Maximum
53
54

PERFORMANCE VERIFICATION
Output current verification (Minimum/Maximum)
Item Channel Min. limit Result Max. limit
SPD-3606 User Manual
Minimum
Output Current
Output Current
CH1 –1m
CH2 –1mA 0mA
CH1 6.15A 6.25A Maximum
CH2 6.15A 6.25A
CH3 3.05A 3.15A
A 0mA
Output current verification (Meter accuracy)
Tolerance = ± (0.5%*Multimeter +0.02) A
Channel Multimeter Tolerance SPD (On)
Channel1
Channel2 ~
Channel3 ~
~
SPD (Off)
OVP verification
Item Channel Min. limit Result Max. limit
Minimum OVP
Setting
Functionality
Setting
Functionality
CH1 0.
CH2 0.0V 1.0V
CH3 0.0V 0.1V
CH1 0.5V 1.5V Minimum OVP
CH2 0.5V 1.5V
CH3 0.00V 1.00V
CH1 65.0V 68.0V Maximum OVP
CH2 65.0V 68.0V
CH3 6.0V 7.0V
CH1 59.2V 60.8V Maximum OVP
CH2 59.2V 60.8V
CH3 4.47V 5.53V
0V 1.0V
FAQ
Q1. I cannot turn On the output (the Output key does not respond).
A1. The following scenarios are possible.
• The rear panel remote control terminal is in the Off position. In
s case, set it to the On position or deactivate remote control.
thi
details,
• The OVP setting switch on the rear panel is on the SET side. In
this c
• The OVP indicator is red. In this case, change the OVP setting to
higher v
Note that in several conditions, the Output key automatically turns
Off to avoid harmful condition. For details, see page25.
Q2. The CV/CC indicator is red (Constant Current) while the output is Off.
A2. This indicates there is an internal error. Contact the service
center.
Q3. The meter does not match the real value.
A3. The following scenarios are possible.
• Make sure the rear panel OVP setting is in the “Normal” position.
If
the OV
• If you are using Channel1 or Channel3, make sure the meter
swi
share the same
see page
ase, set the switch to the Norm
alue or remove the over voltage condition.
the OVP switch is in the “SET” position, the meter mi
P setting, not the output value. For OVP details, see page22
tch on the right side is in the correct position. Channel1 and 3
39.
al side.
meter.
For
ght show
.
For more information, contact your local dealer
55
56

APPENDIX
g
SPD-3606 User Manual
Volume Guard (Optional)
APPENDIX
Fuse Replacement
Step
1. Take off the power cord and remove the
socket
using a minus driver
E
S
U
F
E
C
A
D
L
E
P
I
E
F
I
R
C
E
P
S
S
A
G
N
I
T
A
R
E
S
U
F
V
A
5
0
1
1
1
T
V
0
5
2
V
0
3
2
S
T
T
A
W
X
A
0
5
M
5
A
V
0
0
9
z
H
0
6
/
0
5
2. Replace the
E
S
U
F
E
C
A
D
L
E
P
I
E
F
I
R
C
E
P
S
S
A
G
N
I
T
A
R
E
S
U
F
V
A
5
0
1
1
1
T
V
0
5
2
V
0
3
2
S
T
T
WA
X
A
0
5
M
5
A
V
0
0
9
z
H
0
6
/
0
5
D
R
O
C
R
E
W
E
O
S
P
U
T
F
C
G
E
N
N
I
N
C
O
A
L
C
P
S
I
E
D
R
E
R
O
F
E
B
fuse in the ho
D
R
O
C
R
WE
E
O
S
P
U
T
F
C
G
E
N
N
I
N
C
O
A
L
C
P
S
I
E
D
R
E
R
O
F
E
B
.
lder.
fuse
Background
Applicable knobs
ch volume
Atta
guard
The volume guard is an optional item which
replaces the Channel 1 and 2 output knobs to
prevent accidentally changing the output level.
This feature is useful for automated testin
at fixed
output level, such as assembly line inspection.
• Channel 1 Voltage and Current knob
• Channel2 Voltage and Current knob
CH2
1. Pull out the original
knob (Chann
current knob for
example).
2. Insert and screw the
volume
guard to fix its
position.
3. To change the output
level
, use a minus
screwdriver from
opening o
f the volume
guard.
el2
CH1
the
E
G
A
T
L
O
V
2
H
C
E
V
A
L
T
S
N
E
R
R
U
C
.
V
.
C
.
C
.
C
.
R
A
P
E
G
A
T
L
O
V
2
H
C
E
V
A
L
T
S
N
E
R
R
U
C
.
V
.
C
.
C
.
C
.
R
A
P
E
G
A
T
L
O
V
H2
C
E
V
A
L
T
S
N
E
R
R
U
C
.
V
.
C
.
C
.
C
.
R
A
P
Ra
ting
T10A/250V
57
58
APPENDIX
SPD-3606 User Manual
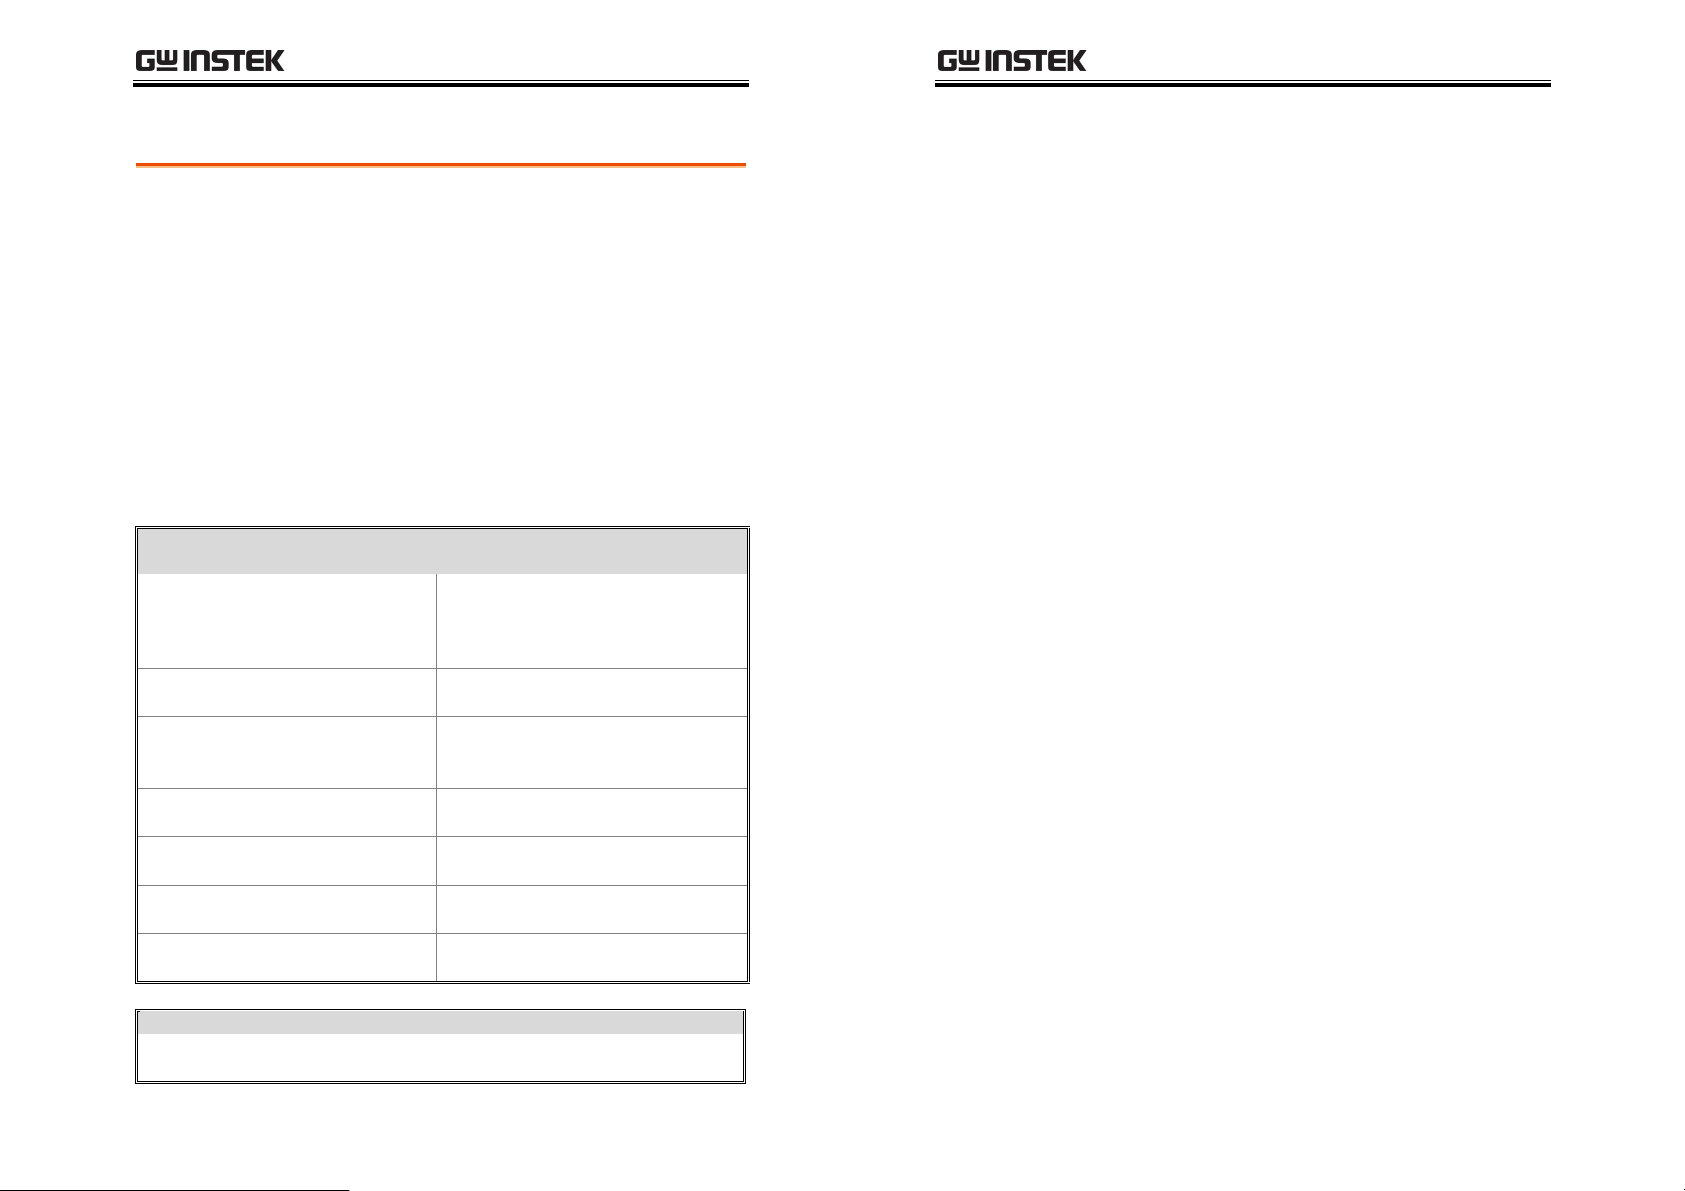
Specification
Output Ratings CH1/CH2
Independent
CH1/CH2
Series
CH1/CH2
Parallel
CH3
Vol tag e
Regulation
Current
Regulation
Tr ac k in g
Operation
Line
Load
Ripple & Noise
Recovery
Line
Load
Ripple & Noise
Tracking Error
Series
Regulation
ple & Noise
Rip
0 ~ 30V / 0 ~ 6A
0 ~ 60V / 0 ~ 3A
60V / 0 ~ 6A
0 ~
0 ~ 120V / 0 ~ 3A
0 ~ 30V / 0 ~ 12A
0 ~ 60V / 0 ~ 6A
0.
1 ~ 5V / 3A
≤ 0.01% + 3mV
≤ 0.01% + 5mV
(rating current ≤ 6A)
≤ 0.01% + 8mV
(rating current ≤ 12A)
≤ 5mVrms (5Hz ~ 1MHz)
≤ 50mV
Time
≤ 100µs (50% load change,
minimum load 0.5A)
≤ 0.2% + 3mA
≤ 0.
≤ 3mArms
≤ 0.5% + 10mV of Master
≤ 300mV
≤ 10mVrms (5Hz ~ 1MHz)
≤ 100mVpp (20Hz ~ 20MHz)
(20Hz ~ 20MHz)
P-P
2% + 3mA
Output On/Off
Response Time
OVP
Meter Type
Insulation
Temperature
Coefficient
Remote Control
Fan Nois e
Operation
Environment
Storage
Environment
Power Source
Accessories
Dimensions
Weight
Vol tage Up
(10% ~ 90%)
Vol tage Down
(90% ~ 10%)
Accuracy
Accuracy
Resolu
Chassis and
Te rm i na l
Chassis and AC
cord
Vol tag e
Current
Output On/Off
≤ 50dB
Ambient temperature 0 ~ 40°C
Relative humidity ≤ 80%
Ambient temperature –10 ~ 70°C
Relative humidity ≤ 70%
AC 115V/230V±15%, 50/60Hz
User manual x 1, Power cord x 1
Test lead GTL-104 x 2, GTL-105 x 1
255 (W) x 145 (H) x 265 (D) mm
Approx. 6kg
≤ 100ms (≤95% rating load)
≤ 100ms (≥10% rating load)
± (0.5% of reading + 0.5V)
digits 0.5" LED display
3 ½
± (0.5% of reading + 2 digits)
tion
100mV/10mA
100MΩ or above (DC 1000V)
100MΩ or above (DC 1000V)
≤ 100ppm/°C+3mV
≤ 150ppm/°C+3mA
59
60
APPENDIX
Declaration of Conformity
We
GOOD WILL INSTRUMENT CO., LTD.
(1) No.7-1, Jhongsing Rd., Tucheng City, Taipei County, Taiwan
(2) No. 69, Lu San Road, Suzhou City (Xin Qu), Jiangsu Sheng, China
declare, that the below mentioned product
Type of Product: Power Supply
Model Number: SPD-3606
are herewith confirmed to comply with the requirements set out in the
Council Directive on the Approximation of the Law of Member States
relating to Electromagnetic Compatibility (2004/108/EC, 89/336/EEC,
92/31/EEC, 93/68/EEC) and Low Voltage Directive (73/23/EEC,
93/68/EEC).
For the evaluation regarding the Electromagnetic Compatibility and
Low Voltage Directive, the following standards were applied:
◎ EMC
EN 61326-1: 2006 Electrical equipment for measurement, control and
laboratory use –– EMC requirements
Conducted Emission
Radiated Emission
ClassA
EN 55011: 1998 + A1:1999 +
A2:2002
Current Harmonics
EN 61000-3-2: 2000 + A2:2005
Voltage Fluctuations
EN 61000-3-3: 1995 + A1:2001
Electrostatic Discharg
EN 61000-4-2: 1995 + A1:1998 +
A2:2001
Radiated Immunity
EN 61000-4-3: 2002 + A1:2002
Electrical Fast Transients
EN 61000-4-4: 2004
+A2:2005
------------------------- Surge Immunity
EN 61000-4-5: 1995 + A1:2001
------------------------- Conducted Susceptibility
EN 61000-4-6: 1996 + A1:2001
------------------------- Power Frequency Magnetic Field
EN 61000-4-8: 1993 + A1:2001
------------------------- Voltage Dip/ Interruption
EN 61000-4-11: 2004
◎ Safety
Low Voltage Equipment Directive 73/23/EEC & amended by 93/68/EEC
Safety Requirements
IEC/EN 61010-1: 2001
e
INDEX
block diagram, system.............. 11
caution symbol............................. 5
cleaning the instrument.............. 7
constant current mode.............. 18
constant voltage mode.............. 18
cooling fan.................................. 20
noise level spec ............................. 60
safety instruction ............................ 6
CV/CC
indicator overview ....................... 16
overview ........................................ 18
default setting for verification . 41
EN 55011..................................... 61
EN 61000..................................... 61
EN61010
declaration of conformity............ 61
measurement category .................. 6
pollution degree.............................. 7
environment
operation.......................................... 7
specification................................... 60
storage .............................................. 7
front panel diagram .................. 14
fuse
SPD-3606 User Manual
rating .............................................. 57
replacing ........................................ 57
safety instruction ............................ 6
socket overview ............................ 17
ground symbol............................. 5
list of features............................. 10
load connection
independent mode ....................... 26
procedure....................................... 24
tracking parallel............................ 36
tracking series ......................... 30, 33
wire type ........................................ 24
meter
ch1/ch3 switch.............................. 28
faq.................................................... 56
OVP mode ..................................... 22
multimeter for verification ....... 40
output current
recording table ........................54, 55
specification................................... 59
verification..................................... 47
output on/off
faq.................................................... 56
key overview................................. 14
61
62

INDEX
manual............................................ 25
remote............................................. 39
response time spec ....................... 60
output range
independent mode ....................... 26
specification................................... 59
switch overview............................ 14
tracking parallel............................ 36
tracking series ......................... 30, 33
output voltage
recording table ........................54, 55
specification................................... 59
technical background................... 13
verification............................... 42, 45
overload indicator
description ..................................... 29
overview ........................................ 15
OVP
automatic output off .................... 25
indicator overview ....................... 14
recording table .............................. 55
setting terminal overview ........... 17
setup ............................................... 22
verification..................................... 50
when activated.............................. 23
power supply
power on/off................................. 21
safety instruction ............................ 6
socket overview ............................ 17
specification................................... 60
switch overview............................ 14
rear panel diagram.....................17
remote output control
disable manual control ................ 25
setup ............................................... 39
terminal overview ........................ 17
service operation
about disassembly .......................... 6
contact point.................................. 56
tracking mode
parallel............................................ 36
parallel indicator overview......... 16
series ............................................... 30
specification................................... 59
tracking series
common ground ........................... 33
tracking switch
automatic output off .................... 25
independent mode ....................... 27
overview ........................................ 15
tracking parallel............................ 36
tracking series ................... 31, 33, 45
UK power cord.............................8
ventillation space requirement.20
volume guard .............................58
warning symbol ...........................5
63
Test Equipment Depot - 800.517.8431 - 99 Washington Street Melrose, MA 02176
TestEquipmentDepot.com
 Loading...