

Page 1

Pro2
User Manual
English
Page 2

目
录
Dierence between Pro 2 and Pro 1 (users updating from Pro 1 to Pro 2 are recommended to read)
0.1 Dierence in appearance and interface
0.2 Special functions of Pro 2
0.3 Comparison of detailed functional parameters
Chapter 1 Preparation for Basic Shooting
1.1 Base preparation
1.1.1 Know the camera
1.1.2 Introduction to oicial accessories
1.1.3 Selection and formatting of storage media
1.1.4 Camera debugging
1.1.5 Connection mode of camera
1.1.6 Download oicial soware
1.1.7 Selection of tripod
1.1.8 Import from multiple storage cards
Chapter 2 Photographing
2.1 Preparation before photographing
2.1.1 [Beginner] Preparation of photography
2.1.2 [Beginner] Selection of accessories for shooting
2.1.3 [Advanced] Selection of advanced accessories for photographing
2.1.4 [Advanced] Preparation of special photographing scene (aerial photography)
2.2 Production
2.2.1 [Beginner] Shooting mode screen and settings
2.2.2 [Advanced] Shooting in special format (Raw, AEB, Timelapse, Burst, super-resolution)
2.2.3 [Advanced] Method for aerial-shooting panoramic picture
2.3 Post-Production
2.3.1 [Beginner] Photo stitching by Stitcher
2.3.2 [Advanced] How to stich Super Resolution photo with Burst photo
2.3.3 [Advanced] Stitching by third party soware, such as PTgui, etc.
2.3.4 [Advanced] Color matching and modification of Photoshop panorama
2.4 Distribution
2.4.1 [Beginner] Fast acquisition of real-time stitching images and sent to SNS
2.4.2 [Beginner] Insta360 Player
2.4.3 Introduction of VR helmet for photo playback (about VR glasses)
2.4.4 Create simple VR roaming (about platform presentation)
Chapter 3 Video Recording
3.1 Preparation before shooting
3.1.1 [Beginner] Setup for recording preparation
Page 3

目
录
3.1.2 [Beginner] Selection of accessories for shooting
3.1.3 [Advanced] Selection of Advanced accessories for video recording
3.1.4 [Advanced] Recording equipment
3.1.5 [Advanced] Introduction of stabilizer
3.1.6 [Advanced] Special scene shooting preparation (aerial photograph)
3.1.7 [Advanced] Create and set logo for real time stitching
3.2 Production
3.2.1 [Beginner] Shooting Mode Screen and Settings
3.2.2 [Advanced] Recording panoramic sound
3.2.3 [Advanced] High FPS Mode
3.2.4 [Advanced] Panoramic aerial photography
3.3 Post-Production Stage
3.3.1 [Beginner] Video stitching by Stitcher
3.3.2 [Beginner] Video Frame Rate Adjustment and Optical Flow Interpolation
3.3.3 [Beginner] Introduction to Premiere cc 2018 Editing
3.3.4 [Beginner] Introduction to FCPX Editing
3.3.5 [Beginner] Quick editing of oicial plugins on Premiere
3.3.6 [Beginner] Application of LUT
3.3.7 [Advanced] Stitching by third-party soware of Mistika VR, AutoPano Video
3.3.8 [Advanced] Other panoramic plugins and their attribute applications
3.3.9 [Advanced] Post production of panoramic sound
3.3.10 [Advanced] Mending Sky for Aerial Photography
3.3.11 [Advanced] Erasing Tripod for Ground Shoot
3.3.12 [Advanced] Introduction of other stabilization methods
3.4 Distribution
3.4.1 [Beginner] Insta360 Player
3.4.2 [Beginner] Introduction of CrystalView 8K, the panorama player
3.4.3 [Beginner] Introduction to other players (Gopro VR Player & PotPlayer)
3.4.4 [Advanced] Upload to various VR platforms
3.4.5 [Advanced] Introduction of VR headset for photo playback (about VR glasses)
Chapter 4 Live-streaming
4.1 Preparation before shooting
4.1.1 [Beginner] Basic preparation for shooting
4.1.2 [Beginner] Selection of accessories for live-streaming
4.1.3 [Beginner] Connection and Stitching Calibration before live-streaming
4.1.4 [Intermediate] Preparation of 4G network Live-streaming (Outdoor live-streaming)
4.1.5 [Intermediate] OBS Computer forwarding push for live-streaming
4.1.6 [Advanced] How to add or edit logo for live-streaming
4.2 Shooting stage
4.2.1 [Beginner] Live Interface and parameter setting
Page 4

目
录
4.2.2 [Beginner] Push mode: internal push, server push, HDMI output
4.2.3 [Beginner] Live-streaming while storing
4.2.4 [Beginner] External audio setting
4.2.5 [Intermediate] Indoor live-streaming scheme
4.2.6 [Intermediate] Outdoor Live-streaming scheme
4.3 Distribution
4.3.1 [Beginner] YouTube live-streaming
4.3.2 [Beginner] Facebook live-streaming
4.3.3 [Beginner] Weibo live-streaming
4.3.4 [Intermediate] Charging platform live-streaming, Utovr (Arcvideo, Tencent Cloud, etc.)
Chapter 5 Street View
5.1 Preparation before shooting
5.1.1 Basic preparation for Street view
5.1.2 Introduction of shooting accessories for special street view
5.2 Production
5.2.1 Parameter setting of car mounted shooting of street view
5.3 Post-Production
5.3.1 Upload street view through Stitcher
5.4 Distribution
5.4.1 Watch street view content via Stitcher
Chapter 6 Manual Exposure, Curve Adjustment, Customize and Template
6.1 [Advanced] Manual exposure and curve adjustment
6.2 [Advanced] Customize and template
Chapter 7 Common Problems
7.1 Common camera problems
7.2 Common problems for Insta Pro app
7.3 Common problems for Insta360 Pro Stitcher
7.4 Other common problems
7.5 Error message summary
7.6 Oicial technical support and Forum
Page 5
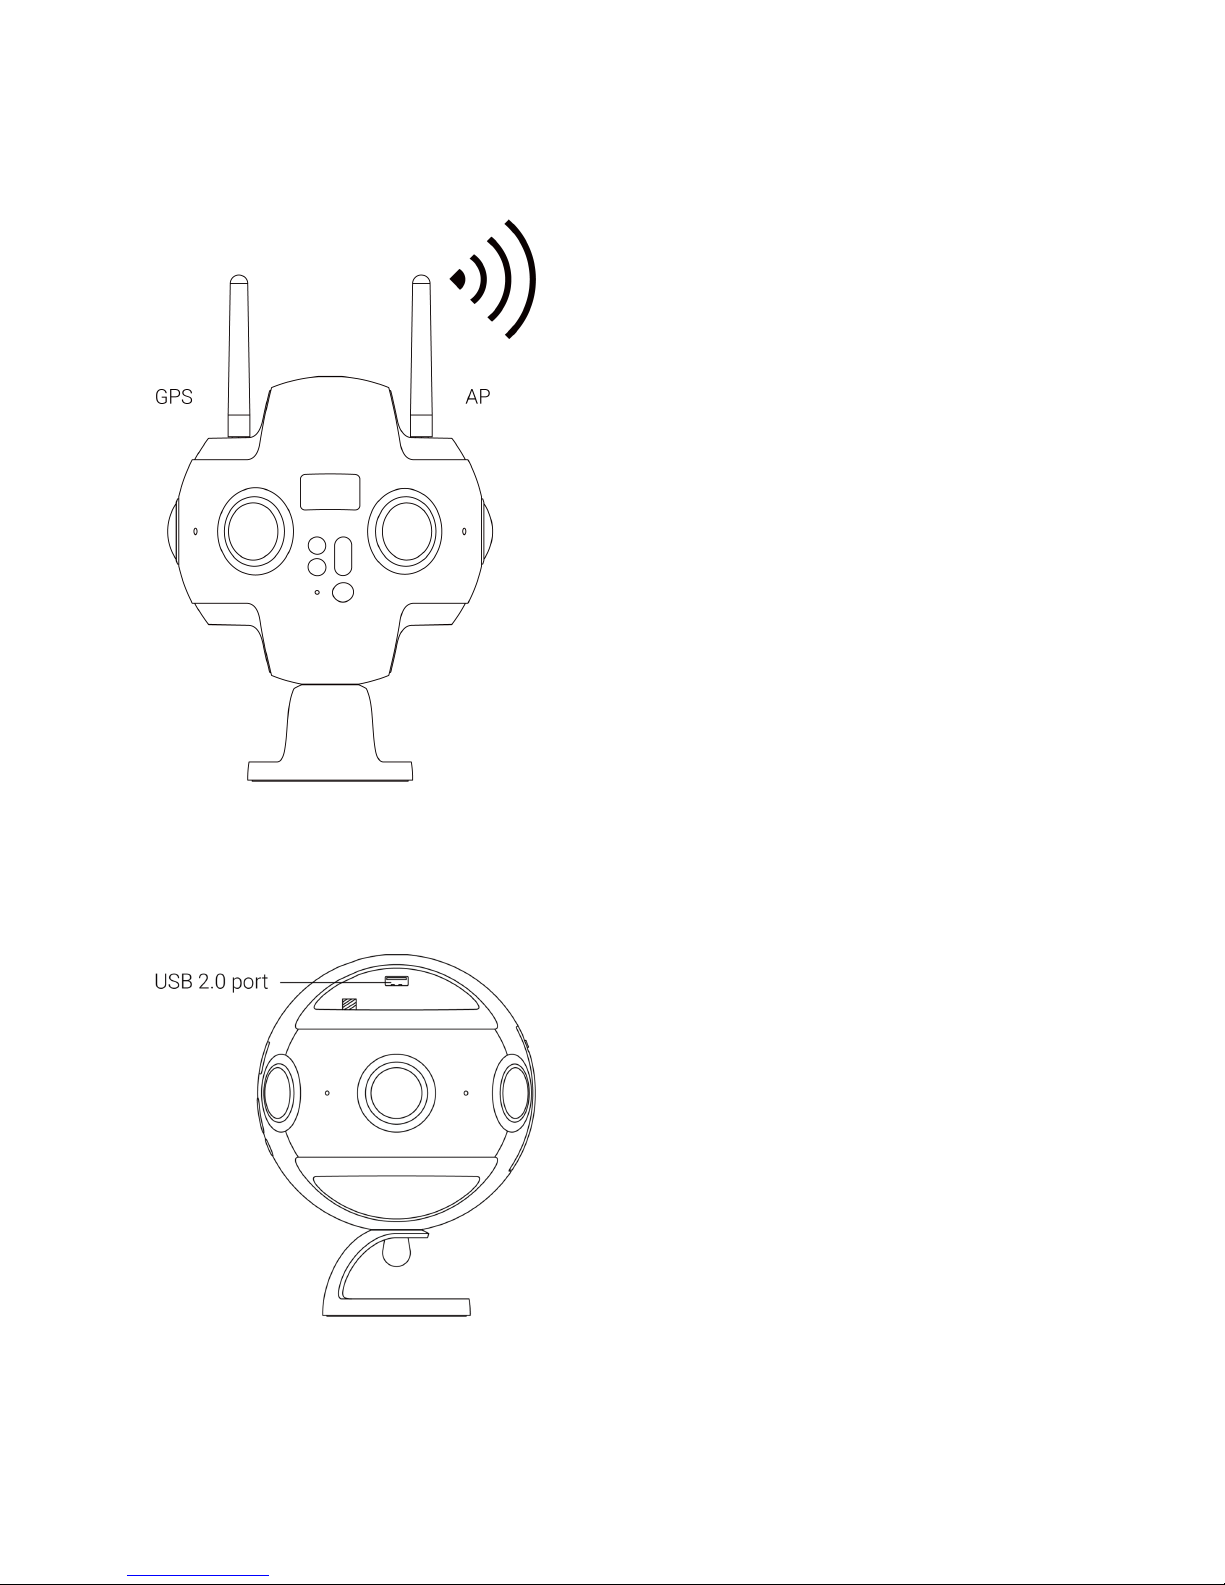
1 Dierence in appearance and interface
1. Compared to the Pro 1, the Pro 2 adds a AP (WiFi) antenna and a GPS antenna to the top.
The stable communication distance of Pro 2 AP signal is twice as long as that of Pro 1.
Dierent from Pro 1, which needs to purchase additional accessories in order to use GPS module, Pro 2 has integrated
GPS module in the camera itself.
Page 6
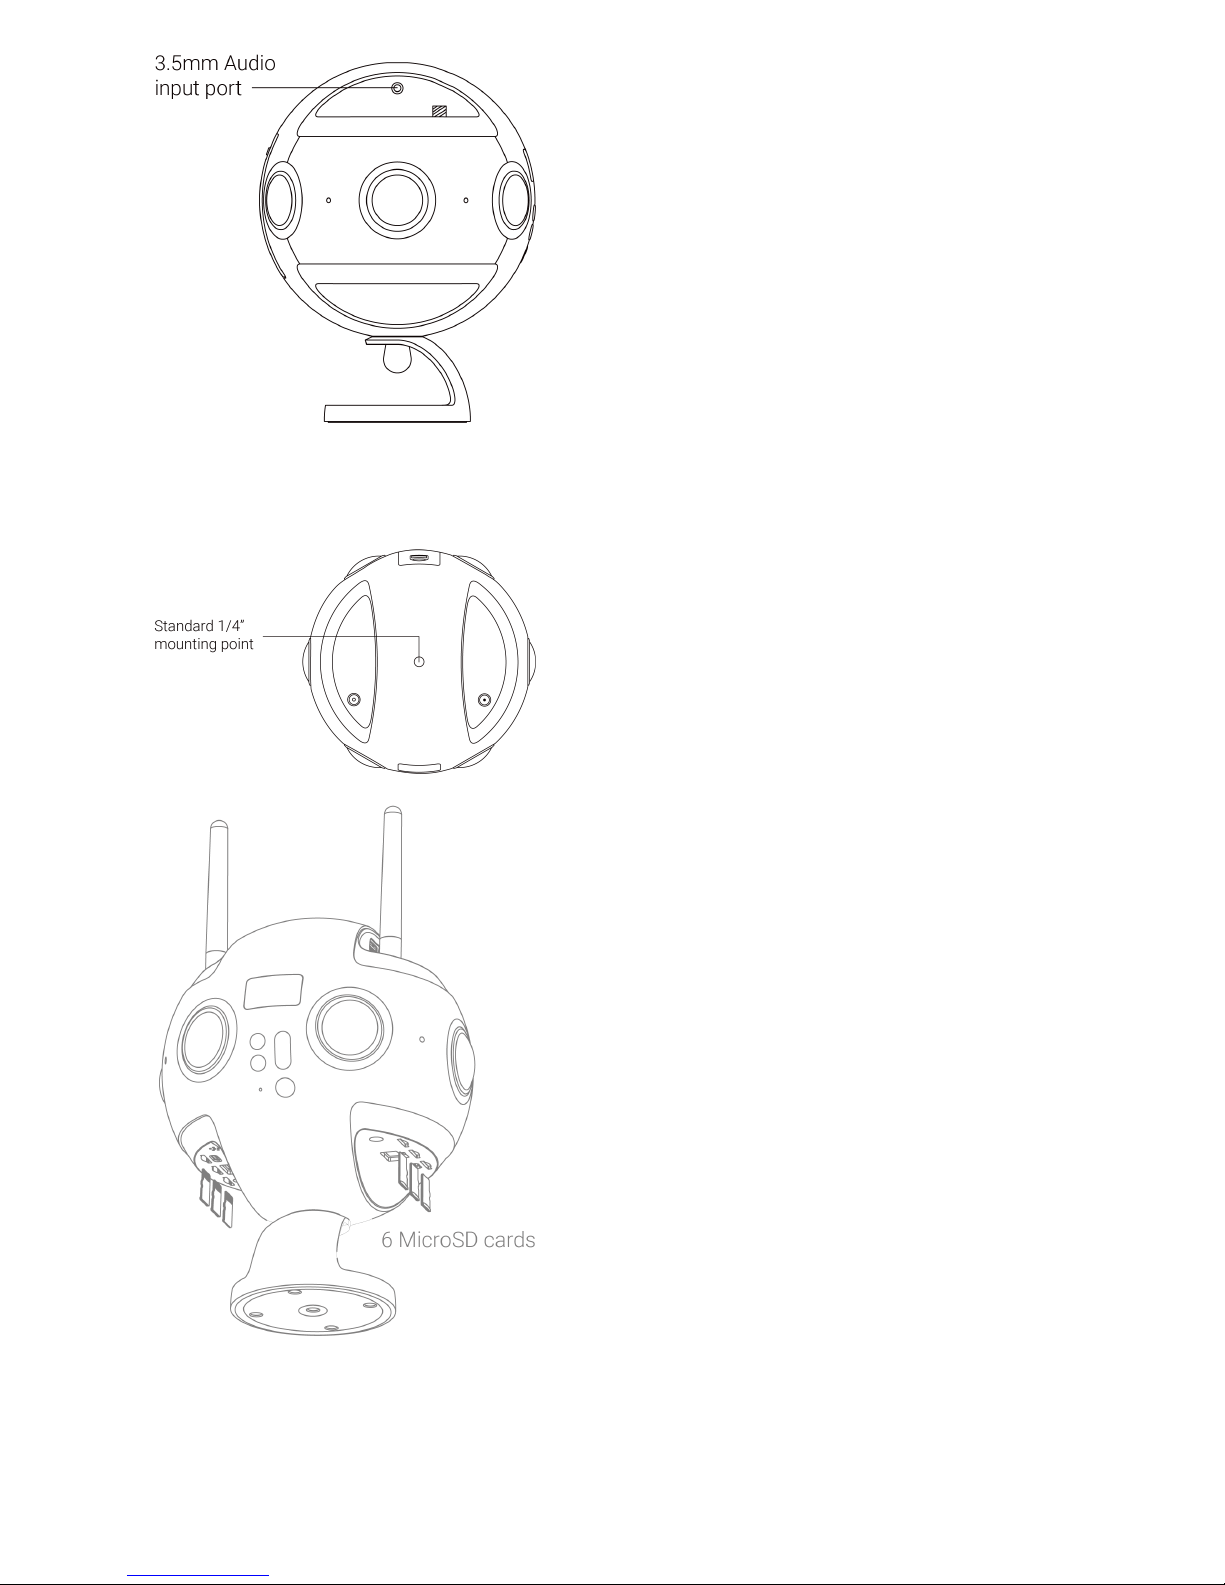
2. A new USB2.0 port, a 3.5mm port, and a 1/4 tapped hole are added to the top of the Pro 2 to make it easier for users
to use some external USB or 3.5mm microphones and hold them directly above the camera. It is especially suitable
for panoramic acoustic microphones that must be placed in the center of the camera for recording.
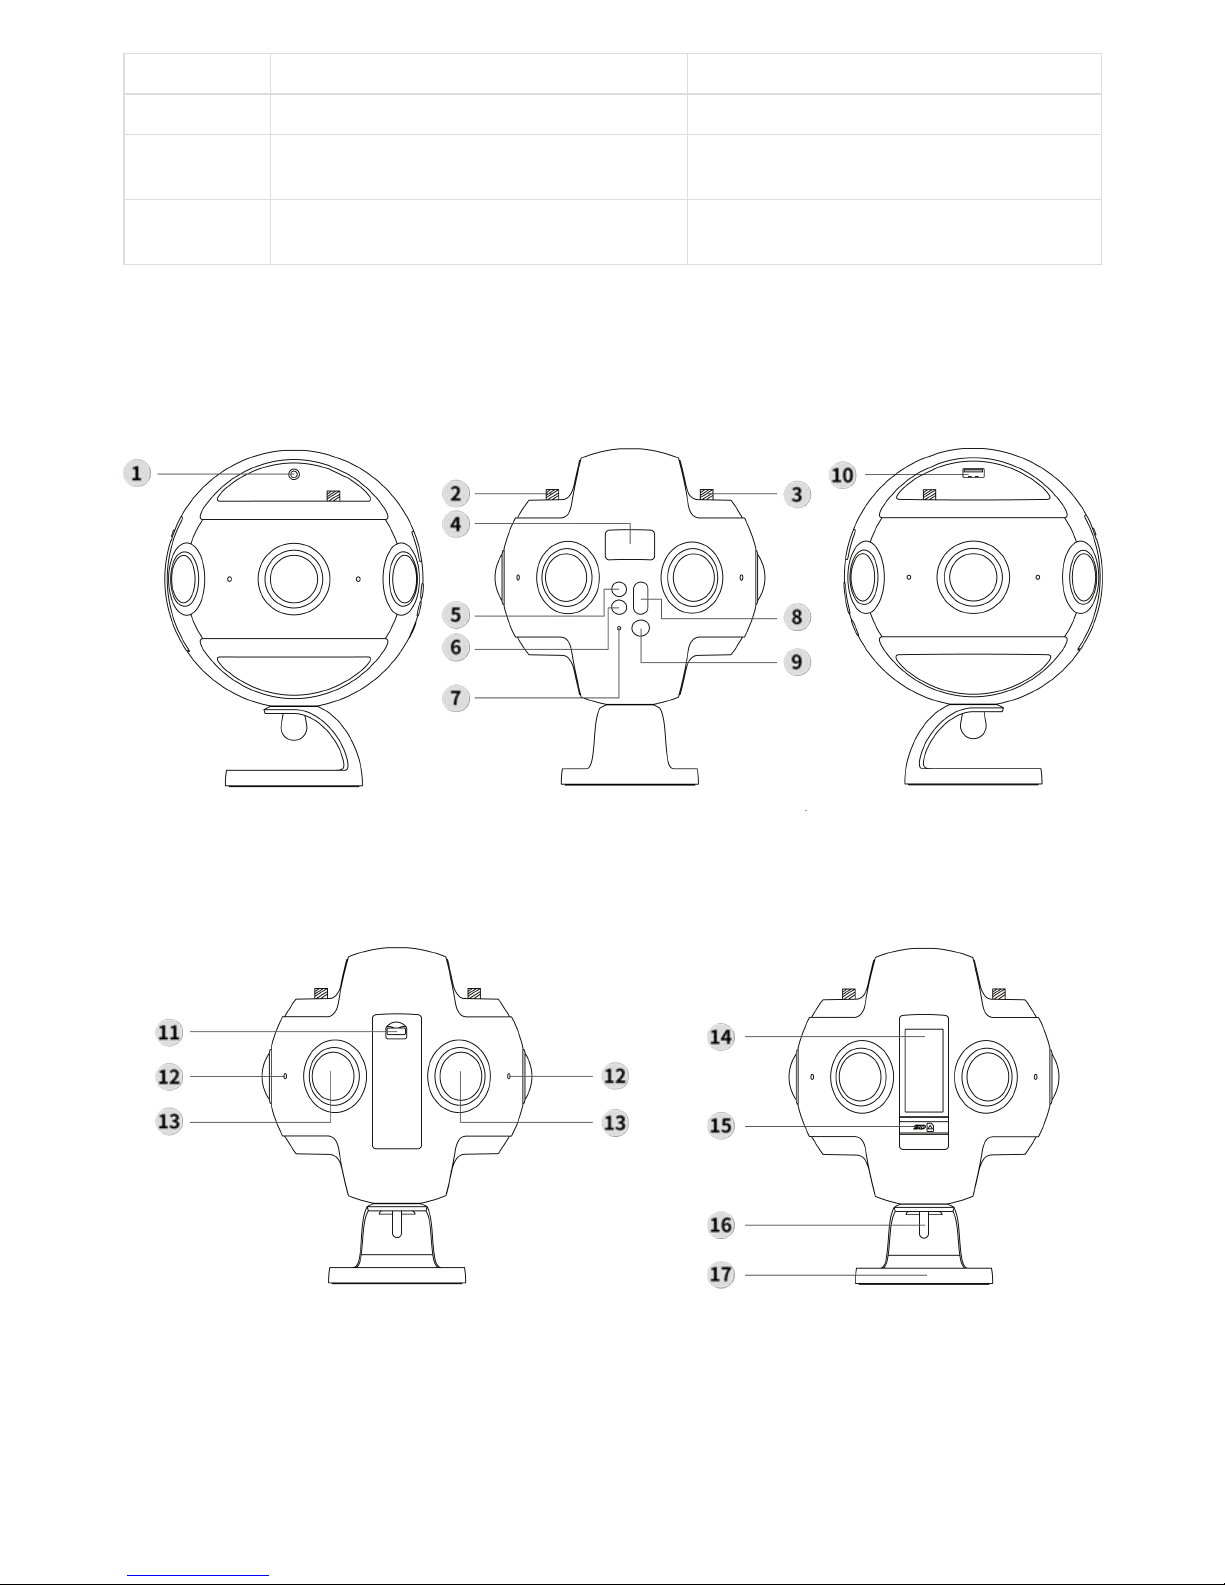
3. The largest change in Pro 2 is the addition of six TF (Micro SD) card slots to the bottom interface, because of the
multi-card mechanism, Pro 2 allows you to record six high-quality original films while recording a real-time stitching
video. Single video rate is up to 120Mbps (8K3D@30fps, 8K2D@60fps, 4K3D@120FPS and other video gear), the rate is
equivalent to three times that of Pro 1, and the video quality details will be better.
Page 7

In the process of using, as the number of storage cards increases, the file directory structure will be more complex
than that of Pro 1, but the stitching soware, Stitcher, provides a tool to import Pro 2 content with only one key. User
only needs to choose storage device reading mode in the camera, and then connect Pro 2 to computer through the
Type-C data line or the network cable to easily transfer the material from the multiple Pro 2 storage cards to the
computer by using the one-key import tool. Please refer to 1.1.8 for detailed instructions of how to import files from
multiple storage cards.
2 Special functions of Pro 2
(1) FlowState Stabilization
Pro 2 hardware is equipped with nine-axis gyroscopes and implements FlowState super stabilization against moving
scenes.
(2) Automatic Exposure Bracketing (AEB) photography, which allows you to select 3, 5, 7, 9 photos
Pro 2 adds AEB photography mode (HDR mode needing post synthesis in Pro 1 equals 3 AEB photos). You can choose to
shoot 3, 5, 7, 9 photos with equal intervals for post synthesis to be high dynamic range photos.
(3) All photo modes can be photographed in Raw+jpg formats
Raw+jpg formats are available to all the shooting modes of Pro 2 (general single shooting, AEB shooting, Burst 10 groups
of photos, Time-lapse delay photography). Images in both dng and jpg formats will be stored.
(4) HDR video
Some video modes in Pro 2 allow you to shoot videos with HDR high dynamic range eect and are suitable for shooting
scene with large light ratio.
(5) Multi-channel shooting, higher rate, wider color gradation and better quality
Pro 2 has 7 cards stored inside, including 6 TF (MicroSD) cards plus 1 SD card. While storing real-time stitching with low
bitrate proxy video into SD card, it can store high bitrate original chip into 6 TF (MicroSD) cards, up to 120 Mbps rate,
which is equivalent to 3 times that of Pro 1 bitrate, with better image quality details. Pro 2 takes YUVJ420P, a wider range
of colors than Pro 1, which is able to show brighter colors and darker colors.
(6) Dual antenna, far and more stable signals
An external antenna is added to ensure smooth control preview within 0 ~ 20 m and the distance is doubled compared
with Pro 1. GPS module and antenna are added to the camera itself and no extra GPS accessory is needed, so as to avoid
the clutter of external accessories and interference to signal when shooting street view.
(7) Farsight system support
Pro 2 carries Farsight, which is the latest invented graph transmission system by Insta360, which can achieve smooth
manipulation of long distance. Communication distance is as long as 300 meters in the ground-to-ground open
environment without shelter and 1 km in the air-to-air environment without shelter. Moreover, Farsight can also support
Pro 1 for manipulation.
Page 8

3 Comparison of detailed functional parameters
Pro 2 Pro
Weight 1550g 1228g
Diameter φ143mm φ143mm
Material aluminum alloy aluminum alloy
Lens 200°6 x F2.4 fish-eye lens 200°6 x F2.4 fish-eye lens
Photo
Specification
real-time stitching:
7680 x 7680(8K 3D)
7680 x 3840(8K 2D)
post stitching:
7680 x 7680(8K 3D)
7680 x 3840(8K 2D)
real-time stitching:
7680 x 7680(8K 3D)
7680 x 3840(8K 2D)
post stitching:
7680 x 7680(8K 3D)
7680 x 3840(8K 2D)
Video
specification
post stitching:
7680 x 3840@30 FPS HDR (8K 2D)
7680 x 7680 @30 FPS(8K 3D)
7680 x 3840 @60 FPS (8K 2D)
6400 x 6400 @60 FPS (6K 3D/2D)
3840 x 3840 @120 FPS (4K 3D/2D Binning)
real-time stitching:
3840x3840@30fps (4K 3D)
3840x1920@30fps (4K 2D)
post stitching:
6400 x 6400@30fps(3D)
7680 x 3840@30fps(2D)
3840 x 3840 @60 FPS(4K 3DBinning)
3840 x 1920 @120FPS(4K 2D Binning)
real-time stitching:
3840 x 3840@24fps(4K 3D)
3840 x 1920@30fps(4K 2D)
Photo Files JPEG/ DNG JPEG/ DNG
Video Files mp4 mp4
Video Color
Space
YUVJ420P, oering a wider color range YUV420P
Video Coding
Format
H264 directly from camera, H265 in post
production
H264 directly from camera, H265 in post
production
Livestreaming
Modes
Built-in server
Custom server
HDMI output
3840x1920@30fps (4K 2D live) simultaneously
store 8K
3840x3840@30fps (4K 3D live) simultaneously
store 6K 3D
Note: live while storage supported.
Built-in server
Custom server
HDMI output
3840x1920@30fps (4K 2D live) can store 4K
3840x3840@24fps (4K 3D live) can store 4K 3D
24frame
Note: live while storage supported.
Livestreaming
Protocol
rtsp, rtmp, hls rtsp, rtmp, hls
Storage 6 MicroSD Card+1 SD Card 1SD Card / USB 3.0
ISO Range 100-6400 100-6400
Page 9

Pro 2 Pro
Exposure
Modes
Auto
Manual
Lens-by-Lens Custom
Shutter Priority (photo only)
ISO Priority (photo only)
video mode can set ISO upper limit
Auto
Manual
Lens-by-Lens Custom
Shutter Priority (photo only)
ISO Priority (photo only)
White
Balance
Modes
Auto, Manual Auto, Manual
Photo Modes
Single shot
Burst (10 continuous shots)
Timelapse
AEB (Auto Exposure Bracket, optional 3, 5, 7,
and 9 photos for in-camera HDR photos)
Raw and JPG are both available in all modes
Single shot
Burst (10 continuous shots)
RAW
HDR
Video mode
General video (opening i-Log color)
High-frame rate video (Binning) (open i-Log
color)
Note: partial video levels support HDR eect
General video High-frame rate video (Binning)
Time-lapse photography
Note: optionally to open Flat-color
Bitrate per
Lens
Up to 120Mbps Up to 40Mbps
Power 12V 5A 12V 5A
Battery
Capacity
5100mAh 5100mAh
Working
Temperature
0-40℃ 0-40℃
Storage
Temperature
-20 ~ 40℃ -20 ~ 40℃
WiFi
Specifications
802.11 b/g/n, 2.4GHz. Signal range is about 20
meters in open space. Max preview framerate of
30 FPS, supported in roughly 5-meter range.
802.11 b/g/n, 2.4GHz. Signal range is about 10
meters in open space. Max preview framerate of
1 FPS, supported in roughly 5-meter range.
GPS Signal
Antenna
Supported Not supported
AP Signal
Antenna
Supported Not supported
Ethernet Port Supported Supported
Video
Transmission
Insta360 Farsight provides ground-to-ground
range of up to 300 meters and ground-to-air
range of up to 1000 meters, with 30 FPS preview.
Insta360 Farsight provides ground-to-ground
range of up to 300 meters and ground-to-air
range of up to 1000 meters, with 1 FPS preview.
Audio 4 x Mono Mic 4 x Mono Mic
Audio Coding
Format
AAC AAC
Spatial Audio Ambisonic Ambisonic
Gyroscope Ultra-precise 9-axis gyroscope Ultra-precise 6-axis gyroscope
Stabilization FlowState stabilization General stabilization
Page 10
Pro 2 Pro
Stitching OpticalFlow / Template OpticalFlow / Template
Exposure
Range
12 stop 12 stop
Control
Soware
Windows / Mac / iOS / Android Windows / Mac / iOS / Android
1.1.1 Know the camera
Page 11
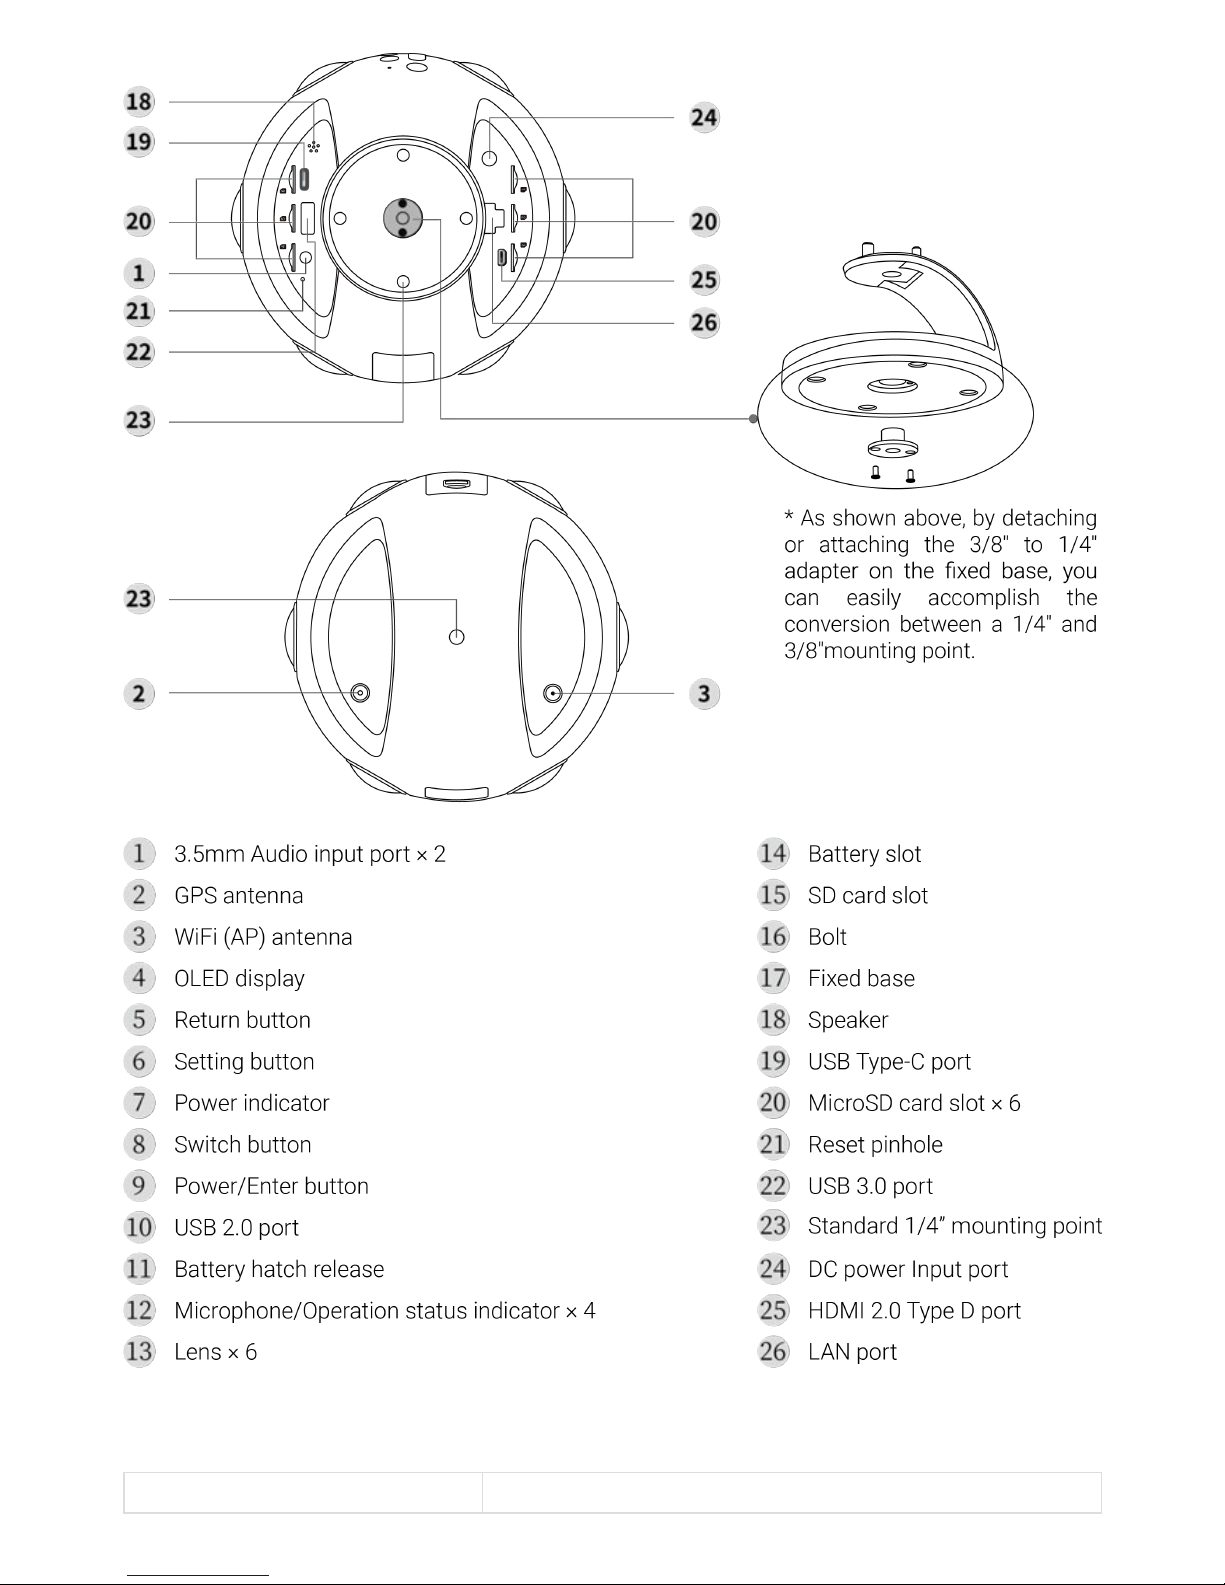
Specification parameter
Specification Parameter
Page 12
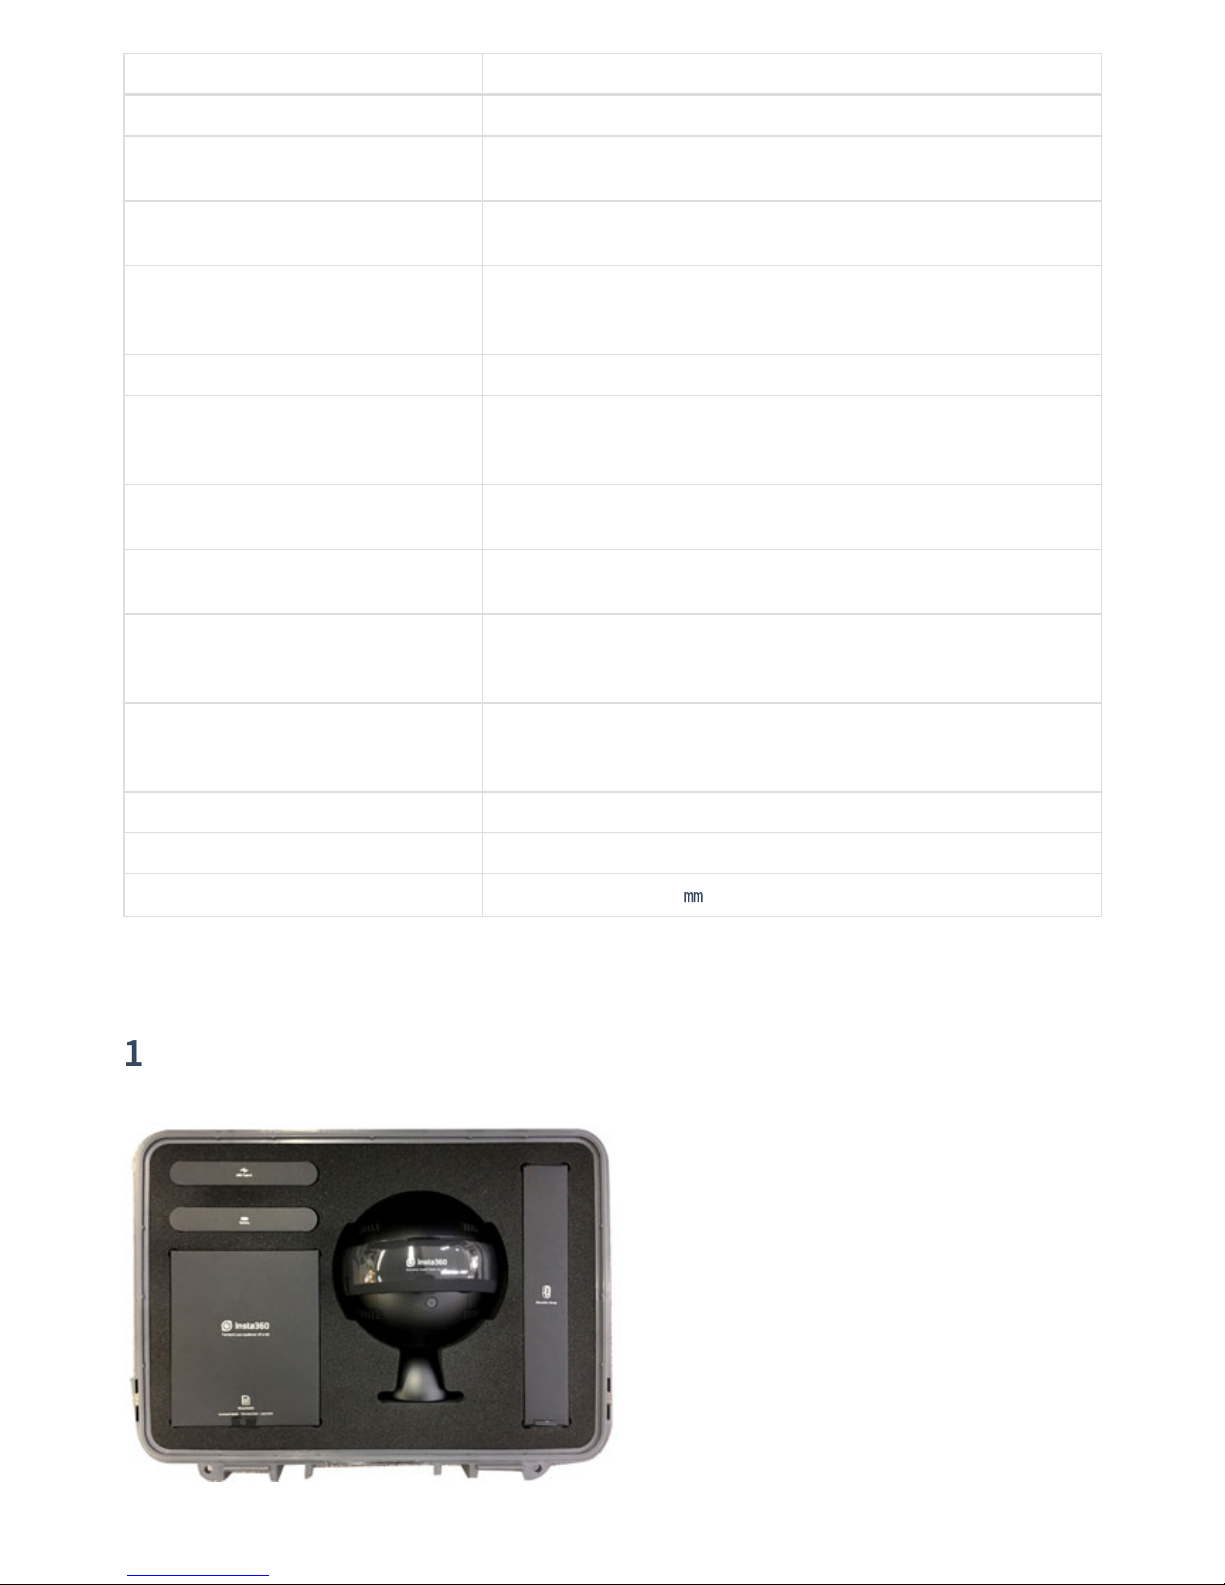
Specification Parameter
Lenses 6 * 200°F2.4 fish-eye lenses
Maximum resolution of single-path
photograph
4000 * 3000
360°panoramic photo shooting
Real-time Stitching/ Post-Processing Stitching, 7680 * 3840 (8K) at the
maximum.
360°panoramic video recording
Real-time Stitching in the camera, 3840 * 1920@30fps (4K) at the
maximum.
Post-Processing Stitching, 7680 * 3840@60fps (8K) at the maximum.
360°3D panoramic photo shooting Real-time/ Post-Processing Stitching, 7680 * 7680(8K 3D)at the maximum.
360°3D panoramic video recording
Real-time stitching in the camera, 3840 * 3840@30fps (4K)at the
maximum.
Post-Processing Stitching, 7680 * 7680@30fps (8K 3D) at the maximum.
File format
Photo: JPG, DNG (RAW format)
Video: MP4
Storage support
6 TF (MicroSD) cards of V30 speed level, UHS-I
SD card of V30 speed level, UHS-I, Sandisk Extreme Pro is recommended
Power and endurance
5100mAh removable battery (endurance time about 50min)
12V/5A power adapter (Continuous recording for several hours at room
temperature)
Audio recording
Built-in Mic * 4
External 3.5 standard audio input interface * 2
Recordable Ambisonic panoramic sound frequency
Power 12V 5A
Camera weight (containing battery) About 1.550kg
Camera size Sphere diameter of 143
㎜
1.1.2 Introduction to oicial accessories
Page 13
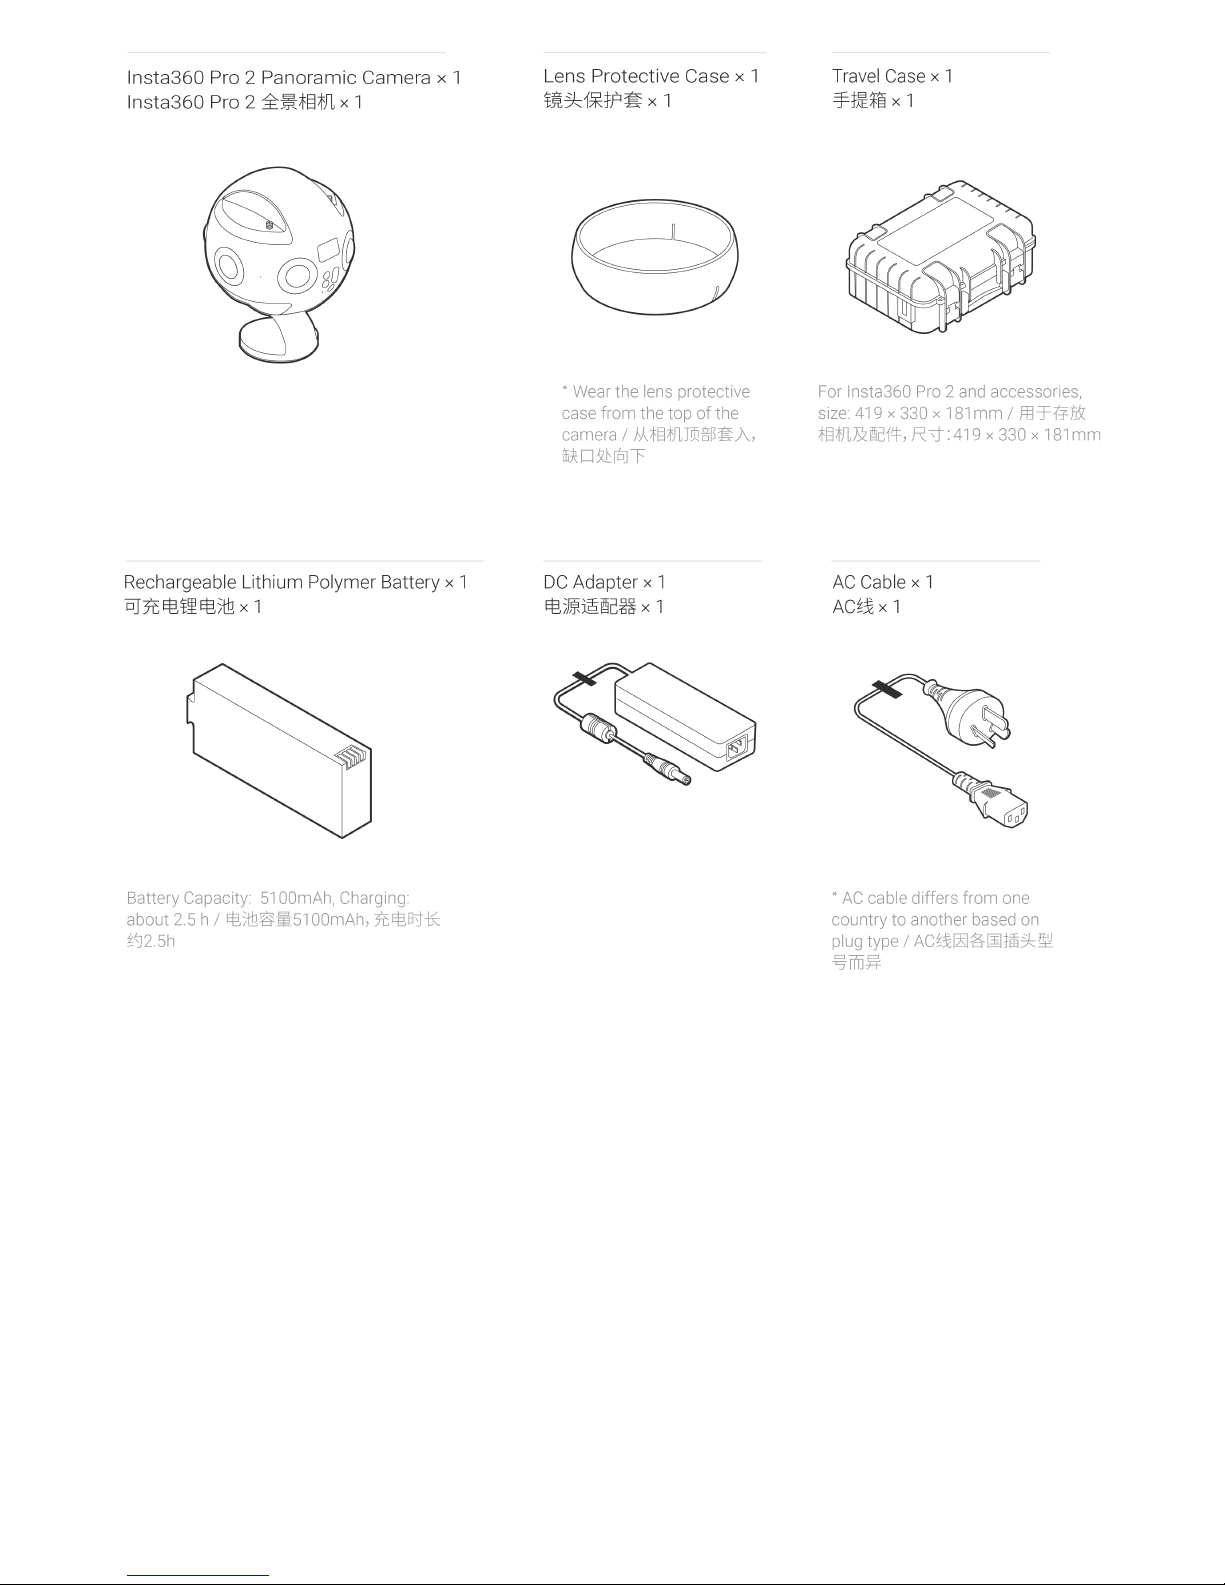
Note: according to international aviation regulations, if you check in your luggage, please remove lithium batteries and
carry them around.
Page 14
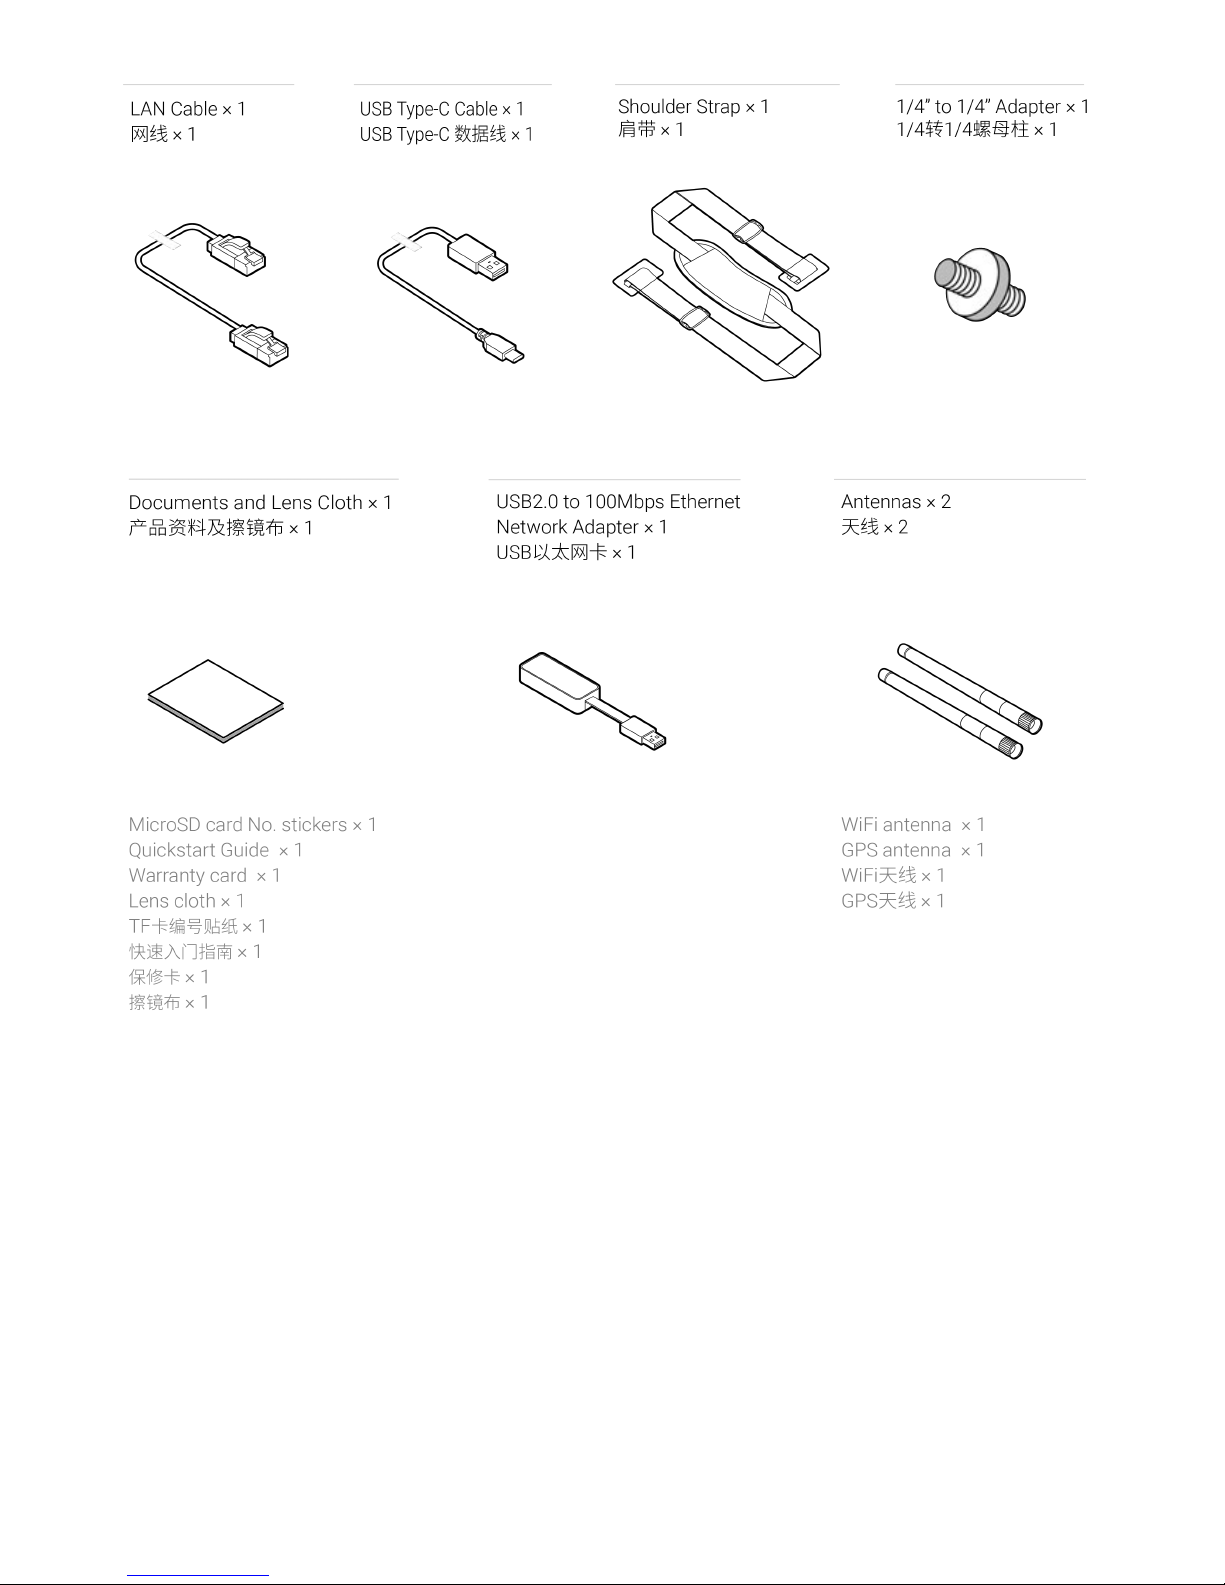
1.1.3 Selection and formatting of storage media
6 TF (MicroSD) cards and one SD card must be inserted to use Insta360 Pro 2 to shoot.
Page 15
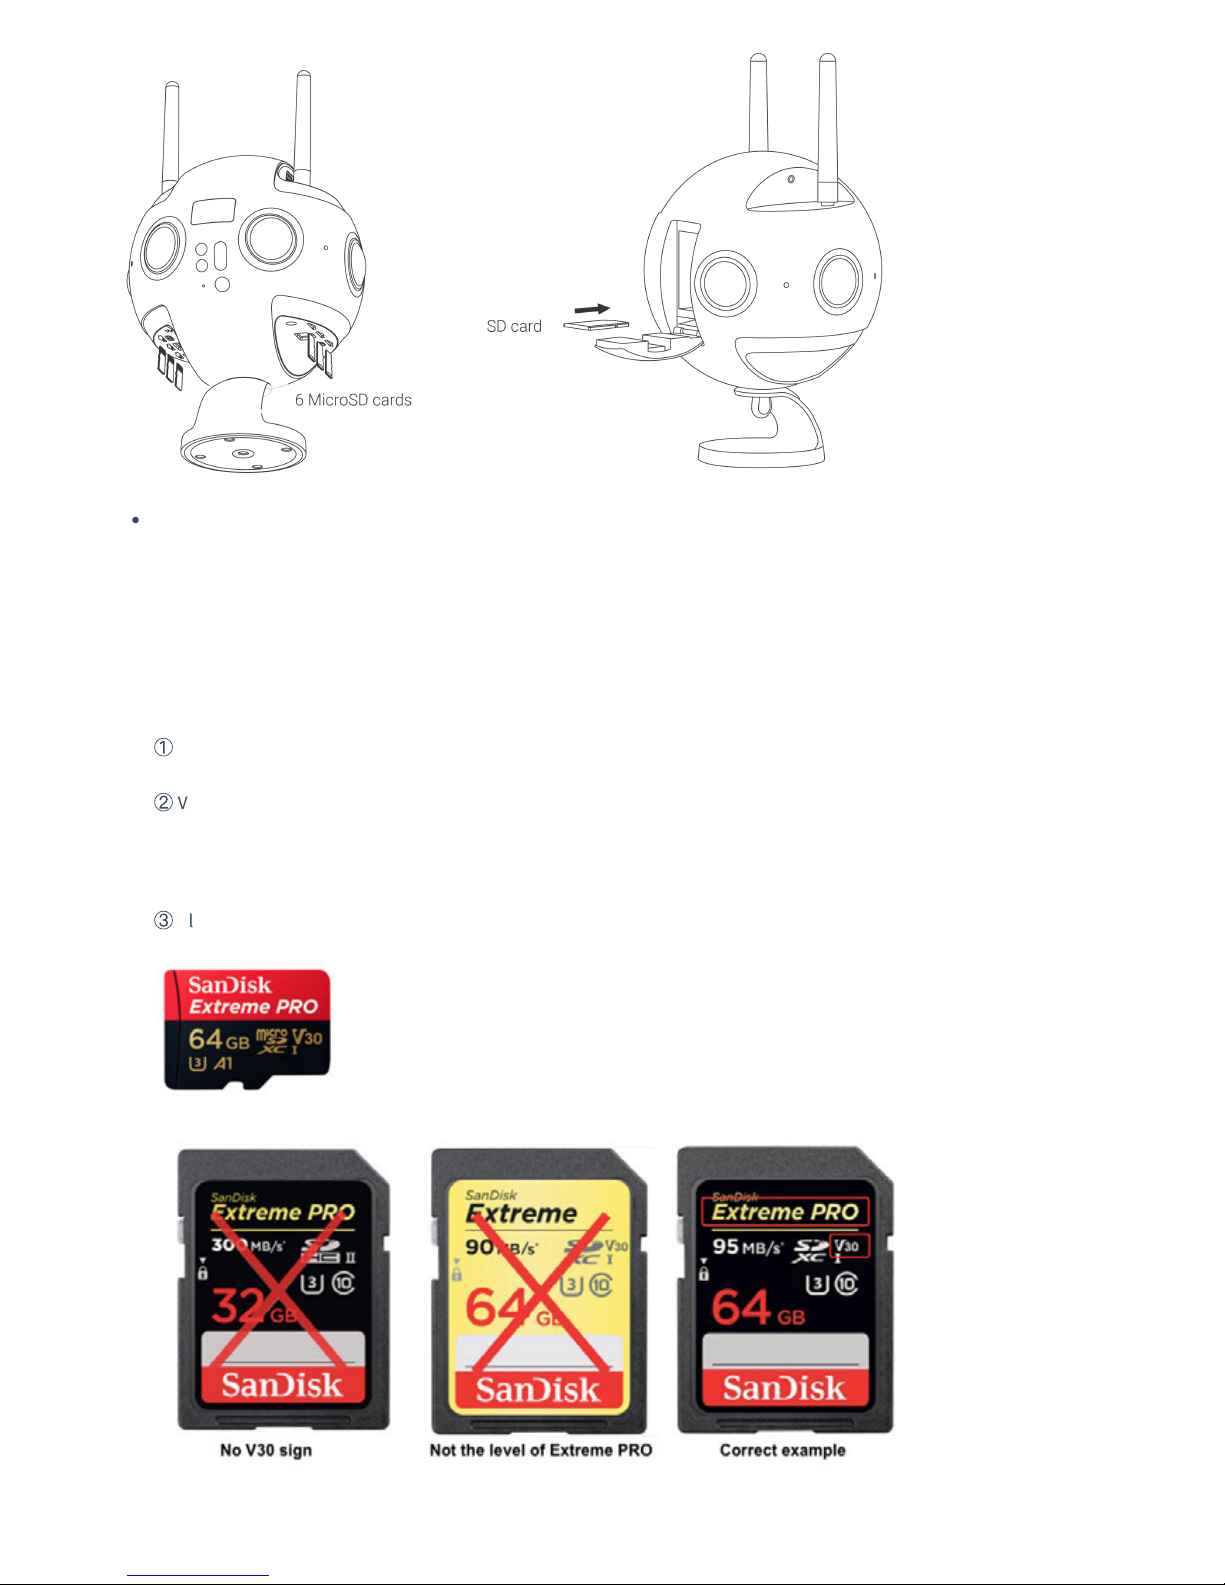
Selection and notes for storage devices
Both TF (MicroSD) cards and SD card required by Insta360 Pro 2 needs to reach the read-write speed level of V30
memory card.
It is recommended to purchase SanDisk SD card (JD.com purchase link, Amazon purchase link) and TF (MicroSD) card
(JD.com purchase link, Amazon purchase link). When selecting memory cards, note that:
①
To choose Extreme Pro instead of Extreme card;
②
V30 mark is a must. Although some high-speed cards have high read-write speed per second, they are not suitable
for simultaneous multi-channel file writing. Aer using for a period of time, accumulation of file fragments will result
in loss of frame or directly stop recording video;
③
Please make sure the format of the card is exFat, if not, it should be formatted as exFat.
Page 16
Pro 2 does not have maximum capacity limits on SD card / TF (MicroSD) card
Note for removing storage card
As the file directory structure is more complex in Pro 2, please make sure to turn o the camera before pulling out
storage cards. If the storage card is pulled out when the camera is on, files may fail to be stored completely in very
few cases. Therefore please make sure to turn o the camera first before removing any storage card.
How to use camera to format a SD card
Frequent recording of high-resolution video will lead to accumulation of data fragments generated by multiple files,
aecting the card speed. So, it is recommend to periodically format storage devices, especially before important
shooting.
Pro 2 has feature of standby formatting and is easy to operate. Using Pro 2 camera to format saves hours and is more
completed than using computer soware. It is strongly recommended to use the camera to format storage devices.
Detailed operation steps are shown below.
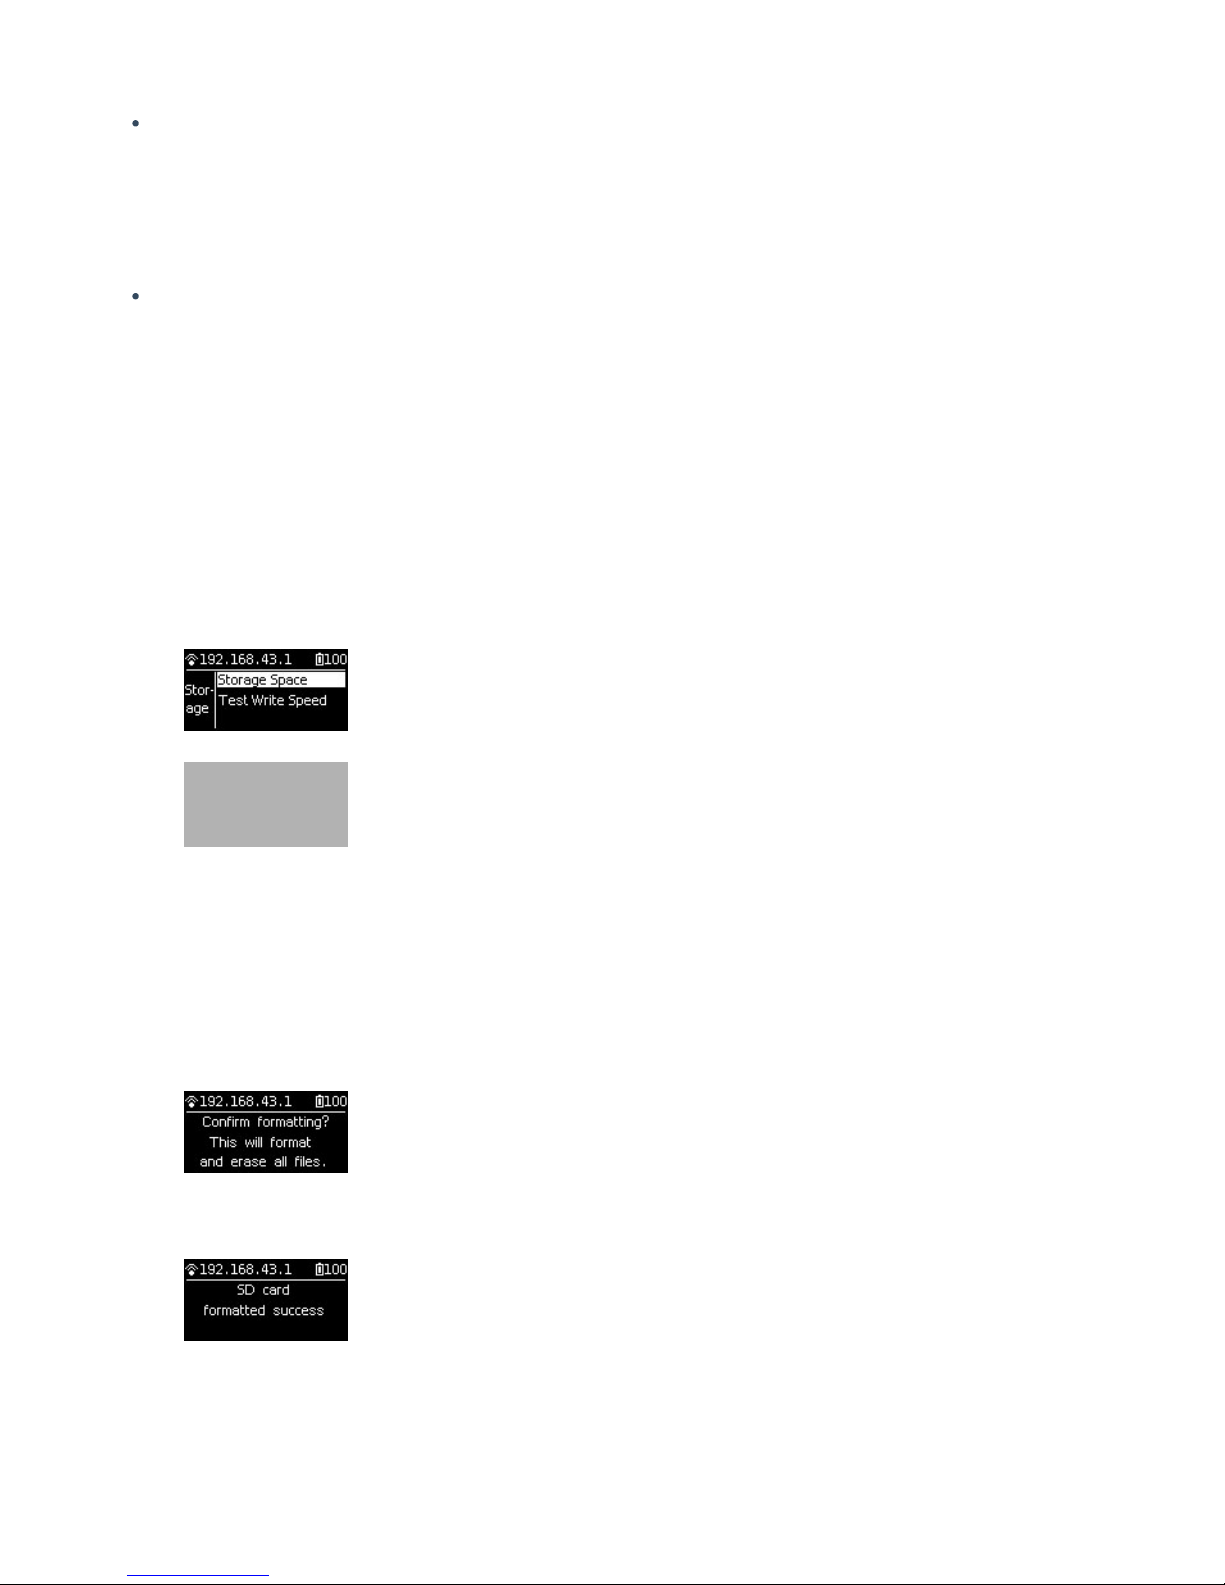
1. Select camera settings on the screen menus, sequentially, Settings -Storage-Storage Space
2. Under this menu, you can view the amount of available capacity / residual capacity information of storage devices
inserted in the current camera. Press the Power button to click on a storage device into the next step to be
formatted, and then the camera will remind you whether to proceed with formatting, continue to click on the
Power button to confirm and then it will start to format the selected storage device. (Please note that before
formatting, you must backup the original data on storage devices and the data cannot be restored once
formatting completes.)
(1) Once formatted, if you are prompted by Formatted success, it means that formatting succeeds.
(2) If it shows "Formatted completed with fragments le", it means formatting is completed, but there are still
some file fragments existing. The SD card cannot be formatted into the required format, please contact the
manufacturer of the card to fix it or replace with a new card.
Page 17
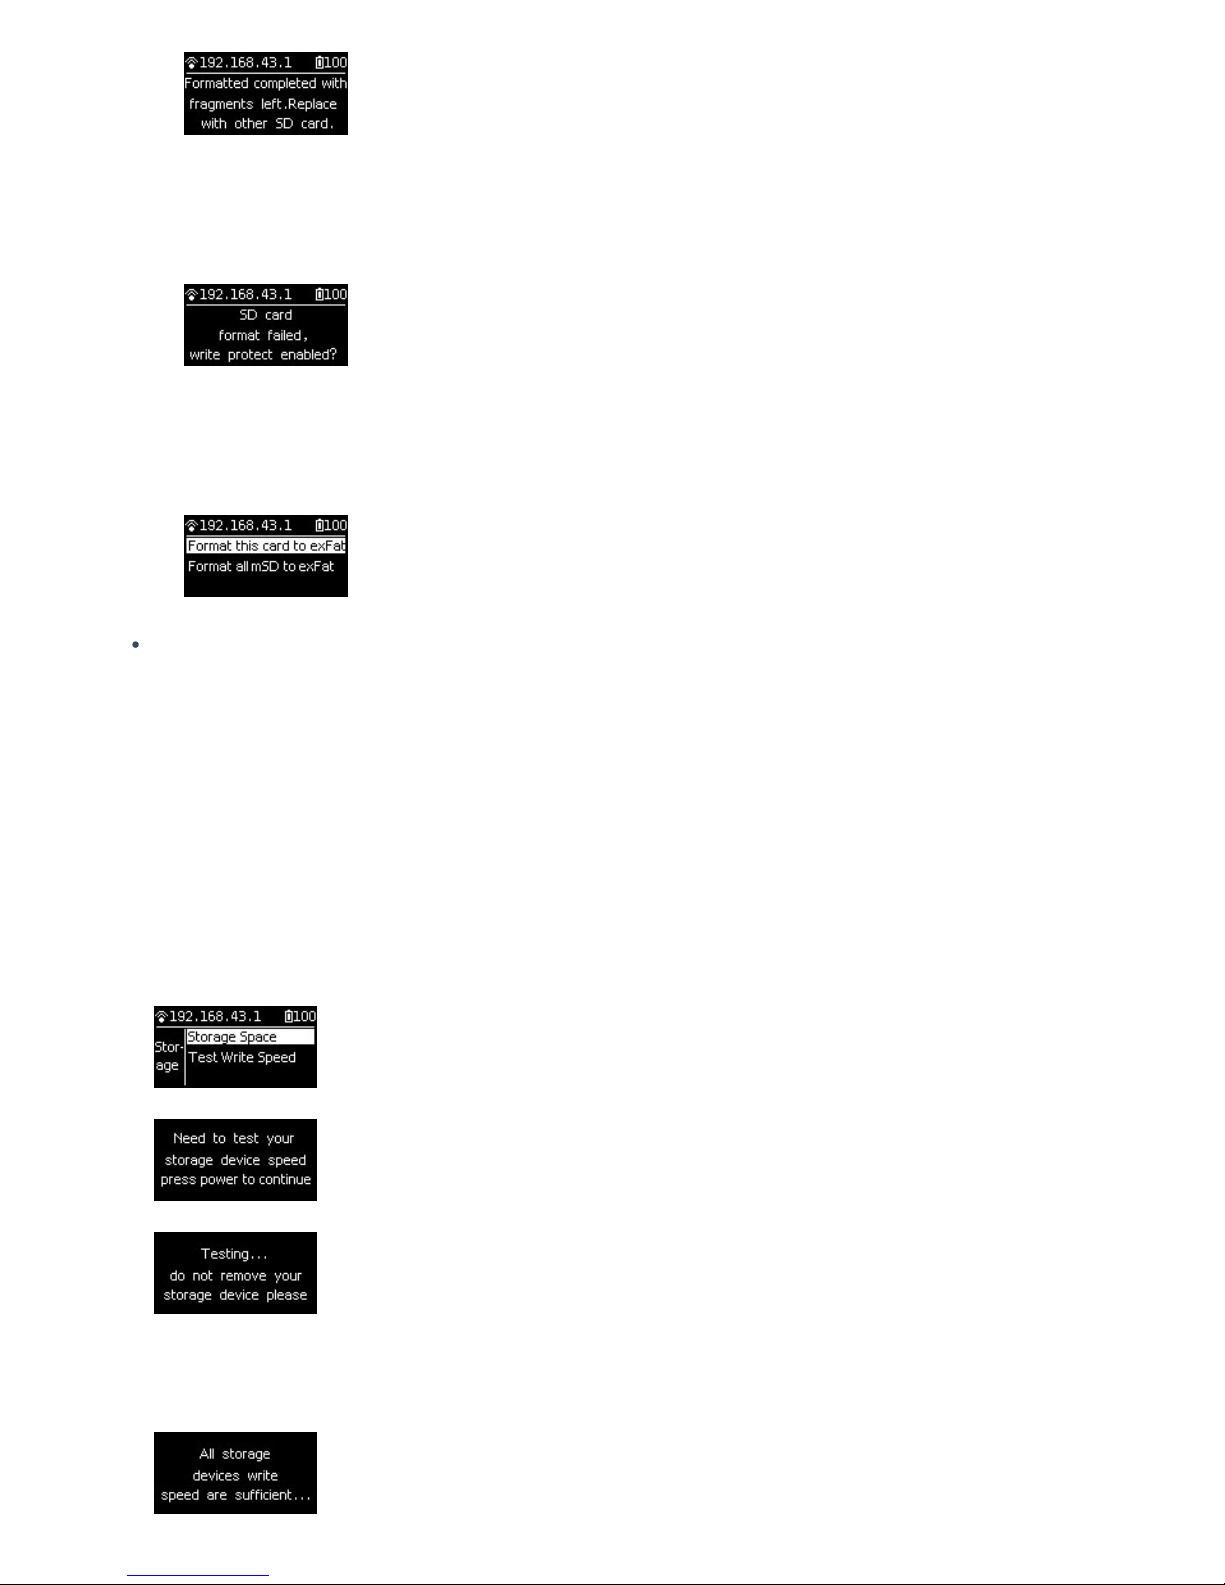
3. Once formatting is completed, if it prompts "Failed", it represents a format failure. Please check whether this
storage device’s write-protection is turned on or it has been corrupted. Please try formatting again aer you
remove write-protection.
4. Pro 2 camera can format 6 MicroSD cards together at the same time. Choose any one of the MicroSD cards and
proceed to the next step. There will be two selections for you to choose: format this card to exFat or format all
devices to exFat.
About card speed test
Insta360 Pro 2 use multi-card mechanism to store files and the single video rate in each storage card is up to
120Mbps, so Pro 2 has high standards on storage card’s write speed and stability. Please use storage card which
meets our oicial recommended standards.
When using new SD cards or MicroSD cards on your camera to record video or record livestream for the first time, you
can follow the instruction on the camera to start a card speed test to ensure the storage card meets recording
standards.
You can also go to camera settings on the screen menus and choose Storage. There is Test Write Speed function
shown below Storage Space. Using Test Write Speed function can start a card speed test.
If the test result is “All storage devices write speed are suicient”, all the storage cards’ write speed meet the
recording requirement.
Page 18

If the test result shows some card’s write speed isn’t suicient, it means recording process may be aected with this
card. Please follow the instructions above to format this SD card using formatting function on camera. Please make
sure to back up your files before formatting. Aer formatting, please start a speed test again on the formatted card.
Using storage cards which meet the requirements on write speed and stability is a key precondition for recording
video successfully. Therefore, please make sure to have a speed test before recording.
1.1.4 Camera debugging
When we get Insta360 Pro 2 camera, before starting your professional panorama experience, please learn some necessary
knowledge first.
Lens protection and cleaning
Insta360 Pro 2 is a six-eye panorama camera, whose fish-eye wide-angle lens is parallel to one lap of the camera itself.
Because of protruding shape, please be careful during use and shooting lest and avoid grinding or unnecessary
damage.
The camera is equipped with rubber protective jacket for lens. When normally packed or in working non-shooting
status, please use protective jacket to possibly minimize lens damage risk.
It is also easy to leave fingerprint on convex lens, so we’ve equipped the camera with camera cloth. Please keep the
camera clean, avoid any stain that impacts quality and stitching eect.
About power supply and electricity quantity
For panoramic photography, electricity guarantee is important. Insta360 Pro 2 provides two types of power supply.
You can use multiple batteries or connect directly to the power supply at suitable locations to extend camera usage
time.
For details please refer to the following information.
Page 19
Power adapter:
The camera adopts12V 5A power adapter with DC interface.
Battery type and duration:
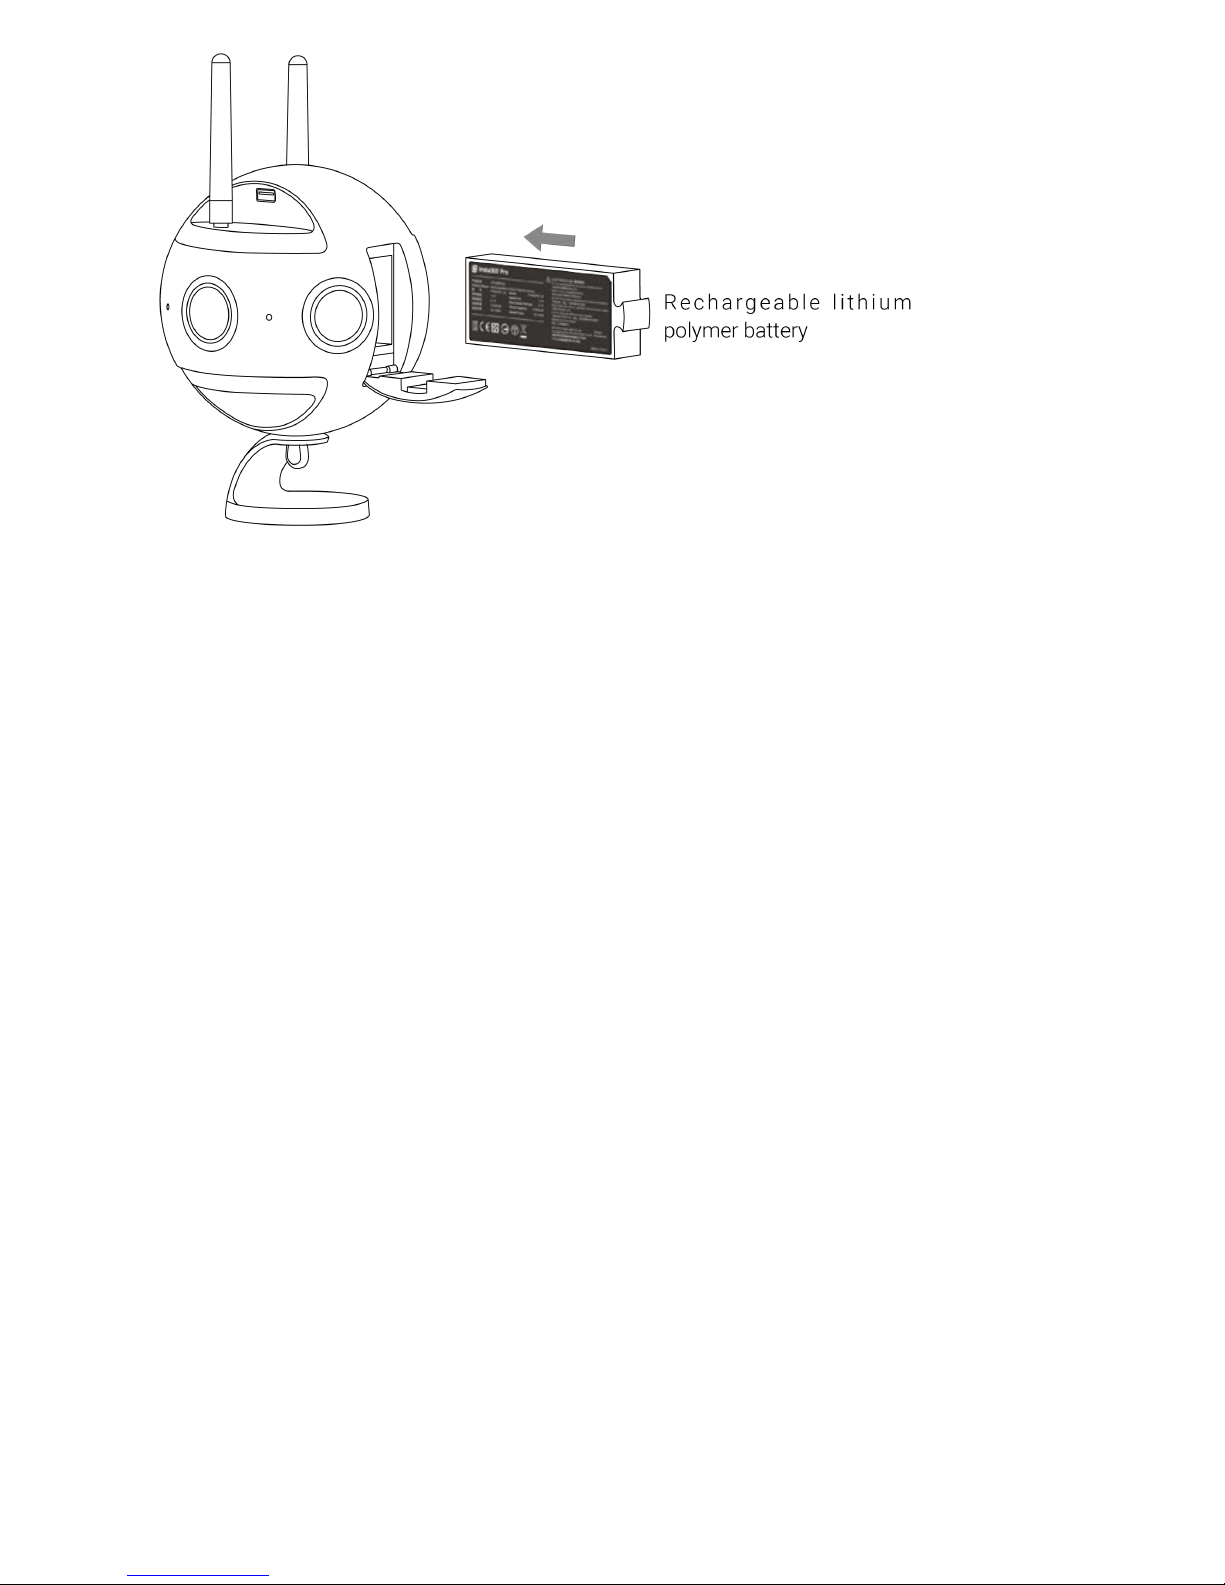
The camera uses 5100 mAh replaceable battery. Without WiFi, the battery life is about 50 min. To fully charge a battery
takes about 2.5 hours.
Charging with power o:
When the camera is not fully charged, the red power indicating lamp will go on;
When the camera is fully charged, the green power indicating lamp will go on.
Charging with power on:
When the electricity quantity of the camera is below 10%, the red power indicating lamp will go on until the low-point
protection is enabled or the camera is shut down upon exhaust of electricity;
When the electricity quantity of the camera is between 11% and 20%, the yellow power indicating lamp will go on;
When the electricity quantity of the camera is between 21% and 100%, the white power indicating lamp will go on;
When the camera operates, the work indicating lamp will be in the same color as the power indicating lamp. Refer to the
section about camera operation instructions for the flashing description of the work indicating amp.
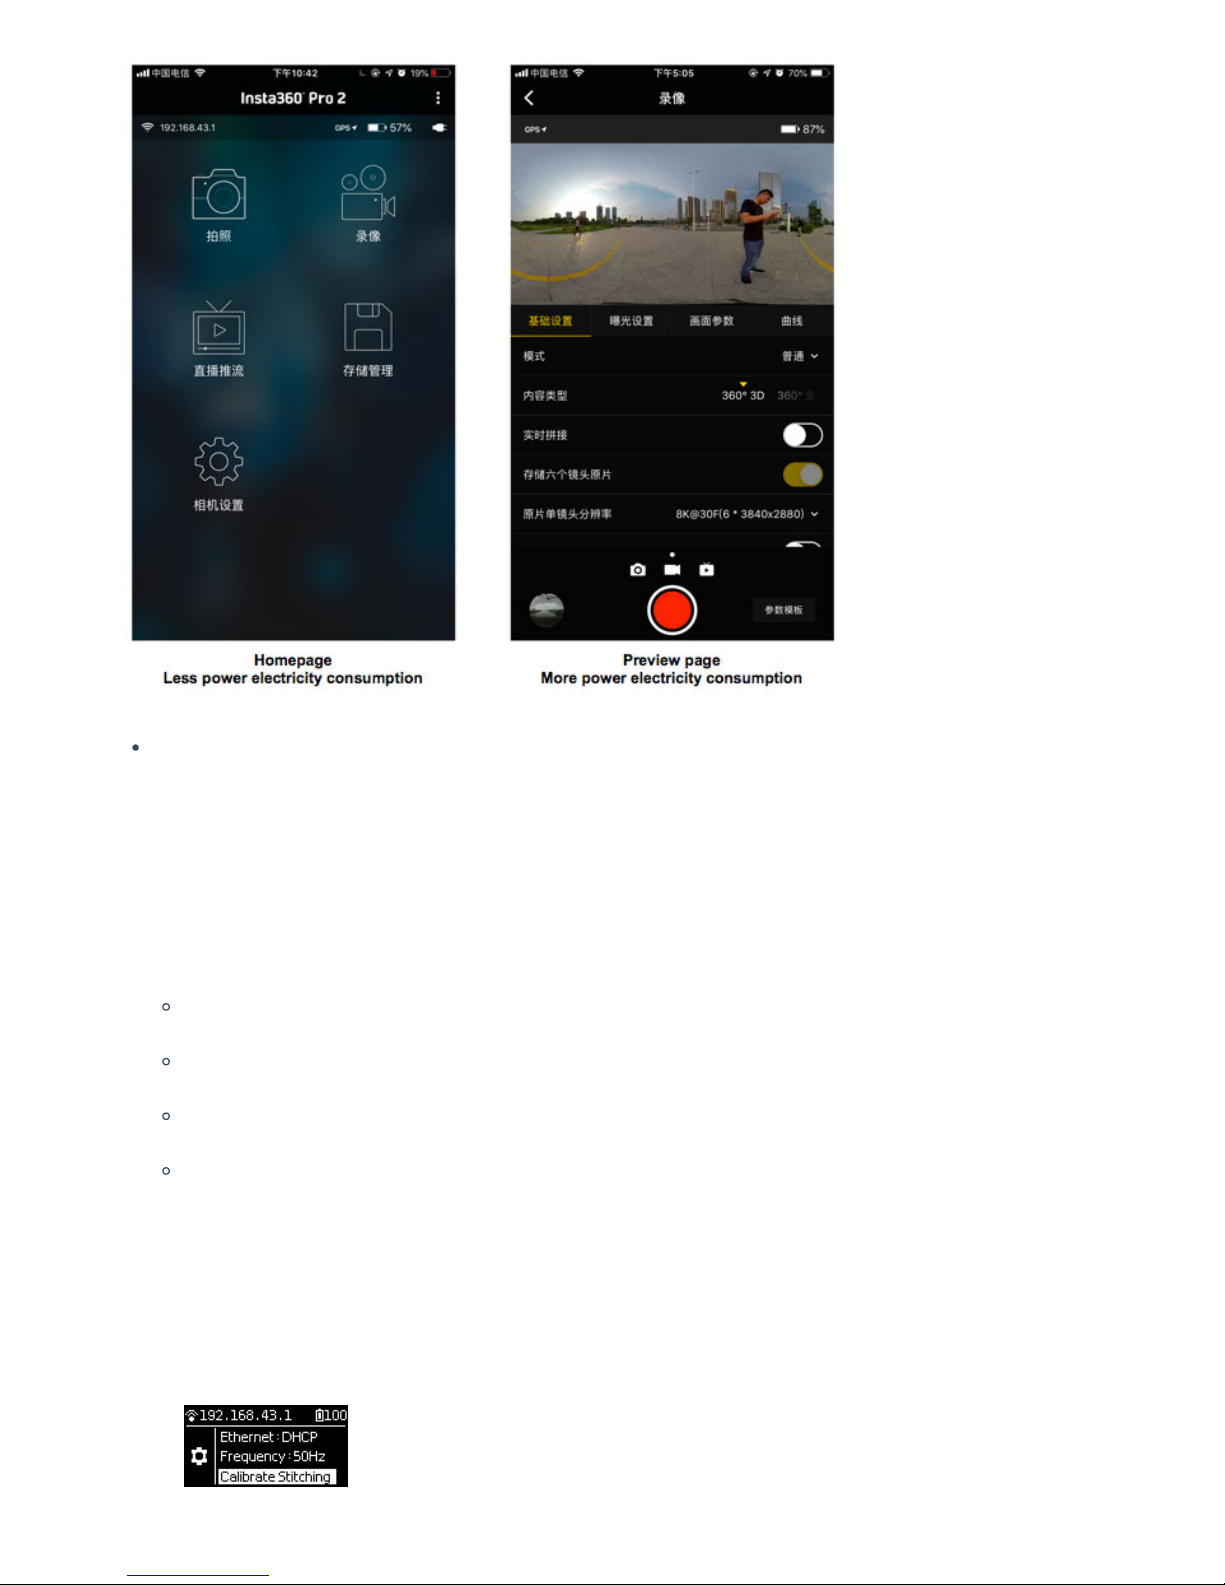
Tip: With WiFi connection, Pro 2 preview mode consumes more power, so please try to return to the homepage when
standby (as shown in the figure)
Page 20
About real-time stitching and stitching calibration
Insta360 Pro 2 has an accurate stitching parameter which can be used in most shooting scenarios. The stitching eect
shown on the preview screen is based on this default stitching parameter. However, the stitching eect may vary due
to dierences between specific shooting scenes. If the stitching eect doesn't meet the requirement, users can use
calibrate the stitching eect on the camera or control app.
Please note that the calibrate stitching only takes eect in the following situations:
preview screen of video recording
real-time stitching video from recording
preview screen of live-streaming
real-time stitching video stored during live-streaming
Stitching eects shown in the other situations, such as photo using real-time OpticalFlow stitching and the preview
screen before shooting, are based on the default stitching parameter.
1. Calibrate stitching eect in Pro 2 camera
(1) Turn on the camera and go to the setting menu, choose Calibrate Stitching function.
Page 21
(2) Aer starting this function, please place the camera in an open place and ensure that there is no shelter within
2m of the camera radius including the user himself or herself. Then press the power button, and the camera will
automatically conduct stitching eect calibration based on current scene.
2. Calibrate stitching eect in Pro 2 app
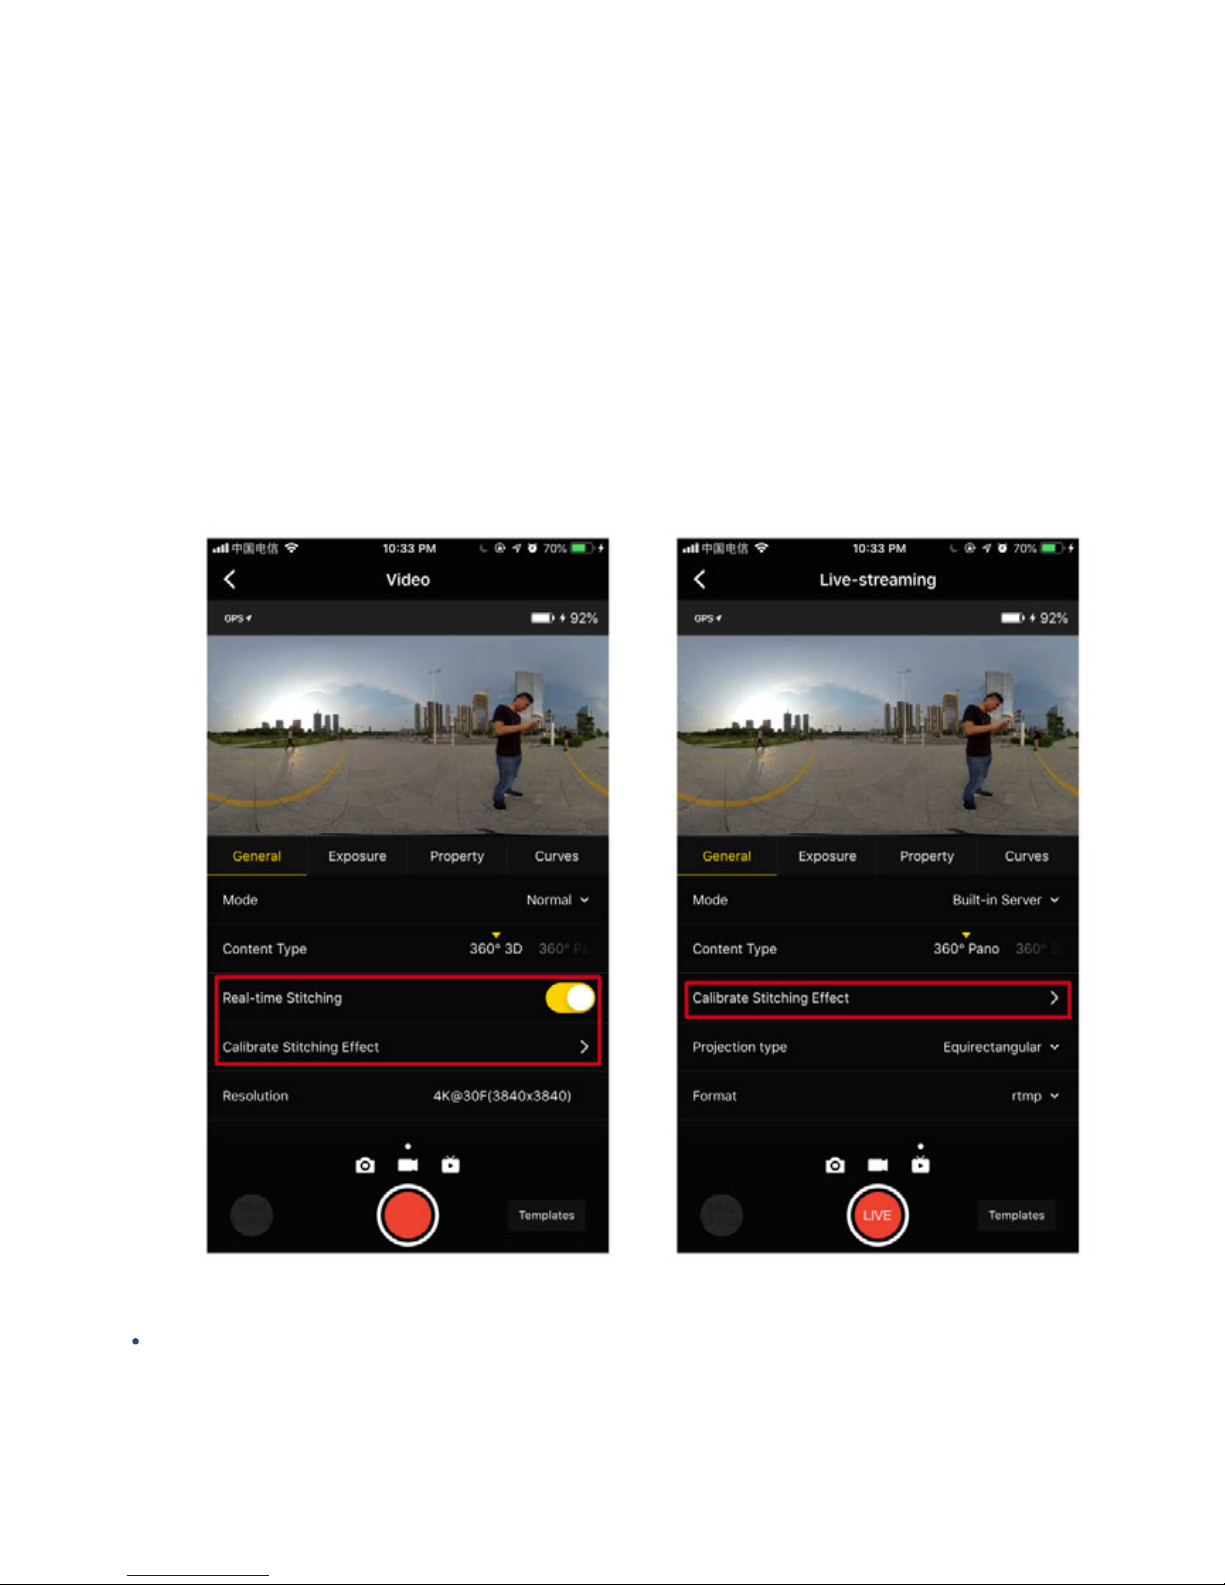
Connect the app with Pro 2 camera. Choose Video mode or Live-streaming mode.
In Live-streaming mode, Calibrate Stitching Eect function will be shown in General setting.
In Video mode, when the Real-time Stitching function is on, Calibrate Stitching Eect function will be shown
below. Please place the camera in an open place and ensure that there is no shelter within 2m of the camera
radius including the user himself or herself. Then start to calibrate stitching eect. New stitching eect will be
shown when stitching completes. Users can choose to apply this new stitching eect or recover the previous
eect, and also can calibrate stitching eect again.
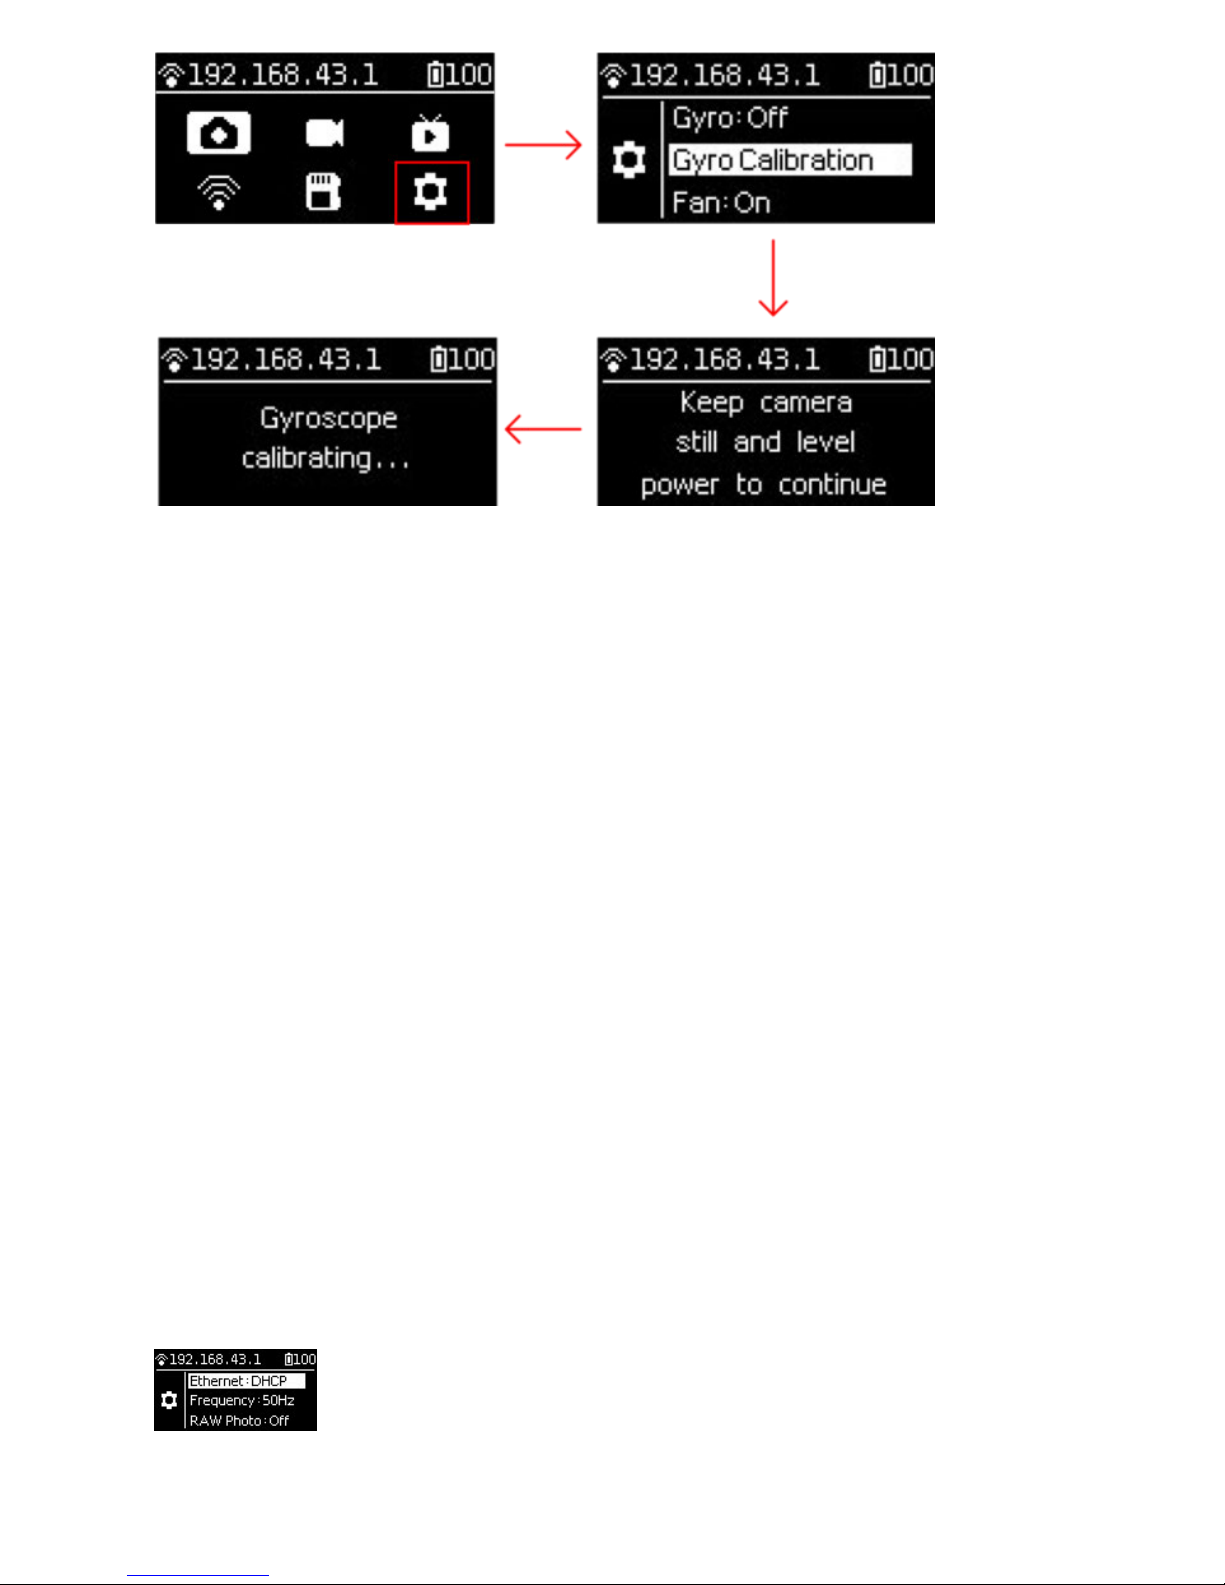
About Gyro calibration
Gyro calibration can be performed for the first time using cameras which ensures that camera functions are as
accurate as possible. Please first place Insta360 Pro on horizontal desktop or ground, on the function navigation
menu, click settings on the lower right to find "Gyro calibration", and complete operation based on prompt (as shown
in the figure).
Page 22
1.1.5 Connection mode of camera
Insta360 Pro 2 provides a variety of camera connection modes, which can be divided into three types, namely, Farsight,
wired connection, and Wi-Fi connection. It can be connected to a computer, iPad or mobile phone, for the remote control
of the camera. Among them, the wired connection is achieved through network cable or local area network (LAN). It is
strongly recommended that the camera be remotely controlled through Farsight, which enjoys the most stable signal and
the farthest communication distance.
If there is no Farsight device, Wi-Fi connection is more convenient and commonly used. The mobile app provides two
ways of camera connectivity: LAN connection and AP hotspot connection of camera. Each of these two ways has its own
characteristics. Hotspot connection is convenient and fast, and the connection distance is usually 5m ~ 10m, which is
suitable for outdoor and quick preview; however, if the LAN is stable enough and the signal coverage area is large, the
LAN connection can be preferentially selected, for the safety range of the connection between the person and the camera
is larger in theory.
These dierent connections are described in more details below:
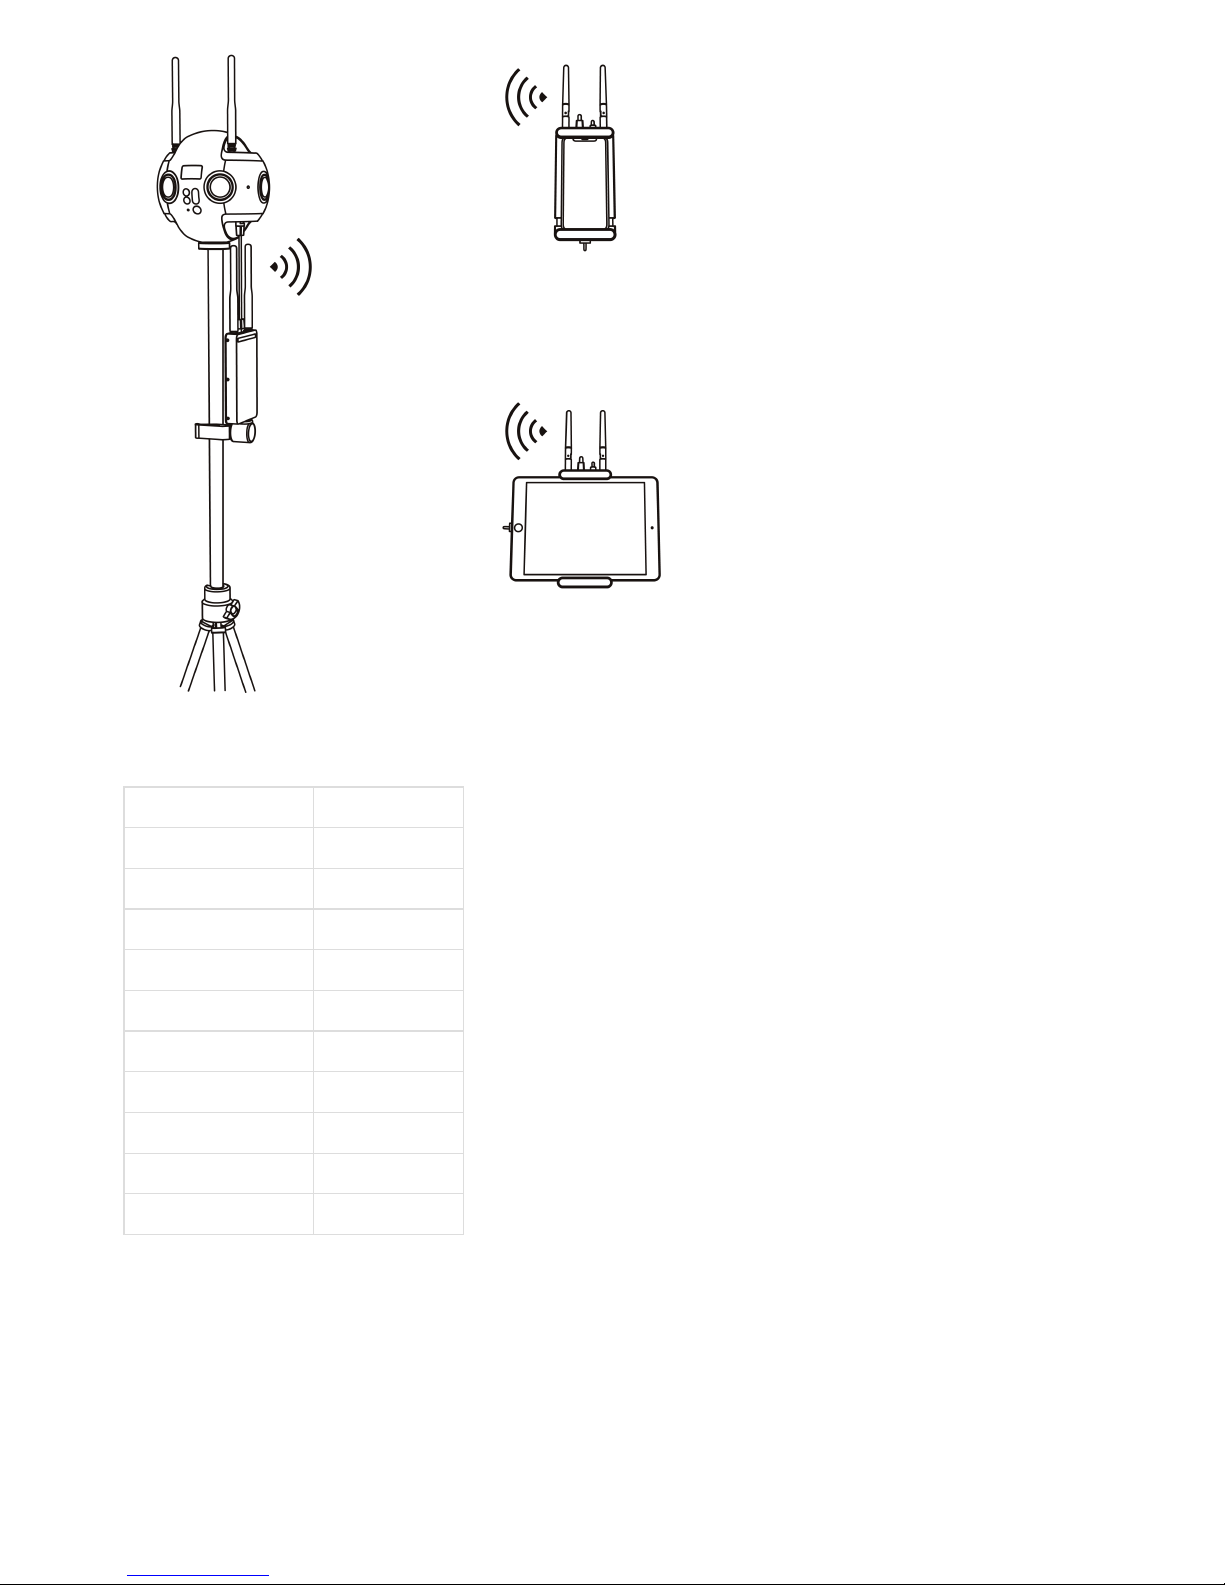
Farsight connection
1. Install antennas onto the Farsight’s transmitter and receiver respectively.
2. Go to the Pro 2 camera Settings, set Ethernet to DHCP.
Please also turn o AP (WiFi) on the camera.
Page 23
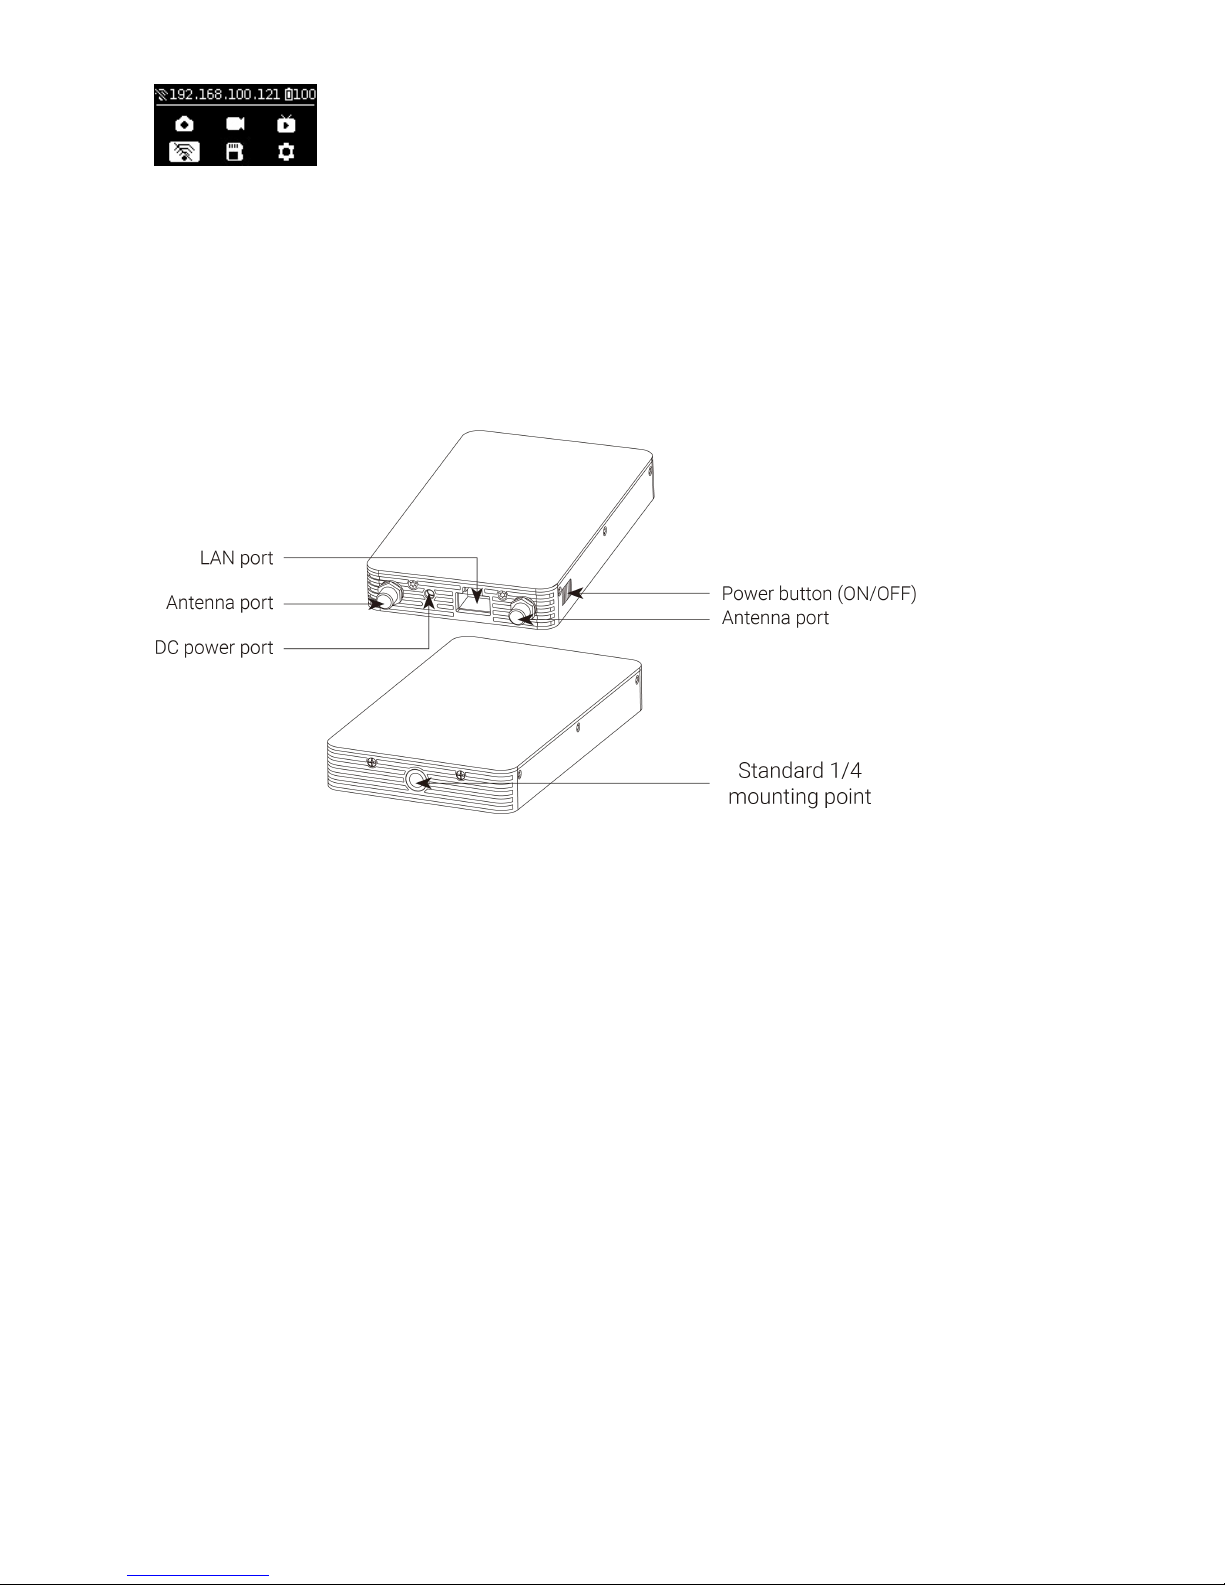
3. Turn on the camera and Farsight transmitter. It takes 15 seconds to start aer transmitter is on.
4. Connect the transmitter with Pro 2 camera via network cable. Waiting for the display of IP address of 192.168.100.XXX
on top of camera screen, which represents a successful connection between camera and Farsight transmitter. If no
required IP shows aer waiting for a long time, please replug the cable until the displayed IP address meets the
requirement. The transmitter can be fixed on tripod with a clip given by the factory.
(Farsight transmitter)
5. Turn on the receiver, and connect the phone / iPad to the receiver through USB cable. Take iOS as an example. Wait
about 15 seconds or so, the phone / iPad settings (generally in system settings menu) will show "Ethernet" option,
click to enter the interface of Ethernet settings. Set "conFig. IP" to automatic, and confirm whether the IP address is
also 192.168.100.XXX. In most Android devices, there is no "Ethernet" option. The set-up is ready aer connecting
your devices to the receiver via USB cable. (please refer to the Compatibility List below for the supported Android
devices)
If there is no required IP available aer waiting for a while, replug the USB cable and reconnect until the desired IP
address is displayed.
If you want to connect the receiver to your computer, please use network cable to connect. Aer connecting, set the
computer network to DHCP, which can automatically obtain the IP address assigned by the receiver.
Page 24
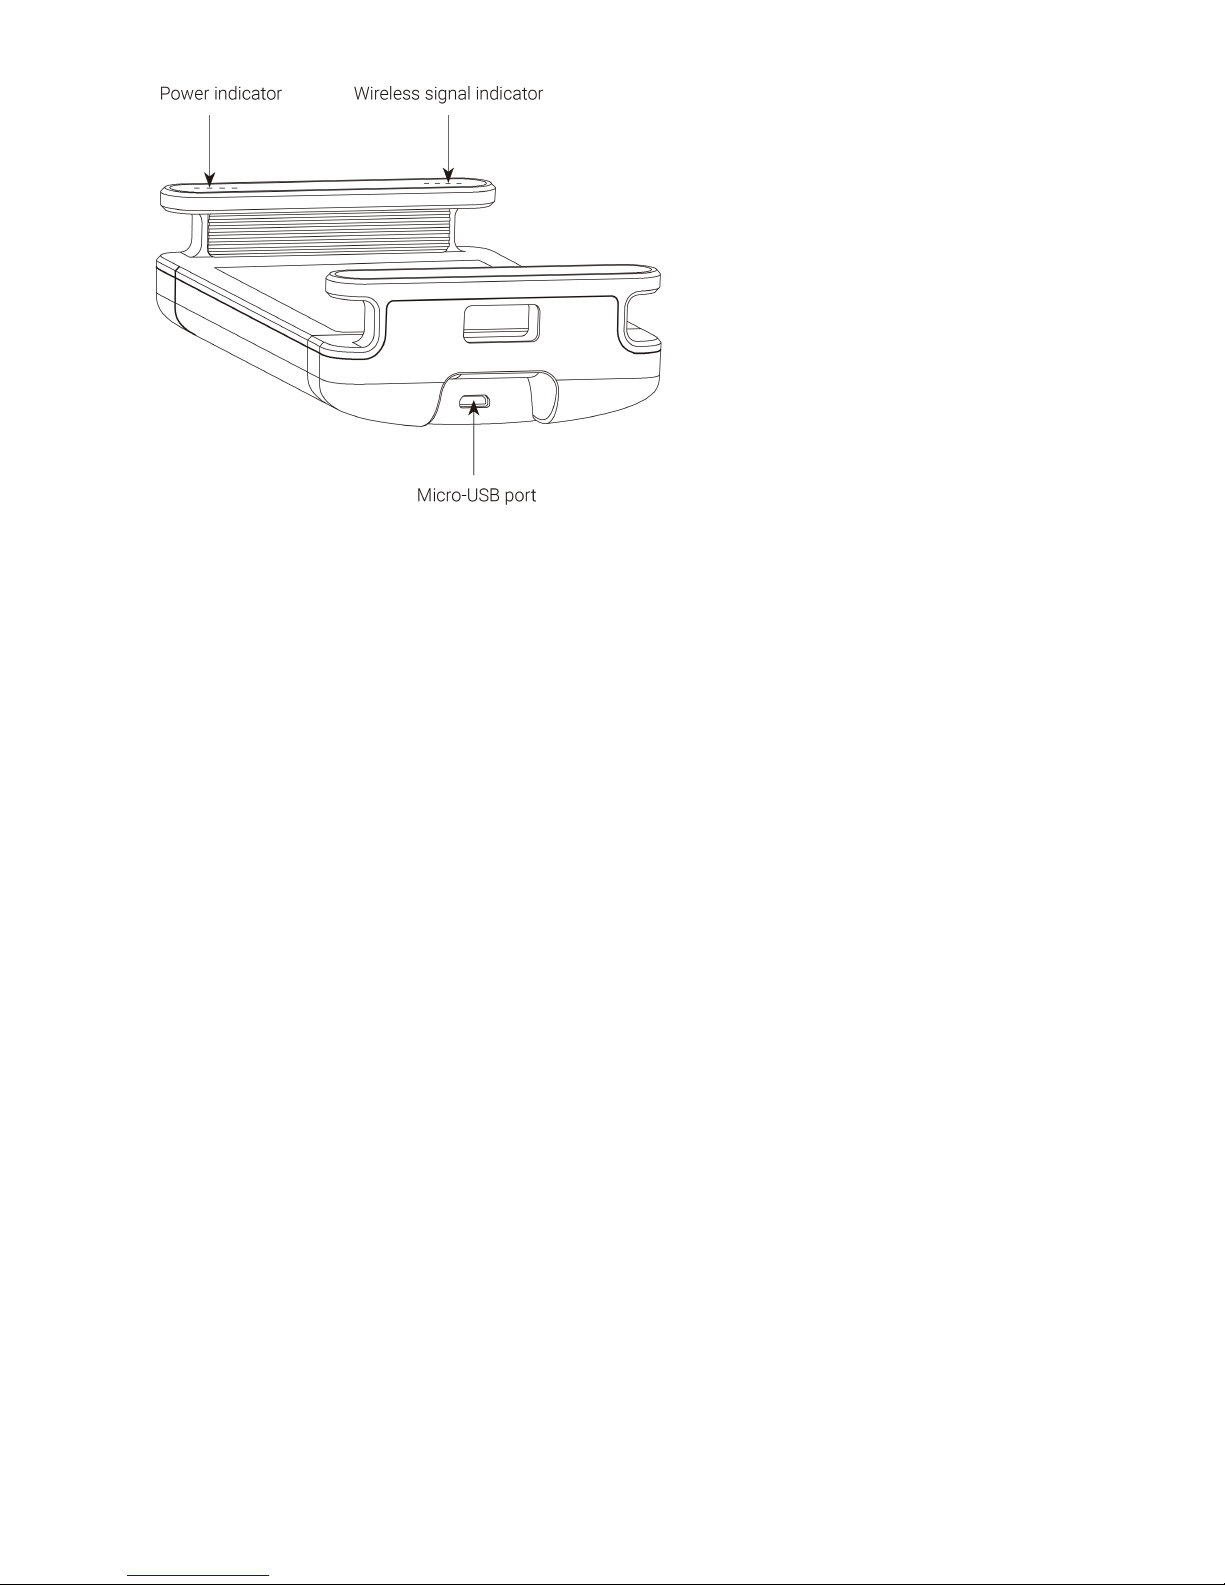
(Farsight receiver - Micro USB port)

(Farsight receiver — antenna port)
6. Please ensure the IP address displayed on top of the camera screen and that assigned to the receiver is
192.168.100.XXX. It represents a successful communication of Farsight. At this point, open the control app on the
device connected by the receiver, which can be connected by inputting the IP address displayed on top of the camera
screen. If the receiver connects to a computer, you can also complete the connection by inputting the IP address
displayed at the top of the camera screen in the connection interface of the camera's controlling client Insta360 Pro
soware.
Page 25
7. Compatibility List of Farsight receiver (devices added continuously)
Device System
Huawei P9 Android 7.0+
Huawei P10 Android 7.0+
Huawei Mate9 Android 8.0+
Huawei Mate10 Android 8.0+
Huawei Honor V10 Android 8.0+
Samsung Galaxy S8 Android 8.0+
Samsung Galaxy S9 Android 8.1.0+
Google Pixel 2 Android 8.1.0+
Moto X Pro Android 5.0.2+
iPhone & iPad iOS 10.3+
Wired connection -- DHCP mode
Page 26
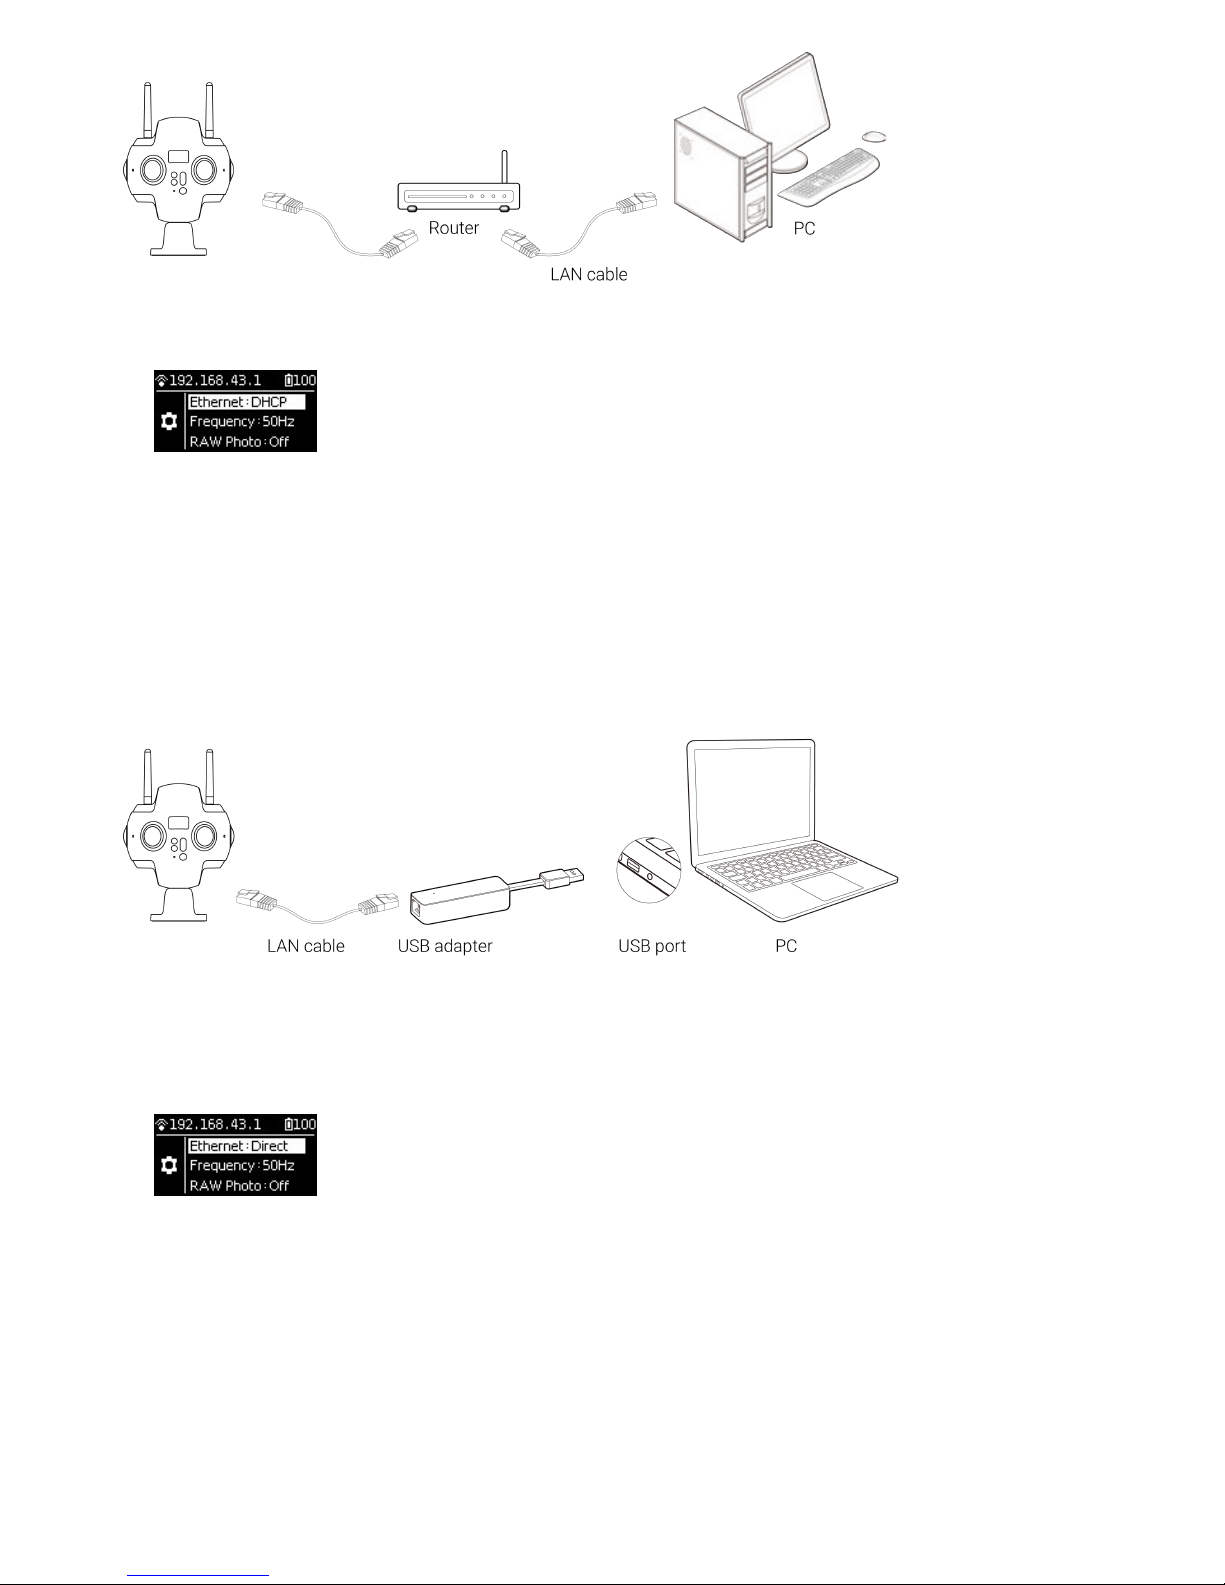
1. Enter the settings menu of Pro 2, set Ethernet to DHCP mode.
2. Connect Pro 2 to router through network cable, and the router's allocation mode needs to be DHCP, and the
computer connects to router’s LAN.
3. Ensure camera and computer are inside the same LAN, open the controlling client soware on the computer, and
input IP address displayed on top of the camera screen.
Wired connection -- Direct connection mode
1. Enter the camera settings menu of Pro 2, set Ethernet to DHCP mode.
2. Connect Pro 2 to computer with network cable. If you want to connect some computer without Internet access, then
you need to switch to USB port by using the transverter. In this mode, the IP address of Pro 2 is fixed as
192.168.1.188, which requires to set up static IP for the PC network segment of 192.168.1. And it is recommended to
set as 192.168.1.100, with the subnet mask of 255.255.255.0.
Page 27
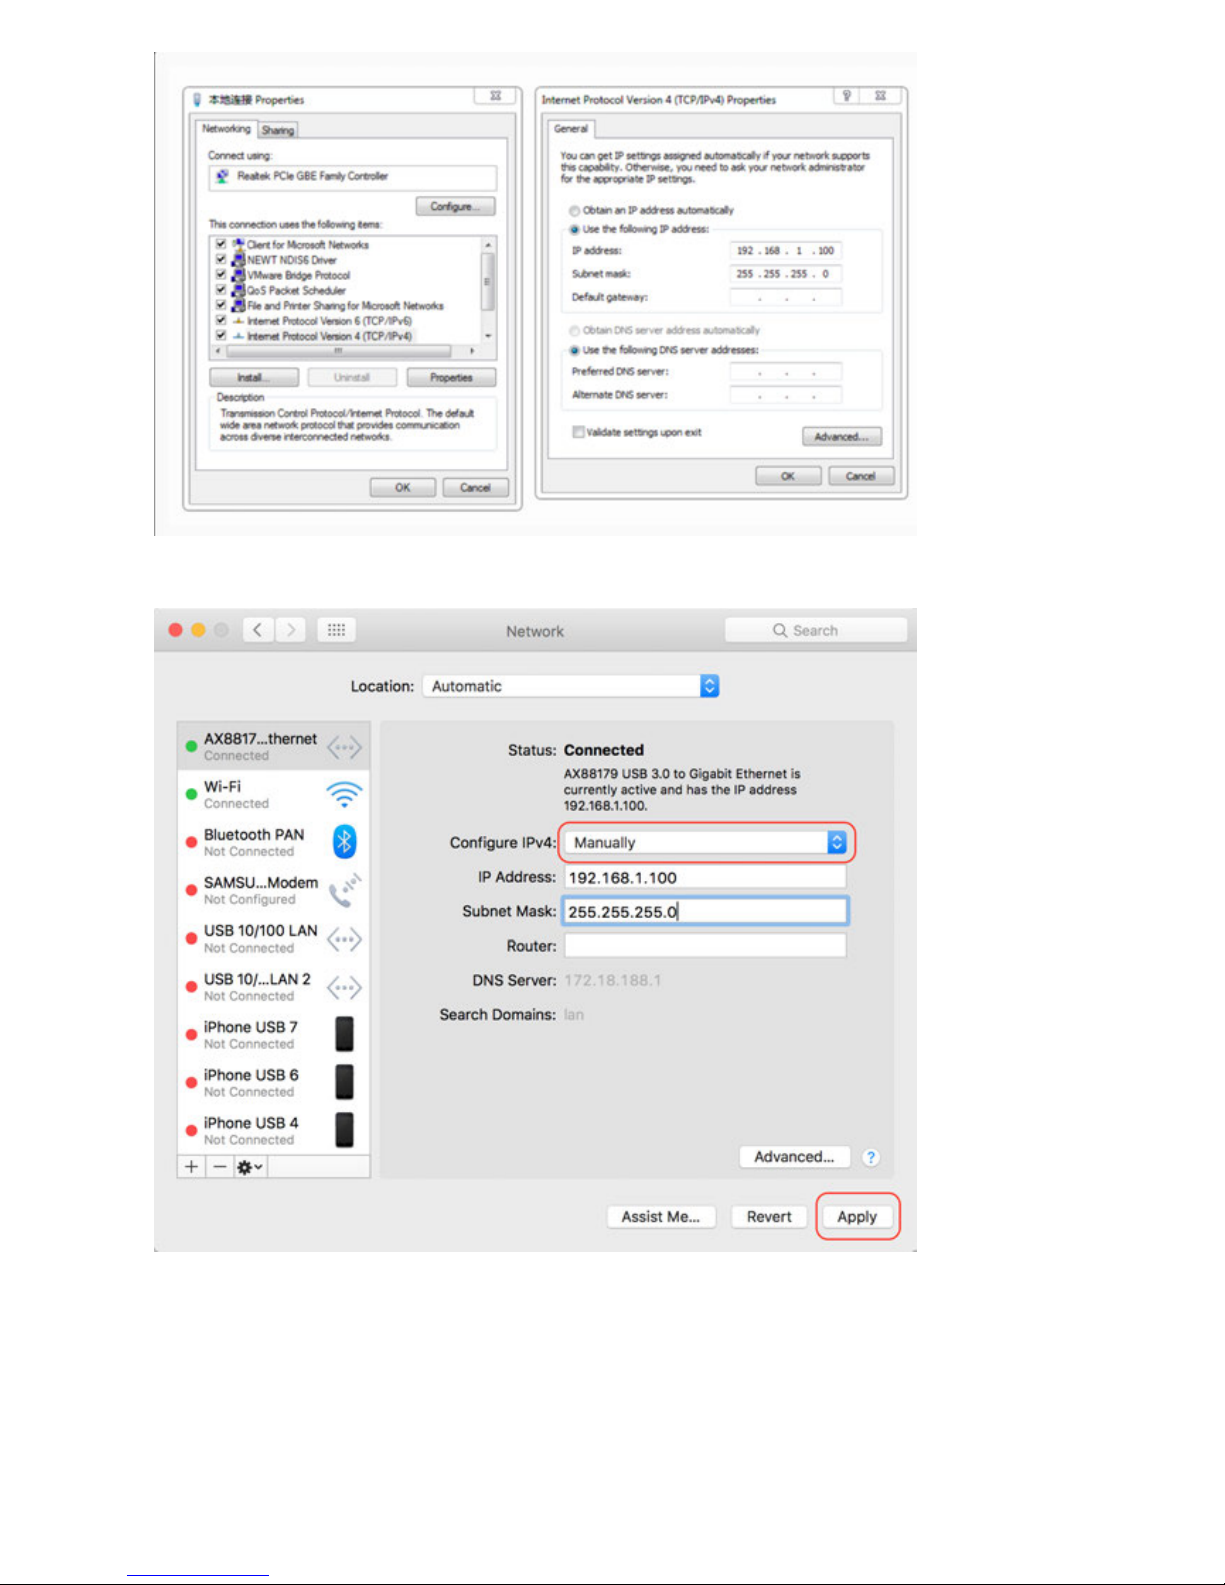
(IP configuration Interface for Windows)
(IP configuration Interface for Mac OS)
3. Aer completing the above configuration, enter 192.168.1.188 on client operation soware, and then connect.
WiFi connectivity -- connecting client devices to camera's AP hotspot
Page 28
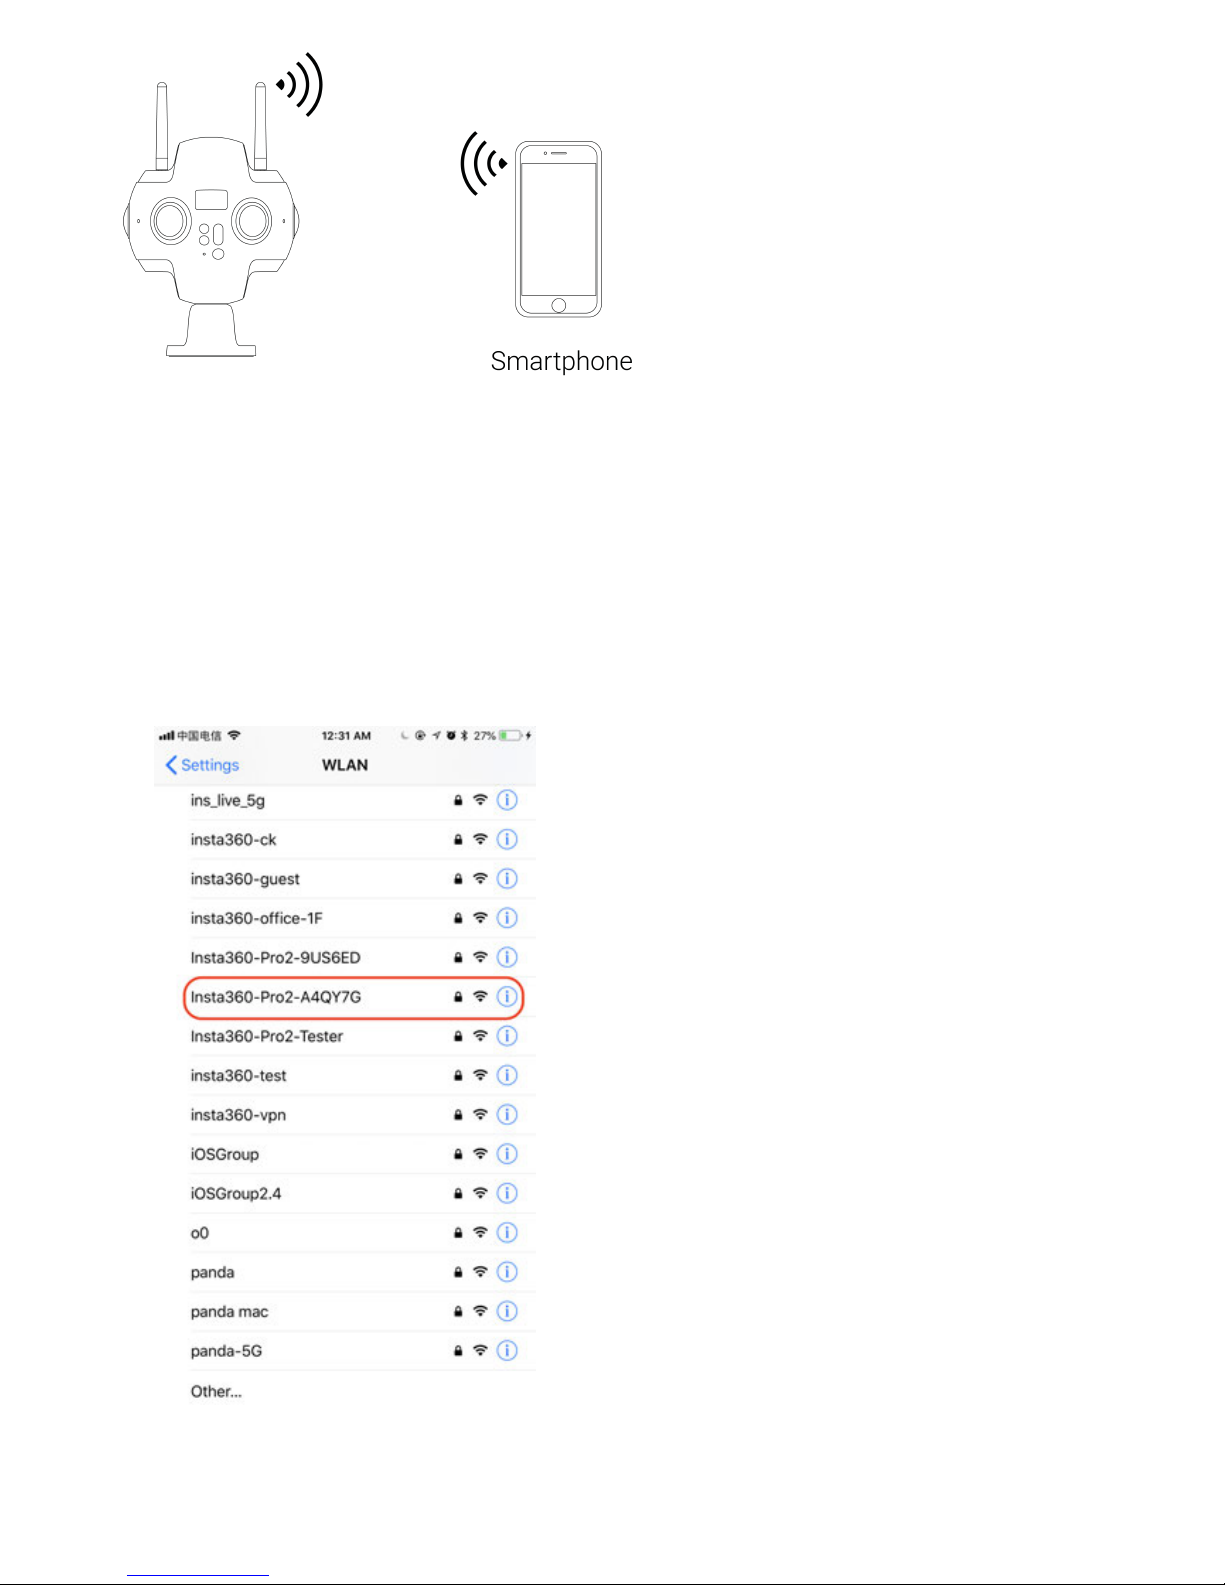
1. click on WiFi logo on homepage of camera screen, and the camera will open its own AP hotspot.
2. open your client device (phone, tablet, laptop) to search nearby WiFi hotspots, and find the hotspots of "Insta360-Pro
2-XXXXXX". Click to input 88888888 (repeat eight for 8 times) to connect.
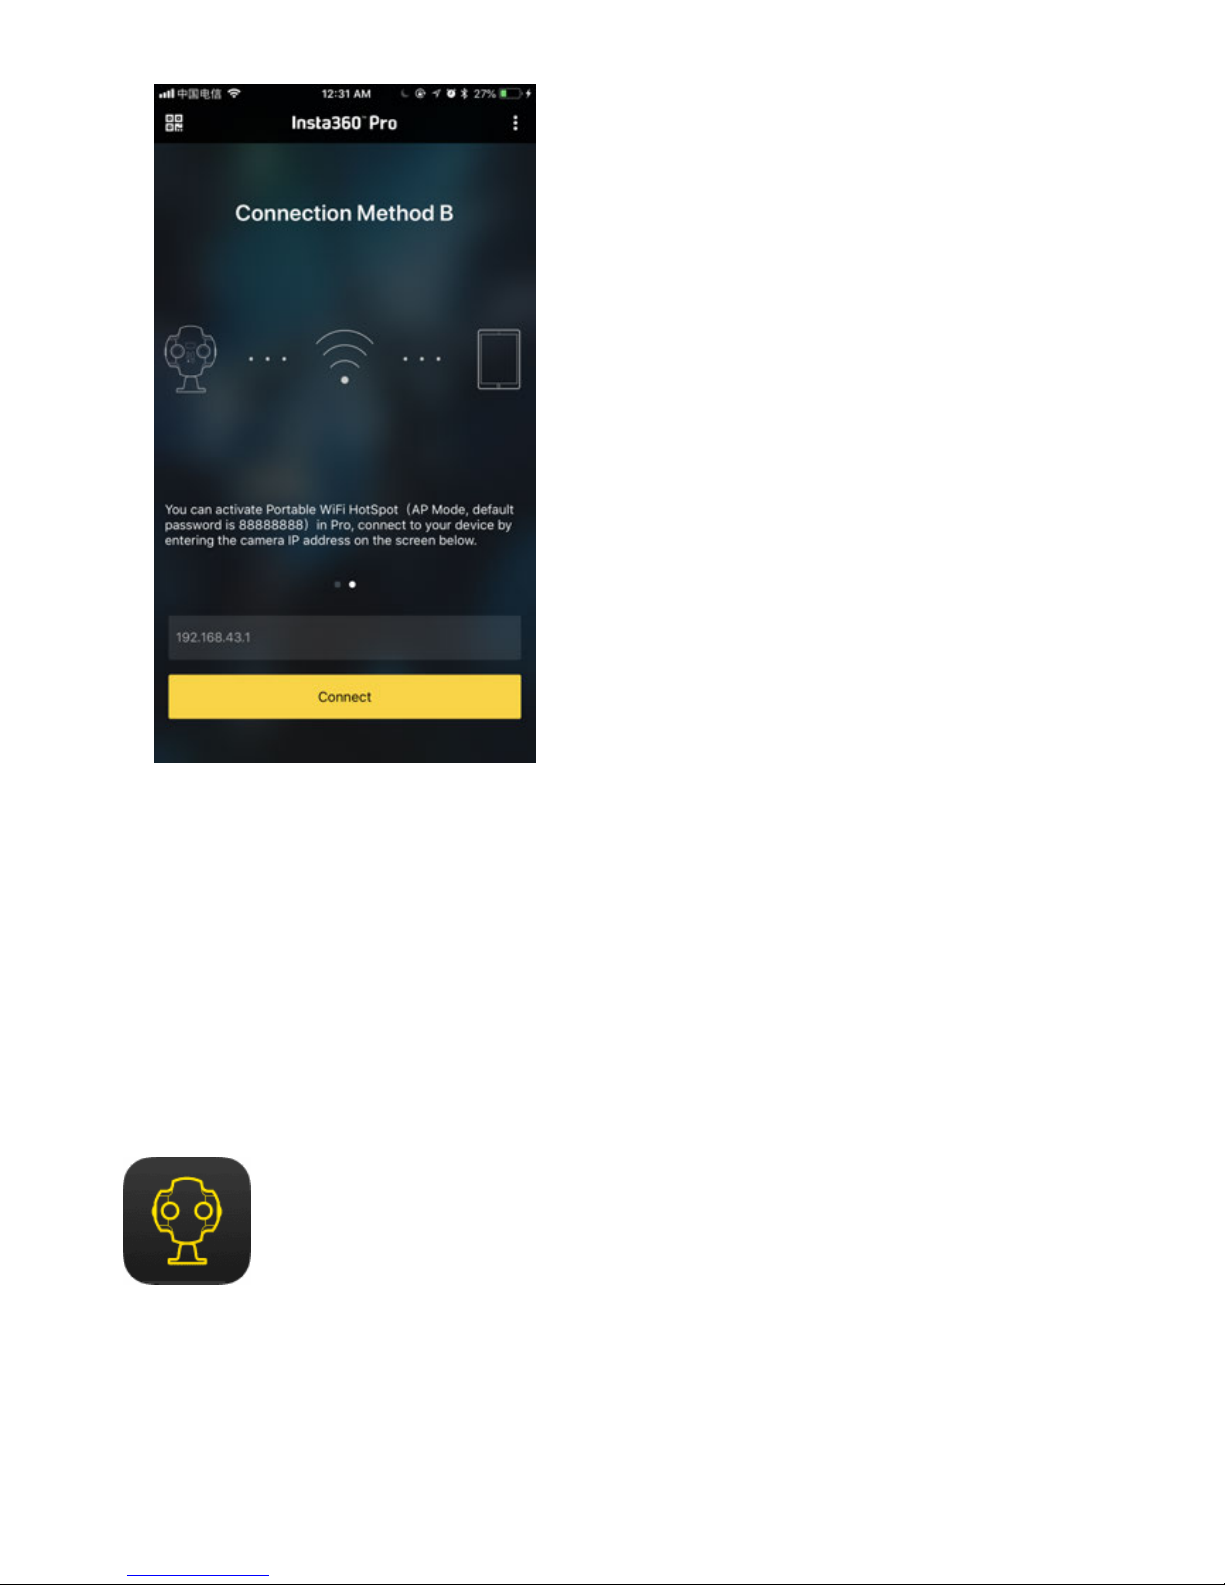
3. aer successful connection, client device and camera have been in same wireless network. Input IP address
192.168.43.1 on client control soware, and then click to connect (phone app can choose Connection Method B for
one-key connection)
Page 29
1.1.6 Download oicial soware
As a technology company dedicated to developing global panoramic imaging technology and building open ecology and
convenient product experience, Insta360 provides abundant soware for users and panoramic enthusiasts of Pro series
cameras. From controlling operations, stitching, to viewing, regardless of mobile phone or computer, there are
corresponding soware for your choice. The following soware is compatible with Pro / Pro 2 camera.
Insta360 Pro Camera control app
The controlling app of professional panoramic camera, Insta360 Pro, helps you remotely control Pro/Pro 2 via WiFi
connection to realize the shooting, recording and live streaming function of the camera. Moreover, you can adjust various
parameters settings, look back filming materials, stitching calibration, viewing information etc. Real-time preview allows
you to adjust to best lens anytime, and help you get panoramic photos or video works in a professional and quick way.
Page 30
(app compatibility requirements)
Insta360 Pro STITCHER
Use Insta360 Stitcher to quickly and easily stitch camera footage taken by Insta360 Pro/Pro 2.
What computer configuration can run Stitcher's stitching function smoothly?
According to Stitcher's requirements for hardware coding and decoding ability, it is recommended to use computers
meeting the standards below:
CPU: CPU for i7 6700K or higher performance
Memory: 8GB or larger
Graphics card: GTX980 or graphics card of higher performance such as NVIDIA, AMD graphics card
Hard disk: it is recommended to use a solid state drive
Operating system: it is recommended to use Windows 8, OSX 10.10 or higher system
For computers with configuration lower than the above standards, they can run the soware but might encounter some
problems. Try to use a computer that reaches the above standards.
Page 31
Insta360 Pro 2 FIRMWARE
Camera firmware
The Insta360 Pro camera firmware ensures that the Insta360 Pro 2 runs eiciently. Please update to the latest version for
the optimal experience. How to upgrade firmware?
Insta360 Moment CrystalView 8K Player
Insta360 Moment supports the playback of all videos and photos from Insta360 apps and files in CrystalView format.
1.1.7 Selection of tripod
The camera supports the combination with tripod, stabilized holder, flying camera and vehicle sucker, among which
tripod is the most frequently used in many scenes . Usually, in order to avoid shooting photographer and shooting
Page 32
content with certain vertical angles, we must require tripod to assist especially during night, sunrise, sunset and in weak
light environments, or we need to shoot with long exposure, delay etc. , in which cases, one cannot hold cameras. Here
are suggestions for choosing a tripod matching Pro 2.
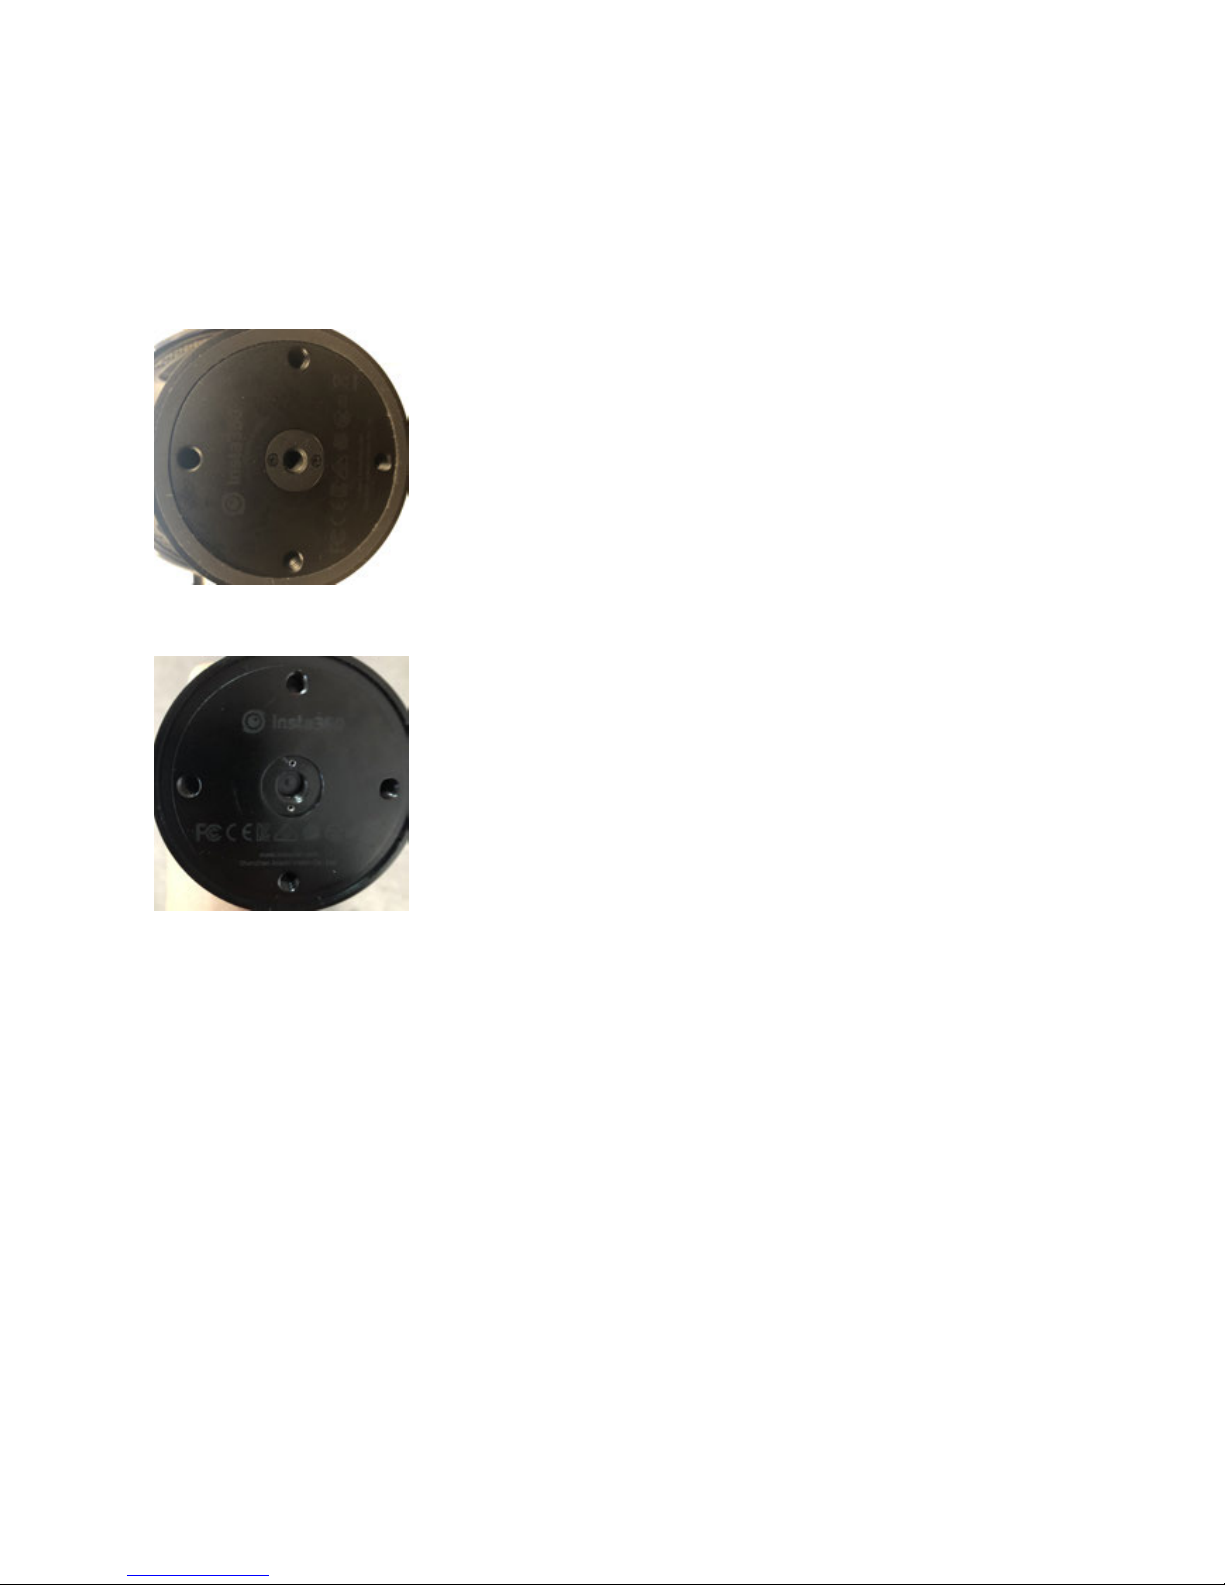
1. Mounting point on the tripod holder has two types: 1/4 inch and 3/8 inch. The base bottom of Pro 2 provides 3/8 nut
stad turning 1/4 inch tapped hole structure, allowing camera to fit the common tripod screw specifications of 1/4 and
3/8. Apart from the mounting point at the bottom, altogether four 1/4 mounting points are around forming a cross,
which is convenient for using some special tripods to make stronger fixation.
(Base central mounting point is 3/8 turn 1/4)
(Base central mounting point is 3/8)
2. When choosing tripod, one should first consider whether it is stable, and try to choose professional brand or have a
try personally to select the suitable one.
3. Panoramic video always simulates a first-person point of view. The distance of Pro 2 base to lens is about12 cm, so
please select tripod with a height above 160 cm.
4. Panorama video also needs bottom stitching. It’s not recommended using a tripod with direction adjusting handle.
5. Shooting of scenery theme may give priority to single unipod. Unipod occupies a much smaller area than tripod,
which is easier to erase in post editing. In panoramic videos, if we look down at our feet, we oen find that there is a
place that is unnatural or covered with LOGO of the producer, which actually hides the unipod position.
6. if the subject is mainly recording activity or there are many uncontrollable people on the scene, a tripod which is
more stable should be chosen to avoid person collision and camera damage.
Page 33
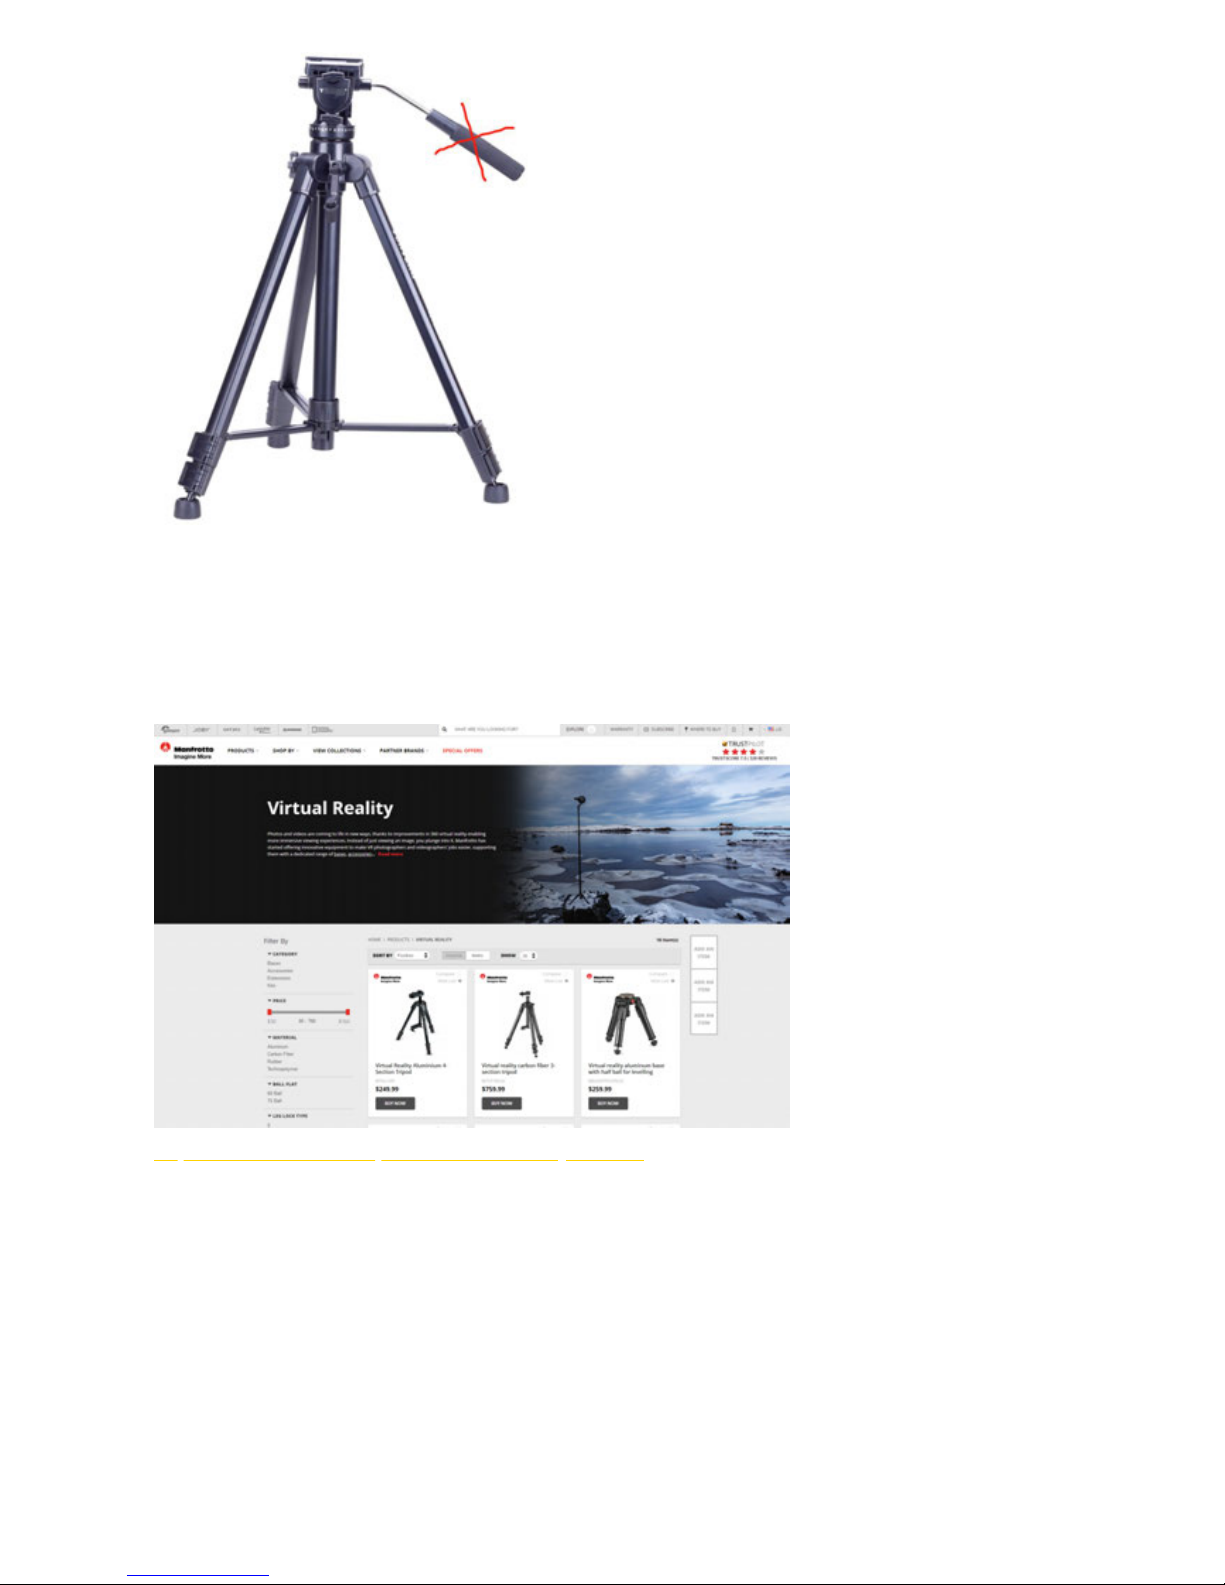
Do not select tripod with handle
7. When shooting panoramic view, we should try to reduce the area of bottom bracket as much as possible for
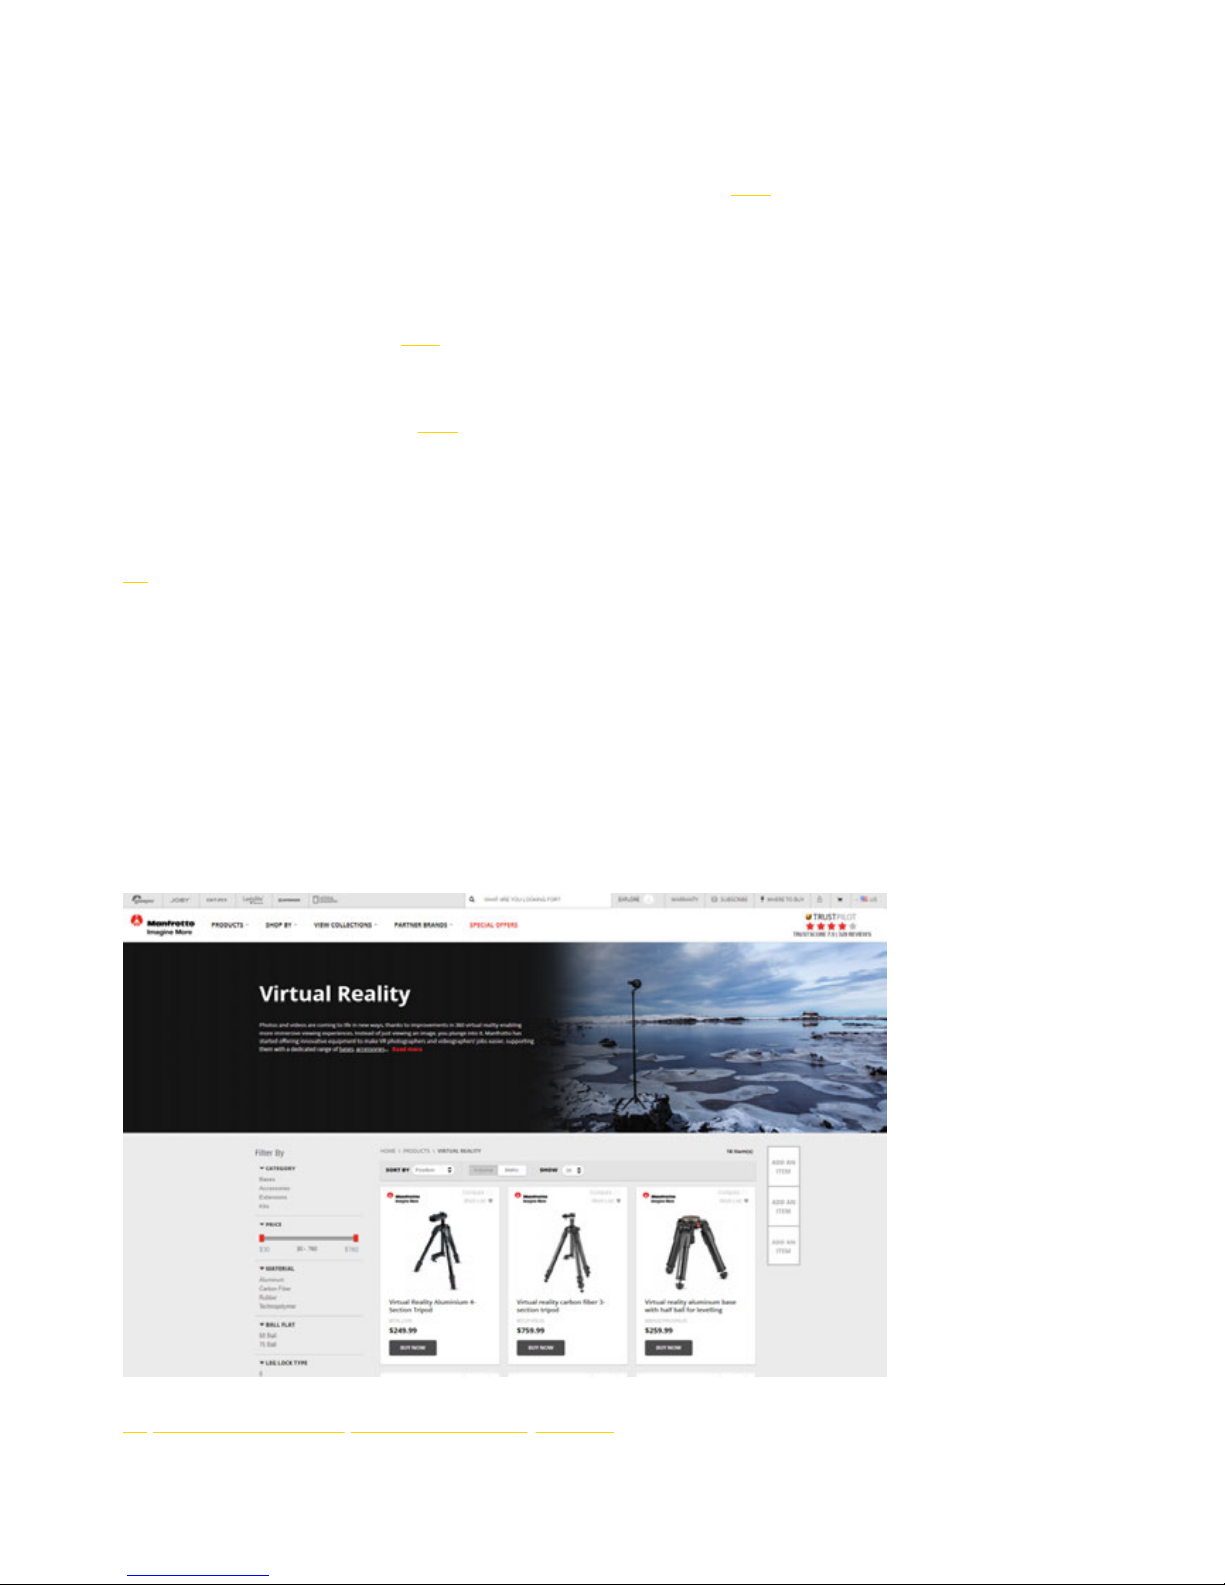
convenient post editing. In this sense, Manfrotto series products, which are relatively safe, portable, convenient, and
easy to operate, can be used as purchase reference for shooting support.
https://www.manfrotto.us/products/virtual-reality?limit=36
8. Nodal Ninja Panoramic Photography Equipment series can be another choice.
Page 34
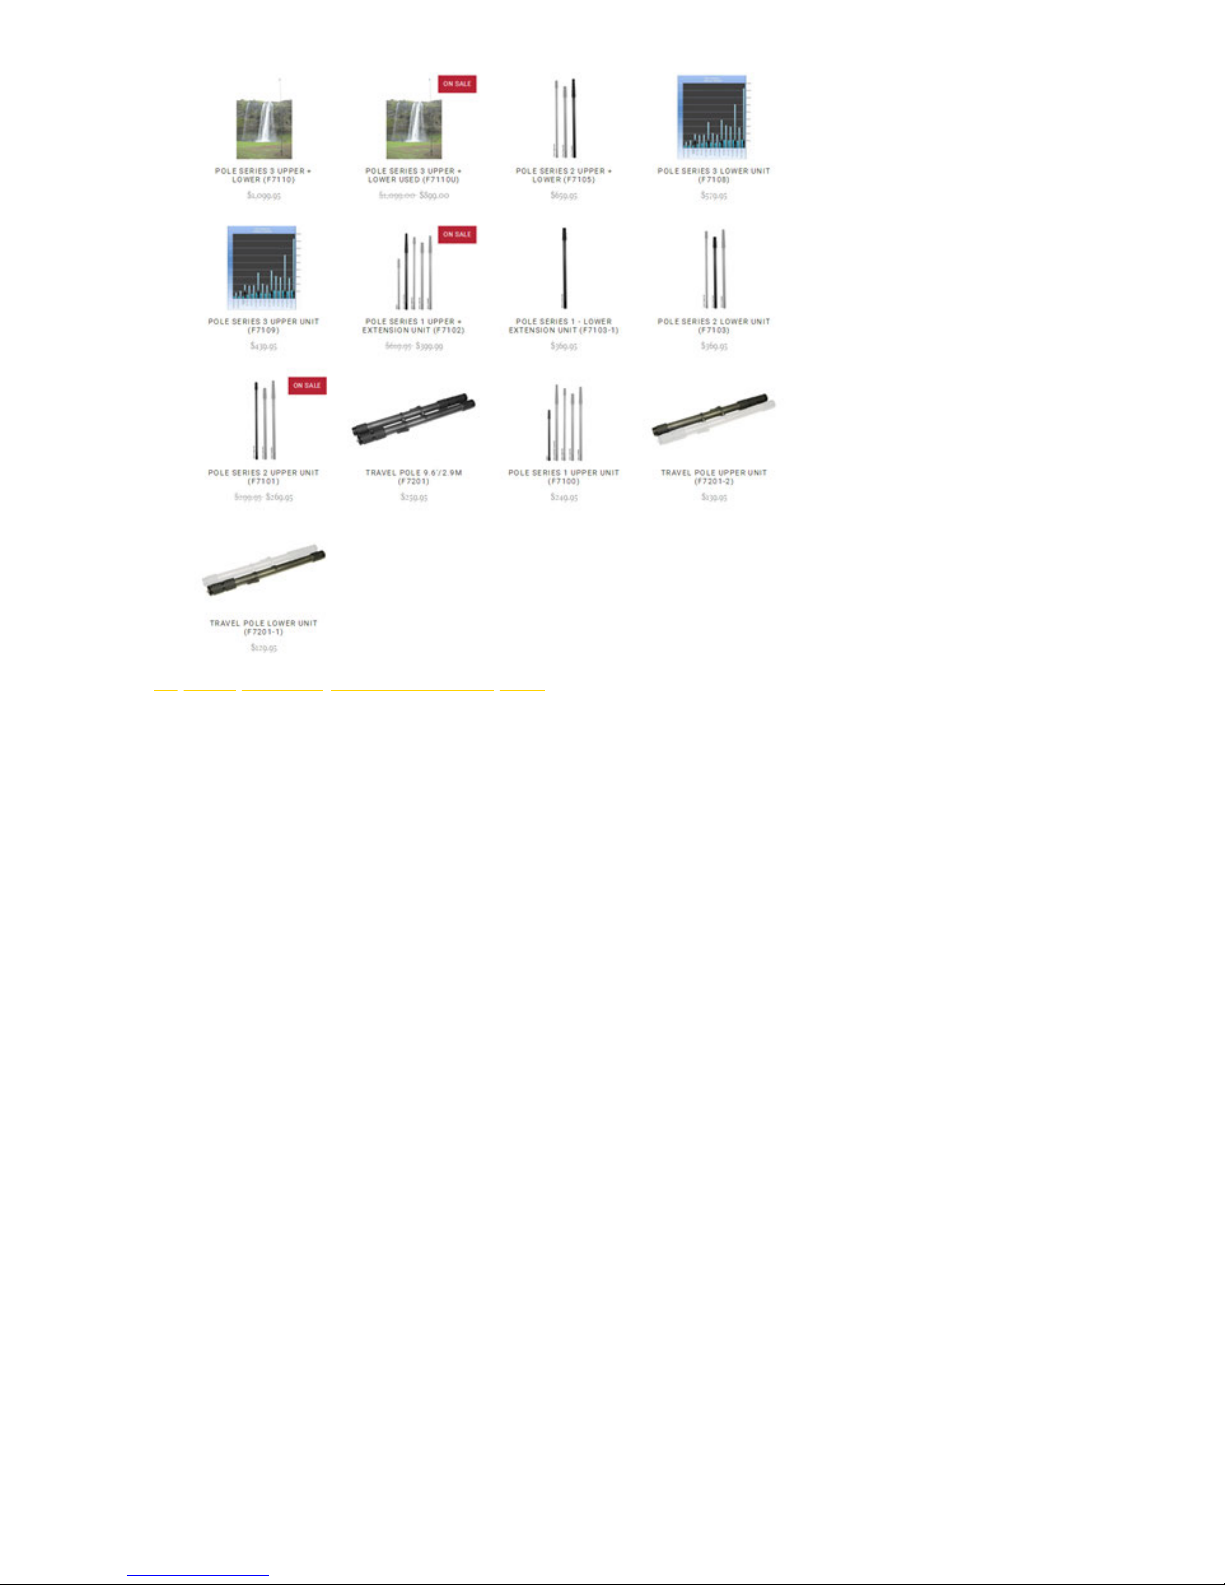
http://shop.nodalninja.com/carbon-fiber-poles/
1.1.8 Import from multiple storage cards
Compared with Pro 1, the largest change in Pro 2 is the addition of six TF (Micro SD) cards. The original files are stored in
multiple storage cards. It’s more complex to manage all the files in Pro 2. In order to simplify the importing process,
we’ve provided reading storage devices function in the camera. When the camera starts to read storage devices, user only
needs to connect Pro 2 to computer to transfer files from the storage cards to the computer by using the one-key import
tool in Stitcher. There is no need to pull out any storage card.
Import Pro 2 files to computer in Windows system:
Import method 1: Use the USB Hub and the SD card reader
1. Please use our oicial SD card reader and USB Hub. Insert the SD card and six MicroSD cards into the Hub, then
connect the Hub to your computer. Wait for your computer to recognize and mount all storage cards.
Page 35
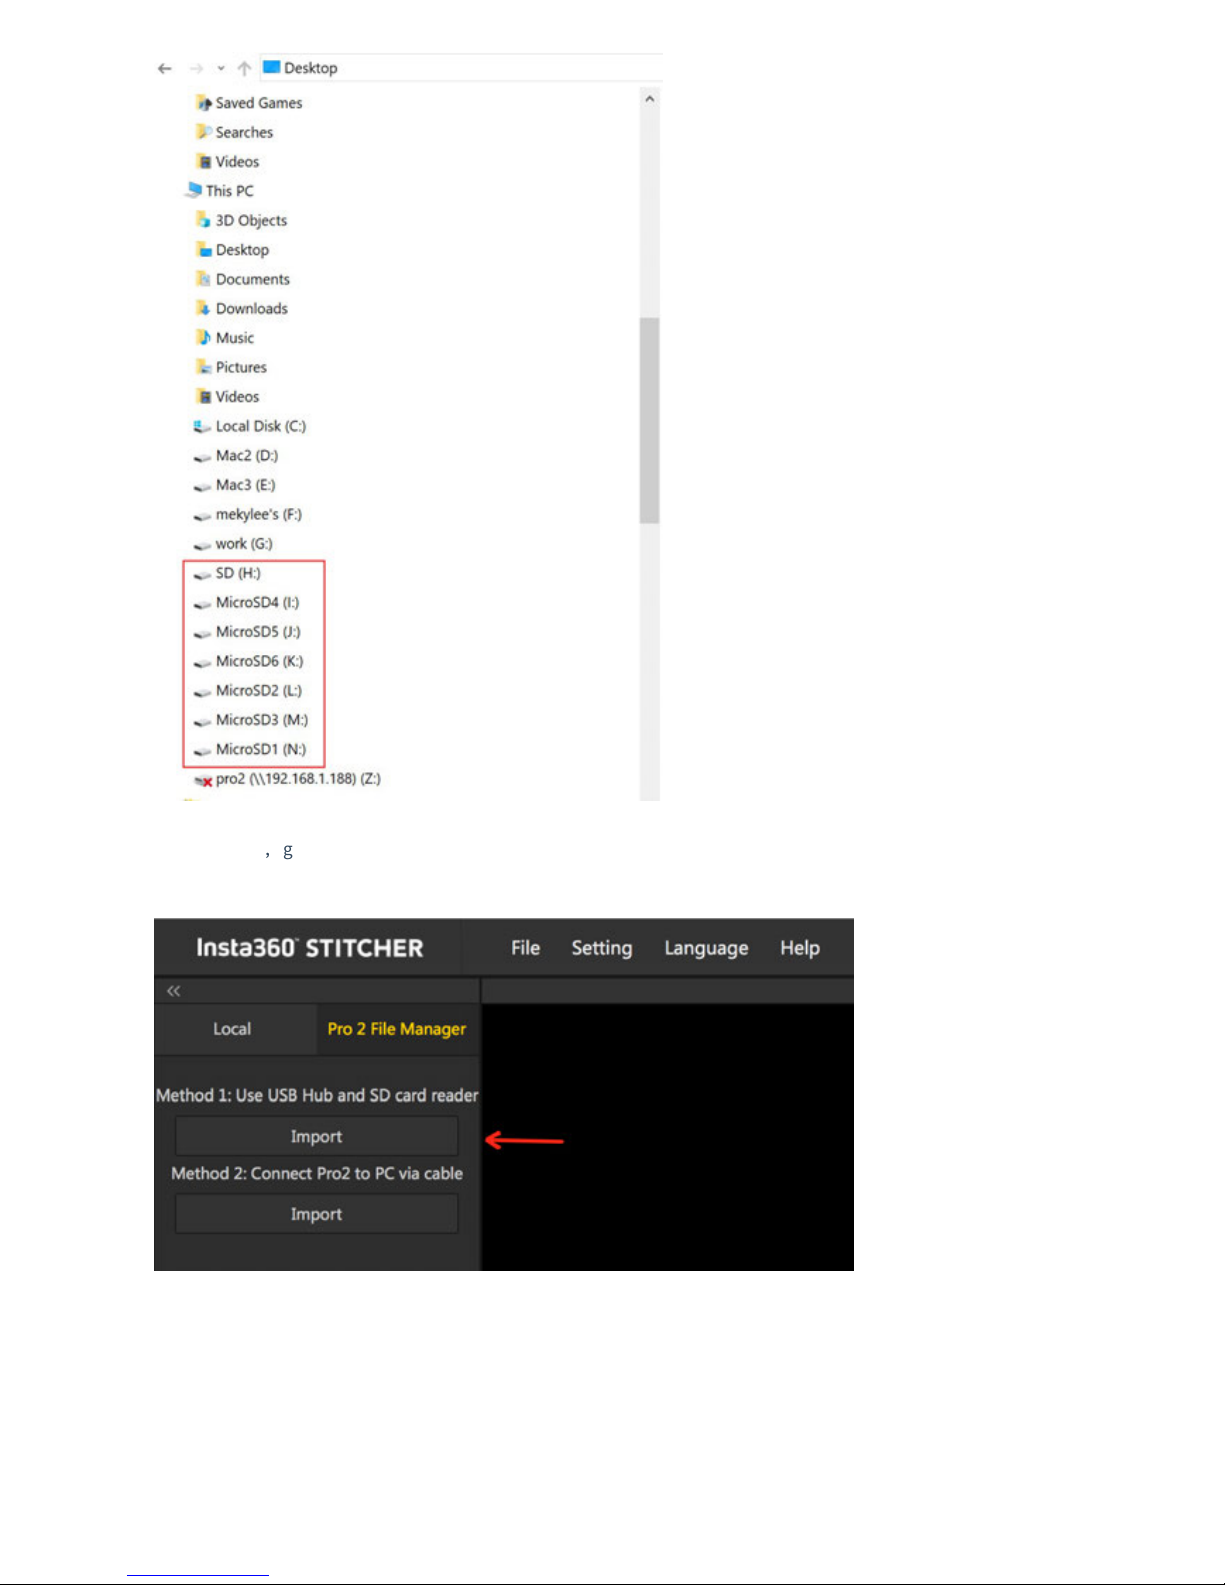
2. Open Stitcher,go to “Pro 2 File Manager" page. Click the "Import" button below method 1. Choose the root directory
from any one of the inserted SD cards.
Page 36
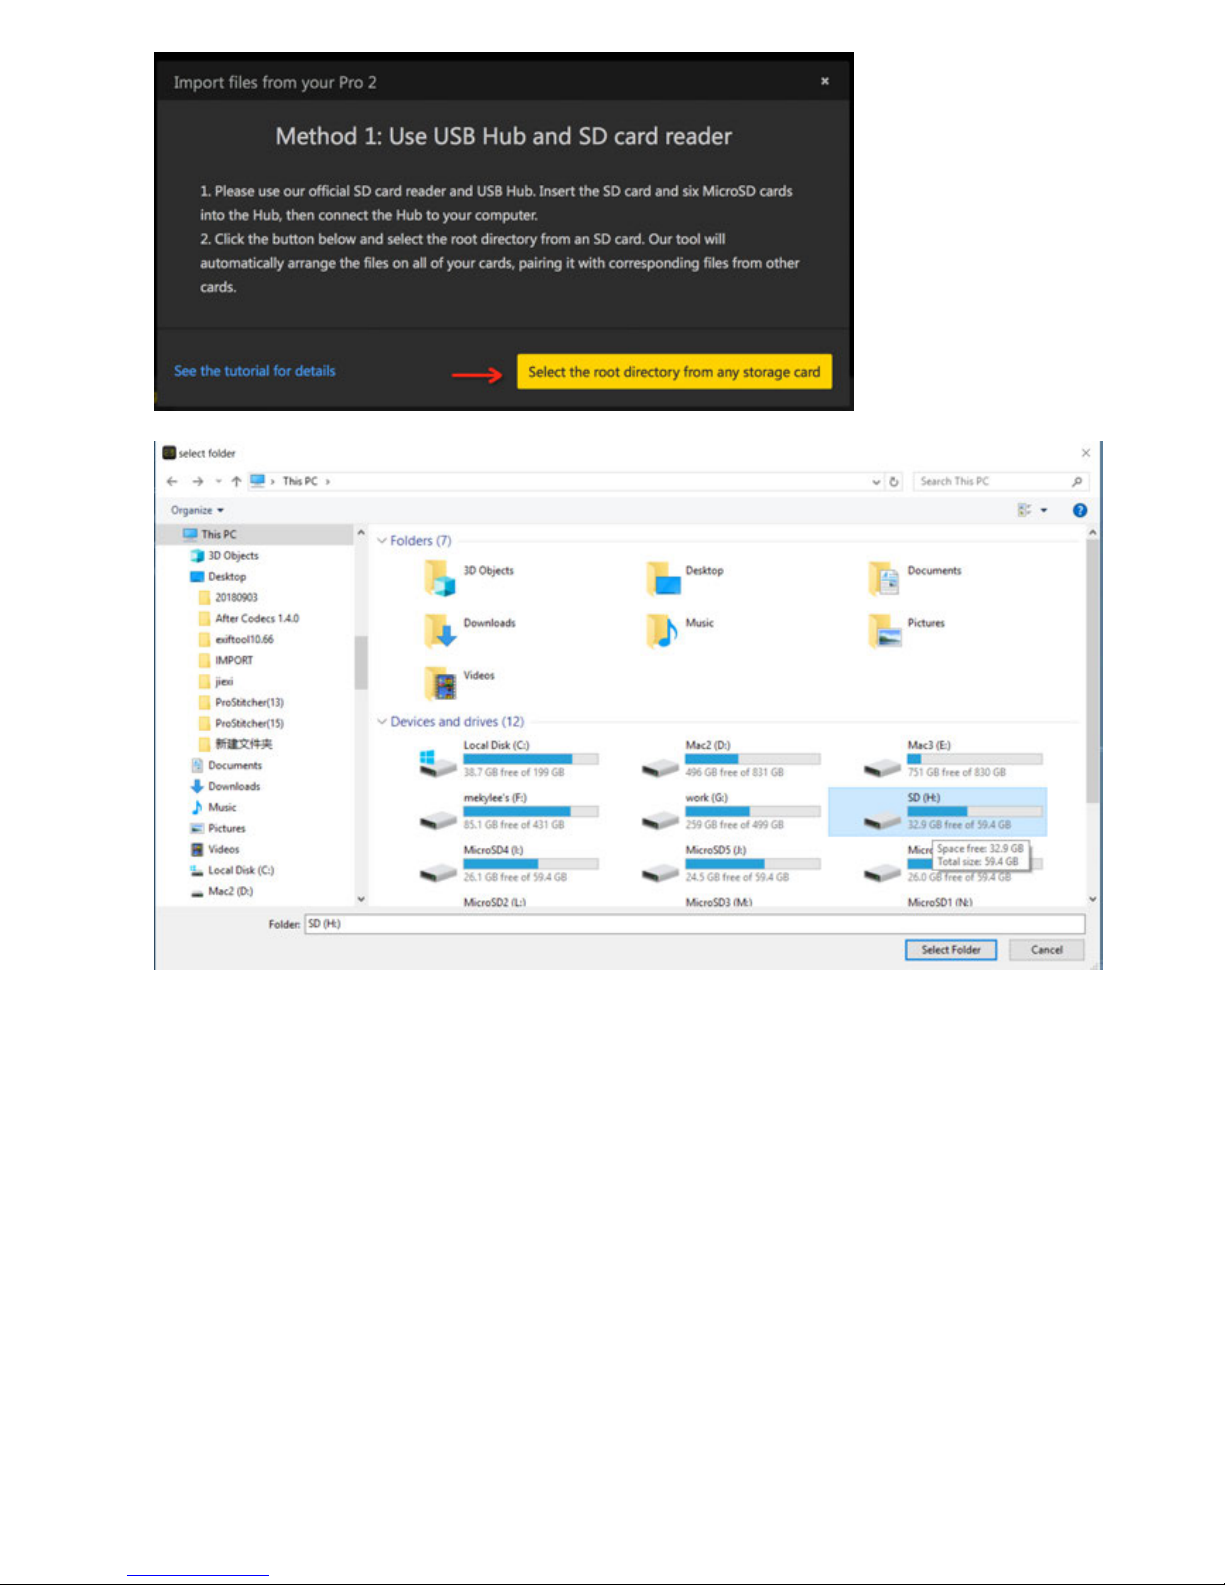
3. It takes a while to load all the contents in SD cards. Please wait for loading process to complete.
Page 37
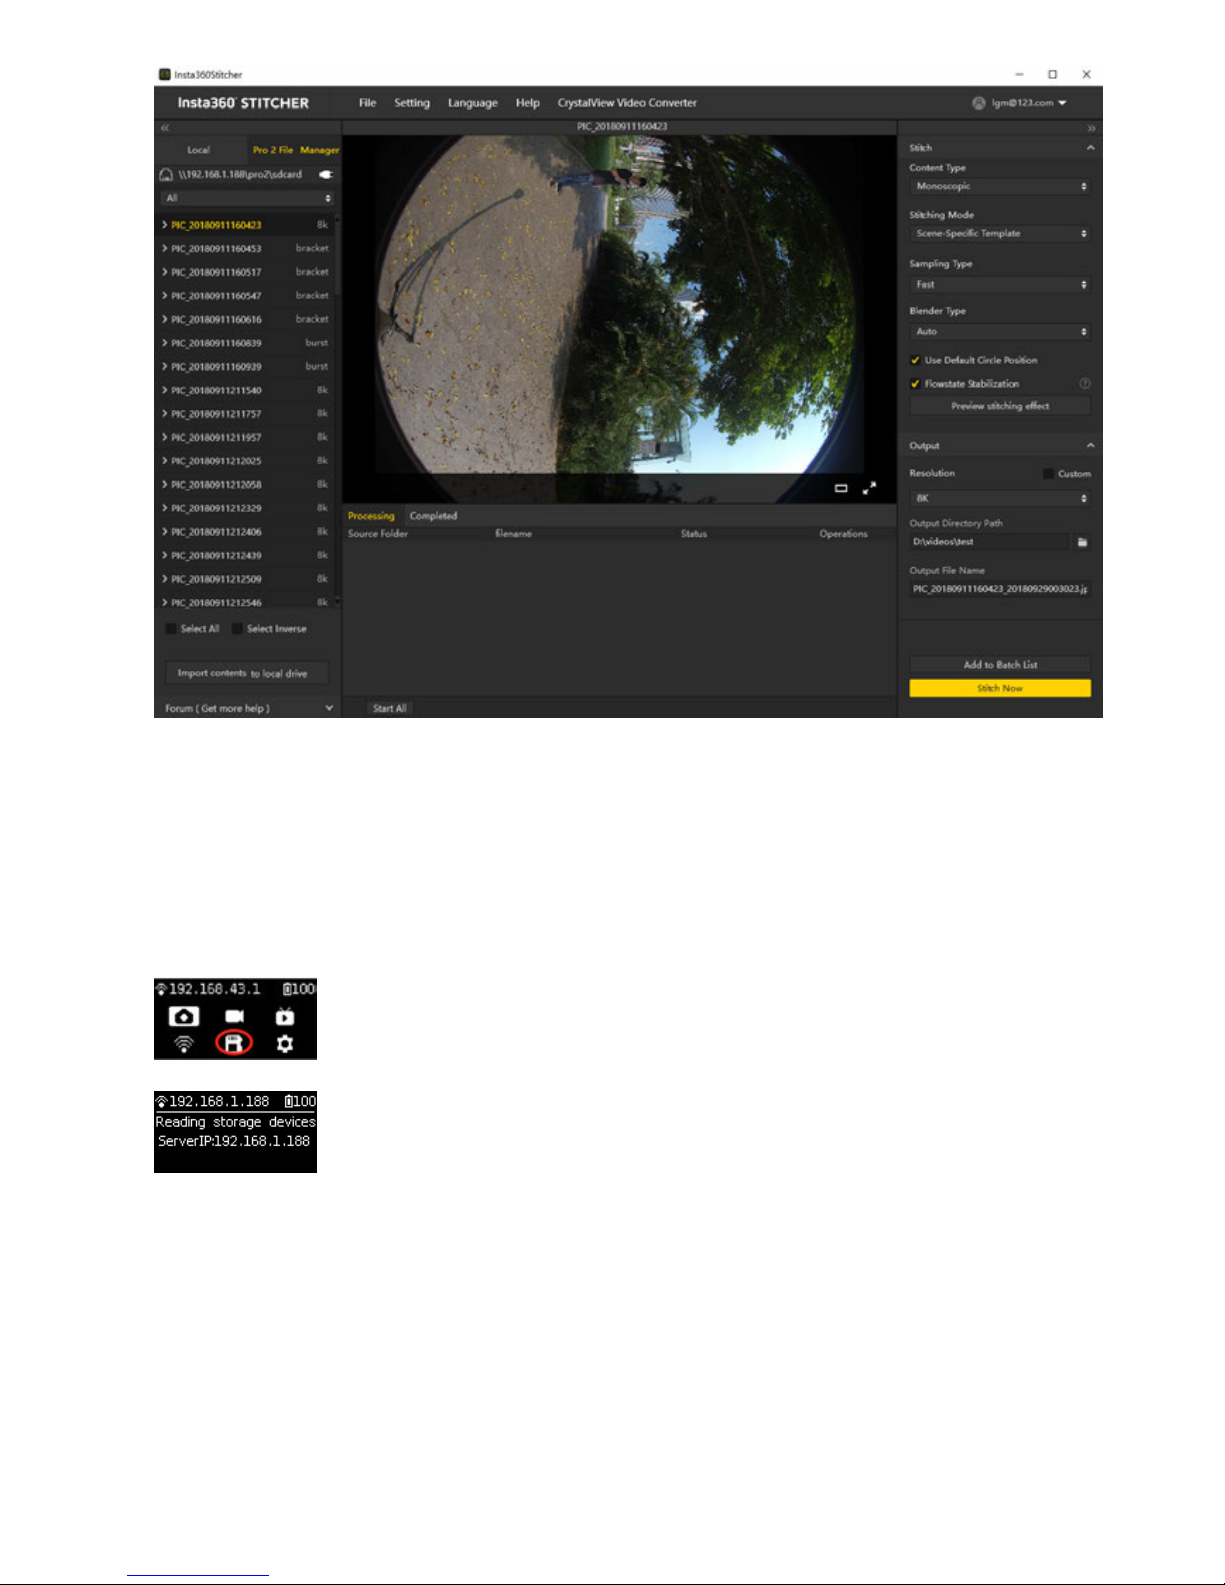
4. Aer all the files are loaded, click the button "Import contents to local drive" at the bottom. Then all the selected
contents will be imported to local drive.
Import method 2: Connect your Pro 2 to your computer via cable
1. Go to the Pro 2's home menu, select the fih function and start storage device reading mode. Wait until the camera
displays "Reading storage devices…".
If the camera shows "Loading failed" aer entering this mode, please restart the camera.
2. Enter\192.168.1.188\ pro2\ in the address bar of the file manager, and visit the directory to read the contents of all
the current storage devices of the camera. You can copy the contents to the same directory and merge the folders
with the same name.
Page 38
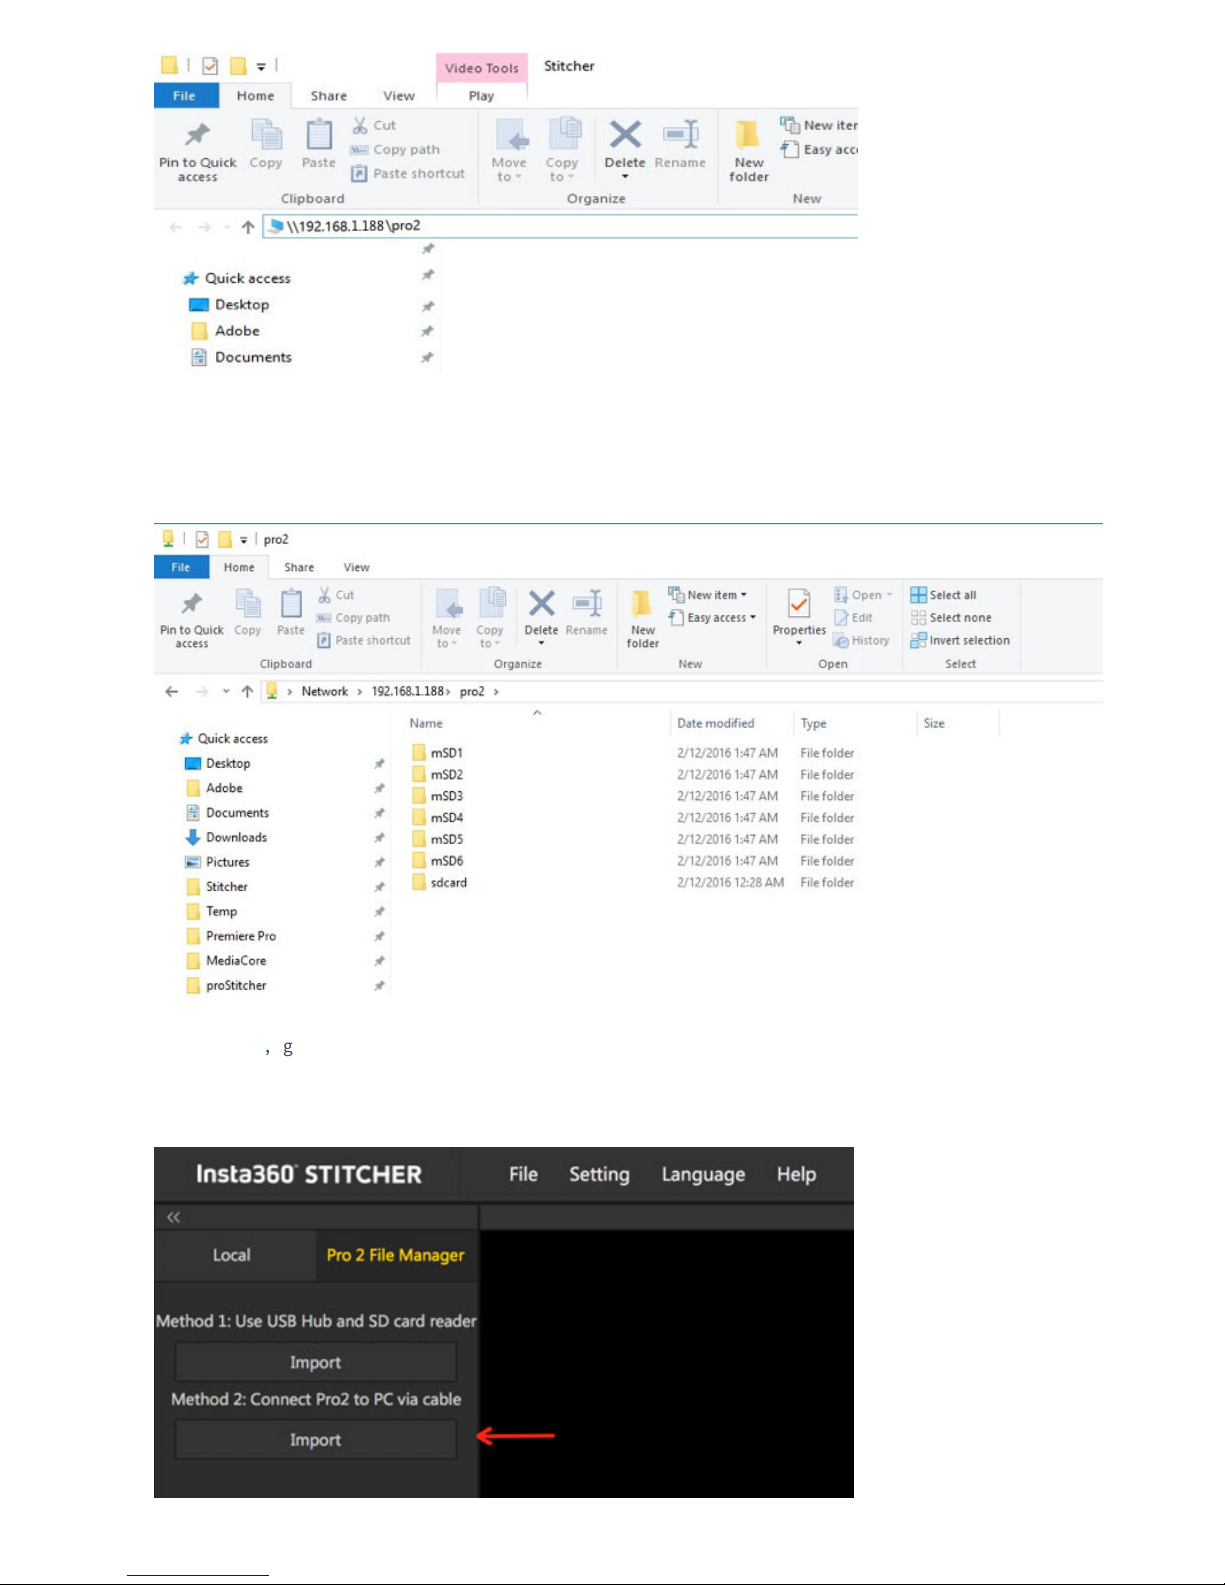
3. If you see six MicroSD cards and one SD card, you have successfully accessed all of your camera's storage devices. You
can choose to merge files in individual folders manually and copy them locally on your computer, or you can import
them by using Stitcher's one-click import tool.
4. Open Stitcher,go to “Pro 2 File Manager" page. Click the "Import" button below method 2. Enter
“\\192.168.1.188\Pro2\” in the address bar of select folder. Access this directory and choose a root directory from any
one of your SD cards.
Page 39
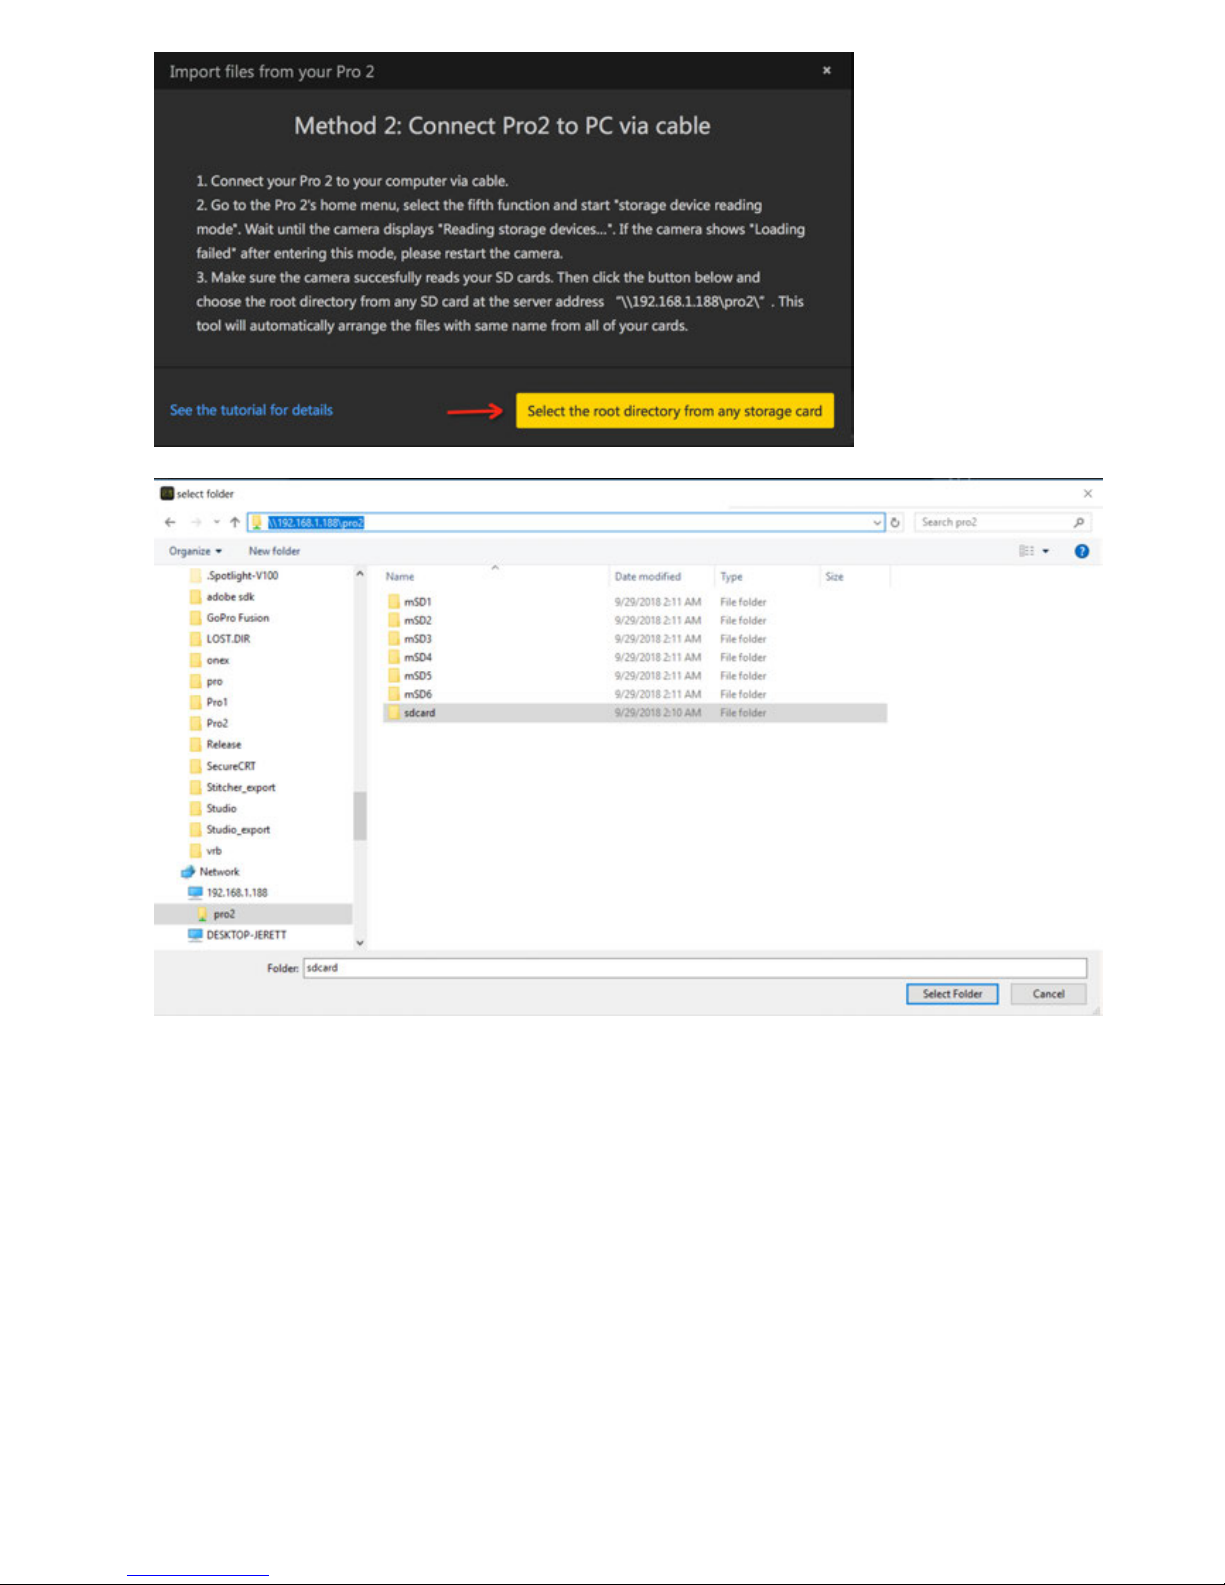
You can also map a network drive for Pro 2 directory under server address: \\192.168.1.188. In this way, you don't
have to type its network address each time.
Page 40
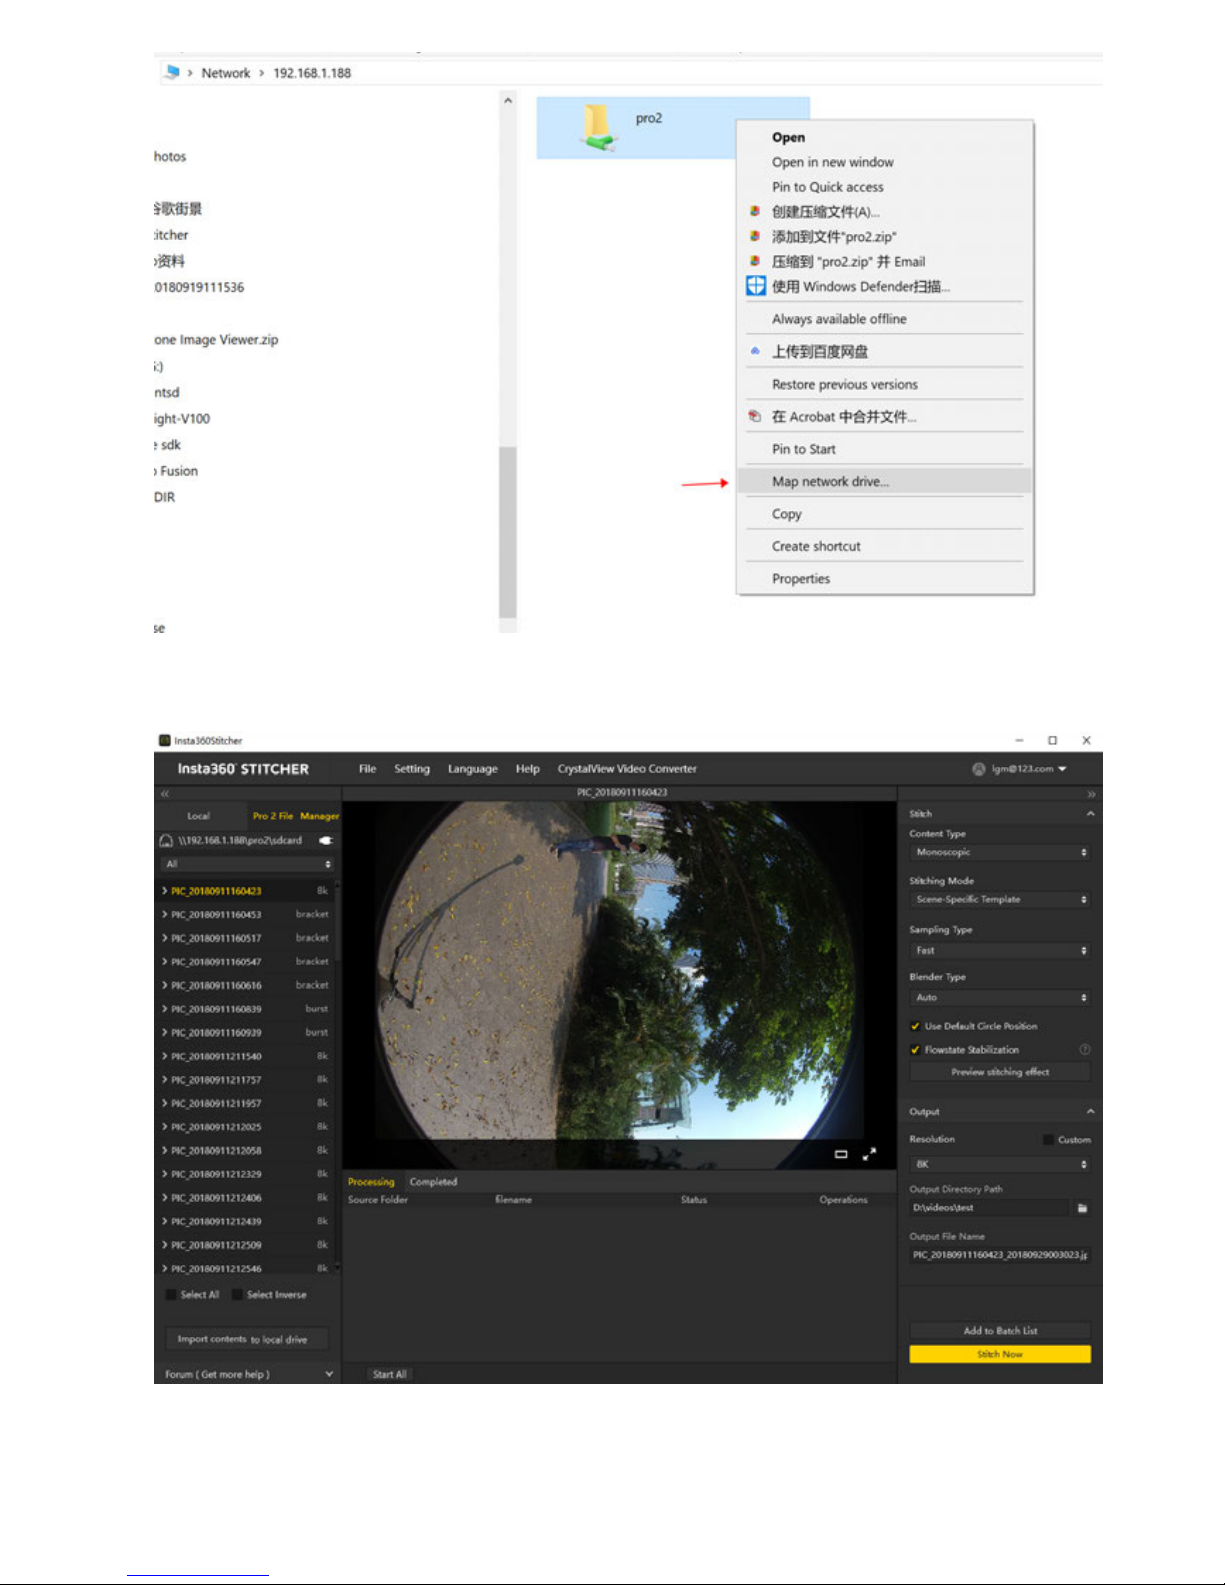
5. It takes a while to load all the contents in SD cards. Please wait for loading process to complete.
6. Aer all the files are loaded, click the button "Import contents to local drive" at the bottom. Then all the selected
contents will be imported to local drive.
Page 41
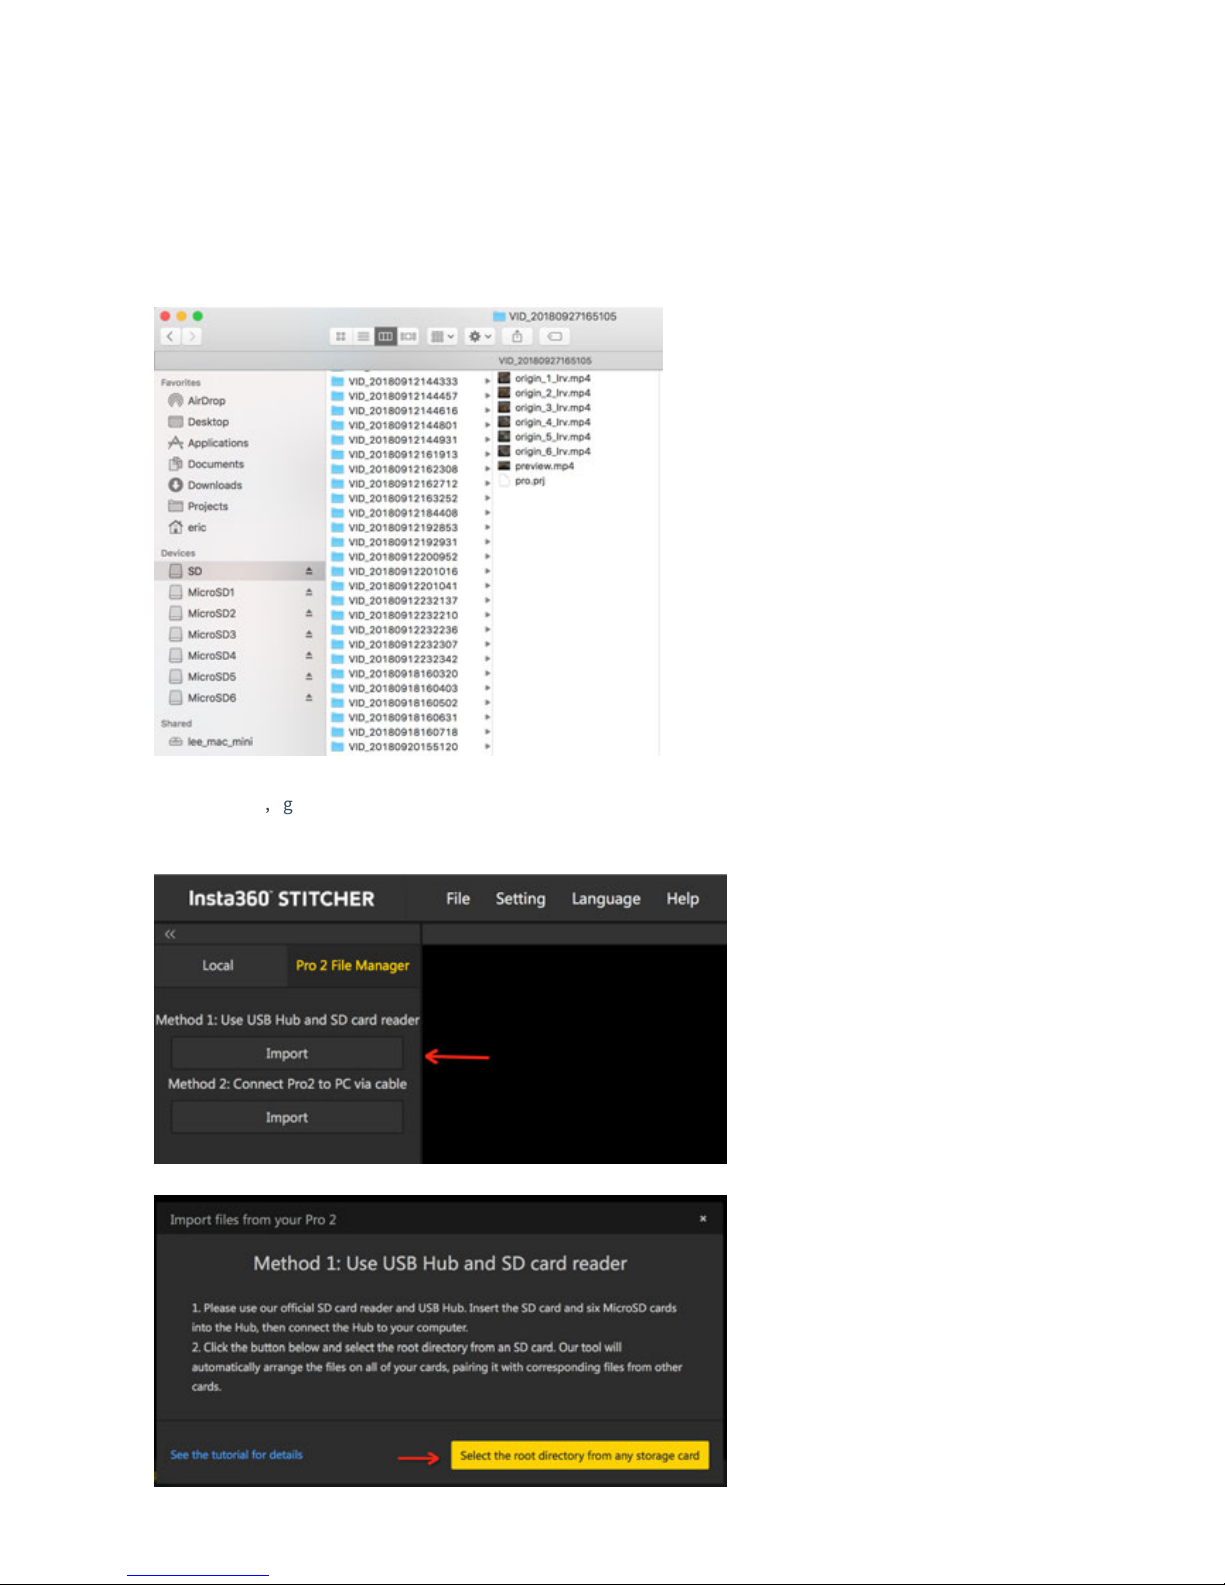
Import Pro 2 files to computer in MacOS:
Import method 1: Use the USB Hub and the SD card reader
1. Please use our oicial SD card reader and USB Hub. Insert the SD card and six MicroSD cards into the Hub, then
connect the Hub to your computer. Wait for your computer to recognize and mount all storage cards.
2. Open Stitcher,go to “Pro 2 File Manager" page. Click the "Import" button below method 1. Choose the root directory
from any one of the inserted SD cards.
Page 42
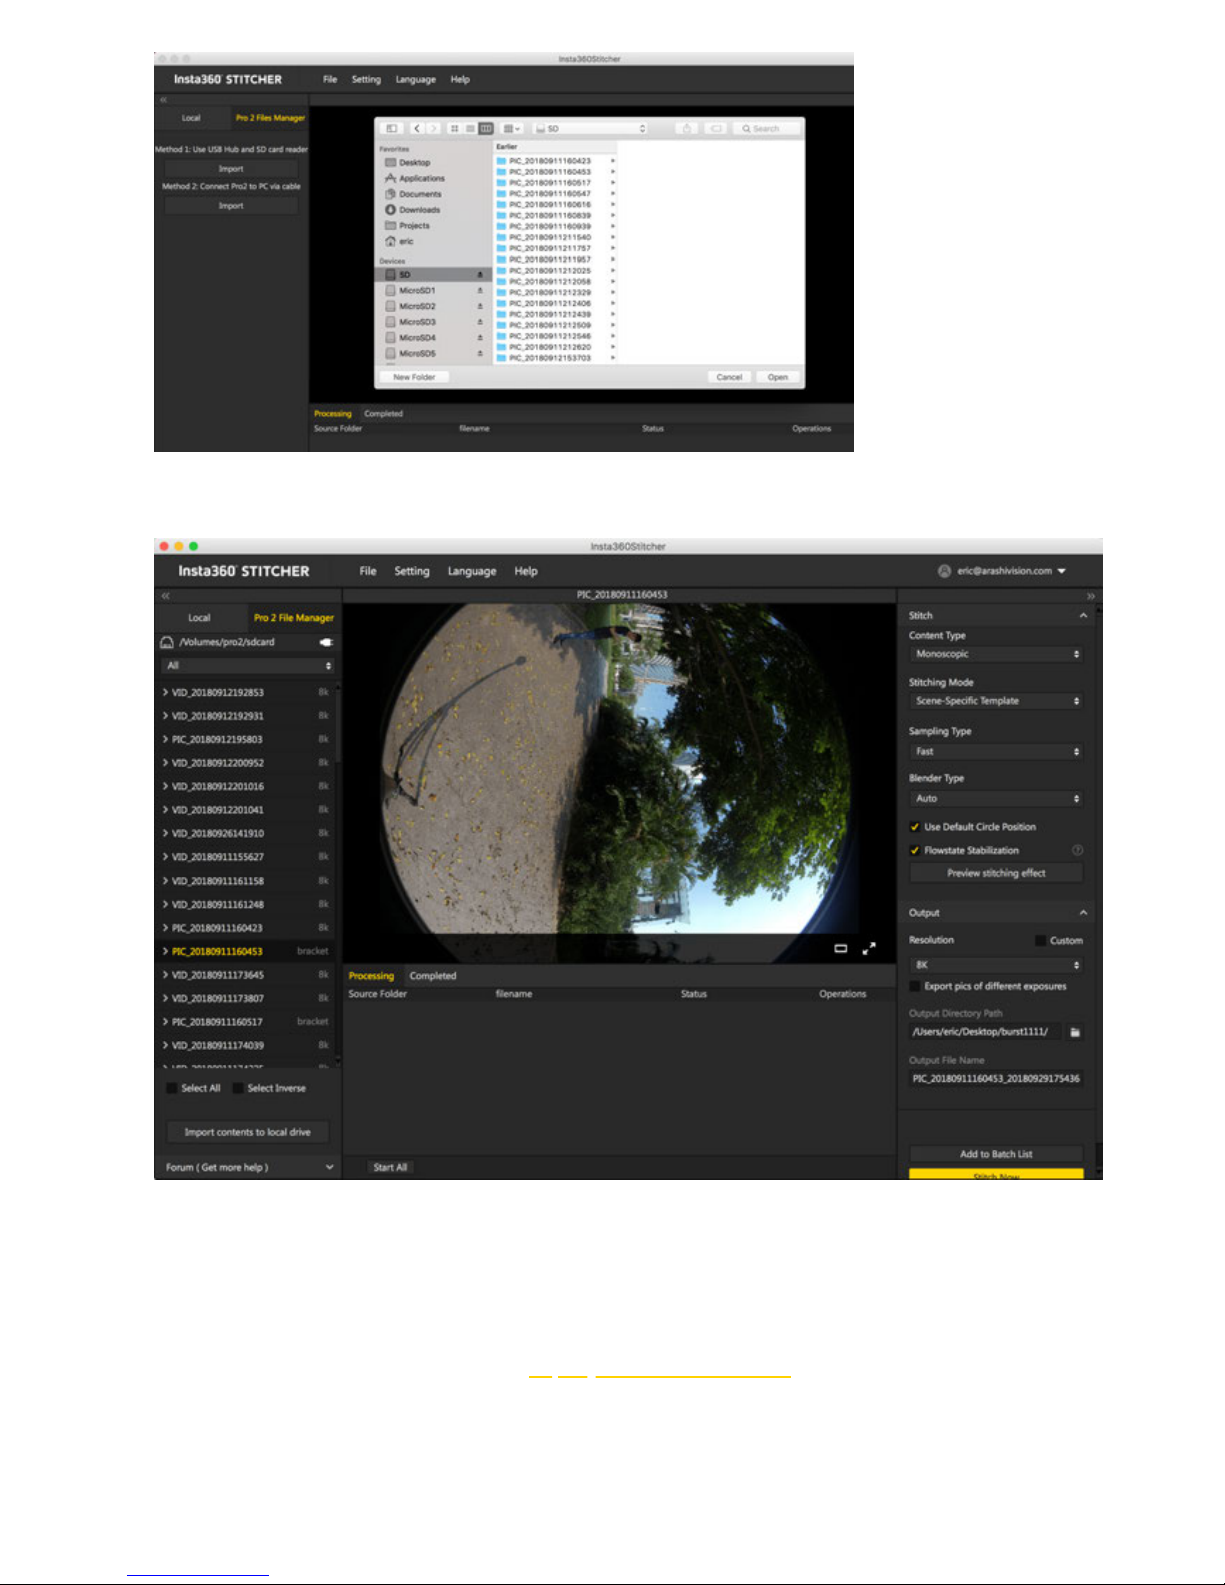
3. It takes a while to load all the contents in SD cards. Please wait for loading process to complete.
4. Aer all the files are loaded, click the button "Import contents to local drive" at the bottom. Then all the selected
contents will be imported to local drive.
Import method 2: Connect your Pro 2 to your computer via cable
Please visit the website before using the function (https://joshuawise.com/horndis). In the Available versions section,
please select to download the corresponding Horndis driver soware according to the current Mac system version, and
then install the soware.
Page 43
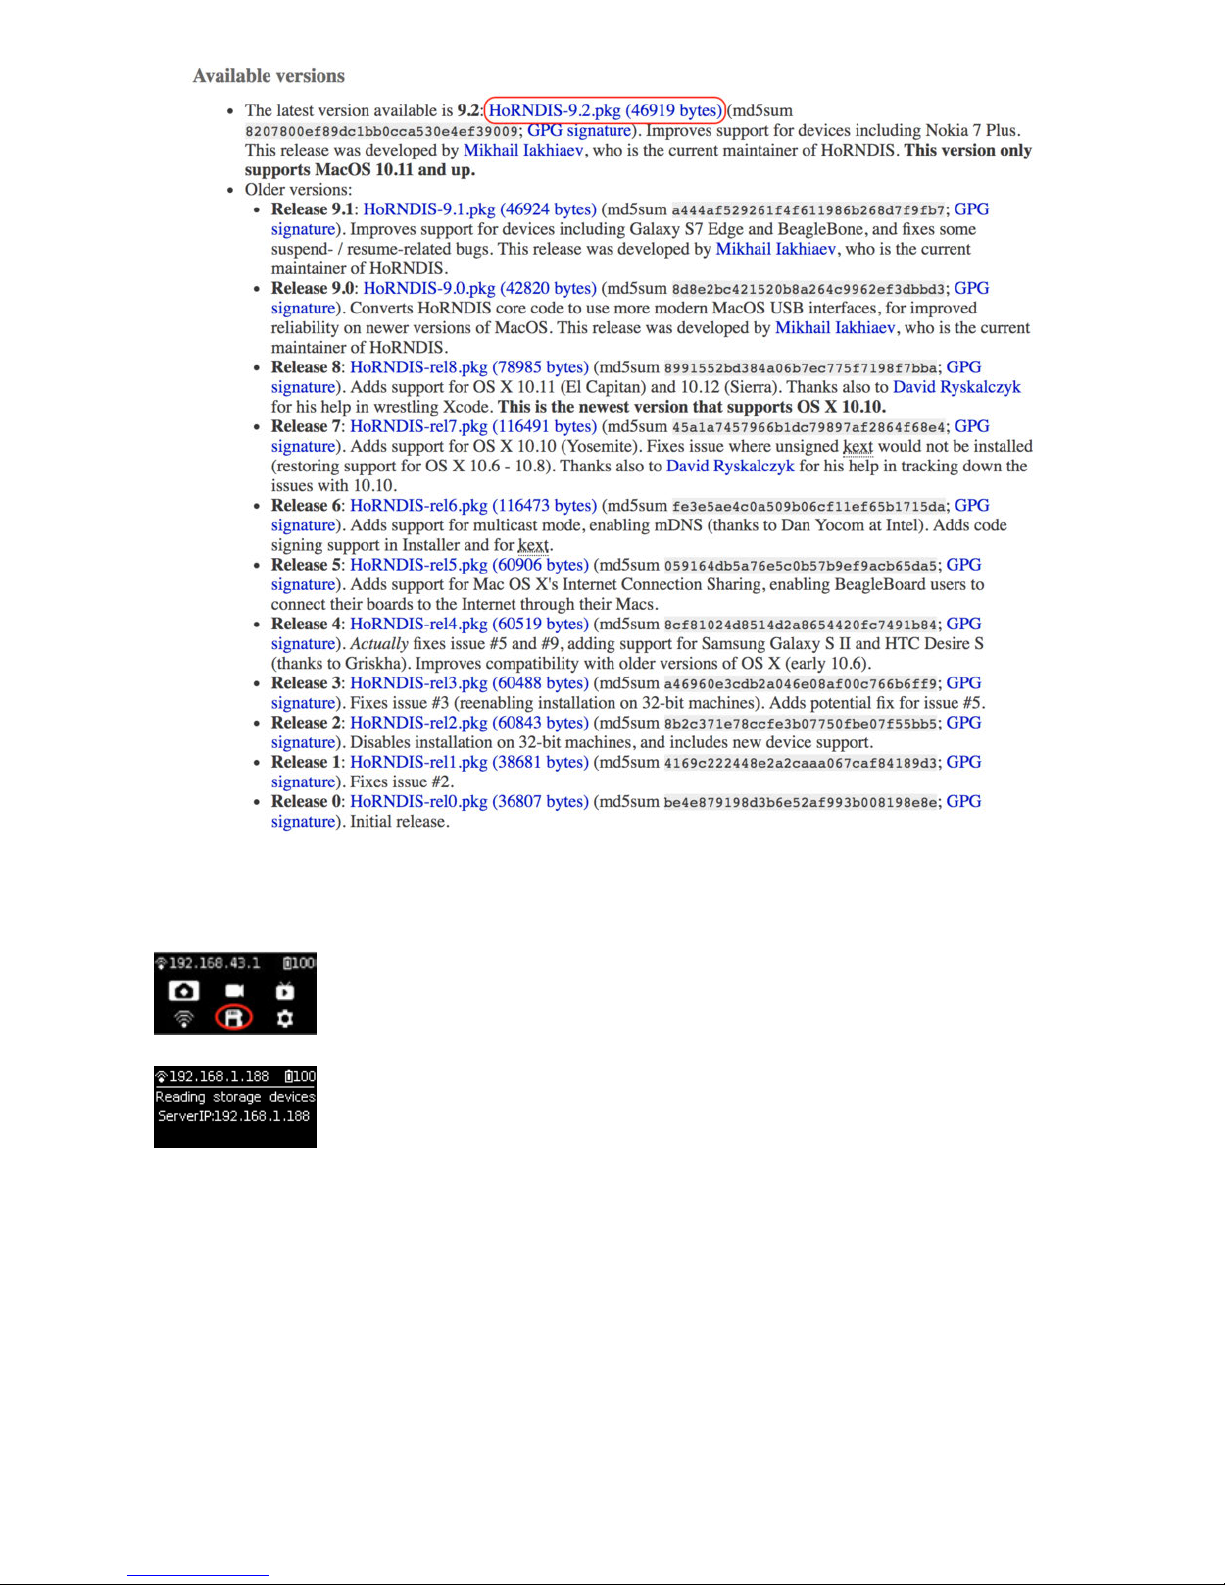
1. Go to the Pro 2's home menu, select the fih function and start storage device reading mode. Wait until the camera
displays "Reading storage devices…".
If the camera shows "Loading failed" aer entering this mode, please restart the camera.
2. Open the file manager Finder on Mac system and click Go -> Connect to Server.
Page 44
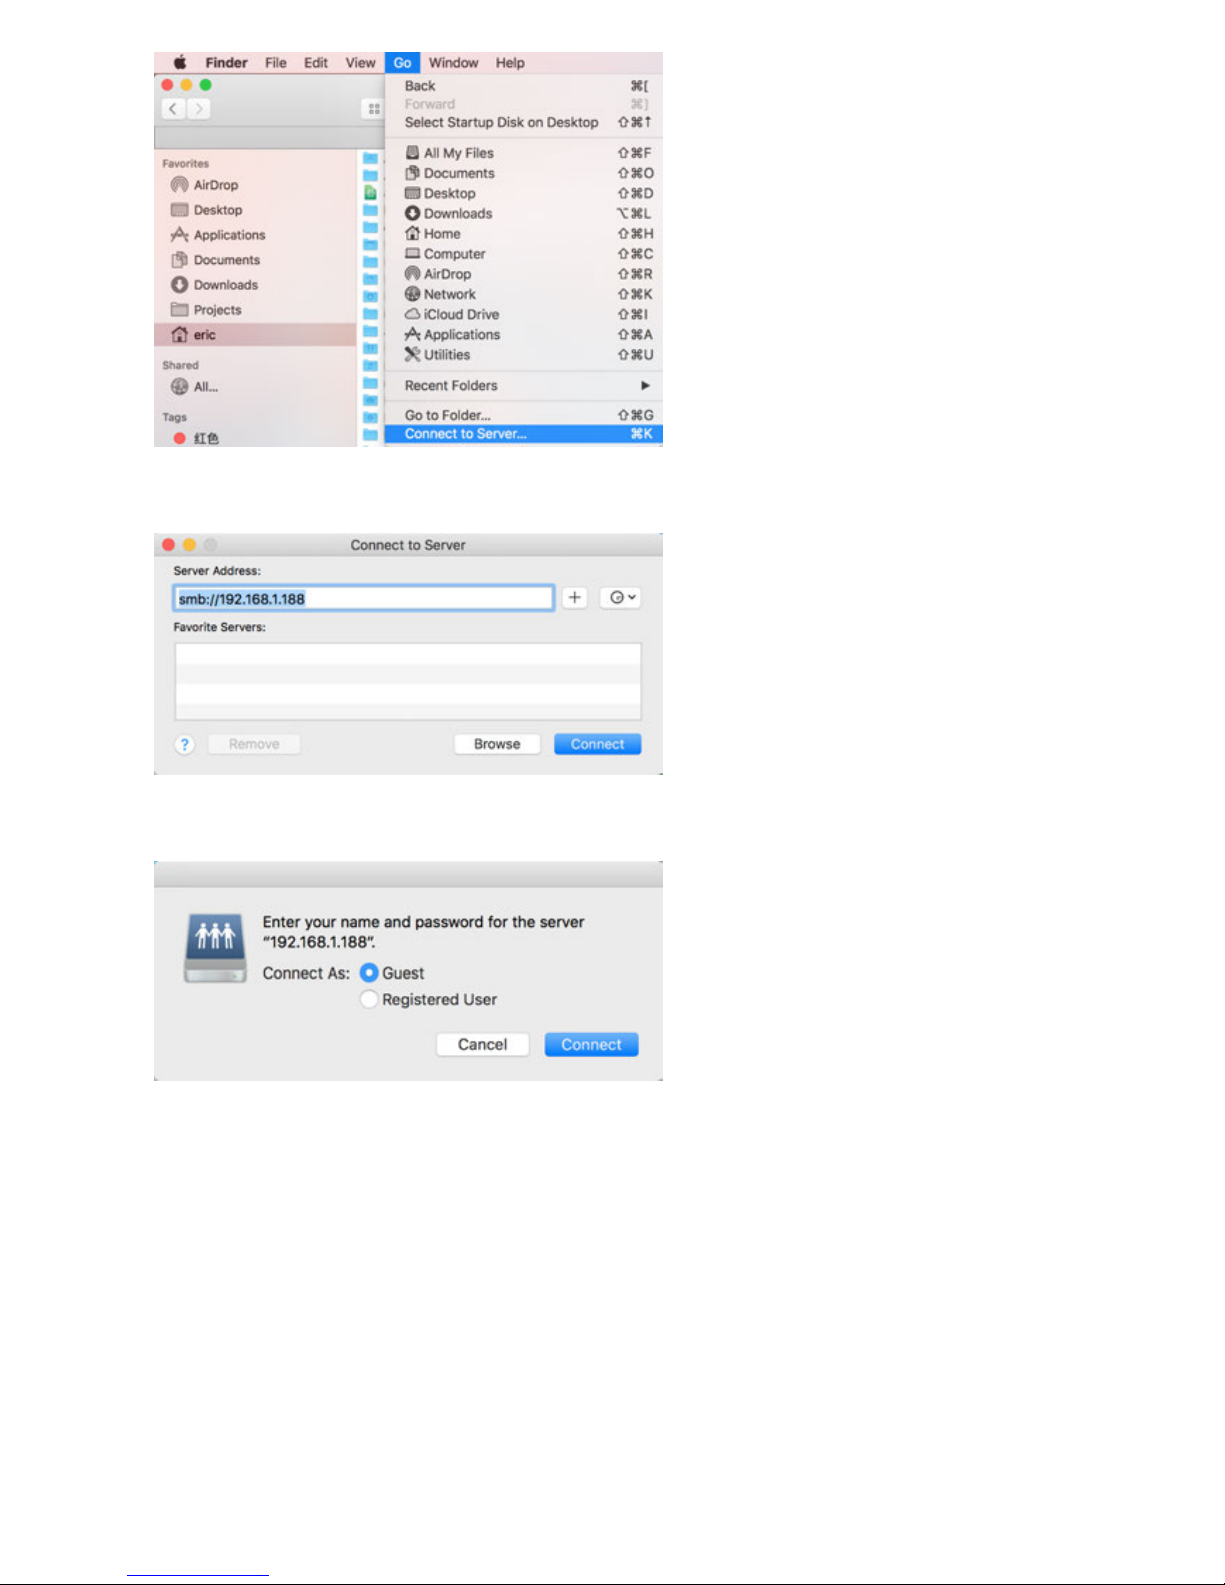
3. Enter smb://192.168.1.188, in the Server Address bar and click “Connect”.
4. Select “Guest” in the pop-up window and click “Connect”.
5. In the next pop-up window, select "pro2" and click “OK" to connect.
Page 45
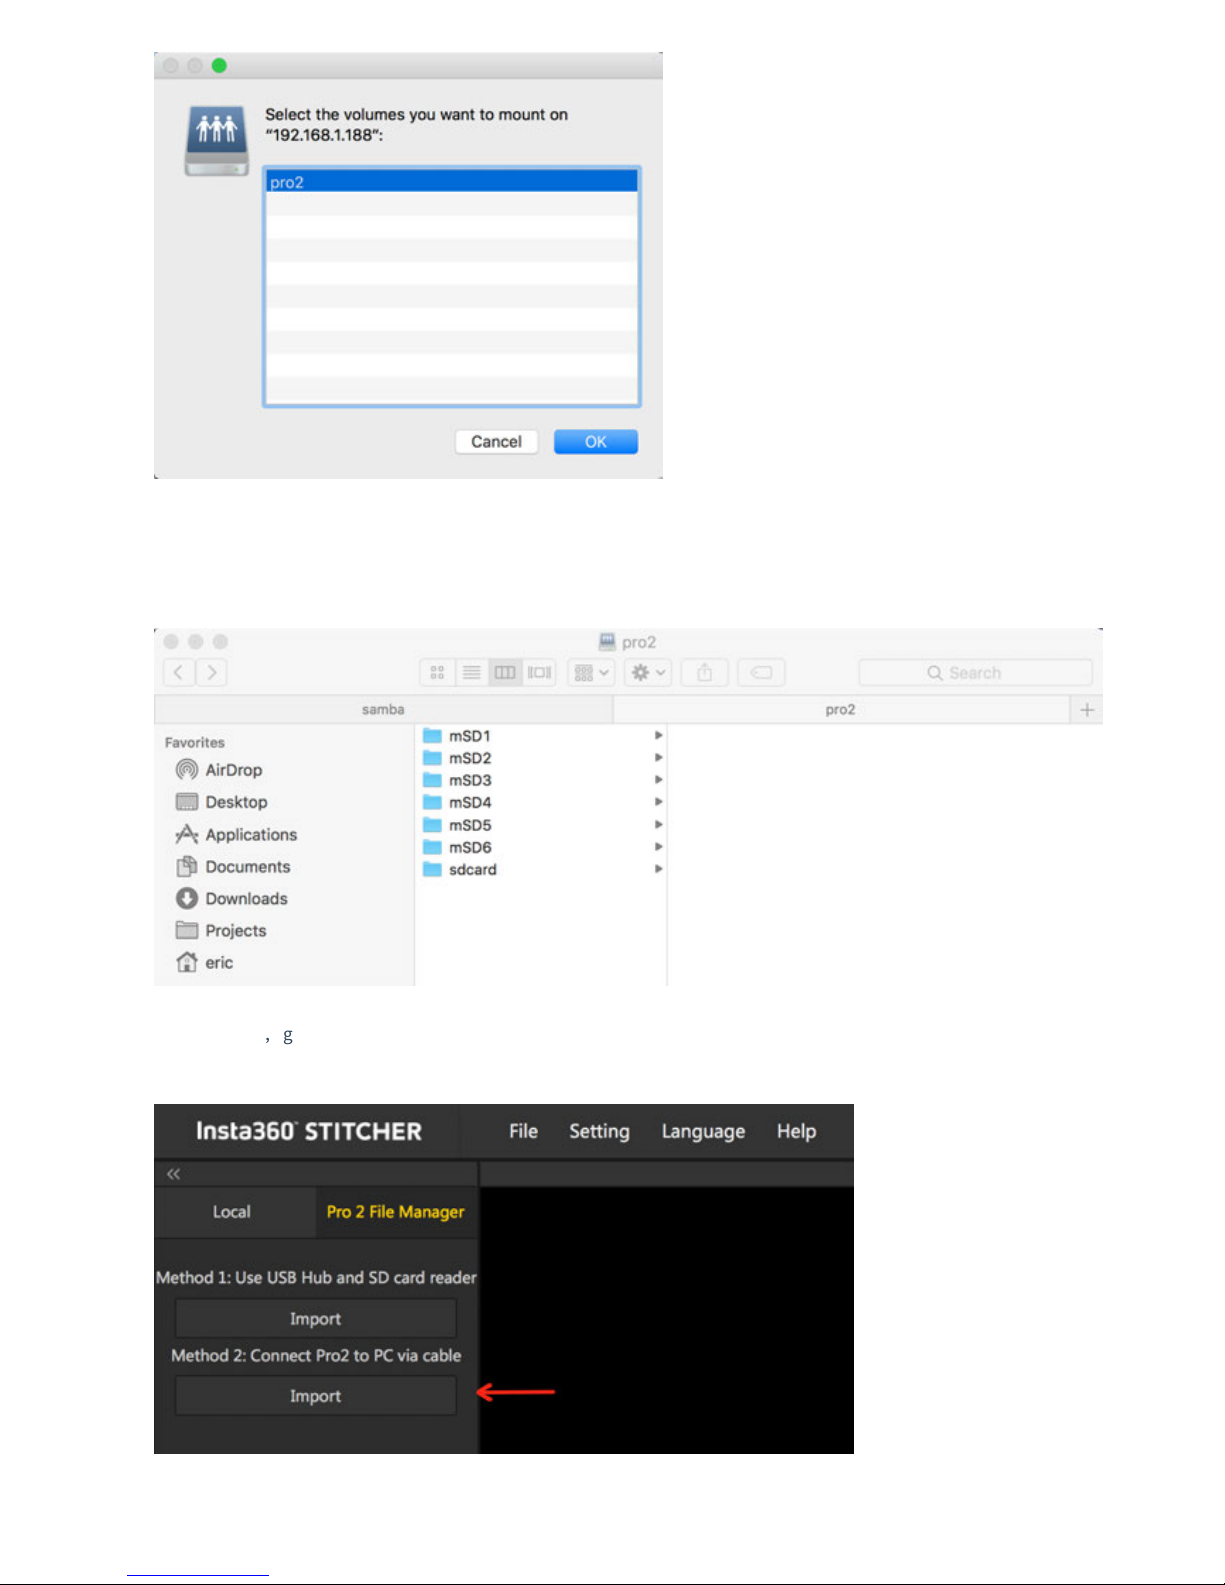
6. If you see six MicroSD cards and one SD card, you have successfully accessed all of your camera's storage devices. You
can choose to merge files in individual folders manually and copy them locally on your computer, or you can import
them by using Stitcher's one-click import tool.
7. Open Stitcher,go to “Pro 2 File Manager" page. Click the "Import" button below method 2. Choose the root directory
from any SD card under server address: 192.168.1.188\pro2.
Page 46
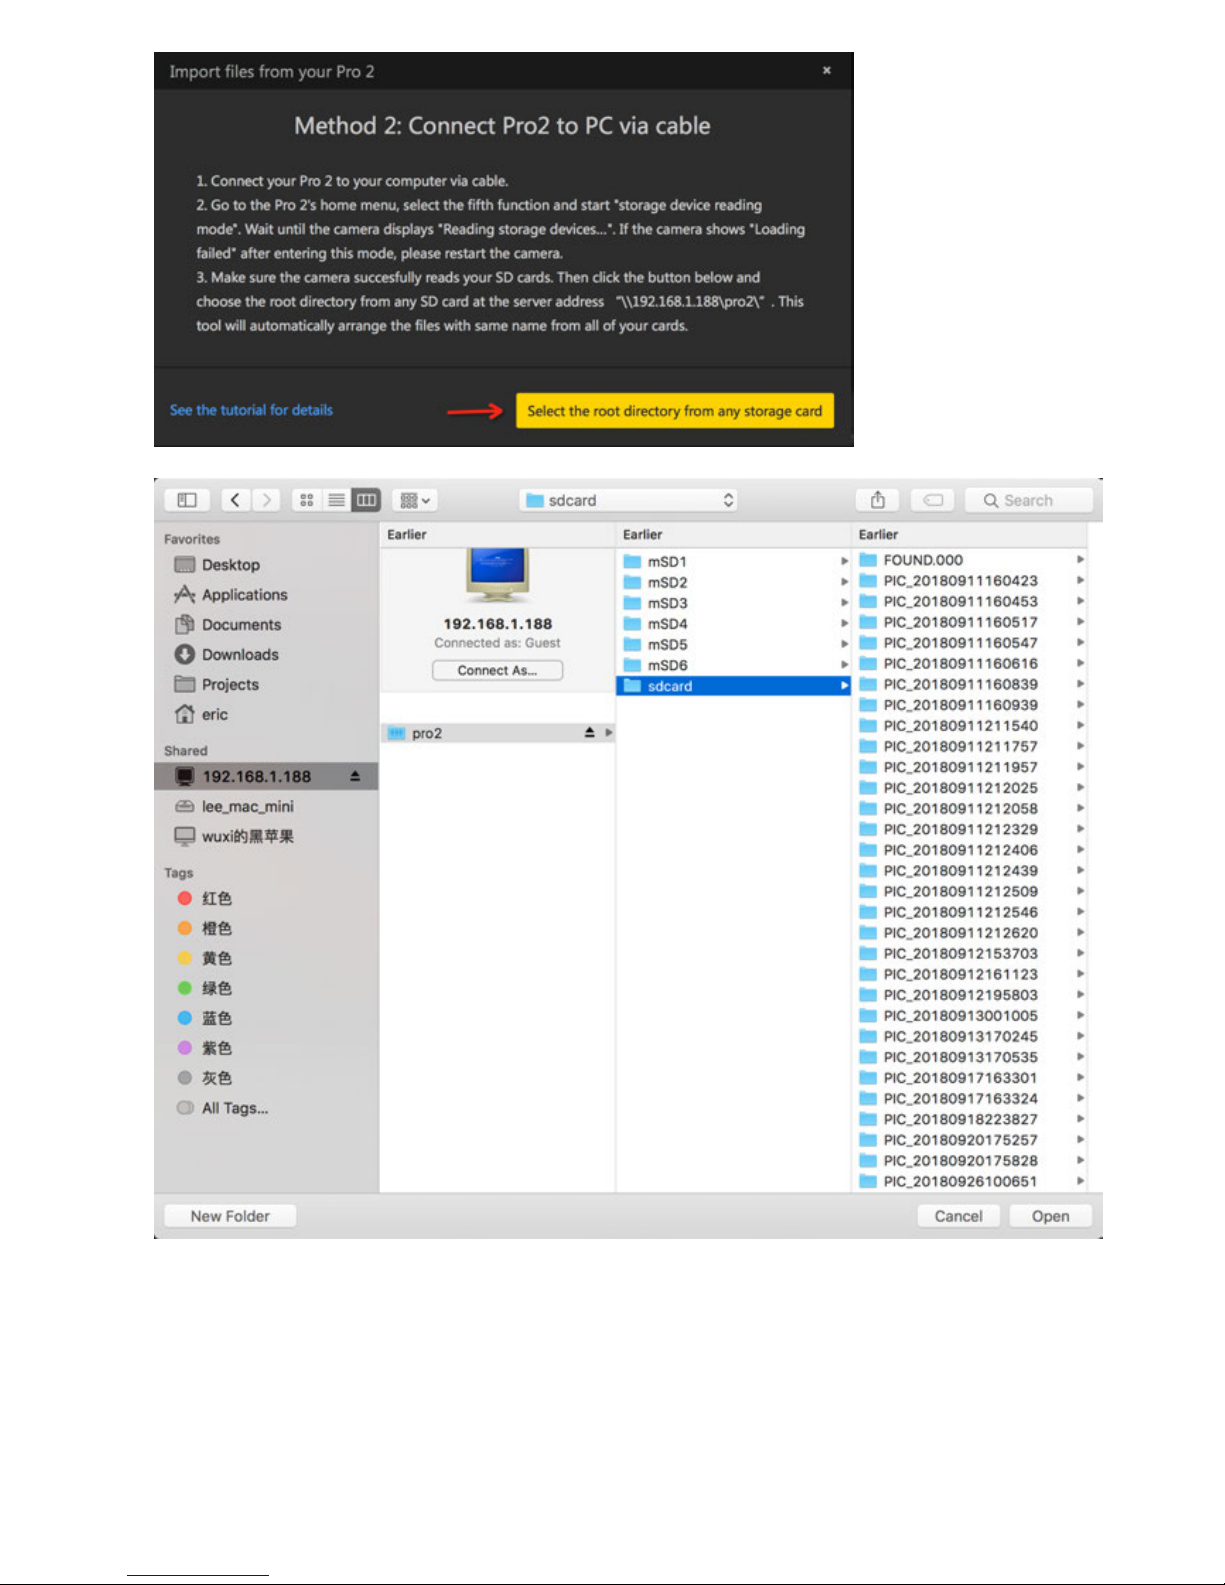
8. It takes a while to load all the contents in SD cards. Please wait for loading process to complete.
Page 47
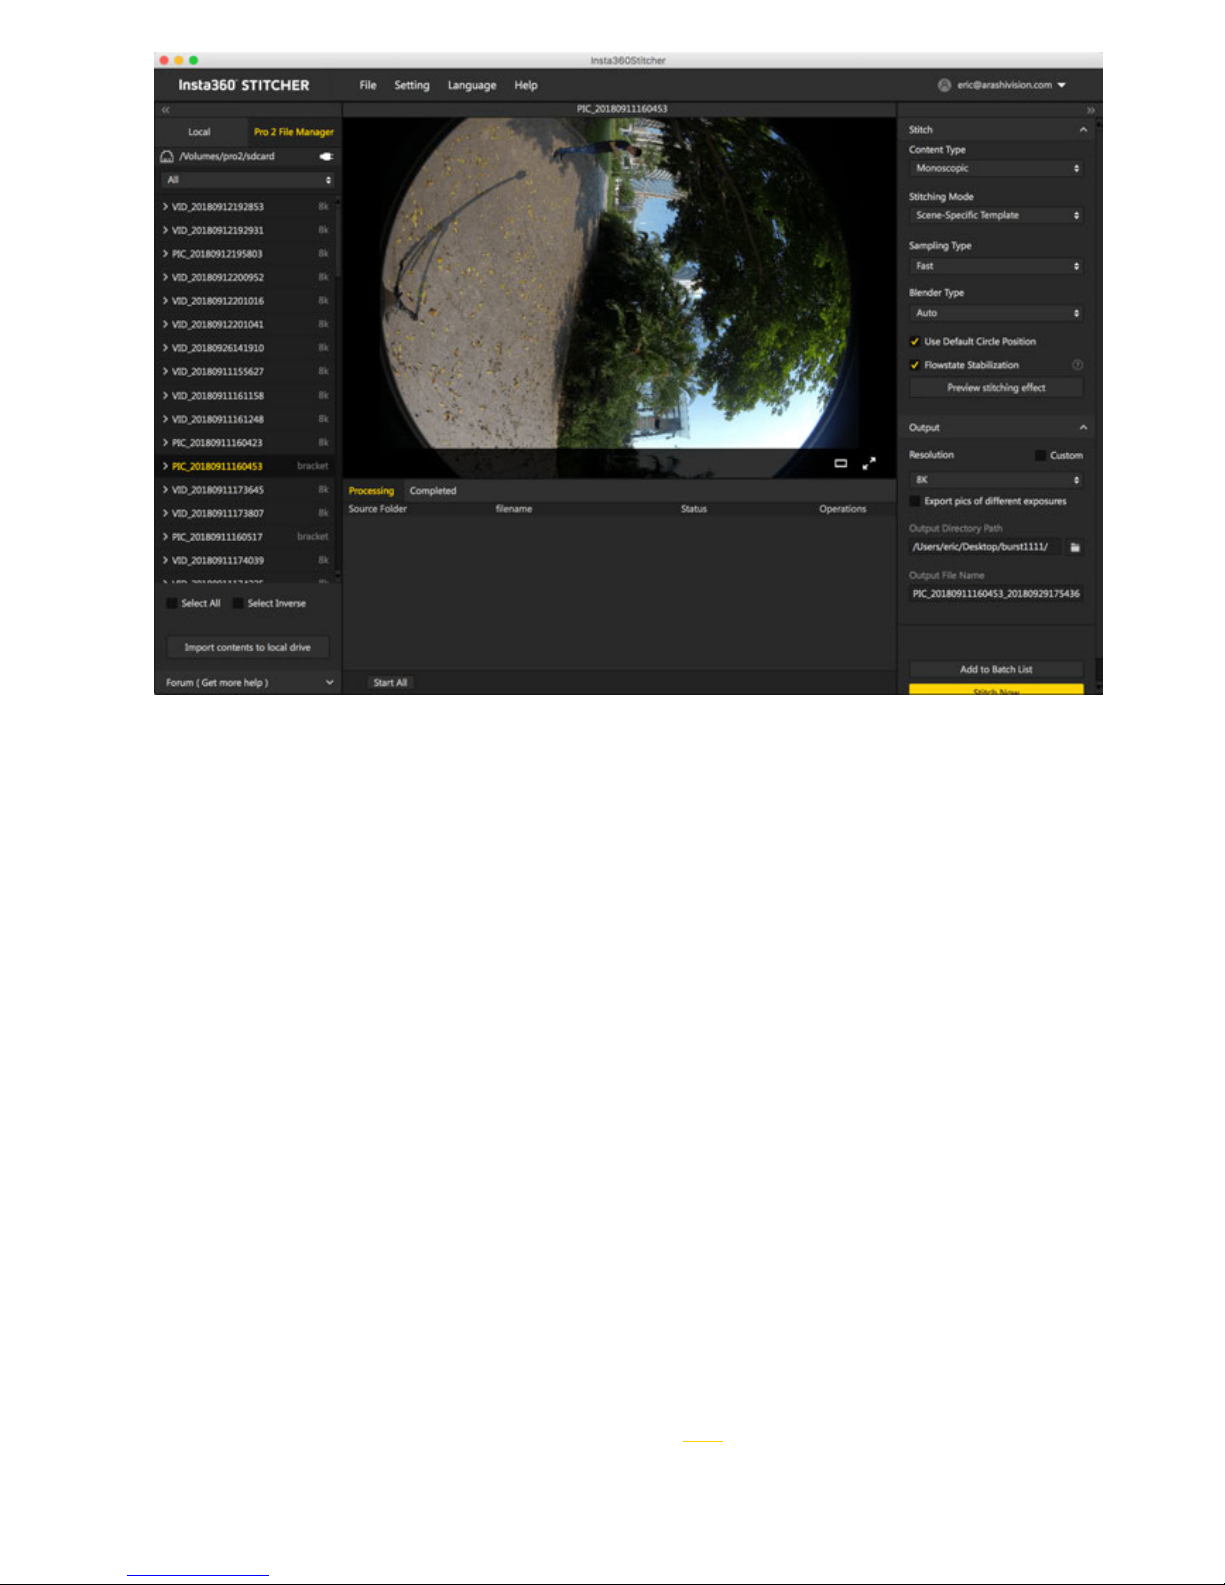
9. Aer all the files are loaded, click the button "Import contents to local drive" at the bottom. Then all the selected
contents will be imported to local drive.
Please note that aer you have put your camera in storage device reading mode, and your computer has direct access to
the directories of multiple storage cards, you can drag the folders in your SD card (not MicroSD) directly to Stitcher for
use. However, this approach depends on the stability and reliability of the network, so it is strongly recommended to save
the content to the local computer before splicing or editing.
Alternatively, if you have purchased an oicial card reader and Hub package, you can take out the seven storage cards
and insert them into the card reader and Hub to connect to your computer, and then manually merge the folders with
same name and copy them to your computer.
2.1.1 [Beginner] Preparation of photography
Before shooting photos, camera’s battery level, format and capacity of storage devices must be checked, environment
safety for shooting should be confirmed, and suitable bracket and accessories must be selected.
Storage medium: make sure that the format is exFAT before shooting, in case your shooting will be delayed due to the
unsuitable format.
Selection and formatting methods for storage media are described in 1.1.3.
Page 48
Battery power: Pro 2’s battery can be used for about 50 minutes when fully charged. When moving to take photos, one
can prepare several spare batteries.
Gyro calibration: before shooting, one can check the preview scene through the camera controlling device of Insta360
Pro 2 to determine whether it needs to have camera calibration. Please see 1.1.4 for detailed method.
Stitching calibration: if only carrying out post stitching, no camera stitching calibration is needed; if real-time stitching
and better preview are needed, one can choose stitching calibration. When there is obvious changes in shooting
environment, e.g. from indoors to outdoors, one should have stitching calibration once again. Calibration methods for
stitching are described in detail in 1.1.4.
You can manipulate cameras by Insta360 Pro client terminal that supports all the platforms, and the connection
operations are described in detail in 1.1.5.
Certainly, you can also take photos without connecting to other devices. The camera has 5s shooting delay by default for
standalone use. If additional settings are needed, you can use customize function to save settings so that camera will
automatically adopt settings specified last time when starting to have next shoot. The detailed method is described in
6.2.
2.1.2 [Beginner] Selection of accessories for shooting
When shooting panoramic view, we should try to reduce the area of bottom bracket as far as possible for convenient post
editing. In this sense, Manfrotto VR series products are relatively safe, portable, convenient shooting bracket, which can
be regarded as reference for purchase.
https://www.manfrotto.us/products/virtual-reality?limit=36
Nodal Ninja Panoramic Photography Equipment series can be another choice.
Page 49
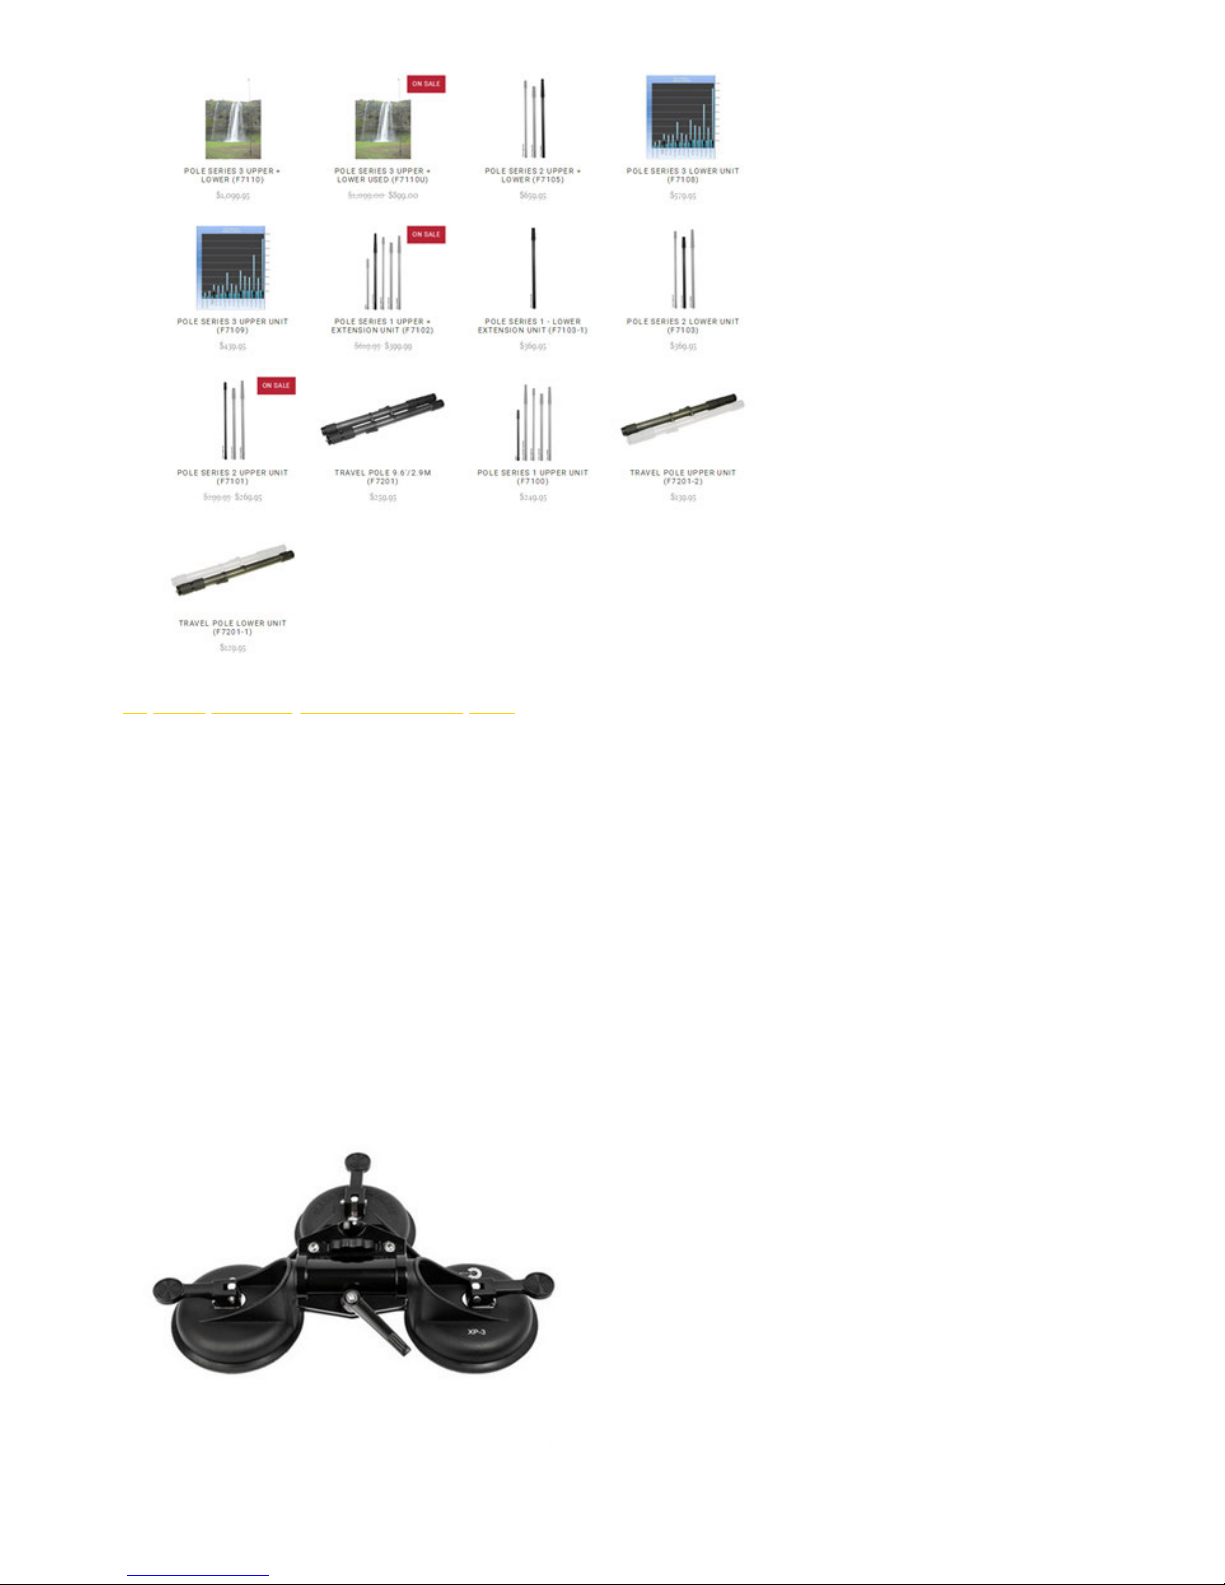
http://shop.nodalninja.com/carbon-fiber-poles/
2.1.3 [Advanced] Selection of advanced accessories for
photographing
Base support. Pro 2 has a weight of 1550 g. Please select base with large suction force for single-lens camera, which is
relatively more stable and reliable.
Page 50
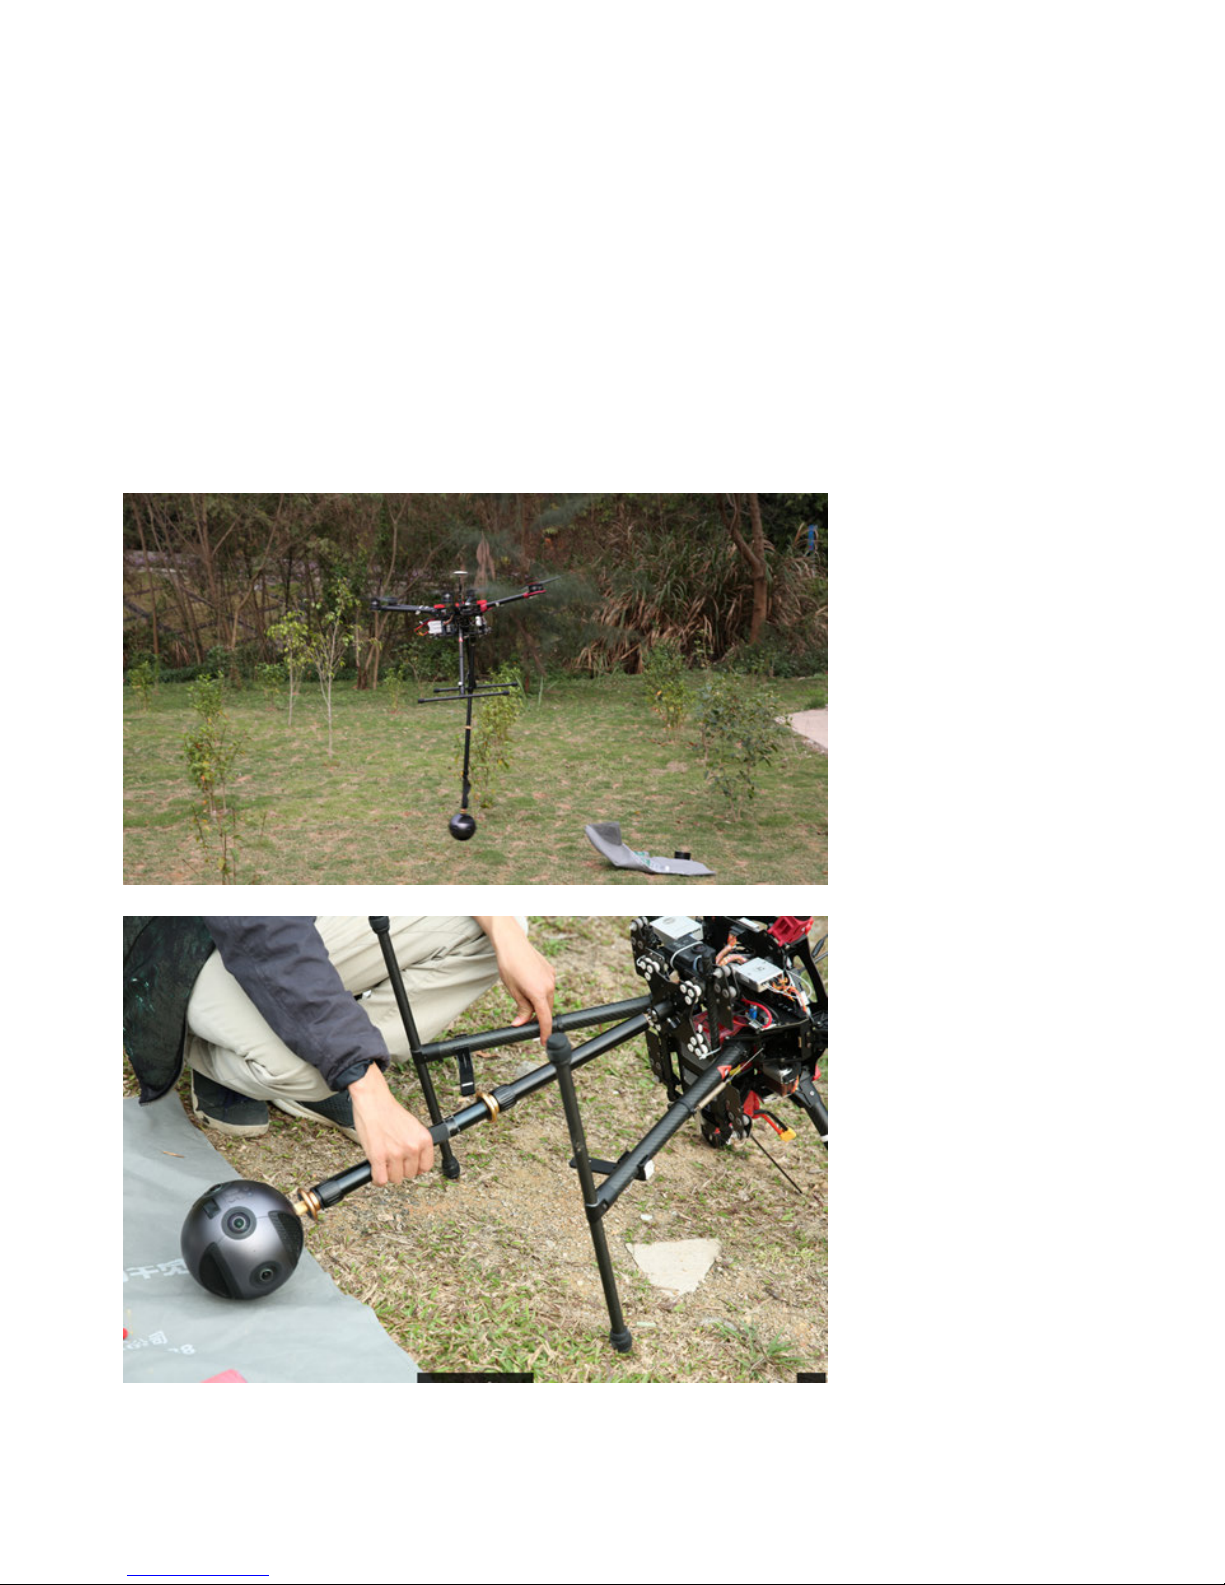
2.1.4 [Advanced] Preparation of special photographing
scene (aerial photography)
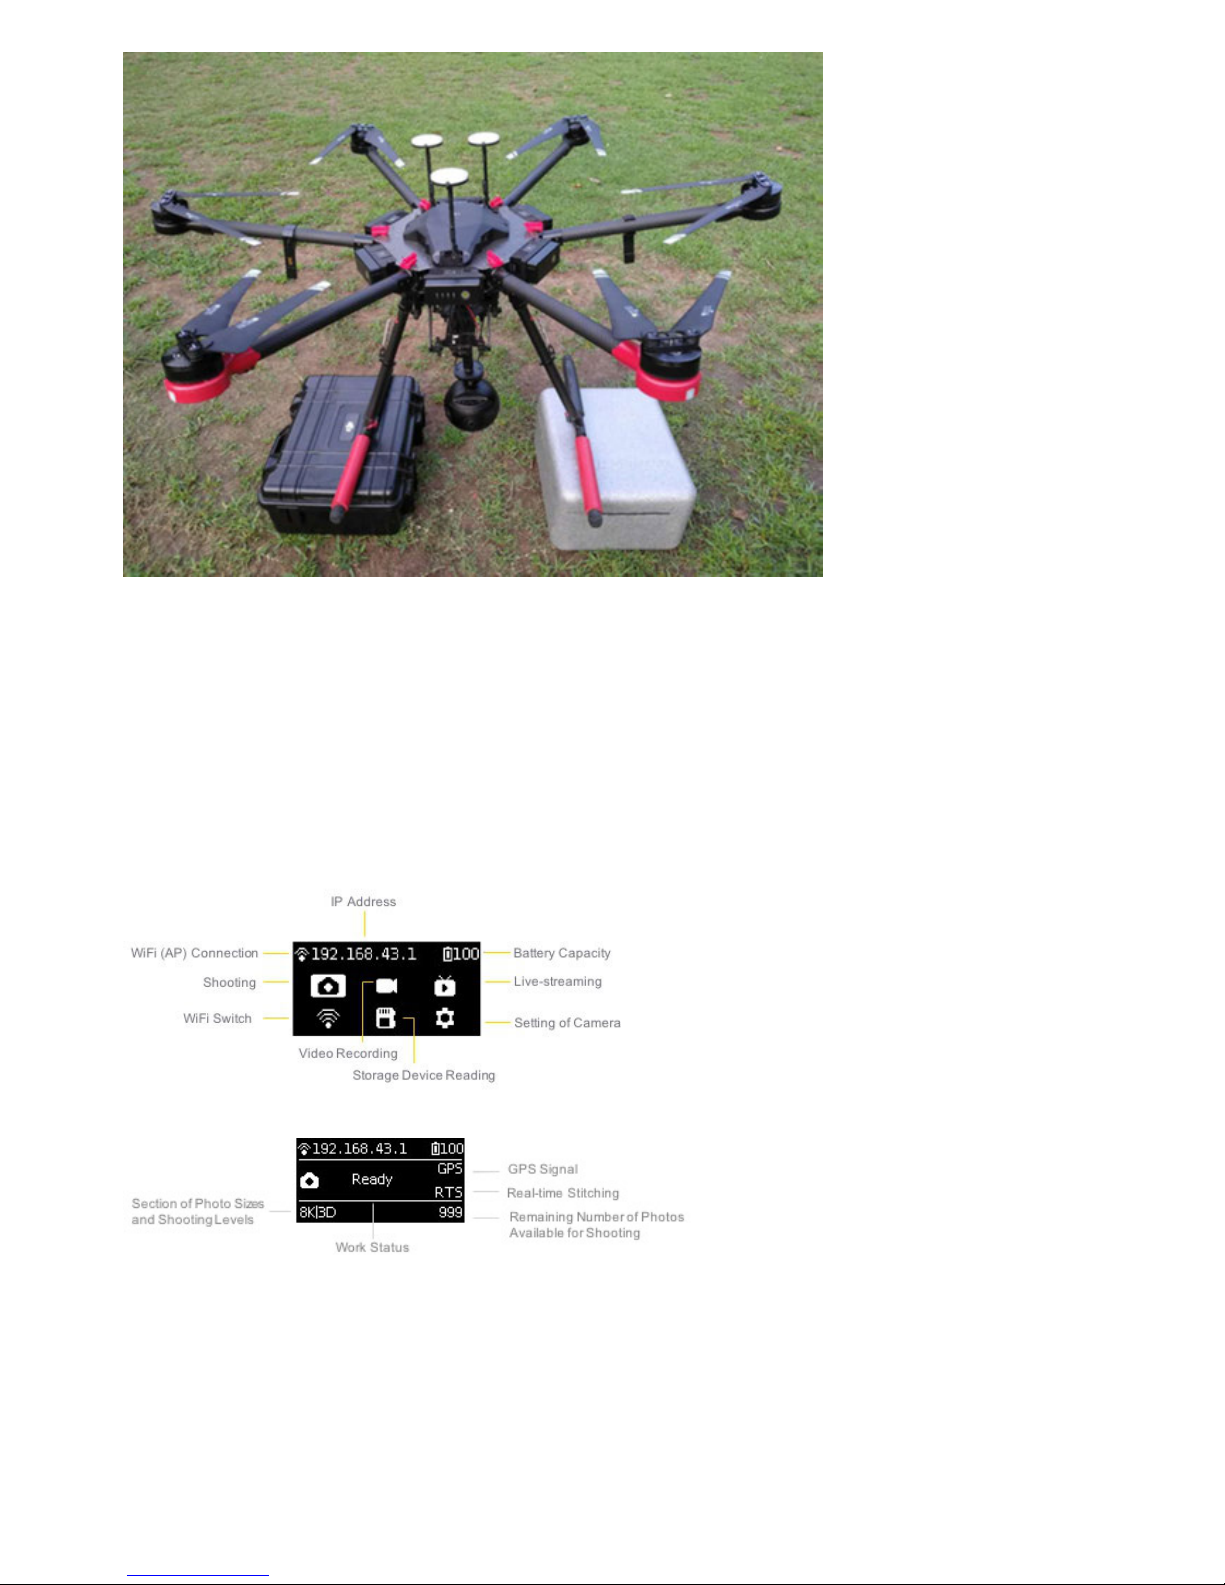
Aerial panoramic photos:
Unmanned aerial vehicles choose unmanned aerial vehicles with large load capacity, such as DJI S 900, M 600, Inspire 2
etc.
No stabilizer is needed for shooting so you can select a straight bar to connect Pro 2. You can select unipod straight bar
with changeable length or a short rod with fixed length.
A long rod needs to add spherical pan-tilt at the joint to facilitate takeo.
Page 51
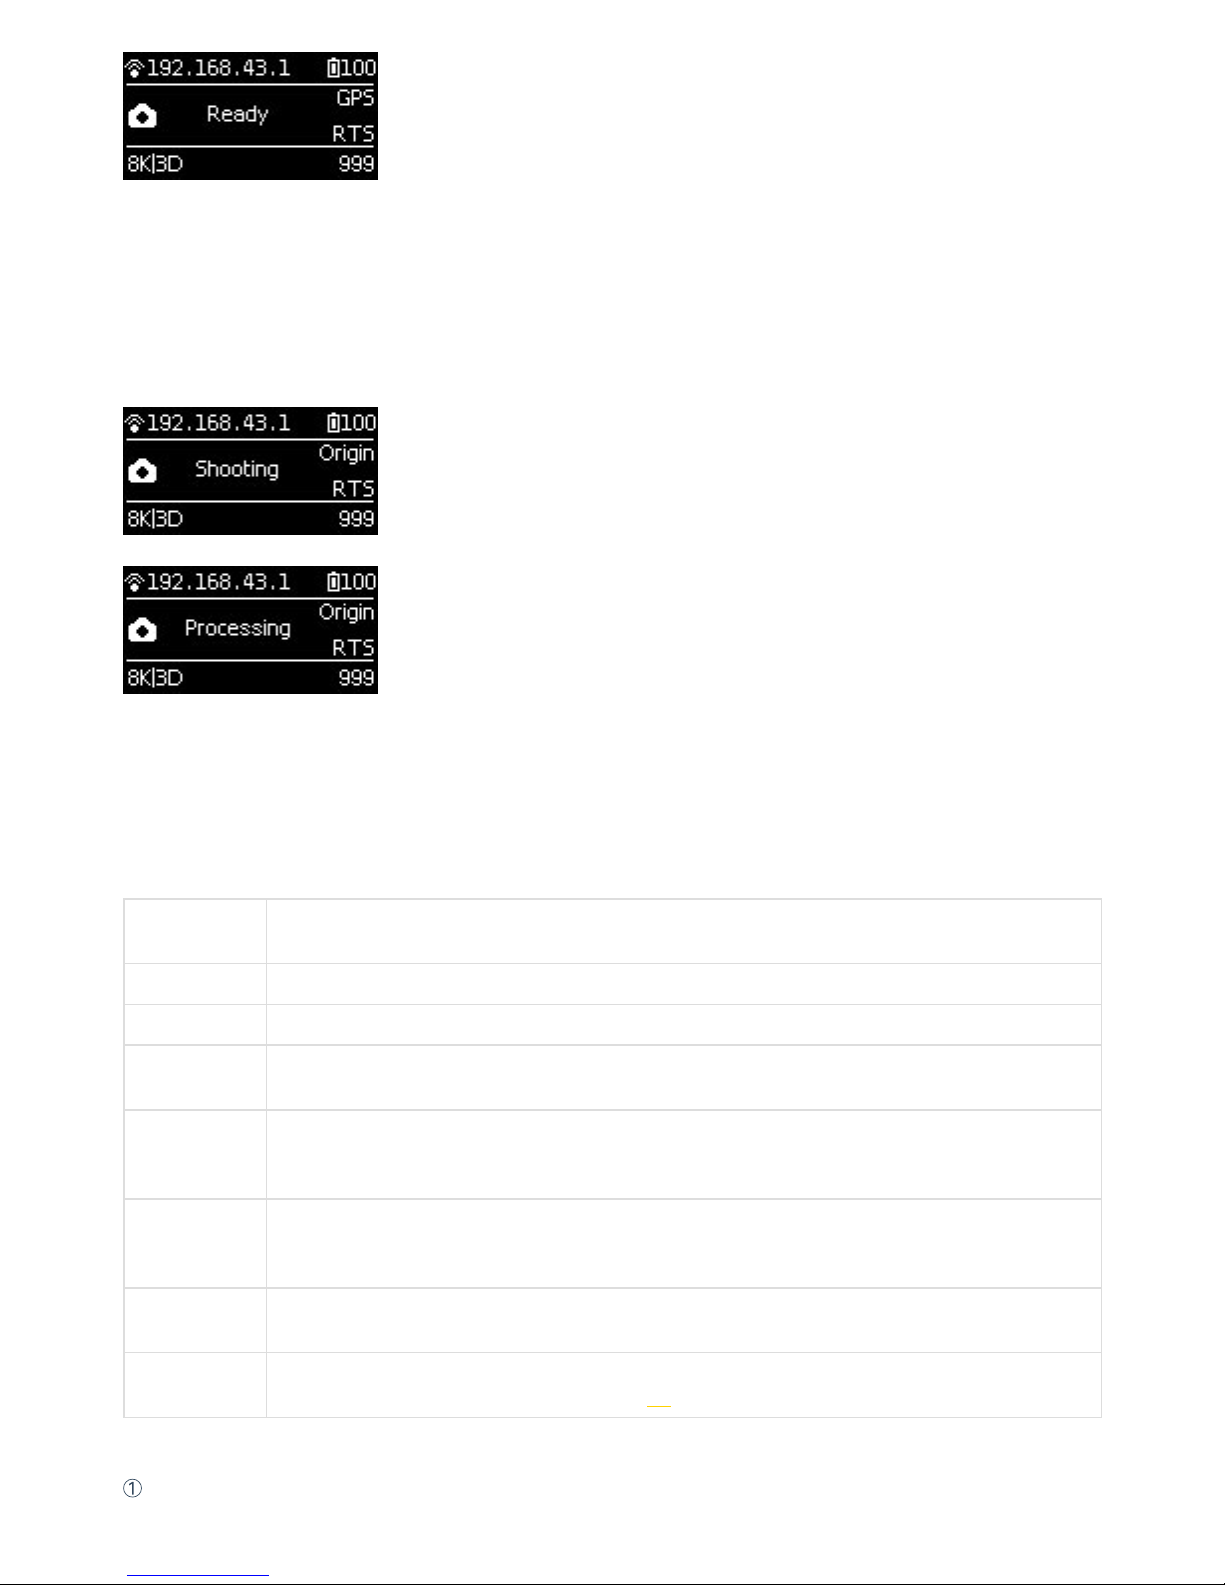
2.2.1 [Beginner] Shooting mode screen and settings
Standalone Use
1.Shooting Mode Screen
2.Operation Instructions
(1) Select the shooting mode from the camera menu, press the POWER key to confirm entering such mode. Aer the
camera completes the preparation, the Ready state will be displayed.
Page 52
(2) When the shooting mode is in Ready state, press UP and DOWN keys to switch over the sizes for shooting.
(3) When the shooting mode is in Ready state, press POWER key and you can take a photo as per the current size.
If the real-time stitching level is needed aer the photo is taken, the camera will enter the processing state. Aer
processing is done, the photo will be saved, and then, the camera will be switched to shooting READY state.
A 5s countdown is needed in each shooting. During the countdown, the work indicating lamp will flash continuously,
accompanied by sound prompt. Be sure to keep away from the camera within the 5s, to avoid aecting the shooting
eect. There will be a sound prompt aer the shooting is done successfully.
3.Specification and level for shooting
Shooting
Specification
Description
8K|OF Shoot and store 8K panoramic original photos and real-time optical flow stitching photos.
8K|3D|OF Shoot and store 8K 3D panoramic original photos and real-time optical flow stitching photos.
8K
Shoot and store panoramic original photos without real-time optical flow stitching. 8K panoramic or
8K 3D panoramic photos can be made in post-production.
AEB3
When shooting AEB3 (Automatic Exposure Bracketing) photos, there will be 3 groups of photos with
dierent exposures. With this function, photos with relatively high latitude can be made in postproduction. User can choose to shoot 3, 5, 7, 9 photos in camera settings.
Burst
One key shoot and store 10 groups of original photos. 10 8K panoramic / 3D panoramic photos can be
synthesized through post-production, and one 12K super-resolution panoramic photo can also be
made through post-production.
Timelapse
Interval length (minimum 2s) can be set and images at consecutive intervals are taken. The
maximum of 8K 3D panoramic video can be synthesized in post-production.
Customize
Camera customized options allow users to quickly select parameters saved last time when using the
controlling app. Details of usage are shown in 6.2.
Note:
①
Photos shot in all modes can be stored in format of Raw+jpg.
Page 53
②
Photos shot in normal, AEB3 or Burst mode are stored in SD card. In Timelapse mode, when photo is stored in jpg
format, the minimum interval length can be set to 2s. When photo is stored in raw+jpg formats, the minimum interval
length is 4s due to the limit of write speed. The jpg files from each lens will be stored in the SD card while dng files will be
stored in six MicroSD cards.
③
For 8K 3D photo and 8K photo, the resolution of their original files captured by each independent lens is 4000 * 3000.
These files can be stitched into 3D or 8K 2D photo in post-production. The real-time stitching function in camera will not
aect the original files from each lens.
4.Use app for shooting
(1) Shoot photos with app (take the interface of iOS app as an example)
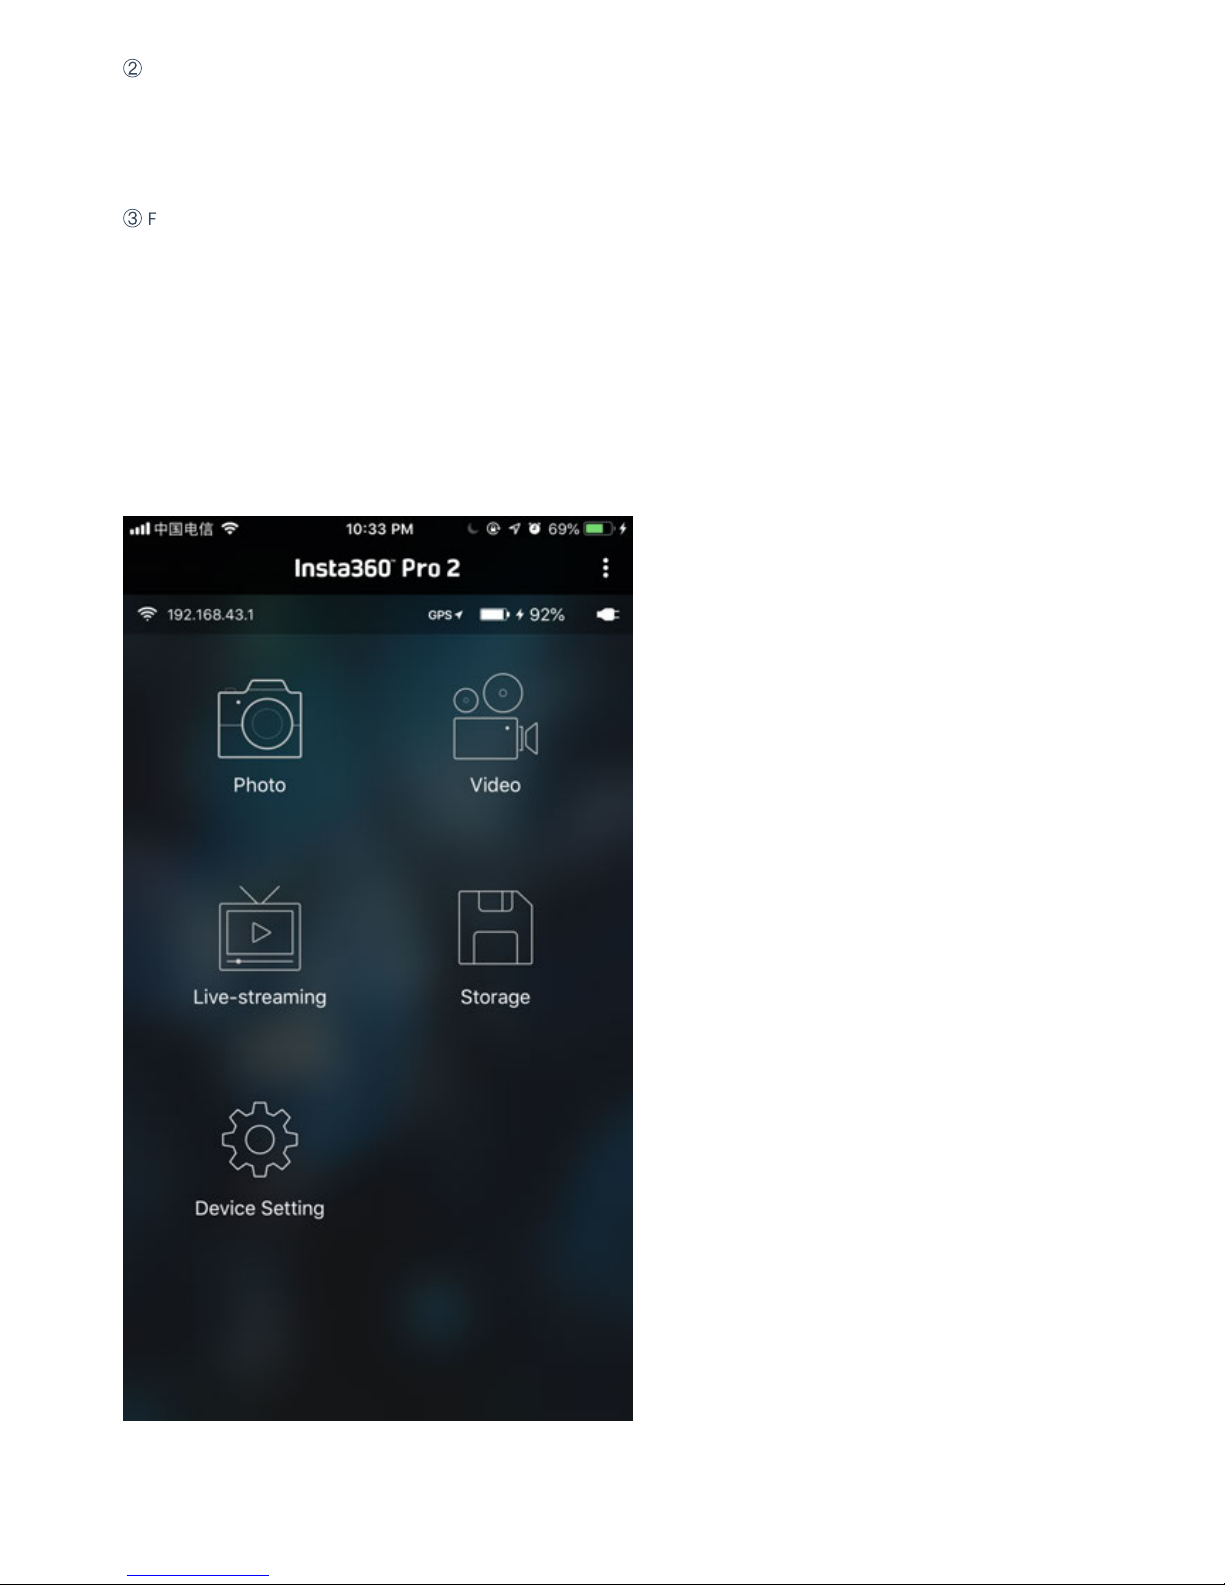
The camera provides access to the following functions: photo, video, live-streaming, calibration, storage and device
setting
Click to enter shooting mode, app will automatically load preview stream and get ready to shoot aer completion. The
interface of photo shooting mode is shown below. There are several buttons at the bottom of preview screen. The buttons
Page 54

from le to right are:
①
Gyroscope for stabilization: with the function on, photos stored through camera’s real-time stitching function can be
automatically corrected according to gyroscope data. Note that this feature cannot take eect when recording 3D real-
time stitching content or 3D live-streaming.
②
VR preview button: tap the button to switch to preview under VR glasses mode.
③
Full screen: tap the button to watch the preview stream in full screen.
④
Brightness histogram: with the button on, a brightness histogram of preview stream will be shown on the top le of
the preview screen. When shooting under sunlight, it’s hard to just check the exposure with your eyes on the preview
screen. Brightness histogram can help you to get the proper exposure.
⑤
Audio button: tap the button to turn on or o the sound in preview stream. Note that this function only takes eect in
the preview screen and doesn’t aect the sound recording settings in camera.
⑥
Close preview button: press it to close preview screen. It can save electricity when preview screen is closed. You can
tap anywhere in preview screen to turn on the preview function again.
Page 55
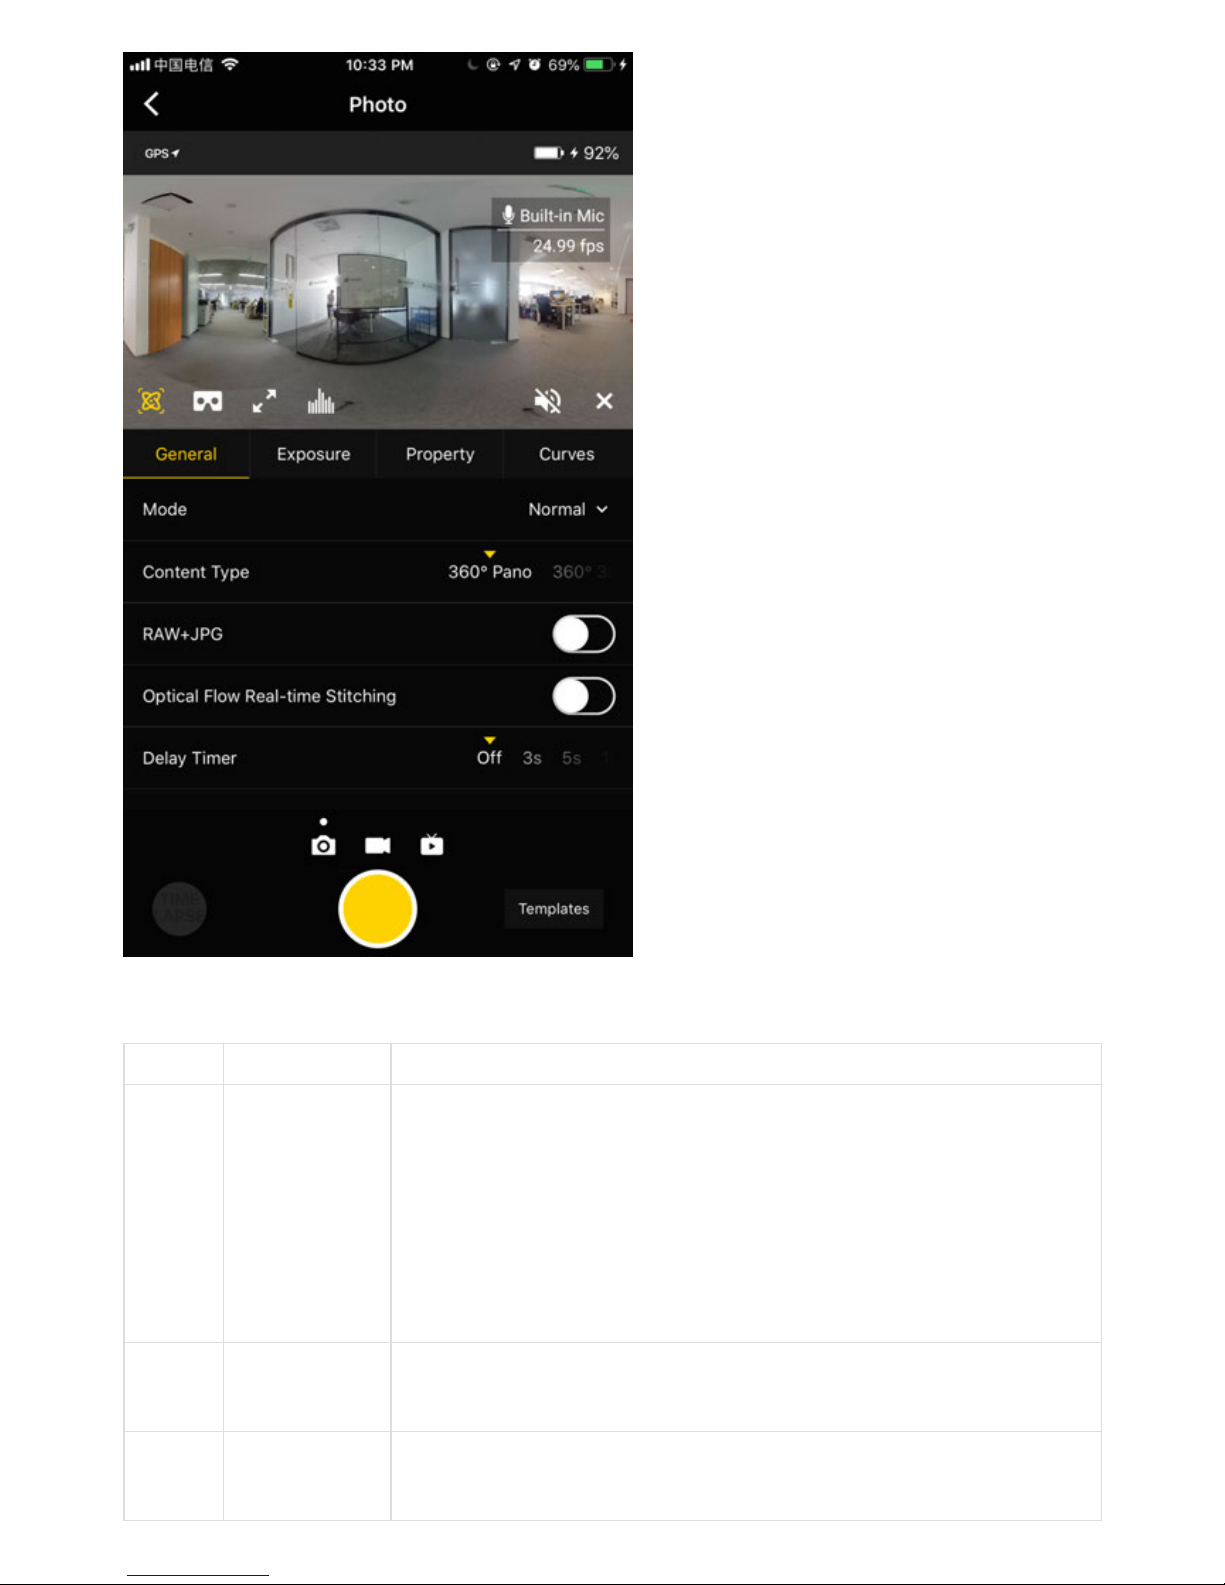
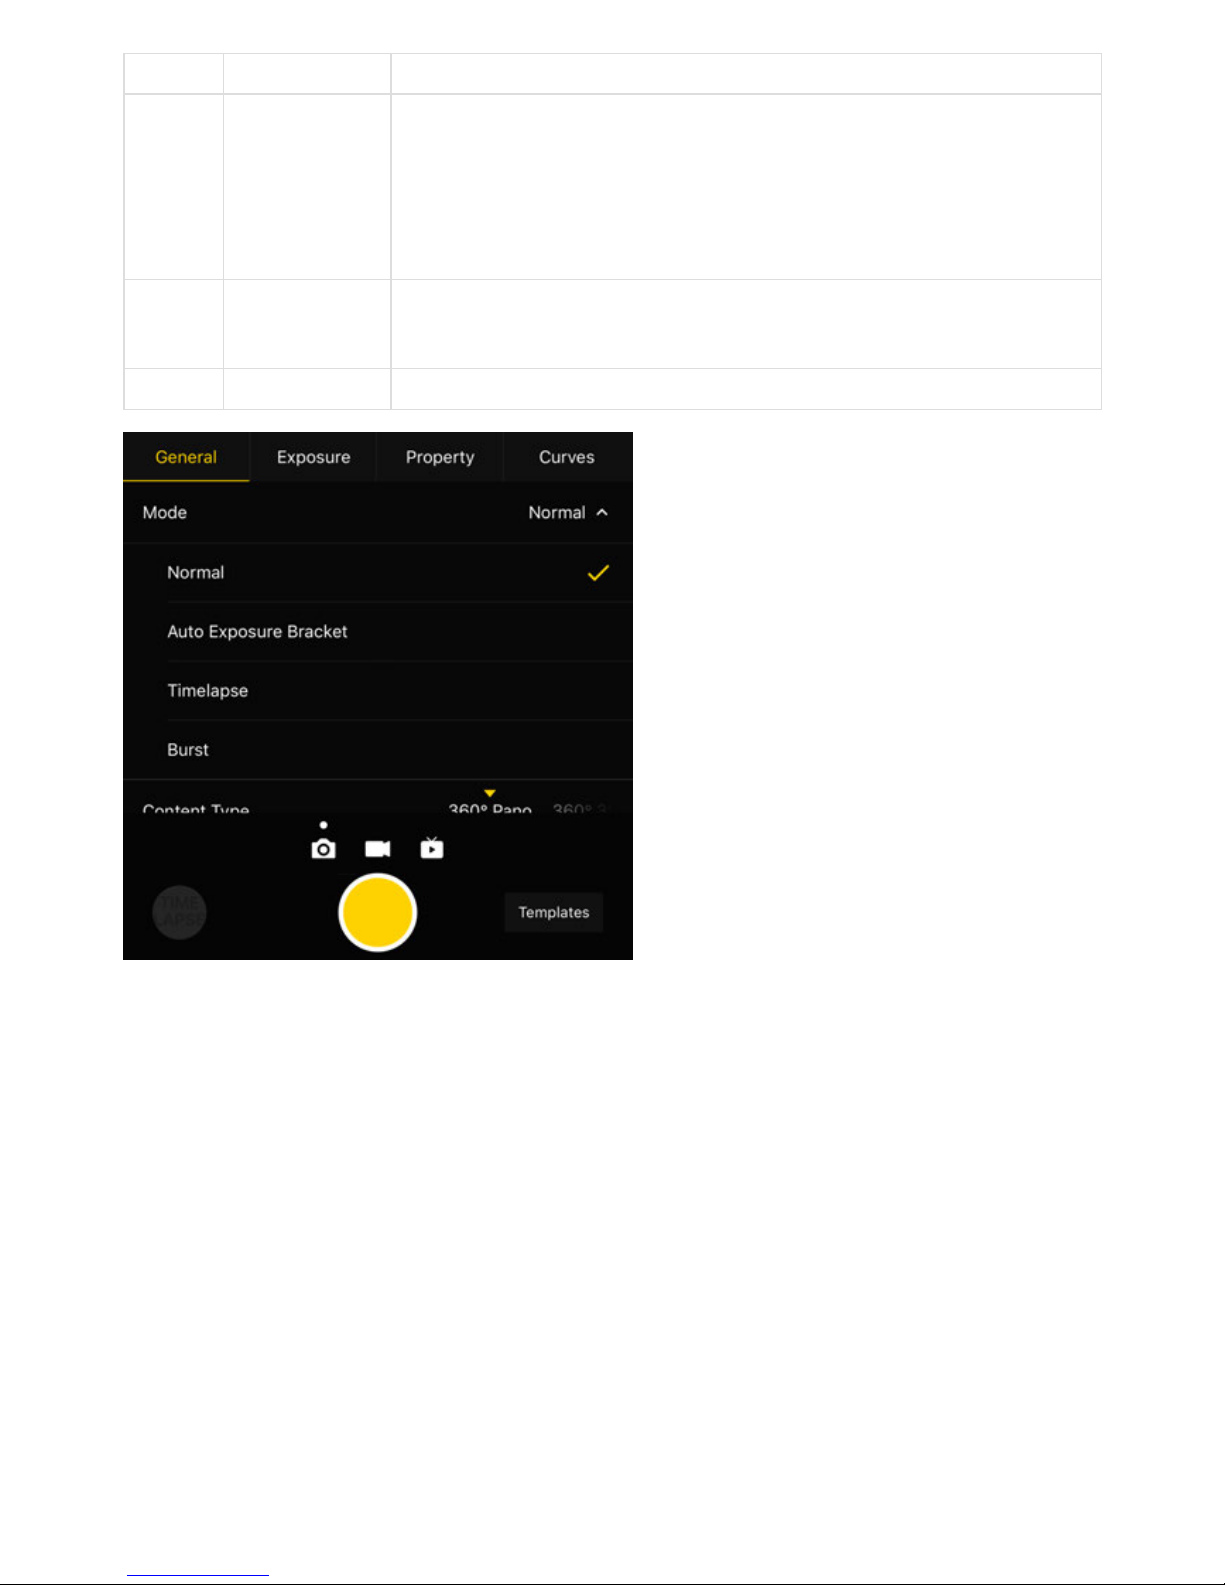
General (Basic settings for photo):
General Level Notice
Mode
Normal Burst
Timelapse Auto
Exposure
Bracket
1. All photo modes can store images from 6 lens. Each photo has a resolution of 4000
* 3000. RAW photo format is DNG. Panoramic / 3D images with maximum resolution
of 8K can be synthesized in Stitcher.
2. The interval length of Timelapse photography must be set above 2s, while interval
time should be 2s longer than Shutter time. For example, setting interval is 3s,
Shutter can be set to 1s at minimum.
3. 10 photos taken by Burst can use Stitcher to synthesize photos with the resolution
of 12K at maximum.
4. Auto Exposure Bracket can select 3, 5, 7, 9 photos with dierent exposures,
eventually synthesizing HDR photos by using soware such as Stitcher or Photoshop.
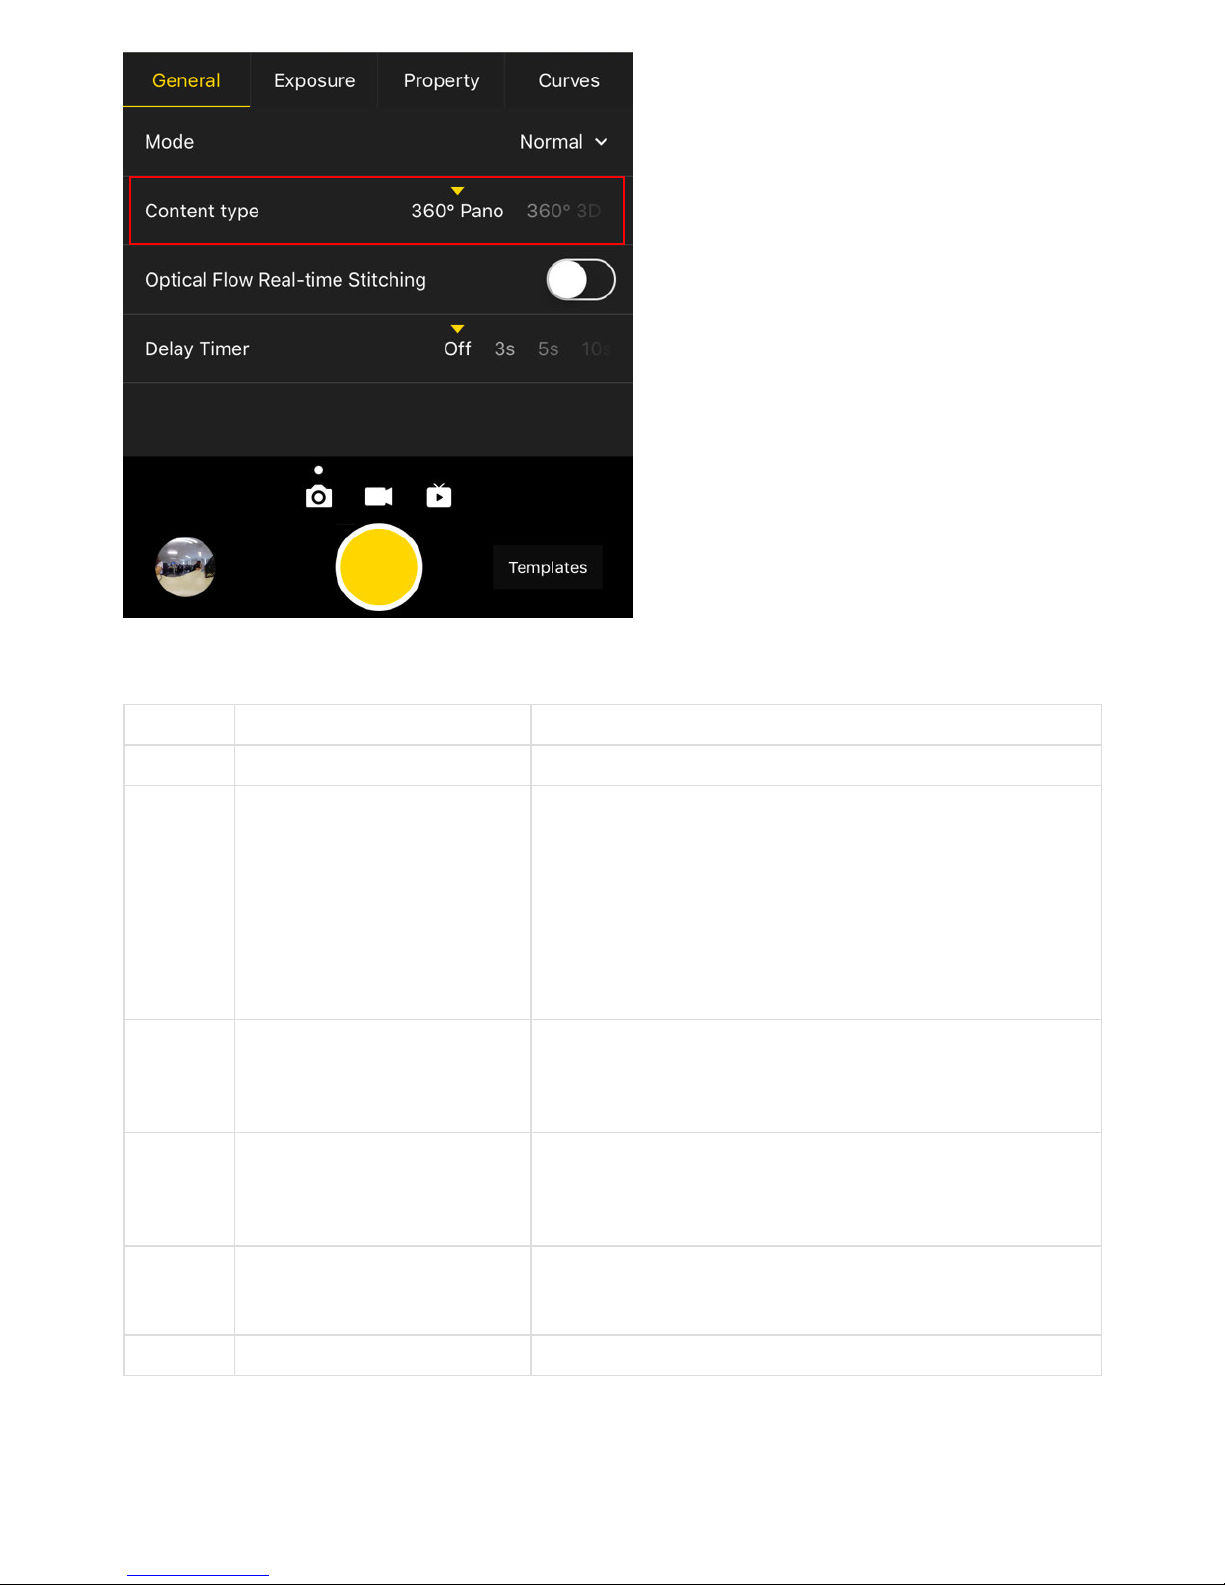
Content
Type
360° Pano 360°
3D
This setting aects only photos that are actually stitched in real time to be 3D or 2D.
Stitcher can still be used to synthesize 6 original images to be panoramic photos or
3D images.
Raw Open / close
1. When this mode is on, photos will be stored in both formats of Raw+JPG
simultaneously.
2. DNG files can be toned via Photoshop etc.
Page 56
General Level Notice
Optical
Flow
Opening: use
optical flow
algorithm.
Closing: use
template
stitching
1. Under Normal mode, real-time optical flow takes time to stitch a 360 ° Pano or 360 °
3D photo and save 6-lens original images simultaneously. The whole real-time
stitching process takes certain time (camera state is Processing) to complete. Aer
stitching, the camera will be ready for the next shoot.
2. Optical flow real-time stitching only takes eect for JPG. If Raw + JPG photos are
taken simultaneously, only JPG photo will be stitched into a panoramic photo in real
time.
Delay
Timer
None, 3S, 5S,
10S, 20S, 30S,
40S, 50S, 60S
Cameras will shoot aer countdown is over.
Reset
Page 57
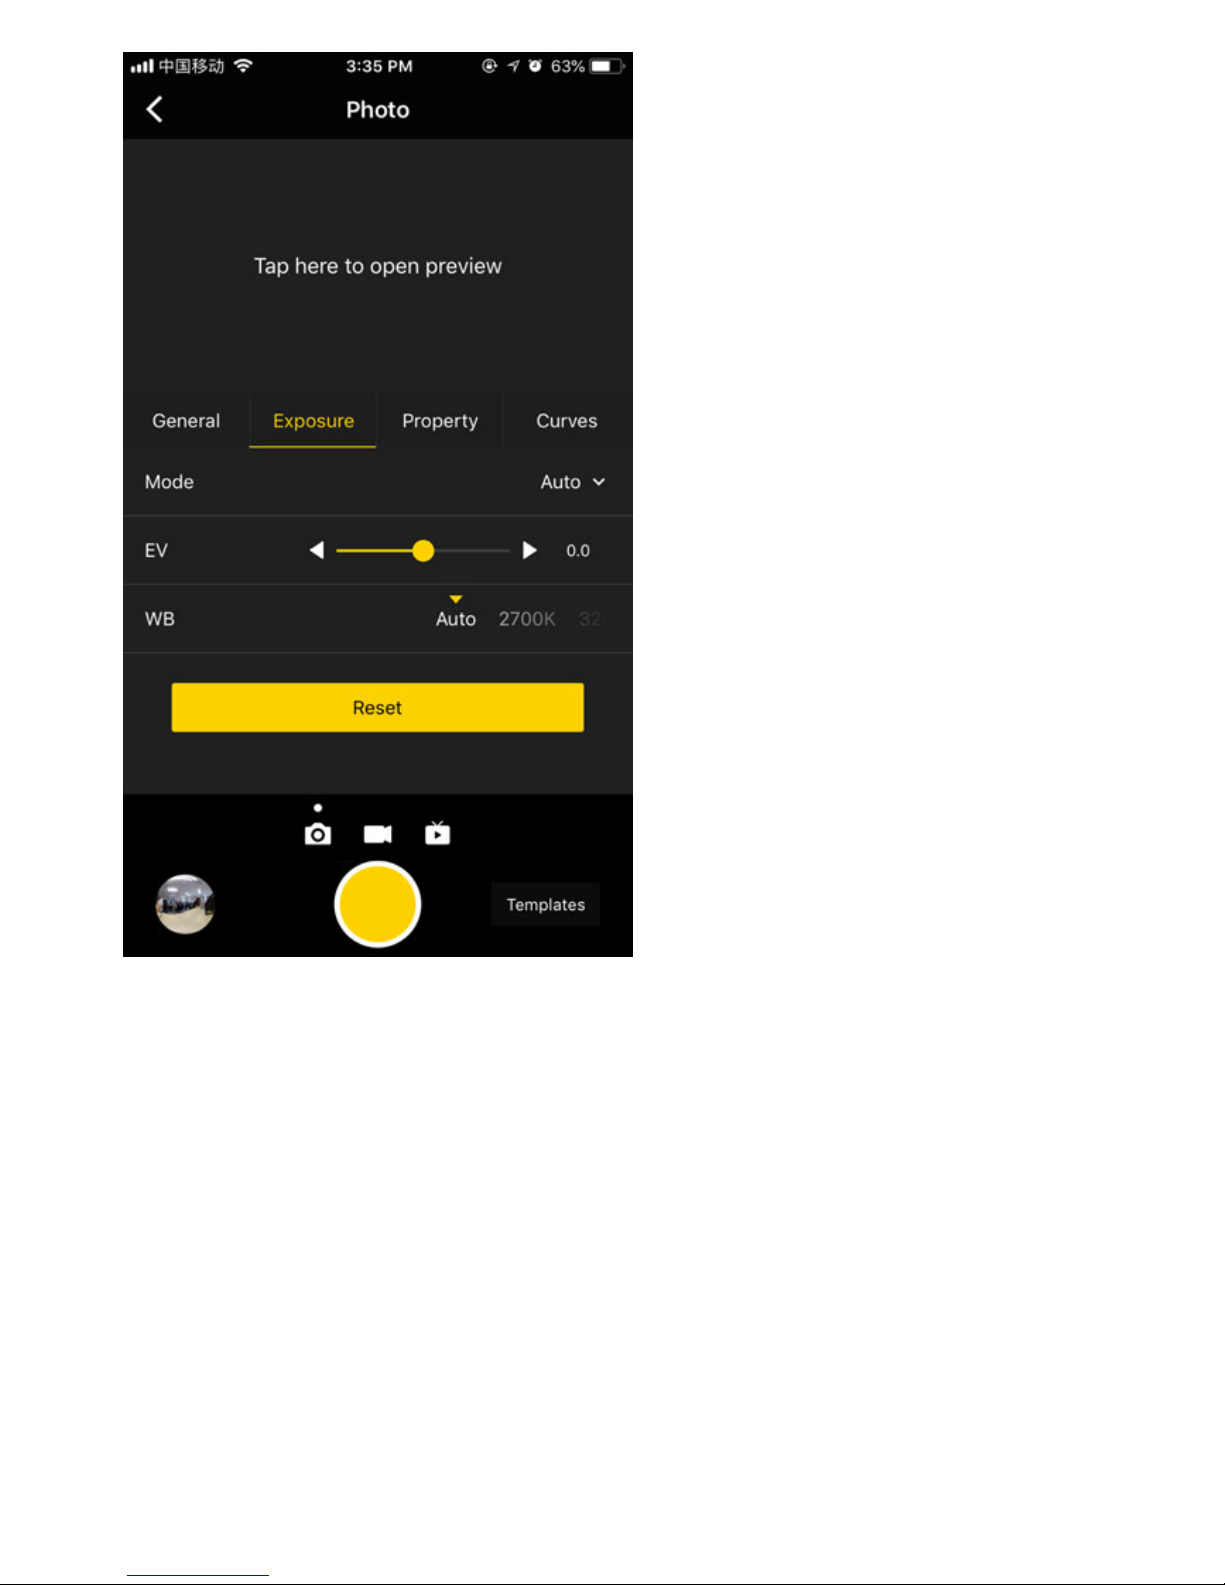
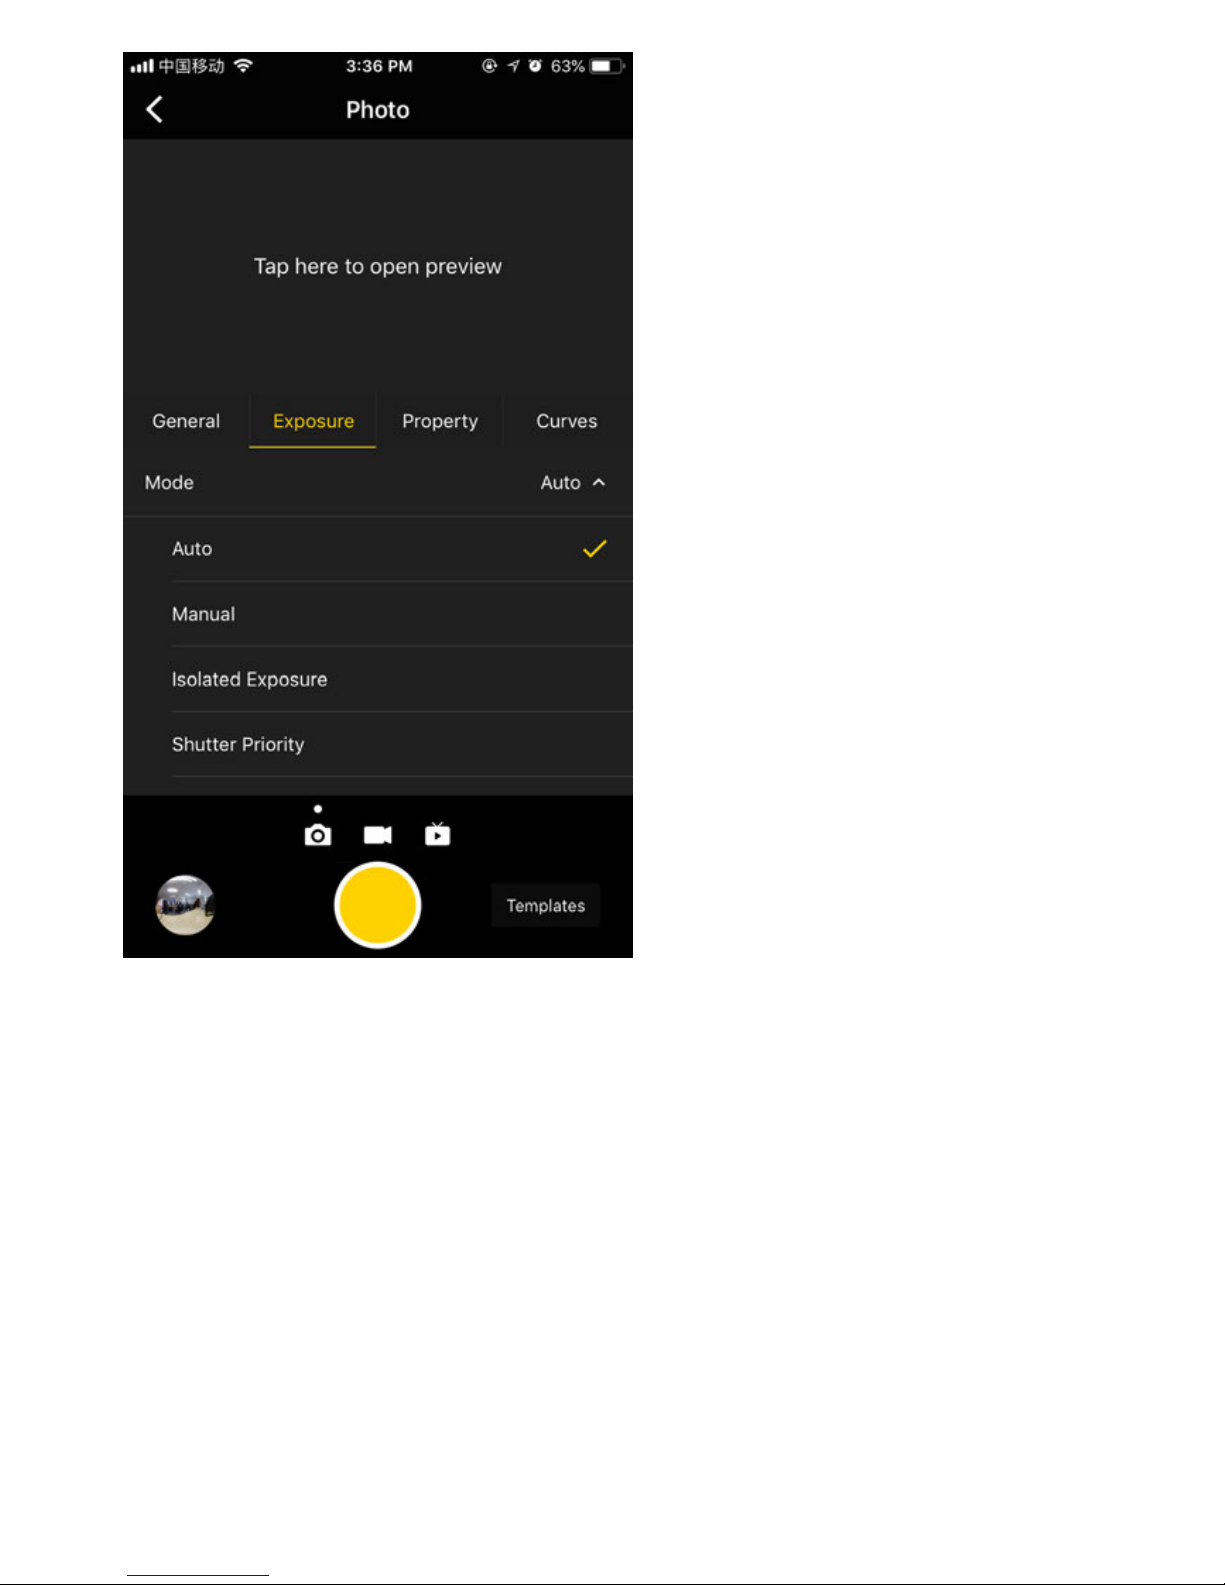
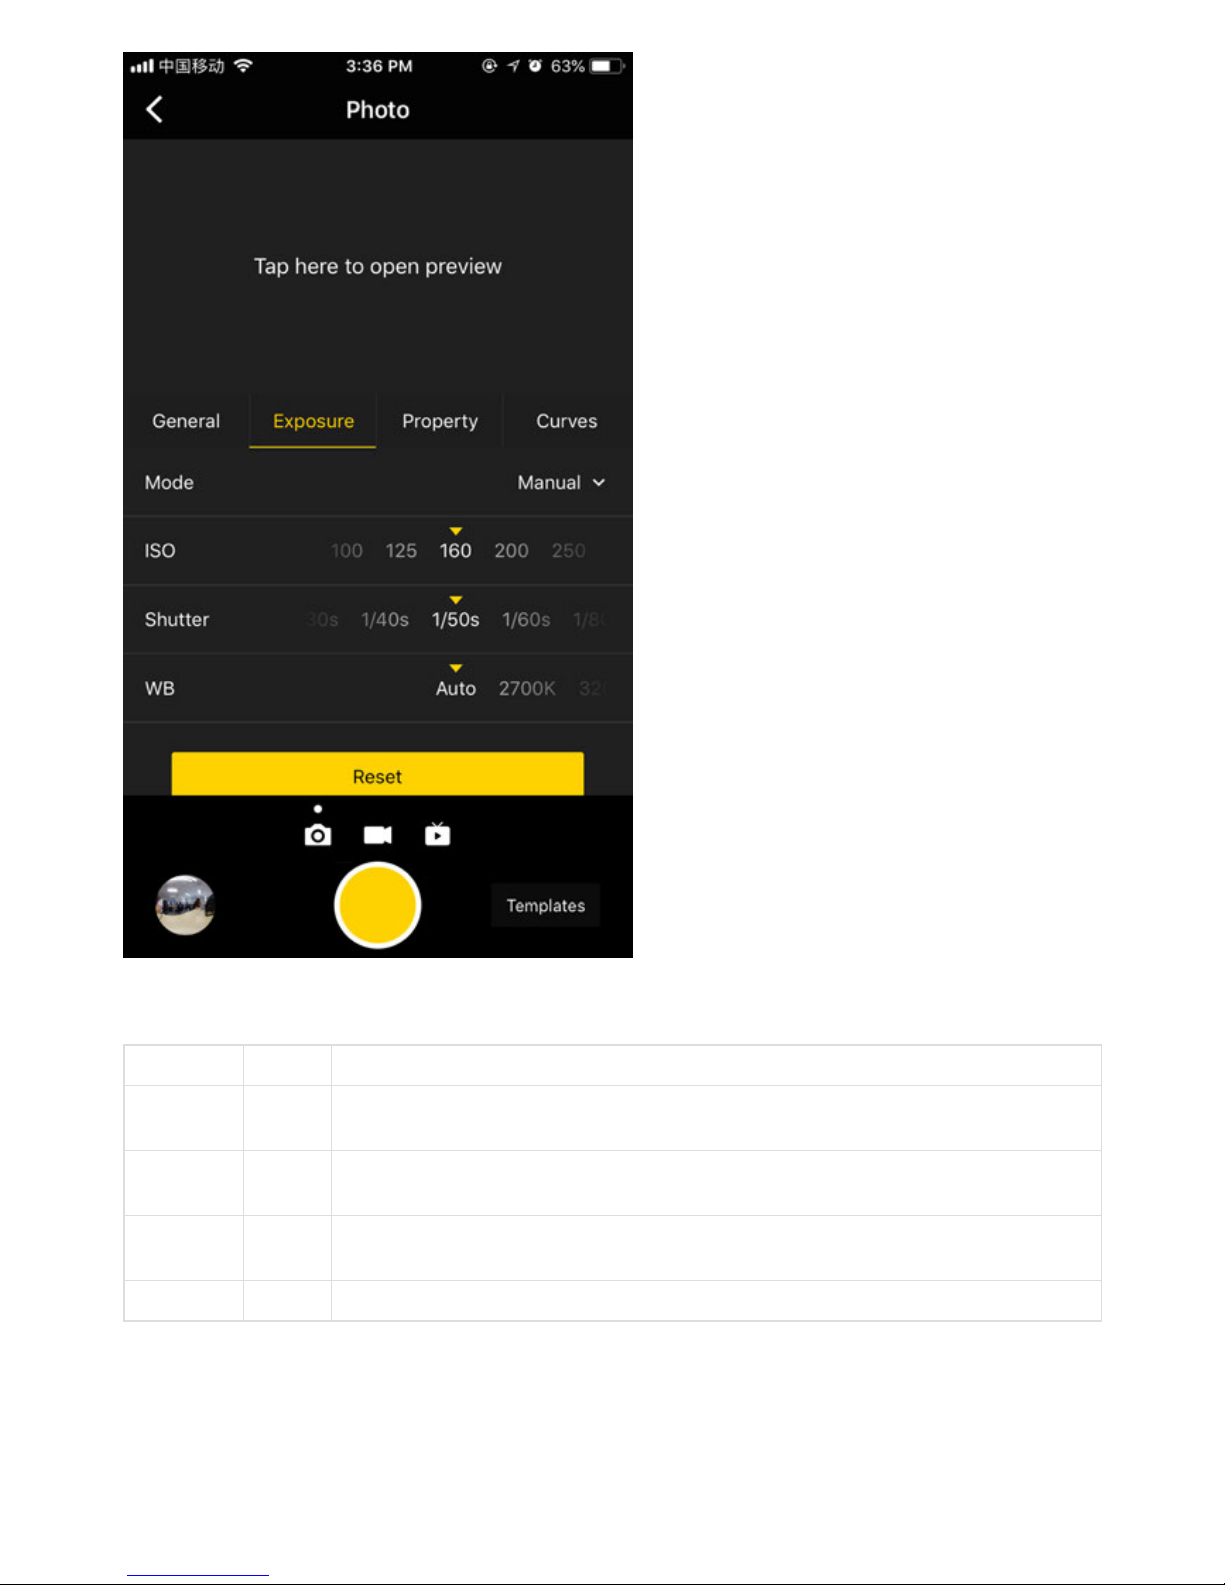
Exposure:
Exposure
Auto It can adjust EV, white balance In the Normal shooting mode, the range of EV is-5 ~ 5.
Manual
ISO range: 100 ~ 6400
Shutter speed range: 1/2s ~
1/8000s for ordinary Shutter, 1s ~
55s for Long Shutter
WB levels: Auto(auto white
balance), 2700K, 3200K, 4000K,
5000K, 6500K, 7500K
Isolated
Exposure
Six lens will expose
independently and
automatically, to adjust EV,
white balance
Independent exposure is suitable for shooting scenes with sharp
light and shade contrast, such as shooting bright windows and
indoor scenes, bright scenes but darker seats in the audience.
Shutter
Priority
Shutter parameters can be set
manually; other parameters are
automatically matched by
camera
ISO
Priority
ISO can be set manually; other
parameters are automatically
matched by camera
Reset
Page 58
Page 59
Page 60
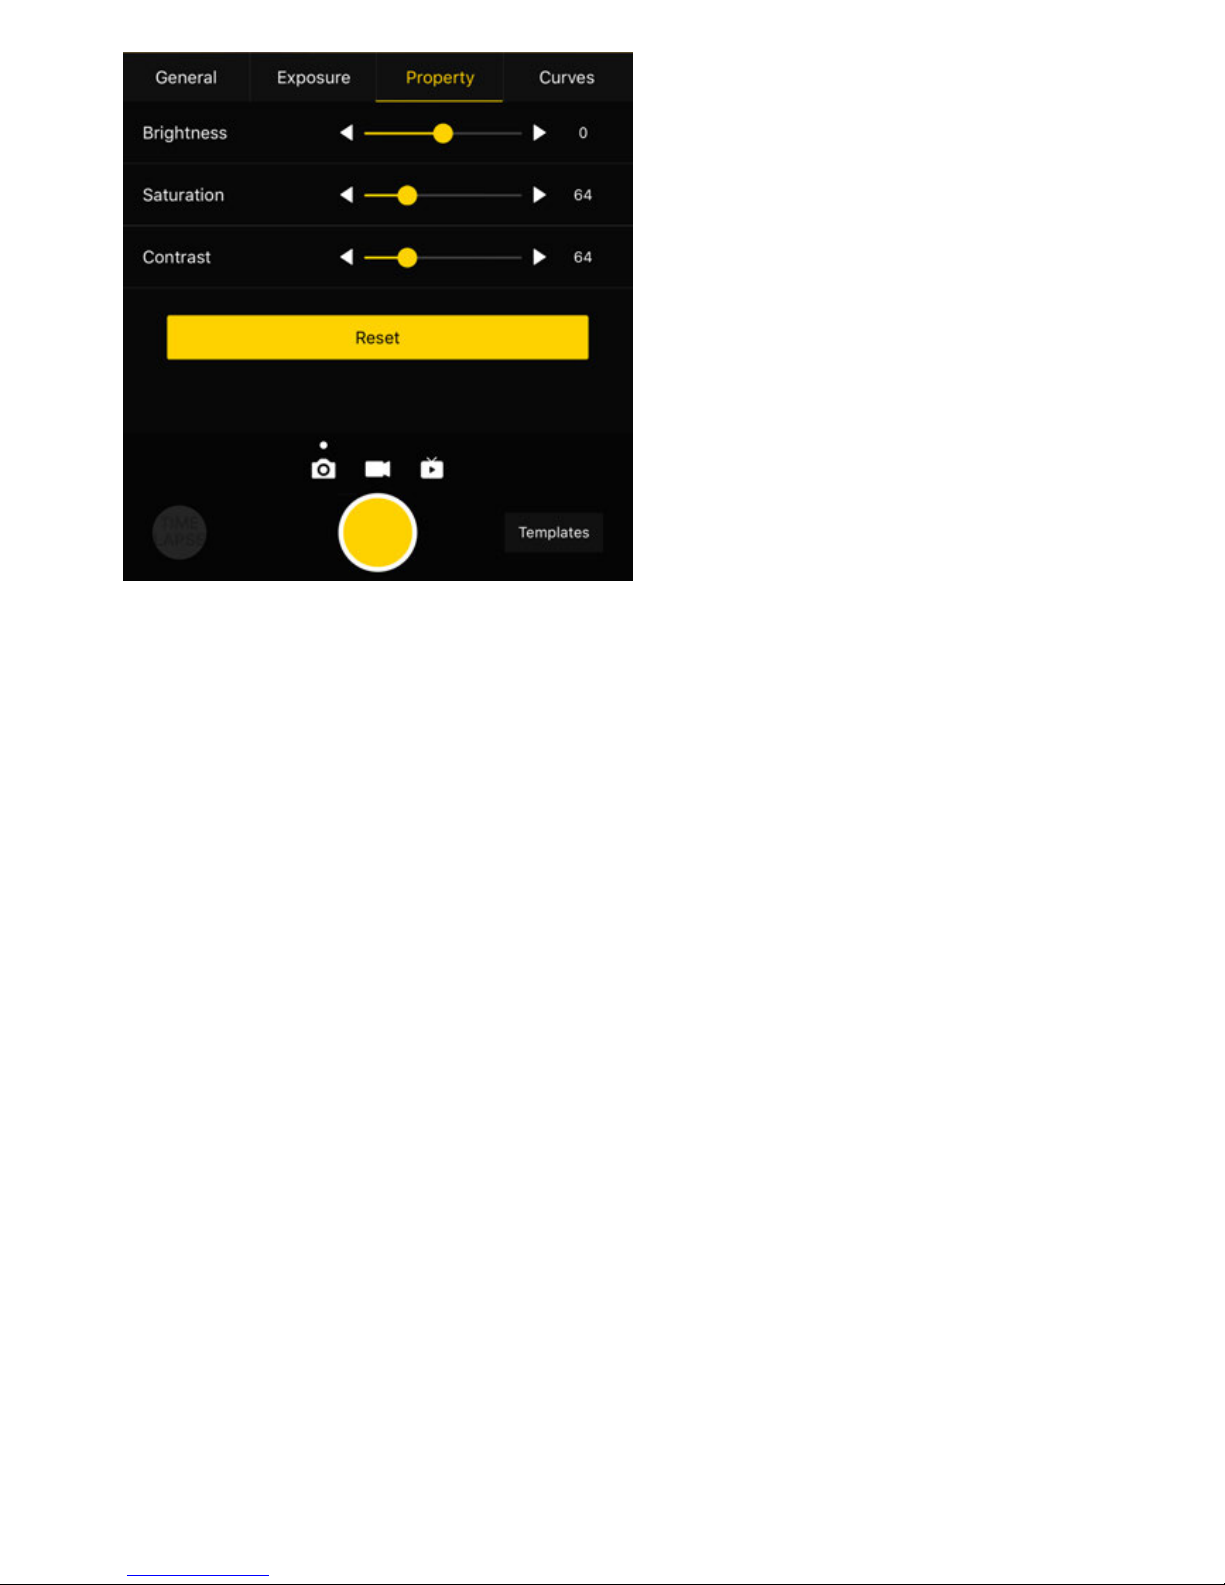
Property
Property
Brightness
-255 ~
255
Note: Property settings generally do not modify, especially sharpness, which may cause
noise increase aer modification.
Saturation
0 ~
255
Contrast
0 ~
255
Reset
Page 61
Aer shooting the desired contents using the mobile app, you can go to the camera storage album through the shortcut
entry in the lower le corner, to access the file folders containing the contents shot just now and from history. Except for
photos in the Auto Exposure Bracket (HDR), Burst or Timelapse mode, all the materials may be previewed, which is
helpful for the user to locate a material quickly. Users can view individual material file via client terminal and download
photos to mobile phones.
However, most of the material files are large in volume, and a camera’s performance of downloading and playing is
relatively weak, so it is recommended that users should use a computer to view and manage the shot materials.
Page 62
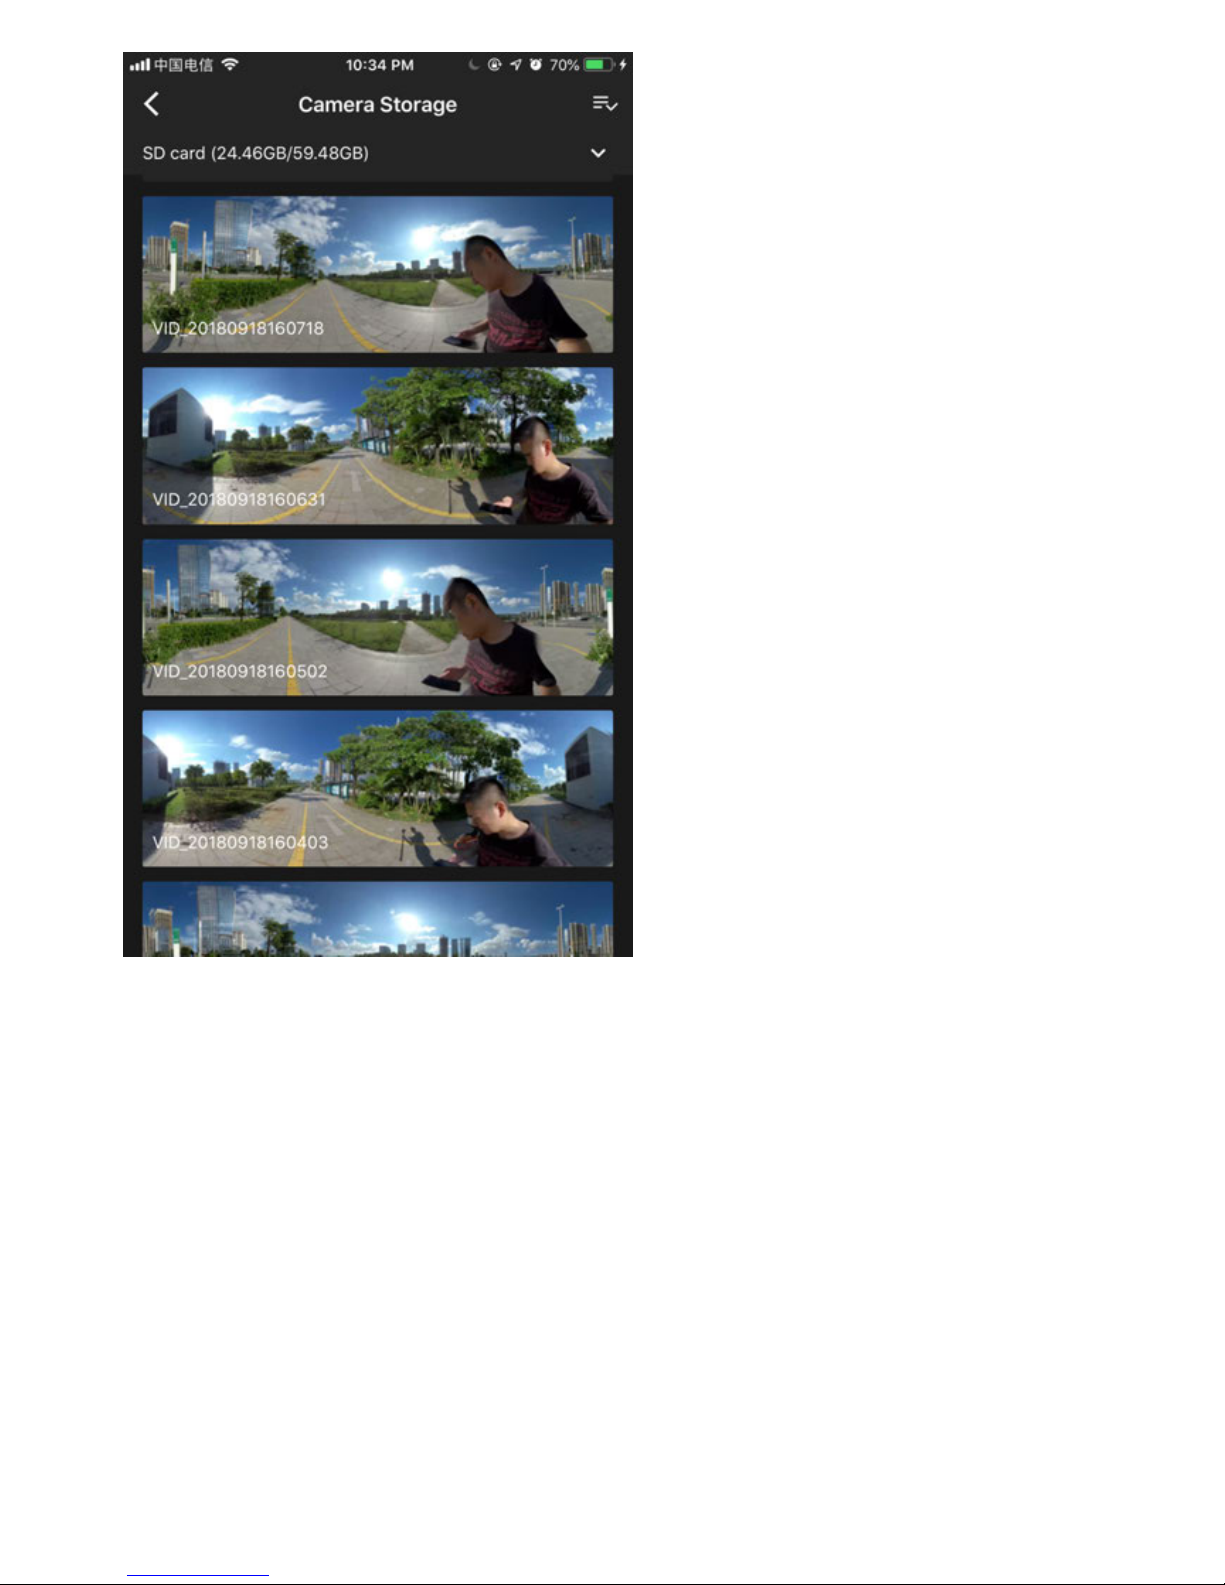
With the storage management function, you can view the capacity of the storage device currently configured to the
camera.
(2) Precautions for shooting
In mobile AP connection, it may cause unstable connection due to crowd density, and shelter, etc.
Pro 2 is not waterproof so it cannot be photographed underwater nor does it recommend photographing in rainy
weather.
Optical flow stitching algorithm is designed to detect each pixel between frames. And if no similar point is found in
adjacent images, ripples will be generated at moving objects or lens seams. For example, in front of wallpaper of fine
vertical stripes, twigs, reflective glass or stainless steel railings. Therefore, we should try to avoid these situations and
place the camera in the scene with details that are rich but non-repetitive.
Safe distance: the safe distance of optical flow stitching is 50cm. The safety distance between template stitching is 1.5m
and safe distance should be considered in camera’s position.
Page 63
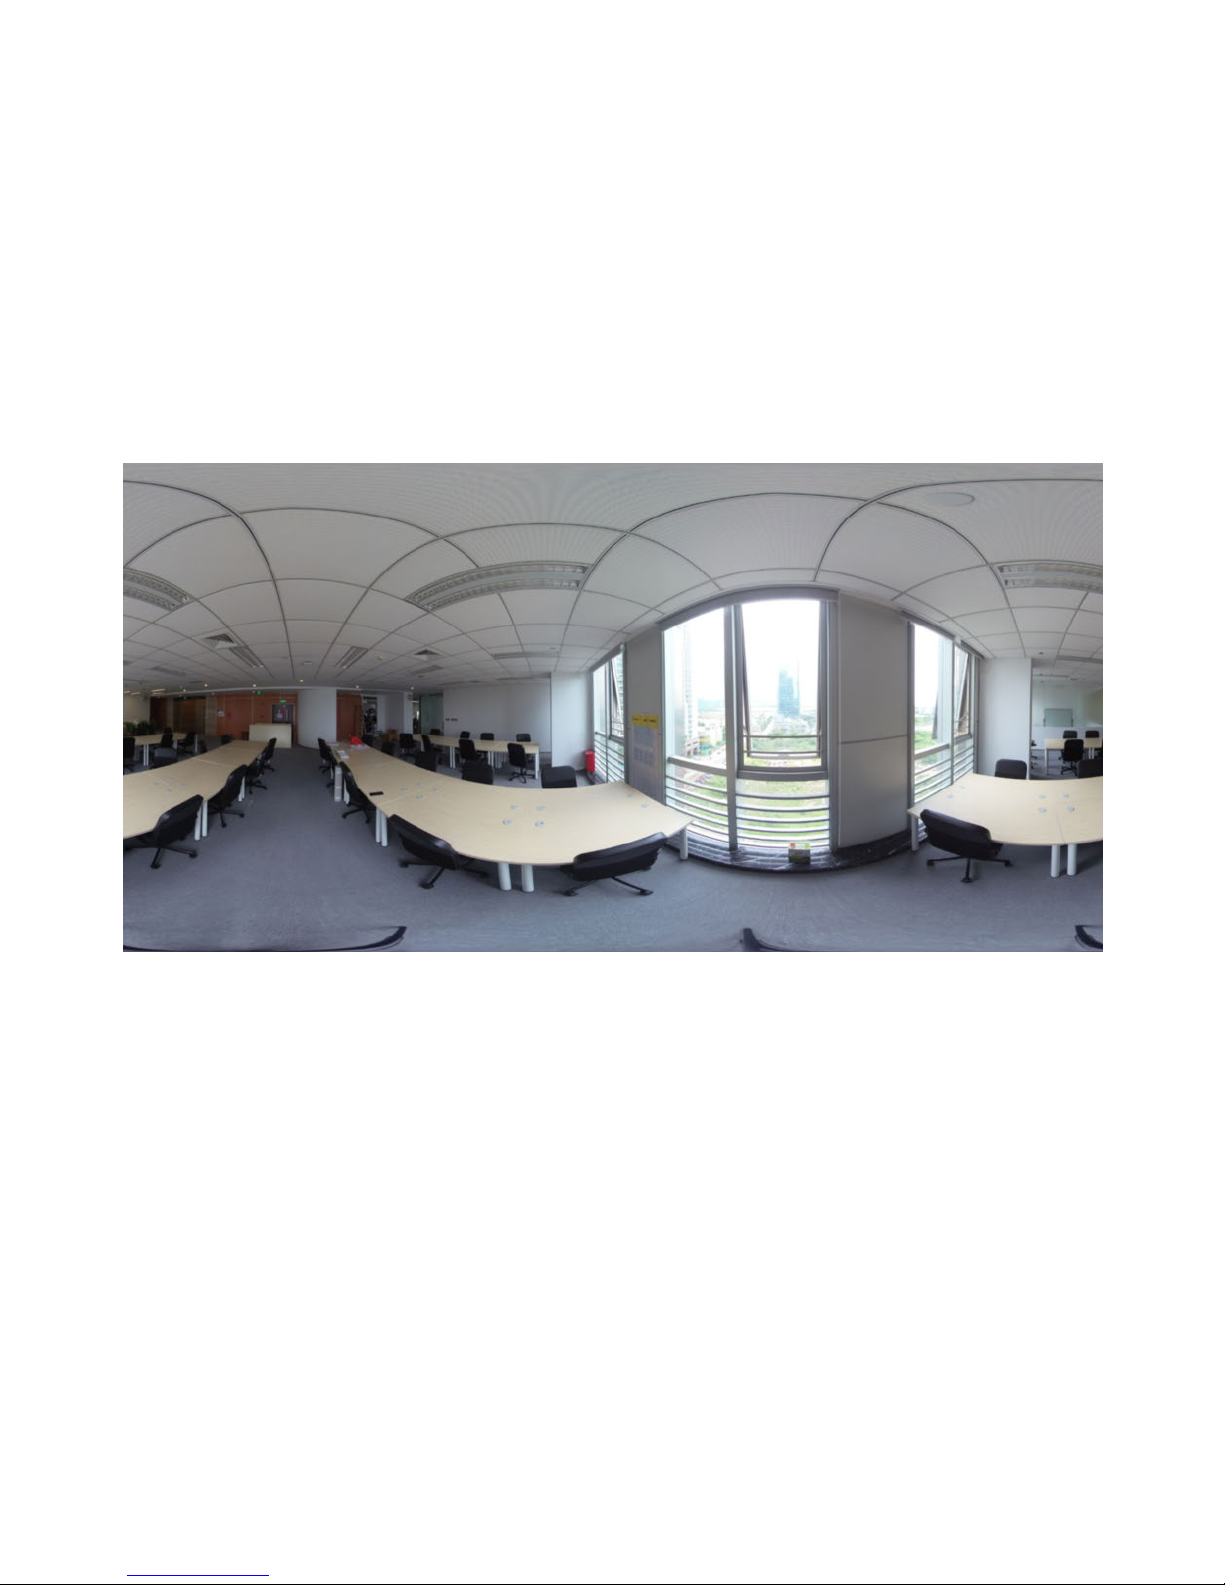
2.2.2 [Advanced] Shooting in special format (Raw, AEB,
Timelapse, Burst, super-resolution)
Raw Shooting
Aer opening Raw shooting, photos will be stored simultaneously in Raw (dng format) and jpg format while taking
photos.
The following illustration shows the eect of a jpg photo.
Raw is to store photos shot by 6 lenses to be the most primitive DNG images, which can be synthesized into 8K / 3D
panoramic photos later, saving the details of images to the maximum. When using Raw to shoot, it is recommended to
use with high image quality requirement and in the environment with large light dierence. And Photoshop might be
needed for post-production as well.
Page 64
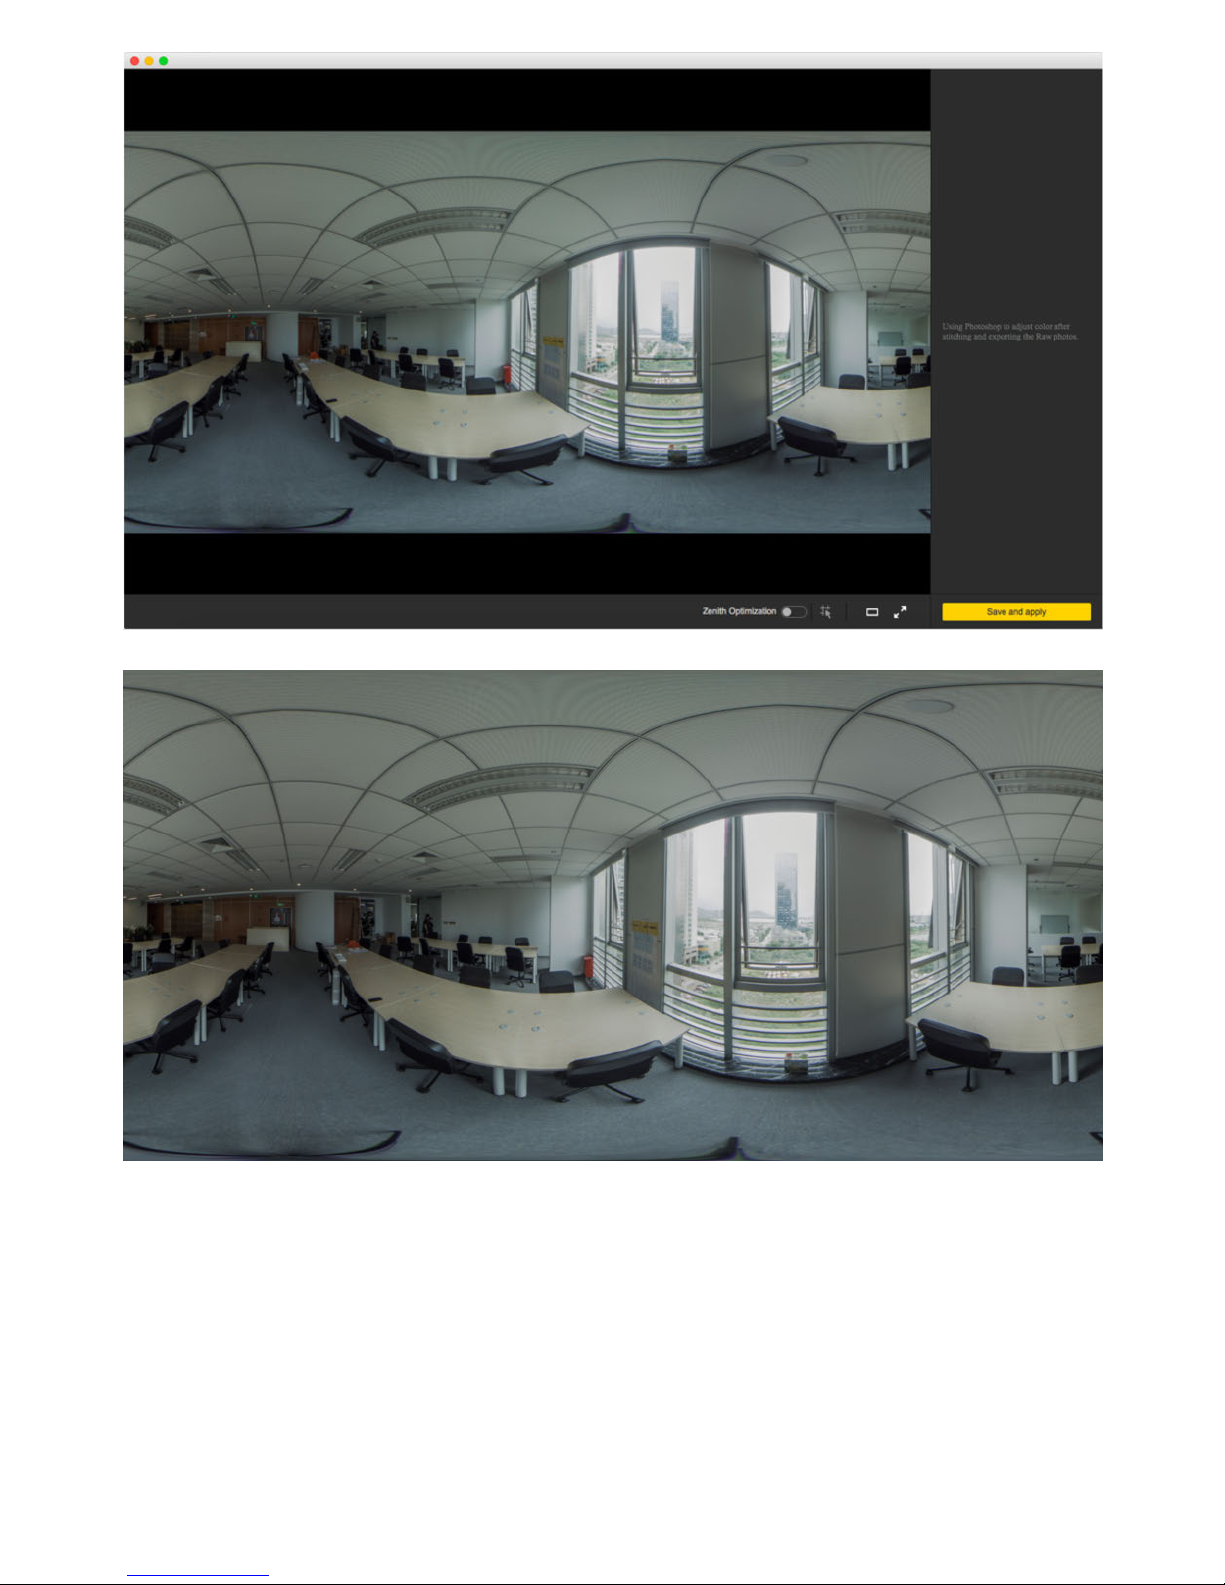
Please note that in Stitcher, color correction function only takes eect for stitched photo in jpg format. Photo in dng
format (Raw) can be stitched only. Please use Photoshop to adjust color for Raw photo.
AEB (Automatic Surround Exposure)
Auto Exposure Bracket (AEB) mode continuously takes 3, 5, 7, 9 groups of photos of dierent exposures, to synthesize one
photo with relatively high latitude (which is widely known as HDR high dynamic range photo). This mode is
recommended to use in static environments where light dierences are large.
Page 65
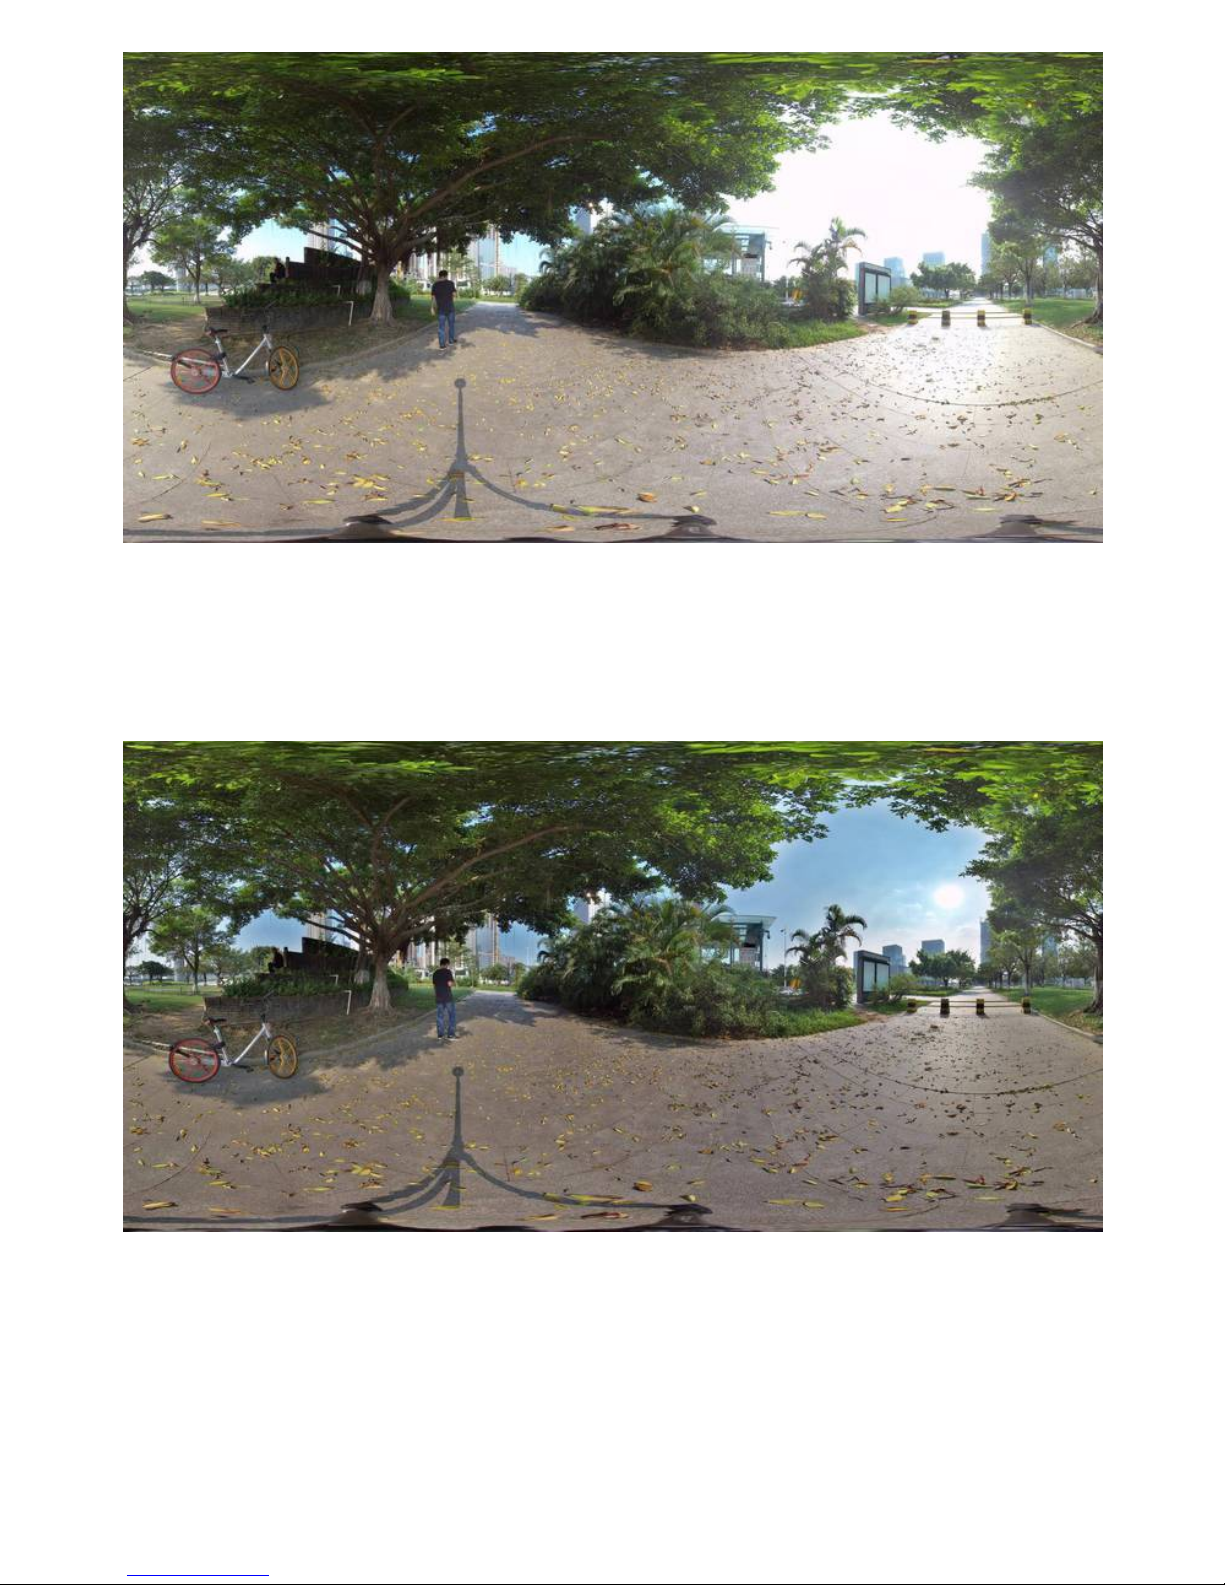
For example, this is an ordinary jpg photograph taken in the shade of a tree, the part of the sky where the sun has been
exposed in order to get the details of the shade. Choose Auto Exposure Bracket mode to take 9 groups of photos with
dierent exposure, and then synthesize them into one photo through Stitcher, which can greatly improve the photo
tolerance. More details are shown in the dark and light parts, without under-exposure or over-exposure in the photo.
Timelapse
When shooting Timelapse, please note that interval length must be set above 2s while the interval is at least 2 seconds
longer than Shutter Speed. For instance, if the interval is set at 3s, the Shutter Speed may be set to 1s to the minimum.
When photo is stored in raw+jpg formats, the minimum interval length is 4s due to the limit of write speed. The jpg files
from each lens will be stored in the SD card while dng files will be stored in six MicroSD cards.
Burst
Page 66
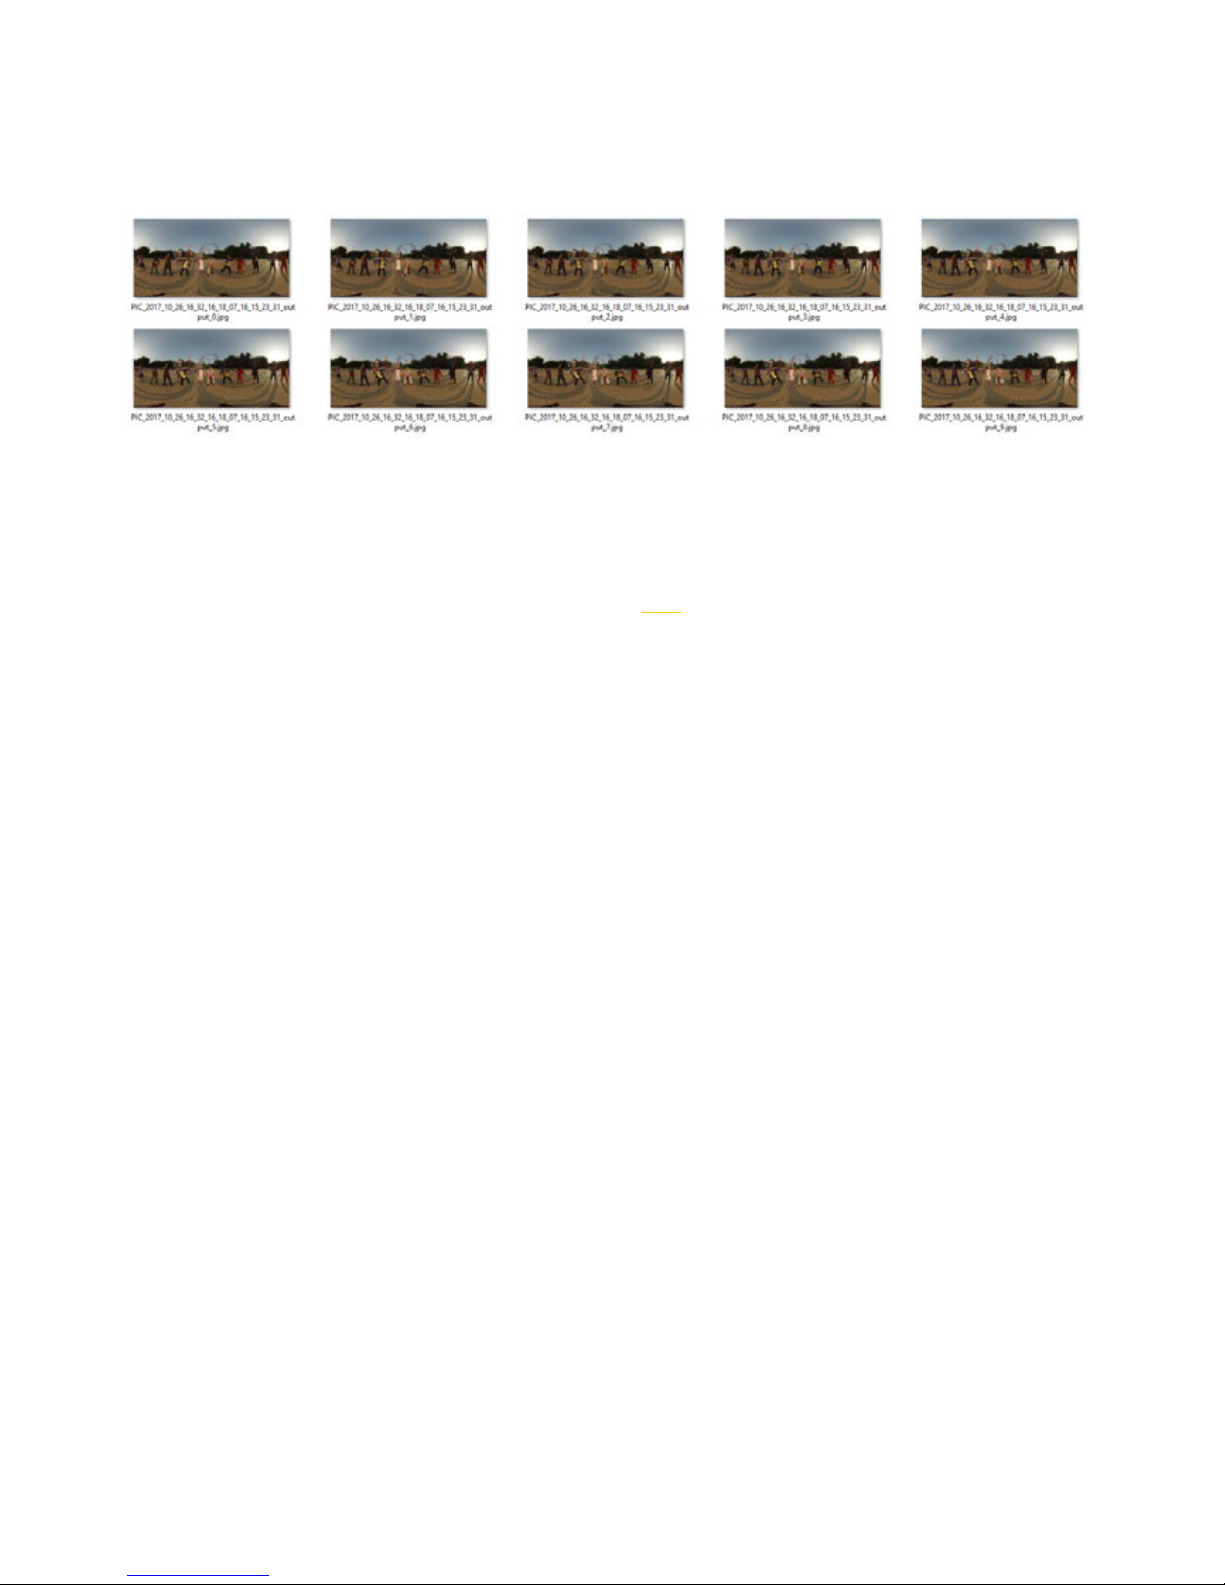
Burst is to shoot 10 groups of photos. The continuous capture is carried out based on the camera shutter speed, so the
shutter speed is 1 / 10s to the minimum. 10 continuous captured photos can be exported. This mode can be used in
taking group photos and static scenes.
For Burst super-resolution shooting, if you want to synthesize 12K super-resolution image in post-production, you need to
shoot in static environment, because the 10 photos taken by continuous shooting are limited by shutter speed and
shooting intervals, and the camera cannot continuously capture in a high speed. Moving characters or objects will cause
ghosting on the synthetic images. Concrete results are shown in 2.3.2.
2.2.3 [Advanced] Method for aerial-shooting panoramic
picture
When Pro 2 is mounted on the aircra, using Farsight can monitor and manipulate it within 1 km distance.
2.3.1 [Beginner] Photo stitching by Stitcher
1. Format of photo files
Page 67
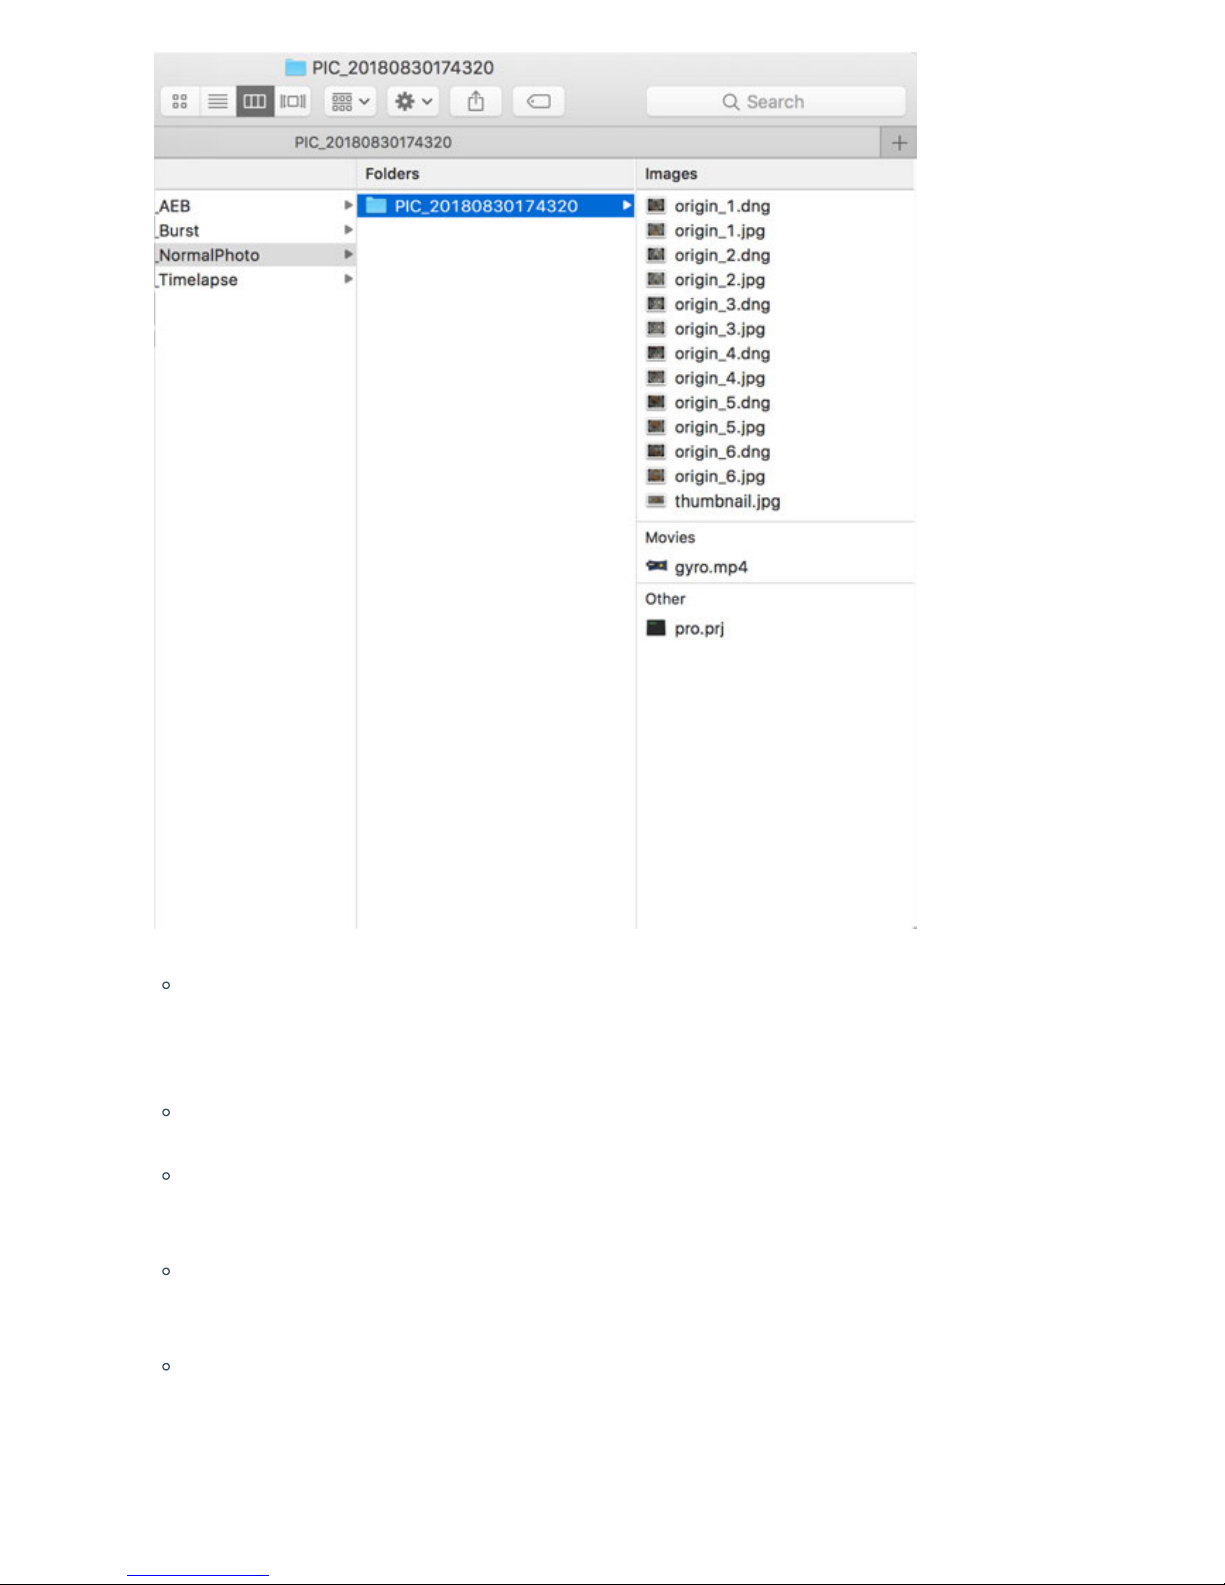
Photos are stored in jpg or dng format. The jpg photos are all stored in the SD card, and if you choose to shot in
RAW+JPG dual format, only the dng (raw) photos in Timelapse mode will be stored on the six MicroSD cards. All
the rest of the photo mode's jpg and dng are stored in the SD card.
When shot in two formats, the same group of photos have the same folder name in all memory cards.
Each shot creates a folder containing project files (pro.prj) or some necessary data files (gyro.mp4) as well as
photos.
origin_*.jpg sequences are original files captured by each independent lens for later stitching. Resolution is 4000 *
3000, which can be stitched into panoramic photos of 7680 * 3840 or 7680 * 7680 3D panoramic photos.
thumbnail.jpg is a preview photo of 1920 * 960. Some photo modes cannot create preview photo due to
performance defect.
2. Stitcher interface introduction
Page 68
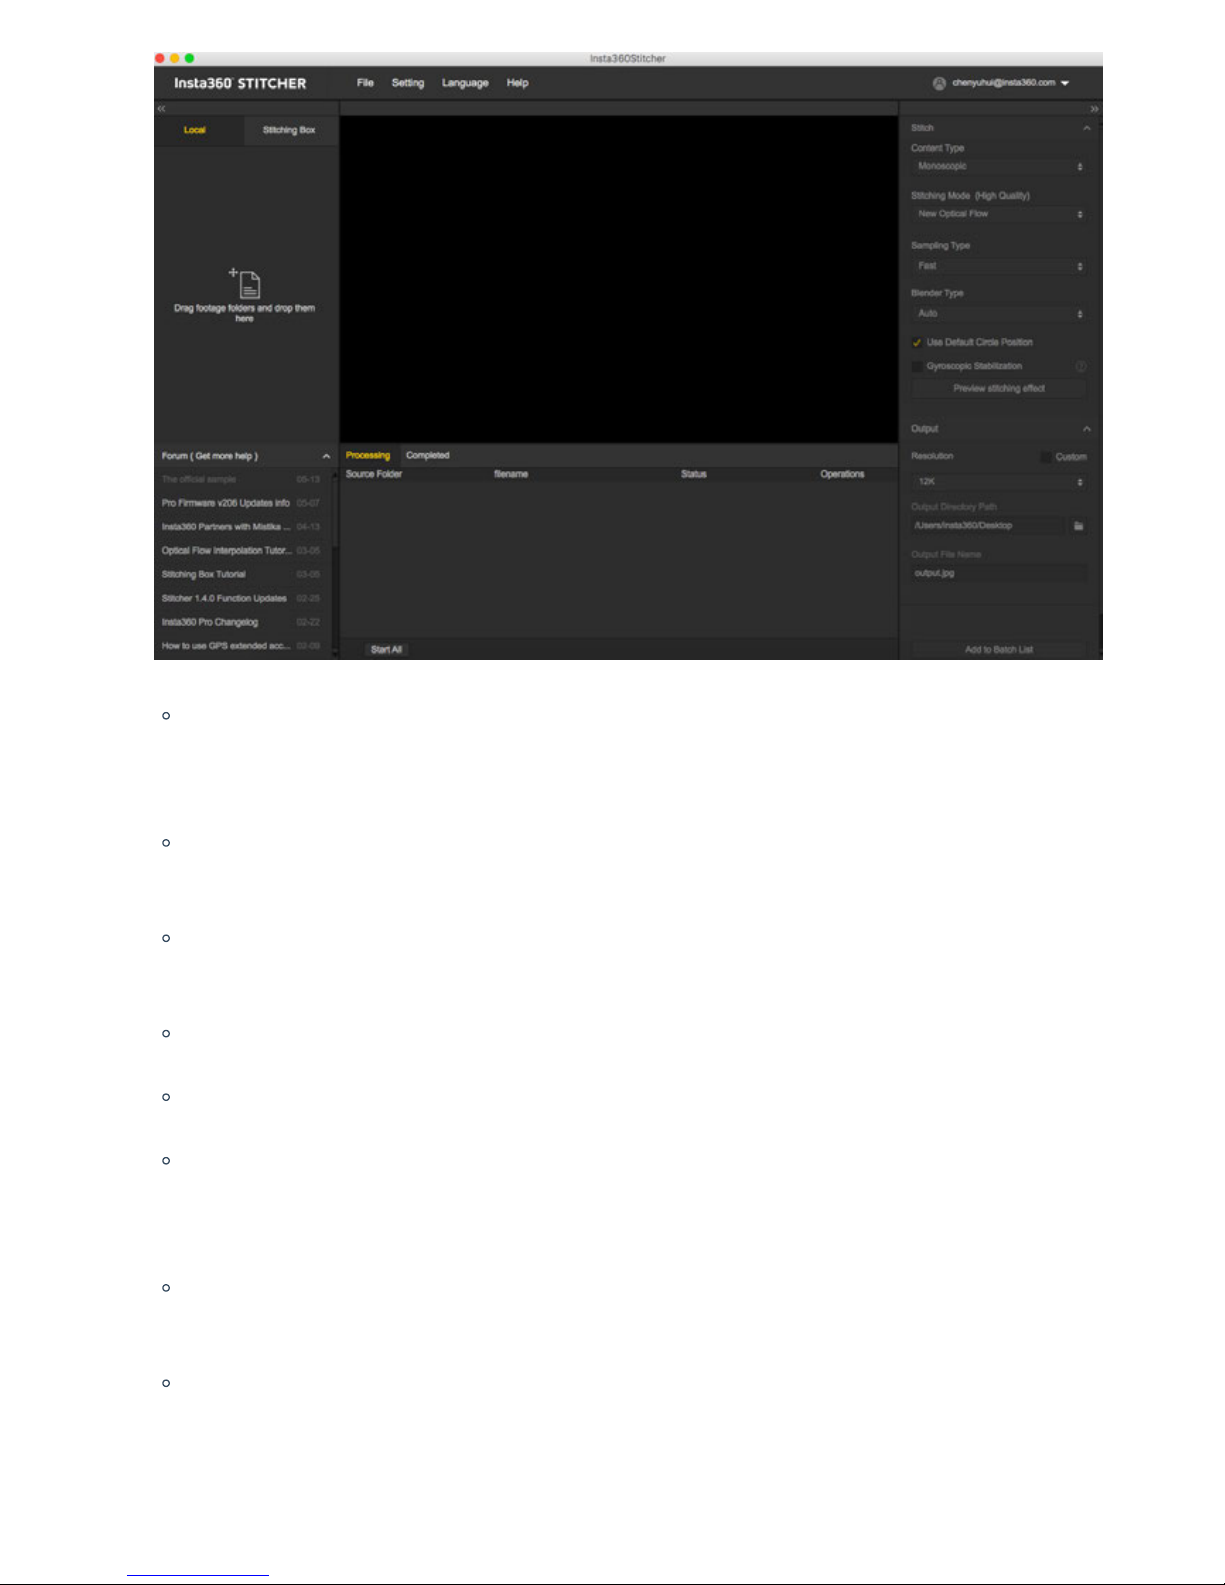
On the top is the menu bar: File, Settings, Language, Help. You can find functions of file import, google street view
upload, log display, preference settings (hard so decoding) , hardware performance test, language settings, log
upload, etc.
On the le is a list of files. You can drag folders directly to import files. Stiching Box refers to using Pro’s own
function for stitching. Stiching Box only supports Pro 1 currently.
Pro's oicial forum is shown at the bottom le, which provides latest soware information, tutorials, technical
discussions, feedback and suggestions to Insta360.
In the middle is real time monitor window, supporting the playback of the file in any lens.
Below is task status bar, where you can see the stitching process and check what has been done.
In the upper right is stitching setting area, where you can set up stitching Content Type (Monoscopic and Stereo)
and Stitching Mode (optical flow and template stitching).Sampling type and Blender Type generally have default
settings. Default Circle Position is used to optimize stitching at top of the frame and under dark conditions.
The lower right corner is output settings, where you can set the exported resolution, output directory path and
output file name.
Stitching eect preview is for you to check the stitching eect of various play modes, manually adjust main angle
of stitching, optimize stitching at top of the frame, make color correction, etc.
3. Stitching step
Page 69
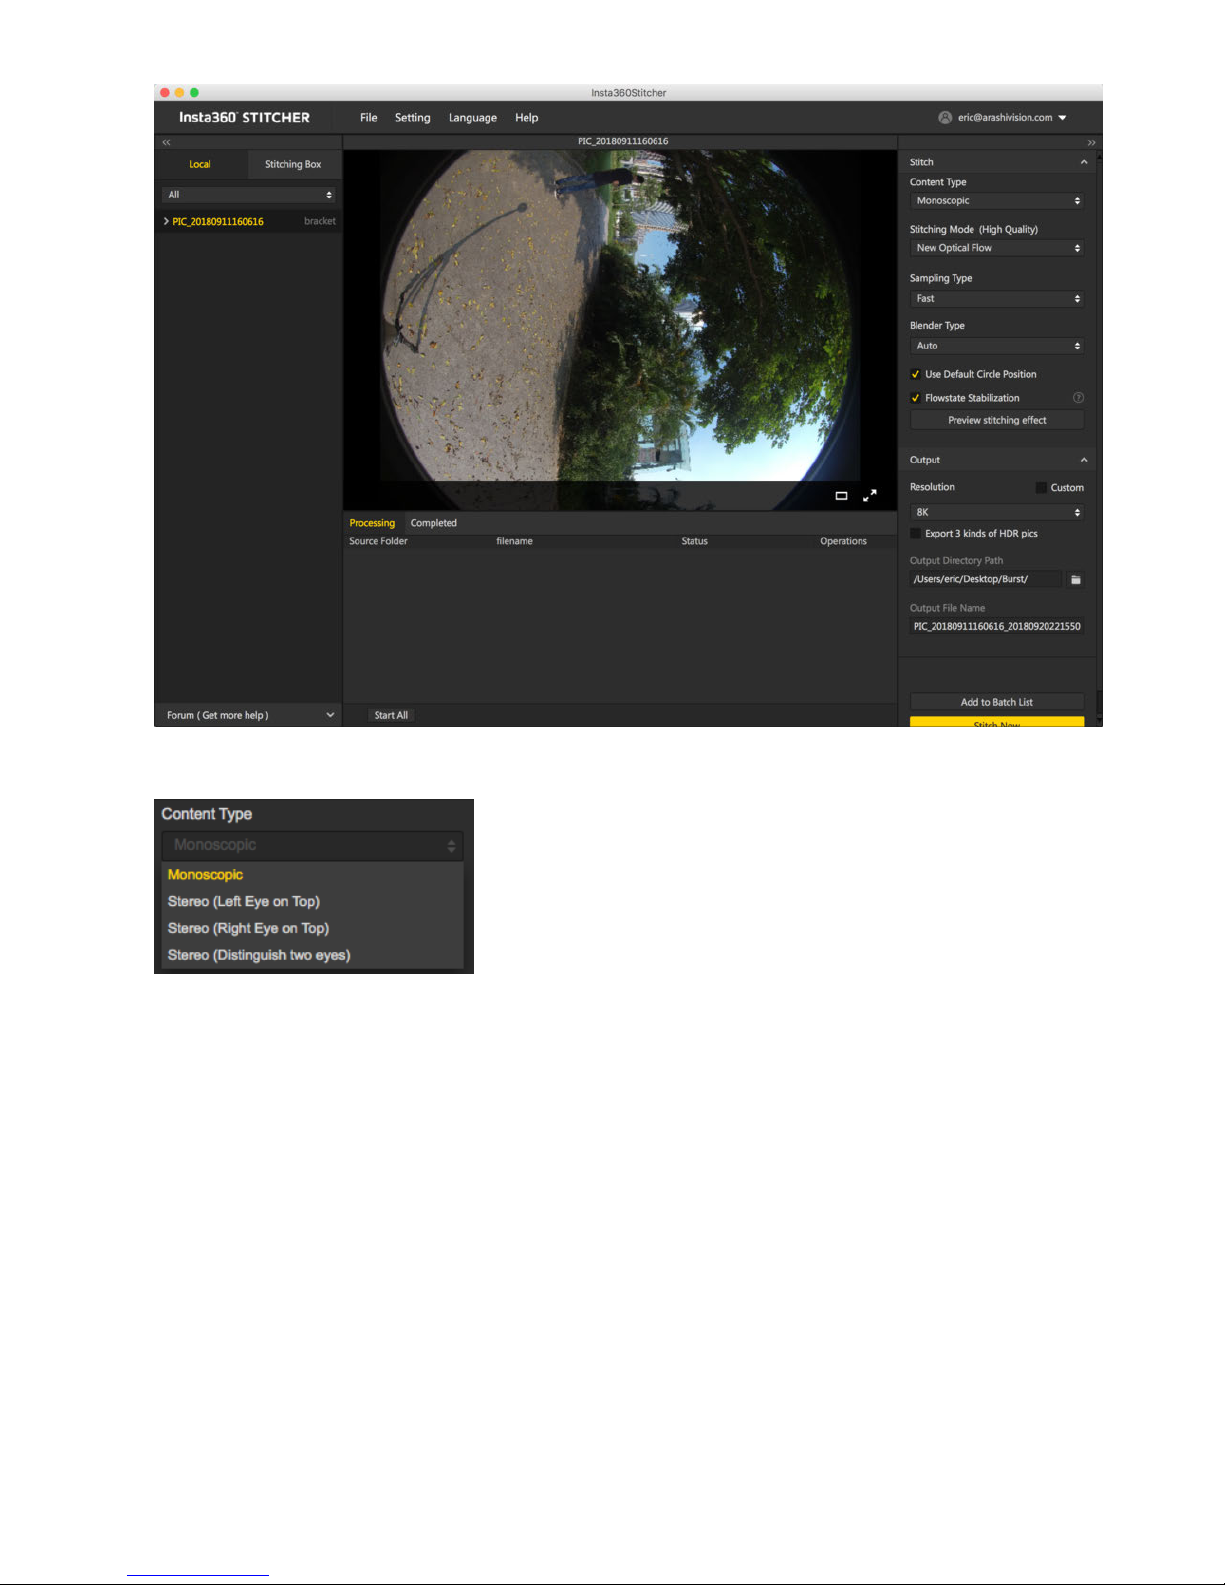
Import a picture folder
Content Type can be Monoscopic, Stereo (Le Eye on Top), Stereo (Right Eye on Top), Stereo (Distinguish two eyes).
For Stitching Mode, you can select new optical flow and optical flow to calculate new template according to current
picture.
Optical Flow: basic optical flow algorithm, general stitching speed.
New Optical Flow: an increase of nearly 3 times of stitching speed on original basic optical flow but few scenes can
achieve less stitching eect than basic optical flow. It is suggested to try basic optical flow and compare eects when
you feel dissatisfied about the stitching eect of new optical flow.
Scene-specific Template: speed is fastest but it is not optical flow stitching, so it has limited eect when there’s
parallax error and in near distance.
Page 70
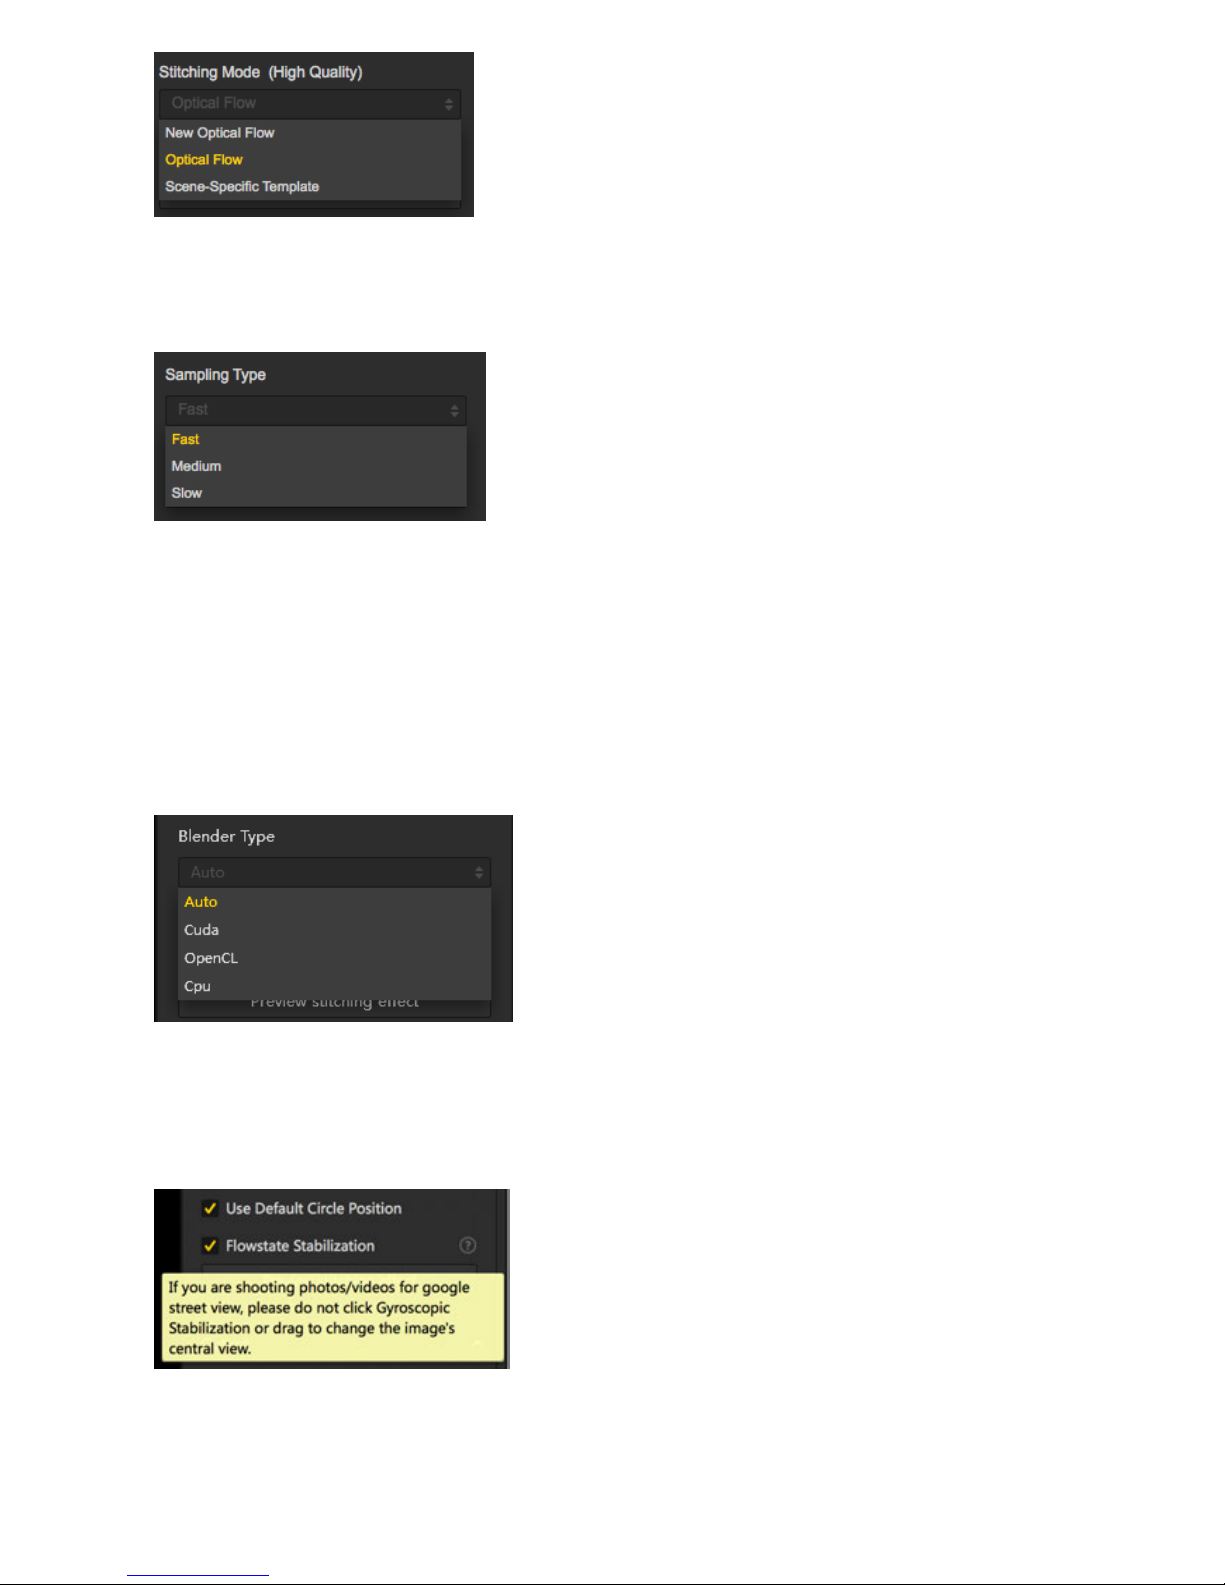
As for Sampling Type, if the camera is still static then three sampling types are not very dierent from each other. If
the camera is moving, sampling with slower speed can obtain better image quality which is commonly used in video
stitching.
Blender Type is generally automatically chosen by the computer.
CUDA: if the computer use NVIDIA graphics cards, you have to select NVIDIA CUDA technology to enable hardware
acceleration.
OpenCL: if the computer doesn’t use NVIDIA graphics cards, we also provide hardware acceleration through OpenCL.
CPU: non hardware acceleration, pure CPU computing.
Using default circle position option for some scenes with shelter at top and scenes under dark conditions will help
improve stitching eects.
Gyroscopic stabilization can make screen automatically keep horizontal when exporting 2D panoramic photo.
Stitching eect preview is an important step in which you can adjust screen level, center angle of view, and make
simple color correction. Zenith Optimization function can optimize scenes with regular lines at top, such as air
conditioning exhaust vents on the ceiling.
Page 71
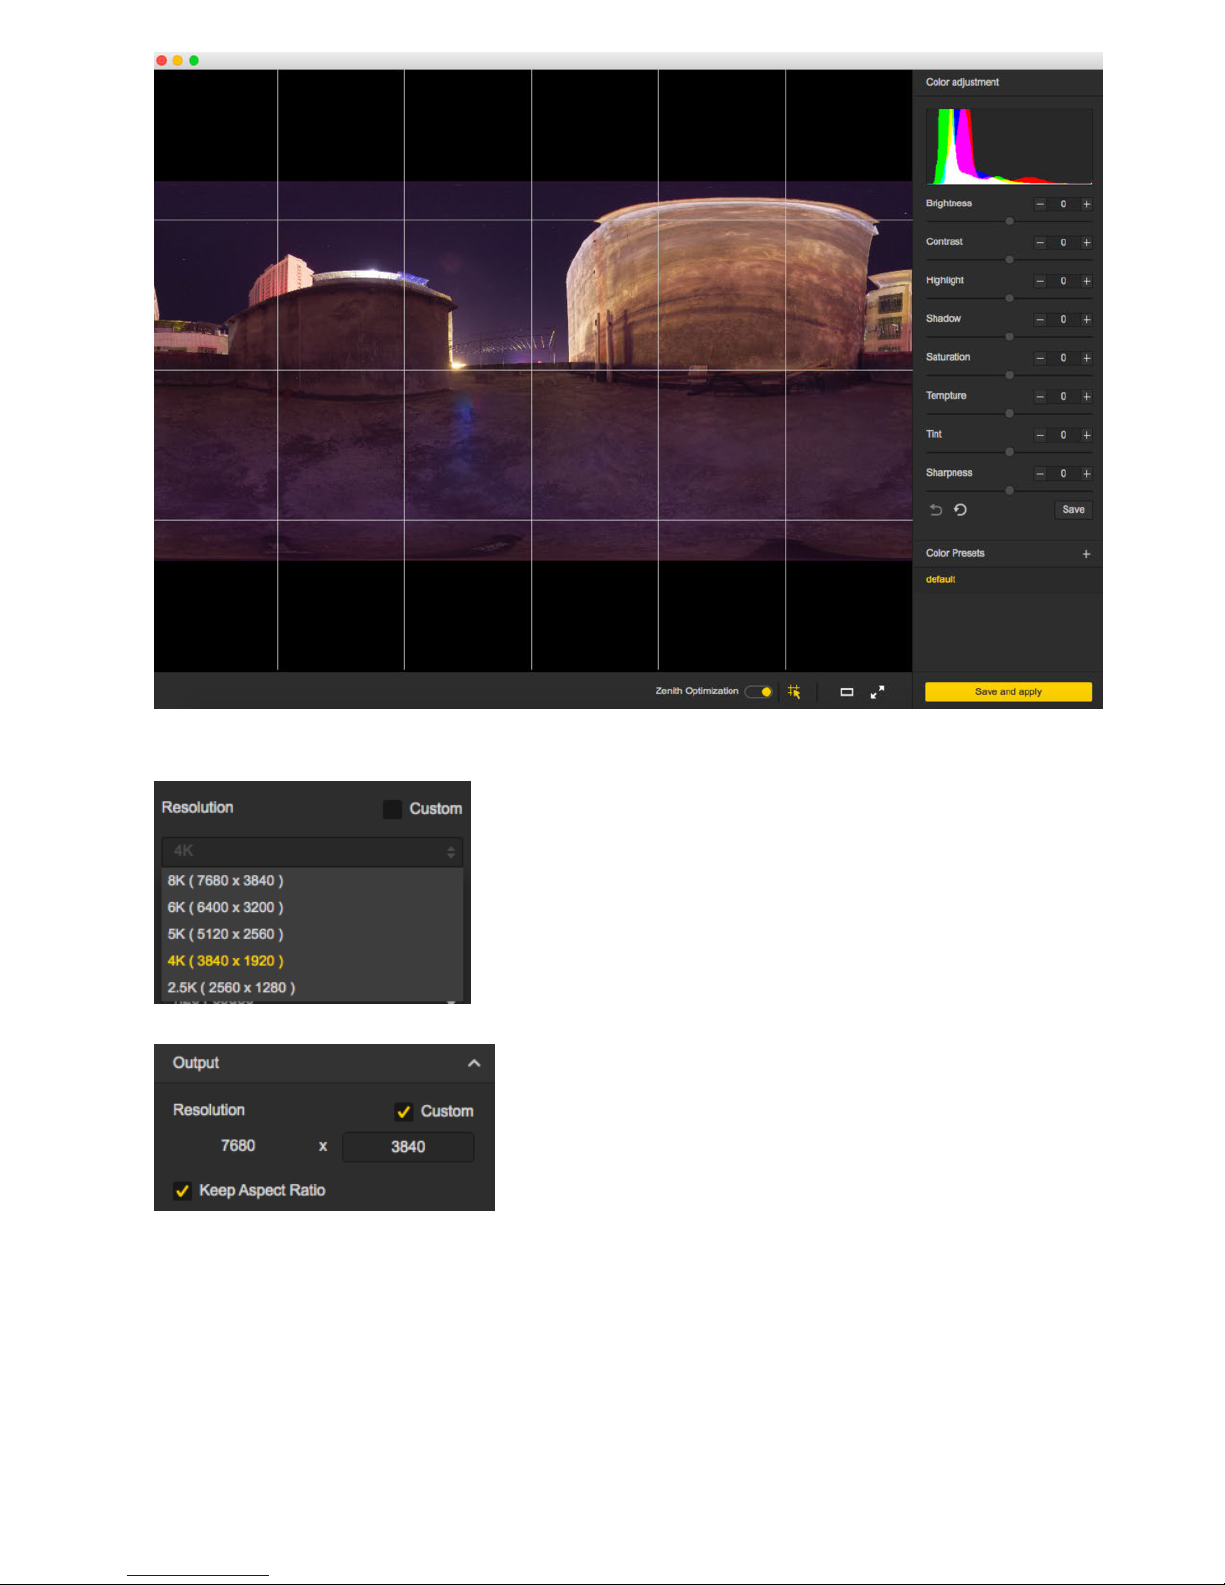
Resolution can be customized in output settings except the preset ones.
Output directory path and output file name can be set. When setup completes, you can add to batch list for pending
processing or stitch immediately.
Page 72
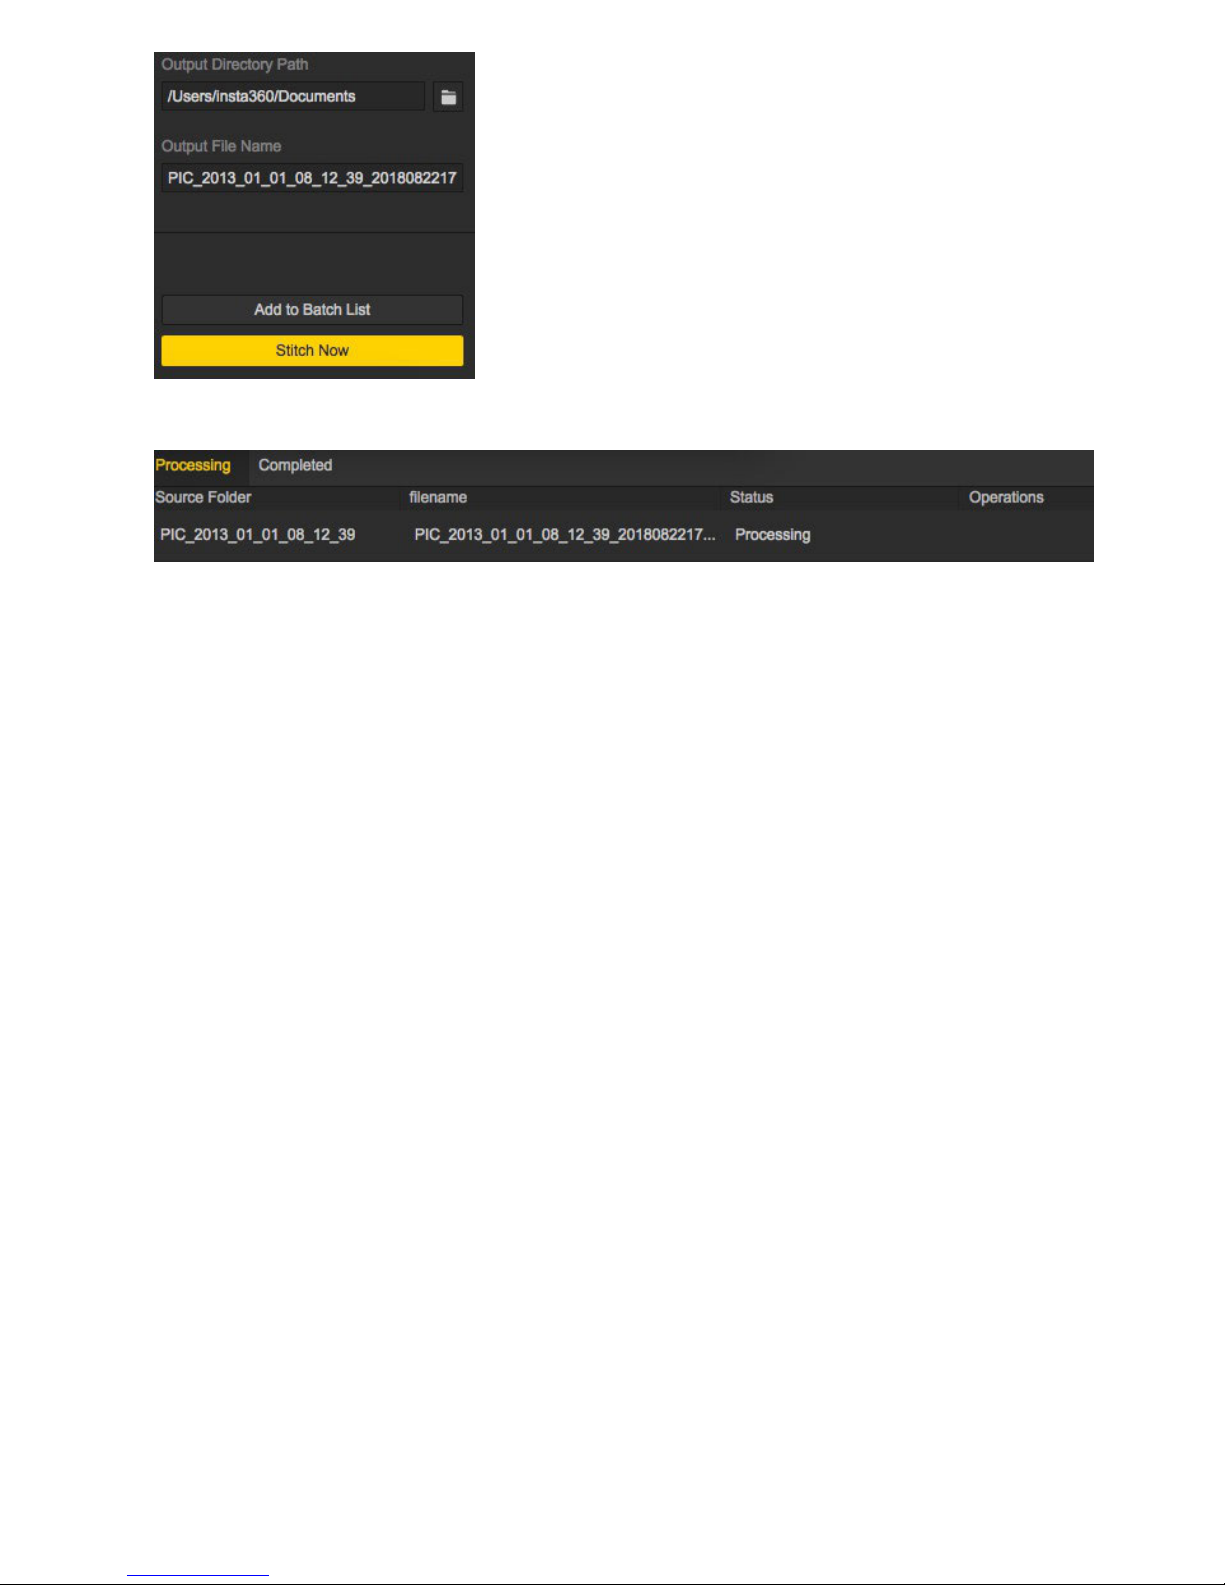
Progress is shown in taskbar. Aer stitching completes, you can open folder to view stitched photos.
4. Stitching of special shots
RAW+JPG: *. DNG is an image taken with RAW+JPG, and it saves the most original information, which gives lots of
room for post-production. It requires stitching in Sticher first. Aer completion of stitching, synthetic panoramic
images of DNG format can be processed in Photoshop for post-production and exported panorama photos in jpg
format.
Burst mode: files of Burst mode are 10 groups of original photos, can be stitched and exported 10 panoramic photos.
You cannot preview stitching eect of the photos when stitching. Aer stitching completes, it will generate 10 photos,
named output_*.jpg
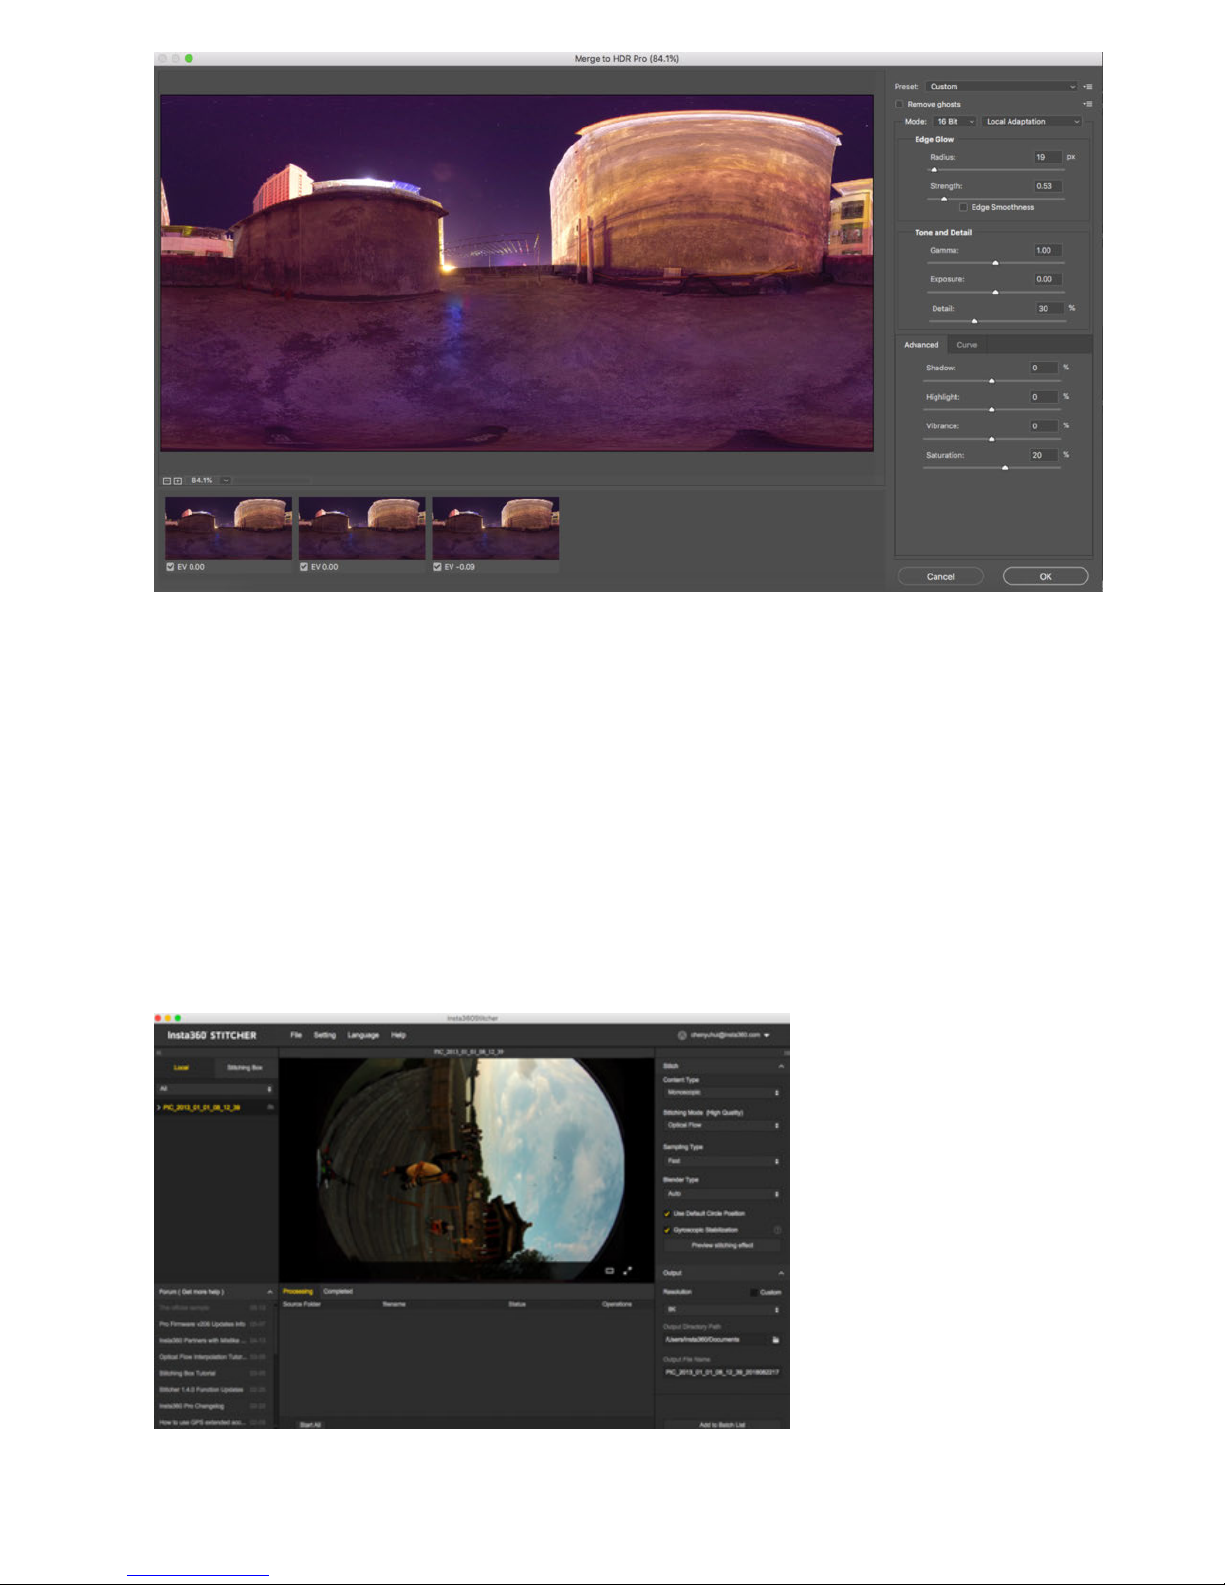
Auto Exposure Bracket: AEB files were 3, 5, 7, 9 groups of photos with dierent exposures. Aer stitching, a photo
with a higher dynamic range will be generated. Taking group 9 as an example, we can export 9 panorama photos of
dierent exposures simultaneously and import them to other sowares to synthesize HDR photo.
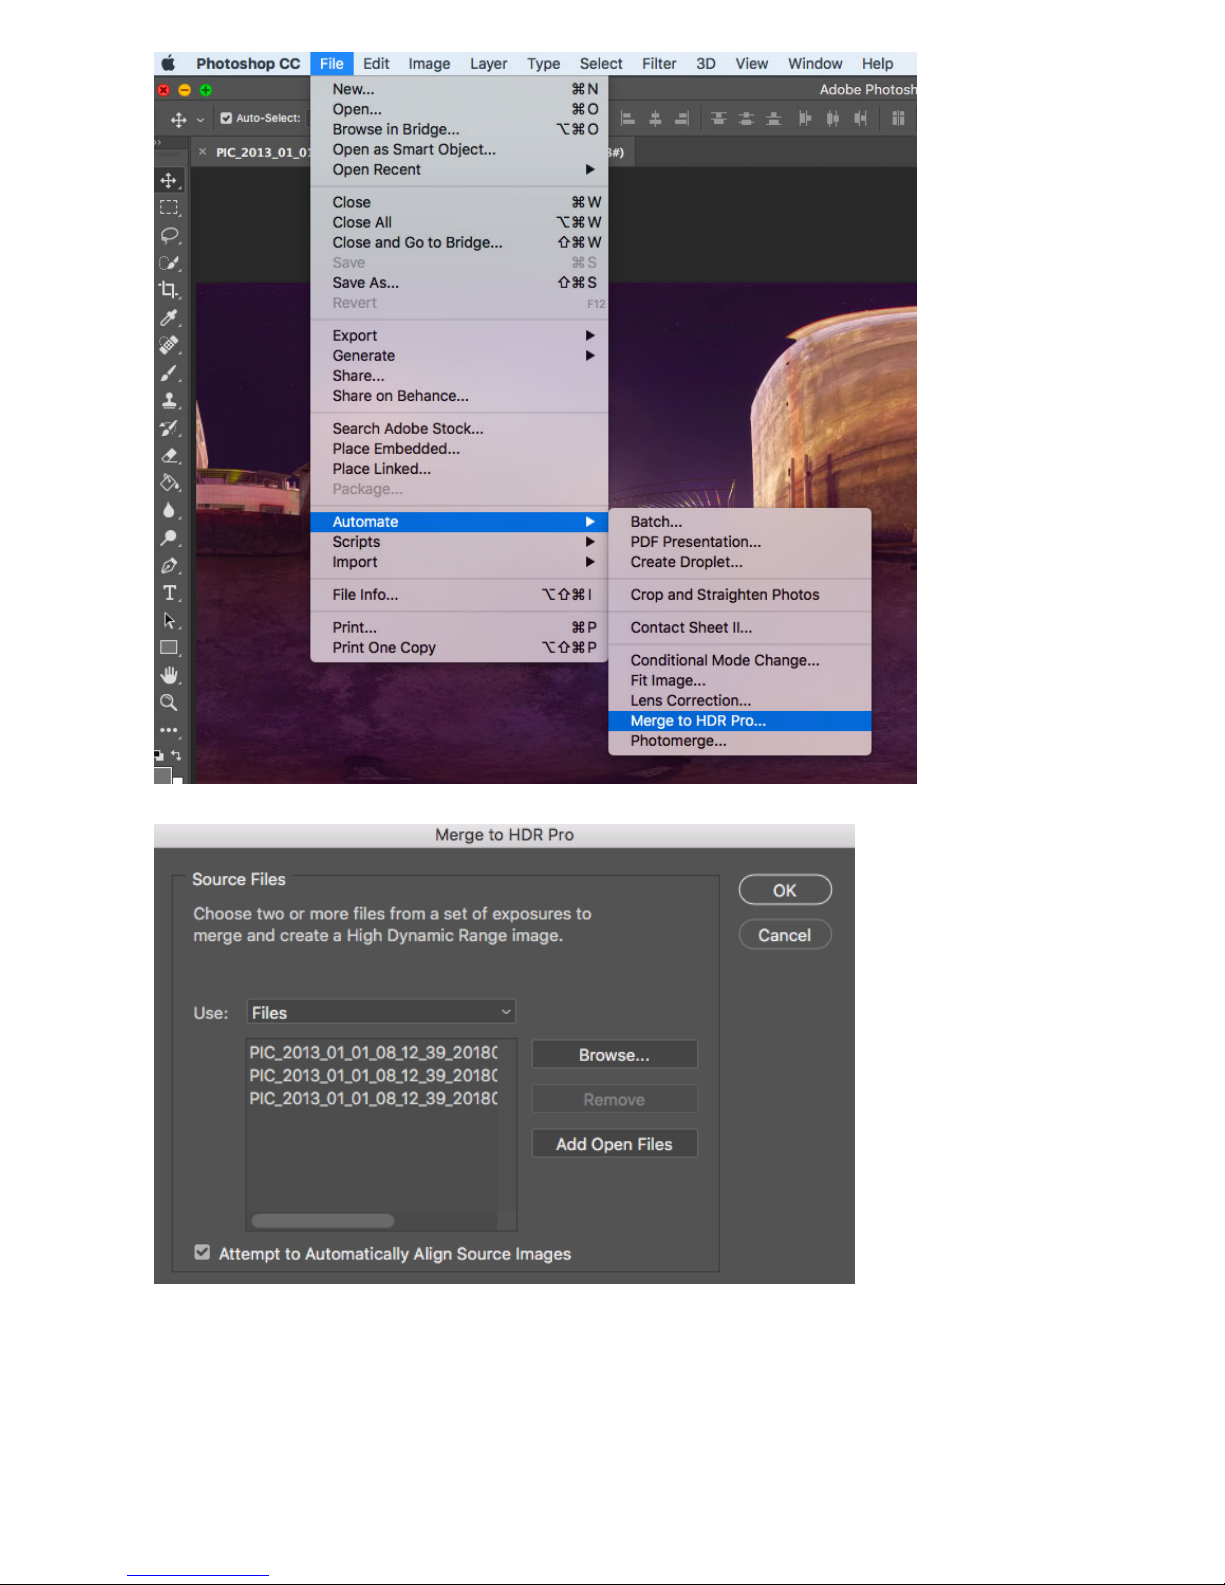
Nine panorama photos of dierent exposures and one merged panorama photo are shown below.
Page 73
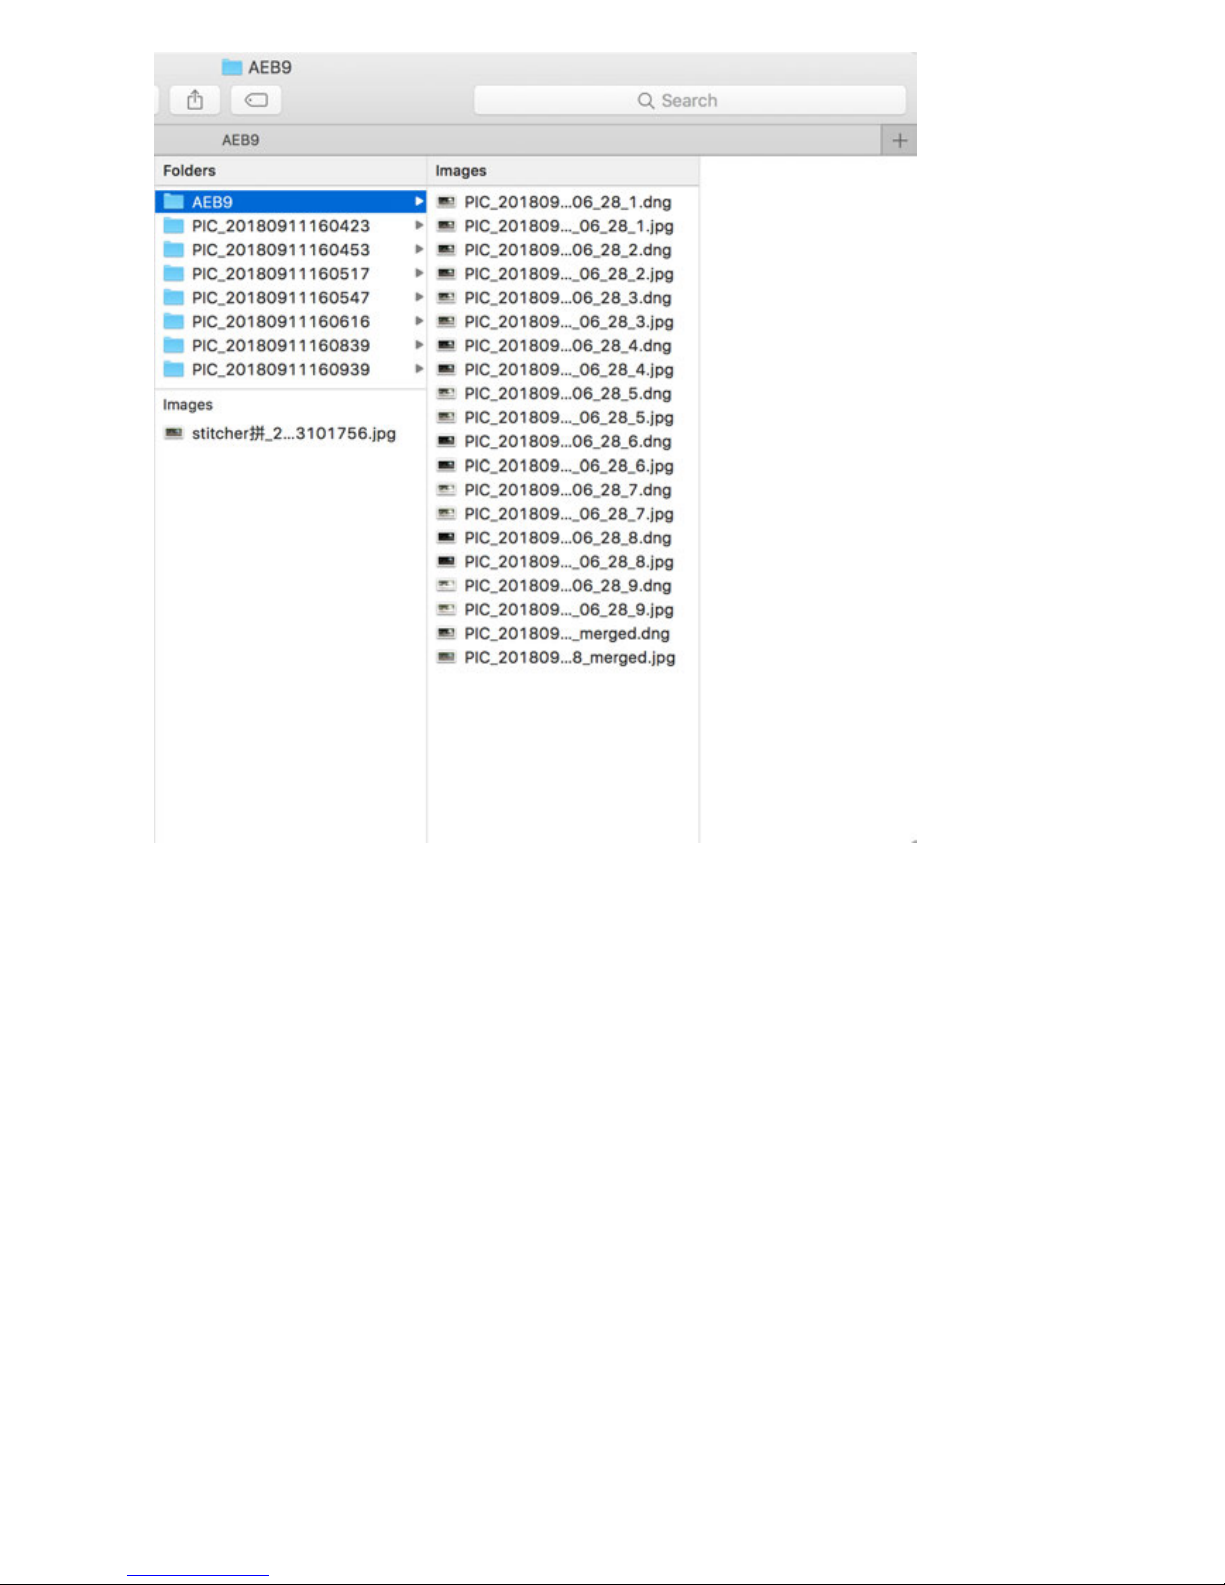
Methods for creating HDR images by using Photoshop:
Page 74
Page 75
Timelapse image sequence stitching
Photos taken by Insta360 Pro 2 are saved in a folder named PIC_* in the form of a photo group sequence.
Insta360 Stitcher can be used to splice up a panoramic image sequence of 8K at maximum.
For example, we imported a timelapse panoramic file of 605 groups, and set tp export 8K 2D panoramic photos. It
took around 12 minutes. And eventually we exported 605 panoramic photos in the folder: G:\footages\Beijing
Timelapse
Caution! When exporting timelapse shooting photos, Gyroscopic Stabilization cannot be applied, otherwise
ghosting will occur in the photo.
In the stitching preview interface, we adjust the center position of screen to be 17 Arch Bridge use reference line to
Page 76
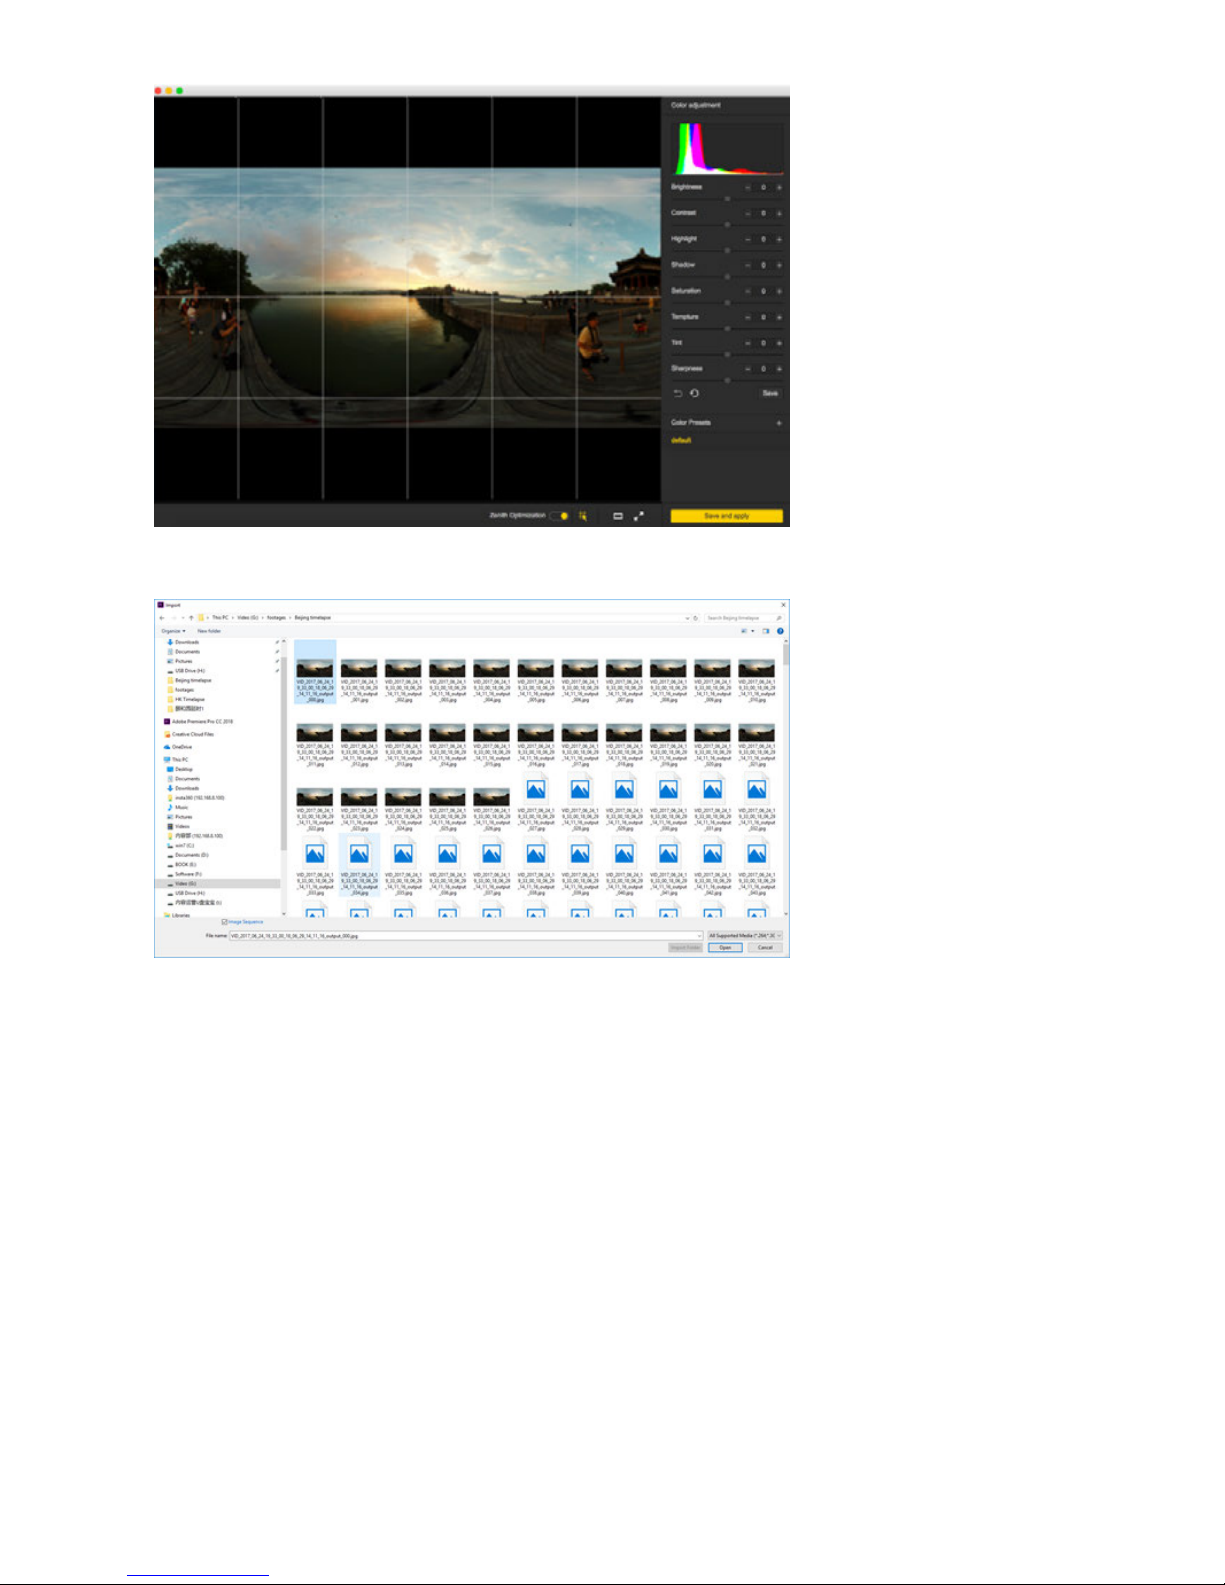
adjust level, save and apply the current eect.
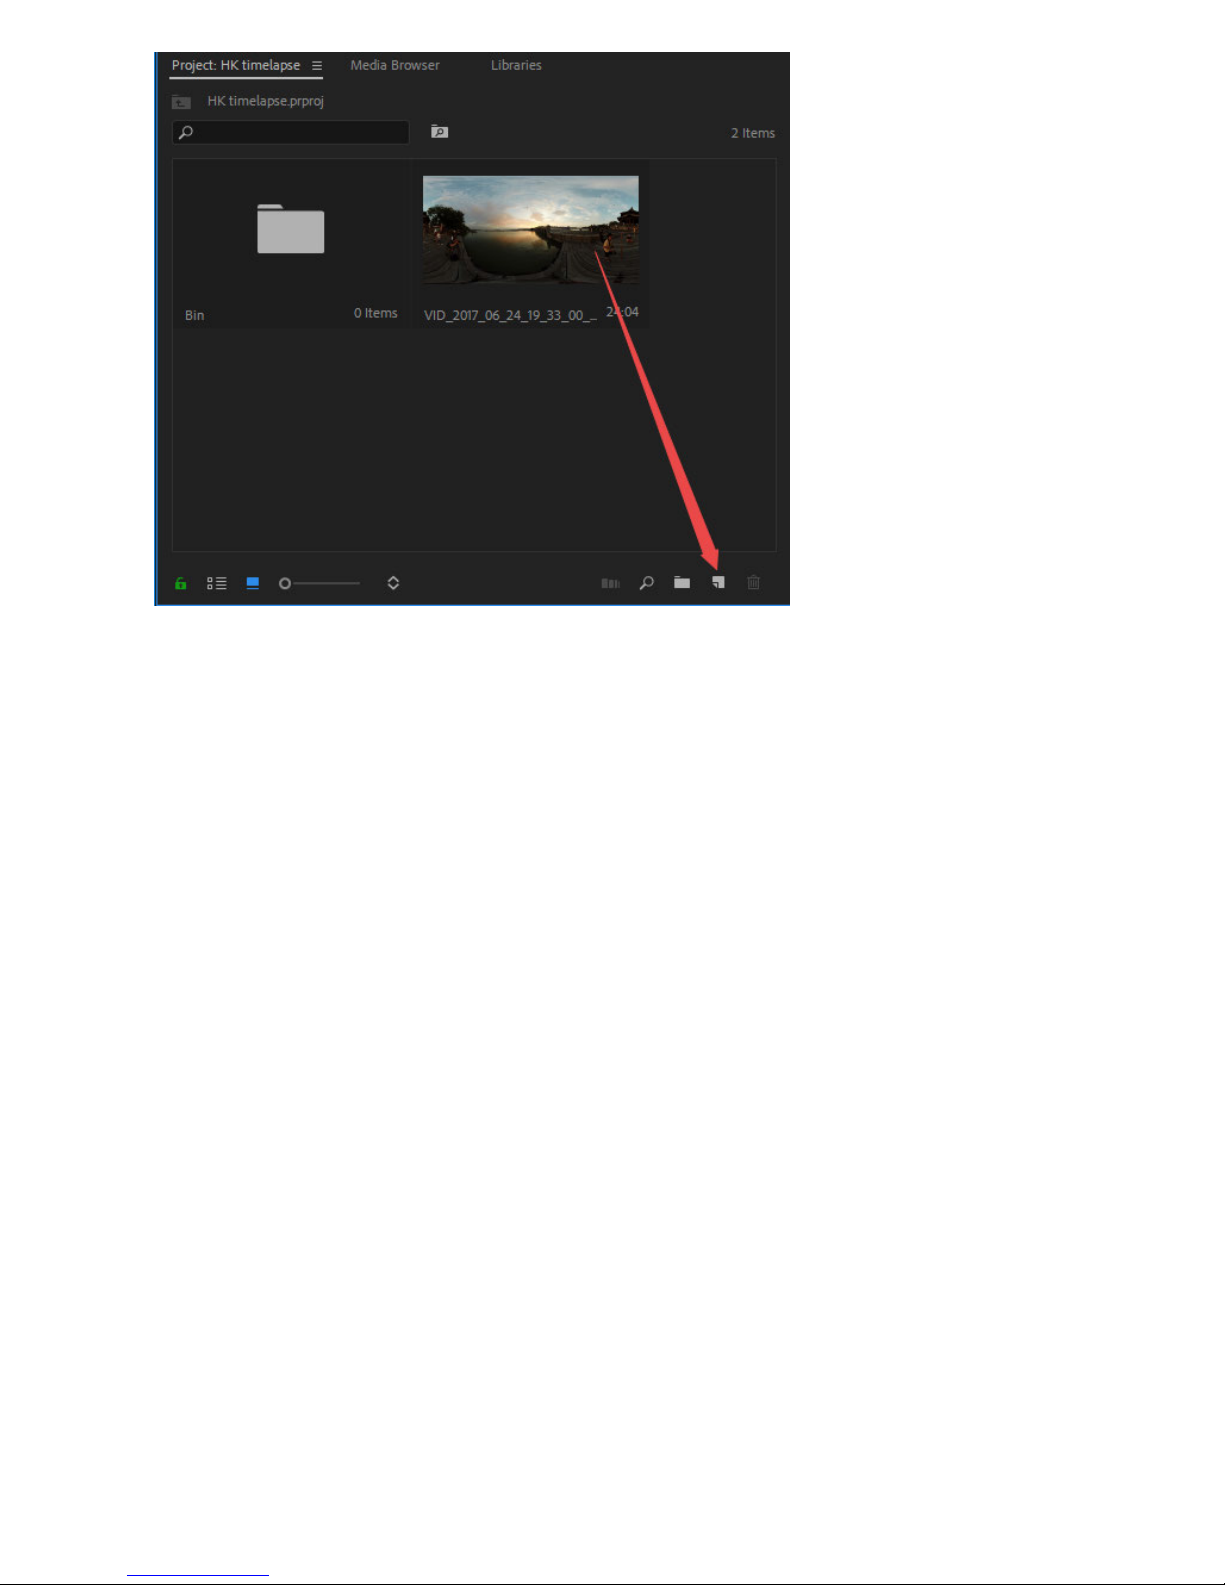
Open Adobe Premiere CC2018, import by sequence.
Create a new sequence and set the resolution to 7680*3840
Page 77
Because it is processing timelapse project with higher-resolution, which has high requirement on computer
configuration. Occurring lag during the process is normal. If the screen flashes, other soware can be used to remove
flicker in timelapse photo, such as LRT (Lightroom Timelapse); or DE: Flicker.
DE:Flicker plugin supports Aer Eects, smoothly removes flickering parts, and automatically retains image details so
that the entire photo becomes smooth and natural. It will not only repair flicker caused by artificial light sources but
also repair other objects that cause flicker even though these flickering objects exist at dierent rates.
DE:Flicker includes the following 3 filters:
DE:Flicker High Speed, oen used to deal with flicker generated during high speed shooting.
DE:Flicker Timelapse, oen used to deal with flicker generated during timelapse shooting.
DE:Flicker Auto Levels, automatically analyzes screen attributes such as color, brightness, etc., and automatically
removes flicker.
In editing soware, materials are stitched together and exported aer color correction.
Due to resolution limitation of H264 encoding, MP4 video of 4096*2048 can be exported to the maximum (The latest
version of Adobe Premiere 2018 Pro CC supports 8K H264 format to the maximum, while the previous versions don't).
If a video of higher resolution are required, it needs to be exported into other formats.
For example, QuickTime format, select GoPro CineForm as encoder, or HEVC format.
You can export videos of 7680*3840.
Page 78
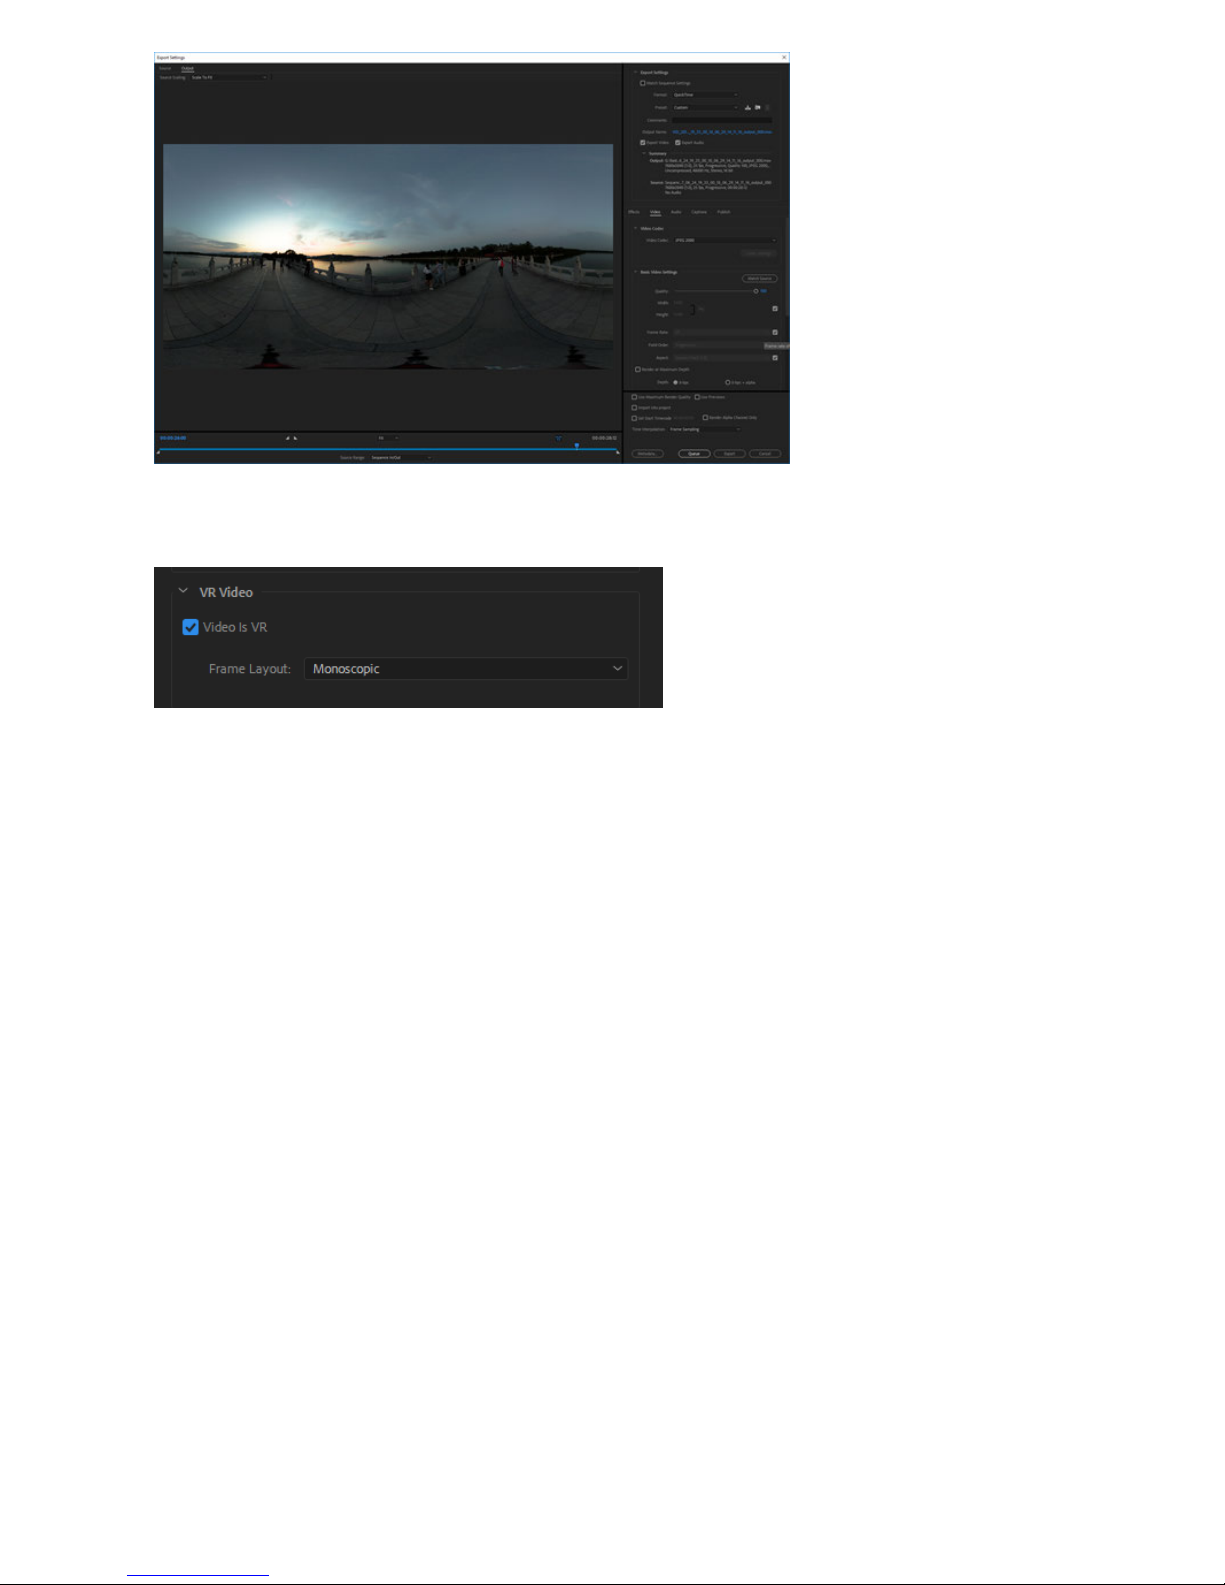
Note that this video needs to be set as VR panoramic video, in which way, Metadata panorama information can be
written into the video.
2.3.2 [Advanced] How to stich Super Resolution photo
with Burst photo
Photos shot on Pro 2 in Burst mode of 8K resolution can be exported to 12K photo with Super Resolution function. This
function was developed to enhance the quality of still shooting. For best results, please use this function in a setting
where movement is limited. This will diminish the possibility of moving objects creating undesirable stitching eects or
shadows.
Steps:
1. Import the burst photos in to Insta360 Stitcher. The "Super Resolution" option will be shown in the sidebar on the
right.
Page 79
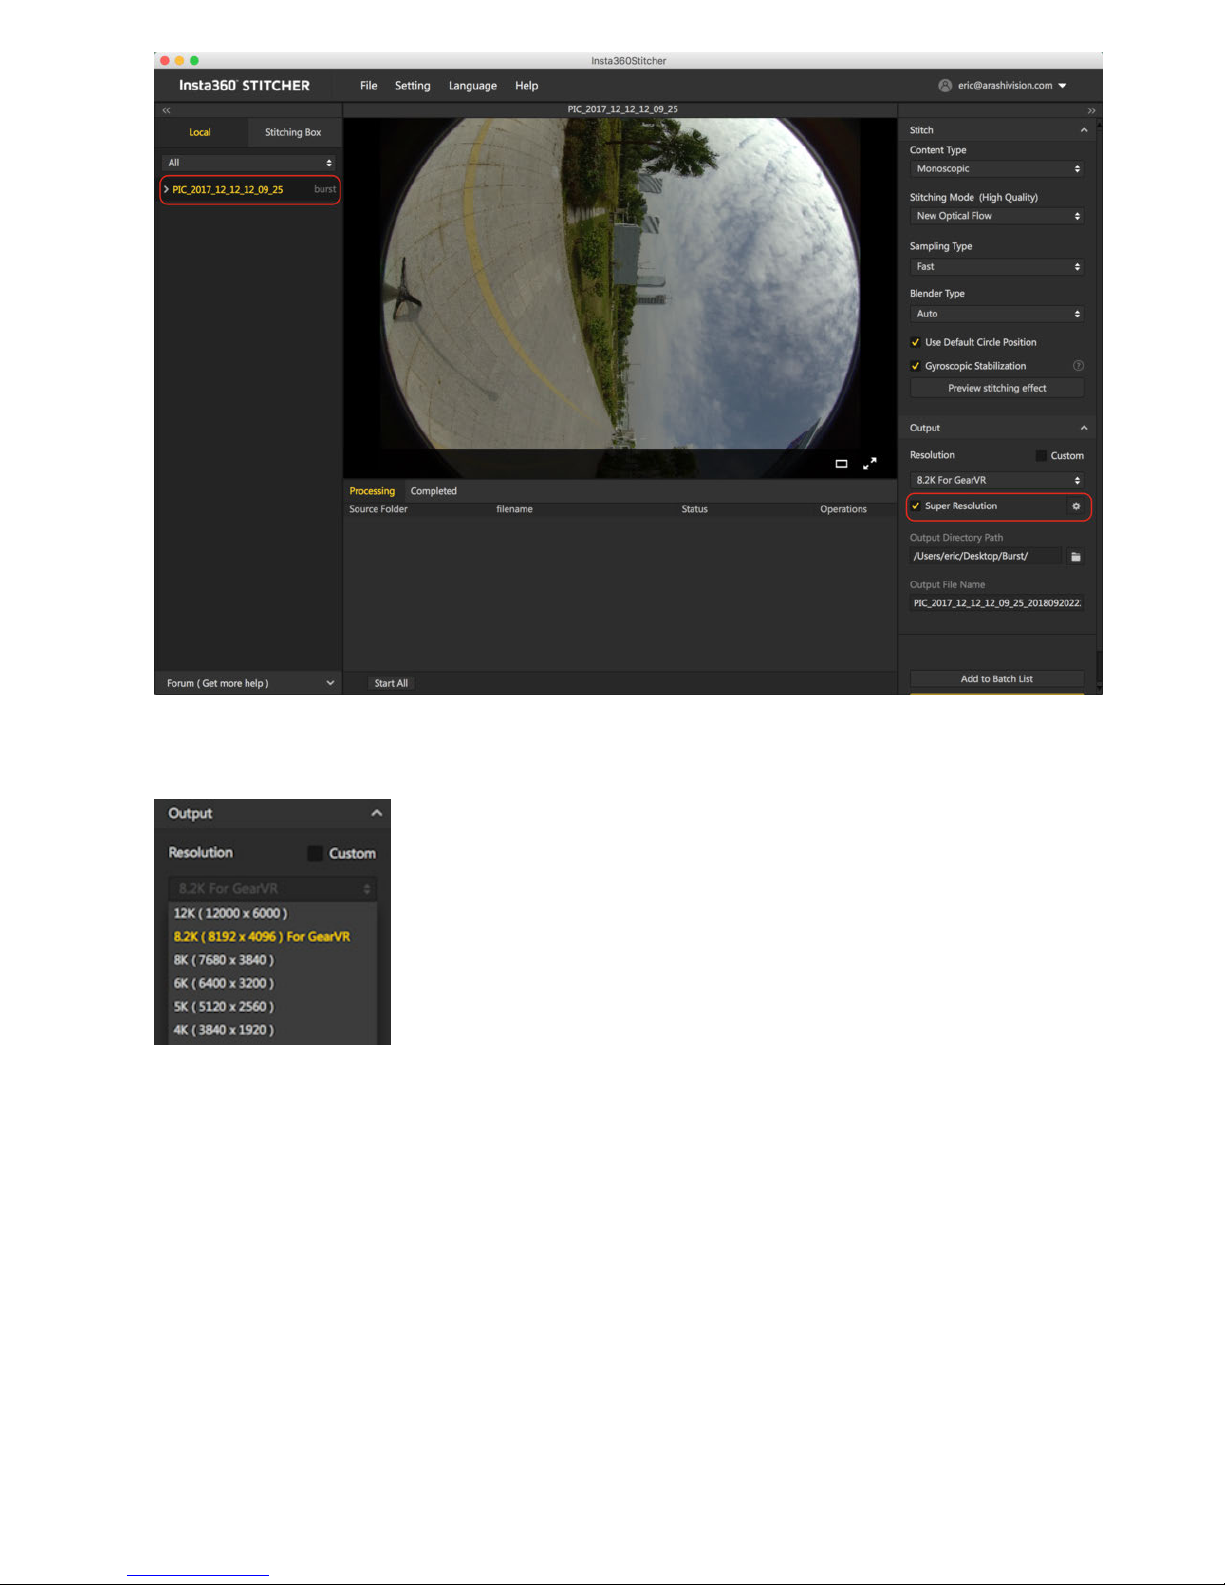
2. Choose the "Super Resolution" option, and the highest resolution will increase by two grades, 8.2K for the best
GearVR eect and the other 12K. The default Super Resolution is 8.2K.
3. If the super resolution function is used for the first time, the setting of origin photos for super resolution is required.
Please select an appropriate number of origin photos. The range should be 5 to the recommended value.
If the image quality is not good, please adjust the number of origin photos to avoid some problems with the
movement.
Page 80
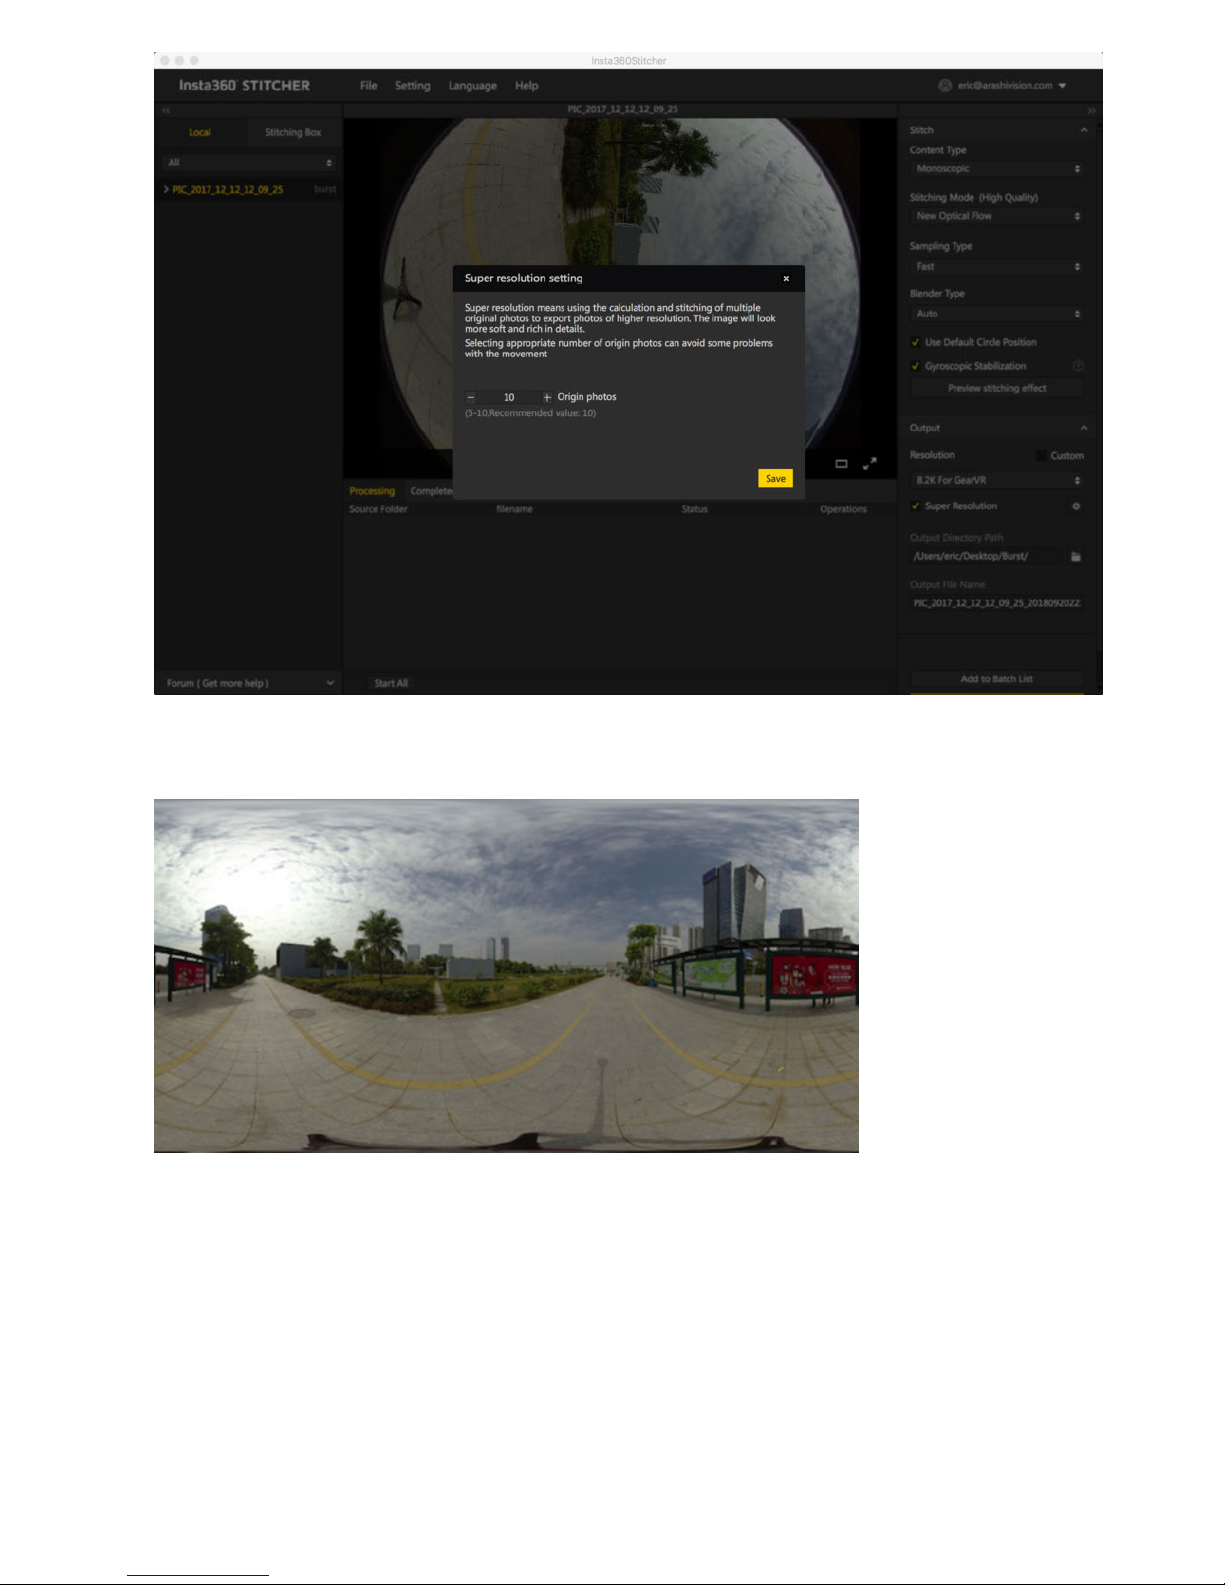
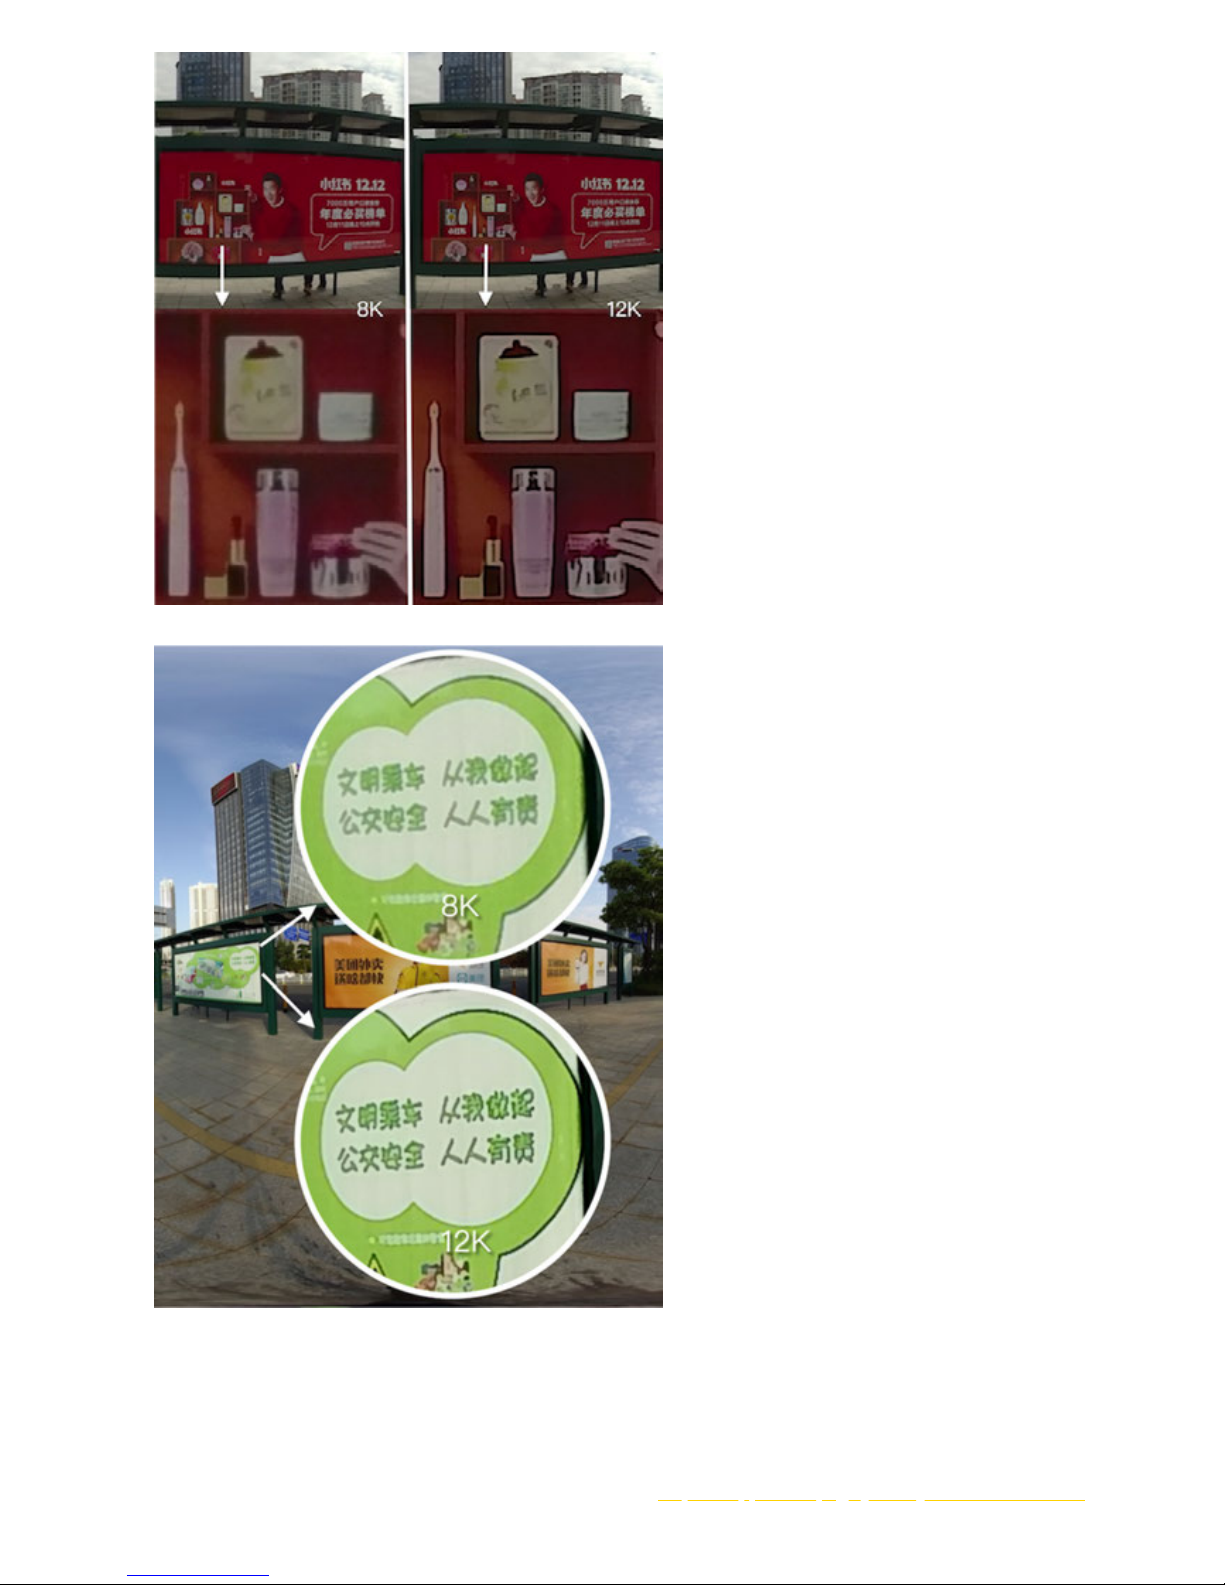
4. Save the intended value in "super resolution setting". Create a task to export (original photos are the 8K bursts), and
one 12K resolution photo will be produced.
Compared to the 8K original photo on the le, the 12K super resolution photo on the right shows details with greater
sharpness.
Page 81
Tips: To attain the best super resolution image results, please make sure photos be taken in stationary. The more
static the camera stays during shooting, the more clear the image will be. It has been proved that photo shot in an
environment with minimal interruptive movement will achieve great image quality.
Check out the following demonstration video for more details: https://v.qq.com/x/page/j05295y87ns.html?start=13
Page 82
2.3.3 [Advanced] Stitching by third party soware, such
as PTgui, etc.
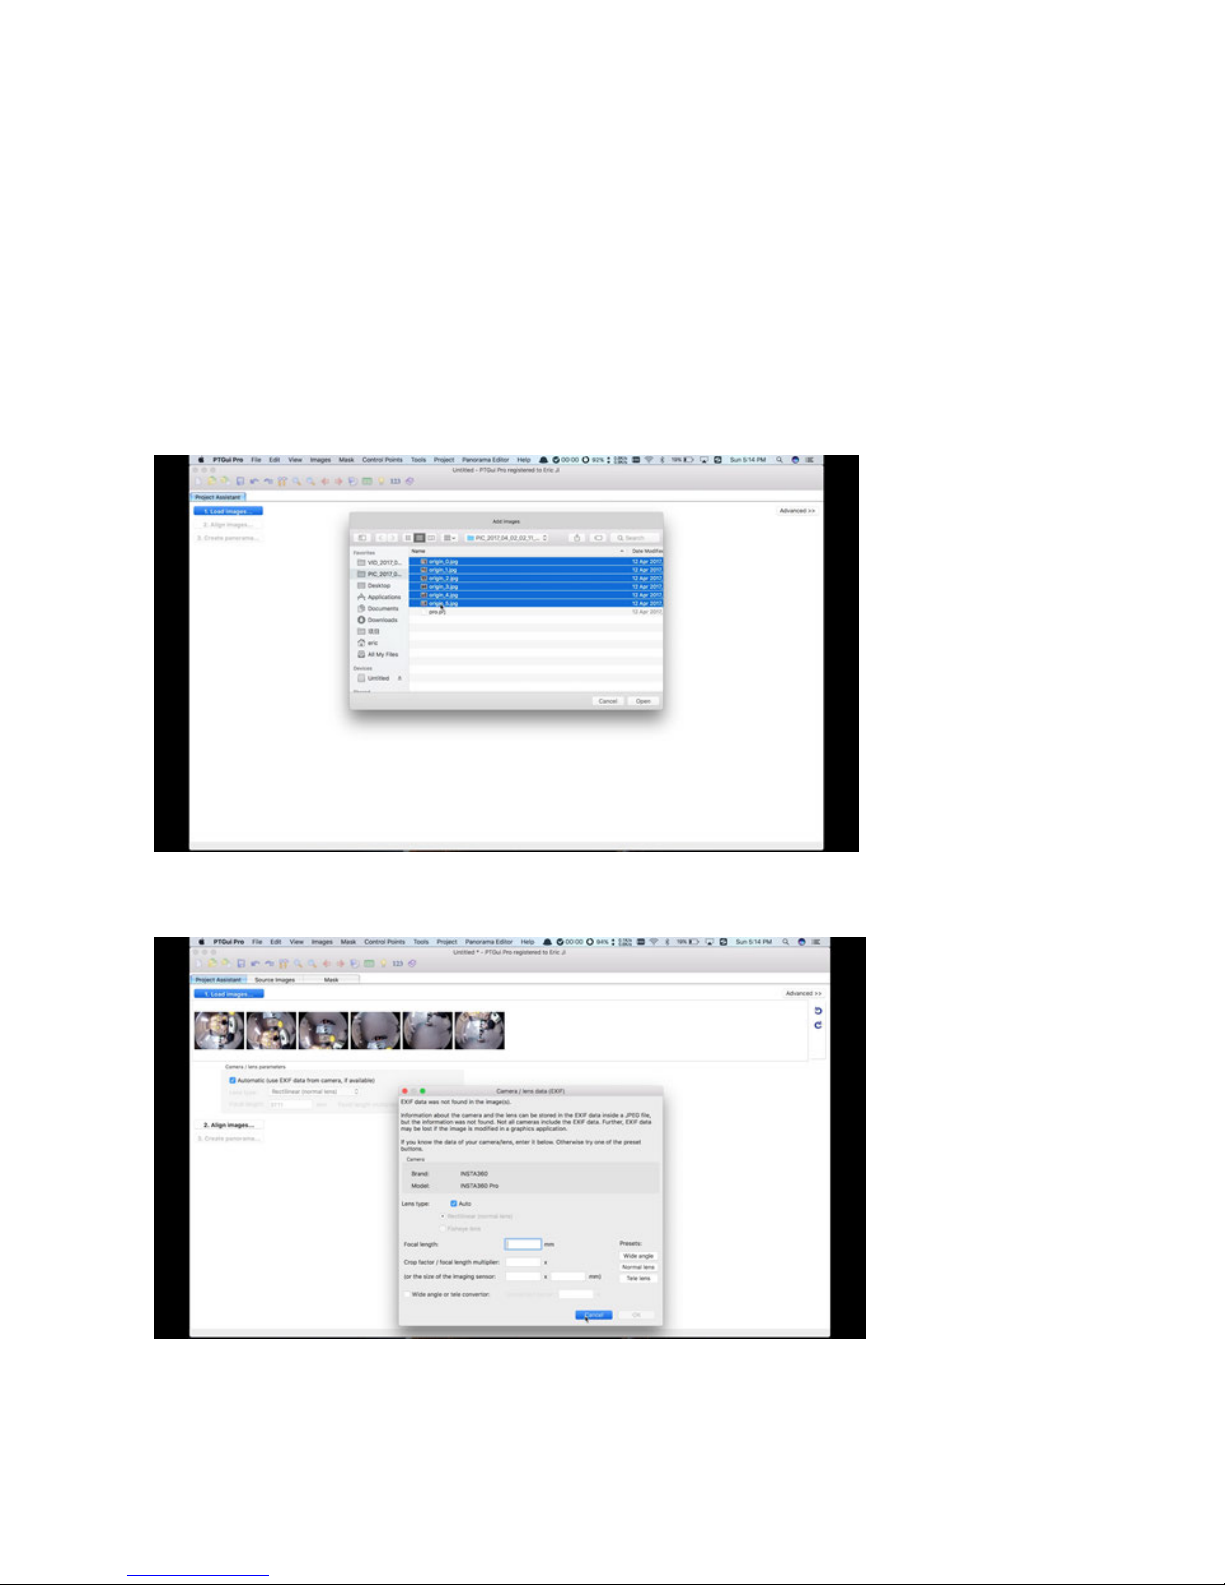
The original images of 6 lens are saved for every shoot, so we can put them together with third party stitching soware,
taking PTgui, Autopano Giga, Mistika VR as examples here.
1. PTgui stitching preservation template
Load images-import 6 original pictures
Skip camera/lens setting
Select lens type as Full Frame Fisheye, setting Focal length for 10.57.
Page 83
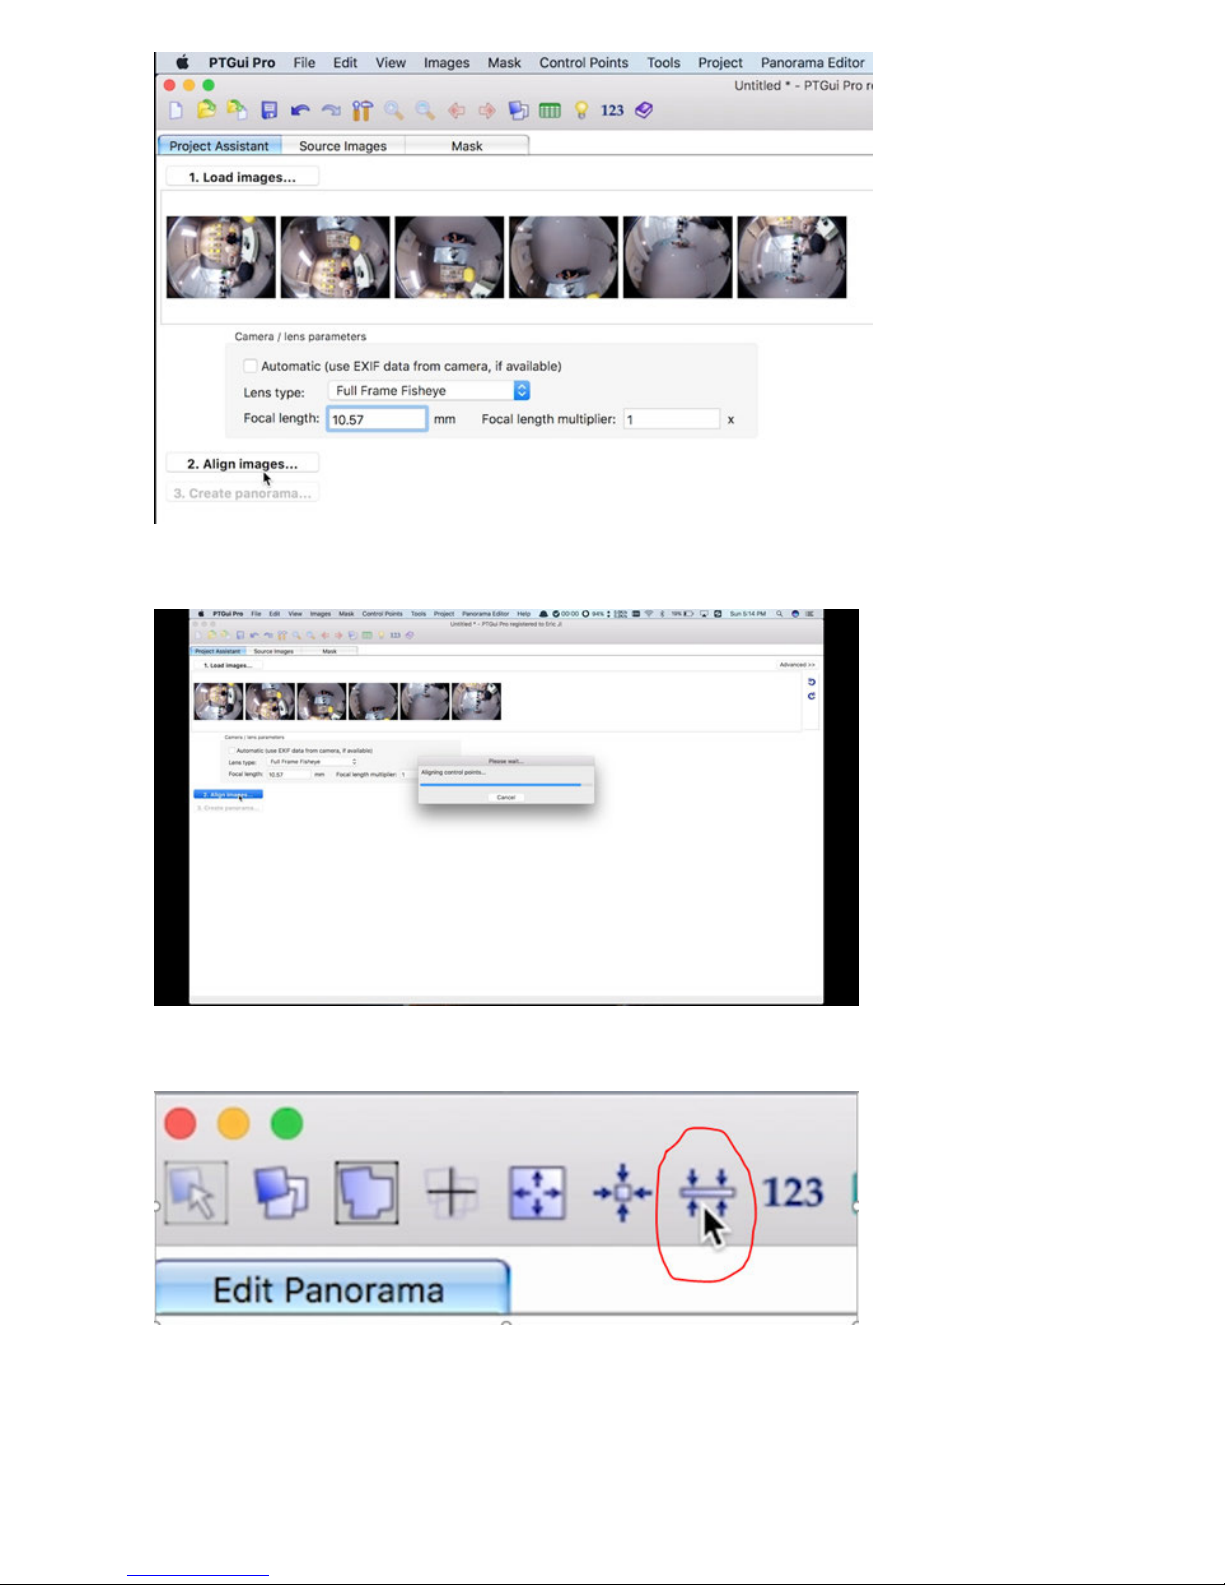
Click Align images for stitching analysis
Adjust level in Panorama Editor, adjust pictures accurately, etc. Detailed method refers to PTgui oicial tutorial.
Page 84
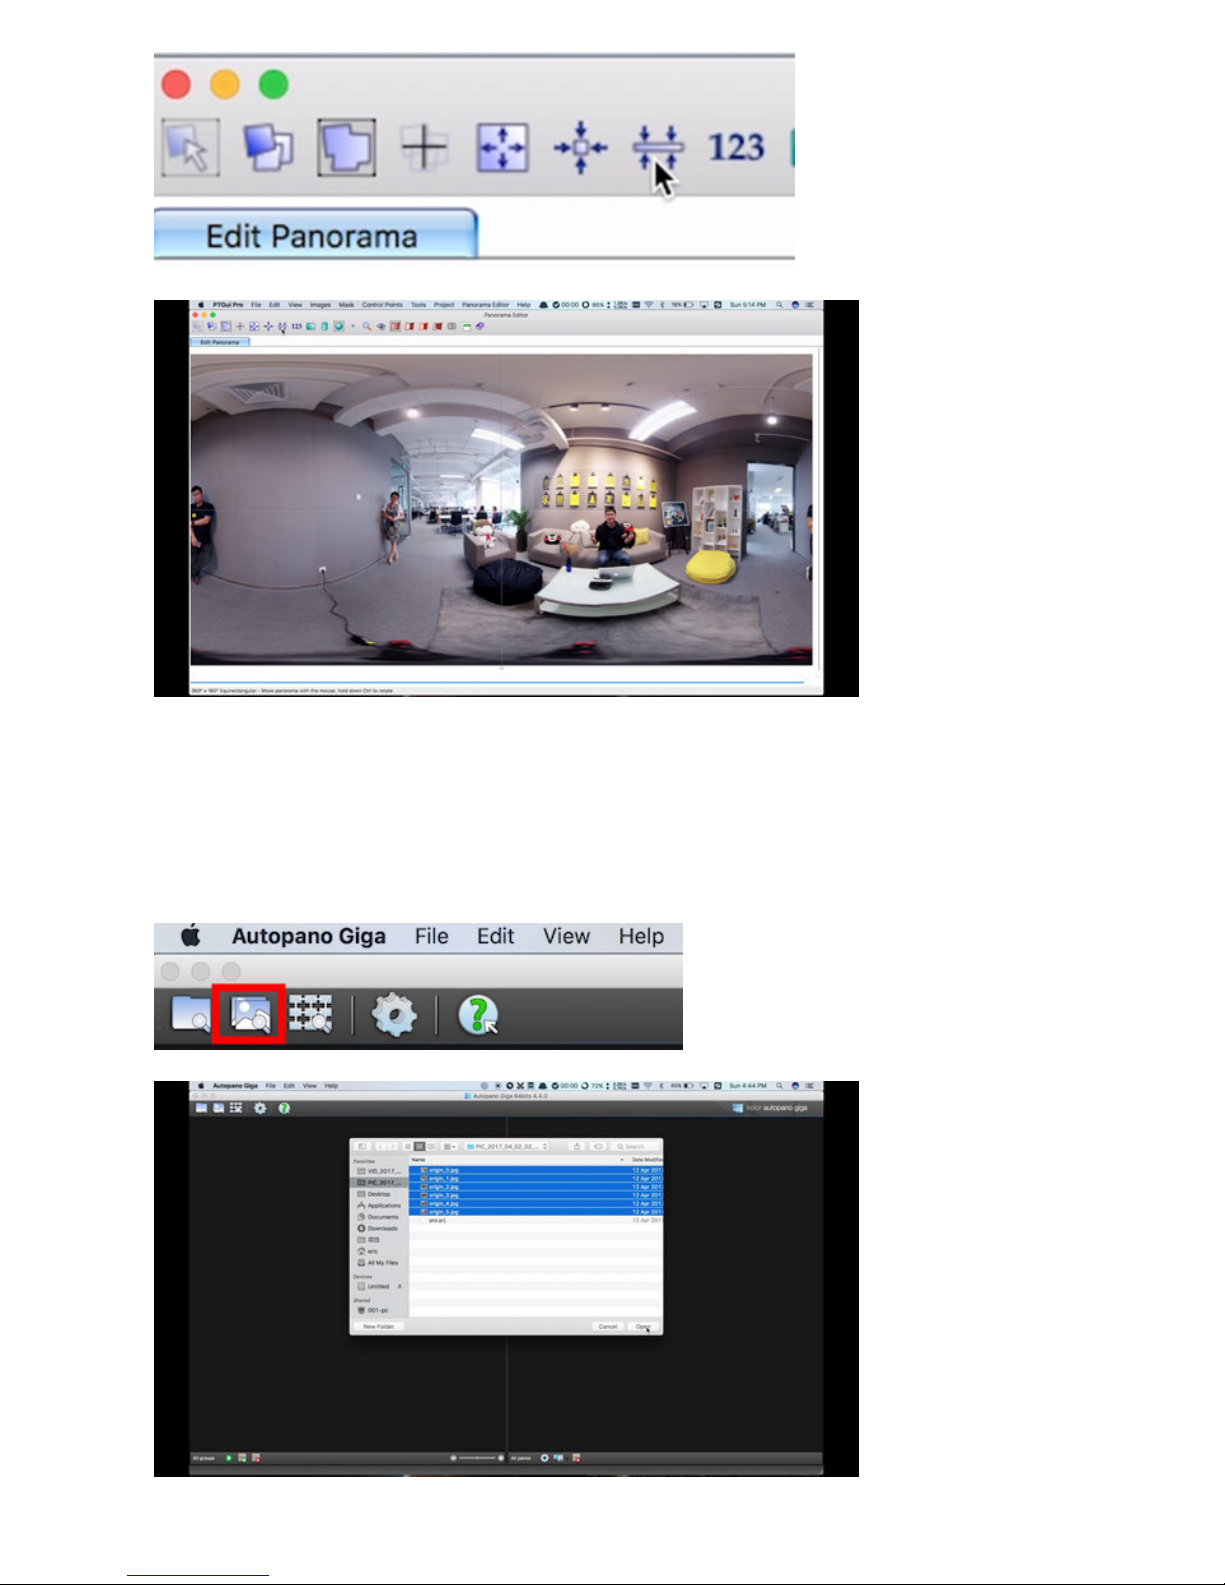
"File-Save as templates" is to save it as pts template files for subsequent use; "Create panorama" can export jpg
panorama images.
2. Autopano Giga
Open Autopano Giga, click icon to import original images of 6 lens.
Page 85
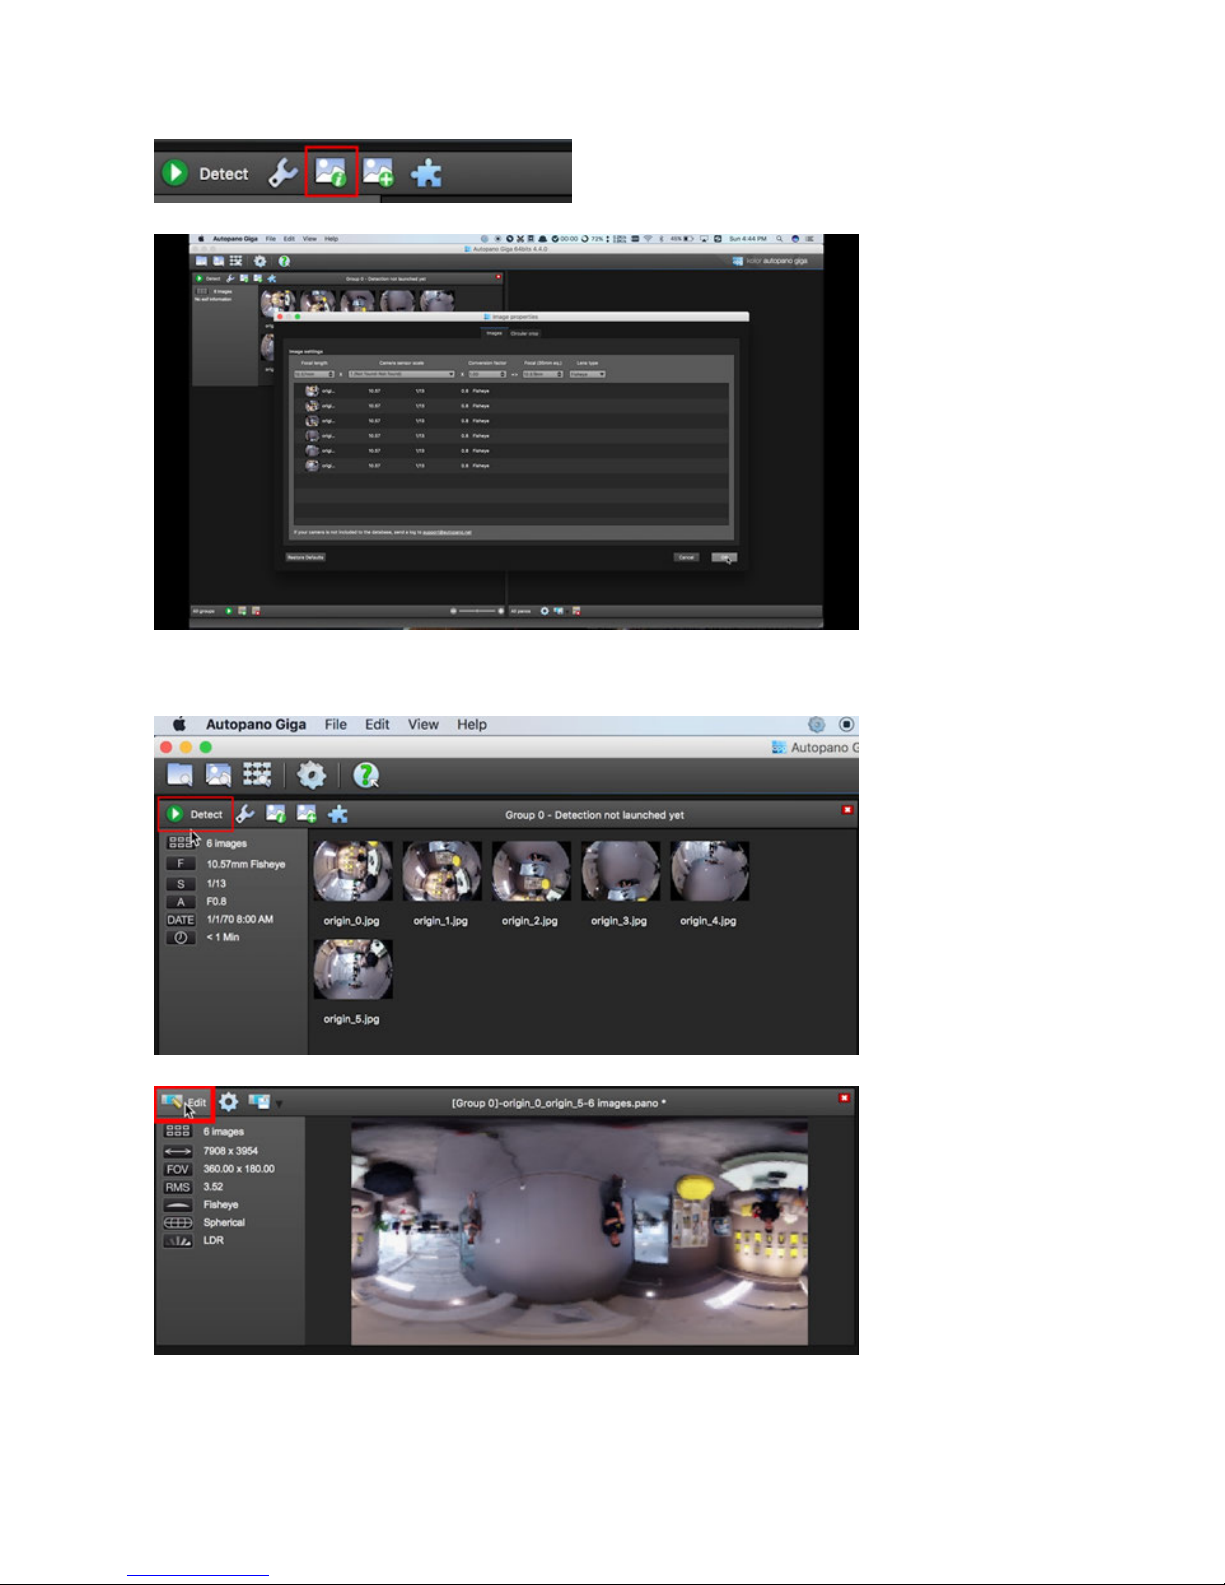
Analyze images, click icons to open "Image settings", modify "Lens type" to be "Fisheye", "Focal" for 10.57mm, click
on "OK" to confirm.
Select "Detect" icon on upper le corner to analyze stitching, select "Edit" aer analysis, enter the editing interface.
Details can be adjusted in editing interface. Refer to Autopano Giga oicial tutorial for detailed methods
Page 86
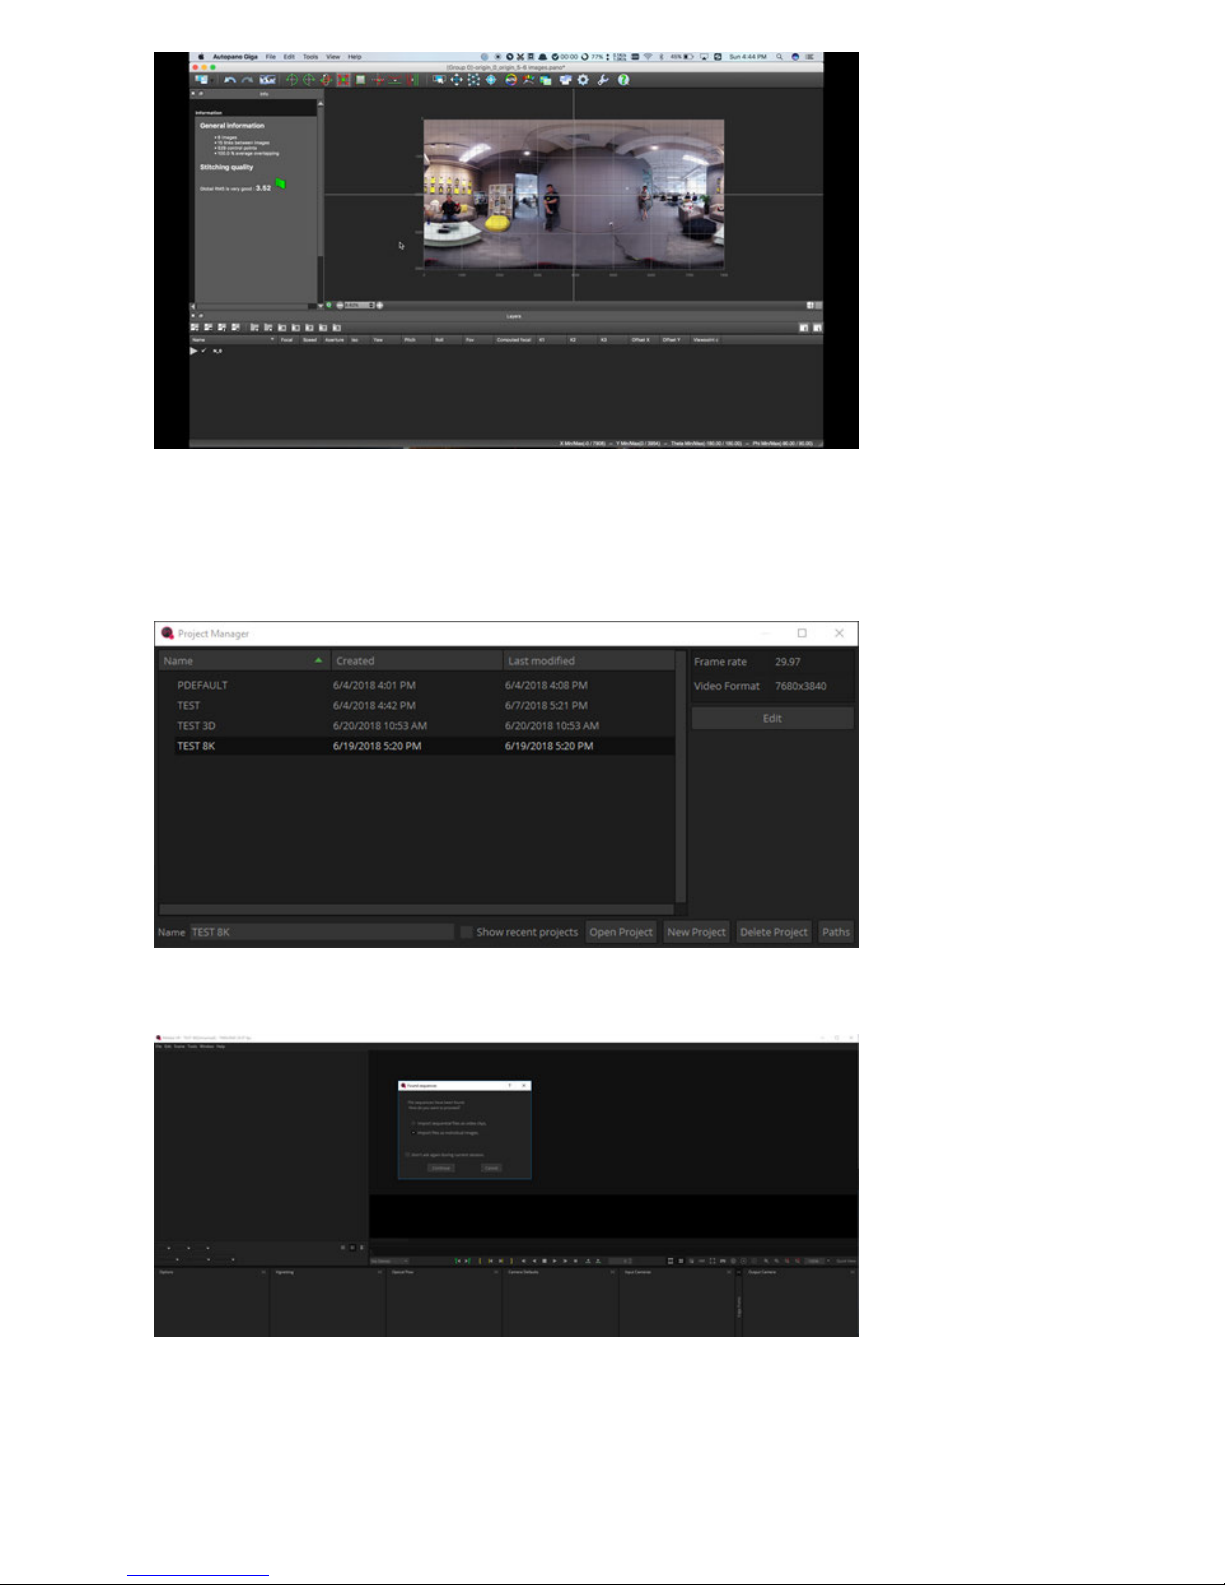
3. Mistika VR stitching panorama
Since the resolution of Mistika VR rendering is consistent with settings in engineering Project, you should set the
required resolution beforehand in Project. Here we chose to build a project of 8K.
Choose original pictures of 6 lens to import, select to import as individual picture
Select Files Per Segment as 6. Select Continue to complete import.
Page 87
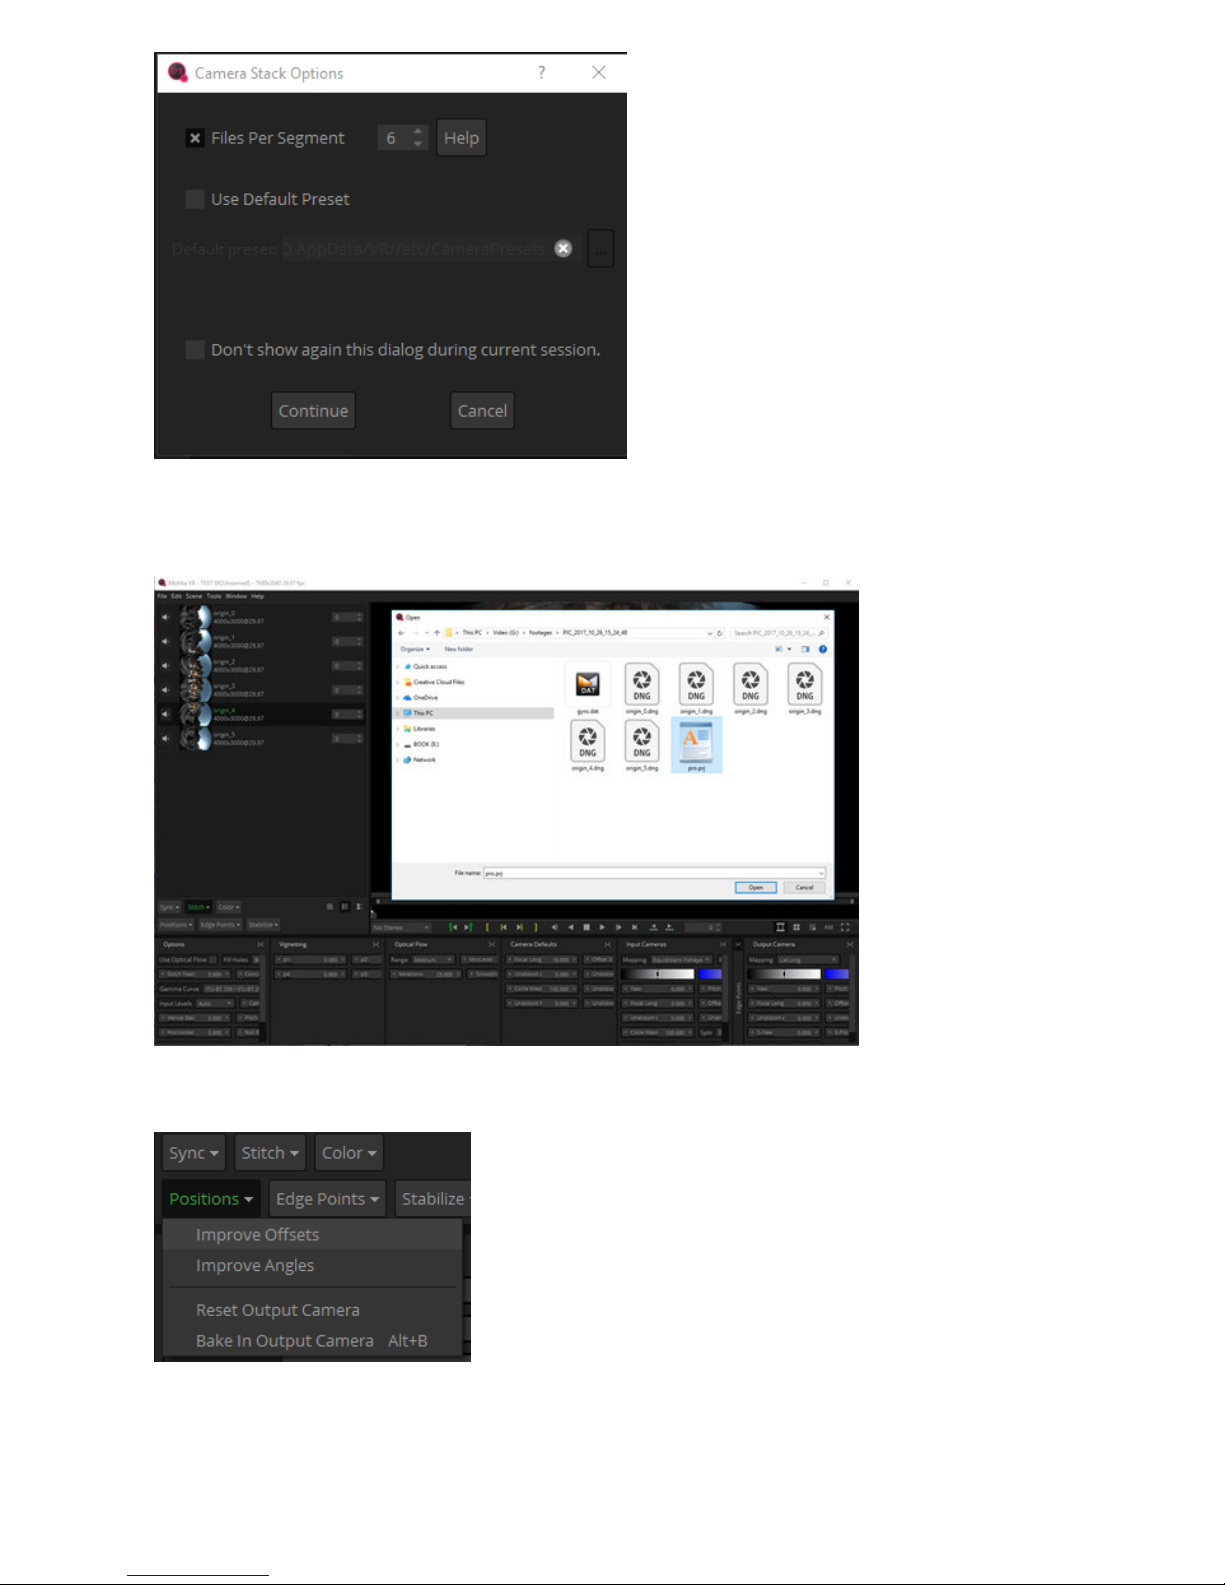
Select "Import Stich" in Stitch drop-down box to find the picture folder, import pro.prj files, refer to Insta360 Pro’s
engineering description file to automatically stitch into a panorama picture.
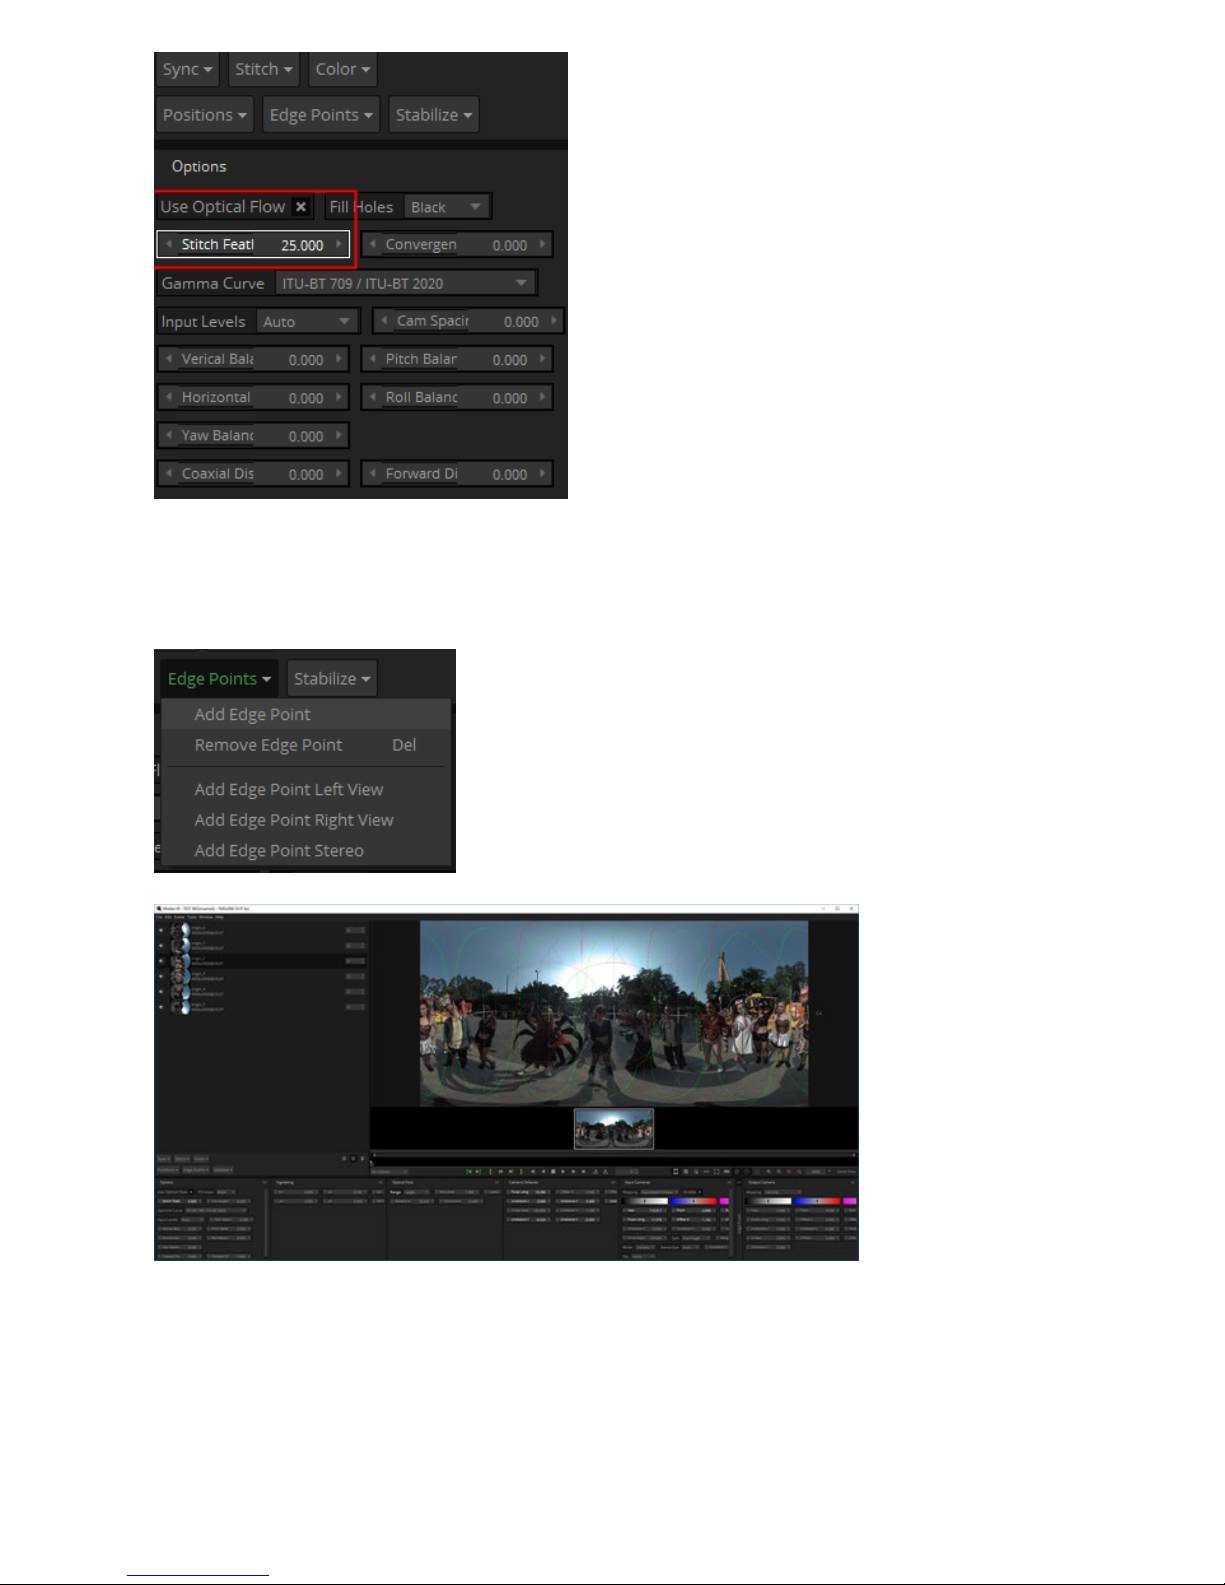
Select improve osets and improve angles in the Position drop-down box to enhance stitching.
Option chooses optical flow stitch, Use Optical Flow, set Stich Feature as appropriate value and the larger the more
overlap parts there will be. The value is generally 8-20.
Page 88
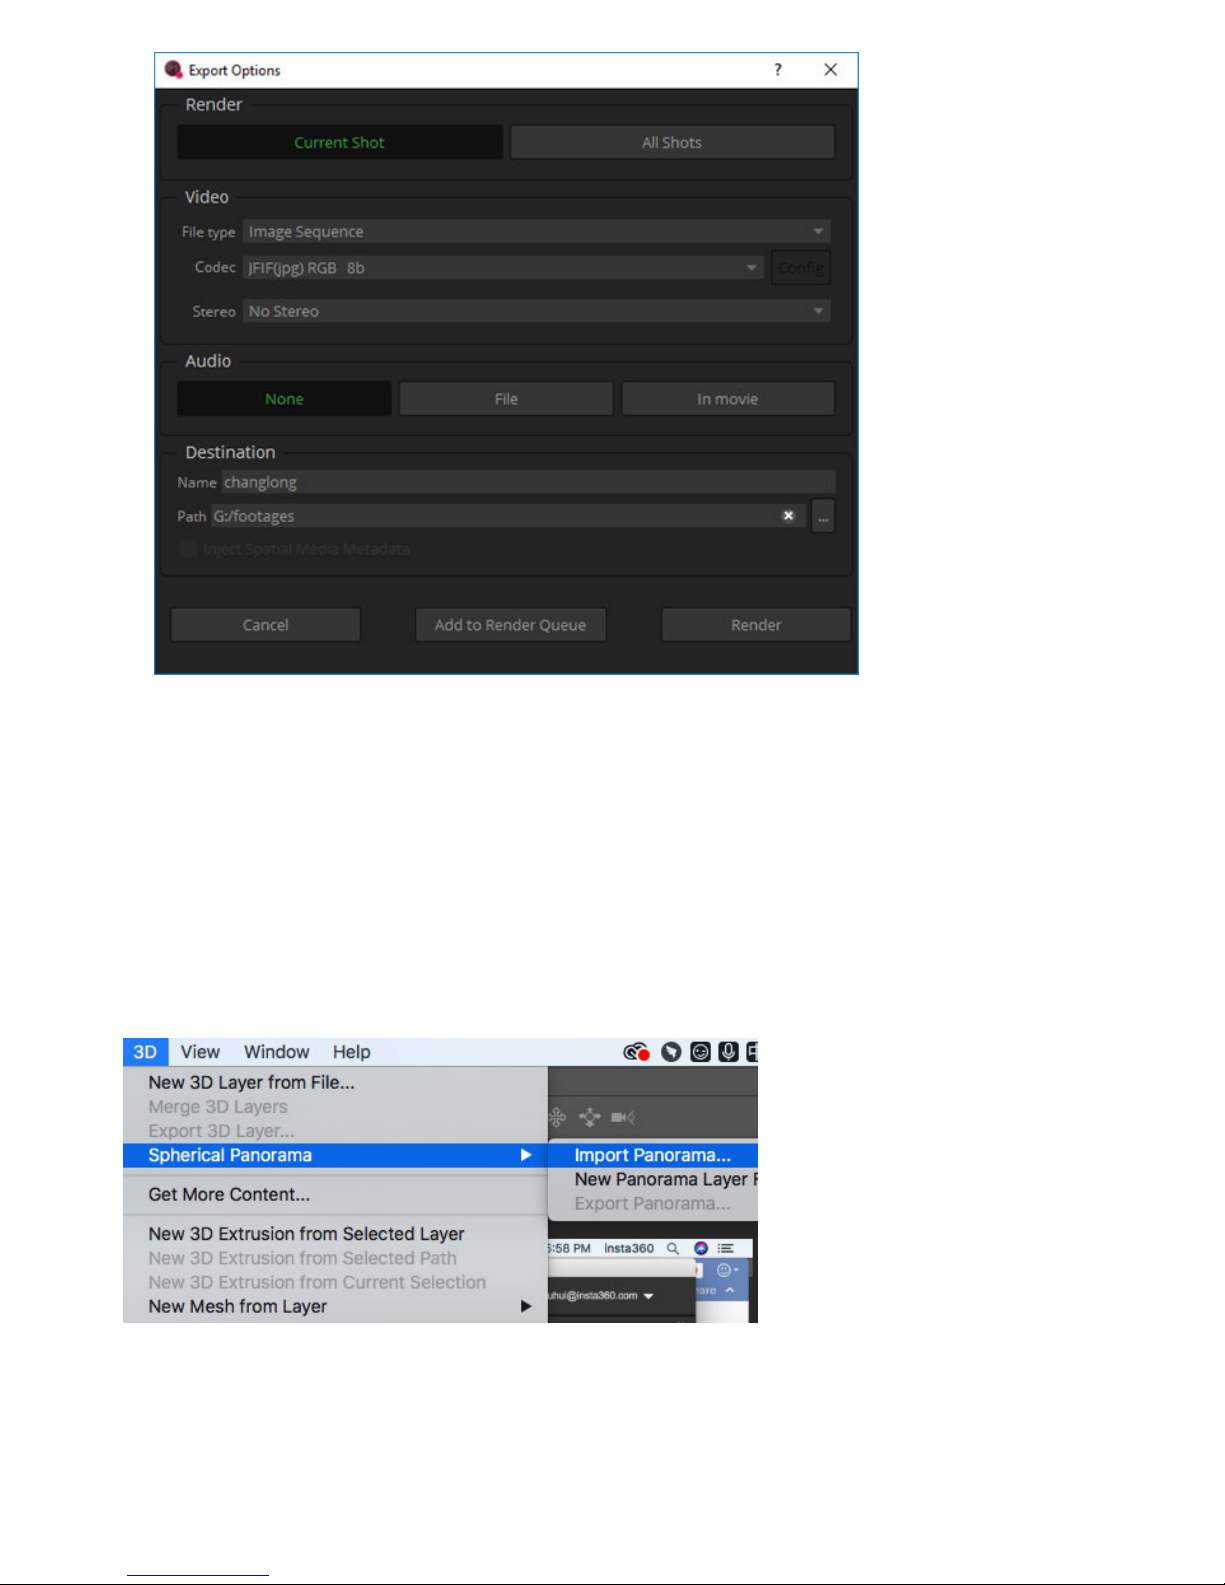
We found that there were characters whose heads were not perfectly stitched so we chose to edit edge points to
avoid header stitching. In this case we add "Edge Point" to camera 5, camera 1 , camera 3, avoiding header stitching
of five characters. Other fine tuning stitching methods refer to Mistika VR oicial tutorials.
Render and export jpg or TIFF files that save the maximum information, continue to modify in other modifications
soware.
Page 89
2.3.4 [Advanced] Color matching and modification of
Photoshop panorama
The latest version of Photoshop cc 2018 has supported panoramic editing. Here is a brief introduction to the basic
workflows. Open Photoshop, select Spherical Panorama from top menu bar, import panorama. Confirm height and width
pixels to be 7680 * 3840.
Page 90
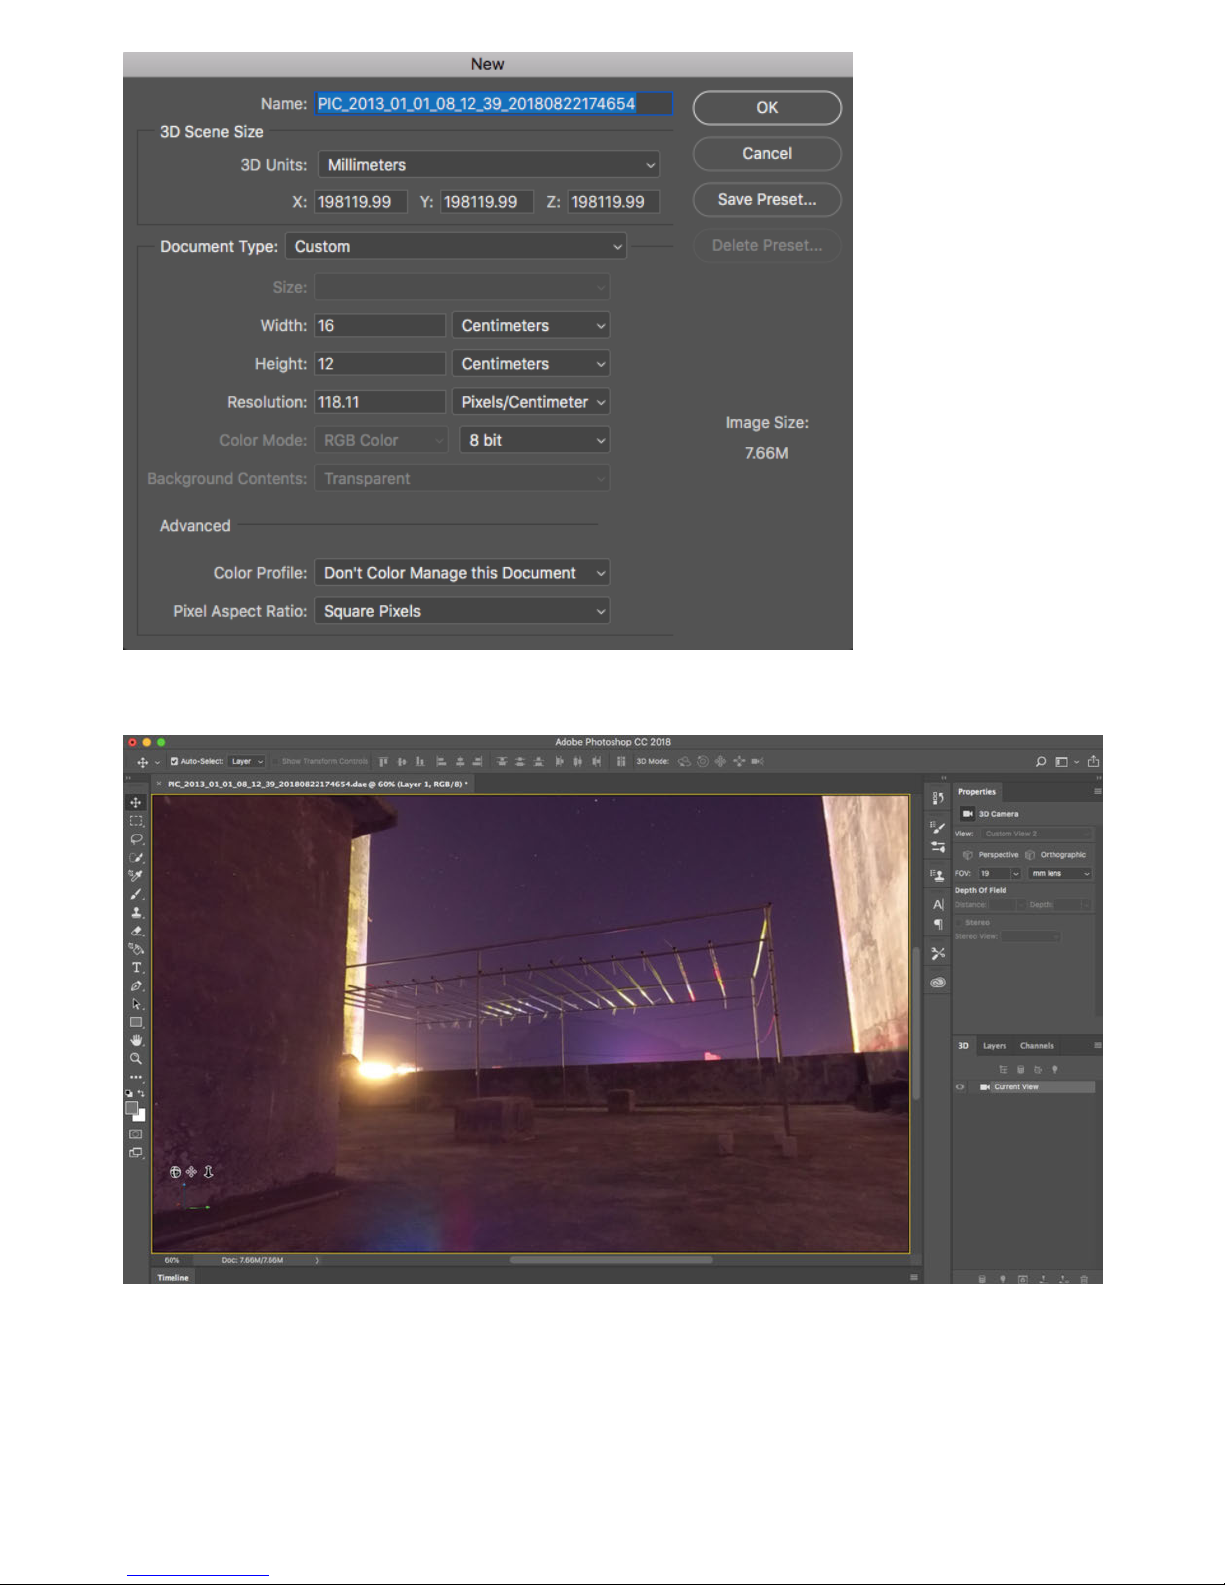
You can drag mouse to view from dierent angles in 3D interface.
The angle value can be modified in the camera property of 3D and change field angle size. 8 millimeters is the view angle
of panoramic view on Facebook by default. So we can easily modify picture details at a specific point of view.
Page 91
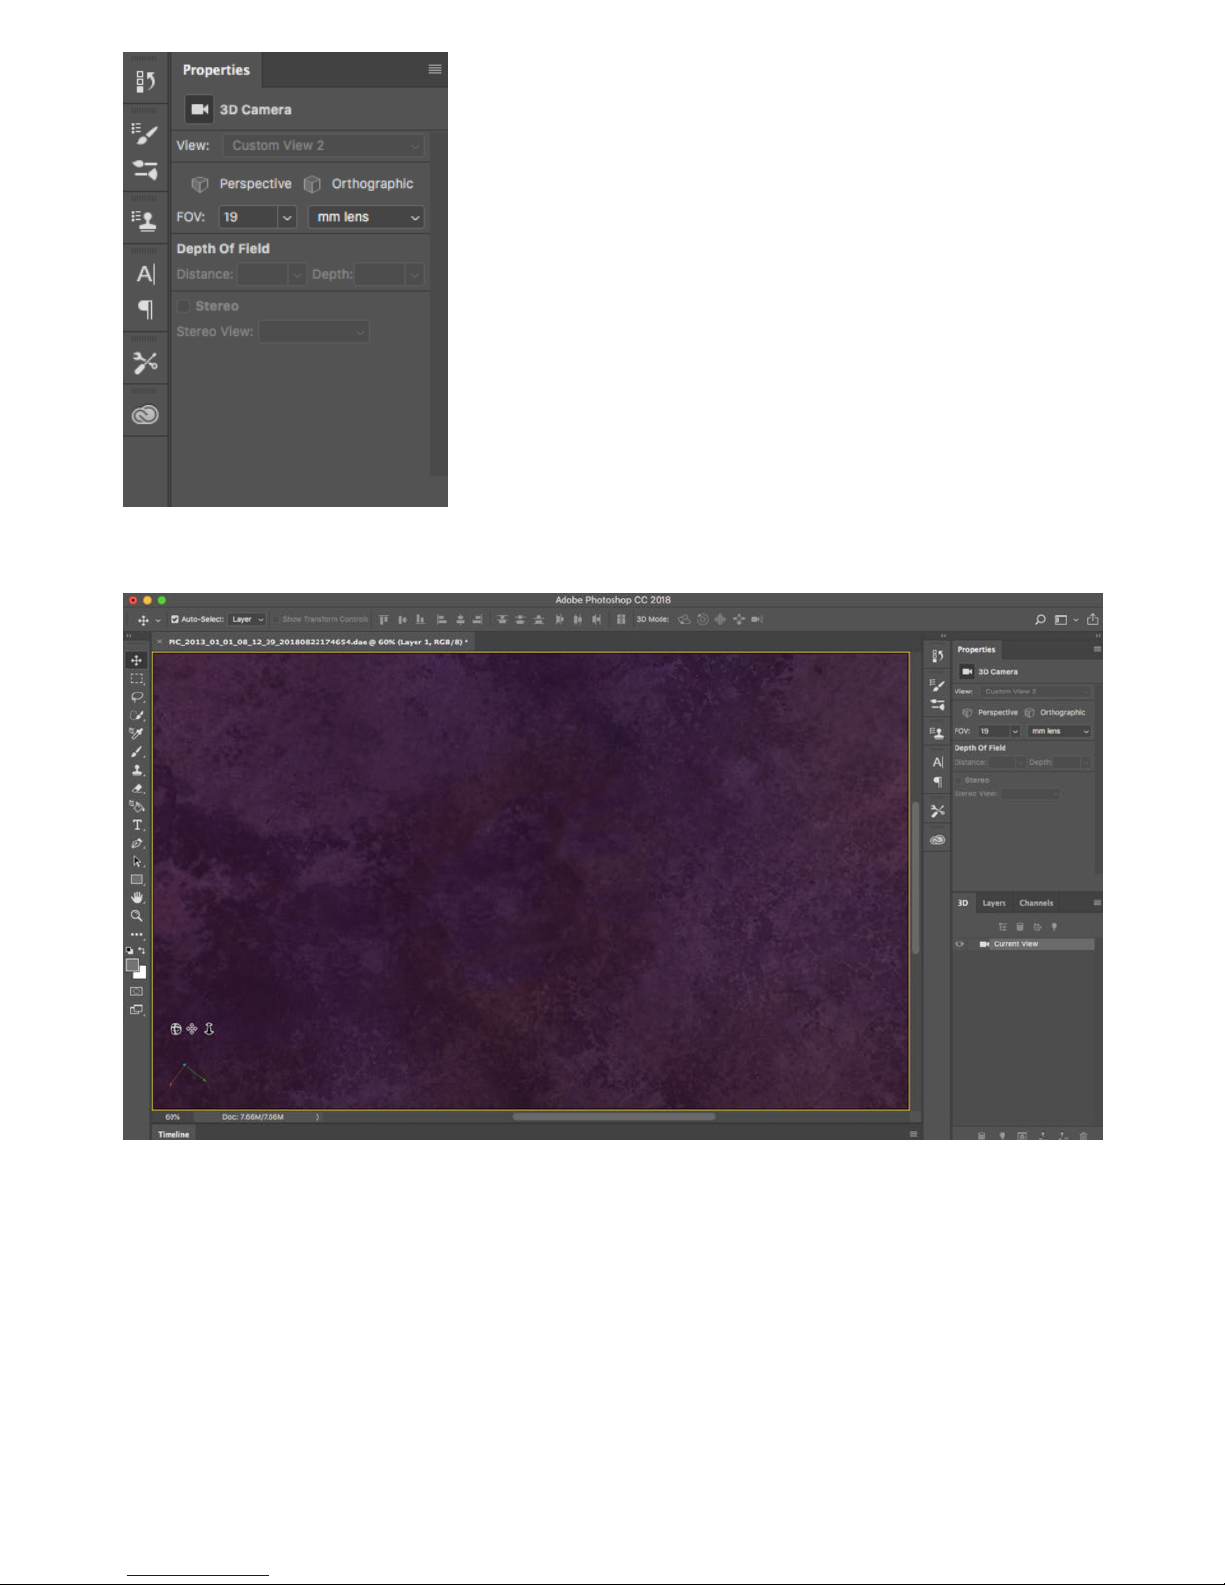
Adjust view to bottom, use imitation seal, patch, stain wipe tools, to remove tripod at the bottom.
Because filters can only apply to visible parts, if you want to modify the overall color, you can use "adjust" in the camera
workspace, to directly modify picture’s overall exposure, color etc.
Page 92
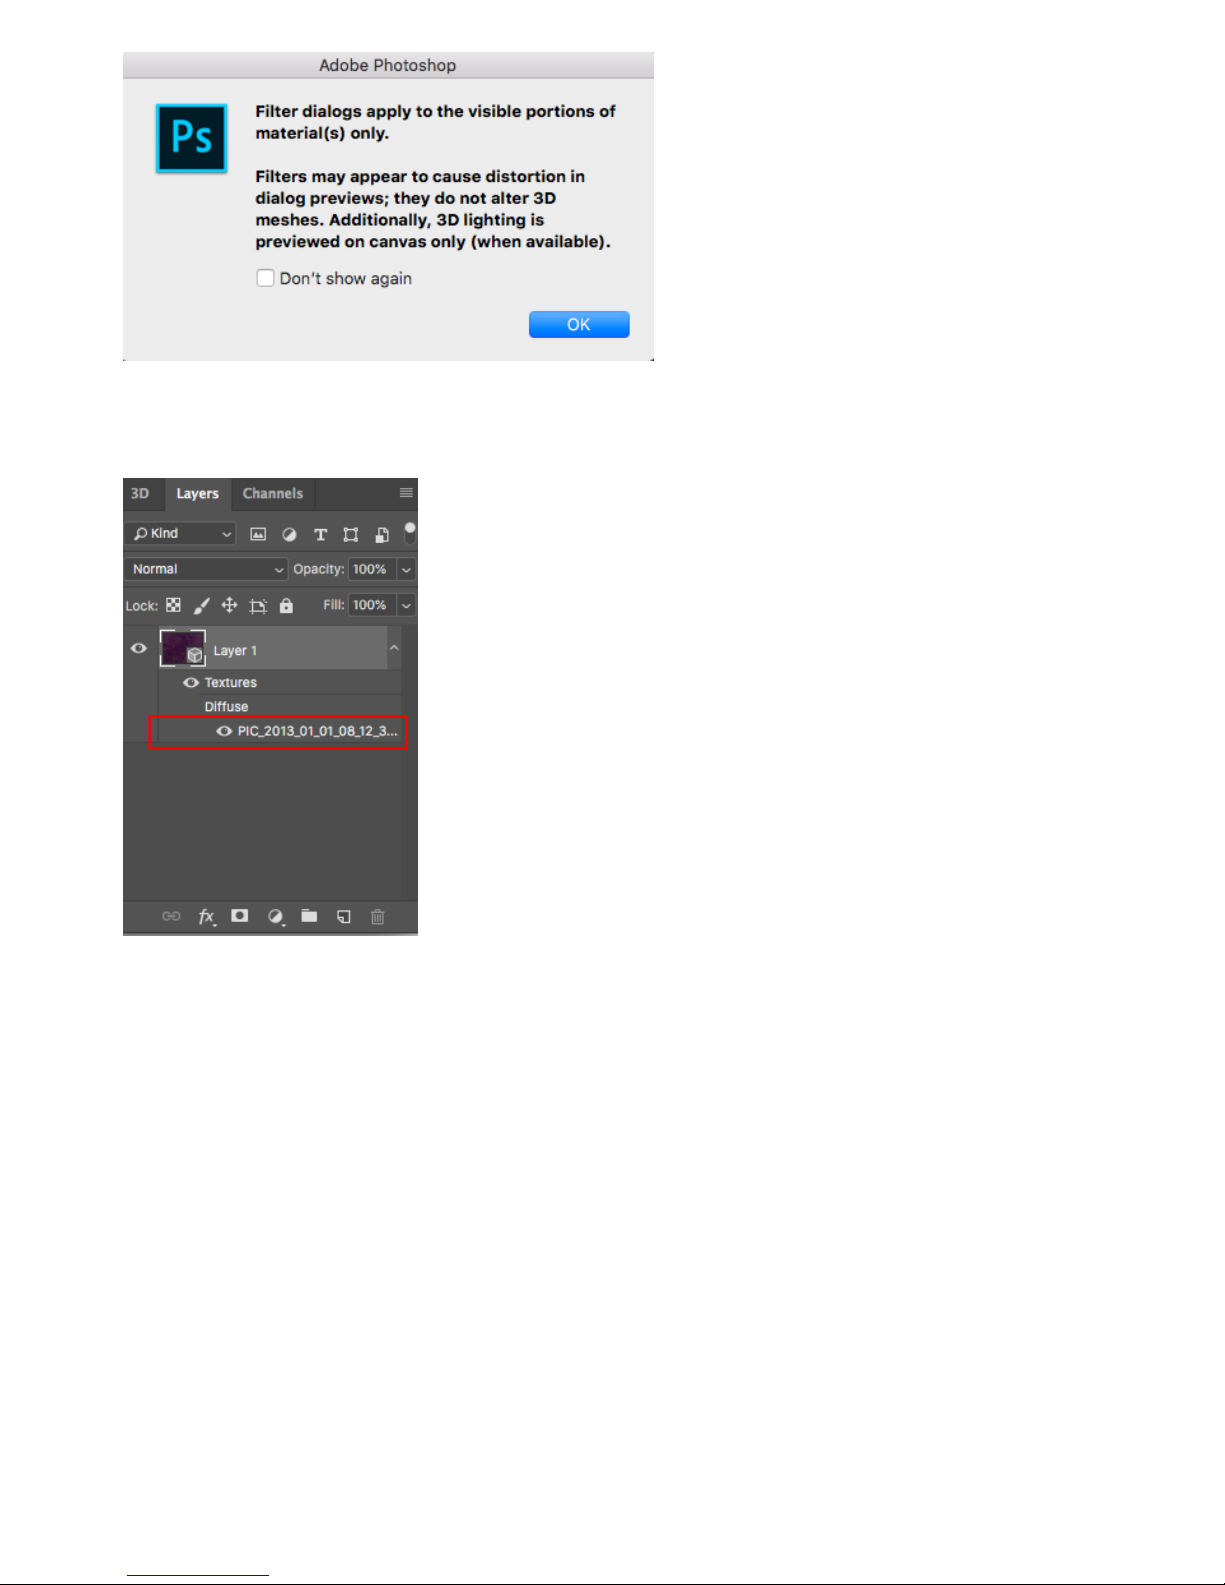
Another way is to double click on filename, to open smart layer, convert polar coordinates into spherical shape, and then
use Camera RAW to mix color to avoid producing transition seams.
Page 93
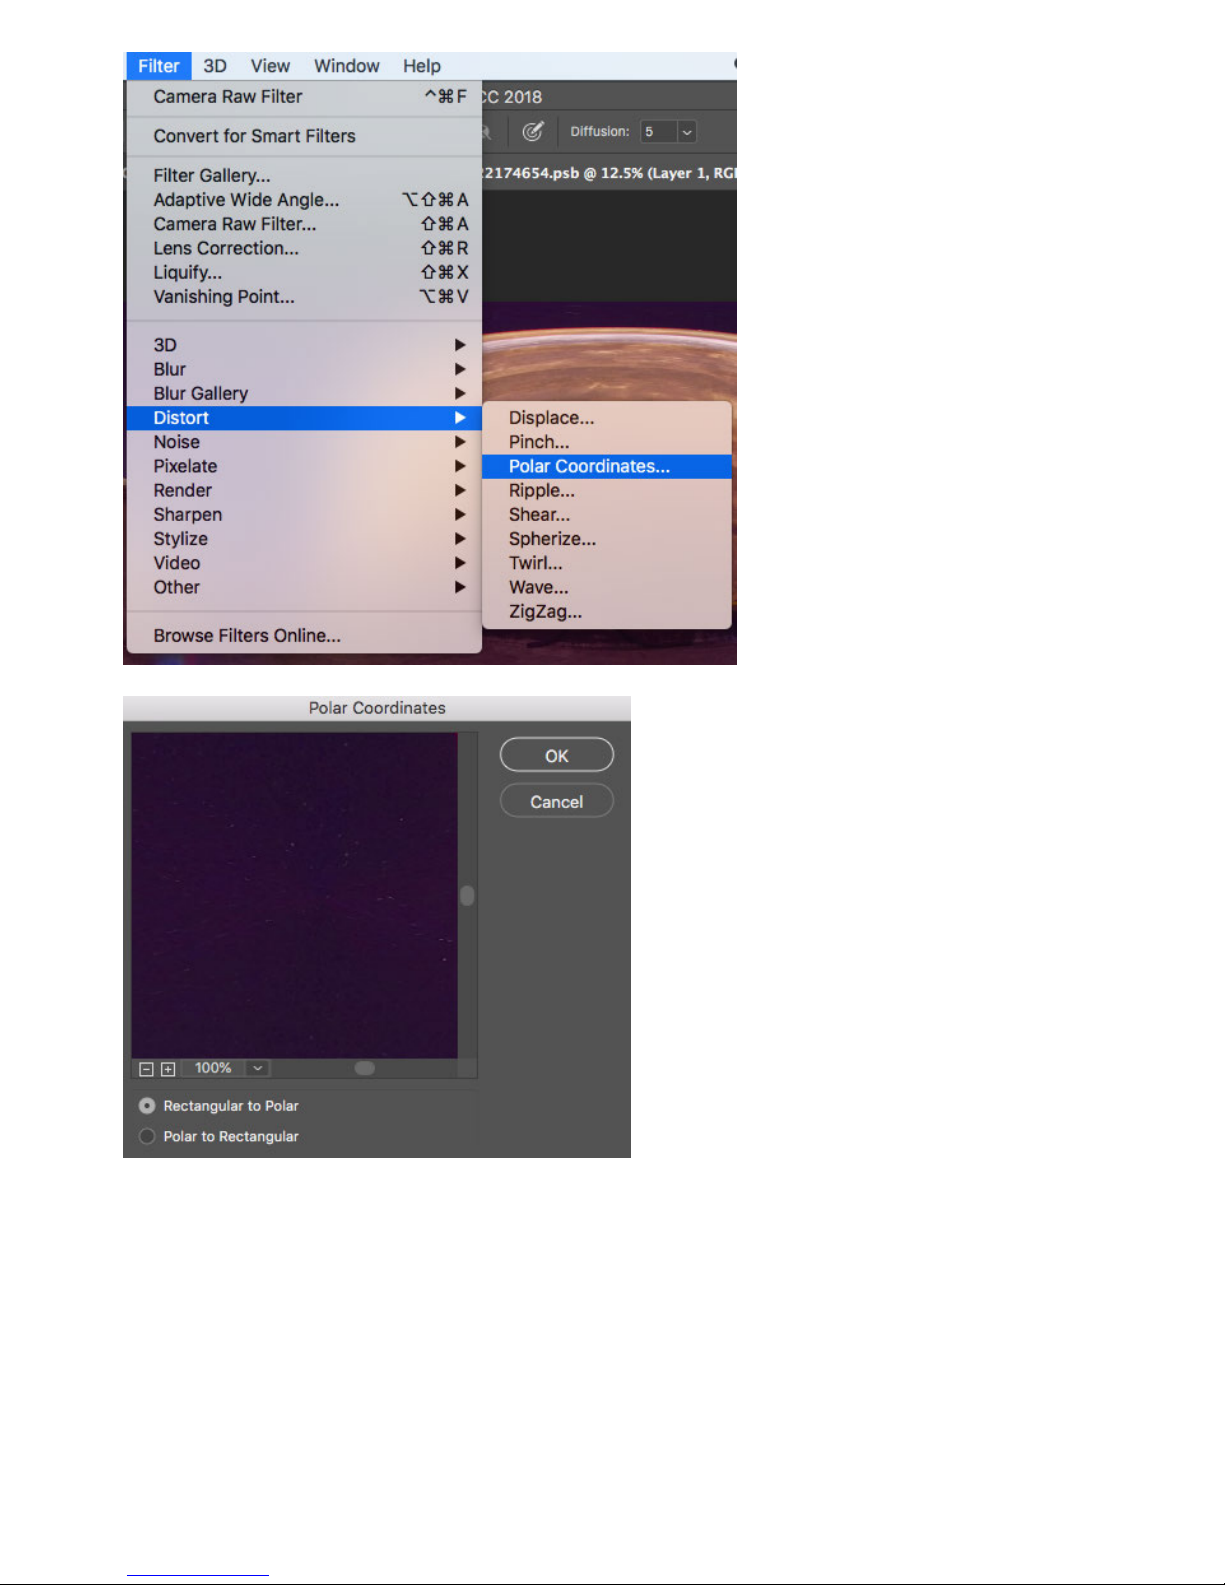
Open camera raw filter for color grading
Page 94
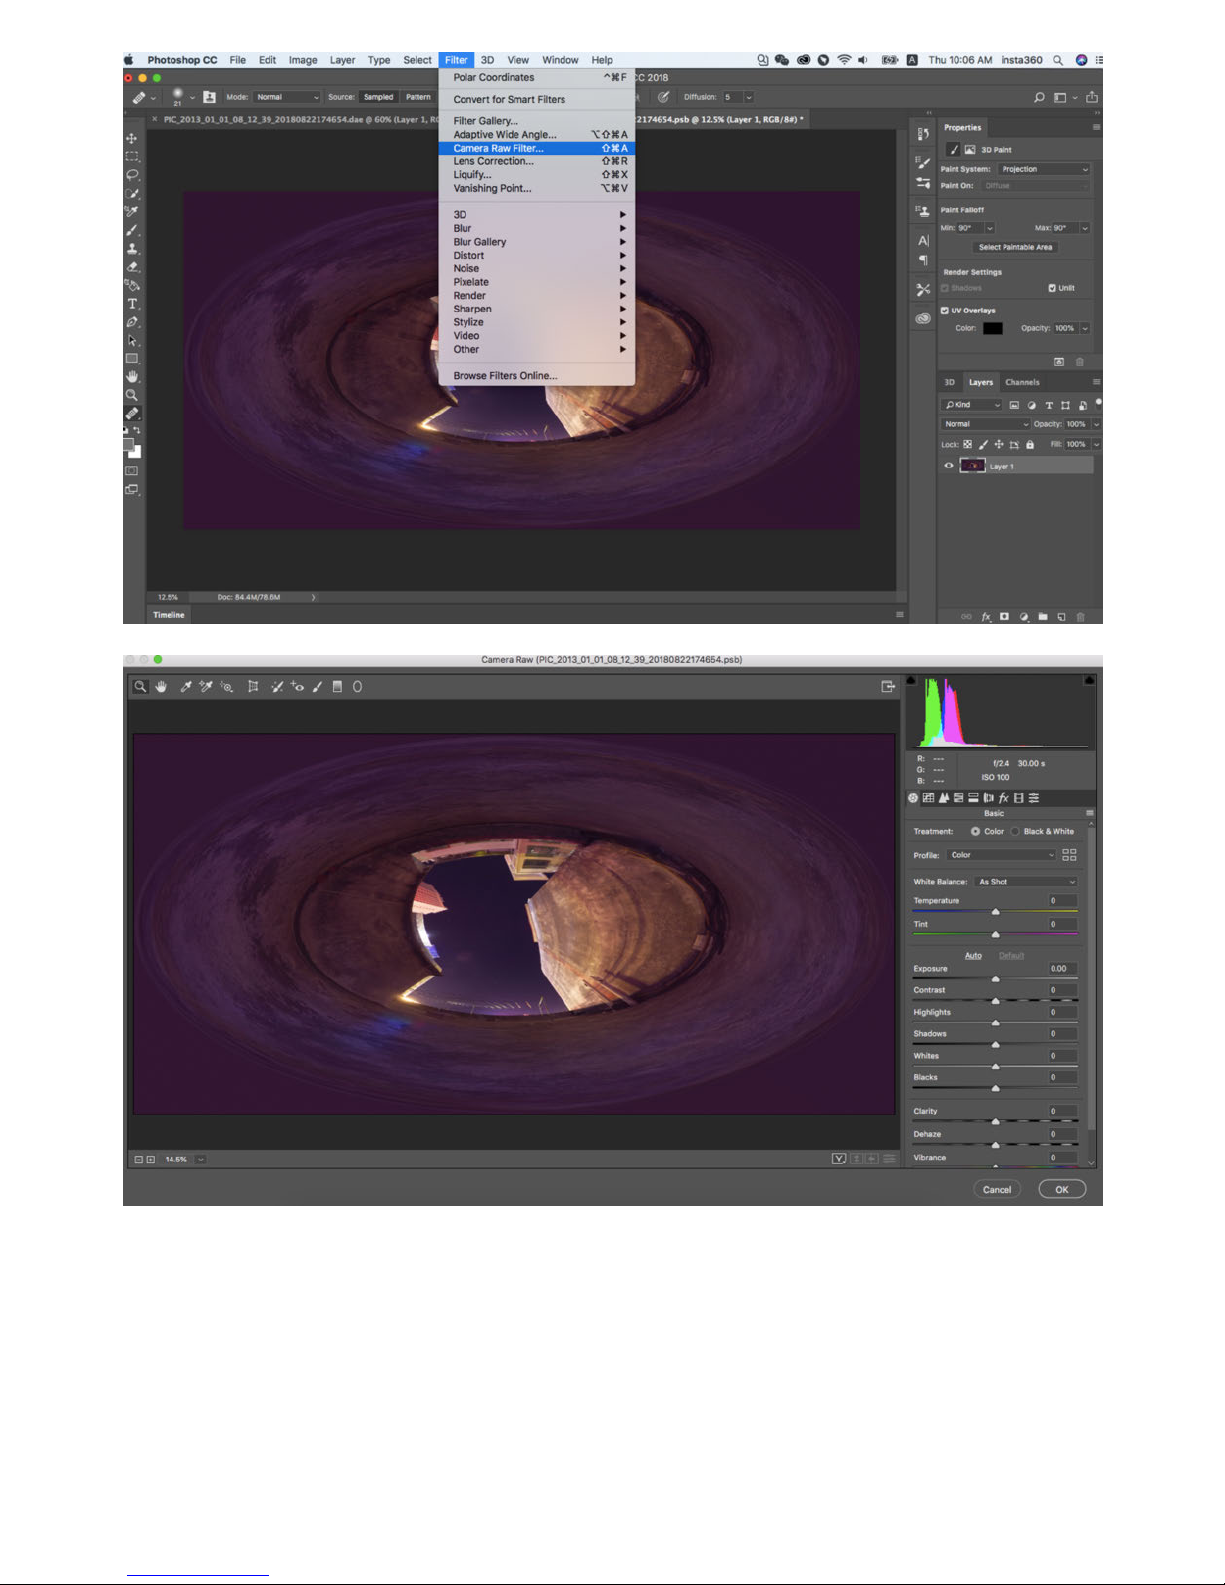
Once again, we apply polar coordinate eect to return to the rectangular of 2:1.
Page 95
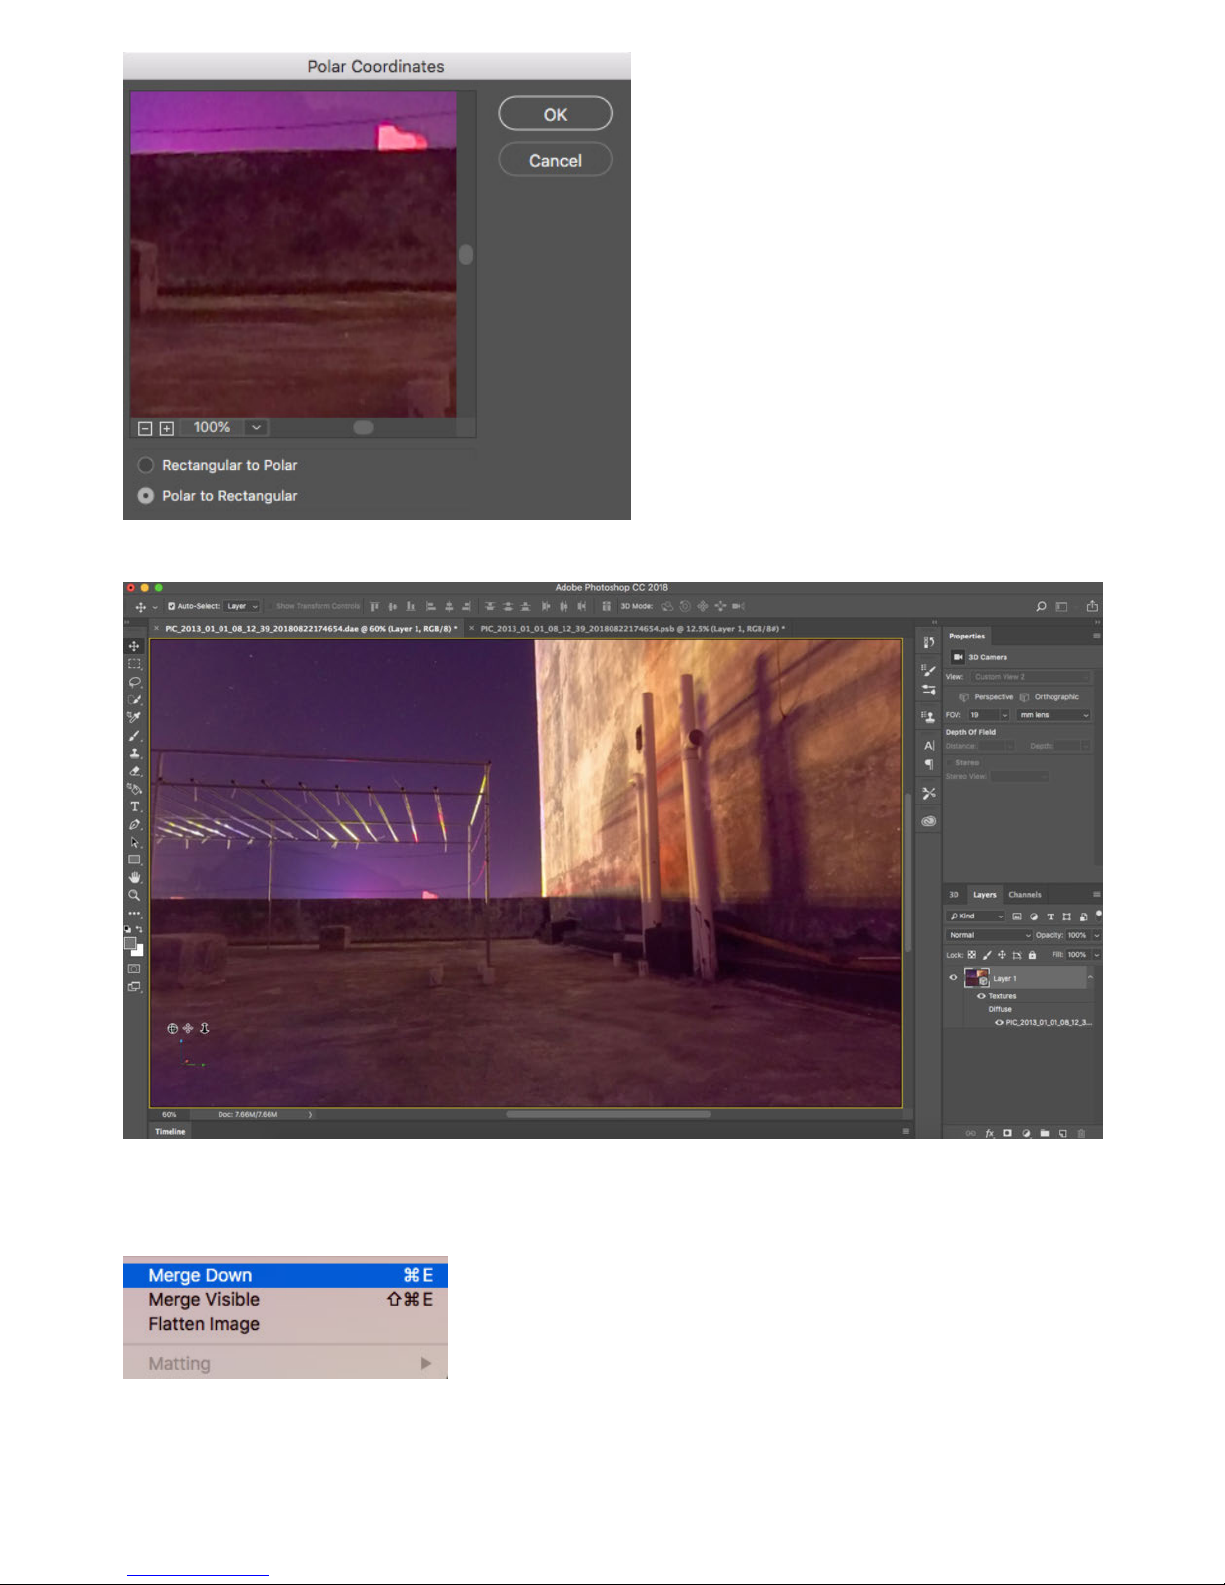
Back to the workspace of spherical panoramic images, we see that images have shown perfect color correction results.
You can also automatically adapt text into 360 sphere automatically by adding text into image, adding new text layer,
applying "merge down".
Page 96
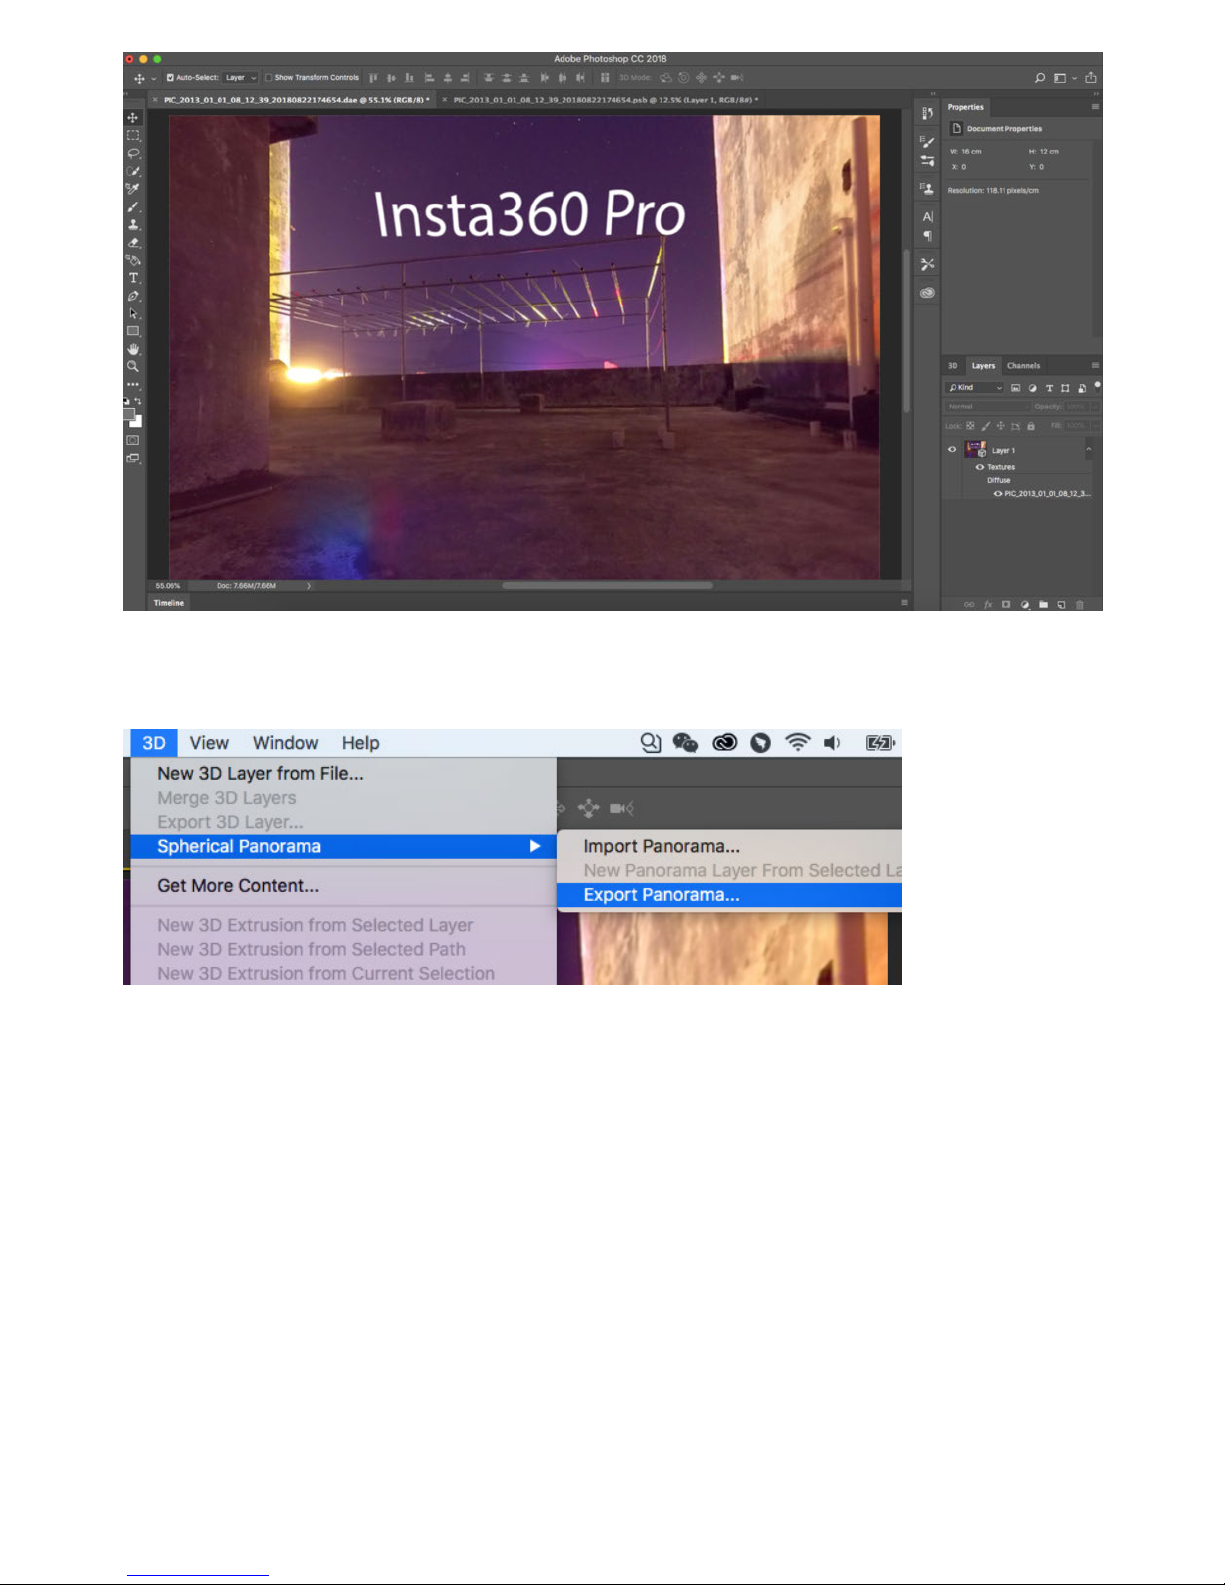
When exporting, using "export panorama" from the 3D menu to correctly save into panoramic image, which has been
written into panoramic Metadata and can be uploaded directly to those platforms supporting panorama.
2.4.1 [Beginner] Fast acquisition of real-time stitching
images and sent to SNS
Insta360 Pro 2 can choose real-time stitching while shooting, to stitch into panorama picture of 360 degrees. Through app
or Insta360 Pro desktop control terminal, you can download stitched panorama, quickly upload to Facebook, Weibo
platform, etc. Please note that to upload a panoramic picture of 2:1, the metadata information of panorama must be
written into file.
Insta360 panorama community, Insta360 consumer-grade products, including Insta360 ONE, Insta360 Nano, Insta360 Air
mobile client, all of which support uploading panoramic images from mobile photo albums. Take Insta360 ONE app as an
example, aer download panoramic images via Insta360 Pro app to mobile photo album, open Insta360 ONE app to
select iPhone albums, select panoramic images saved in mobile albums to share panoramic images into the community.
Page 97
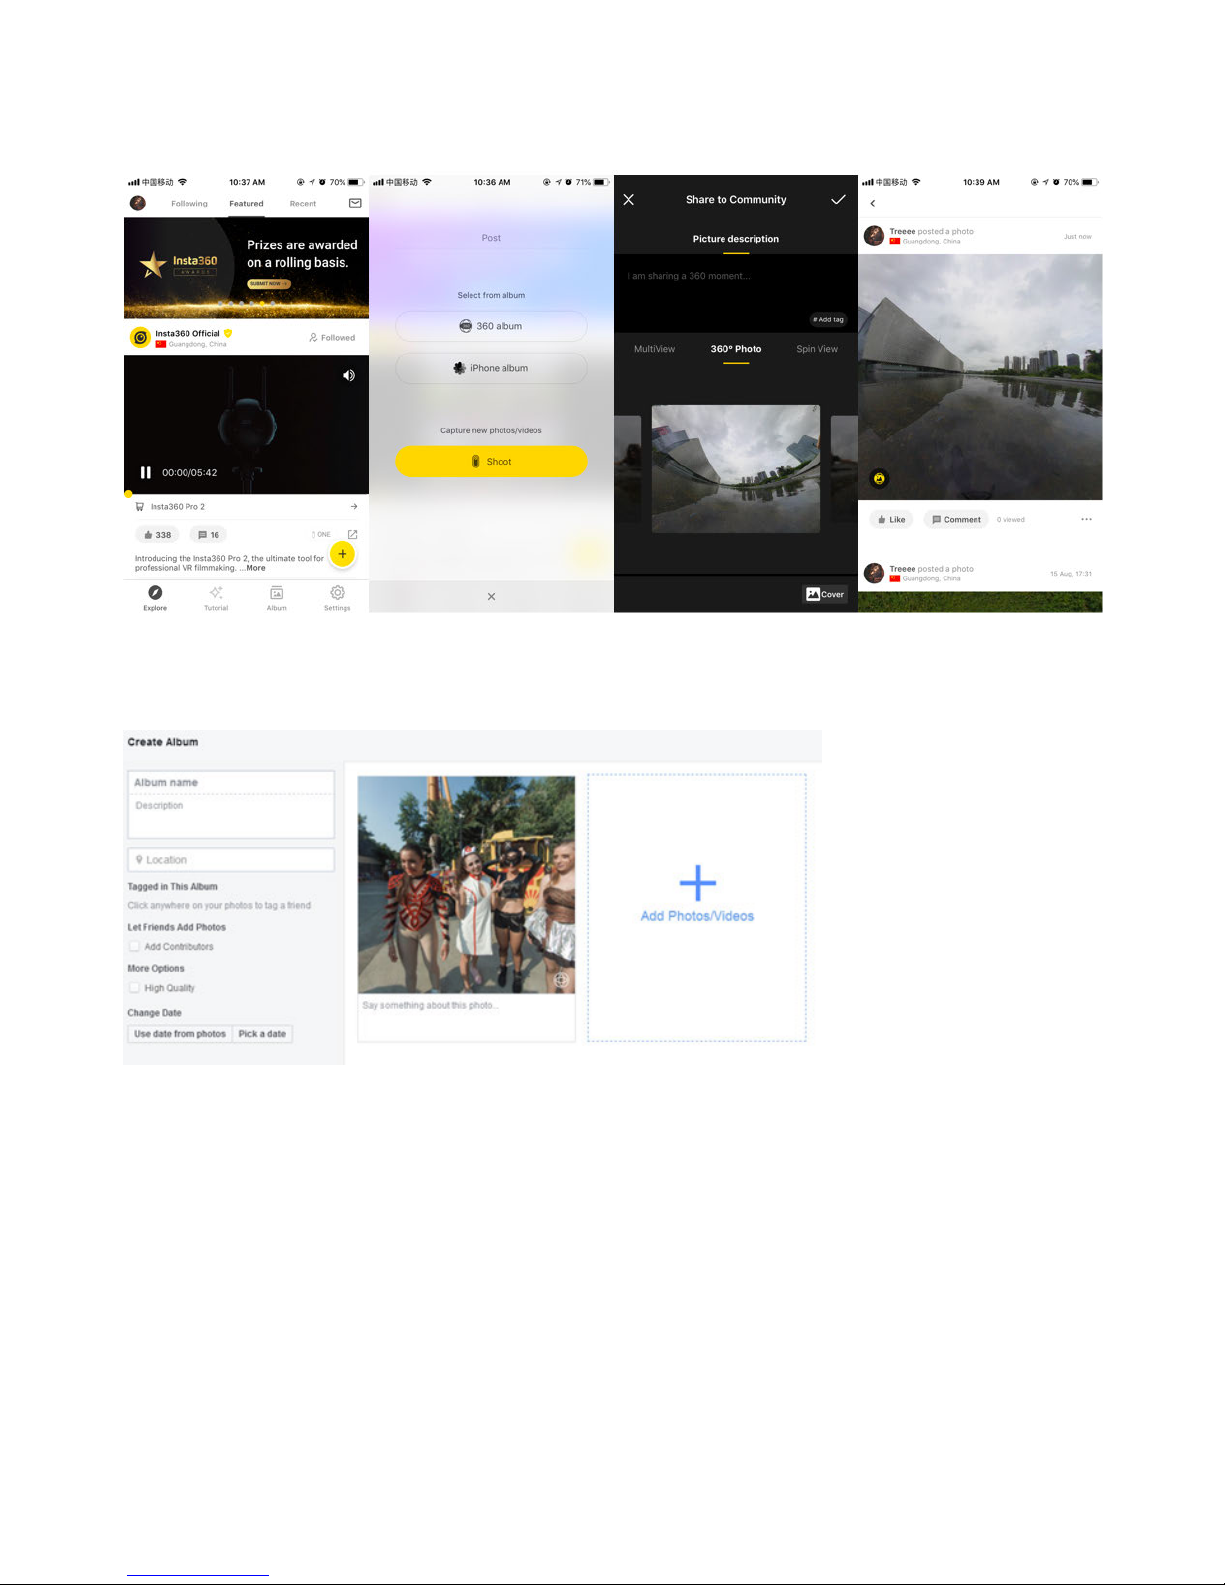
Normal photos and 8K 2D panoramic photos captured by Pro 2 can be shared to the community via Insta360 apps like
ONE. However, 3D photos and videos are not supported in the community currently. Please note that the files shared to
the community should be 2D contents.
Facebook can add images directly like ordinary images on computer ends. When images are identified as 360 photo,
panoramic icon will appear at lower right corner of preview.
Mouse over the panorama icon, click "Select Starting View" to modify the first view point of your picture.
Page 98
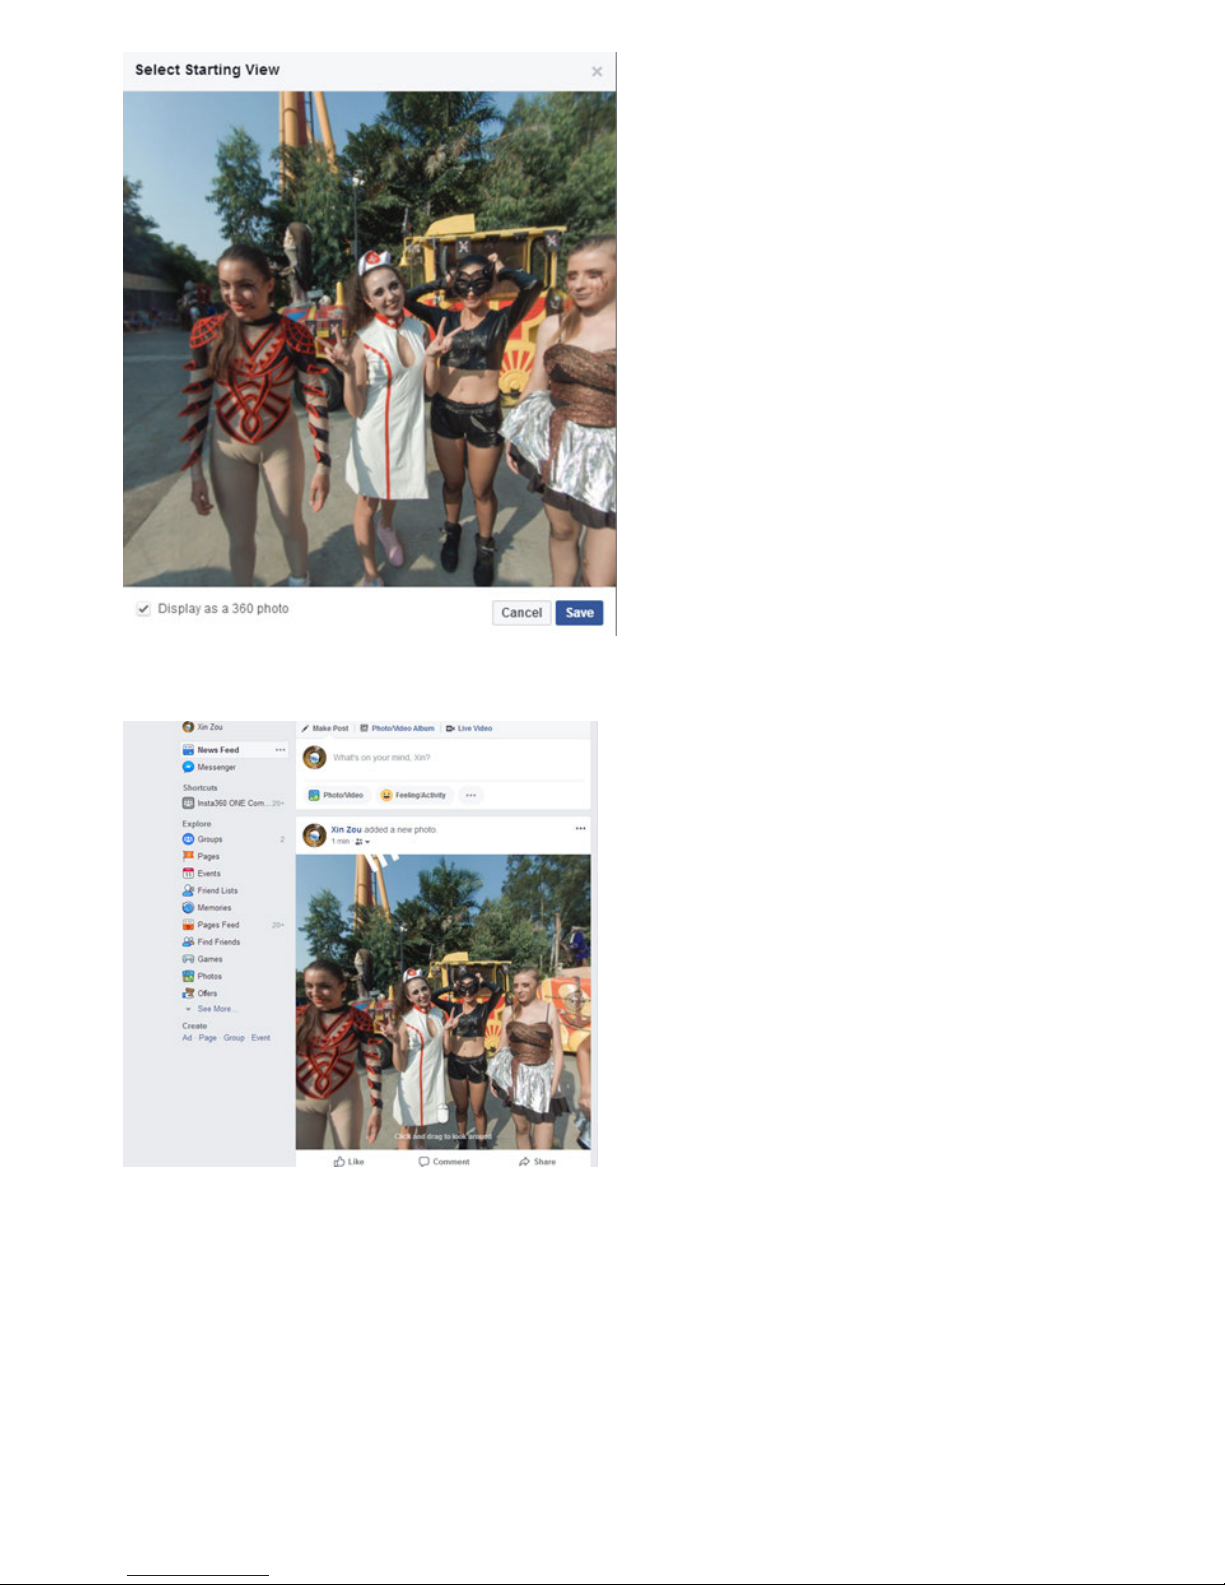
Next, directly release, and you can see panoramic images on timeline.
Weibo doesn't support uploading panoramic images from PC end, but the app for Insta360 panoramic camera supports
uploading panoramic images to Weibo. Take Insta360 Nano app as an example.
Press import button at the upper right corner of photo album, select the panoramic picture in mobile photo album to
introduce panoramic pictures into app album. Click to enter picture, and then click upper right corner to share, in this
way you can choose pictures to share on Weibo. Aer sharing, you can see the uploaded panorama in Weibo time line.
Please note that Weibo clients must be installed in advance on mobile phones and bind community accounts before
sharing pictures.
Page 99
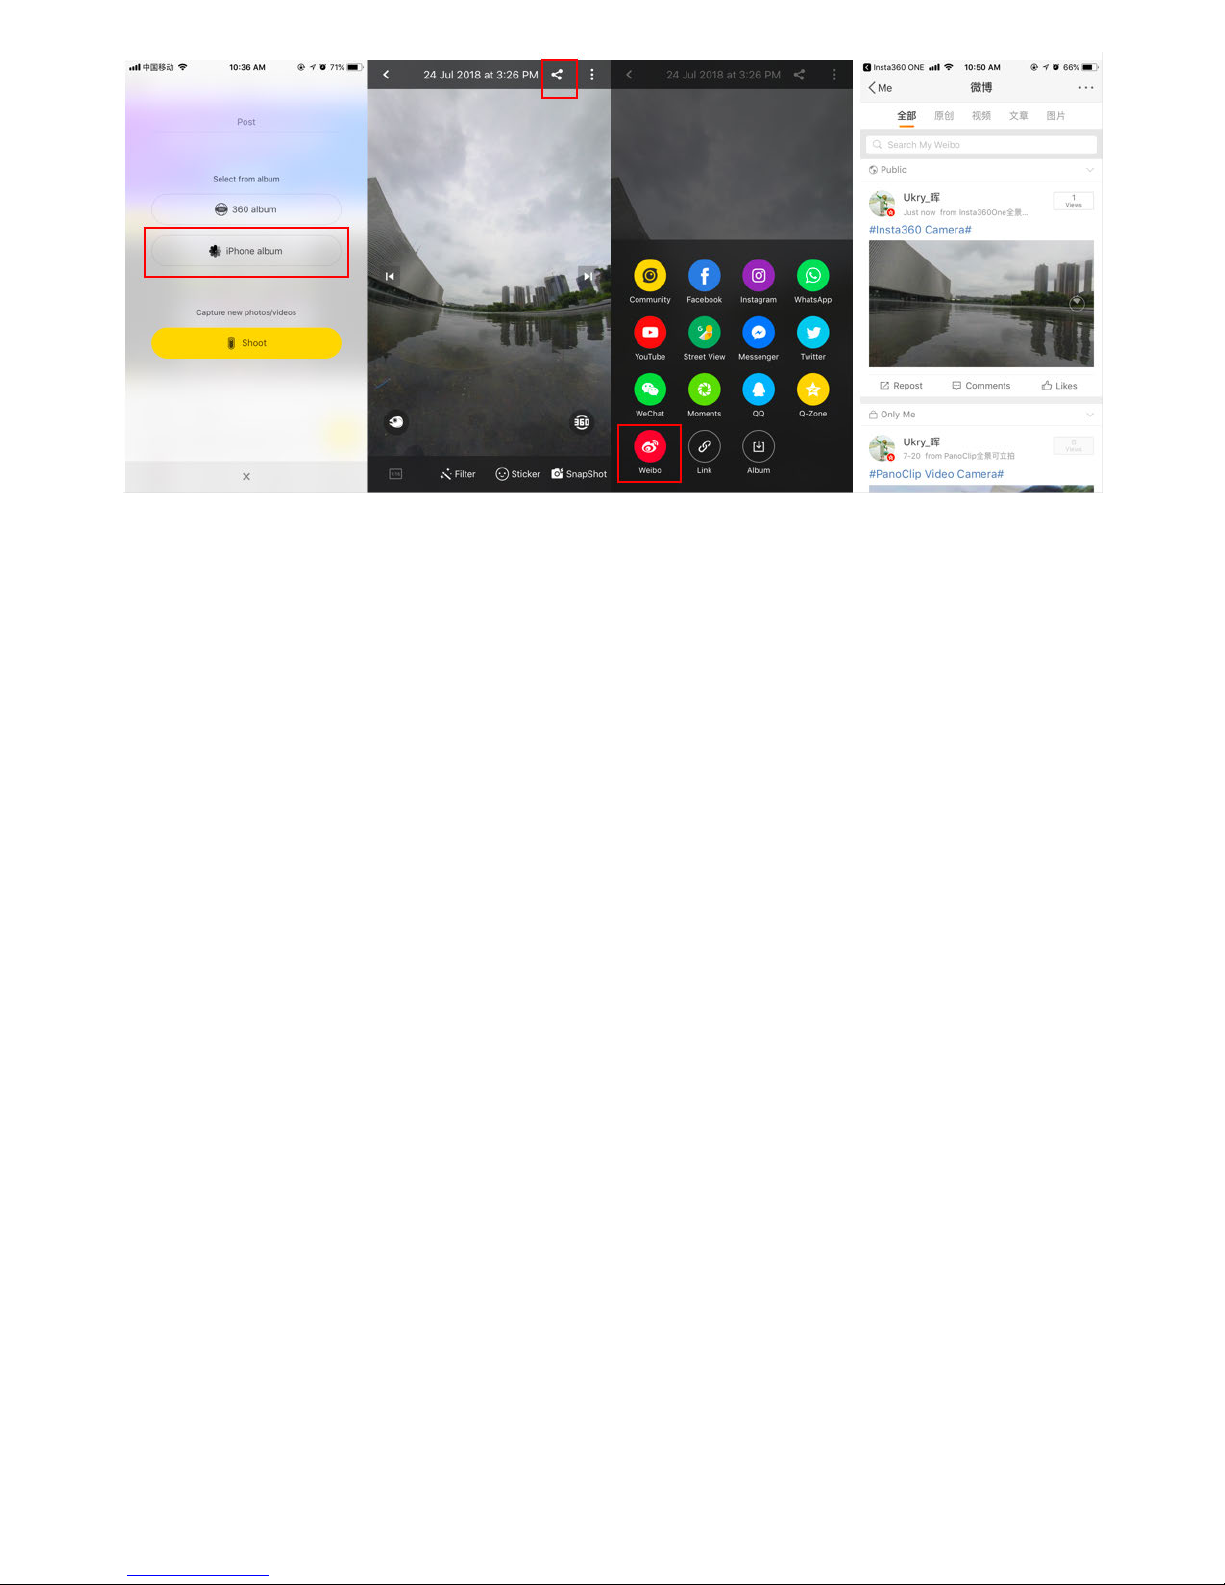
2.4.2 [Beginner] Insta360 Player
Insta360 Player supports to play the content of Insta360 panoramic camera and supports the play of standard panoramic
videos and images with the ratio of 2:1, supporting various platforms.
Take Windows v2.3.6 as an example. The desktop version of Insta360 Player supports photos and videos in insp, insv,
mp4, jpg formats. Currently, videos only support those of 2:1 and general panorama videos below 4K.
Page 100
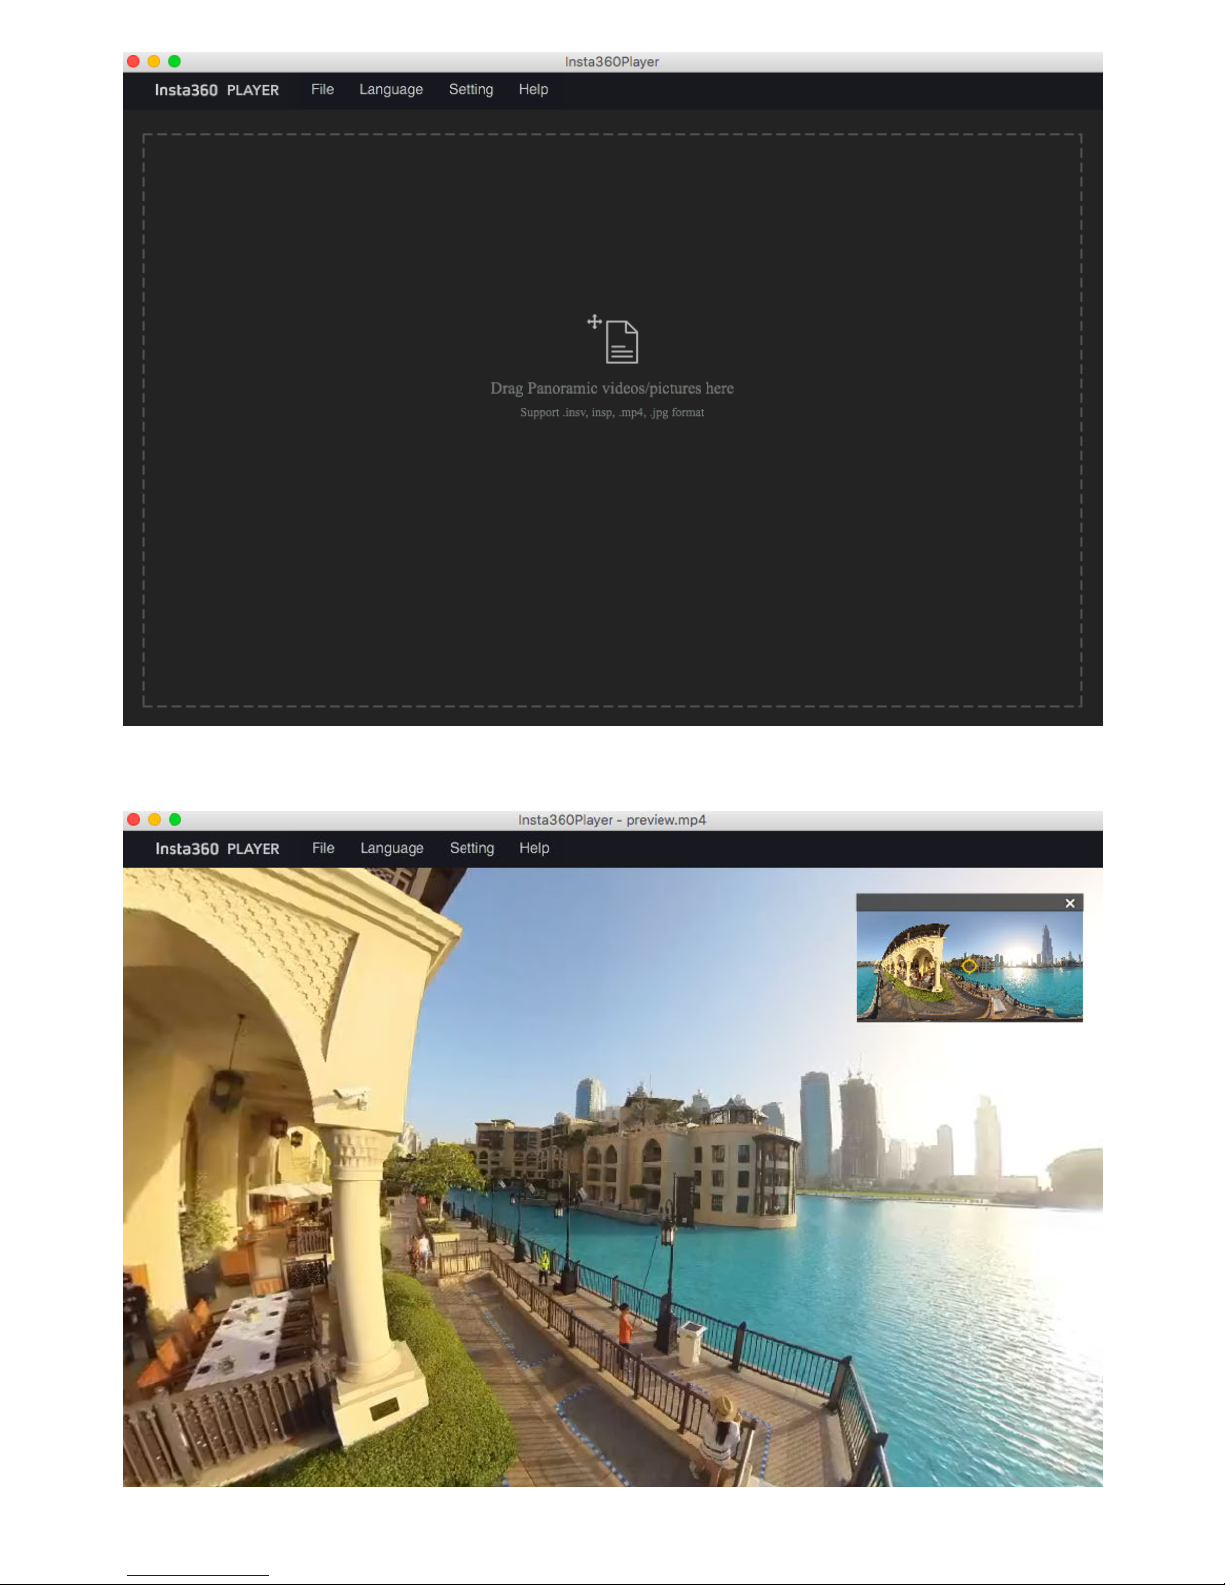
Import a panorama, you can drag mouse to view panoramic view. Preview small window is at the upper right corner.
 Loading...