

Inspired Instruments You Rock Guitar, You Rock Guitar YRG 1000 Gen. 2 User Manual

USER MANUAL
<Gen2>
INSPIRED INSTRUMENTS INC.
4590 ISH DR. SUITE 130, SIMI VALLEY CALIFORNIA, 93063
(805) 426-5000
INFO@YOUROCKGUITAR.COM

2 USER MANUAL INSPIRED INSTRUMENTS INC. 3
Thank you for purchasing a You Rock Guitar.
This product represents years of technological development, hard work, and inspiration. The first YRG
was, in fact, made nearly seven years ago in my garage for myself. With the help of my friends and my
family I was able to bring this product to market. I
hope you can find as many uses for your MIDI guitar
as I do.
Please enjoy,
Cliff Elion
Founder & President
NEED HELP? – CONTACT OUR CUSTOMER SUPPORT!
• OPEN A HELP TICKET AT HTTP://WWW.YRGNET.COM/SUPPORT/
• EMAIL TECH SUPPORT: SUPPORT@YOUROCKGUITAR.COM
• OR GIVE US A CALL AT +1-805-426-5000 (OPTION 2) FOR CUSTOMER
SUPPORT, 9:00AM - 5:00PM (PACIFIC), MONDAY THROUGH FRIDAY.
<Gen 2>

4 USER MANUAL INSPIRED INSTRUMENTS INC. 5
• INSTALLING A HEADSTOCK
• REMOVING THE NECK
• ATTACHING THE NECK
SETUP
POWER
THE BASICS
• INTERNAL SOUNDS
• GUITAR AND SYNTH LAYERS
• HOW THE DISPLAY WORKS
• START PLAYING
CUSTOMIZING PLAY
• BUTTON NAVIGATION
• FRET SELECT
• NAVIGATION
• ADJUSTING THE GUITAR LAYER
• SAVING PRESETS
• SELECTING PRESETS
• OPEN TUNINGS
• SELECTING BACKING TRACKS
• ADJUSTING THE SYNTH LAYER
• ADJUSTING STRING TENSION
• RESETTING PRESETS AND SETTINGS
ADVANCED FEATURES
• ACCESSING SUBMENUS
• SUBMENU 1: TRANSPOSE
• SUBMENU 2: USER TUNINGS
11
12
13
14
18
WHATS IN THE BOX
• +/- BUTTONS
• JOYSTICK
• VOLUME KNOB
GUITAR CONTROLS
I/O CONNECTIONS
OPTIONAL HARDWARE AND SOFTWARE
7
7
8
8
• WHAMMY BAR
• MUTE BAR
• REMOVING A HEADSTOCK
CONTROL PANEL
10
• SLIDE MODE
• TAP MODE
• LED DISPLAY
• MIDI BUTTON
• POWER SAVING FUNCTION
GAME MODE
• OVERDRIVE/STAR POWER ACTIVATION
• WII™
• PS3™
TROUBLESHOOTING
• BEFORE REQUESTING SERVICE
ADDITIONAL INFORMATION AND LEGAL
26
29
28
• SUBMENU 3: LAYER OPTIONS
• SUBMENU 4: PRESET OPTIONS
• SUBMENU 5: GLOBAL SETTINGS
YOU ROCK MODE
• RECORDING WITH YOU ROCK TRACKS
24
• MIDI SURFACE CONTROLLER
• ROCK BAND 3 PRO MODE
• SPECIFICATIONS
• REGULATORY NOTICE
• LIMITED LIABILITY AND WARRANTIES
• COPYRIGHTS AND CREDITS
APPENDIX
• #3 SYNTH SOUNDS
• #2 GUITAR SOUNDS
• #1 PRESETS
• #6 TRACK CHORD PROGRESSIONS
• #5 OPEN TUNINGS
• #4 TRACKS
• #7 USING CLIPS/SCENES IN LIVE!
32
• #8 ROCKBAND 3 PRO-MODE BUTTON LAYOUT
• #9 CHORD DIAGRAMS
6 USER MANUAL INSPIRED INSTRUMENTS INC. 7
RISK OF ELECTRIC SHOCK
DO NOT OPEN
CAUTION
ATTENTION: Risque de chic electrique - ne pas ouvrir.
WARNING: To reduce the risk of fire or electric shock. Do not ex-
pose the equipment to moisture.
These labels shown above are internationally accepted symbols that
warn of potential hazards with electrical products. The lightning flash
with arrowpoint in an equilateral triangle means that there are dangerous voltages present within the unit. The exclamation point in an
equilateral triangle means that it is necessary for the user to refer to
the owner’s manual.
These symbols warn that there are no user serviceable parts inside
the unit. Do not open the unit. Do not attempt to service the unit
yourself. Refer all servicing to qualified personnel. Opening the chassis for any reason will void the manufacturers warranty. Do not get
the unit wet. If liquid is spilled on the unit, shut it off immediately and
take it to a dealer for service. Disconnect the unit during storms to
prevent damage.
ELECTROSTATIC DISCHARGE STATEMENT
This unit may require resetting after a severe electrostatic discharge
event.
RADIO FREQUENCY INTERFERENCE STATEMENT
The unit may require resetting after exposure to radio frequency interference.
OTHER CAUTIONARY STATEMENTS
a. “ The Apparatus shall not be exposed to dripping or splashing and
no objects filled with liquids such as vases, shall be placed on the apparatus.”
b. “Excessive sound pressure from earphones and headphones can
cause hearing loss.”
c. “Batteries shall not be exposed to excessive heat such as sunshine, fire or the like.”
PLEASE READ BEFORE OPERATING THIS DEVICE -
WARNING
DÉCLARATION DE DÉCHARGE ÉLECTROSTATIQUE
Cette unité nécessite une réinitialisation après un cas de décharge
électrostatique grave.
DÉCLARATION SUR LE BROUILLAGE RADIOÉLECTRIQUE DE
FRÉQUENCE
Cette unité nécessite une réinitialisation après un une exposition à
des interférences de fréquences radio.
D’AUTRES ADVERTISSEMENTS
A. “L’APPAREIL NE DOIT PAS ÊTRE EXPOSÉ À DES GOUTTES OU DES ÉCLABOUSSURES
ET QU’AUCUN OBJET REMPLI DE LIQUIDE, TELS QUE DES VASES, DOIT ÊTRE PLACÉ
SURL’APPAREIL.”
B. “LA PRESSION EXCESSIVE DU SON PAR LES ÉCOUTEURS ET LE CASQUE PEUT ENTRAÎNER UNE PERTE D’AUDITION.”
C. “PILES NE DOIVENT PAS ÊTRE EXPOSÉS À UNE CHALEUR EXCESSIVE COMME LE SOLEIL,
LE FEU, ETC.”
S’IL VOUS PLAÎT LIRE AVANT D’UTILISATION CET AP-
PAREIL - AVERTISSEMENT
KEEP THESE INSTRUCTIONS
• THE APPARATUS SHOULD NOT BE EXPOSED TO ANY LIQUIDS.
• DO NOT PLACE ANYTHING DIRECTLY ON TOP OF THE YRG.
• DO NOT PLACE NEAR ANY HEAT SOURCES SUCH AS RADIATORS, HEAT REGISTERS,
STOVES, OR OTHER APPARATUS (INCLUDING AMPLIFIERS) THAT PRODUCE HEAT.
• ONLY USE YRG COMPATIBLE ATTACHMENTS OR ACCESSORIES.
• UNPLUG THIS APPARATUS DURING LIGHTNING STORMS OR WHEN UNUSED FOR LONG
PERIODS OF TIME.
Refer all servicing to qualified service personnel. Servicing is required
when the apparatus has been damaged in any way, such as liquid has
been spilled or objects have fallen into the apparatus, the apparatus
has been exposed to rain or moisture, does not operate normally, or
has been dropped.
OPERATION IS SUBJECT TO THE FOLLOWING FOUR CONDITIONS:
• THIS DEVICE MAY NOT CAUSE HARMFUL INTERFERENCE AND
• THIS DEVICE MAY ACCEPT ANY INTERFERENCE RECEIVED, INCLUDING INTERFERENCE
THAT MAY CAUSE UNDESIRED OPERATION.
OPERATION OF THIS UNIT WITHIN SIGNIFICANT ELECTROMAGNETIC FIELDS SHOULD BE AVOIDED.
• USE ONLY SHIELDED INTERCONNECTING CABLES.
WARNING FOR YOUR PROTECTION
READ THE FOLLOWING
ELECTROMAGNETIC COMPATIBILITY
IF YOU WANT TO DISPOSE OF THIS PRODUCT, DO NOT
MIX IT WITH GENERAL HOUSEHOLD WASTE. THERE IS A
SEPARATE COLLECTION SYSTEM FOR USED ELECTRONICS PRODUCTS IN ACCORDANCE WITH LEGISLATION
THAT REQUIRES PROPER TREATMENT, RECOVERY AND
RECYCLING.
Private households in the 25 member states of the EU, in Switzerland and Norway may return their used electronic products free of
charge to designated collection facilities or to a retailer (if you purchase a similar new one).
For Countries not mentioned above, please contact your local authorities for a correct method of disposal. By doing so you will ensure that
your disposed product undergoes the necessary treatment, recovery
and recycling and thus prevent potential negative effects on the environment and human health.
WHAT’S IN THE
BOX
YRG 1000 (GEN. 2)
GUITAR STRAP
3 GUITAR PICKS
USB CABLE 6 FEET
AUDIO CABLE (GUITAR) 9 FEET
USER GUIDE
OPTIONAL HARDWARE
AND SOFTWARE
HEADSTOCKS
PICKGUARDS
SOUND LIBRARIES
JAM TRACKS
GAMEFLEX CARTRIDGE
8 USER MANUAL INSPIRED INSTRUMENTS INC. 9
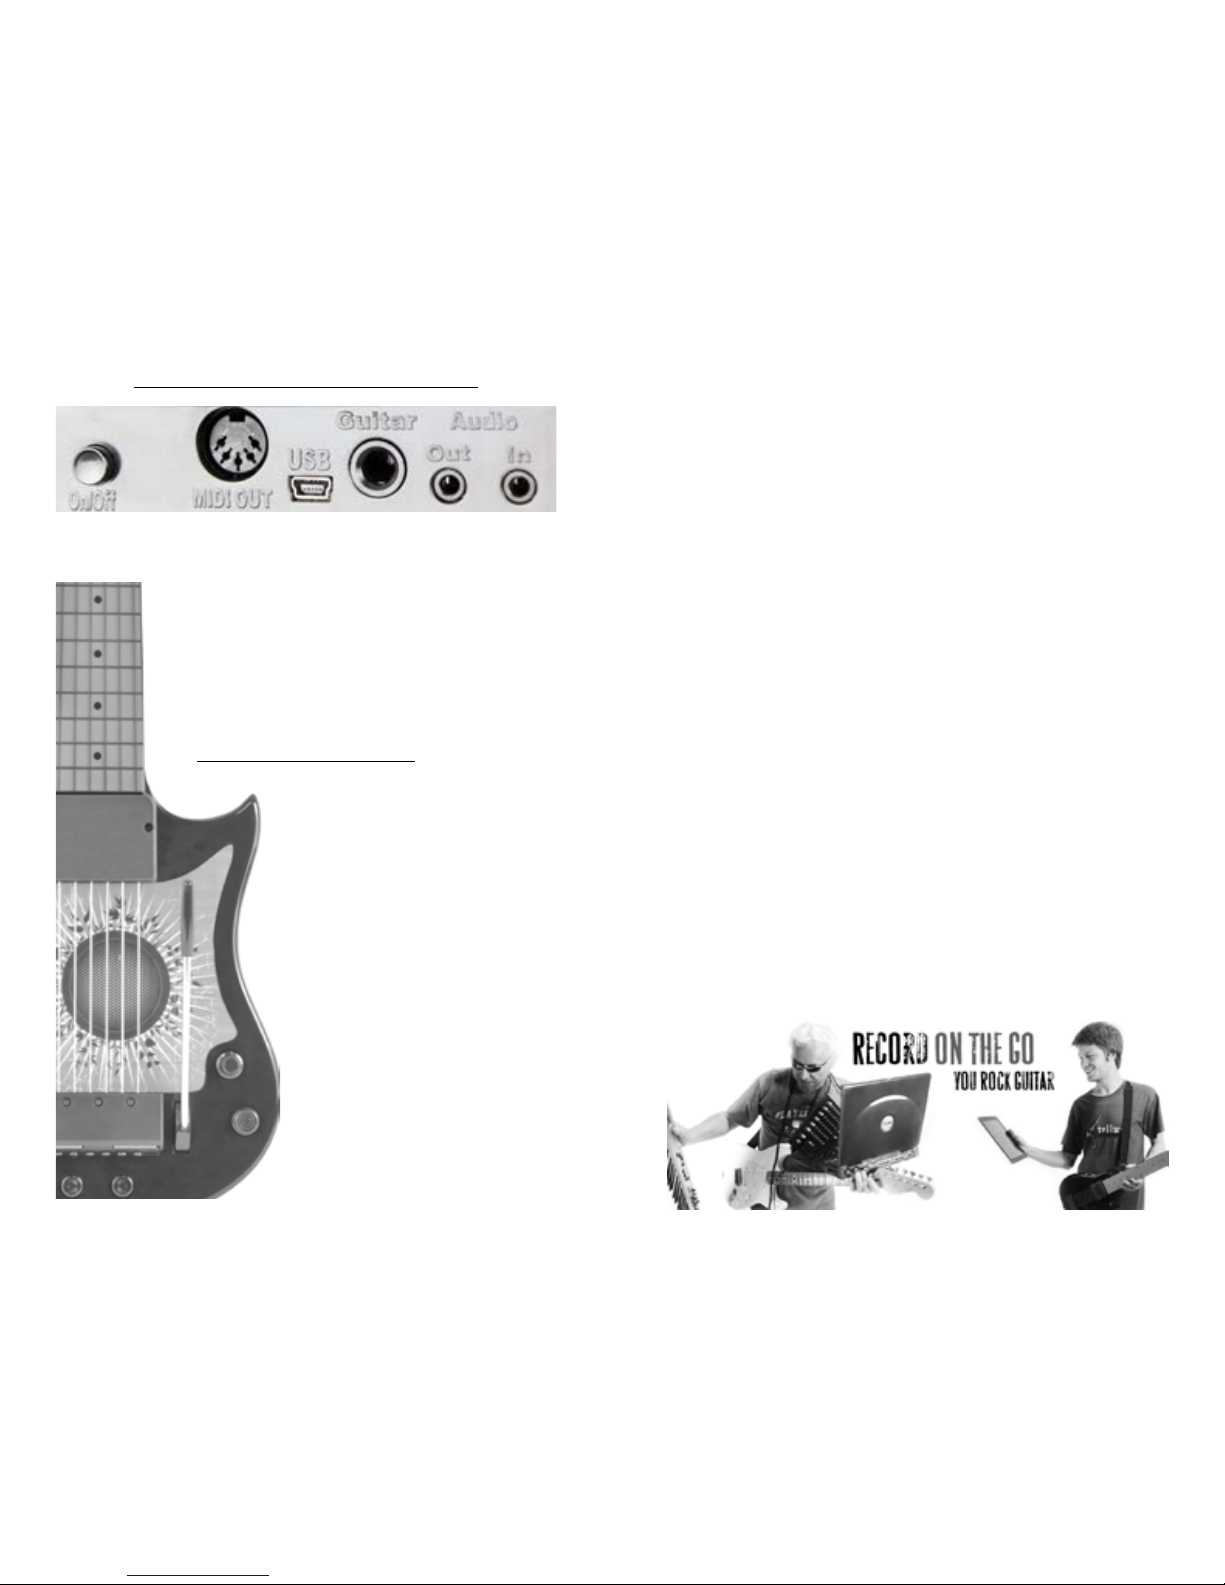
INPUT/OUTPUT CONNECTIONS
ON/OFF:
In is on.
Out is off.
MIDI OUT:
Plug into any
MIDI compatible
sound module.
USB:
Used to upload
new sounds and
software.
1/4” GUITAR
OUT:
Plug into your amp
and play.
AUDIO OUT:
Plug in your stereo
headphones or
stereo line level
monitoring system.
AUDIO IN:
Plug in your MP3
player and jam
along with your
own music.
GUITAR CONTROLS
TOUCH-SENSITIVE NECK:
Never needs tuning.
REAL STRINGS:
For strumming and finger picking.
WHAMMY BAR:
For pitch bending up and down.
MUTE BAR:
Thin metal bar beneath the bridge
piece. Use the one closest to the
whammy bar.
VOLUME KNOB:
Controls the mix levels of the GUITAR
and SYNTH layers.
JOYSTICK:
Modulates GUITAR and SYNTH
sounds and can be assigned to any
MIDI continuous controller.
+/- BUTTONS:
Used for programmable MIDI control.
+ is also used to turn on/off chorus
effect
- is also used to turn on/off transpose effect.
USB TO MIDI:
Sends MIDI data so that you can
control music programs on your
computer.
USB POWER:
When USB is connected, the YRG
will operate from USB power.
• Normal operation is to simply adjust the overall volume of the
instrument.
• While holding the GUITAR button, adjusts the GUITAR layer.
• While holding the SYNTH button, adjusts the SYNTH layer.
• While holding the TRACK button, adjusts the TRACK level.
• While holding TAP, adjusts the tapping velocity.
THE VOLUME KNOB:
JOYSTICK:
MUTE BAR:
WHAMMY BAR:
• Normal operation controls the modulation speed and depth.
• While holding the GUITAR button, move it left/right to adjust the
pan position of the GUITAR layer.
• While holding the SYNTH button, move it left/right to adjust the
pan position of the SYNTH layer.
+/- BUTTONS:
The + button controls the stereo chorus effect. This effect can be
applied to the synth layer, guitar layer, or both using the layer options
menu (described later).
There are two metal bars on the bridge of the guitar. Only the bottom bar (the one nearest the whammy bar) is operational. Pressing
this bar will mute both guitar and synth layers.
The whammy bar is for pitch bending up and down. The pitch bend
range can be adjusted up to a full octave. See detailed instructions
for adjusting the range in submenu 4.
The - button controls the transpose effect. This effect can be applied
to the synth layer, guitar layer, or both using the layer options menu
(described later).
10 USER MANUAL INSPIRED INSTRUMENTS INC. 11
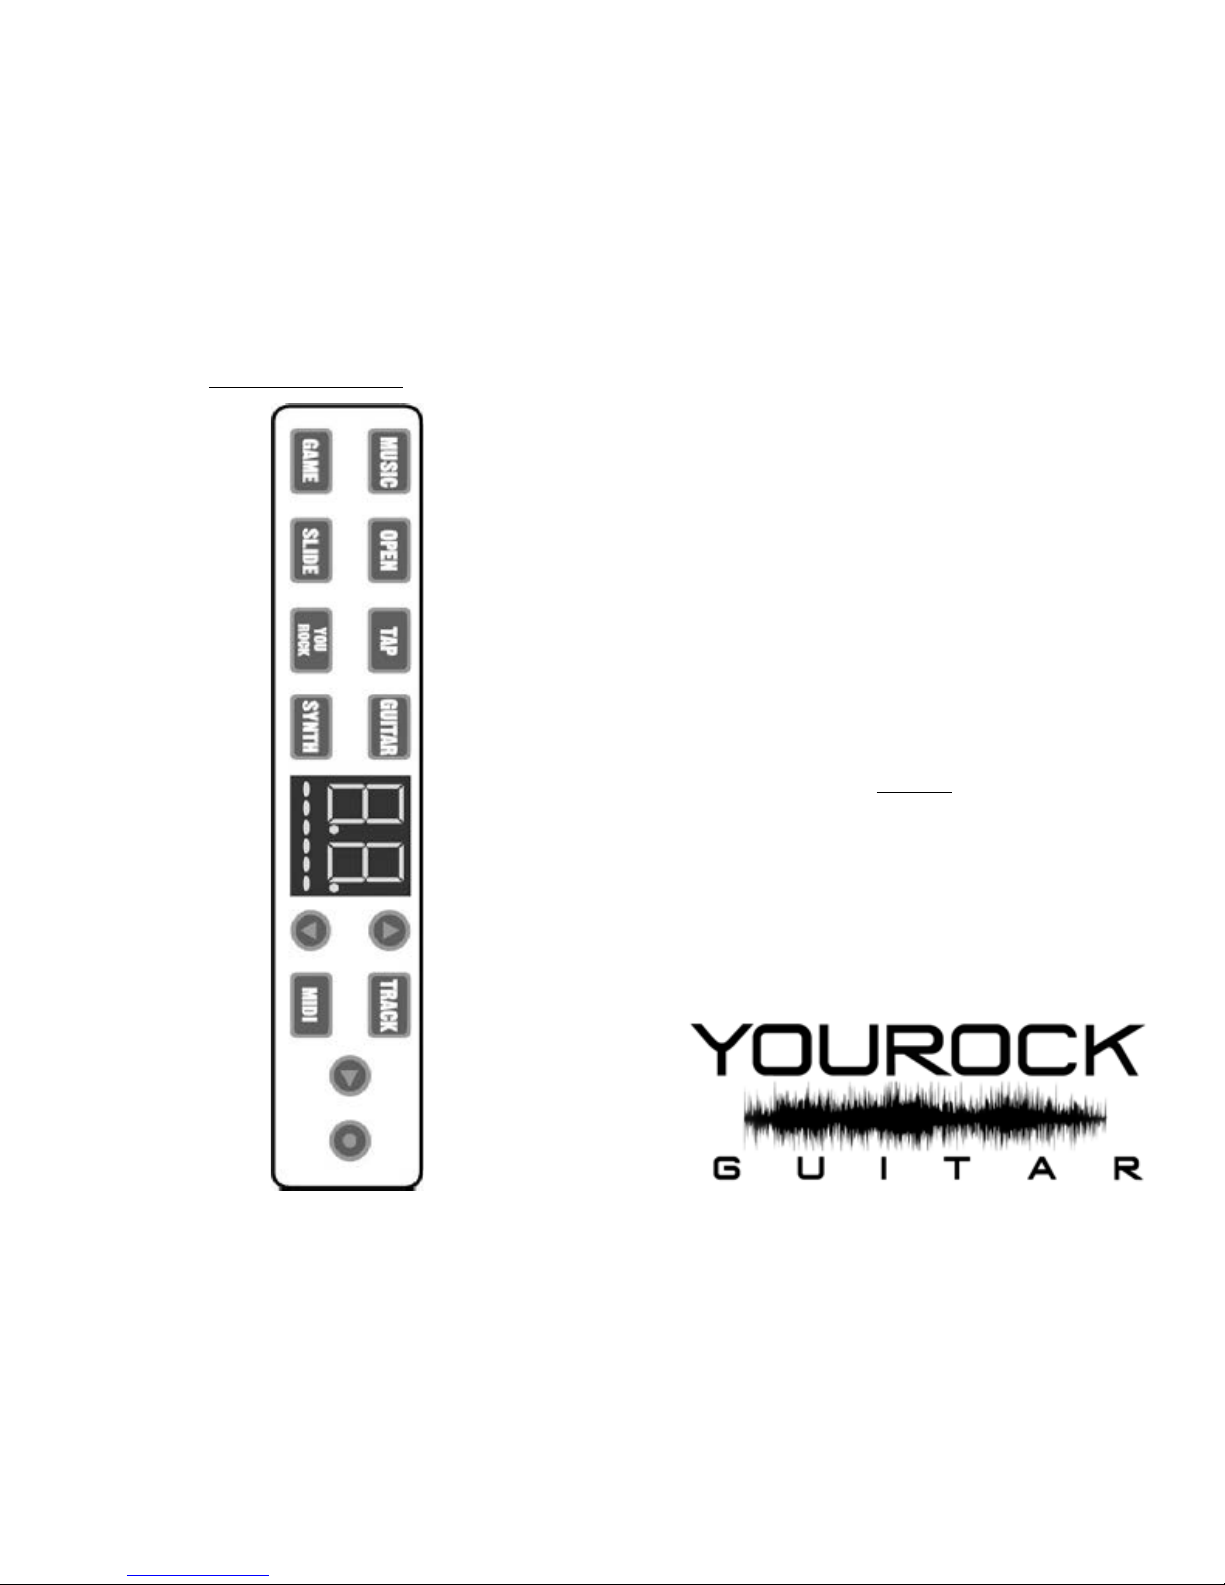
CONTROL PANEL
GAME:
Press to enter GAME mode.
TAP :
Enables TAP
mode. No
strumming or
picking required.
OPEN:
Turns on and
adjusts open tunings.
GUITAR:
Hold to access
GUITAR layer
sounds for the
current preset.
MUSIC:
Press to enter
MUSIC mode.
Blinks to indicate
unsaved preset
modifications.
RECORD:
Starts and stops on-board
recorder.
Used also in conjunction with
the MUSIC button to save
changes to presets.
PLAY:
Starts and stops
backing tracks
and user recorded play back.
MIDI:
Turns the guitar into a MIDI
controller for digital audio
workstations.
UP/DOWN:
Used for navigation.
SYNTH:
Hold to access the SYNTH
layer sounds for the current
preset.
YOU ROCK:
Turns on You Rock Mode to
automatically play in the same
key as the current backing
track.
SLIDE:
Switches between hammeron and bending.
LED DISPLAY:
Displays general information.
TRACK:
Hold to select
backing tracks.
LED DISPLAY:
Displays the current patch number, menu, submenu, or parameter
values during editing.
TAP MODE:
With tap enabled, you don’t the need to strum or pick the strings to
trigger notes. Tap velocity can be adjusted via the volume knob. To
do so, simply hold down the TAP button and scroll through the volume
settings (1-12) with the volume knob. Setting 12 will cause the loudest triggers.
SLIDE MODE:
With slide mode enabled, while sliding up or down the neck, the pitch
of new notes are changed without re-triggering the attack. The slide
range can be adjusted (see: adjusting slide range in submenu 4).
MIDI BUTTON:
The MIDI button is used to activate the MIDI controller function of
the YRG. When enabled the YRG can be used to control features
on a DAW or other applications like Ableton Live!™. MIDI controller
features are implemented as an array of switches that are superimposed on the guitar fingerboard. See: Advanced features/MIDI surface controller.
SETUP
ATTACHING THE NECK:
• Make sure your You Rock Guitar is powered down.
• Slide the neck into the grooves at the top of the guitar body until
the neck snaps into the locked position.
REMOVING THE NECK:
• Make sure your You Rock Guitar is powered down.
• Release the latch at the base of the neck.
• Pull the neck out of the body.
12 USER MANUAL INSPIRED INSTRUMENTS INC. 13
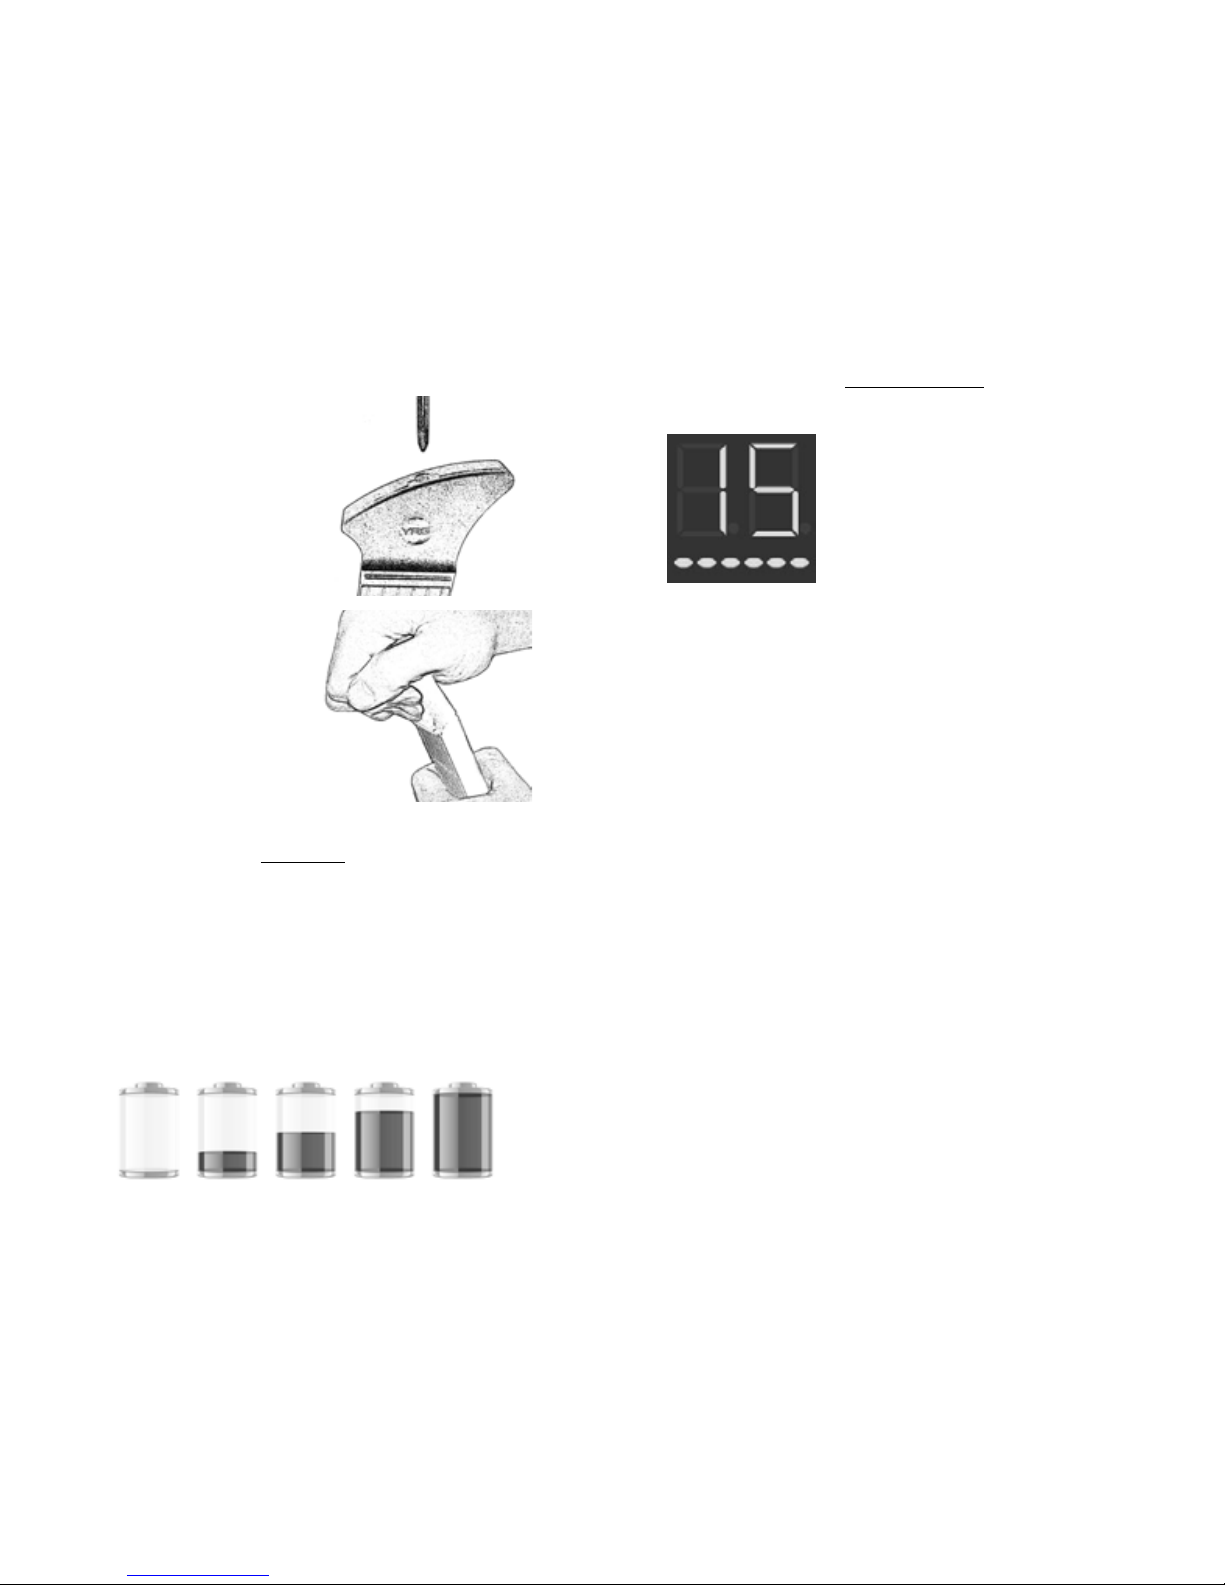
INSTALLING A HEADSTOCK:
• Insert headstock into the slot
at the top of the neck.
• Locate and tighten screw
inside the headstock using a
Phillips head screwdriver.
Note: Tighten only until you feel
resistance against the screw and
the headstock is firmly attached.
REMOVING A HEADSTOCK:
• Loosen screw inside the headstock (screw from the top of
the stock) until the headstock
can be easily wiggled back and
forth (you shouldn’t have to
loosen too much).
• Hold the guitar facing away
from you. Wrap one hand
around the top of the headstock and use the other to
grasp the top of the neck.
• Gently push forward and pull
up to remove the headstock.
You are now ready to install a
different headstock. Repeat
the above instructions.
POWER
The You Rock Guitar can be powered by USB or by four AA batteries.
POWER SAVING FUNCTION:
To save power the YRG automatically shuts off if left idle for five minutes. A minute prior to the automatic shut down the control panel
lights will begin to pulsate.
Note: This function only applies when powered by batteries.
(Headstocks sold separately)
THE BASICS
HOW THE DISPLAY WORKS:
The numerical LED display usually shows the
current preset number. When the GUITAR layer
button is pressed, the LED will show the sound
mapped to the GUITAR layer for a few seconds,
then revert to the preset number. This functions the same for all the parameter buttons.
Additionally, the numerical LED display will display
menu and submenu options as well as the parameter values within those menus.
At the bottom of the display there are six orange LED indicators,
each representing a string on the guitar (the left LED corresponding
to the Low E string, etc.). When a string is struck, or a parameter
for that string is being edited, the matching LED will light up.
GUITAR AND SYNTH LAYERS:
The YRG allows you to select two simultaneous sounds - one for the
GUITAR layer and another for the SYNTH layer. Both layers can access all sounds on the guitar.
Pressing the SYNTH button will turn on the SYNTH layer allowing you
to play the GUITAR and the SYNTH simultaneously.
This GUITAR and SYNTH layer concept can be used creatively by combining different sounds, effects, and other features available on your
You Rock Guitar.
There are many parameters that can be adjusted and assigned to
the GUITAR and SYNTH layer: zone, volume, pan, effects, transpose,
MIDI channel assign, Velocity Tables. These are described later in the
Advanced Menu section.
INTERNAL SOUNDS:
You can play the You Rock Guitar® as a stand-alone electronic guitar
by plugging it into an amplifier, headphones, or stereo system.
Under the GUITAR layer, the YRG <Gen2> features 15 built-in
sampled guitar sounds. See appendix #2 for a list of sounds. More
details available at www.yourockguitar.com.
Under the SYNTH layer, the YRG <Gen2> features 15 synthesizer
sounds all of which can be found in appendix #3.
 Loading...