

Page 1

Spirit™ APS
Car Seat
U. S. Patent No. 636,190S
CSS-2400S
CSS-2400M
CSS-2400L
CSS-2401M
CSS-2401L
™
(Adjustable Positioning System
™
)
WARNING!
Read ALL instructions before using this product!
Page 2

ATTENTION
Your Spirit Adjustable Positioning System (APS) Child Restraint has
been built to the highest standards of quality to ensure years of superior
service. Please take the time to read this informative instruction guide
and pay particular attention to the safety information provided.
Your child’s safety is of the utmost importance, so we urge you to
carefully and completely READ ALL the instructions.
The proper use of a child restraint, combined with careful driving, can
lower a child’s risk of injury or death in a crash. Please ensure that
your child restraint is correctly installed by reading and following the
instructions.
If you require additional assistance, please call Inspired by Drive
Customer Service at (800) 454-6612, or e-mail [email protected]
Thank you for choosing Inspired by Drive.
IMPORTANT
• Use this child restraint in the forward-facing position only.
• The recommended location for this child restraint is in the rear center
seat.
• This child restraint must be used in forward facing vehicle seats only.
• ALWAYS use top tether straps when installed the child restraint in the
vehicle.
• Visit “www.safekidsworldwide.org” to nd the nearest child restraint
safety check point, or ask your local highway patrol ofce for
assistance.
2
Page 3

Table of Contents
Warnings ................................................................................................. 4
Important Safety Information ................................................................... 6
Vehicle Seating Positions ........................................................................ 7
Child Restraint Features .......................................................................... 8
Vehicle Seat Belt Compatibility .............................................................. 10
Installation: Lap-Shoulder Belt (ALR) .................................................... 12
Installation: Lap-Shoulder Belt (ELR) .................................................... 13
Installation: Lap Belt (ALR) .................................................................... 14
Installing Tether ..................................................................................... 15
Adjusting the Child Restraint ................................................................. 17
Operating the Harness Buckle .............................................................. 17
Checking/Adjusting the Harness Height ................................................ 17
Adjusting the Harness Fit ...................................................................... 18
Adjusting the Chest Retainer Clip ......................................................... 19
Adjusting Padded Head Supports ......................................................... 19
Adjusting Seat Recline .......................................................................... 19
Securing the User in the Child Restraint ............................................... 20
Swing-Away Supports for Spirit Plus models ........................................... 21
Care and Maintenance .......................................................................... 22
Cleaning the Cover................................................................................. 22
Removing the Cover .............................................................................. 22
Retting the Cover.................................................................................. 22
Product Registration .............................................................................. 23
Warranty ................................................................................................ 24
3
Page 4

WARNING!
!
• Use only with individuals who weigh between 25 and 130 lb
(11.3 - 59 kg) and are less than 66 inches (1.67 m) in height.
• Read and follow all instructions on this child restraint and in the
written instructions located on the side of the child restraint.
• When using in a vehicle with airbags, read vehicle owner’s manual
for other warnings and additional precautions.
• Make sure that all straps and harnesses provided with this child
restraint t snugly around the user. A snug strap should not allow any
slack and lies in a relatively straight line without sagging. The strap
should also not press on the user’s skin or push the user’s body into
an unnatural position.
• Secure this child restraint with the vehicle’s seat belt even when it is
not occupied.
• Use this child restraint in the forward-facing position ONLY. This child
restraint is NOT designed for use in a rear-facing position.
• Do not use this child restraint in the front seat of a vehicle with a
passenger air bag unless the air bag is turned off. Death or serious
injury can occur. According to crash statistics, children are safer
when properly restrained in the rear seat rather than in the front
seat. Regardless of seating position, the Federal Government
recommends that all children twelve or under ride in the rear seat.
• Do not use this child restraint with vehicle seats that face to the side
or rear or with vehicle seats with backs that can fold forward in a
crash or sudden stop. Check your vehicle manual or with your dealer
if you are not sure.
• This child restraint conforms to all applicable Federal Motor Vehicle
Safety Standards. This Restraint Is Not Certied For Use in Aircraft.
Child restraints could be recalled for safety reasons. You must
register this restraint to be reached in a recall. Register your name,
address, email address, restraint’s model number and manufacturing
date online at www.inspiredbydrive.com.
For recall information, call the U.S. Government’s Vehicle Safety
Hotline at 1-888-327-4236 (TTY: 1-800-424-9153), or go to
http://www.NHTSA.gov.
• Do not use this child restraint with your vehicle’s lower anchor
LATCH connector system. Use only the vehicle’s seat belts for
installation. Upper LATCH anchor points may be used to secure the
tether.
DEATH or SERIOUS INJURY can occur.
4
Page 5

WARNING!
!
• When using this child restraint in a vehicle with side air bags, refer
to the vehicle owner’s manual for installation instructions and
precautions.
• Do not route the vehicle seat belt over the user while using this child
restraint.
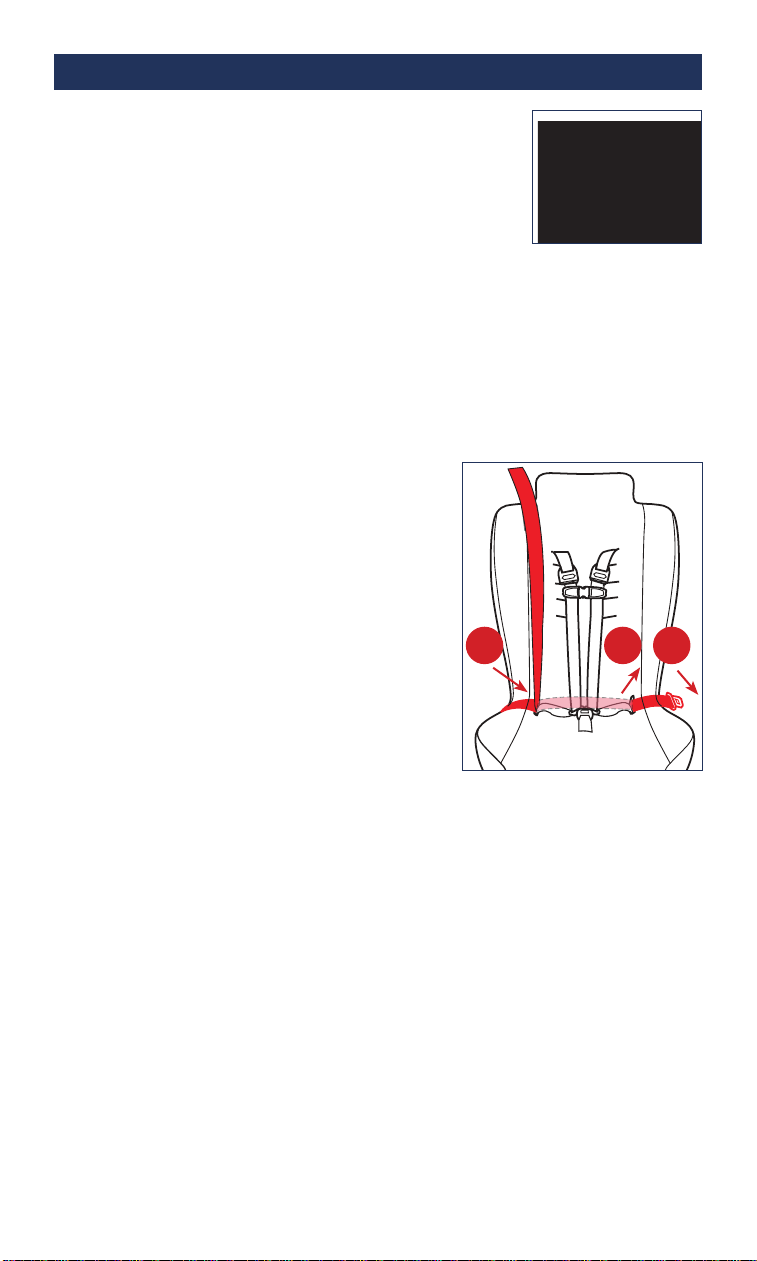
• When using a shoulder/lap safety belt, the shoulder belt strap must
lie within the “Shoulder Belt Zone” as labeled on the upper left and
right side of the child restraint. If this is not the case, then a top tether
MUST be used.
• Do not use the harness independently of the seat. The harness
assembly is for use only with the Spirit APS Child Restraint.
• Secure this child restraint even when it is not occupied; in a crash,
an unsecured child restraint may injure vehicle occupants.
• Never leave a child unattended in the vehicle even if they are
secured in the child restraint. Children could be seriously or fatally
injured from excessive exposure to extreme heat or cold.
• This child restraint conforms to all applicable Federal Motor Vehicle
Safety Standards (FMVSS). This child restraint is certied for use
only in motor vehicles. It is not certied for use in airplanes.
DEATH or SERIOUS INJURY can occur.
5
Page 6

IMPORTANT Safety Information
• This child restraint is designed to t a wide range of individuals. To
ensure a proper t for the user, it is important that the child restraint
be correctly set up and installed before using it for the rst time.
• Read the section on “Vehicle Seat Belt Compatibility” (pg. 10-11)
to determine the type of seat belts that may be used with this child
restraint.
• No additional padding, other than what is provided with the child
restraint, should be used behind or under the child restraint, or under
or behind the user in the child restraint.
• The child restraint harness should not be worn over heavy clothing
such as thick jackets, coats or vests.
• If your child restraint becomes badly worn or damaged, or is involved
in a crash, regardless of speed and regardless of how minor, your
child restraint may no longer be effective and should be immediately
replaced.
• The metal parts on the child restraint and/or vehicle seat belt can
heat up if the vehicle is parked in the sun. To avoid injury to the
occupant, always check that the metal parts are not too hot before
putting the occupant in the seat. We recommend covering the seat
with a blanket or towel, if you park your vehicle in the sun, to help
keep the metal parts from heating up.
• Do not leave loose objects in the passenger compartment of your
vehicle. In the event of a crash, these objects can become projectiles
and can cause serious injury or death.
• Do not leave folding vehicle seats unlatched. In the event of a
sudden stop, a loose seat back could prevent the child restraint from
protecting the child as well as it should.
• Do not, except as described in this booklet, attempt to disassemble
any part of this child restraint or change the way its harness or the
vehicle restraint belts are used.
• Discontinue use of a child restraint if it has been involved in a crash
to prevent injury due to deterioration or hidden damage.
• Upholstery meets Fire-Retardant Code 302 for automobile
upholstery.
6
Page 7

Vehicle Seating Positions
• Do not place a child in a child restraint in the front seat of a
vehicle with a passenger air bag unless the air bag is turned off.
DEATH or SERIOUS INJURY can occur.
• This child restraint must ONLY be used in forward-facing vehicle
seats.
• Use this child restraint in the forward-facing position ONLY.
• The recommended installation location for this child restraint is in the
rear center seat.
• This child restraint CANNOT be used in rear-facing vehicle seats,
such as those in some vans or buses.
• This child restraint CANNOT be used in side-facing vehicle seats,
such as those in some vans and pick-up trucks.
• This child restraint CANNOT be used in ip-down vehicle seats,
often referred to as “jump-seats”.
NOTE: According to research sponsored by the National Highway
Trafc Safety Administration (NHTSA), children are signicantly
safer when properly restrained in the back seat, compared to the
front seat.
7
Page 8
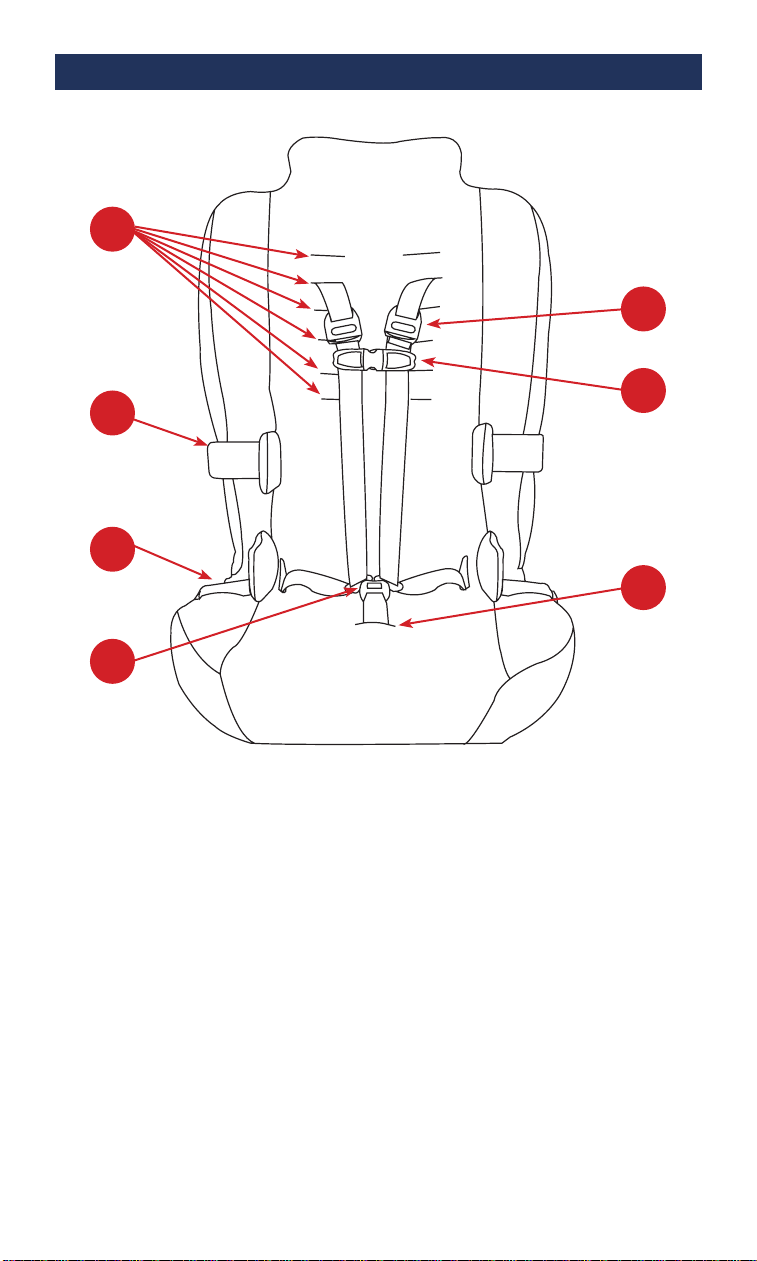
Child Restraint Features
D
C
B
E
F
G
A
A. Harness Buckle
B. Swing-Away Hip Supports (optional accessories)
C. Swing-Away Trunk Supports (optional accessories)
D. Shoulder Harness Slots (6 on each side)
E. T ension Adjuster
F. Chest Retainer Clip
G. Crotch Strap Slot (2 positions)
H. Recline Bar
8
Page 9
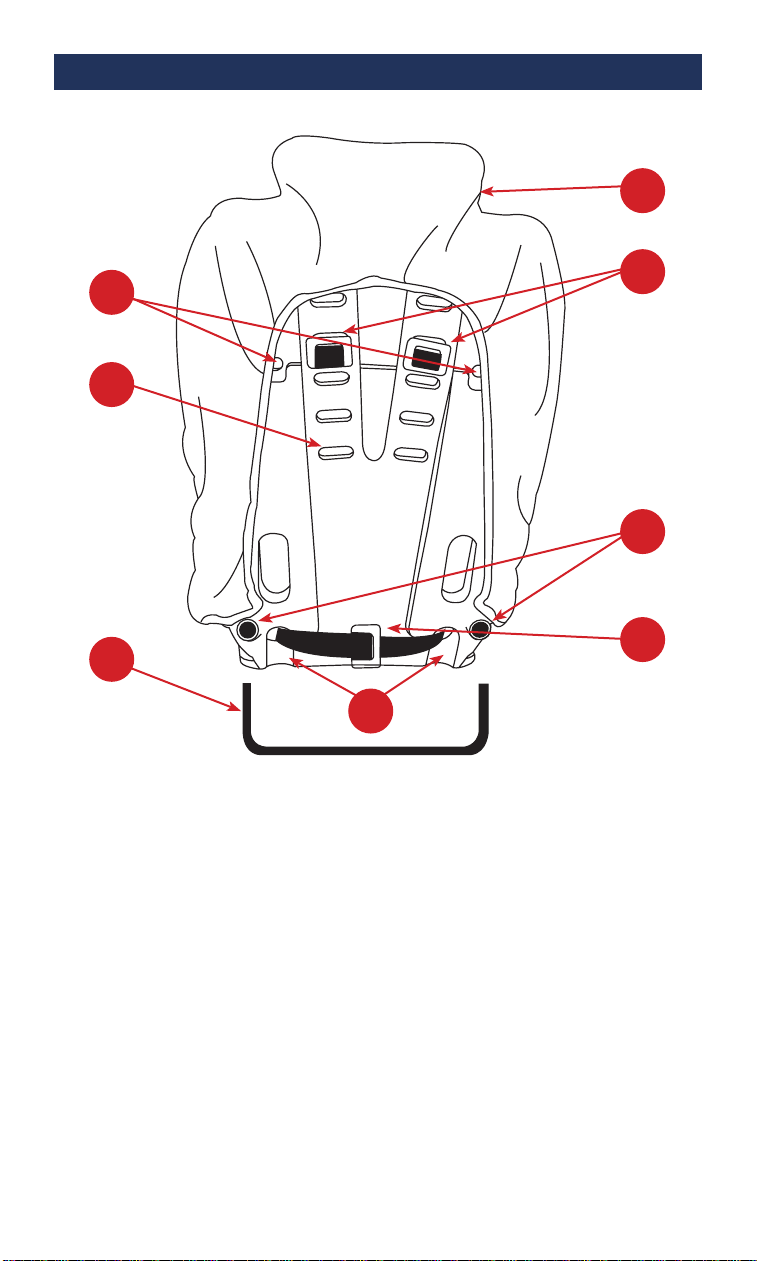
Child Restraint Features
J
I
K
L
M
H
O
I. Shoulder Harness Slot (6 on each side)
J. Tether Slots (4 slots located underneath cover)
K. Cover
L. Harness Metal Bracket
M. Insertion Holes for Recline Bar
N. 3-Bar Metal Bracket Fastener for Harness Assembly
O. Lower Side Harness/Vehicle Belt Slots
9
N
Page 10

Vehicle Belt Compatibility
Vehicle seats and safety belts differ from vehicle to vehicle. Always
refer to your vehicle owner’s manual or call the vehicle manufacturer
for specic information about the use of child restraints in your vehicle.
Some vehicles may have seating positions or seat belts which are not
compatible with this Inspired by Drive child restraint.
Below are the types of vehicle seat belt retractors. Refer to your vehicle
owner’s manual to determine the kind of retractors used in your vehicle
and how to operate them.
ELR – Emergency Locking Retractor: Allows the belt to be freely
extended or rewound. It locks only when the vehicle slows, changes
direction or stops suddenly.
ALR – Automatic Locking Retractor: Allows belt to be pulled in one
motion until fastened, then operates as a ratchet, winding in slack,
preventing further extension (until completely rewound). In most belts,
you will hear a faint clicking sound that indicates the belt is locked and
ratcheting in.
Switchable – Manually adjustable from ELR mode to ALR mode. For
most, pull belt webbing all the way out of the retractor to activate the ALR
mode. A slight “click” may be heard, but the belt will ratchet into retractor
once switched into ALR mode. In some models, the retractors switch
from ELR to ALR by pushing a button.
10
Page 11

Vehicle Belt Compatibility (continued)
Below are the vehicle seat belts that CAN BE USED:
Continuous-loop lap-shoulder belts with a sliding latch plate. This type of
seat belt consists of continuous webbing that is bolted to the vehicle on
one end and has a retractor on the other end. The latch plate (the “male”
part of the seat belt buckle) slides freely along the webbing to form a lap
belt and a shoulder belt when attached to the buckle. The lap/shoulder
belt may need to be locked by pulling it completely out of the retractor,
thereby switching it to automatic locking mode. Refer to your vehicle
owner’s manual.
Combination lap-shoulder belts with a locking latch plate.
This type of seat belt has a latch plate (the “male” part of the seat belt
buckle) that locks into place to secure the child restraint.
Lap belts with automatic locking retractors (ALR).
These lap belts automatically lock to whatever length they have been
pulled to, after which they can only be reset by retracting the belt
completely. However, a TOP TETHER STRAP MUST BE USED if the
child restraint is installed with only a lap belt.
Lap belts with a locking latch plate.
This type of seat belt stays locked after the seat belt is tightened by
pulling the free end. However, a TOP TETHER STRAP MUST BE USED
if the child restraint is installed with only a lap belt.
Vehicle seat belts that CANNOT BE USED:
Seat belts with the top and/or bottom anchor attached to the vehicle door.
Lap belts with an emergency locking retractor (ELR), which means that
the lap belt will only lock in the event of a sudden stop or crash.
Motorized seat belts that automatically surround the passenger when the
door is closed.
Combination lap and shoulder belts with a “sewn latch plate”. The lap
belt is sewn to the side of the latch plate (the “male” part of the seat belt
buckle), while the shoulder belt is sewn to the top of the latch plate. Each
belt feeds into a separate emergency-locking retractor prohibiting proper
control of the seat belt tension.
11
Page 12
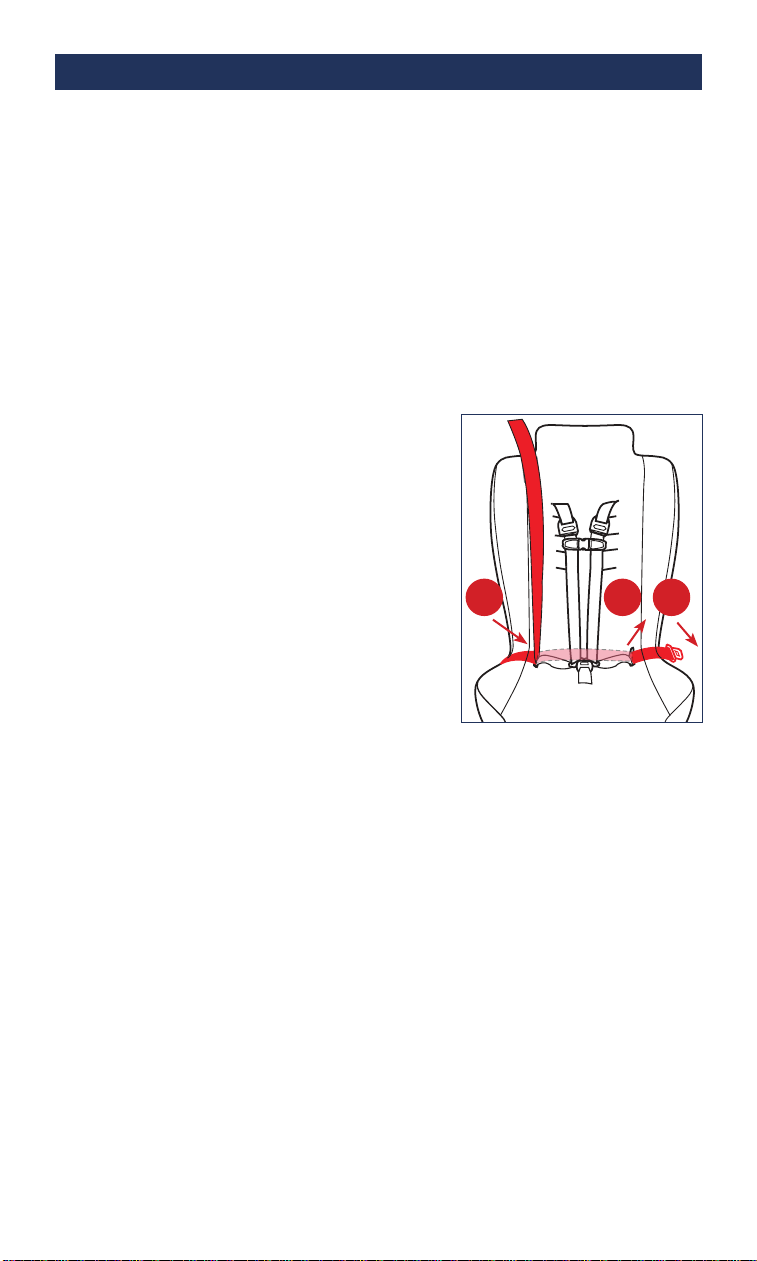
Installation: Lap-Shoulder Belt (ALR)
Follow these instructions when installing in a vehicle with seat belts that
utilize an Automatic Locking Retractor (ALR) which, when extended all
the way out, the seat belt activates the locking mechanism and retracts
the belt without allowing any further lengthening or slack.
Always use top tether strap when installing the restraint in the vehicle.
1. Place the child restraint in a forward-facing position on the vehicle
seat.
Note: If more than 3 inches of the child restraint base extends beyond
the front edge of the vehicle seat (not including use of the recline
bar), then the vehicle seat is too shallow to properly support the child
restraint. If this is the case, DO NOT INSTALL.
2. Pull the seat belt out completely to engage the retractor. Do not allow
the belt to retract.
i. Insert the latch plate (the “male” part
of the seat belt buckle) into the outer
lower side vehicle belt slot and route
the belt around the back of the child
restraint
ii. Pull the seat belt out through the other
lower side vehicle belt slot
iii. Insert the latch plate (the “male” part of
the seat belt buckle) into the vehicle’s
seat belt buckle (see right)
3. When routing the vehicle’s seat belt,
make sure that the shoulder belt lies
within the on top of the seam between the two fabric.
4. Place one knee in the child restraint and push down rmly. Starting
from the buckle, pull on the shoulder belt portion of the webbing until
it is tight.
5. Eliminate the slack by releasing the shoulder belt back into the
retractor. You should hear a clicking noise as the webbing rewinds.
6. Pull on the shoulder belt to ensure that it is locked. If properly
engaged, you should not be able to create any slack in the seat belt.
Ensure that the child restraint is held down rmly into the vehicle seat.
7. The tightness of the installation should ensure that there is no more
than 1-inch of movement of the child restraint. If there is more than
1-inch of movement, then the installation is incorrect and must be
redone.
8. Install top tether strap by following the instructions on page 15.
1 2 3
12
Page 13
Installation: Lap-Shoulder Belt (ELR)
Follow these instructions when installing in a vehicle with seat belts that utilize
an Emergency Locking Retractor (ELR) which allows free movement of
the occupant and only locks in the event of an emergency situation, such
as sudden breaking or collision. To install the child restraint using an ELR
system, a LOCKING CLIP (not provided) is required to maintain to proper
belt tension AND YOU MUST USE A TOP TETHER (see pg. 15).
1. Lift the cover from the child restraint to reveal the tether slots. Insert each
of the metal bracket ends of the tether strap into the
right and left tether slots (insert from front to back).
Y ou will have to turn the bracket horizontally (as
shown on right) then insert the bracket completely
into the slot. The tether strap will wrap over the
top of the child restraint frame and down the back.
Reposition cover.
2. Place the child restraint in a forward-facing position on the vehicle seat.
Note: If more than 3 inches of the child restraint base extends beyond the
front edge of the vehicle seat (not including use of the recline bar), then the
vehicle seat is too shallow to properly support the child restraint. If this is
the case, DO NOT INSTALL.
3. Pull the seat belt out completely. Then,
i. Insert the latch plate (the “male” part of the seat belt buckle) into the
outer lower side vehicle belt slot and route the belt around the back of
the child restraint
ii. Pull the seat belt out through the other lower side vehicle belt slot
iii. Insert the latch plate (the “male” part of the seat belt buckle) into the
vehicle’s seat belt buckle.
4. Place one knee in the child restraint and push
down rmly while pulling on the shoulder belt to
tighten and remove any slack from the lap portion
of the belt.
5. With one hand, rmly hold the shoulder and lap
portions of the seat belt together, immediately
behind the latch. Then, release the seat belt latch
from the buckle.
6. Fold the webbing and thread it through the locking clip, as shown above,
keeping the locking clip as close as possible to the latch plate (no further
than 0.5-inch). Buckle the seat belt checking that the child restraint is tightly
in place and continue to tether installation (pg. 15)
7. The tightness of the installation should ensure that there is no more than
1-inch of movement of the child restraint. If there is more than 1-inch of
movement, then the installation is incorrect and must be redone.
Installation of Locking Clip
13
Page 14
Installation: Lap Belt (ALR)
When installing the child restraint into a vehicle
using only a lap belt, YOU MUST USE A TOP
TETHER STRAP (see pg. 15) anchored to one of
the anchor points in your vehicle. Make sure to
check the Vehicle Seat Belt Compatibility (pg.
10) before installing the child restraint.
1. Lift the cover from the child restraint to reveal the tether slots. Insert
each of the metal bracket ends of the tether strap into the right
and left tether slots (insert from front to back). You will have to turn
the bracket horizontally (as shown on right) then insert the bracket
completely into the slot. The tether strap will wrap over the top of the
child restraint frame and down the back. Reposition cover.
2. Place the child restraint in a forward-facing position on the vehicle
seat.
Note: If more than 3 inches of the child
restraint base extends beyond the front
edge of the vehicle seat (not including
use of the recline bar), then the vehicle
seat is too shallow to properly support
the child restraint. If this is the case,
DO NOT INSTALL.
3. Pull the lap belt out completely. Then,
i. Insert the latch plate (the “male” part
of the seat belt buckle) into the outer
lower side vehicle belt slot and route
the belt around the back of the child
restraint
ii. Pull the seat belt out through the other lower side vehicle belt slot
iii. Insert the latch plate (the “male” part of the seat belt buckle) into
the vehicle’s seat belt buckle (see right)
4. Place one knee in the child restraint and push down rmly while
pulling on the lap belt to tighten and removing all slack. Make sure
that the child restraint is at against the vehicle seat back and bottom.
Continue to tether installation (pg. 15).
5. The tightness of the installation should ensure that there is no more
than 1-inch of movement of the child restraint. If there is more than
1-inch of movement, then the installation is incorrect and must be
redone.
1 2 3
14
Page 15
Installing the Tether
The Spirit APS Child Restraint is designed to use a lap-shoulder belt
equipped with an Automatic Locking Retractor (see pg. 12). However,
when installed in a vehicle using a lap-belt only
or a lap-shoulder belt with an Emergency Locking
Retractor (see pg. 13), then the child restraint must
be anchored to the vehicle’s TOP TETHER ANCHOR
POINTS designated by the symbol on the right.
All vehicles manufactured since 2002 are equipped
with tether anchors located directly behind the rear
seats. Check your vehicle owner’s manual for location details.
For vehicles manufactured before 2002, a bolt-in tether must be used.
Contact Inspired by Drive customer service for more information.
WARNING!
!
• An incorrectly installed child restraint may come loose during a crash
which could result in serious injury or death to the user.
• The tether hooks must be attached to the tether anchor points
designated as tether anchor points by the vehicle manufacturer.
The icon shown above is used by vehicle manufacturers to identify
the tether anchor points. Use of other locations is NOT approved or
permitted.
• For occupants over 80 lb. (36 kg), BOTH tether hooks must be
used. Each hook must be attached to a separate tether anchor. A
single tether anchor is not strong enough to support weights in excess
of 80 lb. (36 kg).
DEATH or SERIOUS INJURY can occur.
Anchor point symbol
15
Page 16
Installing the Tether (continued)
Note: The tether is a REQUIRED accessory and MUST be ordered
separately. Please check vehicle owner’s manual for tether anchor
capacity.
Vehicle owner’s manual supersedes instructions and
recommendations below.
1. As noted in the child restraint installation section
of these instructions (pg. 13-14), lift the cover
from the child restraint to reveal the tether slots.
Insert each of the metal bracket ends of the tether
strap into the right and left tether slots (insert
from front to back). Turn the bracket horizontally
(as shown on right) then insert the bracket completely into the slot.
The tether strap will wrap over the top of the child restraint frame and
down the back. Reposition cover.
2. After the child restraint has been installed using the vehicle’s seat
belts (see pg. 13-14), attach the tether hook(s) to the vehicle’s tether
anchor(s). The primary tether anchor to use will be located
immediately behind the child restraint.
i. For individuals LESS
than 80 lb (36 kg):
attach ONE tether hook
to the tether anchor
immediately behind the
child restraint.
Top View
ii. For individuals
GREATER than 80 lb
(36 kg): use TWO tether
Top View
hooks, attaching one
tether hook to the tether
anchor immediately
behind the child restraint
AND the other tether
hook to the closest
adjacent tether anchor.
3. After the hooks are secured, rmly adjust the tension on tether strap
with adjuster sliders making sure there is no slack on the strap.
16
Page 17
Adjusting the Child Restraint
Operating the Harness Buckle
1. To release, press the red button on the harness buckle.
2. To close, insert one metal latch into the harness buckle until it clicks.
Repeat for the other metal latch.
3. Always make sure BOTH latches are properly fastened in the harness
buckle when securing a user.
4. NEVER lubricate the harness buckle
Checking the Harness Height
1. Place the user in the child restraint and properly secure the harness
(as outlined above).
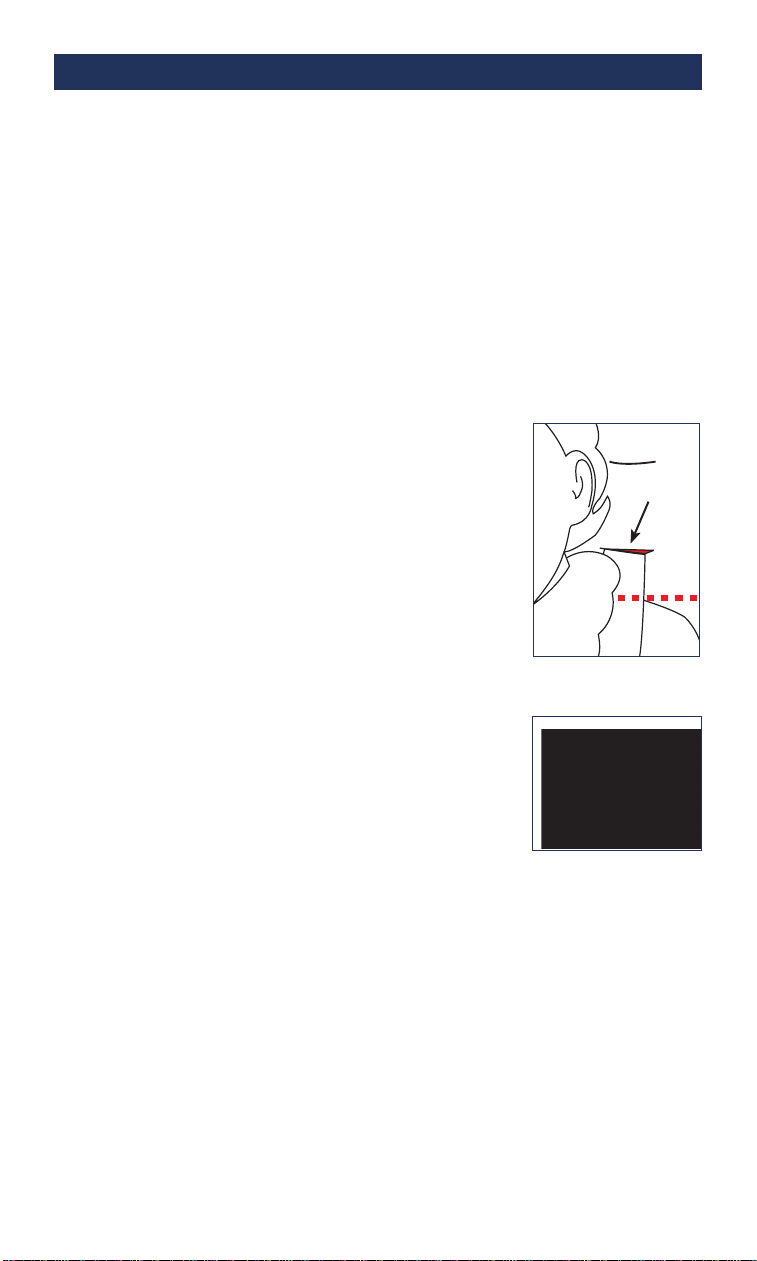
2. Check the position of the harness relative to the
shoulder of the user.
• Harness straps should be inserted in the
nearest slot at or above the user’s shoulder.
• If the height of the user’s shoulder is above
the harness, it will be necessary to adjust the
harness height.
• If the harness height is correct, the child
restraint can be used with no further
adjustment.
Proper Slot
Adjusting the Harness Height
1. Place the user in the child restraint and identify
the closest harness slot at or above the user’s
shoulder. Remove the user from the child
restraint.
2. Locate the metal bracket securing the top of the
harness, along the back side of the restraint, and pull to expose 3” - 4”
of the strap.
3. Turn the metal bracket horizontally so that it ts through the slot (as
shown right) and push it all the way through, including the cover.
Reposition harness to correct slot.
4. Reverse the process to reinstall, ensuring the metal bracket is at
against the back of the child restraint.
17
Page 18
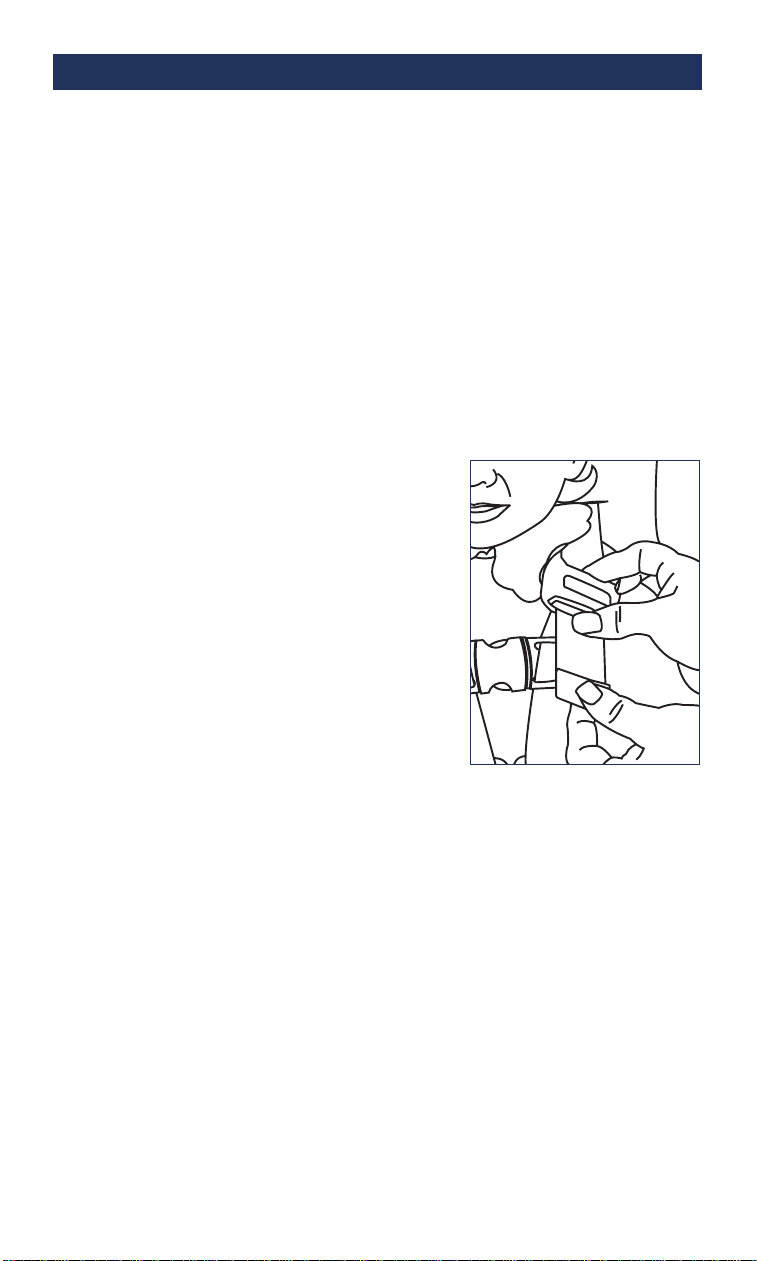
Adjusting the Child Restraint (continued)
Adjusting the Harness Fit
1. With the user in the child restraint, check the location of the buckle.
When pulled upright, the buckle should be positioned at the level of
the user’s hips, not over the stomach area. Adjust the harness to t
the clothes the child is wearing. Remove bulky coats and/or jackets
before putting the child in child restraint.
2. If necessary, the position of the buckle can be changed by relocating
it to the other slot.
• Locate the metal bracket on the under side of the child restraint
that secures the bottom-end of the buckle strap.
• Turn the metal bracket horizontally so that it ts through the slot
and push it up all the way through, including the cover. Reposition
buckle strap to correct slot.
• Reverse the process to reinstall,
ensuring the metal bracket is at
against the underside of the child
restraint once nished.
3. The shoulder straps can be independently
adjusted by pressing the gray button
on the tension adjuster (see “E” on pg.
8) then adding or removing slack in the
webbing.
Note: The tension adjuster should be
positioned just below the user’s collar
bone. If the tension adjuster is either too
low or too high relative to the user’s collar bone, then the shoulder
harness can be shortened/lengthened by increasing or decreasing the
amount of webbing through the 3-bar metal bracket on the back side
of the child restraint.
4. A snug strap SHOULD NOT allow any slack . It lies in a relatively
straight line without sagging or pressing on the user’s skin or body
causing an unnatural position.
18
Page 19
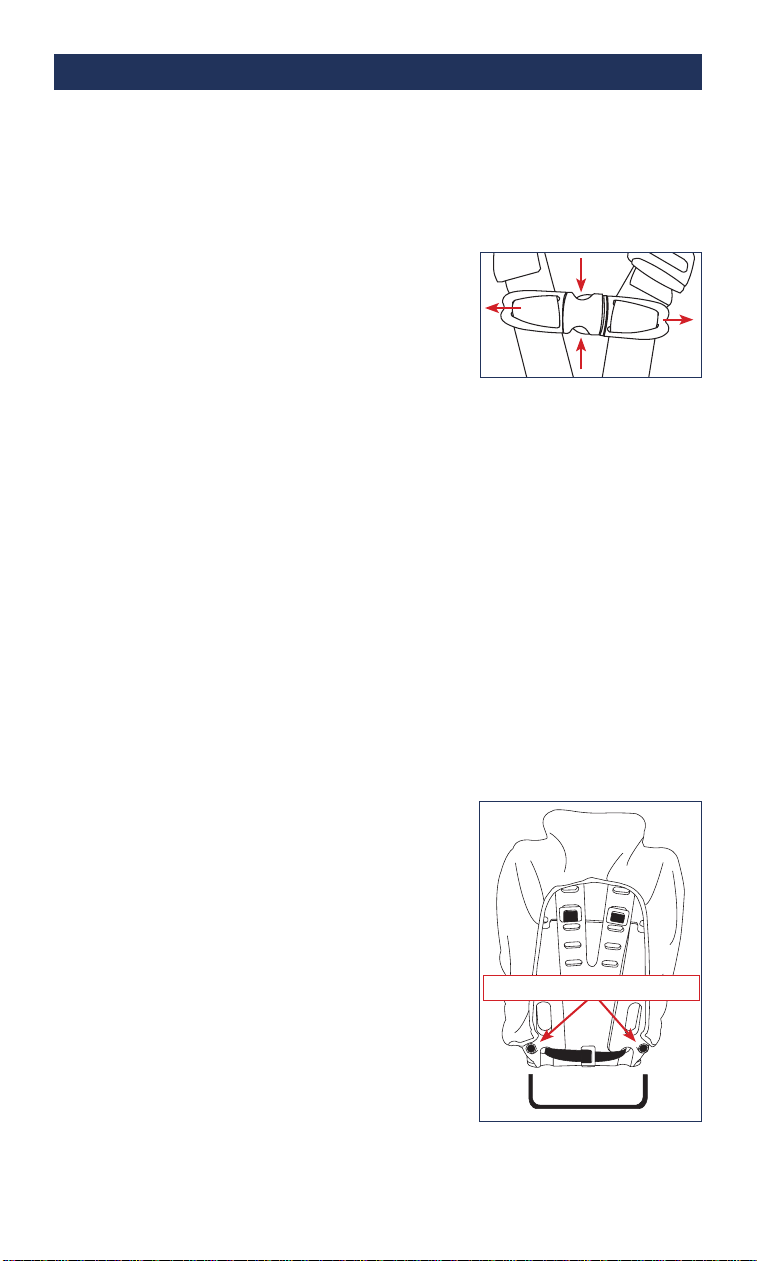
Adjusting the Child Restraint (continued)
Adjusting the Chest Retainer Clip
The chest retainer clip keeps the shoulder straps of the harness from
sliding down off the shoulders.
Note: The correct height for the chest retainer clip is at the middle of the
chest-level with the armpit.
1. The chest retainer clip is fastened by tting
the two halves together. The chest retainer
clip is properly secured only when a click
is heard.
2. Place the chest retainer clip in the proper
location (level with the armpit) by sliding it
up or down the harness straps.
3. To unfasten the chest retainer clip, simply squeeze the top and bottom
tabs in the center, then pull the two halves apart.
Adjusting Padded Head Supports
The Spirit APS Child Restraint comes standard with adjustable softpadded head supports.
1. Locate the plastic buckle and squeeze the top and bottom tabs, then
pull buckle apart.
2. Adjust the height of the head support by inserting each end of the
black strap into any of the unused harness slots that correspond to
the vertical position of the user’s head. Snap buckle to close.
3. To adjust the strap, pull on loose end until desired t is achieved.
Adjusting Seat Recline
The child restraint can be adjusted to a
reclined
position using the optional recline bar.
1. Locate the holes in the lower rear of the
child restraint (see right).
2. Insert the ends of the recline bar into the
holes.
Note: The bottom of the child restraint
should be at on the vehicle seat when
installed.
3. Place and secure the child restraint into
the vehicle as outlined in pages 10 - 16.
19
Insertion holes for recline bar
Recline bar
Page 20

Securing the User in the Child Restraint
Once the child restraint has been properly tted and installed in the
vehicle, follow these instructions to secure the user in the child restraint.
Remove bulky coats and/or jackets before putting the child in child
restraint.
1. Open the harness and move the harness straps to the side of the
child restraint.
2. Place the user in the restraint with his/her back positioned against the
back rest in as upright a position as possible.
3. Verify that the harness straps are located in the slots above, but
closest to the top of the user’s shoulders.
4. If the harness straps are not in the appropriate position, move them
according to the instructions provided in Adjusting the Harness
Height (page 17).
5. Place the harness shoulder straps over each of the user’s shoulders,
making sure that the straps are not twisted or binding on any object.
6. Fasten the metal latch on each shoulder strap securely into the
buckle.
7. Fasten the plastic chest retainer clip and position it in the middle of
the user’s chest - aligned with the armpits of the user.
8. Check to ensure the harness t is snug. A proper t means that you
should not be able to pinch the webbing. If needed, adjust the harness
t as noted in Checking the Harness Fit (page 17).
9. To remove the user from the child restraint, follow the preceding steps
in reverse.
20
Page 21
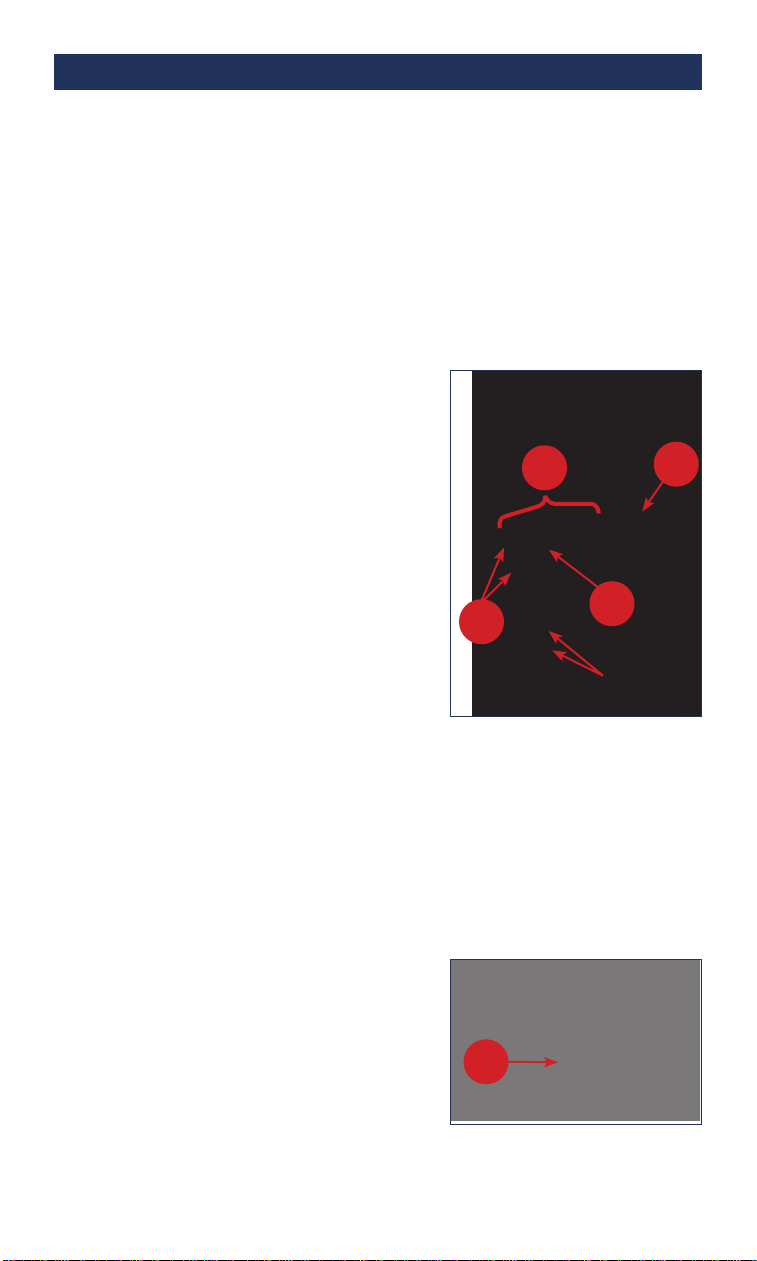
Swing-Away Trunk & Hip Supports for Plus Models
The Spirit APS Child Restraint can be tted with optional accessories
designed to provide a customized t for each user. Consult your therapist
for proper t.
For information on how to install your child restraint’s accessories,
consult the instructions that are included with each accessory.
Swing-Away Supports
The child restraint is designed to be easily tted with swing-away lateral
hip and trunk supports that can be adjusted to provide customized
support for the user.
1. When ordered with trunk and hip
supports, the Spirit APS comes with the
mounting rails already installed. These
rails are used for mounting the swingaway supports. Locate the rails on the
child restraint by pulling back the fabric
aps on each side of the child restraint.
2. To mount the swing-away arm onto
the rail, locate the slab nuts already
inserted in the mounting rail (2 on each
track). Slide the arm into the desired
position, making sure that the slab nuts
are aligned with the open grooves on
the latch mechanism (A). To lock the
arm in position, use an Allen wrench to
screw the bolt (with washer) through
the latch mechanism and into the slab nuts (B). You can use slab nuts
on either track depending on the desired positioning of the swingaway support.
3. To adjust the lateral support depth (how close the supports are to the
user’s body), simply loosen the bolts (C) on the face of the arm, then
slide the bracket in or out. Tighten the bolt to lock it in place. Wrap the
fabric sleeve around the arm to protect the user from the metal edges.
4. To “swing away” the supports, just
press on the latch trigger (D).
B
A
D
Slab Nuts
(four on each rail)
Trunk Support
C
21
D
Hip Support
Page 22

Care and Maintenance
Cleaning the Cover
• Spot clean with upholstery shampoo, foam from a mild detergent, or
mild dry cleaning solvent. Do not saturate with liquid.
• Pile fabrics may require brushing to restore appearance.
• To clean the harness straps, use a sponge, warm water and mild
detergent. Do not use abrasive cleansers.
• To clean the buckle, use a damp cloth and mild detergent. Do not use
abrasive cleansers.
• Do not disassemble the harness.
Removing the Cover
1. Remove the soft support pads (if present) by releasing the lanyards
from the underside of the cover.
2. Open the chest retainer clip and release the metal latches from the
buckle.
3. Remove harness completely by rst locating the metal bracket
securing the top of the harness along the back side of the child
restraint. Pull it away to expose 3 to 4 inches (76.2 to 101.5 mm) of
the webbing.
4. Turn the metal bracket so the short side will t through the slot in the
back of the child restraint and push it through the slot and the cover
(from back to front).
5. Push those same metal brackets through the lower side harness slots
(from front to back). The harness assembly should slide out the back
of the child restraint. Make sure not to disassemble the 3-bar metal
bracket that fastens the harness assembly together.
6. Remove the cover by lifting the edges of the cover over the shell of
the child restraint.
Retting the Cover
• The cover, harness and pads can be reinstalled by the following the
preceding instructions in reverse.
22
Page 23

Product Registration
FOR YOUR CHILD’S CONTINUED SAFETY
Please visit our website at www.inspiredbydrive.com to register for your
car seat.
Although child restraint systems undergo testing and evaluation, it is
possible that a child restraint could be recalled.
In case of a recall, we can reach you only if we have your name and
address, so please ll out the registration form to be on our recall list.
In order to properly register your child restraint system, you will need
to provide the model number, serial number and date of manufacture.
This information is printed on the registration card can be found on a
white label located on the back of the child restraint system.
This registration is only applicable to child restraint systems purchased
in the United States.
23
Page 24

ARRANTY
ARRANTY
W
W
Inspired by Drive warrants this product to be free of defects in material
and workmanship. Our obligation under this warranty is limited to
repair or replacement of any part or entire unit at our option for a
The
period of one year from date of delivery to the original purchaser
warranty does not include cost of inconvenience, property damage,
misuse, abuse, crash or similar incidents. The warranty will not
apply if product has been tampered with or repaired by unauthorized
individuals.
.
© 2017 Columbia Medical, LLC. dba Inspired by Drive
C0240-00-30 (Rev G) 09/2017
 Loading...