

Page 1
www.insize.com
MN ISV-2000D/2001D/3000D/3001D-E-
V0
IS V-2000D/2001D/3000D/3001D
360° SWIVEL VI DE OS CO PE
OP ERATION MAN UA L
Page 2
Product Introduction
Main Unit
ISV-2000D/2001D/3000D/3001D videoscope is an i nspecting device
that of an i ntegration of optics, electronic tech nique, precision
machinery and mico-photograph technique.
Optical testing
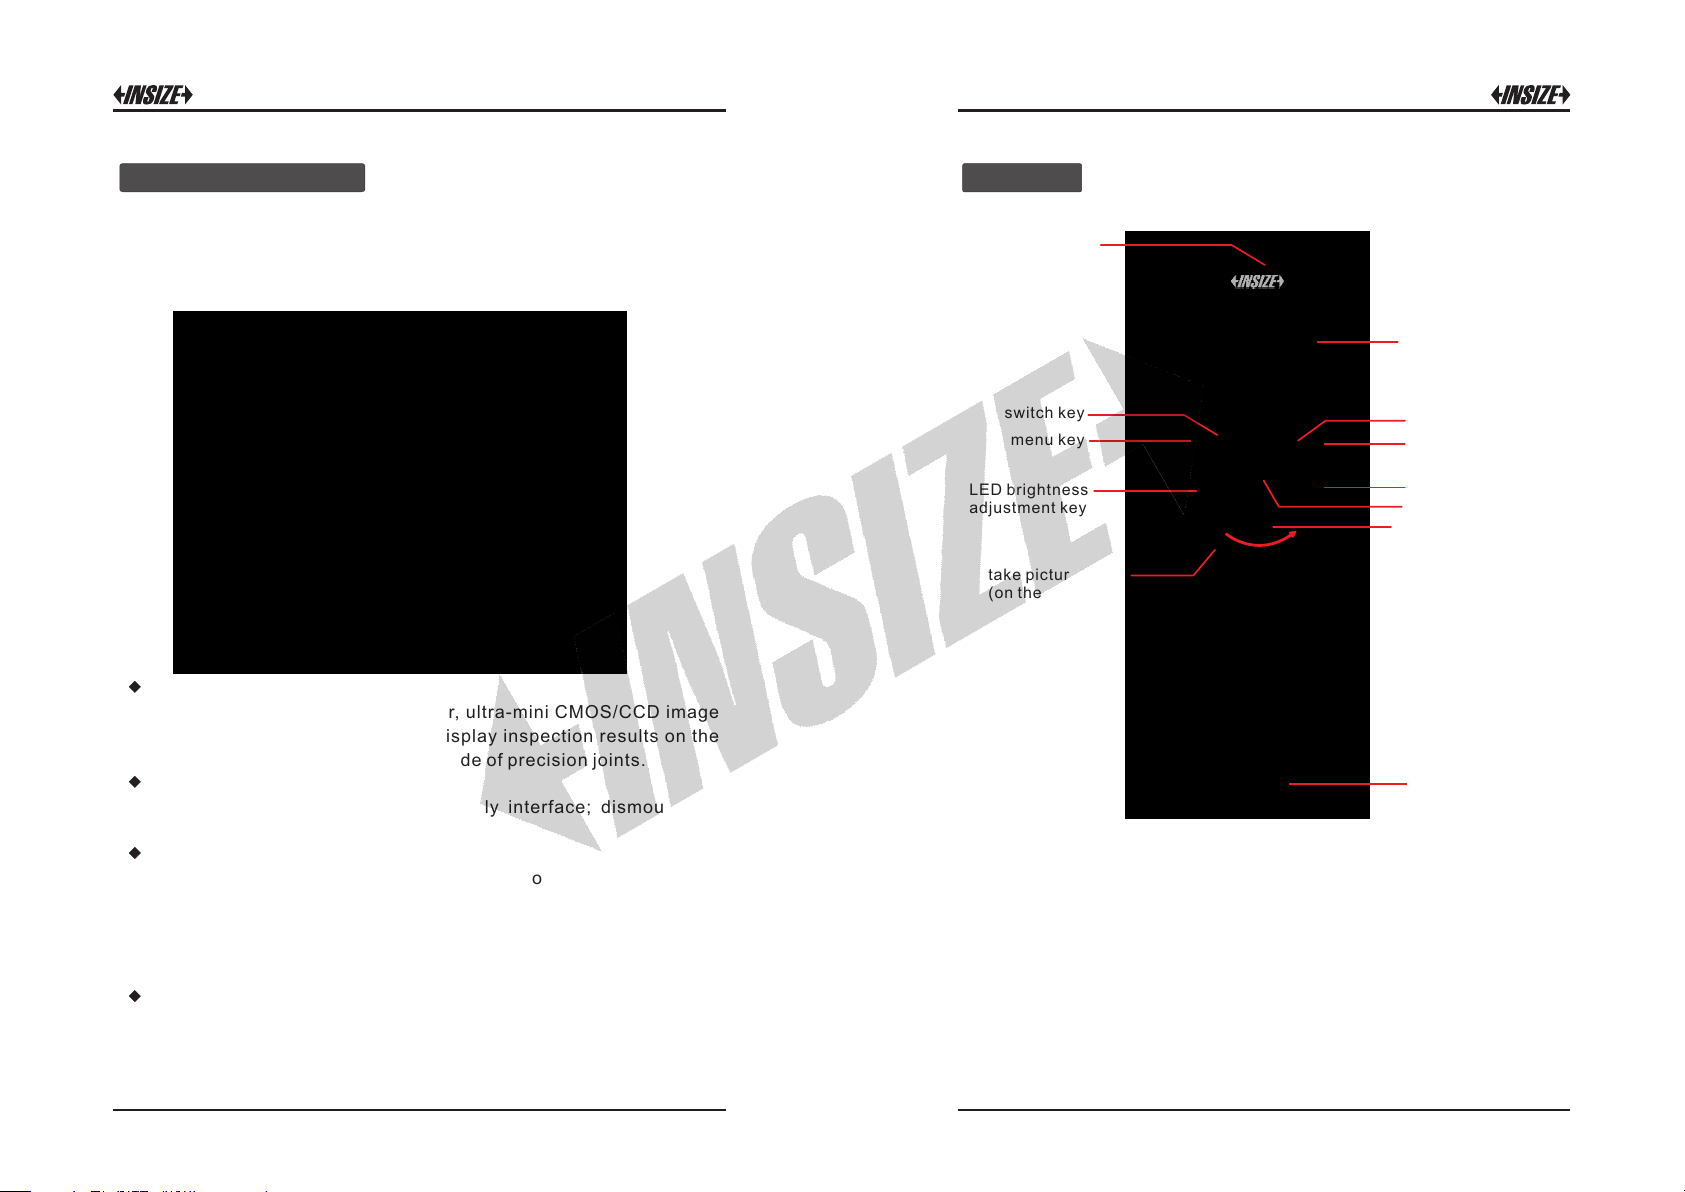
High light 3 .5” LCD screen monitor, ultra-m ini CMOS/CCD im age
sensors amp lify t he images and display inspection res ults o n the
LCD screen. The bending part is made of precision joints.
Portable and practical
Portable and easy to op erate, friend ly interface; dismoun table
and rechargeable alkaline batteries.
Futures
High sens itivenes s CCD/CMOS image sensor, 5x real t ime image
zoom function.
1.5 or 3 meter inspection distance with LED cold light.
SD card storage media, still capture/video function , 640X480
resolution displaying.
Applications
Automobile , machinery, el ectro nics, p etroc hemical, avia tion,
aerospace, marine and Building inspection.
power on/off
3.5' LCD s cre en'
switch key
menu key
LED brightness
adjustment key
take picture/enter
(on the back)
Switch
key:
play&stop key
take video
zoom key
joystick
joystick damping key
battery cover
Press thi s key to s witch betwee n take pict ure and tak e video mod e in
initial interface
In menu mode perform as a browsing key.
.
this key
Play&stop key:
Press thi s key to e nter me mory mode, then pr ess switch key to
browse photos/v ideos taken bef ore, p ress t ake pi cture or take
video key back to initial interface.
Play&stop the videos, press switch key back to memory mode.
1 2
Page 3

Take picture/enter key:
In take pict ure mo de, press to tak e picture. In menu mod e, it i s used
as confirm key.
Take video key:
In take video mode, press to take video, press again to stop taking
video.
Menu key:
Press to ente r me nu mode, press switch key or LED brigh tness
adjustment ke y to browse menu it ems. Press take pic ture/ent er key
to do sel ection and setting. Pr ess this key again to quit from menu
mode.
LED brightness adjustment key:
Press to adjust 5-level recycling light illumination.
Zoom key:
In initial mode press to select magnification(1~5x).
Joystick:
360° full controlling, four-way articulation.
Joystick damping key:
Regulate the obstruction of the joystic k a nd lock the bending
articulation direction.
battery base
USB port
charger port
video output
SD card
3 4
cable
lens
articulation
Page 4

Battery Installation
Operation
Put battery into the base:
Put battery case in to main unit:
Make sure batter y a nd SD card are in stalled before usin g, then turn
on the device.
1
Power on/off:
Long press power on/off key to turn on /off the instrument.
Start inspection:
2
Press to turn o n LED light.
LED brightness adjustment key
Insert probe to the objects.
Control joystick key to make probe get to the target position.
Move j
fixed.
Adjust LED illum inance and pre ss zoom key to re ach the best
image effects.
NOTIC E: Make sure straightness of the probe befo re insertin g
into objects to avoid damage to the probe.
Take picture:
3
Press take picture key on the back to get a picture.
Take video:
4
Press switch ke y to enter tak e video mode, then pres s take video
key, press again to stop taking video.
oystick da mping key to right positio n, the probe will be
take picture mode
taking
take video mode
5 6
taking
Page 5

View the picture or video taken before:
5
Press play&sto p ke y to enter mem ory mode, then press switch
key to b rowse p hotos/vi deos taken before, press take picture or
take video key back to initial interface.
Press this key to pla y or stop playing the video, press switch key
back to memory mode.
Press zoom key to enter list mode, press again back to memory
mode.
view the picture view the video
list mode play the video
Delete the picture or video:
6
Press menu key when view the picture&video.
Press switch key to select item and press take picture to confirm.
Press switch key to select YES or NO then press take pi cture key
to confirm.
Upload the picture or video to computer:
7
Use th e USB cable or take out the SD card, then conne ct it to
computer.
Please turn off the instrument when take out SD card.
Video output:
8
Connect the main u nit to TV o r other screen with AV por t by use
V cable. ideo output
Menu Setting
Press men u ke y to en ter setting items list, us e sw itch and LED
brightness adjustment key to sele ct item and press ta ke picture key
to confirm.
1
Image resolution:
Press switch key to select the items.
Press take picture key to confirm the resolution setting.
Set data/time:
2
Use swit ch key and LED brightness adjustment key to adjust the
value, press zoom key to move the cursor.
Press take picture key to confirm the setting.
Tim e Stamp:
3
Press switch key to select on/off, press take p icture k ey to
confirm.
Tim e st amp marks the date taking photos or video s an d sh ows
date in memory mode.
Format:
4
Press switch key to select YES or NO then press take picture
key to confirm, .
Language
5
Press menu key to get to the submenu and press take p icture key
to en ter the langu age setting m enu interface. T here are four
languages, English, German, French and Simple Ch inese p ress
switch key to select the right lan guage the n pr ess take
picture key to confirm.
:
,
7 8
Page 6

Warning
Do not use out of range of -10℃ to 50℃
Do not place the videoscope in corruption environment.
Do n ot expo se the vdieosc ope into the rai n and place t he prob e under
water long time.
Do not place the videoscope in the magnetic environment.
Do not use the videoscope in mass dusty environment.
Keep the controller clean and do not scratch the monitor.
Do not disass emble the videoscope, the mainten ance se rvice goes
only to the person (s) the manufacturer authorizes.
Do not oper ate the videos cope when cabl e k notted to avoi d damage
to internal steel wire.
When t aking pi cture an d vi deo, make sure LED is suitabl e for
inspection and not tremble the probe.
Check if batteries installed and charged before inspecti on.
After in spection , straighten arti culation an d then pu ll out, do n ot pull
out in a rush.
Clear t he videosc ope and the probe head and lense with wi per, put
into the case; do not s queeze, shoc k and impac t th e monitor, t o avoid
damage. If not use the videosc ope in a long peri od, take out the
batteries to avoid the corruption to the instrument.
Maintenance
Keep the videoscope clean and dry after on-site work.
Place the videocop e in to the design ed c ase for the sake of extending
shelf-life of the product.
9
 Loading...