

Page 1

www.insize.com
MN ISE- -2DT-E
V0
ISE-2DT
DIGITAL LEVEL
OPERATION MANUAL
Page 2
Introduction
Power Key And Touch Panel
Than ks for bu ying our product . ISE-2D T i s a hig h precis ion dual axis
leve l with a color LCD an d touch p anel. I t is po ssible to do h igh spe ed
hori zontal plan e se tting for hig h pr ecision mac hines or home
appl iance as li ke laundry ma chine.
1
Spec ialty:
Easy to se t t he level of the spa ce with 2 axis angl es display at
once .
Leve l up the visu al-effects by t he color LCD.
Smal l & light so th at possible t o use to a sens or unit.
Poss ible to ins ert to high pre cision sy stems.
Buil t-in Li -ion re chargeabl e batte ry. (Recharg eable t o USB
port o n PC)
Set th e toleran ce and the disp lay is show n in different co lors.
2
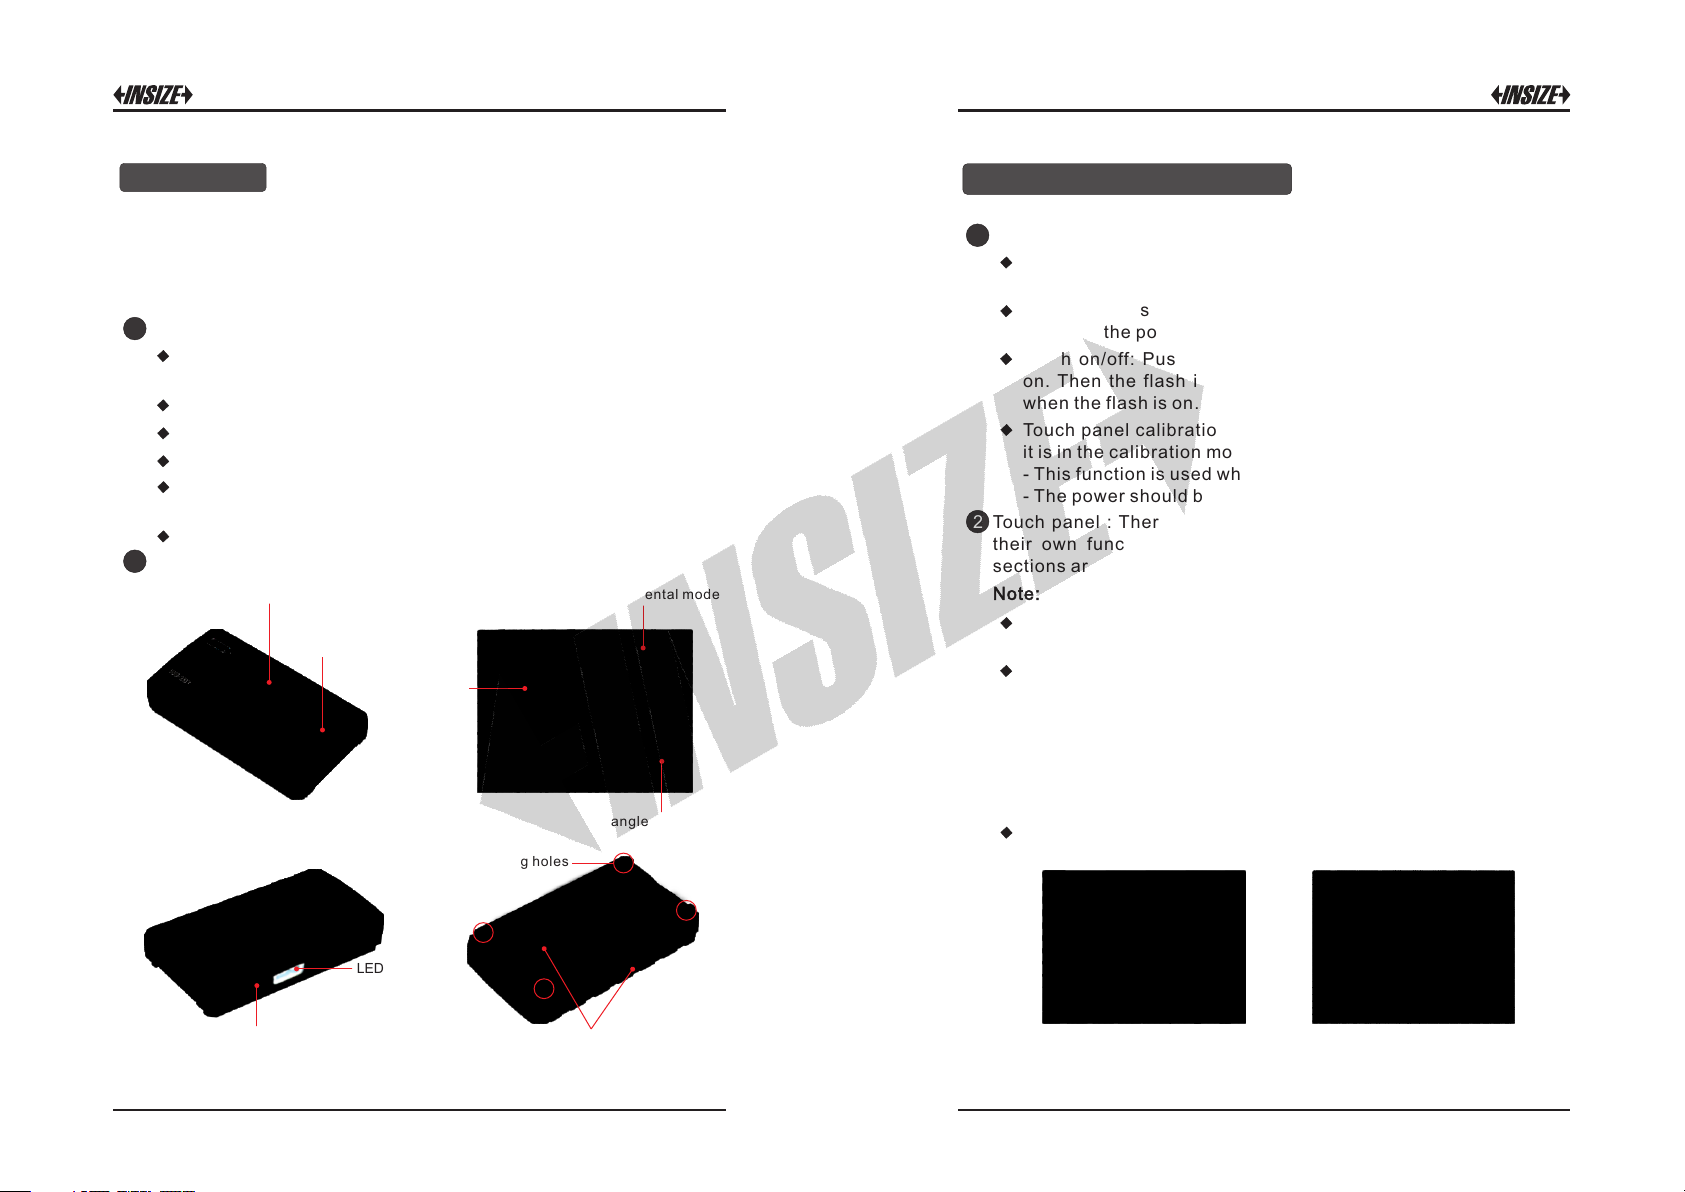
Stru cture:
color LCD a nd t ouch pa ne l
power key
directi on o f
incline
4 thread mo un ting ho le s
absolut e/ in cr em ental m od e
angle of in cl ine
1
Powe r key has 4 fun ctions belo w.
Powe r o n: Pushing the key once if p ower is off then the p ower
is on wi th a sound.
Powe r off: Pu shing t he ke y for a round 2 sec when th e pow er is
on. Then t he power is off.
Flas h on/o ff : Push ing th e key f or under 1 sec af ter po wer is
on. Then the flash is on / off. T he touch pa nel is not w orked
when t he flash is o n.
Touch panel calibrat ion: P ushing t he key for over 5 sec. Then
it is in t he calibr ation mode of t ouch pane l.
- This fun ction is used w hen the tou ch panel does n't work we ll.
- The powe r should be on to e nter this c alibratio n mode.
2
Touch panel : The re are 3 section s on the touch pan el that have
thei r own funct ion. The belo w functio ns are exce eded if e ach
sect ions are to uched.
Note : You must keep t ouching act ion until r each the change .
Main menu entrance: To enter the m ain menu, tou ch t he
'MEN U' area.
Abso lute/In cremental m ode change area : To change the X/Y
to abs olute or in cremental m ode. (ABS REL)
↔
- Abs olute mode: The displaye d values of X/Y are from the
abso lute coordi nate system . The ab solute coor dinate syst em
is se t from th e factory or user's updating at the cal ibration
menu .
- Incr emental m ode: To ma ke curren t X/Y va lues to zer o.
Til t dire ction display area: To ch ange the tilte d dire ction
disp lay metho d. (line↔bubb le)
charge an d da ta outp ut
LED light
V-slot fo r cy linde r
1 2
line bubble
Page 3

Main Menu
3
Spec : To set up the spec. fo r the FLAT mo de.
The mai n m enu is compos ed as the pictu re. Each func tions
can be c hosen by to uching the le tters.
1
Run: To exit t he main menu an d display t he measurin g screen.
2
Mode : To cha nge the mode of d isplay.
foll owing
Go Bac k: To ex it the 'Spec' m enu.
Tolera nce: To setup t he tolera nce of the tilted di rection d isplay
line , the green l ine or bubble m eans with in the tolerance.
Mode l: 10 memo ry spa ces are given to save the use rs'
spec ificati on setting. An d user coul d recall them l ater.
X: The wid th of the setti ng points .
Y: The leng th of the setti ng points .
Pitc h: The pi tch o f the s crewed legs at the home appliance s or
othe r machine s.
Angl e: It is set by 3 60 deg. norma lly.
4
Cali bration : To cal ibrate the absol ute ze ro. Pl ease follo w the
step s careful ly. If no t, it can not b e guarantee d the angle d ata.
XY Calib ration: P ut t he l evel on the s urface as follow ing
pict ure and choos e t he 'X Y 1st '. Then you might see 'X Y 1st
Plea se Touch Scree n'. I f the le vel is settle d w ell o n the
surf ace, touc h the scree n and wai t until the level ga thers the
data a nd averag es them.
Tur n the level 1 80 degrees an d choose the 'X Y Re v'. And
touc h the scree n if the level is s ettled.
X Calib ration: Put the on the surfac e
and choo se the 'X 1s t'. Th en you might see 'X 1st Please
Touch Scree n'. I f the leve l is settl ed well on th e sur face, touch
the sc reen.
3
leve l as foll owing pictur e
4
Page 4

Tur n the 180 deg rees and choo se the 'X Rev' . An d touch
leve l
the sc reen if the l evel is settl ed.
Defa ult: If t he calibr ation is not done well, use r can cho ose the
'def ault'. The n leve l will recal l the zero setti ng value s at the
fact ory.
5
Averag e: To c hange th e number of inputti ng row da ta to avera ge
them . It can be set from 1 to 30.
6
Disp lay: To c hange display optio ns as like brightn ess, d isplay off
time , etc.
Operation
1
Thre e using met hod:
horizontal use vertical use lie-down use
2
Flat mode: Flat m ode is used t o adjust the 4 legs machine s, as
like laundry ma chine, etc., very easily. There are shown the 3
poin ts, that ma kes a plane, wi th the heig hts to raise up .
P1 should be up 2 96mm.
P2 4 00mmshould be up .
Go Bac k: To ex it the Dis play' men u. '
Touch Ca librati on: To cal ibrate th e touch panel .
Brig htness: To change t he bright ness of the scr een.
Disp lay Off: To c hange the dis play on tim e. Th e s creen will be
off afte r this time.
Powe r O ff: To ch ange the power on time. The power will be off
afte r this time .
Line width: To ch ange the width o f the til ed direct ion ind icating
line a t the POLE mo de.
7
Save : To save wh atever user has c hanged, it should be done . If
user doe sn't wan t to save the c urrent c hanges, just turn off th e
powe r .
8
Abou t: To se e the informa tion of the m anufactur er.
5
P2
P1
P3
P4 is floated point
P3 doesn’t need to adjust
P4
floated point
The floated poin t shoul d be taught by us er. It could be P1 , P2, P3,
or P4 dep end on situa tion. If user touche s the area of the float ed
poin t on the screen, ISE-2DT cal culates and disp lays the heights
of t he othe r 3 poi nts. The floated p oint sh ould be fill ed up a t the
last a fter user f inishes to ad just the 3 po ints level.
Note :
Befo re measurin g, to use this fl at m ode, user als o has to set the
para meters.
6
 Loading...