


G N 1 1 0 0 / H C 1 1 0 0
instant hot water dispenser
owner’s manual
manuel d’utilisateur
manual del usuario
Welcome to the world of filtered hot water convenience, from In-Sink-Erator Hot Water Dispensers
Congratulations on the purchase of your new In-Sink-Erator Series 1100 Hot Water Dispenser! This system will provide safe, filtered hot water on demand for the ultimate in sinktop convenience.
How it works: A small tank, mounted neatly under the cabinet, maintains a 1/2 gallon of water at near-boiling (up to 212˚F) temperature. Cool tap water is plumbed into a valve in the dispensing faucet. When the valve is opened, the cool tap water flows into the tank displacing the near-boiling water, which flows out of the faucet. The hot water dispenser can be less costly than heating water on a stove-top or microwave because the only water heated is that which is consumed!
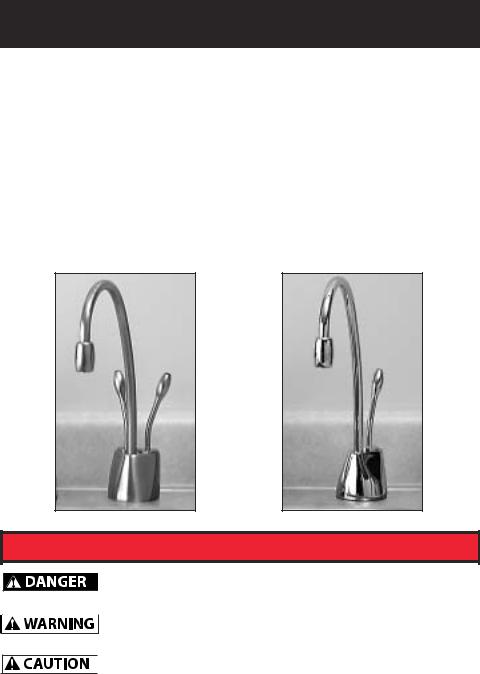
The HC System dispenses fresh, filtered, near-boiling water and cool drinking water.
The GN System dispenses fresh, filtered, near-boiling water only.
Know what these safety symbols mean:
DANGER indicates an imminently hazardous situation which, if not avoided, will result in death or serious injury.
WARNING indicates a potentially hazardous situation which, if not avoided, could result in death or serious injury.
CAUTION indicates a potentially hazardous situation which, if not avoided, may result in minor or moderate injury.
2

The Installation, Care and Use of your new 1100 Series In-Sink-Erator Hot Water Dispenser
Save this important safety information!
This product dispenses water at temperatures up to 212˚F, which is hot enough to cause severe burns. Caution should be exercised when installing and using this product. Under no circumstances is this product to be altered in any way other than that which is specifically addressed in these instructions. Doing so may void your warranty.
Premature connection of the unit to an electrical supply could result in a “dry start” condition, which could damage the unit and void your warranty. The unit must be completely installed and the tank must be completely full with water running from the dispenser before plugging the unit in to an electrical supply.
Do not under any circumstances use bleach, abrasive liquids, powders or scouring pads to clean the faucet as doing so could void your warranty. Occasional cleaning with a soft cloth and warm soapy water is sufficient.
A hot water dispenser, like any water heater, has limited life and will eventually fail. To avoid possible property damage, a hot water dispenser should be regularly examined for leakage and replaced when necessary. A drain pan plumbed to an appropriate drain is highly recommended in those applications where any leakage could cause property damage.
IMPORTANT SAFETY INSTRUCTIONS
WARNING – When using electrical appliances, basic safety precautions to reduce the risk of fire, electric shock, or injury to persons should be followed:
1.READ ALL INSTRUCTION BEFORE USING THIS WATER HEATER.
2.This water heater must be grounded. Connect only to properly grounded outlet. See “GROUNDING INSTRUCTIONS” found on page 4.
3.Install or locate this water heater only in accordance with the provided installation instructions.
4.Use this water heater only for its intended use as described in this manual.
5.Do not use an extension cord set with this water heater. If no receptacle is available adjacent to the water heater, contact a qualified electrician to have one properly installed.
6.As with any appliance, close supervision is necessary when used by children.
7.Do not operate this water heater if it has a damaged cord or plug. If it is not working properly, or if it has been damaged or dropped.
8.This water heater should be serviced only by qualified service personnel. Contact nearest authorized In-Sink-Erator service agent for examination, repair, or
adjustment. |
3 |
Specifications & Approvals
Tank Electrical Specifications: 750 watts, 115 volts, 6.5 amps.
With 3-wire cord and 3 prong plug provided.
Tank Capacity Specifications: 1/2 Gal: 60 cups per hour
Tank Thermostat Specifications: Adjustable from 160˚-200˚F
F201 Chemical & Mechanical Reduction Filter Specifications: (Use replacement cartridge F-201R) This cartridge (included with the system) provides mechanical and chemical reduction of dirt/rust, taste/odor, chlorine and particulates.
Pressure: 30-125 psi |
Temperature: 33˚F–100˚F |
Flow Rate: 0.75 gpm |
Capacity: 500 gallons |
System is tested and certified by NSF International against ANSI/NSF Standard 42 for the reduction of Particulate Class I, Chlorine Class I, Taste and Odor.
Filter Capacity: 500 gallons, depending on local water conditions. Note that while the testing was performed under standard laboratory conditions, actual performance may vary.
Do not use with water that is microbiologically unsafe or of unknown quality without adequate disinfection before or after the system. For cold water use only. Systems must be installed and operated in accordance with the Manufacturer’s recommended procedures and guidelines. See warranty card for warranty. For service and parts, contact your local dealer or In-Sink-Erator directly at 1-800-558-5700.
Contaminant |
Average |
Product |
Average |
USEPA |
NSF |
|
Reduction |
Influent ppm |
Water ppm |
Reduction |
Recommendation |
TEST |
|
|
|
|
|
|
|
|
Taste/Odor/ |
2.10 |
0.05 |
97% |
N/A |
500180-00 |
|
Chlorine |
||||||
|
|
|
|
|
||
|
|
|
|
|
|
|
Particulates |
286667 |
1683 |
99% |
N/A |
500181-00 |
|
|
|
|
|
|
|
Application guidelines/Water Supply Parameters for NSF Testing: Service flow of 0.75 gpm, community or private well water supply, water pressure of 30-125 psi, water temperature of 33˚F–100˚F . Except as noted, all testing performed at pH = 7.5±0.5, Flow: 0.75 gpm, Pressure: 60 psi, Temp:20˚±3˚C.
Contact an authorized In-Sink-Erator service agent for repairs or replacement components.
Grounding Instructions
Electric Shock Hazard. Using an ungrounded or improperly connected appliance can result in serious injury or death from electric shock.
This appliance must be grounded. This appliance is equipped with a cord having an equipment grounding conductor and a grounding pin. The plug must be connected to an appropriate outlet that is properly installed and grounded in accordance with all local codes and ordinances. Please size electrical supply appropriately and check rating plate for electrical requirements. Do not modify the plug provided with the appliance - if it will not fit the outlet, have a proper outlet installed by a qualified electrician. Check with a qualified electrician or serviceman if you are in doubt as to whether the appliance is properly grounded.
4

Parts & Components
In general, you'll be installing a faucet above-sink, with a filter assembly and a heating unit below-sink. You'll also be connecting all of the plumbing. Under the sink you'll need a grounded electrical service outlet, a connection to the cold water line (not included), and enough space to install the filter and tank assemblies.
2.
4.
3.
1.
8.
5.
10.
6. |
9. |
1.Dispenser Faucet (HC Model shown)
2.DuraTank™ Hot Water Tank
3.Filter Head & Bracket Assembly
4.F-201 Filter Cartridge
5.Two 3/8" x 3' Polyethylene Tubes
6.3/8" Brass Nut, Ferrule, and Tube Insert
7.6" Filter Vent Tube (not shown)
8.3/8" to 1/4" Quick-Connect Union Fitting (for GN1100 models)
or 3/8" to 1/4" Quick-Connect "Y" Fitting (for HC1100 Models)
9.Dispenser Faucet Mount O-Ring, Clamp Plate, 6 mm Nut and Installation Tool
10.Tank Mounting Bracket and Screws
Here's what a typical complete installation should look like when you're done: Note: Component placement should be such to avoid electrical outlet.
For Reference Only
SinkTop™ Switch
sold separately.
5
Planning, Preparation and Tools
Things to check before you begin:
Can you make the cold water connection?
If not, you may want to consult a qualified plumber, and have an appropriate plumbing fitting installed.
Do you know where you want to locate the faucet and tank? If you have to drill through the sink or countertop, you will need to rent or purchase the appropriate tools.
(See Step 3)
Do you have a grounded electrical outlet under the sink?
If not, you will need to have electrical service installed by a qualified electrician. For safety, GFCI’s (Ground Fault Circuit Interrupter) are recommended.
Make sure you have room. Ensure that the area where you install the dispenser allows room for the handles to actuate fully and for the neck to swivel. About 3" of clearance behind the dispenser faucet should be enough.
This installation should take 2 hours and be accomplished easily, even if you have no prior electrical or plumbing experience. Read the installation manual first, and be sure to plan ahead for any tools or parts you may need.
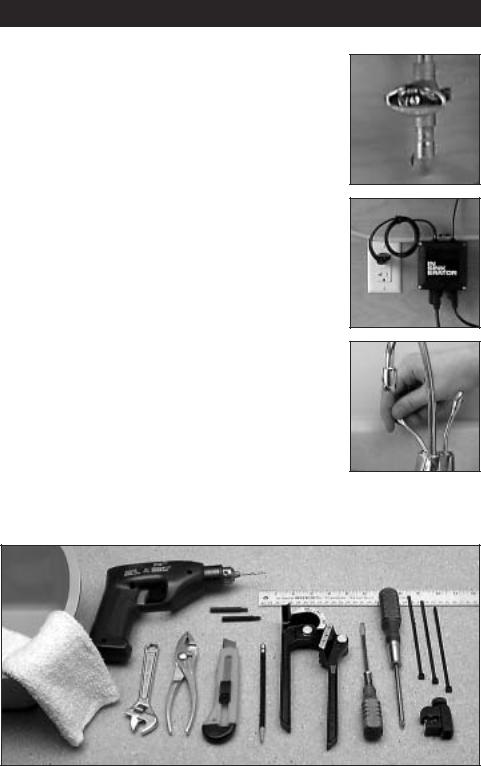
Tools you may need include:
A pan or tub to catch drips, a rag or towel, a cordless drill, phillips and flat head screwdrivers (or phillips and flat head screwdriver bits for your cordless drill), an adjustable wrench,
pliers, a utility knife, a pencil, a ruler, a tube bender, a tube cutter, and finally cord ties or wraps to keep the tubing and cabling tight and out of the way.
6
 Loading...