

Insignia NS-PDP50, TV-720P User Manual

INSIGNIA
NS-PDP50

07-287 NS-PDP50 English Only.fm Page 2 Wednesday, July 1l, 2007 12:05 PM

07-287 NS-PDP50 English Only.fm Page 3 Wednesday, July 1l, 2007 12:05 PM
Insignia NS-PDP50
50" Plasma TV-720P
Contents
Introduction .............................. 3
Safety information ......................... 3
Feat ures ................................. 4
Front ..................................... 5
Back ..................................... 5
Remote control ............................. 6
Setting up your plasma TV ................... 7
Installing batteries .......................... 7
Bundling cables ............................ 8
Grounding ................................. 8
Connecting an antenna or cable TV ............. 9
Connecting a standard A/V device .............. 9
Connecting an S-Video device ................. 9
Connecting a component device .............. 10
Connecting an HDMI device .................. 10
Connecting a DVI device .................... 11
Connecting a digital audio device .............. 11
Connecting a PC .......................... 12
Using your plasma TV ..................... 12
Turning your plasma TV on or off .............. 12
Selecting the video input source .............. 13
Labeling a video input source ................. 13
Changing channels ......................... 13
Adjusting the volume ....................... 13
Creating the channel list ..................... 13
Adding or deleting a channel ................. 14
Creating a favorite channel list ................ 14
Selecting the picture mode ................... 15
Adjusting the color temperature ............... 15
Adjusting the HD picture quality ............... 16
Adjusting the movie picture quality ............. 16
Adjusting the black level ..................... 17
Restoring video settings ..................... 17
Selecting a sound mode ..................... 17
Adjusting the balance ....................... 18
Selecting the audio language ................. 18
Turning the speakers on or off ................ 19
Setting the clock ........................... 19
Setting the on and off timers ................. 20
Setting the sleep timer ...................... 20
Turning Auto Off on and off .................. 20
Selecting the aspect ratio .................... 21
Selecting the on-screen display (OSD) language . 21
Checking the DTV signal strength ............. 21
Selecting closed captions .................... 22
Changing closed caption styles ............... 22
Using low power ........................... 23
Avoiding image burn-in ...................... 23
Setting parental controls ..................... 23
Maintaining .............................. 24
Cleaning the screen ........................ 24
Cleaning the cabinet ........................ 24
Troubleshooting .......................... 25
Specifications ............................ 26
Programming the remote control ............. 26
Remote control codes ...................... 26
One-Year Limited Warranty ................. 31
_iiiiii_Jiij[!_
INSIGNIA
_ii!!iiiiiiiii_ii_
Introduction
Congratulations on your purchase of a
high-quality Insignia product. Your NS-PDP42
represents the state of the art in plasma TV
design and is designed for reliable and
trouble-free performance.
Note
Afew small colored dots may bepresent onyour
plasma TV screen, This is normal inplasma TVs
anddoes notmean that your plasma TV is
defective,
Note
Your plasma TV has cooling fans that insure
reliable operation, When the fans are running
there is a small amount of noise, This is normal
and does not mean that your plasma TV is
defective,
Safety information
Warning
To reducethe riskof electric shock,donot remove
the coveror back, No userserviceable parts
inside, Refer servicing to qualified service
personnel,
To reducethe risk offire orelectric shock,do not
expose your plasma TVto rain or moisture,
Warning
To prevent electric shock, match thewide blade
on the power cord plug tothe wide sloton an
electric outlet,If the plug does not fit, consult a
licensedelectrician toreplace the obsolete outlet,
Do not modifythe power cord plug, or you will
defeat thissafety feature,
........................This symbol indicatesthat dangerous voltage
constituting a risk of electric shockis present
within your plasma TV.This label is locatedon
, the backof your plasmaTV,
.........................This symbol indicatesthat thereare important
,&
operating andmaintenance instructions in the
literature accompanying your plasma TV,
ii
Important safety
instructions
1 Read these instructions.
2 Keep these instructions.
3 Heed all warnings.
4 Follow all instructions.
5 Do not use your plasma TV near water.
6 Clean the cabinet with a dry cloth only.
7 Do not block any ventilation openings. Install
in accordance with the manufacturer's
instructions.
07-287NS-PDP50 English Only.fm Page 4 Wednesday, July 1 l, 2007 12:05 PM
INSIGNIA
iii
ns{ _aNS-PDPS050 Pass-_aYV/20P
10
11
12
13
14
15
Do not install near any heat sources such as
radiators, heat registers, stoves, or other
apparatus (including amplifiers) that produce
heat.
Do not defeat the safety purpose of the
polarized or grounding-type plug. A polarized
plug has two blades with one wider than the
other. A grounding type plug has two blades
and a third grounding prong. The wide blade
or the third prong is provided for your safety.
If the provided plug does not fit into your
outlet, consult an electrician for replacement
of the obsolete outlet.
Protect the power cord from being walked on
or pinched particularly at plugs, convenience
receptacles, and the point where they exit
from your plasma TV.
Only use attachments or accessories
specified by the manufacturer.
Use only with a cart, stand,
tripod, bracket, or table
specified by the manufacturer.
Unplug your plasma TV during
lightning storms or when
unused for long periods of time.
Refer all servicing to qualified service
personnel.
Servicing is required when your plasma TV
has been damaged in any way, such as the
power-supply cord or plug is damaged, liquid
has been spilled or objects have fallen into
your plasma TV, your plasma TV has been
exposed to rain or moisture, does not operate
normally, or has been dropped.
Do not overload wall outlets. Overloaded wall
outlets, loose or damaged wall outlets,
extension cords, frayed power cords, or
damaged or cracked wire insulation are
dangerous. Any of these conditions could
result in electric shock or fire. Periodically
examine the cord of your plasma TV, and if
its appearance indicates damage or
deterioration, unplug it, discontinue use of
your plasma TV, and have the cord replaced
with an exact replacement part by an
authorized service person. Protect the power
cord from physical or mechanical abuse,
such as being twisted, kinked, pinched,
closed in a door, or walked upon. Pay
particular attention to plugs, wall outlets, and
the point where the cord exits your plasma
TV.
16 Ensure that you connect the earth ground
wire to prevent possible electric shock. If
grounding methods are not possible, have a
qualified electrician install a separate circuit
breaker. Do not try to ground the unit by
connecting it to telephone wires, lightening
rods, or gas pipes.
17 Mains plug is the disconnecting device. The
plug must remain readily operable.
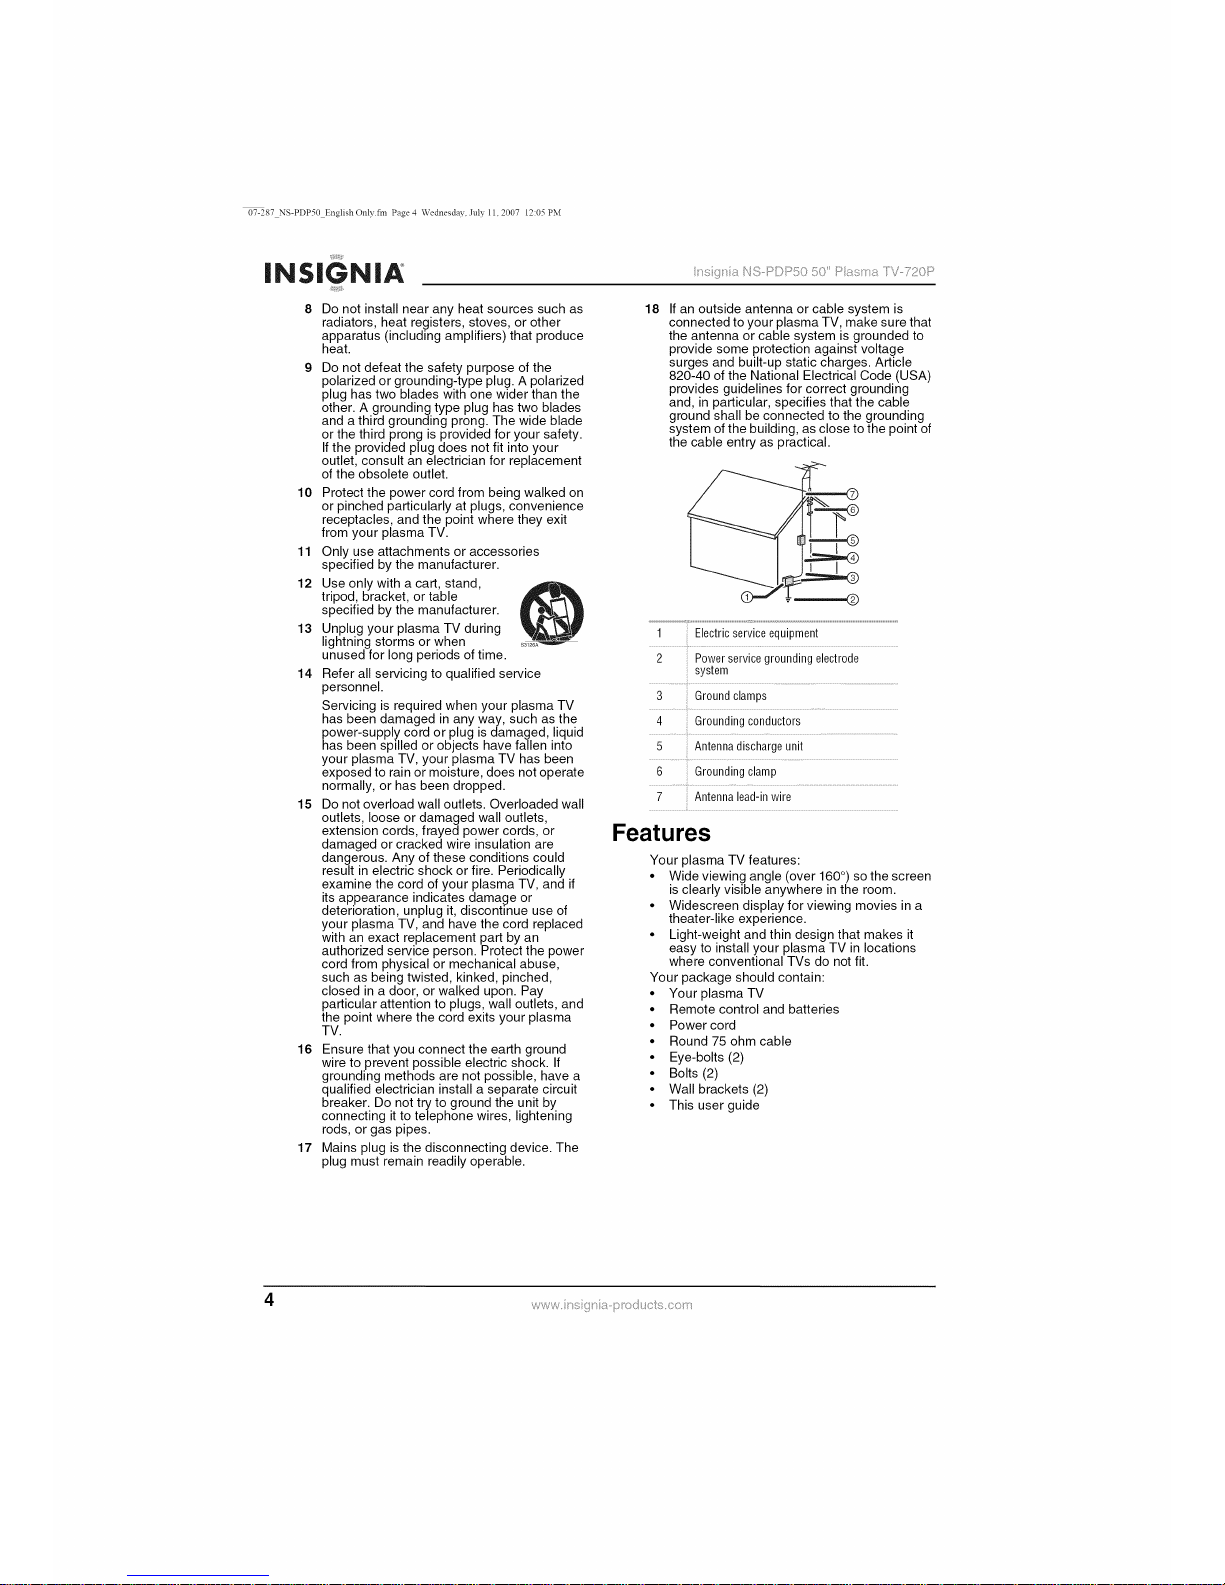
18
If an outside antenna or cable system is
connected to your plasma TV, make sure that
the antenna or cable system is grounded to
provide some protection against voltage
surges and built-up static charges. Article
820-40 of the National Electrical Code (USA)
provides guidelines for correct grounding
and, in particular, specifies that the cable
ground shall be connected to the grounding
system of the building, as close to the point of
the cable entry as practical.
1 Electricserviceequipment
2 ;; Powerservicegroundingelectrode
system
3 Groundclamps
4 Groundingconductors
5 Antennadischargeunit
6 Groundingclamp
7 Antennalead-inwire
Features
Your plasma TV features:
• Wide viewing angle (over 160 °)so the screen
is clearly visible anywhere in the room.
• Widescreen display for viewing movies in a
theater-like experience.
• Light-weight and thin design that makes it
easy to install your plasma TV in locations
where conventional TVs do not fit.
Your package should contain:
• Your plasma TV
• Remote control and batteries
• Power cord
• Round 75 ohm cable
• Eye-bolts (2)
• Bolts (2)
• Wall brackets (2)
• This user guide
;7 07-287 NS-PDP50 English Only.fm Page 5 Wednesday, July 11, 2007 12:05 PM
i;]_i_/,-_i_ _IQ ©_'_©;_"_ ..... /D/_;_?-_ _ -_ _ "_"_ D
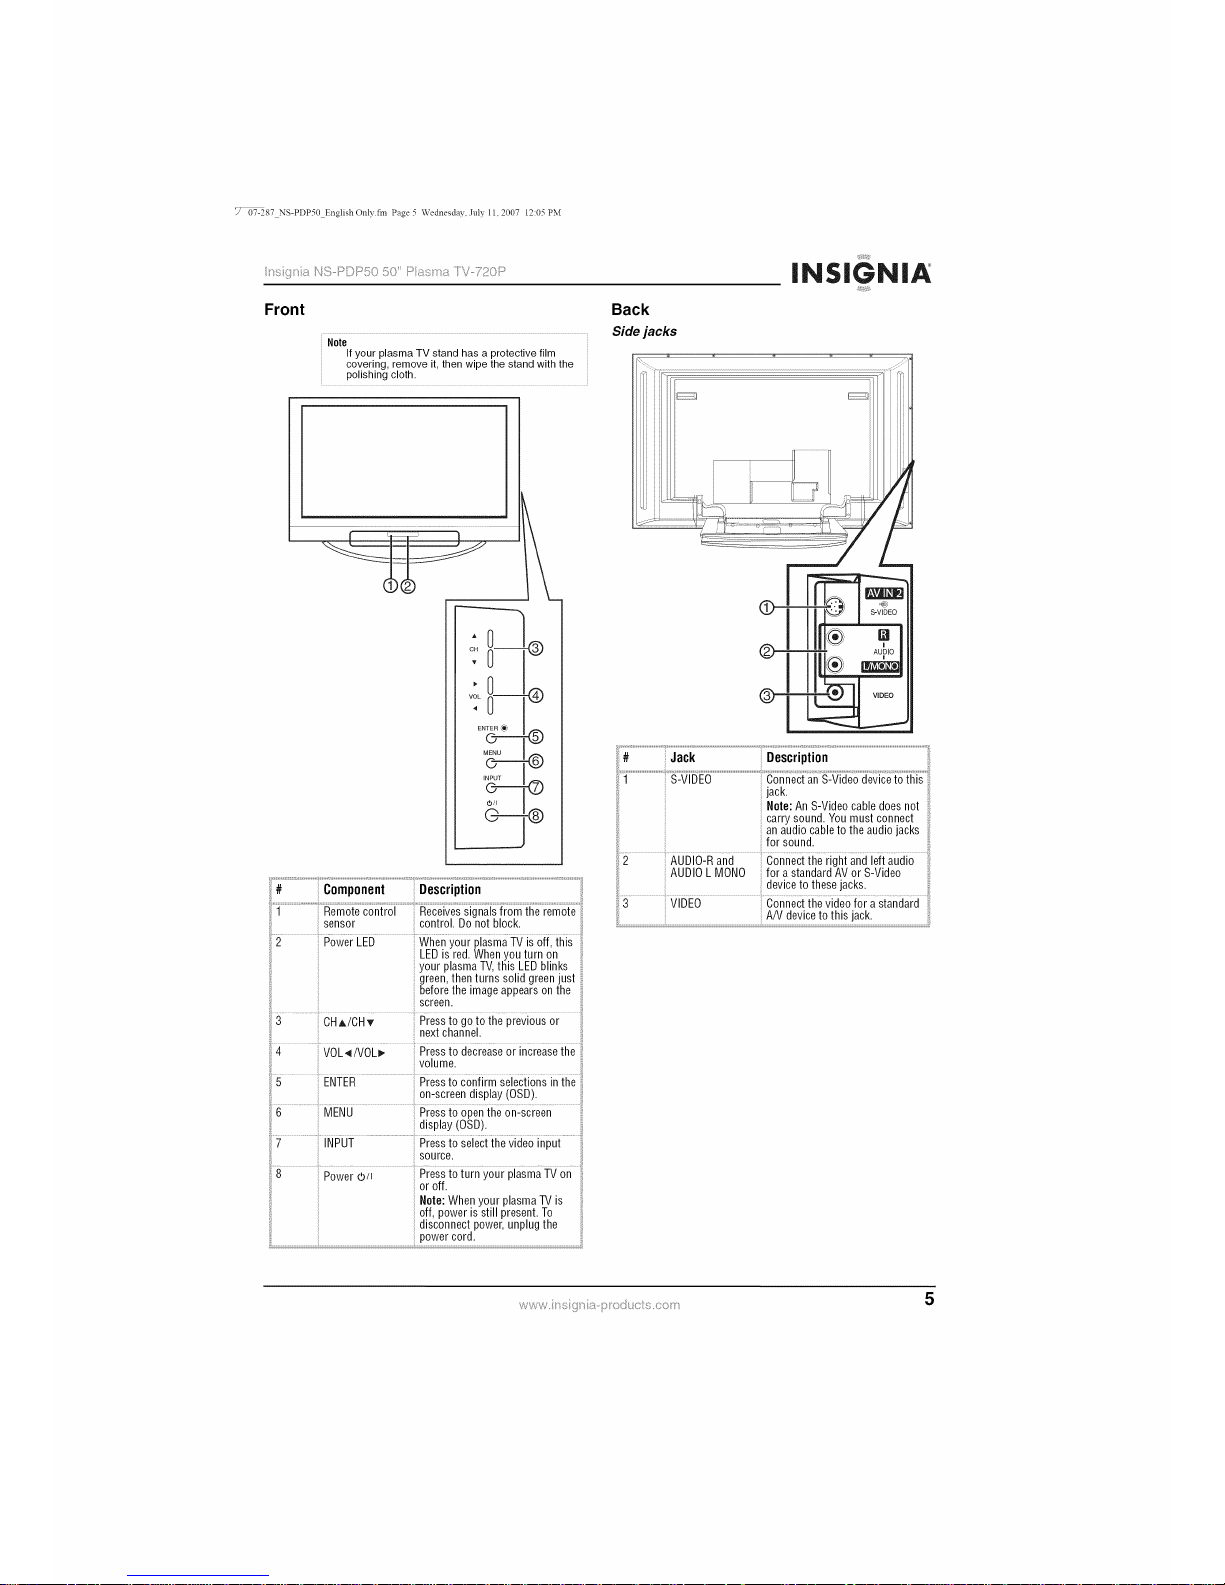
Front
Note
If your plasmaTV stand hasa protectivefilm
covering, removeit, then wipe the stand with the
polishingcloth,
Back
Side jacks
I
OH -- @
T
VOL =@
ENTER _)
O---O
MENU
O--4!)
INPUT
©--O
©---®
# Component Description
_iiii/{{_i]!!
iNSiGNiA
;_ii!i!iiii}i
i
II °
!
AUDIO
+!1
®!
iiii¸........ i-
2 AUDIO-Rand
AUDIOL MONO
.............................................................................. !!
i jack.
Note: An S-Videocabledoes not ,;
carry sound. You must connect
anaudio cable to the audiojacks i
for sound.
iiii
ieii auiio _:i
for a standard AVor S-Video
deviceto these jacks.
1 Remote control Receivessignals from the remote
sensor control. Do not block.
2 Power LED Whenyour plasmaTV is off, this
LEDis red.Whenyou turn on
your plasmaTV,this LEDblinks
green,then turns solid green just
beforethe imageappears onthe
screen.
3 CHA/CHT Pressto goto the previous or
next channel.
4 VOL,_iVOL_- Pressto decrease or increasethe
volume.
5 ENTER Pressto confirm selections inthe
on-screen display(OSD).
6 MENU Press toopenthe on-screen
display (OSD).
7 INPUT Press to select the video input
source.
8 Power _b/I Pressto turn your plasmaTV on
or off.
Note: When your plasmaTV is
off, power is still present. To
disconnect power,unplug the
power cord.
3 VIDEO Connect the videofor a standard _
A/V deviceto this jack.
7 07-287 NS-PDP50 English Only.fm Page 6 Wednesday, July 1l, 2007 12:05 PM
_iiiii/ii!i)_
INSIGNIA
_iJiiii_iJ/i
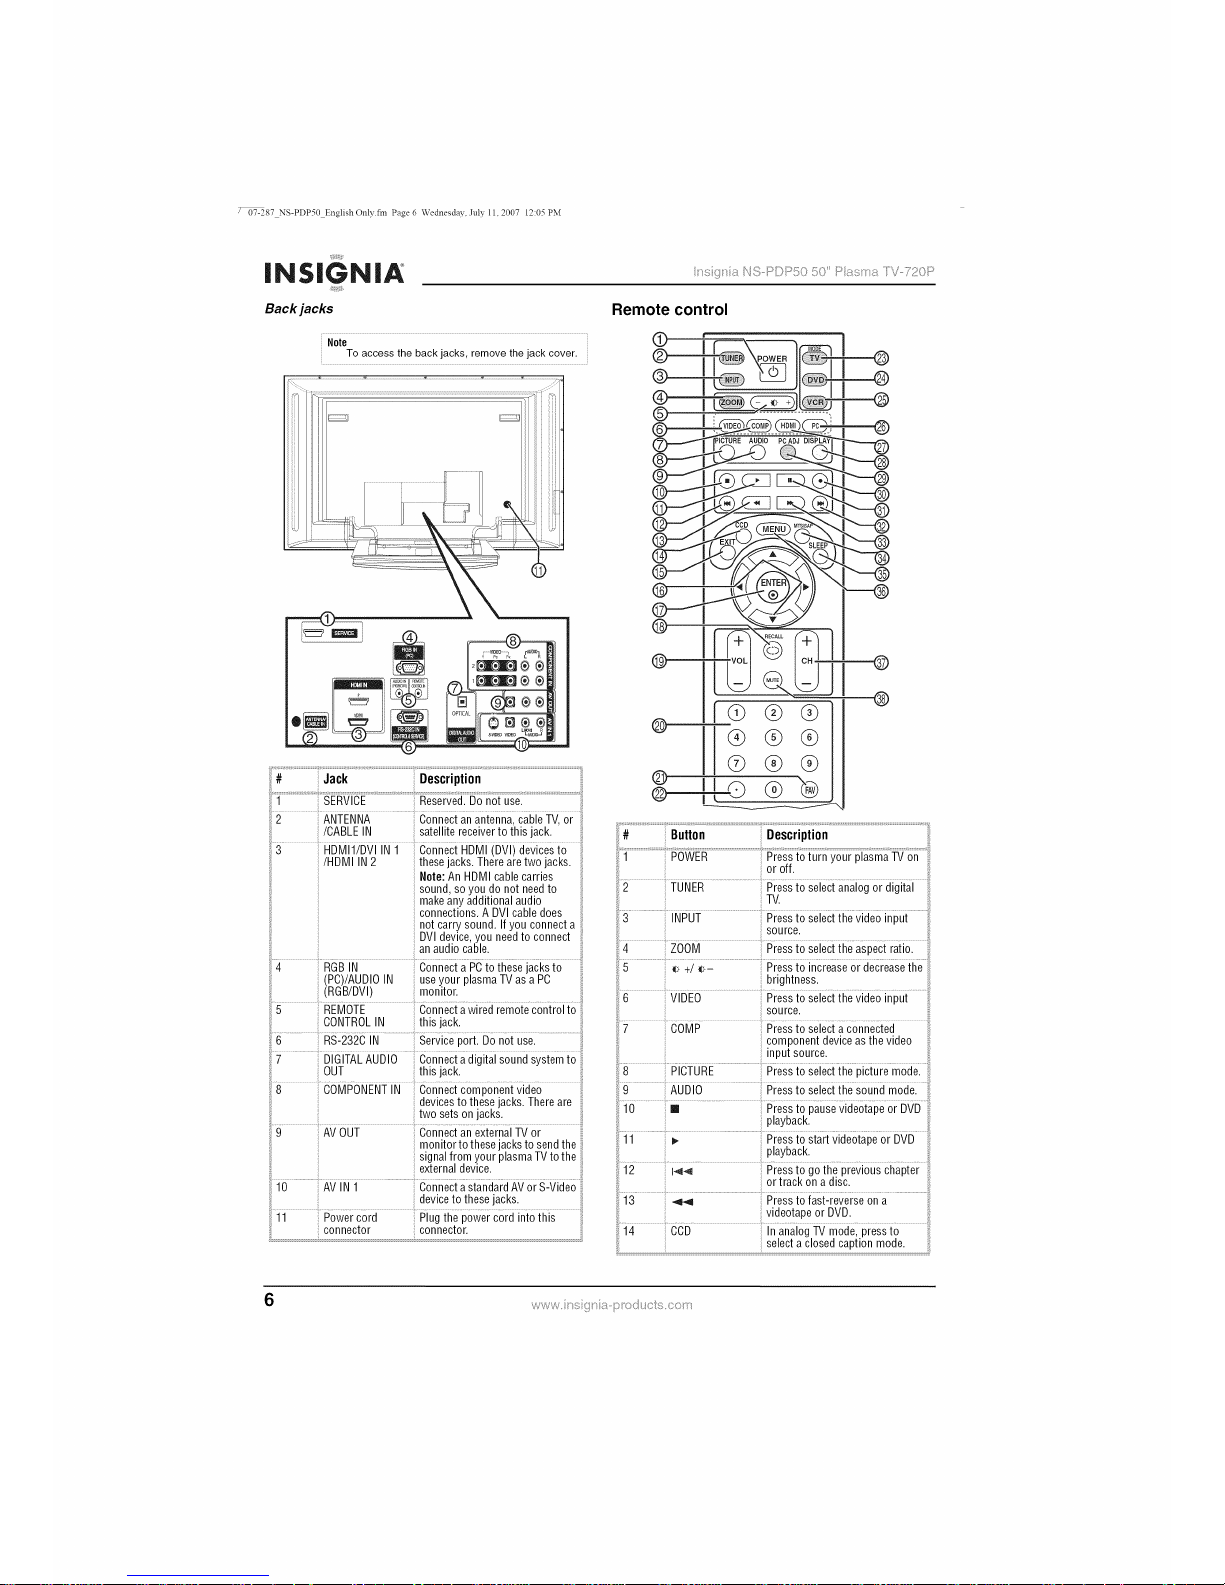
Back jacks
< _ _ ' < <::>%[T>_'_t')O D<<;[?.S
Is 2_I_1 I I,_ I'._,,3" IJ ..k/ .......... v ;],k/
Remote control
Note
To access the back jacks, remove the jack cover.
# Jack Description
i
1 SERVICE Reserved. Do not use.
............ ANTENNA ......................... cabie TVIoi
/CABLEIN satellite receiver tothis jack.
3 HDMI1/DVI IN 1 ConnectHDMI (DVI) devicesto
/HDMI IN2 thesejacks.There aretwo jacks.
Note: An HDMI cable carries
sound, so you do not needto
makeany additional audio
connections. A DVI cabledoes
not carry sound. If you connect a
DVIdevice, you needto connect
anaudio cable. ,:
4 RGB IN Connect a PCto these jacks to
(PC)/AUDIOIN useyour plasma TV asa PC
(RGB/DVl) monitor.
REMOTE Connec{awiied iemote coniioi io
CONTROLIN this jack. _i:
....6..................RS2232CiN .................................Seivice poitl Do not usel.....................................::
7 DIGITALAUDIO Connecta digital soundsystemto
OUT this jack.
8 COMPONENTIN Connectcomponent video
devicesto these jacks.There are
two setson jacks.
....0...... AV60t Connecian exteinai TV oi ....
: monitor to thesejacksto sendthe
: signalfrom your plasmaTV tothe
: externaldevice.
]0.............................iN ] ..................................Connecia standaii AVoi s:Viieo
i. deviceto thesejacks.
ii PoweiCOil Rug ihe powei coil inio this
connector connector.....
K
® II ®®®
® {1.0 (9 x@
@
# Button Description
1 POWER Pressto turn yourplasma TVon
oroff.
2 TUNER Pressto select analogor digital
TV.
3 INPUT Pressto selectthe video input
source.
4 ZOOM Pressto selectthe aspect ratio.
5 _>+/_>- Pressto increaseor decreasethe
brightness.
6 VIDEO Press toselectthe video input
source.
7 COMP Pressto select a connected
component deviceasthe video
input source.
8 PICTURE Press to selectthe picture mode.
9 AUDIO Pressto selectthe sound mode.
.....i 0....... m .........................Piess io pausevideotape oi DvD
playback. :)
....]i ......................; .....................................................Piess io sia_ viieoiape oi DVD
playback.
12 I-,_ Pressto go the previous chapter
or track on a disc.
13 _ Press to fast-reverse on a
videotapeor DVD.
14 CCD In analogTV mode, press to
selecta closedcaption mode.
6
III <+Pi>l',/ < >"

07-287 NS-PDP50 English Only.tin Page 7 Wednesday, July 11, 2007 12:05 PM
i;]_i_/,-_i_ _IQ ©P_©;:_"_ ..... /D/_;_?-_ _ -_ _ "_"_ D
Iiiiiii_i]!!
iNSiGNiA
;_ii!!i!iiii}i
# Button i Description
15 EXIT Presstoclose theon-screen
display (OSD).
i6 ........... ............................Piess to make seieciions inihe ........
on-screen display(OSD).
17 ENTER Pressto confirm selections in the
on-screen display(OSD).
18 RECALL Pressto go to the previously
selectedchannel.
19 VOL+/VOL- Pressto increaseor decreasethe
volume.
20........................Numbei 5uitons Piess to seieci a _ ciannei: ::
........FAV Piess toseiec{ a favoiite channei:
22 ® Press to select a sub-channel.
23 TV Pressto selectTV asthe video
.....................................................................................: inPutsource..............................................
24 DVD Press to select a connectedDVD
playerasthe videoinput source.
25 VCR Press to select a connectedVCR
asthe video input source.
26 PC Press to select the RGB
(computer) video mode.
27 HDMI Pressto select a connected HDMI
deviceas the video input source.
28 DISPLAY Press to display information
about the channelyou are
watching.
29 PCADJ Pressto adjustthe video settings
for aconnected computer.
....................O ........................... Piess tosta_ iecoiiing: ......................................
....3] ................I I ....................................................#iess to pausevNeotape oi iisc ;
playback.
32 _1 Pressto goto the next chapteror
trackon a disc.
33 _ Press to fast-forward on a
videotapeor disc.
34 MTS/SAP Press toselect the audio format
for theTV speakers.
35 SLEEP Press to setthe sleep timer.
36 MENU Press toopen theon-screen
display (OSD). ,:
37 CH+/CH- Pressto go to the next or
previous channel inthe channel
list.
38 MUTE Piessto mute{he sound Press
: againto restore the sound.
Setting up your plasma TV
Installing batteries
To install remote control batteries:
1 Open the battery compartment cover.
2 Insert two AA batteries into the battery
compartment. Make sure that the + and -
symbols on the batteries align with the + and
- symbols in the battery compartment.
3 Close the battery compartment cover.
Warning
Dispose of used batteriesas hazardouswaste.
Remote control range
Use the remote control within 23 feet (7 meters)
and 30 °to the left or right of the remote control
sensor on the front of you plasma TV.
30' 30 °

07-287 NS-PDP50 English Only.fm Page 8 Wednesday, July 1l, 2007 12:05 PM
_iiiii/ii!i)_
INSIGNIA
_iiiiii_iii
< _ _ ' < <_)%YO_'_t*)O D;,<;[?,S
Is 2_I_1 I I,_ I',_,,3" IJ ,=k/ .......... v ;],k/
Bundling cables
You plasma TV has a cable management
bracket that lets you bundle the cables for all the
device you install.
Positioning your plasma TV for ventilation
When you position your plasma TV, make sure
that you leave 4 inches (10.16 cm) of space on
all sides.
To bundle the cables:
1 Hold the cable management bracket with
both hands, then pull it in the direction shown
to remove it.
Connect all external devices and the power
cord.
4" (10.16cm)
o
£
4" (10.16 cm)
t
o
£
L
Grounding
Make sure that you connect the earth ground
wire to prevent possible electric shock. If
grounding methods are not possible, have a
qualified electrician install a separate circuit
breaker.
Power outlet
breaker
Pull the cables through the opening on the
cable management bracket.
Do not try to ground the unit by connecting it to
telephone wires, lightening rods, or gas pipes.
4 Reinstall the cable management bracket.
07-287 NS-PDP50 English Only.fm Page 9 Wednesday, July 1l, 2007 12:05 PM
i;]_i_/hih _IQ ©_'_©;:_"_ ..... /_/_;_,_,-__ -_ _ "_"_ D
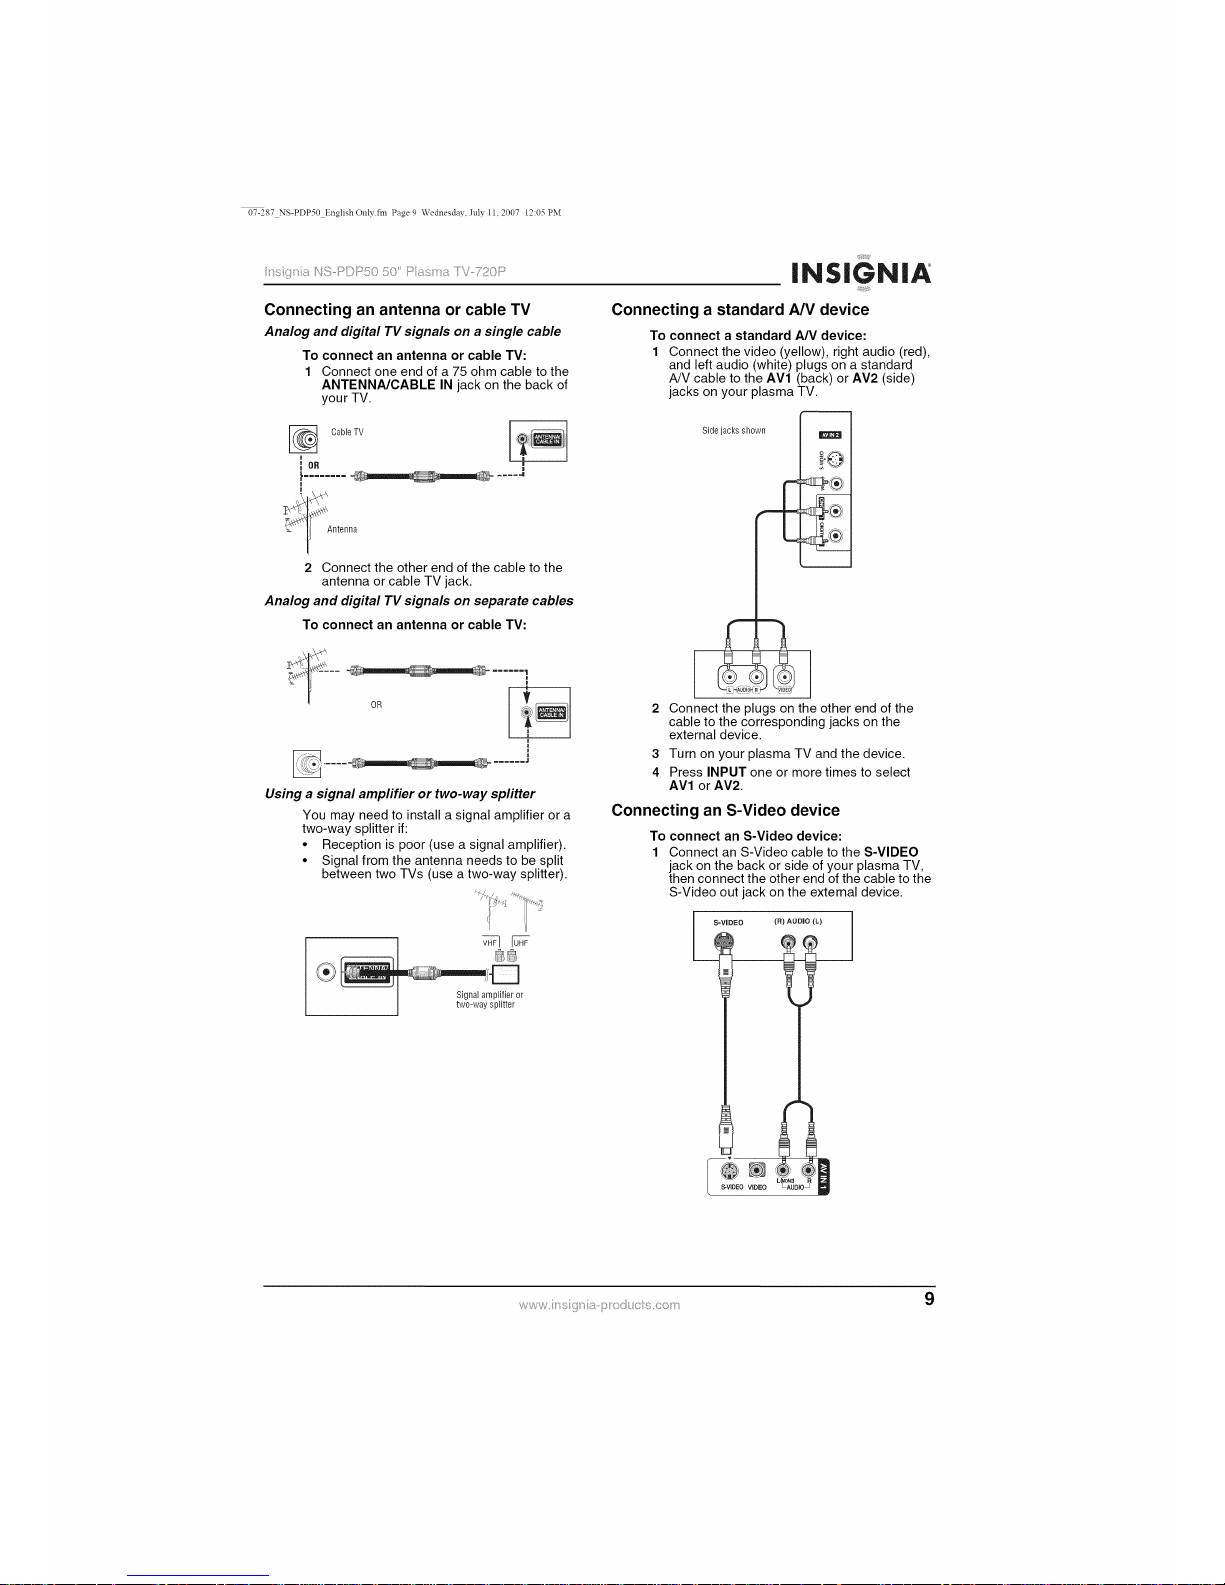
Connecting an antenna or cable TV
Analog and digital TV signals on a single cable
To connect an antenna or cable TV:
1 Connect one end of a 75 ohm cable to the
ANTENNA/CABLE IN jack on the back of
your TV.
Cable TV _i!i!i i
io. l
Antenna
2 Connect the other end of the cable to the
antenna or cable TV jack.
Analog and digital TV signals on separate cables
To connect an antenna or cable TV:
!iiii/ii_ii!!
iNSiGNiA
;_ii!!i!iiiiiii
Connecting a standard AN device
To connect a standard A/V device:
1 Connect the video (yellow), right audio (red),
and left audio (white) plugs on a standard
A/V cable to the AVl (back) or AV2 (side)
jacks on your plasma TV.
i
oR
Using a signal ampfifier or two-way spfitter
You may need to install a signal amplifier or a
two-way splitter if:
• Reception is poor (use a signal amplifier).
• Signal from the antenna needs to be split
between two TVs (use a two-way splitter).
Sidejacks shown
m
!0
Signal amplifier or
two-way splitter
Connect the plugs on the other end of the
cable to the corresponding jacks on the
external device.
3 Turn on your plasma TV and the device.
4 Press INPUT one or more times to select
AVl or AV2.
Connecting an S-Video device
To connect an S-Video device:
Connect an S-Video cable to the S-VIDEO
jack on the back or side of your plasma TV,
then connect the other end of the cable to the
S-Video out jack on the external device.
S-VIDEO (R) AUDIO (L)
@®.===
S-VIDEO VIDEO LAUD]O_
7 07-287 NS-PDP50 EnglishOnly.fm Page l0 Wednesday, July II, 2007 12:05 PM
_iiii/i]i[iii!
iNSiGNiA
Is 2_I_1 I I,_ I',_,,3" IJ ,=k/ .......... v ;],k/
Connect the right audio (red) and left audio
(white) plugs on a standard audio cable to
the AV IN1 (back) or AV2 (side) jacks on
your plasma TV, then connect the plugs on
the other end of the cable to the right audio
out and left audio out jacks on the external
device.
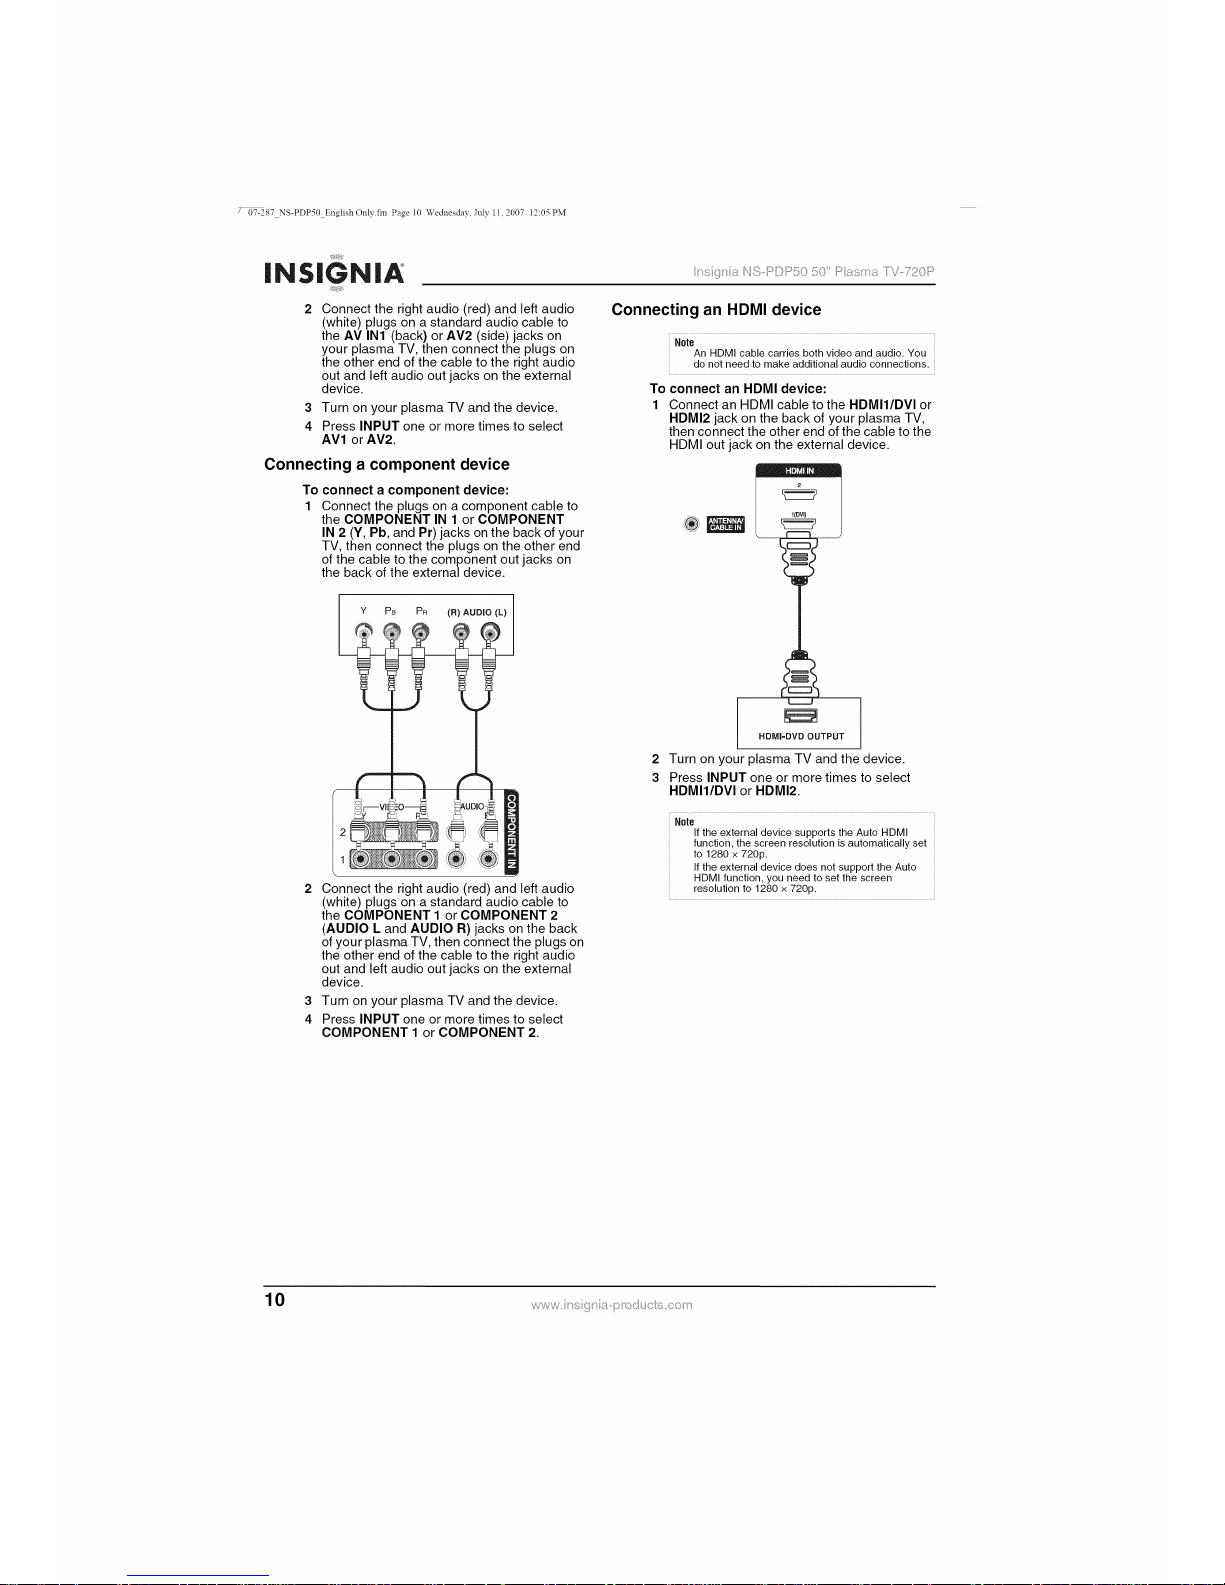
Connecting an HDMI device
Note
An HDMI cable carries both video and audio. You
do not need to make additional audio connections,
To connect an HDMI device:
3 Turn on your plasma TV and the device.
4 Press INPUT one or more times to select
AVl or AV2.
Connecting a component device
To connect a component device:
1 Connect the plugs on a component cable to
the COMPONENT IN 1 or COMPONENT
IN 2 (Y, Pb, and Pr) jacks on the back of your
TV, then connect the plugs on the other end
of the cable to the component out jacks on
the back of the external device.
Y PB PR (R) AUDIO (L)
Connect an HDMI cable to the HDMII/DVl or
HDMI2 jack on the back of your plasma TV,
then connect the other end of the cable to the
HDMI out jack on the external device.
Y
L__J
Connect the right audio (red) and left audio
(white) plugs on a standard audio cable to
the COMPONENT 1 or COMPONENT 2
(AUDIO L and AUDIO R) jacks on the back
of your plasma TV, then connect the plugs on
the other end of the cable to the right audio
out and left audio out jacks on the external
device.
3 Turn on your plasma TV and the device.
4 Press INPUT one or more times to select
COMPONENT 1 or COMPONENT 2.
2
3
HDMI=DVD OUTPUT
Turn on your plasma TV and the device.
Press INPUT one or more times to select
HDMII/DVl or HDMI2.
Note
If the external device supports the Auto HDMI
function, the screen resolution is automatically set
to 1280 x 720p.
If the external device does not support the Auto
HDMI function, you need to set the screen
resolution to 1280 x 720p.
07-287 NS-PDP50 EnglishOnly.fm Page ll Wednesday, July II, 2007 12:05 PM
i;]_i_/hih _IQ ©_'_©_:_"_..... /_/_;_<_,_,-__ -_ _ "_"_ D
1iiiii]1i!!
iNSiGNiA
;_ii!!i!iiiiiii
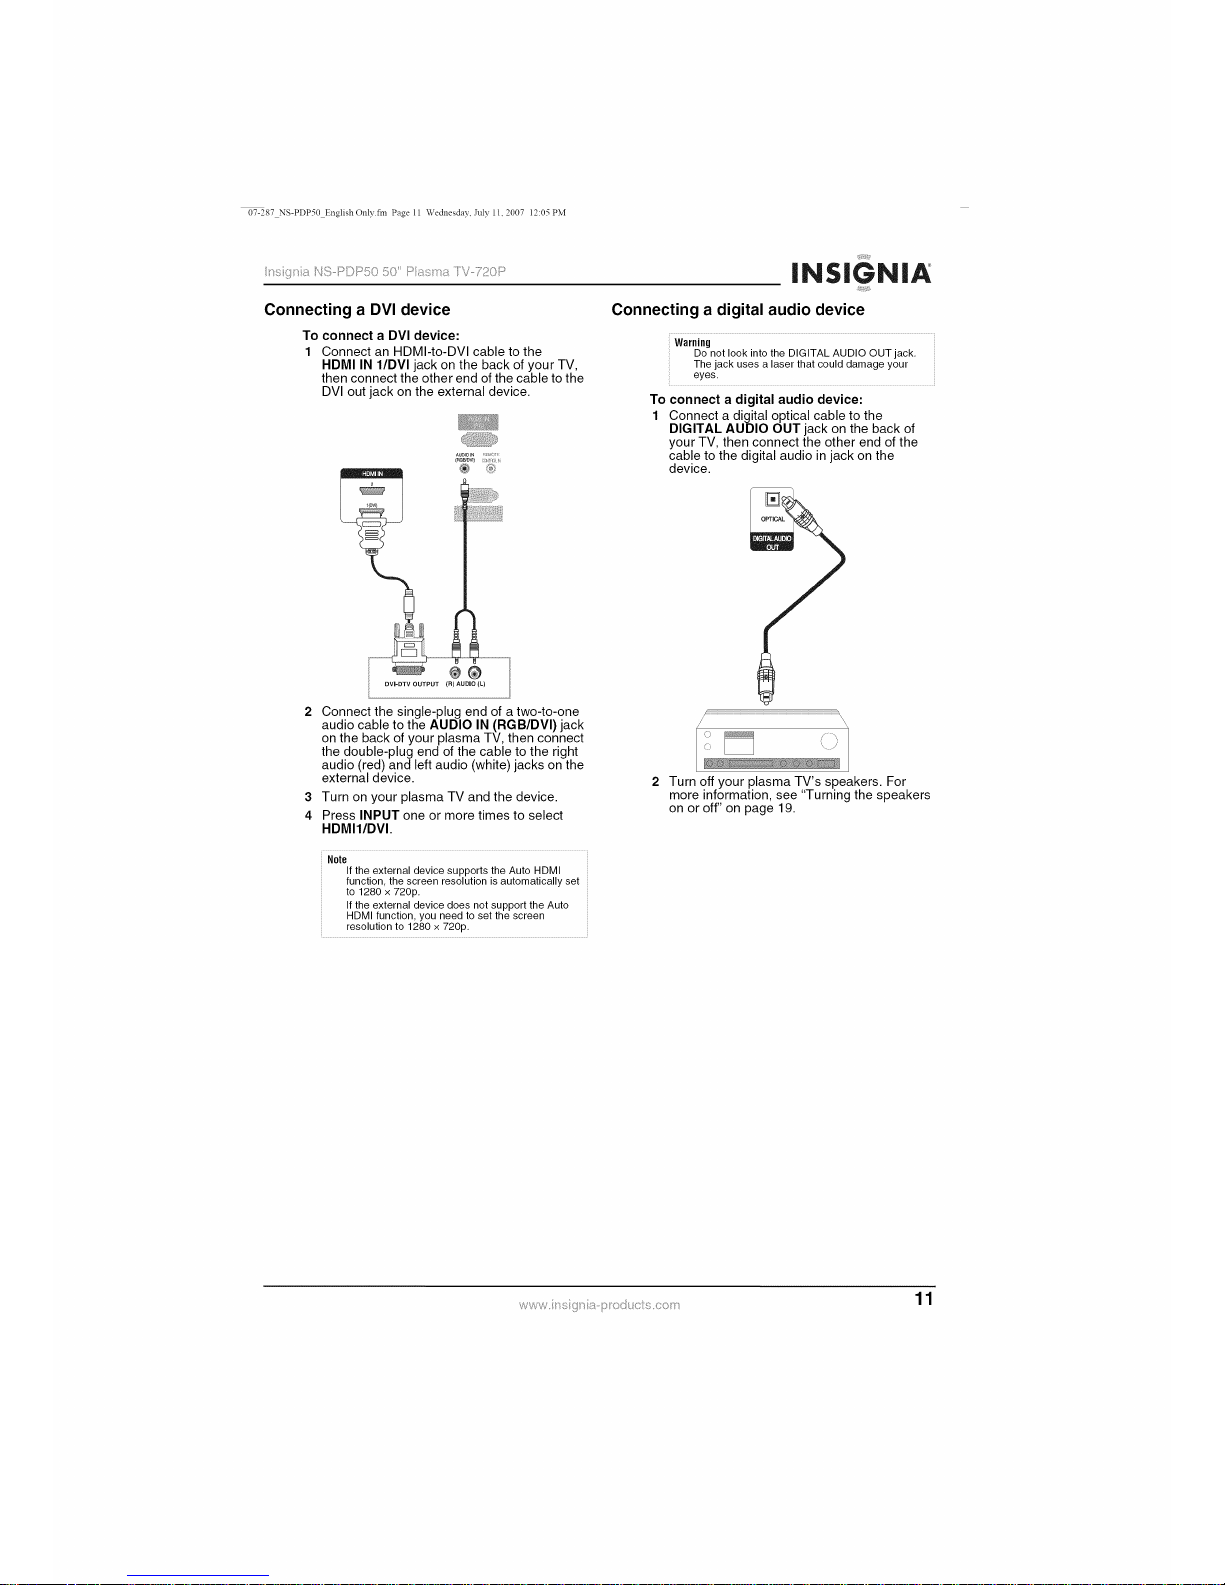
Connecting a DVI device Connecting a digital audio device
To connect a DVI device:
1 Connect an HDMI-to-DVI cable to the
HDMI IN I/DVI jack on the back of your TV,
then connect the other end of the cable to the
DVI out jack on the external device.
AUDIO N ! i;r@)
(RGBJDVI t
Warning
Do not look into the DIGITAL AUDIO OUT jack.
The jack uses a laser that could damage your
eyes.
To connect a digital audio device:
1 Connect a digital optical cable to the
DIGITAL AUDIO OUT jack on the back of
your TV, then connect the other end of the
cable to the digital audio in jack on the
device.
Connect the single-plug end of a two-to-one
audio cable to the AUDIO IN (RGB/DVI) jack
on the back of your plasma TV, then connect
the double-plug end of the cable to the right
audio (red) and left audio (white) jacks on the
external device.
3 Turn on your plasma TV and the device.
4 Press INPUT one or more times to select
HDMII/DVI.
Note
If the external device supports the Auto HDMI
function, the screen resolution is automatically set
to 1280 x 720p.
If the external device does not support the Auto
HDMI function, you need to set the screen
resolution to 1280 x 720p.
'\ )'
Turn off your plasma TV's speakers. For
more information, see "Turning the speakers
on or off" on page 19.
 Loading...