

Page 1
Please see www.insigniaproducts.com for the latest
Quick Start Guide and troubleshooting.
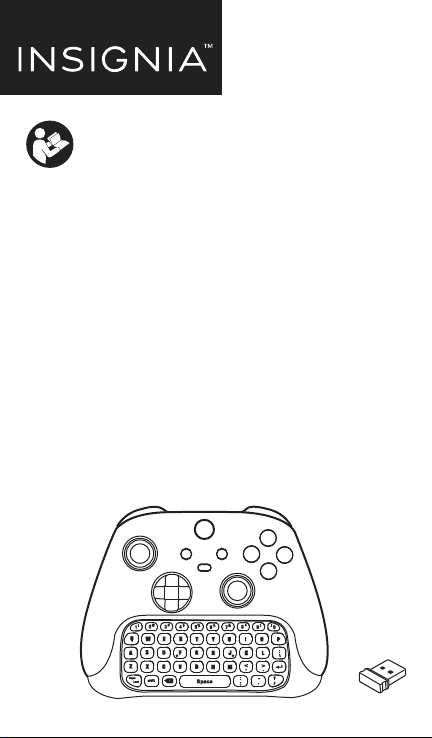
QUICK SETUP GUIDE
Chat Pad
Controller Keyboard
for Xbox®
NS-XB1CHATPAD
PACKAGE CONTENTS
• Chat Pad Controller Keyboard
• 2.4Ghz Dongle
• Quick Setup Guide
Before using your new product, please read these instructions to prevent any damage.
Page 2
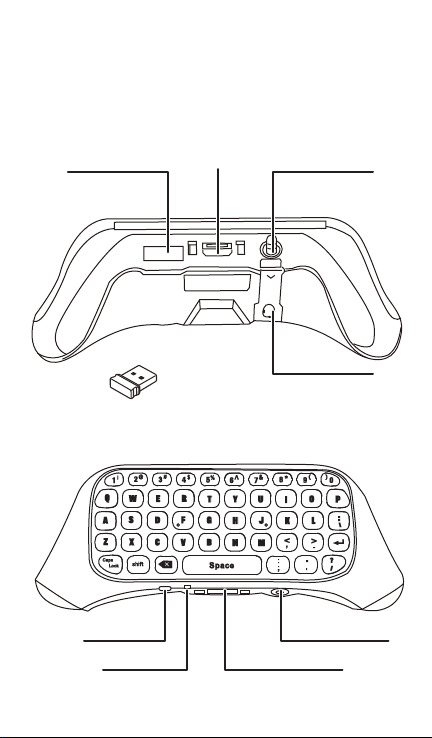
FEATURES
This lightweight backlit keyboard easily attaches to Xbox Wireless Controllers
making it easier to navigate movies, message with friends, enter passwords,
and more. No extra batteries required.
Dongle Storage
Compartment
Power input
2.4Ghz Dongle
LED indicator Headphone / Ext port
Collapsible 3.5mm
headset jack
Rubber cover
3.5mm headset jackPairing button
Page 3
SETTING UP YOUR CHAT PAD
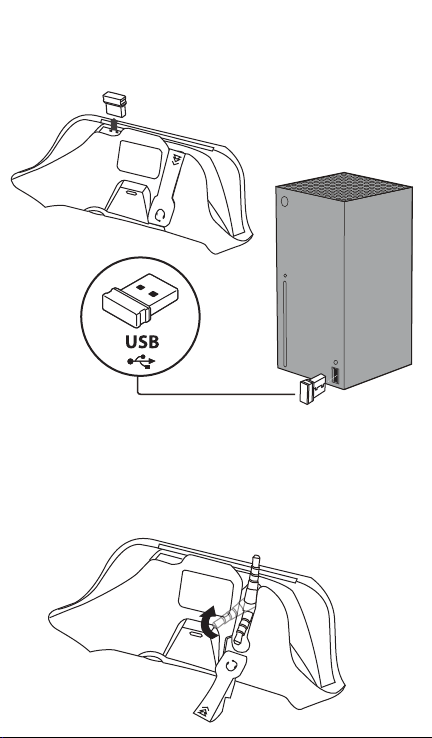
1
Remove the USB dongle from the storage compartment in the Chat Pad and
plug it into an open USB slot on the Xbox Series X | S or Xbox One console.
ATTENTION!
IF YOU HAVE AN OLDER CONTROLLER WITHOUT THE 3.5MM HEADSET INPUT YOU
CAN SKIP STEP #2.
2
Lift the rubber flap open and fold the jack into a extented position. You can
now proceed to the next step to attach this Chat Pad to a newer Xbox
controller with a 3.5mm input.
Page 4

Attach the Chat Pad by aligning the plugs and gently pressing into place.
3
The Chat Pad should already be synced with the dongle out of the box.
4
The back-light of the Chat Pad should illuminate once the Chat Pad has been
connected to a powered on controller.
Caps lock
Shift
Backspace Space
Enter
Note: For superscript symbols, press the Shift key and the
corresponding key at the same time. For example, Shift+1 to type ‘!’,
Shift+2 to type ‘@’ .
Page 5

Once properly installed, connect headset (style compatible with your controller)
5
by directly connecting to the appropriate port on the Chat pad.
Please note that only headsets supported by your wireless controller can be
used with the chat pad. The standard headset output on the chat pad cannot
be used unless your controller supports standard headsets.
B
A
OR
A
Official Microsoft chat headset
B
3.5mm compatible headset
Page 6

HOW TO RECONNECT THE CHAT PAD
The Chat Pad should already be synced with the dongle out of the box.
If it is not , we suggest that you try to pair the USB dongle to the Chat Pad.
1. Make sure the console and controller are powered on.
2. Unplug the USB dongle from the console.
3. Press and release the pair button on the Chat pad to initiate pairing. The LED
indicator will blink rapidly to indicate sync discovery mode.
4. Plug the USB dongle back into the console immediately.
5. Once properly paired, the LED indicator will glow solid blue for 2-3 seconds
to indicate successful connection before turning OFF.
Note: In the process of pairing, if the Chat pad cannot detect the USB dongle
within 15 seconds, the Chat pad enters sleep mode automatically. If this
happens, you need to start the pairing process again.
Page 7

SPECIFICATIONS
Applicable range
Wireless technology
Operating range
Working current (stand by) < 10 uA
Working current (working) < 40 mA
Product dimensions
Chat pad:
Dongle:
Operating temperature 41°F~95°F (5°C~35°C)
Xbox Series X|S and Xbox One controller
2.4 Ghz
< 10 m
5.59 × 2.48 × 1.77 inches
(142 × 63 × 45 mm)
.72 × .56 × .24 inches
(18.4 × 14.1 × 6 mm)
TROUBLESHOOTING
1. The Chat Pad has no functionality?
Check that power input and 3.5mm headset jack on the Chat Pad is properly
connected to that port on the controller.
2. Does the Chat Pad have its own power source?
No, the Chat Pad is powered by the Xbox Series X|S or Xbox One controller.
3. Can I use a headset while using the Chat Pad?
Yes, you can plug a 3.5mm compatible headset into the Chat Pad or use the
official Microsoft chat headset.
4. Can I use the Chat Pad on the PC?
Yes, you are able to use the Chat Pad on the PC while using an Xbox One controller
and the dongle is connected to the PC. Before using the Chat pad on PC, make sure
the Chat pad is synced to the dongle.
Page 8

LEGAL NOTICES
FCC information
This device complies with part 15 of the FCC Rules. Operation is subject to the following two
conditions: (1) This device may not cause harmful interference, and (2) this device must accept any
interference received, including interference that may cause undesired operation.
Warning
: Changes or modifications to this unit not expressly approved by the party responsible for
compliance could void the user’s authority to operate the equipment.
Note: This equipment has been tested and found to comply with the limits for a Class B digital device,
pursuant to Part 15 of the FCC Rules. These limits are designed to provide reasonable protection
against harmful interference in a residential installation. This equipment gene
radiate radio frequency energy and, if not installed and used in accordance with the instructions, may
cause harmful interference to radio communications. However, there is no guarantee that interference
will not occur in a particular installation. If this equipment does cause harmful interference to radio or
television reception, which can be determined by turning the equipment off and on, the user is
encouraged to try to correct the interference by one or more of the following measures:
- Reorient or relocate the receiving antenna.
- Increase the separation between the equipment and receiver.
- Connect the equipment into an outlet on a circuit different from that to which the receiver is connected.
- Consult the dealer or an experienced radio/TV technician for help.
RSS-Gen & RSS-247 statement:
This device complies with Industry Canada licence-exempt RSS standard(s). Operation is subject to the
following two conditions: (1) this device may not cause interference, and (2) this device must accept any
interference, including interference that may cause undesired operation of the device.
rates, uses and can
ONE-YEAR LIMITED WARRANTY
Visit www.insigniaproducts.com for details.
CONTACT INSIGNIA:
For customer service, call 1-877-467-4289 (U.S. and Canada)
www.insigniaproducts.com
Other parties’ marks are the property of their respective owners.
INSIGNIA is a trademark of Best Buy and its affiliated companies. Registered in some countries.
Distributed by Best Buy Purchasing, LLC, 7601 Penn Ave South, Richfield, MN 55423 U.S.A.,
©2021 Best Buy. All rights reserved.
Made in China
ENGLISH V2-21-0104
 Loading...